1
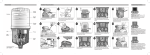
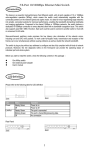
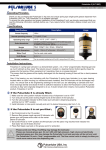
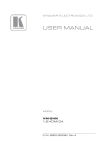
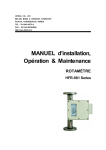
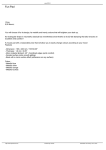
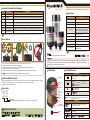
E
Pulsarlube E Grease Selection Guidelines
Grease
Cost Effective, User Friendly Automatic Single Point Lubricator
USER MANUAL
Grease Type
Description
Specifications
PL1
Multi Purpose
High performance NLGI #2 grade
PL2
Heavy Duty
Excellent heavy duty NLGI #2 with high viscosity base fluids and additional load carrying capacity
Specifications
PL3
High Speed
High performance NLGI #1 grade
Grease Capacity
60, 120, 240cc
PL4
H1 Food Grade
USDA H1 NLGI #2 grade for applications where food grade product is required
Max Operating Pressure
5kgf/㎠ (70psi)
PL5
High Temperature
Synthetic high performance NLGI #2 grade with oxidation stability
Operating Temp Range
PL6
Multi Purpose MoS2
Dark gray colored MoS2 containing mineral based product fortified extreme pressure property
PL7
Low Temperature
Fully synthetic product for extreme low temperature applications
-20˚C ~ 55˚C (-4˚F ~ 131˚F )
Product Size
60cc : Ø77mm (3.03") × 92mm (3.62")
120cc: Ø77mm (3.03") × 112mm (4.41")
240cc: Ø77mm (3.03") × 157mm (6.18")
Weight
60cc : 245g (0.54lb) 120cc: 305g (0.67lb)
240cc: 432g (0.95lb)
OEM filling is available upon request under special terms and conditions. Please contact your local distributor for more information.
Installation Thread Size
How to Dispose
1
Description
1/4" Male NPT & BSPT compatible
Nitrogen (N2) Gas
Gas Type
2
4
3
4
Available Dispensing Periods
1, 3, 6, 9 & 12 months
Certifications / IP code
CE / ATEX / UL / IP68
Up to 1m (3ft) using a 8mm (5/16") O.D.
pre-filled lube line
Remote Installation
Technical information is subject to change without prior notice.
Models
/
PULSARLUBE E60/120/240, 60/120/240cc Grease Lubricator
1. Turn the housing cap counterclockwise and unscrew the top to remove the battery cover.
Dispose of used battery pack conforming to local regulations.
2. Using a hand tool such as screw driver, detach the PCB (Printed Circuit Board) from the used unit.
Dispose of the PCB conforming to local regulations.
3. Dispose of remaining plastic components in a designated area. Comply with local regulations for recycling.
Before Use
Thank you for purchasing the Pulsarlube E. To ensure the safe operation and proper installation of the Pulsarlube E unit,
we strongly recommend that you read the following information carefully before use. If you require further information,
please contact your local supplier or manufacturer.
Product Certifications
Product Details
4. Do not cut or puncture a used unit to avoid any potential personal injury or hazards.
Certifications
Shelf Life and Warranty Period
Housing Cap
The shelf life of each Pulsarlube E unit is 1 year from the date of production. Product warranty is limited to original defects in material and workmanship
and will not cover any collateral damage due to mishandling, abuse and /or any other inappropriate use of this product.
Warranty period is 1 year from the date of purchase.
How to Order
E60 / PL1
E120 / PL2
E240 / PL3
Grease Type
Lubricator Model (Pulsarlube E, E60: 60cc, E120: 120cc, E240: 240cc Capacity)
Battery Cover
Battery
Mode Selector
PCB
N₂ Gas
Generation Cell
Piston
Lubricant
Reservoir
Grease
IECEx
0344
ATEX
ll 1 G Ex ia llC T4 Ga
INERIS 12ATEX0062X
-20℃≤Ta≤+55℃
Ex ia llC T4
12-KB2BO-0283X
-20℃≤Ta≤+55℃
KCs
UL
Warning
C
Protector
www.pulsarlube.com / [email protected]
Doc No. 1122-000 REV. 130103
EN 60079-0:2009
EN 60079-11:2007
EN 60079-26:2007
US LISTED
4UX9
Description
Manufacturer /
Address
Product Description
Pulsarlube USA, Inc.
IEC 60079-0:2007-10
IEC 60079-11:2006
· Potential electrostatic charging hazard.
· The cleaning from the PULSARLUBE shall be done with a wet cloth.
· Do not change inside Batteries.
Base
1/4" NPT/BSPT
Compatible Thread
4312 Di Paolo Center, Glenview, IL 60025, USA
TEL: 1-847-795-0591
FAX: 1-847-795-0119
Ex ia llC T4 Ga
IECEx KTL 12.0008X
-20℃≤Ta≤+55℃
Product Name
Type
Trademark
KLT Co., Ltd.
597-2, Geumseung-ri, Tanhyeon-myeon, Paju-Si,
Gyeonggi-Do, South Korea
Automatic Single Point Lubricator
Pulsarlube E
E60, E120, E240
Installation Instructions
6 Mounting Methods
1
Direct Mount - Straight & Angle
Direct Mount with Extension Straight & Angle
Before installing the Pulsarlube E, remove contaminants around the lube point
and ensure a clear passage by purging the lube point with a manual grease gun.
If the lube passage is restricted, it may affect the performance of the lubricator.
Please use the same or compatible grease as contained in the Pulsarlube E.
Remote Mount (up to 1m)
2
Remove the grease nipple and check for hardened grease at the bearing lube point.
If hardened grease exists, clean the lube point before mounting the Pulsarlube E unit
on the bearing.
3
Set dispensing mode
OFF 1
OFF 1
3
2
1
3
1
3
OFF 1 3
6 9 12
6 9 12
6
9
6
12
3
2
OFF 1 3
9
12
3
To position the window properly, place the
in the area indicated (A).
3
1
OFF
1
6
9
6
12
9
12
2
OFF
1
3
^ Turn the housing cap counterclockwise and unscrew the cap.
^ Pull out the red Mode Selector from the default OFF position.
^ To activate the Pulsarlube E unit, firmly push the Mode Selector into the slot of the selected period from 1, 3, 6, 9, or 12 months.
The unit will soon start dispensing self-contained lubricant at the desired rate.
^ Turn the housing cap clockwise until the cap is securely locked in place.
on the housing cap
The most common and preferrable
mounting method is a Direct Straight Mount.
When there are space restrictions of the
application that will not allow a direct
straight mount, use a 45 or 90 fitting for
Direct Angle Mount.
When using angle fittings, ensure that the
total length of the mount is not excessive.
For applications where a direct straight
mount or angle mount is not available, use
a straight, 45 , or 90 fitting with extension
pipe, e.g. 50mm, 100mm, 150mm etc.
For applications not allowing any direct
mounts or extension mounts, remotely
mount the unit, securing with a bracket,
using an 8mm O.D. (5/16") pre-filled lube
line.
When using extension pipes in combination
WARNING
with angle fittings, keep the total length of
Keep the total length of the mount at
the mount as short as possible.
1m (3ft) or less.
A
4
Dispensing Equivalents
E
Web site : www.pulsarlube.com
E-mail : [email protected]
30
20
Installed.
10
Expired.
0
5
Prior to installation, the installation date and scheduled date of expired lube cycle
should be logged by the operator on the label of the Pulsarlube E.
Refer back to label of the Pulsarlube E unit for further identification.
Remove the protector from the output thread and install on the lube point.
The Pulsarlube E has a resiliently engineered plastic 1/4" output thread that is
compatible to both NPT and BSPT threads.
Use appropriate adapters if necessary and make sure that adapters are firmly tightened.
Do not excessively tighten the Pulsarlube E as it may result in permanent damage to the
plastic thread.
WARNING
Do not use the Pulsarlube E unit for multiple lube points as it is designed for single point lubrication only.
Please refer to #6 for preferred mounting methods and examples.
Required dispensing volume may vary with individual bearing types and operating conditions.
Dispensing Period
Dispensing Volume
60cc
120cc
240cc
1 Month
2.00cc/day
4.00cc/day
8.00cc/day
3 Month
0.67cc/day
1.33cc/day
2.66cc/day
6 Month
0.33cc/day
0.67cc/day
1.33cc/day
9 Month
0.22cc/day
0.44cc/day
0.89cc/day
12 Month
0.17cc/day
0.33cc/day
0.67cc/day
Dispensing volumes (cc/day) are calculated assuming
the lubricator is operating at 20˚C/68˚F and at sea level,
14.7 psi.
Output will vary with ambient temperature changes,
atmospheric pressure changes, viscosity of lubricant,
or any resistance or backpressure existing at the lube
point (bearing and passage).
Testing is recommended for specific applications. Contact your local distributor should you need any assistance in
setting proper dispensing rates.