1
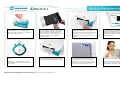
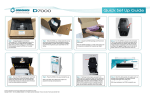
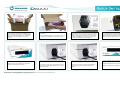
Step 1 - Unpack the Codonics Disinfection
Technology (CDT) D6000 unit by holding it by the
sides of the foam end caps. It is recommended that
two people unpack the D6000 as it is solidly built
and heavy. Place the D6000 on a solid, level
surface.
Step 2 - Unpack the D6000 Cartridge and Power Cord
(not shown).
Step 5 - Place the D6000 in the area intended for use.
Refer to the CDT User’s Manual for location and
placement warnings and precautions.
Step 3 - Turn the D6000 for access to the rear panel.
The AC input module on this device has been set for the
voltage range for your power usage. Ensure the voltage
range is set properly by the raised numerals pointing to
the Applied Voltage Arrow on right side of socket. See
the CDT User’s Manual for more information.
Step 4 - Turn the D6000 for access to the Front Panel.
Push the Open button and pull the drawer towards
you. Holding the yellow handles, align the Cartridge
with the two metal vertical pins and push down to
interlock it with the white electronics connector.
Step 6 - Connect the Power Cord to the Power Input
Port on the rear panel.
Step 7 - Turn the D6000 on with the Power Switch by
placing it into the “I” position on the rear panel.
Step 8 - After thirty (30) seconds, the system warm up
process will be completed. The System LED and
Cartridge LED lights will be solid green.
Connect the Power Cord to a grounded power outlet
that supplies the appropriate voltage for your specific
region of the world.
After five (5) seconds, the System LED light will flash
in green and the system operations (fans) will be
audible.
Place the D6000 Cartridge on a solid, level surface until
it is ready to be installed into the system per Step 4.
Codonics Disinfection Technology D6000 Quick Set Up/Reference Guide
Copyright © 2013 - 2014 by Daylight Medical, Inc. All rights reserved, worldwide. Printed in the USA. Part Number 900-617-001.
With those indications, the D6000 is ready for use.
Step 1 - Locate the appropriate sized Codonics
Disinfection Sleeve for your mobile device.
One single or two nested sleeves are utilized
for the Double-Pass model.
Step 5 - The D6000 will disinfect the mobile
device.
Step 2 - Slip the mobile device into the
sleeve(s) and close each sleeve by using the
zip(s) or the adhesive strip(s) on the sleeve
flap. Note: If marker is present, the white
portion of the sleeve marker is blank. (A check
mark will be visible upon a completed
disinfection cycle).
Step 6 - When the disinfection process is
completed successfully, the Check Mark LED
on the D6000 Front Panel will flash in green.
On average, a mobile device the size of an
®
iPad will be processed for disinfection in thirty
(30) seconds.
Codonics Disinfection Technology D6000 Quick Set Up/Reference Guide
Copyright © 2013 - 2014 by Daylight Medical, Inc. All rights reserved, worldwide. Printed in the USA. Part Number 900-617-001.
Step 3 - Place the sleeved mobile device into
the Entry Slot of the D6000 Front Panel.
The mobile device must be face (screen) down
with the sleeve closure (zip or flap) on the
leading (front) end as it is processed into the
Entry Slot.
Step 7 - The disinfected mobile device is
ejected from the Entry Slot on the Front Panel
for the Double-Pass unit. Note: If the marker
option was chosen, the sleeve marker will now
show a visible check mark. The mobile device
is now ready to be picked up by the user.
Step 4 – The D6000 sensors detect the entry
of a mobile device and activate the transport
rollers, which will feed the sleeved device
through the Cartridge’s two high-output
ultraviolet C (UVC) bulbs utilized for the
disinfection process.
Step 8 - Remove the exterior Codonics
Disinfection Sleeve and discard it.
The disinfected mobile device is now ready for
use and can be taken into medical settings
where infection prevention is desirable.