1
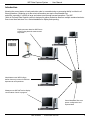
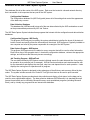
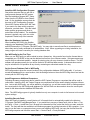
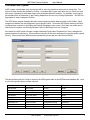
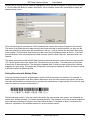
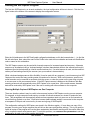
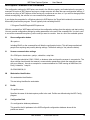
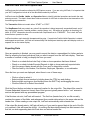
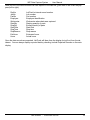
*MEC*MEC Software
WIP Data Capture System
User Manual
Rev. 4/2009
MEC Software
Evanston, Illinois
www.mecsw-usa.com
WIP Data Capture System - User Manual
Introduction
Knowing the current status of each production order in a manufacturing or processing facility is critical to efficient operations. Obtaining up-to-the-minute information can require considerable time
and effort, especially if a facility is large and orders travel through several operations. The WIP
(Work In Process) Data Capture system is designed to gather production data from multiple scattered workstations in real time and store it in a central database for display and reporting.
Employees enter data into WIPCature
screens using barcode scanners and
keyboards.
WORK ORDER
*12345*
Administrator uses WIPConfig to
define data entry screens for different
departments and operations.
Managers use WIPJobTrack to display
current status of work in progress.
Central database files store
system configuration and
captured data.
MEC Software - www.mecsw-usa.com
WIP Data Capture System - User Manual
Structure of the WIP Data Capture System
Two database files sit at the center of the WIP system. Each must be located in a shared network directory
that is accessible to all computers that are part of the WIP system.
Configuration Database
The configuration database file (WIPConfig.mdb) stores all of the settings that control the appearance
of the data entry screens.
Data Collection Database
This database file (WIPData.mdb) stores all of the raw data collected by the WIP workstations as well
as the processed data produced by WIP Job Tracker.
The WIP Data Capture System includes three programs that interact with the configuration and data collection
databases:
Configuration Program - WIPConfig
This program (WIPConfig.exe) is used by the system administrator to define the layout of the data collection screens and specify where the information will be stored. WIPConfig.exe is typically installed on
one computer and used by the person responsible for oversight of the WIP system.
Data Capture Program - WIPCapture
This program (WIPCapture.exe) is installed on every computer that will be used to collect information.
Each time a copy of this program starts, it checks the configuration database, retrieves the appropriate
settings, and constructs the data entry screen accordingly.
Job Tracking Program - WIPJobTrack
The raw data collected by WIPCapture records individual events (the start date and time for a particular operation for a particular job, for example). WIPJobTrack.exe matches each start transaction with
its stop transaction and displays the start time, stop time, and elapsed time for each operation. It also
displays the running time for operations still in progress.
The WIP Data Capture System is designed to take advantage of the efficiency and accuracy offered by barcodes. The system includes a small set of Code 39 TrueType fonts that can be used to print barcodes.
The WIP Data Capture System provides basic data collection and display of job status, but the data can be
used for more sophisticated analysis. The data collection database (WIPData.mdb) is in standard Microsoft
Access format which can be utilized by Microsoft Access, most spreadsheet programs (including Microsoft
Excel), and by virtually any program that can interact with databases.
MEC Software - www.mecsw-usa.com
WIP Data Capture System - User Manual
Install the WIP Software
Install the WIP Configuration Program
Start at the computer that you will use to
configure and manage the WIP system.
Run the installation program WIP_Setup
either from the CD-ROM or from a download. On the installation screen check be
box next to WIP Configuration Program.
Check WIP Capture and/or WIP Job Track
if you want to run them at this computer;
otherwise, un-check them. Click the Install
button and the programs and other required files will be installed. The installation
process is typically very quick; do not be
surprised if it takes only a few seconds.
Move the Databases (optional)
When installing WIPConfig, the installer
copies the two databases (WIPConfig.mdb
and WIPData.mdb) to C:\Program Files\WIPConfig. You may wish to move these files to a network server
where they can be easily accessed by all workstations. Note: When upgrading an existing installation, the
setup program will never overwrite your existing database files.
Run WIPConfig for the First Time
When you run WIPConfig you will be asked to enter a license key. Keys can be found on the license that accompanied your CD-ROM, or they can be obtained on-line from your software vendor. Visit www.mecsw-usa.
com for links to authorized resellers. Instead of entering a key you may choose to Install as Demo. The WIP
software will operate normally, but you will be limited to 50 collected data records. A demonstration version
may be unlocked for full operation at any time by contacting an authorized reseller for a key.
Set the Correct Database Path in WIPConfig
WIPConfig needs to know the correct location of the configuration database (WIPConfig.mdb). If you have
moved the database file to a new location, click the Settings button on the main WIPConfig screen and set the
correct path for WIPConfig.mdb.
Install Programs on Additional Computers
Following the same procedure as above, install the WIP Capture Program on computers that will be used to
collect data. Install the WIP Job Tracker Program on computers that will be used to display job status information. Just as with WIPConfig, you will be asked for a license key; you will also need to click on Settings and set
the correct path for the WIPConfig.mdb database file; WIPJobTrack.exe also needs to know the correct pathname for the data collection database WIPData.mdb.
Note: The WIPConfig program is typically installed on only one computer in order to limit access to the overall
system settings.
Install the Barcode Fonts
When WIPConfig is installed, a small “starter set” of barcode fonts is automatically copied to the directory
C:\Program Files\WIPConfig\BarcodeFonts. If you would like to use any of these fonts, click on Start -> Control Panel -> Fonts -> Install New Font. Browse to the barcode font files, select the font(s) you want, and click
Install. The fonts will then be available to all Windows programs for printing barcodes on this computer. If you
want to use the fonts on a computer where you are not installing WIPConfig, just copy the font files from the
WIPConfig computer and follow the same Start -> Control Panel -> Fonts procedure.
MEC Software - www.mecsw-usa.com
WIP Data Capture System - User Manual
The Default WIP System
A WIP system includes data entry screens that will be used by production employees to record data. The
layouts of these screens are defined by Profiles. A complete WIP system may have only one Profile or it may
have many, depending on what data needs to be collected at different locations. For example, Color may be
an important piece of information in the Painting Department, but not in the Cutting Department. The WIPConfig program is used to design the Profiles.
The WIPCapture program displays data entry screens and records the data according to the Profiles. Each
computer workstation can be configured to use a specific Profile. Thus when WIPCapture starts on the Painting Department computer, it will display the Painting Department entry screen. More than one profile can be
used on each computer; see Running Multiple Copies of WIPCapture on One Computer.
As installed, the WIP system includes a single pre-defined Profile called “Department A” that is designed for
general-purpose job monitoring. We recommend using this Profile as a starting point to get the system up and
running. Once you have the default system operational you can add your own custom Profiles.
The data collected with this Profile is stored in the WIPLog data table in the WIPData.mdb database file. Here
is a list of the specific pieces of data collected:
Name
Description
Source of Data
WIPLog Database Field
Part Number
part number
screen
PartNo
Operation
work being performed
screen
Operation
Employee
employee identification
screen
Employee
Job Number
job or work order
screen
JobNo
Quantity
number of pieces
screen
Quantity
Date/Time
when recorded
system clock
TimeRecorded
Workstation ID
where recorded
configuration setting
Workcenter
Transaction
start or stop work
screen
Transaction
Stop Reason
why work stopped
screen
StopReason
MEC Software - www.mecsw-usa.com
WIP Data Capture System - User Manual
If you modify the Department A profile or add new profiles that will provide data for WIPJobTrack, be sure to
capture all of the fields needed by WIP JobTrack. Here is a description of these data fields and how they are
used for job tracking:
PartNo: any combination of letters, digits, or punctuation characters that identifies a part, model, or assembly. For example: “127AA-338B”.
Operation: describes the work being done: “DRILL”, “CUT”, “POLISH”, etc. The list of operation codes
can include almost anything that makes sense for your particular situation.
Employee: any combination of letters, digits, or punctuation that identifies each individual employee.
Knowing who entered the data can be very helpful when allocating labor hours or when trying to resolve
problems.
JobNo: any combination of letters, digits, or punctuation that identifies a particular job, work order, or
shop order.
Quantity: The number of items being worked on. If the quantity is always 1, you can use the WIPConfig program to set this field’s default entry to 1 and to make it hidden.
TimeRecorded: WIPCapture automatically records the system time each time data is saved.
Workcenter: Using the WIPCapture settings screen you can give each computer a unique identification
code which will be recorded in the Workcenter field each time data is saved.
Transaction: This field should contain only one of two possible values: “START” or “STOP” to indicate
whether an operation is starting or ending.
StopReason: This field can contain almost any code word to indicate why the operation was stopped:
“FINISHED”, “MACHINE DOWN”, “ENGINEERING”, “BREAK”, “END OF DAY”, etc.
Note: Although you can use any combination of letters, digits, or punctuation in many of the data fields, we
recommend that you avoid using single or double quotation marks. The WIP Data Capture system is designed
to handle embedded quotations, but they can often lead to trouble when querying databases.
The data collected in these fields provide the raw material for the job tracking program. WIPJobTrack automatically checks the WIPLog table at regular intervals for new records. When WIPJobTrack reads a new START
transaction record, it creates a new record in the JobTrackerData table (also located in the WIPData.mdb database file) for that particular operation, uniquely identified by the combination of PartNo, JobNo, and Operation.
The TimeRecorded is copied into the StartTime field in JobTrackerData, and the StopTime field is left blank,
indicating that it is a currently-running operation.
When WIPJobTrack reads a STOP transaction, it tries to find the matching START transaction in JobTrackerData by comparing the PartNo, JobNo, and Operation. It fills in the StopTime and StopReason fields, indicating that this is a completed operation.
Note that PartNo, JobNo, and Operation must match for WIPJobTrack to link START and STOP transactions.
MEC Software - www.mecsw-usa.com
WIP Data Capture System - User Manual
Using the WIPConfig Program
The first time you run the WIPConfig.exe program, you will need to specify where the WIPConfig.mdb database is located. Click on the Settings button at the bottom of the WIPConfig screen to display the local settings
screen.
Fill in the full pathname to the WIPConfig.mdb database or click on the button to the right of the field to browse
to the filename. It is common practice to move this database file from its default location to a shared network
drive where it is available to any workstation on the network. For example, if your shared network disk is
mapped as drive N: with a folder named ShareData, the full pathname would be N:\ShareData\WIPConfig.
mdb. Click Save to store the pathname and go back to the main WIPConfig screen.
MEC Software - www.mecsw-usa.com
WIP Data Capture System - User Manual
Profiles
You may define any number of profiles. Each profile defines the appearance and behaviour of a data capture
screen; a separate profile can be created to meet the specific needs of each department in a facility. Click Data
Capture Profiles on the main menu to display a list of profiles. As shipped, the WIP system includes one predefined profile for “Department A”:
To edit an existing profile, select it on the list and click Edit Profile (or you can simply double-click the list). To
create a new profile, click Add Profile. Here is the Edit Profile screen for Department A:
This screen includes a number of fields that define general information about the profile, plus a list of individual
data fields that will capture data.
MEC Software - www.mecsw-usa.com
WIP Data Capture System - User Manual
Here are the key fields on Edit Profile screen:
The Record Number is automatically assigned by WIPConfig and uniquely identifies each profile. You won’t
normally need this number.
The Profile Name identifies the profile and will appear at the top of the data entry screen. Use a name that
makes sense for your operation: “Painting Department”, for example.
The Form Width and Form Height fields define the size of the entry screen. You can either enter a specific
dimension (inches) or use the up-down buttons at the right of the fields.
The Database Path field specifies where to find the database that will collect data (typically WIPData.mdb).
You can enter the full pathname or click the small button to the right of the field to pop up a browser window.
The Data Capture Table specifies which particular table in the database will receive captured data (typically
WIPLog). Click the scroll-down arrow at the right of the field to display a list of tables in the database.
Time Stamp Field specifies which field will receive the date and time information when data is recorded (typically TimeRecorded). Click the scroll-down arrow at the right of the field to display a list of available fields.
Workstation Field specifies which field will receive the computer workstations identification (typically Workcenter). Click the scroll-down arrow at the right of the field to display a list of available fields.
A list of defined data entry fields appears near the bottom of the screen. A profile may contain any number of
data entry fields. To edit an existing field, select it on the list and click Edit Field (or double-click the list). To
add a new data entry field click Add Field.
The Show Sample Form button at the bottom left corner of the screen will display an example of what the finished form will look like. Click once to display, click again to hide. Here is the sample form for the Department
A profile:
MEC Software - www.mecsw-usa.com
WIP Data Capture System - User Manual
Select the PartNo field and click Edit Field. This will display the Edit Field Screen:
The entries on this screen define a single data entry field. Here are the settings:
Record Number is automatically assigned by the WIP system and is used for internal identification. You will
not normally need this number.
The Profile field is just a reminder of which profile this field belongs to.
Field Name identifies the field for your purposes and should make sense to you. For example, “PartNo” is a
short and descriptive name that tells you what information the field contains.
Operator Prompt will be displayed to the person doing the data entry. For example, your Field Name may be
“PartNo”, but the Operator Prompt might be “Part Number” or “Please Enter Part Number”.
Store In Field defines which database field will be used to collect this piece of data. The database and data
table are already defined on the Edit Profile screen; click the scroll-down arrow to display a list of available
database fields.
Default Entry is used if you want the data entry field to be pre-filled with a specific value. This will allow the
operator to skip entering data that is often the same. For example, the quantity field might default to 1.
MEC Software - www.mecsw-usa.com
10
WIP Data Capture System - User Manual
Entry Format specifies whether the data will be text or selected from a pre-defined list of values. If you
choose Text, the user will be presented with a plain entry field (already filled in if you have defined a default
entry).
If you check Entry Required, the user must enter a value in the field. If they leave the field blank and try to
save their data, an error message will be displayed.
Erase After Save specifies if this field should be erased after the data is saved. This can be used for data
that should be entered every time: a serial number, for example. Leaving this box un-checked makes the data
“sticky”; for example, the user could scan a job number once and then scan a series of serial numbers without
having to re-enter the job number each time. If you have defined a default entry, Erase After Save will reload
the default.
Visible lets you hide a field by unchecking this box. This can be useful if you want to specify a fixed value (use
the default entry field) and hide it from the user.
Auto-Save After Entry will cause the data screen to be saved when data is entered in this field. Normally only
one field in a profile should be checked for Auto-Save. For example, the user could enter a Job Number and
Operation once (un-check Erase After Save to make them “sticky”) followed by a series of Serial Numbers;
by checking Auto-Save for the Serial Number field, the screen will be automatically saved each time the user
enters a serial number.
Hide Form after Entry will automatically minimize the data entry screen after the data is saved. This can be
useful to get the WIP screen out of the way if the computer is used for other tasks. This feature is especially
effective if you are using a barcode scanner attached to a serial port; WIPCapture monitors the scanner port
and will automatically pop back up on the screen the moment a scan is received. This lets you configure WIPCapture to pop up when needed and then automatically disappear.
The Tab Stop checkbox and Tab Index field specify the order in which the screen cursor moves from one field
to the next when the user presses the tab key or enters data in a field.
MEC Software - www.mecsw-usa.com
11
WIP Data Capture System - User Manual
Things change slightly if you select Choose fom List instead of Text for the Entry Format:
If you want the user to select a value from a pre-defined list, you must specify the Table and the Field that contains the choices. This table must be located in the same database that is used to capture data. For example,
you might create a table named “ColorMaster” with a field named “Color” and add a series of records: “Red”,
“Yellow”, Blue”, “Orange”, etc. When the data entry screen is displayed, the field will appear as a drop-down
list of choices filled in with the values from the database list.
Auto-Save After Entry is not available for List fields.
Must Choose from List lets you force the user to select one of your pre-defined choices. If you do not check
this box, the user may ignore your choices and fill in any value just as though this were a text field. This may
be useful if the list contains the most common entries for convenience, but you want to give the user some flexibility.
The X Position, Y Position, Width, and Height fields define the location and size of the data entry field on the
form that the user will see. You can enter specific numbers (inches) or use the up-down arrows at the right of
each field. It is very helpful to display the sample form when making these adjustments.
When you are finished with your changes, click Save (or Cancel if you wish to discard your changes).
MEC Software - www.mecsw-usa.com
12
WIP Data Capture System - User Manual
Barcodes
Barcodes can increase efficiency dramatically by increasing speed and reducing errors. It is very convenient
for an operator to simply scan a barcode and have the data appear in the correct field regardless of where the
keyboard cursor happens to be located on the screen. The best way to accomplish this is to include a prefix at
the beginning of each barcode to indicate the type of data it contains. Here are some sample barcodes created
with the Code 39 TrueType fonts included with the WIP Data Capture System:
*WO12345*
WO = Work Order Number
*PN12AA-B5*
PN = Part Number
*OP330*
*STDONE*
OP = Operation Code (drill, sand, assemble, etc.)
ST = Status (start, finish, hold, etc.)
A Work Order barcode would typically be printed at the top of each order’s cover sheet; Part Number barcodes
would generally be on bin labels or on part labels; Operation and Status codes can be printed on “crib sheets”
and posted next to each data capture workstation. You can define as many different types of barcodes as you
wish and you can choose to define only some of the barcodes you will use. If the WIP Data Capture system
cannot identify a barcode by its prefix it will put the data wherever the keyboard cursor is located at the moment. Click on the Barcode Formats button on the main menu to display the Barcodes screen:
MEC Software - www.mecsw-usa.com
13
WIP Data Capture System - User Manual
You can edit an existing barcode format by highlighting it on the list and clicking edit, or simply double-clicking
it. Click the Add New button to create a new format. As an example, double-click JobNumber to display the
barcode format screen:
Fill in a format string for each barcode. Prefix characters are entered just as they will appear in the barcode.
The names of the fields where the data should be stored are enclosed in square brackets; you may type the
field name manually or double-click the desired field on the list... it will be inserted into the format string at the
cursor position. The field name used here must match one of the Field Names shown on the list. If you want
the barcode prefix to be removed before the data is stored, check the Strip Prefix box, otherwise leave it unchecked.
The sample screen above tells the WIP Data Capture system that whenever it sees a barcode beginning with
“JN” it should put the data in the JobNo field. This will be true for all profiles. This means that you only have
to define the JN barcode one time. The destination database field in which the data will be stored is defined
separately for each profile. This means that JN barcodes will always be treated as JobNo’s, but may be stored
in different locations in different profiles.
Printing Barcodes with Multiple Fields
It may be convenient to have a single barcode contain more than one piece of information. For example, instead of having the operator scan three different barcodes to enter the order number, part number, and operation code, the information could be printed on a shop order worksheet as a single barcode. Since this is a shop
order Line Item let’s use the barcode prefix “LI”:
*LI20077/ABB-4894/DRILL*
The barcode begins with “LI” (line item) and is followed by the order number, part number, and scheduled operation code. A slash character (/) is used to separate the fields. The separator can be any character supported
by the barcode symbology as long as it is not used within the data. For example, a dash (-) would be a bad
choice for a separator in this example because it is used in the part number.
MEC Software - www.mecsw-usa.com
14
WIP Data Capture System - User Manual
Here is the format string that will tell the WIP Data Capture system how to divide up the Line Item barcode.
Note that the separator character appears between the fields, which are enclosed in square brackets:
LI[OrdNo]/[PartNo]/[Operation]
When the LI barcode is scanned, the WIP Data Capture system will automatically separate the pieces of data
and put them in the correct fields on the screen. Since separator characters mark field boundaries, the length
of each piece of data can vary from one barcode to the next.
At the risk of complicating matters, you should know that different separators can be used within the same barcode. The following example uses a dollar sign ($) to divide the order number and part number, and a pound
sign (#) to divide the part number and operation:
LI[OrdNo]$[PartNo]#[Operation]
Separators can be more than one character. This might be useful in cases where all likely candidates for
separator characters are used in the data. For example, say that # could not be used because it appears in
part numbers, but ## (two pound signs in a row) never appears in part numbers. The following format would
confuse the WIP Data Capture system if a # appeared in a part number:
LI[OrdNo]#[PartNo]#[Operation]
By using a ## pair, the WIP Data Capture system will be able to distinguish a single # in a part number from a
## separator provided that the # in the part number is never the first or the last character in the part number:
LI[OrdNo]##[PartNo]##[Operation]
It is still a good idea, if possible, to use a single separator character that will never appear as part of the data.
Printing Barcodes with Other Programs
You can use the barcode fonts included with WIPCapture to print barcodes using commonly available programs like Microsoft Word or Excel. In Word, simply type the data you want to appear in the barcode with
an asterisk at each end. The asterisks act as markers for the barcode scanner. For example, to barcode
“PN1234”, type this:
*PN1234*
Then select the text and change the font to one of the Code 39 fonts included with WIPCapture. Be careful not
to accidentally select any tabs or spaces surrounding the data you want to barcode. A good general-purpose
choice is C39_60HB, shown here at 36-point size. Be sure not to use bold or italic.
*PN1234*
In Excel, you might have plain part numbers in one column. Let’s say that column B contains part numbers; in
column C enter this formula and copy it to as many rows as needed. For example, let’s look at cell C8:
=CONCATENATE(“*PN”,B8,”*”)
The result will be that cell C8 will display the PN prefix and the part number (from cell B8) with an asterisk at
each end. Simply change the the font for cell C8 (or whole column) to C39_60HB and you will have barcodes.
MEC Software - www.mecsw-usa.com
15
WIP Data Capture System - User Manual
Command Barcodes
When using the WIPCapture system with a scanner connected to a serial port, special command barcodes can
be used to control operation of the software. This can improve efficiency by allowing the operator to do most
or all data entry using the barcode scanner, reducing or eliminating keyboard/mouse activity.
Command barcodes always begin with CMD followed by the command text. You can create command barcodes using a word processor (Microsoft Word, for example) and the Code 39 barcode fonts included with WIP.
Save (same as clicking the Record Data button)
*CMDSAVE*
Save and Hide (same as clicking the Record Data button followed by the Hide button)
*CMDSAVEHIDE*
Hide (same as clicking the Hide button)
*CMDHIDE*
Clear (erases all of the data entered on the screen)
*CMDCLEAR*
Clear and Hide (erases all of the data entered on the screen, then hides the screen)
*CMDCLEARHIDE*
MEC Software - www.mecsw-usa.com
16
WIP Data Capture System - User Manual
Running the WIPCapture Program
The first time WIPCapture is run at each workstation, the local configuration will have to be set. Click the Configure button at the bottom of the screen to display the configuration screen:
Enter the full pathname to the WIPConfig.mdb configuration database or click the browse button (...) to find the
file with a browser. Next, select the name of the Profile to be used at this workstation and enter an identification
code or name for this workstation.
The WIP Capture screen may be used with a barcode scanner for increased speed and accuracy. A barcode
scanner may be attached using a “keyboard wedge” interface (barcode data looks to the software as though it
had been typed at the keyboard) or a serial communications port. If a serial scanner is used, set the communications port and settings used by the scanner (see your scanner’s documentation).
While a keyboard wedge scanner offers flexibility (it can be used with any program), a serial scanner gives WIP
Capture more control and may provide greater convenience for the user. With a serial scanner, special command barcodes can be scanned to save data, hide the screen, or clear the screen so the user does not need
to use a mouse to click an onscreen button. If the WIP Capture screen is hidden on the Windows Task Bar,
scanning a barcode will automatically return WIP Capture to its normal size. With a serial scanner, barcode
data will be received by WIPCapture even if the user is working with other software on the computer.
Running Multiple Copies of WIPCapture on One Computer
There are situations where it may be useful to have several copies of WIPCapture running on one computer.
For example, a single computer could monitor a number of barcode scanners at a cluster of production stations. This arrangement can be especially effective where operators need only scan one or two barcodes to
record that they worked on an item. Each serial scanner (not keyboard wedge) is connected to the computer
at a separate COM port and is serviced by its own running copy of WIPCapture.
The configuration settings for WIPCapture are stored in the Windows registry. If more than one copy of the
program is running on a single computer they will all use the same configuration settings. This is not good because all copies of the program will use the same workstation identification and there will be conflict when they
all try to open the same serial scanner port. To avoid this problem, use command line parameters to set the
configuration for each copy of the program individually.
MEC Software - www.mecsw-usa.com
17
WIP Data Capture System - User Manual
WIPCapture Command Line Parameters
The configuration settings for WIPCapture are stored in the Windows registry and loaded when the program is
executed. All copies of WIP Capture running on a single computer will share the same configuration settings. If
more than one copy of WIP Capture will be running on a computer at one time, or if you wish to change profiles
without reconfiguring, the solution is to use command line parameters.
If you display the properties for a Windows shortcut to WIPCapture, the Target field contains the command line
that actually executes the program. This will typically look something like this:
C:\Program Files\WIPCapture\WIPCapture.exe
With this command line, WIPCapture will retrieve the configuration settings from the registry, and start running.
You can override configuration settings by adding parameters to the end of the command line. You don’t need
to use all the command line options, just the ones you want to override. Here is a list of the available options:
/B Show configuration button
/B=<yes/no>
Including /B=NO on the command line will hide the configuration button. This will keep unauthorized
people from exploring and possibly altering settings. The default setting is Yes (show the button) .
/S Scanner communication settings
/S=<COM port>:<baud rate>,<parity>,<data bits>,<stop bits>
The COM port should be COM1, COM2, or whatever other serial port the scanner is connected to. The
other settings should match the scanner’s communication parameters (check the manual that came
with your scanner). Here is an example for a scanner attached to COM2 running at 9600 Baud, No
Parity, 8 data bits, 1 stop bit:
/S=COM2:9600,N,8,1
/W Workstation Identification
/S=<workstation identification>
This text string identifies the workstation
/P Profile
/P=<profile name>
Specifies the name of the data capture profile to be used. Profiles are defined using the WIP Config
program.
/C Configuration Path
/C=<configuration database pathname>
This specifies the full pathname to the WIPConfig.mdb configuration database where all the
profiles are stored.
MEC Software - www.mecsw-usa.com
18
WIP Data Capture System - User Manual
You may create any number of Windows shortcuts to the WIPCapture program. By including command line
parameters in each shortcut you can make each copy of the program run differently. For example, let’s say
that we want to run two copies of WIPCapture on a computer. Both copies will behave very much the same so
they can share most of the configuration settings, but each copy will use its own scanner. We can create two
separate shortcuts with the following command lines:
C:\Program Files\WIPCapture\WIPCapture.exe /S=COM1:9600,N,8,1 /W=STN1
C:\Program Files\WIPCapture\WIPCapture.exe /S=COM2:9600,N,8,1 /W=STN2
The copy of the program executed by the first shortcut line will use the scanner on COM1 and identify itself in
the data log as STN1. The copy executed by the second shortcut will use the scanner on COM2 and identify
itself as STN2.
If we did not explicitly tell the two copies to use different serial ports, they would obtain their settings from the
registry and would both try to use the same port. One copy would take possession of the port and the other
would report an error because the port was already taken.
Instead of shortcuts, you can use a batch (script) file to start multiple copies of WIPCapture. For example,
here is a batch file that starts eight separate copies of WIPCapture; four of the workstations will be using the
CUTTING profile and the other four will use the SEWING profile:
C:\Program Files\WIPCapture\WIPCapture.exe /S=COM1:9600,N,8,1 /W=STN1 /PCUTTING
C:\Program Files\WIPCapture\WIPCapture.exe /S=COM2:9600,N,8,1 /W=STN2 /PCUTTING
C:\Program Files\WIPCapture\WIPCapture.exe /S=COM3:9600,N,8,1 /W=STN3 /PCUTTING
C:\Program Files\WIPCapture\WIPCapture.exe /S=COM4:9600,N,8,1 /W=STN4 /PCUTTING
C:\Program Files\WIPCapture\WIPCapture.exe /S=COM5:9600,N,8,1 /W=STN5 /PSEWING
C:\Program Files\WIPCapture\WIPCapture.exe /S=COM6:9600,N,8,1 /W=STN6 /PSEWING
C:\Program Files\WIPCapture\WIPCapture.exe /S=COM7:9600,N,8,1 /W=STN7 /PSEWING
C:\Program Files\WIPCapture\WIPCapture.exe /S=COM8:9600,N,8,1 /W=STN8 /PSEWING
You may want to automate things by putting shortcuts or a batch file in the Windows startup folder so WIPCapture will start automatically when the system starts up.
MEC Software - www.mecsw-usa.com
19
WIP Data Capture System - User Manual
Using the WIPCapture Screen
The WIP Capture screen shown here is just an example based on the default Department A profile that comes
with the software. Appearance of the actual screens will be controlled by settings in your WIP Configuration
file.
The data fields defined in the profile are displayed; the TimeStamp and Workstation ID codes are filled in
automatically by the WIP Capture software and do not appear on the screen. When all of the fields are filled
in, the operator can click on the Record Data button to save the information to the network database. If one of
the defined fields has “Save After Entry” checked in the configuration, the data will be saved when that field is
entered (unless a required field is empty). Another option is to scan a CMDSAVE barcode.
The About button displays version and copyright information about WIP Capture.
The Configuration button displays the local settings for this worksation. Note that the command line options let
you hide this button.
The Hide button minimizes the WIPCapture screen onto the Windows Task Bar. The operator can click the
icon on the task bar or scan a barcode (serial scanner) to restore WIPCapture to normal size.
Quit terminates the program.
Tip: When you have configured your screens with WIPConfig and are ready to prepare training materials for
your users, show the sample form in WIPConfig, click on it to make it the currently-active window, and then
hold down ALT while pressing the Print Screen button. This will copy a picture of the screen to the Windows
clipboard. You can then paste the picture into your document or slide show.
MEC Software - www.mecsw-usa.com
20
WIP Data Capture System - User Manual
Using WIP JobTrack
WIPJobTrack uses the information collected by WIPCapture to display the current status of your operations.
WIPJobTrack is typically installed on computers used by operational managers to quickly see if any jobs are
running behind schedule and to look up the current status and location of any job.
Number of parts at beginning and end
of operation, and difference (loss)
Start and stop time,
reason for stop
Job, part, employee,
and operation
Filter displayed items by job,
part, employee, or operation
Actual hours elapsed
White = inactive or finished
Green = currently active
Yellow = running long
Red = running much too long
Double-click to set
estimated hours for
operation
Limit displayed items to a range
of dates (defaults to current day)
Show/Hide inactive or
exported items
Select records and export
to spreadsheet
MEC Software - www.mecsw-usa.com
21
WIP Data Capture System - User Manual
WIP JobTrack Setup
Click on the Settings button to display the Settings screen:
When you installed the WIPConfig program, two database files (WIPConfig.mdb and WIPData.mdb) were
installed in the C:\Program Files\WIPConfig folder on your local computer. You probably followed our recommendation and moved these two files to a shared network folder that can be seen by all the computers that
you will be using in the WIP system.JobTrack needs to know where to find these two files. Click on the browse
buttons (...) and locate WIPConfig.mdb and WIPData.mdb on your network.
An operation is considered finished when someone uses WIPCapture to record a “STOP” for with the reason
“FINISHED”. Once an operation is finished, it automatically disappears from the JobTrack display. Use the
field labeled “how long should finished operations be retained on active display” to delay the disappearance. In
the example above, operations will stay on the screen for 8 minutes after they are finished. Note that you can
un-check “Active Operations Only” on the main screen to show all jobs, including those that have finished.
If you want JobTrack to alert you when operations are running long, check the “use estimated hours” checkbox.
This will cause the Estimated Hours column to appear on the main display, and JobTrack will highlight longrunning jobs in yellow or red. To set the estimated hours for an operation, double-click its Estimated Hours
field on the main display.
If you are using estimated hours, an operation’s display line will turn yellow the moment the actual elapsed
time reaches the estimated hours. Use the allowed percent over estimate field to specify (in percent) how far
over time an operation can run before it changes from yellow to red.
MEC Software - www.mecsw-usa.com
22
WIP Data Capture System - User Manual
How JobTrack Uses WIPCapture Data
JobTrack uses the information collected by WIPCapture screens. If you are using JobTrack, it is important that
your WIP Configuration include all of the data fields needed by JobTrack.
JobTrack uses the PartNo, JobNo, and Operation fields to identify individual operations and match the start
and stop records. The data in these three fields must match for JobTrack to associate a start transaction with
its matching stop transaction.
The Transaction field must contain either “START” or “STOP”.
The StopReason field may contain any value if the operation is being temporarily suspended (break, end of
day, engineering question, material problem, machine down, etc.). But when an operation is completely finished, a “STOP” transaction should be recorded with StopReason set to “FINISHED”. This is how JobTrack
knows that an operation is done.
JobTrack matches each start with the next matching stop. If a particular PartNo/JobNo/Operation is started
and stopped several times, JobTrack will automatically find the adjacent start/stop pairs and display each as a
separate line on the status display.
Exporting Data
Once an operation is finished, you may want to export the data to a spreadsheet for further analysis.
Start by selecting the lines (operations) that you want to export from the JobTrack display. There are
a number of controls to help you display the lines you want:
• Check or un-check Active Jobs Only to hide or show operations that have finished
• Check or un-check Include Exported Records to hide or show previously exported data
• Limit the range of dates shown with the From and To date picker controls
• Filter the lines by Job Number, Part Number, Employee, Operation, or a combination
Once the lines you want are displayed, select them in one of these ways:
• Click on a line to select it.
• Select multiple lines at random by holding down the CTRL key and clicking
• Select multiple continguous lines holding down the SHIFT key and dragging the cursor
• Click the Select All or Select None button
Click the Export button and select a name and location for the output file. The data will be saved in
Comma-Separated Values text format; files of this type are typically named with a “.csv” extension
and can be opened with any spreadsheet program.
If the file does not exist, JobTrack will create it. The first line (header line) of a .csv file normally
contains the names of the fields, and sebsequent lines contain data values in the same order as the
header line. When creating a new output file, JobTrack automatically adds a header line.
If the output file already exists, JobTrack will ask you if you want to append data to the end of the file
or to replace it (this will erase the old file). An existing file theoretically already has field names in the
first line, so when appending data JobTrack does not write a header line.
MEC Software - www.mecsw-usa.com
23
WIP Data Capture System - User Manual
Here is a list of the data columns JobTrack exports to the data file, given here in the order they appear (left to right):
RecNo
JobNo
PartNo
Employee
Workcenter
StartQty
StopQty
StartTime
StopTime
StopReason
EstHours
Hours
JobTrack’s internal record number
Job number
Part number
Employee identification
Workcenter where data was captured
Starting quantity of parts
Ending quantity of parts
Start time
Stop time
Stop reason
Estimated hours
Actual hours
Once the data records are exported, JobTrack will them from the display, but will not from the database. You can always display exported data by checking Include Exported Records on the main
display.
MEC Software - www.mecsw-usa.com
24