1
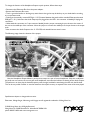
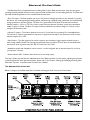
Etherwave® Plus User’s Guide
The Etherwave Plus is an expanded version of Moog Music’s classic Etherwave theremin, using the same greatsounding and easily playable theremin circuitry that has made the Etherwave our best-selling theremin. The Etherwave
Plus adds the following features to the standard Etherwave theremin:
• Pitch CV output – The Pitch Antenna can act as a CV (Control Voltage) controller for any external CV compatible device, such as Moogerfooger® Analog effects, the Minimoog Voyager® analog synthesizer, the Little Phatty®
analog synthesizer or the Moog Guitar. The Pitch CV is generated from the pitch of the theremin waveform.
Nominal output is -2.5V to + 4.5V. Zero Volts is output when the theremin produces a pitch one octave below
middle C (approx. 131Hz). The Pitch CV output is factory-calibrated to produce a change of 1 Volt per octave
change in the theremin’s pitch.
• Volume CV output – The Volume Antenna can act as a CV controller for any external CV-compatible device.
The Volume CV output is generated from the same CV signal used internally for the Etherwave’s VCA circuitry.
Nominal output is 0 to +10V.
• Gate Output – The Gate signal can be used as a signal to start envelopes, trigger sample and hold circuits or
other timing related activities.The Gate signal is generated when the Volume CV rises above 0 Volts AND when
the theremin audio is greater than 0 Hz. OFF is 0 Volts and +10V is ON.
• Headphone output with headphone volume control – can be configured with an internal jumper for normal or
“pitch preview” function.
• Power Indicator LED - indicates when the unit is on and ready to play.
This User’s Guide only describes the added functions of the Etherwave Plus. For information regarding the operation
of the Etherwave Plus’ basic theremin functions, please refer to the Sections “Setting Up and Playing the Moog Music
Etherwave Theremin” in the Etherwave Theremin User’s Manual.
The Etherwave Plus Front Panel
Below is a diagram of the Etherwave Plus Front Panel indicating the Panel Controls and Connections.
What is a CV?
CV stands for Control Voltage. In analog electronic musical instruments, it is a type of low-current electrical signal
used to continuously modulate a musical parameter. In the Etherwave theremin, the simplest example of a CV is the
control of the instrument’s volume by the Volume Antenna. The Volume Antenna circuitry generates a CV that increases as the left hand is pulled away from the antenna. This CV is applied to the control input of a Voltage Controlled
Amplifier (VCA). As the voltage generated by the Volume Antenna circuitry increases, the output level of the VCA
increases too. We hear this as an increase in volume. For more on the subject, you may wish to refer to the “Basics of
Analog Synthesis” chapter of the Minimoog Voyager User’s Manual, or the “Basic Theory” section of the CP-251 Control Processor User’s Manual, both available on our website: www.moogmusic.com.
What is a Gate?
A Gate is a signal that has only two levels: Low and High, or sometimes called Off and On. This can be used as a trigger for events, or as a switch type signal. In analog synthesizers, a gate is usually used to start or stop the sound of the
instrument by starting and stopping circuits called Envelope Generators. For example, a gate on signal is produced when
a key is pressed on the Minimoog Voyager, thus starting a note.
Using the Etherwave Plus CV Outputs.
The Etherwave Plus CV outputs are located on the bottom of the unit as indicated by the front panel, requiring the
placement of the Etherwave Plus on a mic stand to provide access. CAUTION: Be sure you understand the
operating levels of the equipment involved before making connections. Most modern analog equipment has protection built into the inputs of a circuit to prevent damage from unexpected voltage levels. However some
equipment may respond in unexpected ways, or may not respond at all to CVs outside the expected levels.
Note that most modern Moog equipment such as moogerfooger analog effects typically specify 0V to +5V or -5V
to +5V levels for CV inputs. The Etherwave Plus will work safely with these devices despite outputting voltages greater
than specified. In general it is safe to make connections with the equipment powered up.
One thing to avoid when making CV connections is to avoid passively mixing CV output signals into a single CV
input, for instance with a “Y” type splitter cable. This can sum the voltages involved and rapidly exceed the voltage levels
expected at a CV input. This may cause unwanted results. For combining CV signals, use a CV mixer, such as the 4-input
mixer of the moogerfooger CP-251 Control Processor.
Example Applications
Connecting the Etherwave Plus to a Little Phatty analog synthesizer.
In this example we will control the Little Phatty so that it can be played in a gestural manner similar to a theremin.
• First, connect the Etherwave Plus Gate Output to the Little Phatty(LP) Gate Input.
• Second, connect the Pitch CV Output to the LP Pitch control input.
• Next, Connect the Volume CV Output to the LP Volume Control Input.
• On the LP, select a preset that is voiced in the 16’ range and has a sustaining type envelope.
Now – with your left hand away from the Volume Antenna, Move your right hand closer to the Pitch Antenna – note
the LP pitch rises. Now move your left hand close to the Volume Antenna – you will hear the LP go silent – as you lift
your left hand away from the Volume Antenna you will hear the LP start a note again.
It is really fun to try different presets out to hear the ways the Little Phatty will respond to the gestural control of the
Etherwave Plus!
Connecting the Etherwave Plus to a MF-102 Ring Modulator.
In this example we will control the MF-102’s built-in Carrer Oscillator, which is combined with the audio of the theremin itself in the Ring Modulator to produce sum and difference frequencies.
• First, connect the Audio Output of the Etherwave Plus to the Audio Input of the MF-102.
• While making sound with the theremin, adjust the Drive Control of the MF-102 so it is YELLOW.
• Set the MF-102 Frequency Control to 120 Hz (Hi Range).
• Now connect the Pitch CV Output to the MF-102 Frequency Input.
• Set the Mix Control to full CCW and the LFO Amount to full CCW.
• Connect the Volume CV Output to the MF-102 Mix Input.
Now as you move your left hand away from the Volume Antenna, the volume of the audio increases, as does the
volume of the ring modulator effect. When your left hand is away from the Volume Antenna, what you hear is 100% the
effected signal. As your right hand moves in proximity to the Pitch Antenna you will hear the variation of the difference
tones generated by the Ring Modulator as both the pitch of the Carrier Oscillator and the theremin audio are changing.
Note: for more information on the operation of the MF-102, refer to “Understanding and Using your MF-102 Ring
Modulator” manual, available on our website www.moogmusic.com.
For an even more intense effect, try the following changes to the previous setup:
• Connect the Volume CV Output to the LFO Rate Input of the MF-102.
• Now set the Mix and LFO Amount to full clockwise.
• Set the LFO Waveform switch to the square wave position.
• Place the LFO Rate Control in mid-position.
Now when your left hand moves away from the Volume Antenna, the LFO Rate increases – even into the audible
frequency range. This creates complex sidebands in the Carrier Oscillator itself, generating some very hairy timbres. Far
out!
This last example illustrates two important things:
• The Etherwave Plus’ antennas don’t have to control the same parameter on other pieces of gear that they control on
the theremin – for instance the Volume Antenna can control the LFO Rate.
• There are many ways to use gestural control of electronic musical instruments. Hook it up and try it. Experiment!
These are just a couple quick examples to get you started with using the Etherwave Plus as a CV controller. As the
variety of modern analog CV-compatible equipment increases, so to does the wealth of opportunities for the use of
your Etherwave Plus as an expressive gestural controller for your sonic explorations. For more applications using the
Etherwave Plus as a gestural CV Controller, visit our website www.moogmusic.com/theremin/.
Configuring the Headphones for “Pitch Preview”
The Headphone Output of the Etherwave Plus is designed to drive a pair of headphones with a minimum of 32 Ohms
impedance. The level of the Headphones signal is set by the “Phones Vol.” panel control. It is not recommended to use
the Headphone Output with a 2-conductor, Tip-sleeve 1⁄4” instrument plug for an alternate audio output. As configured
from the factory, the Headphone Output is generated from the Etherwave Plus’ audio output for practicing using headphones.
Some theremin users like to hear the theremin’s waveform independently of volume control – the so-called “pitch
preview” function. The Headphone Output can be configured for this feature by moving an internal jumper on the Etherwave Plus circuit board.
To change the function of the Headphone Output to pitch preview, follow these steps:
• Disconnect the Etherwave Plus from the power adapter.
• Remove the Etherwave Plus cover.
• Touch a grounded surface to discharge any static electric charge that may be built up on your hands before touching
any components inside.
• Looking at the vertically mounted PCB (p/n 11-213) located between the panel and the standard Etherwave theremin
PCB (p/n 11-211), find where the Audio Output jack is plugged into the PCB - this connector is labeled J8. Unplug this
connection.
• Underneath this connection is a 3-pin connector labeled J6 with a jumper connecting the pin closest to the center of
the unit to the middle pin of the connector. Move this jumper to connect the middle pin to the pin closest to the output
jacks.
• Now reconnect the Audio Output to the 11-213 PCB, and reinstall the instrument’s cover.
The following image shows the location of the jumper:
Now the Headphone Output delivers a pitch preview output to a pair of stereo headphones. With this modification
the performer can monitor the current pitch with headphones even when the left hand is shutting off the Audio Output.
The performer can then play the desired frequency with the right hand before articulating the note with the left hand.
This can be very useful in studio or even live situations where pitch accuracy is required at the onset of the note played.
Specifications subject to change without notice.
Etherwave, Moogerfooger, Minimoog, and Voyager are all registered trademarks of Moog Music Inc.
© 2009 Moog Music Inc. All Rights Reserved
Moog Music Inc. 2004E Riverside Dr. Asheville NC 28804 USA
phone: 828-251-0090 web: www.moogmusic.com