1
L-BOSS & L-POS
Programmer's guide
I
LogiVision's Back Office System Software Programmer's Guide
Table of Contents
Foreword
0
Part I Programming Guide Overview
4
Part II Requirements
5
Part III Relational Databases
6
1 Database Formats
................................................................................................................................... 7
2 Data Table and
...................................................................................................................................
Field Lists
9
3 SIL Data File...................................................................................................................................
Structure
12
4 The Filemaint...................................................................................................................................
Program
13
5 Database Maintenance
................................................................................................................................... 16
Part IV Communications and Networking
18
1 Terminal Groups
...................................................................................................................................
and Targets
19
Creating Programming
..........................................................................................................................................................
Groups
23
2 Head Office Communications
................................................................................................................................... 25
3 Other L-BOSS
...................................................................................................................................
Communications
30
Part V L-BOSS and Devices
32
1 Definition Tables
................................................................................................................................... 33
Part VI Security Features
35
1 Other Security
...................................................................................................................................
Issues
38
Part VII File Structure
38
1 Configuration
...................................................................................................................................
Files
42
Customize the..........................................................................................................................................................
Entry Adjustment pull-down
47
Part VIII L-BOSS Internal Commands
47
1 Automating L-BOSS
................................................................................................................................... 48
2 Default Command
...................................................................................................................................
Files
52
3 Internal Command
...................................................................................................................................
Dictionary
57
Basic Commands
.......................................................................................................................................................... 57
Date Related Commands
.......................................................................................................................................................... 60
Target Related
..........................................................................................................................................................
Commands
62
Transfer Related
..........................................................................................................................................................
Commands
63
Data Maintenance
..........................................................................................................................................................
Commands
64
Report Data Table
..........................................................................................................................................................
Commands
65
File Related Commands
.......................................................................................................................................................... 66
Miscellaneous..........................................................................................................................................................
Commands
67
© 2007 ... Your company
Contents
Part IX Report Programming
II
67
1 Report Approval
................................................................................................................................... 69
2 Working With...................................................................................................................................
Reports
70
3 Report SQL Editor
................................................................................................................................... 74
4 Report Prompts
................................................................................................................................... 78
5 Report Commands
...................................................................................................................................
and Variables
81
6 POS Report Programming
................................................................................................................................... 83
7 Form Manager
...................................................................................................................................
Application
86
Template Editor
.......................................................................................................................................................... 88
Tools
.......................................................................................................................................................... 91
Menus
.......................................................................................................................................................... 92
Report Formula
..........................................................................................................................................................
Options
96
Part X Inventory Tables
98
1 Dynamic Inventory
...................................................................................................................................
Fields
99
2 Table Structure
...................................................................................................................................
and Example Entry
99
Part XI Importing and Exporting Data
105
1 Importing Data
................................................................................................................................... 106
2 Exporting Data
................................................................................................................................... 110
Part XII Backups
113
1 Autobackup................................................................................................................................... 114
Part XIII Trouble Shooting Tools
116
1 Logs and Log
...................................................................................................................................
FIles
118
Viewing Logs
.......................................................................................................................................................... 119
2 Report Data...................................................................................................................................
Integrity
121
FixSIL Utility.......................................................................................................................................................... 122
3 Item Data Integrity
................................................................................................................................... 124
4 Tracking Internal
...................................................................................................................................
Communication
126
Process Viewer
..........................................................................................................................................................
Buttons
127
Process Viewer
..........................................................................................................................................................
Menus
129
View Polling..........................................................................................................................................................
Status
130
Part XIV Upgrading L-BOSS
132
Part XV Copy Protection Key
134
1 Upgrading the
...................................................................................................................................
Key
136
Part XVI Additional Resources
138
1 POS 101 Keyboard
...................................................................................................................................
Commands
138
2 L-BOSS Version
...................................................................................................................................
History
142
© 2007 ... Your company
II
III
LogiVision's Back Office System Software Programmer's Guide
Index
149
© 2007 ... Your company
Programming Guide Overview
1
4
Programming Guide Overview
Programming Guide Overview
Top
Next
Programming Guide Overview
Top
Next
L-BOSS Programming Overview
The L-BOSS programmer's guide is not designed to teach SQL (Standard Query Language) or other
programming, but to provide a detailed reference for all internal commands, file structures, report and
label design, and other L-BOSS setups. Although some information from the L-BOSS user manual
may appear in this guide, it is assumed that programmers have already mastered the L-BOSS user
interface. If you are unsure of menu options or other L-BOSS application options, please consult the
User Manual found in the \LBoss folder, LBoss.pdf or LBoss.chm.
Each section of the programmer's guide opens with an overview containing conceptual information
about the topic; things to understand before trying to program L-BOSS. The sections are divided into
sub-headings that contain the specific programming details.
Programming Language Overview
Logivision's Back Office System Software uses internal commands developed to allow dealers to
customize installations to meet individual customer needs. When combined with SQL commands, the
internal programming language provides the tools and utilities to create specialized reports, automated
© 2007 ... Your company
5
LogiVision's Back Office System Software Programmer's Guide
events, import and export capabilities and much more.
L-BOSS also combines internal programming features with an industry standard data file format called
SIL (Standard Interchange Language). SIL is a data interchange standard developed by the Uniform
Code Council (http://www.uc-council.org/ ) to transport data between systems, specifically retail control
systems. SIL consists of two (2) parts: a programming language and a data "dictionary". SIL files
contain SQL commands, the referenced data table record field layout, followed by lines of data
(records). L-BOSS is SIL compliant, able to send and receive data using the SIL data language and
dictionary.
L-BOSS is designed to be fully functional with 2 common database formats: "Paradox" and "MSSQL".
Both these database formats use SQL to extract and populate the data tables. By combining relational
data basing using, the SIL data format, SQL commands and proprietary commands, L-BOSS provides
a powerful platform for most retail control needs. For more about database types, see the
"Database Formats" help page under the "Relational Databases" section in this manual.
2
Requirements
Requirements
Previous
Top
Requirements
Next
Previous
Top
Next
Hardware and Software Information
Hardware and Software Minimum Requirements
Most computer systems on the market since the year 2001 are powerful enough to run the L-BOSS
(or L-POS) software and are probably sufficient for small installations. However, depending on the
situation, you may want to suggest that customers obtain more than just the minimum required
hardware. As data collects, reports may take longer to generate, and in multi-lane or high volume
locations, network components and number of simultaneous users become factors.
As a dealer you are probably supporting the customer's hardware as well as the L-BOSS / L-POS
software. The equipment you suggest to your customer should be based on the size of the installation,
the number of lanes and / or additional L-BOSS stations. The better the equipment, the less likely the
hardware will be a support problem.
The requirements mentioned below outline the very least you should consider! L-BOSS will run on
less, but you'll probably want to go for lunch while waiting for a large PLU sales report!
© 2007 ... Your company
Requirements
6
L-BOSS Work Station or Single Controller Basic Requirements (suggested minimum)
·Computer : IBM PC or compatible, minimum Pentium III - 733 Mhz or comparable processor.
·RAM : minimum 128 meg or greater.
·Hard drive : 40 GB or greater.
·Display : should be capable of High Color (16-bit) or greater. (On L-POS, using 256 colors or less
results in improper display of the L-POS screens).
·Peripherals : Standard system parallel or serial ports for device connections, NIC.
L-BOSS Server Basic Requirements (suggested minimum)
·Computer : IBM PC or compatible, minimum Pentium 733 Mhz or comparable processor.
·RAM : minimum 128 meg or greater.
·Hard drive : 40 Gigabyte or greater.
·Display : should be capable of High Color (16-bit) or greater for user
·Peripherals : Standard system parallel or serial ports for device connections, NIC.
For more about why the number of lanes and stations affects the required hardware and software
setups, see the "Database Formats" help page, under the "Relational Databases" help section of this
manual.
Multi-Store Considerations
L-BOSS is capable of communicating either by direct modem connection, or via the Internet and
TCP/IP. Although a regular dial-up 56k connection will suffice, we suggest higher speed connections
such as DSL (Digital Subscriber Line) or cable type link.
3
Relational Databases
Relational Databases
Previous
Top
Next
Relational Databases
Previous
Top
Next
Relational Tables and Database Overview
© 2007 ... Your company
7
LogiVision's Back Office System Software Programmer's Guide
Data Storage
L-BOSS uses a relational database system to maintain all system information. Conventional
databases often use single records that contain all information about a specific data type in a set
number of fields. This limits the amount of information that can be kept for a data type. If new
information is required, fields must be added. For example, if you keep customer information, a
conventional database record might have two (2) possible telephone number fields. If a third telephone
number field becomes necessary, the entire database must be changed to accept the new information.
Relational databases use table sets to link information, allowing for far greater flexibility. As with any
database, each data type must have a "unique identifier" to distinguish it from other data items of the
same type. By combining two or more unique identifiers, it is possible to keep multiple values for a
single data type. For example, if you sell items at different price levels, you need to keep many prices
for the same item. Instead of adding price fields to the same record, the relational system allows you to
have a price level table with as many levels as required. By combining the unique item code and the
price level, it is possible to create a new unique record for each price for the item in the price table.
It is important to understand that data is kept in separate tables that together represent the entire
database. In most cases it will be necessary to "join" tables using SQL commands to extract or save
data. For example, to list items with their cost and price requires finding the same PLU (or UPC)
number in the "Object" table for the description, the "Price" table for the price, and the "Cost" table for
the item's cost. In this example, the PLU code is the unique identifier for each table. In other cases, it is
necessary to combine several fields, that together make up a unique identifier, such as the price level
example given above. Price Level table records contain both the PLU code field and the Price Level
field.
In some cases, such as multi-store installations, the "target" field (store or terminal) can be combined
with the PLU code and price level to keep different prices for the same item on the same price level. In
other words, the same item can have different prices on the same price level, but for different targets.
By combining the three fields as a single unique identifier, the relational system can keep adding
records for each target. This shows how it is possible to have as many different prices for the same
item as required.
3.1
Database Formats
Database Formats
Previous
Top
Database Formats
Next
Previous
Top
Next
Paradox and MSSQL
© 2007 ... Your company
Relational Databases
8
Technical Information about Paradox versus MSSQL
Although both Paradox and MSSQL database formats provide reliability, there are certain factors that
may help you understand why you might choose one over the other. Paradox databases are ideal for
smaller installations, where there is limited simultaneous access, and easily controlled data quantities.
This is because the Paradox database format was designed as a "light" relational database, flexible
and adaptable for most applications. L-BOSS uses the Borland Database Engine to access the
Paradox data tables, sending SQL commands that the BDE processes, returning the results to LBOSS.
In larger installations that use multiple access and contain large amounts of data, the Paradox
database format becomes more difficult to maintain. Paradox databases do not actually remove
deleted records, but marks them as deleted. Over time, this causes a build up of unused space. LBOSS handles this by "packing" the database on a regular basis. Paradox databases must also be
"indexed" to achieve quicker results. On occasion, the indexes can become corrupt, for example during
a system or program crash. This means that the indexes must be re-built. If L-BOSS is not shut down
properly, it will display a message the next time it is launched, warning that the system may have to be
re-indexed. L-BOSS provides an application called "Filemaint" to deal directly with the Paradox
database. It is described in the "Filemaint Program" help page below.
MSSQL type databases are much more robust, capable of handling large amounts of data, and do not
require the same level of maintenance. The database "server" takes care of all required maintenance.
They do not need to be "packed" or "re-indexed", even if the system crashes. In large data situations,
they are much quicker than Paradox databases, even with many simultaneous requests. L-BOSS still
uses the BDE to interact with the MSSQL database, but the BDE interacts with the database "server"
program (such as MSDE* ). The databse server maintains all tables, even during a system crash,
keeping "transaction" records, making it capable of rebuilding any lost information.
In smaller installations, the database host system (computer) is also used as the L-BOSS control
station and work station, using more resources. If too many other L-POS or L-BOSS stations access
the host computer, the system will become sluggish. In larger installations, the database host system
(computer) is not normally a workstation, so the server program is not using resources required by
users. High volume installations should really use this type of configuration to maintain reliable
information, and keep the workstations free of the additional workload.
* MSDE is a Microsoft product, distibuted under license with the L-BOSS software for use with LBOSS. This is the perfect solution for small businesses that want the reliability of the SQL Server.
There is a 2GB limit to total database size with MSDE. In large installations a more robust server such
as the full MSSQL program should be considered.
Table Lock Files
As with most databases, the Paradox relational tables cannot allow simultaneous record access.
When records are being accessed, the BDE "locks" the record, and actually creates a file on disk,
removing it when the record is released. In a system or program crash, the BDE cannot remove these
files. When the system is back up, the lock files (.lck) may remain on disk, preventing L-BOSS from
© 2007 ... Your company
9
LogiVision's Back Office System Software Programmer's Guide
functioning normally. In some cases, you may have to remove these files manually. MSSQL servers
handle simultaneous access internally and do not create disk files as table lock markers.
3.2
Data Table and Field Lists
Data Table and Field Lists
Previous
Top
Next
Data Table and Field Lists
Previous
Top
Next
Data Dictionary
Besides the initialization (.ini) files, L-BOSS loads a "data dictionary" at launch time. The data
dictionary is called ServDic.csv, (comma separated value) and contains a record for each SIL field.
Each ServDic record contains all the information about the field; its format (numeric, string, logical), its
descriptor, which tables it exists in. L-BOSS "builds" information about the database tables from these
records every time it is launched. The ServDic file can be opened by most "spreadsheet" programs, or
as a text file.
NOTE: If the ServDic file is in use (open by another program) or not in the \LBOSS folder, L-BOSS will
open with an error message because it cannot read the ServDic file, but will not run. The ServDic.csv
file must not be modified.
Table Field Lists
The L-BOSS Report application has a special "System" report that will print all fields for any table in
the database. Once you know the table name, you can generate a list of all fields found in that table.
The Filemaint program displays all the tables it finds in the database when it launches. Some of the
data tables are used to store information for L-POS
These tables are contained within L-BOSS. Refer to the data-dictionary (LBoss\Servdic.csv) for fields
used within each file.
Note: Tables not listed are temporary tables created at different points by using the system. They are
irrelevant to the purpose of this document.
Alias_tab = Alternate look-up codes for a PLU.
Bat_tab = Batch table is the table that contains the header information for the batch files.
Bati_tab = used to create a list of items that a future price is entered for ahead of time.
Since only one futire price can be entered through the main PLU editing screen. Creating batches
allows
many future prices to be entered ahead of time.
© 2007 ... Your company
Relational Databases
10
Blk_tab = The names of the 24 hour periods that exist for the hourly report segments, required
because of different languages
Btl_tab = bottle deposit and environmental fee table (for collecting bottle deposits on soft drinks in
states and provinces that have compulsory deposits on empty containers for ecological reasons)
Button = information regarding the buttons created in PosSetup for register operation
Can_tab= list of the reversed transactions.
Cat_tab = Category table. Items may or may not be associated with a category.
Cbk_tab = Cost break table, contains information on special cost deals with suppliers
Clc_tab = Cleint contact table. This table joins with the Clt_tab (client table) Many clc_tab records can
be created for each unique customer.
Clf_tab = Client shopper level is used to determine customer price level, discount status, etc.
Clk_tab = Clerk (or cashier) file. This is list of operators created on system.
Clr_tab = Client risk table defines customer credit limit and check spending privileges.
Clt_tab = Customer file
Cost_tab = product cost file
Cpn_tab = Coupon table for vendor coupons tied to UPC codes
Dept_tab = Department table, products are linked to subdepartments which are linked to departments
Dpto_tab = table used for defining main department file in a multi-target environment
Dsc_tab = discount table used with preferred shopper discounts
EcL_tab = Electronic coupon links table, contains information on coupons triggered on the POS
system to offer deals to customers.
Fct_tab = function table where the register functions are defined (such as Cash, void, etc)
Fcz_tab = is where the functions are linked to the totalizer for accounting purposes
Formname = is also information related to screen and keyboard setup
Forms = information related to screen and keyboard setup
Functions = information related to screen and keyboard setup
Gift_tab = gift certificate table
Kit_tab = kits table contains information on items that are built as kits
law_tab = layaway table
lnk_tab = links the register terminal list with the target list
© 2007 ... Your company
11
LogiVision's Back Office System Software Programmer's Guide
log_tab = message table that tracks what backend sends to front end
logs_tab = supplement to log_tab
lvl_tab = price level table (each PLU MUST have at least one price level [F126])
mix_tab = mix and match table, this is only an information file...it is not required. it will show a
description of the mix number
obj_tab = main item reference table, each item can exist only once in this table
param = register function flag settings
pos_tab = register related item flags such as tax status, compulsory scale, etc. contains
register description, etc.
price_tab = product price file, can have multiple entries for each item (as with multiple price levels
and multiple price targets.
prm_tab = prompt list table, these are questions attached to buttons in the POS system to prompt for
additional information
rent_tab = information regarding the rental items
rntt_tab = supplementary information for rental system
rpt_clk = clerk sales
rpt_clt = client sales
rpt_dpt = Department sales
rpt_fin = financial sales report data
rpt_hou = hourly sales dat
rpt_itm_d,w,m,y = product sales daily, weekly, monthly, yearly (separated by period to allow easier
cleanup)
rpt_itm_n = non resettable total per item (current stock level)
rpt_sub = Subdepartment sales data
rst_tab = restrictor file, e.g. Cannot sell beer between 23h00 and 08h00
scl_tab = Scale data to send to electronic scale systems
scl_tab =Stock control settings from the inventory tab of PLU records. Does not include current
inventory stock levels.
sdp_tab = sub-department file. The subdepartments attach to departments. Sdp_tab is multi-target to
allow differemt tax structures per region.
sdpo_tab = subdepartment object file for reporting purposes
sec_tab = security table for controlling menu access in the Backoffice software.
smg_tab = scale message table contains information for the electronic scale systems.
© 2007 ... Your company
Relational Databases
12
std_tab = store details table contains information on store contact for multi-store system.
sto_tab = Target groups (composed of individual registers and used for creating report groups,
exchange groups, program groups
stx_tab = scale extended text table, more information fields for electronic scale systems
sys_tab = internal settings
tar_tab = Tare weight table (empty containers base weight for scalable items being weighed at the
POS)
task_tab = Event file for Lboss scheduler
ter_tab = terminal list made up of individual regisers and backoffice machines. these terminals are
grouped in the sto_tab and the lnk_tab
tlz_tab = Totalizer information. contains descriptor and accounting setup for report system. Functions
(fct_tab) are linked to totalizers (tlz_tab) via the [fcz_tab] files.
tty_tab = Terminal type, used to restrict what L-BOSS deploys to this type of terminal
vendor = vendor information file.
zone = one of the 5 files used in setup of the appearance and operation of the POS screens.
3.3
SIL Data File Structure
SIL Data File Structure
Previous
Top
Next
SIL Data File Structure
Previous
Top
Next
Standard Interchange Language
L-BOSS also combines internal programming features with an industry standard data file format called
SIL (Standard Interchange Language). SIL is a data interchange standard developed by the Uniform
Code Council (http://www.uc-council.org/ ) to transport data between systems, specifically retail control
systems. SIL consists of two (2) parts: SQL and data lines. SIL files contain SQL commands, the
referenced data table record field layout (all the "F" field names, in the exact order they appear in the
record), followed by lines of data (records). L-BOSS is SIL compliant, able to send and receive data
using the SIL data language and dictionary.
L-BOSS makes full use of this data file format, not just to transport data, but to backup and restore
database tables. Each SIL type backup file contains all the information about the table name, record
and field layout, along with the SQL commands required to reconstruct the specified table. L-BOSS
© 2007 ... Your company
13
LogiVision's Back Office System Software Programmer's Guide
provides the "Filemaint" application (described in the "Filemaint Program" help page below.) to view,
backup and re-create database tables from SIL files.
Example SIL File
Here is an example of a SIL file, in this case the Clerk (cashier or system operator) table backup. LBOSS uses the default .sql file extension for the SIL files it creates from the tables.
File name: CLK_TAB.sql (system operators)
@CREATE(CLK_TAB,CLK);
REATE VIEW CLK_TAB_LOAD AS SELECT
F1185,F1000,F1001,F1126,F1127,F1141,F1142,F1143,F1144,F1145,F1146,F2094,F2117 FROM
CLK_TAB;
INSERT INTO CLK_TAB_LOAD VALUES
('1','PAL',0,1111,'Drawer 1',,0,'','',,'',1111,),
('2','PAL',0,2,'Cashier',,2,'','',,'',2,),
('3','PAL',0,3,'Clerk',,3,'','',,'',3,),
('4','PAL',0,4,'Assistant',,4,'','',,'',4,),
('5','PAL',0,5,'Manager',,5,'','',,'',5,),
('6','PAL',0,6,'Owner',,6,'','',,'',6,),
('7','PAL',0,7,'Programmer',,7,'','',,'en',7,),
('8','PAL',0,77,'Programmer',,7,'','',,'fr',77,),
('999','PAL',0,999,'Programmer',123,7,'','',,'',999,);
@UPDATE_VIEW(ADD,CLK_TAB,CLK_TAB_Load);
DROP TABLE CLK_TAB_Load;
The first and last entries are SQL commands used by the database engine to perform operations on
the data within the file. The "F" SIL fields are listed in the order that they are created in the data table
record, defining the record structure. After the "Insert" command, each table record's data values are
listed by field, and MUST follow the exact order described in the record definition line.
This industry standard file format is ideal for exporting / importing data. Once you recognize the
format, you will see how L-BOSS combines SQL, SIL and internally recognized commands to
accomplish many tasks, including generating reports.
3.4
The Filemaint Program
The Filemaint Program
Previous
Top
Next
The Filemaint Program
Previous
Top
Next
Handling Data Tables
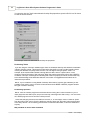
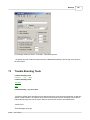
L-BOSS File and Database Maintenance Utility
© 2007 ... Your company
Relational Databases
14
L-BOSS provides a utility to handle database tables, used to backup and restore information from the
tables, or re-index and pack tables. Some of the options controlled by the File maintenance utility can
be run from within L-BOSS as automated "Events". For example, the backup operation. However, the
File Maintenance utility is a "Stand alone" program, not linked with the L-BOSS program or other
module. To launch the File Maintenance utility, open the Windows "Start" menu, "Programs", "LBOSS",
"File maintenance" option.
NOTE: Since the File Maintenance utility accesses the data tables, they must not be in use during
operations. To ensure the tables are not being accessed, you should close L-BOSS before running
this utility .
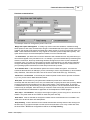
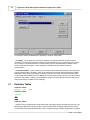
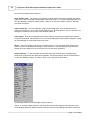
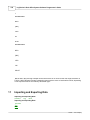
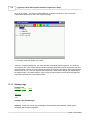
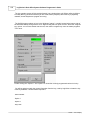
This example shows the L-BOSS "stand alone" File and Data table Maintenance Utility.
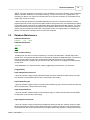
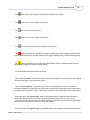
View File Properties and Contents
The File Maintenance utility can also display specific information about a table and its associated SIL
file. With one table selected, click the right mouse button. A properties panel opens, displaying the
table information in the top portion of the panel. If you did not select an associated backup from the
"View" menu there is no associated backup file. If you select a backup day from the view menu, then
right click a table, the bottom portion of the properties panel displays information about the backup file.
© 2007 ... Your company
15
LogiVision's Back Office System Software Programmer's Guide
You can also click the "View" button below the backup file properties to open the SIL file in a file viewer
to view the actual contents.
This example shows the Data table and backup file properties.
Re-indexing Tables
If you are using the "Paradox" database type, there are situations that may arise where the data table
"indexes" become corrupt. This doesn't mean that the data itself is corrupt, just the internal pointers
used by the database to quickly locate records. This can happen during a system "crash". For
example: at the moment that L-BOSS is writing data to a table, there is a power failure, or the
computer "freezes" because of low resources. When the system comes back online, and L-BOSS is
re-started, it will open a message box indicating that it was not properly shut down, and that this may
have caused damage to the data table indexes. In this case it is suggested that the tables be reindexed as a precaution.
NOTE: If your installation is using MSDE or MSSQL rather than a Paradox style database you will
probably never need to run the re-index command because the MSDE or MSSQL program handles
this type of situation internally.
Re-Indexing Operation
NOTE: Close all L-BOSS programs and modules before running the re-index command. If you reindex while there are tables open, the process will stop, indicating that a table is busy. You must close
all L-BOSS programs and re-start the re-index process.
Follow the selection process for the tables to re-index, or, in most cases, use the "select all" option
from the utility's "Edit" menu. Once the tables are selected, press the "Re-index" button at the bottom
of the utility window. The re-indexing process does not affect the table data, or harm the database in
any way.
Why and How to use the Pack Command
© 2007 ... Your company
Relational Databases
16
NOTE: The Pack command is only required if your installation is using the "Paradox" type of database.
MSDE or MSSQL databases do not require "Packing". This process occurs on a regular basis, run
internally by L-BOSS. You should not normally have to run the Pack command. It is described here to
explain why it exists as a utility.
When records are deleted from a Paradox data table, the record is "marked for deletion", but the
physical space the record occupied in the table remains. During normal use, the data tables are added
to and have records removed on a regular basis, taking more space than actually required. The "Pack"
operation seeks and removes these spaces from the Paradox table structure, diminishing the table to
include only the records that contain data. This process occurs on a regular basis, run internally by LBOSS. You should not normally have to run the Pack command.
3.5
Database Maintenance
Database Maintenance
Previous
Top
Next
Database Maintenance
Previous
Top
Next
Notes on Data Cleanup
As data grows over time, it becomes necessary to "Cleanup" the data tables. L-BOSS ships with a
default set of .sql command files that can be automated to maintain the database tables. The server.ini
file has a section that can keep track of when these cleanups should occur. By creating daily
automated processes, L-BOSS can use values found in the server.ini file to trigger the cleanup at the
correct times.
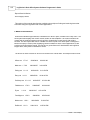
In the server.ini file, under the section called [TriggerDates] In this section, you can define:
[TriggerDates]
DaysToKeepEachTerminal=14
This is the number of days to keep individual terminal item sales. Past this number of days, the data
from all lanes is consolidated into lane 001 (This process is done daily)
DaysToKeepOKLog=2
This is the number of days to keep successful communication log (LO). Please note that the LOG files
MUST be kept small. (This process is done daily)
DaysToKeepAllLOG=14
This is the number of days to keep all communication log (LO). Please note that the LOG files MUST
be kept small. (This process is done daily)
DaysToKeepProcessed=92
This is the number of days to keep the processed files and the journal files. Past this number of days,
the processed files are archived to the Archived Directory, and the journal files to the journal directory.
Archived journal files can be viewed with the EJ program without any restriction. (This process is done
© 2007 ... Your company
17
LogiVision's Back Office System Software Programmer's Guide
Monthly)
DaysToKeepData=92
This is the number of days to keep the DAILY sales information in the database. Past this number of
days, the information is deleted from the database.
NOTE1: The weekly, monthly and yearly sales information are never deleted.
NOTE2: Larger the files are, slower is the system.
NOTE3: Paradox has a file size limit depending of your Block Size parameter in the BDE
administrator:
Block Size
Max records
2048
393,216
4096
786,432
8192
1,572,864
16k
3,145,728
32k
6,291,456
NOTE: All database types have size limits, for example, MSDE has a limit of 2 Gig for the whole
database (all files together). (This process is done Monthly).
DaysToKeepFINdata=427
This is the same as above, except this is related to the FINANCIAL daily data only. (This process is
done Monthly)
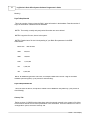
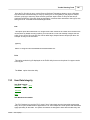
Cleanup Tab
Earlier versions of L-BOSS required that these values be entered manually in the system.ini file. More
recent versions include a more visual presentation of this information. From the L-BOSS "File" menu's
"Configuration" option, select the "Cleanup" tab.
© 2007 ... Your company
Relational Databases
18
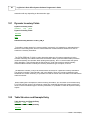
This example shows the "Cleanup" tab settings for controlling data buildup
4
Communications and Networking
Communications and Networking
Previous
Top
Next
Communications and Networking
Previous
Top
Next
Inter-connectivity
Polling Process
"Polling" is the act of collecting information from POS stations. The 901 back end station collects the
sales and other information from the front end stations, storing the information in the database. In
some systems, polling takes place once at the end of each sales period (often day end). In these types
of systems, there is normally a "request" from the back end, forcing the POS stations to communicate
the sales information.
How Polling Works
© 2007 ... Your company
19
LogiVision's Back Office System Software Programmer's Guide
The L-BOSS back and front end L-POS machines are in constant communication, so the polling
process is constantly running. The back end machine that has been designated to retrieve sales
information is constantly checking each POS station's "outbox" at a set interval, collecting any
information that the POS stations are producing. The front end stations produce sales information files
(eg. EJ) after every transaction. After "finalizing" a sale, the information is immediately placed in a file
in the POS's "outbox". The POS station then sends a message to the L-BOSS station telling it that
there is mail to come and get. Even if the back end does not receive messages from a POS, it checks
that stations "outbox" for information regardless.
Secure Information
This method of collecting sales information adds to the system's data integrity. If the back end LBOSS station "crashes", (or the network communication is halted at any time), individual POS stations
can continue to finalize sales. The sales information collects in each station's outbox, so when normal
network communication resumes, the back end L-BOSS station collects the information as usual,
"catching up". If a front end L-POS terminal goes down, information continues to be deployed to its
"inbox", so when the terminal re-starts, all new information is absorbed.
During a communication failure, each POS relies on its own data base for item prices and other item
information so the store can continue normal sales operations. Several factors are involved if the front
end uses "floating cashiers " or customer accounts .
While the network is "down" and L-BOSS cannot communicate with the front end :
·No new item prices can be obtained, but the L-POS front end stations work from their local item
database. Local "price override" can be used to modify prices if required.
·Floating cashier balance reports cannot be generated until the system returns to normal operation.
·No customer account balances will be available until the system returns to normal, but the L-POS front
end station will prompt the cashier with a "server not available - continue anyway?" error message. At
this point it is up to the store manager to allow or not allow account charges during a network down.
Reports that may be run on the front-end POS terminals will not be available while the L-BOSS server
is down. The report data will still be stored in the correct date because L-POS stamps the transaction
date on each file. Even in the event that the server was down for several days all data will process
automatically to the correct date when communications are restored.
4.1
Terminal Groups and Targets
Terminal Groups and Targets
Previous
Top
Next
Terminal Groups and Targets
Previous
Top
Next
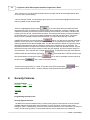
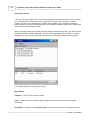
Terminal Table Programming
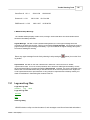
Terminals and Groups
One of the key features of L-BOSS is the communication method used to move data to and from the
L-POS register terminals. Whether you want to send a programming change or retrieve a report, the
register must be part of a group . Therefore, a first step in setting up the software for use in a live
© 2007 ... Your company
Communications and Networking
20
environment is to create the terminal list and assign the terminals to one or more target groups.
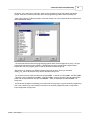
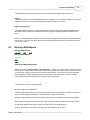
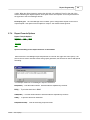
Access the Register option from the main maintenance application. The following menu and screen
layout will appear:
This example shows the Terminal and Target Group programming utility.
The screen is divided into 2 areas. The left hand side of the screen displays the groups, the right hand
side shows the terminals that have been created. Each PC or POS terminal in the store must be
created as a terminal to be used with L-BOSS .
To add a terminal, select the Terminal option from the menu and use the Add option. You can also
click anywhere in the right-hand side of the Terminals window and add a terminal by using the
add
tool . L-BOSS will prompt for the Store number and the Terminal number. The next step is to assign
a Description for the terminal. When this data has been entered, you will need to set the path that
the server will use to send data or receive data from this terminal. When the station you are adding is
only a gate for communication, select the Host flag. Enter the communication settings the station will
use to communicate with the remote L-BOSS.
The Terminal's Inbox must be set to the location where the L-POS terminal expects to see its
received mail. L-POS normally monitors the C:\Inbox\ on its own hard drive for its mail. That means
that on the L-BOSS server you must set the path as a remote directory by using the UNC for the
location. If you are programming the first terminal and you named the terminal Pos01 and set up its
drive sharing to allow access to C , the path to set for Terminal's Inbox would be \\Pos01\C\Inbox\
© 2007 ... Your company
21
LogiVision's Back Office System Software Programmer's Guide
The Terminal's outbox is the location the server monitors to receive data from the L-POS terminal.
This is set in the same format as the example above for register terminal 1. \\Pos01\C\Outbox\ In this
case the back office will search for data from the L-POS terminal in the outbox directory on the remote
terminal.
The terminals you create must be assigned to register groups. The groups serve 3 purposes:
Programming, reporting and exchanging data. A program group is used to associate
programming data such as prices, accounts and register set-up with registers. The report groups are
used when the report program is executed. When you request a report, the report program will allow
you to access data by register group. If you need to report sales for each terminal, or for all terminals,
several report groups are needed. The exchange group XAL is used to identify the terminals to which
data is sent or received. There is only one exchange target. There can be many report or program
targets.
In most situations within a single store the registers will belong to common program, report and
exchange groups. You will send (or exchange) the same program data to all registers. Reports will be
requested for all terminals. When you are using both touch screen and a keyboard POS set-up in the
same store, you will need to set up a separate program group for each register type so the screen
layouts stored in the L-BOSS database do not get mixed up.
To add a terminal to an existing register group, highlight the terminal. Then highlight the group to
which you want to add the selected terminal. Now click the
tool between the 2 window areas to
move the terminal into the selected group. To remove a terminal from a register group, use the
tool. You may include the same terminal in as many different groups as required by your installation.
In a normal store operation, you will need to create, or modify the following groups:
PAL or Program All Lanes: This target group should include each register in the store. It will be used
as the default target for price changes, cashier changes, etc. This target will be selected as a Program
group only. By default it is also the Item, Price and Cost group. NOTE: If you add another item, price
or cost group, you need to decide whether or not the PAL group will be used for pricing or other item
related maintenance. If it is to be used, make sure that the ITEM, PRICE and COST check boxes are
selected within the PAL target group.
RAL or Report All Lanes . This target group should include each register in the store as well as
each back office unit. When reports are requested and you select the group RAL , the system will
display or print the data for all the terminals. This target will be selected as a Report group only.
XAL or Exchange All Lanes is used to send data simultaneously to all terminals. This target will be
selected as a Exchange grp only. This group will include all terminals.
001 including register 1 only. This target needs to be created so that reports can be taken individually
for one machine, or data can be transferred to one machine only, or in case you need to define
separate set-up options for different terminals (such as printers, scanners, keyboards, etc). This group
would be selected as Report and Program.
002 including register 2 only. This group would be selected as Report and Program.
etc. for all other registers as for group 001.
© 2007 ... Your company
Communications and Networking
22
901 including the back office terminal number 901. This will be selected as a Report target. Then a
report can be taken for back office operations such as account payments performed on this unit.
902 if terminal 902 exists same as above for 901.
Setting up terminals and target groups with remote data communications
Under normal circumstances, LRemote will be used to transfer data between L-BOSS stations found
in different locations. In order for this to occur, you need to set up parameters at each side. Create an
Outboxhost folder on the hard drive of the L-BOSS server in each store. See the related programming
on the L-BOSS File menu under Configuration and Host tab.
Terminals required at Headquarters to transfer data to remote stores
The headquarter terminal list will include a terminal for each back office machine in each store. Each
of these terminals will have its Inbox . You have a choice as to whether report data is available per
terminal for each store, or whether the report data from each terminal in the store is merged into a
common total for the store. (Related flag in L-BOSS, File, Configuration menu under Host). If you do
not want merged data, then you do not need to create each terminal in each store at the head office. If
you decide to report consolidated per store, then you only need to create the back office terminal as we
have already explained. Most businesses will probably want to report consolidated sales only, so they
should not forget to set the flag in the Host configuration.
If you need to report on each lane individually at the head office, then you must create a terminal for
each register in every store at the head office. These terminals must not have any inbox or outbox
assigned. They are only included in Report groups.
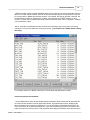
Sample terminal list:
Terminal Description Path Inbox Path Outbox
001 901 Backoffice store 1 Inbox= C:\INBOX001\ Outbox= C:\OUTBOX001\
002 901 Backoffice store 2 Inbox= C:\INBOX002\ Outbox= C:\OUTBOX002\
003 901 Backoffice store 3 Inbox= C:\INBOX003\ Outbox= C:\OUTBOX003\
NOTE: You will need to create all the folders before using the system.
Terminal groups at Headquarters
When L-BOSS is used in a multi-store environment LRemote polling, care must be taken in the Target
group set-up. For example, within each store there are unique data files that cannot be sent to each
store. An example of this could be the Receipt header and trailer messages. If there are different
addresses to print in each store it is important to structure the groups properly. Otherwise the
headquarters system will not be able to change the receipt message for store 1 without changing the
message in store 2, etc. The Mail Server in each store may also have a different name. This means
that at the head office you need to create a group for each store, for example S01, S02, S03, S04.
Within these groups you would place the back-office terminal that acts as controller in each remote
store. Then L-BOSS will be able to transfer the correct data files to the correct store. You MUST NOT
use group numbers such as 001, 002, etc. This would create a conflict. Here is a sample list that may
be created at the HQ if you have 3 stores to communicate with:
© 2007 ... Your company
23
LogiVision's Back Office System Software Programmer's Guide
S01 Terminal 001 901 , created as Program, report
S02 Terminal 002 901 , created as Program, report
S03 Terminal 003 901 , created as Program, report
PAL Terminal 001 901 , 002 901 , 003 901 created as Program group
RAL Terminal 001 901 , 002 901 , 003 901 created as Report group
XAL Terminal 001 901 , 002 901 , 003 901 created as Exchange group
When you are using multi-zone pricing you need to define the Item, Price and Cost settings on the
appropriate groups. In the 3 store example from above, if each store has separate prices, then you
would need to select Price on each of the S01, S02 and S03 groups. If different items go to different
stores, then you need to select Item in the same groups. Same for the Cost records of items. If some
of the prices are common to all stores, then make sure that the PAL group has Item, Price and Cost
selected.
4.1.1
Creating Programming Groups
Creating Programming Groups
Previous
Top
Next
Creating Programming Groups
Previous
Top
Next
Special L-POS Groups
Groups are used when front-end terminal set-up is not identical throughout the store. When one
terminal has a different scanner than another, separate programming groups are required for the
different scanner set-ups. In a store where different terminals have different printers, separate printer
groups are required for each different printer type.
The L-POS terminals are all defined as part of program group PAL in the L-BOSS system. All
programming is shared by default. In order to use distinct programming set-up for different terminals
you will need to create terminal groups in the L-BOSS maintenance module. You can create as many
program groups as required by the complexity of your application.
The L-BOSS groups programming is specified in the Maintenance application under the "Register"
menu. Create the terminals and associate them to the different groups as required. Note that the
terminals must be associated to Program groups. You can also assign the report or exchange status
to the terminal groups if required.
Let's take an example of a 2 lane store with 1 terminal using scale-scanner and receipt-endorsement
printer while the other terminal uses a different scanner and a receipt printer.
You need to start with the initial setup on every terminal in the store and you need to have completed
© 2007 ... Your company
Communications and Networking
24
the deploy_pos_load event to each lane. Now you are prepared to set up the scanner and printer
groups. From the C:\Poswin folder open the L-POS programming module called PosSetup.exe.
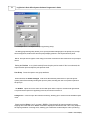
After logging into the PosSetup program, select the Groups Icon. The Groups Window is divided into 2
sections as ahown below:
The Left hand sections shows the programming options which can be assigned to a group. The right
hand section shows the groups created in L-BOSS that have been assigned the Program status.
Expand the view of a program group to view the terminal list within the group.
Now back to our example: two different scanner setups in the store. Since you executed
deploy_pos_load to all terminals, they all have the same setup so far.
You need to move the scanner setup from the group PAL to include it in Group 001 and Group 002
. Move the cursor to highlight Group 001 . With Group 001 selected, change to the left hand window
panel and move down the list until you see Scanner . Place a checkmark to select Scanner for
Group 001.
A new window will appear requesting you to define the source group to copy the scanner programming
from. This is because you are creating a new file for the scanner programming and L-POS needs a
base configuration to begin from.
© 2007 ... Your company
25
LogiVision's Back Office System Software Programmer's Guide
Select Scanner.pal as the source group. Once this selection has been made, L-POS will create a
new file named Scanner.001 . If you click on the left hand window pane again on scanner, you should
see that 2 groups on the right-hand window pane (PAL and 001 ) are set for scanner programming.
Now L-POS needs to be advised that the file Scanner.pal is no longer required.
In the right-hand window panel, select group PAL again. Now return to the left hand panel and remove
the check mark from Scanner. Click once more on Scanner and you should see only one red arrow
pointing to Group 001 on the right.
To add a new scanner file for lane 2, select Group 002 on the right hand window panel. Then place a
checkmark in the box on the Scanner file on the left hand panel. This will once again prompt for a
source file. Select Scanner.001 as the source file. L-POS will create a new file named Scanner.002
that will be used whenever you program changes to the scanner set-up of lane 2.
NB You should note that you may still share the Scanner definition table among lanes if required. If
you don't want to share the scanner definition among the lanes, you need to create separate
Scannerdeftbl groups the way you created individual Scanner groups.
4.2
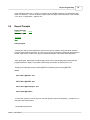
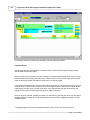
Head Office Communications
Head Office Communications
Previous
Top
Next
Head Office Communications
Previous
Top
Next
Multi-Store Communications
In some situations it is necessary to transfer files from the POS system in a store to a central location
for further processing. The L-BOSS communication method and set-up is defined under the Host tab.
Different communication types are supported such as dial up with modem to modem, or internet
enabled data transfer. It is strongly recomended that communications are tested before trying to
setup L-BOSS store to head office transfers. If the dial-up or other networking service is not
functional, there is no point in proceeding with the L-BOSS setups.
© 2007 ... Your company
Communications and Networking
26
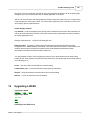
Host data communications
This example shows the Configuration panel's "Host" tab.
Merge lane report data together is usually only used in multi-store situations. Instead of having
sales reports for each lane, the head office will get a consolidated total store report. Instead of terminal
numbers, the reports will be named and listed as the store number. If you do not select this option you
must create individual terminals for every register in each store (on the headquarters system). This
option should only be set at the headquarters L-BOSS, not in an individual store.
The Connection pull down menu is used to determine how L-BOSS connects. Any valid choice you
can make will appear in the pull-down menu. For example, if you have installed dial up networking and
defined a connection, the dial up networking definition will appear as a choice for the L-BOSS host
connection type. If you plan on using modem to modem communications, you will need to install and
configure the calling side for dial up networking and the other side for dial up server. Please refer to
your operating system instructions for further help on these set-up issues.
IP or Domain name is the identification path to the remote L-BOSS file system. This would be
entered as the head office IP address if you are connecting to a fixed TCPIP address. In direct modem
dialup situations, it should be the UNC name of the server at the Head Office (eg.: \\HOserver).
Client Port and Host Port is the actual port number required at each side to open the connection.
Try FTP if you are unsure. Make both sides match.
Host path is the location on your system that L-BOSS will put the files in before the actual
connection with the other side occurs. This is a location that is used by the store side (not HQ) L-BOSS
to specify that need to be transferred out of the current location. This could be called, for example
C:\OutBoxHost\ or any other directory you create for this purpose. The HQ L-BOSS terminal does not
need an entry for host path. Each store that you connect to must have a back office terminal defined
on the terminal list in the Maintenance application of the headquarters L-BOSS program.
User name and Password are used to secure sign on rights if you are using an FTP server for file
transfer. They must match at the L-BOSS on each end (store and HQ).
Host active must be selected for the system L-BOSS remote communication to be available. This
needs to be set at both store and headquarters.
Keep listening must be selected on the L-BOSS terminal that normally waits for calls coming from
the other side. If you want to transfer from the store to the head office once a day or after each sale,
the head office L-BOSS host configuration would be set to Keep listening .
© 2007 ... Your company
27
LogiVision's Back Office System Software Programmer's Guide
Live communication is set when you want to transfer data immediately when required and not on a
scheduled basis. When Live communication is set, each time the L-BOSS detects data in the Host
path directory, the data communication will be activated. Otherwise, the data transfer will be activated
according to the scheduled events programmed in the Task/Event option of the L-BOSS program.
Scheduled communications would typically occur once per day between the L-BOSS terminals.
When L-BOSS Host is active, the communication program starts if either Keep listening or Live
communication is selected. This is the actual transfer program called LRemote.exe. It runs as a
service in the Icon Tray and should not require any special user intervention. It is responsible for
sending and receiving the files from the remote L-BOSS connection.
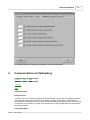
If you require an event to schedule the communications, you only need to select the LRemote.exe
program found in the L-BOSS folder. Then set the time and frequency of data transfer. Select
automatic for scheduled communication and allow manual to be able to send data upon request. You
will probably set the store to send the data to the headquarters computer. The event set-up for once a
day automatic communications would be set as follows in each store:
This example shows the Task Editor scheduled event programming.
NOTE: For more about scheduling tasks for automatic execution, see the Automating L-BOSS help
pages in this manual.
Direct Modem Communications
Communication by IP (Internet) is probably the best way to setup Head Office to Store
© 2007 ... Your company
Communications and Networking
28
communications. However, L-BOSS can also support dialup communications. L-BOSS relies on
Windows "Dial-up" connections (or RAS with NT, Win2000 and XP), so the Windows dialup connection
utility must be installed (store side), and a dialup connection established. The Head Office must install
Microsoft Dialup server, or RAS for NT / Win2000 / XP.
After the Windows dialup is installed (both Head Office and Store computers), both store and HO LBOSSes must be configured for communications, and automated processes (Events / Tasks), as
described.
L-BOSS Dialup connection
Store Side Host Tab Setup
·DO NOT select "Merge lane report data together"
·From the "Connection" drop down list, select the dialup connection you created with the server
telephone number.
·In "IP or Domain name", enter the SERVER MACHINE NAME.
·In the "Port" row, in both "Client" and "Server" enter FTP.
·"Host Path" (store side only) place the name of the special outbox. Make sure you create the folder
manually.
·In the "User" section, put the name and password. This will be the same for all stores AND server
side.
·Select the "Host Active" option only.
Store Side Dialup Event
Create this event in each STORE.
Set the time in each store, allowing plenty of time between calls the server will receive (so the line is
not busy). If store 1 calls at 1:00am, set store 2 to call at 1:30 am, and so on. (depends on the number
of calls that must be received)
© 2007 ... Your company
29
LogiVision's Back Office System Software Programmer's Guide
NOTE: DO NOT set "execute past events"... if the communication is not complete because the store is
"down" it will try and call as soon as it is up, to make up for the last time it was supposed to do the
send. It can be executed manually.
Server Side Host Tab Setup
Since the server side should only accept the calls, there is less setup than the store.
·SELECT "Merge lane report data together"
·From the "Connection" drop down list, select LAN
·Leave "IP or Domain name" BLANK
·In the "Port" row, in both "Client" and "Server" enter FTP.
·Leave "Host Path" BLANK
·In the "User" section, put the name and password. This will be the same for all stores AND server
side.
·Select the "Host Active", and "Keep Listening" options.
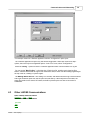
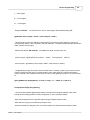
The L-Remote Application
© 2007 ... Your company
Communications and Networking
30
This example shows the L-Remote application with the "Configuration" option open..
The L-Remote application requires very little actual configuration. Other than "Start" and "Stop"
options, there are only two configurable options. In the "File" menu, select "Configuration":
Check the "Debug " option to have the L-Remote application track communications to a log file.
You can set the "Max file Size " to limit the size of file the log file, avoiding overly large log files.
When L-Remote detects that the log file has reached this limit, it writes over the existing log starting at
the top of the file, creating a "cyclical" logfile.
The Waiting Before Receive time setting is in seconds, and determines how long L-Remote should
wait to get the status report from the HO (files received status). If the wait period is exceeded, the
status file remains in the store's HO outbox, and will be picked up the next time a connection is
established.
4.3
Other L-BOSS Communications
Other L-BOSS Communications
Previous
Top
Next
Other L-BOSS Communications
Previous
Top
Next
© 2007 ... Your company
31
LogiVision's Back Office System Software Programmer's Guide
Connecting To Other Devices
Besides front to back end and head office communications, L-BOSS can host other types of
communications, for example: portable data terminals or cash registers. Setting up the communication
depends on the device that is to be connected. In some cases LogiVision provides the means to
establish the link, but some "other" communications require a device driver; an application provided by
the device manufacturer.
One of the main factors that determine if an interface is possible is the device's data format. L-BOSS
can produce or read several data file types, such as Comma (or tab) Separated Values. If the device to
connect to uses one of these types of data formats, it can probably be interfaced. Even if L-BOSS does
not actually "drive" the communication, interfaces can be designed as file imports. In other words, a
user runs an application that retrieves information from a device (eg: PDT) and places it in a file. At this
point the interface is not with the device; it becomes a file import. File imports are described in the
"Importing and Exporting Data" section of this guide. As a dealer, you should contact LogiVision to find
out if the interface already exists, or if it can be developed.
L-Register
L-BOSS can be configured to retrieve sales and program certain tables in the TEC MA1650. The LBOSS TEC interface installation and setup is described in the l-registerEn.pdf (or .chm Windows
style help) help document that ships with the L-Register interface.
RF Communications
PDT600
For installation and setup of the PT600 Interface, please see the pt600En.pdf (or .chm Windows
style help) help document that ships with the interface.
Supported Operations The PT600 Interface includes:
Price Verification / Modification
Used to verify or modify pricing, either by PLU (UPC) or vendor code. The L-BOSS item file must be
loaded in the unit. The price verification and price modification processes do not require that other
modules be registered.
Batch Mode Operations
Temporary Price Reductions, used to establish promotional pricing for items, and future price change
batches. These operations both use the L-BOSS "Batch" module, which MUST BE registered to be
able to set promotional prices using the unit.
Inventory Operations
All inventory operations on the PT600 require that the L-BOSS Inventory Module be registered for
use. The unit will not prevent you from entering information, but L-BOSS will not import the data, and
issue an "Un-registered" type error.
·Receiving - Bring goods into the store, adding to inventory.
·Orders - Create orders for suppliers programmed in L-BOSS.
© 2007 ... Your company
Communications and Networking
32
·Adjustments - Return merchandise, adjust reported inventory quantities.
·Physical Count - Establish real on hand quantities.
NOTE: The PT600 Interface MUST BE REGISTERED in the software protection key before
communicating with the unit. Some types of operations that can be performed on the PT600, such as
receiving and inventory counting, also require that the corresponding modules be registered for use.
The unit will not stop you from entering data for those types of operations, but the data file import
"From Portable Device" option will not be displayed, making data file imports impossible.
5
L-BOSS and Devices
L-BOSS and Devices
Previous
Top
Next
L-BOSS and Devices
Previous
Top
Next
Installing Devices
Although most of the hardware device setups are associated with L-POS stations, it is also possible
to connect certain devices directly used by the L-BOSS station. The most common device used by LBOSS would be a scanner, used to enter item codes while working with items in the Maintenance
program.
NOTE: Like L-POS devices, L-BOSS devices also use .ini files to store setups. These .ini files are not
to be confused with the .PAL initialization files used to send programming to front end machines from
the backend station. For information about .PAL files, see the " Configuration Files " section in this
manual.
L-BOSS device configuration files are located in the \Lboss\ini folder, and carry a .ini file extension.
L-BOSS Scanner
The Maintenance application offers a utility to enter item codes from a scanner. This can make it easy
to quickly locate items in the database for programming. The scanner must be programmed to function
properly with the Maintenance application. The configuration for the scanner is found in the
Maintenance application's "File" menu, with no tables open.
Use scanner: If a scanner will be used to enter item codes for programming, select the "Use
scanner" option.
Configure scanner: This utility is used to program the Maintenance application for using a scanner.
The utility provides a list of pre-set configurations based on popular manufacturers' models. If your
scanner does not appear in the list, it can be added, programmed and saved.
© 2007 ... Your company
33
LogiVision's Back Office System Software Programmer's Guide
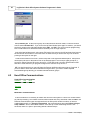
This example shows the Maintenance application's Scanner Setup panel.
The setting menu allows you to select the scanner model being used with the native RS232
connection. Several popular scanner models have been predefined. If your scanner is not on the list
you can add it. The advanced button is used to modify some of the data settings L-BOSS uses to
communicate with the scanner. These settings are available from the scanner technical
documentation.
The Communication menu is where you enter the communications parameters your scanner has
been programmed with. The Test menu is for performing a scan test without loading the L-BOSS
application. Once you have selected the scanner model you can define the scanner definition table.
This is a table that contains the rules L-BOSS uses to filter data received from the bar code scanning
devices on the system. It allows a lot of flexibility in setup but requires specific setup for each type of
scanner and the type of data you are scanning.
5.1
Definition Tables
Definition Tables
Previous
Top
Definition Tables
Next
Previous
Top
Next
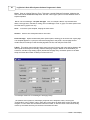
Definition Tables
Scanners can be programmed to read different bar code types, and the way that they are read. The
Maintenance application uses the scanner "definition" table when accepting codes from the device.
Use this utility to setup the definition table. This is usually done by the dealer / programmer or system
© 2007 ... Your company
L-BOSS and Devices
34
administrator at installation time.
This example shows the Maintenance application's Scanner Definition Table.
The first thing to do in the scanning definition table is to try a test scan. If your scanner is set up
properly you will either get a message saying "No match found" or a message that shows "Match found
on line x" and a mention of the routing the scanned data will take. If you get no reaction from the
scanner, either your communication with the device is not set up properly in the OPOS configuration
software or your comm port or cable is faulty. If you get no response from the scanner you should use
a utility software provided by the manufacturer or something like hyperterminal from Windows
accessories to ensure the correct data flow between the scanner and the CPU.
Filtering rules need to be defined because we want to leave maximum flexibility. So when the scanner
outputs data, L-BOSS sees all the data as it is received from the device.
UPC-A
Eg.: A06489057600. The actual human readable characters printed on the item are as follows:
064890576007. By comparing the scanned data and the printed data you should understand that the
scanner transmits the leading "A" to advise L-BOSS that the bar code is UPCA. Then it transmits a "0"
which is part of the product classification and then it sent the 10 digit number commonly known as the
UPC code. The scanner we used for testing was NOT outputting the trailing check digit (which is the
last digit "7" from the readable digits on the can.) The corresponding item in the POS PLU database
was programmed as follows: 6489057600. These are the 10 main digits we understand to be the UPC
code for the product. Since we do not program the product with either the leading "A0" or the trailing
check digit, those digits need to be skipped between the time you scan the item and the time the PLU
lookup is activated by the scanner. That is done in the scanner definition table.
© 2007 ... Your company
35
LogiVision's Back Office System Software Programmer's Guide
Here is how to do it. Cut and paste the data from the test input area to the scanning definition table.
You now need to set the filtering
rules for that type of data. For the example given above, you would need to highlight the A0 from the
data you pasted into the definition table.
When it is highlighted press the button
. If you have done this as we expect the first 2
characters of the line you added to the definition table will be underlined and black. If the A0 is not
underlined and black you will have a problem scanning UPCA products. If the data is underlined but
another color such as red, it is because the button 2 -PLU was pressed before you added the data to
the definition table. To remove the red status, highlight the data (A0) and press the 2 -PLU button.
Once you have underlined in Black characters the A0 you need to select the rest of the data
(6489057600) with the mouse and press the
button. You will see the selected characters
appear in red on your screen. Then press the Enter button on your keyboard to save the entry. Your
data entry should look like this:A0 6489057600. This tells the L-BOSS to search for any data received
that begins with uppercase letter A, followed by numeric zero, followed by any 10 characters. The
characters in black are not input to the function executed by the POS from the data received. Any red
characters are sent to the function called PLU after they are scanned. So your line means search for
A0 but discard it. Then read the next 10 digits and press PLU. The Buttons to the right of the Scanner
definition table have the following significance:
then discard before executing the function
the PLU function
This is data that L-POS will search for and
This is used to send data from the scanner to
This is used to send data from the
scanner to the price function. It is used, for example, with UPC2 (meat) labels.
used to Expand UPCE to UPCA when the scanner cannot perform the expansion itself.
6
This is
Security Features
Security Features
Previous
Top
Security Features
Next
Previous
Top
Next
Programming Security Levels
Security System Overview
The Back Office System Software offers a security level system to restrict access to most functions,
database tables and configuration type information. In some situations, such as a single ownermanager L-POS / L-BOSS setup, or if the PC that runs the back office is in a locked room, you may not
need to use the security system. In most cases however, the PC station that runs L-BOSS (or
© 2007 ... Your company
Security Features
36
networked L-BOSS stations) is accessible to any passer-by. This means that your data and system
configuration is open to possible damage.
The security system is based on access levels that are assigned to users. There are eight (8) levels,
starting with level 0, called "no user", up to level seven (7), called "programmer". Assigning the "no
user" level to an option or utility means that anybody can access it. Once a security level is assigned to
a function, option or data table, the system verifies the logged in user to make sure that they have
access rights. If the user does not have access rights, the system opens a login panel.
Below is an example of how the security levels might be set.
Level 0
Level 1
Level 2
Level 3
Level 4
Level 5
Level 6
Level 7
: No User - locked, the default security level when L-BOSS is launched
: New User - able to access certain tables only, for example items, departments etc.
: Cashier - access to items, departments and other functions that a cashier would require
: Clerk - receive, modify, view certain reports
: Assistant Manager - access and modify items, departments. Access to reports
: Manager - Access, Modify, Add / Delete, no access to network and programming features
: Owner - Access, Modify, Add / Delete all except programming features
: Programmer - complete access
Essentially, there are two steps to follow to implement the security system:
·First : Establish the minimum security level required to access each of the system functions,
options, data tables, and configuration files listed in the Security Tab of the Configuration Panel.
·Second : Associate each operator in the operator table with a security level.
Remember that this is the MINIMUM level required. A user with a higher access level has access to all
levels below.
Establishing access levels
The System tab displays a list of data tables, utilities and setup information. The list has four (4)
columns:
column 1 - the name or description of the option to protect.
column 2 - "Access" - the minimum security level required to access the option.
column 3 - "Modify" - the minimum security level required to change data or settings.
column 4 - "Add / Delete" - the minimum security level required to add or remove data.
© 2007 ... Your company
37
LogiVision's Back Office System Software Programmer's Guide
This example shows the Configuration panel's "Security" tab.
To assign security levels :
·Start by assigning security levels in the "Access" column.
·Select an option or table from the "Access" column by clicking on it.
·Right click or double click to open a list of security levels.
·Choose the minimum security level required to access the selected option.
Once a security level is associated with accessing an option, continue by associating minimum
security levels to the "Modify" and "Add / Delete" columns of the option. For example, you may want to
allow a cashier to have access to view items, but not modify, add or delete them from the system.
Once the required access level to items is set to "Cashier", assign the security level required to
"Modify" items, then the level required to "Add / Delete".
If an option requires a high security level to access it you may not have to bother assigning security
levels to the "Modify" or "Add / Delete" columns, since a user must have access to an option before
they can modify, add or delete it .
Once the required security levels have been assigned to options or data tables, the last step is to
associate a security level to each operator in the system. For help on assigning security levels to
operators, click here to go to the help page now.
NOTE: If you are using the security system, be sure to use the " logout " option to sign off the
© 2007 ... Your company
Security Features
38
system when leaving the work station, leaving the application on the "no user" security level. L-BOSS
will still execute any scheduled operations, including polling or other communications, even if no user is
logged.
6.1
Other Security Issues
Other Security Issues
Previous
Top
Next
Other Security Issues
Previous
Top
Next
How Secure Is It?
File Sharing
Although the L-BOSS internal security level system can be used to prevent unwanted access within
the program, it cannot prevent other types of security breaches, for example disk file manipulation. The
\LBOSS\Office folder must be shared , so could potentially be accessed from any network station, the
files deleted or manipulated in some damaging fashion.
Data Tables
By default, the databases are password protected by the BDE, so that a user trying to view or modify
the data using the BDE will have to enter the password. If another database utility is used to access the
data, they may still have access to the data tables unless they are in use by L-BOSS.
The FileMaint program is a "stand alone" program, and is a primary utility for handling the data tables,
creating backups and restoring. However, (at the time of this release), the FileMaint application is not
security level programmable, so there is no way to prevent an unwanted user from launching the
FileMaint program and manipulating the tables. One way to prevent access to the program is to
remove it from the L-BOSS program group, and all traces of shortcuts. The average user is not likely to
launch the program from the Windows Explorer.
Other Security issues
In situations that call for maximum security, you should consider additional ways to keep data secure,
for example physically limiting access to the server. If the server is in a locked room it makes it harder
to access directly.
7
File Structure
File Structure
Previous
Top
File Structure
Previous
Top
Next
© 2007 ... Your company
Next
39
LogiVision's Back Office System Software Programmer's Guide
L-BOSS File Layout
The file and folder structure that L-BOSS builds at installation time should not be altered. This section
contains information about the folders and their contents. As with most applications, L-BOSS uses
specific file formats, and in some cases the file extensions are proprietary.
L-BOSS Folder Structure after Installation
To keep things simple, you should always use the default installation location for L-BOSS. If you
change the defaults, you will have to configure other options to point to the correct disk location. The
list below describes a basic installation. Certain modules (such as a PDT interface) may create folders
under the Office folder, but are not detailed here. The folder structure may also vary according to
versions.
Default Root Folder = \LBOSS and contains:
\LBOSS
·Cmds
·Device
·ini
·Language
·Log
·+Office
· -Accnt
· -Add
· -Archive
· +Backup
·
-Monday
·
-Tues (etc.)
· -Data
· +Images
·
-Dept
·
-SubDept
· -Import
· -Inbox
· -Ini
· +Journal
·
-200201
· -Law
· -Orders
· -Outbox
· +Processed
·
-Export
·
-Import
·
-Messages
·
-Mime
·
-Original
·
-Sales
· -Rpt
· +Setup
·
+Basic (must Load)
·
-Add
·
-Images
·
-Import
·
-Inbox
·
-Ini
·
+Keyboard 800 X 600
© 2007 ... Your company
File Structure
40
·
-Inbox
·
+Sample
·
-Inbox
·
+Touch 800 X 600
·
-Inbox
· -SFiles
· -Unprocessed
·PosWork
·Programs
·+Temp
· -Entry
· -Maint
· -Paradox
· -Report
· -Server
· -Setup
·Urgent
·UrgentH
File Types, Extensions
L-BOSS makes use of various file types for different applications and utilities. Many of these files are
viewable as text files, but their extensions relate them to specific usage. The extension types and their
.xxx naming is listed here for information purposes only. You do not need to understand the file
associations to configure L-BOSS. The list below shows default file extensions; it is possible to have
other types of files, either from other modules, or version differences.
Programs
.exe - executable program
.dll - dynamic link library
.bat - executable batch file for command line execution
Configuration files
.ini - initialization file - contains setups.
.txt - common text file. These files may contain information read by L-BOSS for titles, or other
messages.
.pal - like .ini files, but with the target as extension. If there are "programming groups" for terminals
with different hardware, there will also be other extensions for the .pal files, depending on the names
given to the programming groups, for example .p01
Command files
.sql - query language file - contains SQL commands, L-BOSS internal commands and data lines.
.sqm - also a query language file, but not executable on its own. A sub-query run from a .sql file.
.sqi - not native to L-BOSS, used for compatibility with other backend software.
Images (three recognized image file types)
.jpg
.bmp
.gif
Reports and Labels
.frp - L-BOSS reports
.frm - L-POS forms
.lrp - report properties
.rrq - L-POS report request
.rpt - Crystal Report setups (old L-BOSS versions only)
Inventory files (saved, not yet posted)
© 2007 ... Your company
41
LogiVision's Back Office System Software Programmer's Guide
.rc - saved receive
.aj - saved adjustments
.or - saved orders
.ct - saved count
Help Files
.chm - Windows style help file
.pdf - Adobe Acrobat printable manual
Database type files should NEVER be handled manually - the BDE uses them, not L-BOSS.
These files should not be copied from one installation to another as they may vary.
.db - data table file
.val .px .Xxx .Yxx .net - saved setup
.lck - temporary table lock file (Paradox only) - normally deleted after use ("Directory busy" message if
exists)
Other data files
.dat - alternate data type used by L-POS
.hdr - header file for import (found in the Import folder)
.ptr - EJ index file
.csv - comma separated value
.out - Only used at L-POS install time
.xxx (where xxx is a three digit target number)
Other types
.zip - archived and compressed file
.log - all log files, some L-BOSS, some installation info
© 2007 ... Your company
File Structure
7.1
42
Configuration Files
Configuration Files
Previous
Top
Next
Configuration Files
Previous
Top
Next
Programming System Files
Although it is possible to edit many of the L-BOSS or L-POS configuration files with a text editor, it is
important to note that these files contain specific formats that must be strictly followed. Entering
information in these files manually may cause errors, preventing the applications from running
correctly. L-BOSS and L-POS both provide the necessary editors for these files. Using the correct
editor will ensure that the file contents are saved correctly.
Initialization files
Many programmers are familiar with the .ini (initialization) type files. As with any Windows style .ini file,
the L-BOSS and L-POS .ini files are divided into sections using the common [section label ] format. LBOSS and L-POS both contain setups configured within the software that save to .ini files. In most
cases, the options required are configurable from within the application setup sections. Unless you are
sure of which section an option should be, and the correct parameters for the option, you should not
edit .ini files manually.
Some initialization files have a different extension, internally recognized by L-BOSS. These extensions
can vary, but are generally named by target, to be able to keep initialization files for separately
programmed terminals. For example, .pal extension files contain initialization information for all targets
in the PAL terminal group, .p01 for terminals in the first terminal group, etc.
NOTE: As with other information in this guide, the listings may vary with version differences. The
reference notes are kept general to portray the type of content for these files.
Common .ini Files
In the \LBOSS folder:
·ej.ini
·ejMask.ini
·Entry.ini
·FileMaint.ini
·FormMgr.ini
© 2007 ... Your company
43
LogiVision's Back Office System Software Programmer's Guide
·FrmMgr.ini
·IniMask.ini
·KeyRdr.ini
·LineDisplayMsk.ini
·Local.ini
·LocalMsk.ini
·LRemote.ini
·LReport.ini
·OperatorDisplayMsk.ini
·Polling.ini
·POSPrinterMsk.ini
·PosSetup.ini
·ScaleMsk.ini
·ScannerMsk.ini
·ServDic.ini
·Server.ini
·ServrMsk.ini
In the \LBOSS\Ini folder:
·Advertisement.ini
·Functions.ini
·Msg_en.ini
·Msg_fr.ini
·Rpt_en.ini
·Rpt_fr.ini
·Scanner.ini
·ScannerDefTbl.ini
·Sections.ini
© 2007 ... Your company
File Structure
44
In the \LBOSS\Office\Ini folder:
NOTE: The files in this folder are .ini files used to send to front end terminals. They use a .PAL
extension, as they contain common setup information. (PAL stands for "Program - all terminals). This
folder should not contain .ini files . If the installation contains .ini files in this folder, you should
remove them. These files are renamed with a .ini extension when deployed to the front end terminals.
·Advertisement.pal
·Coupon.PAL
·Drawer.pal
·flip.pal
·Functions.pal
·General.pal
·KeyAssign.pal
·Keyboard.pal
·KeyLock.pal
·LineDisplay.pal
·Msg_en.pal
·Msg_fr.pal
·MSR.pal
·MSRDefTbl.pal
·OperatorDisplay.pal
·PLUDefTbl.PAL
·PLUList.pal
·Printers.PAL
·ReceiptHeader.pal
·ReceiptTrailer.pal
·Scale.pal
·Scanner.pal
·ScannerDefTbl.PAL
·System.PAL
·Taxes.pal
© 2007 ... Your company
45
LogiVision's Back Office System Software Programmer's Guide
Example .ini File
Server.ini is located in the root \LBOSS folder, and contains information essential to the installation.
Besides company information, directories, and other settings programmed in the L-BOSS "File" menu,
"Configuration" option, "Company", "System" and "Host" tabs, along with other settings, for example
the active lanes from the communicator program. On occasion, such as an invalid entry that prevents
L-POS or L-BOSS from launching, it can be simpler to edit the .ini file manually. In this case, be sure to
use a simple text editor, such as Notepad; the file must be saved as text.
[General]
CompanyName=LogiVision
CompanyAdd=210 Laurier
CompanyCity=Beloeil
CompanyPCode=J3G 4G7
CompanyPhone=450-464-2131
CompanyFax=
StoreNumber=1
LeadingZero=13
GiftValidFor=365
CompressDays=31
SecondServer=C:\OutBoxHost\
HostConnection=
HostIP=
HostPort=
HostServerPort=
© 2007 ... Your company
File Structure
HostUserName=
HostUserPassword=
HostActive=0
KeepListening=0
LiveCommunication=0
OverwriteTerminal=0
Controller=911
Messages=911
ChangeDateMidnight=1
MultiStore=0
Cleanup=10/08/2001
[GiftCertificate]
NextNumber=1
[PollingStatus]
001001=1
001010=1
[Entry]
POnumber=1001
© 2007 ... Your company
46
47
7.1.1
LogiVision's Back Office System Software Programmer's Guide
Customize the Entry Adjustment pull-down
The Entry program allows you to enter Adjustments to your stock levels. This menu can be customized
to add more choices.
Edit the C:\Lboss\Entry.ini file:
Locate the [AdjustmentType] section and add the choices you need.
[AdjustmentType]
Line1=Damaged
Line2=Return
Line3=Gift
Line4=Broken
etc.
8
L-BOSS Internal Commands
L-BOSS Internal Commands
Previous
Top
Next
L-BOSS Internal Commands
Previous
Top
Next
L-BOSS Tool Kit
L-BOSS has its own internal command programming language. The internal commands are used to
execute tasks and events, and inserted into the SQL command files to create flexibility. The internal
commands can be generally separated into two groups. Commands that are used for tasks / events,
and commands that are used within the report module to get user input during report selection, or to
execute special functions during the report generation process.
The internal commands can also be executed from the L-POS stations, sending the command to LBOSS through the normal OUTBOX operation. L-BOSS picks up the command, executes it, then
places the results in the L-POS INBOX, for lane use, such as reports.
The commands listed in this section of the programming guide refer to task / event type commands.
These commands are either used in the Task Manager, or in the .sql command files.
The report type commands are listed in the Report Programming section of this guide.
© 2007 ... Your company
L-BOSS Internal Commands
48
IMPORTANT NOTE : The Internal Command section is "Under Construction". This will be completed
in future versions, and will be available to dealers in the download area. We apologize for the
inconvenience.
8.1
Automating L-BOSS
Automating L-BOSS
Previous
Top
Next
Automating L-BOSS
Previous
Top
Next
Automated Task Overview
The "Events / Tasks" icon on the L-BOSS desktop is used to program or manually launch automated
procedures. L-BOSS MUST be running for the automated commands to run. Many of these commands
access the database tables, and modify contents. If the data tables are in use when these commands
are run, you may receive a "Directory Busy" type message from the BDE. You should close all L-BOSS
applications before manually executing these commands.
L-BOSS will close all non-essential applications such as the Maintenance application after a set period
of inactivity, often 10 minutes. Automated processes that are triggered during the night should not
normally cause the multiple access error, since other applications will have been shut down by LBOSS.
NOTE: The automated tasks are described in this programmer guide section because the tasks often
make use of L-BOSS internal commands that are referenced in this section.
Programming Scheduled Events
L-BOSS provides an editor to program automated tasks. The tasks are saved to the task_tab
database table, and so are not programmable using other editors. In general, specialized events or
tasks are created in an SQL type file, then specified within the task record using the @EXEC
command. L-BOSS uses other commands as well. The command reference section is immediately
below this section in the programming guide.
Modifying / Adding / Automating Tasks
The Task Editor
© 2007 ... Your company
49
LogiVision's Back Office System Software Programmer's Guide
The "Task Editor" utility opens when you press the Task Manager's "Edit" button. As with other tables,
the table edit tools appear as toolbar icons at the top of the editor. If you are unfamiliar with the table
editing tools, refer to the help page in this manual.
To modify an existing event, selecting the event from the Task Manager's list and press the Edit
button.
This example shows the Task Editor programming.
Description : Enter a meaningful descriptor that allows the user to recognize the command's function.
This is not necessarily the command's actual name, and does not affect the actual command that is
run.
Command: This is a combination of the L-BOSS programming and the actual command file to
execute manually or at the specified time. The command reference section is immediately below this
section in the programming guide.
Directory: The Task list can be configured to use sections. Similar to "Report Categories" found in
the Report selection panel, the "Directory" Task List entries do not execute anything. They are used to
group tasks into sections. Selecting the "Directory" flag sets this task as a section heading, with the
related tasks listed below this heading.
Navigating Command Directories
If more than one command exists for a specific task, the tasks may be grouped together under one
heading. In the example above, the "PT600" is a goup of commands that deal with the L-BOSS /
© 2007 ... Your company
L-BOSS Internal Commands
50
PT600 interface. Directories have the term <DIR> under the "Scheduled" column.
To access the commands in a directory:
·Select the command directory to open and double click with the left mouse button,
·Select the command to run in the directory and press the "Execute" button.
·To return to the main task list, press the [BackSpace] key, or
·Double click the ".." directory at the top of the list.
By convention, the ".." symbol always represents the parent directory.
Select Allow manual to be able to force this event from the Task Manager when required.
Allow scheduled : Select this option to force L-BOSS to run this event at the selected date and time.
The event cannot execute if L-BOSS is not running at the date and time programmed.
NOTE: You can set tasks to be both manual AND automatically executed. You can unselect both
"Allow" options to disable the command.
Next event will occur on : This shows the next time this command should run, and is used along with
the repeating cycle setup to determine the dates and times of execution.
Execute one past event : Select this option if you want L-BOSS to execute a command that did not
execute when it should have, usually because the system was "down" or L-BOSS was not running
when the command should have last run. For example, if the system is set to perform the daily
maintenance at 11:59 pm, but the system is not functioning because L-BOSS was inadvertently closed.
When L-BOSS is launched the next morning, it will realize that it should have executed the commands
(set to execute one past event) at the previous date / time, and will execute them. If this option is not
set, L-BOSS will wait until the next scheduled time for the execution.
Execute at loading time : Is used to tell L-BOSS that this command should be run when L-BOSS is
launched. Tasks that are flagged to execute at load time will run when L-BOSS starts. Note that it may
take up to 30 seconds before L-BOSS can read the Task list and execute tasks set to run at startup.
Also, the "scheduled" flag does not have to be set to on for the command to run at startup.
View on all terminals : Set to on by default, this flag determines which terminals can see and execute
this task. When not selected, L-BOSS needs to know which terminal the task is for.
Executed on controller : Set to on by default, this flag specifies that the selected task runs on the LBOSS host terminal (usually 901). If the flag is removed, L-BOSS needs to know which terminal the
selected task should run. This can be convenient for certain tasks that can be run on other terminals,
and helps to remove some of the workload from the controller.
© 2007 ... Your company
51
LogiVision's Back Office System Software Programmer's Guide
Repeating Cycle
The repeating cycle determines the interval that the selected command should run, used along with
the "Next event" entry above.
Hours : Enter the number of hours that determine the cycle. You can also enter a decimal number to
have a command execute every set number of minutes. ( .5 hours = 30 minutes )
Days : Enter the number of days (often 1) to execute this command. You can also use days to
execute once a year
Months : Enter the number of months to execute this command. Calendar months are used, not 30
days
NOTE: You can only enter one (1) type of cycle.
Adding / Removing Tasks
Use the "Add " button to create a new task. L-BOSS will automatically select an available task
number. Unless you have modified the default task numbers, you should leave the suggested task
number. Follow the information above about each option in the task editor.
NOTE: When adding a new task both "Allow" options appear selected, but " Grayed out " because the
system sees them as neither selected or not selected. Click once to clear the grayed check mark, then
click again to select.
To remove a task from the list, select the command to remove, then right click with the mouse. The
right click menu includes a delete option. Care must be exercised when removing tasks from the list;
be sure you do not remove required tasks from the list.
Changing the Task List Order
You can change the order of the Events / Tasks list, placing the most used commands at the top of
the list for easy access. Changing the list order does not affect the way in which automated jobs
execute. To modify the order:
·Select the event to move,
·Press and hold down the [Alt] key,
·Use the up arrow key to move the event up on the list,
·Use the down arrow key to move the event down the list,
© 2007 ... Your company
L-BOSS Internal Commands
52
·Release the [Alt] key, then select another task to move.
Using Command directories
Tasks can also be moved to a command "Directory" by selecting the command to move with the
mouse. To move a command so that it will appear in a directory:
·Select the task with the left mouse button,
·Hold down the left mouse button, and "Drag and Drop" the command on top of the directory.
·Once the command directory is highlighted, release the mouse button.
·A prompt appears asking if the command should be moved to a directory.
·Accept the move by clicking the "Yes" button.
To move a command from a directory back to the main task list:
·From within the directory, select the command to move.
·Hold down the left mouse button, and "Drag and Drop" the command to the top of the directory. (The
top line of the directory displays two dots ".." as the description, and <DIR> under the schedule
column).
·Once the ".." directory is highlighted, release the mouse button.
8.2
Default Command Files
Default Command Files
Previous
Top
Next
Default Command Files
Previous
Top
Next
List Of Default .sql Command Files
L-BOSS provides a default set of command files that should meet the needs of most customers. As
with other options, this list is subject to change according to version releases. The list below is for
reference only, to give you some idea of what these files do. These files are found in the
\LBOSS\Office folder after installation.
© 2007 ... Your company
53
LogiVision's Back Office System Software Programmer's Guide
Command File Name.......................Used For
Cleanup90days.sql........................... Database clean up
CleanupDailyData.sql....................... Database clean up
CleanupAccountData.sql.................. Database clean up
CleanupCashAccountData.sql..........Database clean up
Clear_All_Orders.sql.........................Removes all orders from the RPT_ITM_D table
Clear_All_PLUs.sql............................Removes all items from the database
Daily_Maintenance.sql.......................Consolidates PLU sales, cleans up log files
DeleteBlankPrices.sql....................... Delete all prices level greater than 1 where the regular price is
0.00.
Deploy_all_RiskLevel.sql....................
Deploy_One_RiskLevel.sql................
Deploy_POS_chg.sql.........................
Deploy_POS_Load.sql.......................
Deploy_POS_Load_All.sql.................
Deploy_POS_Replace.sql.................
Deploy_POS_Replace_ALL.sql.........
Deploy_All_Cust.sql...........................
Deploy_One_Cust.sql........................
Deploy_All_Bottle.sql..........................
© 2007 ... Your company
L-BOSS Internal Commands
Deploy_One_Bottle.sql.......................
Deploy_One_Item.sql.........................
Deploy_One_Cashier.sql...................
Deploy_All_Cashier.sql......................
Deploy_All_Function.sql.....................
Deploy_One_Function.sql
Deploy_One_Dept.sql
Deploy_One_Sub.sql
Deploy_all_Dept.sql
Deploy_all_Sub.sql
Deploy_One_Tare.sql
Deploy_All_Tare.sql
Deploy_All_Tlzr.sql
Deploy_one_Tlzr.sql
Deploy_DATE.sql
Deploy_all_CLevel.sql
Deploy_One_CLevel.sql
Deploy_EndOfDay.sql
Deploy_All_Cat.sql
Deploy_All_Level.sql
© 2007 ... Your company
54
55
LogiVision's Back Office System Software Programmer's Guide
Deploy_All_Mix.sql
Deploy_One_Cat.sql
Deploy_One_Level.sql
Deploy_One_Mix.sql
Deploy_Screen.sql
Deploy_all_Gift.sql
Deploy_One_Gift.sql
Deploy_Items_Replace_ALL.sql
DeployToLanesRequest.sql
Deploy_Labels.sql
Deploy_RENT_chg.sql
Deploy_ITEM_chg.sql
Deploy_Items_Load_ALL.sql
Deploy_One_Batch.sql
Deploy_Deleted_Items.sql
Deploy_all_Scale.sql
Deploy_One_Scale.sql
FixTlzr8501.sql
French.sql
© 2007 ... Your company
L-BOSS Internal Commands
Interrest.sql
MakeLastWeek.sql
MakeLastMonth.sql
MakeLastYear.sql
MakeMonth.sql
MakeSpecMonth.sql
MakeSpecWeek.sql
MakeSpecYear.sql
MakeWeek.sql
MakeYear.sql
MarginUpdate.sql
Monthly_Maintenance.sql
Report_Blank.sql
Reprocess_day.sql
ResetSoftDate.sql
ResetSalesPrices.sql
Set_PLU_PAL.sql
SoftDate.sql
SoftDateMinus1.sql
SoftDatePlus1.sql
© 2007 ... Your company
56
57
LogiVision's Back Office System Software Programmer's Guide
Update_Prg.sql
8.3
Internal Command Dictionary
Internal Command Dictionary
Previous
Top
Next
Internal Command Dictionary
Previous
Top
Next
Programming With Internal Commands
L-BOSS internal commands (and variables) allow the programmer to interact with L-BOSS, creating
procedures that are customizable to meet specific needs. This section of the programmer's guide
shows the available commands and their parameters, along with examples of .sql files in which they
are embedded. The examples come from default .sql command files that ship with the current version
of L-BOSS. These files may vary with the version, but generally display normal implementation of
internal commands.
Most internal commands accept parameter type "arguments" so that the information required to
execute is passed to L-BOSS. Like any programming language, the parameters must be in the
established order, and contain valid values for their respective type. Internal commands and their
parameters are NOT case sensitive . By convention they are written in upper case, to be able to
easily distinguish them within the command file.
Internal @ Variables
Some of the internal commands listed below are actually variables that contain values for the
installation. They are described in the "Command" section because their written format appears exactly
like internal commands. The @ variables do not use parameters.
NOTE: The commands described in this section mostly refer to automated processes, events or SQL
command files launched by a user from the L-BOSS, "File" menu, "Execute Command File" option, not
report commands. For help on L-BOSS Report commands, see the Report programming section of
this manual.
8.3.1
Basic Commands
Basic Commands
Previous
Top
Next
© 2007 ... Your company
L-BOSS Internal Commands
58
Basic Commands
Previous
Top
Next
Basic Commands
@EXEC()
Common use : Probably one of the most used commands, it is used to launch command files from
the Task Manager, as automated or manual events. It can also be imbedded within a command file,
used to launch processes from within a process. The EXEC command's first parameter is the
execution type.
Parameters
:
RUN
Example: @EXEC(RUN=LRemote.exe /CLIENT)
Generally used to run LogiVision applications or external programs from within L-BOSS.
OUTPUT
SQL, SQM, LRP
Example: @EXEC(SQL=Deploy_POS_chg)
The EXEC() command can use the command file type (SQL, SQM, LRP), followed by the "="
(equals sign), followed by the name of the command file to execute. Other parameters can be
combined inside the "( )", separated by semi-colons ";" to send a complete format for the results to LBOSS.
NOTE: SQM files are similar to SQL files, used as nested sub-commands to an SQL file. LRP
(LogiVision Report Properties) contain the information for the report, as seen when the "Property"
option is selected from the report right click menu.
Examples
:
In the Task Manager:
@EXEC(SQL=Deploy_POS_chg)
© 2007 ... Your company
59
LogiVision's Back Office System Software Programmer's Guide
In a command file, in this case the MakeMonth.sql:
@SETDATE(@DSNF) // to
@EXEC(SQM=MakeSpecMonth)
In a more complex format, in this case a report request executed from L-POS:
@EXEC(OUTPUT=FullPathName
,LANG=EN,WIDTH=40,USERNAME=CashierName,STYLE=TXT,LRP=Financial,FIELDS=F1039;2;F6
4;1;F65;1,FMT=F65=#.##;F64=#.#)
@EXIT
Common use : The Exit command is used to close external programs that have been opened from
within L-BOSS. External programs that are not launched from within L-BOSS commands using the
@EXEC(RUN= ) command cannot be closed by L-BOSS.
Example
:
Output:
Closes the external program launched from within L-BOSS.
@PROMPT( )
Common use : The Prompt command is used to prompt the user with a special message that
pertains to the particular command being executed, often a warning or confirmation. The Prompt
command will create a standard Windows style confirmation box with "Yes" "No" and "Cancel" buttons.
NOTE: This is the @Prompt() command, not to be confused with "Report Prompts", such as
"@DATE1".
Parameters
Example
: The Prompt command accepts a single parameter, enclosed in single quotes.
:
@Prompt('This process will stop the front end for a period of time. Are you REALLY sure you want to
replace all item files in the front end?');
© 2007 ... Your company
L-BOSS Internal Commands
60
Output:
This example shows the confimation panel created by the Prompt command..
8.3.2
Date Related Commands
Date Related Commands
Previous
Top
Next
Date Related Commands
Previous
Top
Next
Date Related Commands
@TRIGGERDATE
@SETDATE
@NOW
Tells L-BOSS to use the current date / time as indicated by the host computer system.
@DATE
Tells L-BOSS to use date "prompts" to obtain dates from the user at execution time. The @DATE
command can also be written in different formats to indicate specific dates listed below.
Date formats:
© 2007 ... Your company
61
LogiVision's Back Office System Software Programmer's Guide
@Dxyz
where x is the format:
·I : International format (yyyymmdd)
·S : System format (mm/dd/yyyy)
·L : SIL format (YMMDD)
where y is the type:
·S : System current date
·D : Soft date
·W : Current week end
·B : Current week begin
·M : Current month end
·N : Current month begin
·Y : Current year end
·E : Current year begin
and where z is the offset:
·F : Based on today
·C : Computed (With computed, you must supply the offset from today. Ex: @DSSC-10 gives the date
in System format of 10 days ago. For forwared dates, use a + sign)
·E : Entered computed (Ex: @DSME gives the date in System format of the "month end" of the date
entered. @DSME-3 gives the date of the last day of 3 months ago, in system format)
·R : Related Computed (With Related computed, you must supply the offset from today. Ex: @DSMR1 gives the date in System format of the previous month end. For forwared dates, use a + sign)
NOTES:
·The date field to represent a year in the databases is always represented by the first day of the year.
·The date field to represent a month in the databases is always represented by the first day of the
month.
·The date field to represent a week in the databases is always represented by the last day of the week.
By default, the last day of the week is set to Saturday.
© 2007 ... Your company
L-BOSS Internal Commands
62
·To change the last day of the week, add the following line in the main server.ini file, under the
[General] section: WeekEnd=7, Where 1 is Sunday, 2 Monday ... 7 is Saturday. Please note that
changing this setting in an active installation will result in the loss of all previous weekly data since the
new calculation dates will no longer match the previously calculated report files.
8.3.3
Target Related Commands
Target Related Commands
Previous
Top
Next
Target Related Commands
Previous
Top
Next
Target Related Variables
L-BOSS uses the term Target to refer to either Terminal groups, such as the PAL programming group,
or physical network, drive letter or file path. Target variables are used within command type (.sql) files,
and are used to indicate current disk locations for the specified target.
@LBOSS
L-BOSS keeps track of its installed location in this internal variable. It can be used within command
files to indicate a file's path, for example in this export command file, the location of the file to create.
@EXEC(OUTPUT=@LBOSSOffice\Export\ITM.dat,STYLE=CSV,LRP=EXPORTPLU,FIELDS=F01;
0;F02;0)
Note that there is NO "\" between the @LBOSS variable and the rest of the path.
@OFFICE
The physical disk location of the Office folder. This also includes the current L-BOSS disk folder, drive
letter etc.
@SERVER
The network location of the L-BOSS controller. This variable may contain mapped drive or UNC
© 2007 ... Your company
63
LogiVision's Back Office System Software Programmer's Guide
format machine network location (\\Machine1\C\LBoss).
@TERMINAL
The current target's three digit terminal number.
@STORE
Contains the three digit Store number of the current L-BOSS installation.
@TARGET
The Target variable refers to the Terminal Group, for example PAL, which includes all terminals
grouped within it. Command files that indicate a target send information to all terminals listed in the
group.
8.3.4
Transfer Related Commands
Transfer Related Commands
Previous
Top
Next
Transfer Related Commands
Previous
Top
Next
Transfer Related Commands
@DEPLOY
@SEND
@DEPLOYALLFILES
© 2007 ... Your company
L-BOSS Internal Commands
8.3.5
Data Maintenance Commands
Data Maintenance Commands
Previous
Top
Next
Data Maintenance Commands
Previous
Top
Next
Data Maintenance Commands
@PACK
@DBUPDATE
@CLEANUP
@CLEARPROCESSED
@CHECKPRICE
@CHECKBATCHES
@DBSELECT
© 2007 ... Your company
64
65
8.3.6
LogiVision's Back Office System Software Programmer's Guide
Report Data Table Commands
Report Data Table Commands
Previous
Top
Next
Report Data Table Commands
Previous
Top
Next
Report Data Table Commands
@MAKEINTERREST
@MAKEPERIODS
@CLEARQRY
@BUF
@TAR_BUF
@SETBUF
@QRYBUF
© 2007 ... Your company
L-BOSS Internal Commands
8.3.7
File Related Commands
File Related Commands
Previous
Top
Next
File Related Commands
Previous
Top
Next
File Related Commands
@CREATE
@COPYFILE
@WRITEFILE
@FDELETE
@FILEDATA
@MIMESET
© 2007 ... Your company
66
67
8.3.8
LogiVision's Back Office System Software Programmer's Guide
Miscellaneous Commands
Miscellaneous Commands
Previous
Top
Next
Miscellaneous Commands
Previous
Top
Next
Miscellaneous Commands
@REMARK
@LIST
@STYLE
@REVERSE
@PRGUPD
9
Report Programming
Report Programming
Previous
Top
Next
Report Programming
© 2007 ... Your company
Report Programming
68
Previous
Top
Next
Report System Overview
NOTE: Older versions of L-BOSS (before November 2001) used a "third party" software called Crystal
Reports. L-BOSS now ships with "Native" reports, and no longer makes use of the Crystal Reports
package. This section covers the native reports only.
L-BOSS ships with a default selection of reports. Generally, the default reports meet the needs of the
average retail operation. If your customers have special reporting needs that are not covered by the
default reports, it is possible to program the required reports using the Report SQL Editor to build the
necessary SQL queries, and the Form Manager to build the report "template". As a dealer, you have
full access to these tools, even if the customer does not wish to purchase the modules.
NOTE: To avoid confusion, this manual refers to L-POS front end reports as "Forms", and L-BOSS
"reports".
List of Default Reports
NOTE: Some of the report types relate to specific modules and will not produce reports unless the
module is registered for your installation.
List Reports - for example: system operators, or PLUs by vendor. These reports are lists only, and
do not show amounts.
Financial Reports - for example: end of day reports for store balancing, periodic financials for
accounting.
PLU Sales Reports - Item sales totals.
Cashier Reports - For balancing floating cashiers.
Sales Reports - By department, sub-department or other grouping.
Customer Reports - If you use the customer module, these reports include account statements,
account aging etc.
Inventory Reports - Item movement, physical count, on hand etc.
Item and Shelf Labels - Labels are also printed from the Report module. L-BOSS must be registered
to print labels .
Specialized Reports - If you have specialized reports they will be setup as selectable from the
© 2007 ... Your company
69
LogiVision's Back Office System Software Programmer's Guide
standard report list.
System Reports - To print system table contents, for example Functions and Totalizers.
Controlling Reports
When a report has been selected but not launched from the list, there is a special right click menu that
controls the report properties, such as security level required to access it or if is it visible or hidden.
Right Click Menu
Hide: Select this option to hide the report from the list of reports. This hides the report but does not
remove it from the list.
View Hidden: Used to locate hidden reports, showing the entire list accessible according to the user
security level programmed.
Property: Opens the report's properties panel, (see the Working With Reports help page below)
New: Create a new report list entry, and its associated report.
Delete: Remove the report from the list, and delete it.
9.1
Report Approval
Report Approval
Previous
Top
Next
Reports approval system
Previous
Top
Next
The goal
The goal of the report approval is to minimized the errors and problems that custom reports causes to
dealers and system administrators. In order to to keep track of all the custom reports on the market, an
approval system will prevent all kinds of mishaps to dealers end users and facilitating support for these
reports.
© 2007 ... Your company
Report Programming
70
Two possibilities are available to the dealers, signed reports and signed/approved reports.
Signed
The signed report is for the acknowledgement of the existence of this report by L-BOSS, for Logivision
to back-up and store this report in the specialty database created for this effect.
Signed and approved
The signed/approved report is reviewed tested and corrected if necessary, the acknowledgement of
the existence of this report by L-BOSS and stored in Logivision specialty database created for this
effect.
NOTE: It is the dealers responsibility to make sure after an upgrade that the report is compatible to the
new version, in any case the report will have to be resigned and approved for any modifications to the
system or the report
9.2
Working With Reports
Working With Reports
Previous
Top
Next
Working With Reports
Previous
Top
Next
Creating and Modifying Reports
NOTE: You should never modify an existing report . Instead, you should select a report you want
to customize or modify, then use the "New" option from the right click menu to create a new report from
an existing one, giving the new report a customer specific name. This is because L-BOSS upgrades
will overwrite any L-BOSS default report. By naming customized reports with a customer specific
name, L-BOSS upgrades will leave the customized report untouched.
To create new or modify existing reports:
·Be sure to login as a programmer.
·From the Report selection utility, find a default report that most closely matches the report you wish to
create, or needs slight modification for the installation, or right click any report.
·Right click the selected report, and choose the "New" option. A "Create new Report" panel appears.
·Enter a customer specific name for the new report, and press "OK" (this will ensure a unique name )
·A new panel appears, asking if you want to use the SQL from an existing report.
·Press "Yes" to open a file browser, allowing you to select the SQL file to use, or
© 2007 ... Your company
71
LogiVision's Back Office System Software Programmer's Guide
·Press "No" if you wish to create a blank SQL file.
·After selecting a command file (or No), L-BOSS prompts you for a "Form" (template) file to use.
·Select the template file to use for the new report, or "No" to create a new, empty template.
·The Report Properties window opens for the new report.
Report Properties Panel
When you select the "Property" option from the report's right click menu, the properties panel opens.
NOTE: Report files are stored in the LBOSS\OFFICE\RPT folder. There are three (3) basic file types,
.FRP, .LRP and .SQL. NOTE THAT these files should ONLY BE EDITED AND SAVED using the
FORM MANAGER report editor. DO NOT EDIT, COPY, RENAME, SAVE or otherwise manipulate
the report files manually from other installations. File names, extensions and contents follow
internal L-BOSS conventions that MUST be respected for the report system to function properly.
This example shows the Report Properties editor - the Cashier report.
Report Properties Panel Options
The report's property file name and extension (.lrp) appears at the top left of the panel to identify
© 2007 ... Your company
Report Programming
72
the report file being edited.
The Report Title is the name that appears at the top of the report on screen or in printed format.
Language allows you to set the default language for the report.
Minimum user level is the security feature for this report. The security level must be set for each
report individually. The security levels follow the standard L-BOSS security levels. If a user does not
have that security level, the report does not appear in the report list, and therefore is not selectable.
SQL File is the file that contains the L-BOSS proprietary commands and the SQL used to extract the
information from the database for this report. The "E d " button to the right of the name opens the
report SQL editor described below. The "... " button allows you to select the report .sql file from a
browser.
Template File (.frp) is the Form Manager file for the report. The template file contains the visual
layout and presentation aspects of the report. The template file can only be edited using the Form
Manager. If you wish to edit template files to create your own report layouts, make sure that the Form
Manger module is registered for the installation.
Category is used to place the report in a folder with other associated reports. Click the "... " button to
use the Report selection tool to select the correct Category for the report. Select "none" to have the
report appear in the "root" of the report selection window.
Dialog represents the prompts that are used in the report to collect dates or ranges from the user at
report selection time. You can assign default values for the prompts by selecting the prompt to
program from the drop down list, then clicking the "..." button.
© 2007 ... Your company
73
LogiVision's Back Office System Software Programmer's Guide
This example shows the Report Prompt Programming Utility.
The dialog programming utility allows you to specify the default language for the prompt, the prompt
title and alignment, default value and the prompt display position in the Report selection panel.
NOTE: Prompts will not appear in the dialog list until the command file that contains the new prompt is
saved.
Setting the Preview to on (check marked) forces the print preview mode. If this is not selected, the
report selection process skips the print preview mode.
Use Group forces the report to use group totalizers.
When selected, the Printer dialogue field forces the Windows printer driver to open the printer
options panel before actually sending the report to printer, allowing the user to set printer options for
the print job.
The Hidden option here is the same as the Hide option when a report is selected and right clicked.
This prevents the report from appearing in the list, but does not remove it.
Change Icon is used to open the L-BOSS icon library, allowing you to select from the available report
icons.
Check mark the Debug box if you want L-BOSS to "step through" the report generation process,
stopping after each SQL and L-BOSS command to display the command's code. This is very helpful if
the report generation is causing errors, allowing you to determine at what step the code is producing
© 2007 ... Your company
Report Programming
74
errors. It also shows the resulting report's template fields, allowing for template debugging.
Report Sections
The left bottom portion of the Properties panel contains the Report Section used to control the
output for reports that repeat certain details depending on a certain table. For example, a list of sales
details per cashier; each cashier has the same information, such as cash in drawer, total sales etc.
The report must display the same details for each cashier, breaking the report into "sections".
Trigger Fields are fields that force the report to be broken into "bands" (sections), or details for each
record. For example, if the report deals with cashier details, there should be a report section for each
cashier's details. The cashier number field would be the "Trigger Field" that would separate the report,
with each cashier record repeating the same details.
Title Fields are associated with the Trigger Field; they are the title for the report sections established
by the trigger field. Following the cashier example above, the cashier number field is the actual trigger,
but in the report section the title should be the cashier name, not the number. Field On Form is the
report template field that contains the Title fields.
Total fields lists fields that should be added (sum) together in the report. Fields in a report template
file can also contain formulas that calculate elements to generate totals.
New page is also linked with the Trigger field; when selected, it forces the report to print a new page
for every time the Trigger field changes value. To continue with the cashier example, each time the
process generates details for another cashier, it forces the report to start a new printed page. Page 1
forces the page number for that report section to be numbered starting at one.
9.3
Report SQL Editor
Report SQL Editor
Previous
Top
Next
Report SQL Editor
Previous
Top
Next
Modifying L-BOSS Report SQL Code
The L-BOSS reports use a combination of proprietary commands and SQL code to generate the
queries that extract information from the database tables for reporting. The report properties include a
.sql file and combines it with a report template file that controls how the report will actually appear.
© 2007 ... Your company
75
LogiVision's Back Office System Software Programmer's Guide
Once a report file has been selected from the Report Selection tool, right clicking it opens a menu. If
you are familiar with the report file names, you can use [Ctrl-Enter] to enter the report name manually.
The "Property" pop-up menu option opens a panel that contains the report's configuration. The name
of the command file for the report is entered in the "Sql file" properties field. To the right of the sql file
name, the "E d" button opens the SQL Editor, displaying the L-BOSS proprietary commands along with
the SQL code required to extract the data for the report.
This example shows the cashier report in the Report SQL Editor.
Report SQL Editor Window
The SQL editor window is divided into four (4) parts:
·The SQL editor is the top left portion of the screen, and contains the commands for the report.
·The tool bar.
·The upper right of the window shows the prompts used in the Report SQL file to collect the language,
start and end dates, period type, store number and cashier number from the user. The editor reads the
code at load time and displays all prompts it finds in the report file when you open the Editor.
·The bottom portion of the editor window is empty when first opened. It is used to view the results of
the SQL commands in table format with the field numbers as column headers (not as a formatted
report) after pressing the "Test" toolbar button.
Tool Bar Tools
Test: tests the currently loaded query and displays the results in table format. Use this to test
© 2007 ... Your company
Report Programming
76
changes to the query and get immediate results. Note that some SQL report commands are broken
into sections, divided by the "-" sign. The test option only runs the SQL commands in the section where
the cursor is located.
View Qry: Opens a panel displaying the current version of the loaded report query. The panel also
contains an "execute" option that runs the query displaying the results in table format (like the test
option).
Re-Read: If you make changes to the report file, for example adding new prompts, this forces the
editor to re-read the code and refresh the upper right pane that shows the prompts used in the code.
Save: The save button is "greyed out" until you actually change the loaded query. This saves the
modifications in the .sql file.
Close: Closes the Report SQL Editor window. If changes were made to the query, the close process
will prompt to save the modifications.
SIL Field Decoder Feature (field numbers like F1024)
While editing the code, if the cursor is anywhere in a field number, the field's description is displayed in
the Editor window's top bar beside the report file name. Click any "F" field in the query to see which
field is referenced.
This example shows the Editor's SIL field decode feature. The cursor is on the first field in the query (F1185)
SIL Field List
The L-BOSS SQL editor also provides a list of all "F." recognized fields. The pop-up list is accessed by
pressing the [F5] function key anywhere within an SQL report file. The list provides a quick reference to
all available SIL fields.
© 2007 ... Your company
77
LogiVision's Back Office System Software Programmer's Guide
The L-BOSS SQL Editor's SIL field List
Internal Command Help Features
There is also help available for internal commands. With the cursor anywhere within a "@" command,
press [Ctrl] + [Shift] + [Space]. A "hint" box opens with help on the current internal command, its
parameters and usage.
The SQL editor is also color context coded, known as "syntax highlighting". Internal commands or
reserved words are in bold black , SQL commands are in blue. Remarks are in pink. This feature
helps the programmer easily pick out and recognize key programming sequences, SQL and L-BOSS
internal commands.
Note About Printers
In previous versions, L-BOSS used the Crystal Reports program for reports, and did not deal with
printers. The native reports are printed through L-BOSS. You can force L-BOSS to reset the printer to
"Letter" size pages. By default, (after installation) the option is not selected. If the printer's proprietary
© 2007 ... Your company
Report Programming
78
driver defaults to letter size, or if there is no printer on the L-BOSS computer, you should leave this
option "not selected". To force the printer to print Letter size pages, select this option in the L-BOSS,
"File" menu, "Configuration", "System" tab.
9.4
Report Prompts
Report Prompts
Previous
Top
Report Prompts
Next
Previous
Top
Next
Using Prompts
Prompts are used to collect parameters from the user (like a "wizard") during the report selection
process. When building report files, you may use up to four (4) prompts of each kind (listed below) in
an SQL report query. In each case, they are named following the conventions described below.
After opening the .SQL editor, the upper right portion of the screen displays the prompts that are
programmed for the report. The prompt is followed by the number (no space) from 1 to 4.
Example: the start date prompt could be @DATE1, followed by the end date @DATE2
where
RPT.F254>='@DATE1' and
RPT.F254<='@DATE2' and
RPT.F1031='@PeriodType1' and
RPT.F1056='@STORE1'
In each case, prompt 1 must be equal or less than prompt 2 (future development ). Prompts 3 to 4
don't have any special feature.
The available prompts are:
© 2007 ... Your company
79
LogiVision's Back Office System Software Programmer's Guide
@DATEn
used to collect START and END dates for report generation
@PERIODTYPEn
used to collect the PERIOD type , day, week, month, year
@STOREn
ask for the 3 digit STORE number, usually for the target
@TERMn
ask for the 3 digit TERMINAL number, usually for the target
@TARGETn
enter the target terminal GROUP for the report (PAL, P01 etc...)
@DEPTn
enter the DEPARTMENT number(s) for the report
@CUSTn
enter the CUSTOMER number(s) for the report
@NUMBn
use this to gather any undefined NUMBER from the user
@STRINGn
use this to gather any undefined STRING from the user
@SUBn
get the SUB-DEPARTMENT number(s) for the report
@PLUn
enter the PLU number(s)
@TLZRn
get the TOTALIZER number(s)
@CSHRn
for cashier reports, enter the CASHIER number(s)
@CHOICEn
create a drop down list for user to select from, or run an existing L-BOSS .sql type file
Special Prompt Notes
@DATEn : The default uses the format described in the DateFmt.txt file in the LBOSS directory.
@STOREn and @TERMn : Leave the default BLANK to use the current Store number / Terminal
@TARGETn : The default uses an optional argument. The type of list to put in the comboBox is
defined as follows:
Opt,Target where OPT is:
P - Program targets
R - Report targets
X - Exchange targets
© 2007 ... Your company
Report Programming
80
I - Item targets
$ - Price targets
C - Cost targets
Example: PIC,PAL : List from the Price, Item or Cost targets, with the default being PAL
@CHOICE("User prompt1","data1","User prompt 2","data2")
This will create a combo box with the "User prompts" as list choices. Upon selecting a choice, the
corresponding "dataN " will be inserted in the SQL statement. The Default setting corresponds with the
"data" (not the "User prompt").
IMPORTANT NOTE: NO SPACES
ALLOWED OUTSIDE THE QUOTES. Ex :
Incorrect syntax : @CHOICE("User prompt1", "data1", "User prompt 2", "data2" )
Correct syntax : @CHOICE("User prompt1","data1","User prompt 2","data2")
The @CHOICE prompt can also be used to embed and run existing .sql files. This is useful to avoid
having to rewrite the SQL query if it already exists in some other report file. L-BOSS executes the
query contained in the embeded file and uses the values in the @CHOICE prompt. The correct syntax
is:
@IF("@CHOICE1("Sql(GrpSelect)","F1154","F1154")" <> "" THEN ,CLT_TAB CLT)
Prompt Panel Display Programming
The user prompt window appears after selecting a report from the Report Selection utility. Each
prompt can be visually positioned in the prompt panel. To move a prompt visually:
·Open the prompt panel for the specified report using the Report Selection utility.
·Hold down the [Ctrl] key, and select the prompt to move.
·When the prompt box changes colour, move the prompt to the desired location within the panel.
© 2007 ... Your company
81
LogiVision's Back Office System Software Programmer's Guide
·Once a prompt has been moved, the "Print" button at the bottom of the panel changes to "Apply".
·Press the "Apply" button to save the changes.
It is also possible to program a prompt's position from the Report Properties window, by selecting the
prompt from the drop down list of prompts, and clicking the "..." button to open the prompt's properties
and default values, and entering the "left" and "top" numeric values.
9.5
Report Commands and Variables
Report Commands and Variables
Previous
Top
Next
Report Commands and Variables
Previous
Top
Next
Commands, Special Characters, Variables
@LANG
Uses the 2 letter language value currently in use (fr, en, etc).
@DATABASE Uses the database type currently in use, PARADOX or MSSQL. (MSDE will report as
MSSQL).
The semi-colon
In .sql command files, you may enter remarks (rem) by starting its line with a "; " (semi-colon),
followed by a space, then the remark. When executing .sql files, L-BOSS actually reads the remark
lines, but does not use them to build the actual SQL command. However, the Form Manager also uses
the semi-colon for other special purposes.
You can also use the semi-colon (remark) to establish special titles that will be printed as a header for
a report section that uses the .sql file. Its format is the semi-colon, the Title joined by the language
equals the text:
;Title LA =This is a title (where LA is the two letter language format - en or fr and no quotes
around text)
© 2007 ... Your company
Report Programming
82
The semi-colon is also used to declare variables.
Using Variables
The L-BOSS Form Manager also makes use of variables. These variables are useful when complex
SQL commands would have to be repeated throughout the command file (.sql) to obtain a specific
value. Instead of repeating the command, it is possible to store the value in a variable, then insert the
variable where necessary.
Variables are numbered from 0 to 9. The correct syntax is the semi-colon, followed by VAR joined with
the number, equals, NO SPACES, comma separated, quotes around parameters and their values:
;[VARn=F1056,SqlFile.sql,"par1=Test,par2=001"]
where
n
Variable number (0-9)
F1056
The resultant field
SqlFile.sql
The file that contains the SQL command
par n
Optional parameters to pass to the query
=
NOTE: VARn
are not erased before each report.
Multiple SQL Queries in the Same Command File
The Form Manager can recognize multiple SQL queries entered in the same .sql file. It makes use of
the - (minus sign) character to separate the SQL queries. This can be very useful when building
complex reports. You can set variables, execute queries, set more variables and query, then populate
the report. The following example shows the end of one query and the start of the next:
GROUP BY
SUB.F04,SDP.F2156
ORDER BY
© 2007 ... Your company
83
LogiVision's Back Office System Software Programmer's Guide
SUB.F04
-
SELECT
@IF(@LANG = FR THEN 'Total sous-départements' ELSE 'Total sub-department') as F9996,
SUM(SUB.F64) as F64,SUM(SUB.F65) as F65,SUM(SUB.F67) as F67
from
RPT_SUB SUB
where
Commands
@IF(string1 [= | <>] string2 then data1 | else data2|)
If string1 equals (=) or different (<>) than string2 then data1 will be inserted in the SQL, otherwise
data2 (if exists) will be inserted.
9.6
POS Report Programming
POS Report Programming
Previous
Top
Next
POS Report Programming
Previous
Top
Next
L-POS Lane Reports
Lane reports that previously required entering the command manually on the POS can now be built
into files (.rrq) and use the native report system in the following way:
© 2007 ... Your company
Report Programming
84
The SQL file for the report function of L-POS must contain:
LRP= report name
@prompt=
(This is the name of the NATIVE report)
(To set the values of the report prompts)
FIELDS= flds
(To define the fields to use)
FMT=
(To set a special format)
@ASIS
(Do not reformat the report. Print it as received from L-BOSS)
Arguments available from L-POS are:
@ASIS : (Print the report as received)
@CLK : (Cashier number)
@CLT : (Client number)
@TRM : (Terminal number)
@STN : (Store number)
@SDT : (Current softdate)
@LNG : (Operator's language preference)
The fields must be separated by a semi colon (;) followed by it's percentage of the receipt width.
Example: F02;60;F64;20;F65;20
This would use field F02 for 60% of the receipt width, followed by 20% for field F64 and another 20%
for field F65
© 2007 ... Your company
85
LogiVision's Back Office System Software Programmer's Guide
NOTE: Width can be represented in percentage or in character values.
NOTE2: If the specified field does not exists in the result of the SQL query, the column will be blank.
To deal with this situation in a multi query report, you may specify more than one field for a single
column with the following format:
F1039-F9996;50
In this example, if field F1039 does not exist, field F9996 will be used instead. The 50 is the witdh of
the column.
This is a complete example to get the current sale financial report. File could be called Financial.rrq :
LRP=Financial,
@CSHR1=@clk,
FIELDS=F1039;70;F65;30,
FMT=F65=#.##;F64=#.#
This is a complete example to get the current sales for the current cashier
LRP=Cashiers,
@CSHR1=@clk,
@DATE1=@SDT,
@DATE2=@SDT,
FIELDS=F1039;60;F64;15;F65;25,
@ASIS,
FMT=F65=#.##
© 2007 ... Your company
Report Programming
86
Please note that L-POS appends some fields to the command above to specify to L-BOSS that it is a
report command to be executed. The complete command line sent to L-BOSS is:
@EXEC(OUTPUT= FullPathName
,LANG=EN,WIDTH=40,USERNAME=CashierName,STYLE=TXT,LRP=Financial,FIELDS=F1039;2;F
64;1;F65;1,FMT=F65=#.##;F64=#.#)
By creating a file in the LBOSS\Office\Inbox with the line above, L-BOSS will generate a report and
store its file to the OUTPUT= argument.
STYLE= can also be CSV (Comma Separated Values) instead of TXT. Put the length of each field
to 0 if you don't want any padding with spaces.
If OUTPUT is not specified, or blank, the report goes to the screen or printer as defined in the normal
report.
Ex: @EXEC(LRP=Financial)
Printers
The printer used for "printer" is the default printer. You may set a different printer for all reports in the
local.ini file:
[System]
MainReportPrinter=Printer name
Also, each report may override this setting. In the report LRP file, in the System section:
[System]
PrinterName=Printer name
9.7
Form Manager Application
Form Manager Application
Previous
Top
Next
Form Manager Application
© 2007 ... Your company
87
LogiVision's Back Office System Software Programmer's Guide
Previous
Top
Next
F orm Manager Module Overview
NOTE: Although the Form Manager is included in your L-BOSS installation and is fully functional , it
must be registered before you can save L-BOSS report, L-POS form, or item and shelf label
templates.
The Form Manager is an L-BOSS module used to design the visual and content aspects of L-BOSS
reports (including item and shelf labels) and L-POS "form" layouts. Both L-BOSS and L-POS ship with
basic report and form templates that meet the needs of most retail businesses. If the reports and forms
that were included in your installation adequately display your information, you do not need the Form
Manager.
The Form Manager uses a visual programming interface that allows the user to "drag and drop" fields
and other design elements (objects) on a "template", making it simple to create visually attractive
reports. The Form Manager provides a complete set of tools to configure report and form templates as
well as item or shelf labels. The tools are designed to work with data fields, graphic elements (including
line and rectangle drawing tools), and formulas for report time calculations.
L-BOSS Report Template Files
Each L-BOSS report file (.sql) has an associated template file (.frp) that controls the report's on screen
and printed format, along with special formulas that allow data manipulation within the template. The
report template uses fields that are linked with the fields in the report's SQL file to report the SQL query
results.
L-POS Form Template Files
Front end L-POS terminals can also print reports by requesting information from the L-BOSS
controller. Because the L-POS reports are often printed on the receipt printer, they cannot use the
same template as the L-BOSS reports. L-POS templates are called "Form" templates to help
distinguish them from back office "report" templates.
Shelf and Item Labels
The Form Manager is also used to create templates for item or shelf labels, allowing you to configure
© 2007 ... Your company
Report Programming
88
the label page layout (columns and rows), label contents, such as bar code, description, price, and
other common label type information.
9.7.1
Template Editor
Template Editor
Previous
Top
Template Editor
Next
Previous
Top
Next
Form and Report Template Editor
Opening an Existing Template
The Form Manager can be launched as a "stand alone" application from the L-POS Windows
application menu. It is also possible to select a report file using the Report Selection tool, right clicking
it opens a menu. The "Property" option opens a panel that contains the report's configuration. The
name of the template file for the report is entered in the "Template File" properties field.
To the right of the Template's .frp file name, the
editor.
© 2007 ... Your company
button opens the Form Manager's template
89
LogiVision's Back Office System Software Programmer's Guide
This example shows the cashier report template in the Form Manager's Editor
Template Objects
Anything that appears in the template is called an "object". When selected, objects display "nodes"
that are used to re-size the object.
·When a corner node is selected, the cursor changes to a double ended oblique arrow, used to re-size
both horizontally and vertically at the same time. Hold the cursor over the corner node. Click and hold
down the left mouse button and drag the corner node to re-size the object.
·The center nodes (between the corners) re-size either horizontally or vertically, depending on the node
selected. When a center node is selected, the cursor changes to either a horizontal or vertical double
ended arrow. Hold the cursor over the center node. Click and hold down the left mouse button and
drag the center node to increase either the height or width of the object.
·Once an object is selected, (showing its nodes) you can move it by pointing the cursor over the object,
anywhere within the nodes. Click and hold down the left mouse button, dragging the object to its new
template location.
The template page uses color to distinguish between "Label", "Field" and "Prompt" objects:
© 2007 ... Your company
Report Programming
90
·Label objects are yellow , and contain titles that describe the type of information, often column
titles.
·Field objects are green , and contain fields associated with the SQL file's SIL fields that their data
comes from.
·Prompt objects are blue , and are the variables used in the report's SQL file to collect information
from the user.
·Graphic objects (lines and rectangles) are black .
·Image objects are not assigned any color, they appear as graphic images. (.bmp only)
NOTE: If you enter more than one field in an object box, it will also appear blue.
Object Right Click Menu
Once an object is selected, right clicking over the object opens a special menu containing object
controls and options. The options available depend on the type of object selected.
New Description: (Label objects only ) Modify the label's text.
Justify: Used to position the field value or text within the object . It does not affect the object's
template position. The justify utility also has special "Currency" and "Amount" options for monetary
fields.
Center on Page: Places the selected object in the center of the template . It does not affect the label
text or field value's position within the object.
Copy: Used to copy the object to the Form editor's clip board for pasting elsewhere in the template.
Font: Opens the font panel, allowing you to override the default template font set using the
"Configuration" menu's "Set default font" option. Changes the font for the selected object only
Delete: Remove the selected object from the template.
Condition: This option is used to determine how the object behaves in multi-page reports, and if it
should display zero values.
·All Pages: Use this condition if the object should appear in all report pages.
·Last Page Only: If the object should appear on the last page only.
·First Page Only: If the object appears on the first page only.
·Zero Suppress: If this object should not appear in the report if it has a value of zero (0.00).
© 2007 ... Your company
91
LogiVision's Back Office System Software Programmer's Guide
Formula: (Field and Prompt objects only ) Opens the formula entry box to use a calculation for the
field's value.
9.7.2
Tools
Tools
Previous
Tools
Top
Next
Previous
Top
Next
Top Bar Tools and Options
NOTE: Because the Form Manager edits both L-POS Form templates and L-BOSS report templates,
some options or tools may only apply to forms and some only to reports. In this help, if an option or tool
does not specify which type of template the option or tool is used for, it is available for both template
types.
The Form Manager's top bar show's the template's title assigned when it was created. To change an
existing title, use the "File" menu's "Save As" option. This will open a panel asking for a new
description for the template file. After entering the new description, select the same file name,
overwriting the previous version.
Ln: (Forms only ) LINE For L-POS form templates, if you have defined columns, select this option to
have column lines appear on the printed output.
Detail Count: (Forms only ) Determines how many details appear on the L-POS printed output.
Add Label: This button creates a new Label object for the template. Clicking it opens a Label editor,
where you can edit the text that the label will display in the report. The "Justify" option is used to
position the field value or text within the object . It does not affect the object's template position. After
clicking the "OK" button, point the mouse cursor anywhere in the template and click to have the new
label object appear. You can then determine its final template position and size using the "nodes".
NOTE: You can also change the label's justification after it has been created by selecting the object
and right clicking it to open the object menu and selecting the "Justify" option.
Select Field: is used to create a new template field object. Field objects are normally associated with
the report's .sql file. When the report is generated, the field object value is determined by the query.
Line Tool: Use this tool to create horizontal or vertical lines to graphically define special report or
form areas in the template. The line is a graphic object only , it cannot have any values.
© 2007 ... Your company
Report Programming
92
Rectangle Tool: Use this tool to create rectangles to graphically define special report or form areas
in the template. The rectangle is a graphic object only , it cannot have any values. The rectangle tool is
also used to define a "frame" for a graphic object (.bmp file format only). After drawing a rectangle,
right click the object and select the "Image" option. A file browser opens the default L-BOSS image
folder. If required, navigate to the image's source folder, and select the image object. Once the image
object is contained in the rectangle frame, it takes on the frame's dimensions. You can re-size the
frame to display the image properly.
Cursor X / Y Position: The X and Y boxes show the current cursor position if you have the
"Configuration" menu's "Show position ruler" option set to on.
Object Dimensions: W is the selected object's width, H is the selected object's height. The object's
measurements are in inches unless the "Configuration" menu's "metric" option is set to on (changing
the rulers), then it is measured in centimeters. NOTE: If you change the ruler with an object selected,
the measurement values will not change until you unselect and re-select the object.
Grid Size: The Form editor uses an invisible "grid" to place objects in the template. When placing
objects in the template, they will "snap to" the invisible grid lines. Grid lines help you align objects in the
template. The grid spacing can be adjusted using the grid size setting.
Language: You can temporarily change the language setting for the report to allow for differences in
label or field text that must be resolved to ensure that the report prints correctly in either language. The
language setting is not saved with the template. The default language for a report is defined in its
properties.
Rulers: The Form Manager displays horizontal and vertical rulers along side and above the template
to assist in aligning objects. Click and drag the red arrow (top left corner of the rulers) along the top
ruler to use a line to help align objects vertically.
9.7.3
Menus
Menus
Previous
Menus
Top
Next
Previous
Top
Next
Form Manager Main Menus
File Menu
The "File" menu contains typical file operations and configuration tools for several options.
New: Open a new Report or Form template.
© 2007 ... Your company
93
LogiVision's Back Office System Software Programmer's Guide
Open: Open an existing Report or Form. This opens a typical Windows file browser, displaying the
files in the default LBOSS\Office\Rpt folder. Use the "Files of type" option to choose between Form or
Report templates.
NOTE:The Form Manager can open text type files, for example L-BOSS .sql command files.
When a text type file is selected for editing, the Form Manager "locks" or greys out certain options and
tools that are for graphic use only.
Save: To save the open template, keeping the same name.
Save As: Used to save a template under a new name.
Print Test Page: Opens the Windows printer options panel, allowing you to send a "test" layout page.
The template appears in a "print pre-view before being sent to the printer. The test page doesn't
contain data, but is handy to view what the page will look like, and verify the fields used.
Labels: This option controls the label page setup in terms of columns and rows, spacing between the
labels (both horizontally and vertically). Also the label page margins. Based on the information you
enter here, and the "Page Setting" option (determines the page size), the bottom portion of the label
setup tool shows the number of labels per column and row.
This example shows the Form Manager's label page setup
The measure used (inches or centimeters), depends on the template's rulers, set using the
"Configuration" menu's "Metric" option. Enter the correct values for label width, height, the gaps and
margins. You can either click the field and enter the number, or with the cursor in the field to modify,
use the up and down arrow keys to increase or decrease the value.
© 2007 ... Your company
Report Programming
94
NOTE: Printing Bar Codes requires that bar code fonts be installed, and a special format for the PLU
field: FMT(F01=LBL.UPCA)
Page Setting: This option is used to establish the size of the page being produced by the current
template. The measure used (inches or centimeters), depends on the template's rulers, set using the
"Configuration" menu's "Metric" option.
This example shows the Form Manager's page setup
Records
Some reports contain repeating lines of the same information, based on a changing field, for example
item or PLU sales. Each line is a report "record" that includes the same information for each line. The
"Records" menu allows you to define a repeating report line's contents.
Create the item record: Select this option to create a repeating line "box" (area) to define the
individual item fields that will appear in each line. Once selected, you must point and click somewhere
within the template. After the record box is created, you can move it or re-size it to suit the report
needs.
Create a new tender record: Tender records are used to define the template area that will display
tender amounts by type. Similar to the item record, the tender record will repeat for every tender type
with an amount in the report.
Use SQL Mask: This option controls which fields appear in the "Field" selection drop down list tool.
Selecting this option opens a file browser, allowing you to select the .sql command file to use. The
"Select field" list will contain only the SIL fields found within that command file.
Configuration
Set default font: Opens the font option panel, allowing you to establish the default font for the form or
template. Label objects and field results will be displayed with the default font unless you specifically
change the object's font using the right click menu "font" option. In other words, you can set the default
© 2007 ... Your company
95
LogiVision's Back Office System Software Programmer's Guide
font, then use variations where required.
Show position ruler: The position ruler displays a position marker above the horizontal and vertical
page rulers. It also causes the Form Manager to track the cursor's X / Y position displayed at the top of
the Form Manager. Setting the "Show position" option to on uses more system resources, and may
slow down the system.
Auto load last file: The Form Manager is a stand alone application. It can be launched from a
report's "properties" box, or from the L-POS Windows menu. Set this option to on if you want the Form
Manager to re-load the most recently used template at start up.
Auto repaint: Some screen displays seem to have difficulty re-drawing the template when objects
are moved or modified. Set this option to on if you notice that objects in the template disappear, forcing
the Form Manager to re-paint the screen more often.
Metric: The Form Manager can be set to use either metric or inch measures. When selected, this
option forces the rulers and page settings to metric measures. The Form Manager uses inches by
default, the metric setting must be re-set each time you launch the application.
Object Inspector: Is used to display all information about the selected object, including object
dimensions, page position and other object attributes. The Object Inspector can be placed anywhere
on the Form Manager desktop, or made to "Dock" on the right side of the window.
This example shows the Form Manager's Object Inspector
NOTE: To dock the Object Inspector, click its top bar and drag the inspector to the right side of the
Form Manager. When the Object Inspector is being moved, the Form Manager shows the Inspector's
© 2007 ... Your company
Report Programming
96
outline. When the Object Inspector reaches the right side, the outline will "snap" to the side of the
window. Releasing the Object Inspector at this point "docks" the Inspector. It can only be docked on
the right side of the Form Manager window.
Re-snap to grid: The Form Manager uses a hidden "grid" to help position objects on the form or
report template. This option forces all objects to "snap to" the closest invisible grid line.
9.7.4
Report Formula Options
Report Formula Options
Previous
Top
Next
Report Formula Options
Previous
Top
Next
Special formatting in the "Report Formula" of the totalizer
Each field in the Form Manager report template has a "Formula" box (right click menu option). The
formula can be used to calculate values during report generation, but can also be used to add special
formatting.
This example shows the Form Manager's Report Formula box.
BLD(fields) : Print the fields in BOLD. Several fields are separated by commas.
BLD() : To print the whole line in BOLD
UND(fields) : Print the fields underlined. Several fields are separated by commas.
UND() : To print the whole line underlined.
FMT(field=format) : Print the field using a special format.
© 2007 ... Your company
97
LogiVision's Back Office System Software Programmer's Guide
##:##:## : Prints hours, minutes and seconds
##:## : Prints Hours and minutes
#.### : Prints so many digits after decimal
To format a field, the fields F1034, F2168, F2169 and F2170 must be included in the result set. Also,
"Use Groups" must be set.
More FMT= formats:
String Option: IFZtest
(would insert the word "test" if the field is blank)
Printing Bar Codes requires that bar code fonts be installed, and a special format for the PLU field:
FMT(F01=LBL.UPCA)
Float and BCD options :
Z ...................Leave Blank if zero (0)
##:##:## .......Format number of seconds as time.
##:## ............Format
#.## ..............Format two (2) digits after decimal
####.## ........Format two (2) digits after decimal, with four (4) leading zeros
LLL ...............Format left justify first three (3) characters
#### .............Format without decimal, and four (4) leading zeros
Others .........Invalid
Integer Options :
Z ...................Leave Blank if zero (0)
Date Options:
S ..................Use Windows short date format
© 2007 ... Your company
Report Programming
98
L ...................Use Windows long date format
Others ..........Use the same format currently used by Windows
Other Formula options :
GROUP(Tlzr,Field,Field...) : Add to totalizer group "Tlzr" the fields that follow (separated by
commas)
MOV(Field-FormField) : On the form, prints the field "Field" where "FormField" is located on the
form.
REV(field,field...) : Reverse the sign on the fields. Fields are separated by a commas.
10
Inventory Tables
Inventory Tables
Previous
Top
Inventory Tables
Next
Previous
Top
Next
Understanding the Inventory System
NOTE: Older L-BOSS versions handled inventory differently than the newer L-BOSS versions. The
older versions used Inv_h and Inv_i tables that no longer exist. This guide only covers the newer
inventory table structure. Upgrading to newer versions does not import the older inventory data. When
upgrading, you must back up and restore the database so that it can create the new structure, then
use a conversion utility to import the old inventory data to the new table structure. You should contact
LogiVision if you need to import old inventory.
Keeping all item transaction information creates a large database. To avoid creating additional
database fields taking even more space, the RPT_ITM_D table makes use of existing fields that when
associated with an inventory transaction, contain a different type of information. For example, field
F113 is normally used to keep the Active Price Description. However, when relating to inventory, F113
keeps a special {INV} description that defines the record as an inventory transaction.
Each inventory transaction record creates (and is linked with) "header" records containing certain
information for that transaction. Some inventory transactions do not require as much information as
others. For example, an inventory count does not need to be associated with a vendor, but an order
does. This means that the information in the header (number of records) associated with an inventory
© 2007 ... Your company
99
LogiVision's Back Office System Software Programmer's Guide
transaction will vary depending on the transaction type.
10.1
Dynamic Inventory Fields
Dynamic Inventory Fields
Previous
Top
Next
Dynamic Inventory Fields
Previous
Top
Next
LBOSS Inventory Structure in RPT_ITM_D
To be able to create reports for inventory tracking (movement), it is imperative to understand how LBOSS re-uses existing fields, and how it links transaction records with their headers to be able to
extract the necessary information.
The TOTALIZER field, (F1034) is used to determine what type of inventory transaction is being
recorded. Normally, the Totalizer field stores the totalizer number (from the totalizer table) into which
certain transactions are collected. When dealing with inventory, the F113 field contains the special
{INV} description. This indicates that the field number (F1034) may contain a special internally
reserved totalizer number to identify the inventory transaction type: reception, count etc.
The Reference number (F126) is the field that links all records for a particular inventory transaction.
The reference number is kept internally, and is not editable. Since ALL inventory transaction types
REQUIRE the "remark" field entry, it is possible to locate the remark field in the table to find the internal
reference number.
When creating SQL commands to extract inventory information, you can search for all records using
F113 {INV} and the unique F126 reference number. By combining this with other factors such as the
value of F1034 to determine type of inventory transaction, it is possible to create all required inventory
reports.
10.2
Table Structure and Example Entry
Table Structure and Example Entry
Previous
Top
Next
Table Structure and Example Entry
Previous
© 2007 ... Your company
Inventory Tables
Top
Next
The tables below define inventory special entries in the RPT_ITM_D table:
TABLE 1 - RPT_ITM_D : The RPT_ITM_D table contains the following fields:
RPT_ITM_D
When F113 is {INV}
Field
Normal Use
Header records contain
F01 CHAR(20)
PLU Number
Depends on totalizer data (see F1034 and F01, table 2)
F254 DATE
Movement end date
Stays the same
F1056 CHAR(4)
Store number (must be 3 digits)
Stays the same
F1057 CHAR(4)
Terminal number (3 digits)
Stays the same
F1034 NUMERIC(5,0)
Totalizer number
Reserved totalizer # (see F1034, table 2)
F113 CHAR(10)
Active price description
Special {INV} flag
F126 INTEGER
Price level
Ref# assigned to trans.
© 2007 ... Your company
100
101
LogiVision's Back Office System Software Programmer's Guide
F64 NUMBER(12,4)
Movement quantity
Operator # (F1185)
F65 NUMBER(12,2)
Movement amount
contains transaction type (see F65 , table 2)
F67 NUMBER(12,3)
Movement weight
N/A
TABLE 2 - INVENTORY HEADER - list of internally reserved totalizer numbers and their associated
field use is as follows:
When F1034 is
F01
F113
F64
F65
F126
8620
Vendor # (F27)
{INV}
Operator # (F1185)
Varies
Ref #
8621
PO #
{INV}
© 2007 ... Your company
Inventory Tables
102
Operator # (F1185)
1= recv.
Ref #
8622
Invoice #
{INV}
Operator # (F1185)
2= adj.
Ref #
8623
Remark
{INV}
Operator # (F1185)
4= ord.
Ref #
8624
Cost target (F1000)
{INV}
Operator # (F1185)
5= cnt.
Ref #
TABLE 3 - SPECIAL INVENTORY FIELDS - Besides the normal fields, the inventory record contains
these additional special usage fields:
Transaction Type
F1034
F113
© 2007 ... Your company
103
LogiVision's Back Office System Software Programmer's Guide
F126
Receiving
8603
{INV}
Ref #
Adjustments
8602
{INV}
Ref #
Orders 8650
8650
{INV}
Ref #
Count 8601
8601
{INV}
Ref #
Example contents of records created for receiving:
F01
F1034
F113
F126
F64
F65
101
8620
© 2007 ... Your company
Inventory Tables
{INV}
1256
7
1
GT015
8621
{INV}
1256
7
1
1234
8622
{INV}
1256
7
1
Test Recv
8623
{INV}
1256
7
© 2007 ... Your company
104
105
LogiVision's Back Office System Software Programmer's Guide
1
000000000001
8603
{INV}
1256
24
46.25
000000000002
8603
{INV}
1256
144
249.95
NOTE that in the receiving example records above there is no record for the cost target, therefore no
F1034 = 8624. Different inventory transaction types may have more or less header records, depending
on the required fields for the inventory transaction type.
11
Importing and Exporting Data
Importing and Exporting Data
Previous
Top
Next
Importing and Exporting Data
Previous
Top
Next
© 2007 ... Your company
Importing and Exporting Data
106
Data Transfers
Because L-BOSS keeps all data in common database table format, it is easy enough to extract data
and create a disk file to export the data to other programs. The important factor is the file's format. LBOSS can also read files and import the data they contain, based on the file format.
Formats (eg. SIL, CSV, Fixed length...)
The most common file formats are fairly simple, such as CSV (Comma Separated Values), where
each line in the file contains specific field values separated with commas. The SIL standard file format
uses comma delimitation, but has a special "header" that describes the field order for each line. Other,
more complex data file formats are not as easily handled, such as DBF.
The export and import routines can be programmed in L-BOSS using command files, combining SQL,
and L-BOSS internal commands.
11.1
Importing Data
Importing Data
Previous
Top
Importing Data
Next
Previous
Top
Next
Importing in L-BOSS
The import process relies on two (2) files in particular. The data file, and a corresponding "header" file
that describes the exact format of the data file. The header file is created, then placed in the
\lboss\office\import folder. L-BOSS uses the header to create or modify records.
The header and data file names are important as they are used by L-BOSS to link the data import with
the specific file format header. For example, if a comma separated value data file for import bears the
name "MyPLU.csv", its corresponding header file must be "MyPLU.hdr". The import process requires
that the data file to import be placed in the \lboss\office\inbox folder, in other words, the inbox for the LBOSS that is importing the data.
NOTE: After placing the data file in the local inbox, you must remove the "archive bit" from the file
before L-BOSS will detect the file's presence. In Windows, the archive bit is a file property, available in
the selected file's right click menu.
© 2007 ... Your company
107
LogiVision's Back Office System Software Programmer's Guide
If there are errors during the import, L-BOSS will display an urgent message, and will place the data
file in the local "unprocessed" folder.
Working With Import Header Files
To create an import header file, you can basically start with an existing .hdr file that most closely
resembles the format of the data file to import. By default, L-BOSS ships with header files for importing
data from LogiVision's "Cashbox" DOS POS from earlier years.
Header files consist of several sections:
·A help section describing the L-BOSS commands available for manipulating the data during import.
·An @Style command to establish the data file's format.
·A section that precisely describes the data field formats.
·A section that shows the order that the fields appear in each data line in the import file.
·A section that contains the SQL commands to manipulate the data, performing the actual import.
Example CSV Import Header File
/* New Items import header file
*/
/* Price level 1
/*
*/
*/
/* The sub-departments are set to number 99 IF NOT EXISTING
/* Special commands:
*/
/* @STRIP(' ') to strip spaces or any char
/* @RPL(x=y,...) Replace value x by y
/* @VAL(x) Set to value x
/* @DEF(x) Set to value x if blank
*/
*/
*/
*/
*/
© 2007 ... Your company
Importing and Exporting Data
/* @FLAG(field AND value=value) Result=0 or 1 depending of the evaluation */
/* @MID(valueX,start,len)
Return the mid string of value
*/
/* @IF(valueX,valueY,valueZ,valueW) Value can be a string or a field */
/*
if ValueX equal valueY then use valueZ, otherwise valueW
/* @STYLE(x) x is 'FIXED' for fixed length record format
/*
'FIXEDLINE' for fixed length but CRLF ends the record
/* 'CSV' for Commas Separated value
/* more to come....
*/
*/
*/
*/
*/
/* NUMBER(x[,y]) convert to number. If y, will add a decimal
/* CHAD(x) Convert DOS characters to Windows characters
/*Special control:
*/
*/
*/
/* The value of F1001 can control how to import the data
*/
/*
1 : Item has been modified and must be sent to L-POS
*/
/*
2 : Import only if the item did not already exist
/*
3 : Import only if the item already exists
/*
20: Do not import this item
*/
*/
*/
@STYLE('CSV');
CREATE TABLE PRICE_DCT(F01 CHAR(20)@STRIP(' '),
© 2007 ... Your company
108
109
LogiVision's Back Office System Software Programmer's Guide
F30 NUMBER(8),
F31 NUMBER(5),
F126 CHAR(0)@VAL('1'),PRIMARY KEY(F01));
INSERT INTO HEADER_DCT VALUES
('HR','00000213','001001','','ERRORS.SIL','',2000063,0241,2000063,0241,,'ADDRPL',NEW
ITEMS,,,,,0,'1/1.0','VER:1.1.2.18','','');
CREATE VIEW PRICE_CHG AS SELECT F01,F31,F126,F30 FROM PRICE_DCT;
INSERT INTO PRICE_CHG VALUES
/* Data from the file will go here. The value 1441 is the size of the header */
@FILEDATA
;
/* After the file has finished, this footer will be executed */
@UPDATE_VIEW(ADD,pos_tab,ITEM_CHG);
@UPDATE_VIEW(ADD,price_tab,ITEM_CHG);
@UPDATE_VIEW(ADD,obj_tab,ITEM_CHG);
@UPDATE_VIEW(ADD,cost_tab,ITEM_CHG);
DROP TABLE ITEM_CHG;
© 2007 ... Your company
Importing and Exporting Data
11.2
110
Exporting Data
Exporting Data
Previous
Top
Exporting Data
Next
Previous
Top
Next
L-BOSS Data Export Setup
NOTE: Copying data from one L-BOSS installation to another does not require the export process.
The simplest way is to backup the data using the Filemaint program, then restoring the backups in the
new L-BOSS installation. For help on the Filemaint program, please see the Filemaint help section ,
under the Relational Database portion of this manual. Also, the SQL commands that generate the
export data require knowledge of the SQL language. The information in this manual does not cover
SQL programming.
There are several situations that require data exports. For example, transferring data to an accounting
package or other third party software. The L-BOSS export process can generate comma separated
value (csv) files, a common format for data, as well as fixed field length files.
The export process requires three (3) separate files:
·A .sql command file that executes the export routine, containing the L-BOSS commands required to
execute a .sql report file to extract the data from the L-BOSS data tables. This is like any other
command file, and can be scheduled to run using the L-BOSS Tasks / Events utility.
·A .sql Report file that contains the SQL commands to query the correct data tables, like standard
reports.
·A Report module "Properties" file. This file does not actually get used to generate the output, but must
exist for L-BOSS to execute the export because it refers to the .sql report file.
NOTE: The export process DOES NOT require a "Report Template" (.frp) file, unless the export's
report .sql file is also used to generate an on screen or printed L-BOSS report, accessible from the
Report selection utility. This can be handy to verify the file's data before generating the export file.
Launching the Export Process
Once the export files exist, the process can be run three (3) ways:
·From the L-BOSS "FIle" menu, use the "Execute command file" to locate and run the export .sql
command file.
Create a Task / Event for the command. If the task is set to be able to run manually or automatically,
·From the "Tasks / Events" option, select the export process task.
·Set the task to run automatically at a pre-defined time and cycle.
© 2007 ... Your company
111
LogiVision's Back Office System Software Programmer's Guide
The .SQL L-BOSS Command File for Data Export
The L-BOSS command file contains the L-BOSS internal commands that will define the output file's
destination folder, file type, Properties file, and the data format. The L-BOSS command files are
normally located in the \L-BOSS\Office folder.
An example of a simple .sql command file that generates an item data file with the PLU code and
description.
@EXEC(OUTPUT=@LBOSSOffice\Export\ITM.dat,STYLE=CSV,LRP=EXPORTPLU,FIELDS=F01;0
;F02;0)
Creates a file that contains:
0000000000001,OREO COOKIES
0000000000002,UNCLE BEN'S RICE
0000000000003,PREMIUM PLUS SODA BISCUITS
0000000000004,IGA SALAD DRESSING
0000000000005,IDEAL CREAM CORN
The command file MUST contain the following:
·The @EXEC internal L-BOSS command that triggers the execution process.
·The OUTPUT= to tell L-BOSS that this process will generate output.
·The @LBOSS internal variable that L-BOSS uses to know where it is installed (drive etc).
·The remaining path to the output file, including the file name and extension. (note that there is NO
"\" between the @LBOSS variable and the rest of the path). Make sure the indicated folder exists
before running the command.
·The STYLE can be CSV (Comma separated values) or FIXED (fixed field lengths).
·The Report Properties file (it MUST be in the \LBoss\Office\RPT report file folder).
·The FIELDS= determines each SIL ("F####") field and its fixed length, separated by semi-colons.
Note that the lengths are set to 0 for CSV type files, since the field's data determines the length. For
fixed length fields, the 0 would be replaced by the field's pre-set length.
© 2007 ... Your company
Importing and Exporting Data
112
NOTE: The FIELDS listed at the end of the line MUST be included in the report .sql file. However,
the .sql report file may actually extract more data than is included in the export file. The output file will
only contain the fields listed after the FIELDS= parameter.
The .SQL L-BOSS Report File for Data Export
As with any L-BOSS report, there must be an SQL report file that contains the necessary SQL
commands to extract the required data from the database tables. Usually the report SQL file and the
Report Properties file have the same name, but different extensions. L-BOSS .sql report files are
normally located in the \L-BOSS\Office\Rpt folder.
Following the simple example above, the .sql report file would be:
select
POS.F01,POS.F02
from
POS_TAB POS
The .LRP " Report Properties" File for Data Export
The report properties file (.LRP) MUST exist , and is used by L-BOSS to locate the .sql file. As any LBOSS report, the properties file lists the essential information for the report. L-BOSS .lrp property files
are normally located in the \L-BOSS\Office\Rpt folder.
© 2007 ... Your company
113
LogiVision's Back Office System Software Programmer's Guide
Following the example above, the properties file for the export process.
Errors on Export
If the .LRP or .SQL report files do not exist, the output process does not generate an "Urgent" error
in L-BOSS's error log. However, the exported data file will not contain data, but will contain an error
message indicating the file that cannot be found, or other errors. For example:
File not found.
EXPORTPLU.lrp
12
Backups
Backups
Previous
Backups
Top
Next
Previous
Top
Next
© 2007 ... Your company
Backups
114
Backing up and Restoring
About Data Table Backups
The L-BOSS utility can extract all data from the tables and store the information in text type "SIL"
(Standard Interchange Language ) files. The backup files contain information about each table, along
with the data to re-populate the tables. It can completely re-build the database from these files. When
set as an automated task, the backup utility works as a "cyclical" backup; it creates a series of folders
named for each day of the week. After the first week, the process replaces each day's existing backup
from the week before. There is always at least one week of data, going back day by day.
When and How to Use the Data Table Backups
These backups are only used if the data tables become corrupt, or if for some reason they do not
contain the correct data. If this situation should arise it may become necessary to replace the data
table, restoring it to a previous "last known as good" state. It is rare that all tables become corrupt, so it
is essential to know which table to restore. By default, the File Maintenance utility displays all the tables
(and their internal names) it finds in the current database when it opens.
To restore a file from a backup:
·Open the File Maintenance "View" menu and select the day of the week to restore the table from.
·The table list now shows the table names, and the associated backup files for that weekday.
·Select the table to restore. (you can hold down the [Ctrl] key to select more than one table)
·Press the "Restore" button at the bottom of the File Maintenance utility.
NOTE: The "Edit" menu also has preset selection patterns that simplify the selection process. For
example, if you want to select all the report tables, use the "Edit" menu's "Select Report files" option.
12.1
Autobackup
Autobackup
Previous
Top
Autobackup
Next
Previous
Top
Next
Creating An Automated Backup
© 2007 ... Your company
115
LogiVision's Back Office System Software Programmer's Guide
L-BOSS provides a utility to handle database tables, used to backup and restore information from the
tables, or re-index and pack tables. Some of the options controlled by the File maintenance utility can
be run from within L-BOSS as automated "Events". For example, the backup operation.
If your installation does not already include an automated backup "Event" you can create one by
following several simple steps. First, open the "Events / Tasks" utility using the L-BOSS desktop icon.
·Click the "Add" button at the bottom of the Automated Tasks utility to open the "Task Editor".
·Enter a description for the task, such as "Daily Backup".
·Place the cursor in the "Command" entry line, then click the "..." button to the right of the Command
box.
·A file browser opens. From the "Files of type" option at the bottom of the file browser, select
"Programs".
·By default, the file browser shows the "Office" folder. Navigate to the \LBOSS folder.
·Find and select the "FileMaint.exe" file.
·The Task Editor will automatically fill in the Command with the backup option.
·Place a check mark beside both the "Allow manual" and "Allow scheduled" options.
·Set the time for the backup operation.
·In the "Repeating cycle" box, enter 1 "days" to have the backup performed every day.
·Press the check mark icon on the Task Editor top bar to save the new task and close the editor.
© 2007 ... Your company
Backups
116
This example shows the Event / Task editor - Daily Backup event.
The backup files are created in folders under the \LBOSS\Office\Backup, with the day of the week as
the folder name.
13
Trouble Shooting Tools
Trouble Shooting Tools
Previous
Top
Next
Trouble Shooting Tools
Previous
Top
Next
Troubleshooting - Tips and Tools
LogiVision includes tools and utilities to help dealers and users verify and track operations. As with any
mission critical software, it is important to be able to find and resolve issues. Generally, these utilities
and trouble shooting tools can be broken down into several main sections, as detailed below:
·Version tools
·Error Messages and Logs
© 2007 ... Your company
117
LogiVision's Back Office System Software Programmer's Guide
·Report Data Verification
·Item Integrity Checks
This section of the manual describes the available tools and tips to finding and resolving issues that
arise while using the LogiVision retail control applications.
L-BOSS Version Numbers
As with most Windows type software, L-BOSS has an "About" option, located in the "Help" menu. The
About option also displays the current version number for the installation. The version numbers can
greatly help the technical support team at LogiVision, determining "known issues" with existing
versions. The About panel also has an L-BOSS icon at the top left of the About panel. Clciking the LBOSS icon opens a version panel, displaying version numbers for all the current applications. It also
produces a text file with the results. The text file is a great reference for both dealers and LogiVision
support team, easily faxed or attached to emails.
The text file is called "Version.txt" and can be located in the \Lboss folder. An example version.txt file:
LBoss.exe 1.7.0.0
2002/06/12
Maint.exe 1.7.0.0
8:36:28 AM
2002/06/07
Polling.exe 1.6.1.2
3:04:28 PM
2002/04/30
Entry.exe 1.4.2.1
2:41:00 PM
2002/05/29
12:26:16 PM
PosSetup.exe 2.0.1.13
2002/05/27
8:54:02 AM
FileMaint.exe 1.7.0.0
2002/06/07
9:33:46 AM
Ej.exe
1.4.1.4
2002/04/15
FormMgr.exe 1.5.0.0
Monitor.exe 1.0.0.1
EmlDrv.dll 1.3.1.0
4:03:14 PM
2002/05/21
2001/06/04
2001/12/12
9:53:56 AM
5:10:22 PM
12:55:36 PM
© 2007 ... Your company
Trouble Shooting Tools
CommPort.dll 1.0.2.1
Scanner.dll 1.0.2.1
2001/11/09
2001/11/09
POSPrinter.dll 1.0.2.0
2001/11/05
118
10:42:46 AM
10:43:34 AM
12:05:08 PM
L-BOSS Desktop Warnings
The L-BOSS desktop displays certain errors, making it obvious that there are critical situations that
should be immediately dealt with.
Urgent Message will flash on the L-BOSS Desktop whenever a new urgent message has been
received by the back-end controller. Clicking on the flashing Urgent message will access the view log
page and open the urgent message immediately. If you do not delete the urgent message the system
will continue flashing the warning.
Delete any urgent message from the list by selecting it and pressing the
log toolbar.
(delete) icon on the View
Unprocessed will flash on the main L-BOSS menu whenever a file is sent to the L-BOSS
"unprocessed" folder. This is not a normal situation and it should be addressed immediately. Access
the unprocessed folder by pressing the flashing Unprocessed message. The screen will switch to the
Status view of all terminal folders and you will have access to the list of unprocessed files. Right click
on the unprocessed files to reprocess them. If they cannot be reprocessed successfully contact your
dealer for assistance in determining the contents of the file.
13.1
Logs and Log FIles
Logs and Log FIles
Previous
Top
Next
Logs and Log FIles
Previous
Top
Next
View Log Utility
L-BOSS includes a utility to review the status of, and messages to and from all terminals and stations
© 2007 ... Your company
119
LogiVision's Back Office System Software Programmer's Guide
set up in the system. The View Log utility allows you to see the functional "in" and "out" boxes,
unprocessed commands or data, and "urgent messages.
This example shows the System Log viewer.
Used as a "trouble shooting" tool, the viewer provides a complete system report tool. The View Log
information is also "color coded" making it simple to distinguish between normal functionality and error
situations. When opened, the View Log utility searches all terminals in the system. Each terminal listed
shows arrows for "in", "out" and "unprocessed" mail boxes. These arrows change color depending on
the mailbox status. The viewer makes it easy to verify the entire system from the back end station for
any unprocessed SIL files in the POS terminals.
13.1.1 Viewing Logs
Viewing Logs
Previous
Top
Viewing Logs
Next
Previous
Top
Next
Viewing Logs and Messages
View Log allows you to view urgent messages, terminal status and mailboxes, normal system
messages and the system log tables.
© 2007 ... Your company
Trouble Shooting Tools
The
folder icon is used to open a log file that was saved on the system.
The
printer icon is used to print a message file.
The
icon is used for a print preview.
The
delete icon is used to delete a selected file.
The
120
OK icon saves any changes and exits the active screen.
The
(urgent message) icon switches the screen to display any urgent messages available on the
system. Right-click this icon to obtain a history of the urgent messages that you have deleted recently.
The
(status information) icon will show the different folders used by L-BOSS and the front-end
terminals and display the contents of those folders.
In normal situations the folders should be empty.
Files in the Local Inbox means that those files were received with the archive bit set on and L-BOSS
cannot process them. This is extremely unlikely.
Files in the Local Outbox is possible if one of your POS terminals is not online. The data that
should be transferred to that terminal is stored on the local terminal outbox folder until communication
with that terminal is restored. Then the data will be moved from the Local Outbox to the terminal inbox.
If there are files in the Unprocessed folder, L-BOSS was unable to import the data contained in
those files. Your first remedy should be to try and reprocess the files. Place the cursor on the
Unprocessed folder and right click. Select Reprocess files. If the files return to the Unprocessed folder
you will need to verify the file contents to correct the situation.
If there are files in the register inbox it is probably because the register is connected to the network
© 2007 ... Your company
121
LogiVision's Back Office System Software Programmer's Guide
but is not operating the POS application. If the POS is operating and there are still files in the register
Inbox, action is required to determine the problem.
If there are files located in the register outbox you have not collected all the sales. This is not a
normal situation and should be addressed immediately.
The
normal messages icon displays the normal priority messages recorded by the system.
The
(check) icon can be used to validate the data that has been collected and posted to the
report database by L-BOSS. This option shows the number of transactions and the total that the
system processed and compares the numbers with data stored on the registers. The total in the
difference column should amount to zero. If there is a difference in the amounts it is very important to
reprocess the data collected for that day. A difference in the quantity is less alarming. It means your
system has functions that do not involve dollar amounts which do not have a counter (totalizer)
programmed in the report totals. Correct this in the totalizer setup of L-BOSS or in the System settings
under totalizer in Pos-Setup.
The
(log) icon displays the table containing information that is recorded when files are exchanged
with the POS terminals. There are 3 different views available. they are accessed by pressing the logs
icon successively. The first view shows the information on files that L-BOSS sent to the lanes for which
no status file was returned to the backend. The second view shows information on files that were
received and not processed properly by a POS terminal. The third view shows a log of all the files
transferred to the lanes.
13.2
Report Data Integrity
Report Data Integrity
Previous
Top
Next
Report Data Integrity
Previous
Top
Next
When Report Data Goes Wrong
The L-BOSS report system is an ongoing process, using the "Mailslot" technology to transport report
data over the network as transactions are finalized by L-POS lanes. In normal operation, the data is
collected and absorbed into the database report tables. It is important to note that as dealers, the
report system must be setup at installation time and verified for all functions with amounts. If any
totalizers are missing, or if sales figures are improperly linked with totalizers, sales reports will not
© 2007 ... Your company
Trouble Shooting Tools
122
balance. The logs and processed files can help determine these problems before implementation time.
In some circumstances the normal process is interrupted, either because of network failures, or other
unusual events that may lead to incomplete report data. When reports do not balance (or are
incomplete), it is possible to re-trace the data trail using the log files and "processed" files that L-BOSS
saves when absorbing data.
After an L-POS SIL file has been processed, L-BOSS saves the SIL file in the \Lboss\Office\Sales
folder. This integrity check uses all the SIL files collected from the POS stations, comparing them with
the values from the database report tables.
The "Ck" Log File Utility
The
(check) icon can be used to validate the data that has been collected and posted to the
report database by L-BOSS. This option shows the number of transactions and the total that the
system processed and compares the numbers with data stored on the registers. The total in the
difference column should amount to zero. If there is a difference in the amounts it is very important to
reprocess the data collected for that day, after determining that all sales data has been received from
all lanes.
A difference in the quantity is less alarming. It means your system has functions that do not involve
dollar amounts which do not have a counter (totalizer) programmed in the report totals. Correct this in
the totalizer setup of L-BOSS or in the System settings under totalizer in Pos-Setup.
Re-processing Data
Because L-BOSS keeps all SIL files from L-POS transactions, it is possible to "re-process" all data
received from L-POS stations. Re-processing the data overwrites the report tables with the new values.
This process is most often used when a station could not send data, perhaps because of network
failures. If L-BOSS closed the daily period without those transactions, the daily totals will be incorrect.
Re-processing should take place after retrieving the missing sales data.
13.2.1 FixSIL Utility
FixSIL Utility
Previous
Top
FixSIL Utility
Previous
Top
© 2007 ... Your company
Next
123
LogiVision's Back Office System Software Programmer's Guide
Next
Repairing SIL Files
In some cases, it is possible to find duplicate or missing transactions within individual SIL files. LBOSS provides a utility to verify the SIL files, searching through them for transactions that have been
entered more than once, and any missing transaction numbers. Duplicate transactions may occur if
you take the SIL backup files from a POS station and re-process them in L-BOSS. You would perhaps
do that if there are missing transactions in the database report tables.
The FixSIL Utility
This example shows the Fix SIL utility.
NOTE: The Fix SIL program must be launched from the \loss folder manually. It is a "stand alone"
program, not run from within L-BOSS, or the L-BOSS Windows program group in the start menu.
The Fix SIL utility allows you to verify all SIL files collected by L-BOSS from L-POS stations.
Remember that every time a transaction is finalized in the front end, L-BOSS receives a SIL file. LBOSS stores these files in the \loss\office\sales folder after absorbing the information contained.
Log File With
The top of the Fix SIL utility displays a "Log FIle With" option that allows you to log "All", "Missing &
Duplicate" or "Duplicate Only". In most cases, you would not want to log All, since there may be a large
amount of data to be processed. If you think there are transactions "missing", log Missing & Duplicate,
or just Duplicate.
Remove Duplicate Transactions Button
© 2007 ... Your company
Trouble Shooting Tools
124
Once the Fix SIL utility is open, use the Remove Duplicate Transactions button to open a Windows
style file browser. Select the file(s) to verify by clicking one or more ([Shift] or [Ctrl] keys for multiple
selection, [Ctrl]+[A] to select all). Once selected, press the "Open" button to verify the SIL files for
duplicate transactions. If the utility finds any duplicates, it removes them and writes to the log file, also
saving the file to: \Loss\Office\Processed\Original folder.
Edit
This option opens the selected SIL file, using the text editor entered in the FixSIL.ini file located in the
\Lboss folder. By default the entry is blank; you must edit the .ini file and manually configure the text
editor of your choice. Since the SIL files can be rather large, Notepad cannot always open them. An
example .ini entry for the text editor:
[System]
Editor="C:\Program Files\JGsoft\EditPad Classic\EditPad.exe"
Print
This option sends the log file displayed on the FIxSIL utility's screen to the printer for a paper version
of the log file.
The Close option closes the utility.
13.3
Item Data Integrity
Item Data Integrity
Previous
Top
Next
Item Data Integrity
Previous
Top
Next
Item Maintenance Utilities
The "PLU" desktop icon and the "PLU" menu's "Item" option both open the Item table programming
utility. Once open, the Maintenance application's "File" menu adapts to include options and utilities that
apply specifically to item table. The options and utilities are designed to work with item data entry and
© 2007 ... Your company
125
LogiVision's Back Office System Software Programmer's Guide
programming integrity.
Item Table File Menu Options
Tests : This option includes item tests that help control item data integrity, such as sub-department
links, items with no price and other tests, including:
PLU at zero price in level 1: Items should have a price on level 1! This tests the item tables for
any items that do not have a price on price level 1, and opens a list box. If there are no items without a
price, the list is empty. If there are items without a price, you can double click an item to edit it right
away. You can then either edit or delete the item in question. Repeat the process until all items have
been dealt with.
NOTE: Items can exist without a price. The Maintenance application will not stop you from creating an
item, then leaving the item table without entering a price.
No sub-department: Items in the database should all be linked to a sub-department. Subdepartments allow for selective reporting and item group programming. Use this test to find any items
that are not linked to a sub-department. Selling items that are not linked to sub-departments will lead
to discrepancies in the item, sub-department and department sales reports. As with the item test, a list
appears allowing you to select the item for immediate editing.
Unreferenced sub-department: Although the Maintenance application has drop down lists to allow
you to select the correct sub-department for an item, you can also enter the sub-department manually.
This makes it possible to enter a non-existent sub-department as a link. The system will emit a
warning, but does not stop you from continuing. Use this test to find any items that are programmed
with a sub-department number that does not exist in the sub-department table. If there are unreferenced sub-departments, the items will appear in a list. You can then either correct the entry, or
create a new sub-department table record.
Unreferenced bottle link: Similar to un-referenced sub-departments, it is possible to assign a nonexistent bottle link to an item that sells with a bottle. Run the test to find any items that have been
incorrectly linked. From the ensuing list, you can either fix the bottle link number, or open the bottle link
table to add a new record.
Unreferenced tare link: Run this test to discover items in the database that reference a tare table
record that does not exist. If any items appear in the list, double click to edit immediately, correcting the
problem in the item, or programming the tare table to include the unreferenced record.
PLU price over 100.00: This test looks for items that have prices over $100.00. The system does not
limit item pricing; this utility is included to find items that have probably been incorrectly programmed,
often an undetected "typo". This is handy if your store does not have any items with prices in the
100.00 range.
Show POS targets: L-BOSS makes use of "target groups" to know which terminals are to receive
programming. When selected, an information list opens, displaying a list of all POS targets for the
© 2007 ... Your company
Trouble Shooting Tools
126
selected item. Normally, all terminals receiving programming will be in the PAL target. ("Programming
ALL"). For more about the terminal groups, see the "Register menu", "Terminal table" help pages in
this manual.
Show Price targets: The same as the "Show POS targets" utility above, this opens a list of the Price
targets programmed for the selected item.
13.4
Tracking Internal Communication
Tracking Internal Communication
Previous
Top
Next
Tracking Internal Communication
Previous
Top
Next
What's Happening "behind the scenes"
To understand how the L-POS / L-BOSS communications work, refer to the
"Communications and Networking" help page in this manual.
View internal process
When running, L-BOSS is constantly performing transactions, exchanging information and processing
commands. The "View Internal Process" option launches the "Viewer", a utility that monitors the
internal exchange system as it functions, tracking activity. This option can be used to view what the LBOSS mail exchange program is doing internally.
The viewer should be used to trouble-shoot; it is very useful in determining communication problems
between the back-end controller and the POS lanes.
NOTE:The options and controls available in the viewer utility control the viewer only, not the actual
internal system processes. In other words, you cannot stop or freeze the actual internal processing
system from the internal process viewer.
The Viewer Display
Once the viewer window is open, the utility begins to track the internal process, displaying a line for
every activity being tracked. Each line consists of:
© 2007 ... Your company
127
LogiVision's Back Office System Software Programmer's Guide
10:12:07.680 Mailslot received: 00190611ACT,SUPPORT3:
- the precise time that the process began, including milliseconds
10:12:07.680 Mailslot received : 00190611ACT,SUPPORT3:
- a short description of the process
10:12:07.680 Mailslot received: 001 90611ACT,SUPPORT3:
- the three digit store number
10:12:07.680 Mailslot received: 001906 11ACT,SUPPORT3:
- the three digit terminal number
10:12:07.680 Mailslot received: 00190611 ACT,SUPPORT3:
- the two digit internal Mailslot line number (internal id)
10:12:07.680 Mailslot received: 00190611ACT ,SUPPORT3:
- the terminal's status, ACT means "active"
10:12:07.680 Mailslot received: 00190611ACT,SUPPORT3 :
- the terminal's machine network name
The viewer has both a top bar main menu and buttons to control how the viewer behaves, and to allow
you to determine what exchanges are being traced. The help pages below this topic explain the
functions and controls for the "View Internal Process" viewer utility.
13.4.1 Process Viewer Buttons
Process Viewer Buttons
Previous
Top
Next
© 2007 ... Your company
Trouble Shooting Tools
128
Process Viewer Buttons
Previous
Top
Next
Controlling the Viewer
This example shows the Internal Process viewer.
Status bar and control buttons
The options and controls available in the viewer utility control the viewer only, not the actual internal
system processes. In other words, you cannot stop or freeze the actual internal processing system
from the internal process viewer.
Status Bar
The status bar is the area at the bottom right of the viewer window, and displays current system
information, such as the "average merge time", the transaction number and more. Hold the mouse
cursor above the status information to find out what the information represents.
Buttons
OK: The OK button closes the viewer, and is identical to the "Files" menu's "close" option.
FREEZE: This option "freezes" the viewer at it's current display line. It behaves as a "toggle", in other
words, clicking the first time freezes the display; clicking the second time "unfreezes" the display, which
then continues to display lines. Although similar to the "Files" menu's "stop" option, no lines are
© 2007 ... Your company
129
LogiVision's Back Office System Software Programmer's Guide
skipped; the viewer continues displaying all activity from the point at which it was frozen. The "stop"
option is explained in the "Process Viewer Menus" help page above.
READ KEY: This option checks the hardware copy protection key and tests it's current
communication status. Only one machine in the system hosts the key, and runs a program that
"broadcasts" the key info. Use this option to determine if the key is functioning properly. The viewer
does not show the content or value the key returns, only that the communication was successful. For
example:
11:08:27.300 Send Key MailSlot
11:08:27.520 Mailslot received: Key info
13.4.2 Process Viewer Menus
Process Viewer Menus
Previous
Top
Next
Process Viewer Menus
Previous
Top
Next
Controlling the Viewer
Internal process viewer menus
The options and controls available in the viewer utility control the viewer only, not the actual internal
system processes. In other words, you cannot stop or freeze the actual internal processing system
from the internal process viewer.
Files Menu
Stop : This option stops the viewer at it's current display line and behaves as a "toggle". In other
words, clicking the first time stops the viewer from displaying more lines and puts a check mark beside
the menu option. Clicking the second time restarts the viewer, removes the check mark and continues
to display lines. All internal processes continue as usual; this does not stop actual internal
processing. Although similar to the "Freeze" button, the "stop" option skips all process lines or activity
between the time it was stopped and when it is restarted. The activity or processes that occurred
during the time the viewer was stopped will not be displayed.
Freeze : The same as the button found at the bottom of the viewer, this option "freezes" the viewer at
it's current display line. It behaves as a "toggle", in other words, clicking the first time freezes the
display; clicking the second time "unfreezes" the display, which then continues to display lines.
Although similar to the "Files" menu's "stop" option, no lines are skipped; the viewer continues
© 2007 ... Your company
Trouble Shooting Tools
130
displaying all activity from the point at which it was frozen. When unfrozen, the viewer displays all
activity lines since frozen.
Reset transaction counter : This option resets the internal process line count for the viewer only, not
the actual internal process number . It is a counter used by the viewer to keep track of which line is
being displayed. The current process line count is displayed at the bottom right of the viewer's status
bar (bottom of viewer window).
Close : The "Close" option closes the viewer, and is identical to the "OK" button at the bottom left of
the viewer.
View menu
The viewer allows you to control which types of internal processes you wish to track. Checked items in
the list will be tracked and displayed as transaction lines. The option acts as a "toggle"; click to select
or unselect the items to be tracked. In some cases (searching for a specific type of internal process) it
may be easier to follow only one type of process to determine communication problems.
MailSlot : Information requests to and from the back office, hardware copy protection key information
etc.
EJ : "Electronic Journal"; actual POS transactions, as sent to the back end after a tender key finalizes
a transaction.
Mime : Other information communicated to and from the POS (such as images, search results).
Import : Information files received from external sources, such as PLU files from another store or
head office.
Export : Information files sent to external destinations, such as PLU files sent to another store or head
office.
Misc : Other types of files, messages.
Errors : Error messages communicated through the system after an error occurs, normal, urgent etc.
Commands : Polling requests and other command type files.
13.4.3 View Polling Status
View Polling Status
Previous
Top
Next
View Polling Status
Previous
Top
Next
© 2007 ... Your company
131
LogiVision's Back Office System Software Programmer's Guide
View Polling Process
This "File" menu option opens a two pane viewer that displays the files being retrieved from, and sent
to, the POS terminals, along with a list of the stations (or POS terminals) involved in the polling
process. The viewer is not actually part of L-BOSS, but a separate utility or application. When the
polling software is running (in the background), it's icon shows in Window's "System tray" (bottom right
corner of the Windows desktop tool bar).
NOTE:The polling viewer uses Window's regional settings to determine language. This means that the
language specified in L-BOSS does not control the language displayed in the viewer. To change
languages, you must change the settings in the Window's Control Panel - Regional Settings utility.
This example shows the Polling Process viewer.
Menu Options
File Menu: The "File" menu has two options:
Close : Closes the viewer, leaving the polling software running, it's icon visible in the Window's
System tray.
Quit polling : Closes the viewer and also stops the communication process. You should only use
© 2007 ... Your company
Trouble Shooting Tools
132
this option if you are certain that you want to stop communications all together. Once the polling utility
is stopped, you must exit and re-launch the L-BOSS application to re-start it.
NOTE:You can also launch the polling viewer by double clicking the system tray icon, or right clicking
it and selecting the "View status" option. The context menu (right click) also has both the "Close" and
"Quit Polling" options explained above.
Viewer Display windows
Top window: Each line displayed in the polling viewer includes the exact time to the millisecond, as
well as the store and terminal number. If the server cannot reach a POS station for sales information,
the viewer displays the error.
Example top window line: 13:58:18.130 Polling 001 024
Bottom window: The polling viewer's bottom window shows all the POS terminals presently
configured in the L-BOSS station's "terminal list", their store and terminal number, current status, and
machine network name. Selecting a terminal from the list will display that terminal's location
information in the status line at the window's bottom bar.
It is also possible to stop or force the polling process for one or all terminals from the View polling
bottom window. After selecting a terminal from the terminal list, clicking the right mouse button opens a
menu allowing you to:
Pause : Use this to stop one terminal from communicating.
Communicate now : Forces that terminal to begin polling immediately.
Stop All : Stops all terminals in the terminal list from communicating.
Start All : Forces all terminals to poll immediately.
14
Upgrading L-BOSS
Upgrading L-BOSS
Previous
Top
Next
Upgrading L-BOSS
Previous
Top
Next
Handling Version Differences
© 2007 ... Your company
133
LogiVision's Back Office System Software Programmer's Guide
What Can Change
LogiVision is constantly improving the features that ship with L-BOSS and L-POS. These new features
often require that the data tables accept new information, usually new fields. This means that the old
data tables must be recreated so that the new fields will exist. The "backup and restore" process
recreates the tables with the new fields. So as far as database tables and their contents go, upgrading
is not really a problem.
NOTE: L-BOSS versions now prompt the user to save the .sql command files and to run the backup
and restore during the upgrade.
However, because the L-POS and L-BOSS applications are customizable, it is not possible to simply
install over an existing version. Many files such as initialization files may have been modified for that
particular installation. For example, if you modify an existing default report to design a custom report,
the update will write over the report file (see note below). There are several folders that contain these
types of files. They should be backed up before installation, then used to replace new files if required.
NOTE: When customizing reports, NEVER modify an existing report. You should always create a
new report, and when a prompt asks if you want to base the new report on an existing one say yes and
select the existing report that you want to use as a model. You will also be asked if you whish to create
a new template or use an existing one. If you use the default report files and customize them, always
re-name them to protect your work. Upgrades will not remove or overwrite report files that do not have
the same name as the report files that ship with L-BOSS.
Version History
To check for version differences, see the L-BOSS Version History page below. The version history is
also available on the LogiVision website, dealers section, download area, near the top of the page,
click on the "history_lboss.htm" link. The "History" link contains L-POS version history. The file can also
be found in the \Lboss folder, but the most recent version is always on the website.
Upgrading - What to do
As with any "mission critical data" situation, it is essential to backup everything before making major
changes. Most of today's hard drives are capable of holding vast quantities of information. It only takes
a few minutes to copy everything to another folder before trying to upgrade.
Short of backing up everything, there are several folders and that contain critical configuration
information:
·The \Lboss\Office\Backup folder (after having used the Filemaint program to create the updated files).
·The \Lboss\Ini folder (containing any hardware devices used directly by L-BOSS).
© 2007 ... Your company
Upgrading L-BOSS
134
·The \Lboss\Office\Ini folder (containing POS setup files with the .pal extension - used to program the
front end machines)
·The \Lboss\Office folder's .sql command files, as some may be modified or created for custom
situations.
These files represent the minimum setup and database files required to re-configure a new
installation.
Upgrading From Older Versions
If you are upgrading from very old L-BOSS versions (from before version 1.4.0), there are several
commands that must be run from within L-BOSS after the newer version has been installed. Upgrading
more recent versions does not require running these commands.
After installing and restoring backups :
·From the Maintenance application's "File" menu select the "SQL COmmand" option, opening a
command panel.
·From the Drop down list at the top of the command panel, select "Set Main Dept. & Sub-dept
descriptors".
·After that, select the "Reverse Sign" command.
15
Copy Protection Key
Copy Protection Key
Previous
Top
Next
Copy Protection Key
Previous
Top
Next
Software Protection Key Overview
LogiVision works hard to develop its retail control software. In an ideal world, the software key would
not be necessary, but we all know about that. The key protects the software, preventing illegal
distribution. Without this protection, LogiVision would not be able to continue to exist. The key also
permits dealers to offer customers only the portions of the software that they truly require. Modules can
© 2007 ... Your company
135
LogiVision's Back Office System Software Programmer's Guide
be added by phone, making it a simple process to upgrade customers.
L-BOSS and L-POS ship with all possible configurations, and installs with them all. Each module has a
certain behaviour when a user access it and it is not registered. Sometimes an error message will
appear and will not allow further use, such as multi-station access. In other cases, the module's full
functionality is accessible, but the user cannot save any changes. This allows users to see the
modules features, and decide if they wish to register the module with LogiVision.
Installing the Key
NOTE: If there is a printer attached to the software key, make sure that this printer stays ON all the
time .
When you install L-POS and L-BOSS to run in active mode, the Sentinel Key Driver must be present
on ONE MACHINE ONLY . The key does not necessarily need to be installed on the "server". It can
be installed on any station, either front or back end machine, even if the machine does not run L-BOSS
or L-POS. You only install the Sentinel drivers on the machine that physically has the key . The
Sentinel driver program must be running on the machine that has the key for the system to run in
active mode.
To ensure that the program is running even after a system crash or re-boot, you should place a link to
the program (KeyRdr.exe) in the C:\Windows\Start Menu\Programs\StartUp\ folder. The KeyRdr.exe
file is located in either the \LBOSS or \PosWin folders after installation, so can be found on both front
and back end machines.
To install the Sentinel Key and Driver:
·Place the key physically on the chosen machine.
·On that machine, run the LogiVision install program.
·From the install menu, select "Sentinel Drivers".
·A confirmation window opens, displaying a message.
·Select "OK" to install the driver.
·Create a link to the KeyRdr.exe program in the C:\Windows\Start Menu\Programs\StartUp\ folder.
The Sentinel key is designed to "piggyback" with other keys; some protection keys will not. If the
machine selected to host the key has an existing protection key for another program, try placing the
LogiVision key after the existing key, or, in network situations, select another machine to host the
LogiVision key, and run the KeyRdr program on that machine.
Running Multiple Key Reader Programs
© 2007 ... Your company
Copy Protection Key
136
There should only be one key reader program running on the network. If you launch a second
KeyRdr.exe program on the same network, the keyrdr.exe system tray icon flashes from yellow to red
continuously. Opening the second copy, note that the background color is blue, and there is a red
message at the top of the key reader panel that says "Key Reader disabled, (second copy) ". If you
want to run the key reader on this machine, exit the first key reader program, and remove its link in the
Windows startup folder before running it on the new machine.
LPT (parallel) Port
The key is designed to run on any LPT port without required specific configuration (LPT2 for example).
If you experience problems with the port, contact LogiVision for solutions.
Defective Keys
Occasionally, the Sentinel key may be defective. Although this is very rare:
If the Sentinel key is defective on installation, and the KeyRdr "driver" never successfully reads the
hardware key the system will only run in demo mode.
Should the key fail to function properly, (or is not detected for whatever reason) after having worked
at least once , the system will continue to function in active mode for 14 days. There will be an error
message every day, showing the number of days remaining. After 14 days, the system will only run in
demo mode. It is important to contact LogiVision IMMEDIATELY after getting an "INVALID KEY"
error message, to allow as much time as possible to obtain a new key.
NOTE:Both L-POS and L-BOSS programs will run in demo mode if no Sentinel key is detected on the
system. Demo mode allows complete system functionality, but sales totals are limited to $100.00. After
reaching the limit, you can still sell, but the system stops polling. All system totalizers must be re-set to
0 to resume demo mode use.
15.1
Upgrading the Key
Upgrading the Key
Previous
Top
Next
Upgrading the Key
Previous
Top
Next
Registering New Versions, Lanes, Stations and Modules
© 2007 ... Your company
137
LogiVision's Back Office System Software Programmer's Guide
The key upgrade process is fairly straight forward, just a simple phone call. Before calling LogiVision
to modify the key, please be sure that you are at the station (computer) where the key is physically
installed, and the KeyRdr.exe program is running.
The KeyRdr program places an icon in the Windows "systray", normally located at the bottom right of
the Windows desktop, along with the clock. Right clicking the icon opens a menu. Select the "Program
Key" option. You can also double click the icon, then select "Program Key" from the reader program's
"File" menu.
Double clicking the "Options 1" and "Options 2" shows the currently programmed values in the key.
You will be asked to supply the current information from the key, used by LogiVision to locate the key
in the key database. The information required is:
·Serial Number
·Option 1
·Option 2
·Key Code
© 2007 ... Your company
Copy Protection Key
138
If you are upgrading versions or adding more lanes, you will be asked for the old version or old
number of lanes. The LogiVision support person will ask you to wait while the key program generates a
new key code. When the new key code is generated, you will be asked to enter the new code in your
key reader program. After entering the new code, pressing the "Program Key" option will write the new
code to the key. The key program will respond with a "key programmed, thank you" message.
16
Additional Resources
Additional Resources
Previous
Top
Next
Additional Resources
Previous
Top
Next
Helpful Resources
The LogiVision website is probably the best way to keep on top of version upgrades, patches and
documentation. If you do not have a dealer logon for the LogiVision dealer pages, please call or email
your request.
16.1
POS 101 Keyboard Commands
POS 101 Keyboard Commands
Previous
Top
Next
POS 101 Keyboard Commands
Previous
Top
Next
Key Assignment for the Default 101 Keyboard
F1
= Cash
Sh-F1 = Foreign Cash
Alt-F1 = No Sale
Ctrl-F1 = Cashier
© 2007 ... Your company
139
LogiVision's Back Office System Software Programmer's Guide
F2 = Suspend/resume
Alt-F2 = Report current cashier today
Sh-F2 = Manager override
Ctrl-F2 =
F3 = Check
Alt-F3 = Foreign subtotal
Sh-F3 = Tax shift
Ctrl-F3 = Receipt ON/OFF
F4 = Charge
Alt-F4 = Customer ID#
Sh-F4 = Price override
Ctrl-F4 = Number entry
F5 = Visa
Alt-F5 = Price level
Sht-F5 = Set-up menu
Ctrl-F5 = Reports
F6
= Item disc%
Sh-F6
= Price change to back
© 2007 ... Your company
Additional Resources
Ctrl-F6
F7
= Subtl Discount
= Master Card
Alt-F7
=
Sh-F7
=
Ctrl-F7
F8
=
= Void last item
Sht-F8
= Refund
Alt-F8 = Correction
Ctrl-F8 = Void All
F9
= Function Menu list
Alt-F9
= Help
Shift-F9 = Search description PLU
Ctrl-F9
= Search account
F10
= Multiply
Alt-F10
=
Shift-F10= Subdpt #
Ctrl-F10 = Exit
F11
= Reprint
© 2007 ... Your company
140
141
LogiVision's Back Office System Software Programmer's Guide
Alt-F11
= Lotto paid out
Sh-F11 = Reversal
Ctrl-F11 = Paid out
F12
= Store coupon
Alt-F12
= Vendor coupon
Sh-F12 =
Ctrl-f12 = Price verify
ENTER = PLU
`
= Subtotal
Alt-1
= Open Subdept 1 (Grocery)
Alt-2
= Double cpn shift
Ctrl-PgUp= Review journal backward
Ctrl-PgDn= Review journal forward
Alt-B
= Bottle return
Alt-F
= Flip chart
Alt-G
= Grocery supdpt.
Alt-I
= Print invoice
Alt-P
= Initialize printer
Alt-R
= Received account
© 2007 ... Your company
Additional Resources
16.2
Alt-S
= Scale shift
Alt-T
= List tenders
Ctrl-F
= Food stamp
Ctrl-N
= No limit
Ctrl-P
= Password change
Ctrl-T
= Training mode
Ctrl-V
= Validation
142
L-BOSS Version History
L-BOSS Version History
Previous
Top
L-BOSS Version History
Previous
Top
This section contains Information about L-BOSS versions. The version history is available on the
LogiVision website, dealers section, download area, near the top of the page, click on the
"history_lboss.htm" link. The "History" link contains L-POS version history. The file can also be found in
the \Lboss folder, but the most recent version is always on the website.
L-BOSS update information
Installing an upgrade is different than installing a new software. Unless you uninstall and then
delete the LBOSS folder, no data should be lost on the terminal. Nonetheless, several
precautions should be taken. Please make a backup of the full LBOSS folder including subfolders and all files on the target machine before you begin. If something unpredictable occurs,
you will be able to use the back-up files.
N.B. When upgrading from an older version, take the time to review the notes that relate to all
versions released since the one you are replacing. If you are updating to the latest version from
a much older version you only need to run data conversion once. There is no need to update
from version 1.4.0.3 to version 1.5.0.2 if you want to end up with version 1.6.0.3. Just update
from version 1.4.0.3 to 1.6.0.3 and convert the data or other steps required depending on the
© 2007 ... Your company
143
LogiVision's Back Office System Software Programmer's Guide
version.
If you are installing an update on a network with multiple LBoss stations, each station needs to
updated to the latest version. It is important that the same version of all programs be used in a
store. When you are prompted for data conversion on the LBoss server, execute the backup
and restore procedure with the internal FileMaint program when prompted. When you install
onto an LBoss workstation, it is NOT necessary to convert the data. An LBoss workstation
uses the same data as the server and it should already have been converted when you updated
the server.
When you are installing updates to L-POS, it is required that you perform the data conversion
on each lane when prompted because each lane does have its own database tables.
Version 1.6.0.4
NOTE: The upgrade to this version requires data conversion. Run Filemaint.exe when
prompted. This procedure will back up all you data and restore it to the new format with the
new fields that were added to the system. Depending on computer speed and file size this can
be a lengthy process.
+ The Crystal reports program is no longer being used internally by the system to access data tables
and produce reports. Logivision supplies an internal program to access data and produce reports.
Take note that the format of some reports may have changed. If you have developed reports in Crystal,
modifications may be required to allow them to operate with the new data formats in LBoss 1.6.0.0 or
greater. Data is now selected via Sql commands and report print-out style is formatted using the Forms
Editor software available from Logivision. This software is normally part of dealer key and can be
purchased for end user as a module when required.
+ The Form Editor program has been enhanced to allow label design.
+ All price methods are now supported during batch creation.
+ Batch verification has been improved to speed the process of detecting the correct prices.
+ LBoss now verifies both price and quantity to determine the best price to be used on the registers
when concurrent batches exist for the same product.
+ The Active price and Next price display windows in the item maintenance program did not always
display the correct information. Corrected.
+ The filtering and global modification has been improved to allow operations on several fields that
were restricted previously.
+ The totalizers have several new fields including report section, sequence and format to provide
greater flexibility in report definitions.
+ The maintenance module now has a menu entry to setup an rs232c type scanner for use in item
maintenance.
+ Quantity on hand for an item can be viewed from item maintenance by moving the cursor over the
Inv flag on the Inventory tab of PLU maintenance. A hint appears to display current on hand.
+ LRemote has been enhanced with improved error control and logging.
+ The Entry module has been modified to ensure easier data entry. All transactions made in the entry
module are now saved as separate entries. Reprocessing is now possible on transactions made to the
entry module.
+ The LBoss file menu has a date conversion utility to convert from the internal Julian date to both unix
date and normal calendar date styles.
+ The Monitor mode is now available from the LBoss modules menu. This allows viewing of the
register entries from an LBoss station.
+ The LBoss menu has a new section called Special. Commands can be added to the Special pulldown list that act as shortcuts to reports or other functions they use repeatedly.
+ The PLU maintenance screens have been modified to use multiple tabs instead of one page with
data from multiple tables.
+ The stock control flags have been moved to a new table to allow easier multi-record creation and
tracking.
+ Several AR related issues have been corrected in this release including new statement forms, aging
© 2007 ... Your company
Additional Resources
144
reports and interest calculation.
+ The Events programming has been modified to allow users to easily redefine the order the events
appear on the list.
+ The View internal process function has been enhanced with a menu that allows selection of the logs
to be viewed.
+ The LBoss Help file is now available in both CHM and PDF format.
+ New flags are available in the LBoss configuration to allow multi-store selection, to reinitialize
printers before reports and to set the report print preview to maximized.
Version 1.5.0.5
NOTE: The upgrade to this version requires data conversion. Run Filemaint when prompted.
This procedure will back up all you data and restore it to the new format with the new fields
that were added to the system. Depending on computer speed and file size this can be a
lengthy process.
NOTE: You must run 2 SQL commands to create description fields in several tables. Start
LBoss and run the Maintenance application. From the file menu of Maintenance select SQL
Command. A window will appear that allows you to type in an SQL command or select a
command from the pull-down list.
·Select the command "Set main Dept & Sub-dept descriptors" and press the Execute button.
This command prompt for the source descriptor PAL by default. This is the correct source
unless you are using multi-store item programming and then you need to decide which target
will be used to set the main (head office) descriptors. It will execute very quickly and the
window will display "done" when complete.
·Select the command "Set main descriptor Paradox" or "Set main descriptor MS-SQL"
according to the database type you are using. You will again be prompted for source descriptor
with PAL as default. This will take a bit longer and the system will indicate "Done" when
complete.
+ Multi store system has been enhanced to allow improved head office management of the system.
+ Program targets can now be set up as item, price and cost targets to further enhance multi-store
set-up.
+ The scale tables have been added to allow data creation for scale management systems.
+ Several reports have been improved to provide better statistical information.
+ An EJ report has been added to allow detailed listing of payment types.
* The view log functionality has been enhanced.
* The internal database updating has been enhanced.
* LReport was reporting a path error if data was being accessed from drive other than C. Corrected.
* LReport was displaying an NT error. Corrected.
* The weekly item by sub-department report was sending all data to sub-department 0. Corrected.
Version 1.4.1.6 2001.09.13
+ Reprocessing a day from archived files now reverses the account transactions before reprocessing
the day.
+ New fields have been added to the database to allow comparative pricing on labels.
+ New fields have been added to the database to allow more specific reports.
+ The scale table has been added to allow preparing data for scale management systems within LBoss.
+ New fields have been added to allow retail price calculation based on the cost of the item.
* An error occurred on some systems when the default installation drive was not used.
Version 1.4.1.5 2001.08.18
* Reprocessing of transactions has been simplified.
+ Multi-target item maintenance has been added to the system.
© 2007 ... Your company
145
LogiVision's Back Office System Software Programmer's Guide
Version 1.4.0.5 2001.05.10
N.B. IMPORTANT: An upgrade to version 1.4.0.5 should not be performed with the system live.
Please terminate all applications including front end and back end. Ensure that the mailboxes
are empty. If you upgrade the back end to version 1.4.0.5 or greater your front end MUST be
upgraded to version 2.0.0.11 or greater.
+ Further enhancements have been made to the parent-child inventory tracking.
* An error occurred in some situations showing a sharing violation while processing transactions.
Corrected.
* An error could occur on LBoss when the company name was changed on stations 2 or higher where
the station number sometimes reverted to station 1. Corrected.
+ The Urgent Message that warning now displays on screen if files have been moved to the
unprocessed folder.
Version 1.4.0.3 2001.05.01
N.B. Ensure that all functions and totalizers have been created in the Maintenance application
with the correct files and debit or credit data. These new totalizers must be sent to the register
terminals being used. Totalizers that have no "D" for debit or "C" for credit or the wrong sign
(in the back-end set-up) will not function properly. Earlier versions of LBoss used an internal
hard-coded formula for report balancing. This code has been replaced by the D (debit) and C
(credit). If you are unsure about whether the totalizer should be a debit or a credit, refer to the
totalizer set-up in a new LBoss installation using version 1.4.0.1 or greater (and not an install
done over a previous version.) The totalizer debit and credit set-up is correct in a new install of
version 1.4.0.1. When an update is made this type of data is not overwritten so it is very
important to make any necessary changes and send these changes to the POS terminals before
using them. If your POS terminals display an out of balance warning error after a transaction is
is probably because the totalizer set-up is incorrect.
+ The account discount function has been fixed to function 412 to use subtotal discount and to
function 452 to use item discount for account reductions. The selection in PosSetup has been changed
to only allow selection of discount by item or not. This choice assigns the appropriate function (412 or
452) automatically. Make sure that you are not using function 412 and function 452 for another
function.
+ L-Boss now supports parent-child item file maintenance. This allows you to control the sales and
inventory for multiple PLU codes that all link back to the same parent item as required in liquor stores,
tobacco shops, etc. (where the same product purchased by the case could be sold many ways such as
by the item, half case and case.)
+ The report module can now be executed unattended from the LBoss scheduler.
+ L-Boss has several new reports.
+ LBoss maintenance has been enhanced to provide easier navigation and record addition.
+ LBoss customer record has several new fields available.
+ The PLU record now includes the Not for sale flag to restrict the item from being sold at the POS.
+ LRemote has been enhanced to increase speed and provide better security during data transfer
between LBoss head office and LBoss remote stations.
+ Several new totalizers have been added into the system.
+ LBoss has a new option to transfer sales data to the general ledger system of certain accounting
systems.
* The Electronic journal has been corrected to print all results of a search that was performed.
+ The View Log Status feature has been enhanced to allow easier view of terminal status.
Version 1.3.1.2 2001.01.07
+ Batch files have been added to L-Boss to allow promotional price batches or price change batches.
The L-Boss batches use Best price selection . This means if the same product is in more than one
batch with overlapping dates, L-Boss will send the price from the batch with the lowest price to the
register.
+ You can now search for items by vendor code in the PLU maintenance, in batch maintenance, and
in the entry modules (ordering, receiving, etc.)
© 2007 ... Your company
Additional Resources
146
+ Rental tracking is now available with L-Boss.
+ L-Boss reports have been redesigned to provide compatibility with Ms-Sql.
+ The account system now allows adjustments to the customer balance through the backend system.
+ Pickup and loan has been added to the Entry module to allow these transactions to be done on the
back-end system.
+ The PLU screen layout has been modified to allow easier data entry between the price and cost
fields.
+ L-Boss now supports multi-target for item deploy from a central site. This way pricing and other item
fields can be defined for individual stores or store groups.
+ L-Boss now includes a simplified method to execute individual sql commands such as transferring
an individual table like bottle deposits, functions, etc.
+ L-Boss PLU maintenance can now be performed by using an rs232c scanner to search for products.
Version 1.3.0.0 2000.11.07
+ L-BOSS will now attempt to backup and restore the database tables automatically when a new
version is installed and the table layouts have changed.
+ New system integrity checks have been added to ensure that data transfer and updates are being
completed. Use the View Log icon and you will see a new button CK to access the system Checks.
This feature logs data received from the L-POS terminals and compares the imported data totals with
those data totals stored internally on the L-POS terminal. The Lo icon is used to view the file transfer
process between the L-BOSS and the L-POS terminals. Every communication that L-BOSS initiates to
send data is logged as a file number. The L-POS sends back a received message to L-BOSS to
confirm reception and sucessful processing of the data in the file or a failure message. The first time
you press Lo , the files listed in the table view are those that were sent and not received by the front
end. Press the Lo icon again and the system displays files received that could not be processed by LPOS. Press the Lo icon again and L-BOSS displays a list of ALL files transferred. This database is
rolled over after 30 days.
+ The Environmental fees are now available. Access the bottle link table and you will see a new
section called environmental fee. Users who require the environmental fee will understand how to
create the records they need.
Version 1.2.2.11 2000.10.20
N.B. This version of L-BOSS contains new fields in several tables in the database. Please use
Filemaint.Exe in the C:\Lboss folder to backup and restore ALL tables after installing if you are
performing an upgrade from any previous version. If this is the first install of the software on
this terminal it is not necessary to use Filemaint at this time.
+ L-BOSS maintenance now includes a global modification process to change multiple fields on
filtered PLU's. Examples of global modifications include price increase, decrease, price matching for
Mix match numbers, etc.
+ A setup screen has been added to define the host terminal operation to prepare files for a host
system, such as a remote computer that requires data updates.
+ LRemote is available to transfer files between L-Boss terminals in remote locations.
+ L-BOSS has a new pricing method available for mix match price method type. Assign letter F to set
"Buy one and get ONLY ONE free".
+ Header files for importing Cash Box files into L-BOSS have been added to ease the data conversion
requirements. Export the Cash Box item file to CASHBOX.DBF and copy the file to the
LBOSS\OFFICE\INBOX folder. Once the archive bit is removed the LBOSS will import the data. In the
default import all sub-department numbers will be set to 1. If you use the gobal change function in
Cash box to convert the category descriptor field of the PLU items to numeric only values, then the
import mask can be modified to send the category number to the sub-department field in L-BOSS. Call
for further assistance.
+ To use filemaint to run a backup of the files as an event in the L-BOSS events/tasks list, create an
event in LBOSS and put this command in the command field
© 2007 ... Your company
147
LogiVision's Back Office System Software Programmer's Guide
@EXEC (run=Filemaint.exe /BACKUP).
NOTE: Starting with LBOSS 1.2.2.8, selecting any EXE file will add the RUN= automatically. Also,
selecting FILEMAINT.EXE automatically add the /BACKUP argument.
Version 1.2.2.7 2000.10.06
+ L-BOSS pricing methods have been enhanced. The split price such as reg. 1.00 / 3 will now
calculate .34, .33, .33 without creating a package price. You may assign different items with the same
base split price as 1.00 / 3 and assign to a common mix match table. L-POS will now calculate the
correct mix price without a package price.
+ It is no longer necessary to assign a mix match group number to use LQD on a single item. Enter
the regular price and the limited quantity discount price. Setting mix match on those items will allow
control within a group of products over the quantity offered at the discount price.
+ Package pricing such as .50, .50, .25 can be created without mix and match for giving a deal price
on unique items.
+ Screen layouts have been modified.
+ Entry module has been enhanced to facilitate the order and receive transactions.
+ The PLU maintenance table has a new field for label types.
+ The PLU maintenance will now detect a price change so that items can be sent to a label system.
+ A field has been added to manually add an item to the label batch.
+ A host communication option has been added to L-BOSS to allow data forwarding on a batch or
real-time basis to a remote L-BOSS host system. This option is designed to allow either trickle data
over an open connection or scheduled batch transfer over the connection.
+ Mailslot messaging has been modified to cooperate better with the NT operating system.
+ Certain files were not loading properly on startup load. (FLIP.PAL for one). Corrected.
+ Crystal reports has been recompiled to correct an error when attempting to use the graphical
reports. Please reinstall the Crystal reports distribution files (CRinst.exe).
Version 1.2.2.1 2000.09.06
+ L-Boss now includes a language selection to permit bilingual (English or French) operation.
+ L-Boss terminal group programming has been improved.
+ Account reports now include statements and aging reports.
+ Item reports now include sorted by subdepartment. Financial report can be printed with departments
and with sub-departments.
+ Key reader has been enhanced.
+ The Maintenance application has been enhanced to speed up the PLU statistics check.
+ The PLU menu has a new entry under File to select all items with no sub-department, invalid data,
etc.
+ After deleting the last urgent message, that screen will automatically close.
+ The Electronic journal program can now be accessed by a link on the L-BOSS main screen.
+ L-BOSS now includes a pickup function (8053) and a loan function (8052) to allow those entries on
the front-end terminals (only on front-end for now). The financial and cashier reports have been
modified accordingly. To use these new functions you must make sure they exist in the backend
function tables. If you add them to your backend function list, don't forget to deploy the files to the frontend. Please take note that normally you can pickup tender functions such as cash, cheque, credit
cards, etc. If you want to pickup a function such as bottle returns, lottery winners or another type of
"non-tender" function, you will need to make a modification in the system files. Locate the
C:\LBOSS\OFFICE\INI\SYSTEM.PAL file and add the following section:
[PickupTlzr]
420=108
460=106
© 2007 ... Your company
Additional Resources
148
330=114
The section above is not necessarily entered exactly as we have shown. We have left this flexible so
that systems using a "discount" type function instead of a true tender function can still pick up the
drawer amounts. In the example we show, we are telling the system that any pickups done on the
function 420 (VENDOR COUPON) need to affect the totalizers linked to function 108 (which is vendor
coupon in the tenders section of the report). This is the same for function 460 (STORE COUPON) and
330 (PAID OUT). If you do not make pickups on those function types this entry is not required. If you
do pickups on any other type of function that is not a normal tender function you will need to define the
reference to which in drawer total gets affected by a pickup (or loan) to that function.
Version 1.0.0.8 2000.06.26
+ L-Boss now includes an entry module. This program allows inventory control with order creation,
receiving with or without an order, inventory count and inventory adjustments.
+ L-Boss now has gift certificate tracking.
+ Several new reports have been added to the L-Boss reporting tool.
+ A PLU table check has been added to verify that all items exist in all item related tables. An option to
delete invalid items was added.
+ The customer maintenance set-up now allows you to assign an image to each account and transfer
the images to the front end terminals.
+ The L-Boss item maintenance now allows you to assign create a vendor file.
+ The L-Boss maintenance program has a new table where items are assigned to vendors with the
item cost information. Each item can be assigned to as many vendors as required.
+ The item maintenance now allows you to decide whether or not you want to track inventory. You can
also set a minimum level and reorder quantity.
End of file.
© 2007 ... Your company
149
LogiVision's Back Office System Software Programmer's Guide
Index
-@@
57, 60, 62, 63, 64, 65, 66, 67, 78, 81
BUF 65
CHECKBATCHES 64
CHECKPRICE 64
CHOICE 78
CLEANUP 64
CLEARPROCESSED 64
CLEARQRY 65
COPYFILE 66
CREATE 66
CSHR 78
CUST 78
DATABASE 81
DATE 78
DBSELECT 64
DBUPDATE 64
DEPLOY 63
DEPLOYALLFILES 63
DEPT 78
EXEC 57
EXIT 57
FDELETE 66
FILEDATA 66
LANG 81
LBOSS 62
LIST 67
MAKEINTERREST 65
MAKEPERIODS 65
MIMESET 66
NOW 60
NUMB 78
OFFICE 62
PACK 64
PERIODTYPE 78
PLU 78
PRGUPD 67
PROMPT 57
QRYBUF 65
REMARK 67
REVERSE 67
SEND 63
SERVER 62
SETBUF 65
SETDATE 60
STORE 78
STRING 78
STYLE 67
SUB 78
TAR_BUF 65
TARGET 78
TERM 78
TERMINAL 62
TLZR 78
TRIGGERDATE 60
WRITEFILE 66
-AAdditional Resources 138
assign security levels 35
Auto load last file 92
Auto repaint 92
Automated Task Overview 48
Automating L-BOSS 48
-BBackups 113
Creating 113
Restoring 113
BLD() 96
BLD(fields) 96
-CChanging the Task List Order 48
Cleanup Tab 16
Client Port 25
Commands 57, 60, 62, 63, 64, 65, 66, 67
Basic 57
Data Maintenance 64
Date Related 60
File Related 66
Miscellaneous 67
Report Data Table 65
Target Related 62
Transfer Related 63
Communicate now 130
Communications and Networking 18
© 2007 ... Your company
Index
Communicator program 130
Configuration Files 42
Configure scanner 32
Connecting To Other Devices 30
Controlling the Viewer 127
Copy Protection Key 134
Creating An Automated Backup 114
Creating Programming Groups 23
Execute at loading time 48
Execute one past event 48
Executed on controller 48
Exporting Data 110
L-BOSS SQL Command File 110
L-BOSS SQL Report File 110
LRP "Report Properties" File 110
Exporting From L-BOSS 105
-D-
-F-
Data 9
Dictionary 9
Table List 9
Data Transfers 105
Database 6, 7, 13, 16
Data Storage 6
DaysToKeepAllLOG= 16
DaysToKeepData= 16
DaysToKeepEachTerminal= 16
DaysToKeepFINdata= 16
DaysToKeepOKLog= 16
DaysToKeepProcessed= 16
Formats 7
Locked Tables 7
Maintenance 16
Maintenance Utility 13
MSDE 7
Notes on Data Cleanup 16
pack 13
re-index 13
Relational 6
Table Lock Files 7
Tables Overview 6
Default Command Files 52
Defective Keys 134
Definition table 32
Definition Tables 33
Direct Modem Communications 25
duplicate transactions 122
Dynamic Inventory Fields 99
File 7, 38
.lck 7
Command 38
Configuration 38
Extensions 38
Layout 38
Structure 38
Types 38
File Sharing 38
Filemaint Program 13
FixSIL Utility 122
FMT(field=format) 96
Folder Structure after Installation 38
Form and Report Template Editor 88
Form editor 91
Main Menus 91
tools and menus 91
Form Manager Main Menus 92
Form Manager Module 86
Forms 83
FREEZE 127
-EErrors on Export
Example .ini File
Example SIL File
© 2007 ... Your company
110
42
12
-GGraphic objects
Grid Size 91
88
-HHandling Data Tables 13
Hardware and Software Information
Head Office Communications 25
Host active 25
Host Port 25
5
150
151
LogiVision's Back Office System Software Programmer's Guide
L-Remote Application
-I-
-M-
Image objects 88
Import Header Files 106
Importing and Exporting Data 105
Importing in L-BOSS 106
Initialization files 42
Installing Devices 32
Installing the Key 134
Inter-connectivity 18
Internal @ Variables 57
Internal Command Dictionary 57
Internal Commands 47
Internal process viewer menus 129
Inventory 98, 99
Header 99
Overview 98
RPT_ITM_D table 99
Special Fields 99
Structure in RPT_ITM_D 99
Table Structure 99
IP or Domain name 25
Merge lane report data together 25
messages 118
Moving an Object 88
MSSQL 7
Multi-Store Communications 25
-NNew page 70
Next event will occur on
nodes 88
-LLanes and Stations Table 5
Launching the Export Process 110
L-BOSS 4, 47
Programming Overview 4
Tool Kit 47
L-BOSS Data Export Setup 110
L-BOSS Desktop Warnings 116
L-BOSS Scanner 32
L-BOSS Version History 142
L-BOSS Version Numbers 116
Line Tool 91
Live communication 25
Local Inbox 119
L-POS Lane Reports 83
L-Register 30
48
-OObject Dimensions 91
Object Inspector 92
Object nodes 88
Object Right Click Menu 88
Other L-BOSS Communications
Other Security Issues 38
-KKeep listening 25
Key Assignment for the Default 101 Keyboard
KeyRdr program 136
25
138
30
-Ppack 13
PAL 19
Paradox 7
Polling Process 130
POS 101 Keyboard Commands 138
Printing Bar Codes 96
Process Viewer Buttons 127
Process Viewer Menus 129
Program groups 23
Programming 35, 42, 48, 57, 86, 114
Auto Backup 114
Form Templates 86
Internal Commands 57
Report Templates 86
Scheduled Events 48
Security Levels 35
System Files 42
Programming Language Overview 4
Progrramming 78
Report Prompts 78
© 2007 ... Your company
Index
Set default font 92
Show position ruler 92
SIL Data File Structure 12
Software Protection Key 134
Special L-POS Groups 23
Standard Interchange Language
-QQuit polling
130
-RRAL 19
READ KEY 127
Rectangle Tool 91
Registering New Versions 136
re-index 13
Repairing SIL Files 122
Repeating Cycle 48
Report 69
Approval system 69
Report Template Editor 86
Reports 67, 69, 70, 74, 78, 81, 96
Commands and Variables 81
Creating and Modifying 70
Formula Options 96
Internal Command Help Feature 74
Modifying L-BOSS SQL Code 74
Multiple SQL Queries in the Same Command File
81
Prompt Panel Display Programming 78
Prompts 78
Properties Panel 70
Signed 69
Signed and Approved 69
SIL Field Decoder Feature 74
SIL Field List 74
Special formatting 96
Special Prompt Notes 78
SQL Editor 74
syntax highlighting 74
System Overview 67
TitleLA= 81
Requirements 5
Reset transaction counter 129
Resizing an object 88
Rulers 91
Running Multiple Key Reader Programs 134
Security Features
© 2007 ... Your company
-TTarget Related Variables 62
Task List Order 48
Template Editor 88
Template Objects 88
Terminal 19
groups at Headquarters 19
Table Programming 19
Title Fields 70
Total fields 70
Tracking Internal Communication
Trigger Fields 70
Trouble Shooting Tools 116
35
126
-UUND(fields) 96
Understanding the Inventory System 98
Unprocessed 116
Upgrading From Older Versions 132
Upgrading L-BOSS 132
Upgrading the Key 136
Urgent Message 116
Use scanner 32
Using tasks / events directories 48
-VVersion.txt 116
View internal process 126
View Log Utility 118
View on all terminals 48
View Polling Status 130
Viewing Logs and Messages
-W-
-S-
12
Waiting Before Receive
25
119
152
153
LogiVision's Back Office System Software Programmer's Guide
-XX / Y Position
XAL 19
91
© 2007 ... Your company
154
Endnotes 2... (after index)
© 2007 ... Your company
Back Cover