1
L-POS User Manual
© 2008 ... Logivision
L-POS User Manual
by Logivision
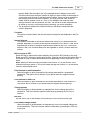
Logivision is a corporation specialized in the
development of software for the retail industry with a
particular focus on operation systems for front-end
terminals. Innovative and always at the forefront of
new technological developments, Logivision is
committed to improving the service and the products
we provide to our customers.
Contents
I
Table of Contents
Section I Welcome to L-Pos set-up help
7
Section II The POS maintenance module.
8
1 Screen and Keyboard
...................................................................................................................................
introduction
9
Full-screen mode
.......................................................................................................................................................... 10
Accessing Zone
..........................................................................................................................................................
Setup
10
Keyboard.........................................................................................................................................................
shortcuts in zone editing.
12
Why create
.........................................................................................................................................................
zones?
12
Adding Zones
......................................................................................................................................................... 13
Moving Zones
......................................................................................................................................................... 13
Multiple Monitors
......................................................................................................................................................... 13
Buttons and Forms
..........................................................................................................................................................
introduction
14
Understanding
.........................................................................................................................................................
buttons, functions and report totals
15
Adding buttons
......................................................................................................................................................... 17
Naming Buttons
......................................................................................................................................................... 18
Changing.........................................................................................................................................................
button properties
19
Assigning
.........................................................................................................................................................
buttons to the keyboard
20
Assigning
.........................................................................................................................................................
buttons to the form
20
Remove buttons
.........................................................................................................................................................
from forms
21
Accessing form
..........................................................................................................................................................
setup
22
Form types
......................................................................................................................................................... 24
Numbering
.........................................................................................................................................................
forms
25
Adding forms
......................................................................................................................................................... 25
Special names
.........................................................................................................................................................
for forms
26
Loading forms
.........................................................................................................................................................
at start-up.
27
Assigning
.........................................................................................................................................................
buttons to the form
27
Remove buttons
.........................................................................................................................................................
from forms
28
Attaching.........................................................................................................................................................
forms to zones
29
Adding and
.........................................................................................................................................................
removing options on system forms.
30
Function parameters
.......................................................................................................................................................... 33
General parameters
......................................................................................................................................................... 35
Attach function
.........................................................................................................................................................
#8051
37
Backspace
.........................................................................................................................................................
#35
37
Bottle return
.........................................................................................................................................................
(manual amount entry) #111
38
Bottle sales
.........................................................................................................................................................
#510
38
Buttons 0-9
......................................................................................................................................................... 38
Cancel order
.........................................................................................................................................................
#630
39
Cash #101 (and other normal tender functions including Check, credit
card, etc)......................................................................................................................................................... 39
Card function
.........................................................................................................................................................
#8048
40
Check #102
......................................................................................................................................................... 41
Clear #30......................................................................................................................................................... 42
Corporate
.........................................................................................................................................................
card #112
42
Correction
.........................................................................................................................................................
#640 (Void)
44
Credit card
.........................................................................................................................................................
#104
44
Customer.........................................................................................................................................................
ID# #305
47
Debit Card
.........................................................................................................................................................
#103
47
© 2008 ... Logivision
I
II
L-POS User Manual 3.2.1.0
Deploy command
.........................................................................................................................................................
#8058
50
Department
.........................................................................................................................................................
coupon 465
50
Discount.........................................................................................................................................................
Global #410
50
Down arrow
.........................................................................................................................................................
#8021
51
Double coupon
.........................................................................................................................................................
shift #8039
52
EBT
......................................................................................................................................................... 52
EBT Cash.........................................................................................................................................................
#120
54
Exact pricing
.........................................................................................................................................................
#8065
55
Exit #8012
......................................................................................................................................................... 55
Flip charts
.........................................................................................................................................................
#8054
56
Food stamp
.........................................................................................................................................................
#118
56
Foreign currency
.........................................................................................................................................................
#105
58
Freebee .........................................................................................................................................................
#8060
59
Function .........................................................................................................................................................
code #8044
59
Gift certificate
.........................................................................................................................................................
redeem #117
60
Gift certif.........................................................................................................................................................
sold #123
62
GPIC #8055
......................................................................................................................................................... 63
Help #5 ......................................................................................................................................................... 64
Hold/Recall
.........................................................................................................................................................
#8037
64
Invoice print
.........................................................................................................................................................
#8046
65
Item discount
.........................................................................................................................................................
#450
65
Item file #8067
......................................................................................................................................................... 66
Keyboard.........................................................................................................................................................
assign # 8063
67
Keyboard.........................................................................................................................................................
level #8057
67
Left arrow
.........................................................................................................................................................
#8023
68
Layaway .........................................................................................................................................................
function #8050
68
List #8047
......................................................................................................................................................... 69
Load form
.........................................................................................................................................................
#8001
70
Loan #8052
......................................................................................................................................................... 70
Lock Keyboard
.........................................................................................................................................................
#8041
70
Login #10010
.........................................................................................................................................................
(Cashier-Manager)
71
Lotto terminal
.........................................................................................................................................................
winner #109
71
Lottery ticket
.........................................................................................................................................................
winner #110
72
Loyalty card
.........................................................................................................................................................
#8068
72
Maint. POS
.........................................................................................................................................................
#8014(Maintenance)
73
Manual cost
.........................................................................................................................................................
#8059
74
Manual Points
.........................................................................................................................................................
#317
75
Manual tare
.........................................................................................................................................................
#8056
75
Money request
.........................................................................................................................................................
8070
76
No limit #8032
.........................................................................................................................................................
(Override, HALO)
76
No sale #680
......................................................................................................................................................... 76
Number entry
.........................................................................................................................................................
#8040
77
Other program
.........................................................................................................................................................
#8043
77
Paid out #330
......................................................................................................................................................... 78
Password.........................................................................................................................................................
change #8045
78
Payment .........................................................................................................................................................
#310 (R/A-Account payment)
78
Pickup #8053
......................................................................................................................................................... 79
Printing detailed.........................................................................................................................................
pickup receipts
79
PLU Attach
.........................................................................................................................................................
#8066
84
Plu code .........................................................................................................................................................
#710
84
Points tender
.........................................................................................................................................................
#140
85
Price Inquiry
.........................................................................................................................................................
#8033
85
Price level
.........................................................................................................................................................
#8030
86
Price override
.........................................................................................................................................................
#8031
86
© 2008 ... Logivision
Contents
III
Pump function
.........................................................................................................................................................
#8062
87
Receipt copy
.........................................................................................................................................................
#730
88
Receipt on/off
.........................................................................................................................................................
#732
88
Refund #650
......................................................................................................................................................... 89
Refund mode#660
......................................................................................................................................................... 90
Report #8010
......................................................................................................................................................... 90
Reversal .........................................................................................................................................................
#8049
91
Right arrow
.........................................................................................................................................................
#8022
91
Scale shift
.........................................................................................................................................................
#8036
92
Search #8011(Find
.........................................................................................................................................................
PLU, ect...)
92
Send message
.........................................................................................................................................................
#8013
93
Store Charge
.........................................................................................................................................................
#106
93
Store coupon
.........................................................................................................................................................
#460
94
Subdepartement
.........................................................................................................................................................
#715
95
Subtotal #720
......................................................................................................................................................... 96
Tafmo #8069
......................................................................................................................................................... 96
Tax shift .........................................................................................................................................................
#8034
96
Temporary
.........................................................................................................................................................
tender #198
97
Tender transfer
.........................................................................................................................................................
#8061
98
Training mode
.........................................................................................................................................................
#8038
98
Unit Quantity
.........................................................................................................................................................
#40
99
Up #8020......................................................................................................................................................... 99
Validation
.........................................................................................................................................................
print #8042
100
Vendor .........................................................................................................................................................
coupon #420
100
Void last.........................................................................................................................................................
item #610 (Error correct)
101
Wic payment
.........................................................................................................................................................
#119
101
Wic Subtotal
.........................................................................................................................................................
#8035
103
2 System settings
................................................................................................................................... 103
General tab .......................................................................................................................................................... 104
Directories tab
.......................................................................................................................................................... 110
Alias tab
.......................................................................................................................................................... 111
Taxes tab .......................................................................................................................................................... 112
Food stamp ..........................................................................................................................................................
tab
112
PLU tab
.......................................................................................................................................................... 112
Account tab .......................................................................................................................................................... 115
Totalizer tab.......................................................................................................................................................... 117
Zones tab .......................................................................................................................................................... 118
Headers tab .......................................................................................................................................................... 118
Restrictors tab
.......................................................................................................................................................... 119
Coupon tab .......................................................................................................................................................... 120
Miscellaneous
..........................................................................................................................................................
tab
127
Events tab .......................................................................................................................................................... 132
Language tab
.......................................................................................................................................................... 135
Currency Tab
.......................................................................................................................................................... 136
Rent tab
.......................................................................................................................................................... 138
3 Peripherals................................................................................................................................... 140
Printers
.......................................................................................................................................................... 141
Scanner
.......................................................................................................................................................... 146
Definition table
.......................................................................................................................................................... 147
Drawer set-up
.......................................................................................................................................................... 155
Scale set-up.......................................................................................................................................................... 157
Keylock set-up
.......................................................................................................................................................... 158
Pole display..........................................................................................................................................................
set-up
158
© 2008 ... Logivision
III
IV
L-POS User Manual 3.2.1.0
Keyboard set-up
.......................................................................................................................................................... 158
Bank set-up .......................................................................................................................................................... 159
MSR set-up .......................................................................................................................................................... 159
OPOS set-up.......................................................................................................................................................... 159
Signature capture
.......................................................................................................................................................... 159
4 Creating register
...................................................................................................................................
groups
162
Section III PCI DSS requirements
165
Section IV Electronic Journal
167
Section V Communicator
171
Section VI Monitoring
172
Section VII Advertising Set-Up
174
Section VIII Point of sale operator's guide
177
1 Account number
................................................................................................................................... 177
2 Account payment
................................................................................................................................... 177
3 Amex
................................................................................................................................... 177
4 BackSpace ................................................................................................................................... 178
5 Bottle return
...................................................................................................................................
(manual amount)
178
6 Bottle sales................................................................................................................................... 178
7 Card function
................................................................................................................................... 179
8 Cash tender................................................................................................................................... 179
9 Check tender
................................................................................................................................... 179
10 Credit card ................................................................................................................................... 179
11 Debit-MAC ................................................................................................................................... 180
12 Department................................................................................................................................... 180
13 Department...................................................................................................................................
coupon
181
14 Diner's Club................................................................................................................................... 181
15 Discover
................................................................................................................................... 181
16 Double coupon
...................................................................................................................................
shift
182
17 Down
................................................................................................................................... 182
18 EFS Electronic
...................................................................................................................................
food stamp
182
19 Exact pricing
................................................................................................................................... 183
20 Exit
................................................................................................................................... 183
21 Flip charts ................................................................................................................................... 183
22 Food stamp................................................................................................................................... 184
23 Foreign currency
................................................................................................................................... 184
24 Front-end report
................................................................................................................................... 184
25 Function code
................................................................................................................................... 184
© 2008 ... Logivision
Contents
V
26 Global discount
................................................................................................................................... 185
27 Help
................................................................................................................................... 185
28 Hold (Suspend-resume)
................................................................................................................................... 186
29 Invoice print
................................................................................................................................... 186
30 Item correct...................................................................................................................................
- Void last
187
31 Item discount
................................................................................................................................... 187
32 Keyboard assign
................................................................................................................................... 187
33 Layaway transactions
................................................................................................................................... 188
34 List
................................................................................................................................... 189
35 Lock keyboard
................................................................................................................................... 189
36 Loan
................................................................................................................................... 189
37 Lotto terminal
...................................................................................................................................
winner
189
38 Lotto ticket...................................................................................................................................
winner
190
39 Maintenance
...................................................................................................................................
(PosSetup.exe)
190
40 Master card................................................................................................................................... 190
41 Multiply
................................................................................................................................... 191
42 No limit
................................................................................................................................... 191
43 No sale
................................................................................................................................... 191
44 Number entry
................................................................................................................................... 192
45 Other program
................................................................................................................................... 192
46 Paid out
................................................................................................................................... 192
47 Password ................................................................................................................................... 192
48 PLU attach ................................................................................................................................... 193
49 PLU entries................................................................................................................................... 193
50 Pickup
................................................................................................................................... 193
51 Price inquiry
................................................................................................................................... 194
52 Price level ................................................................................................................................... 194
53 Price override
................................................................................................................................... 194
54 Receipt copy
................................................................................................................................... 195
55 Receipt on/off
................................................................................................................................... 195
56 Received on
...................................................................................................................................
account
196
57 Refund
................................................................................................................................... 196
58 Refund mode
................................................................................................................................... 196
59 Rental transactions
................................................................................................................................... 197
60 Reversal
................................................................................................................................... 197
61 Scale shift ................................................................................................................................... 197
62 Search
................................................................................................................................... 198
63 Send message
................................................................................................................................... 198
64 Store coupon
................................................................................................................................... 198
© 2008 ... Logivision
V
VI
L-POS User Manual 3.2.1.0
65 Store charge
................................................................................................................................... 199
66 Subdepartment
...................................................................................................................................
entry
199
67 Subtotal
................................................................................................................................... 200
68 Tax shift
................................................................................................................................... 200
69 Temporary ...................................................................................................................................
Tender
200
70 Training
................................................................................................................................... 201
71 Up
................................................................................................................................... 201
72 Validation ................................................................................................................................... 201
73 Vendor coupon
................................................................................................................................... 201
74 Visa
................................................................................................................................... 202
75 Void - Correct
...................................................................................................................................
previous item
202
76 Wic subtotal
................................................................................................................................... 203
Index
205
© 2008 ... Logivision
Welcome to L-Pos set-up help
1
7
Welcome to L-Pos set-up help
POS Software that understands you ...
... From people who understand POS.
This guide will help you set up the L-POS terminals for use in a store. Please take some time to read
through the help manual to gain a lot of insight into how L-POS can be tailored to run in a wide variety
of retail applications. The set-up guide is followed by a brief explanation about how to use the different
functions available on the POS application.
Logivision's documentation and manuals are subject to change as new software versions become
available. Please ask your Logivision dealer about manual updates.
This manual covers changes to L-POS version 3.2.1.0
Logivision has attempted to make this document accurate. Logivision is not responsible for any direct,
incidental, or consequential damages resulting from this documentation or inaccuracies within.
Specifications are subject to change.
Printed in Canada.
© 2008 ... Logivision
8
2
L-POS User Manual 3.2.1.0
The POS maintenance module.
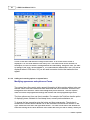
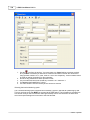
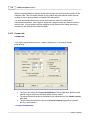
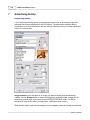
POSWIN maintenance module (POSSETUP.EXE)
Access to the set-up of the L-POS terminals is refused whenever the back-end server is
unavailable. Whenever PosSetup.exe is accessed, either from the L-POS terminal or from
the L-BOSS station, the system attempts to access data files on the server. It is not possible
to run PosSetup from the POS terminal without a connection to the L-BOSS server. The
system protects against changing on the lane without first changing in the back-end server
database.
All changes made using PosSetup are recorded in the backend database only. However,
whenever PosSetup is accessed from within the L-POS application, all changes made from
that POS terminal are copied back to that POS terminal immediately. The changes are not
sent to other POS terminals until the deploy changes command is executed. The command
to send the changes can be executed from the L-BOSS event task/event menu (Deploy all
changes) or from the pull-down menu available on the POS terminal by clicking on the serial
number. Until the changes are deployed they will not be available at other POS stations.
The maintenance of the L-POS can be accessed by starting C:\POSWIN\POSSETUP.EXE
or directly from the L-POS transaction entry screen. Users of touch screen systems will
probably have a few pre-defined buttons to access the different programming options. For
the keyboard driven systems we have assigned the Maintenance function list to the [Shift-F5]
position of the standard PC keyboard. If you use a POS keyboard, search for the Set-Up
button or the Function button to access the terminal programming mode. Press the button or
select the menu option programmed for SET-UP.
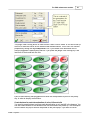
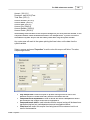
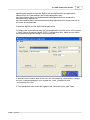
The programming menu can also be accessed from the POS entry screen by entering
MENU and pressing [PLU] or by clicking the General Info Form where the L-POS serial
number is displayed. You must Login by pressing the Login button, entering your ID# and
pressing enter (or PLU.) If you logged in, the POSSETUP.EXE will prompt you for store and
terminal number as soon as you attempt to access any of the menu options. For users of
touchscreen systems, once you have pressed the login button, doubleclick in the entry zone
of the Login window to pop up a numeric keypad.
© 2008 ... Logivision
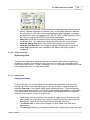
The POS maintenance module.
9
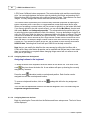
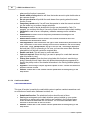
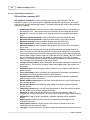
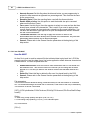
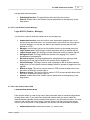
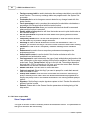
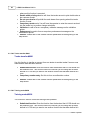
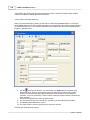
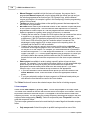
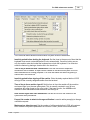
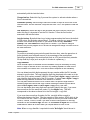
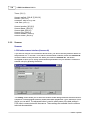
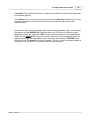
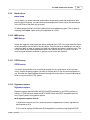
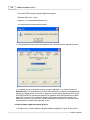
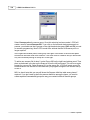
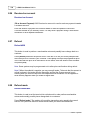
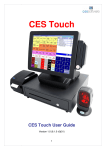
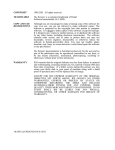
The 2 images above shows the access forms for PosSetup options. The form on the left
opens when the Setup is run from the L-POS program group or from the L-BOSS modules
menu. The form on the rigt is obtained by clicking the serial number while L-POS is
operating in register mode.
2.1
Screen and Keyboard introduction
Screen and keyboard setup
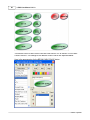
The L-POS software includes a flexible design module that allows you to personalize the
screen and keyboard. Three types of objects exist to set up screens and keyboards.
The first object type is called a button. A button is most often used to make transaction
entries.
,
and
are buttons. Buttons are usually
attached to a location on the keyboard or on a touchscreen. Buttons may also be used from
a pull-down menu.
The second type of object is called a form. A form is an area of the screen.
I form fits into the third type of object which is called a zone. In order to create and assign a
button to a touchscreen, you must create a form that will appear on the screen. To assign a
form to the screen, you need to create a zone to place the form on.
This section of the help guide will assist you in setting up the screen and keyboard on your
system. Specific understanding of cash registers and their functionality is a suggested prerequisite to using this part of the L-POS software.
© 2008 ... Logivision
10
2.1.1
L-POS User Manual 3.2.1.0
Full-screen mode
L-POS can be run in a window or in full-screen mode where the taskbar and other programs
are hidden when L-POS is being used. This selection is defined under the Possetup
advanced settings. You can define Windows mode or full-screen for each monitor. If you
switch an existing system you may need to adjust the size of the zones or you may hide part
of the form with the taskbar. The default setting for L-POS is full-screen with no visible
taskbar.
Several advanced flags can be defined to modify screen appearance
Section: System related advanced flags:
Border style number
Main monitor full screen. (Default = yes)
Customer monitor full screen. (Default = yes)
Display Wic, FS, Manual weight symbols
Stretch background image
Other things to note when using Window mode for the screen layout. Suppose you have a
1024X768 monitor and you place a zone toward the right hand side of the monitor. Even
though you do not place any zones on the left hand portion of the monitor, the POS
application will occupy everything left of where you placed your zone on the right portion of
your screen. If you place that same zone on the left hand side of the screen the POS
application will occupy as far right on the monitor as that zone was extended. Now you can
move the entire application window to the right of the screen, as you would with any other
application's form. So if you want to leave the lft hand side of the monitor available you need
to plave the zone on the left, then start L-POS and drag the entore program window over to
the right of your monitor's desktop.
Note: L-POS does not have a "maximize" function to extend the application form to fullscreen size. You need to extend zones to the portion of the screen you want to hide with the
POS application.
2.1.2
Accessing Zone Setup
Accessing zone setup and the Zone toolbar
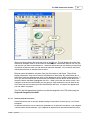
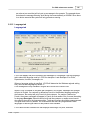
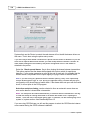
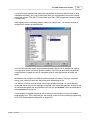
From the PosSetup menu, access the Zone programming . When the zone setup appears,
you will see the currently assigned zones on the screen. The Zone editor tool is displayed
and Zone 1 should be highlighted in blue.
© 2008 ... Logivision
The POS maintenance module.
11
Select a zone to edit:You can select another zone if required by clicking the [Next] button in
the Zone editor or by clicking on the zone you want to edit.
Switch view from monitor 1 to monitor 2: The Zone editor also allows you to toggle
among between multiple monitors if you system is equipped with more than one monitor.
The default view is to display forms on the Main Monitor. Use the pull-down next to the name
Main monitor to edit the zones placed on the Customer monitor.
Move a zone to the other monitor:To move a zone from one monitor to the other select the
zone. Then click the Monitor button. You will be prompted to switch the zone to the other
monitor. If you have more than 2 monitors, use the drop-down list to select the monitor you
want to use for this zone.
Add a new zone: Use the [Add] button to create a new zone. It will be placed on the Monitor
you are working on at that time. So to add a new zone to the customer monitor you should
first select the customer monitor in the pull-down monitor selection field.
Delete a zone: Use the [Delete] button to remove a zone from the monitor.
Any changes will be saved in the database when the [Save] button is pressed.
N.B.: ZONE set-up for L-POS when updating from V2.x.x.x to V3.x.x.x and
greater.
Systems using dual monitors require changes to zone set-up before running version
3. This procedure is necessary if you have installed an update from version 2.x.x.x to
version 3.x.x.x.
Zones that are off viewing area of screen: In version 3 the zones must be
assigned to a specific monitor. After update form a version 3 to a version 3 all zones
are assigned to your main monitor. This means that some of those zones will be
outside the viewing position of the monitor.
When L-POS detects this the program is suspended and PosSetup opens the zone
menu with a prompt window requesting an action.
1- Reposition on the current monitor
2- Reposition on the other monitor
3- Delete them all
© 2008 ... Logivision
12
L-POS User Manual 3.2.1.0
4-Do nothing
Most likely you should select option 2, to reposition the zones that are off screen
onto monitor 2. Once this is done the POS will reload. You need to wait about 20
seconds for the POS to reinitialize and load the zones into their proper location.
Once this is complete you will need to use the LBOSS task named "Deploy screen" if
you have other L-POS terminals in the store. The screen files will be deployed to the
other lanes.
This should only occur if you are using dual monitors. If you get this message on a
single monitor system you will reposition on the current monitor. You may then need
to work on the zone that was repositioned. For example, maybe your zone was a few
points too large and is now back on your screen. If it overlaps with another zone you
will need to work on the zone set-up.
2.1.2.1
Keyboard shortcuts in zone editing.
Keyboard shortcuts in Zone editing
Here is a list of the functions available with the keyboard while you are editing the zone
setup. They can be very useful when you have created a zone that is hiding another zone or
when you want to move to the next zone.
·
·
·
·
·
·
·
·
·
·
2.1.2.2
[Alt]-[N] (select next zone)
[Alt]-[S] (save configuration now)
[Alt]-[C] (cancel changes and exit now)
[Alt]-[Left arrow] (reduce horizontal zone size)
[Alt]-[Right arrow] (increase horizontal zone size)
[Alt]-[Up arrow] (decrease vertical zone size)
[Alt]-[Down arrow] (increase vertical zone size)
[Tab] (select next function button within current zone)
[Ctrl]-[Left], [Ctrl]-[Right], [Ctrl]-[Up], [Ctrl]-[Down] to reposition the zone on the
screen
[Esc] (exit now from setup)
Why create zones?
Creating zones
Zones are rectangular areas that need to be defined in area and position. Why create
zones? The L-POS assigns forms (visible screen areas) to zones. By assigning forms to a
zone, we feel we can save you a lot of time in the actual screen design. Zones are areas of
the screen that you can assign multiple forms into.
© 2008 ... Logivision
The POS maintenance module.
13
For example, you may need to create some one-touch PLU screens. Rather than needing to
set the size for each form separately, you create one zone and place the form in that zone.
This way all forms placed in one zone will be the same size. We decided that rather than opt
for a fixed screen layout it would be better to leave screen design and layout as a setup
option.
When planning the zone layout, think about all the areas you need to see on your screen,
not necessarily the final window content for each area. For example, you may want to see
the Total in a separate area to the lower right hand corner of the screen. You will need to
assign the form to a zone. So create a zone the correct size and position it where you want
it.
This section explains the different steps involved in setting up zones on the screen.
2.1.2.3
Adding Zones
Adding zones
Select Zone 1 and click the Add button to create a new zone. The L-POS will assign the
lowest number possible to keep subsequent set-up as simple as possible. Use the keyboard
shortcuts or the mouse to drag the zone to its desired location.
When you are satisfied that your zone layout is complete, save the programming and exit the
zone setup module. It is possible to return to the zone setup and add new zones without
deleting any of the current setup. So don't worry about forgetting a zone in the initial setup
phase.
2.1.2.4
Moving Zones
Moving zones
Select the zone and drag it to the position on the desktop you want to occupy. You can also
move zones using keyboard shortcuts. See the related programming in this section.
2.1.2.5
Multiple Monitors
Multiple monitors
For systems using more than one monitor to display the Windows desktop, you will be able
to place a zone on the second monitor as you would for any other Windows application. You
could have a zone on the primary monitor that displays the receipt form and another zone on
© 2008 ... Logivision
14
L-POS User Manual 3.2.1.0
the secondary monitor that displays a different receipt form for the customer view. The forms
sent to those zones will display in the proper location automatically.
You can also add a zone to the customer monitor even if that monitor is not present. In the
Zone editor form, use the pull-down to select the monitor you want to work on. If the monitor
is present you will see it as being active. If the monitor is not present you will still be able to
assign zones to it. L-POS will display the zones on the Main monitor even though they are
assigned to the customer monitor. When the second monitor is attached and configured it
will be detected and used by L-POS. When you use the Main monitor to view zones
assigned to the second monitor, the zones normally appearing on the main monitor are
hidden. You are really looking at the zones of monitor 2.
2.1.3
Buttons and Forms introduction
Buttons and Forms Setup
The L-POS software can be configured for use with many different types of equipment.
Whether your system uses a touch screen or a normal keyboard, it is necessary to create
buttons that will be used to enter data. On the keyboard driven systems, system defined
forms are used to display the items entered (on the receipt form), the running totals are
displayed on a Total form,etc. You may also have forms that show images such as a
welcome message. On touch screen systems, forms are created to place department
buttons, payment buttons, etc.
Tender buttons like
are necessary to accept payment, status buttons like
can be programmed to modify the taxability of an entry, while
buttons allows percentage or amount reduction. These buttons all contain
functions that must be created on your backend software before the button can be created
and assigned to the key position or touch screen. A more detailed explanation of the buttonfunction relationship is explained under the heading Understanding buttons, functions
and report totals in this help guide.
Accessing button (and form) setup
Access Possetup and select the "Buttons and Forms" module. When the menu appears
you will see the currently programmed button list on the screen. Use the mouse to select any
button in the button column and then scroll up or down the list to locate the button you want
to program. To add a button press the small Calculator icon at the top of the Button Name
list.
© 2008 ... Logivision
The POS maintenance module.
2.1.3.1
15
Understanding buttons, functions and report totals
Understanding buttons, functions and totalizers
L-POS uses buttons that are placed on a keyboard or a touch screen to operate. When a
button is pressed, it executes a function that may sell an item, perform a correction, collect
money, etc. When the transaction is completed, L-POS prepares a file that is used to update
totals on a report produced by the backend software. Because the L-POS software can be
used with different back end systems, it is required that some of the inter-related
programming be performed through both the backend Maintenance and through the Pos
Setup menus.
Totalizers are used to mainly to feed data to the report system from POS transactions.
Each of the totals can be sent to different report types. The totals are updated each time the
registers send data to the backend application. For totalizers to be updated, a link with a
function needs to be defined. This is done in the backend Maintenance menu under the
Register menu option. Whenever a total is added to the backend system, it needs to be sent
to L-POS. An example of linking a function to a total would be the Refund function #650
which feeds its data to the Refund key total #3011. There are other types of totals that need
to be updated as well. For example, whenever a transaction is completed, L-POS counts a
customer and updates the customer count totalizer. If you change the totalizer number used
for customer count in the backend, you must modify the link the L-POS uses to the former
totalizer and set it to your new totalizer. This mapping is changed in the Pos Setup
application under the System menu and the totalizer tab.
Functions are required on the system to perform register transactions. A function such as
Refund #650 can be used in different ways on the L-POS terminal depending on the
properties assigned to it. The functions required by L-POS are created in the backend
Maintenance menu under the Register menu option. Whenever a function is added or
modified, it needs to be sent to L-POS. The properties of the function are defined through
the register Pos Setup program. Each function can be incorporated into a button that will be
placed on the POS keyboard on onto a form on the touch screen. Once the button is
created, you add a function that will be executed when the button is pressed.
Buttons are used on the actual POS terminal keyboard or touch screen to perform tasks
such as sign on, item entry, corrections, etc. A button incorporates a function, or several
functions, to execute the required task. In the case of a refund button, the embedded
function is the usually the refund function #650. The operational behavior of the refund
button you create would be modified using the Pos Setup program under buttons and
forms.
Forms are data windows on the terminal's screen. These data windows include the receipt
window, the total window, the entry window, etc. On a touch screen system you have buttons
in some of the windows in order to operate the system. Forms fit into pre-defined areas on
the screens that are called Zones.
© 2008 ... Logivision
16
L-POS User Manual 3.2.1.0
Zones are areas on the screen that L-POS uses to display the forms required for the
particular application. Zones are created so that a window will fit exactly over another
window if you need to swap the menu when buttons are depressed. By way of example, the
touch screen system you are programming may only have room for 6 department buttons
and a few payment buttons on the form you created. Whenever another department or
payment button is needed you will need a button that swaps the first form and displays the
second form with the additional departments or payment buttons. Both of these forms will be
assigned to the same zone and will therefore appear in precisely the same position on the
screen.
Where do I add records when I need a new button on my L-POS system? Backend
Maintenance Pos Setup
Back-end Maintenance
POS Setup
Create / modify the totalizer
Create / modify Zones (if required)
Create / modify the new function functions
Create / modify Forms (if required)
Create / modify function - totalizer linking
Create / Modify Buttons to add the new key
Don't forget to send the changes from the backend to the L-POS using the correct deploy
commands.
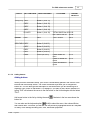
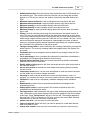
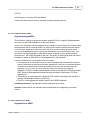
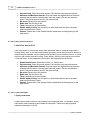
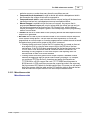
The following table may assist in understanding the relationship between buttons, functions
and totals. The table shows the results for the sale of item 1234 which is priced at $ 1.00,
taxable at rate 1 for 7%, and paid by cash where $20 was tendered.
© 2008 ... Logivision
The POS maintenance module.
ENTRY
FUNCTION USED
1234 [PLU] 1 KEY
Button 1 (fct # 11)
2 KEY
Button 1 (fct # 12)
3 KEY
Button 1 (fct # 13)
4 KEY
Button 1 (fct # 14)
PLU KEY
Button 1 (fct # 10)
Internal
2.1.3.2
BUTTON USED
none
none
2000 CASH 2 KEY
Button 2 (fct #12)
0 KEY
Button 0 (fct #10)
0 KEY
Button 0 (fct #10)
0 KEY
Button 0 (fct #10)
CASH
CASH (fct #101)
TOTALIZER
17
REPORT
RESULTS
TOTAL SALES tlzr #2 $1.00
NET SALES tlzr #3
$1.00
TAX 1 tlzr #22
$0.07
CASH tender tlzr
#101
CASH in drawer tlzr
#1201
CASH declared tlzr
#1301
$1.07
$1.07
$1.07
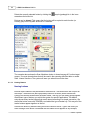
Adding buttons
Adding buttons
When you enter the buttons setup, your cursor is automatically placed in the column of the
Buttons and forms setup screen. The cursor movement keys allow you to navigate the
button list. You can also type the description of the button name you are searching for to
reposition your cursor on that button. For example, if you want to find a button named PLU,
typing "PLU" will advance the cursor to the first button on the list that begins with the letters
"PLU".
Add a new button to the list by clicking the small
button list.
Calculator in the icon area above the
You can also use the keyboard option
(Alt-M) to select the menu, then choose Button,
then choose add. The button you add will use the previously highlighted button as a template
for many of the settings including size, color, and button properties.
© 2008 ... Logivision
18
L-POS User Manual 3.2.1.0
Delete the currently selected button by clicking the
area above the button list.
recycle (garbage) bin in the icons
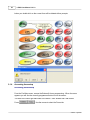
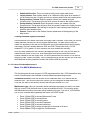
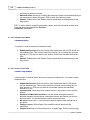
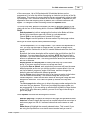
Buttons can be shared. This means that the button will be copied to each function (or
screen) group on the system whenever it is modified.
The example above shows the Scan Markdown button is shared among all Function target
groups. You must share buttons that will be used in the scanning definition table or certain
other internal functions. The system will warn you when this must be done.
2.1.3.3
Naming Buttons
Naming buttons
Buttons require names to be positioned on the button list. The button name will not print on
the receipt. The button text (the keytop label) viewed on a button (with a touchscreen
system) can also be different then the button name. This way you can easily group together
the different type of buttons you add to the system for specific applications. Our default
setup shows many tender buttons that are all named according to a simple convention. We
started the button name with TENDER= and added the type of tender key. This way all of the
tender buttons appear together on the list.
Rename the button by double clicking the button name on the list. Type in the name you
want to assign to the button. Remember that this name will not appear on any receipts,
© 2008 ... Logivision
The POS maintenance module.
19
reports or screens. It is only a reference to position the button on the button list.
Whenever you add a button to the button list, the existing button properties can be carried
forward to the new button. Try to find a button of identical proportions that already exists on
the buttons list. Then when you add a new button, its properties will match those of the
previously selected button.
When a button is first created, the description entered on the button name list will be copied
to the button keytop description. This automatic button description cut and paste does not
occur when you modify a description on an existing button.
To modify the label placed on the keytop, click the button name twice. An entry window will
appear allowing you to enter the description. Take care in that the [ENTER] key is used to
force a carriage return on the keytop. A vertical bar will be inserted in the button entry
window to show the position of the carriage return. It will disappear when the entry is
completed by pressing Ok or Cancel. Select the Auto-Size feature to justify the text size
automatically on the keytop.
2.1.3.4
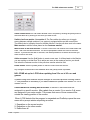
Changing button properties
Modifying button properties
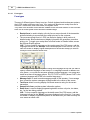
You can modify many of the settings associated with each button on your system. This is
only for systems using touch screen for data entry. A normal keyboard system will not have
buttons on the screen under normal circumstances. There are several icons on the Buttons
and forms screen that allow you to modify the button appearance.
·
·
·
·
·
·
·
·
·
·
·
·
© 2008 ... Logivision
The Key is used to assign a button to the keyboard.
The Calculator is used to add a new button to the button list.
The trash can is used to delete a button from the list.
Mn will access the options available via a menu instead of using these icons or a
mouse.
Zn toggles the view from the Zone sampler to a true view of the form you are
programming.
A allows the alpha descriptor of a Button to be changed.
The Landscape image is used to assign an image to the button background.
The color grid allows you to change the button color. Double click to select the color
for your button.
The Copy icon is used to memorize the button properties.
The paste icon is used to replicate the button properties and settings that were
copied on another button.
The help icon will open the L-POS help file.
The exit icon will close the buttons and forms programming module.
20
L-POS User Manual 3.2.1.0
L-POS uses 2 different button components. The custom button style and the normal button
style. You can toggle between the button styles by selecting the button and pressing Alt+C.
Normal buttons have 3 fixed sizes with a choice of among 6 colors. These buttons use fixed
images. The only changes that can be made are the text, size and color.
The custom button style allows you to further modify the button properties by opening the
button component itself. Press Alt+C to toggle between normal and custom button style.
When you are editing a custom button use your mouse to right-click on the button face itself.
If you cannot right-click (as with a touch screen), you can use the Mn (Menu) shortcut and
then select Button and enhanced properties . The enhanced button properties allow you
to select the button type (modifies the look of the button). You may also assign a help file to
call in the POS entry when the help key is depressed before this button is pressed. The Help
context file is entered as a number is you type it manually. The number is a 6 digit number
that begins with 2 and is followed by the 5 digit function number from the function list in the
back end setup. For example, assign number 200610 to the Error correct key as the Help
Context file. If you browse to search for the file, the file name for error correct would show
hl200610.htm . Selecting that file will still input 200610 into the help context file.
Note that you can modify the help files the users access by editing the html files with a
HTML editor. Many other button properties can be modified and the best way to learn about
them is to experiment on a system where changing things around will not cause a crucial
error (like in your shop).
2.1.3.5
Assigning buttons to the keyboard
Assigning buttons to the keyboard
To assign a button to the keyboard, select the button on the button list. Then click on the
small
Key icon above the button list. A new window will open up showing the currently
assigned key locations.
Press the small
calculator to add a new keyboard position. Each function can be
assigned to more than one keyboard location.
To remove a keyboard location, click on the
window.
garbage bin within the key assignment
The PLU and Sub-department functions can also be assigned in the POS mode using the
Keyboard Assign function 8063.
2.1.3.6
Assigning buttons to the form
Begin by selecting the Forms tab from the Buttons and forms setup screen. The list of forms
will be displayed.
© 2008 ... Logivision
The POS maintenance module.
21
When you have selected the forms tab click on the Zn icon. This will display the actual form
rather than a sample view of all the zones in reduced size. Scroll down the form list until you
find the form you want to add buttons to. Note that the window you are working in may move
from place to place to show you the form that has been selected. This is normal, the cursor
should remain active in the same field it was in.
Buttons cannot be added to a system form like the receipt or total forms. Those forms
display information, they are not used to add buttons to the screen. By default there are a
few button forms pre-programmed such as the department form 6 and the payment form 11.
Once you see the correct form in the window you need to find the button on the button list.
When the button has been highlighted click on it. When you move the mouse cursor it will
change to a small circle that means you are going to copy the button to a free area on the
form. Now click the free area you have selected onto the form. The button will appear and
you can slide it into place.
The PLU and Sub-department functions can also be assigned in the POS mode using the
Keyboard Assign function 8063.
2.1.3.7
Remove buttons from forms
Delete the button from a form by double-clicking on the button in forms set-up. You will be
prompted
to delete this button or not, to cancel the procedure or to select the All choice. If you respond
Yes the button will be removed. If you respond All the button will be removed and any other
© 2008 ... Logivision
22
L-POS User Manual 3.2.1.0
button you double-click on the current form will be deleted withou prompts.
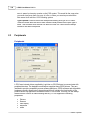
2.1.4
Accessing form setup
Accessing forms setup
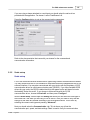
From the PosSetup menu, access the Buttons & forms programming.. When the menu
appears you will see the currently programmed button list on the screen.
The area to the lower right hand side of the button / form window has a tab named
Forms
. Use the mouse to select the Forms tab.
© 2008 ... Logivision
The POS maintenance module.
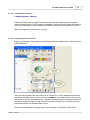
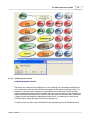
23
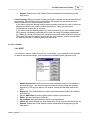
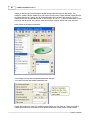
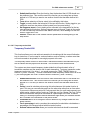
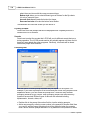
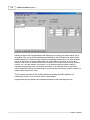
The screen will display the list of currently available forms. Select a form from the list or by
clicking a zone from the "Zone Sample" window shown in the following image.
To select a form from the secondary monitor, select customer monitor in the zone sample
window.
© 2008 ... Logivision
24
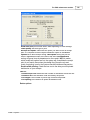
2.1.4.1
L-POS User Manual 3.2.1.0
Form types
Form types
There are 2 different types of forms to set up. On both keyboard and touchscreen systems,
the L-POS needs to have an entry form. Your system will also have a receipt form and a
total form. These forms, and a few others, are system forms.
They differ from the button forms that are created to use with touch screen or with a mouse.
Here is a list of the system forms and their intended usage:
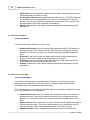
·
·
·
·
·
·
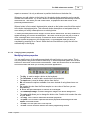
Receipt form: is used to display a line by line on screen résumé of the transaction
entries simulating to some extent the receipt print-out for the customer.
The on-screen receipt form in L-POS can be set to display in brief mode or in
detailed mode. Brief mode does not display information like quantities, promotion
pricing, etc. To toggle your receipt form from Brief mode to Detailed mode, access
the Options>Display options.
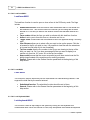
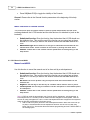
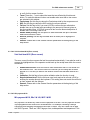
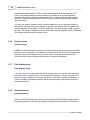
N.B.: To force a specific language on the receipt area of the POS screen, add the
language indicator to the *Receipt* form name displayed on the form list. So if you
want the screen to display English descriptions on the screen receipt you need to
modify the form name as shown here:
This change is only required if you are using multi-language set-up and you want to
specify a different language for the receipt. If no language indicator is added to the
form name, L-POS uses the Windows operating system language. The receipt and
detail forms have 4 language options: EN, FR, CUST or OPER (where CUST is the
customer language and OPER is the cashier languauge.)
Message form: is used to send message prompts for the operator. If no message
form is used the system messages will be directed to the center of the screen.
Total form: allows a running display of different amounts owing for the current
transaction.
General info form: provides system information options.
Detail form: is used to display programming details such as unit price, tax status,
etc., for the item being entered.
N.B.: To force a specific language on the detail area of the POS screen, add the
language indicator to the *Detail* form name displayed on the form list. If you want
the screen to display English descriptions on the detail form you need to modify the
form name as shown here:
© 2008 ... Logivision
The POS maintenance module.
25
This change is only required if you are using multi-language set-up and you want to
specify a different language for the detail form. If no language indicator is added to
the form name, L-POS uses the Windows operating system language. The receipt
and detail forms have 4 language options: EN, FR, CUST or OPER (where CUST is
the customer language and OPER is the cashier languauge.)
· Entry form: shows the keystrokes as they are being entered. The entry form is a
compulsory form. Your software will not operate without the entry form enabled.
· Customer display form shows the product name and price on the last entry.
· Customer info form allows you to display customer related details on the screen.
· Icons form: displays the icons available for the different states the system is
engaged in.
·
2.1.4.2
Numbering forms
Numbering forms
The forms are numbered automatically as they are created. When a form is deleted, the
deleted form number will be assigned to the next form you create. So it is possible that a
system would have forms 1,2,3 and 5 followed by 6 to 10. This would be because form 4 had
been deleted after forms 1-10 had been created.
2.1.4.3
Adding forms
Adding new forms
To add a new form you need to toggle from the default view presented when you enter
Buttons and Forms in the PosSetup program. If you are currently viewing the button list,
press the Forms tab in the window called Select buttons and forms . This will change the
focus from programming buttons to a list of the forms currently programmed on your system.
Their are several icons below the list of forms that are not available unless you toggle the
view from Zone sampler to the view of each form.
·
·
·
© 2008 ... Logivision
Press the Zn icon at the bottom of the window to toggle the view from buttons and
zone sample to the form layout view. Now the icons at the bottom of the window will
be available. These are the icons used to add, delete and save forms.
The diskette icon is used to save changes you have made to the form being
programmed.
The color grid allows you to change the button color. Double click to select the color
26
L-POS User Manual 3.2.1.0
·
·
·
·
for your button.
The Landscape image is used to assign an image to the button background.
The trash can is used to delete a button from the list.
The Calculator is used to add a new button to the button list.
Zn toggles the view from the Zone sampler to a true view of the form you are
programming.
To add a new form, click the Calculator . The lowest available form number will be
assigned. So if you are using a system that has been modified or using one of the default
set-up screens, you may see, for example, that you have added form 6. And this even
though your current forms may go, for example, as high as 21. This is normal, L-POS always
assigns the lowest available form number.
When you have added a new form you will need to select the type of form, the zone position
and declare whether or not this form loads upon execution of the software (at startup.)
Warning: When a new form is added it may use a form number that had been previously
used in a previous set-up. This can lead to strange behavior within the screen operation. For
example, if the system is being programmed for touch screen operation and you ad a new
form you may notice that the form disappears for no reason from your screen. This is
actually because there is a button on one of your forms that is affecting the appearance of
the new form that was created. For example, pressing subtotal may make one of your
receipt forms disappear from the screen. This is most likely because the Subtotal function is
swapping the form. If you access the properties of the functions used in the subtotal button,
you will probably see the swap command entered in one of the functions in that button.
You can easily check all buttons that affect a form. When you are in the Forms view of
PosSetup, you will see a menu that allows access to the Execution, Appearance, Options
and Special menu related to the form currently selected. Press the Special menu and select
Form info . A list of all buttons that activate and deactivate the form is displayed. If a button
activates the form but should not you need to access the button in question and modify the
swap form settings that should not be there.
2.1.4.4
Special names for forms
Special names for forms
Some forms are given, by programming a specific name, a special status. The touchscreen
systems that the L-POS is installed on have a numeric keypad enabled on the screen.
Whenever a system message form appears it normally centers itself on the screen. This
could happen after an error, or after the user pressed an open department button. Any forms
that are overlapped by the system messages are deactivated to the touch. To ensure that
the numeric keypad is never overlapped by another form or a system message you must
name the numeric keypad form you create as "NUMPAD".
© 2008 ... Logivision
The POS maintenance module.
2.1.4.5
27
Loading forms at start-up.
Loading forms at start-up
Select the LOAD column for each form that you want to have loaded when the system is
started or whenever the L-POS program is reloaded. Leaving this column blank will allow the
form to be called with a LOAD FORM function when a specific button combination is used.
NB: It is compulsory to load the ENTRY form.
2.1.4.6
Assigning buttons to the form
Begin by selecting the Forms tab from the Buttons and forms setup screen. The list of forms
will be displayed.
When you have selected the forms tab click on the Zn icon. This will display the actual form
rather than a sample view of all the zones in reduced size. Scroll down the form list until you
find the form you want to add buttons to. Note that the window you are working in may move
from place to place to show you the form that has been selected. This is normal, the cursor
should remain active in the same field it was in.
Buttons cannot be added to a system form like the receipt or total forms. Those forms
© 2008 ... Logivision
28
L-POS User Manual 3.2.1.0
display information, they are not used to add buttons to the screen. By default there are a
few button forms pre-programmed such as the department form 6 and the payment form 11.
Once you see the correct form in the window you need to find the button on the button list.
When the button has been highlighted click on it. When you move the mouse cursor it will
change to a small circle that means you are going to copy the button to a free area on the
form. Now click the free area you have selected onto the form. The button will appear and
you can slide it into place.
The PLU and Sub-department functions can also be assigned in the POS mode using the
Keyboard Assign function 8063.
Remove a button from a form by double-clicking the button on the form.
2.1.4.7
Remove buttons from forms
Delete the button from a form by double-clicking on the button in forms set-up. You will be
prompted
to delete this button or not, to cancel the procedure or to select the All choice. If you respond
Yes the button will be removed. If you respond All the button will be removed and any other
button you double-click on the current form will be deleted withou prompts.
© 2008 ... Logivision
The POS maintenance module.
2.1.4.8
29
Attaching forms to zones
Attaching forms to zones
Each form you create must be assigned to a zone. Although you can assign multiple forms
to the same zone, only one of those forms can appear on the screen at any given time. For
example, on a touch screen system you may have an area of the screen that is normally
used for department buttons. And it's possible that your form isn't large enough to display all
department buttons simultaneously. Create 2 forms that both use the same zone and create
a toggle function that swaps the department button forms. The same type of form set-up
could be used to create drill-down flip charts or product lists.
To attach a form to a zone, open the Button/Form programming from the PosSetup menu.
© 2008 ... Logivision
30
L-POS User Manual 3.2.1.0
Clieck on the forms tab below the image of the button. A list of the current forms is
displayed. You can scroll down the list row by row. The rows include a form number, its
description, the zone to which it is assigned and the Load setting. Assign the form you want
to change to the zone it should appear in. The Load selection determines if the Form will be
displayed when L-POS starts. If nt you will need to execute a button that makes the form
appear.
2.1.4.9
Adding and removing options on system forms.
Modifying appearance and options on Forms
The system forms like receipt, totals, general information all allow certain settings to be user
defined. Some forms have totals and other data fields that can be selected. All forms have
background color selection. Some have background picture selection. The form options,
fonts and colors are programmed through the buttons and forms programming module.
The form options vary from one form to another. For example, the Total form has the option
of displaying taxes, subtotals for food stamp items, account previous balance, etc.
To change the form properties enter the button and form programming. The window is
divided into 2 sections with the Button list on the left and the Function/Form section on the
right. Select the Form tab in the right-hand section. The view of that area of the window will
show the existing forms. Move down the list to select the form you wish to modify. When you
© 2008 ... Logivision
The POS maintenance module.
31
have selected the correct form click on the Zn icon to view the form you have selected
instead of the Zone sampler.
The form you selected will appear with a menu available to make changes to the form
attributes. Here is an explanation of the menu. Not all forms have the same menu option. If
the option cannot be selected for the form type you are modifying the selection will appear
greyed. If the form you want to modify covers the entire screen vertically, the menu shown
below may be hidden behind your form. To access the window that is hidden behind a form
press Alt-F6. The windows will toggle front-to-back.
The Execution menu allows you to select buttons that can be executed whenever the form
is loaded or removed from the screen. This is more useful for touch screen systems when
you need to open or close several forms at the same time.
Appearance is used to select the Font, form color or background picture, and the label
color. Fonts and colors can be selected from the fonts and colors available on your operating
system.
Options allows the choice of display options (e.g. Taxes, subtotal, etc), captions (option
descriptors such as Cashier, GST for Tax 1), Stretch image for item detail box, and Double
size icons for the Icon form.
Special gives access to Form info and to options that change the background color of the
form during Training mode operation, the Error message form, and the Leading
messages form.
When you access the Options menu and select Screen options, a window appears with the
currently selected options showing to the right hand side and the remaining options available
for the form to the left. To select or remove an option, highlight the option and use the small
arrow icon to move it to the other side of the window. To select or remove all options for the
form use the double-arrow icon. To move an option that has already been selected up or
down the totals list, click the option and press Alt-Up or Alt-Down keys.
Note: The on-screen receipt form in L-POS can be set to display in brief mode or in detailed
mode. Brief mode does not display information like quantities, promotion pricing, etc. To
toggle your receipt form from Brief mode to Detailed mode, access the Options>Display
options.
The Captions for a form can also be selected if required. In the example given above for the
total form, if you want the system to display F-stamp Subtl before the amount, select
Captions in the Options menu of the form programming window. Here are the options
available for the system forms.
Total form options
·
© 2008 ... Logivision
Accnt SubTl: displays the running balance owing for the customer including all
current transaction amounts. Can be useful when customers make purchases and
32
L-POS User Manual 3.2.1.0
·
·
·
·
·
·
·
·
·
·
·
·
·
·
payments in the same transaction.
Accnt Balance: displays the charge account balance for the customer.
Discnt SubTl: displays the total of discountable items in the transaction.
Tax 1, Tax 2, Tax 3, Tax 4 display the taxes collected in the current transaction.
WIC SubTl: shows the outstanding amount of the sale eligible WIC payment.
F-stamp SubTl shows the outstanding amount of the sale eligible for Food Stamp
payment.
Payment shows the amount of received on account entries made in the current
transaction.
Subtotal shows the total due in the current sale before sales tax.
Total shows the total amount owing in the transaction.
You saved shows the total difference between the regular price for products and the
price paid by the current customer.
Points shows the number of points issued in the current transaction.
Item count shows the number of items purchased in this sale.
Weight shows the current weight on the scale.
Foreign 1 subtl shows the value of the current sale total converted to foreign
currency 1 value
Foreign 2 subtl shows the value of the current sale total converted to foreign
currency 2 value
Item detail form options:
·
·
·
·
·
·
·
·
·
·
·
Image display shows a graphic image of a product in a reserved area of the item
detail form. The image must be present in the images directory (miscellaneous
configuration, directories tab) and be named according to the naming convention for
linking images to products.
Taxability shows the tax and other status for the product
Price shows the price the item was sold for
Net price shows the net price the item was sold for
Price level shows the price level that was in effect for the line entry
Quantity shows the number of items sold on the line entry
Weight shows the amount of weight entered for scalable items
Retail price shows the SRP field.
On hand will display inventory quantity available
Item number displays the PLU code number
Item description displays the name of the product.
Customer info options:
·
·
·
·
·
·
·
Accnt shows the customer's account number
Company will display the full account name.
Name shows the customer name
Address shows the customer address and street name
City shows the city and state (province)
Points shows the total points accumulated by the customer
Remark displays the customer record remark field
General information form options:
© 2008 ... Logivision
The POS maintenance module.
·
·
·
·
·
·
·
·
33
Cashier shows the name of the cashier signed on to the terminal
Register number displays the terminal id#
Invoice number shows the transaction number
Time displays the current time
Date displays the current date
Account name shows the name of the customer
Account number shows the number of the customer
Icons show the status icons
NOTE: To verify which buttons affect a form (activating or deactivating the form) access the
Special menu and select Form info . A list of all buttons that activate and deactivate the form
is displayed. If a button deactivates the form but should not you need to access the button in
question and modify the swap form settings that should not be there.
2.1.5
Function parameters
Function parameters
Each function can be programmed with parameters to control the behaviour of the key. The
functions listed below are the functions available from the backend software maintenance
module that can be assigned within buttons on the L-POS. The parameters for each of the
button types are explained.
The parameters shown under the General header in the parameters screen are available
and common to all functions. This means that each function selected as part of a Button can
be programmed to follow a common set of rules.
From the button properties window you can select Advance. Advanced view allows you to
see the programming options in their native state without the menu to program the options.
Whenever the whole parameter window is highlighted in blue it means an option has been
set which does not correspond to the parameters available for this function. It usually occurs
when you are using a variable for a very specific POS application need.
Variables: L-POS allows you to set variables and test for certain results within a transaction.
This can be useful for certain buttons you may need to program depending on the
environment that you are using L-POS for.
For example, you can avoid errors when someone presses the Foreign Sub-total button by
testing the transaction state of L-POS. We use internal variable 89 for this. Enter the
advanced programming of the function properties. Depending on the button you choose you
may see settings in the advanced window that relate to options you set for that button.
In the Advance window of the properties for the subtotal button you would enter /IEQ89=1 to
ensure you are in a transaction. If you are not in a transaction L-POS will not execute the
function. If you had not set this variable L-POS would give an error because you should not
be pressing Sub-Total if you are not in a transaction. The "/" is compulsory. The "89" is the
internal variable that tests whether we are in a transaction or not. The "IEQ" represents "If
EQual." The "1" (one) represents True. So we have said /IEQ89=1 and it means If variable
89 is equal to 1 we can execute the function. Otherwise we ignore the entry.
© 2008 ... Logivision
34
L-POS User Manual 3.2.1.0
Another example is when you put a button on the keyboard that will do X if a Variable is set,
or Y if it is not set. For example, you put a button on the keyboard to "sell" a gift card that
was scanned. When this button is pressed we set an internal variable. Then when you scan
a gift card we send the data to a button that either sells a card or redeems, depending on the
variable being present or not. To see this example in detail refer to the FAQ section of the
Logivision web-site.
Variable 00 represents the input buffer. The input buffer can be used for lots of things. For
example, you want a sub-department where the entries record negative. In that subdepartment button properties you would enter /CLC=00*-1. This means Calculate the result
of Entry buffer multiplied by (-1). This use aof the variables is possible without entering the
Advance properties of the button. Just press the ... icon beside Calculation and use the
calculation wizard to enter the formula you want for this button.
This is a list of the preset Variables available within L-POS:
00: Entry buffer
89: 1 when in transaction, 0 otherwise
90: The amount of the last item (1.2)
91: The net amount of the last item (1.1)
92: The quantity of the last item (1.234)
93: The amount of the last item (voidable) (1.20)
94: The net amount of the last item (voidable) (1.10)
95: The quantity of the last item (voidable) (1.234)
96: The sub-total (3.3)
97: To total of the sale including taxes (3.9)
98: The formatted amount of the entry buffer (12.00)
99: The quantity entered (8)
Most of these variables are read within a calculation. To set your own variable you would
assign the flag in button properties of the key used to set the variable. For example
/VAR01=Q would set Variable 01 to "Q". You could test for that variable during another entry
by entering /IEQ01=Q. This means If variable 01 is equal to Q. That test will determine
whenther or not your function that checks the variable is executed. By the same token you
could reverse the logic by entering /INE01=Q and the function would be executed only if
variable 01 was not equal to Q.
Here are the functions that can be used with variables:
/VARnn=x to set variable nn (00-88) to the value x
/IEQnn=x If variable nn is Equal to x
/INEnn=x If variable nn NOT equal to x
/IGTnn=x If variable nn is greater than x
/ISTnn=x If variable nn is smaller than x
/BITnn=x If all bits x of variables nn are set (Ex: /BIT02=5 means if bit 0 and 2 are set)
/NBInn=x If all bits x of variables nn are NOT set (Ex: /NBI02=5 means if bit 0 and 2 are not
set)
/LORnn=x Make a logical OR with variable nn and the value x. Stores the result in variable
nn
/XORnn=x Make a logical Exclusive OR with variable nn and the value x. Stores the result in
variable nn
/ANDnn=x Make a logical AND with variable nn and the value x. Stores the result in variable
nn
© 2008 ... Logivision
The POS maintenance module.
35
/RES=n1n2n3n4nx Reset all variables to blank
2.1.5.1
General parameters
General parameters
The general parameters can be assigned to any function type used in a button.
·
·
·
·
·
·
·
·
·
·
© 2008 ... Logivision
Print form immediately: Select Yes if this function should execute a print form
command as soon as it is executed.
Print form file: Enter the form file to be used with this function.
Account required: Set this flag if it is compulsory to open an account before using
this function.
In sale flag: This option can be used to determine whether or not L-POS is in a
transaction, in the tendering process, or not. An example for using this flag could be
that you do not want to allow a certain form to be loaded once the tendering process
has begun. The option In tendering could be set to accomplish this. Click the … icon
to select the option you need for this function.
Receipt copies: This parameter allows you to obtain a detailed receipt copy
automatically even with your printer was turned off. For example, a C-store may work
with the receipt printer turned off on a regular basis. But on paid out transactions the
owner needs a copy of the transaction for audit purposes. Set this parameter to one
on the paid out function and L-POS will always issue one receipt for the transaction.
If the receipt was on to begin the sale, no extra copy would be issued. If you set the
parameter to 2 receipt copies, L-POS will issue up to 2 receipts automatically. If the
printer was off, 2 copies but if the printer was on you would obtain the original receipt
and one copy receipt. When you are printing an automatic copy related to the charge
function you may not want to have a second signature stub. In this case set the
number of receipt copies you want to a negative number (E.G. -2). The 2 copies will
then be printed without the account stub (signature slip).
Receipt trailer: Use this flag to select an extra trailer message that you want L-POS
to print whenever this button is used during a transaction. The trailer number refers to
the trailers added in the receipt trailers set-up. Many trailers can be created. The first
trailer will print each time a receipt is issued. The trailers 2, 3 or 4, etc will be printed
after the first trailer has been printed on the receipt. This means that 2 trailers will
print if an extra trailer is selected on a button.
Abort if form x exists: This is used to stop execution when a specific form is in use.
Click the small arrow to the right of the window to select the form you want to define.
Abort if form x does not exist: This is used to stop execution when a specific form
is not in use. Click the small arrow to the right of the window to select the form you
want to define.
Swap form: This is useful when you want to force on or force off a form or multiple
forms after the execution of a button. For example, you want to invert the forms on
your touchscreen layout when you press the subtotal key. To force a form onto the
screen, enter the + sign followed by the form number. For example, +16, +20 would
force on forms 16 and 20. To force form off, enter the—sign and the form number.
You may enter multiple forms by entering the + or -, the form number and a comma
between each subsequent form number.
Disable PLU function is used to prohibit the PLU function from operating when this
36
L-POS User Manual 3.2.1.0
·
·
·
·
·
·
·
·
·
·
·
function is in use. This is sometimes required after he subtotal key is depressed to
stop inadvertent scans of the items belonging to the next customer at the
checkstand.
Compulsory sub-Total set to Yes will force usage of a subtotal key.
Do not clear entry buffer is intended to use in a situation where data may be
entered prior to pressing a button instead of after the button. On a touch screen
where the subtotal button loads a new form showing the payment buttons, this could
be set on the subtotal function. Then you could enter an amount and press subtotal
and the tender button. The entry buffer that includes the tendered amount would not
be cleared and amount tendering would occur. Otherwise the tendered amount would
disappear when the new screen appeared.
Exit from function list will cause L-POS to stop executing the remaining functions in
the multi-key set-up of the button you are executing when certain predefined
variables have not been met.
Form to be selected with cursor allows you to specify which form the cursor
movement keys will control whenever this function is executed. This would be most
useful on non-touch screen systems that want to use flip charts and navigate the flip
charts with the cursor keys (up, down, right, left, pageup, pagedown.)
Calculation is used to enter a formula to be computed when this button is executed.
You may use the basic mathematical operators.
Button number can be used to define a button that will be depressed when the onscreen alpha keyboard is used for data input. For example, you have a number entry
function to capture additional information. You would have created a button that
executes the number entry function. But you need to enter additional alpha-numeric
data. Create a Load Form button and set the flag for On-screen keyboard to Yes. Set
the Button number to use the Number entry button you created to capture the data.
When the On-screen keyboard data has been entered and you depress the Enter, LPOS will execute the Number entry button for you automatically.
On-screen keyboard can be set to produce an image of the alpha-numeric
keyboard for use on a touch screen or with a mouse if no alpha keyboard is available
on your POS. You can also force the keyboard to pop up by double-clicking in the
entry window rapidly.
Customer display message is used when you want to send a specific message to
your pole display. Enter the message for the pole (remember that if your pole has 2
lines X 20 characters L-POS will display 20 characters only on the line reserved for
product description).
Play a sound can be used to select a sound file you want to hear when this button is
used. Of course it is assumed that speakers are available to hear the selected sound
file.
Leading message: Define a custom message in the System setup > General tab >
Pole messages section. Enter the message number here. A form must be created to
display messages. Refer to screen setup, forms for assistance on setting up a
message form.
Leading message duration: Enter the time in seconds to display the leading
message.
SEQUENCER
The sequencer is useful in situations where you must use or notuse certain functions
before another function can be executed. For example, you never want a cashier to accept
© 2008 ... Logivision
The POS maintenance module.
37
credit card payment when the Fishing License subdepartment button was used. You would
set the function flag when the Sub-department was pressed and enter the same value in
the prohibited flag on the credit card button.
· Function flag: Enter the flag to set when this function is pressed. Flags are the
combination of bit settings 1, 2, 4, 8, etc. So the Flag 17 would be bit 16 plus bit 1.
· Compulsory flags: Enter the flags that must have been set proviously in order to use
this function.
· Prohibited flags: Enter the flags that must not be set in order to use this function.
· Clear flags: Reset the flag total to zero.
· Message: What message does this function display if an error is encountered. Just
type in the message you want to display.
2.1.5.2
Attach function #8051
Attach #8051
This function is used to join transactions that are being entered simultaneously on 2 different
L-POS terminals. You must define the lane groups between which the transactions can be
joined. The functions is designed to speed up the check out process for stores that have
orders with many items to scan. Cashier on lane 1 can begin scanning the order at the same
time as cashier on lane 2. Either cashier can attach their order to the other lane to obtain a
running total and allow merging the items from both terminals into one total and one receipt.
All system features such as mix match pricing, receipt sorting and account balances remain
in effect when the Attach function is used.
Substituted function: The substitute function should be set to None.
General: Please refer to the General function parameters at the beginning of this help
section.
2.1.5.3
Backspace #35
Backspace #35
This function is used to move the cursor back one position while erasing the data in that
position.
Substituted function: Enter the function from the backend program that L-POS should use
the attributes from. This could be used if the function you are using has not been defined in
L-POS and you want to use another function that has been defined in L-POS.
General: Please refer to the General function parameters at the beginning of this help
section
© 2008 ... Logivision
38
2.1.5.4
L-POS User Manual 3.2.1.0
Bottle return (manual amount entry) #111
Bottle return (manual amount entry) #111
To create a Bottle return function that requires manual amount entry follow the suggestions
on this page. The L-POS can also allow Scanned Bottle return. See the Refund function
parameters for more information on scanning bottle returns.
If it does not exist, add a button and call it Bottle return. Add the Bottle return function 111 to
this button. In the properties of the function set the parameters as follows:
·
·
·
·
·
·
·
·
2.1.5.5
Substituted function: Press CL to set this to None
Preset amount: Enter the pre-set amount if this function uses a pre-set amount.
Minimum and Maximum amount: Enter the lowest and highest amounts available
with this button. Leaving them blank will create a Pre-set only button. The pre-set
amount is set in the previous field.
No minus: Select No for this data bit.
Bottle sale: Set this flag to No.
Taxes: Bottle return is normally set as non-taxable.
Double width printing: Use this option to send the double size print command
whenever this button is used.
General: Please refer to the General function parameters at the beginning of this
help section.
Bottle sales #510
Bottle sales #510
This function is used to enter a bottle deposit amount manually. Bottle deposits are normally
programmed within the individual PLU item by setting a bottle link number.
·
·
2.1.5.6
Substituted function: The substitute function should be set to None.
General: Please refer to the General function parameters at the beginning of this
help section.
Buttons 0-9
Buttons 0-9
Use of the buttons 0-9 is usually limited to the set-up of a multi-function button. For example,
setting up a Quick-tender key for an automatic $20 cash payment would require use of the
function named Button 2, the function named Button 0, the function named Button 0, the
function named Button 0 and the Cash function.
© 2008 ... Logivision
The POS maintenance module.
2.1.5.7
39
Cancel order #630
Cancel order #630
This function is used to cancel the current transaction.
·
·
·
2.1.5.8
Substituted function: Enter the function from the backend that L-POS should use
the attributes from. This could be used if the function you are using has not been
defined in L-POS and you want to use another function that has been defined in LPOS.
Validation: You can set the flag for validation to force a printed record of the
transaction.
General: Please refer to the General function parameters at the beginning of this
help section
Cash #101 (and other normal tender functions including Check, credit card, etc)
Cash #101 ( All tender functions including Check, credit card, etc)
The tendering functions such as Cash are used to accept payment for a transaction.
·
·
·
·
·
·
·
·
·
·
·
© 2008 ... Logivision
Substituted function: Enter the function from the backend that L-POS should use
the attributes from. This could be used if the function you are using has not been
defined in L-POS and you want to use another function that has been defined in LPOS.
Minimum amount tendered is used to prohibit amount entry below this limit.
Maximum amount tendered is used to prohibit amount entry above this limit.
Minimum quantity is used to prohibit quantity entry below this limit.
Maximum quantity is used to prohibit quantity entry above this limit.
Maximum change is used to prohibit change above this amount when this tender
key is used.
Points is used to calculate points using this ratio whenever this tender function is
used. This way you can calculate points on the sale value rather than on item sales.
If you want to issue more points for Cash payment than for credit card payments you
would assign a higher value of points on Cash than on Visa, Master Card, etc. Points
issued on tender will always be calculated as a percentage of the total. A related
setting in PosSetup>System>General>Advanced flags allows you to decide whether
tax is included in the calculation of the points issued.
Foreign currency table is used to determine the exchange rate table to use with this
tender function. The currency exchange tables are programmed in the System Setup module.
Overtender fee is set to charge an amount related to any change issued with this
tender function.
Fee in percentage is set to yes when the overtender fee should be calculated as a
percentage of the change issued with this tender function.
Activate buttons on form allows you to select a button that should be accessed
40
L-POS User Manual 3.2.1.0
·
·
·
·
·
·
·
·
·
·
·
·
·
2.1.5.9
whenever this function is executed.
Double width printing selection will force the tender amount to print double size on
the customer receipt.
Do not open drawer will prohibit the cash drawer from opening when this tender
function is used.
Compulsory tender set to Yes will force the operator to enter the amount received
into the tender key to perform change calculation
Exchange is used to decide whether this function can be traded for Cash. For
example, you could set this flag to Yes on the Check function to allow check cashing.
Validation is used to force a compulsory validation message on the validation
printer.
Endorsement is used to force a compulsory endorsement message on the
endorsement printer.
Authorisation centre is used to decide if this function activates a call to the
credit/debit card authorisation centre.
Card argument is used to determine the type of card authorisation performed on this
card. Information on the correct settings for this field is available in the Device setup
under bank. Press "Set up Device" and go to the Info tab. The settings depend on
the bank that L-POS is connecting to. So once you have the correct bank interface
selected this info field will contain the required data.
Double card stub: This will issue to credit card stubs.
Cash out required: Select this flag if you want to prompt for a cash back amount
when this tender is used.
Pickup form number: Enter the form to load when this function is used during a
pickup. Normally this will load a form with different denominations programmed to
simplify the pickup routine. See detailed information in the Printing detailed pickups
section.
Signature: Set this flag to require signature capture to the L-Tracker files when this
payment function is used.
General: Please refer to the General function parameters at the beginning of this
help section.
Card function #8048
Card function #8048
This type of function is used by the credit-debit system to perform certain transactions such
as corrections of credit sales, settlement routines, etc.
·
·
·
Substituted function: The substitute function should be set to None.
Card argument depends on the bank interface system installed on your system.
Instructions on setting up the card functions are available in the Possetup menu
under the Bank tab and under the Info section. You must have selected a bank
interface to have access to the info screen.
General: Please refer to the General function parameters at the beginning of this
help section.
© 2008 ... Logivision
The POS maintenance module.
41
2.1.5.10 Check #102
Check #102 ( All tender functions including Check, credit card, etc)
The tendering functions such as Check are used to accept payment for a transaction.
·
·
·
·
·
·
·
·
·
·
·
·
·
·
·
·
© 2008 ... Logivision
Substituted function: Enter the function from the backend that L-POS should use
the attributes from. This could be used if the function you are using has not been
defined in L-POS and you want to use another function that has been defined in LPOS.
Minimum amount tendered is used to prohibit amount entry below this limit.
Maximum amount tendered is used to prohibit amount entry above this limit.
Minimum quantity is used to prohibit quantity entry below this limit.
Maximum quantity is used to prohibit quantity entry above this limit.
Maximum change is used to prohibit change above this amount when this tender
key is used.
Points is used to calculate points using this ratio whenever this tender function is
used. This way you can calculate points on the sale value rather than on item sales.
If you want to issue more points for Cash payment than for credit card payments you
would assign a higher value of points on Cash than on Visa, Master Card, etc. Points
issued on tender will always be calculated as a percentage of the total. A related
setting in PosSetup>System>General>Advanced flags allows you to decide whether
tax is included in the calculation of the points issued.
Foreign currency table is used to determine the exchange rate table to use with this
tender function. The currency exchange tables are programmed in the System Setup module.
Overtender fee is set to charge an amount related to any change issued with this
tender function.
Fee in percentage is set to yes when the overtender fee should be calculated as a
percentage of the change issued with this tender function.
Activate buttons on form allows you to select a button that should be accessed
whenever this function is executed.
Double width printing selection will force the tender amount to print double size on
the customer receipt.
Do not open drawer will prohibit the cash drawer from opening when this tender
function is used.
Compulsory tender set to Yes will force the operator to enter the amount received
into the tender key to perform change calculation
Negative check is used to refuse checks from customer placed on the black list. Use
thebackend software account set-up. Assign the proper risk level to refuse checks.
When the same customer has multiple checking accounts and you want to refuse
checks from all accounts if one was negative, enter the additional check account
numbers into a new contact's home phone number. The POS will verify the account
number and all the contact numbers home phone for a number that matches the
check account. When a match is found and risk level is set properly the checks will
be refused.
Read MICR is used to tell the software that it can read check data by using the
printer's built-in micr reader. If your system is not equipped with a MICR do not set
the option.
42
L-POS User Manual 3.2.1.0
·
·
·
·
·
·
·
·
·
·
Exchange is used to decide whether this function can be traded for Cash. For
example, you could set this flag to Yes on the Check function to allow check cashing.
Validation is used to force a compulsory validation message on the validation
printer.
Endorsement is used to force a compulsory endorsement message on the
endorsement printer.
Authorisation centre is used to decide if this function activates a call to the
credit/debit card authorisation centre.
Card argument is used to determine the type of card authorisation performed on this
card. Information on the correct settings for this field is available in the Device setup
under bank. Press "Set up Device" and go to the Info tab. The settings depend on
the bank that L-POS is connecting to. So once you have the correct bank interface
selected this info field will contain the required data.
Double card stub: This will issue to credit card stubs.
Cash out required: Select this flag if you want to prompt for a cash back amount
when this tender is used.
Pickup form number: Enter the form to load when this function is used during a
pickup. Normally this will load a form with different denominations programmed to
simplify the pickup routine. See detailed information in the Printing detailed pickups
section.
Signature: Set this flag to require signature capture to the L-Tracker files when this
payment function is used.
General: Please refer to the General function parameters at the beginning of this
help section.
2.1.5.11 Clear #30
Clear #30
This function is used to clear an error state or to clear the entry buffer.
·
·
Substituted function: Enter the function from the backend that L-POS should use
the attributes from. This could be used if the function you are using has not been
defined in L-POS and you want to use another function that has been defined in LPOS.
General: Please refer to the General function parameters at the beginning of this
help section.
2.1.5.12 Corporate card #112
Corporate card #112 ( All tender functions including Check, credit card, etc)
The tendering functions such as Corporate Card are used to accept payment for a
transaction.
© 2008 ... Logivision
The POS maintenance module.
·
·
·
·
·
·
·
·
·
·
·
·
·
·
·
·
·
·
·
·
·
·
© 2008 ... Logivision
43
Substituted function: Enter the function from the backend that L-POS should use
the attributes from. This could be used if the function you are using has not been
defined in L-POS and you want to use another function that has been defined in LPOS.
Minimum amount tendered is used to prohibit amount entry below this limit.
Maximum amount tendered is used to prohibit amount entry above this limit.
Minimum quantity is used to prohibit quantity entry below this limit.
Maximum quantity is used to prohibit quantity entry above this limit.
Maximum change is used to prohibit change above this amount when this tender
key is used.
Points is used to calculate points using this ratio whenever this tender function is
used. This way you can calculate points on the sale value rather than on item sales.
If you want to issue more points for Cash payment than for credit card payments you
would assign a higher value of points on Cash than on Visa, Master Card, etc. Points
issued on tender will always be calculated as a percentage of the total. A related
setting in PosSetup>System>General>Advanced flags allows you to decide whether
tax is included in the calculation of the points issued.
Foreign currency table is used to determine the exchange rate table to use with this
tender function. The currency exchange tables are programmed in the System Setup module.
Overtender fee is set to charge an amount related to any change issued with this
tender function.
Fee in percentage is set to yes when the overtender fee should be calculated as a
percentage of the change issued with this tender function.
Activate buttons on form allows you to select a button that should be accessed
whenever this function is executed.
Double width printing selection will force the tender amount to print double size on
the customer receipt.
Do not open drawer will prohibit the cash drawer from opening when this tender
function is used.
Compulsory tender set to Yes will force the operator to enter the amount received
into the tender key to perform change calculation
Exchange is used to decide whether this function can be traded for Cash. For
example, you could set this flag to Yes on the Check function to allow check cashing.
Validation is used to force a compulsory validation message on the validation
printer.
Endorsement is used to force a compulsory endorsement message on the
endorsement printer.
Authorisation centre is used to decide if this function activates a call to the
credit/debit card authorisation centre.
Card argument is used to determine the type of card authorisation performed on this
card. Information on the correct settings for this field is available in the Device setup
under bank. Press "Set up Device" and go to the Info tab. The settings depend on
the bank that L-POS is connecting to. So once you have the correct bank interface
selected this info field will contain the required data.
Double card stub: This will issue to credit card stubs.
Cash out required: Select this flag if you want to prompt for a cash back amount
when this tender is used.
Pickup form number: Enter the form to load when this function is used during a
44
L-POS User Manual 3.2.1.0
·
·
pickup. Normally this will load a form with different denominations programmed to
simplify the pickup routine. See detailed information in the Printing detailed pickups
section.
Signature: Set this flag to require signature capture to the L-Tracker files when this
payment function is used.
General: Please refer to the General function parameters at the beginning of this
help section.
2.1.5.13 Correction #640 (Void)
Correction #640 (Void)
This function is used to cancel a previous item sold within the current transaction.
·
·
·
·
·
Substituted function: Enter the function from the backend that L-POS should use
the attributes from. This could be used if the function you are using has not been
defined in L-POS and you want to use another function that has been defined in LPOS.
Validation: Set this flag to force printer validation when the function is used.
Keyed minimum level: Set the minimum user level required to refunnd a PLU by
entering the number through the keyboard. This setting does not restrict the refund of
an item entered with the scanner.
Prohibit selection: With this flag set you cannot move back up the receipt to correct
a previous sub-department entry with this function. You will need to Press the
Correction button, enter the amount, and the Sub-Dept button. L-POS will search
backwards in the transaction from the bottom upwards for a match and correct the
first match it finds.
General: Please refer to the General function parameters at the beginning of this
help section.
2.1.5.14 Credit card #104
Credit card #104( All tender functions including Check, credit card, etc)
The tendering functions such as Credit Card are used to accept payment for a transaction.
·
·
·
·
·
Substituted function: Enter the function from the backend that L-POS should use
the attributes from. This could be used if the function you are using has not been
defined in L-POS and you want to use another function that has been defined in LPOS.
Minimum amount tendered is used to prohibit amount entry below this limit.
Maximum amount tendered is used to prohibit amount entry above this limit.
Minimum quantity is used to prohibit quantity entry below this limit.
Maximum quantity is used to prohibit quantity entry above this limit.
© 2008 ... Logivision
The POS maintenance module.
·
·
·
·
·
·
·
·
·
·
·
·
·
·
·
·
·
·
·
Maximum change is used to prohibit change above this amount when this tender
key is used.
Points is used to calculate points using this ratio whenever this tender function is
used. This way you can calculate points on the sale value rather than on item sales.
If you want to issue more points for Cash payment than for credit card payments you
would assign a higher value of points on Cash than on Visa, Master Card, etc. Points
issued on tender will always be calculated as a percentage of the total. A related
setting in PosSetup>System>General>Advanced flags allows you to decide whether
tax is included in the calculation of the points issued.
Foreign currency table is used to determine the exchange rate table to use with this
tender function. The currency exchange tables are programmed in the System Setup module.
Overtender fee is set to charge an amount related to any change issued with this
tender function.
Fee in percentage is set to yes when the overtender fee should be calculated as a
percentage of the change issued with this tender function.
Activate buttons on form allows you to select a button that should be accessed
whenever this function is executed.
Double width printing selection will force the tender amount to print double size on
the customer receipt.
Do not open drawer will prohibit the cash drawer from opening when this tender
function is used.
Compulsory tender set to Yes will force the operator to enter the amount received
into the tender key to perform change calculation
Exchange is used to decide whether this function can be traded for Cash. For
example, you could set this flag to Yes on the Check function to allow check cashing.
Validation is used to force a compulsory validation message on the validation
printer.
Endorsement is used to force a compulsory endorsement message on the
endorsement printer.
Authorisation centre is used to decide if this function activates a call to the
credit/debit card authorisation centre.
Card argument is used to determine the type of card authorisation performed on this
card. Information on the correct settings for this field is available in the Device setup
under bank. Press "Set up Device" and go to the Info tab. The settings depend on
the bank that L-POS is connecting to. So once you have the correct bank interface
selected this info field will contain the required data.
Double card stub: This will issue to credit card stubs.
Cash out required: Select this flag if you want to prompt for a cash back amount
when this tender is used.
Pickup form number: Enter the form to load when this function is used during a
pickup. Normally this will load a form with different denominations programmed to
simplify the pickup routine. See detailed information in the Printing detailed pickups
section.
Signature: Set this flag to require signature capture to the L-Tracker files when this
payment function is used.
General: Please refer to the General function parameters at the beginning of this
help section.
PCI Security concerns
© 2008 ... Logivision
45
46
L-POS User Manual 3.2.1.0
System access
Logivision recommends that access to PCs, servers and databases with payment applications should
be restricted by the use of a unique username and complex password combination.
Data retention
Logivision took steps to minimize the storage and display of card data so as to minimize the possibility
of that data being lost or compromised. Card account data is truncated on receipts, in electronic journal
and in log files. Logivision only stores the LAST 4 digits to comply with both PCI requirements and
FACTA rules. The data retention policies cannot be modified by system integrators or by end users.
Remote Access
Remote access is the ability to connect and interact with a remote network or computer as if you were
directly connected of that remote network or computer. Full remote access implies that this access is
available at will (on demand), and some level of network communication is allowed to or through a
firewall. PCI/PABP recommendations are to use two-factor authentication for remote access login.
The industry recognizes that implementing two-factor authentication can be difficult and costly. If a
merchant cannot justify the expense of implementing a two-factor authentication solution for remote
access, there are other options available by providing connectivity needed to support customers
without creating a "full" remote access solution. When considering these alternative solutions, the
following principles must be addressed to ensure that the solution provides needed controls without
enabling "full" remote access:
· Ensure that remote connectivity can be traced to a specific service request (this would allow
identification the customer support representative and the user requesting support).
· Ensure that the solution does not allow "on demand" or "always on" access.
· Ensure the solution uses robust (at least 128 bit) encryption for all communications.
· Ensure that the solution does not allow for the exchange of credentials.
· Mandate that the customer environment must be monitored while access is enabled.
· Ensure that the connection is enabled by an outbound connection that does not require firewall
port enablement.
Here are some examples of this type of solution that can be implemented to meet these requirements
include:
·
Go To Assist (full usage tracking with unique session tokens created by customer support
rep) http://www.gotoassist.com/
·
LogMeIn Rescue (full usage tracking with unique session tokens created by customer
support rep) https://secure.logmeinrescue.com/HelpDesk/Home.aspx
·
Techinline Remote Desktop (full usage tracking with unique session tokens created by
customer support rep) http://www.techinline.com/
·
iRemotePC Remote Support Service (full usage tracking with unique session tokens
created by customer support rep) https://www.iremotepc.com/
·
Go To Meeting (tracking of meeting IDs used and persons involved need to be tracked in
support tickets) https://www.gotomeeting.com/
·
LiveMeeting (tracking of meeting IDs used and persons involved need to be tracked in
support tickets)
http://office.microsoft.com/en-us/livemeeting/default.aspx
·
UltraVNC (configure to require customer to initiate access and to connect to a specific IP
address or range for support connectivity, and persons involved need to be tracked in support tickets)
http://www.uvnc.com/
Encryption
Logivision does not use any data encryption because it is not needed within our application. The credit
interfaces we provide do not control pin-pads or card data communication. No sensitive card data is
stored in the L-POS or other Logivision applications.
Nonetheless it is important to know that Logivision has chosen software partners that are PCI-CISP
approved. These partners have been validated to ensure that data is not stored that can lead to any
© 2008 ... Logivision
The POS maintenance module.
47
type of compromise.
For detailed information on requirements to meet PCI compliancy you should review the PCI
Implementation guide for L-POS v1.01.Pdf document deleived with this application.
2.1.5.15 Customer ID# #305
Customer ID #305 (=New Invoice 305)
The customer ID function is used to recall a customer account.
Substituted function: Enter the function from the backend that L-POS should use the
attributes from. This could be used if the function you are using has not been defined in LPOS and you want to use another function that has been defined in L-POS.
Compulsory number entry: use this flag to request a number entry preceding the customer
acount entry. You need to program a number entry button on the keyboard.
Minimum digits: Set the minimum number of digits available for account number entry.
Maximum dgits: Set the maximum number of digits available for account number entry.
Library name: Enter your custom GPIC name here to execute your own custome DLL when
the account button is used.
Function name: Enter the function this key uses within your custom DLL.
Argument: Enter the argument required by your custom DLL when this button is used.
Transaction type entry: Enter the transaction type required.
General: Please refer to the General function parameters at the beginning of this help
section.
2.1.5.16 Debit Card #103
Debit Card #103( All tender functions including Check, credit card, etc)
The tendering functions such as Debit Card are used to accept payment for a transaction.
·
·
·
·
·
·
·
© 2008 ... Logivision
Substituted function: Enter the function from the backend that L-POS should use
the attributes from. This could be used if the function you are using has not been
defined in L-POS and you want to use another function that has been defined in LPOS.
Minimum amount tendered is used to prohibit amount entry below this limit.
Maximum amount tendered is used to prohibit amount entry above this limit.
Minimum quantity is used to prohibit quantity entry below this limit.
Maximum quantity is used to prohibit quantity entry above this limit.
Maximum change is used to prohibit change above this amount when this tender
key is used.
Points is used to calculate points using this ratio whenever this tender function is
used. This way you can calculate points on the sale value rather than on item sales.
If you want to issue more points for Cash payment than for credit card payments you
would assign a higher value of points on Cash than on Visa, Master Card, etc. Points
48
L-POS User Manual 3.2.1.0
·
·
·
·
·
·
·
·
·
·
·
·
·
·
·
·
·
issued on tender will always be calculated as a percentage of the total. A related
setting in PosSetup>System>General>Advanced flags allows you to decide whether
tax is included in the calculation of the points issued.
Foreign currency table is used to determine the exchange rate table to use with this
tender function. The currency exchange tables are programmed in the System Setup module.
Overtender fee is set to charge an amount related to any change issued with this
tender function.
Fee in percentage is set to yes when the overtender fee should be calculated as a
percentage of the change issued with this tender function.
Activate buttons on form allows you to select a button that should be accessed
whenever this function is executed.
Double width printing selection will force the tender amount to print double size on
the customer receipt.
Do not open drawer will prohibit the cash drawer from opening when this tender
function is used.
Compulsory tender set to Yes will force the operator to enter the amount received
into the tender key to perform change calculation
Exchange is used to decide whether this function can be traded for Cash. For
example, you could set this flag to Yes on the Check function to allow check cashing.
Validation is used to force a compulsory validation message on the validation
printer.
Endorsement is used to force a compulsory endorsement message on the
endorsement printer.
Authorisation centre is used to decide if this function activates a call to the
credit/debit card authorisation centre.
Card argument is used to determine the type of card authorisation performed on this
card. Information on the correct settings for this field is available in the Device setup
under bank. Press "Set up Device" and go to the Info tab. The settings depend on
the bank that L-POS is connecting to. So once you have the correct bank interface
selected this info field will contain the required data.
Double card stub: This will issue to credit card stubs.
Cash out required: Select this flag if you want to prompt for a cash back amount
when this tender is used.
Pickup form number: Enter the form to load when this function is used during a
pickup. Normally this will load a form with different denominations programmed to
simplify the pickup routine. See detailed information in the Printing detailed pickups
section.
Signature: Set this flag to require signature capture to the L-Tracker files when this
payment function is used.
General: Please refer to the General function parameters at the beginning of this
help section.
PCI Security concerns
System access
Logivision recommends that access to PCs, servers and databases with payment applications should
be restricted by the use of a unique username and complex password combination.
Data retention
Logivision took steps to minimize the storage and display of card data so as to minimize the possibility
of that data being lost or compromised. Card account data is truncated on receipts, in electronic journal
© 2008 ... Logivision
The POS maintenance module.
49
and in log files. Logivision only stores the LAST 4 digits to comply with both PCI requirements and
FACTA rules. The data retention policies cannot be modified by system integrators or by end users.
Remote Access
Remote access is the ability to connect and interact with a remote network or computer as if you were
directly connected of that remote network or computer. Full remote access implies that this access is
available at will (on demand), and some level of network communication is allowed to or through a
firewall. PCI/PABP recommendations are to use two-factor authentication for remote access login.
The industry recognizes that implementing two-factor authentication can be difficult and costly. If a
merchant cannot justify the expense of implementing a two-factor authentication solution for remote
access, there are other options available by providing connectivity needed to support customers
without creating a "full" remote access solution. When considering these alternative solutions, the
following principles must be addressed to ensure that the solution provides needed controls without
enabling "full" remote access:
· Ensure that remote connectivity can be traced to a specific service request (this would allow
identification the customer support representative and the user requesting support).
· Ensure that the solution does not allow "on demand" or "always on" access.
· Ensure the solution uses robust (at least 128 bit) encryption for all communications.
· Ensure that the solution does not allow for the exchange of credentials.
· Mandate that the customer environment must be monitored while access is enabled.
· Ensure that the connection is enabled by an outbound connection that does not require firewall
port enablement.
Here are some examples of this type of solution that can be implemented to meet these requirements
include:
·
Go To Assist (full usage tracking with unique session tokens created by customer support
rep) http://www.gotoassist.com/
·
LogMeIn Rescue (full usage tracking with unique session tokens created by customer
support rep) https://secure.logmeinrescue.com/HelpDesk/Home.aspx
·
Techinline Remote Desktop (full usage tracking with unique session tokens created by
customer support rep) http://www.techinline.com/
·
iRemotePC Remote Support Service (full usage tracking with unique session tokens
created by customer support rep) https://www.iremotepc.com/
·
Go To Meeting (tracking of meeting IDs used and persons involved need to be tracked in
support tickets) https://www.gotomeeting.com/
·
LiveMeeting (tracking of meeting IDs used and persons involved need to be tracked in
support tickets)
http://office.microsoft.com/en-us/livemeeting/default.aspx
·
UltraVNC (configure to require customer to initiate access and to connect to a specific IP
address or range for support connectivity, and persons involved need to be tracked in support tickets)
http://www.uvnc.com/
Encryption
Logivision does not use any data encryption because it is not needed within our application. The credit
interfaces we provide do not control pin-pads or card data communication. No sensitive card data is
stored in the L-POS or other Logivision applications.
Nonetheless it is important to know that Logivision has chosen software partners that are PCI-CISP
approved. These partners have been validated to ensure that data is not stored that can lead to any
type of compromise.
For detailed information on requirements to meet PCI compliancy you should review the PCI
Implementation guide for L-POS v1.01.Pdf document deleived with this application.
© 2008 ... Logivision
50
L-POS User Manual 3.2.1.0
2.1.5.17 Deploy command #8058
Deploy command #8058
Use this function to request the backend to perform a task (deploy command).
·
·
·
Substituted function: Enter the function from the backend that L-POS should use
the attributes from. This could be used if the function you are using has not been
defined in L-POS and you want to use another function that has been defined in LPOS.
Sql command: Enter the sql command to execute when this button is pressed. This
command will be sent to the L-BOSS controller for execution.
General: Please refer to the General function parameters at the beginning of this
help section.
2.1.5.18 Department coupon 465
Store Coupon #460
This type of function is used to manually reduce the sale amount of a selected department
when the amount is entered. The parameters for this type of functions are the following:
·
·
·
·
·
·
Substituted function: Enter the function from the backend that L-POS should use
the attributes from. This could be used if the function you are using has not been
defined in L-POS and you want to use another function that has been defined in LPOS.
Preset amount: Enter the pre-set coupon amount if it is pre-set. Otherwise leave it
blank.
Minimum and Maximum discount: Enter the lowest and highest discount amounts
available with this button. Leaving them blank will create a Pre-set only discount
button. The pre-set amount is set in the previous field.
Positive coupon: Set this flag to Yes to add the coupon amount to the transaction.
Double width printing: Use this option to send the double size print command
whenever this button is used.
General: Please refer to the General function parameters at the beginning of this
help section.
2.1.5.19 Discount Global #410
Discount Global #410
A global discount such as function 410 will reduce (or increase) the amount of the sale of
discountable items by the amount or by the percentage entered.
© 2008 ... Logivision
The POS maintenance module.
51
The global discount parameters are:
·
·
·
·
·
·
·
·
·
·
·
·
Substituted function: Enter the function from the backend that L-POS should use
the attributes from. This could be used if the function you are using has not been
defined in L-POS and you want to use another function that has been defined in LPOS.
Preset discount rate: Enter the pre-set discount rate or amount.
Minimum and Maximum discount: Enter the lowest and highest discount rates (or
amounts) available with this button. Leaving them blank will create a Pre-set only
discount button. The pre-set amount is set in the previous field.
No minus: Select Yes if L-POS should not allow a negative total through use of this
button.
Positive discount: Set this flag to Yes to add the discount into the transaction as a
premium.
Discount level (1-4): L-POS can track up to 4 discount subtotals. Enter the discount
subtotal being used in this discount function.
Taxes: Press the … icon to select the taxes that are affected by this discount button.
To make this discount button non-taxable make sure that no tax names are selected
in this window. A greyed out tax name is the same as no tax selected.
Full tax: Set this flag to No if you want L-POS to remove the tax collected on taxable
items on a pro-rata basis according to the amount of discount given on the
discountable items. L-POS will remove all tax from the taxable items if this flag is set
to Yes.
Amount discount: Set this flag when the discount button you are programming is
entered in dollar amounts as opposed to a percentage rate.
Rounding factor: Enter the rounding factor used with the discount button.
Double width printing: Use this option to send the double size print command
whenever this button is used.
General: Please refer to the General function parameters at the beginning of this
help section.
2.1.5.20 Down arrow #8021
Down arrow #8021
This type of function allows the control of cursor movement up or down by line or by page. It
can also be used to navigate the electronic sales journal when the Next transaction
parameter is selected. You may need to create 2 Down buttons, the first to move down the
transaction you are in or to move down lists you are viewing and the second to move forward
in the electronic journal.
·
·
© 2008 ... Logivision
Substituted function: Enter the function from the backend that L-POS should use
the attributes from. This could be used if the function you are using has not been
defined in L-POS and you want to use another function that has been defined in LPOS.
Page scrolling allows the function to operate as page down instead of moving down
one line only.
52
L-POS User Manual 3.2.1.0
·
·
Next transaction is required when this function is used to move ahead while
reviewing the electronic journal.
General: Please refer to the General function parameters at the beginning of this
help section.
2.1.5.21 Double coupon shift #8039
Double coupon shift #8039
This function is used to manually change the coupon multiplication level.
·
·
·
·
Substituted function: Enter the function from the backend that L-POS should use
the attributes from. This could be used if the function you are using has not been
defined in L-POS and you want to use another function that has been defined in LPOS.
Multiplication factor will shift the coupon entries by this multiplication factor.
Fractions are accepted.
Stay shifted means that all the entries made into a coupon function will be multiplied
by the multiplication factor programmed on the Double coupon shift button.
Otherwise only the coupon entries in the current transaction will use the multiplication
factor assigned to this button. Pressing the Double coupon shift button again will
revert the L-POS coupon doubling to the state it was in set at before the Double
coupon shift button was used. See related programming in the System set-up under
the Coupon tab
General: Please refer to the General function parameters at the beginning of this
help section.
2.1.5.22 EBT
Cash #101 ( All tender functions including Check, credit card, etc)
The tendering functions such as Cash are used to accept payment for a transaction.
·
·
·
·
·
·
Substituted function: Enter the function from the backend that L-POS should use
the attributes from. This could be used if the function you are using has not been
defined in L-POS and you want to use another function that has been defined in LPOS.
Minimum amount tendered is used to prohibit amount entry below this limit.
Maximum amount tendered is used to prohibit amount entry above this limit.
Minimum quantity is used to prohibit quantity entry below this limit.
Maximum quantity is used to prohibit quantity entry above this limit.
Maximum change is used to prohibit change above this amount when this tender
key is used.
© 2008 ... Logivision
The POS maintenance module.
·
·
·
·
·
·
·
·
·
·
·
·
·
·
·
·
·
·
© 2008 ... Logivision
53
Points is used to calculate points using this ratio whenever this tender function is
used. This way you can calculate points on the sale value rather than on item sales.
If you want to issue more points for Cash payment than for credit card payments you
would assign a higher value of points on Cash than on Visa, Master Card, etc. Points
issued on tender will always be calculated as a percentage of the total. A related
setting in PosSetup>System>General>Advanced flags allows you to decide whether
tax is included in the calculation of the points issued.
Foreign currency table is used to determine the exchange rate table to use with this
tender function. The currency exchange tables are programmed in the System Setup module.
Overtender fee is set to charge an amount related to any change issued with this
tender function.
Fee in percentage is set to yes when the overtender fee should be calculated as a
percentage of the change issued with this tender function.
Activate buttons on form allows you to select a button that should be accessed
whenever this function is executed.
Double width printing selection will force the tender amount to print double size on
the customer receipt.
Do not open drawer will prohibit the cash drawer from opening when this tender
function is used.
Compulsory tender set to Yes will force the operator to enter the amount received
into the tender key to perform change calculation
Exchange is used to decide whether this function can be traded for Cash. For
example, you could set this flag to Yes on the Check function to allow check cashing.
Validation is used to force a compulsory validation message on the validation
printer.
Endorsement is used to force a compulsory endorsement message on the
endorsement printer.
Authorisation centre is used to decide if this function activates a call to the
credit/debit card authorisation centre.
Card argument is used to determine the type of card authorisation performed on this
card. Information on the correct settings for this field is available in the Device setup
under bank. Press "Set up Device" and go to the Info tab. The settings depend on
the bank that L-POS is connecting to. So once you have the correct bank interface
selected this info field will contain the required data.
Double card stub: This will issue to credit card stubs.
Cash out required: Select this flag if you want to prompt for a cash back amount
when this tender is used.
Pickup form number: Enter the form to load when this function is used during a
pickup. Normally this will load a form with different denominations programmed to
simplify the pickup routine. See detailed information in the Printing detailed pickups
section.
Signature: Set this flag to require signature capture to the L-Tracker files when this
payment function is used.
General: Please refer to the General function parameters at the beginning of this
help section.
54
L-POS User Manual 3.2.1.0
2.1.5.23 EBT Cash #120
EBT Cash #120( All tender functions including Check, credit card, etc)
The tendering functions such as EBT Cash are used to accept payment for a transaction.
·
·
·
·
·
·
·
·
·
·
·
·
·
·
·
·
·
·
·
Substituted function: Enter the function from the backend that L-POS should use
the attributes from. This could be used if the function you are using has not been
defined in L-POS and you want to use another function that has been defined in LPOS.
Minimum amount tendered is used to prohibit amount entry below this limit.
Maximum amount tendered is used to prohibit amount entry above this limit.
Minimum quantity is used to prohibit quantity entry below this limit.
Maximum quantity is used to prohibit quantity entry above this limit.
Maximum change is used to prohibit change above this amount when this tender
key is used.
Points is used to calculate points using this ratio whenever this tender function is
used. This way you can calculate points on the sale value rather than on item sales.
If you want to issue more points for Cash payment than for credit card payments you
would assign a higher value of points on Cash than on Visa, Master Card, etc. Points
issued on tender will always be calculated as a percentage of the total. A related
setting in PosSetup>System>General>Advanced flags allows you to decide whether
tax is included in the calculation of the points issued.
Foreign currency table is used to determine the exchange rate table to use with this
tender function. The currency exchange tables are programmed in the System Setup module.
Overtender fee is set to charge an amount related to any change issued with this
tender function.
Fee in percentage is set to yes when the overtender fee should be calculated as a
percentage of the change issued with this tender function.
Activate buttons on form allows you to select a button that should be accessed
whenever this function is executed.
Double width printing selection will force the tender amount to print double size on
the customer receipt.
Do not open drawer will prohibit the cash drawer from opening when this tender
function is used.
Compulsory tender set to Yes will force the operator to enter the amount received
into the tender key to perform change calculation
Exchange is used to decide whether this function can be traded for Cash. For
example, you could set this flag to Yes on the Check function to allow check cashing.
Validation is used to force a compulsory validation message on the validation
printer.
Endorsement is used to force a compulsory endorsement message on the
endorsement printer.
Authorisation centre is used to decide if this function activates a call to the
credit/debit card authorisation centre.
Card argument is used to determine the type of card authorisation performed on this
card. Information on the correct settings for this field is available in the Device setup
under bank. Press "Set up Device" and go to the Info tab. The settings depend on
© 2008 ... Logivision
The POS maintenance module.
·
·
·
·
·
55
the bank that L-POS is connecting to. So once you have the correct bank interface
selected this info field will contain the required data.
Double card stub: This will issue to credit card stubs.
Cash out required: Select this flag if you want to prompt for a cash back amount
when this tender is used.
Pickup form number: Enter the form to load when this function is used during a
pickup. Normally this will load a form with different denominations programmed to
simplify the pickup routine. See detailed information in the Printing detailed pickups
section.
Signature: Set this flag to require signature capture to the L-Tracker files when this
payment function is used.
General: Please refer to the General function parameters at the beginning of this
help section.
2.1.5.24 Exact pricing #8065
Exact pricing #8065
The exact pricing function is used to correct label errors according to a very specific set of
rules applied in the province of Quebec, Canada. Exact pricing is used to correct a price,
and then offer a discount to the customer. The Exact pricing function will subtract $10.00
from the corrected price for all items that are priced over $10.00. Items sold for less than
$10.00 are corrected and offered for free to the customer.
· Substituted function: Enter the function from the backend that L-POS should use
the attributes from. This could be used if the function you are using has not been
defined in L-POS and you want to use another function that has been defined in LPOS.
· Keyed minimum level: Set the minimum user level required to correct a PLU when
the PLU number is entered through the keyboard and not scanned. This setting does
not restrict the Exact pricing correction of an item entered with the scanner.
· General: Please refer to the General function parameters at the beginning of this
help section.
There are several related flags in the PosSetup>General>Advanced area.
· Override function used for EXACT PRICING: Set this value when you need to
differentiate the price changes done with the Exact pricing function as compared to the
normal Price override function.
· EXACT PRICING new price is sent to the office: Set this to true to update the backoffice database and the other POS terminals when the Exact pricing function is used.
· EXACT PRICING minimum new price percentage before warning: L-POS can
warn the operator when the Exact pricing is used. You need to set the percentage
variance that will trigger the warning message.
2.1.5.25 Exit #8012
Exit #8012
© 2008 ... Logivision
56
L-POS User Manual 3.2.1.0
The exit function returns the L-POS terminal to the operating system.
·
·
Substituted function: Enter the function from the backend that L-POS should use
the attributes from. This could be used if the function you are using has not been
defined in L-POS and you want to use another function that has been defined in LPOS.
General: Please refer to the General function parameters at the beginning of this
help section.
2.1.5.26 Flip charts #8054
Flip Chart #8054
This function is used to load the flip chart screens. Note that this function loads the flip
charts to a predefined zone and that only certain types of buttons are enabled on the flip
charts.
·
·
·
Substituted function: The substitute function should be set to None.
Page number: Set the Flip charts menu number that will be accessed when this
button is used.
General: Please refer to the General function parameters at the beginning of this
help section.
2.1.5.27 Food stamp #118
Food stamp #118
Food stamp is a tender key used to receive payment for a sale. The food stamp function is
pre-programmed and uses built-in characteristics. For example, tendering is always
compulsory and changing the flag below will have no effect. Only food stamp items can be
paid with food stamps.
·
·
·
·
·
·
·
Substituted function: Enter the function from the backend that L-POS should use
the attributes from. This could be used if the function you are using has not been
defined in L-POS and you want to use another function that has been defined in LPOS.
Minimum amount tendered is used to prohibit amount entry below this limit.
Maximum amount tendered is used to prohibit amount entry above this limit.
Minimum quantity is used to prohibit quantity entry below this limit.
Maximum quantity is used to prohibit quantity entry above this limit.
Maximum change is used to prohibit change above this amount when this tender
key is used.
Points is used to calculate points using this ratio whenever this tender function is
used. This way you can calculate points on the sale value rather than on item sales.
© 2008 ... Logivision
The POS maintenance module.
·
·
·
·
·
·
·
·
·
·
·
·
·
·
·
·
·
© 2008 ... Logivision
57
If you want to issue more points for Cash payment than for credit card payments you
would assign a higher value of points on Cash than on Visa, Master Card, etc. Points
issued on tender will always be calculated as a percentage of the total. A related
setting in PosSetup>System>General>Advanced flags allows you to decide whether
tax is included in the calculation of the points issued.
Foreign currency table is used to determine the exchange rate table to use with this
tender function. The currency exchange tables are programmed in the System Setup module.
Overtender fee is set to charge an amount related to any change issued with this
tender function.
Fee in percentage is set to yes when the overtender fee should be calculated as a
percentage of the change issued with this tender function.
Activate buttons on form allows you to select a button that should be accessed
whenever this function is executed.
Double width printing selection will force the tender amount to print double size on
the customer receipt.
Do not open drawer will prohibit the cash drawer from opening when this tender
function is used.
Compulsory tender set to Yes will force the operator to enter the amount received
into the tender key to perform change calculation
Exchange is used to decide whether this function can be traded for Cash. For
example, you could set this flag to Yes on the Check function to allow check cashing.
Validation is used to force a compulsory validation message on the validation
printer.
Endorsement is used to force a compulsory endorsement message on the
endorsement printer.
Authorisation centre is used to decide if this function activates a call to the
credit/debit card authorisation centre.
Card argument is used to determine the type of card authorisation performed on this
card. Information on the correct settings for this field is available in the Device setup
under bank. Press "Set up Device" and go to the Info tab. The settings depend on
the bank that L-POS is connecting to. So once you have the correct bank interface
selected this info field will contain the required data.
Double card stub: This will issue to credit card stubs.
Cash out required: Select this flag if you want to prompt for a cash back amount
when this tender is used.
Pickup form number: Enter the form to load when this function is used during a
pickup. Normally this will load a form with different denominations programmed to
simplify the pickup routine. See detailed information in the Printing detailed pickups
section.
Signature: Set this flag to require signature capture to the L-Tracker files when this
payment function is used.
General: Please refer to the General function parameters at the beginning of this
help section.
58
L-POS User Manual 3.2.1.0
2.1.5.28 Foreign currency #105
Foreign currency #105( All tender functions including Check, credit card, etc)
The tendering functions such as Foreign currency are used to accept payment for a
transaction.
·
·
·
·
·
·
·
·
·
·
·
·
·
·
·
·
·
·
·
Substituted function: Enter the function from the backend that L-POS should use
the attributes from. This could be used if the function you are using has not been
defined in L-POS and you want to use another function that has been defined in LPOS.
Minimum amount tendered is used to prohibit amount entry below this limit.
Maximum amount tendered is used to prohibit amount entry above this limit.
Minimum quantity is used to prohibit quantity entry below this limit.
Maximum quantity is used to prohibit quantity entry above this limit.
Maximum change is used to prohibit change above this amount when this tender
key is used.
Points is used to calculate points using this ratio whenever this tender function is
used. This way you can calculate points on the sale value rather than on item sales.
If you want to issue more points for Cash payment than for credit card payments you
would assign a higher value of points on Cash than on Visa, Master Card, etc. Points
issued on tender will always be calculated as a percentage of the total. A related
setting in PosSetup>System>General>Advanced flags allows you to decide whether
tax is included in the calculation of the points issued.
Foreign currency table is used to determine the exchange rate table to use with this
tender function. The currency exchange tables are programmed in the System Setup module.
Overtender fee is set to charge an amount related to any change issued with this
tender function.
Fee in percentage is set to yes when the overtender fee should be calculated as a
percentage of the change issued with this tender function.
Activate buttons on form allows you to select a button that should be accessed
whenever this function is executed.
Double width printing selection will force the tender amount to print double size on
the customer receipt.
Do not open drawer will prohibit the cash drawer from opening when this tender
function is used.
Compulsory tender set to Yes will force the operator to enter the amount received
into the tender key to perform change calculation
Exchange is used to decide whether this function can be traded for Cash. For
example, you could set this flag to Yes on the Check function to allow check cashing.
Validation is used to force a compulsory validation message on the validation
printer.
Endorsement is used to force a compulsory endorsement message on the
endorsement printer.
Authorisation centre is used to decide if this function activates a call to the
credit/debit card authorisation centre.
Card argument is used to determine the type of card authorisation performed on this
card. Information on the correct settings for this field is available in the Device setup
© 2008 ... Logivision
The POS maintenance module.
·
·
·
·
·
59
under bank. Press "Set up Device" and go to the Info tab. The settings depend on
the bank that L-POS is connecting to. So once you have the correct bank interface
selected this info field will contain the required data.
Double card stub: This will issue to credit card stubs.
Cash out required: Select this flag if you want to prompt for a cash back amount
when this tender is used.
Pickup form number: Enter the form to load when this function is used during a
pickup. Normally this will load a form with different denominations programmed to
simplify the pickup routine. See detailed information in the Printing detailed pickups
section.
Signature: Set this flag to require signature capture to the L-Tracker files when this
payment function is used.
General: Please refer to the General function parameters at the beginning of this
help section.
2.1.5.29 Freebee #8060
Freebee #8060
Use this function to sell a free item. This item will not remove attached items like bottle
deposits and sends data to separate totals for tracking the free items.
·
·
·
Substituted function: Enter the function from the backend that L-POS should use
the attributes from. This could be used if the function you are using has not been
defined in L-POS and you want to use another function that has been defined in LPOS.
Must pay taxes will leave the taxes on the PLU items that are not tax free even when
the item is free.
General: Please refer to the General function parameters at the beginning of this
help section.
2.1.5.30 Function code #8044
Function code #8044
The Function code is used to enter a button by an assigned number. This is particularly
useful when the keyboard has limited positions.
·
·
© 2008 ... Logivision
Substituted function: Enter the function from the backend that L-POS should use
the attributes from. This could be used if the function you are using has not been
defined in L-POS and you want to use another function that has been defined in LPOS.
General: Please refer to the General function parameters at the beginning of this
help section.
60
L-POS User Manual 3.2.1.0
2.1.5.31 Gift certificate redeem #117
Gift certificate redeemed #117
Gift certificate redeemed is used to receive payment by a gift certificate. The gift
certificate system can be used as both a certificate intended for one-time use, or as a gift
card that can control a decreasing balance. The related settings are made in the advanced
settings of Possetup.
·
·
·
·
·
·
·
·
·
·
·
·
·
·
·
·
·
·
·
Substituted function: Enter the function from the backend that L-POS should use
the attributes from. This could be used if the function you are using has not been
defined in L-POS and you want to use another function that has been defined in LPOS.
Minimum amount tendered is used to prohibit amount entry below this limit.
Maximum amount tendered is used to prohibit amount entry above this limit.
Minimum quantity is used to prohibit quantity entry below this limit.
Maximum quantity is used to prohibit quantity entry above this limit.
Maximum change is used to prohibit change above this amount when this tender
key is used.
Points is used to calculate points using this ratio whenever this tender function is
used. This way you can calculate points on the sale value rather than on item sales.
If you want to issue more points for Cash payment than for credit card payments you
would assign a higher value of points on Cash than on Visa, Master Card, etc. Points
issued on tender will always be calculated as a percentage of the total. A related
setting in PosSetup>System>General>Advanced flags allows you to decide whether
tax is included in the calculation of the points issued.
Foreign currency table is used to determine the exchange rate table to use with this
tender function. The currency exchange tables are programmed in the System Setup module.
Overtender fee is set to charge an amount related to any change issued with this
tender function.
Fee in percentage is set to yes when the overtender fee should be calculated as a
percentage of the change issued with this tender function.
Activate buttons on form allows you to select a button that should be accessed
whenever this function is executed.
Double width printing selection will force the tender amount to print double size on
the customer receipt.
Do not open drawer will prohibit the cash drawer from opening when this tender
function is used.
Compulsory tender set to Yes will force the operator to enter the amount received
into the tender key to perform change calculation
Exchange is used to decide whether this function can be traded for Cash. For
example, you could set this flag to Yes on the Check function to allow check cashing.
Validation is used to force a compulsory validation message on the validation
printer.
Endorsement is used to force a compulsory endorsement message on the
endorsement printer.
Authorisation centre is used to decide if this function activates a call to the
credit/debit card authorisation centre.
Card type is used to determine the type of card authorisation performed on this card.
© 2008 ... Logivision
The POS maintenance module.
·
·
·
·
·
·
61
Information on the correct settings for this field is available in the Device setup under
bank. Press "Set up Device" and go to the Info tab. The settings depend on the bank
that L-POS is connecting to. So once you have the correct bank interface selected
this info field will contain the required data.
Gift number: This is used when you are working with numbered gift certificates or
gift cards that carry a balance on the system.
Credit note: This selection is used when you want the change due on a gift
certificate to be issued as a new gift certificate.
Form file name: Enter the form template's name that will be used to print the gift
certificate issued when change is due and the Credit note flag was selected.
Number of copies: set the quantity of copies to print.
Signature: Set this flag to require signature capture.
General: Please refer to the General function parameters at the beginning of this
help section.
Note 2: Gift cards: The gift certificates can be used a Gift cards by making a few changes
to the settings. Gift cards work similar to an account with a credit balance. Here are the
steps required to set-up the system to use gift cards rather than gift certificates.
1. In PosSetup>System>General>Advanced you need to set the Gift card server IP
addess.
2. Create a button that uses function 117 named Gift card tender. Set Gift number to
True. Set Credit note to True.
3. Create a button that uses function 123 named Gift card redeem. Set Pre-programmed
true. Set request amount true if you want to be able to override the amount the card
was programmed for originally.
Note 3: Scanning gift cards:
1. Create a button and call it "Sell Gift Cert." add function "load form" in there and map it on
the keyboard.
2. In the properties of that function, click on "Advanced" and type in /VAR01=1. (This
button will need to be pressed before scanning to sell the gift cert.)
3. In the properties of the "CLEAR" button, click on "Advanced" and type in /VAR01=0 (this
is going to remove the variable from memory when "clear is pressed")
4. Create another button, this one called "Gift Cert.", and add 2 functions in there: Gift
Certificate (+) #123 and Gift Certificate (-) #117. (no need to map that one to the
keyboard as it's only going to be used in the definition table)
5. In that button, go in the Advanced properties for function Gift Certificate (+) #123, and in
there type in /IEQ01=1 /VAR01=0 (this will execute the function only if var01 is equal to
1 and set back the var01 to get out of selling mode)
6. Still in the same button, but on the 2nd function Gift Certificate (-)
#117==>properties==>advanced, type in /INE01=1 (this will execute the function only if
var01 is NOT equal to 1)
7. Your def. table needs to have an entry for that: set your [8 - Undef] function to use the
"Gift Cert" button that you created at step 4 (you need a "key" on the barcode to be able
to recognize that it is a gift certificate).
8. To sell a new gift certificate, you push "Sell Gift Cert" (created at step #1) and scan your
gift card. To redeem it, you just scan the card without pressing that button.
© 2008 ... Logivision
62
L-POS User Manual 3.2.1.0
2.1.5.32 Gift certif sold #123
Gift certificate sold #123
This function is used if to sell a Gift Certificate or a Gift card. Gift certificates are designed
for one time use. With gift certificates a decision is made when the system is set up
concerning change on gift certificates. Either change is given, or a new gift certificate is
issued when change is due. This decision is made in the set-up of the gift certificate
redeemed button. If you are working with gift cards, change is never issued, it remains on
the the original gift card and uses the same tracking number.
·
·
·
·
·
·
·
·
·
·
·
·
·
·
Substituted function: Enter the function from the backend that L-POS should use
the attributes from. This could be used if the function you are using has not been
defined in L-POS and you want to use another function that has been defined in LPOS.
Item number: This can be used to set a specific gift certificate number to the
keyboard.
Print certificate: Select this flag to print a gift certificate.
Generate number: This is used when L-POS will number the next gift certificate
number.
Manual number: This is used when the operator will enter the gift certificate number
manually.
Pre-programmed: This is used to tell L-POS to search for the gift certificate number
in the gift certificate database.
Request amount: Using this flag means you do not neeed to asign a value to the
pre-programmed certificates. The OS will request an amount at the time of sale. So a
gift certificate has no value until it is redeemed, even though it may have a printed
value. Until it is authorized the paper or crad is worthless.
Minimum digits is used to limit the length of the certificate or card number.
Maximum digits is used to limit the length of the certificate or card number.
Minimum amount is used to prohibit amount entry below this limit.
Maximum amount is used to prohibit amount entry above this limit.
Form file name:: Enter the form template's name that will be used to print the gift
certificate issued.
Refund minimum level: Set the minimum user level required to refund a gift card.
General: Please refer to the General function parameters at the beginning of this
help section.
Note 2: Gift cards: The gift certificates can be used a Gift cards by making a few changes
to the settings. Gift cards work similar to an account with a credit balance. Here are the
steps required to set-up the system to use gift cards rather than gift certificates.
1. In PosSetup>System>General>Advanced you need to set the Gift card server IP
addess.
2. Create a button that uses function 117 named Gift card tender. Set Gift number to
True. Set Credit note to True.
3. Create a button that uses function 123 named Gift card redeem. Set Pre-programmed
true. Set request amount true if you want to be able to override the amount the card
was programmed for originally.
© 2008 ... Logivision
The POS maintenance module.
63
N.B. It is not possible to create a gift card on the fly from the POS. The numbers MUST be
pre-programmed in the L-BOSS server receiving the gift card requests. You can create
arange of gift cards easily to make them available quickly. Select the flag to Request
Amount when you want to be able to enter the gift card amount at the point of purchase.
Note 3: Scanning gift cards:
1. Create a button and call it "Sell Gift Cert." add function "load form" in there and map it on
the keyboard.
2. In the properties of that function, click on "Advanced" and type in /VAR01=1. (This
button will need to be pressed before scanning to sell the gift cert.)
3. In the properties of the "CLEAR" button, click on "Advanced" and type in /VAR01=0 (this
is going to remove the variable from memory when "clear is pressed")
4. Create another button, this one called "Gift Cert.", and add 2 functions in there: Gift
Certificate (+) #123 and Gift Certificate (-) #117. (no need to map that one to the
keyboard as it's only going to be used in the definition table)
5. In that button, go in the Advanced properties for function Gift Certificate (+) #123, and in
there type in /IEQ01=1 /VAR01=0 /BRK (this will execute the function only if var01 is
equal to 1 and set back the var01 to get out of selling mode)
6. Still in the same button, but on the 2nd function Gift Certificate (-)
#117==>properties==>advanced, type in /INE01=1 (this will execute the function only if
var01 is NOT equal to 1)
7. Your def. table needs to have an entry for that: set your [8 - Undef] function to use the
"Gift Cert" button that you created at step 4 (you need a "key" on the barcode to be able
to recognize that it is a gift certificate).
8. To sell a new gift certificate, you push "Sell Gift Cert" (created at step #1) and scan your
gift card. To redeem it, you just scan the card without pressing that button.
Note 4: Gift certificate expiration:
1. If there is no date in the EXPIRATION field in the gift certificate maintenance, AND there
is no setting in LBOSS for number of days for gift certificate expiration, the gift certificate will
never expire.
2. If the number of days for gift certificate (in the miscellaneous tab of the configuration of LBOSS) is set to 0, the expiration of the gift card (if any) will not be modified when it is sold. If
there is a number in that field L-POS will set the expiration date to the date the certificate is
sold plus the number of days in the configuration field for gift card expiration days.
3. There is a new flag in the advance set-up (System): "Gift certificate never expires". This
option takes precedence over option 1 and 2.
2.1.5.33 GPIC #8055
GPIC #8055
This function is available for users who want to write their own program additions to the LPOS source code. It allows an external DLL file to be created for use as a function within the
L-POS transaction. Related information is supplied in the POSWIN\DEVELOP folder which
is created when the L-POS is installed. Open the files with your text file editor to view the
documentation supplied.
·
·
© 2008 ... Logivision
Substituted function: The substitute function should be set to None.
Library name defines the name of the external application being called by the L-
64
L-POS User Manual 3.2.1.0
·
·
·
POS GPIC function.
Function name is used to call the specific function within the DLL program.
Argument allows you to specify different arguments within the function being called.
General: Please refer to the General function parameters at the beginning of this
help section.
2.1.5.34 Help #5
Help #100005
The Help function is used during a POS transaction entry to obtain assistance on a specific
button's operation.
·
·
Substituted function: Enter the function from the backend that L-POS should use
the attributes from. This could be used if the function you are using has not been
defined in L-POS and you want to use another function that has been defined in LPOS.
General: Please refer to the General function parameters at the beginning of this
help section.
2.1.5.35 Hold/Recall #8037
Hold / recall #8037
The Hold / recall function is used to suspend a transaction that cannot be completed
immediately. The same function button executes both the save and the recall.
·
·
·
·
·
·
Substituted function: Enter the function from the backend that L-POS should use
the attributes from. This could be used if the function you are using has not been
defined in L-POS and you want to use another function that has been defined in LPOS.
Print on suspending should be selected if you want the receipt printed for items
entered to that point in the transaction.
Do not print stub means that the hold slip will not print when this option is set to yes.
Form filename can be used to send the data from the hold to a specific data form on
a windows printer.
Special order can be used to track items that have been put on hold. This can be
used to track orders when you want a production list of all items that have been
placed on order. An example of this would be a bakery that receives phone orders
for bread to be delivered tomorrow. By opening an order and putting it on hold it is
easy to recall when the order was prepared. The inventory "items to order" report will
provide a summary list of everything that needs to be baked for next day delivery.
General: Please refer to the General function parameters at the beginning of this
help section.
© 2008 ... Logivision
The POS maintenance module.
65
Note: You can limit the number of hold transactions per terminal in
PosSetup>System>General>Advanced flags: Maximum number of hold per lane.
2.1.5.36 Invoice print #8046
Invoice print #8046
This function is used to print an invoice to a predefined form, normally on an 8.5" X 11"
printer.
·
·
·
·
·
·
Substituted function: Enter the function from the backend that L-POS should use
the attributes from. This could be used if the function you are using has not been
defined in L-POS and you want to use another function that has been defined in LPOS.
Form file name is the name of the invoice template file to use for this invoice print.
Set the Number of copies to the amount required.
In Transaction can be selected as required. If you need to print an invoice as an
estimate or for use as a picking slip, set the flag to No. Otherwise this flag should be
set to yes.
Printer name is used to define which printer will be used to print the full form invoice.
Double click and select the appropriate printer.
General: Please refer to the General function parameters at the beginning of this
help section.
2.1.5.37 Item discount #450
Item discount #450
An item discount such as function 450 will reduce (or increase) the amount of the item
entered by the amount or percentage entered. When a dollar amount or percentage discount
button is used, L-POS will react according to the settings defined in the associated discount
function. The item discount parameters are:
·
·
·
·
·
© 2008 ... Logivision
Substituted function: Enter the function from the backend that L-POS should use
the attributes from. This could be used if the function you are using has not been
defined in L-POS and you want to use another function that has been defined in LPOS.
Preset Discount Rate: Enter the pre-set discount rate or amount.
Minimum and Maximum discount: Enter the lowest and highest discount rates (or
amounts) available with this button. Leaving them blank will create a Pre-set only
discount button. The pre-set amount is set in the previous field.
No minus: Select Yes if L-POS should not allow a negative total through use of this
button.
Positive discount: Set this flag to Yes to use this as a premium function instead of a
discount function.
66
L-POS User Manual 3.2.1.0
·
·
·
·
·
·
Amount discount: Set this flag when the discount button you are programming is
entered in dollar amounts as opposed to a percentage rate. This would be the case
for the coupon keys.
Rounding factor: Enter the rounding factor used with the discount button.
Double width printing: Use this option to send the double size print command
whenever this button is used.
Force scan: Use this flag to force the operator to select to or scan an item that has
already been entered in the transaction. This is useful if you want to apply a store
coupon directly against an item previously entered into the current transaction. You
can also use this discunt type against a an open sub-department amount enetered
into the current transaction.
Transaction discount: Use this flag to apply the discount to each of the
discountable items that have already been entered in the transaction. Any item that
was already discounted will not be discounted again.
General: Please refer to the General function parameters at the beginning of this
help section.
2.1.5.38 Item file #8067
Item file #8067
An item file is used to recall an external file that collected data to play back into L-POS.An
example would be receiving data from a line buster application where data was clooected on
a mobile device. The item file parameters are:
·
·
·
Substituted function: Enter the function from the backend that L-POS should use
the attributes from. This could be used if the function you are using has not been
defined in L-POS and you want to use another function that has been defined in LPOS.
Delete file: Select this flag to delete the file once it is played back by the POS.
General: Please refer to the General function parameters at the beginning of this
help section.
File parameters:
This function uses an advanced etting (Command Inbox) to find the location f a command
file. The advanced settings are made inon is executed, is the name of the file (no extension).
The structure of the file s as follows
{OPT=1|2,F01=pluNumber,F126=PriceLevel,F64=Qty,F65=Amount,F30=Price,ResID=Resp
onseID}
Option :
1= Sale using Pump quantity and price (F64,F65,F67)
2 = Sale using Pump quantity (F64,F67), POS calculate price
So, a file like this:
{F01=1}
© 2008 ... Logivision
The POS maintenance module.
67
{F01=2}
would ring item 1 and item 2 all their default
Please note that if an error occurs, the system stops processing the file.
2.1.5.39 Keyboard assign # 8063
Keyboard assign #8063
This function is used to re-assign and rename a specific PLU or a specific Sub-department
to a button on the POS keyboard or on the touch screen.
With L-POS, any button can be assigned to the keyboard or touch screen in PosSetup under
the button/form set-up. But that means you need to have access to button and form set-up.
This function is designed to work from within the POS to make it easier to decide which
PLU's or sub-departments will be used on pre-set buttons or on a touch screen form. This
way only the pre-set keyboard or touch items can be changed. So your tender functions,
discounts, etc., will not be disturbed by the user. The goal is to avoid going back and forth to
PosSetup to assign a different PLU or sub-department to the keyboard.
Several considerations to think about before you begin:
· The keyboard or touch screen button you want to program with function 8063 needs to
exist on the button list and must have been assigned to a form or to a keyboard position.
So when you create buttons that will be used as PLUs you need to make them PLU
functions (710 PLU.) But you don't need to set the PLU number or the keytop
description. The PLU number and description will be set through the POS using function
8063. Same for Sub-department buttons except you need to use function 715 (Subdepartment).
· This means you could create 40 or 50 preset PLU functions and assign the actual PLU
number and description with the L-POS user.
· The PLU or Sub-department needs to exist in the L-BOSS database.
Substituted function: The substitute function should be set to None.
General: Please refer to the General function parameters at the beginning of this help
section.
2.1.5.40 Keyboard level #8057
Keyboard level #8057
© 2008 ... Logivision
68
L-POS User Manual 3.2.1.0
Use this function to select the keyboard level.
· Substituted function: Enter the function from the backend that L-POS should use
the attributes from. This could be used if the function you are using has not been
defined in L-POS and you want to use another function that has been defined in LPOS.
· Level: Set the keyboard level to access when this key is used. Leave blank for a
variable level.
· Temporary: Select this flag to instruct the POS to revert to the original key level
immediately after a function is used on the new level.
· General: Please refer to the General function parameters at the beginning of this
help section.
2.1.5.41 Left arrow #8023
Left arrow #8023
This type of function allows the control of cursor movement.
·
·
Substituted function: Enter the function from the backend that L-POS should use
the attributes from. This could be used if the function you are using has not been
defined in L-POS and you want to use another function that has been defined in LPOS.
General: Please refer to the General function parameters at the beginning of this
help section.
2.1.5.42 Layaway function #8050
Layaway #8050
This function is used to create or to recall Layaway transactions.
·
·
·
·
·
Substituted function: Enter the function from the backend that L-POS should use
the attributes from. This could be used if the function you are using has not been
defined in L-POS and you want to use another function that has been defined in LPOS.
Minimum payment: Enter the minimum amount required to establish a layaway.
Minimum is amount: Otherwise the minimumis a percentage of the transaction
amount.
No confirmation: When no minimum payment is required, set this to true to remove
the payment suggestion prompt.
Keep open: Use this setting when you need to force layaways to stay open even
though the layaway balance is zero. This is possible when you need to use the
layaway function to track a transaction as a layaway, even though it has been entirely
paid.
© 2008 ... Logivision
The POS maintenance module.
·
69
General: Please refer to the General function parameters at the beginning of this
help section.
Cancel layaway: When you cancel a layway you need to consider the deposit received from
the customer. Since all items will be returned from the layaway the system will be out of
balance because of the deposit already received.
If you want to return the layaway deposit amounts already received you need to Select the
payment and press Error Correct to delete the payment. When you use Cancel
Transaction the layaway will be reversed.
If you want to keep the layaway deposit you need to make sure you have created function
520 (Layaway cancellation) and attached it to total 2 and total 45 (Layaway cancellation
fee.) When you cancel the layaway any deposits received will not be returned to customer.
The system will report the deposit amount into the "other revenue" section using totalizer
45. Normally this total is called Layaway cancellation fee.
2.1.5.43 List #8047
List #8047
This function is used to create a function list. For example, if your keyboard is too restricted
to allow all the required buttons, a list could show the available tender (payment) keys.
·
·
·
·
·
·
·
© 2008 ... Logivision
Substituted function: Enter the function from the backend that L-POS should use
the attributes from. This could be used if the function you are using has not been
defined in L-POS and you want to use another function that has been defined in LPOS.
Button list: Click Select Buttons to open a new window where buttons are added to
the button list.
Use the Add button to select another button to place on the button list.
Delete will remove a button off the list.
Up and Down allow the buttons on the list to be repositioned.
Cancel will ignore changes you have made while OK will save and exit the button list.
General: Please refer to the General function parameters at the beginning of this
help section.
70
L-POS User Manual 3.2.1.0
2.1.5.44 Load form #8001
Load form #8001
The load form function is used to open or close a form in the POS entry mode. The flags
include:
·
·
·
·
·
·
·
·
Substituted function: Enter the function from the backend that L-POS should use
the attributes from. This could be used if the function you are using has not been
defined in L-POS and you want to use another function that has been defined in LPOS.
Form number defines the form you wish to activate with this load form function.
Active is set to yes to force this form on, otherwise set it to no.
Toggle on/off is used when this form should be set to the opposite setting it currently
uses.
View filename allows you to select a file you want to view on the screen. Click the …
to browse for the file you wish to view. It is possible to view files with the extensions
txt (normal text file) and rtf (rich text formatted).
Top line number sets the line number in the file you are viewing to the top of the
form you send it to. So if you have a message file that you want to display to a
cashier only from line 101, enter 101 as the top line number.
Keep control means that the cursor movement keys will have control over the file
being viewed instead of the receipt area for scrolling purposes.
General: Please refer to the General function parameters at the beginning of this
help section.
2.1.5.45 Loan #8052
Loan #8052
This function is used to add money into the cash drawer for cash balancing reasons. It will
augment the total float by the amount entered.
·
·
Substituted function: The substitute function should be set to None.
General: Please refer to the General function parameters at the beginning of this
help section.
2.1.5.46 Lock Keyboard #8041
Lock keyboard #8041
This function is used to stop usage of the system by locking out the keyboard from
unauthorized users. When this function is used, only the operator who locked the keyboard
© 2008 ... Logivision
The POS maintenance module.
71
can sign back onto the system.
·
·
Substituted function: The substitute function should be set to None.
General: Please refer to the General function parameters at the beginning of this
help section.
2.1.5.47 Login #10010 (Cashier-Manager)
Login #10010 (Cashier - Manager)
This function is used to enter the cashier id# or the manager id#.
·
·
·
·
·
·
·
·
·
·
Substituted function: Enter the function from the backend program that L-POS
should use the attributes from. This could be used if the function you are using has
not been defined in L-POS and you want to use another function that has been
defined in L-POS.
Manager: set this flag to yes to use this cashier function as a manager entry key.
Login drawer open: Set this flag to control the drawer activity at cashier sign-on.
Logout drawer open: Set this flag to control the drawer activity at cashier sign-off.
No logout if hold: This flag prohibits the operator from logging out if a sale is
suspended on the transaction.
No stub on logout: This flag suppresses the receipt printer from printing a stub
showing sign-in and sign-out time for the operator that is logging out.
Closed message: This flag is used to send a message to the on-screen customer
display form (or to the actual customer display) when no operator is logged on to the
register.
Button on login: This can be used to instruct L-POS to press another button from
the button list when an operator logs in.
Button on logout: This can be used to instruct L-POS to press another button from
the button list when an operator logs out.
General: Please refer to the General function parameters at the beginning of this
help section.
2.1.5.48 Lotto terminal winner #109
Lotto terminal winner #109
Lotto terminal winner is used to pay money from the drawer when a customer brings back a
winning lottery ticket. If your store uses a terminal machine and you want to settle the
terminal winners separate from the scratch ticket winners, you will use this function. If it does
not exist, add a button and call it Lottery Terminal Winner. Add the Lotto terminal winner
function 109 to this button. In the properties of the function set the parameters as follows:
·
© 2008 ... Logivision
Substituted function: Select the function 111- Bottle return
72
L-POS User Manual 3.2.1.0
·
·
·
·
·
·
·
Preset amount: Enter the pre-set amount if this function uses a pre-set amount.
Minimum and Maximum amount: Enter the lowest and highest discount amounts
available with this button. Leaving them blank will create a Pre-set only discount
button. The pre-set amount is set in the previous field.
No minus: Select No for this data bit.
Bottle sale: Set this flag to No.
Taxes: Normally set as non-taxable.
Double width printing: Use this option to send the double size print command
whenever this button is used.
General: Please refer to the General function parameters at the beginning of this
help section.
2.1.5.49 Lottery ticket winner #110
Lotto ticket winner #110
Lotto ticket winner is used to pay money from the drawer when a customer brings back a
winning lottery ticket. If your store sells scratch type lottery tickets and you want to settle the
terminal winners separate from the scratch ticket winners, you will use this function. If it does
not exist, add a button and call it Lottery Ticket Winner. Add the Lotto ticket winner function
110 to this button. In the properties of the function set the parameters as follows:
·
·
·
·
·
·
·
·
Substituted function: Select the function 111- Bottle return
Preset amount: Enter the pre-set amount if this function uses a pre-set amount.
Minimum and Maximum amount: Enter the lowest and highest discount amounts
available with this button. Leaving them blank will create a Pre-set only discount
button. The pre-set amount is set in the previous field.
No minus: Select No for this data bit.
Bottle sale: Set this flag to No.
Taxes: Normally set as non-taxable.
Double width printing: Use this option to send the double size print command
whenever this button is used.
General: Please refer to the General function parameters at the beginning of this
help section.
2.1.5.50 Loyalty card #8068
Loyalty card #8068
Loyalty card is used to collect a card number in the transaction data. For example, loyalty
card can be used to capture a card number like Aeroplan. These are loyalty programs
maintained externally to L-POS.
© 2008 ... Logivision
The POS maintenance module.
·
·
·
·
·
·
73
Substituted function: This is not required for the main loyalty card button.
Loyalty number: Each system allows up to 5 different loyalty cards to be created. If
you do need more than 1 loyalty card on your system please refer to the notes below.
Prompt number if refund: Enter the prompt number you created using the
Prompting lists. This prompt will occur when a return is made to the loyalty function
Prompt number if reversal: Enter the prompt number you created using the
Prompting lists. This prompt will occur when a reversal is made to the loyalty function
Encrypt card number: Use this flag to encrypt the card numbers when the data is
stored to the transaction files.
General: Please refer to the General function parameters at the beginning of this
help section.
Creating additional loyalty card buttons
Some situations occur where more than one loyalty card is required. In this case you need to
create additional functions in L-BOSS register maintenance. For each new function you
create it is necessary to link the new function with one of the totalizers that track the loyalty
card usage. Choose a totalizer between 3522 and 3525. These totals exist in L-POS
releases 3.0.1.0 or greater. On prior versions you must create them manually.
Once you have created the new functions and deployed them to the POS you are ready to
create the new button for the POS. After creating the new button choose the function
number created for the 2nd loyalty card. You will be warned that this function is not valid for
the point of sale. Choose it anyway. Then in the properties of the new function you must use
the Substitued function parameter to select the function 8068 as its model.
2.1.5.51 Maint. POS #8014(Maintenance)
Maint. Pos #8014 (Maintenance)
This function gives the user access to L-POS maintenance from the L-POS transaction entry
screen. Several options are available to access different programming screens.
Substituted function: Enter the function from the backend that L-POS should use the
attributes from. This could be used if the function you are using has not been defined in LPOS and you want to use another function that has been defined in L-POS.
Maintenance type: Here you can select which maintenance program you wan to run when
this key is used. Click the small arrow to view the available choices. You may also assign
this Maintenance function to a button without selecting the type. If you do so, L-POS allows
you to enter a number before pressing this button in the POS screen.
·
·
·
·
·
·
·
© 2008 ... Logivision
Press 1 [Maint.POS] to access Buttons and Forms
Press 2 [Maint.POS] to access Zones
Press 3 [Maint.POS] to access System
Press 4 [Maint.POS] to access Peripherals
Press 5 [Maint.POS] to access Advertising
Press 6 [Maint.POS] to deploy all changes to the setup to all lanes
Press 99[Maint.POS] to toggle the Console status.
74
L-POS User Manual 3.2.1.0
·
Press 999[Maint.POS] to toggle the visibility of the Console.
General: Please refer to the General function parameters at the beginning of this help
section.
Maint. POS #8014 as Console function
This function will open a console window to allow a system administrator see the event
exchange between the L-POS terminal and the other devices it is attached to (such as the
backend).
·
·
·
Substituted function: Enter the function from the backend that L-POS should use
the attributes from. This could be used if the function you are using has not been
defined in L-POS and you want to use another function that has been defined in LPOS.
Maintenance type allows selection of the type of maintenance executed with this
maintenance button. Select Console for this button by clicking the small arrow.
General: Please refer to the General function parameters at the beginning of this
help section.
2.1.5.52 Manual cost #8059
Manual cost #8059
Use this function to record the manual cost of an item sold by a sub-department.
·
·
·
·
·
Substituted function: Enter the function from the backend that L-POS should use
the attributes from. This could be used if the function you are using has not been
defined in L-POS and you want to use another function that has been defined in LPOS.
No minus: Set this to prohibit using more points than the current balance in the
customer file.
Negative: Set this flag to use this key as a redeem rather than an issue of points.
Current points: Set this flag to include the current sale points in the available points
for redemption.
General: Please refer to the General function parameters at the beginning of this
help section.
Note: L-POS can send the approximate cost of goods sold by department, sub-department, or
Price Required PLU's. The entry must be made to a button assigned to the keyboard, it will not
work on an entry prompted from a list. For each sub-department button assigned to the keyboard
make the following modification in the button set-up:
1. Add a Load Form (8001) function to the sub-department button. Move the Load Form up
so that it is executed before the sub-department function. Set the "Do not clear entry
buffer" flag to Yes. Access the advanced features programming and add "/VAR01=#00" to
the existing option.
© 2008 ... Logivision
The POS maintenance module.
75
2. Add a Manual Cost (8059) function to the sub-department button. Move the Manual Cost
function up so that it is executed before the sub-department function. Set the "Do not clear
entry buffer" flag to Yes. Set the Calculation field to "#00*.72" to capture a cost of 28% of
the price that the item was sold for. (Set the Calculation field to "#00*.68" to capture a cost
of 32% of the price that the item was sold for.)
3. In the properties of the Sub-department function set the minimum entry to .01 (or higher)
to force a price entry before the sub-department key is pressed.
4. In the advanced properties of the Sub-department function add the following value
"VAR00=#01"
2.1.5.53 Manual Points #317
Manual Points #317
Use this function to affect the points accumulated manually..
·
·
·
·
·
Substituted function: Enter the function from the backend that L-POS should use
the attributes from. This could be used if the function you are using has not been
defined in L-POS and you want to use another function that has been defined in LPOS.
No minus: Set this to prohibit using more points than the current balance in the
customer file.
Negative: Set this flag to use this key as a redeem rather than an issue of points.
Current points: Set this flag to include the current sale points in the available points
for redemption.
General: Please refer to the General function parameters at the beginning of this
help section.
2.1.5.54 Manual tare #8056
Manual Tare #8056
Manual tare may be required to remove weight included in a product being weighed at the
point of sale. Normally the tare weight value is predefined in the backend system. This
function is only required to remove the tare weight amount manually.
·
·
© 2008 ... Logivision
Substituted function: The substitute function should be set to None.
General: Please refer to the General function parameters at the beginning of this
help section.
76
L-POS User Manual 3.2.1.0
2.1.5.55 Money request 8070
Money request #8070
Money request can be used to order change from the store office for the cash drawer. This
key is normally programmed to open a form with the different cash denominations. A receipt
will print that is given to a store manager or head cashier to get the change.
·
·
Substituted function: The substitute function should be set to None.
General: Please refer to the General function parameters at the beginning of this
help section.
2.1.5.56 No limit #8032 (Override, HALO)
No limit #8032
This function is used to all restrictions including amount limits and function access for the
function being executed by the current operator.
·
·
·
·
Substituted function: Enter the function from the backend that L-POS should use
the attributes from. This could be used if the function you are using has not been
defined in L-POS and you want to use another function that has been defined in LPOS.
Stay active means that the limits and restrictions normally imposed will be
overridden until clear is pressed or until the end of the current transaction.
Toggle auto log-off: Use this function to change the Auto log-off at the end of each
transaction. So when a store gets really busy and wants to toggle to using one
cashier on a terminal they can press this key to keep the current cashier logged on
until he logs off. Restart the POS will set the system to its default programming setup.
General: Please refer to the General function parameters at the beginning of this
help section.
2.1.5.57 No sale #680
No Sale #680
This function is normally reserved to open the cash drawer without entering and sale items
or payment amounts.
·
·
·
Substituted function: Enter the function from the backend that L-POS should use
the attributes from. This could be used if the function you are using has not been
defined in L-POS and you want to use another function that has been defined in LPOS.
No print will prohibit L-POS from generating a receipt for this transaction.
Validation will force validation of this transaction on the validation printer.
© 2008 ... Logivision
The POS maintenance module.
·
77
General: Please refer to the General function parameters at the beginning of this
help section.
2.1.5.58 Number entry #8040
Number entry #8040
This function is used to enter data. An example of this could be the entry of a remark onto
the receipt such as watering instructions in a florist shop.
·
·
·
·
·
Substituted function: Enter the function from the backend that L-POS should use
the attributes from. This could be used if the function you are using has not been
defined in L-POS and you want to use another function that has been defined in LPOS.
Force entry should be selected when data entry into this key cannot be aborted by
the operator.
Double width printing will set the printed font of the number entry data to double
size.
Entry type (0-8) is provided to allow specific types of number entry data to print at
different areas of a customized 8.5" X 11" invoice print. This way if multiple data
entries are required for fields such as Tax #, purchase order #, and Ship to
Address, the fields could all be sent to a specific area of a pre-formatted invoice. All
type 1 number entry functions share the same print area, as do all type 2's. In regard
to the standard receipt, the number entries print one after each other as do items.
General: Please refer to the General function parameters at the beginning of this
help section.
2.1.5.59 Other program #8043
Other program #8043
This function is used to execute another program from the POS screen.
·
·
·
·
© 2008 ... Logivision
Substituted function: The substitute function should be set to None.
Program name: Enter the name of the program to execute when this button is used.
Argument: Enter the program argument if required.
General: Please refer to the General function parameters at the beginning of this
help section.
78
L-POS User Manual 3.2.1.0
2.1.5.60 Paid out #330
Paid out #330
This function is used to pay an amount from the drawer such as in the purchase of supplies.
·
·
·
·
·
·
·
·
Substituted function: Enter the function from the backend that L-POS should use
the attributes from. This could be used if the function you are using has not been
defined in L-POS and you want to use another function that has been defined in LPOS.
Compulsory number entry: Set this flag to require number entry every time you use
the paid out function. FOr example to record a supplier invoice number.
Minimum amount: Enter minimum paid out amount.
Maximum amount: Enter maximum paid out amount.
No print: Set this fgal to prohibit printing paid outs.
Prompt list #: Enter the prompt list number to use with this function.
Validation: Set this to force validation on paid out entries.
General: Please refer to the General function parameters at the beginning of this
help section.
2.1.5.61 Password change #8045
Password Change #8045
This function is used to modify the operator password from the front end.
·
·
Substituted function: Enter the function from the backend that L-POS should use
the attributes from. This could be used if the function you are using has not been
defined in L-POS and you want to use another function that has been defined in LPOS.
General: Please refer to the General function parameters at the beginning of this
help section.
2.1.5.62 Payment #310 (R/A-Account payment)
Payment #310 (R/A - Account payment)
This function is used to receive a payment from a customer towards his store charge
account.
·
Substituted function: Enter the function from the backend that L-POS should use
the attributes from. This could be used if the function you are using has not been
defined in L-POS and you want to use another function that has been defined in L© 2008 ... Logivision
The POS maintenance module.
·
79
POS.
General: Please refer to the General function parameters at the beginning of this
help section.
2.1.5.63 Pickup #8053
Pickup #8053
This function is used to remove money from the cash drawer for cash balancing reasons. It
will diminish the total in drawer by the amount entered. You can pick up amounts for any
tendering type function such as cash, coupons, credit cards, etc.
·
·
·
·
·
Substituted function: The substitute function should be set to None.
Do not open drawer: Set this flag when you do not want the drawer to open.
Drawer number: Enter the drawer number affected by this pickup function.
Force quanity: Set this flag to force the system to always print a quantity for the
pickup entry. When the quantity is not entered the system will set to one. This does
not force the operator to use a quantity.
General: Please refer to the General function parameters at the beginning of this
help section.
Note: Certain flags control the behavior pf the pickup function. You can set the system to
use "blind balancing." These flags are set in the System settings, General, Advanced flag
settings.
2.1.5.63.1 Printing detailed pickup receipts
Creating pickup buttons and forms for detailed receipt print
L-POS version 3.0.1.0 and greater allow you to set up the pickup function to print a detailed
pickup slip. This slip can contain the information for the quantity of each coin and paper bill
denomination to make it easier to balance the cashier's deposits. This is not the only way to
set up the system, you can define many different screens to accomplish the POS pickups.
The forms and buttons in this section are not part of the default set-up screens supplied b
The cashier presses the Pickup button to start the pickup. This will load a PICKUP form with
the different tender types you want to pick up. This pickup form will NOT allow pickups
directly to the cash tender function. It will have a button that loads another form to start the
CASH PICKUP. In the following explanation form 23 is the PICKUP TENDERS screen and
form 20 is the PICKUP CASH screen. So the entries for all tenders except CASH are made
on one form (23) and all Cash entries are made from form (20). The button called BEGIN
CASH PICKUP will load the Cash pickup form 20.
Here is our example for form 23 we created for pickups. Most of these keys are just normal
tender functions.
© 2008 ... Logivision
80
L-POS User Manual 3.2.1.0
The BEGIN CASH PICKUP button uses the Cash function 101 to advise L-POS to start
CASH PICKUPS. The settings for the BEGIN CASH PICKUP are explained below.
Here is the programming for the BEGIN CASH PICKUP button.
© 2008 ... Logivision
The POS maintenance module.
81
The [Begin Cash Pickup] button is used to enter CASH PICKUP mode. In our test we set up
form 20 to make the entries for the different cash denominations. This is set in the function
properties by setting the flag Pickup form to 20. If you looked in the advanced view of
function properties is entered as /FRM=20. If you press this [Begin Cash Pickup] key it will
load form 20 that could look like this:
Each of these buttons was programmed to allow the receipt details to print for the pickup
slip, in order to simplify reconciliation.
Create buttons for each denomination of coins, bills and rolls
You need to create buttons to pickup each denomination or coin and bill in the drawers. You
can also create buttons for the different coin rolls that need to be picked up. The description
from the button key-top is what will be printed on the pick-up slip. If you want to use an
© 2008 ... Logivision
82
L-POS User Manual 3.2.1.0
image on the key-top you still need to assign the text that will print on the receipt. For
example, create a button called 5¢ to pick up the 5 cent coins. Create a button called Roll 5¢
to pickup the rolls of 5 cents, etc. All of these buttons will use the Cash function. For the
5cents button set the calculation field of the function 101 to .05. To allow multiplication of the
entries to the 5¢ button you need to insert the multiply function before the Cash function.
Here is how to set up the 5¢ button:
The multiply function has no special parameter settings.
The CASH function has these parameters set:
Create the buttons for each coin and bill denomination you can pick up. Then you need to
create the button that will end the CASH pickup and return to the normal Pickup tender
© 2008 ... Logivision
The POS maintenance module.
83
screen where you can continue or finalize the pickup transaction. We called this button
[Back] on the Cash pickup form 20 from the example above.
The BACK button is really another CASH function that "unloads" the CASH PICKUP FORM
20. The system returns to the pickup form that was on the screen before the Cash pickup
form was accessed. The image above shows the parameter setting required. The BACK
button also produces a printed subtotal for all the cash picked up.
From there you can continue the pickup of other tenders or press Pickup to terminate. On
the Pickup Tenders form 23 you need to place a PICKUP function to exit from the pickup. In
our example this button is called Pickup End.
The Pickup End button uses the PICKUP function 8053. In the Pickup end button we set the
SWAP parameter to +11 to reload the normal department screen (form 11 in our working
example.)
Transaction sample
[PICKUP]
Amount [Tender 1]
Amount [Tender 2]
[Begin Cash Pickup]
12 [ 1¢ ]
15 [ 5¢ ]
6 [ ROLL 10¢ ]
[BACK]
[END PICKUP]
© 2008 ... Logivision
84
L-POS User Manual 3.2.1.0
Receipt sample
L-POS
POS SOFTWARE THAT UNDERSTANDS YOU...
...FROM PEOPLE WHO UNDERSTAND POS
17/03/2008 3:03:14 PM
Carol
Pick up
Debit card
$59.99
Credit card
$147.88
Food stamp
$25.00
Cash
122 X 1¢
$1.22
15 X 5¢
$0.75
47 X 10¢
$4.70
23 X 25¢
$5.75
3 X ROLL 1¢
$1.50
12 X $1
$12.00
3 X ROLL 5¢
$6.00
2 X ROLL 10¢
$10.00
2 X ROLL 25¢
$20.00
ROLL $1
$25.00
2 X $50
$100.00
Cash SUB TOTAL
$186.92
---------------------------------------Pick up
$419.79
Trans:34464
Terminal:030001002-003001
You can become a Preferred Shopper today!
Please ask for information at
our courtesy booth.
THANK YOU & COME BACK
2.1.5.64 PLU Attach #8066
The PLU Attach function is used to attach the sale of an item to another product. An
example of this would be if you want to use a PLU to add a descriptive remark to a main
item. Using the attach function for the remark will force it to print with the main item
regardless of report sorting.
2.1.5.65 Plu code #710
Plu code #710
This type of function allows the entry of a PLU code or can be used to assign a specific PLU
to the keyboard.
·
Substituted function: Enter the function from the backend that L-POS should use
the attributes from. This could be used if the function you are using has not been
defined in L-POS and you want to use another function that has been defined in LPOS.
© 2008 ... Logivision
The POS maintenance module.
·
·
·
·
·
85
Item number is used to assign a specific PLU for usage with this button.
Definition table set to yes will send the PLU number entered to the definition table to
follow any special filtering rules that are required.
Rounding factor is used to decide how amounts entered into the PLU function are
rounded. Normal rounding is .005
Double width printing will instruct the printer to print double size characters for
entries made to this PLU code key.
General: Please refer to the General function parameters at the beginning of this
help section.
2.1.5.66 Points tender #140
Use this function to tender a payment in points.
·
·
·
·
·
·
·
·
Substituted function: Enter the function from the backend that L-POS should use
the attributes from. This could be used if the function you are using has not been
defined in L-POS and you want to use another function that has been defined in LPOS.
Point ratio: Use this to set the value of each point. For example, set 1 to use 1 point
as one dollar. Set .01 to use 1 point as one cent. If you set .001, it would require
1000 points for a $1.00 payment.
Activate button on form: Select the button to execute when the points tender is
used. Not required normally.
Double width printing: Set this to send double width characters to the printer.
Do not open drawer: If drawer not required set this flag.
Validation: Set this to force validation.
Endorsement: Set this to use the endorsement.
General: Please refer to the General function parameters at the beginning of this
help section.
2.1.5.67 Price Inquiry #8033
Price inquiry #8033
This function is used to inquire on the price of an item without selling it. It can also be used
to inquire on account balance.
·
·
·
© 2008 ... Logivision
Substituted function: Enter the function from the backend that L-POS should use
the attributes from. This could be used if the function you are using has not been
defined in L-POS and you want to use another function that has been defined in LPOS.
Stay active is used to allow multiple price inquiries in sequence without pressing the
Price inquiry button each time.
Toggle allowed means that this Price inquiry function can be switched between «
normal mode » and « stay mode ».
86
L-POS User Manual 3.2.1.0
·
·
·
Detail form is used to determine which form will be used to display the price inquiry
information when this function is used.
In transaction check changes the behaviour of a Price inquiry. The POS will search
the transaction (or the last transaction if you are not in a transaction) for the item
number. This way you can quickly locate the last entry for the item in question and
the total number of that item sold within the transaction.
General: Please refer to the General function parameters at the beginning of this
help section.
2.1.5.68 Price level #8030
Price level #8030
This function allows the selection of a price level.
·
·
·
·
Substituted function: Enter the function from the backend that L-POS should use
the attributes from. This could be used if the function you are using has not been
defined in L-POS and you want to use another function that has been defined in LPOS.
Price level is the field in which you assign the price level to be activated by this
function. Leave this field blank to select the price level manually.
Temporary should be selected to make the POS return to the original price level
after a product is sold on the temporary price level.
General: Please refer to the General function parameters at the beginning of this
help section.
2.1.5.69 Price override #8031
Price override #8031
This function is used to modify a price during a transaction. It can be set to act as a
temporary price modification for this entry only or to update the back end price and
immediately deploy the modification to all other lanes.
This function can also be used to over-ride the maximum entry amount assigned to an open
PLU, a sub-department, or a department.
·
·
·
Substituted function: Enter the function from the backend that L-POS should use
the attributes from. This could be used if the function you are using has not been
defined in L-POS and you want to use another function that has been defined in LPOS.
Vendor code should be selected if you want to enter the vendor (warehouse) code to
look up the product price. This is the number entered in the cost table for the UPC
code. Note that the sale will be recorded under the UPC code of the item.
Update back office: When selected this change will be sent to the back office
© 2008 ... Logivision
The POS maintenance module.
·
·
87
maintenance and then to the other POS terminals. This functionality is not compatible
when using multi-zone pricing from a central L-Remote. Changing the price on any LPOS terminal will end up changing the prices of all stores. In a multi-store
environment with different price targets do not select this option to update
back office.
SQL command file: This parameter is used to change the behavior of the Price
override function. Use the SQL query field to open a list of PLU items on the POS
screen. The operator can then choose the item from the list, change the price, and
post it. Using the SQL command file flag changes system behavior:
· If this parameter is assigned you cannot use the button in a transaction.
· The back office system is updated every time you use a Price modify button that
uses the SQL command file list. The changes are sent to other terminals
immediateley irregardless of the Update back office flag setting.
General: Please refer to the General function parameters at the beginning of this
help section.
Note: Price modification can print an asterisk beside the modified price and add a line
showing the original price. Set the flag in PosSetup>System>General tab advanced flag setup.
Note 2: You can set a maximum percentage to be removed or added to the current price
with the price modify button function. Set the flag in PosSetup>System>General tab
advanced flag set-up.
Note 3: The flag to update the back office may not function if you use a 3rd party back office
product. Please verify with the technicians who installed.
2.1.5.70 Pump function #8062
Pump function #8062
The Pump function is required for fuel interface control. It is also used with the Line Buster
application. It will normally be used to start (Authorize) a pump, recall the fuel sale amount,
recall a stored transaction from the line buster, etc.
·
·
·
·
·
© 2008 ... Logivision
Substituted function: Enter the function from the backend that L-POS should use
the attributes from. This could be used if the function you are using has not been
defined in L-POS and you want to use another function that has been defined in LPOS.
Button ID defines what the button does, for example it may authorize a pump, recall
an amount, etc. Detailed instructions are available in the PUMP interface guide.
General: Please refer to the General function parameters at the beginning of this
help section.
The Pump interface manual contains the button specific information required to set
up the pump control interface.
The L-HTML interface documnet explains how to set up the Pump functions for the
Line buster application.
88
L-POS User Manual 3.2.1.0
2.1.5.71 Receipt copy #730
Receipt copy #730
This function is normally used to reprint a copy of the last transaction on the receipt printer. It
can also reprint a past transaction being reviewed in L-POS. Press the zero key and the
Receipt copy button to initialize the printer and reload the customer logo into the printer. You
can create a multi function key that will do this key sequence automatically for you.
·
·
·
·
·
·
Substituted function: Enter the function from the backend that L-POS should use
the attributes from. This could be used if the function you are using has not been
defined in L-POS and you want to use another function that has been defined in LPOS.
Endorsement reprint should be selected if you need a function to reprint check
endorsement after a print error occurred during the first endorsement attempt.
Manual coupon print should be selected if you need a function to manually print the
in-store coupons set to require Manual print. This could be useful in situations where
certain criteria have been met, but not all customers require the specific coupon type
to print. For example, a parking voucher is printed for customers that request it, but
only when sale total is over $50.00. Related set-up in System settings under Coupon
tab.
Include bank info: Set this flag to include bank information when you print a receipt
copy (debit/credit authorization.)
Receipt format type: This flag is normally used to select a different receipt
formatting style for the copy. The system includes Receipt format 4 to print a Gift
receipt that hides the prices. To print a Gift receipt enter 4 in this field.
General: Please refer to the General function parameters at the beginning of this
help section.
Note: If you want to get copies of your transaction to print automatically when a specific
button is used, you can set the number of Receipt copies flag in the General function
parameters of the button in question.
2.1.5.72 Receipt on/off #732
Receipt on/off #732
This function is used to toggle the receipt printer status from on to off to on.
·
·
·
Substituted function: Enter the function from the backend that L-POS should use
the attributes from. This could be used if the function you are using has not been
defined in L-POS and you want to use another function that has been defined in LPOS.
On state: This flag is used by L-POS to determine whether the printer will be turned
on or turned off when thebutton is pressed. Select Yes for On, No for Off. If the flag
"Toggle" is selected to Yes, then this flag is ignored.
Toggle: This flag can be used to toggle on or toggle off the receipt printer. Meaning it
will go on when it was off and vice versa. This flag overrides the "ON state" flag
setting.
© 2008 ... Logivision
The POS maintenance module.
·
89
General: Please refer to the General function parameters at the beginning of this
help section.
Note: To force receipt on, you can press 1 and Receipt on/off. To force receipt off you can
press 2 and receipt on/off. Thiscan be usefule if you are programming multi-key functions
and receipt status needs to be confirmed.
2.1.5.73 Refund #650
Refund #650
The refund function has several uses. It can be set to use as an item refund, bottle refund
and refund mode.
·
·
·
·
·
·
·
Substituted function: Enter the function from the backend that L-POS should use
the attributes from. This could be used if the function you are using has not been
defined in L-POS and you want to use another function that has been defined in LPOS.
Refund mode should be set to yes to force L-POS to treat each entry as a refund.
To refund several items in sequence without pressing refund before each item, set
refund mode to yes. This also means that you cannot sell an item in the same
transaction as you use the refund mode function. So if you want refunds done in a
separate transaction set the Refund Mode flag.
Note: We recommend the use of the function type 660 for refund mode rather than
the refund 650.
Bottle refund will make the refund function behave as a bottle return key. When this
flag is set to yes, pressing the key and scanning a PLU with a bottle deposit link will
refund the bottle deposit amount and increment the bottle return totalizer.
Force price confirmation means that the operator performing a refund on a pre-set
item will be prompted for price confirmation. This means that it is possible to trap
items that were purchased on special but that are being returned at today's price.
Keyed minimum level: Set the minimum user level required to refund a PLU by
entering the number through the keyboard. This setting does not restrict the refund of
an item entered with the scanner.
Validation: Set this to force validation on refund entries to PLU & sub-department
entries.
General: Please refer to the General function parameters at the beginning of this
help section.
Refund #650 as Bottle Return
The refund function has several uses. One of them is bottle return. Set the flag for bottle
return for this refund type function to be used as a bottle return key. This function is used to
refund the bottle deposit linked to the item that is scanned.
·
© 2008 ... Logivision
Substituted function: Enter the function from the backend that L-POS should use
the attributes from. This could be used if the function you are using has not been
defined in L-POS and you want to use another function that has been defined in L-
90
L-POS User Manual 3.2.1.0
·
·
·
·
POS.
Refund mode should be set to yes to force L-POS to treat each entry as a refund.
To refund several items in sequence without pressing refund before each item, set
refund mode to yes. This also means that you cannot sell an item in the same
transaction as you use the refund mode function. So if you want refunds done in a
separate transaction set the Refund Mode flag.
Bottle refund will make the refund function behave as a bottle return key. When this
flag is set to yes, pressing the key and scanning a PLU with a bottle deposit link will
refund the bottle deposit amount and increment the bottle return totalizer.
Force price confirmation means that the operator performing a refund on a pre-set
item will be prompted for price confirmation. This means that it is possible to trap
items that were purchased on special but that are being returned at today's price.
General: Please refer to the General function parameters at the beginning of this
help section.
2.1.5.74 Refund mode#660
Refund mode #660
The refund mode is used to reverse a previous entry. It is similar to a manual transaction
reversal that affects the curremt operator.
·
·
Substituted function: Enter the function from the backend that L-POS should use
the attributes from. This could be used if the function you are using has not been
defined in L-POS and you want to use another function that has been defined in LPOS.
General: Please refer to the General function parameters at the beginning of this
help section
2.1.5.75 Report #8010
Report #8010
The Report function is used to generate a report at the front end. the report request is
actually processed on the back end server and transmitted to the front end terminal for
display and print-out.
Substituted function: Enter the function from the backend that L-POS should use the
attributes from. This could be used if the function you are using has not been defined in LPOS and you want to use another function that has been defined in L-POS.
SQL command line allows an SQL statement to be inserted to execute the report request to
the back-end. Here are some report request examples that can be made on the front end LPOS terminal:
Request all cashiers for today:
© 2008 ... Logivision
The POS maintenance module.
91
CGI=RPT_CLK,DETAIL=D,TARGET=RAL,TLZ1=0,TLZ2=999999
Request the currently signed-on cashier for today:
CGI=RPT_CLK,DETAIL=D,TARGET=RAL,TLZ1=0,TLZ2=999999,FIL1=@clk,FIL2=@clk
Request the financial report for the store for today:
CGI=RPT_FIN,DETAIL=D,TARGET=RAL,TLZ1=0,TLZ2=999999
Request the financial report for the store for the week:
CGI=RPT_FIN,DETAIL=W,TARGET=RAL,TLZ1=0,TLZ2=999999
Request the subdepartment report for today:
CGI=RPT_SUB,DETAIL=D,TARGET=RAL,TLZ1=0,TLZ2=99999,FIL1=0,FIL2=99999
General: Please refer to the General function parameters at the beginning of this help
section.
2.1.5.76 Reversal #8049
Reversal #8049
This type of function allows the reversal of a previous transaction.
·
·
·
Substituted function: The substitute function should be set to None.
Affect current date/operator allows you to decide whether the reversal performed
with this function will affect the date and operator/lane/drawer of the original
transaction or the date and the operator/lane/drawer of the current transaction. Leave
the parameter set to no to write a negative transaction to the original date the
transaction was made. (Note : You can create 2 separate reversal functions if you
need one that corrects the original transaction and another that acts more like a
global refund feature to give money back out of the current operator's drawer.)
General: Please refer to the General function parameters at the beginning of this
help section.
2.1.5.77 Right arrow #8022
Right arrow #8022
This type of function allows the control of cursor movement.
·
© 2008 ... Logivision
Substituted function: Enter the function from the backend that L-POS should use
the attributes from. This could be used if the function you are using has not been
defined in L-POS and you want to use another function that has been defined in LPOS.
92
L-POS User Manual 3.2.1.0
·
General: Please refer to the General function parameters at the beginning of this
help section.
2.1.5.78 Scale shift #8036
Scale shift #8036
This function inverts the scale status of the item.
·
·
·
·
·
Substituted function: Enter the function from the backend that L-POS should use
the attributes from. This could be used if the function you are using has not been
defined in L-POS and you want to use another function that has been defined in LPOS.
Toggle should be selected to allow the Scale button to reverse the scale status of
the next item. Selecting No in the Toggle and Yes to Active means the scale status
of the next item can only be added, never suppressed. Selecting No in Toggle and
No in Active means the scale status for the following item can only be suppressed,
never added.
The Toggle set to Yes is probably the most common setting. In rare circumstances,
when you may need to always remove the scalable status you would set Toggle to
No. An example would be using price levels to sell different sizes. If bananas are
normally weighed on level 1 but not on level 2 because you sell by the case at a unit
price, you could shift the scale status of bananas when selling on price level 2 to
remove the scalable setting. But the same scale shift function could not be used on
level 2 for an item such as a cucumber which is sold at a unit price on both levels.
Pressing a scale shift button set to Toggle would turn the scale status to On for the
cucumber. That is where the Toggle should be set to No and the Active bit should be
set to No. Now the scale shift function used with level 2 pricing will never turn the
scale status on, only off. Incorporating the scale shift and the price level key into one
macro button will make the operation very easy.
General: Please refer to the General function parameters at the beginning of this
help section.
2.1.5.79 Search #8011(Find PLU, ect...)
Search (FIND) #8011
The FIND function allows a search to be executed within the sale transaction. The search
results depend on the request that is made. It is possible to search and list accounts,
products, departments, etc.
·
·
Substituted function: Enter the function from the backend that L-POS should use
the attributes from. This could be used if the function you are using has not been
defined in L-POS and you want to use another function that has been defined in LPOS.
SQL command line allows an existing SQL file to be selected for execution by this
© 2008 ... Logivision
The POS maintenance module.
·
93
function. Press the small icon (…) to search for the appropriate SQL command. The
default path for the search statements is the C:\POSWIN\SFILES directory.
General: Please refer to the General function parameters at the beginning of this
help section.
2.1.5.80 Send message #8013
Send message #8013
This button is used to send a message from the an L-POS terminal to another terminal.
·
·
·
Substituted function: Enter the function from the backend that L-POS should use
the attributes from. This could be used if the function you are using has not been
defined in L-POS and you want to use another function that has been defined in LPOS.
Enter the text message to deploy with this button. The message format must be
TEXT,DESTINATION STATION ID. For example: Wrapper needed now,901 will send
a message to station 901 stating Wrapper needed now. The destination station sees
the sending station in the message window that displays.
General: Please refer to the General function parameters at the beginning of this
help section.
2.1.5.81 Store Charge #106
Store Charge #106( All tender functions including Check, credit card, etc)
The tendering functions such as Store Charge are used to accept payment for a transaction.
·
·
·
·
·
·
·
© 2008 ... Logivision
Substituted function: Enter the function from the backend that L-POS should use
the attributes from. This could be used if the function you are using has not been
defined in L-POS and you want to use another function that has been defined in LPOS.
Minimum amount tendered is used to prohibit amount entry below this limit.
Maximum amount tendered is used to prohibit amount entry above this limit.
Minimum quantity is used to prohibit quantity entry below this limit.
Maximum quantity is used to prohibit quantity entry above this limit.
Maximum change is used to prohibit change above this amount when this tender
key is used.
Points is used to calculate points using this ratio whenever this tender function is
used. This way you can calculate points on the sale value rather than on item sales.
If you want to issue more points for Cash payment than for credit card payments you
would assign a higher value of points on Cash than on Visa, Master Card, etc. Points
issued on tender will always be calculated as a percentage of the total. A related
setting in PosSetup>System>General>Advanced flags allows you to decide whether
tax is included in the calculation of the points issued.
94
L-POS User Manual 3.2.1.0
·
·
·
·
·
·
·
·
·
·
·
·
·
·
·
·
·
Foreign currency table is used to determine the exchange rate table to use with this
tender function. The currency exchange tables are programmed in the System Setup module.
Overtender fee is set to charge an amount related to any change issued with this
tender function.
Fee in percentage is set to yes when the overtender fee should be calculated as a
percentage of the change issued with this tender function.
Activate buttons on form allows you to select a button that should be accessed
whenever this function is executed.
Double width printing selection will force the tender amount to print double size on
the customer receipt.
Do not open drawer will prohibit the cash drawer from opening when this tender
function is used.
Compulsory tender set to Yes will force the operator to enter the amount received
into the tender key to perform change calculation
Exchange is used to decide whether this function can be traded for Cash. For
example, you could set this flag to Yes on the Check function to allow check cashing.
Validation is used to force a compulsory validation message on the validation
printer.
Endorsement is used to force a compulsory endorsement message on the
endorsement printer.
Authorisation centre is used to decide if this function activates a call to the
credit/debit card authorisation centre.
Card argument is used to determine the type of card authorisation performed on this
card. Information on the correct settings for this field is available in the Device setup
under bank. Press "Set up Device" and go to the Info tab. The settings depend on
the bank that L-POS is connecting to. So once you have the correct bank interface
selected this info field will contain the required data.
Double card stub: This will issue to credit card stubs.
Cash out required: Select this flag if you want to prompt for a cash back amount
when this tender is used.
Pickup form number: Enter the form to load when this function is used during a
pickup. Normally this will load a form with different denominations programmed to
simplify the pickup routine. See detailed information in the Printing detailed pickups
section.
Signature: Set this flag to require signature capture to the L-Tracker files when this
payment function is used.
General: Please refer to the General function parameters at the beginning of this
help section.
2.1.5.82 Store coupon #460
Store Coupon #460
This type of function is used to manually reduce the transaction amount. The parameters for
this type of functions are the following:
© 2008 ... Logivision
The POS maintenance module.
·
·
·
·
·
·
·
·
·
·
95
Substituted function: Enter the function from the backend that L-POS should use
the attributes from. This could be used if the function you are using has not been
defined in L-POS and you want to use another function that has been defined in LPOS.
Preset amount: Enter the pre-set coupon amount if it is pre-set. Otherwise leave it
blank.
Minimum and Maximum discount: Enter the lowest and highest discount amounts
available with this button. Leaving them blank will create a Pre-set only discount
button. The pre-set amount is set in the previous field.
Positive coupon: Set this flag to Yes to add the coupon amount to the transaction.
Taxes: Enter the taxes that will be reduced when this coupon is used. You need to
understand that the store coupon will reduce as much tax as it can from a
transaction, without allowing the tax to become negative.
Food stamp: Set this flag to reduce the Food-stamp total by the coupon amount.
WIC: Set this flag to reduce the WIC total by the coupon amount.
Double width printing: Use this option to send the double size print command
whenever this button is used.
Reverse printing: Set this flag to enable white on black print to highlight the store
coupons.
General: Please refer to the General function parameters at the beginning of this
help section.
2.1.5.83 Subdepartement #715
Subdepartment #715
This type of function allows the entry of a subdepartment code or can be used to assign a
specific subdepartment to the keyboard.
·
·
·
·
Substituted function: Enter the function from the backend that L-POS should use
the attributes from. This could be used if the function you are using has not been
defined in L-POS and you want to use another function that has been defined in LPOS.
Subdepartment number is used to assign a specific subdepartment for usage with
this button.
Double width printing will instruct the printer to print double size characters for
entries made to this Subdept button.
General: Please refer to the General function parameters at the beginning of this
help section.
Note: L-POS can send the cost of goods sold by department, sub-department, or Price
Required PLU's. The entry must be made to a button assigned to the keyboard, it will not
work on an entry prompted from a list. For each sub-department button assigned to the
keyboard make the following modification in the button set-up:
1. Add a Load Form (8001) function to the sub-department button. Move the Load
Form up so that it is executed before the sub-department function. Set the "Do
© 2008 ... Logivision
96
L-POS User Manual 3.2.1.0
not clear entry buffer" flag to Yes. Access the advanced features programming
and add "/VAR01=#00" to the existing option.
2. Add a Manual Cost (8059) function to the sub-department button. Move the
Manual Cost function up so that it is executed before the sub-department
function. Set the "Do not clear entry buffer" flag to Yes. Set the Calculation field
to "#00*.72" to capture a cost of 28% of the price that the item was sold for. (Set
the Calculation field to "#00*.68" to capture a cost of 32% of the price that the
item was sold for.)
3. In the properties of the Sub-department function set the minimum entry to .01 (or
higher) to force a price entry before the sub-department key is pressed.
In the advanced properties of the Sub-department function add the following value
"VAR00=#01"
2.1.5.84 Subtotal #720
Subtotal #720
This function is used to display the subtotal on the receipt and on the pole display.
·
·
·
·
Substituted function: Enter the function from the backend that L-POS should use
the attributes from. This could be used if the function you are using has not been
defined in L-POS and you want to use another function that has been defined in LPOS.
Foreign currency table allows you to select an exchange rate that will be executed
when this Subtotal button is used. Click the small arrow to select the rate you want to
assign. These rates are programmed in the System set-up under the
Miscellaneoustab.
Execute account discount must be selected whenever you are using a global
discount function to remove the customer discount from the transaction. Select the
automatic account discount function in the Account settings .
General: Please refer to the General function parameters at the beginning of this
help section.
2.1.5.85 Tafmo #8069
Tafmo #8069
This function is used to open an external program Tafmo used for web based ordering. This
function requires the Tafmo product. Further instructions are included with the Tafmo setup
information.
2.1.5.86 Tax shift #8034
Tax shift #8034
This function is used to shift the tax status of the next item.
© 2008 ... Logivision
The POS maintenance module.
·
·
·
·
·
97
Substituted function: Enter the function from the backend that L-POS should use
the attributes from. This could be used if the function you are using has not been
defined in L-POS and you want to use another function that has been defined in LPOS.
Taxes allows selection of the tax rate(s) to be shifted by this button.
Toggle is used to define the behaviour of the tax shift function. Setting toggle to yes
means the next item tax status will be inverted from its normal setting.
Set Suppress taxes to Yes to delete all tax collected in the transaction for the tax
rates affected by this button. Setting Suppress taxes to No and Toggle to No results
in a tax shift that only removes the tax status of an item, never adding it as with the
normal Toggle set to Yes.
General: Please refer to the General function parameters at the beginning of this
help section.
2.1.5.87 Temporary tender #198
Temporary Tender #198
This function allows you to set aside a transaction for tendering with the correct finalization
key at a later time. It can be used in various situations such as delivery, or when more than
one invoice needs to be printed for one single payment at the end.
The temporary tender function is useful when a transaction needs to be finanlized but you
are not certain how the payment will be made. This is often the case with deliveries.
The system can store several temporary tender totals that will each contain a list of
transaction numbers and the amount due for each transaction. To store a transaction under
temporary tender total 1 for driver 1, you would program the TEMP TENDER button to
execute 1 [TEMP TENDER]. To store a transaction under temporary tender total 2 for driver
2, you would program the TEMP TENDER button to execute 2 [TEMP TENDER].
·
·
·
·
·
© 2008 ... Logivision
Substituted function: Enter the function from the backend that L-POS should use
the attributes from. This could be used if the function you are using has not been
defined in L-POS and you want to use another function that has been defined in LPOS.
Points is used to calculate points using this ratio whenever this tender function is
used. This way you can calculate points on the sale value rather than on item sales.
If you want to issue more points for Cash payment than for credit card payments you
would assign a higher value of points on Cash than on Visa, Master Card, etc. Points
issued on tender will always be calculated as a percentage of the total. A related
setting in PosSetup>System>General>Advanced flags allows you to decide whether
tax is included in the calculation of the points issued.
Overtender fee is set to charge an amount related to any change issued with this
tender function.
Fee in percentage is set to yes when the overtender fee should be calculated as a
percentage of the change issued with this tender function.
Activate buttons on form allows you to select a button that should be accessed
98
L-POS User Manual 3.2.1.0
·
·
·
·
·
·
whenever this function is executed.
Double width printing selection will force the tender amount to print double size on
the customer receipt.
Do not open drawer will prohibit the cash drawer from opening when this tender
function is used.
Compulsory tender set to Yes will force the operator to enter the amount received
into the tender key to perform change calculation
Validation is used to force a compulsory validation message on the validation
printer.
Endorsement is used to force a compulsory endorsement message on the
endorsement printer.
General: Please refer to the General function parameters at the beginning of this
help section.
2.1.5.88 Tender transfer #8061
Tender transfer #8061
Use this function to transfer an amount from one tender to another tender if an error was
made and the sale has been finalized.
·
·
·
Substituted function: Enter the function from the backend that L-POS should use
the attributes from. This could be used if the function you are using has not been
defined in L-POS and you want to use another function that has been defined in LPOS.
Compulsory number entry: Set this to force a confirmation number.
General: Please refer to the General function parameters at the beginning of this
help section.
2.1.5.89 Training mode #8038
Training mode #8038
This function is used to invoke the training mode operation.
·
Substituted function: Enter the function from the backend that L-POS should use
the attributes from. This could be used if the function you are using has not been
defined in L-POS and you want to use another function that has been defined in L© 2008 ... Logivision
The POS maintenance module.
·
·
99
POS.
Do not open drawer will prohibit the cash drawer from opening during training
transactions.
General: Please refer to the General function parameters at the beginning of this
help section.
2.1.5.90 Unit Quantity #40
Unit quantity (multiplication) #40
This function is used to enter the quantity of items being sold when it is different than the
default quantity of one.
·
·
·
·
·
Substituted function: Enter the function from the backend that L-POS should use
the attributes from. This could be used if the function you are using has not been
defined in L-POS and you want to use another function that has been defined in LPOS.
Multiply indefinitely is used to change the behaviour of this function from @/For to
a cubic multiplication. This means that an entry of « 5 qty 5 qty 5 qty » would result in
a multiplication of the unit price by 125.
Minimum quantity will set the lowest multiplication factor available with this multiply
function.
Maximum quantity will set the highest multiplication factor available with this multiply
function.
General: Please refer to the General function parameters at the beginning of this
help section.
2.1.5.91 Up #8020
Up #8020
This type of function allows the control of cursor movement up by line or by page. It can also
be used to navigate the electronic sales journal when the Last transaction parameter is
selected. You may need to create 2 Up buttons, the first to move back up the transaction
you are in or to move up lists you are viewing, and the second to move backward in the
electronic journal.
·
·
·
© 2008 ... Logivision
Substituted function: Enter the function from the backend that L-POS should use
the attributes from. This could be used if the function you are using has not been
defined in L-POS and you want to use another function that has been defined in LPOS.
Page scrolling allows the function to operate as page up instead of moving up one
line only.
Previous transaction is required when this function is used to move backward while
100
L-POS User Manual 3.2.1.0
·
·
reviewing the electronic journal.
Maximum offset allows you to define the maximum number of transactions that you
can move back to when using the L-POS to open the electronic journal.
General: Please refer to the General function parameters at the beginning of this
help section.
P.S. To return direct to a specific transaction number, enter the transaction number and
press the arrow key assigned the Previous
transaction parameter.
2.1.5.92 Validation print #8042
Validation #8042
This button is used to activate the validation printer.
·
·
Substituted function: Enter the function from the backend that L-POS should use
the attributes from. This could be used if the function you are using has not been
defined in L-POS and you want to use another function that has been defined in LPOS.
General: Please refer to the General function parameters at the beginning of this
help section.
2.1.5.93 Vendor coupon #420
Vendor Coupon #420
Vendor coupon is used to reduce the amount owing on a transaction. The vendor coupon
parameters are:
·
·
·
·
·
·
Substituted function: Enter the function from the backend that L-POS should
use the attributes from. This could be used if the function you are using has not
been defined in L-POS and you want to use another function that has been
defined in L-POS.
Preset amount: Enter the pre-set coupon amount if this function uses a pre-set
amount.
Minimum and Maximum discount: Enter the lowest and highest discount
amounts available with this button. Leaving them blank will create a Pre-set only
discount button. The pre-set amount is set in the previous field.
No minus: Select Yes if L-POS should not allow a negative total through use of
this button.
Positive coupon: Set this flag to Yes to add the coupon amount to the
transaction.
Coupon level (1-4): L-POS can track up to 4 coupon flags. Enter the coupon flag
© 2008 ... Logivision
The POS maintenance module.
·
·
·
·
·
·
·
101
to verify for this coupon function.
Taxes: Press the … icon to select the taxes that are affected by this discount
button. To make this discount button non-taxable make sure that no tax names
are selected in this window.
Food stamp: Set this flag to reduce the Food-stamp total by the coupon amount.
WIC: Set this flag to reduce the WIC total by the coupon amount.
Full tax: Set this flag to No if you want L-POS to remove the tax collected on
taxable items on a pro-rata basis according to the amount of discount given on
the discountable items. L-POS will remove all tax from the discounted portion of
taxable items if this flag is set to Yes.
Double width printing: Use this option to send the double size print command
whenever this button is used.
Reverse printing: Set this flag to enable white on black print to highlight the
coupons.
General: Please refer to the General function parameters at the beginning of this
help section.
2.1.5.94 Void last item #610 (Error correct)
Void last item #610 (Error correct)
The error correct function reverses the last item entered automatically. It can also be used to
reverse the highlighted item if the operator scrolls back up the receipt area within the current
transaction.
·
·
·
·
Substituted function: Enter the function from the backend that L-POS should use
the attributes from. This could be used if the function you are using has not been
defined in L-POS and you want to use another function that has been defined in LPOS.
Validation: Set this flag to force printer validation when the function is used.
Keyed minimum level: Set the minimum user level required to refunnd a PLU by
entering the number through the keyboard. This setting does not restrict the refund of
an item entered with the scanner.
General: Please refer to the General function parameters at the beginning of this
help section.
2.1.5.95 Wic payment #119
Wic payment #119, Wic 2 # 149, WIC 3 #150
Wic payment is a tender key used to receive payment for a sale. The Wic payment function
is pre-programmed and uses built-in characteristics. For example, tendering is always
compulsory and changing the flag below will have no effect. Only WIC items can be paid
with WIC Payment. There are 3 WIC flags per item, sub-department and department. This
© 2008 ... Logivision
102
L-POS User Manual 3.2.1.0
allows you to set different WIC types on products. Items flagged for WIC 1 can only be paid
with WIC tender 1 (function 119.) Likewise, Items flagged for WIC 2 or WIC 3 can only be
paid with WIC tender 2 (function 149) or WIC tender 3 (function 150.)
·
·
·
·
·
·
·
·
·
·
·
·
·
·
·
·
·
·
·
·
·
Substituted function: Enter the function from the backend that L-POS should use
the attributes from. This could be used if the function you are using has not been
defined in L-POS and you want to use another function that has been defined in LPOS.
Minimum amount tendered is used to prohibit amount entry below this limit.
Maximum amount tendered is used to prohibit amount entry above this limit.
Minimum quantity is used to prohibit quantity entry below this limit.
Maximum quantity is used to prohibit quantity entry above this limit.
Maximum change is used to prohibit change above this amount when this tender
key is used.
Points % is used to calculate points using this ratio whenever this tender function is
used. This way you can calculate points on the sale value rather than on item sales.
If you want to issue more points for Cash payment than for credit card payments you
would assign a higher value of points on Cash than on Visa, Master Card, etc. Points
issued on tender will always be calculated as a percentage of the total. A related
setting in PosSetup>System>General>Advanced flags allows you to decide whether
tax is included in the calculation of the points issued.
Foreign currency table is used to determine the exchange rate table to use with this
tender function. The currency exchange tables are programmed in the System Setup module.
Overtender fee is set to charge an amount related to any change issued with this
tender function.
Fee in percentage is set to yes when the overtender fee should be calculated as a
percentage of the change issued with this tender function.
Double width printing selection will force the tender amount to print double size on
the customer receipt.
Do not open drawer will prohibit the cash drawer from opening when this tender
function is used.
Compulsory tender set to Yes will force the operator to enter the amount received
into the tender key to perform change calculation
Negative check will force this tender to request a checking account entry.
Read MICR will force the POS to use the MICR reader to input the check account
number.
Exchange is used to decide whether this function can be traded for Cash. For
example, you could set this flag to Yes on the Check function to allow check cashing.
Rounding currency is used to allow this tender function to use the system rounding
factor (for example, your country does not use pennies in the drawer so all entreis in
this tender are rounded to the nearest 5 cents.
Validation is used to force a compulsory validation message on the validation
printer.
Endorsement is used to force a compulsory endorsement message on the
endorsement printer.
Authorisation centre is used to decide if this function activates a call to the
credit/debit card authorisation centre.
Card type is used to determine the type of card authorisation performed on this card.
© 2008 ... Logivision
The POS maintenance module.
·
103
Information on the correct settings for this field is available in the Device setup under
bank. Press "Set up Device" and go to the Info tab. The settings depend on the bank
that L-POS is connecting to. So once you have the correct bank interface selected
this info field will contain the required data.
General: Please refer to the General function parameters at the beginning of this
help section.
2.1.5.96 Wic Subtotal #8035
Wic subtotal #8035
This function is used to display the amount payable by WIC check.
·
·
2.2
Substituted function: The substitute function should be set to None.
General: Please refer to the General function parameters at the beginning of this
help section.
System settings
System configuration
This section of the maintenance is used to modify different system options such as taxes,
coupon settings, file paths, PLU flags, account flags, etc.
© 2008 ... Logivision
104
2.2.1
L-POS User Manual 3.2.1.0
General tab
General tab
When you access the system settings option, the default view shows the general settings tab
selection. This is where you will enter the Store name and address , phone number , and
© 2008 ... Logivision
The POS maintenance module.
105
the store and terminal numbers to be used on the machine. The store number is a 3 digit
field that should be set to 001 unless you are working in a multi-store environment. In the
multi-store environment it is important to set all stores with different numbers. If not sales
data from different stores will be impossible to obtain. You also need to determine how the
front end sends data to the back-end in respect to balancing cashiers . You may choose to
balance the cashiers, balance the lane or balance the actual drawer. The default cashier
balancing does not require any special attention.
Balancing type
Several balancing types are available: cashier balancing, terminal balancing or drawer balancing. The
system cannot use more than one balancing method in the same store. So you need to evaluate the
set-up options to make the correct choice for your installation.
Cashier balancing
L-POS will track the drawer related information by cashier. Cashier balancing is the default method so
no set-up changes are required.
Terminal balancing
Use this option to track drawer related totals by terminal. This means that the loans, pickups, declares,
in drawer and over/short information will be tracked for each terminal but not for individual cashiers.
Virtual cashiers for terminal balancing
When you select balancing by terminal you will need to create several virtual cashiers. L-POS uses
these virtual cashiers to record the balancing totals for all transactions done on the particular terminal.
The cashiers are added to the system under the L-BOSS | Maintenance | Register | Operators menu:
© 2008 ... Logivision
106
L-POS User Manual 3.2.1.0
1. Use the
icon from the tool-bar. You must create one virtual cashier record per terminal.
So if you have 4 terminals you will need to create 4 extra cashier records. We recommend
using operator numbers 1111, 2222, 3333 etc. This is not compulsory. These numbers cannot
be used as cashier id numbers for other operators.
2. Do not set any password for these operator records.
3. The print name and first name should say Terminal 1 for L-POS lane 1.
4. You must set the Level field to 0 (zero.)
5. The other fields are not used so they do not need to be entered.
Selecting the terminal balancing option
The Terminal balancing option is selected from PosSetup | System | General tab | Balancing by field.
This is a one-time set-up that MUST be executed at the POS station. The information is recorded into
a file stored locally on the POS terminal. Although PosSetup can be executed from the back-office
menu the required settings will not be sent to the POS terminal.
© 2008 ... Logivision
The POS maintenance module.
107
1- Select Terminal from the pull-down list in the Balancing by field.
2- The system already shows the Store number, terminal number and may or may not display a
Lane #. You must set the Lane # to match the virtual cashier number you created in operator
maintenance.
3- This change MUST be made directly on the POS terminal. The setting is not available from the
back-end.
Once you have completed the changes and sent the virtual cashier records to the POS you are ready
to begin balancing by terminal. Sign on using the normal method by entering the operator number and
password for the operator working on the terminal.
If you see the error "Balancing terminal/drawer number not found" it means the number you entered in
the Lane # field does not match with any of the virtual cashier records, or the virtual cashier records
were not sent to the POS terminals (use the task "Deploy all changes".)
If you see the error "Balancing terminal/drawer number must have a level of 0" it means the number
you entered in the Lane # field is not using security level 0. Modify the level number field for each of
the virtual cashier records you created and deploy the changes to the POS terminals.
Drawer balancing
Use this option to track drawer related totals by drawer. This means that the loans, pickups, declares,
in drawer and over/short information will be tracked for each drawer but not for individual cashiers. This
option is sometimes required when cashiers need to be balanced more than once per day with
separate totals, as in the case of split shifts. Drawer balancing is not related to using a dual cash
drawer system. The dual cash drawer system is used with the normal cashier balancing system. The
drawer balancing option will prompt the operator who signs on to enter a drawer number. This number
© 2008 ... Logivision
108
L-POS User Manual 3.2.1.0
is assigned to the physical tray the operator was given for the current shift. These drawer numbers
need to be created in L-BOSS operator maintenance.
Virtual cashiers for drawer balancing
When you select balancing by drawer you will need to create several virtual cashiers. L-POS uses
these virtual cashiers to record the balancing totals for all transactions done with the particular drawer
(or cash drawer tray insert.) The cashiers are added to the system under the L-BOSS | Maintenance |
Register | Operators menu:
6. Use the
icon from the tool-bar. You must create one virtual cashier record per cash
drawer tray insert. So if you have 20 tray inserts you will need to create 20 extra cashier
records. We recommend using operator numbers that fall outside the normal range of
operators. This is not compulsory. These numbers cannot be used as cashier id numbers for
other operators.
7. Do not set any password for these operator records.
8. The print name and first name should say Tray 9901 if you have labeled the tray 9901.
9. You must set the Level field to 0 (zero.)
10. The other fields are not used so they do not need to be entered.
Selecting the drawer balancing option
© 2008 ... Logivision
The POS maintenance module.
109
The Drawer balancing option is selected from PosSetup | System | General tab | Balancing by field.
This is a one-time set-up that MUST be executed at the POS station. The information is recorded into
a file stored locally on the POS terminal. Although PosSetup can be executed from the back-office
menu the required settings will not be sent to the POS terminal.
1- Select Drawer from the pull-down list in the Balancing by field.
2- This change MUST be made directly on the POS terminal. The setting is not available from the
back-end.
Once you have completed the changes and sent the virtual cashier records to the POS you are ready
to begin balancing by drawer. Sign on using the normal method by entering the operator number and
password for the operator working on the terminal. Now you will be prompted to enter the "drawer"
number the cashier is using. This is the number you have assigned to the cash drawer insert tray given
to the operator for the current shift.
If you see the error "Balancing terminal/drawer number not found" it means the "drawer number" you
entered does not match with any of the virtual cashier records, or the virtual cashier records were not
sent to the POS terminals (use the task "Deploy all changes".)
If you see the error "Balancing terminal/drawer number must have a level of 0" it means the drawer
number you entered is not using security level 0. Modify the level number field for each of the virtual
cashier records you created and deploy the changes to the POS terminals.
There is also access to the currency symbol so that behavior can be assigned and to the
system sound settings. The CID limits can be modified to set the maximum in drawer
amounts for 5 tender functions. Select the corresponding In Drawer totalizer from the list
© 2008 ... Logivision
110
L-POS User Manual 3.2.1.0
that appears when you press the CID limits button. Enter the maximum allowed in drawer
for that tender. When the maximum of ANY tender set here has been reached, a visual
indicator (Moneybag) will appear in the icons area of the POS transaction screen. The
Moneybag icon will remain on screen until ALL tenders are below their prescribed limits. The
cash in drawer limits are affected by movement in and out of the cash drawer by sales, loans
to the register, pickups, paid outs, etc.
L-POS has a floating cashier file built-in. This means that reports are available for the same
cashier even if that cashier worked on several terminals the same day. The CID limit is
verified at log-on through the floating cashier system. If the cashier has worked on another
terminal and is over the CID limit for one of the tenders, the Moneybag will appear. When the
store controller is unavailable (L-POS is operating off-line) the accumulated totals for the
cashier cannot be verified. This means that the CID amount is only based on the sales being
done on the current terminal, with no verification possible at log-on. As soon as the L-POS
returns on-line, the data will be restored to the Store Controller. But the CID limit will not be
updated from the central file until the next log-on by the cashier.
The cash in drawer sentinel can also be set up to add enhanced in-drawer security. By
default the system will only warn the operator that a pick-up is required by displaying the
money-bag icon. L-POS can also send warning messages and even block transactions when
the in-drawer limit is exceeded by a set percentage. Use the Advanced parameters
programming to set the allowable percentage before the system is locked for further use. If
no value is entered in this key, L-POS will display an icon to warn the operator that a pickup
is required. When a value is entered in the Percent to add to the limits to force a pickup
advanced parameter L-POS will wanr the operator that a pickup is required soon. Once the
percentage is reached, L-POS will block further transaction entries.
The Advanced flags button gives access to advanced flags. With the list open you will see
the default value and the current setting for each of the advanced flags. The default checkbox can be selected to return that specific advanced system parameter to the default value.
The flags are separated by section into PLU related flags, Account related flags and system
related flags. To search while you are editing the advanced flags press CTRL-F and enter
the search text. Press F3 to locate the next occurence of that text string. These are flags that
will probably never change on your system more than once. Please contact your technical
resource for an explanation of each flag setting.
Press the Pole message display button to change the welcome and register closed
messages that appear on the pole display. .
The IP button can be used to select the IP address of this station for it's broadcast requests.
Use the SMTP server field to identify the server used by your mail client to send messages.
Enter the Port that your email client uses to send messages.
2.2.2
Directories tab
Directories tab
The directories tab allows you to define the path the system will use for certain information
files. These settings should be correct from your initial run of the product during installation.
© 2008 ... Logivision
The POS maintenance module.
·
·
·
·
2.2.3
111
Inbox refers to the directory on the local drive used to receive mail (e.g.
programming data) from the back office system. Typically this would show C:\INBOX\
Outbox refers to the directory on the local drive used to store mail outgoing (e.g.
Sales transaction data) to the back office system. Typically this would show
C:\OUTBOX\
Main refers to the location of the backend program backend software main directory.
This will show the UNC path to the L-BOSS program directory, or, for example:
\\LBOSS01\C\LBOSS\. Of course is you are on a single "L-BOSS and L-POS"
terminal the drive would be set to C:\LBOSS\.
Office refers to the location of the backend program office subdirectory on the
backend system. This will show the UNC path to the L-BOSS OFFICE folder on the
server, or, for example: \\LBOSS01\C\LBOSS\OFFICE\. Of course is you are on a
single "L-BOSS and L-POS" terminal the drive would be set to C:\LBOSS\OFFICE\.
Alias tab
Alias tab:
·
·
·
·
© 2008 ... Logivision
Back Office Alias. L-POS requires an alias to connect to the back end database
that contains the set-up files used by the terminal. The database alias was
created during the BDE setup as described previously in this document. If you
followed the default installation, select the LBOSSSQL alias.
Database type. Select MSSQL unless you are using Paradox to manage the
database tables.
DB User name. The user default for the native MSSQL database is SA.
DB Password. Leave this entry blank with the default database set-up.
112
L-POS User Manual 3.2.1.0
You may also execute the Borland Database Administrator to change the internal settings of
the BDE by pressing the button to execute the BDE.
2.2.4
Taxes tab
Taxes tab
The tax settings can be entered for up to 4 rates. Select the tax you want to program first.
Then set the rate, rounding and minimum taxable amount for this rate. For taxes 2, 3 and 4 it
is possible to select a flag to calculate that tax compounding over the tax amount already
charged in this transaction.
It is also possible to print the taxable amounts instead of the default setting that only shows
the tax amount. If you select the print taxable, you can decide whether or not you need to
condense the printing of the taxable amount and tax amount on one line.
You may also edit tax tables if they are required in your tax jurisdiction. The setting for VAT
relates to businesses who need to show tax inclusive prices and split out the inclusive taxes
on the customer receipt as well as on the sales reports.
2.2.5
Food stamp tab
Food stamp tab
Select the food stamp jurisdiction your state uses. You may change the receipt symbol for
both food stamp items and WIC items.
2.2.6
PLU tab
PLU tab
General rules used for every PLU in the database can be selected in the PLU settings.
© 2008 ... Logivision
The POS maintenance module.
113
The Miscellaneous section:
Select Qty on same line to reduce the number of lines of print data whenever
multiple quantity entry is used.
· If you need points calculated in percentage rather than as an amount, check the
points in percentage setting.
· No discount on promo will override the discountable status of any item that is not at
the regular price when it is sold on the L-POS system. When you set this flag you no
longer need to set the Prohibit discount flag for items you place on sale. If you are
using the batch system, this flag overwrites the discountable status that can be set
for individual batches. So if you need some batches to be discountable and others to
be non-discountable, do not use this flag.
· The PLU definition table uses the same set-up rules as the Scanning definition
table so refer to the scanner set-up for a detailed explanation.
· Maintain cost must be set if you want the POS system to return the cost of goods
sold to the reports database.
· Allow selling below cost refers to items that have been modified by the Price
Override function. It is not allowed by default.
· Gas desc is the descriptor that will be printed for GAS type PLU's. This will show as
a calculation of the total amount entered for the PLU divided by the unit price. So you
may see 25.78 liters or 7.14 gallons calculated according to the total amount and per
unit price.
· You can also decide which PLU function is used for manual PLU entry by defining
the function in the PLU Function area.
· Definition table opens a window to define the definiction table for the PLU key.for the
PLU button. Use this link to access the help section on the definition table.
·
Note: L-POS can send the cost of goods sold by department, sub-department, or Price
© 2008 ... Logivision
114
L-POS User Manual 3.2.1.0
Required PLU's. The entry must be made to a button assigned to the keyboard, it will not work
on an entry prompted from a list. For each sub-department button assigned to the keyboard
make the following modification in the button set-up:
1. Add a Load Form (8001) function to the sub-department button. Move the Load Form up
so that it is executed before the sub-department function. Set the "Do not clear entry
buffer" flag to Yes. Access the advanced features programming and add "/VAR01=#00" to
the existing option.
2. Add a Manual Cost (8059) function to the sub-department button. Move the Manual Cost
function up so that it is executed before the sub-department function. Set the "Do not clear
entry buffer" flag to Yes. Set the Calculation field to "#00*.72" to capture a cost of 28% of
the price that the item was sold for. (Set the Calculation field to "#00*.68" to capture a cost
of 32% of the price that the item was sold for.)
3. In the properties of the Sub-department function set the minimum entry to .01 (or higher)
to force a price entry before the sub-department key is pressed.
4. In the advanced properties of the Sub-department function add the following value
"VAR00=#01"
The Printing options:
The selections on the right hand side of the window are related to the format printing will
occur for PLU entries. We suggest that you experiment with the different print methods to
understand the one most appropriate to your customer's needs. In summary these are the
meanings of the different settings you can choose from:
·
·
·
·
·
·
·
·
Print Plu number Select this option to print the PLU item number for each item sold.
Net price will print the item price after any reduction as opposed to printing the price
and then the discount amount. This option is normally not selected.
Explain price shows the price status of items that are sold in a quantity different than
one or that are part of any type of special pricing method.
Explain discount shows the discount that was given to arrive at the net price. It may
be printed as a statistic (offset into the centre of the receipt) or in the pricing column if
net price was not used. Note that if you did not select net price the explain discount
flag is automatically selected for you.
SRP is an abbreviation for suggested retail price. This field can be maintained in the
backend program and transferred to the L-POS. Select this field to use the SRP as
the basis for price comparison on the customer receipt.
Your price will print that descriptor beside the customer's price for the item.
You saved will print that descriptor beside the difference in price between the
customer's price and either SRP or price level 1 regular retail. Note that the system
only has one current price for level one. If the product is on sale or in a promotion
batch on level one the system does not have the regular level one price. For this type
of comparison between regular retail and a sale price you MUST maintain the regular
retail price in the SRP field. The only comparison to level one price is when the item
price is coming from another price level. Then L-POS can compare between the
customer's price and price level one.
Based on SRP and based on level 1 selects the price used for the price comparison
as described above.
N.B. No matter which receipt sort options are set, the system will
consolidate the receipt print for mix match items when the related flag is
set in the System>General>Advanced>Group the mix and match for
printing
Note: The system You saved features also have a flag in the Advanced
© 2008 ... Logivision
The POS maintenance module.
flags on the General tab of system setup. Search for the Flag Print you
saved in the Transaction related flags section. Set this flag to True to get
the Total you saved to print on the bottom of the receipt. This will print the
total based on the difference between the price used and the SRP price or
the level one price. If you do not select the You saved in the print options,
the system will only print the total if you do select the Print you saved in
the advanced settings.
Note 2: The system set-up may seem confusing depending on which
options are selected.
· When you select Based on SRP the 2 options at the bottom of that
column will be greyed out.
· If the fields Your price and You saved are greyed out, you MUST first
select the SRP option. Then select the option you require. When your
selection is complete remove the SRP if you do not want to show
suggested retail price for every PLU you sell. When you remove the
SRP the other fields will appear greyed out again. But if you change to
a different set-up tab, then return to the PLU page the selection should
appear correct.
Note 3: If you want the system to print only the total you saved as
compared to SRP, select the option Based on SRP and set the Print you
saved flag in the General settings advanced flag list.
There are flags related to printer set-up in the Peripheral, printer set-up
section of this guide.
2.2.7
Account tab
Account tab
© 2008 ... Logivision
115
116
L-POS User Manual 3.2.1.0
The account settings are global settings that affect all account transactions. The screen has
3 areas. Print options, Behaviour, and Account discount settings.
1. Print options
Print account name will show the customer company name on the receipt.
Print contact name will show the customer fist name and last name (from the
contact table) on the receipt.
· Print account number will show the customer account number on the receipt.
· Print full address will show the full customer address on the receipt.
· Print account summary will print a transaction summary for the charge transactions
on the bottom of the customer receipt.
· Print stub receipt will print a stub receipt for the charge transactions after the
customer receipt has been printed.
· Print account balance will print the customer charge balance at the start and end of
the transaction whenever a charge or payment is made to the account.
· Print account comment will print the POS comment entered for the account on the
back-end account set-up software
· Print account points bal. will print the customer points information when an account
is opened.
Note: In order to print the account information in double width refer to Printer set-up
under peripherals.
·
·
2. Behaviour options
·
Get account balance will send a request to the backend server for the up-to-date
customer charge account balance and retrieve it into the sale if available. If the
© 2008 ... Logivision
The POS maintenance module.
·
·
·
·
·
·
·
·
117
backend is unavailable the operator will be prompted to abort the transaction or
continue without the up to date customer account balance.
Compulsory means that an account number must be supplied for every transaction.
Must be first means that when an account is used it must be the first entry in the
transaction or it will be refused.
Confirmation means that the operator will be prompted with the account name when
the account number is entered. The operator will be able to confirm acceptance or
refusal of the account look-up.
Extend expiry date can be used when the customer account expiration date has
been exceeded. The system will add one year to today's date and set the new expiry
date. You can also execute a button automatically when this feature is used. The
Account renewal fee button is assigned on the same page. It is available when the
Extend expiry date is enabled. This is useful if you want to charge a fee to extend
the expiry date. You need to program the button properties in button & form set-up.
Accept not-found customers allows the front-end L-POS to send new customer
data to the back-end system.
Create in back-end will send a new account record to backend L-BOSS system.
The Prompts button allows you to select the prompts that the POS will display when
creating a new account on the POS terminal and not in the back-office maintenance.
The button below Prompts in the image above is used to assign a fee to account
renewals. It is not available if the extend account expiry date is not set. Choose a
button from the button list that the POS will execute when the expiry date is extended
on the POS.
3. Account discount settings.
Select Apply % to each item to apply the customer discount as in item discount rather than
as a sub-total discount. The account discount functions (Account subtotal discount must use
fct 412 and Account Item discount must use fct 452).
Use discount table: This flag will use the discount rates set up in LBOSS>Maintenance
under the Account>Discount menu. You can program a different discount rate, or cost plus a
premium by sub-department for each customer level. The discount table always applies
discounts at the item level.
2.2.8
Totalizer tab
Totalizer tab
The totalizers are normally set in the backend system. There are a few tasks executed in the
L-POS system that do not exist in the backend. These tasks must be linked to backend
totalizers in order for the reports to include the data entries. An example would be the
taxable amount of merchandise sold. There is no function in backend for this entry because
it is a system total created as you sell taxable items. All of the front-end specific tasks
created in the L-POS must be linked to a totalizer in the backend. Select the task from the
list and link it to the appropriate totalizer from the backend.
© 2008 ... Logivision
118
2.2.9
L-POS User Manual 3.2.1.0
Zones tab
Zones tab
The Zones tab is used to define the zone that the different lists will be displayed in. You
need to define a zone for the on hold transaction list, for any prompt messages the LPOS will display, and a zone to be used for the lists requested during searches on the
database. You may also define a button to execute when the search is closed. This can be
set to a close form function for example.
2.2.10 Headers tab
Headers tab
Select the header or trailer you want to modify and press the GO button. The receipt header
and trailer can both be defined with up to 15 lines of text. The settings for the printed text
include double height and width, bold, reverse and red. Of course these options depend on
the printer being used. To define a logo using a bitmap or another compatible file format,
return to the receipt printer set-up in the peripherals programming section.
If you need more than 4 receipt trailers just press the GO button and enter the custom trailer
number you need to set up.
Note that the editing features in the header set-up are rather basic. For example, to center
the text, place the cursor at the start of the line and fill with spaces to move the data to the
page center. The trailers printed on the receipt after a sale can vary according to the buttons
used within a transaction. For example, if you give a discount on the items in the sale, you
may want to add a message that says Discounted items are non refundable and must be
exchanged within 10 days of purchase. You could select receipt trailer 2 and add that
message. You must also designate which buttons print the trailer number 2. This is done in
the button setup by editing the function properties.
You can also add a prompt to any of the the receipt trailer. Use this feature whenever you
require some specific but variable information that must be entered at the end of the sale.
For example, after a refund, you want to enter customer name and phone number. You
could add 2 prompts as follows into the trailer generated whenever refund is used:
{PROMPT:Enter customer name?}
{PROMPT:Enter phone number?}
The name and phone number will print at the bottom of the receipt after the normal trailer
information.
To add a barcode representing the transaction number to the receipt trailer add {TRANS} in
the footer message where you want to print the barcode.
Note that the normal receipt trailer always prints and that the trailer 2 will print immediately
after it on the receipt.
© 2008 ... Logivision
The POS maintenance module.
119
Note 2: The system allows you to create a different header for hold sale transactions to
allow a significant difference with a normal receipt.
2.2.11 Restrictors tab
Restrictors tab
The restrictor table should used when you need to prohibit sale of products at certain times
or in quantities exceeding the programmed limit. These are normally state or provinicial
requirements that need to be enforced at the point of sale.
To add a restrictor, press the Add button. Choose a new restrictor number, and enter the
description. Select the restrictor type in the Type pull-down list. Restrictors can be set for
day & time or for maximum allowable quantity in a transaction.
When you have selected the type as Day of week the screen displays an area where you
can define the specific day(s) the restrictor should apply. You must also define the time of
day the restrictor should apply for. In cases where you need to restrict a product for different
times on different days you can add a second page to the restrictor by pressing the Add
page button. This allows you to repeat the same process and add a second restriction level
for the product. An example situtation is when you need to restrict beer sales all day Sunday
and before 10am other days. Set the first page to restrict the product Sunday between 12am
and 11:59pm. Set the second page to restrict the item every day between 12:00 am and
9:59am.
© 2008 ... Logivision
120
L-POS User Manual 3.2.1.0
When you select Maximum quantity as the restrictor type you must enter the quantity in the
maximum field. This will restrict the sale of any product using the restrictor when the total
quantity of any of those products is reached in the transaction.
You must also assign the products to the same restrictor code in the backend file
maintenance application. Don't forget to deploy the changes to send any items modified to
the front end. This will stop the product assigned to the restrictor from being sold during
according to the settings in the restrictor table.
2.2.12 Coupon tab
Coupon tab
The Coupon tab provides access to 3 distinct features of L-POS coupon related
programming:
·
·
·
The first is the setting for Coupon multiplication. This multiplication applies to both
manual coupon entries and scanned vendor coupon entries.
The second feature that can be accessed is the maintenance of the Vendor coupon
table itself.
The third feature concerns the set-up of in-store coupons triggered by customer
activity in a transaction.
1. Coupon multiplication
© 2008 ... Logivision
The POS maintenance module.
121
Coupon multiplication represents the factor by which coupons are multiplied. This
is often required by retailers situated in very competitive environments.
· The Maximums area allows limits to be programmed.
· Maximum vendor coupon per transaction will restrict any multiplication of vendor
coupon above the limit entered on a per transaction basis
· Maximum vendor coupon per item will restrict any multiplication of vendor coupon
above the limit entered on a per item basis. This means that you could stop a 75
cents coupon from multiplying higher than $1.00 for example.
· Maximum store coupon per transaction will restrict any multiplication of store
coupon above the limit entered on a per transaction basis
· Maximum store coupon per item will restrict any multiplication of store coupon
above the limit entered on a per item basis. This means that you could stop a 75
cents coupon from multiplying higher than $1.00 for example.
· Absolute refers to how the maximum per transaction amount is used.
· When the Absolute flag is NOT set, the maximum amount per coupon is used to
determine at what point doubling stops based on the total obtained from doubling
the coupon base amount. If the limit is set to $1.00 and a 75 cent coupon is
accepted, it will increase in value up to the maximum set in the per item field for
that coupon type, in our example $1.00. A 40 cent coupon would double to 80
cents. A 90 cents coupon will double, but stop at maximum of $1.00. A coupon with
face value over the per item maximum will never double or increase in value.
· When Absolute is set, the maximum coupon per item is the maximum value of the
coupon that will be doubled. So, with the limit set at $1.00, and the absolute flag
set on, a .75 cent coupon will double to $1.50. A .40 cent coupon will double to 80
cents. A $1.00 coupon will double to $2.00. A coupon with face value over the per
item maximum will never double or increase in value.
· Below the maximum area there is a button used to select which totalizer the overface-value amount is sent to.
· An example: you can set the system to double vendor coupons up to a maximum of
$2.00 per item and to a limit of $10.00 per transaction. Select the totalizer in the
backend that will be affected by the double coupon portion of the coupon. This is
especially important for the balancing routines to work properly. If the coupon for 50
cents is doubled to $1.00, the merchant will only claim back the $0.50 face value of
the coupon. The other $0.50 is money he decided to offer on his own and therefore
the overage is usually sent to another backend totalizer.
Note: Set the related flags in the "Double coupon" button in Button/Form set-up to
control coupon doubling manually.
·
2. Vendor coupon value table
The vendor coupon value table is predefined in the L-POS system and should not be
modified. Consult your system administrator or your L-POS dealer if the table values need to
be modified. Access is given to set the authentication level your application requires. First
decide whether vendor coupon scanning is active. If active is selected it is possible to
prohibit vendor coupon unless a corresponding vendor id code is found in the transaction
and the coupon parameters are met. You can also assign a coupon family code to each
product in the L-BOSS backend maintenance. This is a 3-digit code that can be found in the
coupon bar code. To authenticate the coupon family code, place a check mark in the
appropriate box.
© 2008 ... Logivision
122
L-POS User Manual 3.2.1.0
3. In store coupons
L-POS allows you to program rules by which customers can be rewarded for spending in
your store. Press the [In store Coupon Generation] button to modify the current rules.
[Header] and [Footer] are used to assign a message to the top (header) and bottom (trailer)
of the in-store coupons you program. All in-store coupons will use these messages.
Two windows are available to create sales coupons and item related coupons. A sale
coupon is triggered by totals in the transaction while an item coupon is triggered by the sale
of an item during the transaction.
1. Sales Coupons
Create a new sales coupon by pressing "New". You will be prompted for a coupon name.
This name is only used as a reference. It will not be printed or shown on the actual coupon.
It will appear in the window with the other sale coupons you create. You can modify an
existing coupon by selecting that coupon in the sales coupon window and pressing "Modify".
The Modify button opens a form where the coupon text can be entered. This is the main text
of the coupon that will print when conditions are met.
© 2008 ... Logivision
The POS maintenance module.
Note the special options that can be used in the coupon text to add variables from the
current transaction.
; Description of fields used in check endorsement and in coupons
; Updated August 24th, 2007
;
; {field,Length,Option}
; If Length = 0 then uses the length of the item
; Option = 1 to Right Justify
;
2 to Center
;
3 to center with "*"
;
+4 to write amount in words
;
+8 Pennies only
;
+16 Leading 0 without decimal (00000450)
;
; ****** ROTATE COMMANDS ******
;
; .R 1 Print Normal
; .R 257 Rotate Right 90
; .R 258 Rotate Rotate left 90
; .R 259 Rotate 180
;
; 10 - Date (Option: 32 = Long Date format)
; 11 - Time;
; 12 - Store number
; 13 - Terminal number
; 14 - Cashier name
; 15 - Manager name
; 16 - Trans Number
; 17 - Gift Cert Number
; 21 - 28 # entry type
© 2008 ... Logivision
123
124
L-POS User Manual 3.2.1.0
; 50 - Expiry date (Option: 32 = Long Date format)
; 100- Amount Net
; 101- Description
; 102- Total Sale
; 103- Total Sale (No currency symbol) (Option: 32 = Absolute number)
; 104- Quantity
; 105- Quantity 0 decimal (truncated)
; 106- Quantity 1 decimal
; 107- Quantity 2 decimals
; 108- Quantity 3 decimals
; 109- Weight
; 110- Weight 0 decimal (truncated)
; 111- Weight 1 decimal
; 112- Weight 2 decimals
; 113- Weight 3 decimals
; 114- Price
; 115- Price (extra digit)
; 116- Plu discount price
; 117- Plu discount price (Extra digit)
; 118- PLU discount amount
; 119- Amount of the item
; 201- Account Number
; 202- Account Name
; 203- Account Address
; 204- Account City
; 205- Account Remark
; 206- Account Points
;
; The following fields are related to each PLU in the transactions
; (Each time the same field is used, it accesses the next PLU
;
; 301- PLU Number
; 302- PLU Description
; 303- PLU Quantity
; 304- PLU Amount
;
; 401- Calculated amount. Used with other variables to execute a calculation.
; Example: {401:#96*4/100,0,0} will print a field on the form with the sale subtotal multipled
by 4%.
Example endorsement message:
This is a simple endorsement test
Date: {10,0,0}
Time: {11,0,0}
Terminal: {12,0,0}{13,0,0}
Cashier: {14,0,0}
Manager: {15,0,0}
Trans: {16,6,1}
Amount spelled: {100,40,7}{100,2,8}
© 2008 ... Logivision
The POS maintenance module.
125
Amount: {100,12,1}
Descriptor: test{101,0,0}Test
Total Sale: {102,0,1}
Account number: {201,0,0}
Account Name: {202,0,0}
Account Add: {203,0,0}
Account City: {204,0,0}
Account Remark: {205,0,0}
Account Points: {206,0,0}
When adding these variables to the coupon message text you must place the variable, or the
computed variable, inside accolades as shown in the sample above. If you do not use the
accolades the system will print the text literally rather than usng the system variable.
Any syntax error will result in the system printing the literal value, not the data from the
system variable.
Select a coupon and press "Properties" to set the rules this coupon will follow. The sales
coupon flags include:
·
·
·
·
© 2008 ... Logivision
Only one per sale: Select this option to prohibit issuing more than one of this
particular coupon no matter how many times the conditions are met.
Compared to sub-department is used to decide with which subdepartment total in
the transaction the coupon criteria will be compared to.
Compared to sale total is used to declare that the coupon issuing will be based on a
transaction total and not a subdepartment amount as explained above.
Client level will restrict this coupon from being issued if this customer level is not
used in the transaction.
126
L-POS User Manual 3.2.1.0
Manual Coupon is available to limit the issue of coupons. Any coupon that is
programmed Manual coupon will not print unless both the criteria are met and you
use a button programmed as function type 730, Receipt Copy, with the Manual
coupon print flag set. An example is given in the Receipt copy function programming
section of this manual.
· Totalizer can be set to collect data on the qualifying amount that was captured for
this coupon to be generated.
· Bar code can be used to print a barcode number on the customer coupon that prints
on the system receipt printer. The bar code can either represent a PLU that was
programmed as a store coupon or it can be programmed as a rebate amount tat
would be captured as a generic store coupon at the time it is scanned.
· Creating the bar code as a Coupon like PLU requires that you create an item set as
a negative PLU by using the store coupon flag in the POS tab of the item
maintenance. If the PLU has been programmed into the backend and sent to the LPOS, then L-POS will sell the item as a reduction when it is scanned. The
advantage to using negative PLU as store coupon is the reporting issue. An
individual total for each PLU will be available.
· Creating the bar code as a generic store coupon would require a standard
convention as the beginning digits of the PLU number in the bar code you assign
for the print ID of the coupon. For example, you could assume that no products in
the store will begin with 77777 and assign the barcodes as 7777700100 for a $1.00
coupon. Bar code 777777700050 would represent a $0.50 barcode. Of course you
still need to define the scanner definition table and the PLU definition table to
decode the bar-code and send the coupon amount to the store coupon redeemed
button.
· Select printer is available in order to select a specific printer to issue in-store
coupons. For example, if you are printing Entrance tickets on a high speed label-style
printer every time an entry fee is paid, you would redirect the output to the
appropriate Windows based printer rather than the receipt printer. If you select
receipt or slip, L-POS uses internal set-up to redirect to the appropriate
· If you have selected to use a windows driven printer you will have access to the
Select Windows button. Press this button to select the appropriate windows
printer.
· If you have selected to redirect in-store coupons to a Windows based printer you
can define the form that will be used in the Form window.
·
The "Delete" button will remove the selected coupon from the list of existing coupons.
2. Item coupons
Create a new item coupon by pressing "New". You will be prompted for a coupon name.
This name is the number of the item that must be sold for this coupon to be issued. It will not
be printed or shown on the actual coupon. It will appear in the window with the other item
coupons you create. You can modify an existing coupon by selecting that coupon in the item
coupon window and pressing "Modify". Select a coupon and press "Properties" to set the
rules this coupon will follow.
The item coupon generation can also be restricted by the same flags that the sales coupons
follow:
·
Only one per sale: Select this option to prohibit issuing more than one of this
© 2008 ... Logivision
The POS maintenance module.
·
·
·
·
·
particular coupon no matter how many times the conditions are met.
Compared to sub-department is used to decide with which subdepartment total in
the transaction the coupon criteria will be compared to.
Compared to sale total is used to declare that the coupon issuing will be based on a
transaction total and not a subdepartment amount as explained above.
Manual Coupon is available to limit the issue of coupons. Any coupon that is
programmed Manual coupon will not print unless both the criteria are met and you
use a button programmed as function type 730, Receipt Copy, with the Manual
coupon print flag set. An example is given in the Receipt copy function programming
section of this manual.
Totalizer can be set to collect data on the qualifying amount that was captured for this
coupon to be generated.
Bar code can be used to print a barcode number on the customer coupon that prints
on the system receipt printer. The bar code can either represent a PLU that was
programmed as a store coupon or it can be programmed as a rebate amount tat would
be captured as a generic store coupon at the time it is scanned.
· Creating the bar code as a Coupon like PLU requires that you create an item set
as a negative PLU by using the store coupon flag in the POS tab of the item
maintenance. If the PLU has been programmed into the backend and sent to the
L-POS, then L-POS will sell the item as a reduction when it is scanned. The
advantage to using negative PLU as store coupon is the reporting issue. An
individual total for each PLU will be available.
· Creating the bar code as a generic store coupon requires a standard number
mask as the beginning digits of the bar code number you assign. For example,
you could use 77777 as the first 5 characters and assign the barcodes as
7777700100 for a $1.00 coupon. Bar code 777777700050 would represent a
$0.50 barcode. L-POS would then process the coupon bar-code in the same way
that it processes UPC2 labels for variable weight items. Of course you still need to
define the scanner definition table and the PLU definition table to decode the barcode and send the coupon amount to the store coupon redeem button.
2.2.13 Miscellaneous tab
Miscellaneous tab
© 2008 ... Logivision
127
128
L-POS User Manual 3.2.1.0
Form number for help:
Enter the form number where L-POS will display the help files requested during a
sales transaction. N.B. The form you select must not be one of the system forms, it
must be a button form. The system forms are easy to recognize: they all have
*asterisks* surrounding their respective names.
Button executed after finalization:
This allows you to define a button that will be executed at the end of the payment
process. This is required when electronic payment systems are used on a touchscreen system and you want the payment form to be removed and the department
form relocated onto the screen. Use a load form function that swaps the appropriate
forms.
Function list table:
L-POS buttons can be accessed by a keyboard shortcut if the button was assigned to
the keyboard. Sometimes the size of a keyboard is restrictive and therefore cannot
contain all the L-POS buttons required. This is where the usage of a Function Code
key can be handy. If you need to modify a price but no Price Modify button was not
assigned to a key, you could use the Price modify button by entering a function
number and pressing the Function Code button. The Function code list is where you
assign the Button to a number that will be used as in the Price Modify example.
Access the Function list table by clicking the Function list table button. Now enter the
function number and then choose the button from the Pop-up list that appears.
Flip charts:
This icon will access the set-up of flip charts. Flip charts are screen forms that have
been pre-defined as far as the size, position, color and button type are concerned.
Flip charts were intended to be used for, among other things, produce look-up charts.
Access the flip charts by pressing the small icon. By default, the flip chart will fill 75%
© 2008 ... Logivision
The POS maintenance module.
of the user screen. Up to 99 flip charts with 30 individual buttons can be
programmed. You have the choice of assigning an Index bar on the top of the flip
chart pages. This creates 6 common buttons that are automatically copied to each
flip chart page. The 6 common buttons do not have to appear, it depends on your
application more than anything else. By default, the 6 common buttons will not
appear. To change the Index bar setting access the Options button.
To set up a flip chart, press the first button you want to program. Buttons on flip
charts can do one of the following built-in functions: SUB-DEPARTMENT, PLU or
PAGE.
Sub-department is just that: assigning this function to the Button will allow
that key to be used as an open entry button to a sub-department.
Choose PLU to use the position as a preset PLU button.
Choose Page to use this position to access another Flip chart page number.
Each type of button requires some parameter settings:
The sub-department, PLU or Page number. If you choose sub-department or
PLU, you may use the finder to locate the item you want to assign at that
screen position. Double click in the PLU number field and select the item from
the list.
By default, the button description will be copied to the text field from the PLU
descriptor. You can change the text as required. NOTE that the text field is
important. If you ever add a new button to the page you may want to sort the
buttons in alphabetical order. The sorting follows the button text entries when
the sort is executed.
Display picture and display text do exactly what they say on the button
facing. If you place a picture and text, the image will shrink.
If you select Use as default, each new button you access will have the same
default properties as the one you told the system to use as default. You can
set Use as default, program a series of like items, and then change the
default to ad more buttons with different properties.
Use the Picture icon to browse the drive for an image to assign to the button.
It will be resized automatically. The modified image will end up in the
Poswin\Images\FC folder with the same name as the original image that was
assigned to the button. This is done to speed up access to the flip chart
forms.
The Go to page button allows you to skip to the page number assigned to the
next menu key you depress. This is how you change the page number you
are programming. If you are setting up a button that will select a Page number
in the L-POS entry sales entry module, you use Go to Page in the set-up to
get to that page.
Press Options to access the following menu choices:
Sort this page only: will place all buttons on this page into alphabetical order.
Index bar is used to toggle the top row from normal buttons that are unique to
each menu page to a row of 6 common buttons that are the same on each
page.
Show focus will highlight the currently selected button. This is useful if you
are using the flip charts on a non-touch screen terminal and you want to
© 2008 ... Logivision
129
130
L-POS User Manual 3.2.1.0
select the menu items with the cursor movement keys.
Button style allows you to select different types of buttons for the flip charts.
It is only a cosmetic issue.
Increase font size will make the button font larger.
Decrease font size will make the button fonts smaller.
The Ok button will close the screen you are active in.
Layaway prompts:
Press here to set the prompts that will be displayed when a layaway account is
created on the POS terminal.
Sounds:
Press here to select the sounds that L-POS will use for different events that occur
during operation. The L-POS sounds section will probably appear well down the list
because it was added after other programs. Obviously, no sounds will be heard
without the proper audio features.
Prompting lists:
Use this option to create prompt requests that you require on the system. For
example, if you want to prompt for a car model and year when using a specific subdepartment button, you can create the prompt here. Create as many different
prompting schemes as you require. Each prompting scheme can have as many
questions as required. Different types of data can be collected including
alphanumeric, numeric, dates, etc.
· Double-click in the prompt list number field to view the existing prompts.
· Add a new prompt by entering a new number in the prompt list number field. Now
you need to add the prompt questions that will be displayed when the operator
uses a button with the prompt attached to it. By default the first question is called
© 2008 ... Logivision
The POS maintenance module.
131
prompt. Modify the description (as in the example above it displays "car model."
Set the minimum and maximum number of digits you want to allow in the answer to
your prompt, and the type of data that can be entered. Once you have entered the
first prompt you want to show the operator, you may press the "Add" button to
create another question (such as "Year" in our example) and enter the other
settings related to the new question you add. The virtual on-screen keyboard can
be called up for use in the prompt entry by selecting "On-screen keyboard."
· The prompts are attached to selected function in the Button setup under the
function properties.
List sizes:
This option is used to define the font size and row height for lists displayed in the Pos
module.
Internal keytone:
This feature is intended to provide an audible tone from the CPU when buttons are
pressed, especially on a touch screen terminal that has the CPU built-in. It will emit a
keyboard type of beep by using the internal tone indicator of the CPU. It will not be
effective if the CPU is located away from the keyboard or screen, such as under the
counter.
Btl rtn reports to CID:
Select this flag to report bottle return made by using function 650 (refund) or by using
Bottle return PLU items as a tender type function, meaning the amounts will report direct to
the tender and the in-drawer amounts rather than appearing in other revenues or in net
sales.
Note: When you select this flag you need to use function 111 as the function in the
manual bottle return button. If you do not select this flag use function 511 in the button
used for manual bottle return.
Print barcode on hold transaction:
Select this option to print a barcode on the receipt generated for a suspended
transaction. This option will not function if your printer does not support barcode
printing.
Print barcode on new PLU:
Select this option to print a barcode on the receipt generated for a not found PLU.
This option will not function if your printer does not support barcode printing.
Change prompt:
Select this option to be prompted in a separate form for the change due on the
transaction. This form requires cashier confirmation by pressing the PLU key to
continue.
Btn font:
Set the font to use on the buttons (the round style, not the custom button type.
Food stamp change prompt:
Select this option to be prompted in a separate form for the food stamp change due
on the transaction. This form requires cashier confirmation by pressing the PLU key
to continue.
© 2008 ... Logivision
132
L-POS User Manual 3.2.1.0
Transaction limits:
When these limits are reached, a manager code will be required to complete the
transaction.
Last item correction: enter the total of Item correction that you permit within a
transaction before a manager is required.
Selected correction: enter the total of previous item correction that you permit within
a transaction before a manager is required. Previous item correction includes
corrections done with the Void function or with the Item correction on any item except
the last (Item correct can be done on a previous item by pressing the Up arrow to
select a previous item in the same transaction.)
Refund: enter the total of refunds that you permit within a transaction before a
manager is required.
Minus transaction: Enter the highest negative subtotal you permit before manager
intervention is required to finalize a transaction.
Manager select:
This option is used to customize the manager override function. If you leave the
default setting of Manager select, L-POS will prompt the user with a choice when
manager number is entered for override. Select either an override of the next entry or
override until the end of the current sale. This would be comparable to turning a
manger key to the override position and removing it after the next entry, or turning
the manager key to override and leaving it there until the current transaction is over.
When you select Override item, L-POS will automatically set the manager override
for the next item only. This means that to execute several restricted functions in the
same sale, the manager code will be required before each entry.
When you select Override transaction, L-POS will invoke the manager override for
the duration of the current transaction.
To force the system to require manager override in a WIC Loss situation (the total of a WIC
sale is greater that the WIC check itself) select the Prompt for WIC Loss option.
2.2.14 Events tab
Events tab
© 2008 ... Logivision
The POS maintenance module.
133
The Events tab allows different timerd events or system events to be defined.
Inactivity period before locking the keyboard: Set the timer to the amount of time that the
keyboard must remain untouched before it locks automatically. Once this locking occurs,
only the cashier code who locked the keyboard can unlock the keyboard. You must also
select the feature by placing a check mark in the check box.
Time of day to delete all Hold Transactions: Enter the time that all suspended
transactions will be deleted. A report can be created on the back store system to list out
these transactions for auditing purposes. You must also select the feature by placing a
check mark in the check box.
Inactivity period before signing off the cashier: Enter the delay required before L-POS
will sign off the currently assigned cashier from the terminal.
Time of day to force cashier sign-off: Set this time to force the cashier off the machine
and ensure sign in on the new system date. This is normally required in non 24 hour
operations who often forget to sign off at night. If that was to occur, the L-POS would
continue to send transactions with the date of the last sign-in.
Auto cashier logoff after each transaction: Set this time to force the cashier off the
system after every transaction.
Prompt list number to attach to the age verification is used to add a prompt(s) to the age
verification request.
Maximum key delay time out: Set the number of milliseconds before L-POS will create an
error situation if keys were pressed but no function is used. (Avoid errors created when
© 2008 ... Logivision
134
L-POS User Manual 3.2.1.0
cashiers attention is removed from the POS and they forget that a partial entry had been
made...)
Delay before showing sub-total (in seconds): This setting is related to the customer poletype display. Set the delay after an item is scanned to display the total amount due on the
customer pole display. The faster you want to see the sale sub-total, the shorter the delay.
Delay before displaying the time after the transaction (in seconds: This setting is
related to the customer pole-type display. L-POS will wait the specified number of seconds to
display the time on the customer pole display count after the sale has been completed. The
faster you want to see the time on the display, the shorter the delay should be.
Timed events: This button will open a new window where POS events are created. The
events are used to launch functions at the specified time. For example, you may want your
system to use a specific price level at a given time, or you may want the L-POS to invoke
coupon doubling every Tuesday morning.
Active: set the event to active when it is to be executed. You can stop the event execution
by setting the active status to No.
Date: this is the date the event will start executing.
Time: this is the time the event will start executing.
Cycle: this setting is used to determine the frequency the event will repeat on. You can
select from hourly, daily, weekly, monthly, once only, all week days, weekend days only.
Button: this is where you define the action that the L-POS will take when the event occurs.
For example, if you want L-POS to use price level 2 on Tuesdays, then you need to create
a button that sets price level 2. This button would be called by the event programmed to
execute Tuesday morning. Of course you will also need to create another event to be
executed on Wednesday that will execute a button programmed for price level 1.
Terminal: Use this to define events that should only be executed on a specific terminal.
Message: The message text will display on the L-POS when the event is executed. You
© 2008 ... Logivision
The POS maintenance module.
135
can also set an event that will only act as a message to the operator. The example above
that shows the message Warning: shelf facing time executed daily at 2:00PM. Since there
is no button executed the system will only generate a warning
2.2.15 Language tab
Language tab
L-POS can display and print information and messages in 2 languages. Use the Language
tab to select the language used by L-POS for descriptor 1 and descriptor 2 for PLUs,
Departments, functions, messages, etc.
When no language setting is specified, L-POS will determine the Windows regional setting
entry and use that language by default. LPOS messages are only available in English and French at the current time.
When L-POS is installed on a system with Windows in US English, messages and receipts
will print in English. If a customer is defined as French in the backend language setting for
the customer, the receipt will print French for that customer If a cashier is defined as
French, the screen messages will appear in French for that cashier. But of course the setting
for language Descriptor 2 would need to be fr and the customer or cashier record would
also need to show fr in the language setting. Totals and functions should be preprogrammed
in English and French by default. You must ensure that items are programmed in both
languages for the bilingual nature of the product to be available.
L-POS also includes a details form that displays status flags, unit price, and other
© 2008 ... Logivision
136
L-POS User Manual 3.2.1.0
information related to the items being scanned. Use the LED descriptor fields to modify the
labels shown on the details form. For example, you can change the default T1 (for tax 1)
descriptor to something more significant like state tax or GST. T2, T3 and T4 are for the
additional tax rates. FS is for identifying food stampable items. WI is used for WIC items and
DS is for discountable items.
N.B.: To force a specific language on the receipt area or the details form of the POS
screen, add the language indicator to the *Receipt* or the *Detail* form name displayed
on the form list. So if you want the screen to display English descriptions on the screen
receipt or the details form you need to modify the form names as shown here:
This change is only required if you are using multi-language set-up and you want to specify
a different language for the receipt. If no language indicator is added to the form name, LPOS uses the Windows operating system language.
2.2.16 Currency Tab
Currency tab
© 2008 ... Logivision
The POS maintenance module.
137
Foreign currency:
Use the pull down arrow to select the Currency table to be modified. Then enter the foreign
currency exchange rate required. The table number is assigned to the Tender function in the
Buttons and Forms set-up by accessing the Properties of the Tender function. You may
modify the descriptor of the foreign currency table. So if a rate for YEN and another rate for
French Francs is required they each have their own name on the programming list. The
actual name of the tender key is assigned in the functions set-up of the backend system.
The name on this list is only a reference provided for convenience sake.
Use the [Calc] button to set the rate required for this foreign currency type. Enter the value
issued in the foreign currency against $1.00 of the domestic currency. This will display the
correct foreign currency rate to be used.
Amount of smallest piece of money can be used where pennies are no longer used in
cash transactions. This is the case, for example, in Australia. If you set the amount to 5
cents, then L-POS will use the next flag, Rounding used to calculate the smallest piece
of money. This means, how does L-POS round a transaction that adds to $5.57? If you
enter a 2 as the rounding amount, the sale of $5.57 will round down to $5.55 but a sale for
$5.58 will round up to $5.60 (because L-POS uses the closest 2 cents.) Each Tender
function can be set to use the rounding factor individually. So if you want to continue
collecting the exact sale amount for Checks, Visa, etc., you would only set the Rounding
flag on the cash tender function. This is selected on the properties set-up page for the actual
tender under the buttons and forms menu option of PosSetup.
© 2008 ... Logivision
138
L-POS User Manual 3.2.1.0
2.2.17 Rent tab
Rent tab
Rental items can be controlled by L-POS when the system is used with the L-BOSS backend
system. The rental tab includes general programming that defines how the rental system will
operate. The rental items are set up in the LBOSS system under PLU programming.
Return time:
L-POS can control return time for rental items two ways. The more popular
application for rental with L-POS is controlling films in a c-store type application. In
this type of environment, the return time is usually determined as being 6:00 pm or
thereabouts. If this is your case, leave the Check box for Based on the period as a
blank. An item rented today at 3PM will be due at the return time tomorrow. Same
thing for an item rented at 11PM tonight, it will be due tomorrow at 6:00PM if a return
time is specified.
When L-BOSS is used for rental that is based on time, you need to place a check
mark next to Based on the period. This would be used in an application where
something is rented for an hour, 2 hours, 8 hrs, etc. An example would be strollers
rented to customers by the hour in an amusement park. When you select this option,
any time that shows in the Return time will be ignored.
Late fee
Open account: Set this flag to automatically open the customer account who is
returning a film late. There is a related flag in the
PosSetup>System>General>Advanced flags: Bypass customer contact on late
return. This flag must be set if you want to open the account and charge a fee
© 2008 ... Logivision
The POS maintenance module.
139
automatically with the Late fee button.
Charge late fee: Select this flag if you want the system to activate a button when a
film is returned late.
Automatic quantity: Use this flag to send the number of days an item is late to the
Late fee button. An item returned 3 days late will enter 3 QTY end press the Late fee
button.
Use same PLU: Select this flag to use the same item as the late fee. When you
select this flag it is important to set the PLU function 710 as the first function
executed in the late fee button.
Late fee button: By default there is no button programmed as late fee on the default
L-POS set-up. So the button shows [None]. To charge a late fee you need to assign
a button in the rental set-up screen. If you decide to set the flag "Automatic
quantity" and "Use same PLU" assign the PLU button. If you want to charge a
different fee you can program a PLU as late fee charge and assign a Pre-Set PLU as
the Late fee button.
Grace period
To permit an automatic grace period beyond the return time, enter the grace time in
hours (probably as a fractional amount) or in percentage of the rental period.
Selecting a percentage of the rental period (such as 10%) would obviously extend a
30 day rental by 3 days (such as a pair of crutches in a pharmacy.)
Copy identifier
When several copies of the same item are available it may be necessary to easily
learn if a copy of the item is still in the store. By creating a pattern or mask for the
item numbers of the same film L-POS will be able to respond on film availability.
You can determine which digits represent the copy number within the PLU number
entered to rent the item. The copy identifier digits can be placed at the start or at the
end of the PLU number created in LBOSS. Choose First x digits = copy to place the
copy identifier digits at the start of the PLU number. Or select Last x digits = copy to
place the copy identifier at the end of the actual PLU number.
You may also determine that the PLU number itself is a specific length and the
remaining digits are used as the copy number following the same logic as above.
Select First x digits = Item or Last x digits = copy if this is the case.
You can also define how many digits are required to identify the copy. If you never
have more than 9 of the same item, select 1 in the #digits entry. This field
corresponds to the value x referred to in the First x digits = copy field.
If you never have more than 9 copies of a film, one digit will be enough to
differentiate between the films. Take the example of item number 12345 which is the
PLU code for the film Titanic. If you had 4 copies of the film you could number them
123451, 123452, 123453, 12344. if you were to set the configuration of the copy
identifiers to use the Last x digit, and set 1 in the number of digits field L-POS will
understand to search all 4 items when you request status for item 12345.
Note: When no copy identifier is required the value "# of digits" should be set to
© 2008 ... Logivision
140
L-POS User Manual 3.2.1.0
zero to speed up inventory queries on the POS system. This would be the case when
you never have more than one copy of a film, or when you receive pre-coded films
that cannot be fit with the L-POS masking system.
Type H period is used to define the fixed period used by price type H PLU items.
These are rental items that do not have variable rental periods like the price type G
items. This would be most common for items like films in a c-store that are always
rented for the same time period.
2.3
Peripherals
Peripherals
L-POS uses internal drivers supplied by Logivision or OPOS drivers to communicate with
peripheral devices. The hardware manufacturer supplies these OPOS drivers. They are
intended to provide compatibility across software platforms. OPOS software and compatible
hardware normally allows tests to be performed that will validate the functionality of the
product before any application software such as L-POS is used. This way you can always
determine that a device is malfunctioning and why. L-POS supports the following
peripherals:
·
·
·
·
·
Printers
Scanner
Pole display
Keyboard
Scale
© 2008 ... Logivision
The POS maintenance module.
·
·
·
·
·
2.3.1
141
Drawer
Keylock
Magnetic stripe reader
Bank terminal
Signature capture
Printers
Printers
Access the Peripherals configuration by pressing 4 Shift-F5. Now select the Printers tab.
You can modify settings for 3 types of printers (receipt, document and coupon).
Receipt printer
General tab
This selection allows you to enter a filename in the comment field if you want
to direct the printer output to a file for test purposes. The test function here
was provided for users that implemented early versions of L-POS with OPOS
interface. This button is not used with the direct interface now used within LPOS.
Details tab
Use this tab to select the printer interface method. Select PosPrinter.DLL as
the OPOS SO device type.
Press Configure to open the POS Printer Setup windows. This window is
divided into 4 tabs:
Inside the configuration you need to define the settings required for
your printer to communicate with L-POS. Begin by selecting the type
of printer you are interfacing with. For all Epson thermal printers select
between Epson with 42 column or 56 column mode. If your printer type
© 2008 ... Logivision
142
L-POS User Manual 3.2.1.0
does not appear on the list it can be added. Press the Add button to
add another printer. This will open a new page with 3 tabs. You will
need to define the printer codes required for the printer to be used by
L-POS.
When adding a new printer:
The information page displays some information on how to enter the
data settings required for the printer to operate with L-POS.
The General tab allows you to select which functionality will be
activated with your printer. Select the printer station to activate
(receipt and / or document.) If your printer has a cash drawer
attached, select the cash drawer here. If you are using a Line display
that shares the same communication port as the printer, place a check
mark in the selection box. If you use a cash drawer or a line display
with the OPOS interface, do not select them here.
The Receipt tab is used to enter the specific printer codes your printer
uses.
Once you have selected the printer type, you need to define the
interface method. Choose the Communication tab. Select the proper
port type and number.
If the printer has been installed and selected properly, the Test option
can be used to try the printer. After opening the Test window, press
the Open button to activate the printer port. If the Print button remains
grayed out, the communication or another setting is not functioning.
When the Print button is available you can input some sample data
into the area labeled Data to print. When the data is there, press
Print. Feed the paper on the printer and verify the data print. You can
also test the barcode printing option by entering a void bar code
number in the Data to print field and pressing Print.
Other printer settings and options
Print options:
© 2008 ... Logivision
The POS maintenance module.
Allow bold print prints some data in bold depending on other settings.
Letter quality sets that type of print.
Receipt sort option: Select the sort option you want to use for receipt
print. It is required to use the Spool transaction option in the Device
options tab to allow receipt sorting. Description sorting will print all
items in alphabetical order at the end of the sale. Sub-department
sorting will group items by department on the receipt. N.B. No matter
which receipt sort options are set, the system will consolidate the receipt
print for mix match items when the related flag (Group the mix and
match for printing) is set in the System>General>Advanced flag section.
Double width printing: Check the box next to the data you want printed
double size on your receipts.
Font tab:
Characters per line determines the number of characters across the line.
Character set is the character code set used by the printer.
Line height is the number of points high for each line printed.
Line spacing is the amount of space left between lines.
Device options
© 2008 ... Logivision
143
144
L-POS User Manual 3.2.1.0
Selecting Print asynchronously will add extra levels of data communication
validation and slow down the receipt printing.
Select Suppress voids to print only the net items sold and not the
corrections. This has the same effect and invoices printed on a windows
based full size printer.
You should also place a Checkmark in the box available according to the
printer stations you want to use on your device. So if you want to use check
endorsement on a 2 station printer you will need to select Document.
Endorsement
; Description of fields used in check endorsement and in coupons
;
; {field,Length,Option}
; If Length = 0 then uses the length of the item
; Option = 1 to Right Justify
;
2 to Center
;
3 to center with "*"
;
+4 to write amount in words
;
+8 Pennies only
;
+16 Leading 0 without decimal (00000450)
;
; ****** ROTATE COMMANDS ******
;
; .R 1 Print Normal
; .R 257 Rotate Right 90
; .R 258 Rotate Rotate left 90
; .R 259 Rotate 180
;
; 10 - Date (Option: 32 = Long Date format)
; 11 - Time;
; 12 - Store number
; 13 - Terminal number
© 2008 ... Logivision
The POS maintenance module.
145
; 14 - Cashier name
; 15 - Manager name
; 16 - Trans Number
; 17 - Gift Cert Number
; 21 - 28 # entry type
; 50 - Expiry date (Option: 32 = Long Date format)
; 100- Amount Net
; 101- Description
; 102- Total Sale
; 103- Total Sale (No currency symbol) (Option: 32 = Absolute number)
; 104- Quantity
; 105- Quantity 0 decimal (truncated)
; 106- Quantity 1 decimal
; 107- Quantity 2 decimals
; 108- Quantity 3 decimals
; 109- Weight
; 110- Weight 0 decimal (truncated)
; 111- Weight 1 decimal
; 112- Weight 2 decimals
; 113- Weight 3 decimals
; 114- Price
; 115- Price (extra digit)
; 116- Plu discount price
; 117- Plu discount price (Extra digit)
; 118- PLU discount amount
; 119- Amount of the item
; 201- Account Number
; 202- Account Name
; 203- Account Address
; 204- Account City
; 205- Account Remark
; 206- Account Points
;
; The following fields are related to each PLU in the transactions
; (Each time the same field is used, it accesses the next PLU
;
; 301- PLU Number
; 302- PLU Description
; 303- PLU Quantity
; 304- PLU Amount
;
; 401- Calculated amount. Used with other variables to execute a calculation.
; Example: {401:#96*4/100,0,0} will print a field on the form with the sale subtotal multipled
by 4%.
This is a simple endorsement test
Date: {10,0,0}
Time: {11,0,0}
Terminal: {12,0,0}{13,0,0}
Cashier: {14,0,0}
Manager: {15,0,0}
© 2008 ... Logivision
146
L-POS User Manual 3.2.1.0
Trans: {16,6,1}
Amount spelled: {100,40,7}{100,2,8}
Amount: {100,12,1}
Descriptor: test{101,0,0}Test
Total Sale: {102,0,1}
Account number: {201,0,0}
Account Name: {202,0,0}
Account Add: {203,0,0}
Account City: {204,0,0}
Account Remark: {205,0,0}
Account Points: {206,0,0}
2.3.2
Scanner
Scanner
L-POS native scanner interface (Scanner.dll)
If you are not using an OPOS scanner device driver, you will not see any scanner names on
the pull-down list. To use the L-POS native communication interface, select the scanner.dll
file as the name on the pull-down list. When you select the scanner.dll , the Button
will appear to allow you to set the communication parameters for your scanner. Access the
scanner set-up by pressing the Button.
The setting menu allows you to select the scanner model being used with the native RS232
connection. Several popular scanner models have been predefined. If your scanner is not on
the list you can add it. The advanced button is used to modify some of the data settings LPOS uses to communicate with the scanner. These settings are available from the scanner
technical documentation.
© 2008 ... Logivision
The POS maintenance module.
147
The Communication menu is where you enter the communications parameters your
scanner has been programmed with. The Test menu is for performing a scan test without
loading the L-POS application. Once you have selected the scanner model you can define
the scanner definition table. This is a table that contains the rules the POS uses to filter data
received from the barcode scanning devices on the system. It allows a lot of flexibility in
setup but requires specific setup for each type of scanner and the type of data you are
scanning.
Definition table purpose and set-up
Use this link to access the help section on the definition table.
OPOS scanner set-up:
Access the Peripheral Configuration screen and select the Scanner tab. If you are using an
OPOS driver, select the scanner brand and model from the pull-down window. If you have
not installed the OPOS service objects you must do so to continue. Refer to the OPOS
information provided with your hardware. We have added some basic information on the
Magellan scanner setup at the end of this section.
Magellan OPOS set-up
In order to use a device with L-POS, you must register the device. The Magellan scannerscale uses a program developed by PSC Inc. that follows the Opos standards. The program
is distributed as a zipped file called OPOS-INSTALL.ZIP. Unzip the file and run the SETUP
program to install the PSC files. During set-up you are prompted to register Control Objects,
Service Objects, Sample settings and a test utility. DO NOT install the control objects. If you
installed according to defaults except for the Control objects, the program is installed to the
Program Files\PSC Inc folder. Access that folder and locate the OPOS\Sample Settings
directory. You will need to edit at least one of the reg type files that are marked as read-only
after the install. Remove the read-only status of the Magellan.reg or the Magellansc.reg file.
The difference between the files is that the Magellansc.reg is designed for the single cable
rs232c model only.
The file must be edited to reflect the parameters programmed into the scanner/scale. Ensure
that the baud rate, parity, data bits, etc., all match those that were programmed in the device
during set-up of the device. When you have edited the file to the correct specs, register the
Magellansc.reg (or the dual cable Magellan.reg) by double-clicking it. Then return back one
folder level to the Opos directory where you will find the required dll files. If you registered
the single cable model, you need to register the PSC_SC232.dll file by double clicking it. If
you registered the dual cable model, you need to register both the PSC_RS232_Scanner.dll
and the PSC_RS232_Scale.dll files. If you registered any other RS232 scanner in the PSC
family, you would register the PSC_RS232_Scanner.dll to use it. The L-POS should now be
able to scan or weigh with the devices.
2.3.3
Definition table
L-POS allows you to define a set of rules that will translate data read by the scanner, by the
MSR or by the PLU button. This means that you can use many different types of scanners,
© 2008 ... Logivision
148
L-POS User Manual 3.2.1.0
barcode types, and create rules that will allow data to be received in a specific format. This
may sound confusing, but it will really allow some creative set-up without rewriting the
scanner interface for customized applications. So you can use the same logic presented
here for the PLU definition table an dthe MSR definistion table.
You need to ensure that all bar code types pass data correctly. The scanners themselves
allow you to program bar code types that can be read. The scanner programming allows you
to define whether or not a check digit will be sent with the item code. You can also set
leading characters, convert UPCE to UPCA, and a lot of other internal settings. There is no
"best" way to program a scanner to use with L-POS. The one recommendation we make: if
your database is fed by a wholesaler and your items are programmed in UPCA format, then
you should use the scanner to perform the UPCE to UPCA conversion. What the scanning
definition table does is convert data from the scanner to make it match with the way the data
has been entered into the database. So if your item file has UPC codes entered without the
check digit you need to make sure that PLU function in L-POS receives the item code
wityhout the check digit. You can program your scanner to not transmit the CD, or you can
program L-POS to skip the CD even though the scanner reads it and tries to pass it to the
PLU function inside L-POS. The definition table intercepts the data coming from the scanner,
finds a definition line that matches the data format received froim the scanner, then performs
the rules set up on that line.
So the first rules you need to define are to decode he PLU data properly. We will start with a
very simple example. You have created UPC items in the database. The visible item code on
the product is 0 70735 02097 0. But the product was created in L-BOSS by typing in
07073502097. Meaning the CD was not entered into the database as is typically the case for
most retailers. If you were to look on the LBOSS item maintenance this product would show
up ar 00007073502097. L-BOSS will normally pad the item code to a 14 digit number
starting with zeroes. So in this case it added 3 zeroes to the front of the 11 digit numbr typed
from the package. Once the item is created you will need to scan the item to sell it. Let's
assume that the scanner is programmed to transmit the check digits with the UPCA code.
This means that the scanner will send, at least, 070735020970 to the POS application. You
will have to create a rule in the definition table to recognize this type of entry and then make
sure the application removes the check digit before pressing the PLU key. If you were to
enter the whole 12 digits to the PLU function L-POS would tell you the item does not exist.
And that is true because you set up without the check digit.
Maybe you want to scan cards with a bar code to identify cashiers. If you make your cashier
cards with a bar code that begins with a common string that is unique to cashier cards it will
be easy to define a rule that sends those scans to the cashier function, rather than to the
PLU function. The system can also add data to a scanned bar-code. For example, you may
have pre-pack scales that were set up to put the weight, rather than a price, in the Type 2
UPC code printed when you weigh fish. This allows you to sell that fish to different
customers at different prices by using price levels for each shopper type. In this case, the
scale will send 1234 as weight to represent 1.234 kg. The POS requires the decimal input,
but that decimal isn't printed by the scale. With the definition table you could create a
definition line that will insert the decimal point at the correct place in the data input.
There is no fixed or hard-coded restriction to using incoming data. So you should be able to
create custom cashier cards, manager over-ride cards, or customer cards and use them with
the POS by including additional entries in the scanner definition table. Other uses we know
of: scanning codes from presciptions issued in the lab of pharmacies, reading back tags
© 2008 ... Logivision
The POS maintenance module.
149
used for line busting from 3rd party applications, or any other specific data input you may
need to capture bar code data into the transaction.
The first thing to do in the scanning definition table is to try a test scan. If your scanner is set
up properly you will either get a message saying "No match found" or a message that shows
"Match found on line x" and a mention of the routing the scanned data will take. When you
scan, the data is read by the POS. The POS will compare the data with the rows in the
Definition table. It looks for a match on line 1 before going to line 2. Each row of the table
has a unique set of rules. The rules are pretty easy.
· Rule 1: the number of characters input by the scanner must match the number of digits
from a row in the table. If you scan a barcode that sends 14 characters the system will
© 2008 ... Logivision
150
L-POS User Manual 3.2.1.0
look for the forst row in the definistion table that has 14 digits.
· Rule 2: On a row in the table all characters defined as "KEY" must match exactly with
the data received from the scanner. The key characters are underlined. They can be any
color but must be underlined to be considered as a Key. The button [1-Key] on the
upper right side of the definition table is used to define key characters.
Here is how to set up a new line in the definition table. There are seven buttons to the right
of the window. These buttons can be turned on or turned off for any part of data on any line
in the definition table. Characters assume the color of the button you assign to that data. If
you select a few characters on a line and press the
button, those characters will
be red. a row of the definition table. There is one exception: when you select data and press
that data will be underlined. It is also possible to select data that will be both "1KEY " and another function such as "2-PLU." That data would be RED and UNDERLINED.
To remove a function, or color, from characters, select the data and press the same function
button. The buttons act as toggle on-off.
Select data with and press this button to set a KEY. This is data that L-POS will
search for and require an exact match before executing. Let's say you have account cards
printed, they are 13 digit numbers starting with ACC. In the L-POS database you created
your accounts as 10 digit numbers, omitting the ACC. You need a row in the Definition table
that starts with ACC and has any other 10 characters for a total of 13 characters:
ACC1234567890
To have this row send the last 10 digits "1234567890" to the Account function you would
select those digits and press the [5-ACCNT] button.
ACC1234567890
When a line has digits that are black, like the ACC above, it means there is no function
assigned to them so they are ignored by L-POS. So the definition table entry will work to
search for the account. But you may have another barcode that is 13 digits long, not starting
by ACC, and that barcode is a regular product code. When the system uses the line
ACC1234567890 it will strip the first 3 digits of the product barcode. But because you forgot
to set the ACC as a key. it will also strip the first 3 digits of any 13 digit code it sees. To
make ACC a key, highlight the ACC and press the [1-Key] button. This will underline the
ACC. Now L-POS will think like this: if you scan a 13 digit number that starts with ACC it will
skip the ACC (since it is black and has no function assigned) and take all the grey digits and
go to Account button. All other 13 digit numbers that don't start will ACC will not be matched
on this line. The system will look for the next row in the table that has 13 characters to see if
it matches the data format.
This is used to send data from the scanner to the PLU function.
This is used to send data from the scanner to the price function. It is used, for
example, with UPC2 (meat) labels where L-POS needs to read the price from the label..
This is used to Expand UPCE to UPCA when the scanner cannot perform the
© 2008 ... Logivision
The POS maintenance module.
151
expansion itself.
This is used to send data from the scanner to the account function
This is used to send data from the scanner to the Cashier function.
This button is actually a look-up button. It allows you access to any button you
have programmed in the button set-up. This means that you can filter data and send to any
button you want to.
Here is an example:
1. Scan an item. We scanned UPCA item code labeled 0 70735 02097 0 (including
leading and trailing digits from the bar code). The scanner returned A070735020970.
2. Copy and paste the data from the test input area to top of the definition table. You now
need to set the filtering rules to tell L-POS how to process the data. First question: is this
type of data a product code. Answer is yes so we need to send part of the scan data to the
PLU function. You do that by highlighting that part of the scan and pressing the
button. Next question: how are the UPCA items programmed in the database?
Were they entered with the check digits? If they were then the check digit needs to be
entered on the POS to look up the item. If the check digit was not entered into the
database you need to skip the check digit when the item code is entered by the scanner.
Let's assume the check digit was not entered into the database. And of course the
database will not include the leading A that the scanner returns to identify a UPCA
barcode. So you need to tell the system to skip the A, enter 07073502097, and skip the
check digit. You want that line to look like this:
A070735020970
This tells L-POS: check to see if the data from scanner is 13 digits long. If it is 13 digits in
length it will verify that the 13 digits begin with "A0". If those 2 conditions are met the data
will be filtered by taking the 2nd through 12th digits and using the PLU function. Since the
A at start and 0 at end are black they will be ignored.
For the example given above, you would need to highlight the A0 from the data you pasted
into the definition table. When A0 is highlighted press the button
. Now highlight
07073502097 and press the
button. You will see the selected characters appear
in red in the definition table. Then press the Enter button on your keyboard to save the entry.
As long as the last digit is black you are all set. If it is not black select that digit and toggle off
the function that was assigned by pressing the same function button again.
Here is an sample for what you may do with the custom buttons. Let's say you have some
special labels printed up as mark-down tags. Those tags get placed on merchandise to
remove a fixed amount off the item. When you drop a can of soup and want to reduce the
price by $1.00 you would take a tag that is used for $1.00 price reduction and add it to the
can of soup. You leave the regular bar-code visible and add a big red markdown label to
your can. Since there are soups that need to sell at the regular price you cannot just change
the retail price in L-BOSS. You need to give a discount, or markdown, on the damaged can.
© 2008 ... Logivision
152
L-POS User Manual 3.2.1.0
if you create some markdown labels with the price in the bar code L-POS will be able to
apply the markdown. You would scan the UPC on the soup at it's regular price. And then you
would scan the markdown label. So let's say you have created markdown labels with
barcodes that are 10 digits long starting with 99999 and then have 5 characters for the
markdown amount. The scanner could return 9999900100 because the amount in the label
is $1.00. You need to create a button in the Buttons & Forms programming module that will
be used as a "Custom" button in the scanning definition table. Create a button using function
type Price Override with the following parameters assigned:
Apply on last item: Select this flag for L-POS to apply your discount amount to the last item
scanned, or to the selected item if yiou have selected a previous item.
© 2008 ... Logivision
The POS maintenance module.
153
Calculation: Enter the fields as shown to subtract the markdown amount from the price that
was scanned originally.
In the Button set-up, this button you create must be set as Shared as shown here. If you do
not share the button it cannot be used by the scanning definistion table, or any other
definistion table.
Now go back to the scanning definition table. Scan the item markdown label. In our example
the scanner will input 9999900100. Paste this data to the TOP row in the definition table.
Highlight the first 5 "9's" and press 1-KEY. Those characters should now be underlined and
Black. Like this 9999900100. If they are not black remove the function assigned to them as
explained previously. Now highlight the last 5 characters and press the 7-CUSTOM button.
When you press 7-Custom button a list will appear. This is a list of all the buttons created on
the system. Find the Button you created to use for Scan-Markdown.
© 2008 ... Logivision
154
L-POS User Manual 3.2.1.0
Once you locate the button press OK. The 5 characters you assign to this custom button will
assume a new color. We cannot say which color because the number of custom buttons you
create determines how mnay new colors you will have on selected text. In our example when
we assign Scan-Markdown to the 5 characters we see this in the definition table:
© 2008 ... Logivision
The POS maintenance module.
155
You can see that the last 5 characters are pink. If you have your cursor in that area you can
also see that the button 7-Custom shows 7-6342 because the button is number 6342 in the
database file. In your system it may not be the same button number because you have more
or less records in your datase than in our sample. The name of the button assigned to that
pink text shows right below the custom button image on the right hand side of the window.
2.3.4
Drawer set-up
Drawer Setup
© 2008 ... Logivision
156
L-POS User Manual 3.2.1.0
Systems that use the Printer to control the cash drawer will not install the drawer drivers on
this menu. That is done using the printer set-up menu.
If you are using a cash drawer connected to a printer use this menu to determine if you can
work with an opened drawer and whether you clear receipt when the drawer is closed. All
other drawer settings are controlled by the printer configuration menu if the drawer is
attached to the printer.
Select the Check opened drawer flag to force closing the drawer between transactions.
This option requires that the drawer be equipped with a micro-switch for open/close
detection. If your system generates an error at the end of each sale it is probable that the
drawer switch is not present but the Opos registry is trying to check for drawer status.
Note: If you are having any problems with the drawer opening, verify in the Opos setup
that the drawer opens "high" or "low" and try the opposite setting. Remark that the Opos
configuration utility should have a health check. If the drawer does not open with the health
check, it will not open in the POS program.
Auto clear receipt on closing can be selected to force an automatic screen clear as
soon as the drawer is closed after a transaction.
Note: The receipt will be cleared automatically 15 seconds after the transaction if the flag
to clear the receipt on closing the drawer is set where the tender is NOT opening the
drawer. To set the time to a different setting than 15 seconds, use the following flag of the
system.ini, system section: AutoClearReceiptTime=15
If you are using OPOS drivers you will use this program to select the OPOS device instance
name created during the OPOS software installation.
© 2008 ... Logivision
The POS maintenance module.
157
If you are using a drawer attached to a serial port you should select the native driver
provided with the application. For drawer 1 select CashDrawer1.dll.
Press the Configure button to set up the communication parameters.
Refer to the documentation that came with your drawer for the command and
communication information.
2.3.5
Scale set-up
Scale set-up
L-POS can communicate with different device types using different communication methods.
You may choose from the OPOS interface for those devices that are shipped with the OPOS
software interface. You may also communicate with your device with the proprietary L-POS
communication driver for serial communication ports (RS232C). If you have installed OPOS
drivers for your scale, the OPOS installed device(s) will appear on the pull-down list under
the heading "Select the scale". If you choose to communicate with the L-POS
communication driver, choose the Scale.dll and then press "Configure".
With the Scale Setup window open the Setting tab where you can select the scale type or
add a new one if the scale you are using is not on the list. Then you need to verify that the
settings for the scale are entered according to the scale specifications. This is done by
selecting the correct scale type and pressing "Advanced".
Next you should select the Communication tab. This is where you will set the
communication port, speed, and data settings. Test is used to verify the communication
© 2008 ... Logivision
158
L-POS User Manual 3.2.1.0
between device and system. L-POS has been pre-configured for several popular POS
scales. The values entered have been tested for some brands. No system should be
delivered without first testing the scales ahead of time. If approval for the scale weighing
accuracy is required ensure that the communication is functional before scheduling the
approval session.
You may also select a symbol to identify manual weight entry on the customer receipt to
differentiate the items which were weighed on another scale and for which the weight was
entered manually by the cashier, not by the POS scale. The default symbol is M (meaning
m anual.) The correct configuration for the OPOS driver with the Magellan scale is explained
in the help page that refers to Scanner set-up.
2.3.6
Keylock set-up
Keylock setup
L-POS can utilize the keylock positions by assigning buttons that are to be executed when
the key position is changed. Your hardware must have an OPOS driver for the keylock and
the driver needs to be installed. Once you have chosen the keylock model, select the
position and the button to execute when the key is turned to that position.
2.3.7
Pole display set-up
Pole display setup
If you are using a line display attached with a receipt printer on a common communication
port, select the line display option in the receipt printer settings. If you are using an OPOS
driver for the pole display you can select the device in this section and define whether it is
used for customer or operator guidance. Assure that the correct Opos drivers have been
loaded and verified.
2.3.8
Keyboard set-up
Keyboard setup
Select the OPOS keyboard you wish to use. Note that some POS keyboards that use the
standard keyboard port and that are windows compatible do not require an OPOS driver.
© 2008 ... Logivision
The POS maintenance module.
2.3.9
159
Bank set-up
Bank setup
This is where you define the credit authorization center being called and program the pospad for communications. You can obtain more assistance on the set-up for your bank driver
in the INFO tab of the Bank set-up screen.
To select the bank driver it must be installed from the installation program. This is done by
choosing the Custom option during the installation of L-POS.
2.3.10 MSR set-up
MSR Set-up
Assign the magnetic card reader type being used with the L-POS. You must install the Opos
driver compatible with the Msr to use this option. Once the device is installed you can set up
a definition table in order to interpret the data from different card types in different ways. This
is very similar to the scanning definition table in the scanner set-up. Of course if you are
using a regular keyboard interface no special OPOS drivers are required.
2.3.11 OPOS set-up
OPOS set-up
This menu option allows a link to the setup program for the Opos device drivers you are
using. Choose the setup program you want to execute and L-POS will call that program for
you. Note that the Opos software accessed through this menu option is an external program
which is not part of the L-POS system.
2.3.12 Signature capture
Signature capture
Signature capture requires either the MTX WinEPS application or an OPOS interface to
function. L-POS has been tested with MTX WinEPS and with OPOS compatible devices
from Topaz Systems for signature capture.
MTX signature capture devices
1-Install and configure your MTX WinEPS/OpenEPS application to require signature as
documented by MTX.
2-You need to register the Microtrax.dll file supplied by Logivision using RegSvr32.EXE.
© 2008 ... Logivision
160
L-POS User Manual 3.2.1.0
From each POS terminal using the Signature capture:
Windows Start menu > Run:
Regsvr32 C:\Poswin\Bank\Microtrax.DLL
You should see this confirmation prompt.
3- From peripherals menu select the Signature tab. Select the device type Microtrax.dll.
3- Configure your POS payment buttons to require signature. You need to select the
Signature flag. This must be done on the Credit card button to capture credit signatures
and on the Charge button if you want to capture in-house charge signatures.This will tell
WinEPS/OpenEPS to prompt the customer for signature after the transaction has been
approved. If everything is configured properly the signature data will be stored to the
electronic journal. If you have the L-Tracker module you will be able to view and re-rpint
the transactions including the signature on file.
TOPAZ Systems signature capture devices
1-Configure your Topaz hardware usingthe software supplied by Topaz. At the time of
© 2008 ... Logivision
The POS maintenance module.
161
publishing this manual we used the SigPlus.exe and SigPlusOpos.exe applications
obtained from the Topaz website: http://www.topazsystems.com/
http://www.topazsystems.com/Software/download/sigplusactivex.htm contains the
download link for SigPlus.Exe
http://www.topazsystems.com/software/download/javapos/index.htm contains the link for
the OPOS drivers download.
2-Install the SigPlus and the SigPlusOpos applications.
3-Configure the correct device using the Topaz application from Start menu >All Programs
> Topaz Systems Signature Capture OPOS > Configuration utility. Make sure you select
the correct device type and assign it to the correct port.
4- Browse to the POSWIN folder of the POS you are configuring. Select and run (doubleclick) the "RegisterSigCap.bat" file to register the "Opos_Constants.dll" and
"OPOSSigCap.ocx" files.
5- From peripherals menu select the Signature tab. Select the device type Topaz.
© 2008 ... Logivision
162
L-POS User Manual 3.2.1.0
6- Configure your POS payment buttons to require signature. You need to select the
Signature flag. This must be done on the Charge button to capture in-house charge
signatures.This will tell L-POS to prompt the customer for signature on charge
transactions. If everything is configured properly the signature data will be stored to the
electronic journal. If you have the L-Tracker module you will be able to view and re-rpint
the transactions including the signature on file.
2.4
Creating register groups
Register Groups
Groups are used when front-end terminal set-up is not identical throughout the store. When
one counter has a different scanner than another, 2 groups are required for the different
scanner set-ups. In a store where different terminals have different printers, separate printer
groups are required for each different printer type.
The L-POS terminals are all defined as part of program group PAL in the L-BOSS system.
All programming is shared by default. In order to use distinct programming set-up for
different terminals you will need to create terminal groups in the L-BOSS maintenance
module. You can create as many program groups as required by the complexity of your
application. The L-BOSS groups programming is specified in the back-end maintenance
under system files. Create the terminals and associate them to the different groups as
required. Note that the terminals must be associated to Program groups. You can also
assign the report or exchange status to the terminal groups if required.
Let's take an example of a 2 lane store with 1 terminal using scale-scanner and receiptendorsement printer while the other terminal a scanner and a receipt printer.
© 2008 ... Logivision
The POS maintenance module.
163
You need to start with the initial setup on every terminal in the store and you need to have
completed the deploy_pos_load to each lane. Now you are prepared to set up the scanner
and printer groups. From the C:\Poswin folder open the L-POS programming module called
PosSetup.exe.
After logging into the PosSetup program, select the Groups Icon. The Groups Window is
divided into 2 sections as shown below:
The Left hand sections shows the programming options which can be assigned to a group.
The right hand section shows the groups created in L-BOSS that have been assigned the
Program status. Expand the view of a program group to view the terminal list within the
group.
Now back to our example: two different scanner setups in the store. Since you executed
deploy_pos_load to all terminals, they all have the same setup so far.
You need to move the scanner setup from the group PAL to include it in Group 001 and
Group 002. Move the cursor to highlight Group 001. With Group 001 selected, change to the
left hand window panel and move down the list until you see Scanner. Place a checkmark to
select Scanner for Group 001.
A new window will appear requesting you to define the source group to copy the scanner
programming from. This is because you are creating a new file for the scanner programming
and L-POS needs a base configuration to begin from.
© 2008 ... Logivision
164
L-POS User Manual 3.2.1.0
Select Scanner.pal as the source group. Once this selection has been made, L-POS will
create a new file named Scanner.001. If you click on the left hand window pane again on
scanner, you should see that 2 groups on the right-hand window pane (PAL and 001) are set
for scanner programming. Now L-POS needs to be advised that the file Scanner.pal is no
longer required.
In the right-hand window panel, select group PAL again. Now return to the left hand panel
and remove the check mark from Scanner. Click once more on Scanner and you should see
only one red arrow pointing to Group 001 on the right.
To add a new scanner file for lane 2, select Group 002 on the right hand window panel. Then
place a checkmark in the box on the Scanner file on the left hand panel. This will once again
prompt for a source file. Select Scanner.001 as the source file. L-POS will create a new file
named Scanner.002 that will be used whenever you program changes to the scanner set-up
of lane 2.
NB You should note that you may still share the Scanner definition table among lanes if
required. If you don't want to share the scanner definition among the lanes, you need to
create separate Scannerdeftbl groups the way you created individual Scanner groups.
© 2008 ... Logivision
PCI DSS requirements
3
165
PCI DSS requirements
PCI Security concerns
System access
Logivision recommends that access to PCs, servers and databases with payment
applications should be restricted by the use of a unique username and complex password
combination.
Data retention
Logivision took steps to minimize the storage and display of card data so as to minimize the
possibility of that data being lost or compromised. Card account data is truncated on
receipts, in electronic journal and in log files. Logivision only stores the LAST 4 digits to
comply with both PCI requirements and FACTA rules. The data retention policies cannot be
modified by system integrators or by end users.
Remote Access
Remote access is the ability to connect and interact with a remote network or computer as if
you were directly connected of that remote network or computer. Full remote access implies
that this access is available at will (on demand), and some level of network communication is
allowed to or through a firewall. PCI/PABP recommendations are to use two-factor
authentication for remote access login.
The industry recognizes that implementing two-factor authentication can be difficult and
costly. If a merchant cannot justify the expense of implementing a two-factor authentication
solution for remote access, there are other options available by providing connectivity
needed to support customers without creating a "full" remote access solution. When
considering these alternative solutions, the following principles must be addressed to ensure
that the solution provides needed controls without enabling "full" remote access:
· Ensure that remote connectivity can be traced to a specific service request (this
would allow identification the customer support representative and the user
requesting support).
· Ensure that the solution does not allow "on demand" or "always on" access.
· Ensure the solution uses robust (at least 128 bit) encryption for all communications.
· Ensure that the solution does not allow for the exchange of credentials.
· Mandate that the customer environment must be monitored while access is enabled.
· Ensure that the connection is enabled by an outbound connection that does not
require firewall port enablement.
Here are some examples of this type of solution that can be implemented to meet these
requirements include:
·
Go To Assist (full usage tracking with unique session tokens created by customer
support rep) http://www.gotoassist.com/
·
LogMeIn Rescue (full usage tracking with unique session tokens created by
customer support rep) https://secure.logmeinrescue.com/HelpDesk/Home.aspx
·
Techinline Remote Desktop (full usage tracking with unique session tokens created
by customer support rep) http://www.techinline.com/
·
iRemotePC Remote Support Service (full usage tracking with unique session
tokens created by customer support rep) https://www.iremotepc.com/
·
Go To Meeting (tracking of meeting IDs used and persons involved need to be
tracked in support tickets) https://www.gotomeeting.com/
·
LiveMeeting (tracking of meeting IDs used and persons involved need to be tracked
© 2008 ... Logivision
166
L-POS User Manual 3.2.1.0
in support tickets)
http://office.microsoft.com/en-us/livemeeting/default.aspx
·
UltraVNC (configure to require customer to initiate access and to connect to a
specific IP address or range for support connectivity, and persons involved need to be
tracked in support tickets) http://www.uvnc.com/
Encryption
Logivision does not use any encryption for card data because it is not needed within our
application. No sensitive card data is stored in the L-POS or other Logivision applications.
Nonetheless it is important to know that Logivision has chosen software partners that are
PCI-CISP approved. These partners have been validated to ensure that data is not stored
that can lead to any type of compromise.
For detailed information on requirements to meet PCI compliancy you should review the PCI
Implementation guide for L-POS v1.04.Pdf document delivered with this application. You
are fully responsible for creating and maintaining a secure environment as explained in the
implementation guide.
© 2008 ... Logivision
Electronic Journal
4
167
Electronic Journal
L-POS electronic journal utility
The electronic journal allows reviewing sales transactions made on the L-POS system. The
program is executed by running the EJ.EXE executable in the POSWIN directory.
Two program versions are available, basic and professional version. The basic version is
included with L-POS on each lane while the Professional EJ version is an optional purchase.
Call your L-POS dealer to purchase the Professional version if it has not been enabled.
The first window shown here is the normal EJ layout. This view of the EJ is used to review
transactions. The File menu allows rebuilding the pointer files and exiting the application.
The Edit menu allows you to memorize personalized searches that are used frequently.
More assistance on this feature is explained in the Professional version section.
View allows you to toggle the view options including PLU number, extended to view the
search input area, and the animation option.
The Print menu allows you to launch the search and print each transaction with data that
responds to the search; to print the current transaction; and to print the entire transaction file
for the current day.
© 2008 ... Logivision
168
L-POS User Manual 3.2.1.0
Help opens this file.
Here is an explanation of the function keys available within the EJ program. The EJ program
can be operated without the mouse by using the function buttons to execute the required
command. It is also possible to use the mouse if preferred.
Press "F2-Date" to select the date you want to review. You can also select the date from the
date pull-down window above the receipt area. When the calendar is open, the Home key
will select today's date automatically.
The receipt area shows the transaction data. Use the scroll bar within the receipt area to
move up or down the transaction. From anywhere within the transaction file for a given day,
the Home key returns to the top of the file and the End key advances to the end of the
transaction file.
"PgUp Prv" moves back to the previous transaction in the same day. Although it is not
shown, Ctrl-Pgup moves one date backward.
"PgDn - Nxt" moves ahead to the next transaction in the same day. Ctrl-PgDn moves ahead
one full date.
Use the track-bar to the right of the scroll bar to move up and down the transaction list for
the date you selected. The track-bar moves proportionally to the size of the file (indicated
below the Sore and Terminal numbers.)
Press "Esc-Exit" to close the EJ program.
Press to extend the EJ window to the following layout:
© 2008 ... Logivision
Electronic Journal
169
The ProfessionalEJ program includes search functions not available in the standard EJ.
The search tool allows you to set a maximum of eight criteria to find the data you need. For
example, you could search for all customers who purchased a particular product or spent an
amount equal to, greater than, etc. Cashier review tools such as finding voids, refunds or
other negatives are also easily performed.
The pull-down windows in the search columns can be accessed by clicking the small arrow
button or the function button above the search fields. The headers in each of the columns
are explained below.
F4 - Field is used to set filters to use within your search. The fields include: Transaction, text,
cashier, amount, PLU number, customer, date, time, store, terminal, subdepartment,
department, function, and totalizer.
F5 is adjusted dynamically to reflect the filter type you selected in the F4 column. For
example, if you select PLU number, the header for the F5 column becomes PLU #.
F6 - Operand is used to set an argument such as = (equal to), > (greater than), < (lesser
than), etc.
F7 - also changes according to the filter field set in the F4 column. For example, set the F4
column to PLU number, and you will see the F7 column becomes Amount.
F8 - Condition is used to determine whether or not an additional search line should be added
to the current entries. As you add multiple lines to the search you may realize that one of the
entries is invalid. Use the "F11-Delete line" button to remove a search line. Use "F12-Insert
line" to add a search line into the current search data.
The first step is to select a field to search by, in order to display only data that is required.
For example, if you need to see all transactions between 10:00AM and 2:00PM that included
manual amount entries into the subdepartment 5, you would set the following:
© 2008 ... Logivision
170
L-POS User Manual 3.2.1.0
Initiating a search with incomplete data will display an error telling you which search line is
incomplete. The cursor will be positioned automatically in the field where the data must be
added to assist you. Note that in the interest of simplifying the data entry, we have enabled
use of the Enter key to change fields within the search data entry forms. So if you have
entered Time in the F4 column, press Enter to move to the F5 field, enter to move to the F6
column, etc. If the last column is left blank, L-POS assumes that the search criteria is
complete and pressing Enter will execute the search. If an additional entry is required to
funnel toward the data you are searching for, press the down arrow key to add a condition to
create another search entry line.
The EJ search executes all OR conditions before executing the AND conditions. All
conditions must be true for a search result to be available.
Program and help file updates are available periodically from www.logivision.com
© 2008 ... Logivision
Communicator
5
171
Communicator
Communicator
The Communicator is required to import the data files received from the backend system.
When L-POS is started, the Communicator will be started automatically after 15 seconds.
This gives you time to login and exit the program before the import of those files begins if
necessary.
The Communicator will start as an icon in the system tray to avoid inadvertent closing of the
application. You can open the communicator by clicking the system tray icon. Close the
Communicator by right-clicking the icon in the system tray and selecting Exit.
If you start the Communicator as a separate program manually, it will not be closed when
you exit the L-POS. When it is started automatically by L-POS, it closes when you exit LPOS.
© 2008 ... Logivision
172
6
L-POS User Manual 3.2.1.0
Monitoring
Watching the Front End
L-POS includes a monitoring utility that allows you to view the current transactions from any
L-POS lane in the installation. The Monitoring utility is useful in watching cashiers' activity
during transactions. Execute Monitor.EXE from the POSWIN folder to lauch the monitoring
tool.
Note: Monitoring is also used to output transaction data to security systems. Consider
placing a shortcut to the Monitor.exe application in the system startup folder. Users should
be trained to leave the application open at all times.
These selections are available on the File menu:
New: This will clear the current monitor session so yo can start over.
Open: Use this selection to manually open a POS lane to monitor. Enter the store number
and lane number of the terminal you want to see. Note that terminals should be in the same
workgroup to facilitate monitoring.
Note: You can also use the
button to select the terminals to monitor. Place a check
mark beside the terminals you want to view, then click the check mark button above the list.
You can open multiple monitor windows simultaneously, and arrange the open windows
within the Monitor utility.
Beep on red: You can set the Monitoring utility to alert you with a "BEEP" when certain
functions are used, notably functions that are set to be "red", meaning negative functions
that subtract amounts from the current transaction. To activate the warning beep, select the
terminal to track, then from the Monitoring utility's "File" menu, select "Beep on red". If a
negative function is used during the transaction, the Monitoring utility will issue a warning
"beep".
Monitoring Statistics
The utility also provides totals for all activity tracked during the monitoring process. The
"File" menu contains a "Statistics" option that opens a window showing the statistics for the
selected terminal.
© 2008 ... Logivision
Monitoring
173
This example shows a sample of Monitor Statistics.
Redirect output: Use this option to set up a data output for a 3rd party security system. This
data will be sent to the designated TCP/IP or RS232C port for display on another system,
such as video surveillance cameras. The Prefix field may be required by some systems
when more than one POS terminal is sending data to a common port. This prefix on lane
one could say "POS01", the prefix on lane 2 could say "POS02", etc. This way we will
differentiate the data from lane 1, 2 and 3, even though all data from each lane is being
received at the sameport/address. All rows of data arriving from lane 1 will be "prefixed" by
POS01, etc.
The Folder is used to open a specific L-POS terminal manually.
Use the
tool if you have highlighted text and want to copy to another application.
The red arrow down diminishes the number of characters, narrowing the space used. The
red arrow up widens the column used in each monitor window.
Use the "A" button to change the font.
The
tool will display a list of all active terminals.
The
tool exits the application. Monitoring stores the settings and will reopen all terminals
that were being viewed the last time it ran.
© 2008 ... Logivision
174
7
L-POS User Manual 3.2.1.0
Advertising Set-Up
Advertising Set-up
L-POS has an advertising option. The Advertising option is set up by building image and
animated files that are displayed on the POS screen. The ads can be displayed during
transactions on a zone reserved dor the ads, after an inactivity period in a screen saver type
mode, or in both modes.
Image filename: Enter the name of an image you want to display with the advertsing
module. Use the Browse button to select the image from a specific folder. Images for the
advertising module need to be copied to the LBOSS\OFFICE\ADD folder. You will be
prompted to copy the file when you select from a different source location.
Text: Use the field to type a text message yu want to display beloew the image you selected.
© 2008 ... Logivision
Advertising Set-Up
175
Trigger item number is used to return the ad display sequence to the associated image
when the trigger item is scanned. The ad sequence will continue forward from that point in
the images sequence. The goal is to allow negotiation with suppliers that want their products
advertised more than others. This type of ad display is only appropriate if you are using the
ads on a continual basis.
Note that the same trigger item will only reposition the ads once in the same transaction.
This tool is used to reposition an image on the list of available images.
This tool is used to reposition an image on the list of available images.
This tool is used to delete an image from the advertising list.
The delay field to the right of the down arrow is used to set the image specific
display duration. If you have a more complex image that needs to be displayed longer (or
shorter) than the default setting you enter the time for this picture here. For every new item
you add this field will be set to to match the default delay. If you change the default delay it
will change all images that match the default delay setting.
Stretch: Select this to stretch the images to fit the zone size used by the advertising module.
List of advertisements area: This displays the list of images that will be displayed by the
advertising module.
Normal font:
Use this to select the font properties for any text message you attach to an image
displayed during regular "in transaction" ads.
Use the color panel to select the color for delault font.
Set the scrolling time for text messages that are too wide to fit onto the advertising
form.
Animation:
Set the speed of the transition effects for changing slides.
Default Delay:
This field controls the time that images will be played unless you specify a different
duration for each specific image. Enter the value in seconds for the default duration.
Advertising on:
To enable the advertising, place a checkmark in the Advertising ON checkbox found at
the bottom of the form.
Advertisement form:
© 2008 ... Logivision
176
L-POS User Manual 3.2.1.0
This is the form that will be used to display images on a continuous basis during
transactions. If you do not want the advertising to be displayed during transactions set this
to None.
Inactivity advertisement:
This is where you decide whether the advertising will toggle to full-screen mode after a
specified period of inactivity.
Enable: Place a check mark to use this feature.
Delay: Set the inactivity time in seconds before the full-screen advertising mode will start.
: Select the font properties for the images when they are used in full-screen mode.
You will see the same text as in regular mode, but the fonts will appear much smaller in
full-screen mode.
Set the scrolling time for text messages that are too wide to fit onto the advertising
form.
Select the monitor to be used for the inactivity ads.
Advertising on: To enable the advertising, place a checkmark in the Advertising ON
checkbox found at the bottom of the form.
You may find it slow to return to the POS application when you exit the advertising set-up on
a front end terminal. This is because the image files are being copied back to the lane. You
have no alternative but to wait. Large animated files like avi and mpeg can be quite large
and take some time to copy to the lane.
NOTE that if your system license does not include advertising it will not function even
though you program in values and enable it.
© 2008 ... Logivision
Point of sale operator's guide
8
177
Point of sale operator's guide
This section explains how to use the functions that may be installed on your system.
Because of the many settings available on different functions it is not possible to ensure that
all the buttons on your POS installation have been explained. Please refer to your dealer for
further assistance.
8.1
Account number
Account #305
The Account function is used to enter a customer number for the current transaction.
Enter the customer number and press [ACCOUNT]. The POS will display the customer
name and account number. Your system may require a confirmation to accept the customer
record.
You may also press [CLEAR] to abort the Account entry if no transaction data has been
entered.
You may close an account entry opened in a transaction by using the Correction function
(type 640) and then entering the account number to close. You may also replace an account
after you opened the wrong one. Enter a new account number and press [Account]. The
system will prompt you to replace the account.
8.2
Account payment
Account payment (Received on account)
(RA or Account Payment) #310 Account payment is used to receive a payment towards a
customer store charge account.
Enter the amount of payment the customer wants to make and press the RA button.
Continue the sale as you normally would. You may enter a payment during a normal sale
transaction or as a separate transaction. Pressing Account payment (RA) with no entry
assumes payment of the entire account balance.
8.3
Amex
Amex #132
The tendering functions such as Amex are used to accept payment for a transaction.
© 2008 ... Logivision
178
L-POS User Manual 3.2.1.0
Enter the amount received and press [Amex ].
Certain options may be programmed on your system such as credit or debit authorisation.
Follow the prompts to complete the transaction. This will probably include reading a card on
a magnetic card device hooked up to your terminal.
If your system uses remote credit/debit approval, the POS will display the amount due or the
change due after the approval has been returned from the bank to the system.
8.4
BackSpace
Backspace #35
The Backspace function is used to delete the last character entered.
Press [BACKSPACE] to delete the last character entry in the currently active window.
8.5
Bottle return (manual amount)
Bottle refund (manual amount entry)
Bottle refund is used to pay money from the drawer when a customer brings back empty
bottles. Enter the amount and press the button.
You may use the Multiplication function with Bottle refund.
8.6
Bottle sales
Bottle deposit #510
The Bottle deposit function is used to collect manual bottle deposits for items with no link
bottle code.
Enter the amount and press [Bottle deposit] to charge an amount for empty bottles sold.
© 2008 ... Logivision
Point of sale operator's guide
8.7
179
Card function
Card function 8048
The card function is used to perform various operations related to credit authorization, for
example initiating settlement and performing refunds. Detail instructions on the procedures
are available in the PosSetup module under the devices, bank set-up, and the info tab.
8.8
Cash tender
Cash #101
(and other normal tender functions including Check, credit card, etc)
The tendering functions such as Cash are used to accept payment for a transaction.
Enter the amount received and press [CASH]. The POS will display the amount due or the
change due.
8.9
Check tender
Check #102
The tendering functions such as Check are used to accept payment for a transaction.
Enter the amount received and press [CHECK]. The POS will display the amount due or the
change due.
Certain options may be programmed on your system such as check writing or endorsement.
If so, you will need to insert the check which requires writing or endorsement into the printer.
Your system may prompt that a check limit has been reached for the customer. If so, advise
the customer or call the manager.
8.10
Credit card
Credit card #104
© 2008 ... Logivision
180
L-POS User Manual 3.2.1.0
The tendering functions such as Credit Card are used to accept payment for a transaction.
Enter the amount received and press [Credit Card].
Certain options may be programmed on your system such as credit or debit authorisation.
Follow the prompts to complete the transaction. This will probably include reading a card on
a magnetic card device hooked up to your terminal.
If your system uses remote credit/debit approval, the POS will display the amount due or the
change due after the approval has been returned from the bank to the system.
8.11
Debit-MAC
Debit-MAC #103
The tendering functions such as Debit-MAC are used to accept payment for a transaction.
Enter the amount received and press [Debit-MAC].
Certain options may be programmed on your system such as credit or debit authorisation.
Follow the prompts to complete the transaction. This will probably include reading a card on
a magnetic card device hooked up to your terminal.
If your system uses remote credit/debit approval, the POS will display the amount due or the
change due after the approval has been returned from the bank to the system.
8.12
Department
Department #716
The Department function allows the entry of an open amount. Departments into which data
is frequently entered are normally placed on the terminal keyboard.
Enter the amount and press the [Dept Button] ex: 2.29 [Grocery]
Departments also function by number. Enter the department number and press [Dept #]. LPOS will prompt for a price. Enter the price and press [PLU]
To obtain a list of the existing departments during a transaction, press the [Dept #] button
with no entry. Scroll down the list to select the department you want to use. Press [PLU] to
accept the department. Enter the price and press [PLU].
© 2008 ... Logivision
Point of sale operator's guide
8.13
181
Department coupon
Store Coupon #465
Department Coupon allows entry of an amount reduction for a department.
Enter the amount and press [Department Coupon]. The POS will prompt for you to press
the department the reduction is to be removed from and validate that the purchase in the
department was made.
On systems that use Coupon multiplication, the original coupon amount shows in brackets
beside the coupon descriptor and the multiplied coupon value shows below the other item
prices on the receipt.
8.14
Diner's Club
Diner Club #133
The tendering functions such as Diner Club are used to accept payment for a transaction.
Enter the amount received and press [Diner Club ].
Certain options may be programmed on your system such as credit or debit authorisation.
Follow the prompts to complete the transaction. This will probably include reading a card on
a magnetic card device hooked up to your terminal.
If your system uses remote credit/debit approval, the POS will display the amount due or the
change due after the approval has been returned from the bank to the system.
8.15
Discover
Discover #133
The tendering functions such as Discover are used to accept payment for a transaction.
Enter the amount received and press [Discover ].
Certain options may be programmed on your system such as credit or debit authorisation.
Follow the prompts to complete the transaction. This will probably include reading a card on
a magnetic card device hooked up to your terminal.
If your system uses remote credit/debit approval, the POS will display the amount due or the
change due after the approval has been returned from the bank to the system.
© 2008 ... Logivision
182
8.16
L-POS User Manual 3.2.1.0
Double coupon shift
Double coupon shift #8039
Double coupon shift sets the coupon multiplication to the factor preprogrammed within the
key setup.
To activate coupon multiplication manually press [Double coupon shift].
The Double coupon shift function can be programmed to stay active until deactivated or to
remain active for the next coupon entry only. Verify with the store manager how your Double
coupon shift button is programmed.
N.B. Your system may be programmed for automatic coupon multiplication. Consult your
manager for more information.
8.17
Down
Down #8021
Down allows the movement of the cursor or the selection bar within certain windows of the
POS system.
Down can also be used to review the electronic journal files. If you are searching in the EJ
for a specific transaction, you can enter the transaction number and press the Down button
that has been programmed for Next transaction review.
8.18
EFS Electronic food stamp
Electronic Food stamp #121
The tendering functions such as Electronic food stamp are used to accept payment for a
transaction.
Enter the amount received and press [Electronic food stamp]. The POS will display the
amount due or the change due.
Note: The [Electronic food stamp] cannot be used after any other tender with the exception
of the WIC tender function or the normal Food stamp.
© 2008 ... Logivision
Point of sale operator's guide
8.19
183
Exact pricing
The exact pricing function is used to compensate a consumer for a labeling error. The law in
Quebec forces retailers to compensate customers if a price is charged that does not match
with the advertised or shelf price.
Press the [Exact pricing] button.
Scan or key in the PLU number.
Enter the displayed price that consumer is entitled to pay.
The next 3 steps may not be required depending on how your Exact price function was set
up.
(Confirm the price discrepancy if you are prompted to)
(Enter the price the product should be programmed at)
(Confirm the price discrepancy if you are prompted to)
The POS will calculate the rebate the customer is entitled to and correct the price for all
items in the transaction.
8.20
Exit
Exit #8012
Use EXIT to terminate the L-POS program and return to the operating system.
Press [EXIT].
8.21
Flip charts
Flip Chart 8054
Use the Flip charts button(s) to load forms that have been programmed for item look-up on
your POS terminal. When the form has been loaded you will have the choice of pressing any
of the buttons on the screen. If enabled, the top row is a constant Menu that is always the
same on each form.
The buttons at the bottom of the screen either allow you to return back one menu or to close
the flip charts. Other keys either access another menu page or items or sub-departments.
Whenever you use a PLU or a subdepartment key to sell an item, the flip charts close
automatically.
Note that you may close the flip charts at any time by pressing [Clear ] or by touching any
area of the screen outside the flip-chart.
© 2008 ... Logivision
184
8.22
L-POS User Manual 3.2.1.0
Food stamp
Food stamp #118
The tendering functions such as Food stamp are used to accept payment for a transaction.
Enter the amount received (in whole dollars only) and press [Food stamp]. The POS will
display the amount due or the change due.
Note: The [Food stamp] cannot be used after any other tender with the exception of the
WIC tender function or the Electronic Food stamp.
8.23
Foreign currency
Foreign currency #105
The tendering functions such as Foreign currency are used to accept payment for a
transaction. On most systems that use foreign currency tenders, a [Foreign Currency
Subtotal] button is normally available. Press this subtotal button to obtain the amount owing
in Foreign currency.
Enter the amount received and press [Foreign currency ]. The POS will display the amount
due or the change due.
Note: Any change displayed is owed to the customer in normal domestic currency.
8.24
Front-end report
Report # 8010
This function allows the operator to select a report for printing on the front end register.
Press the report function and select the report to be printed.
8.25
Function code
Function #8044
© 2008 ... Logivision
Point of sale operator's guide
185
The Function button is used to enter a function by number rather than pressing a button on
the keyboard. This is used for functions that are used rarely and which were not assigned to
the L-POS keyboard or touchscreen.
Enter the function number and press [Function].
L-POS will display the description of the function you have chosen. Press [Function] again
to invoke the
function.
Other types of functions require data entry before they are used. Such as a Paid Out
function. For this type of function you enter the function number and press [Function]. Then
you enter the data and press [Function].
8.26
Global discount
Global discount #410
Use the Global discount function to reduce the entire sale (really the discountable items that
qualify) by a percentage or by an amount. A preset Global discount will remove the discount
automatically. Just press the [Global discount] button.
An open Global discount requires an entry. Enter the discount percentage or discount
amount and press [Global discount].
Once a Global discount has been used in a transaction, the discountable total is set back to
zero to avoid giving a global discount on items which had already been discounted.
8.27
Help
Help #5
The Help function is used to display a help message related to the usage of buttons on the
keyboard.
Press [Help] and then press the Button you require help with.
© 2008 ... Logivision
186
8.28
L-POS User Manual 3.2.1.0
Hold (Suspend-resume)
Hold #8037
The Hold function is used to suspend or resume a transaction than cannot be completed
immediately. Placing transactions on hold:
To suspend a transaction at any time press [Hold]. A Hold number will be assigned to the
transaction by the system.
You may also enter a remark to the Hold transaction. Enter the remark and press [Hold].
The remark will be saved with the Hold number assigned to the transaction by the system.
To suspend and assign a specific recall number to a transaction, enter the recall number
(maximum 7 digits) and press [Hold]. Your Hold number will be assigned to the transaction.
You may also enter a remark to the Hold transaction that you save with your own recall
number. Enter a remark and press the QTY-@/for button. Enter the recall number (maximum
7 digits) and press [Hold]. Your remark will be saved with your Hold number
Recalling transactions:
Note: The following sequences only function outside of a transaction.
Press [Hold] to recall the transactions on hold. If no transactions are on hold on your
terminal nothing will happen. If only one transaction is on hold on your terminal it will be
restored automatically.
Pressing [Hold] when more than one transaction is on hold on the local terminal will display
a list of all hold transactions.
Enter [0][Hold] to recall all hold transactions from all terminals even when no hold
transactions exist locally.
Enter xxxxxxx [Hold] [Qty-@/for] [mc#] will recall that hold transaction from the specified
terminal number (where xxxxxxx = a hold transaction number and mc# = a terminal # on the
local network).
Note: You can limit the number of hold transactions per terminal in
PosSetup>System>General>Advanced flags: Maximum number of hold per lane
8.29
Invoice print
Invoice print #8046
The Invoice print function is used to print a full invoice on 8.5" by 11" pre-formatted invoices.
© 2008 ... Logivision
Point of sale operator's guide
187
Press [Invoice print].
8.30
Item correct - Void last
Void last item (Error correct) #610
Void last item is used to reverse an item entry.
Press[Void last item] or [Error correct] to reverse the last entry.
Scroll back up the receipt to a previous item entry in the current transaction and press [Void
last item] or [Error correct] to reverse a previous entry within the current transaction.
8.31
Item discount
Item discount #450
Use the Item discount function to reduce the last item entered by a percentage or amount. A
preset Item discount will remove the discount automatically. Just press the [Item discount]
button.
An open Item discount requires an entry. Enter the discount percentage or the discount
amount and press [Item discount].
8.32
Keyboard assign
Keyboard assign #8063
This function is used to re-assign and rename a specific PLU or a specific Sub-department
to a button on the POS keyboard or on the touch screen.
1-Assigning PLUs to the keyboard/touch-screen.
· Press [Keyboard assign]. The KB icon will appear to show you are in Keyboard
assign mode.
· Enter or scan a PLU that you want to assign to the keyboard or touch screen.
· Press the keyboard or touch screen location to be used for this PLU. Note that this
button must have been programmed as a PLU type 710 using buttons and forms
programming.
· The description of the button will appear in the Entry form. Enter the description you
© 2008 ... Logivision
188
L-POS User Manual 3.2.1.0
would like to see on the Key-top and press PLU/Enter. (This will change the name of the
touch screen button image, not the name of the button itself.)
· Enter the next PLU to assign to another button and repeat or press [Keyboard assign]
to exit Keyboard assign mode.
1-Assigning Sub-departments to the keyboard/touch-screen.
· Press [Keyboard assign]. The KB icon will appear to show you are in Keyboard
assign mode.
· Enter The sub-department number that you want to assign to the keyboard or touch
screen.
· Press the keyboard or touch screen location to be used for this Sub-department. Note
that this button must have been programmed as Sub-department type 715 using buttons
and forms programming.
· The description of the button will appear in the Entry form. Enter the description you
would like to see on the Key-top and press PLU/Enter. (This will change the name of the
touch screen button image, not the name of the button itself.)
· Enter the next Sub-department to assign to another button and repeat the process or
press [Keyboard assign] to exit Keyboard assign mode.
8.33
Layaway transactions
Layaway #8050
This function is used to create or to recall Layaway transactions.
To initiate a layaway enter the transaction as you normally would. Press the layaway
button to create the layaway. Follow the prompts to complete the transaction.
A layaway button can be created that will retain a transaction as layaway even though
the transaction is paid. If you are using the layaway function to store transactions with a
zero balance you need to press the layaway button before accepting the complete
payment amount.
Cancel layaway: When you cancel a layway you need to consider the deposit received from
the customer. Since all items will be returned from the layaway the system will be out of
balance because of the deposit already received.
If you want to return the layaway deposit amounts already received you need to Select the
payment and press Error Correct to delete the payment. When you use Cancel
Transaction the layaway will be reversed.
If you want to keep the layaway deposit you need to make sure you have created function
520 and attached it to total 2 and total 45. When you cancel the layaway any deposits
received will not be returned to customer. The system will report the deposit amount into
the "other revenue" section using totalizer 45. Normally this total is called Layaway
cancellation fee.
© 2008 ... Logivision
Point of sale operator's guide
8.34
189
List
List
The List function is used to create a pull-down list to place more functions on a keyboard.
8.35
Lock keyboard
Lock Keyboard 8044
Lock keyboard is the function that locks the keyboard and prevents unlocking by anyone
other than the cashier who locked it. It may be activated automatically by a period of
inactivity as well. In this case it still prevents anyone else from unlocking the keyboard.
Press [Lock Keyboard] to invoke this feature.
When the keyboard is locked, only the cashier signed on before the lock state occurred can
unlock the keyboard. To unlock the keyboard sign on as normal with the same cashier who
locked it.
8.36
Loan
Loan 8052
Use the Loan button to add funds to the cash drawer.
Operation: Press Loan. Enter the amount being added to the float for each tender type
being added.
Press Loan to terminate the Loan process.
8.37
Lotto terminal winner
Lotto terminal winner
Lotto terminal winner is used to pay money from the drawer when a customer brings back a
winning lottery ticket. If your store uses a terminal machine and you want to settle the
terminal winners separate from the scratch ticket winners, you will use this function. Enter
© 2008 ... Logivision
190
L-POS User Manual 3.2.1.0
the amount and press the button.
8.38
Lotto ticket winner
Lotto ticket winner
Lotto ticket winner is used to pay money from the drawer when a customer brings back a
winning lottery ticket. If your store uses a terminal machine and you want to settle the
terminal winners separate from the scratch ticket winners, you will use this function. Enter
the amount and press the button.
8.39
Maintenance (PosSetup.exe)
Maintenance #8014
Maintenance is used to access the set up program for the POS.
Press [1][Maintenance] to access Buttons and Forms set up.
Press [2][Maintenance] to access Zone set up.
Press [3][Maintenance] to access System set up.
Press [4][Maintenance] to access Peripherals set up.
Press [5][Maintenance] to access Advertising set up.
8.40
Master card
Master Card #131
The tendering functions such as Master are used to accept payment for a transaction.
Enter the amount received and press [Master].
Certain options may be programmed on your system such as credit or debit authorisation.
Follow the prompts to complete the transaction. This will probably include reading a card on
a magnetic card device hooked up to your terminal.
If your system uses remote credit/debit approval, the POS will display the amount due or the
change due after the approval has been returned from the bank to the system.
© 2008 ... Logivision
Point of sale operator's guide
8.41
191
Multiply
Multiply (@/for) #40
The multiply function is used to enter a quantity other than 1 which is the default quantity.
Enter the number of items being sold and press [Qty-@/for] to multiply the next entry by the
factor entered.
Example: 3 [Qty-@/for] 123 [PLU]
For split price calculation, enter the quantity and press [Qty-@/for], enter the split price factor
and press [Qty-@/for], enter the price and press the [Dept button]
Example: 3 [Qty-@/for] 5 [Qty-@/for] 149 [Grocery] ($0.90 Grocery)
Note: Your system may be set to use cubic multiplication instead of the split price division as
shown in the above example.
Example: 3[Qty-@/for] 5 [Qty-@/for]
123 [PLU] (15 times 123 PLU)
Note: The [Qty-@/for] is used to separate fields when recalling hold transactions.
Note2: A number entered before scanning an item will be accepted as a quantity by default
before scanning an item or using a pre-set PLU. To force use of the Multiply function you
need to set the related flag in PosSetup>System>General>Advanced settings: Entry made
before a preset PLU react like a quantity.
8.42
No limit
No Limit #8032
The No limit function overrides the entry limit assigned to a function. When an amount
entered is higher than the limit permitted, press [No Limit] and enter the data again.
8.43
No sale
No Sale #680
The No sale function is used to open the cash drawer without making a normal sale
© 2008 ... Logivision
192
L-POS User Manual 3.2.1.0
transaction.
Press [No Sale] to open the cash drawer.
L-POS reports the no sales on the cashier balancing report.
8.44
Number entry
Number entry #8040
This function is used to enter miscellaneous data such as a reference number, driver's
license, etc.
Enter the data to be captured and press [Number entry] button.
8.45
Other program
Other program #8043
Other program function allows L-POS program to call another program.
L-POS will start any program assigned to an [Other program] button.
8.46
Paid out
Paid out #330
The Paid out function is used to make cash pay outs from the drawer, normally to settle a
COD supplier invoice.
Enter the amount and press [Paid Out].
You should keep a copy of the receipt for drawer auditing.
8.47
Password
Password Change #8045
Password change is used to modify a user's secret code. The password can be 3 numeric
© 2008 ... Logivision
Point of sale operator's guide
193
digits.
You must first sign on to the register as you do normally.
Then press [Password change] .
Enter your current password and press [Password change]. Enter your new password and
press [Password change].
If you are entering your password for the first time, you must first sign on as a cashier, then
press [Password change].
Enter your new password twice and press [Password change].
8.48
PLU attach
The PLU Attach function is used to attach the sale of an item to another product. An
example of this would be if you want to use a PLU to add a descriptive remark to a main
item. Using the attach function for the remark will force it to print with the main item
regardless of report sorting.
8.49
PLU entries
PLU #710
The PLU function is used to enter a product number (UPC) to execute a Price Look Up.
Enter the product identification number and press [PLU].
8.50
Pickup
Pickup 8052
Use the Pickup button to remove funds from the cash drawer.
Operation: Press Pickup. Enter the amount being removed from the float for each tender
type being affected.
Press Pickup again to terminate the Pickup process.
You may use the quantity button to perform multiplications if required.
© 2008 ... Logivision
194
L-POS User Manual 3.2.1.0
Example 22 [@/FOR ] 20.00 [CASH ] will do the same thing as entering 440.00 [CASH ].
8.51
Price inquiry
Price inquiry #8033 (also used as Account balance inquiry)
Price inquiry is required to verify a price on the L-POS terminal.
Enter the PLU number and press [Price inquiry] or Press [Price inquiry] and scan the item.
L-POS will display the price and any related information in the item details window.
Press [Price inquiry][Price inquiry] to invoke Price Inquiry Mode. This means L-POS will
keep checking prices until [Clear] is pressed.
Note: L-POS software may be programmed to inhibit the Price Inquiry Mode operation.
Please consult the manager for further assistance.
Note2: To perform an Account balance inquiry: Press [Price inquiry], entre account
number, press [Account].
Note 3: L-POS will not verify a price if the item is set to Not for Sale.
8.52
Price level
Price level #8030
Price level allows manual selection of the price level.
Enter the desired level and press the [Price level] key. The L-POS system may be
programmed for temporary price level. If this is the case, L-POS will return to the original
price level immediately after the sale of the item.
Note: The L-POS system may be programmed so that one key depression selects a preset
price level.
8.53
Price override
Price override #8031
© 2008 ... Logivision
Point of sale operator's guide
195
This function allows the operator to change the price of an item within a normal sale
transaction. The button can me programmed to update the back office price or only modify
the price in the transaction.
Press [Price override] to modify the price of the next item entry. The current price will be
displayed in the entry form. Enter the new price and press [Plu - Enter] to accept the price.
If you set the [Price override] to search for Vendor code, pressing it will allow you to type
or scan the vendor code to look up the product in the database.
[Price override] can also be used to override a maximum amount set on an open PLU, a
sub-department, or a department. Press [Price Override] and enter the amount and press
the [SUB-DEPT] button.
8.54
Receipt copy
Receipt copy #730
Receipt copy is used to reprint a copy of the last transaction. It must be used immediately
after the last transaction.
Receipt copy can also be used to print a previous transaction that you are viewing with the
Ej viewer in L-POS.
Receipt copy can also be programmed to reprint a check endorsement message.
Press [0] [Receipt Copy] to initialize your printer whenever it is required.
8.55
Receipt on/off
Receipt on/off #732
Receipt on/off is used to reverse the on-off status of the receipt printer. It works as a toggle
function.
Pressing it with receipt on will turn the receipt off, and vice versa.
© 2008 ... Logivision
196
8.56
L-POS User Manual 3.2.1.0
Received on account
Received on Account
(RA or Account Payment) #310 Received on account is used to receive a payment towards
a customer account.
Enter the amount of payment the customer wants to make and press the RA button.
Continue the sale as you normally would. You may enter a payment during a normal sale
transaction or as a separate transaction.
8.57
Refund
Refund #650
This button is used to perform a merchandise return and possibly issue change back to a
customer.
Press [Refund] and enter the product code. If the item is on file you will be prompted with
the current price for refund to your customer. Press [PLU] to accept the programmed price.
In the case that the price to be refunded is not the same, enter the amount to be refunded
and press [PLU].
Note: Some systems may be programmed not to allow price confirmation during refund.
Note 2 When the subtotal is negative you may use split tender. Take note that the amount to
refund is shown in the tender function descriptor and that the Change amount is only
showing what you need to keep from the complete amount tendered. It is the opposite of
what normally happens when you tender a regular sale.
8.58
Refund mode
Refund mode #660
This button is used to set the terminal into refund mode in order perform merchandise
returns and normally possibly issue change back to a customer.
Press [Refund mode]. The register will record the transaction entry opposite the normal
entries. The system will return to normal entries when you finalize the transaction.
© 2008 ... Logivision
Point of sale operator's guide
8.59
197
Rental transactions
Rental transactions require the entry of a customer account number. Enter the item number
and press [PLU]. Normal rental items such as video films will be sold at their normal rental
price.
For items that are rented for different periods of time, L-POS offers two methods of
programming the items. Depending on the programming method selected the POS
behaviour changes.
Items set with different periods of time and that have no default time period pre-defined will
prompt the operator with a selection window. The window shows the different time blocks
available for that item. Select the appropriate time block and press PLU.
Items set with different periods of time but also have a default time period defined will not
prompt the operator with a selection window. The item will be rented for the default time
block. To obtain the other periods you need to press the [Price Override] button before
entering the item number. The window shows the different time blocks available for that item.
Select the appropriate time block and press PLU.
To verify the on-hand quantity of an item your system needs to be set up to display the onhand quantity in the details window. Enter the rental item number and press [Price Inquiry].
8.60
Reversal
Reversal 8049
Reversal is a post-void function that allows you to reverse the contents of a previous
transaction by creating a new transaction with the opposite entries. Enter the transaction
number to reverse and press [Reversal].
8.61
Scale shift
Scale shift # 8036
This function changes the scale operation for the next product entry.
Press the [Scale shift] to modify the scale status of the next item. Note that the scale
shifting status is programmable. Your Scale shift function be programmed to remove, add or
to toggle the scale status of the next item.
© 2008 ... Logivision
198
8.62
L-POS User Manual 3.2.1.0
Search
Search # 8011
Enter the data and press the [Search] key to view a list. Different search functions can be
set. Most popular is the search for item or account by description. Keys for searching by
department, category, price, etc., can all be added as required.
8.63
Send message
Messages:
You can send both pre-programmed messages and messages created on-the-fly from the LPOS terminals to another station.
Send message #8013
This button is used to send a pre-programmed message from L-POS.
Press the [Send Message] button that contains the pre-programmed message you wish to
send.
Sending an on-the fly message:
To send a chat message to another terminal, enter the message, press [QTY], enter the
destination station number and press [QTY].
The station number can be a lane number such as 1, 2, 3 etc., or it can be a back office
number such as 901, 902, etc.
8.64
Store coupon
Store Coupon #460
Store Coupon allows entry of an amount reduction for a product or department offered by
the store (as opposed to Vendor Coupon).
Enter the amount and press [Store Coupon]. The POS will verify that the item allows the
coupon reduction and other settings which dictate coupon operation. A Store coupon can
only be entered immediately after the sale of a qualifying item unless the button is
programmed as a department coupon.
© 2008 ... Logivision
Point of sale operator's guide
199
If your terminal is programmed to require department entry, you will need to press a
department key after using the [Store Coupon]. You are not allowed to accept manual store
coupons for more than the current sales amount in the related department.
On systems that use Coupon multiplication, the original coupon amount shows in brackets
beside the store coupon descriptor and the multiplied coupon value shows below the other
item prices on the receipt.
8.65
Store charge
Charge #106
The Charge function is used to transfer an amount due on a transaction to the account
receivable (A/R) system. Charge is not allowed without a customer account opened.
Enter the amount tendered and press [Charge].
The system will display the change or the remaining payment amount due.
Note: The POS will also print an account summary slip and a stub receipt for customer
signature. Keep the signed slip for balancing your drawer.
8.66
Subdepartment entry
Sub-Department #715
The SubDepartment function allows the entry of an open amount. SubDepartments into
which data is frequently entered are normally placed on the terminal keyboard.
Enter the amount and press the [SubDept Button] ex: 2.29 [Grocery]
SubDepartments also function by number. Enter the subdepartment number and press
[SubDept #]. L-POS will prompt for a price. Enter the price and press [PLU].
To obtain a list of the existing subdepartments during a transaction, press the [SubDept #]
button with no entry. Scroll down the list to select the Subdepartment you want to use. Press
[PLU] to accept the Subdepartment. Enter the price and press [PLU].
© 2008 ... Logivision
200
8.67
L-POS User Manual 3.2.1.0
Subtotal
Subtotal #720
Subtotal is used during a transaction to calculate the exact amount owing.
Press [Subtotal]. The system will display the outstanding amount due.
8.68
Tax shift
Tax shift # 8034
Tax shift is used to modify the tax status of the next entry.
Press [Tax shift]. The tax status of the following entry will be shifted according to the set-up
of the tax shift function.
Note: L-POS software may be programmed several different ways with regards to the tax
shift function. Please consult your store manager for more details.
8.69
Temporary Tender
The temporary tender function is useful when a transaction needs to be finanlized but you
are not certain how the payment will be made. This is often the case with deliveries.
The system can store several temporary tender totals that will each contain a list of
transaction numbers and the amount due for each transaction.
To store a transaction in the temporary tender total press [Temporary Tender].
You may store several transactions into the same temporary tender total.
To recall the transactions that have been stored press [Temporary tender]. The transaction
list will appear. Enter the payment amount for CASH and press [CASH]. Enter the payment
amount of CHECK and press [CHECK]. Repeat this until the temporary tender has been
paid off.
To store more than one temporary tender you need to enter a number before pressing
[Temporary Tender]. If you enter a normal sale and press 1 [Temp Tender] you will have
thattransaction under the total for TEMP TENDER 1, or driver 1 in a real example. If you
enter a normal sale and press 2 [Temp Tender] you will have thattransaction under the
total for TEMP TENDER 2, or driver 2.
To recall the transactions on the TEMP TENDER 1 list only, press 1 [TEMP TENDER].
© 2008 ... Logivision
Point of sale operator's guide
201
To recall the transactions on the TEMP TENDER 2 list only, press 2 [TEMP TENDER].
To recall a list of all temporary tender balances outstanding press 0 [TEMP TENDER].
8.70
Training
Training 8038
Press the [Training] key to put the terminal into the training mode.
Press the [Training] key again to quit the training mode.
8.71
Up
Up #8020
Up allows the movement of the cursor or the selection bar within certain windows of the POS
system.
Up can also be used to review the electronic journal files. If you are searching in the EJ for a
specific transaction, you can enter the transaction number and press the Up button that has
been programmed for previous transaction review.
8.72
Validation
Validation #8042
This button is used to activate the validation printer.
Place the form in the validation printer and press [Validation].
8.73
Vendor coupon
Vendor Coupon #420
Vendor Coupon allows entry of an amount reduction offered by the Vendor of the product.
When you scan a Vendor Coupon, the POS validates the acceptance of the coupon
© 2008 ... Logivision
202
L-POS User Manual 3.2.1.0
according to the restrictions set up on your terminal.
You may be permitted to enter an amount and press [Vendor Coupon]. If this is the case
you are required to verify that the coupon applies in the current transaction and that it should
be accepted or refused.
On systems that use Coupon multiplication, the original coupon amount shows in brackets
beside the vendor coupon descriptor and the multiplied coupon value shows below the other
item prices on the receipt.
8.74
Visa
Visa #130
The tendering functions such as Visa are used to accept payment for a transaction.
Enter the amount received and press [Visa].
Certain options may be programmed on your system such as credit or debit authorisation.
Follow the prompts to complete the transaction. This will probably include reading a card on
a magnetic card device hooked up to your terminal.
If your system uses remote credit/debit approval, L-POS will display the amount due or the
change due after the approval has been returned from the bank to the system.
8.75
Void - Correct previous item
Void past item #640
Correction is used to cancel a previous item without scrolling up the receipt to select the
item.
Press [CORRECTION] and enter the item code to be corrected. You may also press
[CORRECTION] and scan the item.
To correct a department entry press [CORRECTION], enter the price and press the
[Department button].
Note: Correction of an item that was preceded by scale-shift must be made without the
scale-shift. You only need to place the item on the scale, press [CORRECTION] and enter
the PLU code. For an open department, press [CORRECTION], enter the amount, and press
the[Department button].
© 2008 ... Logivision
Point of sale operator's guide
8.76
Wic subtotal
WIC subtotal 8035
The [Wic subtotal] function displays the amount of the sale that WIC payment can be
applied to.
© 2008 ... Logivision
203
Index
Password change #8045
Index
Plu code #710 84
Price Inquiry #8033
-AAccessing form setup
Accessing Zone Setup
22
10
receipt on/off
Refund #650
Adding buttons 17
Adding Zones 13
Search #8011(Find PLU ,ect...)
Store coupon #460 94
Alias tab 111
Assigning buttons to the keyboard
Attach #8051 37
Attaching a button to a form
Attaching forms to zones
88
89
Right arrow #8022 91
Scale shift #8036 92
30
Subdepartement #715
Subtotal #720 96
20
Tax shift #8034 96
Training mode #8038
20
29
92
95
98
Unit Quantity #40 99
Vendor coupon #420 100
-B-
Buttons 0-9 38
Buttons and Forms setup
14
104
Bank set-up 159
Building button forms
Buttons 37
Backspace #35
-C-
27
Check 41
Cheque
37
Bottle return (manual entry)
Cancel order #630 39
38
CID
Cash #101 (and other normal tender functions
including Check ,credit card ,etc) 39
Clear #30 42
Correction #640 (Void) 44
Customer ID# #305 47
Discount Global #410 50
Down arrow #8021 51
Exit #8012 55
Function code #8044
Hold/Recall 64
Item discount #450
59
Drawer set-up
Maint. POS #8014(Maintenance)
No limit #8032 (Override ,HALO)
73
76
© 2008 ... Logivision
104
50
Directories tab 110
Display Messages 104
65
71
78
Coupon tab 120
Creating Zones 12
Deploy command #8058
Load form #8001 70
Login #10010 (Cashier-Manager)
Paid out #330
104
CID limits 104
Cost of goods 112
-D-
Item list #8067 66
Left arrow #8023 68
No sale #680 76
Page up #8020 99
41
currency symbol
78
85
Price level #8030 86
Receipt copy #730 ,Manual coupon
Account tab 115
Adding and removing options on system forms.
Balancing
78
Payment #310 (R/A-Account payment)
PLU Attach #8066 84
155
-EEvents 132
automatic ,programmed ,logoff
132
88
205
206
L-POS User Manual 3.2.1.0
-F-
-N-
Flip charts 56
floating cashier
Naming Buttons 18
Numbering forms 25
104
Food stamp tab 112
Form types 24
Freebee 59
Function parametrers
-P33
Peripherals 140
Peripherals-Printers
-GGeneral parameters
General tab 104
GPIC 63
G-PIC ,8065
35
104
Pole display set-up 158
Poswin maintenance module.
63
8
-R118
-I-
register closed
104
Restrictors tab
119
-S-
In Drawer 104
inquiry 194
Scale set-up
157
Screen and Keyboard Setup. 9
Special names for forms 26
-KKeyboard level #8057
Store name 104
Store number 104
67
Keyboard set-up 158
Keyboard shortcuts in zone editing.
Keylock set-up
158
-L-
System settings
12
103
-TTaxes tab 112
Temporary tender
Loading forms at start-up.
27
Totalizer tab
97
117
-V-
-MManual Print
146
Pole Display 104
Pole Display Messages
-HHeaders tab
141
Peripherals-Scanner
PLU tab 112
Void last item #610 (Error correct)
120
Messages 104
Moving Zones 13
Multiple Monitors
101
-Z13
Zones tab
118
© 2008 ... Logivision
L-POS User Manual
Produced and printed in Canada