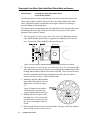
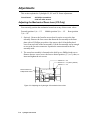
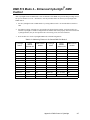
1
cyberlight
•
cyberlight
•
cyberlight
®
®
®
User Manual
© High End Systems, Inc 1996, All Rights Reserved
Information and Specifications in this document are subject to change without notice High
End Systems, Inc assumes no responsibility or liability for any errors or inaccuracies that may
appear in this manual The system software for the Status Cue ® lighting console described in
this manual is furnished under a license agreement and may be used or copied only in
accordance with the terms of the agreement
Printed in the USA
Cyberlight User Manual
i
Trademarks
Trademarks used in this text: Cyberlight, Intellabeam, Lightwave Research, the Lightwave
Research logo, the High End Systems globe logo, Status Cue, Emulator, Trackspot, and
LithoPatterns are registered trademarks; and High End Systems and Psy-Dye are
trademarks of High End Systems Inc
Belden is a registered trademark of Belden, Inc Philips is a registered trademark of Philips
Lighting Company Other trademarks and trade names may be used in this document to
refer to either the entities claiming the marks and names or their products High End
Systems disclaims any proprietary interest in trademarks and trade names owned by others
Cyberlight/Cyberlight CX/Cyberlight SV User Manual, March 2005
P/N 60600016 Version 2.2
ii
Cyberlight User Manual
Declaration of Conformity
according to ISO/IEC Guide 22 and EN45104
Manufacturer’s name:
High End Systems Inc
Manufacturer’s address:
High End Systems Inc
2105 Gracy Farms Lane
Austin, Texas 78758
USA
Declares that the product
Product Name:
Cyberlight
Product Number:
CBL-01
CBL-CX
CBL-SV
Product Options:
All
CL Litho
CX Litho
SV Litho
conforms to the following EEC directives:
73/23/EEC, as amended by 93/68/EEC
89/336/EEC, as amended by 92/31/EEC and 93/68/EEC
Equipment referred to in this declaration of conformity was manufactured in compliance with
the following standards beginning in 1995:
Safety:
EN 60598-1 : 1993
EN 60598-2-17 : 1989
A1-A3 : 1993
EMC:
EN 50081-1 : 1992
EN 50082-1 : 1992
Lanny Derryberry, Compliance Engineer
USA, March 3, 2005
Cyberlight User Manual
iii
IMPORTANT SAFETY INFORMATION
INSTRUCTIONS PERTAINING TO CONTINUED PROTECTION AGAINST FIRE,
ELECTRIC SHOCK, EXPOSURE TO EXCESSIVE ULTRAVIOLET (UV) RADIATION,
AND INJURY TO PERSONS ARE FOUND IN APPENDIX E
PLEASE READ ALL INSTRUCTIONS PRIOR TO ASSEMBLY, MOUNTING, AND
OPERATING THIS EQUIPMENT
IMPORTANT: INFORMATIONS DE SÉCURITÉ
INSTRUCTIONS RELATIVES À UNE PROTECTION CONTINUE CONTRE L'
INCENDIE, LE CHOC ÉLECTRIQUE, L' EXPOSITION AUX RADIATIONS
ULTRAVIOLETTES EXCESSIVES ET CONTRE DES BLESSURES POSSIBLES SUR
DES INDIVIDUS SE TROUVENT DANS L'APPENDICE E
PRIÈRE DE LIRE TOUTES LES PRÉCAUTIONS ET LES AVERTISSEMENTS AVANT
D'ASSEMBLER, DE MONTER, ET DE FAIRE FONCTIONNER CET ÉQUIPEMENT
WICHTIGE SICHERHEITSHINWEISE
DIE NACHSTEHENDEN HINWEISE BETREFFEN DEN SCHUTZ GEGEN BRAND,
ELEKTRISCHEN SCHLAG, ÜBERHÖHTE UV-STRAHLUNG SOWIE VERLETZUNGEN
SIE BEFINDEN SICH IN APPENDIX E
LESEN SIE ALLE WARNUNGEN SORGFÄLTIG, BEVOR SIE DAS GERÄT
ZUSAMMENBAUEN, INSTALLIEREN UND BENUTZEN!
INFORMACIÓN IMPORTANTE DE SEGURIDAD
SE ENCUENTRAN EN EL APÉNDICE E LAS INSTRUCCIONES CONCERNIENTES A
LA PROTECCIÓN CONTINUA CONTRA INCENDIO, CHOQUE ELÉCTRICO,
EXPOSICIÓN EXCESIVA A RAYOS ULTRAVIOLETAS Y LESIONES A PERSONAS
POR FAVOR LEA TODAS LAS PRECAUCIÓNS Y LAS ADVERTENCIAS ANTES DE
ENSAMBLAR, MONTAR Y OPERAR ESTE EQUIPO
INFORMAZIONI IMPORTANTI DI SICUREZZA
ISTRUZIONI PERTINENTI LA PROTEZIONE CONTRO IL FUOCO, LE SCOSSE
ELETTRICHE, L' ECCESSIVA ESPOSIZIONE AI RAGGI ULTRAVIOLETTI I DANNI
ALLE PERSONE SI TROVANO NEL APPENDICE E
LEGGERE TUTTI GLI AVVERMENTI PRIMA DI MONTARE E USARE QUESTO
APPARECCHIO
FCC Information
This equipment has been tested and found to comply with the limits for a Class A digital
device, pursuant to part 15 of the FCC rules These limits are designed to provide
reasonable protection against harmful interference when the equipment is operated in a
commercial environment This equipment generates, uses, and can radiate radio frequency
energy and, if not installed and used in accordance with the instruction manual, may cause
harmful interference to radio communications Operation of this equipment in a residential
area is likely to cause harmful interference in which case the user will be required to
correct the interference at his own expense
iv
Cyberlight User Manual
Warranty Information
Limited Warranty
Unless otherwise stated, your product is covered by a two year parts and labor limited
warranty Dichroic filters and LithoPatterns ® high resolution glass gobos are not
guaranteed against breakage or scratches to coating It is the owner’s responsibility to
furnish receipts or invoices for verification of purchase, date, and dealer or distributor
If purchase date cannot be provided, date of manufacture will be used to determine
warranty period
Returning an Item Under Warranty for Repair
It is necessary to obtain a Return Authorization number (RA#) from your dealer or
point of purchase BEFORE any units are returned for repair The manufacturer will
make the final determination as to whether or not the unit is covered by warranty
Lamps are covered by the lamp manufacturer’s warranty
Any Product unit or parts returned to High End Systems must be packaged in a
suitable manner to ensure the protection of such Product unit or parts, and such
package shall be clearly and prominently marked to indicate that the package contains
returned Product units or parts and with a Returned Authorization (RA#) number
Accompany all returned Product units or parts with a written explanation of the
alleged problem or malfunction
Please Note: Freight Damage Claims are invalid for fixtures shipped in non-factory
boxes and packing materials
Freight
All shipping will be paid by the purchaser Items under warranty shall have return
shipping paid by the manufacturer only in the Continental United States Under no
circumstances will freight collect shipments be accepted Prepaid shipping does not
include rush expediting such as air freight Air freight can be sent customer collect in
the Continental United States
REPAIR OR REPLACEMENT AS PROVIDED FOR UNDER THIS WARRANTY IS
THE EXCLUSIVE REMEDY OF THE CONSUMER HIGH END SYSTEMS, INC
MAKES NO WARRANTIES, EXPRESS OR IMPLIED, WITH RESPECT TO ANY
PRODUCT, AND HIGH END SPECIFICALLY DISCLAIMS ANY WARRANTY OF
MERCHANTABILITY OR FITNESS FOR A PARTICULAR PURPOSE HIGH END
SHALL NOT BE LIABLE FOR ANY INDIRECT, INCIDENTAL OR
CONSEQUENTIAL DAMAGE, INCLUDING LOST PROFITS, SUSTAINED OR
INCURRED IN CONNECTION WITH ANY PRODUCT OR CAUSED BY
PRODUCT DEFECTS OR THE PARTIAL OR TOTAL FAILURE OF ANY
PRODUCT REGARDLESS OF THE FORM OF ACTION, WHETHER IN
CONTRACT, TORT (INCLUDING NEGLIGENCE), STRICT LIABILITY OR
OTHERWISE, AND WHETHER OR NOT SUCH DAMAGE WERE FORESEEN OF
UNFORESEEN
Warranty is void if the product is misused, damaged, modified in any way, or for
unauthorized repairs or parts This warranty gives you specific legal rights, and you
may also have other rights which vary from state to state
Cyberlight User Manual
v
vi
Cyberlight User Manual
Table of Contents
Introduction
Cyberlight® Features ........................................................................................... intro-1
About This Manual .............................................................................................. intro-4
Caution, Warning and Explosion Symbols .......................................................... intro-5
Getting Help ......................................................................................................... intro-5
Chapter 1
Installation and Setup
Unpacking the Cyberlight® Fixture........................................................................... 1-1
Specifications ............................................................................................................. 1-1
The Cyberlight® Family of Fixtures.......................................................................... 1-5
Optional Accessories.................................................................................................. 1-6
Identifying Rear Panel Components .......................................................................... 1-7
Obtaining and Installing the Power Cord Cap ........................................................... 1-9
Setting the Cyberlight® Fixture Voltage ................................................................. 1-10
Installing the Yoke ................................................................................................... 1-15
Installing or Replacing the MSR 1200 Lamp .......................................................... 1-17
Installing SV Color Wheel Dichroic Filters............................................................. 1-21
Setting the Personality DIP Switches....................................................................... 1-24
Rear Panel LED Indicators....................................................................................... 1-29
Putting the Fixture Into Use ..................................................................................... 1-30
Where to Go From Here........................................................................................... 1-32
Chapter 2
Using Your Cyberlight®
Choosing DMX 512 or LWR Protocol ...................................................................... 2-1
Implementing DMX/LWR Control............................................................................ 2-3
Obtaining Cabling and Terminators........................................................................... 2-6
Linking the Fixtures to the Controller........................................................................ 2-8
Mounting the Fixture.................................................................................................. 2-9
Troubleshooting ....................................................................................................... 2-12
Chapter 3
Servicing Your Cyberlight®
General Maintenance and Cleaning ........................................................................... 3-1
Replacing Parts......................................................................................................... 3-14
Adjustments.............................................................................................................. 3-22
Appendix A DMX Control of Cyberlight®
Overview ................................................................................................................... A-1
Address DIP Switches............................................................................................... A-2
Cyberlight User Manual
1
Related Topics .......................................................................................................... A-2
Accessing Control Information................................................................................. A-2
Rounding Conventions ............................................................................................. A-2
DMX 512 Mode 1 – Standard Cyberlight® DMX Control...................................... A-3
DMX 512 Mode 2 – Enhanced Cyberlight® DMX Control .................................... A-7
DMX 512 Mode 3 – Cyberlight® 15-Channel DMX Control ............................... A-12
Channel Boundaries ................................................................................................ A-17
Appendix B Cyberlight® Mirror Movement Times
Appendix C Factory-Installed Wheels
Appendix D Typical Voltages Worldwide
Appendix E Important Safety Information
Glossary
List of Tables
Table 1-1: Cyberlight Optional Accessories ............................................................. 1-6
Table 1-2: Cyberlight Information Mode ............................................................... 1-25
Table 1-3: Description of Cyberlight Rear Panel LEDs ......................................... 1-28
Table 2-1: Protocol Mode Switch Settings ............................................................... 2-5
Table 2-2: Cyberlight Fixture Number Settings (LWR Protocol) ............................ 2-5
Table 2-3: XLR Cable Pinouts ................................................................................. 2-7
Table 3-1: Description and Function of Power Supply Board Fuses ..................... 3-17
Table A-1: Addressing Fixtures in 20-Channel DMX 512 Mode 1 ........................ A-3
Table A-2: Cyberlight DMX Assignments Mode 1 ................................................. A-3
Table A-3: Addressing Fixtures in 20 Channel DMX 512 Mode 2 ......................... A-7
Table A-4: Cyberlight DMX Assignments Mode 2 ................................................. A-8
Table A-5: Addressing Fixtures in 15 Channel DMX 512 Mode 3 ....................... A-12
Table A-6: Cyberlight DMX Assignments Mode 3 ............................................... A-13
Table A-7: 20-Channel Addresses (Modes 1 and 2) .............................................. A-17
Table A-8: 15-Channel Addresses (Mode 3) ......................................................... A-18
2
Cyberlight User Manual
Table of Figures
Figure 1-1 Identifying Cyberlight rear panel components ...................................... 1-7
Figure 1-2 View of the bottom of the Cyberlight fixture, where the access door
latches are located................................................................................ 1-10
Figure 1-3 Removing the first four rear panel screws in order to access the
Cyberlight voltage selection jumpers .................................................. 1-11
Figure 1-4 In order to remove the lamp box access door, you need to remove
the last two 5/32 inch allen screws, which are located by the color
mixing and dim flags ........................................................................... 1-11
Figure 1-5 On CL and CX models, make sure you disconnect the fan power wires
from the fan connectors before removing the lamp box access door .. 1-12
Figure 1-6 Location of the voltage selection jumpers and the voltage selection
wire ...................................................................................................... 1-12
Figure 1-7 Location of the voltage selection tabs and connector .......................... 1-12
Figure 1-8 Components of the Cyberlight yoke .................................................... 1-14
Figure 1-9 Installing the yoke on the Cyberlight fixture....................................... 1-15
Figure 1-10 Location of lamp assembly and optimization screws .......................... 1-16
Figure 1-11 Removing the lamp from its socket ..................................................... 1-17
Figure 1-12 Installing the new lamp into the socket ............................................... 1-17
Figure 1-13 Placing Cyberlight fixture in setup mode allows you to perform the
necessary lamp optimization prior to using a newly-installed lamp.... 1-19
Figure 1-14 Removing the center access door ........................................................ 1-20
Figure 1-15 The color wheel is located between the effects wheel and the color mixing
flags, opposite the rotating litho wheel................................................ 1-21
Figure 1-16 High End Systems recommends you replace the CL color correction filter
(at position 4) with the salmon-colored CTO correction filter, and the aqua
filter (at position 5) with the homogenizing frost filter ....................... 1-21
Figure 1-17 Push the dichroic filter toward the large retaining tab to free it from the
wheel clips ........................................................................................... 1-22
Figure 1-18 Orient the coated side of the dichroic toward the lamp and the uncoated
side toward the static litho wheel......................................................... 1-22
Figure 1-19 The personality switches...................................................................... 1-23
Figure 1-20 The Cyberlight rear panel LEDs give you information about the
Cyberlight fixture’s lamp, fixture voltage, operating temperature, data
transmission and reception, and other factors...................................... 1-24
Figure 1-21 Setting the Cyberlight power switch to the ON and OFF positions .... 1-30
Figure 2-1 The address switch block allows you to select the control protocol
(DMX 1, DMX 2, DMX 3, or LWR) and the fixture number ............... 2-4
Figure 2-2 Properly-constructed data cable............................................................. 2-6
Cyberlight User Manual
3
Figure 2-3 Constructing a data cable terminator..................................................... 2-7
Figure 2-4 Make sure you connect the Data Out connector from the previous
Cyberlight to the Data In connector of the next Cyberlight Also, you must
terminate the Data Out connector of the last device in the link (whether the
last device is a Cyberlight or something else) ....................................... 2-8
Figure 2-5 Attaching two C-clamps to the Cyberlight yoke ................................. 2-11
Figure 2-6 Always use suitable safety cables when hanging a Cyberlight from a truss
or any other support system The safety cable can be looped around the
support and the Cyberlight yoke once or twice; loop it twice if this will
help prevent the fixture from rotating, thus possibly loosening the clamp
mounting bolt ...................................................................................... 2-11
Figure 2-7 Loosening the hub screws allows you to adjust the wheel’s clearance2-18
Figure 2-8 Loosen these two allen screws to adjust the rotating litho wheel ....... 2-19
Figure 2-9 The rotating litho wheel’s spring plunger must always contact the rotating
litho wheel ........................................................................................... 2-20
Figure 3-1 Holding the fan fins in place while you clean the fans using compressed
air........................................................................................................... 3-2
Figure 3-1
Figure 3-2
Figure 3-3
Figure 3-4
Figure 3-5
Figure 3-6
Figure 3-7
Figure 3-8
Figure 3-9
Figure 3-10
Figure 3-11
Figure 3-12
Figure 3-13
Figure 3-14
Figure 3-15
4
Bottom view of the Cyberlight fixture .................................................. 3-3
Locations of the iris, power lens, focusing lens, zoom lens and mirror 3-4
Locations of the motors ......................................................................... 3-4
Close the iris by rotating the large black gear located on top of the iris
motor ..................................................................................................... 3-5
Cleaning the anti-reflective glass .......................................................... 3-5
Removing the standoff between the iris motor and the color wheel ..... 3-6
Make sure the wheel is positioned with the keyhole slots facing downward
before removing it ................................................................................. 3-6
The homing slot is a small groove on the outside edge of the wheel The
static litho wheel and the color wheel’s homing slots are in different
locations The effects wheel does not have a homing slot .................... 3-7
Clean the groove in the wheel sensor .................................................... 3-7
Static litho wheel lithos must be oriented with the coated/etched side
facing away from the lamp .................................................................... 3-7
Color wheel dichroic filters should be oriented with the coated side of the
dichroic facing toward the lamp and the glass side facing toward the static
litho wheel ............................................................................................. 3-8
Position the keyhole slots so they fit over both hex screws as well as the
“slider” screw inset in the hub............................................................... 3-8
Location of lamp assembly and optimization screws.......................... 3-10
Removing the lamp from its brass socket ........................................... 3-10
Location of the first four rear panel screws you need to remove in order to
access the lamp assembly .................................................................... 3-11
Cyberlight User Manual
Figure 3-16 In order to remove the lamp box access door, you need to remove the
last two 5/32 inch allen screws, which are located by the color mixing and
dim flags .............................................................................................. 3-11
Figure 3-17 On CL and CX models, make sure you disconnect the fan power wires
from the fan connectors before removing the lamp box access door .. 3-12
Figure 3-18 Locations of the reflector and infrared filter........................................ 3-12
Figure 3-19 Location of the color mixing flags and dim flags................................ 3-13
Figure 3-20 View of the bottom of the Cyberlight fixture, where the access door latches
are located ............................................................................................ 3-15
Figure 3-21 Removing the rear panel screws allows you to access the Cyberlight
voltage selection jumpers .................................................................... 3-15
Figure 3-22 In order to remove the lamp box access door, you need to remove the last
two 5/32 inch allen screws, which are located by the color mixing and dim
flags...................................................................................................... 3-16
Figure 3-23 On CL and CX models, make sure you disconnect the fan power wires
from the fan connectors before removing the lamp box access door .. 3-16
Figure 3-24 Location of power supply board fuses................................................. 3-17
Figure 3-25 Removing the center access door ........................................................ 3-18
Figure 3-26 Insert the new or cleaned litho into the rotating litho housing as described
above; improper installation can cause heat damage to the litho ........ 3-19
Figure 3-27 Turn on the spring as you push it into the rotating litho housing ........ 3-19
Figure 3-28 Make sure the end of the spring fits under any one of the three retaining
washers, as shown above ..................................................................... 3-20
Figure 3-29 Do not place the end of the spring between the three retaining
washers ................................................................................................ 3-20
Figure 3-30 Push the dichroic/litho toward the large retaining tab to free it from the
wheel tabs ............................................................................................ 3-21
Figure 3-31 Adjusting the Cyberlight CX mechanical zoom lens .......................... 3-22
Figure 3-32 Loosen the three 5/32 inch allen screws and the T-handle to adjust the
mirror head deviation........................................................................... 3-23
Figure 3-33 Grasp both sides of the mirror head and rotate it to the desired
position ................................................................................................ 3-24
Figure 3-34 Be sure to note the deviation angle in case you need to set other fixtures
for the same deviation, or if you want to use this exact deviation again For
example, the figure above has about a 10° + (plus) deviation............. 3-24
Figure 3-35 Adjust the yoke handles on both sides of the Cyberlight to tilt the fixture
in a specific way .................................................................................. 3-25
Figure A-1 The DMX address switch block allows you to select the control protocol
(DMX 1, DMX 2, DMX 3, or LWR) and the fixture number .............. A-2
Figure A-2 Unplanned channel addressing wastes DMX addresses because of fixture
boundary overlap ................................................................................ A-19
Cyberlight User Manual
5
Figure A-3 Planned channel addressing wastes a minimum of DMX
address space ...................................................................................... A-19
Figure C-1
Figure C-2
Figure C-3
Figure C-4
Figure C-5
Figure C-6
Figure C-7
6
Factory configuration of the CX static litho wheel ...............................C-1
Factory configuration of the CL/SV static litho wheel .........................C-2
Factory configuration of the CX rotating litho wheel ...........................C-3
Factory configuration of the CL/SV rotating litho wheel .....................C-4
Factory configuration of the CX color wheel........................................C-5
Factory configuration of the CL/SV color wheel ..................................C-6
Effects wheel for the CL, CX and SV models ......................................C-7
Cyberlight User Manual
Introduction
Congratulations on your purchase of the Cyberlight® automated luminaire
manufactured by High End Systems, Inc Cyberlight — the most advanced
intelligent lighting instrument available — is ideal for theatrical applications,
stage, studio, concert touring, and nightclubs Cyberlight provides designers and
operators with a luminaire (fixture) of unprecedented brightness, speed, accuracy
and effects for complex lighting cues and scenes
Your microprocessor-based Cyberlight fixture responds to an extensive set of
programming commands called constructs You can easily program these
constructs through the Status Cue system, the Cyberlight LCD controller or
another standard DMX controller into simple or complex scenes and sequences
Examples of constructs are colors, color mixing, lithos, litho mixing, rotating
lithos, special effects, variable frost, dim, iris, and strobing
This manual covers the Cyberlight versions listed below:
•
Cyberlight: The full-featured luminaire, with motorized variable frost from
hard edge to soft edge; beam position and movement speed; focus; variable
zoom; litho and CYM (cyan-yellow-magenta) color selection; color mixing;
variable iris; variable-speed rotating lithos (0-50 RPM); full optical dimming;
and automatic cooling system shutdown Additionally, the fixture accepts
stock and custom LithoPatterns, including Psy-Dye™ high resolution glass
gobos, Art Glass and Special Effects lithos
•
Cyberlight Studio Version (SV): The quieter-operating, full-featured
luminaire
•
Cyberlight CX: The value-priced luminaire, with all of the features of the
Cyberlight except motorized zoom, color mixing and variable frost
Cyberlight ® Features
The Cyberlight features can be categorized into four main areas, listed separately
below: control/information features, lamp, optics, effects, and other features
Control/information features
•
Remote system enable/disable
•
“Info” LED displays lamp hours, lamp strikes, lamp voltage, lamp current,
fixture voltage, fixture temperature, and the fixture version number for at-aglance monitoring (no controller is required)
•
Can be controlled by Lightwave Research (LWR) or standard USITT DMX
512 protocol:
Introduction
Intro-1
•
Use LWR protocol for online software uploads and control with High End
Systems’ top-of-the-line Status Cue system, for uploads only with the
Cyberlight Upload Module, and for control only with the Cyberlight LCD
controller
Use DMX 512 protocol if the Cyberlight is on the same link as other
vendors’ control equipment
•
Lamp
•
1200 watt MSR/MSD lamp; 5600° Kelvin color temperature
•
750-hour rated lamp life
•
Quick lamp change and optimization
Optics
•
Computer-optimized reflector and lens assembly for maximum output
•
Enhanced mirror increases efficiency
•
Motorized zoom control (Cyberlight CL and SV models only; the CX has a 3position zoom at 12°, 14°, and 18°)
•
Zoom angle 12° to 22° (16° to 26° with wide angle lens)—Cyberlight CL and
SV only
•
Field angle up to 36°
•
Motorized focus control
•
Motorized variable frost from hard edge to soft edge
•
Smooth, precise micro-stepped beam positioning
•
100% dimming, fade to black
•
170° pan – 110° degrees tilt
•
Break-resistant mirror
Effects
•
16 million colors available via sophisticated dichroic subtractive CYM (cyanyellow-magenta) color model —Cyberlight CL and SV only
•
Eight-position indexed color wheel with a versatile selection of richlysaturated dichroic colors plus open (white), custom dichroic filters available
•
Upward, downward, and centered color correction
•
Variable speed (forward and reverse 0-50 RPM) rotating lithos (from 0° to
360°) with replaceable patterns (4 lithos plus open)
•
Eight-position fixed litho wheel with seven easily-replaceable LithoPatterns
glass lithos standard
•
Litho mixing effects: rotating over fixed, or fixed over fixed
Intro-2
Cyberlight User Manual
•
Eight-position effects wheel, including multi-image prism effect, split color
effect and subtractive color dichroic mosaic effect
•
Infinitely-variable frost effect—Cyberlight CL and SV only
•
De-focus lens effect
•
Variable speed motorized iris control
•
Variable high-speed strobe shutter (1 to 10 FPS)
•
Variable speed mirror scan, litho, and color changes
Other features
•
Pan and tilt swap; pan and tilt invert
•
Selectable voltage and frequency
•
Circuit breaker protection
•
Six transport handles
•
High-resolution stepper motors
•
Durable black powder coat finish
•
Yoke indexing with graduated scale reduces pre-focus time
•
Adjustable mirror head deviation ± 20 degrees (pan)
•
Thermal overload protection
•
Power factor correction
•
Meets international standards for safety and electromagnetic compatibility
Introduction
Intro-3
About This Manual
This manual covers the following topics in its three chapters and five appendices:
•
Chapter 1: Unpacking your Cyberlight and preparing it for use
•
Chapter 2: Putting the Cyberlight into operation, including the “how-tos” of
DMX 512 and LWR control protocols, connecting the fixture to a controller
and mounting the fixture Troubleshooting suggestions are also included
•
Chapter 3: Routine maintenance and service
•
Appendix A: Explains the three DMX modes and how to use them
•
Appendix B: Cyberlight mirror movement times
•
Appendix C: Shows the factory configuration for the color, effects, static
litho and rotating litho wheels
•
Appendix D: Typical voltage/frequency settings worldwide, based on High
End Systems Inc’s experience
•
Appendix E: Important safety information
•
Glossary
•
Index
Intro-4
Cyberlight User Manual
Caution, Warning and Explosion Symbols
The following three international symbols appear in margins throughout this
manual to highlight caution and warning messages
Caution: This symbol appears adjacent to Caution messages Not heeding these
messages could result in personal injury and damage to equipment
Warning: This symbol appears adjacent to High Voltage Warning messages Not
heeding these messages could result in serious personal injury
Explosion: This symbol appears adjacent to Explosion warning messages
Getting Help
US and Canada
From 8 am to 5 pm (US Central time) Monday through
Friday:
(800) 890-8989
24-hour FAX:
(512) 834-9195
24-hour voice mail: (512) 837-3063 or (800) 890-8989
24-hour BBS:
(512) 339-3043
24-hour World Wide Web site
http://wwwhighendcom
Europe
Voice:
FAX:
+49 8122 9903-0
+49 8122 9903-33
Singapore
Voice:
FAX:
+65 742 8266
+65 743 9322
Introduction
Intro-5
Intro-6
Cyberlight User Manual
Chapter 1
Installation and Setup
Unpacking the Cyberlight® Fixture
First, unpack your fixture and verify that it arrived complete and without any
damage
Save the Shipping Materials
Do not discard the shipping carton and packing materials The carton and packing
materials are specifically designed to protect the product during transport
High End Systems assumes no responsibility for products damaged during
transport Therefore, you should return a product for repair in its original shipping
carton and packing materials
Note Before sending anything to the factory, be sure to call your HES dealer/
distributor for a Return Authorization (RA) number The factory cannot
accept any goods shipped without an RA number
Inspecting the Contents
Carefully unpack the carton and inspect the contents for damage If any of the
items in the following list are missing or damaged you must notify both the
shipping agent and your sales agent immediately
•
One copy of this manual
•
One Cyberlight fixture
•
One MSR 1200 lamp (packaged in a separate box)
•
One yoke enclosed in cardboard packaging with a yoke handle kit consisting of
two yoke handles, two 5/16 inch carriage bolts, two 5/16 inch allen screws, and
two 9/16 inch locknuts
•
SV only: Two color wheel dichroic filters enclosed in individual containers
(one CTO correction filter, one homogenizing frost filter)
Specifications
This section lists specifications for the Cyberlight family of fixtures
Chapter 1 Installation and Setup
1-1
Model and Part Numbers
•
Models:
Cyberlight, Cyberlight CX, Cyberlight SV
•
Manufacturer:
Lightwave Research
High End Systems, Inc
2217 W Braker Lane
Austin, Texas, 78758
USA
•
Product Numbers:
CL Litho
CX Litho
SV Litho
Physical Specifications
•
Fixture weight:
4223 kg (929 lb) for Cyberlight
3977 kg (875 lb) for Cyberlight CX
4432 kg (975 lb) for Cyberlight SV
•
Yoke weight:
127 kg (28 lb)
•
Total fixture weight:
456 kg (957 lb) Cyberlight
4104 kg (903 lb) Cyberlight CX
4559 kg (1003 lb) Cyberlight SV
•
Dimensions (CL and CX):cm: 1067 L x 330 W x 317 H
in: 420 L x 130 W x 1248 H
•
Dimensions (SV):
•
Dimensions with handles (all models):
cm: 1067 L x 330 W x 366 H
in: 420 L x 130 W x 1441 H
add 508 cm (2 in) to length
and 762 cm (3 in) to width
•
Lamp type:
Metal
Use 1200 W, G-22 Base, MSR 1200 or MSD 1200
Halide Lamp Only
Electrical Specifications
•
•
•
•
•
1-2
Voltage selectable:
Power consumption:
Rated power:
Rated frequency:
Power Factors:
Cyberlight User Manual
208V / 230V only
63/63A
1300W
50-60Hz
230V, 50Hz: 085
208V, 60Hz: 097
(1)
Class I equipment - For continued protection against electric shock
connect this equipment to an earthed (grounded) power source
only
(2)
This equipment for connection to branch circuit having a
maximum overload protection of 20 A
Safety Standards
•
Safety standards
• EN 60598-1 : 1993
• EN 60598-2-17 : 1989
A1-A3 : 1993
•
EMC Standards
• EN 50081-1 : 1992
• EN 50082-1 : 1992
Safety Specifications
•
•
•
•
•
•
Maximum ambient temperature:
Maximum exterior surface temperature:
Minimum distance to lighted object:
Minimum distance to flammable objects:
Maximum winding temperature, Tw:
Maximum capacitor temperature, Tc:
•
Do not mount on a flammable surface
•
Not for residential use
•
Use in dry locations only
50° C (122° F)
62° C (144° F)
10 m (328 ft)
10 m (328 ft)
180° C (356° F)
85° C (185° F)
Cables and Connectors
•
DMX data cables: Belden® 9841 or equivalent (meets specifications for EIA
RS-485 applications) with characteristics listed below:
•
•
•
2-conductor twisted pair plus a shield
maximum capacitance between conductors - 30 pF/ft
maximum capacitance between conductor and shield - 55 pF/ft
Chapter 1 Installation and Setup
1-3
•
•
•
1-4
maximum resistance of 20 Ω/1000 ft
nominal impedance 100–140 Ω
22–24 AWG with insulation having a dielectric rating of 300 volts or
higher
•
DMX data connectors: Standard 3-pin male and female XLR connectors
•
DMX data terminators: Male XLR connector with 120 ohm terminator (see
Chapter 2)
Cyberlight User Manual
The Cyberlight® Family of Fixtures
Currently, the Cyberlight family of automated luminaires (fixtures) consists of
three models:
The Cyberlight (referred to in this manual as the CL model):
cyberlight
R
LITHO
LIGH TWAVE RESEARCH
AUSTIN, TEXAS U .S.A.
The Cyberlight SV (referred to in this manual as the SV model):
LIGHT WAVE RESEAR CH
R
AUST IN, TEXAS U. S.A.
The Cyberlight CX (referred to in this manual as the CX model):
cyberlight
R
LITHO
LIGHTWAVE RESEARCH
AUSTIN, TEXAS U.S.A.
Nomenclature
Because all three Cyberlight models have different features and functions, some
references in this manual will be to one specific model only Other references
might encompass all three models The following nomenclature system will be
used throughout this manual so you will know which fixture model is being
referred to:
•
•
•
•
A generic reference to Cyberlight applies to all three models (CL, CX and SV)
A reference to CL applies to the Cyberlight CL only
A reference to CX applies to the Cyberlight CX only
A reference to SV applies to the Cyberlight SV only
Chapter 1 Installation and Setup
1-5
Optional Accessories
Table 1-1 below shows the optional accessories for Cyberlight available from your
High End Systems dealer/distributor:
Table 1-1 Cyberlight Optional Accessories
Name
Part Number
Status Cue controller
Call*
Cyberlight LCD controller with unprogrammed RAM card
19020001
Unprogrammed RAM card
80440017
Replacement MSR 1200 lamp
55030001
Cyberlight LithoPatterns
Call*
Cyberlight custom color wheel dichroic filters
Call*
Cyberlight touring yoke kit
55040005
Cyberlight dust filter kit
55040006
Cyberlight narrow angle lens kit
55040012
Keal road case (1 fixture)
19070001
Keal road case (2 fixtures)
19070001
Heavy duty 3-pin XLR cable (10’)
55050005
Heavy duty 3-pin XLR cable (25’)
55050006
Heavy duty 3-pin XLR cable (50’)
55050007
Heavy duty 3-pin XLR cable (100’)
55050008
Galvanized safety cable
12040001
Deluxe C-clamp
55000004
Call* - Contact either your High End Systems dealer/distributor, High End
Systems Sales, or the High End Systems World Wide Web site The Web site
includes product information and pictures of all currently-available LithoPatterns
High End Systems International Sales: See the inside title page of this manual
High End Systems World Wide Web site: http://wwwhighendcom
1-6
Cyberlight User Manual
Identifying Rear Panel Components
This section describes the rear panel components, LEDs, switches, and connectors
Figure 1-1 Identifying Cyberlight rear panel components
1. Quality Control (QC) plate - displays (from top to bottom) the fixture’s
model number, serial number, factory voltage setting, maximum volts and
amps, manufacturing date and the initials of the engineer responsible for
Quality Control (QC) of the fixture
2. Lamp Assembly – removable from the rear of the fixture for easy lamp
replacement (see “Installing or Replacing the MSR 1200 Lamp” on page 1-17)
3. Lamp Assembly Retaining screws – these two screws fasten the lamp
assembly to the fixture (see “Installing or Replacing the MSR 1200 Lamp” on
page 1-17)
4. Power On/Off Switch – press the “I” side to turn fixture power ON Press the
“O” side to turn fixture power OFF
5. Lamp Optimization Screws – these three screws align the lamp for optimal
output (see page 1-19)
6. Address DIP Switch Settings – this chart lists the fixture number settings and
shows how to select either Lightwave Research (LWR) control protocol or one
of three DMX 512 modes (see “What is DMX 512 Protocol?” on page 2-1)
Chapter 1 Installation and Setup
1-7
7. Status and Information LEDs – these LEDs provide the following
information:
• the top LED displays pertinent fixture information, such as lamp hours,
strikes, current, and so on (see page 1-24 and page 1-26)
• the middle three LEDS display status of the motors, lamp, and fans (see page
1-29)
• the bottom two LEDs blink when data is transmitted to or received from a
controller
(see page 1-29)
8. Data Out XLR Connector – connect this to the Data In connector of the next
device in the link (see “Linking the Fixtures to the Controller” on page 2-8)
9. Data In XLR Connector – connect an XLR cable from the Data Out
connector of the previous device in the link (see “Linking the Fixtures to the
Controller” on page 2-8)
10. Personality DIP Switches – use these switches to set the operating mode of
the fixture (see page 1-24)
11. Address DIP Switches – use these switches to set the fixture address and to
select the control protocol (see “Setting the Address DIP Switches” on page
2-3)
12. Personality DIP Switch Settings – this chart lists the switch settings for the
operating mode of the fixture
1-8
Cyberlight User Manual
Obtaining and Installing the Power Cord Cap
You must obtain and install a power cord cap before you can connect the
Cyberlight to a power outlet The type of power cord cap you must obtain depends
on the location in which the Cyberlight will be used; different locations (even
within the same country) might have different power cord cap requirements
Note
Because of the wide variety of power cord caps used worldwide, High End
Systems cannot make specific recommendations for the particular power cord
cap you should use Contact a local authority if you are unsure which type of
power cord cap you need
Important Power Cord Cap Information - UK Only
IMPORTANT The cores in the mains lead are colored in accordance with the
following code:
•
•
•
green and yellow: earth
blue: neutral
brown: live
Since the colors of the cores in the mains lead of this equipment may not
correspond with the colored markings identifying the terminals in your plug,
proceed as follows:
•
•
•
The core which is colored green and yellow must be connected to the terminal
in the plug which is marked with the letter “E” or by the earth symbol , or
colored green or green and yellow
The core which is colored blue must be connected to the terminal which is
marked with the letter “N” or colored black
The core which is colored brown must be connected to the terminal which is
marked with the letter “L” or colored red
Class 1 equipment: THIS EQUIPMENT MUST BE EARTHED
VIGTIG FIKKER HEDS INFORMATION - DANMARK
ADVARSEI: RESKYTTEKSE MOD ELEKTRISK SHOCK
VIGTIGT!
LEDERE MED GROEN/GUL ISOLATION
MA KUN TILSLUTTES EN KLEMME MAERKET
ELLER
Chapter 1 Installation and Setup
1-9
Setting the Cyberlight ® Fixture Voltage
The Cyberlight fixture voltage is factory-set to customer requirements Normally,
the factory setting is correct for your typical use However, if you change venues
and need to change the fixture’s input voltage, refer to the procedure in this section
(Appendix D has a listing of typical power requirements worldwide)
By moving one wire on the power supply board you can set the input voltage to
any of the following:
205 volts 50 hertz
230 volts 50 hertz
240 volts 50 hertz
Warning
208 volts 60 hertz
230 volts 60 hertz
Check the voltage selection jumper before proceeding with the
equipment setup! Be sure to match the voltage selection jumper to your
power source prior to operating this equipment Do not set the voltage
selection jumper with the equipment plugged in
Changing the Voltage Selection Jumpers
You will need:
- one right angle 5/32 inch allen wrench
Warnings: (1) An unshielded MSR/MSD 1200 lamp emits ultraviolet and visible
(UV-vis) radiation which could damage eyes and skin Wear eye and
hand protection when re-lamping Never look directly at the lamp while
lamp is on
(2) Hot lamp may be an explosion hazard Do not open for 5 minutes after
switching off
(3) Equipment surfaces may reach temperatures up to 62° C (144° F)
Allow 10 minutes for cooling before handling
(4) To avoid the risk of electric shock, turn the fixture OFF and unplug it
from the power source before performing this service
1. After allowing the fixture to cool as described above, turn the power switch
OFF and unplug the fixture Refer to the section titled “Setting the Cyberlight
Power Switch” on page 1-31 for power switch settings
2. With the fixture oriented bottom-side up, remove the center access door by
sliding the two door latches inward Lift the door straight up, unhook the safety
1-10 Cyberlight User Manual
chain, and set the door aside See Figure 1-2
Figure 1-2 View of the bottom of the Cyberlight fixture, where the access door latches
are located
Chapter 1 Installation and Setup
1-11
3. Remove the fixture’s lamp box access door by removing six 5/32 inch allen
head screws as follows:
•
Remove the four 5/32 inch allen head screws from the bottom of the rear
panel as shown in Figure 1-3
Figure 1-3 Removing the first four rear panel screws in order to access the Cyberlight
voltage selection jumpers
•
Remove the last two 5/32 inch allen head screws from the color mixing
plate as shown in Figure 1-4
Remove these two 5/32 inch allen screws
Color mixing plate
Figure 1-4 In order to remove the lamp box access door, you need to remove the last
two 5/32 inch allen screws, which are located by the color mixing and dim flags
1-12 Cyberlight User Manual
4. Carefully lift the lamp box access door from the fixture
5. CL and CX models only: As you lift the assembly, disconnect the two fan
power connectors (black and red wires) from the power supply board as shown
in Figure 1-5 Set the lamp box access door aside You now have access to the
power supply board
Figure 1-5 On CL and CX models, make sure you disconnect the fan power wires
from the fan connectors before removing the lamp box access door
Figure 1-6 Location of the voltage selection jumpers and the voltage selection wire
6. Locate the four voltage and frequency selection tabs shown in Figure 1-7; they
are on the left side of the power supply board
Figure 1-7 Location of the voltage selection tabs and connector
Chapter 1 Installation and Setup
1-13
7. Note which of the four tabs currently has the jumper wire attached If you need
to change the voltage/frequency setting, grasp the connector and pull or wiggle
it to remove it from the tab Make sure you pull on the connector and not on the
wire
8. Move the voltage selection wire to the desired tab and firmly press the
connector onto it If the connector has spread from use, gently squeeze it
together with pliers A loose connector will overheat and turn brown
9. Reinstall the lamp box access door with the six screws in the reverse order in
which you removed them (see Step 3 on page 1-12)
10. Connect the safety chain to the center access door and replace the door (see
Step 1 on page 1-10)
1-14 Cyberlight User Manual
Installing the Yoke
You will need:
(The items listed below are shipped with the Cyberlight)
– two 5/16 inch carriage bolts
– two clamping T-handles
– yoke
– two 5/16 inch allen cap screws
– two 9/16 inch locknuts (nut with nylon insert)
(The items listed below are NOT shipped with the Cyberlight)
- 5/16 inch allen wrench
- 9/16 inch socket wrench or 9/16 inch wrench
1. If the fixture has been running recently, allow it to cool for at least 10 minutes
Then turn the power OFF
2. Remove the center access door You do not need to unlatch the safety chain
3. Stand the fixture on its end handles
4. Insert the carriage bolts through the star-shaped hole in the yoke and attach the
clamping T-handles to the carriage bolts The T-handles should not be very
tight; you will adjust them later Figure 1-8 shows the orientation of parts
Yoke
Clamping
T-Handle
5/16 inch allen
bolts – insert through
yoke and into
fixture
5/16 inch carriage
bolts
9/16 inch
locknuts
Clamping
T-handle
Figure 1-8 Components of the Cyberlight yoke
5. Do both of the following when you place the yoke on Cyberlight:
•
Make sure the U-shape of the yoke is opposite the center access door, as
shown in Figure 1-9
•
Align the bottom holes on the yoke with the yoke pivot hole labeled in
Figure 1-9
6. Insert the two 5/16 inch allen bolts through the round holes in each side of the
yoke, and through the holes in the side of the Cyberlight Tighten them using
your fingers or an allen wrench
7. Place a locknut on the end of each 5/16 inch allen bolt You can use either a 9/
16 inch socket wrench or a 9/16 inch wrench to turn the nut Tighten the nut
until so you are still able to pivot the fixture
Chapter 1 Installation and Setup
1-15
8. Position the yoke as desired, using the deviation degree markings on the yoke
for exact positioning When you have placed the fixture correctly, firmly
tighten the T-handles
Yoke tilt plate
50
N
V I A TI O
AUSTIN, TEXAS U.S. A.
60
60
Yoke pivot hole
30
50
D
E
40
70 80
LIGHTWAVE RESEARCH
LITHO
80 70
cyberlight
40
de gr ee s
20 10 0 10 20 30
T-handle
Figure 1-9 Installing the yoke on the Cyberlight fixture
9. On the top of each yoke are three 13 mm (1/2-inch) diameter mounting holes
which provide two different ways to mount the fixture For more information,
see the section titled “Mounting the Fixture” on page 2-9
1-16 Cyberlight User Manual
Installing or Replacing the MSR 1200 Lamp
You will need:
– 1200 W, G-22 Base, MSR1200 or MSD1200 Metal Halide Lamp
Only
– Protective eye wear
– Protective gloves
Warnings (1) This equipment is designed for use with Philips® type MSR1200 or
MSD1200, 1200 watt lamp only Use of any other type lamp may be
hazardous and will void the warranty
(2) Change the lamp if it becomes damaged or thermally deformed
(3) An unshielded MSR/MSD 1200 lamp emits ultraviolet and visible
(UV-vis) radiation which could damage eyes and skin Whenever you are
working on or near an exposed MSR/MSD 1200 lamp, wear protective
eye gear Never look directly at the lamp while lamp is on
(4) Hot lamp may be an explosion hazard Do not open for 5 minutes after
switching off Wear eye and hand protection when re-lamping
1.
Allow the fixture to cool as described above, then power OFF the fixture and unplug it from
the power source
2.
Fully back out the two lamp assembly screws shown in Figure 1-10 The screws have retaining
springs that prevent them from being removed
Figure 1-10 Location of lamp assembly and optimization screws
3.
Grip the assembly by the three lamp optimizing screws and pull the assembly straight out the
back of the fixture The lamp’s power cord is long enough to allow you to pull the lamp
assembly entirely free of the Cyberlight
4.
When the lamp assembly is free, pull the old lamp straight up and out of the assembly as
shown in Figure 1-11:
Chapter 1 Installation and Setup
1-17
Brass socket
Figure 1-11 Removing the lamp from its socket
5. Put on your protective gloves Remove the plastic shell containing the new
lamp Break the seal, open the container and remove the lamp
6. Hold onto the ceramic lamp base and gently press the two lamp base pins into
the brass lamp sockets as shown in Figure 1-12 Do not force the lamp into the
socket; doing so could break the lamp
Cautions (1) Avoid touching any part of your skin to the lamp’s quartz
envelope Oil and residue from your fingers can create a “hot spot”
on the lamp, causing premature lamp aging
(2) Do not adjust the three optimization screws labeled in Figure 1-12
You will adjust these screws in a separate procedure, described in
the section titled “Optimizing the Cyberlight Fixture Lamp” on
page 1-19
Brass socket
Optimization screws
(do not adjust)
Figure 1-12 Installing the new lamp into the socket
7. Before you insert the lamp assembly back into the fixture, clean the lamp with
the alcohol wipe shipped with the lamp Otherwise, fingerprints and other
contaminates will shorten lamp life
8. Carefully guide the lamp assembly straight back into the fixture and make sure
1-18 Cyberlight User Manual
the lamp is inserted into the reflector Be careful not to crimp the two lamp
wires as you insert the lamp assembly Firmly tighten the two lamp assembly
screws to secure the assembly to the fixture
Resetting the Information Counter
The information counter tracks the cumulative length of time (in hours) the lamp
has been on and the number of lamp strikes (the number of times the lamp has
been illuminated) To reset the counter after changing the MSR lamp, perform the
following steps:
1. Turn the fixture power OFF (refer to Figure 1-21)
2. Set personality switches 3, 4, and 5 ON
3. Note the current settings of all address switches, then set all address switches
OFF, except for switch 6 Address switch 6 must be set ON
4. Turn the fixture power ON (the fixture will not home)
5. Set personality switches 3, 4, 5, and address switch 6 (from Step 3) OFF
6. Return the address switches to their previous settings
Optimizing the Cyberlight Fixture Lamp
Caution
Never operate the Cyberlight fixture without first optimizing the
lamp Damage to the fixture can occur if the lamp is misaligned
In order to get optimal light output you need to position the lamp’s arc at the focal
point of the fixture’s reflector (ie, optimize the lamp) You can do this by following
the procedure below:
1. Make sure the fixture’s power switch is OFF (see the section titled “Setting the
Cyberlight Power Switch” on page 1-31) Then plug the fixture’s power cord
into the electrical outlet
2. Place the Cyberlight in “setup” mode by setting personality DIP switch 2 ON
as shown in Figure 1-13 Make sure that all the remaining personality DIP
switches are OFF
Off
On
personality
12345678
Set switch 2
ON; all other
switches OFF
Chapter 1 Installation and Setup
1-19
Figure 1-13 Placing Cyberlight fixture in setup mode allows you to perform the
necessary lamp optimization prior to using a newly-installed lamp
3. Turn the fixture power ON The fixture homes before striking the lamp During
the homing operation you will hear clattering sounds as the wheels, shutter,
and mirror seek their home positions This is normal (If the lamp fails to strike,
make sure personality switch 2 is set ON)
4. Point the beam at a flat surface several feet away and make sure the beam has a
round shape (not an oval) by following the suggestions below (If a perfectly
flat surface is not available, point the beam at the flattest surface you can find)
•
If the Cyberlight is already connected to a controller, bring a litho into
focus Then select the open positions on all wheels (static litho, rotating
litho, color and effects) Now optimize as explained in this section
Procedural information for selecting effects can be found in the
documentation provided with your controller If you are using DMX 512
protocol to control your Cyberlight, also see Appendix A
•
If the Cyberlight is not connected to a controller, either lay the fixture flat
on its back or stand it on its end handles Point the beam at a flat surface
several feet away Manually swivel either the mirror or the fixture to make
the beam as round as you can
5. Using the three adjusting screws (shown in Figure 1-10), adjust the beam until
it is at its maximum brightness and the light level is even across the beam If
you cannot obtain an even brightness across the entire beam, try to obtain an
even brightness across the brightest (hot spot) point of light near the center of
the beam
Hint: If you have difficulty optimizing the lamp or run out of adjustment on
one of the adjustment screws, turn all three screws fully out and start over
6. After you have optimized the lamp, set personality switch 2 OFF; the shutter
closes The lamp will turn off in a few minutes Wait until the fans have shut
off before turning the fixture OFF
1-20 Cyberlight User Manual
Installing SV Color Wheel Dichroic Filters
This section applies to the SV model only The SV ships with a color wheel
configured identically to the CL, plus two additional color wheel dichroic filters
you can use in place of the factory-installed dichroic filters The two additional
filters are described below:
•
The CTO color correction dichroic filter is salmon-colored and can be used to
color-correct the SV to a 2950° K (tungsten) color temperature to match
tungsten-filament lighting fixtures
•
The homogenizing frost filter helps optimize the color mixing system by
making the light color and intensity even across the entire beam
High End Systems recommends that you substitute the CTO color corrector for the
CL color corrector and the homogenizing frost filter for the aqua filter
Please heed the following precautions when handling and using these filters:
•
Avoid touching the center of the glass Handle the edge of the glass
when removing or installing the filters If possible, wear cloth gloves
when inserting and removing filters from the color wheel
•
If necessary, clean the filters with a mild glass cleaner and a soft cloth
1. Remove the fixture’s center access door as shown in Figure 1-14
Figure 1-14 Removing the center access door
2. Rotate the color wheel until the dichroic you wish to replace is in a position for
easy access Figure 1-15 shows the location of the color wheel Figure 1-16
Chapter 1 Installation and Setup
1-21
shows the position of the dichroics in the color wheel
Figure 1-15 The color wheel is located between the effects wheel and the color
mixing flags, opposite the rotating litho wheel
Color Wheel Before
Color Wheel After
1. Open
2. Red
3. Purple
4. CL Color Corrector
5. Aqua
6. Blue
7. Orange
8. Indigo
1. Open
2. Red
3. Purple
4. CTO Color Corrector
5. Homogenizing Filter
6. Blue
7. Orange
8. Indigo
You will replace
these two dichroics
5
6
4
7
3
2
8
1
Open
Figure 1-16 High End Systems recommends you replace the CL color correction filter
(at position 4) with the salmon-colored CTO correction filter, and the aqua filter (at
position 5) with the homogenizing frost filter
Note Wheel positions are numbered starting at the open hole (position 1) The
other seven positions are numbered counter-clockwise from position 1
when you are facing the color wheel toward the lamp
3. Push the filter you wish to replace toward the center of the wheel to free it from
1-22 Cyberlight User Manual
the two wheel tabs as shown in Figure 1-17:
Figure 1-17 Push the dichroic filter toward the large retaining tab to free it from the
wheel clips
4. Once the dichroic is free of the two wheel tabs, pull it out of the wheel Place
the dichroic you just removed in a safe place where it will not get scratched
5. Orient the CTO color corrector so the coated side is facing the lamp, and with
the glass side facing away from the lamp as shown in Figure 1-18 (The
smoky-looking homogenizing frost filter can be installed with either side
facing the lamp)
Figure 1-18 Orient the coated side of the dichroic toward the lamp and the uncoated
side toward the static litho wheel
Caution
Be careful not to allow the filters to contact other objects during
installation Doing so could scratch them
6. Push the new filter into the large retaining clip on the wheel, then pull it up so
it fits under the wheel tabs
Chapter 1 Installation and Setup
1-23
Setting the Personality DIP Switches
There are two sets of DIP switches located on the rear panel of the Cyberlight
fixture: personality (the top set) and DMX address (the bottom set) Refer back to
Figure 1-1 if you are not sure of the location of these switches
The personality switches (shown in Figure 1-19) determine the fixture’s operating
mode You can use these switches for testing, setup, and for control of specialized
parameters Setting all the switches OFF is the normal operating mode when using
the fixture with a Lightwave Research (LWR) protocol controller, such as the
Status Cue system or the Cyberlight LCD controller Note that a switch is ON when it is
adjacent to the switch number and OFF when it is away from the switch number
Figure 1-19 The personality switches
Personality Switch Setting Descriptions
All Switches Off: Normal Mode
When all switches are OFF, the fixture must be controlled by Lightwave
Research (LWR) control protocol For more about LWR and DMX 512
control protocols, see Chapter 2
Switch 1: Self-Test
Switch 1 On – Setting switch 1 ON starts an internal self-diagnostic routine which
verifies the major functions of the fixture
After setting switch 1 to ON, the fixture homes (you will hear gears turning and
clacking) Except for the homing procedure, which is performed only once, the
self-test repeats until you set switch 1 back OFF
Note Setting switch 1 ON overrides any controller that might be attached to the
fixture You must set switch 1 back to OFF before attaching a controller to
the fixture
A controller is not required for the self-test However, if you do have a controller
you might want to verify fixture functionality under either DMX or LWR control
1-24 Cyberlight User Manual
If you are using the Status Cue system to control the Cyberlight, refer to its
documentation for the procedure If you are using another controller, refer to the
documentation shipped with the controller and also to Appendix A
Switch 1 Off – This is the normal operating mode During normal operation the
motor, fan, and lamp LEDs on the rear panel are ON (see Table 1-3 for a
description of rear panel LEDs)
Switch 2: Setup Mode
Switch 2 On – Setting switch 2 ON causes the lamp to strike This allows you to
adjust (optimize) the lamp without connecting the fixture to a controller It is very
important to optimize the lamp before operating the fixture with a newly-installed
lamp Failure to do so could result in damage to the fixture (See “Optimizing the
Cyberlight Fixture Lamp” on page 1-19)
Note Setting switch 2 ON overrides any controller that might be attached to the
fixture You must set switch 2 back to OFF before attaching a controller to
the fixture
Switch 2 Off – Normal operation
Locating the Information LED
Before describing the remainder of the Cyberlight switches, you need to know the
location of the information LED on the rear panel of the fixture Figure 1-20 shows
the location of this LED:
Figure 1-20 The Cyberlight rear panel LEDs give you information about the
Cyberlight fixture’s lamp, fixture voltage, operating temperature, data transmission
and reception, and other factors
Chapter 1 Installation and Setup
1-25
Switches 3, 4, and 5: Information Mode
Personality switches 3, 4, and 5 control what the “info” LED displays For
example, setting switches 3, 4, and 5 all OFF causes the “info” LED to display the
number of hours the lamp has been on The other information controlled by
personality switches 3, 4, and 5 is shown in Table 1-2:
Table 1-2: Cyberlight Information Mode
Set Switches
3
4
5
Off
Off
Off
Off
On
On
On
On
Off
Off
On
On
Off
Off
On
On
Off
On
Off
On
Off
On
Off
On
To Read this Information
Lamp Hours
Lamp Strikes
Lamp Voltage
Lamp Current
Fixture Voltage
Fixture Temperature
Reserved
Fixture Version Number
A detailed description of the information displayed in Table 1-2 is shown below:
Lamp Hours [off-off-off] – The total number of hours the lamp has been on since
the counter was reset
Lamp Strikes [off-off-on] – The total number of lamp strikes
Lamp Voltage [off-on-off] – The lamp voltage value at the moment of this sample
Lamp Current [off-on-off] – The lamp current value at the moment of this
sample
Fixture Voltage [on-off-off] – The fixture voltage value at the moment of this
sample
Fixture Temperature [on-off-on] – The fixture temperature (in °C) at the
moment of this sample
Reserved [on-on-off] – These switches are reserved for future expansion
Version number [on-on-on] – The fixture’s software version number
1-26 Cyberlight User Manual
Interpreting the Information LED
The “info” LED on the Cyberlight fixture’s rear panel indicates numerical values
by blinking Individual digits in a number are separated by a short pause Iterations
of the same number are separated by a long pause
The value that the info LED represents is determined by personality switches 3
through 5 Once you set the switches as shown in Table 1-2 on page 1-26, the same
value is repeated until you change the switch settings
Example #1: The number 3 would appear as shown below:
Example #2: The number 230 would appear as shown below:
Chapter 1 Installation and Setup
1-27
AU STI N, TEXAS U.S .A.
LI GH TWAVE R ES EA RC H
cyberlight
Switch 6: Pan Invert
Switch 6 inverts the pan motor, which allows two opposing fixtures to respond to
joystick control in the same direction
Switch 6 On – Reverses pan motor movement
A USTI N, TE XA S U. S. A.
Switch 7: Tilt Invert
cyberlight
LIGHTWAV E RES EARCH
Switch 6 Off – This is the normal operating mode The pan motor moves in its
normal direction
Switch 7 inverts the tilt motor, which allows two opposing or upside down fixtures
to respond to joystick control in the same direction
Switch 7 On – Reverses tilt motor movement
Switch 7 Off – This is the normal operating mode The tilt motor moves in its
normal direction
Switch 8: Pan/Tilt Swap
Switch 8 swaps the pan motor and tilt motor operation, which allows
perpendicularly-hung fixtures to respond to joystick control in the same direction
Switch 8 On – Swaps the pan motor and tilt motor movement
Switch 8 Off – This is the normal operating mode The pan and tilt motors move in
their normal directions
1-28 Cyberlight User Manual
Rear Panel LED Indicators
Table 1-3 lists the meanings of the information and status LEDs located on
Cyberlight fixture’s rear panel Refer back to Figure 1-1 earlier in this chapter for
the location of the rear panel LEDs
Table 1-3: Description of Cyberlight Rear Panel LEDs
LED Name
LED Color
Description
info
red (blinks)
Provides fixture status information See
“Switches 3, 4, and 5: Information Mode” on
page 1-26
motor
green
Normal
off
Check power supply board fuses as shown in
“Replacing Power Supply Fuses” on page
3-14
steady
yellow
Normal
flashing
yellow
(1 flash/
sec)
Lamp failed to strike See “Troubleshooting” on
page 2-12
rapid
flashing
Over-temp condition See “Troubleshooting”
on page 2-12
off
Timed out from loss of data
red
Normal
off
Fans have automatically shut off
yellow
The fixture is transmitting data back to a
controller
off
No data is being transmitted
green
The fixture is receiving data from a controller
off
No data is being received
lamp
fan
xmit
recv
If you believe that the LEDs are indicating a problem situation, or if you are
experiencing problems with your fixture, see the section titled “Troubleshooting”
on page 2-12
Chapter 1 Installation and Setup
1-29
Putting the Fixture Into Use
Before putting the Cyberlight fixture into use, you need to do the following:
•
Make sure the Cyberlight power cord cap is wired correctly
•
Make sure the Cyberlight is set for the correct voltage Appendix D contains a
listing of typical voltages worldwide You should always verify the proper
voltage with a local authority in your venue
•
Make sure you configured the fixture properly as described in this chapter
•
If you are connecting the fixture to a controller, see Chapter 2 If you are
controlling the Cyberlight with DMX 512 protocol, also see Appendix A (for
DMX 512 control)
•
See the section titled “Mounting the Fixture” on page 2-9
•
Heed all of the warnings below:
WARNINGS:
•
Do not mount on a flammable surface
•
Maintain minimum distance of 10 meter (328 feet) from
combustible materials
•
Observe minimum distance to lighted objects of 10 meter
(328 feet)
•
This equipment for connection to branch circuit having a
maximum overload protection of 20 A
•
Equipment suitable for dry locations only Do not expose
this equipment to rain or moisture
•
Refer servicing to qualified personnel; no user serviceable
parts inside
•
Class I Equipment - this fixture employs a grounded type
receptacle and is not intended for connection to a two wire,
ungrounded source of supply
•
Heed all other Cautions and Warnings in this manual and
printed on fixture labels
1-30 Cyberlight User Manual
Setting the Cyberlight Power Switch
It is very important that you turn the Cyberlight power switch OFF before
performing certain procedures Figure 1-21 shows the power switch in its ON and
OFF positions:
Figure 1-21 Setting the Cyberlight power switch to the ON and OFF positions
Warnings (1) This equipment for connection to branch circuit having a
maximum overload protection of 20 A
(2) Class I Equipment—This fixture employs a grounded type
receptacle and is not intended for connection to a two wire,
ungrounded source of supply
Chapter 1 Installation and Setup
1-31
Where to Go From Here
The following topics are covered in the remainder of this manual:
•
Chapter 2: Using your Cyberlight Covers the differences between DMX 512
and LWR control protocols; implementing LWR protocol; linking fixtures to
the controller; mounting the fixture; and troubleshooting suggestions
•
Chapter 3: Servicing your Cyberlight Shows how to perform routine
cleaning on mirrors, motors and lenses; replacing power supply fuses;
replacing dichroics or lithos; adjusting the CX mechanical zoom lens;
adjusting the mirror head deviation; and adjusting the yoke deviation
•
Appendix A: DMX control of Cyberlight Explains the three DMX modes
and how to use them Also shows the relationship between the Cyberlight
fixture number and the DMX address range it uses
•
Appendix B: Cyberlight mirror movement times A table that correlates speed
numbers to mirror movement times, in units of seconds
•
Appendix C: Factory-installed wheels Shows the factory-installed options
for the effects wheel, color wheel, static litho wheel and rotating litho wheel
for all three Cyberlight models
•
Appendix D: Typical voltages worldwide A table of typical voltage/
frequency settings from around the world, based on High End Systems’
experience
•
Appendix E: Important safety information Multi-lingual warnings you must
observe whenever operating the Cyberlight fixture
•
Glossary
•
Index
1-32 Cyberlight User Manual
Chapter 2
Using Your Cyberlight®
Choosing DMX 512 or LWR Protocol
Before connecting your Cyberlight to a controller, you need to understand the
difference between DMX 512 and Lightwave Research (LWR) control protocols
What is DMX 512 Protocol?
DMX 512 is an industry-standard method of controlling lighting fixtures and other
devices (such as lasers and hazers) Developed by the United States Institute of
Theatre Technology (USITT), DMX 512 is supported by leading entertainment
industry equipment manufacturers, such as High End Systems
DMX 512 (D for digital, MX for multiplex and 512 is the number of channels per
link) is a reliable, efficient and well-understood control protocol Its strength lies in
its ability to control a large number of different types of devices made by various
vendors on the same link using any DMX-compatible controller
High End Systems recommends setting the Cyberlight for DMX 512 protocol
(mode 2) for the following reasons:
•
The Cyberlight dynamically responds to both DMX 512 and LWR protocols
The fixture will switch to LWR protocol for software uploads, then switch
back to DMX 512 control with no user intervention (LWR protocol is the only
way to perform software uploads for the Cyberlight using either a Link Card or
the Cyberlight Upload Module)
•
DMX mode 2 affords the most features and best resolution of all three DMX
modes (See Appendix A for more detailed information)
What is LWR Protocol?
LWR protocol is another way to control fixtures, and is the protocol used for
Cyberlight software uploads using either a Link Card or the Cyberlight Upload
Module However, LWR protocol can be used to control only Cyberlight fixtures,
Intellabeam® automated luminaires, Emulator® laser simulators and Trackspot®
automated luminaires with a controller that supports LWR protocol (Other
vendors besides High End Systems have controllers that support LWR protocol
Consult the documentation provided with your controller for information about
protocol support)
Setting a Cyberlight for LWR protocol would be a good idea if the following are
true:
Chapter 2 Using Your Cyberlight
2-1
•
You have only Cyberlight fixtures on a link and are controlling them with the
Cyberlight LCD controller, the Status Cue system or another controller that
supports the LWR protocol
•
You have only Cyberlight fixtures, Trackspot fixtures and/or Intellabeam
fixtures attached to a link and are controlling them with the Status Cue system
You cannot have any other vendor’s equipment on the same link
Note At the time of this writing, you cannot perform a Cyberlight software
upload using another vendor’s controller, even if the controller supports
LWR control protocol
Controlling Multiple High End Systems Fixtures on the Same
Link
High End Systems recommends, if possible, that you do not mix Cyberlight
fixtures with other High End Systems equipment on the same link There are two
reasons for making this recommendation:
•
Cyberlight fixtures have the largest number and variety of effects to control;
therfore, putting only Cyberlight fixtures on a link saves you the trouble of
having to remember which fixtures respond to which commands
•
Intellabeam fixtures, Emulator fixtures and AF1000 fixtures will stop software
uploads to Cyberlight fixtures farther down the link Therefore, if you are
going to mix Cyberlight fixtures with Intellabeam fixtures and AF1000
fixtures on the same link, make sure you put all of the Intellabeam fixtures and
AF1000 fixtures after all of the Cyberlight fixtures
2-2 Cyberlight User Manual
Implementing DMX/LWR Control
Once you have decided whether to control your Cyberlight fixture using DMX 512
or LWR protocol, the procedure for connecting the fixtures to a controller is
exactly the same You need to follow the four basic steps listed below Each step
will be explained in greater detail during the remainder of this chapter
Note Please consult the documentation provided with your controller for
controller-specific information not covered in the remainder of this chapter
•
Set the Cyberlight address DIP switches: Select either LWR or DMX
protocol and other options This is covered in the section titled “Setting the
Address DIP Switches” on page 2-3
•
Obtain cabling and terminators: Obtain the right kind of cabling and obtain
or build a terminator for each link This is covered in the section titled
“Obtaining Cabling and Terminators” on page 2-6
•
Link the fixtures to the controller: Use XLR data-grade cable to link
fixtures to the controller and be sure to terminate the last device in the link
This is covered in the section titled “Linking the Fixtures to the Controller” on
page 2-8
•
Mount the fixture: Plan your installation and mount the fixture This is
covered in the section titled “Mounting the Fixture” on page 2-9
Setting the Address DIP Switches
The previous sections in this chapter have helped you decide whether to control
your Cyberlight using DMX 512 protocol or LWR protocol This section explains
how to implement that decision by selecting the protocol and by selecting a fixture
number
The eight DMX address DIP switches set the following options:
•
Whether the Cyberlight will be controlled using DMX 512 protocol or LWR
protocol
•
If you select DMX 512 protocol, you first need to determine which DMX
mode you wish to use, then set the fixture number See Appendix A for a
complete description of these options
•
If you select LWR protocol, you need to set the fixture number This is covered
in the section titled “Switches 1 through 6: Set LWR Protocol Fixture Number”
Chapter 2 Using Your Cyberlight
2-3
Address Switch Descriptions
Figure 2-1 below shows a functional breakdown of the address DIP switches:
Figure 2-1 The address switch block allows you to select the control protocol (DMX 1,
DMX 2, DMX 3, or LWR) and the fixture number
Switches 1 through 6: Set LWR Protocol Fixture Number
If you are using LWR protocol to control your Cyberlight, these switches set the
fixture number Refer to Table 2-2 for switch settings (If you are controlling your
Cyberlight using DMX 512 protocol, refer to Appendix A)
You need to assign a unique fixture number to each Cyberlight you wish to
respond independently to control commands Multiple fixtures can be assigned the
same address if you wish them all to respond to control commands in the same
way
For example, suppose you have 12 Cyberlight fixtures on one link You want six of
them to operate independently of each other and the other six to operate in exactly
the same way You need to assign each of the six independently-operating
Cyberlight fixtures a unique fixture number, but you can assign a single fixture
number to the other six, for a total of seven fixture numbers
Note A unique fixture number is required for each Cyberlight for software
uploads
2-4 Cyberlight User Manual
Switches 7 and 8: Protocol Mode
Use these switches to define the communication protocol between the fixture and
the controller By default, switches 7 and 8 are both set OFF, which enables the use
of Lightwave Research (LWR) protocol for fixture control This means you must
use a controller that supports LWR protocol The Status Cue system and the
Cyberlight LCD controller (both manufactured by High End Systems) support
LWR protocol In addition, other vendors have controllers that support LWR;
consult the documentation provided with your controller for more information
Table 2-1: Protocol Mode Switch Settings
Switches 7 and 8:
7
8
off
off
on
on
off
on
off
on
Mode
LWR
DMX 1
DMX 2
DMX 3
Table 2-2: Cyberlight Fixture Number Settings (LWR Protocol)
For This Fixture
Number
01
02
03
04
05
06
07
08
09
10
11
12
13
14
15
16
Set These DIP
Switches ON
none
1
2
1 and 2
3
1 and 3
2 and 3
1, 2, and 3
4
1 and 4
2 and 4
1, 2, and 4
3 and 4
1, 3, and 4
2, 3, and 4
1, 2, 3, and 4
For This Fixture
Number
17
18
19
20
21
22
23
24
25
26
27
28
29
30
31
32
Set These DIP
Switches ON
5
1 and 5
2 and 5
1, 2, and 5
3 and 5
1, 3, and 5
2, 3, and 5
1, 2, 3, and 5
4 and 5
1, 4, and 5
2, 4, and 5
1, 2, 4, and 5
3, 4, and 5
1, 3, 4, and 5
2, 3, 4, and 5
1, 2, 3, 4, and 5
Chapter 2 Using Your Cyberlight
2-5
Obtaining Cabling and Terminators
There are two main types of cabling you can use: microphone cable and datagrade cable Although pin-compatible microphone cable is suitable for small-scale
designs, data cable is recommended, especially for longer cable runs Data cable is
designed to carry a higher-quality signal with less susceptibility to electromagnetic
interference
The cable you use should have the characteristics listed below:
•
•
•
•
•
•
2-conductor twisted pair plus a shield
maximum capacitance between conductors - 30 pF/ft
maximum capacitance between conductor and shield - 55 pF/ft
maximum resistance of 20 Ω/1000 ft
nominal impedance 100–140 Ω
22–24 AWG with insulation having a dielectric rating of 300 volts or
higher
For example, Belden 9841 data-grade cabling meets specifications for EIA RS-485
applications and is highly recommended for use with Cyberlight
Constructing Cabling
Follow the instructions in this section if you need to construct cabling You should
construct cables using shielded, two-conductor cable with a male 3-pin XLR
connector at one end and a female 3-pin XLR connector on the other end Pinouts
for both male and female XLR connectors are shown in Figure 2-2
Negative
Shield
Positive
Female XLR Connector
Figure 2-2 Properly-constructed data cable
2-6 Cyberlight User Manual
Negative
Male XLR Connector
You should test each cable with a voltage/ohm meter (VOM) to verify correct
polarity and to make sure that the negative and positive pins are not grounded or
shorted to the shield or to each other Also, make sure that pin 1 is shielded
Table 2-3: XLR Cable Pinouts
Pin 1 is the shield
Pin 2 is the data compliment (negative)
Pin 3 is the data true (positive)
Caution
Do not use the ground lug on the XLR connectors Do not connect the
shield to ground or allow contact to ground Grounding the shield could
cause a ground loop and/or erratic behavior
Terminators
The last device on each link must have a 120 ohm, 1/4 watt (minimum) terminator
attached to its Data Out connector (This is true for both DMX 512 protocol or
LWR protocol) Two terminators are shipped with each link card (supplied with the
Status Cue system)
You can construct terminators by following the instructions below:
1 Obtain a male XLR connector
2 Disassemble the connector
3 Solder a 120 ohm resistor,
minimum of 1/4 watt, between pins 2 and 3
4 Reassemble the XLR connector
5 Install the terminator in the Data Out port of
the last device in the link
1
2
3
Figure 2-3 Constructing a data cable terminator
Chapter 2 Using Your Cyberlight
2-7
Linking the Fixtures to the Controller
Starting with the controller, link fixtures using the procedure below Refer also to
Figure 2-4
1. Start with the controller Consult the documentation provided with the
controller for the procedure to connect XLR cable to its Data Out connector
2. Connect the female end of the XLR cable from the controller to the first
Cyberlight fixture’s male Data In connector
3. Connect the male end of another XLR cable to the first Cyberlight fixture’s
female Data Out connector
4. Continue connecting the Data Out connector from one Cyberlight to the Data
In connector to the next Cyberlight until you have linked all of the Cyberlight
fixtures
5. Connect other devices to the Cyberlight fixtures as desired, using the
instructions in the documentation provided with those devices
6. Place a male 120 ohm terminator on the female Data Out connector of the last
device in the link (This is true for both DMX 512 protocol or LWR protocol)
The procedure for making a terminator can be found in the section titled
“Terminators” on page 2-7
Figure 2-4 Make sure you connect the Data Out connector from the previous
Cyberlight to the Data In connector of the next Cyberlight Also, you must terminate
the Data Out connector of the last device in the link (whether the last device is a
Cyberlight or something else)
2-8 Cyberlight User Manual
Mounting the Fixture
Cyberlight is designed to be mounted in any orientation; you can even stand the
fixture on its end handles However you wish to mount the fixture, you must
follow the precautions and suggestions below:
•
Verify the input voltage you are using matches the Cyberlight fixture’s voltage
selection jumpers (see the section titled “Electrical Specifications” on page 1-2
and “Changing the Voltage Selection Jumpers” on page 1-10)
•
Heed the cautions and warnings below to guard against personal injury and
damage to the fixture
Cautions
(1) This equipment for connection to branch circuit having a maximum
overload protection of 20 A
(2) Class I Equipment - This fixture employs a grounded type receptacle
and is not intended for connection to a two wire, ungrounded source of
supply
(3) Mount the fixtures and controllers in a location that is away from
direct heat and protected from moisture Do not mount on a flammable
surface
(4) Maintain minimum distance of 10 meter (328 feet) from combustible
materials Observe minimum distance to lighted objects of 10 meter (328
feet)
Standing the Fixture on its End Handles
The Cyberlight end handles are designed to support the weight of the fixture;
however, make sure you observe the following guidelines:
•
The fixture must be located away from moving objects that could strike it and
cause it to become unbalanced
•
The fixture must be mounted on a sturdy, stable surface
•
If the surface is other than floor height, make sure you use safety cables as
described in the next section
Mounting the Fixture on a Truss or Other Support System
If you are mounting the fixture on a truss or another type of support, do all of the
following:
•
Verify the truss or support will handle the weight of all the devices you are
mounting Cyberlight fixture weights are listed in the section titled
“Physical Specifications” on page 1-2
Chapter 2 Using Your Cyberlight
2-9
•
The use of user-supplied safety cable is strongly recommended You must
supply your own safety cable and you must verify the cable is capable of
supporting the weight of the fixture as listed in the section titled “Physical
Specifications” on page 1-2 You can order galvanized safety cables from
your High End Systems dealer/distributor (part number 12040001) Also
see Figure 2-6 on page 2-11
•
You must supply your own clamps to attach the fixture to the support You
can attach one or two clamps to the Cyberlight yoke Verify that the
clamp(s) you use are capable of supporting the weight of the fixture as
listed in the section titled “Physical Specifications” on page 1-2 You can
order deluxe C-clamps for a two-inch truss from your High End Systems
dealer/distributor (part number 55000004) Also see Figure 2-5 on page
2-11
•
Make sure the fixture cannot be rotated all the way around (360o) (Using
two clamps is a good way to do this) Allowing the fixture to rotate 360o
could loosen the clamp mounting bolts
Note Because of the variety of conceivable lighting designs, you should consider
the procedure below as a suggested guideline only High End Systems
cannot make specific recommendations for your particular lighting design
or venue
Caution: Only experienced lighting personnel should attempt to hang a lighting
fixture to an appropriate theatrical truss.
Do not use the fixture handles as a safety cable attachment point. The
Cyberlight handles are intended only for hand-lifting the fixture.
Warning: Failure to use a safety cable could result in injury or death. High End
Systems supplies the proper safety cables and may be contacted for
replacements if necessary. For more information go to: www.highend.com/
trusshang.
Suggested mounting procedure:
1. You should use three people to mount each Cyberlight fixture: two people to
hold the fixture while it is being secured in place, and one person to secure the
fixture to its support and to attach clamps and safety cables
2. Always stand on a firm, stable surface The fixture should be at a height where
you can comfortably work on it, and should also be resting on a stable surface
Do not try to hold up the fixture yourself while you are working on it; as Step 1
suggests, the ideal method is to have a crew of three people to install the fixture
3. Attach a suitable clamp through one of the holes on top of the Cyberlight
fixture yoke If you are attaching one clamp, use the middle hole on the yoke If
you are attaching two clamps (as shown in Figure 2-5), attach one clamp to
each of the holes on either side of the center hole Use locking washers when
attaching the clamp to the yoke
2-10 Cyberlight User Manual
Figure 2-5 Attaching two C-clamps to the Cyberlight yoke
4. Tighten the clamps firmly to the Cyberlight yoke and to the support
5. Loop one or more suitable safety cables around the support and around the top
of the Cyberlight yoke, as shown in Figure 2-6
Figure 2-6 Always use suitable safety cables when hanging a Cyberlight from a truss
or any other support system The safety cable can be looped around the support and
the Cyberlight yoke once or twice; loop it twice if this will help prevent the fixture from
rotating, thus possibly loosening the clamp mounting bolt
Chapter 2 Using Your Cyberlight
2-11
Troubleshooting
This section lists typical symptoms and solutions for problems you might
encounter when using your Cyberlight If you need additional help, or if the
problem you are experiencing is not listed here, contact your dealer/distributor or
High End Systems Customer Service in one of the ways shown in the section titled
“Getting Help” on page Intro-5
Fixture does not work: no LEDs, fans, lamp, or other functionality
Possible causes and solutions:
1. Cause: No input power
Solutions: Do both of the following:
a. Verify the fixture is plugged into a working power supply
b. Verify the integrity of the power cord and the wiring of the power
cord cap
c. Make sure the lamp box access door is securely fastened; this
engages an interlock switch which must be engaged for the fixture
to power up The location of the lamp box access door is shown in
Figure 1-14 on page 1-21
2. Cause: Power supply board fuse F1 has failed
Solution: Follow the directions in the section titled “Replacing Power
Supply Fuses” on page 3-14 to inspect and replace the fuse if necessary
2-12 Cyberlight User Manual
Lamp does not strike
Possible causes and solutions:
1. Cause: Bad lamp
Solution: Replace with a new or known good lamp
2. Cause: Improper voltage setting or power cord cap wiring
Solutions: Do both of the following:
a. Make sure the fixture is set for the same voltage as the power
supply See “Setting the Cyberlight® Fixture Voltage” on page 1-10
b. Make sure the power cord cap is wired correctly See “Obtaining
and Installing the Power Cord Cap” on page 1-9
3. Cause: Power supply fuse F2 has failed (Other symptoms are: the
fans won’t work and control commands fail)
Solution: Follow the instructions in the section titled “Replacing
Power Supply Fuses” on page 3-14 to inspect the fuse and replace it if
necessary
Lamp shuts off
Possible causes and solutions:
1. Cause: Over-temperature
Note The fixture’s maximum operating temperature is 50° C (122° F) An overtemperature condition can be confirmed by a rapidly-flashing yellow Lamp
LED The location of rear-panel LEDs is shown in Figure 1-1 on page 1-7
Solutions: Do all three of the following:
a. Check for restricted air flow Clean the fans, especially the fans in
the lamp box access door The lamp box access door is shown in
Figure 1-2 on page 1-11 Instructions for cleaning the fans are
shown in the section titled “Cleaning the Fans” on page 3-2
b. Verify fan power connectors are attached to the power supply board
See “Setting the Cyberlight® Fixture Voltage” on page 1-10 for
instructions on removing the lamp box access door so you can
check fan connections
c. Check power supply board fuse F4 Follow the instructions in the
section titled “Replacing Power Supply Fuses” on page 3-14 to
inspect the fuse and replace it if necessary
Chapter 2 Using Your Cyberlight
2-13
2.
Cause: Lamp socket is loose, causing arcing
Solution: Replace the lamp socket assembly Call your High End
Systems dealer/distributor for more information
3. Cause: Aging lamp
Solution: Replace with a new or known good lamp
Fixture is not responding to control commands—“Recv” LED does not flash
Possible causes and solutions:
1. Cause: Faulty XLR cable
Solutions: Do one or both of the following:
a. Replace XLR cables going to the fixture’s Data In and Data Out
connectors with known good cables
b. Verify cable integrity using cable test equipment
3. Cause: There is no controller attached to the link, or the controller is
not generating any output
Solution: Verify that a controller is attached to the link Verify that the
controller is generating output by sending commands to a known
working device
4. Cause: Power supply fuse F2 has failed (Other symptoms are: the
fans won’t work and the lamp won’t strike)
Solution: Follow the instructions in the section titled “Replacing
Power Supply Fuses” on page 3-14 to inspect the fuse and replace it if
necessary
Control commands pass-through only, lamp and fans work only in self-test
Possible cause and solution:
Cause: Power supply board fuse F3 has failed
Solution: Follow the instructions in the section titled “Replacing Power
Supply Fuses” on page 3-14 to inspect the fuse and replace it if necessary
2-14 Cyberlight User Manual
Dim flags close, fixture does not respond to control commands, lamp turns off, fans
turn off
Possible causes and solutions:
1. Cause: Faulty XLR cable
Solutions: Do one or both of the following:
a. Replace XLR cables going to the fixture’s Data In and Data Out
connectors with known good cables
b. Verify cable integrity using cable test equipment
2. Cause: Power supply board fuse F2 has failed
Solution: Follow the instructions in the section titled “Replacing
Power Supply Fuses” on page 3-14 to inspect the fuse and replace it if
necessary
Motor or mirror does not move smoothly
Possible causes and solutions:
1. Cause: Faulty or exposed wiring
Solutions: Do both of the following:
a. Make sure there are no exposed wires leading to the motor/mirror
Exposed wires contacting the metal chassis can short the power
supply to the motor/mirror
b. Verify wiring integrity using electrical test equipment
2. Cause: Mechanical binding
Solutions: Do both of the following:
a. Manually rotate all wheels (static litho, rotating litho, color and
effects) and note any contact with adjacent wheels If there is
contact, see the section titled “Checking and Correcting Wheel
Clearances” on page 2-17
b. Static litho wheel or color wheel: make sure the wheel is not
rubbing against its sensor (the sensor is located at the bottom of the
wheel against the chassis) If there is contact, see “Checking and
Correcting Wheel Clearances” on page 2-17
Warning
Contact between wheels within the Cyberlight fixture can result in
damage to fixture components and to the fixture itself!
Chapter 2 Using Your Cyberlight
2-15
Color wheel or static litho wheel is not centered in the beam or is in the wrong
position
Possible causes and solutions:
1. Cause: Wheel is rubbing against its sensor
Solution: Manually rotate the wheel and note any contact between the
wheel and its sensor (the sensor is located at the bottom of the wheel
against the chassis) If there is contact, see the section titled “Checking
and Correcting Wheel Clearances” on page 2-17
2. Cause: Sensor or homing slot is dirty
Solution: Clean the sensor and the homing slot See “Cleaning the
Color Wheel, Static Litho Wheel, Effects Wheel and Sensors” on page
3-6
Lithos or dichroic filters are cracking
Possible causes and solutions:
1. Cause: Improper installation
Solution:
•
Static lithos and color wheel dichroic filters: dichroic filters should
be oriented with the coated side facing toward the lamp and the
glass (uncoated) side facing away from the lamp
•
Rotating litho wheel lithos: see “Removing and Installing Rotating
Lithos” on page 3-18
2. Cause: Faulty infrared filter allowing overheating inside the fixture
Solution: Visually inspect the infrared filter for cracks or deep
scratches The section titled “Cleaning the Infrared Filter, Reflector,
Color Mixing Flags and Dim Flags” on page 3-9 shows the location of
the infrared filter and how to access it
Color flags, iris or other components cracked or heat damaged
Possible cause and solution:
Cause: Faulty infrared filter allowing overheating inside the fixture
Solution: Visually inspect the infrared filter for cracks or deep scratches
The section titled “Cleaning the Infrared Filter, Reflector, Color Mixing
Flags and Dim Flags” on page 3-9 shows the location of the infrared filter
and how to access it
2-16 Cyberlight User Manual
Fixture will not accept software upload
Possible causes and solutions:
1. Cause: Incorrect addressing or configuration
Solutions: Do both of the following:
a. Make sure each fixture is set for a unique fixture number
b. Verify that all fixture numbers called for are being used
Note The section titled “Setting the Address DIP Switches” on page 2-3 has more
information about fixture addressing
2. Cause: No return communication
Solution: Make sure you bypass any data distributors Data distributors
stop the two-way communication required for software uploads
AF1000 fixtures, Intellabeam fixtures or Emulator fixtures on the same
link as the Cyberlight can also prevent return communication from
Cyberlight See the section titled “Controlling Multiple High End
Systems Fixtures on the Same Link” on page 2-2 for more information
Low light output, fuzzy images
Possible causes and solutions:
1. Cause: Aging lamp
Solution: Replace the lamp with a new or known good lamp
2. Cause: The lamp has not been optimized
Solution: Optimize the lamp as shown in the section titled “Optimizing
the Cyberlight Fixture Lamp” on page 1-19
3. Cause: Dirty optical path
Solution: Clean all lenses, filters, lithos, the anti-reflective glass and
the mirror as shown in the sections titled “Cleaning the Color Wheel,
Static Litho Wheel, Effects Wheel and Sensors” on page 3-6 and
“Cleaning the Infrared Filter, Reflector, Color Mixing Flags and Dim
Flags” on page 3-9
Checking and Correcting Wheel Clearances
You will need:
- 1/16 inch right angle allen wrench
- 7/16 inch wrench
- 5/64 inch allen wrench
Use the procedure in this section to check for clearances between wheels and their sensors, or
between wheels and other objects in the Cyberlight fixture
1. Manually turn the color wheel and effects wheel to make sure there is no
contact between them and any other object
Chapter 2 Using Your Cyberlight
2-17
2. If there was any contact, adjust the wheel’s clearance by taking the three
actions below:
•
using a 1/16 inch right angle allen wrench, loosen the two hex screws on
the wheel’s hub (the rotating litho wheel is shown in Figure 2-7)
•
press on the center of the wheel to move the hub until there is no longer any
contact between the wheel and its sensor or any other object in the fixture
•
retighten the screws
Figure 2-7 Loosening the hub screws allows you to adjust the wheel’s clearance
2-18 Cyberlight User Manual
3. Repeat Step 2 to adjust clearances for the color wheel and effects wheel Make
note of the following:
•
If you cannot adjust the wheel to eliminate contact between the wheel and
other objects or its sensor, the wheel might be warped Follow the
directions in the section titled “Cleaning the Color Wheel, Static Litho
Wheel, Effects Wheel and Sensors” on page 3-6 to remove the wheel After
removing the wheel, lay it on a flat surface to determine whether it is
warped If the wheel is warped, it should be replaced Contact Customer
Service in one of the ways listed in the section titled “Getting Help” on
page Intro-5 for more information
•
The rest of the procedure applies to the rotating litho wheel only
4. Do both of the following:
•
Gently rock the rotating litho wheel back and forth and note any contact
between the rotating litho wheel and the static litho wheel
•
Rotate a litho holder 360°, making note of any contact between it and any
other object
5. If you observe any contact between an individual rotating litho or the rotating
litho wheel and any other object, adjust the rotating litho wheel hub to
eliminate that contact Loosen the two 1/16 inch allen screws shown in Figure
2-8 below and push on the center of the wheel to eliminate the contact
Figure 2-8 Loosen these two allen screws to adjust the rotating litho wheel
6. Make sure the white spring plunger still makes contact with the rotating litho
Chapter 2 Using Your Cyberlight
2-19
wheel The location of the spring plunger is shown in Figure 2-9
Figure 2-9 The rotating litho wheel’s spring plunger must always contact the rotating
litho wheel
7. If the spring plunger does contact the rotating litho wheel, proceed with Step 8
Otherwise, do the following:
•
Use a 7/16 inch wrench to loosen the hex nut shown in Figure 2-9
•
Use a 5/64 inch allen wrench to turn the allen screw shown in Figure 2-9
This allen screw moves the spring plunger in and out Adjust the plunger so
that it makes contact with the rotating litho wheel
•
Use a 7/16 inch wrench to retighten the hex nut
8. Repeat Steps 4 through 7 until you are sure there is no contact between either
the rotating litho wheel or an individual rotating litho and any other object in
the fixture
Note You can turn the rotating litho wheel until both the wheel and the lithos are
locked in place (they will not move) This is the normal “homed” position of
the wheel
2-20 Cyberlight User Manual
Chapter 3
Servicing Your Cyberlight ®
General Maintenance and Cleaning
You should clean your Cyberlight after each lamp change to maintain performance
and reliability, since dust and dirt can accumulate and cause overheating or
malfunctions
Warning Before performing any service or maintenance, make note of the
following:
(1) Hot lamp may be an explosion hazard Do not open for 5
minutes after switching off Wear eye and hand protection when
re-lamping
(2) Equipment surfaces may reach temperatures up to 62° C (144°
F) Allow 10 minutes for cooling before handling
(3) Disconnect power before re-lamping or servicing
After allowing the fixture to cool down and powering it off, see one of the topics
listed below:
•
•
•
•
“Cleaning the Fans” on page 3-2
“Cleaning the Mirror, Lenses, Motors and Iris” on page 3-3
“Cleaning the Color Wheel, Static Litho Wheel, Effects Wheel and Sensors”
on page 3-6
“Cleaning the Infrared Filter, Reflector, Color Mixing Flags and Dim Flags”
on page 3-9
Chapter 3 Servicing Your Cyberlight
3-1
Cleaning the Outer Surfaces
Wipe the outer surfaces with a soft cloth or use a vacuum to remove the built-up dust and dirt
Cleaning the Fans
If necessary to remove built-up dust and dirt from the fans, you can use a low-pressure compressed
air source to clean them You must place an object (not your fingers!), such as a pen or a
screwdriver, into the fan fins to prevent the fans from spinning while you are blowing air into them;
allowing the fans to spin can result in severe damage to the fans
You must also observe the Caution and Warnings below:
Caution
Make sure the fans are held stationary The fans can be severely
damaged if they are allowed to spin with the force of the compressed air
Warnings (1) Use only a low-pressure compressed air source (25 psi or lower)
(2) To avoid personal injury, do not expose your eyes or skin to the direct
jet of compressed air, since it can constitute a serious health hazard Use
suitable protection for your eyes and exposed skin
Screwdriver
holding fins in
place
Fan Fins
Compressed
air source
Figure 3-1 Holding the fan fins in place while you clean the fans using compressed
air
3-2
Cyberlight User Manual
Cleaning the Internal Components
You will need: - a soft, lint-free cotton cloth
- mild glass cleaning solution
- warm soapy water
Removing the Center Access Door
With the fixture bottom-side up, remove the center access door by sliding the two
door thumb latches inward Lift the door straight up, unhook the safety chain, and
set it aside
Figure 3-1 Bottom view of the Cyberlight fixture
Cleaning the Mirror, Lenses, Motors and Iris
1. Using a soft, lint-free cotton cloth, remove dirt and dust from the motors,
mirror, power lens, focus lens, and zoom lens If necessary to remove built-up
dirt and dust, clean the lenses with a mild glass cleaner and a soft lint-free
cotton cloth
Note The Cyberlight CX has no color mixing flags, motorized zoom lens, or
frost flags It does have a three-position mechanical zoom lens
2. Clean the mirror with a cloth soaked in warm, soapy water (see Figure 3-2 for
the location of the mirror)
Chapter 3 Servicing Your Cyberlight
3-3
Figure 3-2 Locations of the iris, power lens, focusing lens, zoom lens and mirror
Figure 3-3 Locations of the motors
3. Manually turn the rotating litho wheel until its open position is opposite the iris
(You will see the iris when looking toward the focusing lens through the open
position on the rotating litho wheel)
3-4
Cyberlight User Manual
4. Manually close the iris by turning the large black-colored gear shown in Figure
3-4:
Figure 3-4 Close the iris by rotating the large black gear located on top of the iris
motor
5. Gently wipe away excess dust and dirt from the iris using a soft lint-free cloth
You can access one side of the iris through the open position on the rotating
litho wheel; you can access the other side through the open position on the
effects wheel
Caution
Be careful when cleaning the iris It is made of a very thin, delicate
metal that can be easily damaged
6. Clean both sides of the anti-reflective glass (shown in Figure 3-5) with a soft,
lint-free cotton cloth and mild glass cleaning solution
Anti-reflective glass
cyberlight
AUSTIN, TEXAS U.S.A.
R
LIT HO
LIGH TWAVE RESEARCH
Figure 3-5 Cleaning the anti-reflective glass
Chapter 3 Servicing Your Cyberlight
3-5
Cleaning the Color Wheel, Static Litho Wheel, Effects Wheel and Sensors
You will need:
- one 9/64 inch right angle allen wrench
- one 5/16 inch wrench
Use this procedure to remove and clean the color wheel, static litho wheel, and
effects wheel; and to clean the sensors for the color wheel and the static litho
wheel High End Systems recommends removing the wheels for cleaning to
prevent bending or deforming them
The optical sensors, located below the color and litho wheels, electronically sense
the homing slot on the edge of the wheel in order to keep track of the “home”
positions of the respective wheels
1. This step applies to removing the static litho wheel only Manually rotate the
color wheel until the open position is opposite the standoff you will remove
next The location of the standoff is shown in Figure 3-6
Figure 3-6 Removing the standoff between the iris motor and the color wheel
2. This step applies to removing the static litho wheel only Use a 9/64 inch right
angle allen wrench to remove the two screws holding the standoff between the
rotating litho assembly and the color wheel assembly (You will need to insert
the allen wrench through the open position on the color wheel in order to
remove one of the screws) Set the standoff aside
3. Manually rotate the wheel until the
large ends of the keyhole slots are
facing down as shown in Figure
3-7
Figure 3-7 Make sure the wheel is
positioned with the keyhole slots
facing downward before removing it
4. Holding the wheel in place with
one hand, use a 5/16 inch wrench
to loosen (do not remove) the two
hex screws securing the wheel to
its hub
5. Pull up on the wheel to remove it from the hub The large ends of the keyhole
slots will slip over the two hex screws
3-6
Cyberlight User Manual
6. Clean the wheel with a mild glass cleaner and a soft cotton cloth Make sure
the homing slot (shown in Figure 3-8) is free of dust and dirt
Figure 3-8 The homing slot is a small groove on the outside edge of the wheel The
static litho wheel and the color wheel’s homing slots are in different locations The
effects wheel does not have a homing slot
7.
This step applies to the color wheel and static litho wheel only Clean the groove in the wheel
sensor Figure 3-9 shows the location of the static litho wheel sensor The color wheel has an
identical sensor located underneath it
Figure 3-9 Clean the groove in the wheel sensor
8. When you are finished cleaning the wheel and sensor, carefully slip the wheel
back onto its hub The large ends of the keyhole slots should be pointing down,
which allows them to slip over the tops of the screws which secure the wheel to
the hub Make sure of the following:
•
All but the effects wheel: The wheel fits within the sensor slot, not outside
of the slot
•
Static litho wheel: Orient the coated/etched side of the litho away from the
lamp; orient the glass side of the litho toward the lamp Improper
installation can damage the litho
Chapter 3 Servicing Your Cyberlight
3-7
Figure 3-10 Static litho wheel lithos must be oriented with the coated/etched side
facing away from the lamp
•
Color wheel: Orient the coated side of the color wheel dichroic filter
toward the lamp; orient the glass side of the dichroic away from the lamp
Figure 3-11 Color wheel dichroic filters should be oriented with the coated side of the
dichroic facing toward the lamp and the glass side facing toward the static litho wheel
Also make sure you do the following:
•
Place the “slider” screw on the hub in the center of the middle keyhole slot,
as shown in Figure 3-12 on page 3-9
•
Push the wheel until the two hex nuts are all the way onto the narrow ends
of the keyhole slots before tightening the screws
•
Tighten the hex nuts until they are secure but do not overtighten Doing so
could damage the wheel
Caution
3-8
Be careful not to allow the lithos/dichroics to contact other objects when
reinstalling the wheels Doing so could scratch them
Cyberlight User Manual
Figure 3-12 Position the keyhole slots so they fit over both hex screws as well as the
“slider” screw inset in the hub
9. Retighten the two screws that hold the wheel in place Tighten the screws only
until they are snug; do not overtighten
10. Re-install the standoff you removed in Step 1 on page 3-6
Cleaning the Infrared Filter, Reflector, Color Mixing Flags and Dim Flags
You will need:
- one right angle 5/32 inch allen wrench
This section explains how to clean two components located inside the Cyberlight
lamp box: the infrared filter and reflector It also explains how to clean the color
mixing flags and the dim flags, which are located on the other side of the lamp
assembly
Cautions
(1) Equipment surfaces may reach temperatures up to 62° C (144° F)
Allow 10 minutes for cooling before handling
(2) Change shields, lenses, or the infrared filter if they have become
visibly damaged to such an extent that their effectiveness is impaired, for
example by cracks or deep scratches
Warnings (1) An unshielded MSR/MSD 1200 lamp emits ultraviolet and visible
(UV-vis) radiation which could damage eyes and skin Never look directly
at the lamp while lamp is on
(2) Hot lamp may be an explosion hazard Do not open for 5 minutes after
switching off Wear eye and hand protection when re-lamping
1. Allow the fixture to cool as described above then power it OFF and unplug it
from the power source
Chapter 3 Servicing Your Cyberlight
3-9
2. Fully back out the two lamp assembly screws shown in Figure 3-13 The
screws have retaining springs that prevent them from being removed
Figure 3-13 Location of lamp assembly and optimization screws
3. Grip the three lamp optimizing screws and pull the lamp assembly straight out
of the back of the fixture The lamp’s power cord is long enough to allow you
to pull the lamp assembly entirely free of the Cyberlight
4. Carefully set the lamp assembly aside You can remove the lamp, if you wish,
and place it where it will not get broken Pull it straight out of the socket as
shown in Figure 3-14
Brass socket
Figure 3-14 Removing the lamp from its brass socket
5. Using the 5/32 inch right angle allen wrench, remove the four 5/32 inch allen
screws shown in Figure 3-15
3-10 Cyberlight User Manual
Figure 3-15 Location of the first four rear panel screws you need to remove in order
to access the lamp assembly
6. Remove the last two 5/32 inch allen head screws from the color mixing plate as
shown in Figure 3-16 Carefully lift the lamp box access door from the fixture
Remove these two 5/32 inch allen screws
Color mixing plate
Figure 3-16 In order to remove the lamp box access door, you need to remove the
last two 5/32 inch allen screws, which are located by the color mixing and dim flags
7. CL and CX models only: As you lift the assembly, disconnect the two fan
power connectors (black and red wires) from the power supply board as shown
in Figure 3-17 Set the lamp box access door aside
Chapter 3 Servicing Your Cyberlight
3-11
Figure 3-17 On CL and CX models, make sure you disconnect the fan power wires
from the fan connectors before removing the lamp box access door
8. Using a lint-free cotton cloth and mild glass cleaner, wipe dust and dirt from
the reflector and infrared filter, which are shown in Figure 3-18 The infrared
filter consists of two rose-colored glass hemispheres directly in front of the
reflector
Figure 3-18 Locations of the reflector and infrared filter
9. Using a soft, lint-free cotton cloth, wipe excess dirt and dust from the other
side of the infrared filter and from the dim flags There are two black, metallic
dim flags on all Cyberlight models Their locations are described below:
•
If you have the CL or SV, the two dim flags are among the color mixing
flags, so you should clean all the flags at the same time Manually “flip”
each flag until it is in a position where you can access it, then wipe the flag
with a lint-free cloth Dampen the cloth with a mild glass cleaning solution
if necessary to clean built-up dust and dirt If a color mixing flag is
damaged or broken, or if you need to remove it in order to clean it, contact
Customer Service in one of the ways shown in the section titled “Getting
Help” on page Intro-5
3-12 Cyberlight User Manual
•
The CX has no color mixing flags The two dim flags are located in the area
shown in Figure 3-19
Figure 3-19 Location of the color mixing flags and dim flags
10. Make sure the infrared filter, reflector, color mixing flags and dim flags are all
clean
11. Carefully guide the lamp assembly straight back into the fixture and make sure
the lamp is inserted into the reflector Be careful not to crimp the two lamp
wires as you insert the lamp assembly Firmly tighten the two lamp assembly
screws (refer to Figure 3-13 on page 3-10) to secure the assembly to the fixture
12. Reinstall the lamp assembly cover Do the following:
•
CL and CX only: Reconnect the two fan wires to the Cyberlight power
supply board Refer back to Figure 3-17 on page 3-12
•
Carefully replace the lamp box access door
•
Reinstall the six 5/32 inch screws (refer to Figure 3-15 on page 3-11 and
Figure 3-16 on page 3-11)
Removing and Cleaning the Rotating Lithos
You can clean the rotating lithos in or out of the rotating litho wheel using a mild
glass cleaner and a soft cotton cloth Turn the rotating wheel so that you have easy
access to the litho then clean the lithos while they are still mounted in the wheel
If you wish to remove the litho for cleaning follow the procedure in the section
titled “Removing and Installing Rotating Lithos” Then clean the litho with a mild
glass cleaner and a soft lint free cloth
Chapter 3 Servicing Your Cyberlight
3-13
Replacing Parts
This section explains how to remove and replace parts inside the fixture Make
note of the following caution and warnings:
Caution
Equipment surfaces may reach temperatures up to 62° C (144° F) Allow
10 minutes for cooling before handling
Warnings (1) An unshielded MSR/MSD 1200 lamp emits ultraviolet and visible
(UV-vis) radiation which could damage eyes and skin Never look directly
at the lamp while lamp is on
(2) Hot lamp may be an explosion hazard Do not open for 5 minutes after
switching off Wear eye and hand protection when re-lamping
(3) Replace fuses only with the specified type and rating
(4) Disconnect power before re-lamping or servicing
After allowing the fixture to cool as described above, turn it OFF and unplug it
from its power source Then see one of the following sections:
•
“Replacing Power Supply Fuses” on page 3-14
•
“Removing and Installing Rotating Lithos” on page 3-18
•
“Replacing Dichroics/Lithos in the Color Wheel or the Static Litho Wheel” on
page 3-21
•
“Adjusting the Mechanical Zoom Lens (CX Only)” on page 3-22
•
“Adjusting the Mirror Head Deviation” on page 3-23
•
“Adjusting the Yoke Deviation” on page 3-25
Replacing Power Supply Fuses
This section explains how to replace the four fuses located on the Cyberlight
power supply board
You will need:
- 5/32 inch allen wrench
- Replacement fuses (5 mm by 20 mm only)
There are a total of four:
Amps
Volts
25 A
250 V
Slow Blow Only
4A
250 V
Fast Blow Only
05 A
250 V
Fast Blow Only
16 A
250 V
Fast Blow Only
3-14 Cyberlight User Manual
Fuse Type
1. After allowing the fixture to cool as described on the previous page, turn the
power switch OFF and unplug the fixture
2. With the fixture oriented bottom-side up, remove the center access door by
sliding the two door latches inward Lift the door straight up, unhook the safety
chain, and set the door aside See Figure 3-20
Figure 3-20 View of the bottom of the Cyberlight fixture, where the access door
latches are located
3. Remove the fixture’s lamp box access door by removing the six 5/32 inch allen
head screws securing it to the fixture as follows:
•
Remove the four 5/32 inch allen head screws from the bottom of the rear
panel as shown in Figure 3-21
Figure 3-21 Removing the rear panel screws allows you to access the Cyberlight
voltage selection jumpers
Chapter 3 Servicing Your Cyberlight
3-15
•
Remove the last two 5/32 inch allen head screws from the color mixing
plate as shown in Figure 3-22 Carefully lift the lamp box access door from
Remove these two 5/32 inch allen screws
Color mixing plate
the fixture
Figure 3-22 In order to remove the lamp box access door, you need to remove the
last two 5/32 inch allen screws, which are located by the color mixing and dim flags
4. CL and CX models only: As you lift the assembly, disconnect the two fan
wiring harness connectors (black and red wires) from the power supply board
as shown in Figure 3-23 Set the lamp box access door aside You now have
access to the power supply board
Figure 3-23 On CL and CX models, make sure you disconnect the fan power wires
from the fan connectors before removing the lamp box access door
3-16 Cyberlight User Manual
5. Note which fuse(s) needs to be replaced and make sure you replace it with a
fuse of the same type and rating, as shown in the list below:
}
F1 = 25 A, 250 V, Slow Blow Only
F2 = 4 A, 250 V, Fast Blow Only
F3 = 05 A, 250 V, Fast Blow Only
F4 = 16 A, 250 V, Fast Blow Only
5 mm x 20 mm only
Table 3-1 below describes the function of each of the four power supply board
fuses
Table 3-1: Description and Function of Power Supply Board Fuses
Fuse
Type and
Rating
Protects
Symptom
F1
25 A, 250 V
Input transformer
Fixture stops working; no functionality
F2
4 A, 250 V
All 5 V power
supplies
Fans won’t work, control commands
fail, lamp won’t strike
F3
05 A, 250 V
Data link power
supply
Control commands pass-through only,
lamp and fans work only in self-test
F4
16 A, 250 V
Fans
Fans won’t work, forcing fixture into
thermal shutdown
Fuses F1, F2 and F3 are located on either side of the large green-colored earth wire
Figure 3-24 shows the location of each fuse
Figure 3-24 Location of power supply board fuses
6. Replace the lamp box access door by reversing this procedure and power the
fixture ON
Chapter 3 Servicing Your Cyberlight
3-17
Removing and Installing Rotating Lithos
This section explains how to remove and replace LithoPatterns lithos
Please heed the following precautions when handling and using lithos:
•
Avoid touching the coated side of the glass Handle the edge or uncoated side
of the glass when removing or installing lithos If possible, wear cloth gloves
when inserting and removing lithos from the litho wheel housing
•
If necessary, clean the lithos with a mild glass cleaner and a soft cloth
Removing a Litho from the Rotating Litho Wheel
1. Remove the fixture’s center access door as shown in Figure 3-25
Figure 3-25 Removing the center access door
2. Rotate the wheel until the desired litho is in a position for easy access
3. Keep the rotating litho holder in place with one hand and grasp the spring tab
with the other hand Turn the spring; as you do so pull it away from each
retainer washer Continue pulling and turning the spring until it is loose enough
to lift out of the housing
4. Carefully remove the litho from the housing
3-18 Cyberlight User Manual
5. Insert the new or cleaned litho into the litho housing as shown in Figure 3-26
Make sure you orient the litho as explained below:
•
Any LithoPatterns or any Psy-Dye lithos, including Psy-Dye Special
Effects: the coated side of the litho must face away from the lamp;
uncoated (glass) side faces toward the lamp
•
Flat unglazed Art Glass or Special Effects other than Psy-Dye: the nontextured side must face away from the lamp; textured side faces toward the
lamp
•
Multi-Color lithos with stainless steel holder: the solid flat side of the
stainless steel litho holder must face away from the lamp (ie, the flat side of
the holder must be against the wheel hub)
Caution
Improper installation can result in heat damage to the litho Use care
when installing the litho; make sure you handle it by the edge only and do
not allow it to contact any other object in the fixture while you are
inserting it
T o w a rd la m p
A w a y fro m la m p
S id e v ie w o f
ro ta tin g lith o
h o u s in g
Figure 3-26 Insert the new or cleaned litho into the rotating litho housing as
described above; improper installation can cause heat damage to the litho
6.
Insert the spring into the housing as shown in Figure 3-27
Turn the spring as you push in on it
Figure 3-27 Turn on the spring as you push it into the rotating litho housing
7.
To lock the litho in place, begin working the spring under any one of the three retainer washers
until the spring is fully compressed as shown in Figure 3-28 (The retaining washers are shaded
Chapter 3 Servicing Your Cyberlight
3-19
in the figure)
Side view of
rotating litho
housing
Fit the end of the
spring under the washer
Front view of
rotating litho
housing
Figure 3-28 Make sure the end of the spring fits under any one of the three retaining
washers, as shown above
Caution
Do not place the end of the spring anywhere else in the rotating litho
wheel housing, as shown in Figure 3-29 Doing so could cause the spring
to unwind and/or cause it to come into contact with other objects inside
the fixture, possibly resulting in damage to the fixture
Incorrect placement
Figure 3-29 Do not place the end of the spring between the three retaining washers
3-20 Cyberlight User Manual
Replacing Dichroics/Lithos in the Color Wheel or the Static
Litho Wheel
This section explains how to replace dichroic filters in the color wheel and how to
replace lithos in the static litho wheel (A dichroic is solid-colored with no etched
pattern, while a litho has an etched pattern)
Although the lithos and dichroics look different from each other, they are the same
size and the wheels are the same size, so the procedure for replacing them is
exactly the same
You can replace dichroics/lithos if they are damaged or broken, to change the
order in their respective wheels, or to add new ones (See the section titled
“Optional Accessories” on page 1-6 for ordering information) Dichroics and
lithos are also completely interchangeable between Cyberlight CLs, CXs and SVs
1. Position the wheel so the dichroic/litho you wish to replace is easy to access
2. This step applies to replacing a litho only Position the effects wheel so the
open position in the wheel aligns with the litho you wish to replace
3. Push the dichroic/litho you wish to replace toward the center of the wheel to
free it from the two wheel tabs as shown in Figure 3-30
Figure 3-30 Push the dichroic/litho toward the large retaining tab to free it from the
wheel tabs
4. Once the dichroic/litho is free of the two wheel tabs, pull it out of the wheel If
you intend to reuse this dichroic/litho, put it in a safe place where it will not get
scratched
5. Color wheel only: Orient the dichroic filter so the coated side is facing toward
the lamp and the uncoated, glass side is facing toward the static litho wheel
6. Static litho wheel only: Orient the new litho so the etched side is facing away
from the lamp (toward the effects wheel) The glass side must be facing the
lamp Improper installation can damage the litho
7. Install the new dichroic/litho into its wheel by pushing it under the large
retaining clip, then pull it up so it fits under the wheel tabs
Chapter 3 Servicing Your Cyberlight
3-21
Adjustments
This section explains the Cyberlight CL, SV and CX fixture adjustments
You will need:
- #2 Phillips screwdriver
- 9/64 inch allen wrench
Adjusting the Mechanical Zoom Lens (CX Only)
You can easily position the mechanical zoom lens to any of three zoom values:
Forward (position 1) is: ~ 12°
3) is: ~ 18°
Middle (position 2) is: ~ 14°
Rear (position
1. Optional: Remove the front fan access door for easier access to the lens
assembly Remove the four screws that fasten the fan assembly to the front
plate with a #2 Phillips screwdriver Also remove the 9/64 inch allen head
screw from each side of the fan assembly Lift the fan assembly out far enough
to access the fan wires connector Separate the connector and set the fan
assembly aside
2. The zoom lens assembly is fastened to the slide by two Phillips head screws
Remove the two screws, move the lens to desired position (1, 2, or 3), then, reinsert and tighten the two screws
Position 3 = ~18o
Position 2 = ~14o (factory default)
Position 1 = ~12o
Remove these two
Phillips-head screws
Figure 3-31 Adjusting the Cyberlight CX mechanical zoom lens
3-22 Cyberlight User Manual
Adjusting the Mirror Head Deviation
You will need:
- 5/32 inch right angle allen wrench
You can easily pivot or offset the mirror head deviation up to 20 degrees left or
right of center for a total range of 40 degrees
1. Using an allen wrench, loosen the three 5/32 inch allen screws shown in Figure
3-32 Using your hand, loosen T-handle that locks the mirror head in position
Loosen these 5/32" allen screws
Loosen this T-handle
Figure 3-32 Loosen the three 5/32 inch allen screws and the T-handle to adjust the
mirror head deviation
Note The mirror head deviation adjustment can be performed with the Cyberlight
positioned either on its back (as is shown in Figure 3-32) or on its front
2. Grasp both sides of the mirror head and rotate it until it is positioned according
to your needs See Figure 3-33
Chapter 3 Servicing Your Cyberlight
3-23
Figure 3-33 Grasp both sides of the mirror head and rotate it to the desired position
3. Note the “Deviation” angle (see Figure 3-34) you are using, in case you wish to
use the same deviation in other venues
de
gr
ee
s
-
+
gre
de
es
Figure 3-34 Be sure to note the deviation angle in case you need to set other fixtures
for the same deviation, or if you want to use this exact deviation again For example,
the figure above has about a 10° + (plus) deviation
4. When you are finished, retighten the three 5/32 inch allen screws and the Thandle so the mirror head is securely in position
3-24 Cyberlight User Manual
Adjusting the Yoke Deviation
You can adjust the yoke deviation to orient the Cyberlight in different positions If
you make note of the deviation angle, you can orient a group of Cyberlight fixtures
in precisely the same direction Figure 3-35 below shows how to adjust the yoke
deviation
Figure 3-35 Adjust the yoke handles on both sides of the Cyberlight to tilt the fixture
in a specific way
Chapter 3 Servicing Your Cyberlight
3-25
3-26 Cyberlight User Manual
Appendix A
DMX Control of Cyberlight®
Use this appendix to control your Cyberlight fixtures using DMX 512 modes 1, 2, and 3
Overview
The Cyberlight is a block-addressed fixture; that is, you do not address it at an arbitrary DMX start channel,
but rather at a channel boundary There are two channel boundaries you can select: 15-channel and 20channel If you choose to control your Cyberlight on a 20-channel boundary, for example, each fixture takes
up a contiguous block of 20 DMX channels
Selecting a DMX Mode
The three DMX modes available for your Cyberlight provide three different levels of control and flexibility,
and can be used with CLs, SVs, and CXs as summarized below:
•
Mode 1: standard 20-channel control
•
Mode 2 (recommended): enhanced 20-channel control Mode 2 offers the same features as mode 1 but
at greater resolution (for example, mode 2 supports frost strobing and 96 shutter strobe speeds while
mode 1 does not support frost strobing and supports only eight shutter strobe speeds)
•
Mode 3: minimal 15-channel minimal control Mode 3 does not support color mixing or zoom You
can select mode 3 in two possible situations:
•
You are controlling only CXs on a link Mode 3 utilizes all CX features but does not support color
mixing or zoom, which are supported by CLs and SVs only
•
You have do not have enough available DMX channels on the link to allocate 20 channels per
Cyberlight fixture (Mode 3 also supports up to 34 fixtures per link, while modes 1 and 2 both
support up to 25 fixtures per link)
Note
Modes 1, 2 and 3 are supported by all Cyberlight models If you have any Cyberlight CXs on the
link, they will not respond to color mixing or zoom commands, but will otherwise respond to
commands identically to CLs and SVs
Performing Software Uploads Over a Link
Software uploads can be performed over a link using either a Link Card or the Cyberlight Upload Module
Fixtures automatically switch to LWR protocol for the upload, then switch back to DMX control after the
upload has been successfully completed Consult the Status Cue software documentation or the Upload
Module for the procedure
Note
There are two things that can stop software uploads to a Cyberlight: a data distributor and certain
High End Systems equipment on the same link You must bypass any data distributors when
performing a software upload on a link Also review the section titled “Controlling Multiple High
End Systems Fixtures on the Same Link” on page 2-2
Appendix A DMX Control of Cyberlight
A-1
Address DIP Switches
Figure A-1 below shows a functional breakdown of the eight DMX address DIP switches, located on the
Cyberlight fixture’s rear panel (Review “Identifying Rear Panel Components” on page 1-7 for the location
of the switches)
Figure A-1 The DMX address switch block allows you to select the control protocol (DMX 1, DMX
2, DMX 3, or LWR) and the fixture number
Related Topics
Other information you might need to reference when assigning DMX channel numbers is summarized
below:
•
The section titled “Channel Boundaries” on page A-17 explains the relationship between fixture number
(which you set with the address DIP switches) and actual DMX address ranges
•
The section titled “Choosing DMX 512 or LWR Protocol” on page 2-1 explains what to consider before
selecting either DMX 512 or Lightwave Research (LWR) control protocol
•
The section titled “Controlling Multiple High End Systems Fixtures on the Same Link” on page 2-2
explains important considerations when mixing Cyberlight fixtures, Intellabeam fixtures, Emulator
fixtures, and AF1000 fixtures on the same link
Accessing Control Information
In order to access the control channel (channel 20 in 20-channel DMX modes 1 and 2 and channel 15 in 15channel DMX mode 3), you must follow the procedure below:
1.
Put the dim channel and the control channel at full
2.
Put the dim channel at zero and the control channel at full
3.
(Must occur within 3 seconds): Put the dim channel at zero Put the control channel at: 25% for home or
50% for shutdown
4.
Hold for an additional 3 seconds
Rounding Conventions
The values displayed in the “Range” and “Channel Value” columns in the following tables may vary slightly
depending on your controller’s rounding convention
Appendix A DMX Control of Cyberlight
A-2
DMX 512 Mode 1 – Standard Cyberlight® DMX
Control
Each Cyberlight fixture in DMX mode 1 uses 20 channels of the DMX 512 protocol thus providing control
for up to 25 fixtures (512 / 20 = 256 fixtures) Use the procedure below to control your Cyberlight with
DMX mode 1:
1.
Set the fixture to DMX mode 1 by setting address switch 7 to OFF and address switch 8 to ON
2.
Set address switches 1 through 5 to correspond to the desired fixture number, as shown in Table A-1
Note that Cyberlight CX fixtures configured for 20-channel mode work properly and can be mixed with
Cyberlight fixtures; they do not respond to the color mixing, zoom, or variable frost constructs
3.
Refer to Table A-2 for the Cyberlight DMX 20-channel assignments
Table A-1: Addressing Fixtures in 20-Channel DMX 512 Mode 1
Cyberlight
Fixture
Fixture
Address
Switches ON
Cyberlight
DMX Channel
Number
Fixture
Fixture
Address
Switches ON
DMX Channel
Number
Fixture 1
none
001
Fixture 14
1, 3, and 4
261
Fixture 2
1
021
Fixture 15
2, 3, and 4
281
Fixture 3
2
041
Fixture 16
1, 2, 3, and 4
301
Fixture 4
1 and 2
061
Fixture 17
5
321
Fixture 5
3
081
Fixture 18
1 and 5
341
Fixture 6
1 and 3
101
Fixture 19
2 and 5
361
Fixture 7
2 and 3
121
Fixture 20
1, 2, and 5
381
Fixture 8
1, 2, and 3
141
Fixture 21
3 and 5
401
Fixture 9
4
161
Fixture 22
1, 3, and 5
421
Fixture 10
1 and 4
181
Fixture 23
2, 3, and 5
441
Fixture 11
2 and 4
201
Fixture 24
1, 2, 3, and 5
461
Fixture 12
1, 2, and 4
221
Fixture 25
4 and 5
481
Fixture 13
3 and 4
241
Table A-2: Cyberlight DMX Assignments Mode 1
Channel
Assignment
Range
Construct Parameter
Channel 1
Pan coarse adjustment
Position
Channel 2
Pan fine adjustment
Position
Channel 3
Tilt coarse adjustment
Position
Channel 4
Tilt fine adjustment
Position
Appendix A DMX Control of Cyberlight
A-3
Table A-2: Cyberlight DMX Assignments Mode 1
Channel
Channel 5
Assignment
Color Wheel
Range
Full
0
Construct Parameter
Color 1 (open)
Half color 1 and 2
Color 2
Half color 2 and 3
Color 3
Half color 3 and 4
Color 4
Half color 4 and 5
Color 5
Half color 5 and 6
Color 6
Half color 6 and 7
Color 7
Half color 7 and 8
Color 8
Half color 8 and 1
Forward spin speed 8
Forward spin speed 7
Forward spin speed 6
Forward spin speed 5
Forward spin speed 4
Forward spin speed 3
Forward spin speed 2
Forward spin speed 1
Reverse spin speed 1
Reverse spin speed 2
Reverse spin speed 3
Reverse spin speed 4
Reverse spin speed 5
Reverse spin speed 6
Reverse spin speed 7
Reverse spin speed 8
Color 1 (open)
Channel 6
Cyan (Red)
Color Mix
Channel 7
Magenta (Green)
Color Mix
Channel 8
Yellow (Blue)
Color Mix
Appendix A DMX Control of Cyberlight
A-4
Table A-2: Cyberlight DMX Assignments Mode 1
Channel
Channel 9
Assignment
Static litho
Range
Full
0
Channel 10
Rotating Litho
Full
Select the litho to rotate
forward/reverse with this
channel Then use Channel
11 to set the rotation speed
For rotating litho position
parameters select the litho
position to index with this
channel Then use Channel
11 to set the rotational
position (index value) from 0
to 360 degrees
0
Construct Parameter
Litho 1 (open)
Litho 2
Litho 3
Litho 4
Litho 5
Litho 6
Litho 7
Litho 8
Forward spin speed 8
Forward spin speed 7
Forward spin speed 6
Forward spin speed 5
Forward spin speed 4
Forward spin speed 3
Forward spin speed 2
Forward spin speed 1
Reverse spin speed 1
Reverse spin speed 2
Reverse spin speed 3
Reverse spin speed 4
Reverse spin speed 5
Reverse spin speed 6
Reverse spin speed 7
Reverse spin speed 8
Litho 1 (open)
Position 3 (open)
Reverse rotate 5
Reverse rotate 4
Reverse rotate 2
Reverse rotate 1
Forward rotate 5
Forward rotate 4
Forward rotate 2
Forward rotate 1
Position 5
Position 4
Position 3 (open)
Position 2
Position 1
Position 3 (open)
Channel 11
Rotate
(use with Channel 10)
For Rotating Litho rotate mode use Ch 11 to set
rotate speed
For Rotating Litho position mode use Ch 11 to set
the index from 0 to 360 degrees
Channel 12
Zoom
Zoom in/out
Channel 13
Focus
Focus in/out
Channel 14
Iris
Iris open/close
Appendix A DMX Control of Cyberlight
A-5
Table A-2: Cyberlight DMX Assignments Mode 1
Channel
Channel 15
Assignment
Effects Wheel
Range
Full
0
Channel 16
Frost
Channel 17
Shutter
Dim
Channel 19
Motor Speed
Channel 20
Control
Effect 4 (open)
Effect 8
Effect 7
Effect 6
Effect 5
Effect 4
Effect 3
Effect 2
Effect 1
Effect 4 (open)
Frost in/out
Full
0
Channel 18
Construct Parameter
Open
Closed
Strobe speed 8
Strobe speed 7
Strobe speed 6
Strobe speed 5
Strobe speed 4
Strobe speed 3
Strobe speed 2
Strobe speed 1
Open
Closed
Dim open/close
Full
Speed 99
0
Speed 1
Speed 94
50% fader – shutdown
25% fader – home
Appendix A DMX Control of Cyberlight
A-6
DMX 512 Mode 2 – Enhanced Cyberlight® DMX
Control
Each Cyberlight fixture in DMX mode 2 uses 20 channels of the DMX 512 protocol thus providing control
for up to 25 fixtures (512 / 20 = 256 fixtures) Use the procedure below to control your Cyberlight with
DMX mode 2:
1.
Set the Cyberlight fixture to DMX mode 2 by setting address switch 7 to ON and address switch 8 to
OFF
2.
Set address switches 1 through 5 to correspond to the desired fixture number, as shown in Table A-3
Note that Cyberlight CX fixtures configured for 20-channel mode work properly and can be mixed with
Cyberlight fixtures; they do not respond to the color mixing, zoom, and frost constructs
3.
Refer to Table A-4 for the Cyberlight DMX mode 2 channel assignments
Table A-3: Addressing Fixtures in 20 Channel DMX 512 Mode 2
Cyberlight
Fixture
Fixture
Address
Switches ON
DMX Channel
Number
Cyberlight
Fixture
Fixture
Address
Switches ON
DMX Channel
Number
Fixture 1
none
001
Fixture 14
1, 3, and 4
261
Fixture 2
1
021
Fixture 15
2, 3, and 4
281
Fixture 3
2
041
Fixture 16
1, 2, 3, and 4
301
Fixture 4
1 and 2
061
Fixture 17
5
321
Fixture 5
3
081
Fixture 18
1 and 5
341
Fixture 6
1 and 3
101
Fixture 19
2 and 5
361
Fixture 7
2 and 3
121
Fixture 20
1, 2, and 5
381
Fixture 8
1, 2, and 3
141
Fixture 21
3 and 5
401
Fixture 9
4
161
Fixture 22
1, 3, and 5
421
Fixture 10
1 and 4
181
Fixture 23
2, 3, and 5
441
Fixture 11
2 and 4
201
Fixture 24
1, 2, 3, and 5
461
Fixture 12
1, 2, and 4
221
Fixture 25
4 and 5
481
Fixture 13
3 and 4
241
Appendix A DMX Control of Cyberlight
A-7
The “Channel Value (%)” column in Table A-4 below has values you should use if your controller has
dimmer-type controls The “Channel Value (numerical)” column has values you should use if you are using
the Status Cue system or another controller that uses digital or numerical controls
Table A-4: Cyberlight DMX Assignments Mode 2
Channel
Assignment
Channel
Value (%)
Channel
Value
(numerical)
Construct Parameter
Channel 1
Pan coarse adjustment
0-100%
0-255
Position
Channel 2
Pan fine adjustment
0-100%
0-255
Position
Channel 3
Tilt coarse adjustment
0-100%
0-255
Position
Channel 4
Tilt fine adjustment
0-100%
0-255
Position
Channel 5
Color Wheel
Full
98
96
94
93
91
90
88
87
85
83
82
80
79
77
76
255
250
245
240
237
232
230
224
222
217
211
209
204
201
196
194
Color 1 (open)
Half color 1 and 2
Color 2
Half color 2 and 3
Color 3
Half color 3 and 4
Color 4
Half color 4 and 5
Color 5
Half color 5 and 6
Color 6
Half color 6 and 7
Color 7
Half color 7 and 8
Color 8
Half color 8 and 1
74
73
71
70
68
66
65
63
62
61
59
57
56
54
52
51
189
186
181
179
173
168
166
161
158
156
150
145
143
138
133
130
Color 1 (open)
Half color 1 and 2
Color 2
Half color 2 and 3
Color 3
Half color 3 and 4
Color 4
Half color 4 and 5
Color 5
Half color 5 and 6
Color 6
Half color 6 and 7
Color 7
Half color 7 and 8
Color 8
Half color 8 and 1
50
127
26
25
66
64
0
0
2
0
Forward spin speed – fastest
•
•
•
Forward spin speed – slowest
Reverse spin speed – slowest
•
•
•
Reverse spin speed – fastest
Color 1 (open)
0-100%
0-255
Full Speed
Color Wheel
Mspeed
Color Wheel
Spin Speed
Channel 6
Cyan (Red)
Color Mix
Appendix A DMX Control of Cyberlight
A-8
Table A-4: Cyberlight DMX Assignments Mode 2
Channel
Assignment
Channel
Value (%)
Channel
Value
(numerical)
Construct Parameter
Channel 7
Magenta (Green)
0-100%
0-255
Color Mix
Channel 8
Yellow (Blue)
0-100%
0-255
Color Mix
Channel 9
Static litho
Full
98
96
94
93
91
90
88
87
85
83
82
80
79
77
76
255
250
245
240
237
232
230
224
222
217
211
209
204
201
196
194
Litho 1 (open)
Litho 1 shake wide
Litho 2
Litho 2 shake wide
Litho 3
Litho 3 shake wide
Litho 4
Litho 4 shake wide
Litho 5
Litho 5 shake wide
Litho 6
Litho 6 shake wide
Litho 7
Litho 7 shake wide
Litho 8
Litho 8 shake wide
74
73
71
70
68
66
65
63
62
61
59
57
56
54
52
51
189
186
181
179
173
168
166
161
158
156
150
145
143
138
133
130
Litho 1 (open)
Litho 1 shake narrow
Litho 2
Litho 2 shake narrow
Litho 3
Litho 3 shake narrow
Litho 4
Litho 4 shake narrow
Litho 5
Litho 5 shake narrow
Litho 6
Litho 6 shake narrow
Litho 7
Litho 7 shake narrow
Litho 8
Litho 8 shake narrow
50
127
26
25
66
64
0
0
2
0
Forward spin speed – fastest
•
•
•
Forward spin speed – slowest
Reverse spin speed – slowest
•
•
•
Reverse spin speed – fastest
Litho 1 (open)
Full Speed
Static litho
Mspeed
Static litho
Spin Speed
Appendix A DMX Control of Cyberlight
A-9
Table A-4: Cyberlight DMX Assignments Mode 2
Channel
Channel 10
Assignment
Rotating Litho
Full Speed
Select Mspeed
the litho to rotate
(forward/reverse) with this
channel Then use Channel
11 to set the rotation speed
For rotating litho position
parameters select the litho
position to index with this
channel Then use Channel
11 to set the rotational
position (index value) from 0
to 360 degrees
Channel
Value (%)
Channel
Value
(numerical)
Full
98
95
91
87
83
80
76
72
68
64
61
58
54
255
250
242
232
222
212
204
194
184
173
163
156
150
138
Position 3 (open)
Reverse rotate 5
Reverse rotate 4
Reverse rotate 2
Reverse rotate 1
Forward rotate 5
Forward rotate 4
Forward rotate 2
Forward rotate 1
Position 5
Position 4
Position 3 (open)
Position 2
Position 1
50
46
42
39
36
32
28
24
20
17
13
10
5
0
127
117
107
99
92
82
71
61
51
43
33
26
13
0
Reverse rotate 5
Reverse rotate 4
Reverse rotate 2
Reverse rotate 1
Forward rotate 5
Forward rotate 4
Forward rotate 2
Forward rotate 1
Position 5
Position 4
Position 3 (open)
Position 2
Position 1
Position 3 (open)
Construct Parameter
Channel 11
Rotate
(use with Channel 10)
0-100%
0-255
For Rotating Litho rotate mode use
Ch 11 to set rotate speed
For Rotating Litho position mode
use Ch 11 to set the index from 0
to 360 degrees
Channel 12
Zoom
0-100%
0-255
Zoom in/out
Channel 13
Focus
0-100%
0-255
Focus in/out
Channel 14
Iris
0-100%
0-255
Iris open/close
Channel 15
Effects Wheel
Full
96
91
85
80
73
67
62
56
255
245
232
217
204
186
171
158
143
Full Speed
Effect 4 – (open)
Effect 8 – cyan color corrector
Effect 7 – diffusion
Effect 6 – wide angle
Effect 5 – magenta color corrector
Effect 4 – (open)
Effect 3 – yellow color corrector
Effect 2 – CYM tri-color mosaic
Effect 1 – prism
Appendix A DMX Control of Cyberlight
A-10
Table A-4: Cyberlight DMX Assignments Mode 2
Channel
Channel 15
Assignment
Effects Wheel
Mspeed
Channel 16
Frost
Channel
Value (%)
Channel
Value
(numerical)
Construct Parameter
50
44
37
33
27
21
14
8
0
127
112
94
84
69
54
36
20
0
Effect 8 – cyan color corrector
Effect 7 – diffusion
Effect 6 – wide angle
Effect 5 – magenta color corrector
Effect 4 – (open)
Effect 3 – yellow color corrector
Effect 2 – tri color mosaic (C-Y-M)
Effect 1 – prism
Effect 4 – (open)
Full
255
50
129
Frost – frost free
•
•
•
Frost – frost full
50
126
0
0
2
0
Full
98
97
255
250
247
1
1
0
4
1
0
100
255
0
0
Full
255-200
0
21
0
Speed 99
•
•
•
Speed 1
Speed 95
50%
25%
128
64
shutdown
home
Frost variable
None to full
Frost
Full Frost Strobing
(Frost in)
Channel 17
Shutter
Strobe
50 % duty cycle
Channel 18
Channel 19
Channel 20
Dim
Motor Speed
Control
Frost strobing – fastest
•
•
•
Frost strobing – slowest
Frost – frost free
Open
Closed
Strobe speed – fastest
•
•
•
Strobe speed – slowest
Open
Closed
No dim
Full dim (blackout)
Appendix A DMX Control of Cyberlight
A-11
DMX 512 Mode 3 – Cyberlight® 15-Channel DMX
Control
Each Cyberlight fixture in DMX mode 3 uses 15 channels of the DMX 512 protocol thus providing control for
up to 34 fixtures (512 / 15 = 341 fixtures) Use the procedure below to control your Cyberlight with DMX mode
3:
1.
Set the Cyberlight fixture to DMX mode 3 by setting address switches 7 and 8 to ON
2.
Set address switches 1 through 6 as shown in Table A-5
3.
Refer to Table A-6 for the Cyberlight 15-channel assignments
Table A-5: Addressing Fixtures in 15 Channel DMX 512 Mode 3
Cyberlight
Fixture
Fixture
Address
Switches ON
DMX Channel
Number
Cyberlight
Fixture
Fixture
Address
Switches ON
DMX Channel
Number
Fixture 1
none
001
Fixture 18
1 and 5
256
Fixture 2
1
016
Fixture 19
2 and 5
271
Fixture 3
2
031
Fixture 20
1,2, and 5
286
Fixture 4
1 and 2
046
Fixture 21
3 and 5
301
Fixture 5
3
61
Fixture 22
1, 3, and 5
316
Fixture 6
1 and 3
076
Fixture 23
2, 3, and 5
331
Fixture 7
2 and 3
091
Fixture 24
1, 2, 3, and 5
346
Fixture 8
1, 2, and 3
106
Fixture 25
4 and 5
361
Fixture 9
4
121
Fixture 26
1, 4, and 5
376
Fixture 10
1 and 4
136
Fixture 27
2, 4, and 5
391
Fixture 11
2 and 4
151
Fixture 28
1, 2, 4, and 5
406
Fixture 12
1, 2, and 4
166
Fixture 29
3, 4, and 5
421
Fixture 13
3 and 4
181
Fixture 30
1, 3, 4, and 5
436
Fixture 14
1, 3, and 4
196
Fixture 31
2, 3, 4, and 5
451
Fixture 15
2, 3, and 4
211
Fixture 32
1, 2, 3, 4,and 5
466
Fixture 16
1, 2, 3, and 4
226
Fixture 33
6
481
Fixture 17
5
241
Fixture 34
1 and 6
496
Appendix A DMX Control of Cyberlight
A-12
Table A-6: Cyberlight DMX Assignments Mode 3
Channel
Assignment
Range %
Construct Parameter
Channel 1
Pan coarse adjustment
Position
Channel 2
Pan fine adjustment
Position
Channel 3
Tilt coarse adjustment
Position
Channel 4
Tilt fine adjustment
Position
Channel 5
Color Wheel
Full Speed
Color Wheel
Mspeed
Color Wheel
Full
98
96
94
93
91
90
88
87
85
83
82
80
79
77
76
Color 1 (open)
Half color 1 and 2
Color 2
Half color 2 and 3
Color 3
Half color 3 and 4
Color 4
Half color 4 and 5
Color 5
Half color 5 and 6
Color 6
Half color 6 and 7
Color 7
Half color 7 and 8
Color 8
Half color 8 and 1
74
73
71
70
68
66
65
63
62
61
59
57
56
54
52
51
Color 1 (open)
Half color 1 and 2
Color 2
Half color 2 and 3
Color 3
Half color 3 and 4
Color 4
Half color 4 and 5
Color 5
Half color 5 and 6
Color 6
Half color 6 and 7
Color 7
Half color 7 and 8
Color 8
Half color 8 and 1
50
Forward spin speed – fastest
•
•
•
Forward spin speed – slowest
Reverse spin speed – slowest
•
•
•
Reverse spin speed – fastest
Color 1 (open)
Spin Speed
26
25
0
0
Appendix A DMX Control of Cyberlight
A-13
Table A-6: Cyberlight DMX Assignments Mode 3
Channel
Channel 6
Assignment
Static litho
Full Speed
Static litho
Mspeed
Static litho
Range %
Construct Parameter
Full
98
96
94
93
91
90
88
87
85
83
82
80
79
77
76
Litho 1 (open)
Litho 1 shake wide
Litho 2
Litho 2 shake wide
Litho 3
Litho 3 shake wide
Litho 4
Litho 4 shake wide
Litho 5
Litho 5 shake wide
Litho 6
Litho 6 shake wide
Litho 7
Litho 7 shake wide
Litho 8
Litho 8 shake wide
74
73
71
70
68
66
65
63
62
61
59
57
56
54
52
51
Litho 1 (open)
Litho 1 shake narrow
Litho 2
Litho 2 shake narrow
Litho 3
Litho 3 shake narrow
Litho 4
Litho 4 shake narrow
Litho 5
Litho 5 shake narrow
Litho 6
Litho 6 shake narrow
Litho 7
Litho 7 shake narrow
Litho 8
Litho 8 shake narrow
50
Forward spin speed – fastest
•
•
•
Forward spin speed – slowest
Reverse spin speed – slowest
•
•
•
Reverse spin speed – fastest
Litho 1 (open)
Spin Speed
26
25
0
0
Appendix A DMX Control of Cyberlight
A-14
Table A-6: Cyberlight DMX Assignments Mode 3
Channel
Channel 7
Assignment
Rotating Litho
Full Speed
Mspeed
Range %
Construct Parameter
Full
98
95
91
87
83
80
76
72
68
64
61
58
54
Position 3 (open)
Reverse rotate 5
Reverse rotate 4
Reverse rotate 2
Reverse rotate 1
Forward rotate 5
Forward rotate 4
Forward rotate 2
Forward rotate 1
Position 5
Position 4
Position 3 (open)
Position 2
Position 1
50
46
42
39
36
32
28
24
20
17
13
10
5
0
Reverse rotate 5
Reverse rotate 4
Reverse rotate 2
Reverse rotate 1
Forward rotate 5
Forward rotate 4
Forward rotate 2
Forward rotate 1
Position 5
Position 4
Position 3 (open)
Position 2
Position 1
Position 3 (open)
Channel 8
Rotate
(use with Channel 7)
For Rotating Litho rotate mode use Ch 8 to set
rotate speed
For Rotating Litho position mode use Ch 8 to set the
index from 0 to 360 degrees
Channel 9
Focus
Focus in/out
Channel 10
Iris
Iris open/close
Channel 11
Effects Wheel
Full Speed
Channel 11
Effects Wheel
Mspeed
Full
96
91
85
80
73
67
62
56
Effect 4 – (open)
Effect 8 – cyan color corrector
Effect 7 – diffusion
Effect 6 – wide angle
Effect 5 – magenta color corrector
Effect 4 – (open)
Effect 3 – yellow color corrector
Effect 2 – cym tri color mosaic
Effect 1 – prism
50
44
37
33
27
21
14
8
0
Effect 8 – cyan color corrector
Effect 7 – diffusion
Effect 6 – wide angle
Effect 5 – magenta color corrector
Effect 4 – (open)
Effect 3 – yellow color corrector
Effect 2 – tri color mosaic (C-Y-M)
Effect 1 – prism
Effect 4 – (open)
Appendix A DMX Control of Cyberlight
A-15
Table A-6: Cyberlight DMX Assignments Mode 3
Channel
Channel 12
Channel 13
Channel 14
Assignment
Shutter
Strobe
50 % duty cycle
Select the litho to rotate
(forward/reverse) with this
channel Then use Channel
11 to set the rotation speed
For rotating litho position
parameters select the litho
Dim
position to index with this
Motor
Speed
channel
Then use Channel
11 to set the rotational
position (index value) from 0
to 360 degrees
Range %
Full
98
97
1
1
0
Control
Open
Closed
Strobe speed – fastest
•
•
•
Strobe speed – slowest
Open
Closed
Dim open/close
Full
0
Channel 15
Construct Parameter
Speed 97
•
•
•
Speed 1
Speed 94
50% fader – shutdown
25% fader – home
Appendix A DMX Control of Cyberlight
A-16
Channel Boundaries
This section describes the relationship between DMX address and fixture number, and explains how to mix
fixtures using DMX modes 1 or 2 with DMX mode 3 on the same link
Overview
DMX 512 protocol provides 512 channels that are divided among all the fixtures connected to the controller
in a particular link The number of channels that a fixture uses depends on the requirements and design of the
fixture In theory, you could have one fixture that uses 512 channels, two fixtures that use 256 channels, four
fixtures that use 128 channels, up to 512 fixtures that use one channel each
Each Cyberlight fixture uses a contiguous block of channels with each block having a unique starting
address The block of channels assigned to each address defines its channel boundary Channel boundaries
can start at any address, even or odd The exact address depends on the fixture’s addressing scheme
Cyberlight DMX modes 1 and 2 are each on 20-channel boundaries while mode 3 is on a 15-channel
boundary
Correlation of Fixture Number and DMX Address
Table A-7 and Table A-8 correlate DMX mode fixture numbering to actual DMX 512 addresses
Table A-7: 20-Channel Addresses (Modes 1 and 2)
Fixture
Number:DMX
Address
Range
Fixture
Number:DMX
Address
Range
Fixture
Number:DMX
Address
Range
Fixture
Number:DMX
Address
Range
Fixture
Number:DMX
Address
Range
1: 1-20
6: 101-120
11: 201-220
16: 301-320
21: 401-420
2: 21-40
7: 121-140
12: 221-240
17: 321-340
22: 421-440
3: 41-60
8: 141-160
13: 241-260
18: 341-360
23: 441-460
4: 61-80
9: 161-180
14: 261-280
19: 361-380
24: 461-480
5: 81-100
10: 181-200
15: 281-300
20: 381-400
25: 481-500
Appendix A DMX Control of Cyberlight
A-17
Table A-8: 15-Channel Addresses (Mode 3)
Fixture
Number:DMX
Address
Range
Fixture
Number:DMX
Address
Range
Fixture
Number:DMX
Address
Range
Fixture
Number:DMX
Address
Range
Fixture
Number:DMX
Address
Range
Fixture
Number:DMX
Address
Range
1: 1-15
7: 91-105
13: 181-195
19: 271-285
25: 361-375
31: 451-465
2: 16-30
8: 106-120
14: 196-210
20: 286-300
26: 376-390
32: 466-480
3: 31-45
9: 121-135
15: 211-225
21: 301-315
27: 391-405
33: 481-495
4: 46-60
10: 136-150
16: 226-240
22: 316-330
28: 406-420
34: 496-511
5: 61-75
11: 151-165
17: 241-255
23: 331-345
29: 421-435
6: 76-90
12: 166-180
18: 256-270
24: 346-360
30: 436-450
Appendix A DMX Control of Cyberlight
A-18
Mixing Modes on the Same Link
High End Systems recommends that you assign all Cyberlight fixtures on a particular link to the same DMX
mode This saves you from having to remember which commands are supported by which mode for which
fixture All Cyberlight models (CLs, CXs and SVs) are compatible with all three DMX modes The only
differences in functionality are between CXs and CLs/SVs; namely, CXs do not support zoom or color
mixing A CX will simply not respond to color mixing or zoom commands
If you do wish to mix DMX modes on a particular link, however, you need to be aware that addressing 20channel and 15-channel fixtures in an unplanned fashion can cause wasted channels because of boundary
overlapping For example, notice in Figure A-2 that to address two 20-channel fixtures and two 15-channels
fixtures in the order, 20 - 15 - 20 - 15 would waste 35 channels (Fixture numbers 2, 5 and 6 cannot be used
because address ranges used by the fixtures would overlap)
Addressing the same fixtures in a planned order, 20 - 20 - 15 - 15, would waste only 5 channels as Figure
A-3 shows
1
2
3
4
5
6
7
20 Channel:
1–20
21–40
41–60
61–80
81–100
101–120
121–140
15 Channel:
(CX)
1–15
16–30
31–45
46–60
61–75
76–90
91–105
Fixture:
Figure A-2 Unplanned channel addressing wastes DMX addresses because of fixture
boundary overlap
1
2
3
4
5
6
7
20 Channel:
1–20
21–40
41–60
61–80
81–100
101–120
121–140
15 Channel:
(CX)
1–15
16–30
31–45
46–60
61–75
76–90
91–105
Fixture:
Figure A-3 Planned channel addressing wastes a minimum of DMX address space
Appendix A DMX Control of Cyberlight
A-19
Appendix A DMX Control of Cyberlight
A-20
Appendix B
Cyberlight® Mirror Movement Times
Use this appendix to determine the mirror movement times in seconds for the speed range of 0 to 99 Note
that these values also apply to the Intellabeam and Trackspot fixtures
Speed #
99
98
97
96
95
94
93
92
91
90
89
88
87
86
85
84
83
82
81
80
79
78
77
76
75
74
73
72
71
70
69
68
67
66
65
64
63
62
61
60
59
58
57
56
55
Time (sec)
015
017
022
034
041
055
073
094
118
145
176
209
246
286
330
376
426
479
535
594
657
722
791
864
939
1017
1099
1184
1272
1364
1458
1556
1657
1761
1869
1979
2093
2210
2330
2454
2580
2710
2844
2980
3119
Speed #
54
53
52
51
50
49
48
47
46
45
44
43
42
41
40
39
38
37
36
35
34
33
32
31
30
29
28
27
26
25
24
23
22
21
20
19
18
17
16
15
14
13
12
11
10
Time (sec)
3262
3408
3557
3709
3865
4023
4185
4350
4519
4690
4865
5043
522
5409
5596
5787
5981
6178
6378
6582
6789
6999
7212
7428
7648
7871
8097
8326
8559
8795
9033
9276
9521
9769
10021
10276
10534
10795
11060
11328
11598
11873
12150
12431
12714
Appendix B Cyberlight Mirror Movement Times
B-1
Speed #
9
8
7
6
5
Time (sec)
13001
13291
13585
13882
14181
Speed #
4
3
2
1
0
Time (sec)
14484
14790
15100
15413
15728
Appendix B Cyberlight Mirror Movement Times
B-2
Appendix C
Factory-Installed Wheels
This appendix shows how the static litho, rotating litho, color and effects wheels are
configured by the factory when Cyberlight is shipped The numbers shown around the outside
of the wheels are the position numbers used by a controller to select that effect For example,
choosing position 5 on the CX static litho wheel (shown in Figure C-1 below) with a
controller selects the “tunnel” litho
CX static litho wheel:
Figure C-1 Factory configuration of the CX static litho wheel
Litho names:
1
open
5
tunnel
2
beveled star
6
indigo dots
3
indigo spin
7
netwerk
4
groovy
8
sharp burst
Appendix C Factory-Installed Wheels
C-1
CL/SV static litho wheel:
5
6
4
3
7
open
2
8
1
Figure C-2 Factory configuration of the CL/SV static litho wheel
Litho names:
1
open
5
tunnel
2
alien star
6
egyptian
space
3
shimmering
star
7
conoid
4
indigo dye
8
disconnect
Appendix C Factory-Installed Wheels
C-2
CX rotating litho wheel:
2
1
open
3
5
4
Figure C-3 Factory configuration of the CX rotating litho wheel
Litho names:
1
droplets
2
paperstack
3
open
4
red wedge
5
indigo
square
Appendix C Factory-Installed Wheels
C-3
CL/SV rotating litho wheel:
2
1
open
3
5
4
Figure C-4 Factory configuration of the CL/SV rotating litho wheel
Litho names:
1
ribbed glass
2
psy-spin
3
open
4
indigo
chiclet
5
wavy black
Appendix C Factory-Installed Wheels
C-4
CX color wheel:
5
6
4
Green
Magenta
7
Aqua
Medium
Blue
Yellow
Red
8
3
Indigo
Open
2
1
Figure C-5 Factory configuration of the CX color wheel
Appendix C Factory-Installed Wheels
C-5
CL/SV color wheel:
5
6
CL Color
Corrector
Dark Blue
7
4
Aqua
Dark
Orange
Purple
Indigo
8
3
Red
Open
2
1
Figure C-6 Factory configuration of the CL/SV color wheel
Appendix C Factory-Installed Wheels
C-6
Effects wheel for all Cyberlight models (CX, SV and CL):
5
6
Wide
angle
7
Magenta
color
corrector
4
open
Diffusion
Yellow
color
corrector
Cyan color
corrector
8
Prism
1
3
Tri-color
mosaic
2
Figure C-7 Effects wheel for the CL, CX and SV models
Appendix C Factory-Installed Wheels
C-7
Appendix C Factory-Installed Wheels
C-8
Appendix D
Typical Voltages Worldwide
This Appendix lists typical worldwide voltage ratings based on High End Systems Inc’s experience
Although High End Systems believes this information to be reasonably correct to the extent of our
knowledge, you should heed the Warning below before proceeding
Warning
Information in this table is subject to change Before selecting a voltage/
frequency for your Cyberlight, you should verify the correct voltage/frequency
setting with a local authority Selecting an incorrect voltage/frequency will result
in an electric shock hazard and can cause injury to persons as well as damage the
fixture High End Systems can accept no responsibility for damage to your
Cyberlight or other equipment caused by an incorrect voltage/frequency setting
Continent
Africa
Country
Hz
Supply
Cyberlight Voltage Tab Setting
Algeria
50
127–220V
S7 230V / 50 Hz
Angola
50
220V
S7 230V / 50 Hz
Benin
50
220V
S7 230V / 50 Hz
Bophuthatswana
50
220V
S7 230V / 50 Hz
Botswana
50
220V
S7 230V / 50 Hz
Burkina Faso (Upper
50
220V
S7 230V / 50 Hz
Burundi
50
220V
S7 230V / 50 Hz
Cameroon
50
127–220V
S7 230V / 50 Hz
Canary Islands
50
127–220V
S7 230V / 50 Hz
Central African
50
220V
S7 230V / 50 Hz
Chad
50
220V
S7 230V / 50 Hz
Congo
50
220V
S7 230V / 50 Hz
Dahomey
50
220V
S7 230V / 50 Hz
Djibouti
50
220V
S7 230V / 50 Hz
Egypt
50
110–220V
S7 230V / 50 Hz
Ethiopia
50
220V
S7 230V / 50 Hz
Gabon
50
220V
S7 230V / 50 Hz
Gambia
50
230V
S7 230V / 50 Hz
Ghana
50
240V
S6 240V / 50 Hz
Guinea
50
220V
S7 230V / 50 Hz
Ivory Coast
50
220V
S7 230V / 50 Hz
Kenya
50
240V
S6 240V / 50 Hz
Lesotho
50
230V
S7 230V / 50 Hz
Liberia
60
120V
S9 208V / 60 Hz
Libya
50
110–115V
S8 205V / 50 Hz
Malagasy Republic
50
127–220V
S7 230V / 50 Hz
Malawi
50
230V
S7 230V / 50 Hz
Mali
50
220V
S7 230V / 50 Hz
Appendix D Typical Voltages Worldwide
D-1
Continent
Africa
Country
Hz
Supply
Cyberlight Voltage Tab Setting
Mauritania
50
220V
S7 230V / 50 Hz
Mauritius
50
230V
S7 230V / 50 Hz
Morocco
50
110–127V
S8 205V / 50 Hz
Mozambique
50
220V
S7 230V / 50 Hz
Namibia/ SW Africa
50
220V
S7 230V / 50 Hz
Niger
50
220V
S7 230V / 50 Hz
Nigeria
50
230V
S7 230V / 50 Hz
Rwanda
50
220V
S7 230V / 50 Hz
Senegal
50
110V
S8 205V / 50 Hz
Seychelles
50
240V
S6 240V / 50 Hz
Senegambia
50
127V
S7 230V / 50 Hz
Sierra Leone
50
230V
S7 230V / 50 Hz
Somalia
50
220V
S7 230V / 50 Hz
South Africa
50
220V
S7 230V / 50 Hz
Sudan
50
240V
S6 240V / 50 Hz
Swaziland
50
220V
S7 230V / 50 Hz
Tanzania
50
230V
S7 230V / 50 Hz
Togo
50
127–220V
S7 230V / 50 Hz
Tunisia
50
127–220V
S7 230V / 50 Hz
Uganda
50
240V
S6 240V / 50 Hz
Upper Volta (Burkina
50
220V
S7 230V / 50 Hz
Zaire
50
220V
S7 230V / 50 Hz
Zambia
50
220V
S7 230V / 50 Hz
Zimbabwe
50
220V
S7 230V / 50 Hz
50
240–265V
S6 240V / 50 Hz
Fiji Islands
50
240V
S6 240V / 50 Hz
Guam
60
120
S9 208V / 60 Hz
New Caledonia
50
220V
S7 230V / 50 Hz
New Zealand
50
230–245V
S6 240V / 50 Hz
Papua New Guinea
50
240V
S6 240V / 50 Hz
Soloman Islands
50
240V
S6 240V / 50 Hz
Tahiti
60
127V
S9 208V / 60 Hz
Tonga
50
230V
S7 230V / 50 Hz
Western Samoa
50
230V
S7 230V / 50 Hz
Afghanistan
50/60
220V
S7 230V / 50 Hz
Bangladesh
50
230V
S7 230V / 50 Hz
Brunei
50
240V
S6 240V / 50 Hz
Burma
50
230V
S7 230V / 50 Hz
Cambodia
50
120–220V
S7 230V / 50 Hz
China
50
220V
S7 230V / 50 Hz
Australia Australia
Asia
Appendix D Typical Voltages Worldwide
D-2
Continent
Country
Hz
Supply
Cyberlight Voltage Tab Setting
Hong Kong
50
220V
S7 230V / 50 Hz
India
50
230V
S7 230V / 50 Hz
Indonesia
50
127–220V
S7 230V / 50 Hz
50/60
100–200V
S8 205V / 50 Hz
Kazakhstan
50
220V
S7 230V / 50 Hz
Kirgizstan
50
220V
S7 230V / 50 Hz
Korea (North)
60
220V
S8 230V / 60 Hz
Korea (South)
60
110–220V
S8 230V / 60 Hz
Laos
50
220V
S7 230V / 50 Hz
Macao
50
115–220V
S7 230V / 50 Hz
Malaysia
50
240V
S6 240V / 50 Hz
Myanmar
50
230V
S7 230V / 50 Hz
Nepal
50
220V
S7 230V / 50 Hz
Phillipines
60
110–220V
S8 230V / 60 Hz
Russia
50
127–220
S7 230V / 50 Hz
Saah (N Borneo)
50
240V
S6 240V / 50 Hz
Singapore
50
230–245V
S6 240V / 50 Hz
Sri Lanka (Ceylon)
50
230V
S7 230V / 50 Hz
Taiwan
60
110V
S9 208V / 60 Hz
Tajikistan
50
220V
S7 230V / 50 Hz
Thailand
50
220V
S7 230V / 50 Hz
Turkmenistan
50
220V
S7 230V / 50 Hz
Vietnam
50
120V
S6 240V / 50 Hz
Central
Anguilla
50
230V
S7 230V / 50 Hz
America
Antigua (Leeward Is)
50
230V
S7 230V / 50 Hz
Bahamas
60
115V
S9 208V / 60 Hz
Barbados
50
115V
S7 230V / 50 Hz
Belize
60
110–220V
S9 208V / 60 Hz
Bermuda
60
115V
S9 208V / 60 Hz
Cayman Islands
60
120V
S9 208V / 60 Hz
Costa Rica
60
120V
S9 208V / 60 Hz
Cuba
60
115–120V
S9 208V / 60 Hz
Dominica
60
110–220V
S9 208V / 60 Hz
Dominican Republic
60
110V
S9 208V / 60 Hz
El Salvador
60
115V
S9 208V / 60 Hz
Grenada
50
230V
S7 230V / 50 Hz
Guadeloupe
50
220V
S7 230V / 50 Hz
Guatemala
60
115V
S9 208V / 60 Hz
Haiti
60
110V
S9 208V / 60 Hz
Honduras
60
110V
S9 208V / 60 Hz
Japan
Appendix D Typical Voltages Worldwide
D-3
Continent
Hz
Supply
Cyberlight Voltage Tab Setting
Jamaica
50
110–220V
S7 230V / 50 Hz
Martinique
50
220V
S7 230V / 50 Hz
Mexico
60
120V
S9 208V / 60 Hz
Monteserrat
60
230V
S8 230V / 60 Hz
Central
Netherland Antilles
50
110–127V
S7 230V / 50 Hz
America
Nicaragua
60
120V
S9 208V / 60 Hz
Panama
60
110–120
S9 208V / 60 Hz
Puerto Rico
60
120V
S9 208V / 60 Hz
St Kitts & Nevis
60
230V
S8 230V / 60 Hz
St Lucia
50
240V
S6 240V / 50 Hz
St Vincent
50
230V
S7 230V / 50 Hz
Trinidad & Tobago
60
115–230V
S8 230V / 60 Hz
Virgin Islands
60
120V
S9 208V / 60 Hz
Albania
50
220–380V
S7 230V / 50 Hz
Austria
50
220V
S7 230V / 50 Hz
Azores
50
220V
S7 230V / 50 Hz
Belarus
50
220V
S7 230V / 50 Hz
Belgium
50
220V
S7 230V / 50 Hz
Bosnia Herzegovina
50
220V
S7 230V / 50 Hz
Bulgaria
50
220V
S7 230V / 50 Hz
Channel Islands
50
210–240V
S6 240V / 50 Hz
Croatia
50
220V
S7 230V / 50 Hz
Czech Republic
50
220V
S7 230V / 50 Hz
Denmark
50
220V
S7 230V / 50 Hz
Estonia
50
220V
S7 230V / 50 Hz
Faeroe Islands
50
220V
S7 230V / 50 Hz
France
50
220V
S7 230V / 50 Hz
Finland
50
220V
S7 230V / 50 Hz
Germany
50
220V
S7 230V / 50 Hz
Gibralter
50
240V
S6 240V / 50 Hz
Greece
50
220V
S7 230V / 50 Hz
Greenland
50
220V
S7 230V / 50 Hz
Hungary
50
220V
S7 230V / 50 Hz
Iceland
50
220V
S7 230V / 50 Hz
Ireland
50
220V
S7 230V / 50 Hz
Isle of Man
50
240V
S6 240V / 50 Hz
Italy
50
220V
S7 230V / 50 Hz
Latvia
50
220V
S7 230V / 50 Hz
Lithuania
50
220V
S7 230V / 50 Hz
Luxembourg
50
220V
S7 230V / 50 Hz
Europe
Country
Appendix D Typical Voltages Worldwide
D-4
Continent
Country
Hz
Supply
Cyberlight Voltage Tab Setting
Macedonia
50
220V
S7 230V / 50 Hz
Madiera
50
220V
S7 230V / 50 Hz
Majorca Island
50
220V
S7 230V / 50 Hz
Malta
50
240V
S6 240V / 50 Hz
Moldova
50
220V
S7 230V / 50 Hz
Monaco
50
220V
S7 230V / 50 Hz
Montenegro
50
220V
S7 230V / 50 Hz
Netherlands
50
220V
S7 230V / 50 Hz
Northern Ireland
50
230V
S7 230V / 50 Hz
Norway
50
220–230V
S7 230V / 50 Hz
Poland
50
220V
S7 230V / 50 Hz
Portugal
50
220V
S7 230V / 50 Hz
Romania
50
220V
S7 230V / 50 Hz
Russia
50
220V
S7 230V / 50 Hz
Serbia
50
220V
S7 230V / 50 Hz
Slovakia
50
220V
S7 230V / 50 Hz
Slovenia
50
220V
S7 230V / 50 Hz
Spain
50
210–220V
S7 230V / 50 Hz
Sweden
50
220V
S7 230V / 50 Hz
Switzerland
50
220V
S7 230V / 50 Hz
Ukraine
50
220V
S7 230V / 50 Hz
United Kingdom
50
220–250V
S6 240V / 50 Hz
Yugoslavia
50
220V
S7 230V / 50 Hz
Middle
Armenia
50
220V
S7 230V / 50 Hz
East
Azerbiajan
50
220V
S7 230V / 50 Hz
Abu Dhabi
50
240V
S6 240V / 50 Hz
Afghanistan
50
220V
S7 230V / 50 Hz
Bahrain
50
230V
S7 230V / 50 Hz
Cyprus
50
240V
S6 240V / 50 Hz
Georgia
50
220V
S7 230V / 50 Hz
Iran
50
220V
S7 230V / 50 Hz
Middle
Iraq
50
220V
S7 230V / 50 Hz
East
Israel
50
230V
S7 230V / 50 Hz
Jordan
50
220V
S7 230V / 50 Hz
Kuwait
50
240V
S6 240V / 50 Hz
Lebanon
50
110–220V
S7 230V / 50 Hz
Muscat
50
240V
S6 240V / 50 Hz
Oman
50
240V
S6 240V / 50 Hz
Pakistan
50
230V
S7 230V / 50 Hz
Qatar
50
240V
S6 240V / 50 Hz
Appendix D Typical Voltages Worldwide
D-5
Continent
Country
Hz
Supply
Cyberlight Voltage Tab Setting
Saudi Arabia
60
127–220V
S8 230V / 60 Hz
Sudan
50
240V
S6 240V / 50 Hz
Syria
50
220V
S7 230V / 50 Hz
Turkey
50
220V
S7 230V / 50 Hz
United Arab Emirates
50
220V
S7 230V / 50 Hz
Yemen
50
220V
S7 230V / 50 Hz
North
Canada
60
115V
S9 208V / 60 Hz
America
United States
60
120V
S9 208V / 60 Hz
South
Argentina
50
220V
S7 230V / 50 Hz
America
Bolivia
50
110V
S7 230V / 50 Hz
Brazil
60
110–127–
S8 230V / 60 Hz
Chile
50
220V
S7 230V / 50 Hz
Columbia
60
110–120V
S9 208V / 60 Hz
Ecuador
60
110–120V
S9 208V / 60 Hz
French Guiana
50
220V
S7 230V / 50 Hz
60/50
110V/60 &
S9 208/60 Hz & S6 240V/50 Hz
Paraguay
50
220V
S7 230V / 50 Hz
Peru
60
220V
S8 230V / 60 Hz
Suriname
60
110–127V
S9 208V / 60 Hz
Uruguay
50
220V
S7 230V / 50 Hz
Venezuela
60
120V
S9 208V / 60 Hz
Guyana
Appendix D Typical Voltages Worldwide
D-6
Appendix E
Important Safety Information
WARNING: For Continued Protection Against Fire
1. This equipment is designed for use with Philips type MSR1200 or MSD1200, 1200
watt lamp only Use of any other type lamp may be hazardous and will void the
warranty
2. Do not mount on a flammable surface
3. Maintain minimum distance of 10 meter (328 feet) from combustible materials
4. Replace fuses only with the specified type and rating
5. Observe minimum distance to lighted objects of 10 meter (328 feet)
6. This equipment for connection to branch circuit having a maximum overload
protection of 20 A
WARNING: For Continued Protection Against Electric Shock
1. If this equipment was received without a line cord plug, attach the appropriate line
cord plug according to the following code:
•
•
•
Brown–live
Blue–neutral
Green/yellow–earth
2. As the colours of the cores in the mains lead of this equipment may not correspond
with the coloured markings identifying the terminals in your plug, proceed as follows:
- the core which is coloured green and yellow must be connected to the terminal in the
plug which is marked with the letter “E” or by the earth symbol , or coloured green or
green and yellow
- the core which is coloured blue must be connected to the terminal which is marked with
the letter N or coloured black
- the core which is coloured brown must be connected to the terminal which is marked
with the letter L or coloured red
3. This equipment must be earthed
4. Disconnect power before re-lamping or servicing
5. Equipment suitable for dry locations only Do not expose this equipment to rain or
Appendix E Important Safety Information
E-1
moisture
6. Refer servicing to qualified personnel; no user serviceable parts inside
7. Class I equipment - this fixture employs a grounded type receptacle and is not
intended for connection to a two wire, ungrounded source of supply
WARNING: For Continued Protection Against Exposure To Excessive Ultraviolet (UV)
Radiation
1. Do not operate this equipment without complete lamp enclosure in place or if shields,
lenses, or ultraviolet screens are damaged
2. Change shields, lenses, or ultraviolet screens if they have become visibly damaged to
such an extent that their effectiveness is impaired, for example by cracks or deep
scratches
3. Never look directly at the lamp while lamp is on
WARNING: For Continued Protection Against Injury To Persons
1. Use secondary safety cable when mounting this fixture
2. CAUTION: Hot lamp may be an explosion hazard Do not open for 5 minutes after
switching off wear eye and hand protection when re-lamping
3. Equipment surfaces may reach temperatures up to 62° C (144° F) Allow 10 minutes
for cooling before handling
4. Change the lamp if it becomes damaged or thermally deformed
Appendix E Important Safety Information
E-2
APPENDICE E
IMPORTANTES INFORMATIONS SUR LA SÉCURITÉ
MISE EN GARDE: Pour Une Protection Permanente Contre Les Incendies
1. Cet appareil est conçu pour être exclusivement utilisé avec des lampes de 1200 watts
MSR 1200 ou MSD 1200 L'usage d'autres lampes peut être risqué et annulera la
garantie
2. Ne pas monter les lampes sur une surface inflammable
3. Maintenir à une distance minimum de 10 mètre de matières inflammables
4. Ne remplacer les fusibles qu'avec des modèles et valeurs assignées recommandés
5. Respecter une distance minimum de 10 mètre par rapport aux objets éclairés
6. Cet appareil de connexion au circuit de dérivation comporte une protection contre les
surcharges de 20A
MISE EN GARDE: Pour Une Protection Permanente Contre Les Chocs Électriques
1. Assembler le câble électrique conformément aux instructions du manuel
2. Déconnecter le courant avant de changer les lampes ou d'effectuer des réparations
3. Cet équipement doit être uniquement utilisé dans des endroits secs Ne pas l'exposer à
la pluie ou l'humidité
4. À l'intérieur de l'équipement il n'y a pas de pièces remplaçables par l' utilisateur
Confiez l'entretien à un personnel qualifié
5. Equipement de Classe I - Cette piece fixe utilise une prise de courant branché à la
terre et elle ne doit pas être branché à une source électrique, non reliée à la terre, à
double fil
Appendix E Important Safety Information
E-3
MISE EN GARDE: Pour Une Protection Permanente Contre Des Expositions
Excessives Aux Rayons Ultra Violets (UV)
1. Ne pas utiliser cet appareil si le boîtier de la lampe n'est pas complètement fixé ou si
les blindages, lentilles, ou écrans ultraviolets sont endommagés
2. Changer les blindages ou les écrans ultraviolets s'ils sont visiblement endommagés au
point que leur efficacité aient été altérée, par exemple par des fissures ou de
profondes égratignures
3. Ne jamais regarder directement la lampe quand celle ci est allumée
MISE EN GARDE: Pour Une Protection Permanente Contre Les Blessures Corporelles
1. Lors de l'assemblage ou du montage, utiliser un câble de sécurité secondaire
2. AVERTISSEMENT: les lampes chaudes comportent un risque d'explosion Après
l'avoir éteinte, attendre 5 minutes avant de la dégager Lors du remplacement de la
lampe, porter des lunettes, et des gants de protection
3. Les surfaces de l'appareil peuvent atteindre des températures de 62° C Laisser
refroidir pendant 10 minutes avant la manipulation
4. Changer la lampe si elle est endommagée ou thermiquement déformé
Appendix E Important Safety Information
E-4
ANHANG E
WICHTIGE HINWEISE FÜR IHRE SICHERHEIT
WARNUNG: Zum Schutz vor Brandgefahr
1. Dieses Gerät darf nur mit 1200 Watt Lampen vom Typ MSR 1200 oder MSD 1200
von Philips verwendet werden Die Verwendung von Lampen eines anderen Typs kann
gefährlich sein und ein Erlöschen der Garantieansprüche zur Folge haben
2. Das Gerät nie auf einer feuergefährlichen Fläche montieren
3. Stets einen Mindestabstand von 1 Meter zu brennbaren Materialien einhalten
4. Zum Ersatz nur Sicherungen verwenden, die dem vorgeschriebenen Typ und
Nennwert entsprechen
5. Einen Mindestabstand von 1 Meter zu den angestrahlten Objekten einhalten
6. Dieses Gerät darf nur an eine Zweigleitung mit einem Überlastungsschutz von
höchstens 20 A angeschlossen werden
WARNUNG: Zum Schutz Gegen Gefährliche Körperströme
1. Bei der Installation des Netzkabels am Lampensockel folgen Sie bitte Anweisungen in
diesem Handbuch
2. Vor dem Austauschen von Lampen oder vor Wartungsarbeiten stets den Netzstecker
ziehen
3. Diese Geräte sind nur zum Einbau in trockenen Lagen bestimmt und müssen vor
Regen und Feuchtigkeit geschützt werden
4. Servicearbeiten sollten nur von Fachpersonal ausgeführt werden Das Gerät enthält
keine wartungsbedürftigen Teile
5. Dieses Gerät gehört zur Klasse 1 - Dieser Beleuchtungskörper verwendet eine
geerdete Fassung und sollte nicht an eine zweipolige, ungeerdete Stromversorgung
angeschlossen werden
Appendix E Important Safety Information
E-5
WARNUNG: Zum Schutz Gegen Übermässige Ultraviolett (UV)-bestrahlung
1. Benutzen Sie dieses Gerät nur, wenn das komplette Lampengehäuse fest eingebaut ist;
ebenfalls dürfen keine der Schutzabdeckungen, Linsen oder der UV-Schutz
Beschädigungen aufweisen
2. Die Schutzabdeckungen, Linsen und der UV-Schutz müssen ausgewechselt werden,
wenn sie sichtlich dermaßen beschädigt sind, daß sie ihre Wirksamkeit einbüßen, zB
infolge von Rissen oder tiefen Kratzern
3. Nie direkt in die eingeschaltete Lampe schauen
WARNUNG: Zum Schutz Vor Verletzungen
1. Verwenden Sie bei der Installation des Beleuchtungskörpers ein zusätzliches
Sicherheitskabel
2. VORSICHT: Bei einer heiße Lampe besteht Explosionsgefahr Nach dem Abschalten
der Netzspannung sollten Sie etwa 5 Minuten warten, bevor Sie das Lampengehäuse
öffnen Schützen Sie beim Auswechseln der Lampen Ihre Hände und tragen Sie eine
Schutzbrille
3. Die Oberflächen des Gerätes können Temperaturen bis zu 62° C erreichen Vor dem
Anfassen stets 10 Minuten lang abkühlen lassen
4. Falls die Lampe beschädigt oder durch Wärmeeinwirkung verformt ist, muß sie
ausgewechselt werden
Appendix E Important Safety Information
E-6
APÉNDICE E
INFORMACIÓN IMPORTANTE DE SEGURIDAD
ADVERTENCIA: Para Protección Continua Contra Incendios
1. Se ha diseñado este equipo para usarse con lámpara tipo philips MSR1200 ó MSD
1200, 1200 vatios El uso de otro tipo de lámpara puede resultar peligroso e invalidará
la garantía
2. No monte el equipo sobre una superficie inflamable
3. Mantenga una distancia mínima de materiales combustibles de 1,0 metro
4. Cambie los fusibles únicamente por otros que sean del tipo y la clasificación
especificadas
5. Observe una distancia mínima a objetos iluminados de 1,0 metro
6. Este equipo debe conectarse a un circuito derivado que tenga una protección máxima
contra las sobrecargas de 20 A
ADVERTENCIA: Para La Protección Continua Contra Electrocuciones
1. Ensamble la tapa del cordón de alimentación según las instrucciones del manual
2. Desconecte el suministro de energía antes de recambiar lámparas o prestar servicio de
reparación
3. Este equipo se adecua a lugares secos solamente no lo exponga a la lluvia o humedad
4. Derive el servicio de reparación de este equipo al personal calificado El interior no
contiene repuestos que puedan ser reparados por el usuario
5. Equipo de Clase 1 Este aparato emplea un enchufe hembra del tipo unido a tierra, y no
tiene por finalidad conectarse a una fuente de alimentación bifilar y sin puesta a tierra
Appendix E Important Safety Information
E-7
ADVERTENCIA: Para Protección Continua Contra La Exposición A Radiación
Ultravioleta (UV) Excesiva
1. No opere este equipo sin tener colocada en su lugar la caja protectora completa de la
lámpara o bien, si el blindaje, los lentes o las pantallas ultravioletas están dañadas
2. Cambie el blindaje, los lentes o las pantallas ultravioleta si nota una avería visible, a
tal grado que su eficacia se vea comprometida, por ejemplo, en el caso de grietas o
rayaduras profundas
3. Jamás mire directamente a la lámpara en tanto ésta esté encendida
ADVERTENCIA: Para Protección Continua Contra Lesiones Corporales
1. Use cable secundario de seguridad al montar este aparato
2. PRECAUCIÓN: Una lámpara caliente puede constituir un peligro de explosión No la
abra por 5 minutos luego de haberla apagado Lleve puestos un protector ocular y
guantes al recambiar lámparas
3. Las superficies del equipo pueden alcanzar temperaturas máximas de 62 grados
centígrados Deje que se enfríen por 10 minutos antes de tocarlas
4. Cambie la lámpara si ésta se avería o deforma por acción térmica
Appendix E Important Safety Information
E-8
APPENDICE E
IMPORTANTI INFORMAZIONI PER LA SICUREZZA
AVVERTENZA: Per La Prevenire Di Incendi
1. Questo apparecchio e' stato disegnato per l'impiego esclusivo di lampade tipo MSR 1200 o
MSD 1200 Watt L'impiego di altri tipi di lampade potrebbe essere pericoloso e rende
nulla la garanzia
2. Non montare su superfici infiammabili
3. Mantenere l' apparecchio ad una distanza minima di 1 metro (328 piedi) da materiali
combustibili
4. Rimpiazzare I fusibili utilizzando solo quelli del tipo e della portata (Corrente
nominale/velocita') specificata
5. Mantenere una distanza minima da oggetti illuminati di 1 metro (328 Piedi)
6. Questo apparecchio deve essere collegato alla rete con ínterruttore automatico 20A
AVVERTENZE: Per La Prevenzione Costante Di Scosse Elettriche
1. Assemblare il terminale del cavo seguendo il manuale delle istruzioni
2. Scollegare la corrente prima di sostituire la lampada o eseguire la riparazione
3. Questo apparecchio e' adatto ad ambienti secchi e non deve essere esposto ad agenti
atmosferici o ad umidita`
4. Per qualsiasi riparazione rivolgersi a personale specializzato L' utente non deve riparare
alcuna parte interna dell'apparecchio
5. Apparecchio di classe I - questo apparecchio e' fornito di presa bipolare + terra e non deve
essere collegato a rete sprovvista di terra
Appendix E Important Safety Information
E-9
AVVERTENZE: Per La Protezione Costante Da Eccessiva Esposizione Agli
Ultravioletti
1. Non azionare questo apparecchio in caso la lampada non sia schermata o schermi, lenti o
filtri UV siano danneggiati
2. Cambiare schermi, lenti o filtri UV in caso siano visibilmente danneggiati al punto di
invalidare la loro efficacia, per esempio da spaccature o da profondi graffi
3. Non guardare direttamente la lampada se accesa
AVVERTENZE: Per La Prevenzione Costante Di Danni Fisici Alle Persone
1. Montare l'apparecchio usando un cavo secondario di sicurezza
2. ATTENZIONE: La lampada calda puo' esplodere Non aprire prima di 5 minuti dal
suo spegnimento Usare protezioni per le mani e per gli occhi prima di cambiare la
lampada
3. Le superfici dell'apparecchio possono raggiungere una temperatura di 62 gradi centigradi
(144 Gradi F) Lasciare raffredare 10 minuti prima di maneggiare
4. Cambiare la lampada in caso si danneggi o deformi per le alte temperature
Appendix E Important Safety Information E-10
Glossary
Additive color mixing
The creation of colors by superimposing red, green and blue light sources The
intensities of red, green and blue light determine the resulting color This
method is commonly used in TVs and projection TV/video devices Additive
color mixing done in this way is also called the RGB (red-green-blue) color
model
See also “Subtractive color mixing”
Block addressing
The Cyberlight is a block-addressed fixture; that is, you do not address it at an
arbitrary DMX starting address per se, but rather at a channel boundary There
are two channel boundaries you can select: 15-channel and 20-channel If you
choose to control your Cyberlight on a 20-channel boundary, for example,
each fixture takes up a contiguous block of 20 DMX channels The more
channels per fixture, the more features you can control
See also “Fixture number”
Central access door
Typically the most commonly-opened door on Cyberlight, where the color,
effects, rotating and static litho wheels may be accessed Figure 1-2 on page
1-11 shows all three Cyberlight access doors
Channel boundary
The first address of a fixture’s block of addresses For example, a Cyberlight
set for fixture number 2 in 20-channel DMX mode 1 or 2 would have a channel
boundary at DMX channel 21
See also “Block addressing” and “Fixture number”
Color temperature
A term used to describe the balance or content of each spectral component of
white light
Color temperature, in turn, relies on the concept of the black body A black
body is a theoretical object that absorbs all of the energy that contacts it
Heating a black body causes it to emit radiation When the spectral
composition of a black body matches the spectral composition of a white light
source, the temperature of the black body (in degrees Kelvin) is the color
Glossary
G-1
temperature of the light source
For example, a light source that is rated at 5600° Kelvin (such as the light
source used in Cyberlight) matches the radiation of a black body heated to
5600° Kelvin
Because not all light sources exhibit a smooth spectral power distribution,
color temperature is an approximate measure of a lamp’s spectral output
Constructs
Features of the fixture (such as color mixing, lithos, rotating lithos, color
wheel, iris, frost and shutter) Constructs can be used by a controller to
program your overall show
Dichroic
A dichroic (meaning “two-layer”) filter achieves a richly-saturated color
without using any chromophoric (pigmented) materials In simple terms, it can
achieve this effect by either reflecting or “cancelling out” through destructive
interference all but a narrow range of the light spectrum
The dichroics used in Cyberlight are all manufactured at the High End Systems
dichroic lab in Austin, Texas They are made from a base of Pyrex-like glass
material coated with multiple, microscopic layers of specialized materials
separated by junctions that either transmit or reflect certain wavelengths of
light, accounting for the resulting color
Dichroic filters offer a number of advantages over traditional gel filters: since
they are made of Pyrex-like glass and absorb almost no heat themselves, they
theoretically have no failure mechanism; they transmit more light than gels;
and their resultant colors are more richly-saturated than is possible with a gel
Dichroics are currently used for all Cyberlight colored lithos, color mixing
flags, effects and of course the color wheel dichroic filters Before installing a
dichroic or litho in Cyberlight, make sure you read the section titled
“Removing and Installing Rotating Lithos” on page 3-18 and the section titled
“Replacing Dichroics/Lithos in the Color Wheel or the Static Litho Wheel” on
page 3-21
See also “Litho”
DMX 512 control protocol
DMX 512 is a standard method of controlling lighting fixtures and other
devices (such as lasers and hazers) Developed by the United States Institute of
Theatre Technology (USITT), DMX 512 is supported by leading entertainment
industry equipment manufacturers, such as High End Systems
G-2
Cyberlight User Manual
DMX 512 (D for digital, MX for multiplex and 512 is the number of channels
per link) is a reliable, efficient and well-understood method of controlling
lighting devices Its strength lies in the ability to control a large number of
different types of devices made by various vendors on the same link using any
DMX-compatible controller
See also “LWR control protocol”
DMX address
The DMX 512 protocol allows a total of 512 addresses to be used on a
particular link (A link is a group of devices connected on a daisy-chain of
XLR cabling) You need to assign a unique fixture number to each Cyberlight
you wish to respond independently to control commands Multiple fixtures can
be assigned the same address if you wish them all to respond to control
commands in the same way
For example, suppose you have 12 Cyberlight fixtures on one link You want
six of them to operate independently of each other and the other six to operate
in exactly the same way You need to assign each of the six independentlyoperating Cyberlight fixtures a unique fixture number, but you can assign a
single fixture number to the other six, for a total of seven fixture numbers
DMX modes
You can use DMX 512 protocol to control the Cyberlight in three different
modes The three DMX modes available for your Cyberlight provide three
different levels of control and flexibility, and can be used with CLs, SVs, and
CXs Mode 1 is 20-channel standard control; mode 2 is enhanced 20-channel
control, and mode 3 is 15-channel control For more information on all three
modes, see Appendix A
Fixture number
Because the Cyberlight is a block-addressed fixture, you do not access it using
an arbitrary DMX starting address Instead, you can choose between 20channel and 15-channel access (see Appendix A) Thus, the concept of fixture
number can be substituted for the actual DMX channel
For example, suppose you have chosen to control the Cyberlight using DMX
mode 2, which is a 20-channel mode Fixture number 1 occupies DMX
addresses 1 through 20; fixture 2 occupies DMX addresses 21 through 40, and
so on A complete listing of how fixture numbers correlate to DMX addresses
can be found in Table A-7 on page A-17
Glossary
G-3
Lamp box access door
This door provides access to the Cyberlight lamp, infrared filter, reflector and
other components Figure 1-2 on page 1-11 shows all three Cyberlight access
doors
Lamp strikes
The number of times the lamp has been illuminated Once the lamp is
“switched on”, whether it is illuminated continuously for one second or one
minute, it counts as one strike
Litho
A litho has a pattern etched on it (some lithos are also textured), as the name
“LithoPatterns” suggests All LithoPatterns are designed and manufactured at
the High End Systems dichroic lab in Austin, Texas There are currently a large
number of available lithos, including LithoPatterns, Art Glass, Psy-Dye and
Special Effects See the section titled “Optional Accessories” on page 1-6 for
ordering information
A dichroic process is used to color all lithos
See also “Dichroic”
Luminaire
Synonymous with “fixture”
LWR control protocol
The native control protocol for Cyberlight, LWR offers all the features of
DMX 512 plus it gives you the ability to perform software uploads using a
High End Systems Link Card or the Cyberlight Upload Module
MSR/MSD
MSR stands for Medium Source Rare Earth and describes the family of arc
lamps used in the Cyberlight Rare earth elements (such as Dysprosium and
Holmium) are added to metal halide to give the lamp a more continuous
spectrum
MSD stands for Medium Source Daylight (“Daylight” is a reference to the fact
that the lamp has roughly the same color temperature as ordinary sunlight)
The MSD lamp has basically the same composition and the same color
temperature as the MSR lamp, but it has a lower light output and longer life
See also “Color temperature”
G-4
Cyberlight User Manual
Strikes
See “Lamp strikes”
Subtractive color mixing
The creation of colors by filtering out (subtracting) certain wavelengths from a
typically white (multi-wavelength) light source For example, putting a
magenta filter in the path of a white light source subtracts green light This is
the color mixing model used in Cyberlight Typically, the filters used in a
subtractive color mixing system are cyan, yellow and magenta; thus, this is
usually referred to as the CYM color mixing model
See also “Additive color mixing”
Terminator
A terminator is a resistor inside an XLR connector It is used to prevent the
analog signal from continuously “echoing” up and down the data link A
terminator must be used on the last device in every DMX link Instructions for
constructing a terminator can be found in the section titled “Terminators” on
page 2-7
Glossary
G-5
G-6
Cyberlight User Manual
A
Accessories 1-6
Adjustments
mechanical zoom lens 3-22
mirror head 3-23 to 3-24
yoke 3-25
AF1000 2-2
Alignment knobs. See Lamp, installing or
replacing
Anti-reflective glass 3-5
B
Barrel. See Truss
Batten. See Truss
C
Cabling
constructing 2-6 to 2-7
ordering 1-6
pinouts 2-6, 2-7
safety 1-6, 2-10
specifications 1-4
terminators 2-7
C-clamps 2-10
ordering 1-6
Center access door 1-10
Channel boundaries A-17 to A-18
CL 1-5
Clamps 2-10
Cleaning
dichroics 3-6 to 3-8
fans 3-2
flags, reflector and infrared filter 3-8
to 3-13
lithos 3-6 to 3-8
mirror, lenses, motor and iris 3-3 to
3-5
outer surfaces 3-2
rotating lithos 3-13
wheels and sensors 3-6 to 3-8
Color mixing plate 3-11
Color wheel 3-6
factory configuration
CL/SV C-6
CX C-5
ordering custom dichroics 1-6
replacing dichroics 3-21
SV dichroic substitution 1-20 to 1-22
Control. See DMX
CTO color correction filter 1-20
Customer Service intro-5
CX
drawing of 1-5
mechanical zoom lens 3-22
Cyberlight
accessories 1-6
adjustments
mechanical zoom lens 3-22
mirror head 3-23 to 3-24
yoke 3-25
cabling
constructing 2-6 to 2-7
ordering 1-6
pinouts 2-7
terminators 2-7
center access door 1-10
channel boundaries A-17 to A-18
CL 1-5
clamps 2-10
cleaning
fans 3-2
flags, reflector and infrared filter
3-8 to 3-13
internal components 3-3 to 3-13
mirror, lenses, motor and iris 3-3
to 3-5
outer surfaces 3-2
rotating lithos 3-13
wheels and sensors 3-6 to 3-8
color wheel
CL/SV C-6
CX C-5
control. See DMX
CX 1-5
DIP switches
address A-2
personality 1-23 to 1-27
DMX or LWR control 2-1
effects wheel C-7
features intro-1 to intro-3
Index
1
fixture number 2-3 to 2-5, A-17 to
A-18
front fan access door 1-10
fuses 3-17
hanging fixtures. See Cyberlight,
mounting fixtures
homing 1-19
info LED 1-24 to 1-26
examples 1-26
lamp
information counter 1-18
installing or replacing 1-16 to
1-18
ordering 1-6
lamp box access door 1-10
LED descriptions 1-28
maintenance
(see also Maintenance)
adjustments 3-22 to 3-25
cleaning internal components 3-3
to 3-13
general 3-1
replacing parts 3-14 to ??
models 1-5
mounting fixtures 2-9 to 2-11
pan invert 1-27
pan/tilt swap 1-27
power
ON and OFF 1-30
power cord cap 1-8 to 1-9
setting voltage 1-9 to 1-13
specifications 1-3
switch 1-30
voltage 1-25
power supply board 1-12
QC plate 1-7
replacing
dichroics/lithos 3-21
lamp 1-16 to 1-18
power supply fuses 3-14 to 3-17
rotating lithos 3-18 to 3-20
rotating litho wheel
CL/SV C-4
CX C-3
safety cables 2-10
self-test 1-23
setup mode 1-24
specifications
cabling 1-4
2
Cyberlight User Manual
electrical 1-3
physical 1-2
safety 1-3
safety standards 1-3
static litho wheel
CL/SV C-2
CX C-1
SV 1-5
drawing of 1-5
substituting dichroics 1-20 to
1-22
tilt invert 1-27
troubleshooting 2-12 to 2-17
version number 1-25
voltage 1-25
yoke
adjusting 3-25
installing 1-14 to 1-15
Cyberlight LCD controller 1-6, 2-2
D
Dichroic intro-2
cleaning 3-6 to 3-8
ordering 1-6
replacing 3-21
substituting in SV 1-20 to 1-22
Dim flags 3-13
DIP switches
address A-2
personality 1-23 to 1-27
DMX
(see also LWR protocol)
channel boundaries A-17 to A-18
description 2-1
fixture number
correlated to DMX address A-17
to A-18
mode 2 A-7
mode 3 A-12
linking devices 2-8
modes
description 2-1
mixing modes 1, 2 and 3 A-19
mode 1 A-3 to A-6
mode 2 A-7 to A-11
mode 3 A-12 to A-16
multiple High End Systems fixtures
2-2
procedure 2-3, A-2 to A-16
selecting DMX or LWR protocol 2-1
software uploads A-1
DMX 512. See DMX
DMX address. See DMX and Fixture
number
Dousing. See Dim flags and Features
E
Effects wheel 3-6
factory configuration C-7
EIA RS-485 2-6
F
Failure. See Troubleshooting
Fan LED description 1-28
Fan power connectors 3-11
Fans, cleaning 3-2
Features intro-1 to intro-3
Firmware. See Software
Fixed litho wheel 3-6
Fixture number 2-3 to 2-5
Focusing lens 3-4
Front fan access door 1-10
Fuse specifications 3-17
G
Gobos. See Lithos
H
Hanging fixtures. See Mounting fixtures
Heat filter. See Infrared filter.
Help intro-5
Help (see also Troubleshooting)
Homing 1-19
Homogenizing frost filter 1-20
I
Info LED 1-24 to 1-26
description 1-28
examples 1-26
Information counter (lamp) 1-18
Infrared filter 3-12
Installing
MSR 1200 lamp 1-16 to 1-18
rotating lithos 3-18 to 3-20
substitute SV dichroics 1-20 to 1-22
yoke 1-14 to 1-15
Intellabeam 2-1
K
Keyhole slots 3-6, 3-8
L
Lamp
hours 1-25
information counter 1-18
installing or replacing 1-16 to 1-18
ordering 1-6
replacing 1-16 to 1-18
strikes 1-25
voltage 1-25
Lamp alignment knobs. See Lamp,
installing or replacing
Lamp box access door 1-10
Lamp LED description 1-28
Lampholder. See Lamp, replacing
LEDs
description 1-28
info 1-24 to 1-26
examples 1-26
Line cord 1-8 to 1-9
Linking fixtures 2-8
LithoPatterns 3-18
ordering 1-6
Lithos
accessories 1-6
cleaning 3-6 to 3-8
Index
3
ordering 1-6
replacing 3-18 to 3-21
Luminaire intro-1
LWR protocol
description 2-1
implementing 2-3 to 2-5
software uploads A-1
M
Maintenance
cleaning infrared filter, reflectors, and
flags 3-8 to 3-13
cleaning mirror, lenses, motors and
iris 3-3 to 3-5
cleaning the fans 3-2
cleaning wheels and sensors 3-6 to
3-8
general 3-1
installing rotating lithos 3-18 to 3-20
replacing dichroics/lithos 3-21
replacing power supply fuses 3-14 to
3-17
replacing rotating lithos 3-18 to 3-20
Mechanical zoom lens 3-22
Mirror head deviation 3-23 to 3-24
Model numbers 1-2
Models 1-5
Modes. See DMX, modes
Motor LED description 1-28
Mounting fixtures 2-9 to 2-11
MSD. See MSR 1200 lamp
MSR 1200 lamp
hours 1-25
information counter 1-18
installing or replacing 1-16 to 1-18
LED description 1-28
ordering 1-6
strikes 1-25
voltage 1-25
O
Optical sensors 3-6
Optimizing MSR 1200 lamp. See Lamp,
4
Cyberlight User Manual
installing or replacing
Optional accessories 1-6
P
Pan invert 1-27
Pan/tilt swap 1-27
Parabolic reflector. See Reflector
Power
fuse specifications 3-17
power cord cap 1-8 to 1-9
replacing fuses 3-14 to 3-17
setting voltage 1-9 to 1-13
specifications 1-3
switch 1-30
turning ON and OFF 1-30
Power lens 3-4
Power supply board 1-12
Problems. See Troubleshooting
Q
Quality Control (QC) plate 1-7
R
Recv LED description 1-28
Reflector 3-12
Replacing
dichroics 3-21
dichroics/lithos 3-21
lithos 3-18 to 3-21
MSR 1200 lamp 1-16 to 1-18
power supply fuses 3-14 to 3-17
rotating lithos 3-18 to 3-20
Rotating litho wheel
factory configuration
CL/SV C-4
CX C-3
ordering lithos 1-6
removing and cleaning lithos 3-13
removing and installing lithos 3-18 to
3-20
S
Safety
of fixture mounting 2-9
specifications 1-3
standards 1-3
Safety cables 2-10
ordering 1-6
Self-test 1-23
Sensors 3-6
Setting 1-23
Setting voltage 1-9 to 1-13
Setup mode 1-24
Shutter. See Dim flags.
Software
uploading A-1
version number 1-25
Specifications
cabling 1-4
electrical 1-3
physical 1-2
power supply fuses 3-17
safety standards 1-3
Static litho wheel
factory configuration
CL/SV C-2
CX C-1
ordering lithos 1-6
replacing lithos 3-21
SV
drawing of 1-5
substituting dichroics 1-20 to 1-22
Switches. See DIP switches
T
Technical support intro-5
Terminators 2-7
Testing the fixture 1-23
Tilt invert 1-27
Trackspot 2-1
Troubleshooting 2-12 to 2-17
Truss 2-10
U
United States Institute of Theatre
Technology. See USITT
Unpacking 1-1
Upgrade. See Uploading software
Uploading software A-1
USITT 2-1
V
Version number 1-25
Voltage rating. See Specifications
Voltage settings 1-9 to 1-13
Voltage, reading 1-25
W
Wheels
cleaning 3-6 to 3-8
color, replacing dichroics 3-21
effects C-7
rotating litho, removing and installing
3-18 to 3-20
static litho, replacing lithos 3-21
Wheels, factory configurations
CL/SV color C-6
CL/SV rotating litho C-4
CL/SV static litho C-2
CX color C-5
CX rotating litho C-3
CX static litho C-1
effects C-7
X
XLR cabling
constructing 2-6 to 2-7
ordering 1-6
C-clamps
ordering 1-6
pinouts 2-6, 2-7
Index
5
terminators 2-7
Xmit LED description 1-28
Y
Yoke
adjusting 3-25
installing 1-14 to 1-15
Z
Zoom lens 3-4
Zoom lens, CX 3-22
6
Cyberlight User Manual