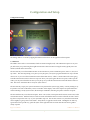
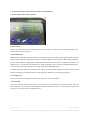
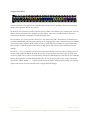
1
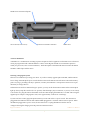
10MF1 USER MANUAL
REV 0-01
WWW.BIGFINSCIENTIFIC.COM
7 2 0 0 H w y 7 1 W, S u i t e B , A u s t i n , T X 7 8 7 3 5 • 5 1 2 . 8 0 8 . 0 3 4 6 • w w w. b i g f i n s c i e n t i f i c . c o m
Introduction
Welcome!
Thank you for purchasing a Big Fin Scientific 10MF1 fish-measurement board. It has been engineered to be a highlyefficient and productive companion in your research endeavors over many years.
The 10MF1 is highly flexible and can be customized to fit with how you work. What’s described in this manual is the
default behavior of the device. After you’ve had a chance to familiarize yourself with how the device works, please
contact Big Fin Scientific to discuss how it can be modified to best suite your needs.
Purpose of the Device
The goals of the 10MF1 fish-measurement board are:
1) decrease acquisition costs of fish-related data and ecosystem meta-data (growth, health, other).
2) eliminate data uncertainty by standardizing the method and practice of data acquisition
The 10MF1 achieves the above goals by providing an electronic means to rapidly capture fish data, increasing in-field
data-capture efficiency and eliminating paper-to-computer translation which is a large source of inefficiency and error. Secondly, the 10MF1 is customized to each customer, allowing for a standardized data-capture routine (workflow) and consistent method of length-measurement.
Introduction to System Features
The 10MF1 system has the following features:
• Ruggedized, waterproof (submersible to 1m) enclosure with shock-isolated electronics
• On-board memory sufficient for thousands of fish-records
• Bluetooth wireless communications
• Length measurement accurate to nearest 1mm
• 1-meter total measurement envelope
• Transflective LCD display, yielding high contrast even in direct sunlight
• In-field firm-ware update ability
• Real-time back-end database communication ability (compatible with FEED or other database programs)
• Customizable alpha-numeric and short-cuts input along sensor bar (replaceable graphics)
• Audio and LED/visual feedback
• Available battery power
• Available PIT tag reading, incorporating PIT tag data into fish-records
B i g F i n S c i e n t i f i c!
10MF1 User Manual
1
Definition of Terms:
• Animal-record: (or “record”) Refers to a set of data about a particular creature which has been measured or characterized by a user of the board. Records include such characteristics as: SPECIES, GENDER, LOCATION, WEIGHT
and LENGTH.
• Work-flow: Refers to a combination of recording sequence and options for each animal-record and is customizable
to each customer or group(s) or user(s) of each customer. Work-flows can vary on a large number of criteria, including type of animal being measured, location of measurement or a group’s particular data-interest. The workflow determines a standard approach to data-taking, such that everyone following the work-flow takes data in the
same order, with the same required fields.
• Stylus: The magnetic finger-stylus by which all selections and measurements are made.
• Serial Connection: Refers to a data connection established between the board and a computer, such that firmware
updates to the board can be made and data recorded on the board can be downloaded to the computer.
• CSV File: A data-file which holds the animal records. CSV stands for Comma-Separated-Value. The CSV datafile
has data about each animal recorded separated by commas, such that programs like Excel and database programs
such as MySQL or Access can import the data using a simple, built-in import utility.
• Platform Manager: A utility developed by Big Fin Scientific and available for download via the web which allows
communication to the 10MF1 board(s). The Platform Manager runs on Windows.
System Overview
Display! !
!
Faceplate !
!
!
Indicator LEDs
!
!
Sensor-Bar area (Length measurement + hot-keys)
B i g F i n S c i e n t i f i c!
10MF1 User Manual
2
Handle and Cal-stick attach points
Service Port (do not remove) !
!
Connector for IOHub connection ! !
Rubber Feet
A Note on WorkFlows
A WorkFlow is a combination of recording sequence and options which is applied to each animal-record. The device
comes pre-programmed with a default WorkFlow. Please contact Big Fin Scientific for customization options to
match your processes (create a custom WorkFlow). All the descriptions included in this manual assume the default
WorkFlow which ships with the device.
Powering / Charging the System
There are two methods for powering your device. If you have a battery upgrade option installed, and the batteries
have a charge, find and flip the power switch which is located on the bottom-side of the board. Because the batterypack is very large, providing a full day’s operation, no battery level indicator is incorporated. Please be sure to put
the battery on-charge after use.
If the batteries do not have sufficient charge to operate, you may see the white indicator LEDs on the front faceplate
light up when you flip the switch to the “on” position, while the display may not function, or you may see no activity.
at all. In this case, plug the unit into the IOHub via the 5m cable and plug the IOHub into a 110-220V outlet using the
supplied power adapter. Charging time varies, but is approximately 6-8 hours for a full charge.
If you do not have a battery upgrade option installed, your unit will not have a power switch. The unit must be
plugged into the IOHub via the 5m cable and the IOHub plugged into a 110-220V outlet in order to operate. When
the IOHub is plugged into a power source, the unit will turn on. Unplug the IOHub to turn the unit off.
A diagram showing the charging and wall-powered connections follows:
B i g F i n S c i e n t i f i c!
10MF1 User Manual
3
How to use the Stylus
The magnetic finger-stylus is typically placed on the user’s right-hand index finger. It is designed to fit around
gloved hands and comes with a velcro strap to keep it attached to the finger. Typically, the stylus is tethered to the
board with the supplied, coiled lanyard. Use a #8-32 x 1/2” screw and lock-washer (also supplied) to attach it to a
threaded-insert on the bottom of the unit.
TIP: multiple styli can be used. Tether one near the faceplate and one mid-way along the lengthmeasurement area, for two-handed operation.
The stylus features are composed of the following three categories:
1) A magnet - The stylus has a strong magnet which has been potted into the plastic. The magnet actuates sensors
within the device behind the faceplate and along the length-sensing region.
2) A finger-basket - Plastic features which hold the user’s finger.
3) A touch-off surface - A rounded tip which is used as the calibrated length-measurement surface with which to
measure lengths. Note that the magnet is somewhat removed from the touch-off surface. The unit is calibrated in
such a way as to make up the distance between magnet and touch-off surface.
For length-measurements, the stylus “touch-off” tip should be facing left, in the direction of the measurement
graphic. The tip is placed up against the object to be measured and pressed down to the measurement surface.
For faceplate selections, the magnet is being sensed by the computer under the faceplate. However, the touch-off tip
is so close to the magnet that you can use the end of the touch-off tip as a visual reference for the keys you’re selecting.
Do not store the stylus in liquid for extended periods of time (over 12 hours) and do not expose the stylus to temperatures over 50C. Wash and dry the stylus after use and store it in a breathable environment such that it fully dries.
Updating FirmWare
The firmware for the unit will be occasionally updated to fix issues or to include improvements and the firmware
“images” or files will be posted on the Big Fin Scientific website for download.
CAUTION: If we have created a customized WorkFlow for you, your firmware may not match what is available online. Loading the “default” firmware available on the website may change your WorkFlow and settings. If this has
already occurred, just contact us to obtain a copy of your customized firmware.
The firmware update is accomplished via the Platform Manager, also available on the BFS website.
B i g F i n S c i e n t i f i c!
10MF1 User Manual
4
Descriptions of Keys
Working from top-left to bottom-right, in left-to-right rows.
SETTINGS
See “Configuration Settings” section.
f(x)
A special-function key which is customizable to your use.
CRUISE
Set a 5 digit (alphanumeric) cruise code to associate with your fish-records.
PAN
The Personal Access Number is a number associated with a specific user, such that any one fish record can be associated with a specific user.
LOCATION
The location is an 8-digit code (alphanumeric) which specifies the location of catch or of measurement. This can be a
station number or a GPS coordinate.
SPECIES
This is a 4-digit alphanumeric code which identifies the SPECIES being measured.
SIZE
This code specifies the size-class of the fish being measured.
B i g F i n S c i e n t i f i c!
10MF1 User Manual
5
SF1
“Special Function 1” is a customizable key. Default function is to allow the user to enter some notes about the measurement being performed. The NOTE field is not “sticky” and reverts to a null value (blank) after the current fishrecord is stored.
Distance Measurement (Length Measurement)
This key causes the board to enter LENGTH-MEASUREMENT MODE and waits for the user to take measurements
along the sensor region with the magnetic stylus. Default action is for the board to store the fish-record and start a
new one, using the entered characteristic data, upon successful LENGTH measurement.
The board will beep and the white indicator LEDs will light when a length-measurement is successful and a record
has been stored. The total number of records shown on the display will increment by 1 and the board will wait for
another measurement. Hit any key on the faceplate to get out of LENGTH-MEASUREMENT mode.
SCALE
By selecting this key, the user will cause the board to look for data coming from a scale. If no scale is detected, the
user will be prompted to enter a weight manually.
GENDER
The gender of the animal being measured can be entered here. The setting is sticky and will perpetuate through multiple records until it is changed.
SPECIAL
The default action of this key is to initiate the PIT tag reading sub-system, if the PIT tag reader option is installed. If
there is no PIT tag reader option installed in the board, the key will report “no PIT tag reader” and return to the previous menu. The key is customizable to other functions.
VIEW DATA
Allows the user to review the on-board data. Tapping the up or down arrow keys will cause the data-fields within a
single record to scroll, while tapping a left or right arrow key will decrement or increment the record.
SF2
“Special Function 2” is a customizable key. No default action.
B i g F i n S c i e n t i f i c!
10MF1 User Manual
6
Configuration and Setup
Configuration Settings
The Settings Menu is accessed by tapping the Hammer+Wrench icon in the upper left of the faceplate.
1. Calibration
The 10MF1 comes with two CAL-STICKS, which are 375mm in length (each). The calibration sequence is very simple, in that only two points along the length-measurement surface need be set using the sticks, typically Zero and
750mm (with the sticks end-to-end.)
The unit will ask you for the intended location of measurement of your first calibration point. Enter “0” (zero) and
tap “enter”. The unit will prompt you to place your stylus; place your stylus up against the fish-nose-stop wall and
down as far as you can to the measurement surface (horizontal surface). There’s a small radius in the corner going
from the measurement surface to the nose-stop wall. Move your stylus against the nose-stop wall, at the top of the
radius; you may notice that this will force your stylus up away from the measurement surface the distance of the radius. The sensor will still be able to read your stylus location.
The unit will only accept your stylus location after some period of the stylus staying steady. A steady reading of stylus position over time is reflected by a series of asterisks on the display. After some sequence of repeated measurements indicating a steady stylus location, the unit beeps and flashes, indicating acceptance of the first cal-point.
The unit will then ask you for the 2nd cal-point. Enter “750” for this one and place both cal-sticks, end-to-end, on the
measurement surface. With one hand, move the cal-sticks such that the left-most surface of the left cal-stick is touching the nose-stop in the same way as your stylus did in step one. The cal-stick will rise away from the measurement
surface slightly to get up and over the radius. Verify there is no gap between the sticks. Holding the cal-sticks up
against the nose-stop in this way, place the stylus on the right side of the cal-sticks and allow the unit to gather a
steady cal-point.
B i g F i n S c i e n t i f i c!
10MF1 User Manual
7
The calibration is complete. Verify the calibration with a measurement of a single cal-stick or some other device of
known length. Go into LENGTH-MEASURE mode and place a single cal-stick on the board, allowing the stick to rest
on top of the small radius at the nose-stop wall and take a measurement. You should see “375”mm for your measurement. If not, verify you did all of the steps correctly (including verification) and repeat the calibration if necessary.
You should verify calibration using a CAL-STICK or other object of known length prior to every use.
B i g F i n S c i e n t i f i c!
10MF1 User Manual
8
2. Set the Date and Time, which will be kept with an on-board battery.
3. Set the volume of the on-board speaker.
4. Clear all Data
This will clear all fish-records on-board the device. Please use caution, as the records are permanently erased. This
function will take about 2 minutes.
5. Enter FEED Mode
FEED (Fish Environmental Electronic Database) is a database program developed by the Virginia Institute of Marine
Science (VIMS). FEED is based on Microsoft Access (a database platform) and provides for the recording and reporting of an almost infinitely configurable set of fish-related characteristics and workflows on Windows-based PCs. The
10MF1 can act as a “front-end” user-input device to FEED, allowing the user to maneuver within the FEED application and to input information into the various fields found in the FEED application(s).
In similar fashion, the 10MF1 can be made to work with any PC-based database application which you may be using.
Please contact Big Fin for technical assistance in integrating the 10MF1 into your technology platforms.
6. Set Length Units
The user can select from the following units for measurements: cm, mm and inches.
7. Scale Settings
Select your scale from the list of scales shown. If you do not see your scale listed, try the “generic” listing. If the “generic” listing does not work, please contact Big Fin Scientific for technical assistance. We will attempt to create a new
scale entry for you and send you updated firmware.
B i g F i n S c i e n t i f i c!
10MF1 User Manual
9
Operation of the Device
Recording Animals
By default, the act of taking a LENGTH-MEASUREMENT is what triggers the 10MF1 to write animal-records to the
internal data-storage. In this case, the LENGTH-MEASUREMENT is called a “Record-Write Trigger” event. A writetrigger can be configured (currently only by Big Fin Scientific) to be any data, such as weight or gonad characteristic.
Upon entering the mode by which trigger-events are accepted, the user will be prompted for any missing information
which is required before the record can be stored. Examples might be LOCATION, PAN (personal access number) or
SPECIES. Selection of which fields are required is also customizable.
By default, the workflow is: [STATION] --> [CRUISE] --> [SPECIES] --> [LENGTH]
In this scenario, the user would enter LENGTH / DISTANCE measure mode (tap the “DISTANCE-MEASURE” key
on the faceplate) and would subsequently be prompted for STATION, CRUISE and SPECIES, if those items were not
already set. If they’ve been previously set, the user would be brought into distance-measure mode straight-away.
Optional characteristics include WEIGHT, GENDER and all special fields, such as GONAD WEIGHT, GONAD APPEARANCE, NOTES and any defect descriptions. These can be entered at any time before a LENGTH is measured.
Some of the fields are “sticky”, in that they’ll last from record to record until they’re changed. Others will revert to a
null value after a single record.
All of the above is configurable to your preferences. A PC application which will allow you to customize your board
is being developed but, currently, Big Fin Scientific will need to do this for you.
Adding Weight Measurements to Records
Scales are attached to the IOHub via a serial cable (9-pin RS-232). USB connections to scales are not yet supported.
After attaching your scale, turn it on and select the SCALE button on the 10MF1 faceplate. After entering any required information, the SCALE information will be displayed. The value being reported by the scale will be shown
on the display, along with the unit of measurement currently selected on the 10MF1. Note that the units shown on
the scale are not necessarily those shown on the 10MF1. The 10MF1 converts your scale output to the units you’ve
selected on the fish-board.
Supported units are: oz, lb, g and kg.
Select “OK” to accept the weight being displayed. This value will be recorded with the next animal-record and will
revert to zero after the record is stored, such that subsequent records will show “zero” unless another scale reading is
taken.
B i g F i n S c i e n t i f i c!
10MF1 User Manual
10
Using the Sensor Decal
A customized decal can be applied to the length-measurement (sensor) area. By default, a hot-key and ruler-mark
decal has been applied to the unit, shown above.
The decal has areas which can be used as selection “buttons” similar to the selection areas on the faceplate. There are
buttons which correspond to letters, numbers and some symbols. There is also a mode-switch key and a key to
switch between the letters and numbers+symbols (the purple # key).
The colored keys, A-Z can also be used as hot-keys for various data entry fields. The default use for the hot-keys is
for entering the SPECIES of the animal being measured. By mapping species-codes to the lettered keys, the SPECIES
can be selected with a single key-stroke instead of entering a multi-digit code. Generally, the colored and lettered
keys are easier to remember for the user than the multi-digit species codes, but the user has their choice between
methods.
The “Mode >>>” key is a reminder to the user of the following functionality: If the user wishes to change species at
any time while in LENGTH-MEASURE mode, the user may “swipe” the stylus from left to right, anywhere on the
sensor bar (graphic area) in order to cause the board to prompt for a SPECIES hot-key. After the user taps a SPECIES
hot-key, the board returns to LENGTH-MEASURE mode. It is not necessary to perform the “swipe” in the purple
area which is marked “MODE >>>”. Swiping anywhere along the graphic will perform the Hot-Key access function.
Species codes may be associated with the hot-keys using the Platform Manager.
B i g F i n S c i e n t i f i c!
10MF1 User Manual
11