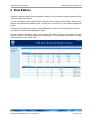
1
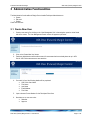
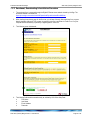
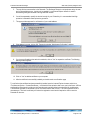
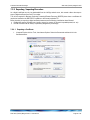
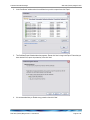
Australian Securities Exchange ASX Clear (Futures) Margin Control ASX Clear (Futures) Margin Control Collateral Lodgement System User Manual ASX Clear (Futures) Margin Control – User Manual Page 1 of 37 Australian Securities Exchange ASX Clear (Futures) Margin Control Contents 1 Introduction ........................................................................................................................................................... 4 1.1 1.2 2 Setup and Access ................................................................................................................................................. 5 2.1 2.2 2.3 2.4 2.5 2.6 3 System Setup............................................................................................................................................... 5 Participant Administrator User Setup ........................................................................................................... 5 Participant Client Setup ............................................................................................................................... 5 Accessing Margin Control ............................................................................................................................ 5 Session Timeout .......................................................................................................................................... 5 Changing your password ............................................................................................................................. 6 Administration Functionalities ............................................................................................................................ 7 3.1 3.2 3.3 4 What is ASX Clear (Futures) Margin Control? ............................................................................................. 4 Who is this User Manual for? ....................................................................................................................... 4 Create New User ......................................................................................................................................... 7 User Search ................................................................................................................................................. 8 Edit User ...................................................................................................................................................... 8 Collateral Instructions .......................................................................................................................................... 9 4.1 Intraday Cash Instruction ............................................................................................................................. 9 4.1.1 Create, Save, Submit .......................................................................................................................... 9 4.1.2 Approve ............................................................................................................................................. 10 4.2 EOD Cash Instruction ................................................................................................................................ 11 4.2.1 Create, Save, Submit ........................................................................................................................ 11 4.2.2 Approve ............................................................................................................................................. 12 4.3 Non-Cash Instruction ................................................................................................................................. 14 4.3.1 Create, Save, Submit ........................................................................................................................ 14 4.3.2 Approve ............................................................................................................................................. 15 4.4 Standing Instructions ................................................................................................................................. 16 4.4.1 Create, Save, Submit ........................................................................................................................ 16 4.4.2 Approve ............................................................................................................................................. 17 5 View Balance ....................................................................................................................................................... 18 6 Contacting Support ............................................................................................................................................ 19 6.1 6.2 7 ASX Online Helpdesk Support ................................................................................................................... 19 ASX24 Service Desk Support ...................................................................... Error! Bookmark not defined. Appendices ......................................................................................................................................................... 20 7.1 7.2 Appendix 1 – Registration Form................................................................................................................. 20 Appendix 2 – Digital Certificate Procedure ................................................................................................ 21 7.2.1 Enrolment for a Digital Certificate...................................................................................................... 21 7.2.2 Download and Installation of a Digital Certificate .............................................................................. 21 7.2.3 Enrolment, Downloading & Installation Procedure ............................................................................ 22 7.2.4 Exporting / Importing Procedure ........................................................................................................ 24 7.2.5 Importing a Certificate ....................................................................................................................... 27 7.3 Appendix 3 – Troubleshooting ................................................................................................................... 30 7.3.1 Browser-related Issues...................................................................................................................... 30 7.3.2 Digital Certificate Issues .................................................................................................................... 32 7.4 Appendix 4 – Instruction Input Issues ........................................................................................................ 37 ASX Clear (Futures) Margin Control – User Manual Page 2 of 37 Australian Securities Exchange ASX Clear (Futures) Margin Control Disclaimer Whilst the ASX Clear Futures Margin Control User Manual is designed to assist Participants in using the ASX Clear Futures Margin Control System, use of this User Manual or the ASX Clear Futures Margin Control System will not in itself ensure compliance by Participants with all relevant requirements of the ASX Group Operating Rules. All examples used in the ASX Clear Futures Margin Control User Manual are for general illustrative purposes only. Although ASX Limited ABN 98 008 624 691 and its related bodies corporate (“ASX”) has made every effort to ensure the accuracy of the information as at the date of publication, ASX does not give any warranty or representation as to the accuracy, reliability or completeness of the information. ASX reserves the right to change details in this document at any time without notice. To the extent permitted by law, ASX and its employees, officers and contractors shall not be liable for any loss or damage arising in any way (including by way of negligence) from or in connection with any information provided or omitted or from any one acting or refraining to act in reliance on this information. © Copyright ASX Limited. ABN 98 008 624 691. All rights reserved 2013. ASX Clear (Futures) Margin Control – User Manual Page 3 of 37 Australian Securities Exchange ASX Clear (Futures) Margin Control 1 Introduction 1.1 What is ASX Clear (Futures) Margin Control? ASX Clear (Futures) Margin Control is a web based system for lodging End of Day Cash, Intraday Cash and NonCash collateral instructions with the ASX. 1.2 Who is this User Manual for? The Margin Control User Manual has been written for Participant users of the Margin Control system. Participant users of Margin Control include the following: Participant Administrator User Participant Client User ASX Clear (Futures) Margin Control – User Manual Page 4 of 37 Australian Securities Exchange ASX Clear (Futures) Margin Control 2 Setup and Access 2.1 System Setup To access Margin Control, you need to have: Internet Explorer 7, 8 or 9. JavaScript enabled browser ActiveX Controls set to “Enabled” Onsite MSI package installed for Windows XP Operating System 2.2 Participant Administrator User Setup To create a Margin Control Participant Administrator User, you should: 1. Ensure you have an active 1ASX Online profile: Contact ASX Online Help Desk 2. Complete, scan and email the following form to: [email protected] 3. Receive Participant Administration User credentials from the ASX Online Help Desk by email 4. Enrol and Download Digital Certificate - Digital Certificate Procedures 5. Confirm login at the following link: https://asxcfmargincontrol.connect.asxonline.com 2.3 Participant Client Setup To create a Margin Control Participant User, you should: 1. Ensure you have an active2 ASX Online profile: Contact ASX Online Help Desk 2. Ask your Participant Administrator to create a Margin Control Participant User profile and request for an Users Digital Certificate - Administration Functionalities 3. Receive Participant Client User credentials from the ASX Online Help Desk by email 4. Enrol and Download Digital Certificate - Digital Certificate Procedures 5. Confirm login at the following link: https://asxcfmargincontrol.connect.asxonline.com 2.4 Accessing Margin Control You can access Margin Control by: 1. Opening your browser and navigate to https://asxcfmargincontrol.connect.asxonline.com 2. Enter your ASX Online login details. 3. Read the Terms of Use and click ‘I Agree’ to continue. 2.5 Session Timeout Session timeout and disconnection occurs after 60 minutes of inactivity. You will be informed of this when attempting to perform a function in Margin Control and asked to log in again. Be aware that when your session times out, any unsaved information will be lost. 1 2 Users must login to ASX Online and change their password to activate their account As per foot note 1 ASX Clear (Futures) Margin Control – User Manual Page 5 of 37 Australian Securities Exchange ASX Clear (Futures) Margin Control 2.6 Changing your password Your password expires every 90 days and you will be prompted by the system to enter a new password. When your password has expired, a message is displayed when you next attempt to log on to ASX Margin Control. You will not be able to log on until you have changed your password. To change your password, follow the prompts presented to you by the system. Be aware that the following standards apply to your password: 1. Passwords must contain characters from at least three (3) of the following four (4) classes: a) English upper case letters, i.e. A-Z b) English lower case letters, i.e. a-z c) Numeric Values, i.e. 0-9 d) Non-alphanumeric special characters of: $ (dollar sign) or _ (underscore) 2. Passwords may not contain the user name or any part of the user’s full name 3. Passwords must be at least 8 characters long 4. New passwords must not be the same as the previous password. ASX Clear (Futures) Margin Control – User Manual Page 6 of 37 Australian Securities Exchange ASX Clear (Futures) Margin Control 3 Administration Functionalities The Administration functionalities of Margin Control enable Participant Administrators to: Create, Edit, and Disable Client User accounts. 3.1 Create New User 1. Create a new user by first clicking on the ‘User Management’ link in the navigation panel on the left hand side of the screen. The User Management Search screen will appear as per below: 2. Click on the ‘Create New User’ button. 3. Participant Administrators will be able to search for usernames that have already been set up in ASX Online. ASX Online usernames are case sensitive. 4. If a match is found, the following details will be populated: ASX Online User Name First Name Last Name Email Address Firm Code 5. Input a relevant Contact Number for the Participant Client User 6. Nominate one or more user roles : Submitter Approver ASX Clear (Futures) Margin Control – User Manual Page 7 of 37 Australian Securities Exchange ASX Clear (Futures) Margin Control Participants have the ability to manage their own Users and User privileges. Request a digital certificate on the user’s behalf, by checking ‘Request Certificate’ and click “Create User” to apply changes. This will send a request to ASX Online Help Desk for a VeriSign digital certificate. 7. Click the ‘Close’ button to end the user creation process. 3.2 User Search 1. 2. 3. 4. Go to the ‘User Management’ screen. Input the Username. Click ‘Search’ Results will appear in summary form 3.3 Edit User 1. Locate the Participant Client User in question as per User Search 2. Click on the Participant Client User in the search results 3. Make the following changes as appropriate: a. Roles – Submitter/Approver b. Revoke Certificate – Send request to ASX Online Help Desk ASX Clear (Futures) Margin Control – User Manual Page 8 of 37 Australian Securities Exchange ASX Clear (Futures) Margin Control 4 Collateral Instructions 4.1 Intraday Cash Instruction Following sections provide information on how to create, submit and approve a new Intraday Cash Instruction. Note that creation and subsequent submission of Intraday Cash Instructions to the ASX is only allowed between 09.00 AM and 14.15 PM for New Zealand Dollar and 09.30 AM and 15.30 PM for Australian Dollar. 4.1.1 Create, Save, Submit Step Action User Description 1. Click Button Submitter Click ‘Collateral Instruction’ link on the left hand side of the screen 2. Click Button Submitter Click ‘Create new Intraday Cash Instruction’ button 3. Data Entry Submitter Enter the following data for the Intraday Cash Instruction Details: - Exchange - Account - Currency: Accepted currencies are AUD, EUR, GBP, JPY, NZD, and USD. - Settlement Date: If Currency is AUD or NZD, then Settlement Date must be equal to Today. If Currency is different than AUD or NZD, then Settlement Date must be Tomorrow. - Amount: Must be greater than zero and equal to or less than 999,999,999,999.00. New 4. Data Entry Submitter Enter the following data for the Additional Information: - Participant Notes New 5. Save/Cancel/Submit Submitter If the Instruction is not yet ready to be sent to the next person in the workflow, click ‘Save’. Saved If the instruction has been saved, but it needs to be cancelled, perform the following tasks: - Click ‘Collateral Instruction’ link on the left hand side of the screen. - Locate the row corresponding to the instruction that requires approval. The instruction becomes high-lighted in grey when hovering over it. Click on the instruction. - The ‘View Instruction’ screen will appear displaying the instruction details. This is a read only screen. To cancel the instruction, click on the ‘Cancel’ button. - A warning message will appear. Click ‘OK’ to cancel the instruction. Cancelled To send instruction directly to the Approver, click ‘Submit’. Submitted ASX Clear (Futures) Margin Control – User Manual Status Page 9 of 37 Australian Securities Exchange ASX Clear (Futures) Margin Control 4.1.2 Approve Step Action User Description Status 1. Click Button Approver Click ‘Collateral Instruction’ link on the left hand side of the screen. By default, the system will show all instructions with Lodgement Date Today, and order according to ‘Last Modified’. If there are more than ten instructions in the search result, they can be accessed by clicking on the page number in the bottom left hand corner of the ‘Search Results’ section. Submitted 2. Locate Instruction Approver Locate the row corresponding to the instruction that requires approval. The instruction becomes high-lighted in grey when hovering over it. Click on the instruction. Submitted 3. View Data Approver The ‘View Instruction’ screen will appear displaying the instruction details. This is a read only screen. To approve or reject the instruction, click on the ‘Edit’ button. Submitted 4. Data Entry Approver The ‘Edit Instruction’ screen will appear, enabling the approver to add additional information in the ‘Participant Notes’ field. Submitted 5. Review Approver Review the collateral instruction details. Submitted 6. Approve/Reject Approver If any data is erroneous in the instruction, click ‘Reject’. A ‘Rejection Reason’ text box will appear. Enter reason for rejection and click ‘OK’. Rejected If all information is correct, click ‘Approve’. The instruction has now been sent to ASX for processing. Note that this is the final status of the instruction, subject to approval from ASX. Approved If ASX cannot process the instruction or if the instruction is incorrect, it will be rejected by an ASX officer and the instruction moves into ASX Reject status. The Participant Submitter must review the instruction and revert to step 1 above. ASX Reject 7. ASX Reject ASX ASX Clear (Futures) Margin Control – User Manual Page 10 of 37 Australian Securities Exchange ASX Clear (Futures) Margin Control 4.2 EOD Cash Instruction Following sections provide information on how to create, submit and approve a new End of Day Cash Instruction. Note that creation and subsequent submission of EOD Cash Instructions to the ASX is only allowed between 06.00 AM to 09.00 for NZD Exchange, 06.00 AM to 09.15 AM for CFD Exchange and 06.00 AM to 09.30 AM for SFE Exchange. 4.2.1 Create, Save, Submit Step Action User Description 1. Click Button Submitter Click ‘Collateral Instruction’ link on the left hand side of the screen 2. Click Button Submitter Click ‘Create new EOD Cash Instruction’ button 3. Data Entry Submitter Enter the following data for the Intraday Cash Instruction Details: - Exchange - Account - Currency: Accepted currencies are AUD, EUR, GBP, JPY, NZD, and USD. - Deposit / Withdraw - Amount: Must be greater than zero and equal to or less than 999,999,999,999.00. New 4. Click Button Submitter Click ‘Refresh’ button. Depending on data entry in step 3, the following will occur in the End of Day Balance grid: - If Margin Control has detected an Excess / Shortage at start of day, and the currency of the instruction is a Matching Currency, Margin Control system will update the column ‘Actual Amount’ with the entered instruction amount, and update ‘Resultant Cash Balance’ and ‘Resultant Excess/Shortage’. Note that an instruction with a resulting “Res Excess/Shortage” value is not accepted, i.e. this field must be equal to or greater than zero as a result of the instruction. - If Margin Control has detected an Excess / Shortage at start of day, and the currency of the instruction is a Non-Matching Currency, Margin Control system will update the column ‘Actual Amount’ with the entered instruction amount. In addition, following will occur: _If Instructed Actual Amount is equal or greater than ‘Resultant Excess/Shortage’, then Margin Control system will reduce ‘Resultant Excess / Shortage (and Resultant Cash balance)’ by the instructed Actual Amount _If Instructed Actual Amount is greater than ‘Resultant Excess/Shortage’, then Margin Control system will reduce ‘Resultant Excess / Shortage’ to zero, and reduce ‘Non Matching Collateral Cash’ by the remaining value. In addition, Margin Control system will reduce ‘Resultant Cash Balance’ by the full actual amount. - If no Excess/Shortage has been detected at start of day, Margin Control system will add a new line and populate columns ‘Actual Amount’ and ‘Resultant Excess / Shortage’ with instruction amounts. Note that the ‘End of Day Balance Grid’ is updated as a result of instruction creation which may still be subject to ASX approval, and as such does not necessarily accurately reflect the collateral New ASX Clear (Futures) Margin Control – User Manual Status Page 11 of 37 Australian Securities Exchange ASX Clear (Futures) Margin Control balances held with the ASX. 5. Data Entry Submitter Enter the following data for the Additional Information: - Participant Notes New 6. Save/Cancel/Submit Submitter If the Instruction is not yet ready to be sent to the next person in the workflow, click ‘Save’. The Margin Control system will perform following validation checks: - If the entered instruction is on a Non-Matching Currency, the ‘Resultant Cash Balance’ must be equal to or greater than zero. If the entered instruction is not on a Non-Matching Currency, the ‘Resultant Excess / Shortage’ must be equal to or greater than zero. Saved If the instruction has been saved, but it needs to be cancelled, perform the following tasks: - Click ‘Collateral Instruction’ link on the left hand side of the screen. - Locate the row corresponding to the instruction that requires approval. The instruction becomes high-lighted in grey when hovering over it. Click on the instruction. - The ‘View Instruction’ screen will appear displaying the instruction details. This is a read only screen. The End of Day Balance Grid will display the status of the instruction under the ‘Status’ column. To cancel the instruction, click on the ‘Cancel’ button. - A warning message will appear. Click ‘OK’ to cancel the instruction. Cancelled To send instruction directly to the Approver, click ‘Submit’. The Margin Control system will perform the following validation checks: - If the entered instruction is on a Non-Matching Currency, the ‘Resultant Cash Balance’ must be equal to or greater than zero. - If the entered instruction is not on a Non-Matching Currency, the ‘Resultant Excess / Shortage’ must be equal to or greater than zero. Submitted 4.2.2 Approve Step Action User Description Status 1. Click Button Approver Click ‘Collateral Instruction’ link on the left hand side of the screen. By default, the system will show all instructions with Lodgement Date Today, and order according to ‘Last Modified’. If there are more than ten instructions in the search result, they can be accessed by clicking on the page number in the bottom left hand corner of the ‘Search Results’ section. Submitted 2. Locate Instruction Approver Locate the row corresponding to the instruction that requires approval. The instruction becomes high-lighted in grey when hovering over it. Click on the instruction. Submitted 3. View Data Approver The ‘View Instruction’ screen will appear displaying the instruction details. This is a read only screen. The End of Day Balance Grid will display the status of the instruction under the ‘Status’ column. To Submitted ASX Clear (Futures) Margin Control – User Manual Page 12 of 37 Australian Securities Exchange ASX Clear (Futures) Margin Control approve or reject the instruction, click on the ‘Edit’ button. 4. Data Entry Approver The ‘Edit Instruction’ screen will appear, enabling the approver to add additional information in the ‘Participant Notes’ field. Submitted 5. Review Approver Review the collateral instruction details. Submitted 6. Approve/Reject Approver If any data is erroneous in the instruction, click ‘Reject’. A ‘Rejection Reason’ text box will appear. Enter reason for rejection and click ‘OK’. Rejected If all information is correct, click ‘Approve’. The instruction has now been sent to ASX for processing. Note that this is the final status of the instruction, subject to approval from ASX. Approved If ASX cannot process the instruction or if the instruction is incorrect, it will be rejected by an ASX officer and the instruction moves into ASX Reject status. The Participant Submitter must review the instruction and revert to step 1 above. ASX Reject 7. ASX Reject ASX ASX Clear (Futures) Margin Control – User Manual Page 13 of 37 Australian Securities Exchange ASX Clear (Futures) Margin Control 4.3 Non-Cash Instruction Following sections provide information on how to create, submit and approve a new Non Cash Instruction. Note that Non Cash Instruction must be submitted by 16.00 PM for next day settlement as per current ASX Clear (Futures) rules and procedures. 4.3.1 Create, Save, Submit Step Action User Description 1. Click Button Submitter Click ‘Collateral Instruction’ link on the left hand side of the screen 2. Click Button Submitter Click ‘Create new Non-Cash Instruction’ button 3. Data Entry Submitter Enter the following data for the Non-Cash Instruction Details: - Exchange - Account - Collateral Type: Possible values are AU Semi-Gov Securities, AU T-Bonds, AU T-Notes and US T-Notes. - Deposit / Withdraw - ISIN Code - Face Value: Requires a value equal or greater than 500,000.00 and less than or equal to 500,000,000.00. - Maturity Date: Must be equal or greater than 2 weeks from lodgement date. - Coupon Rate - Value Date: Must be strictly T+1 and lodgement through the portal must be made prior to 15.30 PM. - ACLR Code: Mandatory for following collateral types – AU Semi-Gov Securities, AU T-Bonds, AU T-Notes - Depositary : Mandatory for US T-Notes collateral type - Depositary Account Number: Mandatory for US T-Notes collateral type - Depositary Account Name: Mandatory for US T-Notes collateral type New 4. Data Entry Submitter Enter the following data for the Additional Information: - Participant Notes New 5. Save/Cancel/Submit Submitter If the Instruction is not yet ready to be sent to the next person in the workflow, click ‘Save’. Saved If the instruction has been saved, but it needs to be cancelled, perform the following tasks: - Click ‘Collateral Instruction’ link on the left hand side of the screen. - Locate the row corresponding to the instruction that requires approval. The instruction becomes high-lighted in grey when hovering over it. Click on the instruction. - The ‘View Instruction’ screen will appear displaying the instruction details. This is a read only screen. To cancel the instruction, click on the ‘Cancel’ button. - A warning message will appear. Click ‘OK’ to cancel the instruction. Cancelled To send instruction directly to the Approver, click ‘Submit’. Submitted ASX Clear (Futures) Margin Control – User Manual Status Page 14 of 37 Australian Securities Exchange ASX Clear (Futures) Margin Control 4.3.2 Approve Step Action User Description Status 1. Click Button Approver Click ‘Collateral Instruction’ link on the left hand side of the screen. By default, the system will show all instructions with Lodgement Date Today, and order according to ‘Last Modified’. If there are more than ten instructions in the search result, they can be accessed by clicking on the page number in the bottom left hand corner of the ‘Search Results’ section. Submitted 2. Locate Instruction Approver Locate the row corresponding to the instruction that requires approval. The instruction becomes high-lighted in grey when hovering over it. Click on the instruction. Submitted 3. View Data Approver The ‘View Instruction’ screen will appear displaying the instruction details. This is a read only screen. To approve or reject the instruction, click on the ‘Edit’ button. Submitted 4. Data Entry Approver The ‘Edit Instruction’ screen will appear, enabling the approver to add additional information in the ‘Participant Notes’ field. Submitted 5. Review Approver Review the collateral instruction details. Submitted 6. Approve/Reject Approver If any data is erroneous in the instruction, click ‘Reject’. A ‘Rejection Reason’ text box will appear. Enter reason for rejection and click ‘OK’. Rejected If all information is correct, click ‘Approve’. The instruction has now been sent to ASX for processing. Note that this is the final status of the instruction, subject to approval from ASX. Approved If ASX cannot process the instruction or if the instruction is incorrect, it will be rejected by an ASX officer and the instruction moves into ASX Reject status. The Participant Submitter must review the instruction and revert to step 1 above. ASX Reject 7. ASX Reject ASX ASX Clear (Futures) Margin Control – User Manual Page 15 of 37 Australian Securities Exchange ASX Clear (Futures) Margin Control 4.4 Standing Instructions The Standing Instruction functionality in Margin Control enables the participant to manage Excess Cash without necessitating a new daily instruction. Standing Instructions are only available for Cash, with a maximum amount of 500.000.000.00 for currencies <> Yen, and 10.000.000.000.00 where currency = Yen, and can be maintained per possible combination of Exchange and Currency. 4.4.1 Create, Save, Submit Step Action User Description 1. Click Button Submitter Click ‘Standing Instructions’ link on the left hand side of the screen 2. Click Button Submitter Click ‘Create new Standing Instruction’ button 3. Data Entry Submitter Enter the following data for the Standing Instruction Details: - Exchange - Account - Currency: Accepted currencies are AUD, EUR, GBP, JPY, NZD, and USD. - Status New Excess Cash Limit: Maximum amount of 500.000.000.00 for currencies <> Yen, and 10.000.000.000.00 where currency = Yen 4. Data Entry Submitter Enter the following data for the Additional Information: - Participant Notes New 5. Save/Submit Submitter If the Instruction is not yet ready to be sent to the next person in the workflow, click ‘Save’. Saved To send instruction directly to the Approver, click ‘Submit’. Submitted ASX Clear (Futures) Margin Control – User Manual Page 16 of 37 Australian Securities Exchange ASX Clear (Futures) Margin Control 4.4.2 Approve Step Action User Description Status 1. Click Button Approver Click ‘Standing Instructions’ link on the left hand side of the screen. The system will show all standing instructions and order according to ‘Instruction ID’. Submitted 2. Locate Instruction Approver Locate the row corresponding to the instruction that requires approval. The instruction becomes high-lighted in grey when hovering over it. Click on the instruction. Submitted 3. View Data Approver The ‘View Instruction’ screen will appear displaying the instruction details. This is a read only screen. To approve or reject the instruction, click on the ‘Edit’ button. Submitted 4. Data Entry Approver The ‘Edit Instruction’ screen will appear, enabling the approver to add additional information in the ‘Participant Notes’ field. Submitted 5. Review Approver Review the standing instruction details. Submitted 6. Approve/Reject Approver If any data is erroneous in the instruction, click ‘Reject’. A ‘Rejection Reason’ text box will appear. Enter reason for rejection and click ‘OK’. Rejected If all information is correct, click ‘Approve’. The instruction has now been sent to ASX for processing. Note that this is the final status of the instruction, subject to approval from ASX. Approved Should you wish to edit the Excess Cash Limit for an existing standing instruction, simply locate the approved instruction and repeat above outlined steps. Saved / Submitted 7. Edit Submitter ASX Clear (Futures) Margin Control – User Manual Page 17 of 37 Australian Securities Exchange ASX Clear (Futures) Margin Control 5 View Balance In addition to enabling collateral instruction lodgement, the Margin Control system also provides participants with End of Day and intraday Cash balances. The End of Day Balance section displays Excess / Shortage Amount, Expected Cash Movement, Actual Amount, Resultant Cash Balance and Resultant Excess / Shortage and is sourced from the ASX Collateral Management System. The Margin Control system also provides an Intraday Balance which, similar to the End of Day Balance sources its information from the ASX collateral Management System. Note that a small time lag between lodging a Cash Instruction (End of Day or intraday) through Margin Control and subsequent update in this Balance screen may be experienced. This indicates that your instruction is pending processing and approval by an ASX Officer. ASX Clear (Futures) Margin Control – User Manual Page 18 of 37 Australian Securities Exchange ASX Clear (Futures) Margin Control 6 Contacting Support 6.1 ASX Online Helpdesk Support Phone: 1800 682 484 Email: [email protected] Helpdesk Support provides primary support for ASX Online users accessing ASX Clear (Futures) Margin Control through ASX Online. Tasks supported include: ASX Online password generator issues ASX Online displaying error messages, cannot continue www.asxonline.com not available under http protocol www.asxonline.com running slowly Cannot connect to www.asxonline.com ASX Clear (Futures) Margin Control login issues ASX Clear (Futures) Margin Control login displaying error message, cannot continue Cannot connect to ASX Clear (Futures) Margin Control 6.2 ASX Clearing Team For all other issues please contact the ASX Clearing and OTC Team. Phone: (+612) 8298 8479 Email: [email protected] Operational support of the ASX Clear (Futures) Margin Control System to Participants which includes, but is not limited to: ASX Clear (Futures) Margin Control site not available under http protocol ASX Clear (Futures) Margin Control site running slowly Assistance on how to submit or approve instructions User Accounts - Creation, Issues, Activation New Participants- How to Rejected instructions ASX Clear (Futures) Margin Control – User Manual Page 19 of 37 Australian Securities Exchange ASX Clear (Futures) Margin Control 7 Appendices 7.1 Appendix 1 – Registration Form ASX Clear Futures Admin Registration Form - AOL.pdf ASX Clear (Futures) Margin Control – User Manual Page 20 of 37 Australian Securities Exchange ASX Clear (Futures) Margin Control 7.2 Appendix 2 – Digital Certificate Procedure To obtain a digital certificate, your ASX Clear (Futures) Margin Control Participant Administrator must first create the user in Margin Control as outlined above. After the ASX Online Help Desk has pre-registered the certificate, you will receive an email with details on how to enrol. The email will be sent to the email address that has been registered in ASX Online. Before enrolling and downloading a digital certificate please ensure the following checklist has been followed: 7.2.1 Enrolment for a Digital Certificate ActiveX Controls set to “Enabled” Onsite MSI package installed for Windows XP Operating System 7.2.2 Download and Installation of a Digital Certificate Ensure user clicks “Install CA” from the Digital Id Centre site to install the CA. Ensure above-mentioned CA has been installed to “Trusted Root Certification Authorities”. During installation, select the format ‘My ID for Microsoft Internet Explorer…’ Download can only occur once, so the user should not delete their digital certificate. ASX Clear (Futures) Margin Control – User Manual Page 21 of 37 Australian Securities Exchange ASX Clear (Futures) Margin Control 7.2.3 Enrolment, Downloading & Installation Procedure 1. The enrolment form is accessed through the Digital ID Centre secure website hosted by VeriSign. The enrolment website is accessed via: https://pki.verisign.com.au/services/ASXOperationsPtyLtd/client/userEnrollMS.htm 2. When loading the enrolment page for the first time, you will see a Security Warning dialog for a program digitally signed by Microsoft. This program is required to enrol for a certificate. It is safe to run it on your computer and its authenticity is proved by a digital signature. Click Yes. 3. The following screen is displayed: 4. The following fields must be entered exactly as advised by ASX Online Help Desk: First Name Last Name E-mail Address Passcode ASX Clear (Futures) Margin Control – User Manual Page 22 of 37 Australian Securities Exchange ASX Clear (Futures) Margin Control 5. The only field not case sensitive is the Passcode. The Challenge Phrase is a unique phrase set by the user and not shared with anyone. It might only be needed if a non-Internet Explorer browser is used for downloading the digital certificate or during certificate renewal. 6. You will be requested to specify the level of security for your Private Key. It is recommended that High protection is selected for better private key protection. 7. This popup window appears for confirmation of your e-mail address 8. If the address is correct, click on OK. The warning window “Web Access Confirmation” appears. 9. If you have confirmed that the web site is authentic, click on “Yes” to request the certificate. The following warning window appears: 10. Click on “Yes” to add the certificate to your computer. 11. After the certificate is successfully installed you should receive a confirmation page To confirm that the certificate has been successfully installed, open the Internet Explorer browser and click on: \Tools\Internet Options…\Content\Certificates… and check that the expiration date is one year in the future. ASX has configured the following policy relating to the Passcode expiry period and the lockout threshold for invalid entries: The Passcode expiration for enrolment is set to one month from the date of issue. The lockout threshold is set to three attempts. The fourth invalid entry will lockout the registration record and will require the ASX to reset the Passcode for the user. ASX Clear (Futures) Margin Control – User Manual Page 23 of 37 Australian Securities Exchange ASX Clear (Futures) Margin Control 7.2.4 Exporting / Importing Procedure As a digital certificate can only be downloaded from the VeriSign website once, this manual outlines the steps to export a digital certificate from one PC to another. This will be required for Business Continuity Processing/Disaster Recovery (BCP/DR) sites where a certificate will need to be installed on the BCP/DR PC in addition to the normal production PC. Before importing or exporting a digital certificate please ensure the following checklist has been followed: Private keys must be included in any import or export (i.e. ensure .pfx format is imported/exported, not .cer). PKCS#12 format must be used (it is specifically designed for private keys). 7.2.4.1 Exporting a Certificate 1. In Internet Explorer click on Tools, then Internet Options. Select the Content tab and then click in the Certificates button. ASX Clear (Futures) Margin Control – User Manual Page 24 of 37 Australian Securities Exchange ASX Clear (Futures) Margin Control 2. In the “Certificates” window select the certificate that you wish to export then click ‘Export’. 3. The Certificate Export Wizard window then appears. Please click ‘Next’ to begin the Export. Ensure that you have checked “Yes, export the private key” then click ‘Next’. 4. It is recommended that you Enable strong protection then click ‘Next’. ASX Clear (Futures) Margin Control – User Manual Page 25 of 37 Australian Securities Exchange ASX Clear (Futures) Margin Control 5. You are required to setup a password to protect the private key. This password will be required in order to import the certificate. 6. Click on the ‘Browse’ button to select the destination for the export of the certificate. 7. Once this has been confirmed, click ‘Next’, then click ‘Finish’. 8. A confirmation box will appear confirming that the export was successful. ASX Clear (Futures) Margin Control – User Manual Page 26 of 37 Australian Securities Exchange ASX Clear (Futures) Margin Control 7.2.5 Importing a Certificate 1. In Internet Explorer, Click on the ‘Tools’ menu, then ‘Internet Options’. 2. Select the ‘Content’ tab and then click on the ‘Certificates’ button. 3. In the Certificates window, click Import. 4. The Certificate Import Wizard window appears. 5. Please click ‘Next’. 6. Click ‘Browse’ to navigate to the location where the certificate was originally exported to. ASX Clear (Futures) Margin Control – User Manual Page 27 of 37 Australian Securities Exchange ASX Clear (Futures) Margin Control 7. Please ensure that you change the file type from the default X 509 Certificate to Personal Information Exchange (*.pfx) in the File of Type drop down box. 8. Select the certificate that you wish to import and click ‘Open’. Click ‘Next’ to proceed. 9. You will then be prompted for the password for the private key. This is the same password that was used when exporting the certificate originally. You are required to enter the password for the private key and then click ‘Next’. 10. Windows will then allow you to select where you have the certificate stored. 11. Click ‘Next’ once completed. 12. Click ‘Finish’ to complete the Certificate Import Wizard. A confirmation box will appear confirming that the import was successful. ASX Clear (Futures) Margin Control – User Manual Page 28 of 37 Australian Securities Exchange ASX Clear (Futures) Margin Control 13. The certificate has now been successfully exported and imported. ASX Clear (Futures) Margin Control – User Manual Page 29 of 37 Australian Securities Exchange ASX Clear (Futures) Margin Control 7.3 Appendix 3 – Troubleshooting 7.3.1 Browser-related Issues 7.3.1.1 This website only supports Internet Explorer 7, 8 and 9 Issue Why do I get the error message, “This website only supports Internet Explorer 7, 8 and 9; Please check your browser”? The application will automatically check your browser for compatibility. You will need to try a different browser version if you try to access the site and get the message Please note that the current implementation does not support Internet Explorer 6. 7.3.1.2 HTTP 403 Forbidden Issue Why do I get the error message, “HTTP 403 Forbidden”? This can happen if there is not a valid digital certificate stored on the computer. You can check your certificate in Internet Explorer by going to Tools-> Internet Options -> Content -> Certificates>Personal. The certificate issued should match your login name. 7.3.1.3 JavaScript Issue Why do I get the error message, “JavaScript must be enabled to use this site. Please enable JavaScript in your browser and try again”? The application checks to see if JavaScript is enabled before it renders the pages in full. If JavaScript is not enabled, you will not be able to enter any data. It should be possible to enable JavaScript through the ‘Internet Options>Programs>Manage add-ons>Toolbars and Extensions section of your browser. Consult Internet Explorer Help for more information on how to do this for your browser version. ASX Clear (Futures) Margin Control – User Manual Page 30 of 37 Australian Securities Exchange ASX Clear (Futures) Margin Control It might be necessary to shut down all instances of Internet Explorer before changes take effect. ASX Clear (Futures) Margin Control – User Manual Page 31 of 37 Australian Securities Exchange ASX Clear (Futures) Margin Control 7.3.2 Digital Certificate Issues Most problems and errors that encountered relating to digital certificates occurred during enrolment, download, installation and importing and exporting. If several key pieces of information are known and precautions taken, most of the problems and errors outlined in this document can be prevented. Below is a summary of the key information that can prevent most of the problems and errors occurring. 7.3.2.1 Enrolment for a Digital Id: Check ActiveX Controls are enabled. If operating system is Windows XP, ensure Onsite MSI package is installed. Enrolment can only occur once for each passcode, so ensure details are correct. 7.3.2.2 Download & Installation of a Digital Certificate: Ensure user has clicked on “Install CA” from the Digital Id Centre site to install the CA. Ensure above-mentioned CA has been installed to “Trusted Root Certification Authorities”. During installation, select the format ‘My ID for Microsoft Internet Explorer…’ Download can only occur once, so the user should not delete their digital certificate. 7.3.2.3 Importing and Exporting Digital Certificates: Private keys must be included in any import or export (ie. ensure .pfx format is imported/exported, not .cer). PKCS#12 format must be used (it is specifically designed for private keys). 7.3.2.4 Enrolment for Digital Id Issues Once a user has requested a digital certificate, they need to enrol their user. This is done via the site: https://pki.verisign.com.au/services/ASXOperationsPtyLtd/client/userEnrollMS.htm There are 5 fields which are mandatory to be entered (First Name, Last Name, Your E-mail Address, Passcode and Challenge Phrase). Note that it is not mandatory to check the “Protect Your Private Key” checkbox or to enter comments. During this process, there are three possible errors: Incorrect Passcode If invalid username or passcode is entered, then the following error message will be displayed: ASX Clear (Futures) Margin Control – User Manual Page 32 of 37 Australian Securities Exchange ASX Clear (Futures) Margin Control Passcode “Already In Use” If the passcode selected has already been used to generate a digital id, then the following error message will be displayed: Digital ID Could Not Be Generated If there is an issue with ActiveX controls for the browser, this error will occur. This issue may occur on a XP machine that did not have the required ActiveX Controls installed. Installation of the Onsite MSI package resolved this issue and allowed the digital certificate to be downloaded. Please refer to your internal technical support for further information relating to this. ASX Clear (Futures) Margin Control – User Manual Page 33 of 37 Australian Securities Exchange ASX Clear (Futures) Margin Control 7.3.2.5 Digital Download and Installation Issues Once the user’s Digital ID has been generated, it needs to be downloaded and installed on the user’s machine. This process is attempted directly after enrolment. During this process, there are two errors that are possible. 7.3.2.6 Digital Certificate Could Not Be Installed This error occurs for a variety of reasons listed below in the error: This error occurs because the root certificate has not been installed. By returning to the Digital ID Centre website: https://pki.verisign.com.au/services/ASXOperationsPtyLtd/digitalidCenter.htm And by clicking on “Install CA”, this issue was resolved (note it must be installed in the “Trusted Root Certification Authorities” store, otherwise the issue will not be resolved). ASX Clear (Futures) Margin Control – User Manual Page 34 of 37 Australian Securities Exchange ASX Clear (Futures) Margin Control 7.3.2.7 ID Format Unselected If a user does not select / specify an ID format from the dropdown list, then the following error message is displayed: 7.3.2.8 Using Digital Certificates Issues After a digital certificate has been installed, it can be used to log into ASX Clear (Futures) Margin Control. Before the ASX Clear (Futures) Margin Control website can be opened, it will require the user to select a digital certificate to use as part of authentication. A list of all available digital certificates installed on the user’s machine will be available to be selected. In the figure below, two digital certificates are available for selection (User 1 and User 2): 7.3.2.9 Digital Certificate Revoked An “Incorrect Username in the Certificate” error message will be displayed when a user attempts to log into ASX Clear (Futures) Margin Control: when their digital certificate has been revoked using another person’s digital certificate Below is an example of the error message: ASX Clear (Futures) Margin Control – User Manual Page 35 of 37 Australian Securities Exchange ASX Clear (Futures) Margin Control 7.3.2.10 Digital Certificate with Incorrect Project Code For a digital certificate to be accepted by Margin Control, the project code must be “ASXTAOTCDC”. If the digital certificate belongs to a different project or has been set up incorrectly, then ASX Clear (Futures) Margin Control will display the following error: To resolve this error, close down all instances of Internet Explorer and re-opening should re-set the digital certificate authority 7.3.2.11 Margin Control User Issues If there is an issue related to the Margin Control login, then the digital certificate authentication is not triggered. For example, in cases such as: A disabled user/firm An incorrect username/password In such cases, Margin Control will prevent login and display an error message. Only when the issue has been resolved will the authentication of the digital signature be checked. ASX Clear (Futures) Margin Control – User Manual Page 36 of 37 Australian Securities Exchange ASX Clear (Futures) Margin Control 7.4 Appendix 4 – Instruction Input Issues Issue Back button does not work. Solution Like certain online banking applications, ASX Clear (Futures) Margin Control does not support use of the back button in order to prevent instructions being entered twice. Depending on the location in the site, the following behaviour might be observed: Unexpected page expiry Unexpectedly reloading the current page instead of going to the previous page Since the instruction input workflow allows for instructions to be edited, saved, cancelled and rejected, it should not be necessary to use the ‘Back’ button at any time. Issue Opening the application in two different browser windows logs onto the same session Solution In certain browsers, such as IE 8, it is only possible to run a single session at a time on a single machine. That means that if two browser windows are opened and the user logs off in the second window and logs on again under a different username, the original window will assume the new username. Older browsers such as IE 6 and IE7 allow separate sessions to run in separate windows. This means that you can log into two windows using different usernames. However, we do not recommend this practice as it can be confusing and prone to error. Issue Can I submit an instruction on a public holiday? Solution The system will not accept instructions for settlement for days that are holidays in the ASX Collateral Management System Calendar. Issue I have been editing or viewing an instruction and then encounter a message saying “Error: Access Denied” when I submit changes. Solution This error may be encountered when the user’s access is modified while they are using the system. Please try to log in again and contact your Participant Administrator User if this is not successful. ASX Clear (Futures) Margin Control – User Manual Page 37 of 37