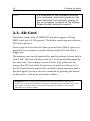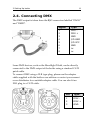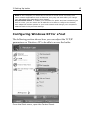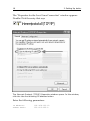
1
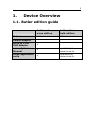
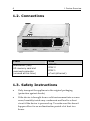
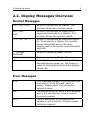
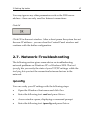
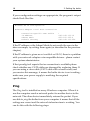
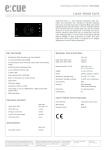
 butler
System Manual
____________________________________________________________
© 2007 e:cue gmbh & co. kg | im dörener feld 11 | d-33100 paderborn | www.ecue.tv
Inhalt
1.
Device Overview
5
1.1.
Butler edition guide ....................................................................... 5
1.2.
Connections..................................................................................... 6
1.3.
2.
Safety Instructions.......................................................................... 6
Setting Up butler
8
2.1.
Connecting Power.......................................................................... 8
2.2.
Display Messages Overview ........................................................ 9
2.3.
SD-Card ......................................................................................... 10
2.4.
Connecting DMX.......................................................................... 11
2.5.
Connecting e*net .......................................................................... 12
2.6.
Setting up the Computer............................................................. 12
2.7.
Network-Troubleshooting .......................................................... 17
2.8.
3.
Configuring the butler................................................................. 20
Using butler with e:cue application suite
3.1.
3.2.
4.
23
Using the Device Manager ......................................................... 23
Exporting a show ......................................................................... 25
Using Show Playback
28
4.1.
Clustering ...................................................................................... 28
4.2.
Run Mode...................................................................................... 31
4.3.
Playback via Remote Control ..................................................... 34
4.4.
Control via e:com ......................................................................... 35
Using the Network Configuration Tool (NCT)
5.
37
5.1.
Starting the NCT .......................................................................... 37
5.2.
butler Status Information............................................................ 37
5.3.
Settings Overview ........................................................................ 39
5.4.
Localizing a butler in the network............................................ 40
5.5.
Firmware Update ......................................................................... 41
5.6.
Resetting to Factory Defaults ..................................................... 41
6.
Technical Data
6.1.
6.2.
7.
42
General........................................................................................... 42
Miscellaneous ............................................................................... 42
Masthead, Copyright
43
5
1.
Device Overview
1.1. Butler edition guide
Colour
butler red
e:cue edition
butler silver
bulk edition
red
silver
Power Adaptor
-
RJ45 to 5 Pin
XLR Adaptor
-
e:cue System
Manual
available at
www.ecue.tv
e:cue application
suite
available at
www.ecue.tv
6
1 Device Overview
1.2. Connections
Front
Back
pushbutton (red)
POWER
SD memory card slot
reserved connector
(unused at this time)
DMX 2
DMX 1
e*net (ethernet)
1.3. Safety Instructions
•
Only transport the appliance in the original packaging
(protection against shocks)
•
If the device is brought from a cold environment into a warm
room, humidity inside may condensate and lead to a short
circuit if the device is powered up. To make sure this doesn’t
happen allow for an acclimatisation period of at least two
hours.
1 Device Overview
7
•
Protect the device from of dust and direct sun beams.
•
The temperature of the device’s environment must be between
0 and 40 degrees celsius (32 to 104 degrees Fahrenheit).
•
Make sure that the required voltage is met by the voltage of
your local power supply.
•
Devices should only be connected to a grounded safe-contactoutlet.
•
During thunderstorms data transmitting wires must not be
connected or disconnected.
•
Make sure objects cannot get inside the appliance.
•
In case of an emergency (e.g. damaged case, fluids or
substances entering the device) immediately disconnect the
power plug and contact technical support.
•
Repairs on the device must be performed by an authorized
support technician. An unauthorized opening and improper
repair can cause considerable danger for the user and voids
the warranty.
8
2.
Setting Up butler
2.1. Connecting Power
•
Via AC/DC Adaptor – Connect the adaptor to the power
input. The butler can handle currents between 9 volts
(minimum) and 48 volts (maximum), AC oder DC. 4 watts are
required to power the butler.
•
Power Over Ethernet with suitable PoE Hub – Warning: Not
all PoE hubs work with the butler. Please contact your e:cue
distributor or e:cue technical support before you connect a
PoE hub.
•
Via Moodlight Tile64 – the butler is directly supplied with
power via the DMX1 connector. Connect the DMX1 output of
the butler with the DMX Input connector of the Moodlight
Tile64.
When the butler is powered up the display shows a small turning
circle or the message "boot" (displayed "b"-"o"-"o"-"t") for a second.
Afterwards the display will show "A01" (displayed "A"-"0"-"1") if a
test show is already present. Otherwise it will display "CRD"
(displayed as "C"-"r"-"d") if the internal SD memory card does not
contain any data yet.
If the butler does not display "BOOT" but only shows a static entry
such as "A", and / or the display is flickering, you might be using an
inadequate power supply. Please make sure your power supply
conforms to the above specifications. If the problem persists, please
contact technical support.
2 Setting Up butler
9
2.2. Display Messages Overview
Normal Massages
A01, A02, A03...
Device is configured as Master. The
number shows the current cuelist.
b01, b02,
b03, --
Device is configured as Slave and is
receiving Timecode by a Master. The
number shows the current cuelist.
-01, -02, -03, ...
Device is configured as Slave and waits
for Timecode by a Master.The number
shows the cuelist which had been
playing before Timecode synchronization
was lost.
0 (schnell
drehend)
Device is receiving data / Online
Blinkender Punkt
Device is receiving IR signals
rSt
If the button is pressed and held for five
seconds during power up, the device is
reset to factory defaults and the display
shows rSt.
Error Massages
Crd
This message appears if the SD card slot
is empty or if the SD card itself is
empty. Please insert the SD card or
upload a show.
SEr
The device does not have a MAC address
and is not operational. Please contact
technical support.
Po.o
The co-processor for processing IR
signals is out of service. Please contact
technical support.
10
2 Setting Up butler
P1.5
If a mismatch of the firmware versions
of co-processor and main processor has
been detected, the firmware version of
the co-processor is shown in the display.
Please contact technical support.
2.3. SD-Card
The butler comes with a 128MB SD Card and supports SD and
MMC cards up to 2 GB capacity. The butler cannot operate when no
SD Card is present.
Since a typical show does not take up more than 2 MB of space, it is
generally not necessary to replace the provided SD Card with a
bigger one.
The memory card can be removed by gently pushing it down until a
click is felt - the card will then come out. It can be installed again by
the same way. Never apply too much force. Also, please do not
remove the SD Card while the device is switched on. However, if
the SD Card has been removed by accident during operation and is
put back again, the show may be continued by pressing the button
on the device – otherwise you need to reboot.
Warning: Please do not remove the SD Card while the device is switched on.
However, if the SD Card has been removed by accident during operation and is put
back again, the show may be continued by pressing the button on the device –
otherwise you need to reboot.
2 Setting Up butler
11
2.4. Connecting DMX
The DMX output is taken from the RJ45 connectors labelled "DMX1"
and "DMX2".
Signal
Type
1
2
3
4
DMX DMX +
GND
I/O GND
5
6
7
8
I/O VCC
GND
nc
nc
Some DMX devices, such as the Moodlight Tile64, can be directly
connected to the DMX output of the butler using a standard CAT5
patch cable.
To connect DMX using a XLR type plug, please use the adaptor
cable supplied with the butler e:cue edition or contact your nearest
e:cue distributor for a suitable adaptor cable. You can also fit an
XLR plug to a CAT5 cable.
Pin
Type
1
2
3
DMX DMX +
GND
12
2 Setting Up butler
2.5. Connecting e*net
You can establish a network connection between the butler and the
computer in the following ways:
•
Connecting directly to the computer using a special CAT5
cable with crossed wires (referred to as cross cable).
•
Using a standard Ethernet hub and connecting both the
computer and the butler(s) to the hub using regular CAT5
cables.
You can not establish the connection by:
•
Using a standard CAT5 cable directly between the butler and
the computer
•
Using a router (such as the devices supplied with home
broadband networks) with an inbuilt DHCP server. This will
only work after you have configured the butler to an IP
address range that matches the settings of the router.
2.6. Setting up the Computer
The following paragraph describes how you can configure your
Windows computer to be ready for e*net applications such as e:cue
programmer, e:cue Network Configuration Tool and e:cue UFGM
player. To enable you to remotely access the butler, you need to set
your computer to the following IP parameters e.g.:
IP Address
Subnet Mask
192.168.123.10
255.255.255.0
2 Setting Up butler
Note: If the computer you would like to use as an e*net server currently runs
other network applications such as Internet, they may not work after you change
your parameters as described in this chapter.
For advanced users: To enable your computer for public and local networking as
well as e*net, you can switch the IP address to be able to configure the butlers,
then adapt the butlers options to your local network and change your computers
address back to the previous settings.
Configuring Windows XP for e*net
The following section shows how you can adjust the TCP/IP
parameters on Windows XP to be able to access the butler.
From the Start menu, open the Control Panel.
13
14
2 Setting Up butler
In the Control Panel, click Network and Internet Connections.
In the next window, click Network Connections
2 Setting Up butler
15
This will show a Network Connection window, which will show your Local
Area Connection. Right-Click on the Local Area Connection symbol.
From the pop-up menu which appears, select Properties.
16
2 Setting Up butler
The "Properties for the Local Area Connection" window appears.
Double-Click the entry that says
The Internet Protocol (TCP/IP) Properties window opens. In this window,
click the Use the following IP address button.
Enter the following parameters:
IP Address:
Subnet Mask:
192.168.123.10
255.255.255.0
2 Setting Up butler
17
You may ignore any other parameters such as the DNS server
address - these are only used for Internet connections.
Click OK
Click OK in the next window. After a short pause the system has set
the new IP address - you can close the Control Panel window and
continue with the butler configuration.
2.7. Network-Troubleshooting
The following section gives some advice on troubleshooting
network problems on Windows XP or Windows 2000. The tool
ipconfig lets you verify the state of your TCP/IP settings, while the
tool ping lets you test the connection between devices in the
network.
ipconfig
You can verify your IP settings with the following steps:
•
Open the Windows Start menu and click Run.
•
Enter the following text: cmd and press Return.
•
A new window opens, displaying a command prompt.
•
Enter the following text: ipconfig and press Return.
18
2 Setting Up butler
If your configuration settings are appropriate, the program’s output
should look like this:
Windows XP IP Configuration
Ethernet Adapter Local Area Connection:
Connection-specific DNS Suffix
IP Address
Subnet Mask
Default Gateway
:
:192.168.123.10
:255.255.255.0
:192.168.123.254
If the IP address or the Subnet Mask do not match the ones in the
above example, try setting them again (as described in the previous
chapter).
If the IP address is given as not available or 0.0.0.0, there is a problem
with your network adapter or incompatible drivers - please contact
your system administrator.
If the ipconfig tool reports that no connection is available please
check whether any CAT5 cables are damaged by replacing them. If
you are using a cross-cable (CAT5 cable with crossed wires) and
you receive this message, it means the butler device is not working make sure your power supply is matching the required
specifications.
Ping
The Ping tool is installed on every Windows computer. When it is
run the computer sends a network packet to another device in the
network. The other device immediately returns the packet. If you
are able to ping the butler from your computer it means that all the
settings are correct and the network infrastructure is working. You
can do this with the following steps:
2 Setting Up butler
19
•
Open the Windows Start menu and click Run.
•
Enter the following text: cmd and press Return.
•
A new window opens, displaying a command prompt.
•
Enter the following text: ping •
Press the space bar to insert a space
•
Enter the IP address of the destination device and press
Return. >> e.g.: ping 192.168.123.1 If the connection was successful, the program’s output should look
approximately like this:
Pinging 192.168.123.1 with 32 bytes of data:
Reply
Reply
Reply
Reply
from
from
from
from
192.168.123.1:
192.168.123.1:
192.168.123.1:
192.168.123.1:
bytes=32
bytes=32
bytes=32
bytes=32
time<1ms
time<1ms
time<1ms
time<1ms
TTL=64
TTL=64
TTL=64
TTL=64
Ping statistics for 192.168.123.1:
Packets: Sent = 4, Received = 4, Lost = 0 (0% loss),
Approximate round trip times in milli-seconds:
Minimum = 0ms, Maximum = 0ms, Average = 0ms
If the ipconfig settings appear to be correct, but ping only yields a
no reply message, you can do the following:
•
Make sure you entered the correct IP address to ping.
•
Disable any firewalls on your computer (contact a system
administrator for help).
Note: Do not disable your firewall while you are connected to the internet.
20
2 Setting Up butler
•
Check whether you are using the appropriate cables, and
check if they are working by swapping them out for new ones.
•
Make sure you followed the instructions in Chapter 2.5,
Connecting to the e*net.
2.8. Configuring the butler
All settings on the butler are configured remotely using the e:cue
Network Configuration Tool (NCT) on the computer. The NCT can
be installed from the e:cue programmer CD. It is also available as a
free download at www.ecue.tv.
Connecting more than one butler
In case you have several butlers they need to be configured one at a
time - please do not connect all of them to the network immediately.
This is due to the fact that the devices all come with the same IP
address by factory default. If they are connected simultaneously an
IP address conflict will occur and you will not be able to configure
any of the devices. In this situation devices with the same IP
address will show up in the NCT marked by a red X.
Instead, connect the butlers one at a time. Connect the first butler
and assign a new IP address to the device (e.g. 192.168.123.11).
Only then connect the next butler to the network and assign the
next available IP address (e.g. 192.168.123.12). Add all the
remaining devices to the network in the same manner and assign
individual IP addresses to each before you connect the next one.
2 Setting Up butler
21
Setting the IP Address using the NCT
1
Make sure any other e:cue applications are closed.
2
Open the Windows Start menu and click on Programs
-> e:series Network Configuration Tool
3
Any butler devices which are connected to the
network should appear in the list. If they do not show
up in the list, check if the IP address settings for your
computer are correct (see previous pages). Please
also make sure your firewall does not prevent
communication between the computer and the butler.
4
Highlight the list entry and click on Configure.
5
Double-click the value on the right next to IP Address
– typically this should read 192.168.123.1 at this
stage, when the butler is still set to factory defaults.
6
An edit window opens. Assign a new IP address of
the same range (only changing the last number), e.g.
192.168.123.11.
7
Confirm to set the new value.
22
2 Setting Up butler
8
Use the same procedure for the remaining network
parameters:
Subnet Mask - receives the value 255.255.255.0
Gateway - receives the value 192.168.123.254
9
Leave the configuration window by clicking
the confirmation icon.
The NCT should now reflect the changes by displaying the altered
IP address value in the IP Address field of the butler list entry - eg.
192.168.123.11 for the first butler. If the display does not change,
try again or click the Refresh Device List button in the NCT.
Please Note: The MASTER / SLAVE information in the butler status bar is not
relevant at this point. The Master / Slave setting is auto-configured by e:cue
programmer during show upload. It cannot be set manually. Please see the chapter
Clustering for details on which action is required for using several butlers on the
same show.
3 Using butler with e:cue application suite
3.
23
Using butler with e:cue
application suite
Note: The full system manual describing all features of e:cue programmer is
available as a free download at www.ecue.tv. A printed version can be obtained by
contacting your nearest distribution partner.
3.1. Using the Device Manager
In order to be able to use the butler with the e:cue programmer you
first need to register the device in the Device Manager in the e:cue
programmer:
(1)
Start e:cue programmer. (Please shut down the NCT before
starting the e:cue programmer.)
(2)
Check the status window (on the top left of the screen, under
the main menu) under the tab e*net - any connected butler
should show up there. If this is not the case or you see the
message Firewall Active? Please make sure the NCT was closed
before starting e:cue programmer. Otherwise you may have to
check your firewall, or go back to the chapter Network Troubleshooting and check whether your network settings are
correct.
(3)
In the main menu, go to Extras > Show Properties or click the
button labelled SHOW:
(4)
The Application options window opens. Now click on the tab
which is labelled Device Manager.
24
(5)
3 Using butler with e:cue application suite
In the Device Manager window, click the button Wizard:
This will open a dialogue box where all devices that have been
found are listed. Here you can check or uncheck single
devices. Only checked devices will be added to the device
manager. Press Ok when you are finished.
Note: If you prefer to manually register each butler device, continue with
step 6 below. If you have clicked Auto Setup, continue with step 10.
(6)
Click the button Add:
This will open a context menu.
(7)
Select DMX Output and choose butler microserver.. to open a
dialogue with butler configuration options.
(8)
Below the alias name field, enter the IP address of the device
you wish to register.
(9)
Below the IP address field you can select the two DMX lines
(Universes) which you want to control with this butler device.
(10) If you have clicked Auto Setup but you receive the message
ʺSorry, Auto Setup failed. No devices foundʺ you need to go back
to previous chapters and check your network settings.
(11) Otherwise confirm your settings by clicking OK and thereby
leaving the Device Manager window.
If all settings are correct and the e:cue programmer has established
a connection to the devices, the butlers will display a spinning
capital 0 in the display. Additionally e:cue programmer will display
an entry for each connected butler under the caption Active Drivers
3 Using butler with e:cue application suite
25
in its status window on the top left, showing the name of the device
and the respective IP address.
3.2. Exporting a show
How the Exporting Process Works
The e:cue devices e:node and nano use a simplified show format for
saving their data. This format is automatically generated by e:cue
programmer when exporting a show file to the device.
The butler works differently, in a way which is more similar to a
DMX recording device. In the butler the DMX data is saved in
exactly the same way as it is output during show playback.
The data which is saved to the butler is thus exactly the same that
you would have if you recorded the output of the e:cue
programmer on a DMX output device in live mode. During export,
the actual DMX data of the show is rendered and compressed analogous to creating MP3’s from a CD.
One consequence is that the export of a cuelist to the butler takes
longer if the cuelist contains loops. If you make most of a cuelist
loop five times, for example, the process of exporting that cuelist
will take nearly five times as long.
Due to the fact that the data is compressed the export process is
faster if the show is less complex - similar to a JPG image on the
internet, which is larger if the picture contains more details. In
practice this means that a cuelist with many effects and changes
takes a longer time to export than a cuelist with simple colour
changes.
The main advantage of the compressed DMX data show format of
the butler is that shows may also contain Live-FX functions and
very complex overlays of several cuelists at once.
26
3 Using butler with e:cue application suite
Note: Not all Live-FX features produce meaningful results during Show Export –
Sound2Light functions and Video-Wizard functions do not yield results during
export. For exporting videos to the Butler please use the UFGM player.
Before Show Export
You can export as many cuelists to the butler as you like - the only
limitation that applies is the size of the SD memory card in the
butler (the butler supports memory cards up to 2 GB in size).
•
Cuelists may contain Live-FX functions (as opposed to nano
and e:node)
•
Cuelists may contain Cue Actions which start off other cuelists
simultaneously - i.e. effects such as overlaying multiple
cuelists can be replicated by the butler.
•
Cuelists may not contain cues whose timing is set to manual or
to a Timecode time. If you receive an error message during
Show Export please check your show for such cues.
Exporting Cuelists
To export cuelists into the butler for Standalone Mode:
(1)
In the main menu of the e:cue programmer select Extras/Export to Device or simply click on the export button.
Show window opens.
(2)
- The Export
In the section labelled Destination Devices on the left highlight
the devices to which you would like to export to (click the box
left of the name). The buttons Select All and Select None help
making multiple choices.
3 Using butler with e:cue application suite
27
(3)
If you would like to check your show, click
Check it, then close the Export Show window to read the
messages generated in the Logbook - or click OK to continue.
(4)
In the section labelled Cuelists you can now select the cuelists
to export to the butler - for example cuelists 7-12. In this
example the butler will receive six cuelists which will be saved
as cuelists 1-6.
Note: It is not possible to replace single cuelists in the Butler whilst keeping
the rest - each Show Export overwrites the memory of the Butler
completely.
(5)
Click Start Upload. The e:cue programmer displays a window
with a progress bar to inform you about the status of the
export.
After Show Export
After the show has been uploaded you can immediately check if it
works by switching the e:cue programmer to offline mode. In e:cue
programmer 3.8 you can do this by going to the status window (top
left of the screen) under the caption Main Switches and clicking on
Allow Network Output. When the e:cue programmer switches off its
network output, it takes about five seconds before all connected
butlers fall into Stand Alone mode and start playing back the show.
For a faster response, you can disconnect the network and manually
reboot the butler by disconnecting and reconnecting the power.
28
4.
Using Show Playback
4.1. Clustering
Note: As soon as the Butler does not receive any data by the e:cue programmer it
automatically switches into Stand Alone mode and begins playback. During
playback the user can skip to the next cuelist by pressing the button on the device.
Clustering allows you to let up to 20 butlers work together in Stand
Alone mode*. Clustered butlers are synchronized to work together
on the same show. With the clustering mode standalone shows may
include up to 40 DMX universes. When exporting clustered shows,
each butler only receives one part of the show specifically for the
DMX lines which are assigned to that device. During playback one
butler acts as a Master which sends Timecode into the local network
to synchronize all other devices (automatically configured as Slaves)
in the cluster.
Using clusters of butlers requires the user to manually set an option.
During Show Export the first butler device in the Device Manager
list of the e:cue programmer will automatically be configured as
Master. After Show Export, the user has to run the Network
Configuration Tool to manually set this Master device to the option
Timecode Master = enable. Also, all devices in the cluster will need to
have their Master Slave Group ID set to the same number.
*Note: These limits depend on experiments. Up-to-date versions normally are able
to control more devices. If your project requires more than 40 DMX lines in
standalone mode, please contact our technical support.
4 Using Show Playback
29
Step by step instructions::
(1)
Connect all butlers in the cluster to the local network.
(2)
Register them in the Device Manager in the e:cue programmer
(see beginning of this chapter).
(3)
Take a note of the name and / or IP address of the first butler device in the Device Manager list - this will be the Timecode
Master.
(4)
Close e:cue programmer and run the NCT.
(5)
Edit each of the devices you would like to include in the
cluster by selecting them individually and clicking Configure
(you can also double-click a device).
(6)
Edit (double-click) the item Master Slave Group ID.
(7)
Set a number between 1 and 512 (in case you would like to
involve an e:com terminal for user control please only use
numbers between 1 and 16).
(8)
Confirm your changes and edit the next device in the group by
repeating steps 5-7.
(9)
Looking at the NCT list, now select the Timecode Master device (recognizing it by its name and / or IP address which you
noted down in step 3) and click Configure.
(10) Edit (double-click) the Timecode Master entry and set it to
enable.
(11) Confirm your edit and exit the configuration window.
30
4 Using Show Playback
The cluster should now be successfully configured. You can check
on the status of the cluster by checking the displays of the devices
themselves. The display of the Master device should now read out
A01 while the displays of all Slave devices should read out b01. If
the displays of the Slave devices read out ‐01 they are not receiving
timecode synchronization - please make sure you have set the
Timecode Master. If more than one device reads A01 then there are
too many Timecode Masters in the group and you need to disable
the one that doesn't read out as Master in the Version column in the
NCT.
Multiple Clusters In the Same Network
Only butlers which have been assigned the same Master‐Slave Group ID listen to the signal of the Timecode Master with that ID. It is
possible to have several clusters working independently from the
others by assigning them different Master‐Slave Group IDs. Since
each Timecode Master adds to the network load, however, it is not
recommended to run more than five cluster groups in the same
local network.
Unlinked Slave Fades Black
If this option is activated for a butler, a device which is configured
as Slave but does not receive Timecode synchronization will
automatically slowly fade out its DMX output (yielding a fade to
black). If part of a cluster group loses synchronization - for example
if the cable is accidentally unplugged from a router - the Unlinked Slave Fades Black option prevents this part of the group from
displaying an unsynchronized show. The affected parts will simply
fade out slowly.
4 Using Show Playback
31
4.2. Run Mode
The run mode determines the operation of the butler in Stand Alone
mode. You can set the desired run mode using the NCT:
•
Start the NCT (e:cue programmer must be closed).
•
Highlight the device you would like to configure.
•
Click Configure.
•
Edit (double-click) the item Run Mode (the default setting is
Standard).
•
Choose a new run mode from the dropdown menu and
confirm.
•
Depending on the selected run mode you now can set an
additional parameter - edit (double-click) the item Run Mode Parameter (the default setting is 0) enter a new number.
Possible Run Mode Parameters are explained below (the
number which needs to be entered is referred to in the text
as n).
The following Run Modes are available:
Standard
The respective cuelist is repeated in a loop. After powering up, the
butler immediately starts playing back the first cuelist on the SD
memory card.
32
4 Using Show Playback
If the option On power up go to last cuelist is also activated the butler
starts playing the last cuelist on the SD memory card after powering
up.
Shuffle
At the end of each cuelist the butler plays back a randomly selected
cuelist.
If the option Donʹt cycle to last cuelist is activated, the last cuelist on
the SD memory card is excepted from the Shuffle feature. This
means if m cuelists are saved on the SD memory card only m-1
cuelists will be utilized for playback. In this scenario the last cuelist
can only be started by external input (e.g. via IR remote control or
e:com terminal).
Next ql after n sec
The butler plays each cuelist for n seconds and then starts playback
of the next cuelist.
If the option Repeat‐On‐End is deactivated the last cuelist will be
repeated endlessly.
If the option Repeat‐On‐End is active the butler will skip back to the
first cuelist after playing the last cuelist.
If the option Donʹt cycle to last cuelist is activated, the last cuelist on
the SD memory card is excepted from the Shuffle feature. This
means if M cuelists are saved on the SD memory card only M-1
cuelists will be utilized for playback. In this scenario the last cuelist
can only be started by external input (e.g. via IR remote control or
e:com terminal).
4 Using Show Playback
33
Next ql after n sec (on end)
The butler plays each cuelist for n seconds but then keeps playing
the cuelist through to the end before it starts playback of the next
cuelist.
If the cuelist has ended but n seconds have not elapsed yet the same
cuelist is repeated again.
If the option Repeat‐On‐End is deactivated the last cuelist will be
repeated endlessly.
If the option Repeat‐On‐End is active the butler will skip back to the
first cuelist after playing the last cuelist.
If the option Donʹt cycle to last cuelist is activated, the last cuelist on
the SD memory card is excepted from the Shuffle feature. This
means if M cuelists are saved on the SD memory card only M-1
cuelists will be utilized for playback. In this scenario the last cuelist
can only be started by external input (e.g. via IR remote control or
e:com terminal).
Next ql after n loops
The butler repeats the cuelist n times. After that playback of the next
cuelist is started.
If the option Repeat‐On‐End is deactivated the last cuelist will be
repeated endlessly.
If the option Repeat‐On‐End is active the butler will skip back to the
first cuelist after playing the last cuelist.
If the option Donʹt cycle to last cuelist is activated, the last cuelist on
the SD memory card is excepted from the Shuffle feature. This
means if M cuelists are saved on the SD memory card only M-1
cuelists will be utilized for playback. In this scenario the last cuelist
34
4 Using Show Playback
can only be started by external input (e.g. via IR remote control or
e:com terminal).
Return to ql#1
At the end of each cuelist the butler skips back to the first cuelist on
the SD memory card.
This option is mainly interesting for interactive installations: If a
user triggers playback of another cuelist (for example through an
e:com terminal which is wired to a photo sensor) then this cuelist is
played back only once before the butler automatically returns to the
main cuelist #1.
If the option Donʹt cycle to last cuelist is active and the last cuelist is
running then the butler will not skip to the first cuelist at the end.
4.3. Playback via Remote Control
The butler comes with an IR receiver to allow the user to start
cuelists using a remote control. Currently the following remote
control models are supported:
•
Traxon Moodlight IR
•
Philipps RC5 (TV-Mode)
If the respective type of remote control is not available in your area
please contact your nearest e:cue distributor.
To activate the IR receiver you need to set the type of remote control
you are using via the NCT:
•
Start the NCT (e:cue programmer needs to be closed).
4 Using Show Playback
35
•
Highlight the device you would like to configure.
•
Click Configure.
•
Edit (double-click) the item IR Remote - the default setting is
RC5 (Philips TV).
•
Choose the desired type of remote from the drop-down menu
and confirm.
If the butler receives an IR signal which it is able to process it shows
a dot in the 7 segment display on the device. If the dot doesn’t
appear while you are pressing a button on the remote, it wasn’t
possible for the butler to decode what was sent by the remote
control.
In the Philips RC5 mode it is also possible to enter two-digit
numbers so that cuelists 1 to 99 can be started directly. To enter a
two-digit code you first have to press the -/-- key and then press
the two digits. This operation needs to be carried out in a short
timeframe (<3 seconds).
4.4. Control via e:com
It is possible to control cuelist playback in the butler by using an
e:cue e:com terminal which is configured to be in the same network.
By pressing a button on the e:com (or by using one of the electrical
inputs) the e:com sends a code which will start the corresponding
cuelist on the butler.
However, the e:com and the butler will not work together straight
away - the e:com needs to be setup to control butlers with the
following steps:
36
•
4 Using Show Playback
Configure the e:com to matching network parameters. E.g. if
the butler is set to the IP-Adress 192.168.123.11 the e:com
could be configured the IP-Adress 192.168.123.50.
In the e:com configuration menu find the parameter Slave Mode. Set
this parameter to exactly the same value as the butler parameter
Master Slave Group ID. This applies for all butlers which need to be
controlled with this e:com terminal. E.g. if the Master Slave Group ID
is set to five for the cluster of butlers, set the Slave Mode of the e:com
to five as well. The value needs to be in the range of 1-16.
Note: The Slave Mode parameter can be configured via the NCT or you can use the
e:com's internal system menu and edit item 4.6.
37
5.
Using the Network
Configuration Tool (NCT)
5.1. Starting the NCT
The NCT can be started by opening the Windows Start menu and
pointing to Programs Æ e:cue Lighting Control Æ Network
Configuration Tool. If you receive the message Broadcast Socket not created ‐ Port is used by another application please make sure all other
e:cue applications are closed before you start the NCT again.
5.2. butler Status Information
The NCT displays all e*net capable devices which are connected to
the local network in a list which is sorted by IP addresses. For the
butler, the NCT it is capable of displaying the following
information:
Type
Type of device
IP-Address
IP address of the device
Version
Version number of the device, name and
status (see below)
Status
Further status information
MAC
MAC address of device *
Traffic (fps)
Network load generated by device*
* Information only needed for technical support purposes
38
5 Using the Network Configuration Tool (NCT)
The butler shows the following status
information:
STAND ALONE
Butler is configured as Master and is
working (playing back a show), but is
not allowed to send Timecode to Slaves
in the network. No synchronization with
other butlers is possible - the option
Timecode Master should be set to
Enable. (See chapter Clustering)
MASTER DMX
Butler plays back a show, is configured
as Master and sends Timecode to
Slaves.
SLAVE DMX
Butler is configured as Slave in the
cluster and receives Timecode from the
Master.
IDLE
Butler is configured as Slave in the
cluster, but does not receive Timecode
(waits for Timecode to start show
playback).
LINK
Butler is online with e:cue programmer
and receives data.
RECEIVING FILE
A show is currently being uploaded into
the butler.
MAC ?
Error: The butler does not have a MAC
address and the device is not
operational - please contact technical
support.
Note: Whether a device is set as Master or Slave is determined by e:cue
programmer during Show Export and cannot be changed manually by the user. See
chapter on Clustering for further information.
5 Using the Network Configuration Tool (NCT)
39
5.3. Settings Overview
The following is only a brief overview of the settings you can
change using the NCT. Please refer to the chapter "Show Playback"
for how to use the individual settings.
Name
The device will be displayed with this
name in the e:cue programmer.
IP, Subnet,
Gateway
Network settings - see previous
chapters.
IR Remote
Type of remote control being used (see
chapter "Remote Control").
Master Slave
Group ID
All devices with the same ID number
automatically connect to form a cluster
(see chapter "Clustering").
Run Mode
The mode in which the butler plays back
cuelists. (See chapter "Run Mode").
Run Mode
Parameter
Some run modes require additional
parameters which you can set here.
Repeat on End
Repeats the entire show after finishing
the last cuelist (only works if the current
run mode plays through all cuelists).
Timecode
Master
This parameter configures the butler to
provide Timecode synchronization for
other devices in the cluster (also see
chapter "Clustering").
Don't cycle to
last cuelist
This setting excludes the last cuelist
from automatic playback (if the current
run mode plays through all cuelists).
This setting is useful if the last cuelist
contains special shutdown sequences for
DMX devices.
40
5 Using the Network Configuration Tool (NCT)
On power up
goto last cuelist
If you set this, the butler will jump
directly to the last cuelist on its SD
memory card when it is powered up.
If this setting is active it also applies to
when the butler falls back from Online
Mode into Standalone Mode.
Unlinked slave
fades black
If you set this, a device which is
configured as Slave but does not receive
Timecode synchronization will
automatically slowly fade out its DMX
output (yielding a fade to black).
Firmware
Version
Displays the firmware version of the
device and cannot be changed.
Build Date
Displays the build date of the firmware
and cannot be changed.
IR Version
Displays the version number of the
internal IR controller.
5.4. Localizing a butler in the
network
A specific butler device can be found in the network:
•
While the NCT software is running, press the button on the
butler. While the button is pressed the NCT will display an
asterisk before the version number in the corresponding row
of the list.
•
If you highlight a butler device in the NCT, the butler will
display a small spinning 0 for two seconds.
•
Additionally, when you change the parameters of any DMX
butler device using the NCT and then click OK, the
corresponding butler displays a turning 0 for five seconds.
5 Using the Network Configuration Tool (NCT)
41
5.5. Firmware Update
The butler firmware can only be updated using a special software.
When you run the NCT and highlight a butler, the Update Firmware
button either cannot be clicked, or if you click you will receive an
error message that a file cannot be found. Updaters for the butler
will be specially announced at www.ecue.tv.
5.6. Resetting to Factory Defaults
While the device is being powered up hold the button for at least
five seconds. This makes the butler revert to its factory defaults and
the display shows rSt.
Note: You will lose all settings, including the IP address, and will have to configure
them again from scratch. However, the show data which is saved on the SD
memory card will be kept.
42
6.
Technical Data
6.1. General
•
Function: Ethernet/DMX Interface with replay unit
•
Application area: Liveshow/ standalone
•
Interface: e*net (Ethernet LAN)
•
DMX Interface: CAT 5 (RJ45) frontside
•
Display: 7-segment LED
•
IR receiver: Standard RC5 IR receiver
•
Memory: SD Card
•
DMX channels live / standalone: 1024
•
DMX channels standalone cluster: Max. 16384
(max. 16 butler devices)
6.2. Miscellaneous
Power supply
9 - 48 VAC/VDC, 4 W, poE
compliant
Dimesions WxHxD
71x24x84 mm
Weight
0,15 kg
Special features
robust case with anodized
aluminium
43
7.
Masthead, Copyright
Authoring: Jan Schaten
Composition: Nadine Topp
Print: Bonifatius GmbH, Paderborn
© 2007 e:cue GmbH & Co. KG
Im Dörener Feld 11 | 33100 Paderborn | Germany
web: www.ecue.tv
e-mail: [email protected]
All rights reserved.
is a registered trademark of the e:cue GmbH & Co. KG.
Windows is a trademark of the Microsoft Corporation, Redmond,
United States of America. All other company names and / or
product names are trademarks and / or registered trademarks of the
concerning manufacturer. The products under circumstances don’t
exactly correspond with the representation. Properties, capacity and
technical data depending on the operating system and used
hardware can differ. Subject to change without notice!
does not grant guarantee on validity for a particular reason,
the marketability or other properties of the product. There is no way
to assert a claim to e:cue, not on the legal way nor other ways.
e:cue is not responsible for damages, including all disadvantages
that are not just limited on loss of sales, that are accrued
44
7 Masthead, Copyright
•
By the use of the product.
•
By the loss of serviceability of the product.
•
By misuse, happenings, circumstances or actions that e:cue
does not have influence, no matter if the damages as well as
consequential damages are direct or indirect; whether they are
special damages or others, nor if the damage is caused by the
owner of the guarantee or third persons.
Notes
____________________________________________________________
____________________________________________________________
____________________________________________________________
____________________________________________________________
____________________________________________________________
____________________________________________________________
____________________________________________________________
____________________________________________________________
____________________________________________________________
____________________________________________________________
____________________________________________________________
____________________________________________________________
____________________________________________________________
____________________________________________________________
____________________________________________________________
____________________________________________________________
____________________________________________________________
____________________________________________________________
____________________________________________________________
____________________________________________________________
____________________________________________________________
butler manual - Rev.1 04/2007 - www.ecue.tv