1
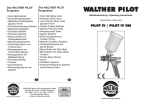
Das WALTHER PILOT-Programm
• Hand-Spritzpistolen
• Automatik-Spritzpistolen
• Niederdruck-Spritzpistolen (System HVLP)
• Zweikomponenten-Spritzpistolen
• Pulverbeschichtungs-Systeme
• Materialdruckbehälter
• Drucklose Behälter
• Rührwerk-Systeme
• Airless-Geräte und Flüssigkeitspumpen
• Materialumlaufsysteme
• Kombinierte Spritz- und Trockenboxen
• Absaugsysteme mit Trockenabscheidung
• Absaugsysteme mit Naßabscheidung
• Pulversprühstände
• Trockner
• Zuluft-Systeme
• Atemschutzsysteme und Zubehör
WALTHER Spritz- und Lackiersysteme
Kärntner Str. 18-30 • 42327 Wuppertal
Telefon: 0202 / 787-0 • Telefax: 0202 / 787-217
www.walther-pilotde • E-Mail: [email protected]
WA LTH ER PI LOT
Operating Manual
PILOT Extrusionspistole
Spare Parts List
Pos.Nr.
Part.-No. V 10 250 00 000 (350 bar)
Pos.Nr.
1
2
3
4
5
6
7
8
9
10
11
12
Part Number
V
V
V
V
V
V
V
V
V
V
V
V
10
10
10
10
10
10
10
10
10
10
10
10
250
250
250
250
250
250
250
250
250
250
250
250
15 000
17 000
16 000
11 000
12 000
24 000
01 000
23 000
18 000
25 000
20 000
26 000
Part Name
Step Nozzle
Cap Nut
Adapter
Material Needle Complete
Valve
Gasket (2 pieces)
Gun Body
Trigger
Bolt Screw
Safety Guard
Packing support washer
V - Packing (6 Stück)
13
14
15
16
17
18
19
20
Part Number
V
V
V
V
V
V
V
V
10
10
10
10
10
10
10
10
250
250
250
250
250
250
250
250
19
22
13
21
02
10
03
14
000
000
000
000
000
000
000
000
Part Name
Packing Pressure Pin
Packing Screw
Washer
Adjusting Nut
Cylinder Head Screw
Back Bushing
Screw
Double Nipple
Additional Nozzle Option
21
V 10 250 15 0SP
Special Nozzle
PILOT Extrusionspistole (Teflon®-coated)
Art.-Nr. V 10 250 40 000
DIffering Part:
7
V 10 250 01 Tef
Gun Body
We recommend that you keep all the bold parts (wearing parts) in stock.
Repair Kit : V 16 250 00 000
Contents
EC Declaration of Conformity
We, the equipment manufacturer, declare under our sole responsibility that the
product in the description below corresponds to the relevant basic safety and
health requirements. Any unauthorized modifications are made to the equipment or
improper use of this declaration loses its validity.
Hersteller
Typenbezeichnung
WALTHER Spritz-und Lackiersysteme GmbH
Kärntner Str. 18-30
D-42327 Wuppertal
Tel.: 0202 / 787-0
Fax: 0202 / 787-217
www.walther-pilot.de • Email: [email protected]
PILOT Extrusionspistole
V 10 250 00 000
V 10 250 40 000 (Teflon®-beschichtet)
Verwendungszweck Verarbeitung spritzbarer Materialien
Angewandte Normen und Richtlinien
EG-Maschinenrichtlinien 98 / 37 EG
94 / 9 EG (ATEX Richtlinien)
DIN EN 292 Teil 1
DIN EN 292 Teil 2
DIN EN 1953
Spezifikation im Sinne der Richtlinie 94 / 9 / EG
Kategorie 2
Gerätebezeichnung
II 2 G c T 6
Tech.File,Ref.:
2409
Besondere Hinweise :
Das Produkt ist zum Einbau in ein anderes Gerät bestimmt. Die Inbetriebnahme ist so
lange untersagt, bis die Konformität des Endproduktes mit der Richtlinie 98 / 37 / EG
festgestellt ist.
Wuppertal, den 7. Juli 2003
i.V.
Name: Torsten Bröker
Stellung im Betrieb: Leiter der Konstruktion und Entwicklung
Diese Erklärung ist keine Zusicherung von Eigenschaften im Sinne der Produkthaftung. Die Sicherheitshinweise der
Produktdokumentation sind zu beachten.
1
1.1
1.2
1.3
General
Model Identification
Intended Use
Inappropriate Use
2
Technical Description
3
3.1
3.2
Safety Instructions
Identification of Safety Instructions
General Safety Instructions
4
4.1
Assembly
Supply Line Connection
5
5.1
5.2
5.3
5.4
5.5
Operation
Safety Information
Start-up and Shut-down
Setting Material Flow Rate
Regulating Material Pressure
Retooling Extrusion Gun
6
6.1
6.2
6.3
Cleaning and Maintenance
Safety
Basic Cleaning
Routine Cleaning
7
7.1
7.2
7.3
Repair
Replace Leaking Valve Seat
Replace Leaking Gasket
Replace Leaking Material Needle
8
Troubleshooting and Solutions
9
Disposal
10
Technical Data
1
1
1.1
If abnormalities are detected during operation, the unit must be shut down
immediately and it is to keep up with WALTHER PILOT consultation.
General
Model Identification
PILOT Extrusion Gun (350 bar)
1.3
Type:
Part.-Nr. V 10 250 00 000
V 10 250 40 000 (Teflon®- coated)
The extrusion gun shall not be used otherwise than 1.2 Intended use is written in
the section.
Any other use is improper.
To inappropriate use include, for example:
• spraying of material on people and animals
• the spraying of liquid nitrogen.
Manufacturer: WALTHER Spritz-und Lackiersysteme GmbH
Kärntner Str. 18-30
D-42327 Wuppertal
Tel.: 0202 / 787-0 • Fax: 0202 / 787-217
www.walther-pilot.de • Email:[email protected]
1.2
2
Intended Use
•
•
•
•
Pasty Materials
Greases, oils, and corrosion inhibitors
Adhesives and glues
Waxes, Bitumen, Silicones, and Kit
Using the device in potentially explosive atmospheres. The device complies with the
ATEX requirements of the directive 94/9 EC (ATEX 100a) for explosion group,
category and temperature class marked on the rating plate. When operating the
device, the specifications of this manual must be followed.
The prescribed inspection and maintenance intervals are required.
The information on the equipment rating plates or the information in the chapter
technical data must be maintained and must not be exceeded. An overloading of
equipment must be ruled.
The device may be used in potentially explosive atmospheres only with the
competent supervisory authority.
The competent authority or the operator is responsible for determining
the explosion hazard (zone classification).
It is operator must check and ensure that all technical data and the marking according
to ATEX conform to the required standards. Applications in which the failure of the
device could be a danger to persons intro-duced are operator must provide
appropriate security measures. Grounding / potential equalization
It must be ensured that the extrusion gun is properly grounded
(maximum resistance 106 Ω).
Technical Description
The WALTHER PILOT extrusion gun is a gun that can be processed by the
existing material pressure of the pump extrudable materials. The max. Operating
pressure is 350 bar .
The gun body is made of cast aluminum and the model V 10 250 40 000 is for
easy cleaning Teflon ® coated. The medium to be processed is supplied to the
extruding gun of a piston or diaphragm pump under pressure. When you press the
trigger , the medium is pressed out of the stage nozzle ( extruded) .
In the PILOT extrusion gun , the material pressure is controlled by the pump and
the amount of material can then be finely adjusted by an additional 18 of the
securing bushing Pos . The scope of the extrusion gun consists of the airless ,
caterpillar -shaped dispensing of pasty materials. It can thermoplastics,
elastomers , silicones , greases , adhesives, glues , waxes , etc. , depending on
the consistency of workable materials are extruded . The stage nozzle has
different diameter sizes . By severing at the respective notch you can the change
required nozzle diameter maximum.
The PILOT Extrusion guns are for the processing of sprayable media, such as:
2
Improper Use
Models:
3
3.1
l
l
Safety
Identification of Safety Instructions
Warning
This picture and the accompanying warning note "Warning" indicate possible risk
and dangers to yourself.
Caution
This picture and the accompanying note "Caution" indicate possible damage to
equipment, workpieces, etc.
Notice
This picture and the accompanyingnote "Notice" indicate additional and useful
information to help you in handling the spray gun with even greater confidence
and efficiency.
3
3.2
General Applicable Safety Precautions
All applicable accident prevention rules and regulations as well as other
recognized industrial safety and health rules and regulations must be observed
at all times
Use the spray gun only in well-ventilated rooms. Fires, naked light and smoking are
strictly prohibited in the working area. WARNING - during the spraying of flammable
materials (e.g. lacquers, adhesives, cleaning agents, etc), there is an increased risk to
health as well as an increased risk of explosion and fire.
4
l
l
An adequate grounding of the extrusion gun is to ensure, for example, through the
fluid hose (maximum resistance 106Ω).
• All fluid connections must be checked and tightened before start-up.
• Inspect hoses, tubes, and couplings daily. Replace worn, damaged, or loose
parts immediately. Damaged hoses should not be repaired. In this case, the
entire hose should be replaced.
Do not point the extrusion gun towards people or animals - risk of injury.
Always observe the spraying and safety instructions given by the manufacturers of
the spraying material and the cleaning agent. Aggressive and corrosive materials in
particular can be harmful to health.
Use only original replacement parts, since WALTHER canonly guarantee safe and
fault-free operation for original parts.
For further information on the safe use of the spray gun and the spraying
materials, please contact WALTHER Spritz- und Lackiersysteme GmbH, D-42327
Wuppertal.
4
Warning
Risk of Injection. Spray from the dispensing valve, leaks, or ruptured components can
inject material into the body and cause serious injury, including the need for
amputation.
• Nozzle valve should never be pointed at people of body parts
• Do not put your hands or fingers over the nozzle valve.
• Never use the Extrusion gun without the trigger guard.
• Before each use, make sure that the gun trigger safely operates the valve.
• Always lock the trigger safety valve when not in use.
• Before performing any cleaning, checking or servicing the equipment or clogged
valve nozzle following the steps given in 5.2 Starting and shutting down.
When spraying make sure your hands and other body parts are clear from the
pressurized nozzle of the extrusion gun - the extremely high injection pressure can
cause serious injury.
Use diaphragm or piston pumps only in the context of a fluid regulator to prevent the
maximum allowable operating pressure of 350 bar can not be exceeded.
After carrying out assembly or maintenance work, always ensure that all nuts, bolts
and screw connections have been fully tightened before the gun is used.
Warning
Material lines that are attached with a hose must additionally be secured by a
hose clamp.
• Although material injected into the skin may look like an ordinary injury, these are
extremely serious injuries. If injection occurs, get immediate medical attention.
Before carrying out any maintenence or service work, always ensure that the air and
material feed to the spray gun have been de-pressurized. The extremely high pressure
at the gun or pump outlet can cause serious injury.Risk of injury!
Exhaust air containing particles (overspray) must be kept away from the working
area and presonnel. In spite of these measures, always wear the regulation
breathing masks and protective overalls when using the gun. Airborne particles
represent a serious health hazard!
Assembly
4.1
l
Supply Line Connection
Warning
Use the pump only in the context of a fluid regulator to prevent the maximum
allowable operating pressure of 350 bar can not be exceeded.
Material connection:
Attach the supply line at the connection item 20 of the extrusion gun. Maintain a
tight screw.
Notice
Use only grounded fluid hoses with a maximum total length of 150 m in order to
ensure a continuous ground and they must be resilient enough for an operating
pressure of 350 bar. Check the electrical resistance of the fluid hoses at least once
a week. If the hose does not have a label, on which the maximum electrical
resistance is specified, the maximum resistance values can be obtained from the
manufacturer. If the resistance exceeds the recommended limits, replace the hose
immediately concerned.
The gun is now ready for operation.
5
5
5.1
Operation
Safety
Shut-down
1. Release the trigger lever fully and screw in the safety button (back bushing item 18)
until it stops.
2. Turn off material supply to the pump.
3. Place the trigger guard Item 10 firmly to a grounded metal pail, turn on the
safety button and pull the trigger lever to relieve the pressure.
Observe the operation of the extrusion gun in accordance with the follow-the safety
instructions!
• When work is interrupted, the extrusion system must be depressurized.
4. Open the pressure relief valve (on site) on the pump to increase the pressure
from the pump, the valve and out of the hoses. The pressure relief valve
should remain open until work resumes. Triggering the gun may not be
sufficient to relieve the pressure. Keep a container handy to collect any
leaking material.
• Wear proper respiratory protection and work clothes when you extrude the
extrusion gun materials. Airborne particles hazardous to your health.
• In the workspace, Fire, naked flame and smoking is prohibited. Spraying of highly
flammable materials (eg glue) there is an increased risk of explosion and fire.
5.2
Start-up and Shut-down
Notice
Before first using the extrusion gun, flush it out with solvent to ensure that it is
clean.
l
l
l
Warning
The entire extrusion line must be always depressurized after work. The
pressurized pipes can burst and injure persons close by the outflowing material.
5.3
Setting the Material Flow Rate
Warning
Turn power off before refitting the extrusion pressure from the system and check
the gauge, otherwise there is a risk of injury.
The setting of the material flow rate - and thus the spray jet width - shall be
initially based on the selection of a suitable nozzle size. Setting the material
pressure regulator on the material and on the safety button of the back bushing
(Item 18) may also be affect the flow rate.
Before you can set the extrusion gun in operation, the fluid pressure must be
available at the extrusion gun.
5.4
Caution
The material pressure must not be set higher than:
- 350 bar
The suitable material pressure you place on the pump (air pressure regulator on
site) and the material pressure regulator. Pay attention to the instructions and
safety of the manufacturer.
Regulating Material Pressure
Start-up
1. Before first use, the trigger lock is locked by screwing in the safety button until it
stops at the back bushing Item 18.
2. Set the pump to minimum speed required to extrude the material with a
satisfactory discharge rate.
3. Slowly unscrew the safety button (back bushing Item 18) and press the trigger
Item 8 to achieve the desired discharge rate. If there is not enough speed, then
the appropriate discharge rate can be further tuned alternating between safety
button and pump (on site air pressure regulator).
4. If the settings are correct, you can start with the extrusion process.
6
7
5.5
l
l
Retooling Extrusion Gun
Change Material Needle
1. Remove the cap nut (Item 2)
2. Remove the fluid nozzle (Item 1), together with adapter (Item 3) from the valve (Item 5)
3. Unscrew the needle securing (Item 18) from the gun body (Item 7)
4. Twist out bolt screw (Item 9) to remove the trigger.
Warning
Turn off pressure retooling the extrusion gun from the system and check the
gauge, otherwise there is a risk of injury.
Warning
Disconnect all supply lines before retrofitting any supply of material to the
extrusion gun-injury.
5. Loosen the cylinder screw (Item 17) turn the adjusting nut (Item 16) of the fluid
needle (Item 4) and take the washer (Item 15).
6. Turn the valve (Item 5) out of the gun body (Item 7).
7. Pull the fluid needle (Item 4) from the gun body.
Notice
To carry out the operations listed below, please use the drawing at the beginning
of this manual.
The assembly is done in reverse order, with needle valve and back bushing
applied with a high-strength adhesive.
Notice
An exact setting dimension does not exist. The adjustment nut is screwed as long
until the trigger play is approximately 5 mm and is secured to the cylinder screw
against rotation.
Change Fluid Nozzle
1. Remove the Cap Nut (Item 2)
2. Remove the fluid nozzle (Item 1), together with adapter (Item 3) from the valve (Item 5)
• Now you can unscrew the step nozzle from the adapter, look for the notch
indicating the appropriate diameter (see drawing) and cut it off at the notch.
6
6.1
Cleaning and Maintenance
Safety
• Turn power off before servicing the extrusion pressure from the system - risk
of injury.
• Disconnect all material pressure before performing any maintenance to the extrusion gun.
• In the workspace, Fire, naked flame and smoking is prohibited. Spraying of
highly flammable materials (eg cleaning agents) there is an increased risk of
explosion and fire.
• Notice. the safety precautions of the detergent manufacturer's warnings.
Aggressive and corrosive cleaning agents can cause health damage.
• But you can also use our special nozzle (Item 21).
6.2
Basic Cleaning
In order for the service life and function of the extrusion gun to be maximized,
the extrusion gun must be cleaned and lubricated.
Assemble in reverse order.
l
Caution
Never place the extrusion gun in solvent or other cleaning agents. The proper
function of the extrusion gun can not otherwise be guaranteed.
l
Caution
When cleaning any hard or sharp objects. Precision parts, extrusion gun may
be damaged and deteriorate the extrusion result.
Replacement of Material Filter
For appropriate filtering of the material, you can use coarse-and fine-mesh filter.
1. Make sure the complete extrusion system is depressurized
2. Remove the hose material / material hoses.
3. Remove the material filter.
Assemble in reverse order.
8
9
To clean the extrusion gun cleaning solutions that are specified by the manufacturer
of the extrusion material and do not contain the following ingredients:
Before you perform the Routine maintenance, the following condition must be met:
• Make sure that the cleaning agent used to the process fits the material. Perform the
following steps:
• halogenated hydrocarbons
(eg 1,1,1, trichloroethane, methylene chloride, etc.)
• Acids and acidic detergents
• regenerated solvents (so-called cleaning dilutions)
• Paint stripper.
1. Place the extrusion gun into operation (see 5.2 putting into operation).
2. Flush the gun with the lowest possible pressure.
3. To maintain grounding continuity when flushing must ensure the gun to be
pressed firmly against one side of a grounded metal pail, then trigger the
gun.
4. Spray the extrusion gun until only a clear detergent is sprayed from the gun.
The above-mentioned Constituents cause electroplated components, chemical
reactions and lead to corrosion damage.
For damages resulting from such treatment, WALTHER PILOT makes no warranty.
Clean the extrusion gun
• before any material change
• at least once a week
• depending on material and depending on the degree several times a week.
This will give you the safe function of the extrusion gun.
l
Warning
Turn off the extrusion pressure before cleaning the system (see 5.2 Starting and
shutting down).
1. Disassemble the pistol as described in 5.5 extrusion gun retooling.
2. Clean the fluid tip with a brush and cleaning agent.
3. Clean all remaining parts and the gun body with a cloth and detergent.
4. Lubricate the following parts with a thin film of grease:
• material needle
• valve
• all moving parts and bearings
• The internal moving parts must be lubricated at least once a week.
• The springs should be constantly provided with a thin layer of grease.
Use an acid-free, non-resinous grease and a brush or enter a drop of oil from a
dosage bottle.
Then, the extrusion gun is set together in reverse order.
6.3
Routine Cleaning
The entire extrusion line should now be depressurized until the next use.
Repair
7
l
l
Warning
Turn power the extrusion pressure from the entire system before servicing (see
5.2 Starting and shutting down).
Warning
Disconnect all power before any repairs, the material feed to the extrusion
gun - risk of injury.
Notice
To carry out the operations listed below, please use the drawing at the
beginning of this manual.
7.1
1.
2.
3.
4.
Remove the fluid nozzle in accordance with 5.5 retooling extrusion gun.
Turn the valve (Item 5) out of the gun body (Item 7).
Replace the two seals (Item 6) with new ones.
Before beginning turn the valve again, you should secure the thread with a highstrength adhesive coat to achieve optimum sealing.
The assembly of the remaining components is carried out in reverse order.
7.2
When changing material or after work, you can also clean the extrusion gun, without
having to disassemble it.
l
10
Warning
Turn off the extrusion pressure from the system before cleaning (see 5.2 Starting
and shutting down).
Replace Leaking Valve Seat
Replace Leaking Gasket
1. Remove the fluid nozzle and needle material as described in 5.5 extrusion gun
retooling.
2. Turn the pack screw (Item 14) with the packing pressure pin (Item 13) from the gun
body.
11
3. Remove the V-pack (Item 12) and the packing support plate (Item 11) out of the
gun body. To do this, use a solid wire whose end is bent into a small hook.
4. Now replace the new packing support washer and new V-pack in the gun body.
To do this, use a special tool that has the shape of the packing pressure pin. With
the difference that the tool has a pin at the front the inner diameter of the V-pack.
Install the components individually.
8
l
l
5. Now turn the screw pack with pushpins in again.
6. Before the packing bolt is tightened, slide in the material needle from the front.
After tightening, the material needle should still be movable.
Troubleshooting and Solutions
Warning
Make sure the entire extrusion system is depressurized before servicing.
Warning
Prior to any repair material supply must be shut off - risk of injury.
Problem
Cause
Leak at the nozzle
•Material needle (Item 4)
Too little material
•Dirty filter
Check settings
or Replace material
needle
-Clean
•Nozzle too small or
clogged
-Choose larger diameter
or clean
•Fluid pressure too low
•Worn seals
-Increase fluid pressure
-Replace seals
The assembly of the remaining components is carried out in reverse order.
Notice
The parts taken from the gun use parts should not be re-used, otherwise a
functionally reliable sealing effect is not guaranteed.
7.3
Replace Leaking Material Needle
Valve seat leak
Disassemble the pistol as described in 5.5 extrusion gun retooling.
Fluid leaks fromgun
body
Assemble in reverse order.
9
Notice
All moving and sliding parts must be greased before installation in the gun body
with an acid-free, non-gumming grease.
Repair Kit:
WALTHER PILOT repair kit available that contains all wearing parts for the PILOT
EXTRUSION GUN (350 bar).
Part. No.: V 16 250 00 000
Consisting of: material needle assy. (Item 4), valve (item 5), seal 2x (item 6),
packing support washer (item 11), V-Pack 6x (key 12), packing pressure pin (item
13), washer (item . 15).
Remedy
• Worn valve
-Replace valve
•Packing (Item 12) leaking -Replace packing
Disposal
The costs incurred in cleaning and maintenance materials should be disposed
of in accordance with the laws and regulations properly and professionally.
l
Warning
Pay particular attention to the instructions of the manufacturer of extrusion and
detergent. Risk to the health of humans and animals.
10
Technical Data
Net Weight
Nozzle equipment of your choice:
570 g
Stage Nozzle (Item 1)
Special Nozzle (Item 21)
Pressure Range
max. pressure.
350 bar
Operating Temp:
42°C
Subject to technical changes.
12
13