1
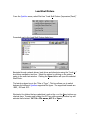
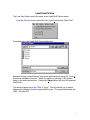
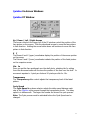
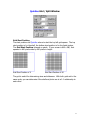
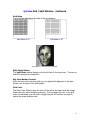
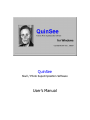
QuinSee
Skull / Photo Superimposition Software
User’s Manual
Setup:
“Setup Cannot Continue” Error Message
Executing the QuinSee Setup.exe program on a client machine may cause the
following message:
Setup cannot continue because some system files
are out of date on your system. Click OK if you
would like setup to update these files now. You
will need to restart Windows before you can run
setup again. Click Cancel to exit setup without
updating system files.
The above message occurs when the version of Oleaut32.dll on the client
machine is older than version 2.20.0000. Certain files critical to the installation
process of the QuinSee application require Oleaut32.dll version 2.20.0000 or
later.
By selecting OK to the above message, Setup.exe will install a newer version of
Oleaut32.dll that is compatible with the installation program. In order for this file
to be updated to the correct version, the operating system must be restarted.
Therefore, after the correct file is installed, the user will be prompted to restart
the computer. The application setup process cannot continue until the machine
is restarted. After the machine is rebooted, re-run the application Setup.exe
program.
If you choose Cancel, the Setup.exe program will terminate. The application
setup will not complete until version 2.20.0000 or later of Oleaut32.dll is installed
on the system.
2
QuinSee Quick Start Guide
Start the QuinSee program
From the menu, select:
File - Load Skull Picture (Impression/Track): Select the skull.jpg file, and click the
Open button to continue.
From the menu, select:
File - Load &Face Picture (Shoe/Tire): Select the photo.jpg file, and click the
Open button to continue.
There are two methods to move the photo into place over the skull picture.
Use the on screen directional arrow buttons to move the photo into place over
the skull photo.
– OR –
From the menu, select:
Options – Move Photo with Mouse. Then click and drag the photo into place
over the skull picture. Then be sure to turn off “Move Photo with Mouse” to
avoid accidentally moving the photo while navigating around the screen.
Select the “1x movement” scale from the options menu, to fine tune the
positioning of the photo over the skull.
Note: The 1x and 10x Movements only effect the navigator arrow buttons they
do not effect the settings when moving the facial picture with the mouse.
Adjust the Transparency slider to adjust the transparency of the face photo.
3
Load Skull Picture
From the QuinSee menu, select File then “Load Skull Picture (Impression/Track)”
Presented next is the Load Skull Picture dialog box:
Navigate through network drives, local drives and directories using the “Look in:”
drop-down navigation text box. Select the picture by clicking on the picture
name in the main text window. Clicking the Open button will open the selected
Skull Photo.
The last drop-down box is the “Files of Type:”, This box allows you to switch
between the different QuinSee supported file types. The supported formats are
.BMP, .JPG and .GIF.
Shortcuts: Any letters that are underlined, such as the o on the Open button are
shortcut keys. Pressing and holding the ALT key while pressing another key will
activate that shortcut. ALT-N = File name, ALT-O = Open.
4
Load Face Picture
The Load Face Picture works the same as the Load Skull Picture screen.
From the QuinSee menu, select File then “Load Face Picture (Shoe/Tire)”
Presented next is the Load Skull Picture dialog box:
Navigate through network drives, local drives and directories using the “Look in:”
drop-down navigation text box. Select the picture by clicking on the picture
name in the main text window. Clicking the Open button will open the selected
Skull Photo.
The last drop-down box is the “Files of Type:”, This box allows you to switch
between the different QuinSee supported file types. The supported formats are
.BMP, .JPG and .GIF.
5
QuinSee File Menu – “File”
Load Skull and Load Face Pictures - See pages 4 and 5 above
Load Case File
Loads a saved QuinSee case file. QuinSee case files have a .qcf extension.
Save Case File
Saves the current information for the “Skull Picture” and “Face Photo”. Current X
and Y positions along with other QuinSee settings are saved. Case files don’t
save the pictures themselves, but rather the file name and directory path to
those pictures. If one of the photos is moved from the directory, the case file
will fail to load.
Exit
The Exit menu selection terminates the QuinSee Skull / Photo Superimposition
Program.
6
QuinSee File Menu – “Edit”
Modify Photo –
Opens the Modify Photo Screen to scale or rotate the facial photo.
See “QuinSee – Modify Photo Screen” on page 15
Save Scaled Photo As…
If the facial photo has been scaled, the newly scaled version can be saved.
You should never save over the original photo. Use sub numbers or letters to
identify a modified photo. (i.e. If the original photo name was Face0984.bmp,
save the scaled photo to something like Face0984s.bmp).
Save Rotated Photo As…
If the facial photo has been rotated, the newly rotated version can be saved.
You should never save over the original photo. Use sub numbers or letters to
identify a modified photo. (i.e. If the original photo name was Face0984.bmp,
save the rotated photo to something like Face0984r.bmp).
Note: The saved graphics format is Windows Bitmap (.BMP).
7
QuinSee File Menu – “Options”
Cycle
Toggles the automatic transparency cycle on and off.
Split Photo
Displays only the left half of the face photo. This can be useful for skull/photo
comparison.
An example of the Split Photo function.
Move Photo with Mouse
Toggles on and off the ability to move the facial photo with the mouse. While
this option is ‘selected’ click and drag the photo into place over the skull picture.
Be sure to turn off “Move Photo with Mouse” to avoid accidentally moving the
photo while navigating around the screen. Whenever a mouse drag event occurs
on the screen the facial photo is centered under the mouse pointer if “Move
photo with Mouse” is selected.
1x Movement and 10x Movement
Once you get the face positioned over the skull photo you can select the 1x
Movement setting to fine tune the position of the face over the skull.
Note: The 1x and 10x Movements only effect the navigator arrow buttons they
do not effect the settings when moving the facial picture with the mouse.
8
QuinSee File Menu – “Window”
Show XY Window
Displays the QuinSee XY Window – See page 11
Show Ruler Window
Displays the QuinSee Ruler Window – See page 12
Show Grid / Split Window
Displays the QuinSee Grid / Split Window – See page 13
Hide All Windows
Hides the above QuinSee windows from view.
Show All Windows
Displays all of the above QuinSee windows.
9
QuinSee File Menu – “Help”
About
Displays the QuinSee About screen.
On the about screen is the “System Info…” button:
“System Info…” will display “Microsoft System Information” about your system,
which will assist you in trouble shooting any current or future system problems.
10
QuinSee On-Screen Windows
QuinSee XY Window
Up / Down / Left / Right Arrows
The arrow controls in the upper left of the XY window control the position of the
face picture on the screen. Click the directional arrows to move the face picture
in that direction. Holding the arrow button down will continue to move the face
picture in that direction.
X Y
The Mouse X and Y (upper) coordinates display the position of the mouse pointer
on the screen.
The Picture X and Y (lower) coordinates indicate the position of the facial picture
on the computer screen.
10x 1x
Once you get the face positioned over the skull photo, selecting the 1x setting
from the movement scale will fine tune the position of the face over the skull. 1x
movement equates to 1 pixel per click and 10 pixels per click for 10x.
Transparency
The Transparency slider control adjusts the transparency level of the facial
picture.
Cycle Speed
The Cycle Speed drop-down selector selects the delay speed between each
step of the QuinSee cycle process through the transparency levels. The delay
speed is in milliseconds. The larger the number the slower the cycle process.
Note: The Cycle process must be activated before the Cycle Speed can be
changed.
11
QuinSee Ruler Window
Ruler Start Position
The start positions tell QuinSee where to start the top of the ruler. The top start
position is for the skull, the bottom start position is for the facial picture. The
Ruler Start Position is based on pixels. If your screen is 640 x 480, that
equates to 640 pixels wide by 480 pixels in height.
Ruler Scale
The Ruler Scale determines the distance between the ruler lines. (in pixels)
The ruler is useful for determining sizes and distances. With both rulers set to
the same scale, you can determine if the skull and photo are at a 1:1 relationship
to each other.
Ruler Color
The Ruler Color Selector picks the color of the ruler or grid to be placed over the
image. Select the color before activating the ruler or grid. If you change the
color of the ruler or grid while it is activated, you will need to toggle the ruler or
grid off and then on again to pickup the newly selected color.
12
QuinSee Grid / Split Window
Grid Start Position
The start positions tell QuinSee where to start the top left grid square. The top
start position is for the skull, the bottom start position is for the facial picture.
The Grid Start Position is based on pixels. If your screen is 640 x 480, that
equates to 640 pixels wide by 480 pixels in height.
Grid Start Position of 0
Grid Start Position of 80
The grid is useful for determining sizes and distances. With both grids set to the
same scale, you can determine if the skull and photo are at a 1:1 relationship to
each other.
13
QuinSee Grid / Split Window - Continued
Grid Scale
The Grid Scale determines the size of the grid squares
Grid Scale of 10
Grid Scale of 20
An example of the Split Photo function.
Split Photo Button
The Split Photo button displays only the left half of the face photo. This can be
useful for skull/photo comparison.
Adj. Face Border Controls
Once the face photo has been split, you can adjust the alignment of the right
border over any part of the photograph.
Grid Color
The Ruler Color Selector picks the color of the grid to be placed over the image.
Select the color before activating the grid. If you change the color of the grid
while it is activated, you will need to toggle the grid off and then on again to
pickup the newly selected color.
14
QuinSee Modify Photo Screen
QuinSee – Modify Photo – Scale Menu Settings
Change Photo Scale
The Change Photo Scale is used to resize the picture. If you do not have
another program to scale the photo, you can use QuinSee to resize the photo to
fit the scale of the skull. It is recommended that you use a commercial graphics
package, if one is available to do your photo resizing. The Change Photo
Scale is based on twips. There are 1440 twips per logical inch; 567 twips per
logical centimeter. Example: To increase the photo by 1 inch, enter 1440 in the
Photo Scale text box, to decrease the photo by 1 inch enter –1440.
Apply Button
This applies the changes to the photo and displays the results on the monitor.
Restore Size
The Restore Size button will return the picture to its original size. All changes
to the picture are done within the computer’s memory, the original photo is
never altered.
Exit Scale Screen Button
The Exit Scale Screen button processes the changes to the photo and returns
you to the QuinSee Main Screen.
15
QuinSee Modify Photo Screen
QuinSee – Modify Photo – Rotate Menu Settings
Rotate Button
The Rotate button rotates the picture clockwise or counterclockwise. A positive
number will rotate counterclockwise and negative number will rotate the image
clockwise. This is useful if the face photo is tilted to one side.
Flip Vertical Button
The Flip Vertical button flips the photo on the vertical axis and creates a mirror
image.
Flip Horizontal Button
The Flip Horizontal button acts much like the Flip Vertical button except it flips
the photo along the horizontal axis. This is useful for such things as footprint
identification. A footprint impression photo can be used in place of the skull
picture, then a picture can be taken of the bottom of the suspect shoe. The
suspect shoe photo can then be flipped vertically to match the shoe print
impression photo.
Restore Picture
The Restore Picture button will return the picture to its original position. All
changes to the picture are done within the computer’s memory, the original
photo is never altered.
Exit Rotate Screen Button
The Exit Rotate Screen button processes the changes to the photo and returns
you to the QuinSee Main Screen.
16
QuinSee – Shoe Impression Example using “Flip Horizontal”
Here is an example of using QuinSee for shoe print analysis.
print1.jpg
shoe1.jpg
shoe1.jpg flipped horizontal
File - Load skull image: select the print1.jpg file.
File - Load face picture: select the shoe1.jpg file.
Edit - Modify Photo
Click Rotate Menu
Click Flip Horizontal
Click Exit Rotate Screen
Now you’re set, position the photo over the print.
17
QuinSee
Web Site:
http://www.irlab.com/QuinSee
E-mail:
[email protected]
Address:
Digital Matrix
PO Box 7478
Olympia, WA
98507-7478
18