1
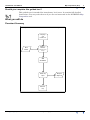
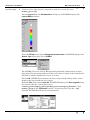
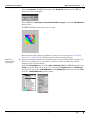
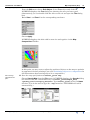
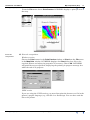
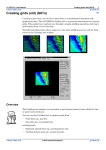
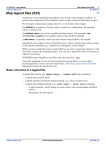
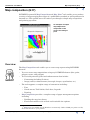
INTREPID User Manual
Library | Help | Top
Map composition (G17)
1
| Back |
Map composition (G17)
Top
INTREPID’s powerful Map Composition and Map Print1 tools enable you to produce
a variety of maps ranging from maps of a publishable standard to quick printouts for
internal use. This guided tour will conduct you through a simple map composition
and printing operation.
An example of simple
map output item
composed on the
screen and ready to
print.
Overview
The Map Composition tool enables you to create map representing INTREPID
datasets.
•
You can create map compositions using any INTREPID dataset (line, point,
polygon, raster, and polygon)
•
You can add powerful geolocated enhancements that include:
•
•
•
Contouring (including Z colour)
•
Image (raster) enhancements (sun angle, drapes, equalisation, etc)
The tool supports a complete range of annotation including:
•
Text
•
North arrows, Title blocks, Scale bars, Legends
•
Drawing
Map Composition provides a complete range of paper management options
including
•
Dividing the map into sheets,
•
Fixed size/variable scale or fixed scale/variable size options.
1.7 Map Print is available for the Windows version only. Under UNIX you print to a file,
then send the file to your printer.
Library | Help | Top
© 2012 Intrepid Geophysics
| Back |
INTREPID User Manual
Library | Help | Top
Map composition (G17)
2
| Back |
Parallel interactive tool and programming language
Map Composition has two elements that can work in parallel:
•
An interactive Map Composition tool,
•
A block-structured map language called MAPCOMP.
The interactive tool is powerful interactive ‘what you see is what you get’ composition
tool. You can print your compositions directly from the interactive tool, or
automatically save their specifications in MAPCOMP language.
The MAPCOMP language forms the basis for an extremely powerful batch system
with complete facilities for detailed, professional quality maps. You can create or edit
MAPCOMP files using any text editor. You can print directly from a MAPCOMP file.
Printer output
Under UNIX, Map Composition can create output for PostScript, HP–GL and HP–GL/
2 printers as well as TIFF and Windows output formats.
Under Windows Print Map supports any appropriate printer for which there is a
Windows driver. You can also print to file in any of the UNIX output formats.
Context of this guided tour
In the context of your data processing cycle, this tour represents the production
of an illustration of a dataset for use in an internal report or at a meeting.
Location of sample data for Guided Tours
We provide two complete sets of sample datasets, one in INTREPID format and one
in Geosoft format. INTREPID works equally well with both formats. When you want
to open a dataset, navigate to the directory containing the required data format.
Where install_path is the path of your INTREPID installation, the project
directories for the Guided Tours sample data are
install_path\sample_data\guided_tours\intrepid_datasets and
install_path\sample_data\guided_tours\geosoft_datasets.
For example, if INTREPID is installed in
C:\Program Files\Intrepid\Intrepid4.5.nnn,
then you can find the INTREPID format sample data at
C:\Program Files\Intrepid\Intrepid4.5.nnn\sample_data\
guided_tours\intrepid_datasets
This is the default location for the sample data. If you have installed INTREPID
normally, the data resides there. If you have installed INTREPID elsewhere, the
exercises will work just as well. Just use the appropriate pathnames.
For more information about installing the sample data, see "Sample datasets—
installing, locating, naming" in INTREPID Guided Tours Introduction (G01)
For a more detailed description of INTREPID datasets, see Introduction to the
INTREPID database (G20). For even more detail, see INTREPID database, file and
data structures (R05).
Library | Help | Top
© 2012 Intrepid Geophysics
| Back |
INTREPID User Manual
Library | Help | Top
Map composition (G17)
3
| Back |
Should you complete this guided tour?
This guided tour is intended for introductory level users. It contains full detailed
instructions. You may omit the tour if you are not interested in the INTREPID Map
Composition tool.
What you will do
Flowchart Summary
Inputs
Proce s s
Outputs
Se t page
size
borders etc
Grid
dataset
Place and
enhance
psuedo colour
im age
Add
annotation
Save map
specs
Intre pid
"m ap" file
Print the
map
Library | Help | Top
© 2012 Intrepid Geophysics
| Back |
INTREPID User Manual
Library | Help | Top
Map composition (G17)
4
| Back |
Positioning objects in a composition
On several occasions during this tour you will need to position new objects in the Map
Composition window. You may also need to move objects in the window. The
procedure differs slightly between the versions and we describe it here. Whenever you
need to position a new object, use this procedure.
Positioning new objects
After specifying a new object to be included:
1
If you are using the Windows version, hold down the left mouse button. (Do not do
this if you are using the UNIX version– INTREPID will automatically attach the
frame.)
INTREPID will attach a rectangular frame to the mouse pointer.
2
Position the frame where you require the object.
3
If you are using the Windows version, release the left mouse button. If you are
using the UNIX version, click the left mouse button.
4
INTREPID displays the object in the frame where you have positioned it.
Moving existing objects
You can easily move an existing object in your map:
1
Select (click) the object. INTREPID displays the name of the selected object at the
bottom of the window. (If there are two objects occupying the position you clicked,
INTREPID displays a pop-up box showing their names. Choose the object you
require from the pop-up box.)
2
If you are using the UNIX version: Drag the object to the new position using the
right mouse button, then release the button.
If you are using the Windows version: Hold down CTRL and drag the object to the
new position using the left mouse button, release the mouse button then release
CTRL.
Library | Help | Top
© 2012 Intrepid Geophysics
| Back |
INTREPID User Manual
Library | Help | Top
Map composition (G17)
5
| Back |
Steps to follow
Creating a composition
Launch the
Map
Composition
tool
1
Start the Project Manager. Navigate to the directory
install_path\sample_data\guided_tours\intrepid_datasets. Start the
Map Composition tool.
See Locating datasets, viewing, statistics, launching tools (G02) for instructions
about navigating to different directories.
Choose Compose Hardcopy from the Printing menu.
INTREPID displays the Map Composition tool window.
You can specify the whole composition in this guided tour using the map specification
file mlevel_grid.map. If you want to use it, load it into the Map Composition tool
using Load Map from the File menu then go to Step 13. Note that map specification
files have a different format from task specification (job) file short cuts. They replace
and extend the function of job files in the Map Composition and Map Print tools.
Library | Help | Top
© 2012 Intrepid Geophysics
| Back |
INTREPID User Manual
Library | Help | Top
Set the page
size
2
Map composition (G17)
6
| Back |
Set the page size to A4 portrait and the viewing scale to 4:1.
From the File menu choose Page Size. INTREPID displays the Page Size dialog
box. Choose Size. INTREPID displays the Standard Page Sizes dialog box. Select
(click) A4 then choose Accept in the Standard Page Sizes dialog box.
Turn on (tick) the Border setting. This will draw a visible border around your
map.
Click OK to close the Page Size dialog box.
З
From the scale cascade in the View menu choose Scale 2:1 (zoom level)
INTREPID clearly displays the outline of your A4 page in the Map Composition
window.
Library | Help | Top
© 2012 Intrepid Geophysics
| Back |
INTREPID User Manual
Library | Help | Top
Create a
pseudocolouvr
map object
3
Specify a grid
dataset
4
Map composition (G17)
7
| Back |
Specify a pseudocolour image as the dataset for the composition.
From the Geographic menu choose New PseudocolourImage. INTREPID
displays the Pseudocolour dialog box.
Specify mlevel_grid as the grid dataset (image) for the composition.
Choose Image from the Pseudocolour dialog box. INTREPID displays the Load
Image dialog box.
Select the mlevel_grid grid dataset and choose OK.
INTREPID displays the path to the grid dataset in the Pseudocolour dialog box.
Library | Help | Top
© 2012 Intrepid Geophysics
| Back |
INTREPID User Manual
Library | Help | Top
Create a legend
5
Map composition (G17)
8
| Back |
Create a colour legend for the composition and save it with the name
mlevel_grid.leg.
Choose Legend from the Pseudocolour dialog box. INTREPID displays the
Legend Editor window.
From the ZField menu choose Histogram Enhancement. INTREPID displays the
Stretch Type dialog box. Select PLHEQ.
The PLHEQ (Piecewise Linear Histogram Equalisation) enhancement assigns
data ranges for the lookup table such that each colour or shade in the lookup table
will have a similar distribution of area on a map.
Choose OK. INTREPID recomputes the data ranges for the lookup table, and redisplays the legend with the new ranges.
From the File menu choose Save As. INTREPID displays the Save Legend dialog
box. Ensure that the current directory is
install_path\sample_data\guided_tours\intrepid_datasets. Type
mlevel_grid1 in the File Name text box. You don’t need to type the .leg
notation. INTREPID will insert it automatically.
Library | Help | Top
© 2012 Intrepid Geophysics
| Back |
INTREPID User Manual
Library | Help | Top
Map composition (G17)
9
| Back |
Choose OK in the Save Legend dialog box. INTREPID displays your
specifications at the top of the Legend Editor window.
Choose OK in the Legend Editor window. INTREPID will close the Legend Editor
and display the path to the legend file in the Pseudocolour dialog box.
Place the
pseudo-colour
map object on
the page
Library | Help | Top
6
Place the dataset into the composition in an appropriate position.
Choose Apply in the Pseudocolour dialog box.
Place the grid within the A4 page frame as shown in the following illustration.
Note that you need to position the object in the window using the mouse before
INTREPID displays it. See Positioning objects in a composition for full
instructions about placing new objects in a composition.
© 2012 Intrepid Geophysics
| Back |
INTREPID User Manual
Library | Help | Top
Specify the
scale
7
Map composition (G17)
10
| Back |
Change the scale of the dataset to 1:100000, automatically adjusting the size of the
box that contains it.
Select (click) the image display in the Map Composition window. The message
‘Selected Object: Data’ will appear in the lower left corner of the window. From
the Edit menu choose Edit Object
INTREPID displays the Select Object to Edit dialog box.
З
Select (click) Data then choose OK.
(Alternatively you can double click the grid display to select it and display the
Select Object to Edit dialog box).
INTREPID displays the Data Extents dialog box.
Choose Layout.
INTREPID displays the Customise Data Box Layout dialog box. In this exercise
you will specify a scale and INTREPID will automatically adjust the size of the
image on the screen to fit the scale. Select the Fixed Scale (Single Sheet) option
button.
Library | Help | Top
© 2012 Intrepid Geophysics
| Back |
INTREPID User Manual
Library | Help | Top
Map composition (G17)
11
| Back |
Choose Customise. INTREPID displays the Set Scale dialog box. Change the
map scale value to 100000.
Choose OK in the Set Scale, Customise Data Box Layout and finally Data Extents
dialog boxes.
INTREPID displays the grid at its new size.
Move the data object (image) slightly to centre it if necessary (See Positioning
objects in a composition for full instructions about moving objects).
Place tick
marks on the
map object
8
Specify and apply latitude and longitude tick marks and edge labels. Specify tick
marks on the image every 2 minutes and labels outside the data object (grid
display) at the left and bottom.
From the Geographic menu choose New Lat/Long Ticks. INTREPID displays the
Ticks dialog box. Enter 0:2:0 (0°2’0”) in both the LongInterval and LatInterval
text boxes. Turn on the LabelAtBottom and LabelAtLeft check boxes. Select Tick
from the Tick/Grid/Border option buttons.
Library | Help | Top
© 2012 Intrepid Geophysics
| Back |
INTREPID User Manual
Library | Help | Top
Map composition (G17)
12
| Back |
Choose Apply in the Ticks dialog box.
INTREPID displays the tick marks and labels on your grid.
9
Place a North
arrow
Place a North arrow with projection information in the composition.
From the Annotations menu choose New NorthArrow. INTREPID displays the
North Arrow dialog box. Turn on the ShowProjection check box. Choose Apply.
Place the North arrow in the lower left part of the A4 page frame as shown in the
following illustration. (See Positioning objects in a composition for full
instructions about placing new objects in a composition.)
Library | Help | Top
© 2012 Intrepid Geophysics
| Back |
INTREPID User Manual
Library | Help | Top
Place a scale
bar
Map composition (G17)
13
| Back |
10 Place a scale bar in the composition.
From the Annotations menu choose New ScaleBar. INTREPID displays the Scale
Bar dialog box. Accept the default settings and choose Apply.
Place the scale bar in the lower right part of the A4 page frame as shown in the
following illustration. (See Positioning objects in a composition for full
instructions about placing new objects in a composition.)
Place a legend
11 Place the pseudocolour legend mlevel_grid.leg in the composition showing
values with no decimal places.
(mlevel_grid.leg is a solution file we have provided which is identical to the
mlevel_grid1.leg you created earlier.)
From the Annotations menu choose New Legend. INTREPID displays the
Legend dialog box.
Library | Help | Top
© 2012 Intrepid Geophysics
| Back |
INTREPID User Manual
Library | Help | Top
Map composition (G17)
14
| Back |
Choose Name. INTREPID displays the Load Legend dialog box. Select the file
mlevel_grid.leg. Choose OK.
INTREPID displays the path of the legend file in the Name text box of the
Legend dialog box.
Enter 0 in the Decimals text box.
Choose Apply.
Place the legend in the A4 page frame at the right of the grid as shown in the
following illustration. (See Positioning objects in a composition for full
instructions about placing new objects in a composition.)
Create a title
12 Give the composition a title ‘Ebagoola Magnetics’ using font 5, size 8.
From the Annotations menu choose Text.
Click a position suitable for the start of a map title above the top left corner of the
image. Type the title Ebagoola Magnetics and press ENTER. The title will appear
in the map window in small letters (you may not be able to read it at this stage).
Select (click) the title you have just typed. The message ‘Selected Object: Text’
will appear in the lower left corner of the window.
Library | Help | Top
© 2012 Intrepid Geophysics
| Back |
INTREPID User Manual
Library | Help | Top
Map composition (G17)
15
| Back |
From the Edit menu choose Edit Object. Select Text object and click OK.
INTREPID displays the Text dialog box showing the text you have typed.
(Alternatively you can double click the title to select it and open the Text dialog
box).
Enter Size 8 and Font 5 in the corresponding text boxes.
Choose Apply.
INTREPID displays the title with its new size and typeface in the Map
Composition Window.
At this point you may want to adjust the position of objects on the map to optimise
its appearance before printing it out. (See Positioning objects in a composition for
full instructions about moving objects in a composition.)
Save a map
specificat-ion
file
Library | Help | Top
13 Save the map specifications as mlevel_grid1.map.
Choose SaveAs Map from the File menu. INTREPID displays the SaveAs dialog
box. Ensure that the current directory is install_path\sample_data
\guided_tours\intrepid_datasets. Type mlevel_grid1 in the file Name
text box. (You do not need to type the .map extension—INTREPID will add it
automatically.)
© 2012 Intrepid Geophysics
| Back |
INTREPID User Manual
Library | Help | Top
Map composition (G17)
16
| Back |
Choose OK. INTREPID will save the map specification file.
Tip: The .map file is a text file containing specifications for producing the map.
You can examine it using any text editor, such as Windows NotePad or vi under
UNIX.
Printing your composition
Print preview
the
composition
14 Print preview the composition (Windows version only).
If you are using the UNIX version of INTREPID, go to the next step.
In the Windows version, the separate Map Print tool performs all previewing and
printing.
From the File menu choose Print. INTREPID will launch the Map Print tool with
the current map loaded (shown as an icon with a temporary name).
Library | Help | Top
© 2012 Intrepid Geophysics
| Back |
INTREPID User Manual
Library | Help | Top
Map composition (G17)
17
| Back |
From the File menu choose Print Preview. INTREPID displays a print preview of
the map.
Print the
composition
15 Print the composition.
Windows version
Choose the Print button in the Print Preview window or Print from the File menu
in the Map Print window. INTREPID displays the Print dialog box. Select the
required printer and adjust its properties if necessary. Choose OK. INTREPID
will print the map as specified, displaying the printing in progress message box
while the task is in progress.
UNIX version
If you are using the UNIX version, you must first print the dataset to a file in the
printer’s graphic language (e.g., HP–GL/2 or PostScript). You can then send the
file to the printer.
Library | Help | Top
© 2012 Intrepid Geophysics
| Back |
INTREPID User Manual
Library | Help | Top
Map composition (G17)
18
| Back |
Choose the output format you require (depending on your printer) from the Print
cascade in the Map Composition tool File menu.
INTREPID displays a Save As dialog box. Select a directory for the output file.
(You can just use install_path\sample_data\guided_tours
\intrepid_datasets if you prefer.) Enter the name of the graphics language
output file you require (e.g., mlevel.prn). Choose OK.
INTREPID will create the graphics language file for the printer.
To print the file you have produced, use the command appropriate to your system,
for example
lp -dHP850C /usr/intrepid/tutorials/mlevel.prn
Where the -d switch specifies the type of printer and the parameter specifies the
graphics language output file you are printing.
To exit
To exit from the Map Print preview, choose Close.
To exit from the Map Print tool, choose Exit from the File menu.
To exit from the Map Composition tool, choose Quit from the File menu.
Tip: Printing with the UNIX version: You can output INTREPID maps to files in
the following formats: PostScript, HP–GL, HP–GL/2, TIFF, Microsoft bitmaps
and metafiles (.bmp and .wmf), MicroStation DGN file, ARC/INFO generate
format
Tip: Printing with the Windows version: You can print your map compositions the
same way as you would print any other graphic data on the same computer.
INTREPID sends its printing to the Windows print management system. As with
other data on your Windows computer, you can print directly to the printer or to a
print file. You can print INTREPID maps to any printer supported by Windows
(within the graphics capabilities of the printer, of course).
Tip: You can also output map compositions to files with any of the formats listed in
‘Printing with the UNIX version’ above.
Library | Help | Top
© 2012 Intrepid Geophysics
| Back |
INTREPID User Manual
Library | Help | Top
Map composition (G17)
19
| Back |
Key points for this guided tour
In this guided tour you have used the INTREPID Map Composition tool to
•
Interactively create a ‘what you see is what you get’ composition,
•
Print the composition.
Map Composition supports
•
An extensive range of image enhancements
•
Powerful contouring and vector output.
A powerful batch system and comprehensive map composition language
(MAPCOMP):
•
Underpins the tool and
•
Enables production of commercial quality maps.
Frequently Asked Questions
Q : Can I have more than one map area in the output?
A : Yes. The Map Composition tool supports multiple data areas. Each of these can
contain multiple geolocated datasets (e.g., a set of colour contours overlaid on a sunangle display).
Q : Does INTREPID Map Composition support tiling large-scale output down
to a smaller printer?
A : Yes. The tool supports automatic tiling onto printers.
Library | Help | Top
© 2012 Intrepid Geophysics
| Back |