1
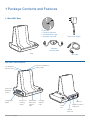
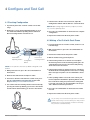
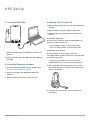
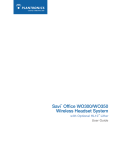
Savi Office WO300/WO350
®
Wireless Headset System
with Optional HL10™ Lifter
User Guide
Welcome
Congratulations on purchasing your new Plantronics product. This guide contains instructions for setting up and using your
Savi Office WO300/WO350 (WO1 Base and WH300/WH350 Headset) Wireless Headset System. Please refer to the separate
safety instructions for important product safety information prior to installation or use of the product.
Refer to the CD for Animated Set Up instructions.
Plantronics Savi User Guide
Contents
1 Package Contents and Features............................ 4
Muting the Headset...................................................... 15
1.1 Savi Base.................................................................. 4
Subscribing a Master Headset..................................... 15
1.2 Savi Headset............................................................. 5
Conferencing In Up to Three Additional Headsets....... 15
1.3 HL10 Lifter (Optional)................................................ 6
Setting Default Line to Desk Phone or PC.................... 16
2 Base Set Up............................................................ 7
Toggling On/Off Over-the-Air Subscription................... 16
2.1 Attaching Charge Cradle to Base............................. 7
Setting the Range......................................................... 16
2.2 Connecting Base to Desk Phone.............................. 7
Ending Subscription..................................................... 16
2.3 Connecting Power Supply to Base........................... 7
Desk Phone and PC Talk Buttons
“Rules to Live By”......................................................... 16
2.4 Positioning Base....................................................... 7
3.1 Adjust the Headband................................................ 8
Desk Phone and PC Talk Buttons
Indicator Lights............................................................. 16
3.2 Adjust the Mouthpiece.............................................. 8
Talk Time....................................................................... 17
3.2 Docking and Charging the Headset.......................... 8
Checking Headset Battery Level.................................. 17
4 Configure and Test Call ......................................... 9
Headset Call Control Button Functions........................ 17
4.1 Checking Configuration............................................ 9
Placing the Headset in Sleep Mode............................. 17
4.2 Making a Test Call with Desk Phone........................ 9
Headset Indicator Light................................................ 17
5 Lifter Set Up (Optional) ........................................ 10
Headset Tones.............................................................. 17
5.1 Installing Lifter......................................................... 10
Subscription Button Indicator Light.............................. 16
3 Headset Set Up ..................................................... 8
8 Plantronics Software Platform.............................. 18
5.2 If You Do Not Hear a Dial Tone............................... 10
Softphone Support.................................................. 18
5.3 Additional Parts (if required)................................... 11
Plantronics Update Manager........................................ 18
6 PC Set Up . .......................................................... 12
Plantronics Control Panel......................................... 19
6.1 Installing USB Cable............................................... 12
Battery Life............................................................. 19
6.2 Installing Plantronics Software............................... 12
Devices Tab.................................................................. 19
6.3 Making a Test Call with PC..................................... 12
Applications Tab...................................................... 20
7 Using Your Savi Office Wireless
Headset System .................................................. 13
Preferences Tab. ..................................................... 21
About Tab............................................................... 21
Powering up Headset................................................... 13
Help for Device Settings - USB Adapter...................... 22
Placing, Answering and Ending Calls with
Desk Phone.................................................................. 13
Placing, Answering and Ending Calls with PC............. 14
Switching Between Desk Phone and PC Audio .......... 14
Mixing Desk Phone and PC Audio .............................. 14
Plantronics Savi User Guide
Help for Device Settings - Advanced........................... 22
9 Troubleshooting and Common Questions............ 23
1 Package Contents and Features
1.1 Savi WO1 Base
CD includes:
• Plantronics Software
• Animated Setup Guide
• Complete User Guide
Base Power Supply
Telephone
Interface Cable
Base
USB Cable
Savi WO1 Base Features
Desk Phone Talk Button
PC Talk Button
Indicator Light
Indicator Light
Desk Phone
Speaking
Volume
Configuration
Switch
Desk Phone
Listening
Volume
Subscription
Button and
Indicator
Light
Charging
Indicator
Light
USB Port
Power
Jack
Telephone Interface
Cable Jack
Handset
Lifter Jack
Plantronics Savi User Guide
4
1.2 Savi Headset
Charge Cradle
WH300 Headset
(Monaural)
WH350 Headset
(Binaural)
(One model included in each package - both models shown.)
Ear Cushions
Savi WH350 Headset Features
Headband
Indicator Light
Volume Up and
Down Button
Call Control Button
Microphone
Mute Button
Plantronics Savi User Guide
5
1.3 HL10 Lifter (Optional)
Handset Lifter Arm
Ringer Microphone Jack
(remove cover)
Power Cord
Height Switch
Accessory Jack
HL10 Lifter
Additional HL10 Lifter Parts (If Required)
Ringer Microphone
Plantronics Savi User Guide
Extender
Arm
For Nortel i2004
phones only
6
2 Base Set Up
2.1 Attaching Charge Cradle to Base
2.3 Connecting Power Supply to Base
1 Connect the headset charge cradle to the base. Push
1 Connect the base power supply into the power jack on
firmly on the cradle until the cradle snaps in to place.
the base.
2 Connect the power supply to outlet.
2.2 Connecting Base to Desk Phone
1 Connect the telephone interface cable to the telephone
interface cable jack on the base.
2 Disconnect the handset coil cord from the desk phone.
2.4 Positioning Base
3 Connect the telephone interface cable to the now open
The minimum recommended separation between your desk
phone and the base is 6 inches.
handset port on the desk phone.
4 Connect the handset coil cord to the telephone interface
cable junction box.
5 Place the handset back on the telephone cradle.
The minimum recommended separation between the base and
computer is 12 inches. Incorrect position can cause noise and
interference problems.
Note If your phone has a built-in headset port, you should only
use the headset port if you will not be using the HL10 lifter. In this
configuration, you must press both the headset button on your
phone and the call control button on the headset to answer or
end calls.
Plantronics Savi User Guide
7
3 Headset Set Up
3.1 Adjust the Headband
1
2"
50.8 mm
1To adjust the headband, lengthen or shorten the band
until it fits comfortably. Position the headset receivers so
that the foam cushions sit comfortably over the center of your
ears.
2 On the WH300, position the stabilizer T-bar above
your ear.
2
3 For a tighter fit, gently pull the opposite ends of
the headset inward as shown.
1
3
2
front back
3.3 Docking and Charging the Headset
1 Gently push the headset into the charge cradle.
The charging indicator light on the base will flash green to
indicate that the headset battery is charging.
3
2 Charge for at least 20 minutes prior to the first use.
A full charge takes 3 hours. The power indicator light will turn
solid green.
3.2 Adjust the Mouthpiece
1 bend and shape the boom with both
1 Carefully
Charging time
hands as shown. Avoid bending or twisting the boom
near the microphone or earpiece.
20 min . ....................
Minimum charge
before first use
2 Position the click-stop turret and boom so that the
3 hours ....................
microphone is two finger-widths from the corner
of your mouth.
Full charge
3 Make sure the front of2" the microphone faces your
50.8 mm
mouth. If necessary, twist the microphone slightly so it’s
in the proper
position. Do not use forceful twisting motions
2
or try to turn the microphone completely around.
Charging
Indicator Light
3 User Guide
Plantronics Savi
8
4 Configure and Test Call
4.1 Checking Configuration
7 If the dial tone still does not sound clear, adjust the
Configuration Switch until the dial tone sounds the best.
1 If your desk phone has a volume control set it to midrange.
2 On the base, ensure the Configuration Switch is set to
“A” and the Desk Phone Speaking Volume and Desk
Phone Listening Volume are both set to 3.
Note Multiple settings might work with your phone; however,
only one is the optimal position.
8 Press the call control button on the headset to complete
configuration.
9 Replace the handset into the desk phone cradle.
4.2 Making a Test Call with Desk Phone
1 If your desk phone has a volume control, ensure it is set
it to mid-range.
2.With your headset on, press the call control button on
the headset.
3 Remove the handset from desk phone cradle.
Desk Phone
Speaking Volume
Configuration
Switch
Desk Phone
Listening Volume
NOTE For most phones, these factory default settings will sound
the best.
3 With your headset on, press the call control button on
the headset.
4 Remove the handset from desk phone cradle.
5 Listen for a dial tone. If the dial tone sounds clear, press
the call control button on headset and continue with
Step 4.2 Making a Test Call with Desk Phone.
6 You can fine tune the listening volume on the headset by
pressing the volume up button [+] to increase the volume
and the volume down button [-] to decrease the volume.
4 Dial the number using your desk phone.
5 If the listening volume is too loud or too soft, adjust
the listening volume on the headset by pushing the call
control button up to increase the volume and pushing
down to decrease the volume.
6 If the listening volume is still too loud or too soft adjust
the Desk Phone Listening Volume on the base. A setting
that is too high can produce an uncomfortable echo for
you.
7 If the speaking volume is too loud or too soft for your
listener, adjust the Desk Phone Speaking Volume on the
base to the best setting for your listener. A setting that
is too high can produce an uncomfortable echo for you
and a distorted sound for you listener.
8 Press the call control button on the headset to end the
test call.
9 Replace the handset into the desk phone cradle.
For your safety, do not use headset at high volumes for extended
periods of time. Doing so can cause hearing loss. Always listen at
moderate levels. For more information on headsets and hearing
visit: plantronics.com/healthandsafety.
Plantronics Savi User Guide
9
5 Lifter Set Up (Optional)
5.1 Installing Lifter
7 Gently place the lifter on the desk phone in the predetermined position.
8 Press firmly to adhere.
Handset Lifter
Power Cord
1 Firmly press the handset lifter power cord into the
handset lifter jack.
2 While wearing your headset, slide the handset lifter arm
under the handset until the lifter base touches the side
of the phone.
3 Slide the lifter up to where it nearly touches the handset
5.2 If You Do Not Hear a Dial Tone
1 If you do not hear a dial tone, raise the lifter height
switch to the next highest position.
earpiece.
2 Repeat steps 2 through 5 in Section 5.1 as necessary
4 Press the call control button on your headset to activate
the lifter.
5 If you hear a dial tone the lifter is set correctly and needs
until you hear a dial tone.
3 When you hear a dial tone, secure the lifter as described
in steps 6 though 8.
no adjustment.
6 Remove the protective strips from the 3 mounting tapes
on the underside of the lifter.
Plantronics Savi User Guide
10
5.3 Additional Parts (If Required)
Ringer Microphone
Extender Arm
2
1
3
1
Stabilizers
2
2
Use ringer microphone only when the telephone speaker is not
located directly under the handset.
1 Remove cover from ringer microphone jack on back of
lifter.
2 Connect ringer microphone plug.
Use extender arm when the handset lifter needs additional
stability lifting and returning handset to cradle.
3 Place ringer microphone over phone speaker. Remove
adhesive tape and attach.
1 Slide extender arm onto lifter.
2 Stabilizers can be shifted left and right. Position
stabilizers on outsides of handset to gently grip the phone.
Plantronics Savi User Guide
For Nortel i2004 Phones Only
11
6 PC Set Up
6.1 Installing USB Cable
6.3 Making a Test Call with PC
1 While wearing your headset, press the PC talk button on
the base.
2 Dial the number using your softphone application.
3 Adjust listening and speaking volume over the PC as
follows:
®
For Windows XP SystemsGo to the “Voice” tab of the “Sounds and Audio Devices”
option in your PC control Panel.
• “Voice playback” volume is your receive volume
• “Voice recording” volume is your transmit volume
®
For Windows Vista Systems-
1 Connect the USB cable to the USB port on the back of
the base.
2 Connect the other end of the USB cable to the USB port
of the PC.
6.2 Installing Plantronics Software
1 In the animated setup guide located on the CD, select
Step 6.2 Installing Plantronics Software.
Go to the “Playback” tab for listening volume or
“Recording” tab for speaking volume of the “Sound” option
in your PC control panel.
• “Speakers Level” volume is your receive volume • “Microphone Level” volume is your transmit volume
4 You can fine tune the listening volume on the headset
by pressing the [+] to increase the volume and the [-] to
decrease the volume.
2 Click on the graphic of the CD labeled “Plantronics
Software”.
3 Follow installation instructions shown on screen.
5 To end the test call, press the call control button on
the headset.
Plantronics Savi User Guide
12
7 Using Your Savi Office Wireless
Headset System
Important It is highly recommended that you install the
Plantronics software. Though your Savi Office system will operate
without the software it will limit the system’s full capabilities.
Indicator Light
Powering Up Headset
If the headset battery is charged the headset is automatically on.
The headset does not have an on/off button.
Call Control Button
Placing, Answering, and Ending Calls with Desk Phone
Phones with Handset Lifter or Electronic
Hookswitch
Phones without Handset Lifter or Electronic
Hookswitch
To place a call
1. Short press call control button on headset*
or short press base desk phone talk button
2. Dial number
1. Short press call control button on headset*
or short press base desk phone talk button
2. Remove handset from cradle**
3. Dial number
To answer a call
1. Short press call control button on headset
or short press base desk phone talk button
1. Short press call control button on headset or
short press base desk phone talk button
2. Remove handset from cradle**
To end a call
1. Short press call control button on headset
or short press base desk phone talk button
1. Short press call control button on headset or
short press base desk phone talk button
2. Return handset to cradle**
* Assumes your default line is set to desk phone.
** To place, answer, and end calls with desk phones that have a headset button and without a handset lifter, you will need to
press the headset button on the desk phone instead of removing the handset from the cradle.
Plantronics Savi User Guide
13
Placing, Answering, and Ending Calls with PC
With Plantronics Software*
Without Plantronics Software
To place a call
1. Dial number from the supported
softphone application***
1. Short press call control button on headset** or
short press base PC talk button
2. Dial number from softphone application
To answer a call
1. Short press call control button on headset or
short press base PC talk button
1. Short press call control button on headset** or
short press base PC talk button
2. Answer call using softphone application
To end a call
1. Short press call control button on headset or
short press base PC talk button
1. Short press call control button on headset** or
short press base PC talk button
2. Hang up call using softphone application
*Assumes use of supported softphone
**Assumes your default line is set to PC
*** Automatically bringing up the PC radio link is not supported when placing an outbound call in Microsoft Office Communicator.
Switching Between Desk Phone and
PC Audio
You can switch back and forth between desk phone and PC
audio the following ways:
Headset
Base
Press the volume up button Short press (less than one second)
(at least 1½ seconds) until
the base talk button of the device
the base talk button indicator that you want to switch to.
light of the desired device
becomes solid green.
Plantronics Savi User Guide
Mixing Desk Phone and PC Audio
You can mix desk phone and PC audio the following way:
Base
Simultaneously hold the desk phone and PC talk buttons down
(at least 1½ seconds) until both indicator lights become solid
green.
14
Muting the Headset
You can mute/unmute the headset the following ways:
Headset
Base
Short press the dedicated
mute button to toggle mute
on/off.
Short press (less than one second)
of a red desk phone or PC talk
button on the base will unmute
the headset. You cannot mute the
headset using the desk phone or
PC talk buttons.
Conferencing In Up to Three Additional
Headsets
While on a call you can subscribe up to three additional headsets
to your base for conferencing. As you add headsets to the base
an additional headset icon will appear in the Plantronics software
screen with a number from 1 to 3 indicating the number of
additional headset subscribed to the base.
Guests may conference in as described below:
1 While you are on a call:
Subscribing a Master Headset
a) Place the guest’s headset into primary user’s charge
cradle.
OR
The headset and base are subscribed to each other at the factory.
In the event that you need to subscribe a new master headset
to the base you can do so one of two ways. You can subscribe
a master headset to the base with the headset docked (secure
subscription) or undocked (over-the-air subscription). In either
case, the system must be idle (not on a call).
Headset Docked
Headset Undocked
Double press the subscription
button on the base. The
subscription light will flash red
and green.
Double press the subscription
button on the base. The
subscription light will flash red
and green. Press the volume
up button on the headset for
three seconds until the headset
indicator light turns solid green.
When the subscription light
becomes solid green, the
headset and based are
subscribed to one another.
When the subscription light on
the base becomes solid green,
the headset and base are
subscribed to one another.
b) Place the guest’s headset into over-the-air
subscription mode by pushing the headset volume
up button for three seconds until the indicator light
becomes solid green.
2 Short press (less than one second) the subscription
button on the base.
The subscription light will flash yellow and green.
3 The subscription light will then turn solid yellow and you
will hear a tone in the master headset indicating a guest
wishes to join the call.
4 If you press the call control button on the master
headset within five seconds, the guest is joined to the
call.
If you do not press the call control button within five seconds,
the request to join the call is rejected and the guest will hear an
error tone in their headset.
5 Guests may leave the conference call by pressing their
call control button.
Note If the subscription process times out after two minutes or
if the subscription process fails, the subscription light will become
solid red for four seconds and then return to its previous state. If
this occurs, try to re-subscribe the headset again.
When they do you will hear a single tone in the master headset
as each guest leaves the call.
To see how many headsets are subscribed to the base, refer to
the lower left corner of the Plantronics software screen. The first
headset is the master headset and the number inside the next
headset is the number of guest headsets subscribed to the base.
The examples below show 1, then 2, then 3, guest headsets
subscribed to the base in addition to the master headset.
1
Plantronics Savi User Guide
2
3
15
Setting Default Line to Desk Phone or PC
The Savi Office system ships with the desk phone as the default
outbound line. This means any call initiated from the headset
with the call control button will open desk phone audio. You can
change your default outbound line from the base talk buttons.
While the system is in idle mode, press and hold the PC talk
button or the desk phone talk button for three seconds to
select that device as your default outbound line. The talk button
indicator light will flash green for four seconds confirming the new
setting.
PC Talk Button
Desk Phone
Talk Button
Indicator Light
Indicator Light
Subscription Button Indicator Light
Master headset subscribed to base
Solid green
Base in master subscribing mode
Flashes red and green
Base conferencing in additional guest
headset(s)
Flashes yellow and
green
Active conference call with guest
headsets subscribed to base
Solid yellow
Desk Phone and PC Talk Buttons
Indicator Lights
No active audio link
Off
Incoming call
Flashes green
Active audio link
Solid green
Toggling On/Off Over-the-Air Subscription
Master headset muted
Solid red
The Savi Office system ships with the over-the-air subscription
enabled. You can toggle on or off over-the-air subscription using
the subscription button on the base. With the master headset
undocked and the system idle, press the subscription button for
three seconds. The subscription button will flash green for four
seconds if over-the-air subscription is on and red for four seconds
if off.
Call on-hold
Flashes red
Seeking Audio Link*
Solid yellow
Setting the Range
With the master headset docked and the system idle, press the
subscription button for three seconds. Both the desk phone and
the PC talk buttons will flash green for high range. If you press
the subscription button again for three seconds, the talk buttons
will flash yellow for medium range. If you press the subscription
button again for three seconds, the talk buttons will flash red for
low range.
*When bringing up a link from the base, the talk button will be
solid yellow until a link is established. This could take up to several
seconds especially for wideband audio and/or when in moderate
to high density environments. If you press the talk button when
the indicator light is yellow, it will terminate the search for an audio
link.
Desk Phone and PC Talk Buttons
“Rules to Live By”
Button (Indicator Light) State
If Button Is Pressed
Off
Solid green
Ending Subscription
Flashing green
Solid green
If the base is in subscription mode (secure or over-the-air), and
you want to end the base from searching for a headset, press the
subscription button again. The subscription light will turn solid red
for four seconds and then go to it’s previous state.
Solid green
Off
Solid red
Solid green
Flashing red
Solid green
note If in any state, you hold down both the PC and desk
phone talk buttons for 1½ seconds both indicator lights will turn
solid green and the audio from both devices will be mixed.
Plantronics Savi User Guide
16
Talk Time
Headset Indicator Light
The Savi Office system will provide up to 8 hours of talk time. Talk
time will be reduced when operating in wideband mode and/or if
the headset is used consistently at a far distance from the base.
Headset Status
Headset Indicator Light
Headset charging
Off
Checking Headset Battery Level
Headset fully charged
Off
When the system is idle, short press the Base subscribe button
once to get feedback on the headset battery level.
Headset in-use
Flashes green
Subscribing
Solid green
Headset Battery
Level
Base PC LED
Base Deskphone
LED
75–100%
Solid green
Solid green
50–75%
Flashes green
Flashes green
25–50%
Flashes yellow
Flashes yellow
0–25%
Flashes red
Flashes red
Headset Call Control Button Functions
Type of Press
Function
Short press
Places, answers, or ends calls
Short press volume up
Increases volume
Short press volume down
Decreases volume
While in a link, long press
volume up (at least 1½
seconds)
Switches between desk phone
and PC audio
Short press mute button
Mutes or unmutes headset
While not in a link, long
press volume up (at least 1½
seconds)
Places headset in subscription
mode
Toggling On/Off Headset In-Use Indicator Light
If you are not on a call, you can toggle the headset in-use
indicator light on and off by pressing the headset volume down
button for three seconds.
Headset Tones
Out of Range Warning
If you are on a call and go out of the operating range, you will
hear three low tones. You will hear a single mid tone when you are
back in range.
If you stay out of range, active calls will be suspended. Calls will
be re-established upon walking back into range. If you remain out
of range for more than 5 minutes the system will drop the call.
If you are not on a call and go out of the operating range and
press the call control button, you will hear a single tone for the
button press and three low tones for the failure to make a link.
Low Battery Warning
While not in a link, long press Enables and disables headset
volume down (at least 1½
in-use indicator light
seconds)
Placing the Headset in Sleep Mode
If you are on a call, you will hear a repeating single low tone every
15 seconds indicating the battery is low. You should recharge the
headset immediately.
If you are not on a call and press the call control button, you will
hear three lows tones indicating the battery is low. You should
recharge the headset immediately.
Mute Warning
When mute is activated, you will hear three high tones. These
tones will repeat every 15 seconds while mute is active.
When unmuted you will hear three low tones.
If you won’t be using the headset for a long duration and the
headset will not be in the charge cradle, you can put the headset
in sleep mode by pressing the call control button for three
seconds while in an idle state. To exit sleep mode, press the
headset call control button again for three seconds.
Plantronics Savi User Guide
17
8 Plantronics Software Platform
Softphone Support
Plantronics Update Manager
Download Plantronics software for remote call answer/end with
supported softphones at plantronics.com/software.
All required software for Savi Office system can be remotely
updated when updates are available. Start Plantronics Update
Manager from Windows Start Programs menu to change settings
such as automatic or manual check for updates.
Remote call answer/end from the Savi headset is available for all
softphones with no additional steps by the user except Skype™.
For a list of supported softphones visit plantronics.com/software.
For Skype support, please follow these steps:
1 Skype will display the following message during the install of
Plantronics Unified Runtime Engine “PlantronicsURE.exe wants
to use Skype”. Choose “Allow Access” to connect.
2 You can also check Savi Office system Skype
connection status by going to Skype and checking the
Tools>Options>Advanced>Advanced Settings>”Manage Other
Programs Access” setting.
Plantronics Savi User Guide
Check for Updates Automatically: By enabling this check box,
you will activate a periodic automatic check for available software
updates.
Check for Updates Now: You can choose to check for available
software updates at any time by clicking on the Check For
Updates Now button in Update Manager: From the Start menu,
click Programs, then Plantronics, then open Plantronics Update
Manager.
Install Checked Updates: Following an automatic or manual
check for updates, this field will be populated with any applicable
software updates and the install checked updates will begin
installation.
18
Plantronics Control Panel
User preferences and various device settings can be changed using the Plantronics Control Panel. To start this program, click
Start>Programs>Plantronics then open Plantronics Control Panel.
Battery Life
At the lower left corner of the screen (and for all software screens), you will see one of the following icons indicating the approximate charge
left in the headset battery.
100%
75%
50%
25%
0%
Devices Tab
To configure your settings, select Savi Office from the pull down menu and click the Device Settings button. Below are the setting options
and defaults for the base and headset.
NOTE Some parameters that do not apply to a particular Plantronics device may appear grayed out.
Device Settings – Base
General
Audio
Feature Set Lock
Feature
Settings
Default
Default Line
Deskphone/PC
Deskphone
Range
High/Med/Low
High
Auto Answer
Selected/Not selected
Not selected
Over-the-Air Subscription
Selected/Not selected
Selected
Deskphone Audio Bandwidth
Wideband/Narrowband
Narrowband
PC Audio Bandwidth*
Wideband/Narrowband
Narrowband
Deskphone Tone Control
Variable Bass to Treble
Midrange
PC Tone Control
Variable Bass to Treble
Midrange
(See Device Settings - Security)
*The system will support both narrowband and wideband audio from the PC. Wideband audio delivers heightened speech clarity and lifelike fidelity. However, wideband audio consumes more battery power and has more stringent access criteria which reduces the number of
systems that can be deployed in a small area.
All PCs support wideband audio.
When switching between narrowband and wideband audio, you must re-establish the audio link for the changes to take effect.
Plantronics Savi User Guide
19
Device Settings – Headset
General
Feature
Settings
Default
Mute Tone
Standard/Low/Off
Standard
Deskphone Ringtone
Sound 1/Sound 2/Sound 3
Sound 1
Deskphone Volume
Standard/Low/Off
Standard
PC Ringtone
Sound 1/Sound 2/Sound 3
Sound 2
PC Volume
Standard/Low/Off
Standard
System Tones
Standard/Low/Off
Standard
Second Inbound Call
Ring Continuously/Ring Once/Ignore
Ring Continuously
Feature
Settings
Default
Audio Limiting
80 dB/85 dB/off
Off
Hours on phone per day
2/4/6/8
8
Anti-Startle
Selected/Not selected
Not selected
G616
Selected/Not selected
Not selected
Device Settings – Advanced
Audio Protection
Feature Set Lock
(See Device Settings - Security)
Device Settings – Security
Change Password
The Plantronics software allows some of the device parameters
settings to be locked by the IT staff and prevent end users
from changing them. The ability to lock/unlock these parameter
settings requires the creation of a password. In order to lock/
unlock any parameter setting follow these steps:
1 You can always change the old password to a new one
Feature Set Lock
1 From the Security screen, create and confirm your
new password and press Set. This will store the password
directly in the device.
in the Change Password section. If a password is not
stored in the device, the only way to store a password in the
device is to use Feature Set Lock. You will only able to change
a password if there is a previous password set in the device.
NOTE In case you forget your password, you will need to call
your local Plantronics Technical Support for assistance.
2 In order to lock/unlock some parameter, go to the Base
or the Advanced tabs of Device Settings and enter the
password that you stored in the device.
3 Select your settings from the Base/Advanced settings
page and lock/unlock each feature as desired.
Plantronics Savi User Guide
Applications Tab
The Applications Tab displays the status of Plantronics support for
various applications such as softphones and media players. The
status will only show as “enabled and running” for softphones and
media players installed and running.
20
Preferences Tab
The Preferences Tab allows you to set preferences for the media player as well as other general settings.
Media Player
General
Feature
Settings
Default
Action to Media Player
– When a call begins
– When a call ends
Mute/pause/do nothing
Unmute/play/do nothing
Pause
Play
Launch audio devices control panel
(Provides a shortcut to the Windows Sounds and Audio Devices
control panel.)
Default Softphone
(Displays the default softphone.)
Ring Both Headset and PC
Selected/Not selected
Microsoft Office Communicator Dial-tone Enabled Selected/Not selected
Not selected
Audio Sensing Enabled
Selected/Not selected
Not selected
Maintain Headset to PC Link
Selected/Not selected
Not selected
Ring Both Headset and PC
This parameter gives you the option to have the PC ringtone
played on both the headset as well as the PC speaker.
When this parameter is selected, the PC ringtone will be heard
on both the PC speaker as well as the headset.
When this parameter is not selected, the PC ringtone will only
be heard on either the headset or the PC speaker based on how
the PC audio has been set up.
Microsoft Office Communicator Certified product:
Default Setting = Not selected
Standard product: Default Setting = Selected
Microsoft Office Communicator Dial-tone Enabled
If this feature is selected, when a PC radio link is established,
Microsoft Office Communicator will assume the user is trying to
place a VoIP call and provide a dial tone.
If this feature is not selected, when a PC radio link is established,
Microsoft Office Communicator will sit idle.
“Microsoft Office Communicator Dial-tone Enabled” can be set
selected or not selected.
Microsoft Office Communicator Certified product:
Default Setting = Selected
Standard product: Default Setting = Not selected
Audio Sensing Enabled
Audio Sensing is a special feature supported by Plantronics
wireless devices that can detect an audio signal at the USB port
and automatically establish a PC radio link between the Base
Plantronics Savi User Guide
Selected
and wireless headset without the user having to press the PC call
control button. If the parameter “Microsoft Office Communicator
Dial-tone Enabled” is selected, then every time a PC radio link is
established the Microsoft Office Communicator dial tone will be
heard. However, the user may have pressed the PC call control
button to listen to music, etc., and does not want to hear the dialtone. In this case, if the user selects the “Audio Sensing Enabled”
parameter, the radio link will be established automatically when
any PC audio is detected at the USB port, thus eliminating the
need for the user to press the PC call control button.
“Audio Sensing Enabled” can be set to selected or not selected.
Microsoft Office Communicator Certified product:
Default Setting = Selected
Standard product: Default Setting = Not selected
Maintain Headset to PC Link
This parameter forces the radio link to the PC to stay active
even after the call has ended. This can eliminate the need to
re-establish the radio link when switching between PC audio
applications.
Default Setting = Not selected
About Tab
The About Tab provides on-line access to this printable user guide
and also includes Plantronics contact information. The current
version of software and firmware currently running on your system
is also shown here.
21
Help for Device Settings - Base
Default
Settings
Range*
High
Range can be minimized to help with PC buzzing, improve user density, or restrict range
of users.
When Range is set to HIGH a user will have up to 300 feet of range.
When Range is set to MEDIUM a user will have up to 150 feet of range.
When Range is set to LOW a user will have up to 50 feet of range.
Auto Answer
Auto answer saves the user a button press to establish the radio link between headset and adapter.
When auto answer is set to OFF you must press the headset call control button to answer an incoming
call.**
Not
Selected
When Auto Answer is set to ON an incoming call will be answered when the headset is removed from the
charge cradle.**
PC Audio
Bandwidth*
The system will support both narrowband and wideband audio from the PC.
Narrowband
Wideband audio delivers heightened speech clarity and life-like fidelity. However, wideband audio
consumes more battery power and has more stringent access criteria which reduces the number of
systems that can be deployed in a small area.
All PCs support wideband audio.
When switching between narrowband and wideband audio, you must re-establish the audio link for the
changes to take effect.
* When bringing up a link from the base, the talk button will be solid yellow until a link is established. This could take up to several seconds
especially for wideband audio and/or when in moderate to high density environments. If you press the talk button when the indicator light is
yellow, it will terminate the search for an audio link.
**Assumes use of a lifter or EHS cable with desk phone and/or use of a softphone that is supported by Plantronics software.
Help for Device Settings - Advanced
Anti-Startle
Anti-startle provides advanced hearing protection against sudden loud sounds. When Anti-startle is
set to ON, the system identifies and eliminates sudden loud sounds and rapidly reduces them to a
comfortable level. When Anti-startle is set to OFF, the headset caps sound levels at 118 dBA to protect
your hearing.
Off
G616*
G616 Acoustic Limiting provides additional hearing protection against acoustic shock. When G616
Acoustic Limiting is set to ON, the system provides additional acoustic shock protection. Sound
levels are limited to 102 dBA as recommended in the G616:2006 guideline issued by the Australian
Communications Industry Forum (ACIF). When G616 Audio-Limiting is set to OFF, the headset caps
sound levels at 118 dBA to protect your hearing.
Off
Audio Limiting* Audio Limiting provides advanced hearing protection for daily noise exposure. When Audio-Limiting is
Off
turned ON, the system monitors and controls sound to ensure action levels do not exceed 80 dBA or 85
dBA (whichever is selected) specified by current and imminent EU legislation. When Audio-Limiting is set
to OFF, the headset caps sound levels at 118 dBA to protect your hearing.
*The noise monitoring and G616 limiting features are based on a typical headset and recommended acoustic coupling between the headset
and the ear. Please follow the instructions for optimal wearing position on page 8.
Plantronics Savi User Guide
22
9 Troubleshooting and Common Questions
I can’t hear a dial tone at the
headset.
Make sure your headset is charged.
Make sure your headset is subscribed to base. See Subscribing a Master Headset on page 15.
Press the call control button on your headset.
Make sure the lifter is lifting the handset high enough to operate the hookswitch; set to a higher
setting if necessary.
Adjust the configuration switch on the base until a dial tone is heard.
Fine tune the listening volume with the call control button.
If the volume is still too low, adjust the desk phone listening volume on the base.
I hear static.
Make sure there is at least 12 inches between your base and your computer, and 6 inches
between your base and your telephone. If adjusting the distance doesn’t help, your headset is
going out of range, move closer to the base.
The sound is distorted when
Lower the desk phone speaking volume and/or Desk Phone Listening Volume on the base. For
using my Savi Office system with most telephones, the correct setting is position 3.
my desk phone.
If your desk phone has a volume control, lower until the distortion disappears.
If the distortion is still present, adjust the headset volume control to lower the headset speaker
volume. If the distortion persists, lower the Desk Phone Listening Volume on the base.
Make sure there is 12 inches between your base and your computer, and 6 inches between your
base and your telephone.
I hear echo in the headset when
using my desk phone.
Adjust the Configuration Switch. The most commonly used position is “A”, which is the default
position.
Lower the Desk Phone Listening Volume on the base. For most telephones, the correct setting is
position 3.
If the audio level is too low in this position, adjust the headset volume control to increase the
headset speaker volume.
Lower the Desk Phone Speaking Volume on the base. For most telephones, the correct setting is
position 3.
If your speaking volume is too low for your listener in this position, adjust the position of the
headset to make sure the microphone is as close as possible to your mouth.
People I talk to can hear a buzz
in the background.
Move the base further away from your phone.
Talk time performance is
significantly degraded even
after a full recharge.
Battery is wearing out. Call Plantronics at (800) 544-4660 for factory service information or contact
us at plantronics.com/support.
The handset lifter is installed
but does not lift the handset.
Be sure the handset lifter power cord is firmly pushed into the handset lifter jack on the base.
Plantronics Savi User Guide
Base power supply is plugged into a power strip. Plug the power supply into the wall directly.
23
I can no longer hear any audio
through my PC Speakers.
For Windows XP Systems:
Refer to the “Audio” tab of the “Sounds and Audio Devices” option in your PC Control Panel.
• Under “Sound playback” change the default setting from Savi Office to your PC speakers. Click
“OK” to confirm your change.
For Windows Vista Systems:
Refer to the “Sound” option in your PC Control Panel.
• Under the “Playback” tab change the default setting from “Speakers Savi Office” to your PC
speakers. Click “OK” to confirm your change.
No audio connection to PC.
Plantronics Savi User Guide
Unplug USB and power cables from base. Reconnect power cable first. Wait for power LED
to illuminate, then re-connect USB cable. Quit and then re-start your PC audio or softphone
application.
24
Plantronics, Inc.
345 Encinal Street
Santa Cruz, CA 95060
United States
Tel: 800-544-4660
plantronics.com
For product support contact us at plantronics.com/support.
© 2010 Plantronics, Inc. All rights reserved. Plantronics, the logo design. HL10, Savi, and Sound Innovation
are trademarks or registered trademarks of Plantronics, Inc. Windows is a registered trademark of Microsoft
Corporation. Nortel is a trademark of Nortel Networks. Skype is a registered trademark of Skype Limited. All other
trademarks are property of their respective owners.
Patents: U.S. 7,633,963; D599,331; D582,901; D602,008; D538,785; D505,413; D535,285; China
ZL200830005437.x; ZL200830005446.9; ZL200630123313.2;
ZL200630123314.7; EM 000873823-0004; 000873823-0003; 000543798-0004; 000543798-0005; Taiwan
D127496; D127400; D117515; D117333
84159-01 (06.10)