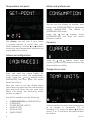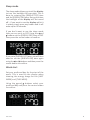
1
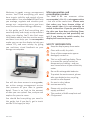
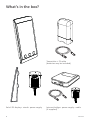
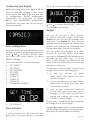
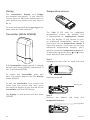
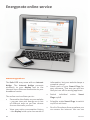
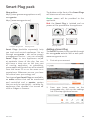
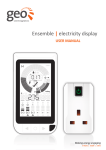
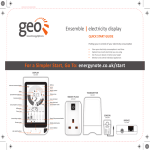
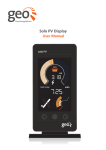
Solo II P1
USER MANUAL
Solo II P1
1
Contents
Welcome
Safety informa on
What’s in the box?
Solo II P1
• Se ng up
• Basic configura on
• Time and date
• Budget
• Tariffs
• Standing charge
• Temperature set-point
• Advanced configura on
• Mode and preferences
• Currency
• Temperature units
• Electricity meter
• Sleep mode
• Week start
Internet bridge
Display overview
Reading your display
• Icons
• Speedometer
• Upper numbers
• Lower numbers
• Budget bar and predic on
• Temperature
• LED indicator
• Changing units
• Viewing your history
• Energy stopwatch
• Pairing
• Transmi er
• Temperature sensors
• Bridge
Energynote online service
Smart Plug pack
FAQs
Technical informa on
Legal informa on
Notes
2
3
3
4
5
10
11
12
18
19
21
22
22
23
Solo II P1
Welcome to geo’s energy management
service. You’ll find everything you need
here to gain visibility and control of your
consump on. Your new Solo II P1 will help
you manage, regulate and visualise your
energy use – suppor ng you as you learn
more and more about energy efficiency.
In this guide you’ll find everything you
need to quickly and simply set up and start
using your display. You’ll also find more
informa on about how the monitor works
and how it can help you. In consump on
mode you can use the display to help you
reduce CO₂ and save money by giving
you real- me, visual feedback on your
energy consump on.
Microgenera on and
consump on modes
The Solo II P1 can measure either
consump on (default) or microgenera on
– but not at the same me. Please note
that when you have chosen either of
these modes then it is not advisable to
switch to the other. If you do, you will lose
the data you have been collec ng (from
whichever mode you had previously set
up). If you choose to switch modes, the
display will reset to day one.
SAFETY INFORMATION
Keep the display away from water
Clean with a so , dry cloth
If any of the components appear
damaged, contact us
This is a self-installing display. There
is no need for you to connect or
disconnect any cabling – and you
won’t need access to your electricity
meter
Do not fit rechargeable ba eries
To protect the environment, please
take your ba eries to a recycling
centre for safe disposal
You will also have access to energynote,
our online energy management service
that presents all your data in greater
detail. There is no limit to the amount
of data you can upload. See, analyse and
explore for years to come.
For use in a dry, indoor
environment only
Please only use the power
supply provided
This product is RoHS compliant and
CE approved
You should find everything you need in
this guide, but if you don’t, get in touch
and we’ll be happy to help.
Solo II P1
3
What’s in the box?
Transmi er + P1 cable
(ba eries may be included)
Solo II P1 display + stand + power supply
4
Internet bridge + power supply + cable
(if supplied)
Solo II P1
Solo II P1
Se ng up
Please note: by choosing [CONSUMPTION]
mode, you will not be collec ng data for
[MICRO-GEN] mode. If you choose to
switch modes you will lose all data you
have collected as the display will reset to
day one.
1.
2.
Connect the P1 cable (supplied) to
the meter. You should hear a “click” to
indicate the cable is fully inserted.
3.
Connect the other end of the P1 cable
to the transmi er.
4.
Connect the power supply (provided)
for the transmi er.
Plug the power supply into
the display. Your display will turn on
automa cally when you plug it into
the mains supply.
Whenever the display is turned on, you
will see the [SET TIME] screen.
This product is designed as ‘permanently
connected equipment’ and should only
be installed by a qualified electrician in
accordance with local regula ons.
Use the and bu ons on the front of
the display to adjust the me and date –
then press the centre bu on when you
have finished.
Solo II P1
5
Configuring your display
Before you start using your Solo II P1 we
need to take you through a few simple
set-up steps. The Solo II P1 has two sets
of configura on: [BASIC] configura on
(informa on you may wish to change
o en) and [ADVANCED] configura on
(informa on you may only set up once or
alter occasionally).
all. If you need to change a se ng use
and to adjust accordingly. Press the
centre bu on to confirm.
Budget
Basic configura on
Press and hold the centre bu on for three
seconds to enter configura on mode then
press
and
to choose [BASIC] mode
and press the centre bu on to select
[BASIC] se ngs.
You will be asked to set the following:
•
•
•
•
•
•
•
•
•
•
[SET TIME]
[SET YEAR]
[SET MONTH]
[SET DAY]
[BUDGET]
[TARIFF 1]
[TARIFF 2]
[TARIFF 3]
[STANDING CHARGE]
[SET-POINT]
Time and date
If you’ve already set the me and date
then
press the centre bu on to confirm
6
You can set yourself a daily, monthly
or annual personal budget which the
display will use to help you manage your
electricity. The display can then tell you
whether you’re on target to be within your
budget, and how you’ve compared over
the past few days, months or annually.
You can enter your budget as a daily,
monthly or annually figure. Whichever
you enter the Solo II P1 will automa cally
calculate for the other two. i.e. if you
enter a daily budget the Solo II P1 will
know what that means for the month and
the annual and so on.
You can get an idea of what to set as your
budget in one of the following ways:
1.
If you pay monthly by direct
debit, enter that figure into your
monthly budget
2.
If you pay quarterly by direct debit,
divide that by three and enter that
into monthly budget.
3.
Look at your recent bills (and the
period they cover) and work out an
average of how much you’ve been
paying each month then enter that
into the monthly budget
If you have a standing charge remember
to include this in your budget.
Use the and bu ons to select whether
you want a daily, monthly or annually budget,
then press the centre bu on to confirm.
Solo II P1
Tariffs
Use the and bu ons to set the second
tariff and then press the centre bu on
to confirm.
Use the and bu ons to set the me the
second tariff switches on and then press
the centre bu on to confirm.
You need to enter the price you pay for
your energy. If you have only one tariff,
then enter the cost per kWh. This can be
found on your electricity bill.
If you have a block tariff you can work
out an average from your recent bills and
enter as one tariff.
What is a block tariff? A block tariff means
that for the first x number of kWh in each
billing period you pay a more expensive
tariff than normal.
and
bu ons to set the
Use the
me the second tariff comes off
and then press the centre bu on
to confirm.
How to calculate it: take the total cost of
electricity for the period (e.g. £120) and
divide it by the amount of kWh you used.
Example:
If you were billed £120 this quarter and
you used 1000kWh, then enter the sum
of £120/1000kWh = £0.12/kWh in the
display se ng [TARIFF 1].
Use the
and
bu ons to set the
tariff and then press the centre bu on
to confirm.
If you have entered a second tariff then
you are prompted to enter a third tariff.
If you don’t have one then simply leave it
as zero.
Standing charge
If you don’t have a second tariff, then
leave [TARIFF 2] cost as zero.
If you do have a second tariff, for example
cheaper electricity overnight, then enter
the cost per kWh for that second tariff. If a
second tariff is entered then you need to
enter the me that tariff starts and ends.
Solo II P1
If you pay your supplier a standing charge
you can enter that amount here.
Use the and bu ons to set the daily
standing charge and press the centre bu on
to confirm.
7
Temperature set-point
Mode and preferences
You can use the display to monitor your
energy use [CONSUMPTION] or generated
energy [MICRO-GEN]. The default is
[CONSUMPTION] mode.
Using the
and
bu ons select
[CONSUMPTION] and press the centre
bu on to confirm.
The display can tell you if your home
is running warmer or cooler than your
ideal temperature. Use the and bu ons
to set your ideal temperature and press the
centre bu on to confirm.
Currency
Advanced configura on
Using the
and
bu ons select your
currency (from £/€/$/kr/kwd) and press the
centre bu on to confirm.
Temperature units
Press and hold the centre bu on for
three seconds to enter the configura on
mode. Using the and bu ons select
[ADVANCED] and then press the centre
bu on to confirm.
Next you need to tell the display about
your electricity meter and the rate at which
your electricity flows. You can read more
about this under the Electricity meter
sec on on page 9.
You will be asked to set the following:
•
•
•
•
•
•
8
[CONSUMPTION] or [MICRO-GEN]
[CURRENCY]
[TEMPERATURE UNITS]
[DISPLAY OFF]
[DISPLAY ON]
[WEEK START]
Select whether you want the temperature
to be shown in cen grade (°C) or
farenheit (°F). Using the and bu ons
select °C or °F and press the centre bu on
to confirm.
Solo II P1
Sleep mode
The sleep mode allows you to tell the display
to turn the backlight off overnight. This is
done by entering the [DISPLAY OFF] me
and the [DISPLAY ON] me. During this me
the backlight of the display will be turned
off – if you want to see the display whilst it
is asleep simply press any bu on and it will
wake up for 60 seconds.
If you don’t want to use the sleep mode
then you can set it to OFF. Using the and
bu ons set the [DISPLAY OFF] me to OFF
then press the centre bu on to confirm.
If you set a [DISPLAY OFF] me, you will then
need to set the [DISPLAY ON] me again
using the and bu ons and then press the
centre bu on to confirm.
Week start
Set your preferred day for the start of the
week. This is used by the display when
showing the energy usage for the [LAST
WEEK] and [THIS WEEK].
and
bu ons select your
Using the
preferred day and press the centre bu on
to confirm.
Solo II P1
9
Internet Bridge (if supplied)
The Solo II P1 may come with a bridge.
The bridge connects wirelessly to your
display and to the internet via an Ethernet
connec on to your broadband router.
This lets you connect your Solo II P1 to
the internet and access our online energy
service, energynote. Here you’ll find live
informa on, data storage and in depth
analysis. You can also monitor your home
and control appliances remotely via your
online account or your mobile phone.
Se ng up
1.
Select the correct set of pins. Insert
and twist clockwise to clip the pins
to the power supply. Plug the power
supply into a mains socket and insert
the other end into the internet bridge.
2.
Using the Ethernet cable provided,
connect the internet bridge to your
broadband router.
3.
You’ll be able to tell if the display is
paired correctly as the cloud icon will
be lit (top le of the display ).
4.
Go to www.energynote.eu to log in
or, if it is your first visit, to set up an
account. The website will take you
through this process step by step.
10
Cloud not lit
If it isn’t lit either your display is out
of range of the bridge or it’s not paired
correctly. Press and at the same me
for a few seconds to enter pairing mode:
the display will show [PAIRING MODE]
for a second then show [MAIN SENSOR].
Press three mes to get to [BRIDGE]. If
the unit is paired it will show [CONN] and
the signal strength will be shown by the
signal strength icon at the top le of the
display. If the unit is not connected go to
the Pairing sec on (page 17) to see how to
pair the bridge.
Cloud lit but flashing
If the cloud icon is flashing it’s because
your display is paired to the bridge but the
bridge is not connected to the internet.
Check that your router is switched on and
that you have an internet connec on.
Solo II P1
Display overview
Cloud
Repeater
Signal strength
Rewards
Speedometer
High background
Ba ery
Message
Upper digits
Energy
Carbon
Unit icons
Text
Currencies
Lower digits
Primary temp.
Heatwave and
snowflake
Energy
Budget bar
Secondary temp.
LED indicator
Right bu on
Le bu on
Centre bu on
Solo II P1
11
Reading your display
Icons
Signal strength
The signal strength icon shows the
quality of the radio connec on to
the transmi er. If
is flashing the
communica on is intermi ent. Try
moving the display and the transmi er
closer together.
Ba ery
The
will flash when the ba eries in the
transmi er are running low. If you lose
power altogether the transmi er will not
be recording any data.
Cloud
When the
icon is on solid without
flashing it means the Solo II P1 is paired to
the bridge and connected to the internet.
icon is flashing it means the
When the
Solo II P1 is paired to the bridge but not
connected to the internet (this maybe
because the bridge is not connected to
the router). For more informa on please
see page 10.
12
Tariff
The money bags light up to tell you which
of your tariffs is currently ac ve and are a
handy reminder for when your electricity
is cos ng you the least.
One tariff: only one money bag will
light up.
Two tariffs (e.g. day and night): two
money bags will light up during the day
(higher rate) and one at night (lower rate).
Three tariffs: three money bags will light
up during the day, two on your middle rate
and one on the lowest.
When the tariff you are on is due to change
in the next 30 minutes the money bag of
that tariff will flash.
Background load indicator
The background load is the sum of
all the appliances in your home that
are permanently on or on standby.
It is calculated by the Solo II P1 and
con nuously monitored and updated
throughout seasonal changes and other
permanent or semi-permanent changes in
the home.
If there is a change to the background
load of more than 30W the background
load indicator will light up to warn you
that you may have le an appliance on
by mistake. For more informa on see the
FAQs sec on.
Solo II P1
Speedometer
Lower numbers
The speedometer gives an up-to-date
graphical view of the amount of electricity
you are consuming or genera ng right
now depending on which mode you have
selected. The speedometer shows power
up to 21kW for consump on mode and
will update every three seconds. For
microgenera on it will depend on your
array size.
Segment index
1‡ to 20
21 to 35
36 to 40
Step per segment (kW)
0.05
0.50
2.50
Number of segments
20
15
5
Upper numbers
This shows how much electricity you
are consuming or genera ng right
now depending on which mode you
have selected. You can view this
in kWh, cost and carbon. You can
change how you display the units by
pressing the centre bu on.
These show how much energy has been
consumed or generated over the me
period you have asked it to show. You can
view this in cost, currency or carbon.
Budget bar and predic on
If you have set yourself a budget, then
the display shows if you are predicted
to be under or over your budget (today,
this week, this month) or were over/
under your budget (yesterday, last week,
last month).
The display predicts whether you will be
within your budget for the period shown.
It predicts this from your consump on
so far, and its es mate of your future
consump on based on how you have
used energy previously. If the display is
predic ng you’ll be in budget then it will
show a ck, if it predicts you will be over
budget then it will show a cross. If neither
is shown then you are exactly on budget.
50% 33%
Solo II P1
±5%
10%
20%
13
Temperature
LED indicator
The LED gives you an at-a-glance overview
of the current level of energy consumed in
your home. Green is low, amber is medium
and red is high.
The Solo II P1 has one built-in sensor
that is displayed on the le . If the
temperature of your home is higher than
the temperature you set on the display,
the display will show the heatwave icon (
). If the temperature is lower, the display
will show the snowflake icon ( ).
You can purchase an addi onal sensor
that you can pair to the second slot on the
right.
Please visit our webstore at:
h p://store.greenenergyop ons.co.uk/
● = low
● = medium
● = high
14
Solo II P1
Changing units
You can change how you display the unit
of genera on by pressing the centre
bu on. You can view usage in kWh, cost
or carbon.
The stopwatch is started and stopped by
pressing the bu on.
Viewing your history
To view previous usage, press the bu on.
The display will cycle through the previous
periods of usage:
•
•
•
•
•
•
•
Today
Yesterday
Day before yesterday (displayed as
the named day of the week)
This week (from the start day to now)
Last week (the previous week, start
day to start day)
This month (calendar month, from
the 1st of the month to now)
Last month (previous calendar month)
A long press of the or bu ons will take
you back to the home screen.
Note that the speedometer and upper
digits always relate to ‘Today’.
Energy stopwatch
•
The stopwatch is reset by pressing
and holding
•
The stopwatch units can be changed
by pressing the centre bu on
•
To leave the stopwatch screen, press
Whilst the stopwatch is running the
icon is shown. You can return to the home
screen or any other screen whilst the
stopwatch is running.
Note:
• The upper por on of the display
con nues to show today’s usage
whilst in stopwatch mode.
•
The maximum dura on for the
stopwatch is 24 hours.
The energy stopwatch mode is entered
by pressing the bu on on any of the
consump on screens.
The energy stopwatch allows you to
measure the energy consump on of a
task, such as running the dishwasher, to
see how much it costs.
On entering the stopwatch mode the
display will briefly show the word
[STOPWATCH] and then show the
current status.
Solo II P1
15
Pairing
The transmi er, display and bridge
are supplied pre-paired. If you need to
re-pair them or add new components to
your system this sec on tells you how to
do so.
Temperature sensors
To enter pairing mode press and at the
same me for a few seconds.
Transmi er [MAIN SENSOR]
The Solo II P1 uses an integrated
temperature sensor. By default, this
is represented as temperature sensor
1 on the display. If you choose to pair
an addi onal temperature sensor you
should pair this to temperature sensor 2
(currently empty). If you wish to use two
addi onal temperature sensors, you’ll
need to overwrite temperature sensor 1.
To enter pairing mode press and at the
same me for a few seconds.
Step 1
Squeeze the two clips on each side and
If the transmi er (main sensor) is already
paired it will show [CONN] (connected). If
not, it will show [NONE].
To unpair the transmi er press and
hold the centre bu on un l the display
shows [NONE].
slide the cover off.
To pair the transmi er, first remove the
cover from the sensor and then press
and hold the bu on on the top le of the
transmi er un l the LED flashes.
The display is now paired and will show
[CONN].
ba ery tab
Step 2
Remove the ba ery
temperature sensor.
tab
from
the
pairing bu on
16
Solo II P1
Step 3
Press the pairing
temperature sensor.
bu on
on
the
Temperature sensor 1
(available separately)
For when you want up to two addi onal
temperature sensors.
The display will show [T1 SENSOR],
and will show [NONE] if it is using its
integrated sensor.
1.
To pair an addi onal sensor, ensure
the display is showing [NONE] and
then press and hold the bu on on the
addi onal temperature sensor un l its
LED flashes. The display will pair and
change to [CONN]
To unpair the addi onal sensor and use
the integrated sensor instead, press and
hold the centre bu on un l the display
shows [NONE].
Bridge
The Solo II P1 connects to the web using
the bridge. To enter pairing mode press
and at the same me for a few seconds.
The display will show [BRIDGE CONN] if it is
already paired with the bridge (bridge must
be powered on).
If the bridge needs pairing the display will
show [BRIDGE NONE].
1.
To unpair the bridge, press and hold
the centre bu on un l the display
shows [NONE]
2.
To pair the bridge, ensure the display
is showing [NONE]. Press and hold the
bu on on the back of the internet
bridge and con nue to hold it whilst
switching the power on at the wall.
Keep the bu on held in for three
seconds, then let go. The display will
show [BRIDGE CONN] to confirm that
it has successfully paired to the bridge.
Temperature Sensor 2
(available separately)
The display will show [T2 SENSOR], and
will show [CONN] if a sensor is paired.
1.
To unpair the addi onal sensor press
and hold the centre bu on un l the
display shows [NONE]
To pair an addi onal sensor, ensure the
display is showing [NONE] and then press
and hold the bu on on the addi onal
Solo II P1
pairing bu on
17
Energynote online service
www.energynote.eu
The Solo II P1 may come with an internet
bridge. The internet bridge connects
wirelessly to your display and to the
internet via an Ethernet connec on to your
broadband router.
The online service allows you to:
•
Personalise the display on your website
– you can view your energy use in lots
of different ways so you can choose
the one that suits you best.
•
View your en re consump on history
– the display holds up to one month of
18
•
informa on, but your website keeps a
complete record.
Name each of your Smart Plugs for
easy reference. That way you are less
likely to turn off the wrong appliance.
•
Switch individual
Plugs on/off.
•
Schedule ac ve Smart Plugs to switch
on/off at set mes.
•
Do all of the above from anywhere you
can access the internet. You can use
ac ve
Smart
Solo II P1
Smart Plug pack
Shop online:
h p://store.greenenergyop ons.co.uk/
The bu on on the front of the Smart Plugs
will show one of two colours:
energynote:
h p://www.energynote.eu/
Green: power will be provided to the
appliance.
Red: the Smart Plug is isolated and no
power will be provided to the appliance.
European plug socket
European plug socket
Smart Plugs (available separately) help
you track and control appliances. Set up
through energynote – our online energy
management service – you can schedule
Smart Plugs to turn appliances on/off
at par cular mes of the day. You can
also keep a close eye on the true cost
of running appliances, as scheduling,
consump on and control can all be viewed
from the home PC or on the move on a
smartphone. Wherever you are, you have
full control over your energy use.
Two types of geo Smart Plugs are available:
an ac ve version that can be monitored
and controlled and a passive version
that can only be monitored – suitable for
appliances that shouldn’t be turned off
such as fridges or freezers.
Solo II P1
UK plug socket
UK plug socket
Adding a Smart Plug
The Solo II P1 system is only possible through
the energynote website with a web pack.
www.energynote.co.uk
1.
First set up an account.
2.
From your home screen on the
energynote site, click on the se ngs
link in the top right hand corner.
19
1.
Scroll down the page to the Smart Plug
Pairing sec on.
2.
Hover your cursor over Add for the
Smart Plug you would like to pair.
3.
Click on the Add Smart Plug link that
becomes available. The system will
now give you five minutes to complete
the next steps.
4.
With the Smart Plug plugged into
a mains socket, press and hold the
bu on on the front for 10 seconds un l
the bu on colour changes to amber.
It will pair with the system a er a few
seconds. Energynote will confirm a
successful pairing.
Renaming a Smart Plug
1.
From your home screen on the
energynote site, click on the se ngs
link in the top right hand corner.
2.
Scroll down the page to the Smart Plug
Pairing sec on.
3.
Hover your cursor over the Smart Plug
you would like to rename.
4.
Click on the label device link that
becomes available and choose
from one of the op ons in the
drop-down list.
5.
Click set to confirm.
European plug socket
UK plug socket
You can now label the Smart Plug choosing
from a drop-down menu.
20
Solo II P1
FAQs
Q. Why is my display not showing
any data?
A. 1. The display is out of range
of the transmi er. Either move
them closer together or move the
display to somewhere with be er
signal strength.
2. If powered by ba eries, the
ba eries could be running low
in the transmi er, please insert
new ba eries.
If you’re s ll having problems, please
refer to the pairing steps on page 16.
Q. Why has my display turned itself off?
A. You have sleep mode enabled.
You
can
change
this
under
configura ons [ADVANCED].
Q. How do I reset my display?
A. Turn off your display by disconnec ng
the power supply and taking out the
cable. Hold down all three bu ons
on the front and re-insert the power
supply. The display will ask [RESET
DATA?]. Select the bu on for no and
the for yes. The display now asks
[RST DEVICE?]. If you select yes all the
paired sensors will disconnect.
Q. Can I export the data from my Solo II P1
into Excel?
A. Yes. First upload your data from your
display onto energynote. You can
then export it as a .csv file into Excel.
From your energynote homepage, go
to Devices and press download (as
shown below).
Q. How can I see the signal strength for
my sensors and the bridge?
A. The signal strength can be viewed on
the pairing screen. Press and at the
same me for a few seconds to enter
pairing mode: the display will show
[PAIRING MODE] for a second then
show [MAIN SENSOR]. Press either
or to cycle through the sensors. If
the unit is paired it will show [CONN]
and the signal strength will be shown
by the signal strength icon at the top
le of the display. This will be flashing
if it is out of range.
Q. Why is the
indicator lit?
background
load
A. The icon lights up when the display
has detected a rise in your baseload
of more than 30W and it’s lasted more
than an hour. This can happen when
you leave an appliance on by mistake
and you have gone out for the day or
gone to bed. Once you’ve turned off
the appliance the icon will disappear
when the baseload returns to normal.
For further technical support please visit
www.greenenergyop ons.co.uk/solo2
Solo II P1
21
Technical informa on
Legal informa on
geo is a registered trademark of Green
Energy Op ons Ltd. Copyright 2014 Green
Energy Op ons Ltd. All rights reserved.
Green Energy Op ons Limited (geo) makes
no representa ons and gives no warran es
of any kind in rela on to the contents of this
document and all warran es, condi ons and
other terms implied by statute or common
law are, to the fullest extent permi ed by
law, hereby excluded.
In par cular, geo assumes no responsibility
for any errors or omissions that may appear
in this document and makes no commitment
to either update or keep current the
informa on contained in this document.
geo retains the right to make changes
to this document (including any
specifica ons contained herein) at any me
without no ce.
No part of this document may be modified,
copied, reproduced, republished, published,
transmi ed or distributed in any form or by
any means without the prior wri en consent
of geo. The contents of this document
are to be used solely for the purpose for
which they are provided by geo and for no
other purpose.
All content, text, graphics and all other
materials contained in this document are
owned by geo (or its licensor’s), and all
proprietary and intellectual property rights
(including copyright, design rights, trade
secrets, trade names, logos and trade
marks) wherever arising in rela on to this
document vest in geo (or its licensor’s) and
all such rights are reserved.
SOL2-A-USG-P1_002
22
Solo II P1
Notes
Solo II P1
23
24
Solo II P1