1
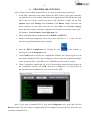
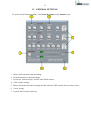
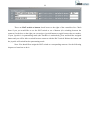
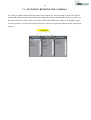
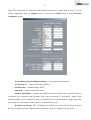
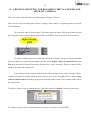
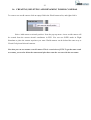
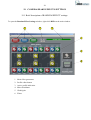
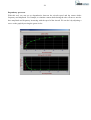
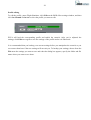
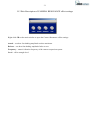
1
EZdok CAMERA ADDON
For Microsoft Flight Simulator X
USER MANUAL
Ver. 1.14
2
CONTENTS
1. Introduction
3
2. Features
4
3. Note for advanced users
5
4. System requirements
6
5. Installation notes
7
6. Preliminary settings
8
7. Interface
9
8. Camera shaking modes
12
9. View modes control
13
10. Addon status indicator
14
11. General settings
15
12. Getting started
18
13. Switching between the cameras
19
14. Assigning keyboard shortcuts and joystick buttons for camera switching.
20
15. Creating, deleting and renaming Virtual Cockpit and Aircraft cameras.
22
16. Creating, deleting and renaming World cameras
23
17. Positioning cameras
24
18. View modes settings
25
19. Camera Shake effects setting
19.1 Brief description of RANDOM EFFECT settings
26
19.2 Brief description of DHM effect settings
30
19.3 Brief description of CAMERA RESONANCE effect settings
31
19. Video examples on youtube.com
32
3
1.
INTRODUCTION
Ezdok Camera Addon (EZCA) greatly enhances view control in Flight Simulator X. It
allows the user to travel within the virtual cockpit of the aircraft, around the aircraft, and around the
Flight Simulator X world. The addon also simulates the visual effects of the pilot’s head movements
caused by vibration, turbulence, aircraft accelerations, and surface roughness when on the ground.
With EZCA you can place internal or external cameras “on-the-fly”, adjust its position,
and turn on or off the appropriate camera shake effects. You can travel around the virtual cockpit
and outside the aircraft using the mouse and keyboard like you do in 3D shooters. With the benefits
of “Point-to-point” and “3D-panoraming” technologies you can make view control in FSX as nearly
as convenient as with advanced hardware view control systems like Track-IR.
We hope developers of scenery addons for FSX will also find EZCA as a valuable tool.
EZCA’s ability of walking around the Flight Simulator world will help them to observe their objects
from any point of view within Flight Simulator, helping them to avoid flaws and mistakes.
EZCA expands the possibilities of Flight Simulator X movie making and will be useful for
addon developers as a tool that can improve the quality of promo videos of their products, as well as
for movie making enthusiasts to get the most realistic effects and viewpoints.
Examples of videos made with EZCA
Video1
Video2
Video3
Video4
EZCA is created by Ezdok Software, and published in partnership with Flight One
Software. Support is provided by Ezdok Software and Flight One Software staff via a customer
support forum. We highly recommend you visit the forum and participate in discussions regarding
EZCA to learn about features, to help offer suggestions, and to help make EZCA even more ground
breaking.
To visit Ezdok Software: http://www.ezdok-software.com
To visit Flight One Software: http://www.flight1.com
For the EZCA discussion forum: http://www.simforums.com/forums
4
2.
FEATURES
With EZCA you can:
•
Travel throughout virtual cockpit or cabin of the aircraft, around the outside of the
aircraft, and around the flight simulator world.
•
Smoothly switch between the cameras (PtP technology). In this mode, the camera
smoothly “floats” from the current position to a new position.
•
Create up to 255 internal, external aircraft, and world cameras for every aircraft.
Edit POV and locations of the camera “on-the-fly” with the mouse and keyboard.
•
Switch between the cameras with joystick buttons or keyboard shortcuts.
•
Enable and disable mouse look mode with the middle mouse button.
•
Use 3D “panoraming” mode.
•
Create and modify your own camera shake effects with the built-in effects editor.
•
Import and export settings to an external files for back-up or sharing with other
EZCA users. You can export camera settings and other settings for every single
effect or module separately.
5
3.
NOTE FOR ADVANCED USERS
Advanced users can create custom camera shake effects. This will require that the user has a
clear comprehension of the EZCA operation principles. The creation of effects will be described in
separate documentation or videos shortly after the initial release of EZCA. Please check the support
forum for more information.
6
4.
SYSTEM REQUIREMENTS
1. Windows XP/Vista/7 32-bit or 64-bit.
2. Microsoft Flight Simulator X with SP1, SP2, or Acceleration Pack installed. The
EZCA will not work on any simulator prior to FSX.
3. Hardware capable to maintain over 10 FPS in Flight Simulator X. For comfortable
flying with camera shake effects on, we recommend that you fine tune the graphics
settings of your Flight Simulator so that it can perform at more than 20 FPS.
4. Mouse with scroll wheel and middle button recommended.
EZCA is incompatible with other software and hardware view control systems in.
simultaneous operation. Using two view control systems can cause erratic behaviors.
However, when disabled, EZCA doesn’t interfere, or if your other view system is disabled, it
should not interfere with EZCA. Some view systems may have a simple toggle mode to allow
for multiple view systems to operate next to each other.
7
5.
INSTALLATION NOTES
If you use WINDOWS VISTA or WINDOWS 7, there are some specifics you may need to
be aware of.
Because FSX by default is in the user-restricted Program Files folder, and camera entries
need to be written to FSX, you need to make sure that User Account Control or other user settings in
Vista or Windows 7 do not prevent the writing of data to the FSX folders. This may mean you need
to turn User Account Control off, and/or right click the EZCA Config tool and select Run as
Administrator. If you installed FSX outside of Program Files, the above may not apply.
8
6.
PRELIMINARY SETTINGS
After you have successfully installed EZCA, you have to make some preparations.
1. In the FSX controllers setup menu disable the HAT-switch of the game controller
you plan to use for view control, otherwise the assignments in FSX will interfere with
EZCA and you will get erratic movement of the direction of sight. On the FSX
Options menu click Settings, then Controls. Click Button / Keys and select the
game controller of your choice from the list. Click Views on the Event category
menu and delete Game controllers assignments from all the items that contain “pan”.
For instance, Look left (pan), Look right (pan), etc.
2. Delete keyboard shortcut assignments A, S, SHIFT-A, SHIFT-S.
3. Remove keyboard assignments from arrow keys and keys 0, 1, 2, and 3 on the
numeric keypad following the same principle.
4. Start the EZCA Configurator by clicking its icon
on the desktop or
choosing it from the Programs menu.
5. Click START and wait while the Configurator modifies the aircraft.cfg files of all
the models installed in FSX. The Configurator doesn’t make any significant changes
to the aircraft.cfg files, it just adds a new “EZDOK universal camera” section.
6. When Configurator finishes his job, a list of successfully patched aircraft appears in
the Configurator window. Click OK, then close Configurator. You will need to do
this operation after installation of every new aircraft to FSX.
Note: If you want to uninstall EZCA, first start Configurator once again and click the
Restore button. This will restore everything that EZCA changed in aircraft.cfg files. After that you
can safely uninstall EZCA.
9
7.
INTERFACE
Important: The EZCA is available in the FSX Addons menu. You MUST BE IN WINDOWED
mode or else you will not see the interface. Windowed mode also allows for rapid testing of your
settings.
1. Virtual cockpit cameras list.
2. External aircraft cameras list.
3. World cameras list.
4. Joystick button assigned for switching to selected camera.
5. Keyboard shortcut assigned for switching to selected camera.
6. Aircraft type (L – light, M – medium, H – heavy) indication.
7. Effects selection buttons.
10
8. Indicates that EZCA is enabled.
9. Indicates that connection with FSX is established.
10. Selected aircraft name.
11. View mode selection buttons.
Cameras lists
These lists display custom cameras created by the user with EZCA. Cameras created with other
addons are not listed and cannot be managed by EZCA. There are three types of cameras:
Virtual cockpit camera
Cameras related to the virtual cockpit of the aircraft.
Aircraft camera
Cameras related to aircraft external model. They are attached to the aircraft and follow it in
flight. Some aircraft’s external models have a very detailed visual cabin model. You can
place external cameras inside the cabin and get a picture that cannot usually be set up with
FSX's own Virtual Cockpit camera. For example, if the external model has a pilot inside the
virtual cockpit, you can create an Aircraft camera, place it inside the cockpit, and get a view
from within the cockpit that shows the pilot up close.
World camera
Cameras bound to scenery and not to the aircraft. With these cameras you can observe the
flight of the aircraft from the ground or from any other point of view, or just walk around.
World cameras can be used to create floating camera effects or to walk around the FSX
world.
Keyboard shortcuts
You can assign keyboard shortcuts or joystick buttons for switching between cameras. By default
there are no assignments. You have to set up them yourself.
11
Aircraft type
Visual effects of turbulence and vibrations in EZCA depend on the weight of the aircraft. All the
aircrafts are divided onto three types. The type of the aircraft is displayed in the “Type” window of
the EZCA main window:
L (Light) - less than 4000 Kg.
M (Medium) – 4000 to 50.000 Kg.
H (Heavy) – over 50.000 Kg.
Aircraft name
The Aircraft Name displays the name of the aircraft as it’s specified in the aircraft.cfg file. EZCA
uses it to form individual lists of cameras for every aircraft. So if the aircraft.cfg lacks the aircraft
name, EZCA will not be able to form a list for it. This case is actually very rare, but if you
experience this problem you can manually add it by opening the aircraft.cfg file with any text editor
and add it in a value... e.g. ATC_ID=”aircraft name”
12
8.
CAMERA SHAKING MODES
Effects selection buttons.
Clicking these buttons can turn on and off different components of the Camera Shaking effects.
EZCA saves the state of the buttons for every camera when making the selection.
RND (Random)
Visual effect simulating the roughness of the surface when the plane is on the ground, and slight
general turbulence effect that occur whenever the aircraft is airborne. This is a visual only effect that
doesn’t take into account the current weather settings of the FSX. This effect depends on the weight
of the aircraft and the type of the surface.
DHM (Dynamic head movements)
Simulates the movement of the pilot’s head caused by aircraft accelerations during maneuvers,
touchdowns, or because of turbulence. Contrary to RND, this effect depends on weather settings.
This effect is designed to be used with Virtual Cockpit cameras only.
CR (Camera Resonance)
This effect is similar to Dynamic Head Movement, and simulates the shaking of the camera attached
to aircraft parts at touchdown.
13
9.
VIEW MODES CONTROL
There are five buttons that enable or disable different camera modes. EZCA saves the state
of the buttons for every camera independently.
PTP (Point-to-Point)
This mode enables or disables smooth switching between the cameras. In this mode camera
smoothly floats from the current position to a new one. This effect is only possible if PtP mode is
enabled for both cameras: the currently active camera, and the camera you want to switch to. If at
least one of the pair has this mode disabled, switching to the camera will occur instantly without the
smooth effect.
360º view
This mode enables unlimited camera rotation around the vertical axis (heading). If it’s disabled you
will not be able to rotate the camera more than 180º.
POV (Point Of View)
This mode allows you to move the camera with the arrow buttons on the keyboard maintaining
constant angular positions of the direction of sight. This mode can also be temporarily enabled by
pressing and holding middle mouse button.
ML (Mouse Look)
This mode allows the user to look round with the mouse. This mode can also be temporarily enabled
by pressing and holding middle mouse button.
Z (Zoom)
Enables camera zoom control with the mouse wheel.
14
10. ADDON STATUS INDICATOR
Indicates
if EZCA is enabled. You can enable and disable EZCA by pressing 3 on
numeric keypad or clicking Global Disable in the Ezdok section of the Addons menu of FSX.
Disabled, EZCA doesn’t interfere with other view control systems and doesn’t consume CPU
resources.
15
11. GENERAL SETTINGS
To open General Settings window, click General settings on the Options menu.
1. Mouse look sensitivity and smoothing
2. Keyboard sensitivity and smoothing
3. Presets for Virtual cockpit, Aircraft, and World cameras
4. Click volume settings
5. Mouse and keyboard control settings (disable when the FSX window does not have focus)
6. Cursor setting
7. Joystick HAT-switch sensitivity
16
Keyboard sensitivity and smoothing
You can set camera motion speed by rotating the SPEED knob. Smoothing is adjusted with the
SMOOTH knob. Increasing this parameter adds more inertia to the camera. It can be used to
simulate a camera crane, or for floating camera effects (look at Presets).
Accelarat.1
This knob sets the camera speed increment value in Acceleration mode. You can use this mode to
increase the speed of the camera for a short time. It is enabled while you hold the ACC1 button.
World cameras have two acceleration buttons; ACC1 and ACC2, with different speed increment
value settings. ACC2 can be used for faster moving the camera over long distances.
Mouse look sensitivity and smoothing
This principle is the same as for Keyboard sensitivity and smoothing settings above.
Switching Camera confirmation sound
When enabled this will generate a beep sound each time you press the middle mouse button or
switch between the cameras. You can adjust the volume of the sound by rotating the knob, or you
can simply turn off the sound by moving the slider all the way to the left.
17
12. GETTING STARTED
1. Start FSX. The addon is active right after the FSX is started, but its window is minimized. Switch
FSX to windowed mode (you can do this by pressing ALT + ENTER).
2. Open the main addon window by clicking the menu item Addons-> EZdok camera addon ->
Show studio:
The EZCA main window will pop up. You can also do it with the keyboard shortcut (SHIFT-D).
The main EZCA window looks as follows:
3. Select Joystick Configuration from the Options menu. Select the joystick controllers you would
like to use with EZCA.
18
There are HAT-switch as button check boxes to the right of the controllers list. Check
them if you you would like to use the HAT switch as set of buttons (for switching between the
cameras). In the box on the right you can assign a joystick button to toggle between the two modes.
If your joystick is in panoraming mode (the checkbox is unchecked), press and hold the assigned
button and you will be able to switch between cameras with the HAT-switch. Release the button and
the joystick will switch back to panoraming mode.
Note: You should first assign the HAT switch to corresponding cameras. See the following
chapters to learn how to do it.
19
13. SWITCHING BETWEEN THE CAMERAS.
To switch to another camera click the name of the camera you want to switch to on the list. If both
current and selected cameras have PtP mode enabled the camera will smoothly float to a position of
the selected camera. If any of the cameras have PtP mode disabled, the camera will instantly appear
in a new position. You can also switch between the cameras with joystick buttons and/or a keyboard
shortcut.
20
14. ASSIGNING KEYBOARD SHORTCUTS AND JOYSTICK BUTTONS
FOR CAMERA SWITCHING.
Click the name of the camera you want to set an assignment to. If you want to assign a keyboard
shortcut click “Keyb” box on the main window and enter the keyboard shortcut you want to assign
to this camera.
To assign joystick buttons, follow the same principle with the “Joystick” entry field. Note, that if
you want to assign a HAT-switch, you should first switch your joystick to HAT-switch as button
mode as described in chapter 12.
21
Some EZCA functions are controlled with keyboard shortcuts or joystick buttons only. To set or
change assignments click the Options menu and then select Define keys to open Keyboard
assignment window.
Forward/Backward/Left/Right/Up/Down - camera movement directions.
Acceleraton1, 2 – camera acceleration buttons
Global enable – enables/disables EZCA
Edit mode – toggles camera Edit mode
Emulate MM button – emulates the middle mouse button with either a joystick button or
a keyboard key to switch on and off Mouse look. It has two modes: H - hold and T - toggle. Hold
means that Mouse Look is enabled as long as you hold the key or joystick button. Toggle means that
you shortly press the button to either enable, or disable Mouse Look.
Default View System – EZCA substitute for default view system. Do not forget to delete
the same assignments in the Flight Simulator controllers setup. See chapter 6 for the details.
22
15. CREATING, DELETING, AND RENAMING VIRTUAL COCKPIT AND
AIRCRAFT CAMERAS.
Note: You create cameras before positioning them in chapter 16 below.
There are two ways of creating new cameras: creating “from scratch”, or importing from an external
file and cloning.
To create new camera “from scratch”, click three times an empty field on the camera list and
enter the name of the camera with the keyboard. Press ENTER. Your new camera is now created.
To import a camera from an external file (which, for example, was previously downloaded
from the Internet, or exported from another aircraft), select Import camera to current list from the
File menu and select External File (camera files have the “.cam” extension). The new camera will be
added to the end of the cameras list.
If you want to create a camera with the same effects settings as one of the existing cameras,
you have an option of cloning. Select the camera you want to clone, and right-click it. Choose Clone
camera with the effects from the pop-up menu, and the cloned camera will be added to the end of
the cameras list.
To delete a camera, select it with the mouse, right-click, and select Delete from the pop-up menu.
To rename a camera, click its name three times and enter new name. Press ENTER.
23
16. CREATING, DELETING AND RENAMING WORLD CAMERAS
To create a new world camera click an empty field in the World cameras list, and right-click it.
Select “Add camera at aircraft position“ from the pop-up menu. A new world camera will
be created from the current aircraft coordinates in FSX. You can use SLEW mode in Flight
Simulator to place the camera anywhere you want. World cameras can be deleted the same way as
Virtual Cockpit and Aircraft cameras.
Note that you can not rename a world camera. This is a restriction of FSX. To get the same result
as rename, you need to delete the camera and after that create the new one with the new name.
24
17. POSITIONING CAMERAS
Positioning Virtual Cockpit and Aircraft cameras.
To change the position of the camera, switch to this camera and toggle EDIT mode (press button 2
on the numeric keypad by default). You will hear beeps indicating that EZCA is in EDIT mode.
Adjust the camera position by using the arrow keys, and set camera elevation with the Page Up and
Page Down keys (the name will vary based on your keyboard). Then set the view direction with the
mouse, adjusting the camera zoom with the mouse wheel. You then leave EDIT mode by pressing
button 2 again on numeric keypad. The stop of the beep sound will indicate that EDIT mode is off.
Positioning World cameras.
You can adjust world camera positions the same way. But this new position can not be saved and
exists only during the current flight simulator session. After restart of FSX world cameras will revert
back to their default positions. Properties of the world cameras can only be changed manually by
editing the FSX cameras.cfg file. We hope this issue will be addressed in the next versions of
EZCA.
25
18. VIEW MODES SETTINGS
PtP movement speed
You can adjust the camera movement speed in PtP mode. Right-click PtP on the main window to
open the PtP settings window and adjust Transition time by rotating the knob. Transition time is a
duration of the time interval in seconds of camera movement from the current position to a new one.
The less its value the faster camera moves.
3D panoraming mode settings
3D panoraming mode combines camera rotation with linear shift. For example: you rotate the
camera to the left and while rotating, the camera moves closer to the left window. To open 3D
panoraming settings, right-click ML on the main window.
There are two knobs that set camera shifts along the axes X and Y. The Value of the shift can be
positive and negative. If positive, the camera moves towards the rotation direction, and if negative,
the camera moves away.
26
19. CAMERA SHAKE EFFECTS SETTINGS
19.1 Brief description of RANDOM EFFECT settings.
To open the Random Effect Settings window, right-click RND on the main window.
1. Main effect generators
2. Profile editor button
3. Active profile indication
4. Mixer-distributor
5. Global gain
6. Filters
27
Main effect generators
This generator synthesizes composite waveforms. Click the generator’s icon to open its settings
window. With three independent generators A, B, C you can create different effects like shaking
hands while holding the camera, explosions, and crash landings. Please check the support forum for
more discussion regarding effect generators.
Profile editor button
The RND effect has two independent profiles – On Ground and On air. When the aircraft is on the
ground, EZCA uses the On Ground profile to create camera shake caused by surface roughness.
When the aircraft becomes airborne, EZCA loads the On Air profile that simulates the visual effects
created by turbulence. Click the Profile edit button to modify profile settings.
Active profile indication
Indicates the selected profile you are editing.
Mixer-distributor mixes signals of the A, B, C generators and distributes them to all degrees and
locations of the camera: deltaX, deltaY, deltaZ, heading, bank, pitch. This gives you full freedom
with your camera views. Since you can set the individual mix of signals for every degree of
freedom, it makes it possible to create a large variety of effects in EZCA.
Global Gain
Sets global effect strength.
Again, please visit the support forum for more discussion regarding these advanced features.
28
Dependency processor
With this tool you can set up dependencies between the aircraft speed and the camera shake
frequency and amplitude. For example, to simulate camera shake during the take off run we need to
have amplitude and frequency increasing with the speed of the aircraft. We can do it by adjusting a
curve on the graph by moving the green circles.
29
Profile editing
To edit the profile, pause Flight Simulator, click Edit on the RND effect settings window, and then
click On Ground or On Air to select the profile you want to edit.
EZCA will load the corresponding profile and enable the controls. After you’ve adjusted the
settings, click Edit once again to save the settings of the profile and to exit Edit mode.
It is recommended that you backup your current settings before you manipulate the controls so you
can restore them later if the new settings will not suit you. To backup your settings, choose from the
File menu the settings you want to save and when the dialog box appears, specify the folder and file
name where you want to save them.
30
19.2 Brief description of DHM effect settings
Right-click DHM on the main window to open Dynamic Head Movements effects settings.
1, 2, and 3 - Axes input mixers for head movement calculations
4. Global effect strength (Main Level)
5. Landing effect settings
6. Pilot’s body parameters.
Note. All the settings, except the Main Level, are the same for all virtual cockpit cameras of the
aircraft. Main Level can be set independently for every camera. All the settings are automatically
saved to the database after changing. So it is recommended to backup your current settings before
you experiment with them.
31
19.3 Brief description of CAMERA RESONANCE effect settings
Right-click CR on the main window to open the Camera Resonance effect settings.
Attack – sets how fast shaking amplitude reaches maximum.
Release – sets how fast shaking amplitude fades to zero.
Frequency – natural-vibration frequency of the camera suspension system.
Level – effect strength level.
32
20. VIDEO EXAMPLES ON YOUTUBE.COM
VIDEO 1 – EZCA general presentation.
VIDEO 2 – EZCA general presentation.
VIDEO 3 – “Before and after”. Compare the flight with and without EZCA.
VIDEO 4 – RND effect example.
VIDEO 5 – DHM effect example.
VIDEO 6 – CR effect example.
VIDEO 7 – Combination of RND,DHM and CR effects.
VIDEO 8 – Demo flight in severe turbulence.
VIDEO 9 – Hard touchdown.
VIDEO 10 – 3D-panoraming.
VIDEO 11 – Traveling over virtual cockpit with EZCA.
VIDEO 12 – Another views with EZCA .
VIDEO 13 - Hard landing.
Promo video examples created with EZCA.
VIDEO 14 – Example 1.
VIDEO 15 – Example 2.
VIDEO 16 – Example 3.
VIDEO 17 – Example 4.