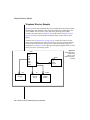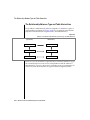
1
IBM Informix Guide to Database Design and Implementation Informix Extended Parallel Server, Version 8.3 Informix Dynamic Server, Version 9.3 August 2001 Part No. 000-8336 © Copyright International Business Machines Corporation 2001. All rights reserved. Trademarks AIX; DB2; DB2 Universal Database; Distributed Relational Database Architecture; NUMA-Q; OS/2, OS/390, and OS/400; IBM Informix; C-ISAM; Foundation.2000TM; IBM Informix 4GL; IBM Informix DataBlade Module; Client SDKTM; CloudscapeTM; CloudsyncTM; IBM Informix Connect; IBM Informix Driver for JDBC; Dynamic ConnectTM; IBM Informix Dynamic Scalable ArchitectureTM (DSA); IBM Informix Dynamic ServerTM; IBM Informix Enterprise Gateway Manager (Enterprise Gateway Manager); IBM Informix Extended Parallel ServerTM; i. Financial ServicesTM; J/FoundationTM; MaxConnectTM; Object TranslatorTM; Red Brick Decision ServerTM; IBM Informix SE; IBM Informix SQL; InformiXMLTM; RedBack; SystemBuilderTM; U2TM; UniData; UniVerse; wintegrate are trademarks or registered trademarks of International Business Machines Corporation. Java and all Java-based trademarks and logos are trademarks or registered trademarks of Sun Microsystems, Inc. in the United States and other countries. Windows, Windows NT, and Excel are either registered trademarks or trademarks of Microsoft Corporation in the United States and/or other countries. UNIX is a registered trademark in the United States and other countries licensed exclusively through X/Open Company Limited. Other company, product, and service names used in this publication may be trademarks or service marks of others. Documentation Team: Diane Kirsten-Martin, Jennifer Leland, Cynthia Newton, Judith Sherwood ii IBM Informix Guide to Database Design and Implementation Table of Contents Table of Contents Introduction In This Introduction . . . . . . . . About This Manual . . . . . . . . . Types of Users . . . . . . . . . Software Dependencies . . . . . . Assumptions About Your Locale. . . Demonstration Database . . . . . New Features in Dynamic Server, Version 9.3 Documentation Conventions . . . . . Typographical Conventions . . . . Icon Conventions . . . . . . . . Sample-Code Conventions . . . . . Additional Documentation . . . . . . Related Reading . . . . . . . . . . Compliance with Industry Standards . . Informix Welcomes Your Comments . . . . . . . . . . . . . . . . . . . . . . . . . . . . . . . . . . . . . . . . . . . . . . . . . . . . . . . . . . . . . . . . . . . . . . . . . . . . . . . . . . . . . . . . . . . . . . . . . . . . . . . . . . . . . . . . . . . . . . . . . . Section I Basics of Database Design and Implementation Chapter 1 Planning a Database In This Chapter . . . . . . . . . . . . . . . . . Choosing a Data Model for Your Database . . . . . . . . Using ANSI-Compliant Databases . . . . . . . . . . Differences Between ANSI-Compliant and Non-ANSI-Compliant Databases . . . . . . Determining if an Existing Database Is ANSI Compliant . Using a Customized Language Environment for Your Database . . . . . . . . . . . . . . . . . . 3 3 3 4 4 5 6 6 6 7 8 9 12 12 12 . . . 1-3 1-3 1-4 . . 1-5 . . 1-9 . . 1-10 Chapter 2 Building a Relational Data Model In This Chapter . . . . . . . . . . . . . . Building a Data Model . . . . . . . . . . . Overview of the Entity-Relationship Data Model . . Identifying and Defining Principal Data Objects . . Discovering Entities . . . . . . . . . . . Defining the Relationships . . . . . . . . Identifying Attributes . . . . . . . . . . Diagramming Data Objects . . . . . . . . . . Reading E-R Diagrams . . . . . . . . . . Telephone Directory Example . . . . . . . Translating E-R Data Objects into Relational Constructs Defining Tables, Rows, and Columns . . . . . Determining Keys for Tables . . . . . . . . Resolving Relationships . . . . . . . . . . . Resolving m:n Relationships . . . . . . . . Resolving Other Special Relationships . . . . Normalizing a Data Model . . . . . . . . . . First Normal Form . . . . . . . . . . . Second Normal Form . . . . . . . . . . Third Normal Form . . . . . . . . . . . Summary of Normalization Rules . . . . . . Chapter 3 iv . . . . . . . . . . . . . . . . . . . . . . . . . . . . . . . . . . . . . . . . . . . . . . . . . . . . . . . . . . . . . . . . . . . . . . . . . . . . . . . . . . . . . . . . . . . . . . . . . . . . . . . . . 2-3 2-3 2-4 2-5 2-5 2-9 2-17 2-20 2-21 2-22 2-23 2-24 2-26 2-30 2-30 2-31 2-32 2-33 2-35 2-35 2-36 In This Chapter . . . . . . . . . . . . . . . . . . . Defining the Domains . . . . . . . . . . . . . . . . Data Types . . . . . . . . . . . . . . . . . . . . Choosing a Data Type . . . . . . . . . . . . . . . Numeric Types . . . . . . . . . . . . . . . . . Chronological Data Types . . . . . . . . . . . . . . BOOLEAN Data Type . . . . . . . . . . . . . . . Character Data Types . . . . . . . . . . . . . . . Null Values . . . . . . . . . . . . . . . . . . . Default Values . . . . . . . . . . . . . . . . . . . Check Constraints . . . . . . . . . . . . . . . . . . Referential Constraints . . . . . . . . . . . . . . . . 3-3 3-3 3-4 3-4 3-7 3-13 3-17 3-18 3-24 3-25 3-25 3-26 Choosing Data Types IBM Informix Guide to Database Design and Implementation Chapter 4 Implementing a Relational Data Model In This Chapter . . . . . . . . . . . . Creating the Database . . . . . . . . . . Using CREATE DATABASE . . . . . . Using CREATE TABLE . . . . . . . . Using CREATE INDEX . . . . . . . . Using Synonyms with Table Names . . . . Using Synonym Chains . . . . . . . . Using Command Scripts. . . . . . . . Populating the Database . . . . . . . . . Moving Data from Other Informix Databases Loading Source Data into a Table. . . . . Performing Bulk-Load Operations . . . . Section II Managing Databases Chapter 5 Table Fragmentation Strategies . . . . . . . . . . . . . . . . . . . . . . . . . . . . . . . . . . . . . . . . . . . . . . . . In This Chapter . . . . . . . . . . . . . . . . What Is Fragmentation? . . . . . . . . . . . . . Why Use Fragmentation? . . . . . . . . . . . Whose Responsibility Is Fragmentation? . . . . . . Enhanced Fragmentation for Extended Parallel Server . Fragmentation and Logging . . . . . . . . . . Distribution Schemes for Table Fragmentation . . . . . Expression-Based Distribution Scheme. . . . . . . Round-Robin Distribution Scheme . . . . . . . . Range Distribution Scheme. . . . . . . . . . . System-Defined Hash Distribution Scheme . . . . . Hybrid Distribution Scheme . . . . . . . . . . Creating a Fragmented Table . . . . . . . . . . . Creating a New Fragmented Table . . . . . . . . Creating a Fragmented Table from Nonfragmented Tables Rowids in a Fragmented Table . . . . . . . . . Fragmenting Smart Large Objects . . . . . . . . . . . . . . . . . . . . . . . . . . . . . . . . 4-3 4-3 4-4 4-6 4-10 4-11 4-13 4-14 4-15 4-17 4-17 4-18 . . . . . . . . . . . . . . . . . . . . . . . . . . . . . . . . . . 5-3 5-3 5-4 5-5 5-5 5-6 5-6 5-7 5-9 5-10 5-11 5-12 5-12 5-13 5-14 5-16 5-17 Table of Contents v Modifying Fragmentation Strategies . . . . . . . . Reinitializing a Fragmentation Strategy . . . . . . Modifying Fragmentation Strategies for Dynamic Server Modifying Fragmentation Strategies for XPS . . . . Granting and Revoking Privileges from Fragments . . . Chapter 6 . . . . . . . . . . 5-17 5-18 5-19 5-21 5-24 . . . . . . . . . . . . . . . . . . . . . . . . . . . . . . . . . . . . . . . . . . . . . . . . . . . . . . . . . . . . . . . . . . . . . . . . 6-3 6-3 6-4 6-5 6-6 6-8 6-8 6-12 6-14 6-15 6-16 6-17 6-21 6-22 6-23 6-23 6-24 6-25 6-26 6-29 6-31 6-34 6-34 6-35 Granting and Limiting Access to Your Database In This Chapter . . . . . . . . . . . Using SQL to Restrict Access to Data . . . Controlling Access to Databases . . . . . Granting Privileges . . . . . . . . . Database-Level Privileges . . . . . . Ownership Rights . . . . . . . . Table-Level Privileges . . . . . . . Column-Level Privileges . . . . . . Type-Level Privileges . . . . . . . Routine-Level Privileges . . . . . . Language-Level Privileges . . . . . Automating Privileges . . . . . . . Using SPL Routines to Control Access to Data Restricting Data Reads . . . . . . . Restricting Changes to Data . . . . . Monitoring Changes to Data . . . . . Restricting Object Creation . . . . . Using Views . . . . . . . . . . . . Creating Views . . . . . . . . . Restrictions on Views . . . . . . . Modifying with a View. . . . . . . Privileges and Views . . . . . . . . . Privileges When Creating a View . . . Privileges When Using a View . . . . vi . . . . . IBM Informix Guide to Database Design and Implementation . . . . . . . . . . . . . . . . . . . . . . . . . . . . . . . . . . . . . . . . . . . . . . . . . . . . . . . . . . . . . . . . . . . . . . . . . . . . . . . . . . . . . . . . . . . . . . . . . . . . . . . . . . . . . . . . . . . . . . . . Section III Object-Relational Databases Chapter 7 Creating and Using Extended Data Types in Dynamic Server In This Chapter . . . . . . . . . Informix Data Types . . . . . . . Fundamental or Atomic Data Types . Predefined Data Types . . . . . Extended Data Types . . . . . . Smart Large Objects . . . . . . . . BLOB Data Type . . . . . . . CLOB Data type . . . . . . . Using Smart Large Objects . . . . Copying Smart Large Objects . . . Complex Data Types . . . . . . . Collection Data Types . . . . . Named Row Types . . . . . . Unnamed Row Types . . . . . . Chapter 8 . . . . . . . . . . . . . . . . . . . . . . . . . . . . . . . . . . . . . . . . . . . . . . . . . . . . . . . . . . . . . . . . . . . . . . . . . . . . . . . . . . . . . . . . . . . . . . . . . . . . . . . . . . . . . . . . . . . . . . . . . . . . . . 7-3 7-4 7-5 7-5 7-7 7-10 7-10 7-10 7-12 7-13 7-14 7-15 7-21 7-30 Understanding Type and Table Inheritance in Dynamic Server In This Chapter . . . . . . . . . . . . . . . What Is Inheritance? . . . . . . . . . . . . . Type Inheritance . . . . . . . . . . . . . . . Defining a Type Hierarchy . . . . . . . . . . Overloading Routines for Types in a Type Hierarchy . Inheritance and Type Substitutability . . . . . . Dropping Named Row Types from a Type Hierarchy . Table Inheritance . . . . . . . . . . . . . . . The Relationship Between Type and Table Hierarchies Defining a Table Hierarchy . . . . . . . . . . Inheritance of Table Behavior in a Table Hierarchy. . Modifying Table Behavior in a Table Hierarchy . . . SERIAL Types in a Table Hierarchy . . . . . . . Adding a New Table to a Table Hierarchy. . . . . Dropping a Table in a Table Hierarchy . . . . . . Altering the Structure of a Table in a Table Hierarchy . Querying Tables in a Table Hierarchy . . . . . . Creating a View on a Table in a Table Hierarchy . . . . . . . . . . . . . . . . . . . . . . . . . . . . . . . . . . . . . . . . . . . . . . . . . . . . . . . . 8-3 8-3 8-4 8-4 8-8 8-9 8-10 8-11 8-12 8-14 8-15 8-17 8-19 8-20 8-22 8-22 8-23 8-23 Table of Contents vii Chapter 9 Creating and Using User-Defined Casts in Dynamic Server In This Chapter . . . . . . . . . . . . . . . . What Is a Cast? . . . . . . . . . . . . . . . . Creating User-Defined Casts . . . . . . . . . . Invoking Casts . . . . . . . . . . . . . . Restrictions on User-Defined Casts . . . . . . . Casting Row Types . . . . . . . . . . . . . . Casting Between Named and Unnamed Row Types . . Casting Between Unnamed Row Types . . . . . . Casting Between Named Row Types . . . . . . . Using Explicit Casts on Fields . . . . . . . . . Casting Individual Fields of a Row Type. . . . . . Casting Collection Data Types . . . . . . . . . . . Restrictions on Collection-Type Conversions . . . . Collections with Different Element Types . . . . . Converting Relational Data to a MULTISET Collection . Casting Distinct Data Types . . . . . . . . . . . Using Explicit Casts with Distinct Types . . . . . . Casting Between a Distinct Type and Its Source Type . Adding and Dropping Casts on a Distinct Type . . . Casting to Smart Large Objects . . . . . . . . . . Creating Cast Functions for User-Defined Casts . . . . An Example of Casting Between Named Row Types . An Example of Casting Between Distinct Data Types . Multilevel Casting . . . . . . . . . . . . . . . . . . . . . . . . . . . . . . . . . . . . . . . . . . . . . . . . . . . . . . . . . . . . . . . . . . . . . . . . . . . . . . . . . . . . . 9-3 9-3 9-4 9-5 9-5 9-6 9-7 9-8 9-9 9-9 9-11 9-12 9-13 9-13 9-14 9-15 9-15 9-16 9-17 9-18 9-19 9-19 9-20 9-22 . . . . . . . . . . . . . . . 10-3 . 10-4 . 10-5 . 10-7 . 10-10 . 10-12 . 10-13 Section IV Dimensional Databases Chapter 10 Building a Dimensional Data Model In This Chapter . . . . . . . . . Overview of Data Warehousing . . . Why Build a Dimensional Database? What Is Dimensional Data? . . . Concepts of Dimensional Data Modeling The Fact Table . . . . . . . . Dimensions of the Data Model . . viii IBM Informix Guide to Database Design and Implementation . . . . . . . . . . . . . . . . . . . . . . . . . . . . . . . . . . . . . . . . . . . . . . . . . Building a Dimensional Data Model . . . . . . . . Choosing a Business Process . . . . . . . . . Summary of a Business Process . . . . . . . . Determining the Granularity of the Fact Table . . . Identifying the Dimensions and Hierarchies . . . . Choosing the Measures for the Fact Table . . . . . Resisting Normalization . . . . . . . . . . . Choosing the Attributes for the Dimension Tables . . Handling Common Dimensional Data-Modeling Problems Minimizing the Number of Attributes in a Dimension Table . . . . . . . . . . Handling Dimensions That Occasionally Change . . Using the Snowflake Schema . . . . . . . . . Chapter 11 . . . . . . . . . . . . . . . . . . . . . . . . . . . 10-16 10-17 10-17 10-19 10-21 10-23 10-26 10-27 10-29 . . . . . . . . . 10-29 10-31 10-33 Implementing a Dimensional Database In This Chapter . . . . . . . . . . . . . . . . Implementing the sales_demo Dimensional Database . . . Using CREATE DATABASE . . . . . . . . . . Using CREATE TABLE for the Dimension and Fact Tables Mapping Data from Data Sources to the Database . . . Loading Data into the Dimensional Database . . . . Creating the sales_demo Database . . . . . . . . Testing the Dimensional Database . . . . . . . . Logging and Nonlogging Tables in Extended Parallel Server Choosing Table Types. . . . . . . . . . . . . Switching Between Table Types . . . . . . . . . Indexes for Data-Warehousing Environments . . . . . . Using GK Indexes in a Data-Warehousing Environment . . Defining a GK Index on a Selection . . . . . . . . Defining a GK Index on an Expression . . . . . . . Defining a GK Index on Joined Tables . . . . . . . . . . . . . . . . . . . . . . . . . . . . . . . . . . . . . . . 11-3 11-3 11-4 11-4 11-7 11-9 11-11 11-11 11-12 11-13 11-17 11-17 11-19 11-19 11-20 11-20 Index Table of Contents ix Introduction Introduction In This Introduction . . . . . . . . . . . . . . . . . . 3 About This Manual . . . . . . . Types of Users . . . . . . . Software Dependencies . . . . Assumptions About Your Locale . Demonstration Database . . . . . . . . . . . . . . . . . . . . . . . . . . . . . . . . . . . . . . . . . . . . . . . . . . . . . . . . . . . . . . . 3 3 4 4 5 . . . . . . . . . 6 New Features in Dynamic Server, Version 9.3 Documentation Conventions . . . . . Typographical Conventions . . . . Icon Conventions . . . . . . . . Comment Icons . . . . . . . Feature, Product, and Platform Icons Sample-Code Conventions . . . . . . . . . . . . . . . . . . . . . . . . . . . . . . . . . . . . . . . . . . . . . . . . . . . . . . . . . . . . . . . . . 6 6 7 7 8 8 Additional Documentation . . . . . . . . . . . . . . . . 9 Related Reading . . . . . . . . . . . . . . . . 12 Compliance with Industry Standards . . . . . . . . . . . . 12 Informix Welcomes Your Comments . . . . . . . . . . . . . 12 . . . . 2 IBM Informix Guide to Database Design and Implementation In This Introduction This introduction provides an overview of the information in this manual and describes the conventions it uses. About This Manual This manual provides information to help you design, implement, and manage your Informix databases. It includes data models that illustrate different approaches to database design and shows you how to use structured query language (SQL) to implement and manage your databases. This manual is one of several manuals that discuss Informix implementation of SQL. The Informix Guide to SQL: Tutorial shows how to use basic and advanced SQL and Stored Procedure Language (SPL) routines to access and manipulate the data in your databases. The Informix Guide to SQL: Syntax contains all the syntax descriptions for SQL and SPL. The Informix Guide to SQL: Reference provides reference information for aspects of SQL other than the language statements. Types of Users This manual is written for the following users: ■ Database administrators ■ Database server administrators ■ Database-application programmers Introduction 3 Software Dependencies This manual assumes that you have the following background: ■ A working knowledge of your computer, your operating system, and the utilities that your operating system provides ■ Some experience working with relational databases or exposure to database concepts ■ Some experience with computer programming If you have limited experience with relational databases, SQL, or your operating system, refer to the Getting Started manual for your database server for a list of supplementary titles. Software Dependencies This manual is written with the assumption that you are using one of the following database servers: ■ Informix Extended Parallel Server, Version 8.3x ■ Informix Dynamic Server, Version 9.3 Assumptions About Your Locale Informix products can support many languages, cultures, and code sets. All the information related to character set, collation, and representation of numeric data, currency, date, and time is brought together in a single environment, called a Global Language Support (GLS) locale. The examples in this manual are written with the assumption that you are using the default locale, en_us.8859-1. This locale supports U.S. English format conventions for date, time, and currency. In addition, this locale supports the ISO 8859-1 code set, which includes the ASCII code set plus many 8-bit characters such as é, è, and ñ. If you plan to use nondefault characters in your data or your SQL identifiers, or if you want to conform to the nondefault collation rules of character data, you need to specify the appropriate nondefault locale. For instructions on how to specify a nondefault locale, additional syntax, and other considerations related to GLS locales, see the Informix Guide to GLS Functionality. 4 IBM Informix Guide to Database Design and Implementation Demonstration Database Demonstration Database The DB-Access utility, which Informix provides with its database server products, includes one or more of the following demonstration databases: XPS ■ The stores_demo database illustrates a relational schema with information about a fictitious wholesale sporting-goods distributor. Many examples in Informix manuals are based on the stores_demo database. ■ The sales_demo database illustrates a dimensional schema for datawarehousing applications. For conceptual information about dimensional data modeling, see the Informix Guide to Database Design and Implementation. ♦ ■ The superstores_demo database illustrates an object-relational schema. The superstores_demo database contains examples of extended data types, type and table inheritance, and user-defined routines. ♦ IDS For information about how to create and populate the demonstration databases, see the DB-Access User’s Manual. For descriptions of the databases and their contents, see the Informix Guide to SQL: Reference. The scripts that you use to install the demonstration databases reside in the $INFORMIXDIR/bin directory on UNIX platforms and in the %INFORMIXDIR%\bin directory in Windows environments. Introduction 5 New Features in Dynamic Server, Version 9.3 New Features in Dynamic Server, Version 9.3 For a description of the new features in Informix Dynamic Server, Version 9.3, see the Getting Started manual. Documentation Conventions This section describes the conventions that this manual uses. These conventions make it easier to gather information from this and other volumes in the documentation set. Typographical Conventions This manual uses the following conventions to introduce new terms, illustrate screen displays, describe command syntax, and so forth. Convention Meaning KEYWORD All primary elements in a programming language statement (keywords) appear in uppercase letters in a serif font. italics italics Within text, new terms and emphasized words appear in italics. Within syntax and code examples, variable values that you are to specify appear in italics. italics boldface boldface Names of program entities (such as classes, events, and tables), environment variables, file and pathnames, and interface elements (such as icons, menu items, and buttons) appear in boldface. monospace monospace Information that the product displays and information that you enter appear in a monospace typeface. (1 of 2) 6 IBM Informix Guide to Database Design and Implementation Icon Conventions Convention Meaning KEYSTROKE Keys that you are to press appear in uppercase letters in a sans serif font. ♦ This symbol indicates the end of product- or platform-specific information. ➞ This symbol indicates a menu item. For example, “Choose Tools➞Options” means choose the Options item from the Tools menu. (2 of 2) Tip: When you are instructed to “enter” characters or to “execute” a command, immediately press RETURN after the entry. When you are instructed to “type” the text or to “press” other keys, no RETURN is required. Icon Conventions Throughout the documentation, you will find text that is identified by several different types of icons. This section describes these icons. Comment Icons Comment icons identify three types of information, as the following table describes. This information always appears in italics. Icon Label Description Warning: Identifies paragraphs that contain vital instructions, cautions, or critical information Important: Identifies paragraphs that contain significant information about the feature or operation that is being described Tip: Identifies paragraphs that offer additional details or shortcuts for the functionality that is being described Introduction 7 Sample-Code Conventions Feature, Product, and Platform Icons Feature, product, and platform icons identify paragraphs that contain feature-specific, product-specific, or platform-specific information. Icon Description GLS Identifies information that relates to the Informix Global Language Support (GLS) feature IDS Identifies information or syntax that is specific to Informix Dynamic Server UNIX Identifies information that is specific to the UNIX operating system WIN NT Identifies information that is specific to the Windows NT environment (To distinguish from WIN 2000) XPS Identifies information or syntax that is specific to Informix Extended Parallel Server These icons can apply to a row in a table, one or more paragraphs, or an entire section. A ♦ symbol indicates the end of the feature-specific, productspecific, or platform-specific information. Sample-Code Conventions Examples of SQL code occur throughout this manual. Except where noted, the code is not specific to any single Informix application development tool. If only SQL statements are listed in the example, they are not delimited by semicolons. For instance, you might see the code in the following example: CONNECT TO stores_demo ... DELETE FROM customer WHERE customer_num = 121 ... COMMIT WORK DISCONNECT CURRENT 8 IBM Informix Guide to Database Design and Implementation Additional Documentation To use this SQL code for a specific product, you must apply the syntax rules for that product. For example, if you are using DB-Access, you must delimit multiple statements with semicolons. If you are using an SQL API, you must use EXEC SQL at the start of each statement and a semicolon (or other appropriate delimiter) at the end of the statement. Tip: Ellipsis points in a code example indicate that more code would be added in a full application, but it is not necessary to show it to describe the concept being discussed. For detailed directions on using SQL statements for a particular application development tool or SQL API, see the manual for your product. Additional Documentation Informix Dynamic Server documentation is provided in a variety of formats: ■ Online manuals. The Informix OnLine Documentation Web site at http://www.informix.com/answers contains manuals that Informix provides for your use. This Web site enables you to print chapters or entire books. ■ Online help. Informix provides online help with each graphical user interface (GUI) that displays information about those interfaces and the functions that they perform. Use the help facilities that each GUI provides to display the online help. This facility can provide context-sensitive help, an error message reference, language syntax, and more. To order a printed manual, call 1-800-331-1763 or send email to [email protected]. Provide the following information when you place your order: ■ ❑ The documentation that you need ❑ The quantity that you need ❑ Your name, address, and telephone number Documentation notes. Documentation notes, which contain additions and corrections to the manuals, are also located at the OnLine Documentation site at http://www.informix.com/answers. Examine these files before you begin using your database server. Introduction 9 Additional Documentation ■ Release notes. Release notes contain vital information about application and performance issues. These files are located at http://www.informix.com/informix/services/techinfo. This site is a password controlled site. Examine these files before you begin using your database server. Documentation notes, release notes, and machine notes are also located in the directory where the product is installed. The following table describes these files. UNIX On UNIX platforms, the following online files appear in the $INFORMIXDIR/release/en_us/0333 directory. Online File Purpose ddi_docnotes_9.30.html The documentation notes file for your version of this manual describes topics that are not covered in the manual or that were modified since publication. release_notes_9.30.html The release notes file describes feature differences from earlier versions of Informix products and how these differences might affect current products. This file also contains information about any known problems and their workarounds. machine_notes_9.30.txt The machine notes file describes any special actions that you must take to configure and use Informix products on your computer. Machine notes are named for the product described. ♦ 10 IBM Informix Guide to Database Design and Implementation Additional Documentation The following items appear in the Informix folder. To display this folder, choose Start➞Programs➞Informix Dynamic Server 9.30➞ Documentation Notes or Release Notes from the task bar. Windows Program Group Item Description Documentation Notes This item includes additions or corrections to manuals with information about features that might not be covered in the manuals or that have been modified since publication. Release Notes This item describes feature differences from earlier versions of Informix products and how these differences might affect current products. This file also contains information about any known problems and their workarounds. Machine notes do not apply to Windows NT platforms. ♦ ■ UNIX Error message files. Informix software products provide ASCII files that contain Informix error messages and their corrective actions. For a detailed description of these error messages, refer to Informix Error Messages in Answers OnLine. To read the error messages on UNIX, use the following command. Command Description finderr Displays error messages online ♦ WIN NT To read error messages and corrective actions on Windows NT, use the Informix Find Error utility. To display this utility, choose Start➞Programs➞Informix from the task bar. ♦ Introduction 11 Related Reading Related Reading For a list of publications that provide an introduction to database servers and operating-system platforms, refer to your Getting Started manual. Compliance with Industry Standards The American National Standards Institute (ANSI) has established a set of industry standards for SQL. Informix SQL-based products are fully compliant with SQL-92 Entry Level (published as ANSI X3.135-1992), which is identical to ISO 9075:1992. In addition, many features of Informix database servers comply with the SQL-92 Intermediate and Full Level and X/Open SQL CAE (common applications environment) standards. Informix Welcomes Your Comments We want to know about any corrections or clarifications that you would find useful in our manuals that would help us with future versions. Include the following information: ■ The name and version of the manual that you are using ■ Any comments that you have about the manual ■ Your name, address, and phone number Send electronic mail to us at the following address: [email protected] This address is reserved for reporting errors and omissions in our documentation. For immediate help with a technical problem, contact Informix Customer Services. We appreciate your suggestions. 12 IBM Informix Guide to Database Design and Implementation Chapter 1 Planning a Database Chapter 2 Building a Relational Data Model Chapter 3 Choosing Data Types Chapter 4 Implementing a Relational Data Model Section I Basics of Database Design and Implementation Chapter Planning a Database In This Chapter . . . . . . . . . 1 . . . . . . . . . . . 1-3 Choosing a Data Model for Your Database. . . . . . . . . . . 1-3 Using ANSI-Compliant Databases . . . . . . . . . . . . Differences Between ANSI-Compliant and Non-ANSI-Compliant Databases . . . . . . . . . . . . . . . . . . Transactions . . . . . . . . . . . . . . . . . Transaction Logging. . . . . . . . . . . . . . . Owner Naming . . . . . . . . . . . . . . . . Privileges on Objects . . . . . . . . . . . . . . Default Isolation Level . . . . . . . . . . . . . . Character Data Types . . . . . . . . . . . . . . Decimal Data Type . . . . . . . . . . . . . . . Escape Characters . . . . . . . . . . . . . . . Cursor Behavior . . . . . . . . . . . . . . . . The SQLCODE Field of the SQL Communications Area . . Synonym Behavior . . . . . . . . . . . . . . . Determining if an Existing Database Is ANSI Compliant . . . . 1-4 . . . . . . . . . . . . . 1-5 1-5 1-6 1-6 1-7 1-7 1-8 1-8 1-8 1-8 1-9 1-9 1-9 Using a Customized Language Environment for Your Database . . 1-10 . 1-2 IBM Informix Guide to Database Design and Implementation In This Chapter This chapter describes several issues that a database administrator (DBA) must understand to effectively plan for a database. It discusses choosing a data model for your database, using ANSI-compliant databases, and using a customized language environment for your database Choosing a Data Model for Your Database Before you create a database with an Informix product, you must decide what type of data model you want to use to design your database. This manual describes the following database models: ■ Relational data model This data model typifies database design for online transaction processing (OLTP). The purpose of OLTP is to process a large number of small transactions without losing any of them. An OLTP database is designed to handle the day-to-day needs of a business, and database performance is tuned for those needs. Section I of this manual, “Basics of Database Design and Implementation,” describes how to build and implement a relational data model for OLTP. Section II discusses how to manage your databases. IDS ■ Object-relational data model Object-relational databases employ basic relational design principles, but include features such as extended data types, user-defined routines, user-defined casts, and user-defined aggregates to extend the functionality of relational databases. Section III of this manual, “Object-Relational Databases,” discusses how to use the extensible features of Dynamic Server to extend the kinds of data you can store in your database and to provide greater flexibility in how you organize and access your data. ♦ Planning a Database 1-3 Using ANSI-Compliant Databases ■ Dimensional data model This data model is typically used to build data marts, which are a type of data warehouse. In a data-warehousing environment, databases are optimized for data retrieval and analysis. This type of informational processing is known as online analytical processing (OLAP) or decision-support processing. Section IV of this manual, “Dimensional Databases,” describes how to build and implement a dimensional data model for OLAP. In addition to the data model you choose to design the database, you must make the following decisions that determine which features are available to applications that use the database: ■ Which database server should you use? ❑ Dynamic Server ❑ Extended Parallel Server ■ Does the database need to be ANSI compliant? ■ Will the database use characters from a language other than English in its tables? The remainder of this chapter describes the implications of these decisions and summarizes how the decisions that you make affect your database. Using ANSI-Compliant Databases You create an ANSI-compliant database when you use the MODE ANSI keywords in the CREATE DATABASE statement. However, creating an ANSIcompliant database does not ensure that this database remains ANSIcompliant. If you take a non-ANSI action (such as CREATE INDEX) on an ANSI database, you receive a warning, but the application program does not forbid the action. You might want to create an ANSI-compliant database for the following reasons: ■ Privileges and access to objects ANSI rules govern privileges and access to objects such as tables and synonyms. 1-4 IBM Informix Guide to Database Design and Implementation Differences Between ANSI-Compliant and Non-ANSI-Compliant Databases ■ Name isolation The ANSI table-naming scheme allows different users to create tables in a database without having to worry about name conflicts. IDS ■ Transaction isolation ■ Data recovery ANSI-compliant databases enforce unbuffered logging and automatic transactions for Dynamic Server. ♦ You can use the same SQL statements with both ANSI-compliant databases and non-ANSI-compliant databases. Differences Between ANSI-Compliant and Non-ANSI-Compliant Databases Databases that you designate as ANSI compliant and databases that are not ANSI compliant behave differently in the following areas: ■ Transactions ■ Transaction logging ■ Owner naming ■ Privileges on objects ■ Default isolation level ■ Character data types ■ Decimal data type ■ Escape characters ■ Cursor behavior ■ SQLCODE of the SQLCA ■ Synonym behavior Transactions A transaction is a collection of SQL statements that are treated as a single unit of work. All the SQL statements that you issue in an ANSI-compliant database are automatically contained in transactions. With a database that is not ANSI compliant, transaction processing is an option. Planning a Database 1-5 Differences Between ANSI-Compliant and Non-ANSI-Compliant Databases In a database that is not ANSI compliant, a transaction is enclosed by a BEGIN WORK statement and a COMMIT WORK or a ROLLBACK WORK statement. However, in an ANSI-compliant database, the BEGIN WORK statement is unnecessary because all statements are automatically contained in a transaction. You need to indicate only the end of a transaction with a COMMIT WORK or ROLLBACK WORK statement. For more information on transactions, see Chapter 4, “Implementing a Relational Data Model” and the Informix Guide to SQL: Tutorial. Transaction Logging ANSI-compliant databases run with unbuffered transaction logging. In an ANSI-compliant database, you cannot change the logging mode to buffered logging, and you cannot turn logging off. IDS XPS Databases that are not ANSI compliant can run with either buffered logging or unbuffered logging. Unbuffered logging provides more comprehensive data recovery, but buffered logging provides better performance. ♦ Databases that are not ANSI compliant run with unbuffered logging only. Unbuffered logging provides more comprehensive data recovery. ♦ For more information, see the description of the CREATE DATABASE statement in the Informix Guide to SQL: Syntax. Owner Naming In an ANSI-compliant database, owner naming is enforced. When you supply an object name in an SQL statement, ANSI standards require that the name include the prefix owner, unless you are the owner of the object. The combination of owner and name must be unique in the database. If you are the owner of the object, the database server supplies your user name as the default. Databases that are not ANSI compliant do not enforce owner naming. For more information, see the Owner Name segment in the Informix Guide to SQL: Syntax. 1-6 IBM Informix Guide to Database Design and Implementation Differences Between ANSI-Compliant and Non-ANSI-Compliant Databases Privileges on Objects ANSI-compliant databases and non-ANSI-compliant databases differ as to which users are granted table-level privileges by default when a table in a database is created. ANSI standards specify that the database server grants only the table owner (as well as the DBA if they are not the same user) any table-level privileges. In a database that is not ANSI compliant, however, privileges are granted to public. In addition, Informix provides two tablelevel privileges, Alter and Index, that are not included in the ANSI standards. To run a user-defined routine, you must have the Execute privilege for that routine. When you create an owner-privileged procedure for an ANSI-compliant database, only the owner of the user-defined routine has the Execute privilege. When you create an owner-privileged routine in a database that is not ANSI compliant, the database server grants the Execute privilege to public by default. For more information about privileges, see Chapter 6, “Granting and Limiting Access to Your Database” and the description of the GRANT statement in the Informix Guide to SQL: Syntax. Default Isolation Level The database isolation level specifies the degree to which your program is isolated from the concurrent actions of other programs. The default isolation level for all ANSI-compliant databases is Repeatable Read. The default isolation level for non-ANSI-compliant databases that do use logging is Committed Read. The default isolation level for non-ANSI-compliant databases that do not use logging is Uncommitted Read. For information on isolation levels, see the Informix Guide to SQL: Tutorial and the description of the SET TRANSACTION and SET ISOLATION statements in the Informix Guide to SQL: Syntax. Planning a Database 1-7 Differences Between ANSI-Compliant and Non-ANSI-Compliant Databases Character Data Types When a database is not ANSI compliant, you do not get an error if any character field (CHAR, CHARACTER, NCHAR, NVARCHAR, VARCHAR, CHARACTER VARYING) receives a string that is longer than the specified length of the field.The database server truncates the extra characters without resulting in an error message. Thus the semantic integrity of data for a CHAR(n) column or variable is not enforced when the value inserted or updated exceeds n bytes. In an ANSI-compliant database, you get an error if any character field (CHAR, CHARACTER, NCHAR, NVARCHAR, VARCHAR, CHARACTER VARYING) receives a string that is longer than the specified width of the field. Decimal Data Type In an ANSI-compliant database, no scale is used for the DECIMAL data type. You can think of this as scale = 0. Escape Characters In an ANSI-compliant database, escape characters can only escape the following characters: percent (%) and underscore(_). You can also use an escape character to escape itself. For more information about escape characters, see the Condition segment in the Informix Guide to SQL: Syntax. Cursor Behavior If a database is not ANSI compliant, you need to use the FOR UPDATE keywords when you declare an update cursor for a SELECT statement. The SELECT statement must also meet the following conditions: 1-8 ■ It selects from a single table. ■ It does not include any aggregate functions. ■ It does not include the DISTINCT, GROUP BY, INTO TEMP, ORDER BY, UNION, or UNIQUE clauses and keywords. IBM Informix Guide to Database Design and Implementation Determining if an Existing Database Is ANSI Compliant In ANSI-compliant databases, you do not have to explicitly use the FOR UPDATE keywords when you declare a cursor. In ANSI-compliant databases, all cursors that meet the restrictions that the preceding list describes are potentially update cursors. You can specify that a cursor is read-only with the FOR READ ONLY keywords on the DECLARE statement. For more information, see the description of the DECLARE statement in the Informix Guide to SQL: Syntax. The SQLCODE Field of the SQL Communications Area If no rows satisfy the search criteria of a DELETE, an INSERT INTO tablename SELECT, a SELECT...INTO TEMP, or an UPDATE statement, the database server sets SQLCODE to 100 if the database is ANSI compliant and 0 if the database is not ANSI compliant. For more information, see the descriptions of SQLCODE in the Informix Guide to SQL: Tutorial. Synonym Behavior Synonyms are always private in an ANSI-compliant database. If you attempt to create a public synonym or use the PRIVATE keyword to designate a private synonym in an ANSI-compliant database, you receive an error. For more information, see the description of the CREATE SYNONYM statement in the Informix Guide to SQL: Syntax. Determining if an Existing Database Is ANSI Compliant The following list describes two methods to determine whether a database is ANSI compliant: ■ From the sysmaster database you can execute the following statement: SELECT name,is_ansi FROM sysmaster:sysdatabases The query returns the value 1 for ANSI-compliant databases and 0 for non-ANSI-compliant databases for each database on your database server. Planning a Database 1-9 Using a Customized Language Environment for Your Database ■ GLS If you are using an SQL API such as Informix ESQL/C, you can test the SQL Communications Area (SQLCA). Specifically, the third element in the SQLCAWARN structure contains a W immediately after you open an ANSI-compliant database with the DATABASE or CONNECT statement. For information on SQLCA, see the Informix Guide to SQL: Tutorial or your SQL API manual. Using a Customized Language Environment for Your Database Global Language Support (GLS) permits you to use different locales. A GLS locale is an environment that has defined conventions for a particular language or culture. By default, Informix products use the U.S.-English ASCII code set and perform in the U.S.-English environment with ASCII collation order. Set your environment to accommodate a nondefault locale if you plan to use any of the following functionalities: ■ Non-English characters in the data ■ Non-English characters in user-specified object names ■ Conformity with the sorting and collation order of a non-ASCII code set ■ Culture-specific collation and sorting orders, such as those used in dictionaries or phone books For descriptions of GLS environment variables and for detailed information on how to implement non-U.S. English environments, see the Informix Guide to GLS Functionality. 1-10 IBM Informix Guide to Database Design and Implementation Chapter Building a Relational Data Model In This Chapter . . 2 . . . . . . . . . . . . . . . . . . 2-3 Building a Data Model . . . . . . . . . . . . . . . . . 2-3 Overview of the Entity-Relationship Data Model . . . . . . . . 2-4 Identifying and Defining Principal Data Objects . . . . . . . . . Discovering Entities . . . . . . . . . . . . . . . . . Choosing Possible Entities . . . . . . . . . . . . . The List of Entities . . . . . . . . . . . . . . . . Telephone Directory Example . . . . . . . . . . . . Diagramming Entities . . . . . . . . . . . . . . . Defining the Relationships . . . . . . . . . . . . . . . Connectivity . . . . . . . . . . . . . . . . . . Existence Dependency . . . . . . . . . . . . . . . Cardinality . . . . . . . . . . . . . . . . . . . Discovering the Relationships . . . . . . . . . . . . Diagramming Relationships . . . . . . . . . . . . . Identifying Attributes . . . . . . . . . . . . . . . . Selecting Attributes for Entities . . . . . . . . . . . . Listing Attributes. . . . . . . . . . . . . . . . . About Entity Occurrences . . . . . . . . . . . . . . 2-5 2-5 2-5 2-6 2-7 2-9 2-9 2-10 2-10 2-11 2-11 2-17 2-17 2-17 2-19 2-19 Diagramming Data Objects . . . Reading E-R Diagrams . . . Telephone Directory Example . 2-20 2-21 2-22 . . . . . . . . . . . . . . . . . . . . . . . . . . . . . . . . . . . . . . . 2-2 Translating E-R Data Objects into Relational Constructs . . . . . . Defining Tables, Rows, and Columns . . . . . . . . . . . Placing Constraints on Columns. . . . . . . . . . . . Domain Characteristics . . . . . . . . . . . . . . . Determining Keys for Tables . . . . . . . . . . . . . . Primary Keys . . . . . . . . . . . . . . . . . . Foreign Keys (Join Columns) . . . . . . . . . . . . . Adding Keys to the Telephone Directory Diagram . . . . . 2-23 2-24 2-25 2-25 2-26 2-26 2-28 2-29 Resolving Relationships . . . . . . . . . . . . . . . . . Resolving m:n Relationships . . . . . . . . . . . . . . Resolving Other Special Relationships . . . . . . . . . . . 2-30 2-30 2-31 Normalizing a Data Model . . . . . . . . . . . . . . . . First Normal Form . . . . . . . . . . . . . . . . . . Second Normal Form . . . . . . . . . . . . . . . . . Third Normal Form . . . . . . . . . . . . . . . . . Summary of Normalization Rules . . . . . . . . . . . . 2-32 2-33 2-35 2-35 2-36 IBM Informix Guide to Database Design and Implementation In This Chapter The first step in creating a relational database is to construct a data model: a precise, complete definition of the data you want to store. This chapter provides an overview of one way to model the data. For information about defining column-specific properties of a data model, see Chapter 3, “Choosing Data Types.” To learn how to implement the data model that this chapter describes, see Chapter 4, “Implementing a Relational Data Model.” To understand the material in this chapter, a basic understanding of SQL and relational database theory are necessary. Building a Data Model You already have some idea about the type of data in your database and how that data needs to be organized. This information is the beginning of a data model. Building a data model with formal notation has the following advantages: ■ You think through the data model completely. A mental model often contains unexamined assumptions; when you formalize the design, you discover these assumptions. ■ The design is easier to communicate to other people. A formal statement makes the model explicit, so that others can return comments and suggestions in the same form. Building a Relational Data Model 2-3 Overview of the Entity-Relationship Data Model Overview of the Entity-Relationship Data Model More than one formal method for data modeling exists. Most methods force you to be thorough and precise. If you know a method, by all means use it. This chapter presents a summary of the entity-relationship (E-R) data model. The E-R data-modeling method uses the following steps: 1. Identify and define the principal data objects (entities, relationships, and attributes). 2. Diagram the data objects using the E-R approach. 3. Translate the E-R data objects into relational constructs. 4. Resolve the logical data model. 5. Normalize the logical data model. Steps 1 through 5 are discussed in this chapter. Chapter 4 discusses the final step of converting your logical data model to a physical schema. The end product of data modeling is a fully-defined database design encoded in a diagram similar to Figure 2-21 on page 2-34, which shows the final set of tables for a personal telephone directory. The personal telephone directory is an example developed in this chapter. It is used rather than the demonstration database because it is small enough to be developed completely in one chapter but large enough to show the entire method. 2-4 IBM Informix Guide to Database Design and Implementation Identifying and Defining Principal Data Objects Identifying and Defining Principal Data Objects To create a data model, you first identify and define the principal data objects: entities, relationships, and attributes. Discovering Entities An entity is a principal data object that is of significant interest to the user. It is usually a person, place, thing, or event to be recorded in the database. If the data model were a language, entities would be its nouns. The demonstration database provided with your software contains the following entities: customer, orders, items, stock, catalog, cust_calls, call_type, manufact, and state. Choosing Possible Entities You can probably list several entities for your database immediately. Make a preliminary list of all the entities you can identify. Interview the potential users of the database for their opinions about what must be recorded in the database. Determine basic characteristics for each entity, such as “at least one address must be associated with a name.” All the decisions you make about the entities become your business rules. The telephone directory example on page 2-7 provides some of the business rules for the example in this chapter. Later, when you normalize your data model, some of the entities can expand or become other data objects. For more information, see “Normalizing a Data Model” on page 2-32. Building a Relational Data Model 2-5 Discovering Entities The List of Entities When the list of entities seems complete, check the list to make sure that each entity has the following qualities: ■ It is significant. List only entities that are important to your database users and that are worth the trouble and expense of computer tabulation. ■ It is generic. List only types of things, not individual instances. For instance, symphony might be an entity, but Beethoven’s Fifth would be an entity instance or entity occurrence. ■ It is fundamental. List only entities that exist independently and do not need something else to explain them. Anything you might call a trait, a feature, or a description is not an entity. For example, a part number is a feature of the fundamental entity called part. Also, do not list things that you can derive from other entities; for example, avoid any sum, average, or other quantity that you can calculate in a SELECT expression. ■ It is unitary. Be sure that each entity you name represents a single class. It cannot be separated into subcategories, each with its own features. In the telephone directory example in Figure 2-1 on page 2-7, the telephone number, an apparently simple entity, actually consists of three categories, each with different features. These choices are neither simple nor automatic. To discover the best choice of entities, you must think carefully about the nature of the data you want to store. Of course, that is exactly the point of a formal data model. The following section describes the telephone directory example in detail. 2-6 IBM Informix Guide to Database Design and Implementation Discovering Entities Telephone Directory Example Suppose that you create a database for a personal telephone directory. The database model must record the names, addresses, and telephone numbers of people and organizations that the user needs. First define the entities. Look carefully at a page from a telephone directory to identify the entities that it contains. Figure 2-1 shows a sample page from a telephone directory. Figure 2-1 Partial Page from a Telephone Directory AME PHONE NAME Catherine Morgan PHONE 206-789-5396 ADDRESS 429 Bridge Way Seattle, WA 98103 AME PHONE AME PHONE N O NAME PHONE Norman Dearborn 206-598-8189 P Q ADDRESS R Morganthaler Industries S 12558 E. 10th Ave. Seattle, WA 98102 206-509-6872 T NAME PHONE U Thomas Morrison 503-256-6031 V ADDRESS W 866 Gage Road X Y Klamath Falls, OR 97601 Z Building a Relational Data Model 2-7 Discovering Entities The physical form of the existing data can be misleading. Do not let the layout of pages and entries in the telephone directory mislead you into trying to specify an entity that represents one entry in the book: an alphabetized record with fields for name, number, and address. You want to model the data, not the medium. Are the Entities Generic and Significant? At first glance, the entities that are recorded in a telephone directory include the following items: ■ Names (of persons and organizations) ■ Addresses ■ Telephone numbers Do these entities meet the earlier criteria? They are clearly significant to the model and are generic. Are the Entities Fundamental? A good test is to ask if an entity can vary in number independently of any other entity. A telephone directory sometimes lists people who have no number or current address (people who move or change jobs) and also can list both addresses and numbers that more than one person uses. All three of these entities can vary in number independently; this fact strongly suggests that they are fundamental, not dependent. Are the Entities Unitary? Names can be split into personal names and corporate names. You decide that all names should have the same features in this model; that is, you do not plan to record different information about a company than you would record about a person. Likewise, you decide that only one kind of address exists; you do not need to treat home addresses differently from business addresses. However, you also realize that more than one kind of telephone number exists. Voice numbers are answered by a person, fax numbers connect to a fax machine, and modem numbers connect to a computer. You decide that you want to record different information about each kind of number, so these three types are different entities. 2-8 IBM Informix Guide to Database Design and Implementation Defining the Relationships For the personal telephone directory example, you decide that you want to keep track of the following entities: ■ Name ■ Address (mailing) ■ Telephone number (voice) ■ Telephone number (fax) ■ Telephone number (modem) Diagramming Entities Later in this chapter you can learn how to use the E-R diagrams. For now, create a separate, rectangular box for each entity in the telephone directory example, as Figure 2-2 shows. “Diagramming Data Objects” on page 2-20 shows how to put the entities together with relationships. name address voice fax modem Figure 2-2 Entities in the Personal Telephone Directory Example Defining the Relationships After you choose your database entities, you need to consider the relationships between them. Relationships are not always obvious, but all the ones worth recording must be found. The only way to ensure that all the relationships are found is to list all possible relationships exhaustively. Consider every pair of entities A and B and ask, “What is the relationship between an A and a B?” A relationship is an association between two entities. Usually, a verb or preposition that connects two entities implies a relationship. A relationship between entities is described in terms of connectivity, existence dependency, and cardinality. Building a Relational Data Model 2-9 Defining the Relationships Connectivity Connectivity refers to the number of entity instances. An entity instance is a particular occurrence of an entity. Figure 2-3 shows that the three types of connectivity are one-to-one (written 1:1), one-to-many (written 1:n), and many-to-many (written m:n). Figure 2-3 Connectivity in Relationships one-to-one one-to-many many-to-many For instance, in the telephone directory example, an address can be associated with more than one name. The connectivity for the relationship between the address and name entities is one-to-many (1:n). Existence Dependency Existence dependency describes whether an entity in a relationship is optional or mandatory. Analyze your business rules to identify whether an entity must exist in a relationship. For example, your business rules might dictate that an address must be associated with a name. Such an association indicates a mandatory existence dependency for the relationship between the name and address entities. An example of an optional existence dependency could be a business rule that says a person might or might not have children. 2-10 IBM Informix Guide to Database Design and Implementation Defining the Relationships Cardinality Cardinality places a constraint on the number of times an entity can appear in a relationship. The cardinality of a 1:1 relationship is always one. But the cardinality of a 1:n relationship is open; n could be any number. If you need to place an upper limit on n, you specify a cardinality for the relationship. For instance, in a store sale example, you could limit the number of sale items that a customer can purchase at one time. You usually use your application program or stored procedure language (SPL) to place cardinality constraints. Discovering the Relationships A convenient way to discover the relationships is to prepare a matrix that names all the entities on the rows and again on the columns. The matrix in Figure 2-4 reflects the entities for the personal telephone directory. name name address number (voice) number (fax) number (modem) Figure 2-4 A Matrix That Reflects the Entities for a Personal Telephone Directory address number (voice) number (fax) number (modem) Building a Relational Data Model 2-11 Defining the Relationships You can ignore the shaded portion of the matrix. You must consider the diagonal cells; that is, you must ask the question, “What is the relationship between an A and another A?” In this model, the answer is always none. No relationship exists between a name and a name or an address and another address, at least none that you need to record in this model. When a relationship exists between an A and another A, you have found a recursive relationship. (See “Resolving Other Special Relationships” on page 2-31.) For all cells for which the answer is clearly none, write none in the matrix. Figure 2-5 shows the current matrix. name name address number (voice) address number (voice) number (fax) number (modem) Figure 2-5 A Matrix with Initial Relationships Included none none none none number (fax) none number (modem) Although no entities relate to themselves in this model, this situation is not always true in other models. A typical example is an employee who is the manager of another employee. Another example occurs in manufacturing, when a part entity is a component of another part. 2-12 IBM Informix Guide to Database Design and Implementation Defining the Relationships In the remaining cells, write the connectivity relationship that exists between the entity on the row and the entity on the column. The following kinds of relationships are possible: ■ One-to-one (1:1), in which never more than one entity A exists for one entity B and never more than one B for one A. ■ One-to-many (1:n), in which more than one entity A never exists, but several entities B can be related to A (or vice versa). ■ Many-to-many (m:n), in which several entities A can be related to one B and several entities B can be related to one A. One-to-many relationships are the most common. The telephone directory model show one-to-many and many-to-many relationships. As Figure 2-5 on page 2-12 shows, the first unfilled cell represents the relationship between names and addresses. What connectivity lies between these entities? You might ask yourself, “How many names can be associated with an address?” You decide that a name can have zero or one address but no more than one. You write 0-1 opposite name and below address, as Figure 2-6 shows. name name address Figure 2-6 Relationship Between Name and Address none 0-1 Ask yourself how many addresses can be associated with a name. You decide that an address can be associated with more than one name. For example, you can know several people at one company or more than two people who live at the same address. Building a Relational Data Model 2-13 Defining the Relationships Can an address be associated with zero names? That is, should it be possible for an address to exist when no names use it? You decide that yes, it can. Below address and opposite name, you write 0-n, as Figure 2-7 shows. name name Figure 2-7 Relationship Between Address and Name address none 0-n 0-1 If you decide that an address cannot exist unless it is associated with at least one name, you write 1-n instead of 0-n. When the cardinality of a relationship is limited on either side to 1, it is a 1:n relationship. In this case, the relationship between names and addresses is a 1:n relationship. Now consider the next cell in Figure 2-5 on page 2-12: the relationship between a name and a voice number. How many voice numbers can a name be associated with, one or more than one? When you look at your telephone directory, you see that you have often noted more than one telephone number for a person. For a busy salesperson you have a home number, an office number, a paging number, and a car phone number. But you might also have names without associated numbers. You write 0-n opposite name and below number (voice), as Figure 2-8 shows. name name address none 0-n 0-1 2-14 number (voice) IBM Informix Guide to Database Design and Implementation 0-n Figure 2-8 Relationship Between Name and Number Defining the Relationships What is the other side of this relationship? How many names can be associated with a voice number? You decide that only one name can be associated with a voice number. Can a number be associated with zero names? You decide you do not need to record a number unless someone uses it. You write 1 under number (voice) and opposite name, as Figure 2-9 shows. name name address none number (voice) 0-n 0-1 Figure 2-9 Relationship Between Number and Name 1 0-n To fill out the rest of the matrix in the same fashion, take the following factors into account: ■ A name can be associated with more than one fax number; for example, a company can have several fax machines. Conversely, a fax number can be associated with more than one name; for example, several people can use the same fax number. ■ A modem number must be associated with exactly one name. (This is an arbitrary decree to complicate the example; pretend it is a requirement of the design.) However, a name can have more than one associated modem number; for example, a company computer can have several dial-up lines. ■ Although some relationship exists between a voice number and an address, a modem number and an address, and a fax number and an address in the real world, none needs to be recorded in this model. An indirect relationship already exists through name. Building a Relational Data Model 2-15 Defining the Relationships Figure 2-10 shows a completed matrix. name name address none 0-n 0-1 address number (voice) number (voice) none number (fax) 1 0-n none none number (fax) number (modem) 1-n 0-n none Figure 2-10 A Completed Matrix for a Telephone Directory 1 0-n none none none none none none number (modem) Other decisions that the matrix reveals are that no relationships exist between a fax number and a modem number, between a voice number and a fax number, or between a voice number and a modem number. You might disagree with some of these decisions (for example, that a relationship between voice numbers and modem numbers is not supported). For the sake of this example, these are our business rules. 2-16 IBM Informix Guide to Database Design and Implementation Identifying Attributes Diagramming Relationships For now, save the matrix that you created in this section. You will learn how to create an E-R diagram in “Diagramming Data Objects” on page 2-20. Identifying Attributes Entities contain attributes, which are characteristics or modifiers, qualities, amounts, or features. An attribute is a fact or nondecomposable piece of information about an entity. Later, when you represent an entity as a table, its attributes are added to the model as new columns. You must identify the entities before you can identify the database attributes. After you determine the entities, ask yourself, “What characteristics do I need to know about each entity?” For example, in an address entity, you probably need information about street, city, and zip code. Each of these characteristics of the address entity becomes an attribute. Selecting Attributes for Entities To select attributes, choose ones that have the following qualities: ■ They are significant. Include only attributes that are useful to the database users. ■ They are direct, not derived. An attribute that can be derived from existing attributes (for instance, through an expression in a SELECT statement) should not be part of the model. Derived data complicates the maintenance of a database. At a later stage of the design, you can consider adding derived attributes to improve performance, but at this stage exclude them. For information about how to improve the performance of your database server, see your Performance Guide. Building a Relational Data Model 2-17 Identifying Attributes ■ They are nondecomposable. An attribute can contain only single values, never lists or repeating groups. Composite values must be separated into individual attributes. ■ They contain data of the same type. For example, you would want to enter only date values in a birthday attribute, not names or telephone numbers. The rules for how to define attributes are the same as those for how to define columns. For information about how to define columns, see “Placing Constraints on Columns” on page 2-25. The following attributes are added to the telephone directory example to produce the diagram that Figure 2-15 on page 2-22 shows: 2-18 ■ Street, city, state, and zip code are added to the address entity. ■ Birthdate, e-mail address, anniversary date, and children’s first names are added to the name entity. ■ Type is added to the voice entity to distinguish car phones, home phones, and office phones. A voice number can be associated with only one voice type. ■ The hours that a fax machine is attended are added to the fax entity. ■ Whether a modem supports 9,600-, 14,400-, or 28,800-baud rates is added to the modem entity. IBM Informix Guide to Database Design and Implementation Identifying Attributes Listing Attributes For now, list the attributes for the telephone directory example with the entities with which you think they belong. Your list should look like Figure 2-11. name address voice fax modem fname lname bdate anniv email child1 child2 child3 street city state zipcode vce_num vce_type fax_num oper_from oper_till mdm_num b128000 b256000 Figure 2-11 Attributes for the Telephone Directory Example About Entity Occurrences An additional data object is the entity occurrence. Each row in a table represents a specific, single occurrence of the entity. For example, if customer is an entity, a customer table represents the idea of customer; in it, each row represents one specific customer, such as Sue Smith. Keep in mind that entities become tables, attributes become columns, and entity occurrences become rows. Building a Relational Data Model 2-19 Diagramming Data Objects Diagramming Data Objects Now you know and understand the entities and relationships in your database, which is the most important part of the relational-database design process. After you determine the entities and relationships, a method that displays your thought process during database design might be helpful. Most data-modeling methods provide some way to graphically display the entities and relationships. Informix uses the E-R diagram approach that C. R. Bachman originally developed. E-R diagrams serve the following purposes: ■ Model the informational needs of an organization ■ Identify entities and their relationships ■ Provide a starting point for data definition (data-flow diagrams) ■ Provide an excellent source of documentation for application developers as well as database and system administrators ■ Create a logical design of the database that can be translated into a physical schema Several different styles of E-R diagrams exist. If you already have a style that you prefer, use it. Figure 2-12 shows a sample E-R diagram. name address entity entity relationship 2-20 IBM Informix Guide to Database Design and Implementation Figure 2-12 Symbols of an Entity-Relationship Diagram Reading E-R Diagrams In an E-R diagram, a box represents an entity. A line represents the relationships that connect the entities. In addition, Figure 2-13 shows how you use graphical items to display the following features of relationships: ■ A circle across a relationship link indicates optionality in the relationship (zero instances can occur). ■ A small bar across a relationship link indicates that exactly one instance of the entity is associated with another entity (consider the bar to be a 1). ■ The crow’s feet represent many in the relationship. Optionality Figure 2-13 The Parts of a Relationship in an Entity-Relationship Diagram Optionality many exactly one Reading E-R Diagrams You read the diagrams first from left to right and then from right to left. In the case of the name-address relationship in Figure 2-14, you read the relationships as follows: names can be associated with zero or exactly one address; addresses can be associated with zero, one, or many names. Figure 2-14 Reading an EntityRelationship Diagram can have zero or exactly 1 name address can have zero,1, or many Building a Relational Data Model 2-21 Telephone Directory Example Telephone Directory Example Figure 2-15 shows the telephone directory example and includes the entities, relationships, and attributes. This diagram includes the relationships that you establish with the matrix. After you study the diagram symbols, compare the E-R diagram in Figure 2-15 with the matrix in Figure 2-10 on page 2-16. Verify for yourself that the relationships are the same in both figures. A matrix such as Figure 2-10 on page 2-16 is a useful tool when you first design your model, because when you fill it out, you are forced to think of every possible relationship. However, the same relationships appear in a diagram such as Figure 2-15, and this type of diagram might be easier to read when you review an existing model. name lname fname bdate anniv email child1 child2 child3 voice vce_num vce_type 2-22 address street city state zipcode fax fax_num oper_from oper_till modem mdm_num b128000 b256000 IBM Informix Guide to Database Design and Implementation Figure 2-15 Preliminary EntityRelationship Diagram of the Telephone Directory Example Translating E-R Data Objects into Relational Constructs After the Diagram Is Complete The rest of this chapter describes how to perform the following tasks: ■ Translate the entities, relationships, and attributes into relational constructs ■ Resolve the E-R data model ■ Normalize the E-R data model Chapter 4 shows you how to create a database from the E-R data model. Translating E-R Data Objects into Relational Constructs All the data objects you have learned about so far (entities, relationships, attributes, and entity occurrences) translate into SQL tables, joins between tables, columns, and rows. The tables, columns, and rows of your database must fit the rules found in “Defining Tables, Rows, and Columns” on page 2-24. Before you normalize your data objects, check that they fit these rules. To normalize your data objects, analyze the dependencies between the entities, relationships, and attributes. Normalization is discussed in “Normalizing a Data Model” on page 2-32. After you normalize the data model, you can use SQL statements to create a database that is based on your data model. Chapter 4 describes how to create a database and provides the database schema for the telephone directory example. Each entity that you choose is represented as a table in the model. The table stands for the entity as an abstract concept, and each row represents a specific, individual occurrence of the entity. In addition, each attribute of an entity is represented by a column in the table. The following ideas are fundamental to most relational data-model methods, including the E-R data model. Follow these rules while you design your data model to save time and effort when you normalize your model. Building a Relational Data Model 2-23 Defining Tables, Rows, and Columns Defining Tables, Rows, and Columns You are already familiar with the idea of a table that is composed of rows and columns. But you must respect the following rules when you define the tables of a formal data model: ■ Rows must stand alone. Each row of a table is independent and does not depend on any other row of the same table. As a consequence, the order of the rows in a table is not significant in the model. The model should still be correct even if all the rows of a table are shuffled into random order. After the database is implemented, you can tell the database server to store rows in a certain order for the sake of efficiency, but that order does not affect the model. ■ Rows must be unique. In every row, some column must contain a unique value. If no single column has this property, the values of some group of columns taken as a whole must be different in every row. ■ Columns must stand alone. The order of columns within a table has no meaning in the model. The model should still be correct even if the columns are rearranged. After the database is implemented, programs and stored queries that use an asterisk to mean all columns are dependent on the final order of columns, but that order does not affect the model. ■ Column values must be unitary. A column can contain only single values, never lists or repeating groups. Composite values must be separated into individual columns. For example, if you decide to treat a person’s first and last names as separate values, as the examples in this chapter show, the names must be in separate columns, not in a single name column. 2-24 IBM Informix Guide to Database Design and Implementation Defining Tables, Rows, and Columns ■ Each column must have a unique name. Two columns within the same table cannot share the same name. However, you can have columns that contain similar information. For example, the name table in the telephone directory example contains columns for children’s names. You can name each column, child1, child2, and so on. ■ Each column must contain data of a single type. A column must contain information of the same data type. For example, a column that is identified as an integer must contain only numeric information, not characters from a name. If your previous experience is only with data organized as arrays or sequential files, these rules might seem unnatural. However, relational database theory shows that you can represent all types of data with only tables, rows, and columns that follow these rules. With a little practice, these rules become automatic. Placing Constraints on Columns When you define your table and columns with the CREATE TABLE statement, you constrain each column. These constraints specify whether you want the column to contain characters or numbers, the form that you want dates to use, and other constraints. A domain describes the constraints when it identifies the set of valid values that attributes can assume. Domain Characteristics You define the domain characteristics of columns when you create a table. A column can contain the following domain characteristics: ■ Data type (INTEGER, CHAR, DATE, and so on) ■ Format (for example, yy/mm/dd) ■ Range (for example, 1,000 to 5,400) ■ Meaning (for example, personnel number) ■ Allowable values (for example, only grades S or U) ■ Uniqueness ■ Null support Building a Relational Data Model 2-25 Determining Keys for Tables ■ Default value ■ Referential constraints For information about how to define domains, see Chapter 3. For information about how to create your tables and database, see Chapter 4. Determining Keys for Tables The columns of a table are either key columns or descriptor columns. A key column is one that uniquely identifies a particular row in the table. For example, a social security number is unique for each employee. A descriptor column specifies the nonunique characteristics of a particular row in the table. For example, two employees can have the same first name, Sue. The first name Sue is a nonunique characteristic of an employee. The main types of keys in a table are primary keys and foreign keys. You designate primary and foreign keys when you create your tables. Primary and foreign keys are used to relate tables physically. Your next task is to specify a primary key for each table. That is, you must identify some quantifiable characteristic of the table that distinguishes each row from every other row. Primary Keys The primary key of a table is the column whose values are different in every row. Because they are different, they make each row unique. If no one such column exists, the primary key is a composite of two or more columns whose values, taken together, are different in every row. Every table in the model must have a primary key. This rule follows automatically from the rule that all rows must be unique. If necessary, the primary key is composed of all the columns taken together. For efficiency, the primary key should be a numeric data type (INT or SMALLINT), SERIAL or SERIAL8 data type, or a short character string (as used for codes). Informix recommends that you do not use long character strings as primary keys. 2-26 IBM Informix Guide to Database Design and Implementation Determining Keys for Tables Null values are never allowed in a primary-key column. Null values are not comparable; that is, they cannot be said to be alike or different. Hence, they cannot make a row unique from other rows. If a column permits null values, it cannot be part of a primary key. Some entities have ready-made primary keys such as catalog codes or identity numbers, which are defined outside the model. Sometimes more than one column or group of columns can be used as the primary key. All columns or groups that qualify to be primary keys are called candidate keys. All candidate keys are worth noting because their property of uniqueness makes them predictable in a SELECT operation. Composite Keys Some entities lack features that are reliably unique. Different people can have identical names; different books can have identical titles. You can usually find a composite of attributes that work as a primary key. For example, people rarely have identical names and identical addresses, and different books rarely have identical titles, authors, and publication dates. System-Assigned Keys A system-assigned primary key is usually preferable to a composite key. A system-assigned key is a number or code that is attached to each instance of an entity when the entity is first entered into the database. The easiest systemassigned keys to implement are serial numbers because the database server can generate them automatically. Informix offers the SERIAL and SERIAL8 data types for serial numbers. However, the people who use the database might not like a plain numeric code. Other codes can be based on actual data; for example, an employee identification code could be based on a person’s initials combined with the digits of the date that they were hired. In the telephone directory example, a system-assigned primary key is used for the name table. Building a Relational Data Model 2-27 Determining Keys for Tables Foreign Keys (Join Columns) A foreign key is a column or group of columns in one table that contains values that match the primary key in another table. Foreign keys are used to join tables. Figure 2-16 shows the primary and foreign keys of the customer and order tables from the demonstration database. customer orders order_num orders customer_num Figure 2-16 Primary and Foreign Keys in the Customer-Order Relationships Foreign key Primary key Tip: For ease in maintaining and using your tables, it is important to choose names for the primary and foreign keys so that the relationship is readily apparent. In Figure 2-16, both the primary and foreign key columns have the same name, customer_num. Alternatively, you might name the columns in Figure 2-16 customer_custnum and orders_custnum, so that each column has a distinct name. Foreign keys are noted wherever they appear in the model because their presence can restrict your ability to delete rows from tables. Before you can delete a row safely, either you must delete all rows that refer to it through foreign keys, or you must define the relationship with special syntax that allows you to delete rows from primary-key and foreign-key columns with a single delete command. The database server disallows deletes that violate referential integrity. To preserve referential integrity, delete all foreign-key rows before you delete the primary key to which they refer. If you impose referential constraints on your database, the database server does not permit you to delete primary keys with matching foreign keys. It also does not permit you to add a foreignkey value that does not reference an existing primary-key value. Referential integrity is discussed in the Informix Guide to SQL: Tutorial. 2-28 IBM Informix Guide to Database Design and Implementation Determining Keys for Tables Adding Keys to the Telephone Directory Diagram Figure 2-17 shows the initial choices of primary and foreign keys. This diagram reflects some important decisions. For the name table, the primary key rec_num is chosen. The data type for rec_num is SERIAL. The values for rec_num are system generated. If you look at the other columns (or attributes) in the name table, you see that the data types that are associated with the columns are mostly character-based. None of these columns alone is a good candidate for a primary key. If you combine elements of the table into a composite key, you create a cumbersome key. The SERIAL data type gives you a key that you can also use to join other tables to the name table. For the voice, fax, and modem tables, the telephone numbers are shown as primary keys. These tables are joined to the name table through the rec_num key. The address table also uses a system-generated primary key, id_num. The address table must have a primary key because the business rules state that an address can exist when no names use it. If the business rules prevent an address from existing unless a name is associated with it, then the address table could be joined to the name table with the foreign key rec_num only. name rec_num PK lname fname bdate anniv email child1 child2 child3 address id_num PK rec_num FK street city state zipcode fax voice vce_num PK rec_num FK vce_type fax_num PK rec_num FK oper_from oper_till Figure 2-17 Telephone Directory Diagram with Primary and Foreign Keys Added modem mdm_num PK rec_num FK b9600 b14400 b28800 PK = Primary Key FK = Foreign Key Building a Relational Data Model 2-29 Resolving Relationships Resolving Relationships The aim of a good data model is to create a structure that provides the database server with quick access. To further refine the telephone directory data model, you can resolve the relationships and normalize the data model. This section addresses how and why to resolve your database relationships. Normalizing your data model is discussed in “Normalizing a Data Model” on page 2-32. Resolving m:n Relationships Many-to-many (m:n) relationships add complexity and confusion to your model and to the application development process. The key to resolve m:n relationships is to separate the two entities and create two one-to-many (1:n) relationships between them with a third intersect entity. The intersect entity usually contains attributes from both connecting entities. To resolve a m:n relationship, analyze your business rules again. Have you accurately diagrammed the relationship? The telephone directory example has a m:n relationship between the name and fax entities, as Figure 2-17 on page 2-29 shows. The business rules say, “One person can have zero, one, or many fax numbers; a fax number can be for several people.” Based on what we selected earlier as our primary key for the voice entity, an m:n relationship exists. A problem exists in the fax entity because the telephone number, which is designated as the primary key, can appear more than one time in the fax entity; this violates the qualification of a primary key. Remember, the primary key must be unique. To resolve this m:n relationship, you can add an intersect entity between the name and fax entities, as Figure 2-18 shows. The new intersect entity, faxname, contains two attributes, fax_num and rec_num. The primary key for the entity is a composite of both attributes. Individually, each attribute is a foreign key that references the table from which it came. The relationship between the name and faxname tables is 1:n because one name can be associated with many fax numbers; in the other direction, each faxname combination can be associated with one rec_num. The relationship between the fax and faxname tables is 1:n because each number can be associated with many faxname combinations. 2-30 IBM Informix Guide to Database Design and Implementation Resolving Other Special Relationships name rec_num PK lname fname bdate anniv email child1 child2 child3 fax_num PK FK rec_num PK FK fax fax_num PK rec_num FK oper_from oper_till rec_num PK lname fname bdate anniv email child1 child2 child3 Intersect Entity faxname fax_num PK FK rec_num PK FK fax fax_num PK oper_from oper_till BEFORE Figure 2-18 Resolving a Many-to-Many (m:n) Relationship PK = Primary Key FK = Foreign Key AFTER Resolving Other Special Relationships You might encounter other special relationships that can hamper a smoothrunning database. The following list shows these relationships: ■ Complex relationships ■ Recursive relationships ■ Redundant relationships A complex relationship is an association among three or more entities. All the entities must be present for the relationship to exist. To reduce this complexity, reclassify all complex relationships as an entity, related through binary relationships to each of the original entities. A recursive relationship is an association between occurrences of the same entity type. These types of relationships do not occur often. Examples of recursive relationships are bill-of-materials (parts are composed of subparts) and organizational structures (employee manages other employees). You might choose not to resolve recursive relationships. For an extended example of a recursive relationship, see the Informix Guide to SQL: Tutorial. Building a Relational Data Model 2-31 Normalizing a Data Model A redundant relationship exists when two or more relationships represent the same concept. Redundant relationships add complexity to the data model and lead a developer to place attributes in the model incorrectly. Redundant relationships might appear as duplicated entries in your E-R diagram. For example, you might have two entities that contain the same attributes. To resolve a redundant relationship, review your data model. Do you have more than one entity that contains the same attributes? You might need to add an entity to the model to resolve the redundancy. Your Performance Guide discusses additional topics that are related to redundancy in a data model. Normalizing a Data Model The telephone directory example in this chapter appears to be a good model. You could implement it at this point into a database, but this example might present problems later with application development and data-manipulation operations. Normalization is a formal approach that applies a set of rules to associate attributes with entities. When you normalize your data model, you can achieve the following goals: ■ Produce greater flexibility in your design ■ Ensure that attributes are placed in the proper tables ■ Reduce data redundancy ■ Increase programmer effectiveness ■ Lower application maintenance costs ■ Maximize stability of the data structure Normalization consists of several steps to reduce the entities to more desirable physical properties. These steps are called normalization rules, also referred to as normal forms. Several normal forms exist; this chapter discusses the first three normal forms. Each normal form constrains the data to be more organized than the last form. Because of this, you must achieve first normal form before you can achieve second normal form, and you must achieve second normal form before you can achieve third normal form. 2-32 IBM Informix Guide to Database Design and Implementation First Normal Form First Normal Form An entity is in the first normal form if it contains no repeating groups. In relational terms, a table is in the first normal form if it contains no repeating columns. Repeating columns make your data less flexible, waste disk space, and make it more difficult to search for data. In the telephone directory example in Figure 2-19, it appears that the name table contains repeating columns, child1, child2, and child3. name rec_num lname fname bdate anniv email child1 child2 child3 Figure 2-19 Name Entity Before Normalization Repeating columns You can see some problems in the current table. The table always reserves space on the disk for three child records, whether the person has children or not. The maximum number of children that you can record is three, but some of your acquaintances might have four or more children. To look for a particular child, you have to search all three columns in every row. To eliminate the repeating columns and bring the table to the first normal form, separate the table into two tables as Figure 2-20 shows. Put the repeating columns into one of the tables. The association between the two tables is established with a primary-key and foreign-key combination. Because a child cannot exist without an association in the name table, you can reference the name table with a foreign key, rec_num. name rec_num lname fname bdate anniv email Figure 2-20 First Normal Form Reached for Name Entity Primary Key child rec_num child_name Foreign Key Building a Relational Data Model 2-33 First Normal Form Now check Figure 2-17 on page 2-29 for groups that are not in the first normal form. The name-modem relationship is not in the first normal form because the columns b9600, b14400, and b28800 are considered repeating columns. Add a new attribute called b_type to the modem table to contain occurrences of b9600, b14400, and b28800. Figure 2-21 shows the data model normalized through the first normal form. name rec_num PK lname fname bdate anniv email voice vce_num PK rec_num vce_type faxname fax_num PK FK rec_num PK FK fax fax_num PK oper_from oper_till 2-34 child rec_num FK child_name address id_num PK rec_num FK street city state zipcode modem mdm_num PK rec_num FK b_type IBM Informix Guide to Database Design and Implementation PK = Primary Key FK = Foreign Key Figure 2-21 The Data Model of a Personal Telephone Directory Second Normal Form Second Normal Form An entity is in the second normal form if all of its attributes depend on the whole (primary) key. In relational terms, every column in a table must be functionally dependent on the whole primary key of that table. Functional dependency indicates that a link exists between the values in two different columns. If the value of an attribute depends on a column, the value of the attribute must change if the value in the column changes. The attribute is a function of the column. The following explanations make this more specific: ■ If the table has a one-column primary key, the attribute must depend on that key. ■ If the table has a composite primary key, the attribute must depend on the values in all its columns taken as a whole, not on one or some of them. ■ If the attribute also depends on other columns, they must be columns of a candidate key; that is, columns that are unique in every row. If you do not convert your model to the second normal form, you risk data redundancy and difficulty in changing data. To convert first-normal-form tables to second-normal-form tables, remove columns that are not dependent on the primary key. Third Normal Form An entity is in the third normal form if it is in the second normal form and all of its attributes are not transitively dependent on the primary key. Transitive dependence means that descriptor key attributes depend not only on the whole primary key, but also on other descriptor key attributes that, in turn, depend on the primary key. In SQL terms, the third normal form means that no column within a table is dependent on a descriptor column that, in turn, depends on the primary key. To convert to third normal form, remove attributes that depend on other descriptor key attributes. Building a Relational Data Model 2-35 Summary of Normalization Rules Summary of Normalization Rules The following normal forms are discussed in this section: ■ First normal form: A table is in the first normal form if it contains no repeating columns. ■ Second normal form: A table is in the second normal form if it is in the first normal form and contains only columns that are dependent on the whole (primary) key. ■ Third normal form: A table is in the third normal form if it is in the second normal form and contains only columns that are nontransitively dependent on the primary key. When you follow these rules, the tables of the model are in the third normal form, according to E. F. Codd, the inventor of relational databases. When tables are not in the third normal form, either redundant data exists in the model, or problems exist when you attempt to update the tables. If you cannot find a place for an attribute that observes these rules, you have probably made one of the following errors: 2-36 ■ The attribute is not well defined. ■ The attribute is derived, not direct. ■ The attribute is really an entity or a relationship. ■ Some entity or relationship is missing from the model. IBM Informix Guide to Database Design and Implementation Chapter Choosing Data Types In This Chapter . . 3 . . . . . . . . . . . . . . . . . . 3-3 Defining the Domains . . . . . . . . . . . . . . . . . . 3-3 Data Types. . . . . . . . . . . . . . . . . . . Choosing a Data Type . . . . . . . . . . . . . Numeric Types . . . . . . . . . . . . . . . . Counters and Codes: INTEGER, SMALLINT, and INT8 Automatic Sequences: SERIAL and SERIAL8 . . . . Approximate Numbers: FLOAT and SMALLFLOAT . Adjustable-Precision Floating Point: DECIMAL(p) . . Fixed-Precision Numbers: DECIMAL and MONEY . . Chronological Data Types . . . . . . . . . . . . Calendar Dates: DATE . . . . . . . . . . . . Exact Points in Time: DATETIME . . . . . . . . Choosing a DATETIME Format . . . . . . . . . BOOLEAN Data Type . . . . . . . . . . . . . Character Data Types. . . . . . . . . . . . . . Character Data: CHAR(n) and NCHAR(n) . . . . . Variable-Length Strings: CHARACTER VARYING(m,r), VARCHAR(m,r), NVARCHAR(m,r), and LVARCHAR . . . . . . . . . . . . . Variable-Length Execution Time . . . . . . . . Large Character Objects: TEXT . . . . . . . . . Binary Objects: BYTE . . . . . . . . . . . . Using TEXT and BYTE Data Types . . . . . . . . Changing the Data Type . . . . . . . . . . . Null Values . . . . . . . . . . . . . . . . . . . . . . . . . . . . . . . . . . . . . . . . . . . . . . . . . . . . . . . . . . . . . . 3-4 3-4 3-7 3-7 3-8 3-10 3-11 3-12 3-13 3-13 3-14 3-17 3-17 3-18 3-18 . . . . . . . . . . . . . . . . . . . . . 3-19 3-21 3-22 3-22 3-23 3-24 3-24 Default Values 3-2 . . . . . . . . . . . . . . . . . . . . 3-25 Check Constraints . . . . . . . . . . . . . . . . . . . 3-25 Referential Constraints . . . . . . . . . . . . . . . . . 3-26 IBM Informix Guide to Database Design and Implementation In This Chapter After you prepare your data model, you must implement it as a database and tables. To implement your data model, you first define a domain, or set of data values, for every column. This chapter discusses the decisions that you must make to define the column data types and constraints. The second step uses the CREATE DATABASE and CREATE TABLE statements to implement the model and populate the tables with data, as Chapter 4 discusses. Defining the Domains To complete the data model that Chapter 2 describes, you must define a domain for each column. The domain of a column describes the constraints and identifies the set of valid values that attributes (columns) can assume. The purpose of a domain is to guard the semantic integrity of the data in the model; that is, to ensure that it reflects reality in a sensible way. The integrity of the data model is at risk if you can substitute a name for a telephone number or if you can enter a fraction where only integers are valid values. To define a domain, specify the constraints that a data value must satisfy before it can be part of the domain. To specify a column domain, use the following constraints: ■ Data types ■ Default values ■ Check constraints ■ Referential constraints Choosing Data Types 3-3 Data Types Data Types The first constraint on any column is the one that is implicit in the data type for the column. When you choose a data type, you constrain the column so that it contains only values that can be represented by that data type. Each data type represents certain kinds of information and not others. The correct data type for a column is the one that represents all the data values that are proper for that column but as few as possible of the values that are not proper for it. This chapter describes built-in data types. IDS For information about the extended data types that Dynamic Server supports, see Chapter 7, “Creating and Using Extended Data Types in Dynamic Server.” ♦ Choosing a Data Type Every column in a table must have a data type. The choice of data type is important for the following reasons: ■ It establishes the set of valid data items that the column can store. ■ It determines the kinds of operations that you can perform on the data. For example, you cannot apply aggregate functions, such as SUM, to columns that are defined on a character data type. ■ It determines how much space each data item occupies on disk. The space required to accommodate data items is not as important for small tables as it is for tables with hundreds of thousands of rows. When a table reaches that many rows, the difference between a 4-byte and an 8-byte data type can be crucial. Figure 3-1 on page 3-5 shows a decision tree that summarizes the choices among built-in data types. The choices are explained in the following sections. 3-4 IBM Informix Guide to Database Design and Implementation Choosing a Data Type Figure 3-1 Choosing a Data Type Data items purely numeric? yes no Numbers all integral? no yes All numbers between -(215-1) and 215-1? no All numbers between -(231-1) and 231-1? no All numbers between -(264-1) and 264 -1 no yes SMALLINT yes INTEGER yes INT8 DECIMAL(p,0) Number of fractional digits is fixed? no At most 8 significant digits? no At most 16 significant digits? no yes DECIMAL(p,s) yes SMALLFLOAT yes FLOAT DECIMAL(p) (1 of 2) Choosing Data Types 3-5 Choosing a Data Type Data is chronological? yes no Data is boolean? no span Span of time or specific point in time? point yes INTERVAL BOOLEAN yes Precise only to nearest day? no Data contains non-English characters? DATE DATETIME yes no yes No or little variance in item lengths? no NCHAR(n) NVARCHAR(m,r) Data is ASCII characters? yes no yes No or little variance in item lengths? no Read or write to any portion of the data? no Lengths under 32,767 bytes? yes no BLOB Lengths exceed 255 bytes? no BYTE yes CHAR(n) yes LVARCHAR VARCHAR(m,r) or CHARACTER VARYING(m,r) Read or write to any portion of data? no TEXT yes CLOB (2 of 2) 3-6 IBM Informix Guide to Database Design and Implementation Numeric Types Numeric Types Some numeric data types are best suited for counters and codes, some for engineering quantities, and some for money. Counters and Codes: INTEGER, SMALLINT, and INT8 The INTEGER and SMALLINT data types hold small whole numbers. They are suited for columns that contain counts, sequence numbers, numeric identity codes, or any range of whole numbers when you know in advance the maximum and minimum values to be stored. Both data types are stored as signed binary integers. INTEGER values have 32 bits and can represent whole numbers from -231 through 231–1. SMALLINT values have only 16 bits. They can represent whole numbers from –32,767 through 32,767. The INT and SMALLINT data types have the following advantages: ■ They take up little space (2 bytes per value for SMALLINT and 4 bytes per value for INTEGER). ■ You can perform arithmetic expressions such as SUM and MAX and sort comparisons on them. The disadvantage to using INTEGER and SMALLINT is the limited range of values that they can store. The database server does not store a value that exceeds the capacity of an integer. Of course, such excess is not a problem when you know the maximum and minimum values to be stored. IDS Only Dynamic Server supports the INT8 data type. The INT8 data type is stored as a signed binary integer, which uses 8 bytes per value. Although INT8 takes up twice the space as the INTEGER data type, INT8 has the advantage of a significantly larger range of data representation. INT8 can represent integers ranging from – (263 –1) through 263 –1. ♦ Choosing Data Types 3-7 Numeric Types Automatic Sequences: SERIAL and SERIAL8 The SERIAL data type is simply INTEGER with a special feature. Similarly, the SERIAL8 data type is INT8 with a special feature. Whenever a new row is inserted into a table, the database server automatically generates a new value for a SERIAL or SERIAL8 column. IDS Only Dynamic Server supports the SERIAL8 data type. ♦ A table cannot have more than one SERIAL and one SERIAL8 column. Because the database server generates the values, the serial values in new rows are always different, even when multiple users are adding rows at the same time. This service is useful because it is quite difficult for an ordinary program to coin unique numeric codes under those conditions. The SERIAL data type can yield up to 231–1 positive integers. Consequently, the database server uses all the positive serial numbers by the time it inserts 231–1 rows in a table. For most users the exhaustion of the positive serial numbers is not a concern, however, because a single application would need to insert a row every second for 68 years, or 68 applications would need to insert a row every second for a year, to use all the positive serial numbers. However, if all the positive serial numbers were used, the database server would wrap around and start to generate integer values that begin with a 1. The SERIAL8 data type can yield up to 263 –1 positive integers. With a reasonable starting value, it is virtually impossible to cause a SERIAL8 value to wrap around during insertions. For SERIAL and SERIAL8 data types, the sequence of generated numbers always increases. When rows are deleted from the table, their serial numbers are not reused. Rows that are sorted on a SERIAL or SERIAL8 column are returned in the order in which they were created. You can specify the initial value in a SERIAL or SERIAL8 column in the CREATE TABLE statement. This makes it possible to generate different subsequences of system-assigned keys in different tables. The stores_demo database uses this technique. In stores_demo, the customer numbers begin at 101, and the order numbers start at 1001. As long as this small business does not register more than 899 customers, all customer numbers have three digits and order numbers have four. 3-8 IBM Informix Guide to Database Design and Implementation Numeric Types A SERIAL or SERIAL8 column is not automatically a unique column. If you want to be perfectly sure that no duplicate serial numbers occur, you must apply a unique constraint (see “Using CREATE TABLE” on page 4-6). If you define the table using the interactive schema editor in DB-Access, it automatically applies a unique constraint to any SERIAL or SERIAL8 column. The SERIAL and SERIAL8 data types have the following advantages: ■ They provide a convenient way to generate system-assigned keys. ■ They produce unique numeric codes even when multiple users are updating the table. ■ Different tables can use different ranges of numbers. The SERIAL and SERIAL8 data types have the following disadvantages: ■ Only one SERIAL or SERIAL8 column is permitted in a table. ■ They can produce only arbitrary numbers. Altering the Next SERIAL or SERIAL8 Number The database server sets the starting value for a SERIAL or SERIAL8 column when it creates the column (see “Using CREATE TABLE” on page 4-6). You can use the ALTER TABLE statement later to reset the next value, the value that is used for the next inserted row. You cannot set the next value below the current maximum value in the column because doing so causes the database server to generate duplicate numbers in certain situations. However, you can set the next value to any value higher than the current maximum, thus creating gaps in the sequence. Choosing Data Types 3-9 Numeric Types Approximate Numbers: FLOAT and SMALLFLOAT In scientific, engineering, and statistical applications, numbers are often known to only a few digits of accuracy, and the magnitude of a number is as important as its exact digits. Floating-point data types are designed for these kinds of applications. They can represent any numerical quantity, fractional or whole, over a wide range of magnitudes from the cosmic to the microscopic. They can easily represent both the average distance from the earth to the sun (1.5 ¥ 1011 meters) or Planck’s constant (6.626 ¥ 10-34 joule-seconds). For example, CREATE INSERT INSERT INSERT TABLE t1 (f FLOAT); INTO t1 VALUES (0.00000000000000000000000000000000000001); INTO t1 VALUES (1.5e11); INTO t1 VALUES (6.626196e-34); Two sizes of floating-point data types exist. The FLOAT type is a doubleprecision, binary floating-point number as implemented in the C language on your computer. A FLOAT data type value usually takes up 8 bytes. The SMALLFLOAT (also known as REAL) data type is a single-precision, binary floating-point number that usually takes up 4 bytes. The main difference between the two data types is their precision. Floating-point numbers have the following advantages: ■ They store very large and very small numbers, including fractional ones. ■ They represent numbers compactly in 4 or 8 bytes. ■ Arithmetic functions such as AVG, MIN, and sort comparisons are efficient on these data types. The main disadvantage of floating-point numbers is that digits outside their range of precision are treated as zeros. 3-10 IBM Informix Guide to Database Design and Implementation Numeric Types Adjustable-Precision Floating Point: DECIMAL(p) The DECIMAL(p) data type is a floating-point data type similar to FLOAT and SMALLFLOAT. The important difference is that you specify how many significant digits it retains. The precision you write as p can range from 1 to 32, from fewer than SMALLFLOAT up to twice the precision of FLOAT. The magnitude of a DECIMAL(p) number can range from 10-130 to 10124. The storage space that DECIMAL(p) numbers use depends on their precision; they occupy 1 + p/2 bytes (rounded up to a whole number, if necessary). Do not confuse the DECIMAL(p) data type with the DECIMAL(p,s) data type, which is discussed in the next section. The DECIMAL(p) data type has only the precision specified. The DECIMAL(p) data type has the following advantages over FLOAT: ■ Precision can be set to suit the application, from approximate to precise. ■ Numbers with as many as 32 digits can be represented exactly. ■ Storage is used in proportion to the precision of the number. ■ Every Informix database server supports the same precision and range of magnitudes, regardless of the host operating system. The DECIMAL(p) data type has the following disadvantages: ■ Performance of arithmetic operations and sorts on DECIMAL(p) values is somewhat slower than on FLOAT values. ■ Many programming languages do not support the DECIMAL(p) data format in the same way that they support FLOAT and INTEGER. When a program extracts a DECIMAL(p) value from the database, it might have to convert the value to another format for processing. Choosing Data Types 3-11 Numeric Types Fixed-Precision Numbers: DECIMAL and MONEY Most commercial applications need to store numbers that have fixed numbers of digits on the right and left of the decimal point. For example, amounts in U.S. currencies are written with two digits to the right of the decimal point. Normally, you also know the number of digits needed on the left, depending on the kind of transactions that are recorded: perhaps 5 digits for a personal budget, 7 digits for a small business, and 12 or 13 digits for a national budget. These numbers are fixed-point numbers because the decimal point is fixed at a specific place, regardless of the value of the number. The DECIMAL(p,s) data type is designed to hold decimal numbers. When you specify a column of this type, you write its precision (p) as the total number of digits that it can store, from 1 to 32. You write its scale (s) as the number of those digits that fall to the right of the decimal point. (Figure 3-2 shows the relation between precision and scale.) Scale can be zero, meaning it stores only whole numbers. When only whole numbers are stored, DECIMAL(p,s) provides a way of storing integers of up to 32 digits. precision: 8 digits DECIMAL(8,3) 31964.535 Figure 3-2 The Relation Between Precision and Scale in a FixedPoint Number scale: 3 digits Like the DECIMAL(p) data type, DECIMAL(p,s) takes up space in proportion to its precision. One value occupies (p +3)/2 bytes (if scale is even) or (p + 4)/2 bytes (if scale is odd), rounded up to a whole number of bytes. The MONEY type is identical to DECIMAL(p,s) but with one extra feature. Whenever the database server converts a MONEY value to characters for display, it automatically includes a currency symbol. The advantages of DECIMAL(p,s) over INTEGER and FLOAT are that much greater precision is available (up to 32 digits as compared to 10 digits for INTEGER and 16 digits for FLOAT), and both the precision and the amount of storage required can be adjusted to suit the application. 3-12 IBM Informix Guide to Database Design and Implementation Chronological Data Types The disadvantages of DECIMAL(p,s) are that arithmetic operations are less efficient and that many programming languages do not support numbers in this form. Therefore, when a program extracts a number, it usually must convert the number to another numeric form for processing. Choosing a Currency Format GLS Each nation has its own way to display money values. When an Informix database server displays a MONEY value, it refers to a currency format that the user specifies. The default locale specifies a U.S. English currency format of the following form: $7,822.45 For non-English locales, you can use the MONETARY category of the locale file to change the current format. For more information on how to use locales, see the Informix Guide to GLS Functionality. ♦ To customize this currency format, choose your locale appropriately or set the DBMONEY environment variable. For more information, see the Informix Guide to SQL: Reference. Chronological Data Types The chronological data types record time. The DATE data type stores a calendar date. DATETIME records a point in time to any degree of precision from a year to a fraction of a second. The INTERVAL data type stores a span of time; that is, a duration. Calendar Dates: DATE The DATE data type stores a calendar date. A DATE value is actually a signed integer whose contents are interpreted as a count of full days since midnight on December 31, 1899. Most often it holds a positive count of days into the current century. The DATE format has ample precision to carry dates into the far future (58,000 centuries). Negative DATE values are interpreted as counts of days prior to the epoch date; that is, a DATE value of -1 represents the day December 30, 1899. Choosing Data Types 3-13 Chronological Data Types Because DATE values are integers, the values can be used in arithmetic expressions. For example, you can take the average of a DATE column, or you can add 7 or 365 to a DATE column. In addition, a rich set of functions exists specifically for manipulating DATE values. For more information, see the Informix Guide to SQL: Syntax. The DATE data type is compact, at 4 bytes per item. Arithmetic functions and comparisons execute quickly on a DATE column. GLS Choosing a Date Format You can punctuate and order the components of a date in many ways. When an application displays a DATE value, it refers to a date format that the user specifies. The default locale specifies a U.S. English date format of the form: 10/25/2001 To customize this date format, choose your locale appropriately or set the DBDATE environment variable. For more information, see the Informix Guide to SQL: Reference. For languages other than English, you can use the TIME category of the locale file to change the date format. For more information on how to use locales, refer to the Informix Guide to GLS Functionality. Exact Points in Time: DATETIME The DATETIME data type stores any moment in time in the era that begins 1 A.D. In fact, DATETIME is really a family of 28 data types, each with a different precision. When you define a DATETIME column, you specify its precision. The column can contain any sequence from the list year, month, day, hour, minute, second, and fraction. Thus, you can define a DATETIME column that stores only a year, only a month and day, or a date and time that is exact to the hour or even to the millisecond. Figure 3-3 on page 3-15 shows that the size of a DATETIME value ranges from 2 to 11 bytes depending on its precision. 3-14 IBM Informix Guide to Database Design and Implementation Chronological Data Types The advantage of DATETIME is that it can store specific date and time values. A DATETIME column typically requires more storage space than a DATE column, depending on the DATETIME qualifiers. DATETIME also has an inflexible display format. For information about how to circumvent the display format, see “Forcing the Format of a DATETIME or INTERVAL Value” on page 3-16. Precision Size* Precision Size* year to year year to month year to day year to hour year to minute year to second year to fraction (f) month to month month to day month to hour month to minute month to second month to fraction(f) day to day 3 4 5 6 7 8 8 + f/2 2 3 4 5 6 6 + f/2 2 day to hour day to minute day to second day to fraction(f) hour to hour hour to minute hour to second hour to fraction(f) minute to minute minute to second minute to fraction(f) second to second second to fraction(f) fraction to fraction(f) 3 4 5 5 + f/2 2 3 4 4 + f/2 2 3 3 + f/2 2 2 + f/2 1 + f/2 Figure 3-3 Precisions for the DATETIME Data Type * When f is odd, round the size to the next full byte. Durations: INTERVAL The INTERVAL data type stores a duration, that is, a length of time. The difference between two DATETIME values is an INTERVAL, which represents the span of time that separates them. The following examples might help to clarify the differences: ■ An employee began working on January 21, 1997 (either a DATE or a DATETIME). ■ She has worked for 254 days (an INTERVAL value, the difference between the TODAY function and the starting DATE or DATETIME value). ■ She begins work each day at 0900 hours (a DATETIME value). Choosing Data Types 3-15 Chronological Data Types ■ She works 8 hours (an INTERVAL value) with 45 minutes for lunch (another INTERVAL value). ■ Her quitting time is 1745 hours (the sum of the DATETIME when she begins work and the two INTERVALs). Like DATETIME, INTERVAL is a family of data types with different precisions. An INTERVAL value can represent a count of years and months; or it can represent a count of days, hours, minutes, seconds, or fractions of seconds; 18 precisions are possible. The size of an INTERVAL value ranges from 2 to 12 bytes, depending on the formulas that Figure 3-4 shows. Precision Size* Precision Size* year(p) to year year(p) to month month(p) to month day(p) to day day(p) to hour day(p) to minute day(p) to second day(p) to fraction(f) hour(p) to hour 1 + p/2 2 + p/2 1 + p/2 1 + p/2 2 + p/2 3 + p/2 4 + p/2 5 + (p + f)/2 1 + p/2 hour(p) to minute hour(p) to second hour(p) to fraction(f) minute(p) to minute minute(p) to second minute(p) to fraction(f) second(p) to second second(p) to fraction(f) fraction to fraction(f) 2 + p/2 3 + p/2 4 + (p + f)/2 1 + p/2 2 + p/2 3 + (p + f)/2 1 + p/2 2 + (p + f)/2 1 + f/2 Figure 3-4 Precisions for the INTERVAL Data Type * Round a fractional size to the next full byte. INTERVAL values can be negative as well as positive. You can add or subtract them, and you can scale them by multiplying or dividing by a number. This is not true of either DATE or DATETIME. You can reasonably ask, “What is one-half the number of days until April 23?” but not, “What is one-half of April 23?” Forcing the Format of a DATETIME or INTERVAL Value The database server always displays the components of an INTERVAL or DATETIME value in the order year-month-day hour:minute:second.fraction. It does not refer to the date format that is defined to the operating system, as it does when it formats a DATE value. 3-16 IBM Informix Guide to Database Design and Implementation BOOLEAN Data Type You can write a SELECT statement that displays the date part of a DATETIME value in the system-defined format. The trick is to isolate the component fields with the EXTEND function and pass them through the MDY() function, which converts them to a DATE. The following code shows a partial example: SELECT ... MDY ( EXTEND (DATE_RECEIVED, MONTH TO MONTH), EXTEND (DATE_RECEIVED, DAY TO DAY), EXTEND (DATE_RECEIVED, YEAR TO YEAR)) FROM RECEIPTS ... GLS Choosing a DATETIME Format When an application displays a DATETIME value, it refers to a DATETIME format that the user specifies. The default locale specifies a U.S. English DATETIME format of the following form: 2001-10-25 18:02:13 For languages other than English, use the TIME category of the locale file to change the DATETIME format. For more information on how to use locales, see the Informix Guide to GLS Functionality. To customize this DATETIME format, choose your locale appropriately or set the GL_DATETIME or DBTIME environment variable. For more information about these environment variables, see the Informix Guide to GLS Functionality. IDS BOOLEAN Data Type The BOOLEAN data type is a one byte data type. The legal values for Boolean are true ('t'), false ('f'), or NULL. The values are case insensitive. You can compare a BOOLEAN column against another BOOLEAN column or against Boolean values. For example, you might use these SELECT statements: SELECT * FROM sometable WHERE bool_col = 't'; SELECT * FROM sometable WHERE bool_col IS NULL; Choosing Data Types 3-17 Character Data Types GLS Character Data Types Informix database servers support several character data types, including CHAR, NCHAR, and NVARCHAR, the special-use character data type. Character Data: CHAR(n) and NCHAR(n) The CHAR(n) data type contains a sequence of n bytes. These characters can be a mixture of English and non-English characters and can be either single byte or multibyte (Asian). The length n ranges from 1 to 32,767. Whenever the database server retrieves or stores a CHAR(n) value, it transfers exactly n bytes. If an inserted value is shorter than n, the database server extends the value with single-byte ASCII space characters to make up n bytes. If an inserted value exceeds n bytes, the database server truncates the extra characters without returning an error message. Thus the semantic integrity of data for a CHAR(n) column or variable is not enforced when the value that is inserted or updated exceeds n bytes. Data in CHAR columns is sorted in code-set order. For example, in the ASCII code set, the character a has a code-set value of 97, b has 98, and so forth. The database server sorts CHAR(n) data in this order. The NCHAR(n) data type also contains a sequence of n bytes. These characters can be a mixture of English and non-English characters and can be either single byte or multibyte (Asian). The length of n has the same limits as the CHAR(n) data type. Whenever an NCHAR(n) value is retrieved or stored, exactly n bytes are transferred. The number of characters transferred can be less than the number of bytes if the data contains multibyte characters. If an inserted value is shorter than n, the database server extends the value with space characters to make up n bytes. The database server sorts data in NCHAR(n) columns according to the order that the locale specifies. For example, the French locale specifies that the character ê is sorted after the value e but before the value f. In other words, the sort order that the French locale dictates is e, ê, f, and so on. For more information on how to use locales, refer to the Informix Guide to GLS Functionality. 3-18 IBM Informix Guide to Database Design and Implementation Character Data Types Tip: The only difference between CHAR(n) and NCHAR(n) data is how you sort and compare the data. You can store non-English characters in a CHAR(n) column. However, because the database server uses code-set order to perform any sorting or comparison on CHAR(n) columns, you might not obtain the results in the order that you expect. A CHAR(n) or NCHAR(n) value can include tabs and spaces but normally contains no other nonprinting characters. When you insert rows with INSERT or UPDATE, or when you load rows with a utility program, no means exist for entering nonprintable characters. However, when a program that uses embedded SQL creates rows, the program can insert any character except the null (binary zero) character. It is not a good idea to store nonprintable characters in a character column because standard programs and utilities do not expect them. The advantage of the CHAR(n) or NCHAR(n) data type is its availability on all database servers. The only disadvantage of CHAR(n) or NCHAR(n) is its fixed length. When the length of data values varies widely from row to row, space is wasted. Variable-Length Strings: CHARACTER VARYING(m,r), VARCHAR(m,r), NVARCHAR(m,r), and LVARCHAR Often the items in a character column are different lengths; that is, many are an average length and only a few are the maximum length. For each of the following data types, m represents the maximum number of bytes and r represents the minimum number of bytes. The following data types are designed to save disk space when you store such data: ■ CHARACTER VARYING (m,r). The CHARACTER VARYING (m,r) data type contains a sequence of, at most, m bytes or at the least, r bytes. This data type is the ANSI-compliant format for character data of varying length. CHARACTER VARYING (m,r), supports code-set order for comparisons of its character data. ■ VARCHAR (m,r). VARCHAR (m,r) is an Informix-specific data type for storing character data of varying length. In functionality, it is the same as CHARACTER VARYING(m,r). Choosing Data Types 3-19 Character Data Types IDS ■ NVARCHAR (m,r). NVARCHAR (m,r) is also an Informix-specific data type for storing character data of varying length. It compares character data in the order that the locale specifies. ■ LVARCHAR. LVARCHAR is an Informix-specific data type for storing character data of varying length for values greater than 256 bytes but less than 2 kilobytes. LVARCHAR supports code-set order for comparisons of its character data. ♦ Tip: The difference in the way data is compared distinguishes NVARCHAR(m,r) data from CHARACTER VARYING(m,r) or VARCHAR(m,r) data. For more information about how the locale determines code-set and sort order, see “Character Data: CHAR(n) and NCHAR(n)” on page 3-18. When you define columns of these data types, you specify m as the maximum number of bytes. If an inserted value consists of fewer than m bytes, the database server does not extend the value with single-byte spaces (as with CHAR(n) and NCHAR(N) values.) Instead, it stores only the actual contents on disk with a 1-byte length field. The limit on m is 254 bytes for indexed columns and 255 bytes for non-indexed columns. The second parameter, r, is an optional reserve length that sets a lower limit on the number of bytes that a value being stored on disk requires. Even if a value requires fewer than r bytes, r bytes are nevertheless allocated to hold it. The purpose is to save time when rows are updated. (See “Variable-Length Execution Time” on page 3-21.) The advantages of the CHARACTER VARYING(m,r) or VARCHAR(m,r) data type over the CHAR(n) data type are as follows: ■ It conserves disk space when the number of bytes that data items require vary widely or when only a few items require more bytes than average. ■ Queries on the more compact tables can be faster. These advantages also apply to the NVARCHAR(m,r) data type in comparison to the NCHAR(n) data type. 3-20 IBM Informix Guide to Database Design and Implementation Character Data Types The following list describes the disadvantages of using varying-length data types: ■ They do not allow lengths that exceed 255 bytes. ■ Table updates can be slower in some circumstances. ■ They are not available with all Informix database servers. Variable-Length Execution Time When you use any of the CHARACTER VARYING(m,r), VARCHAR(m,r), or NVARCHAR(m,r) data types, the rows of a table have a varying number of bytes instead of a fixed number of bytes. The speed of database operations is affected when the rows of a table have a varying number of bytes. Because more rows fit in a disk page, the database server can search the table with fewer disk operations than if the rows were of a fixed number of bytes. As a result, queries can execute more quickly. Insert and delete operations can be a little quicker for the same reason. When you update a row, the amount of work the database server must perform depends on the number of bytes in the new row as compared with the number of bytes in the old row. If the new row uses the same number of bytes or fewer, the execution time is not significantly different than it is with fixed-length rows. However, if the new row requires a greater number of bytes than the old one, the database server might have to perform several times as many disk operations. Thus, updates of a table that use CHARACTER VARYING(m,r), VARCHAR(m,r), or NVARCHAR(m,r) data can sometimes be slower than updates of a fixed-length field. To mitigate this effect, specify r as a number of bytes that encompasses a high proportion of the data items. Then most rows use the reserve number of bytes, and padding wastes only a little space. Updates are slow only when a value that uses the reserve number of bytes is replaced with a value that uses more than the reserve number of bytes. Choosing Data Types 3-21 Character Data Types Large Character Objects: TEXT The TEXT data type stores a block of text. It is designed to store self-contained documents: business forms, program source or data files, or memos. Although you can store any data in a TEXT item, Informix tools expect a TEXT item to be printable, so restrict this data type to printable ASCII text. XPS Extended Parallel Server supports the TEXT data type in columns but does not allow you to store a TEXT column in a blobspace or use a TEXT value in an SPL routine. ♦ TEXT values are not stored with the rows of which they are a part. They are allocated in whole disk pages, usually in areas separate from rows. For more information, see your Administrator’s Guide. The advantage of the TEXT data type over CHAR(n) and VARCHAR(m,r) is that the size of a TEXT data item has no limit except the capacity of disk storage to hold it. The disadvantages of the TEXT data type are as follows: ■ It is allocated in whole disk pages, so a short item wastes space. ■ Restrictions apply on how you can use a TEXT column in an SQL statement. (See “Using TEXT and BYTE Data Types” on page 3-23.) ■ It is not available with all Informix database servers. Binary Objects: BYTE The BYTE data type is designed to hold any data a program can generate: graphic images, program object files, and documents saved by any word processor or spreadsheet. The database server permits any kind of data of any length in a BYTE column. XPS Extended Parallel Server supports the BYTE data type in columns, but does not allow you to store a BYTE column in a blobspace or use a BYTE value in an SPL routine. ♦ As with TEXT, BYTE data items usually are stored in whole disk pages in disk areas separate from normal row data. The advantage of the BYTE data type, as opposed to TEXT or CHAR(n), is that it accepts any data. Its disadvantages are the same as those of the TEXT data type. 3-22 IBM Informix Guide to Database Design and Implementation Character Data Types Using TEXT and BYTE Data Types The database server stores and retrieves TEXT and BYTE columns. To fetch and store TEXT or BYTE values, you normally use programs written in a language that supports embedded SQL, such as Informix ESQL/C. In such a program, you can fetch, insert, or update a TEXT or BYTE value in a manner similar to the way you read or write a sequential file. In any SQL statement, interactive or programmed, a TEXT or BYTE column cannot be used in the following ways: ■ In arithmetic or Boolean expressions ■ In a GROUP BY or ORDER BY clause ■ In a UNIQUE test ■ For indexing, either by itself or as part of a composite index In a SELECT statement that you enter interactively or in a form or report, you can perform the following operations on a TEXT or BYTE value: ■ Select the column name, optionally with a subscript to extract part of it. ■ Use LENGTH(column_name) to return the length of the column. ■ Test the column with the IS [NOT] NULL predicate. In an interactive INSERT statement, you can use the VALUES clause to insert a TEXT or BYTE value, but the only value that you can give that column is null. However, you can use the SELECT form of the INSERT statement to copy a TEXT or BYTE value from another table. In an interactive UPDATE statement, you can update a TEXT or BYTE column to null or to a subquery that returns a TEXT or BYTE column. Choosing Data Types 3-23 Null Values Changing the Data Type After the table is built, you can use the ALTER TABLE statement to change the data type that is assigned to a column. Although such alterations are sometimes necessary, you should avoid them for the following reasons: ■ To change a data type, the database server must copy and rebuild the table. For large tables, copying and rebuilding can take a lot of time and disk space. ■ Some data type changes can cause a loss of information. For example, when you change a column from a longer to a shorter character type, long values are truncated; when you change to a lessprecise numeric type, low-order digits are truncated. ■ Existing programs, forms, reports, and stored queries might also have to be changed. Null Values In most cases, columns in a table can contain null values. A null value means that the value for the column can be unknown or not applicable. For example, in the telephone directory example in Chapter 2, the anniv column of the name table can contain null values; if you do not know the person’s anniversary, you do not specify it. Do not confuse null value with zero or blank value. For example, the following statement inserts a row into the manufact table of the stores_demo database and specifies that the value for the lead_time column is null: INSERT INTO manufact VALUES ('DRM', 'Drumm', NULL) IDS 3-24 Collection columns cannot contain null elements. Chapter 7 describes collection data types. ♦ IBM Informix Guide to Database Design and Implementation Default Values Default Values A default value is the value that is inserted into a column when an explicit value is not specified in an INSERT statement. A default value can be a literal character string that you define or one of the following SQL constant expressions: ■ USER ■ CURRENT ■ TODAY ■ DBSERVERNAME Not all columns need default values, but as you work with your data model, you might discover instances where the use of a default value saves dataentry time or prevents data-entry error. For example, the telephone directory model has a state column. While you look at the data for this column, you discover that more than 50 percent of the addresses list California as the state. To save time, specify the string CA as the default value for the state column. Check Constraints Check constraints specify a condition or requirement on a data value before data can be assigned to a column during an INSERT or UPDATE statement. If a row evaluates to false for any of the check constraints that are defined on a table during an insert or update, the database server returns an error. However, the database server does not report an error or reject the record when the check constraint evaluates to NULL. For this reason, you might want to use both a check constraint and a NOT NULL constraint when you create a table. To define a constraint, use the CREATE TABLE or ALTER TABLE statements. For example, the following requirement constrains the values of an integer domain to a certain range: Customer_Number >= 50000 AND Customer_Number <= 99999 Choosing Data Types 3-25 Referential Constraints To express constraints on character-based domains, use the MATCHES predicate and the regular-expression syntax that it supports. For example, the following constraint restricts a telephone domain to the form of a U.S. local telephone number: vce_num MATCHES '[2-9][2-9][0-9]-[0-9][0-9][0-9][0-9]' For additional information about check constraints, see the CREATE TABLE and ALTER TABLE statements in the Informix Guide to SQL: Syntax. Referential Constraints You can identify the primary and foreign keys in each table to place referential constraints on columns. Chapter 2, “Building a Relational Data Model,” discusses how you identify these keys. Almost all data type combinations must match when you are trying to pick columns for primary and foreign keys. For example, if you define a primary key as a CHAR data type, you must also define the foreign key as a CHAR data type. However, when you specify a SERIAL data type on a primary key in one table, you specify an INTEGER on the foreign key of the relationship. Similarly, when you specify a SERIAL8 data type on a primary key in one table, you specify an INT8 on the foreign key of the relationship. The only data type combinations that you can mix in a relationship are as follows: IDS ■ SERIAL and INTEGER ■ SERIAL8 and INT8 ♦ For information about how to create a table with referential constraints, see the CREATE TABLE and ALTER TABLE statements in the Informix Guide to SQL: Syntax. 3-26 IBM Informix Guide to Database Design and Implementation Chapter Implementing a Relational Data Model In This Chapter . . . . . . . . . . . . . . . . . . . . 4-3 . . . . . . . . . . . . . . . . . . . . . . . . . . . . . . . . . . . . . . . . . . . . . . . . . . . . . . . . . . . . . . . . . . . . . . . . . . . . . . . . . . . . . . . . . . . . . . . . . . . . . . . . . . . . . . . . . . . . . . . . . . . . . . . . . . . . . . . . . . . . . . . . . . . . . . . . . . . . . . . . . . . . . . . . . . . . . . . . . . . . . . . . . . . 4-3 4-4 4-4 4-5 4-5 4-6 4-9 4-9 4-10 4-10 4-11 4-11 4-13 4-14 4-14 4-14 4-14 Populating the Database . . . . . . . . . Moving Data from Other Informix Databases Loading Source Data into a Table . . . . Performing Bulk-Load Operations . . . . . . . . . . . . . . . . . . . . . . . . . . . . . . . . . . . . 4-15 4-17 4-17 4-18 Creating the Database . . . . . . . Using CREATE DATABASE . . . Avoiding Name Conflicts . . . Selecting a Dbspace . . . . . Choosing the Type of Logging . Using CREATE TABLE . . . . . Creating a Fragmented Table . . Dropping or Modifying a Table . Using CREATE INDEX . . . . . Composite Indexes . . . . . Bidirectional Traversal of Indexes Using Synonyms with Table Names. Using Synonym Chains . . . . . Using Command Scripts . . . . Capturing the Schema . . . . Executing the File . . . . . An Example . . . . . . . 4 4-2 IBM Informix Guide to Database Design and Implementation In This Chapter This chapter shows how to use SQL syntax to implement the data model that Chapter 2 describes. In other words, it shows you how to create a database and tables and populate the tables with data. This chapter also discusses database logging options, table synonyms, and command scripts. Creating the Database Now you are ready to create the data model as tables in a database. You do this with the CREATE DATABASE, CREATE TABLE, and CREATE INDEX statements. The syntax for these statements is described in the Informix Guide to SQL: Syntax. This section discusses how to use the CREATE DATABASE and CREATE TABLE statements to implement a data model. Remember that the telephone directory data model is used for illustrative purposes only. For the sake of the example, it is translated into SQL statements. You might have to create the same database model more than once. You can store the statements that create the model and later re-execute those statements. For more information, see “Using Command Scripts” on page 4-13. When the tables exist, you must populate them with rows of data. You can do this manually, with a utility program, or with custom programming. Implementing a Relational Data Model 4-3 Using CREATE DATABASE Using CREATE DATABASE A database is a container that holds all parts of a data model. These parts include not only the tables but also views, indexes, synonyms, and other objects that are associated with the database. You must create a database before you can create anything else. GLS When the database server creates a database, it stores the locale of the database that is derived from the DB_LOCALE environment variable in its system catalog. This locale determines how the database server interprets character data that is stored within the database. By default, the database locale is the U.S. English locale that uses the ISO8859-1 code set. For information on how to use alternative locales, see the Informix Guide to GLS Functionality. ♦ When the database server creates a database, it sets up records that show the existence of the database and its mode of logging. These records are not visible to operating-system commands because the database server manages disk space directly. Avoiding Name Conflicts Normally, only one copy of the database server is running on a computer, and the database server manages the databases that belong to all users of that computer. The database server keeps only one list of database names. The name of your database must be different from that of any other database that the database server manages. (It is possible to run more than one copy of the database server. You can create more than one copy of the database server, for example, to create a safe environment for testing apart from the operational data. In this case, be sure that you are using the correct database server when you create the database, and again when you access it later.) 4-4 IBM Informix Guide to Database Design and Implementation Using CREATE DATABASE Selecting a Dbspace The database server lets you create the database in a particular dbspace. A dbspace is a named area of disk storage. Ask your database server administrator whether you should use a particular dbspace. You can put a database in a separate dbspace to isolate it from other databases or to locate it on a particular disk device. For information about dbspaces and their relationship to disk devices, see your Administrator’s Guide. For information about how to fragment the tables of your database across multiple dbspaces, see Chapter 10, “Building a Dimensional Data Model.” Some dbspaces are mirrored (duplicated on two disk devices for high reliability). Your database can be put in a mirrored dbspace if its contents are of exceptional importance. Choosing the Type of Logging To specify a logging or nonlogging database, use the CREATE DATABASE statement. The database server offers the following choices for transaction logging: ■ No logging at all. Informix does not recommend this choice. If you lose the database because of a hardware failure, you lose all data alterations since the last backup. CREATE DATABASE db_with_no_log When you do not choose logging, BEGIN WORK and other SQL statements that are related to transaction processing are not permitted in the database. This situation affects the logic of programs that use the database. Extended Parallel Server does not support nonlogging databases. However, the database server does support nonlogging tables. For more information, see “Logging and Nonlogging Tables in Extended Parallel Server” on page 11-12. ♦ XPS ■ Regular (unbuffered) logging. This choice is best for most databases. In the event of a failure, you lose only uncommitted transactions. CREATE DATABASE a_logged_db WITH LOG Implementing a Relational Data Model 4-5 Using CREATE TABLE ■ Buffered logging. If you lose the database, you lose few or possibly none of the most recent alterations. In return for this small risk, performance during alterations improves slightly. CREATE DATABASE buf_log_db WITH BUFFERED LOG Buffered logging is best for databases that are updated frequently (so that speed of updating is important), but you can re-create the updates from other data in the event of a failure. Use the SET LOG statement to alternate between buffered and regular logging. ■ ANSI-compliant logging. This logging is the same as regular logging, but the ANSI rules for transaction processing are also enforced. For more information, refer to “Using ANSI-Compliant Databases” on page 1-4. CREATE DATABASE std_rules_db WITH LOG MODE ANSI The design of ANSI SQL prohibits the use of buffered logging. When you create an ANSI-compliant database, you cannot turn off transaction logging. IDS For databases that are not ANSI-compliant, the database server administrator (DBA) can turn transaction logging on and off or change from buffered to unbuffered logging. For example, you might turn logging off before inserting a large number of new rows. You can use Informix Server Administrator (ISA) or the ondblog and ontape utilities to change the logging status or buffering mode. For information about these tools, refer to the Administrator’s Guide for Informix Dynamic Server. You can also use the SET LOG statement to change between buffered and unbuffered logging. For information about SET LOG, see your Informix Guide to SQL: Syntax. ♦ Using CREATE TABLE Use the CREATE TABLE statement to create each table that you design in the data model. This statement has a complicated form, but it is basically a list of the columns of the table. For each column, you supply the following information: 4-6 ■ The name of the column ■ The data type (from the domain list you made) IBM Informix Guide to Database Design and Implementation Using CREATE TABLE The statement might also contain one or more of the following constraints: ■ A primary-key constraint ■ A foreign-key constraint ■ A not null constraint ■ A unique constraint ■ A default constraint ■ A check constraint In short, the CREATE TABLE statement is an image in words of the table as you drew it in the data-model diagram in Figure 2-21 on page 2-34. The following example shows the statements for the telephone directory data model: CREATE TABLE name ( rec_num SERIAL PRIMARY KEY, lname CHAR(20), fname CHAR(20), bdate DATE, anniv DATE, email VARCHAR(25) ); CREATE TABLE child ( child CHAR(20), rec_num INT, FOREIGN KEY (rec_num) REFERENCES NAME (rec_num) ); CREATE TABLE address ( id_num SERIAL PRIMARY KEY, rec_num INT, street VARCHAR (50,20), city VARCHAR (40,10), state CHAR(5) DEFAULT ’CA’, zipcode CHAR(10), FOREIGN KEY (rec_num) REFERENCES name (rec_num) ); CREATE TABLE voice Implementing a Relational Data Model 4-7 Using CREATE TABLE ( vce_num CHAR(13) PRIMARY KEY, vce_type CHAR(10), rec_num INT, FOREIGN KEY (rec_num) REFERENCES name (rec_num) ); CREATE TABLE fax ( fax_num CHAR(13), oper_from DATETIME HOUR TO MINUTE, oper_till DATETIME HOUR TO MINUTE, PRIMARY KEY (fax_num) ); CREATE TABLE faxname ( fax_num CHAR(13), rec_num INT, PRIMARY KEY (fax_num, rec_num), FOREIGN KEY (fax_num) REFERENCES fax (fax_num), FOREIGN KEY (rec_num) REFERENCES name (rec_num) ); CREATE TABLE modem ( mdm_num CHAR(13) PRIMARY KEY, rec_num INT, b_type CHAR(5), FOREIGN KEY (rec_num) REFERENCES name (rec_num) ); In each of the preceding examples, the table data gets stored in the same dbspace that you specify for the database because the CREATE TABLE statement does not specify a storage option. You can specify a dbspace for the table that is different from the storage location of the database or fragment the table into multiple dbspaces. For information about the different storage options Informix database servers support, see the CREATE TABLE statement in the Informix Guide to SQL: Syntax. The following section shows one way to fragment a table into multiple dbspaces. 4-8 IBM Informix Guide to Database Design and Implementation Using CREATE TABLE Creating a Fragmented Table To control where data is stored at the table level, you can use a FRAGMENT BY clause when you create the table. The following statement creates a fragmented table that stores data according to a round-robin distribution scheme. In this example, the rows of data are distributed more or less evenly across the fragments dbspace1, dbspace2, and dbspace3. CREATE TABLE name ( rec_num SERIAL PRIMARY KEY, lname CHAR(20), fname CHAR(20), bdate DATE, anniv DATE, email VARCHAR(25) ) FRAGMENT BY ROUND ROBIN IN dbspace1, dbspace2, dbspace3; For more information about the different distribution schemes that you can use to create fragmented tables, see Chapter 5. Dropping or Modifying a Table Use the DROP TABLE statement to remove a table with its associated indexes and data. To change the definition of a table, for example, by adding a check constraint, use the ALTER TABLE statement. Use the TRUNCATE statement to remove all rows from a table and all corresponding index data while preserving the definition of the table. For information about these commands, refer to Informix Guide to SQL: Syntax. Implementing a Relational Data Model 4-9 Using CREATE INDEX Using CREATE INDEX Use the CREATE INDEX statement to create an index on one or more columns in a table and, optionally, to cluster the physical table in the order of the index. This section describes some of the options available when you create indexes. For more information about the CREATE INDEX statement, see the Informix Guide to SQL: Syntax. Suppose you create table customer: CREATE TABLE customer ( cust_num SERIAL(101) UNIQUE fname CHAR(15), lname CHAR(15), company CHAR(20), address1 CHAR(20), address2 CHAR(20), city CHAR(15), state CHAR(2), zipcode CHAR(5), phone CHAR(18) ); The following statement shows how to create an index on the lname column of the customer table: CREATE INDEX lname_index ON customer (lname); Composite Indexes You can create an index that includes multiple columns. For example, you might create the following index: CREATE INDEX c_temp2 ON customer (cust_num, zipcode); 4-10 IBM Informix Guide to Database Design and Implementation Using Synonyms with Table Names Bidirectional Traversal of Indexes The ASC and DESC keywords specify the order in which the database server maintains the index. When you create an index on a column and omit the keywords or specify the ASC keyword, the database server stores the key values in ascending order. If you specify the DESC keyword, the database server stores the key values in descending order. Ascending order means that the key values are stored in order from the smallest key to the largest key. For example, if you create an ascending index on the lname column of the customer table, last names are stored in the index in the following order: Albertson, Beatty, Currie. Descending order means that the key values are stored in order from the largest key to the smallest key. For example, if you create a descending index on the lname column of the customer table, last names are stored in the index in the following order: Currie, Beatty, Albertson. The bidirectional traversal capability of the database server lets you create just one index on a column and use that index for queries that specify sorting of results in either ascending or descending order of the sort column. Using Synonyms with Table Names A synonym is a name that you can use in place of another name. You use the CREATE SYNONYM statement to provide an alternative name for a table or view. Typically, you use a synonym to refer to tables that are not in the current database. For example, you might execute the following statements to create synonyms for the customer and orders table names: CREATE SYNONYM mcust FOR masterdb@central:customer; CREATE SYNONYM bords FOR sales@boston:orders; After you create the synonym, you can use it anywhere in the current database that you might use the original table name, as the following example shows: SELECT bords.order_num, mcust.fname, mcust.lname FROM mcust, bords WHERE mcust.customer_num = bords.Customer_num INTO TEMP mycopy; Implementing a Relational Data Model 4-11 Using Synonyms with Table Names The CREATE SYNONYM statement stores the synonym name in the system catalog table syssyntable in the current database. The synonym is available to any query made in that database. A short synonym makes it easier to write queries, but synonyms can play another role. They allow you to move a table to a different database, or even to a different computer, and keep your queries the same. Suppose you have several queries that refer to the tables customer and orders. The queries are embedded in programs, forms, and reports. The tables are part of the demonstration database, which is kept on database server avignon. Now you decide to make the same programs, forms, and reports available to users of a different computer on the network (database server nantes). Those users have a database that contains a table named orders that contains the orders at their location, but they need access to the table customer at avignon. To those users, the customer table is external. Does this mean you must prepare special versions of the programs and reports, versions in which the customer table is qualified with a database server name? A better solution is to create a synonym in the users’ database, as the following example shows: DATABASE stores_demo@nantes; CREATE SYNONYM customer FOR stores_demo@avignon:customer; When the stored queries are executed in your database, the name customer refers to the actual table. When they are executed in the other database, the name is translated through the synonym into a reference to the table that exists on the database server avignon. 4-12 IBM Informix Guide to Database Design and Implementation Using Synonym Chains Using Synonym Chains To continue the preceding example, suppose that a new computer is added to your network. Its name is db_crunch. The customer table and other tables are moved to it to reduce the load on avignon. You can reproduce the table on the new database server easily enough, but how can you redirect all access to it? One way is to install a synonym to replace the old table, as the following example shows: DATABASE stores_demo@avignon EXCLUSIVE; RENAME TABLE customer TO old_cust; CREATE SYNONYM customer FOR stores_demo@db_crunch:customer; CLOSE DATABASE; When you execute a query within stores_demo@avignon, a reference to table customer finds the synonym and is redirected to the version on the new computer. Such redirection also happens for queries that are executed from database server nantes in the previous example. The synonym in the database stores_demo@nantes still redirects references to customer to database stores_demo@avignon; the new synonym there sends the query to database stores_demo@db_crunch. Chains of synonyms can be useful when, as in this example, you want to redirect all access to a table in one operation. However, you should update the databases of all users as soon as possible so their synonyms point directly to the table. If you do not, you incur extra overhead when the database server handles the extra synonyms, and the table cannot be found if any computer in the chain is down. You can run an application against a local database and later run the same application against a database on another computer. The program runs equally well in either case (although it can run more slowly on the network database). As long as the data model is the same, a program cannot tell the difference between one database and another. Implementing a Relational Data Model 4-13 Using Command Scripts Using Command Scripts You can enter SQL statements interactively to create the database and tables. In some cases, you might have to create the database and tables two or more times. For example, you might have to create the database again to make a production version after a test version is satisfactory, or you might have to implement the same data model on several computers. To save time and reduce the chance of errors, you can put all the statements to create a database in a file and later re-execute those statements. Capturing the Schema The dbschema utility is a program that examines the contents of a database and generates all the SQL statements you require to re-create it. You can build the first version of your database, making changes until it is exactly as you want it. Then you can use dbschema to generate the SQL statements necessary to duplicate it. For information about the dbschema utility, see the Informix Migration Guide. Executing the File Programs that you use to enter SQL statements interactively, such as DB-Access, can be run from a file of commands. You can start DB-Access to read and execute a file of commands that you or dbschema prepared. For more information, see the DB-Access User’s Manual. An Example Most Informix database server products come with a demonstration database (the database that most of the examples in this book use). The demonstration database is delivered as an operating-system command script that calls Informix products to build the database. You can copy this command script and use it as the basis to automate your own data model. 4-14 IBM Informix Guide to Database Design and Implementation Populating the Database Populating the Database For your initial tests, the easiest way to populate the database is to type INSERT statements in DB-Access. For example, to insert a row into the manufact table of the demonstration database, enter the following command in DB-Access: INSERT INTO manufact VALUES ('MKL', 'Martin', 15); If you are preparing an application program, such as an application in C, you can use the application to enter rows into a database table. The following table lists Informix tools that you can use for entering information into your database. The acronyms in the Reference column are explained after the table. Tool Purpose Reference dbaccessdemo dbaccessdemo_ud Prepare and populate sample databases. DB-A SQLR DB-Access Edit a database by entering explicit commands. DB-A SQLS SQL Editor Edit a database by entering explicit commands. online help SQLS onunload & onload utilities Copy an entire database or selected database tables from files on tape or disk. MG AR dbload Load data from one or more text files into one or more existing tables. MG High-Performance Loader Copy an entire database, selected tables, or selected columns of selected tables. HPL LOAD UNLOAD Load data from a text file. SQLS dbexport & dbimport Copy an entire database using text files. MG Enterprise Replication Update selected databases each time a specified table is updated. ER (1 of 2) Implementing a Relational Data Model 4-15 Populating the Database Tool Purpose Reference onxfer Copy data to an Extended Parallel Server from Informix Dynamic Server. MG C application Use SQL commands embedded in a C program to update databases. ESQLC DAPI DBDK Java application Use SQL commands embedded in a Java program to update databases. Java DBDK Gateway applications Access data from non-Informix databases. GM GU (2 of 2) 4-16 Mnemonic Explanation of References Column SQLR Informix Guide to SQL: Reference SQLS Informix Guide to SQL: Syntax MG Informix Migration Guide AR Informix Administrator’s Reference GM Enterprise Gateway Manager User Manual GU Enterprise Gateway User Manual DBDK DataBlade Developer’s Kit ESQL/C Informix ESQL/C Programmer’s Manual Java J/Foundation Developer’s Guide HPL Guide to the High-Performance Loader DB-A DB-Access User’s Manual ER Guide to Informix Enterprise Replication DAPI DataBlade API Programmer’s Manual IBM Informix Guide to Database Design and Implementation Moving Data from Other Informix Databases Moving Data from Other Informix Databases Often, the initial rows of a table can be derived from data that is stored in tables in another Informix database or in operating-system files. The following utilities let you move large quantities of data: ■ onunload/onload utilities ■ dbexport/dbimport utilities ■ dbload utility ■ SQL LOAD statement ■ High Performance Loader (HPL) You can also select the data you want from the other database on another database server as part of an INSERT statement in your database. As the following example shows, you could select information from the items table in the demonstration database to insert into a new table: INSERT INTO newtable SELECT item_num, order_num, quantity, stock_num, manu_code, total_price FROM stores_demo@otherserver:items; Loading Source Data into a Table When the data source is not an Informix database, you must find a way to convert it into a flat ASCII file; that is, a file of printable data in which each line represents the contents of one table row. After you have the data in an ASCII file, you can use the dbload utility to load it into a table. For more information on dbload, see the Informix Migration Guide. The LOAD statement in DB-Access can also load rows from a flat ASCII file. For information about the LOAD and UNLOAD statements, see the Informix Guide to SQL: Syntax. XPS After you have the data in a file, you can use external tables to load it into a table. For more information on external tables, see your Administrator’s Guide. ♦ Implementing a Relational Data Model 4-17 Performing Bulk-Load Operations Performing Bulk-Load Operations Inserting hundreds or thousands of rows goes much faster if you turn off transaction logging. Logging these insertions makes no sense because, in the event of a failure, you can easily re-create the lost work. The following list contains the steps of a large bulk-load operation: ■ If any chance exists that other users are using the database, exclude them with the DATABASE EXCLUSIVE statement. ■ Ask the administrator to turn off logging for the database. The existing logs can be used to recover the database in its present state, and you can run the bulk insertion again to recover those rows if they are lost. You cannot turn off logging for databases that use Extended Parallel Server. However, you can create nonlogging tables (raw permanent or static permanent) in the database. ♦ XPS ■ Perform the statements or run the utilities that load the tables with data. ■ Back up the newly loaded database. Either ask the administrator to perform a full or incremental backup or use the onunload utility to make a binary copy of your database only. ■ 4-18 Restore transaction logging and release the exclusive lock on the database. IBM Informix Guide to Database Design and Implementation Chapter 5 Table Fragmentation Strategies Chapter 6 Granting and Limiting Access to Your Database Section II Managing Databases Chapter Table Fragmentation Strategies In This Chapter . . . . . . . . . . . . . . . . . . 5-3 What Is Fragmentation? . . . . . . . . . . . . Why Use Fragmentation? . . . . . . . . . . Whose Responsibility Is Fragmentation? . . . . . Enhanced Fragmentation for Extended Parallel Server Fragmentation and Logging . . . . . . . . . . . . . . . . . . . . . . . . . . . . . . . . . . 5-3 5-4 5-5 5-5 5-6 Distribution Schemes for Table Fragmentation Expression-Based Distribution Scheme . Range Rule . . . . . . . . . . Arbitrary Rule . . . . . . . . . Using the MOD Function . . . . . Inserting and Updating Rows . . . Round-Robin Distribution Scheme . . . Range Distribution Scheme . . . . . System-Defined Hash Distribution Scheme Hybrid Distribution Scheme . . . . . . . . . . . . . . . . . . . . . . . . . . . . . . . . . . . . . . . . . . . . . . . . . . . . . . . 5-6 5-7 5-8 5-8 5-9 5-9 5-9 5-10 5-11 5-12 Creating a Fragmented Table . . . . . . . . . . . . Creating a New Fragmented Table . . . . . . . . . Creating a Fragmented Table from Nonfragmented Tables . Using More Than One Nonfragmented Table . . . . Using a Single Nonfragmented Table . . . . . . . Rowids in a Fragmented Table . . . . . . . . . . Fragmenting Smart Large Objects . . . . . . . . . . . . . . . . . . . . . . . . . . . . . . 5-12 5-13 5-14 5-15 5-15 5-16 5-17 . . . . . . . . . . . . . . . . . . . . . . . . . . . . . . . . . . . . . . . . . . 5 5-2 Modifying Fragmentation Strategies . . . . . . . . . Reinitializing a Fragmentation Strategy . . . . . . Modifying Fragmentation Strategies for Dynamic Server Using the ADD Clause . . . . . . . . . . . Using the DROP Clause . . . . . . . . . . Using the MODIFY Clause . . . . . . . . . Modifying Fragmentation Strategies for XPS . . . . . Using the INIT Clause . . . . . . . . . . . Using ATTACH and DETACH Clauses . . . . . . . . . . . . . . . . . . . . . . . . . . . . . . . . . . . . . . . . . 5-17 5-18 5-19 5-19 5-20 5-20 5-21 5-21 5-22 Granting and Revoking Privileges from Fragments . . . . . 5-24 IBM Informix Guide to Database Design and Implementation . . . In This Chapter This chapter describes the fragmentation strategies that your database server supports and provides examples of the different fragmentation strategies. It discusses fragmentation, distribution schemes for table fragmentation, creating and modifying fragmented tables, and providing privileges for fragmented tables. For information about how to formulate a fragmentation strategy to reduce data contention and improve query performance, see your Performance Guide. What Is Fragmentation? Fragmentation is a database server feature that allows you to control where data is stored at the table level. Fragmentation enables you to define groups of rows or index keys within a table according to some algorithm or scheme. You can store each group or fragment (also referred to as a partition) in a separate dbspace associated with a specific physical disk. You use SQL statements to create the fragments and assign them to dbspaces. The scheme that you use to group rows or index keys into fragments is called the distribution scheme. The distribution scheme and the set of dbspaces in which you locate the fragments together make up the fragmentation strategy. The decisions that you must make to formulate a fragmentation strategy are discussed in your Performance Guide. After you decide whether to fragment table rows, index keys, or both, and you decide how the rows or keys should be distributed over fragments, you decide on a scheme to implement this distribution. For a description of the distribution schemes that Informix database servers support, see “Distribution Schemes for Table Fragmentation” on page 5-6. Table Fragmentation Strategies 5-3 Why Use Fragmentation? When you create fragmented tables and indexes, the database server stores the location of each table and index fragment with other related information in the system catalog table named sysfragments. You can use this table to access information about your fragmented tables and indexes. If you use a user-defined routine as part of the fragmentation expression, that information is recorded in sysfragexprudrdep. For a description of the information that these system catalog tables contain, see the Informix Guide to SQL: Reference. From the perspective of an end user or client application, a fragmented table is identical to a nonfragmented table. Client applications do not require any modifications to allow them to access the data in fragmented tables. For some distribution schemes, the database server has information on which fragments contain which data, so it can route client requests for data to the appropriate fragment without accessing irrelevant fragments. (The database server cannot route client requests for data to the appropriate fragment for round-robin and some expression-based distribution schemes.) For more information, see “Distribution Schemes for Table Fragmentation” on page 5-6.) Why Use Fragmentation? Consider fragmenting your tables if you have at least one of the following goals: ■ Improve single-user response time ■ Improve concurrency ■ Improve availability ■ Improve backup-and-restore characteristics ■ Improve loading of data Each of the preceding goals has its own implications for the fragmentation strategy that you ultimately implement. Your primary fragmentation goal determines, or at least influences, how you implement your fragmentation strategy. When you decide whether to use fragmentation to meet any of the preceding goals, keep in mind that fragmentation requires some additional administration and monitoring activity. 5-4 IBM Informix Guide to Database Design and Implementation Whose Responsibility Is Fragmentation? For more information about the preceding goals and how to plan a fragmentation strategy, see your Performance Guide. Whose Responsibility Is Fragmentation? Some overlap exists between the responsibilities of the database server administrator and those of the database administrator (DBA) with respect to fragmentation. The DBA creates the database schema, which can include table fragmentation. The database server administrator, on the other hand, is responsible for allocating the disk space in which the fragmented tables will reside. Because neither of these responsibilities can be performed in isolation from the other, to implement fragmentation requires a cooperative effort between the DBA and the database server administrator. This manual describes only those tasks that the DBA performs to implement a fragmentation strategy. For information about the tasks the database server administrator performs to implement a fragmentation strategy, see your Administrator’s Guide and Performance Guide. XPS Enhanced Fragmentation for Extended Parallel Server Extended Parallel Server can fragment tables and indexes across disks that belong to different coservers. Each table fragment can reside in a separate dbspace that is associated with physical disks that belong to different coservers. A dbslice provides the mechanism to manage many dbspaces across multiple coservers. Once you create the dbslices and dbspaces, you can create tables and indexes that are fragmented across multiple coservers. For information on the advantages of fragmenting tables across coservers, see your Performance Guide. For information about how to create dbslices and dbspaces, see your Administrator’s Guide. Table Fragmentation Strategies 5-5 Fragmentation and Logging Fragmentation and Logging IDS XPS With Dynamic Server, fragmented tables can belong to either a logging database or a nonlogging database. As with nonfragmented tables, if a fragmented table is part of a nonlogging database, a potential for data inconsistencies arises if a failure occurs. ♦ With Extended Parallel Server, fragmented tables always belong to a logging database. However, Extended Parallel Server does support several logging and nonlogging table types. For more information, see “Logging and Nonlogging Tables in Extended Parallel Server” on page 11-12. ♦ Distribution Schemes for Table Fragmentation A distribution scheme is a method that the database server uses to distribute rows or index entries to fragments. Informix database servers support the following distribution schemes: ■ Expression-based. This distribution scheme puts rows that contain specified values in the same fragment. You specify a fragmentation expression that defines criteria for assigning a set of rows to each fragment, either as a range rule or some arbitrary rule. You can specify a remainder fragment that holds all rows that do not match the criteria for any other fragment, although a remainder fragment reduces the efficiency of the expression-based distribution scheme. ■ Round-robin. This distribution scheme places rows one after another in fragments, rotating through the series of fragments to distribute the rows evenly. The database server defines the rule internally. For INSERT statements, the database server uses a hash function on a random number to determine the fragment in which to place the row. For INSERT cursors, the database server places the first row in a random fragment, the second in the next sequential fragment, and so on. If one of the fragments is full, it is skipped. 5-6 IBM Informix Guide to Database Design and Implementation Expression-Based Distribution Scheme XPS ■ Range distribution. This distribution scheme ensures that rows are fragmented evenly across dbspaces. In range distribution, the database server determines the distribution of rows among fragments based on minimum and maximum integer values that the user specifies. Informix recommends a range distribution scheme when the data distribution is both dense and uniform. ■ System-defined hash. This distribution scheme uses an internal, system-defined rule that distributes rows with the objective of keeping the same number of rows in each fragment. ■ Hybrid. This distribution scheme combines two distribution schemes. The primary distribution scheme chooses the dbslice. The secondary distribution scheme puts rows in specific dbspaces within the dbslice. The dbspaces usually reside on different coservers. ♦ For complete descriptions of the SQL syntax you use to specify a distribution scheme, see the CREATE TABLE and CREATE INDEX statements in the Informix Guide to SQL: Syntax. For a discussion about the performance aspects of fragmentation, refer to your Performance Guide. Expression-Based Distribution Scheme To specify an expression-based distribution scheme, use the FRAGMENT BY EXPRESSION clause of the CREATE TABLE or CREATE INDEX statement. The following example includes a FRAGMENT BY EXPRESSION clause to create a fragmented table with an expression-based distribution scheme: CREATE TABLE accounts (id_num INT, name char(15)) FRAGMENT BY EXPRESSION id_num <= 100 IN dbspace_1, id_num <100 AND id_num <= 200 IN dbspace_2, id_num > 200 IN dbspace_3 When you use the FRAGMENT BY EXPRESSION clause of the CREATE TABLE statement to create a fragmented table, you must supply one condition for each fragment of the table that you are creating. You can define range rules or arbitrary rules that indicate to the database server how rows are to be distributed to fragments. The following sections describe the different types of expression-based distribution schemes. Table Fragmentation Strategies 5-7 Expression-Based Distribution Scheme Range Rule A range rule uses SQL relational and logical operators to define the boundaries of each fragment in a table. A range rule can contain the following restricted set of operators: ■ The relational operators >, <, >=, <= ■ The logical operator AND A range rule can refer to only one column in a table but can make multiple references to this column. You define one expression for each of the fragments in your table, as the following example shows: FRAGMENT id_num > id_num > id_num > BY 0 20 40 EXPRESSION AND id_num <= 20 IN dbsp1, AND id_num <= 40 IN dbsp2, IN dbsp3 In the preceding example, each expression specifies a fragment that does not overlap with the other fragments. Nonoverlapping fragments improve database performance. XPS requires fragments that do not overlap. For information about how to use fragments with XPS, refer to the Performance Guide for Informix Extended Parallel Server. Arbitrary Rule An arbitrary rule uses SQL relational and logical operators. Unlike range rules, arbitrary rules allow you to use any relational operator and any logical operator to define the rule. In addition, you can reference any number of table columns in the rule. Arbitrary rules typically include the use of the OR logical operator to group data, as the following example shows: FRAGMENT BY EXPRESSION zip_num = 95228 OR zip_num = 95443 IN dbsp2, zip_num = 91120 OR zip_num = 92310 IN dbsp4, REMAINDER IN dbsp5 5-8 IBM Informix Guide to Database Design and Implementation Round-Robin Distribution Scheme IDS Using the MOD Function You can use the MOD function in a FRAGMENT BY EXPRESSION clause to map each row in a table to a set of integers (hash values). The database server uses these values to determine in which fragment it will store a given row. The following example shows how you might use the MOD function in an expression-based distribution scheme: FRAGMENT BY MOD(id_num, MOD(id_num, MOD(id_num, EXPRESSION 3) = 0 IN dbsp1, 3) = 1 IN dbsp2, 3) = 2 IN dbsp3 Inserting and Updating Rows When you insert or update a row, the database server evaluates fragment expressions, in the order specified, to see if the row belongs in any of the fragments. If so, the database server inserts or updates the row in one of the fragments. If the row does not belong in any of the fragments, the row is put into the fragment that the remainder clause specified. If the distribution scheme does not include a remainder clause, and the row does not match the criteria for any of the existing fragment expressions, the database server returns an error. Round-Robin Distribution Scheme To specify a round-robin distribution scheme, use the FRAGMENT BY ROUND ROBIN clause of the CREATE TABLE statement. The following statement illustrates a fragmented table with a round-robin distribution scheme: CREATE TABLE account_2 ... ... FRAGMENT BY ROUND ROBIN IN dbspace1, dbspace2, dbspace3 When the database server receives a request to insert a number of rows into a table that uses round-robin distribution, it distributes the rows in such a way that the number of rows in each of the fragments remains approximately the same. Round-robin distributions are also called even distributions because information is distributed evenly among the fragments. The rule for distributing rows to tables that use round-robin distribution is internal to the database server. Table Fragmentation Strategies 5-9 Range Distribution Scheme Important: You can use the round-robin distribution scheme only for table fragmentation. You cannot fragment an index with this distribution scheme. XPS Range Distribution Scheme When data distribution is dense and uniform and the fragmentation column contains no duplicates, you can use a range distribution scheme to distribute rows evenly across dbspaces. Range distribution uses MIN and MAX values that the user specifies to determine the distribution of rows among the fragments. The following statement includes a FRAGMENT BY RANGE clause to specify a range distribution scheme: CREATE TABLE cust_account (cust_id INT) ... ... FRAGMENT BY RANGE (cust_id MIN 1000 MAX 5000) IN dbsp_1, dbsp_2, dbsp_3, dbsp_4) The MIN and MAX values specify the total range of expected values in the column. You must specify a MAX value in the FRAGMENT BY RANGE clause. If you omit the MIN value, the default MIN value is 0. In the preceding example, the database server uses cust_id values to distribute table rows across four dbspaces. The database server fragments the rows as follows. Storage Space For Rows with Column Values dbsp_1 1000 <= cust_id < 2000 dbsp_2 2000 <= cust_id < 3000 dbsp_3 3000 <= cust_id < 4000 dbsp_4 4000 <= cust_id < 5000 You can use range fragmentation on a single column or, in a hybrid distribution scheme, you can specify a range scheme on different columns for each FRAGMENT BY RANGE clause. For information about how to use range fragmentation in a hybrid distribution scheme, see “Hybrid Distribution Scheme” on page 5-12. 5-10 IBM Informix Guide to Database Design and Implementation System-Defined Hash Distribution Scheme XPS System-Defined Hash Distribution Scheme The database server uses a system-defined hash algorithm to distribute data evenly by hashing a specified key. In addition to even data distribution, system-defined hash fragmentation permits the automatic elimination of fragments for queries that use the hashed key. You can use hash fragmentation for several tables to provide fragment elimination when the tables are joined in queries and to perform more processing on the local coserver. A system-defined hash distribution scheme is the preferred method for distributing data evenly across fragments, except in the following cases: ■ Range queries are used. A range distribution scheme might lead to better fragment elimination and therefore better query performance. ■ The specified column contains a very uneven number of duplicate values or a very small number of different values. Either condition can result in data skew, in which some fragments become larger than others. Data skew can lead to uneven performance because the amount of data that the database server needs to process is larger in some fragments than in other fragments. To specify a system-defined hash distribution scheme, use the FRAGMENT BY HASH clause in the CREATE TABLE statement as follows: CREATE TABLE new_tab (id INT, name CHAR(30)) FRAGMENT BY HASH (id) IN dbspace1, dbspace2, dbspace3; In a system-defined hash distribution scheme, specify at least two dbspaces where you want the fragments to be placed or specify a dbslice. You can also specify a composite key for a system-defined hash distribution scheme. Table Fragmentation Strategies 5-11 Hybrid Distribution Scheme XPS Hybrid Distribution Scheme A hybrid distribution scheme combines a base strategy and second-level strategy on the same table. The base strategy can be expression-based or range fragmentation. You can use a hybrid distribution scheme to apply different fragmentation strategies on one or two columns. When you define a hybrid distribution scheme you can specify a single dbslice, a single dbspace, or multiple dbspaces as the storage domain of the fragmentation expression. The following statement defines a hybrid scheme based on two columns of the table: CREATE TABLE hybrid_tab (col_1 INT, col_2 DATE, col_3 CHAR(4)) FRAGMENT BY HYBRID (col_1) EXPRESSION col_1 >= 0 AND col_1 < 20 IN dbspace_1, col_1 >= 20 AND col_1 < 40 IN dbspace_2, col_1 >= 40 IN dbspace_3; Creating a Fragmented Table This section explains how to use SQL statements to create and manage fragmented tables. You can fragment a table at the same time that you create it, or you can fragment existing nonfragmented tables. An overview of both alternatives is given in the following sections. For the complete syntax of the SQL statements that you use to create fragmented tables, see the Informix Guide to SQL: Syntax. Before you create a fragmented table, you must decide on an appropriate fragmentation strategy. For information about how to formulate a fragmentation strategy, see your Performance Guide. 5-12 IBM Informix Guide to Database Design and Implementation Creating a New Fragmented Table Creating a New Fragmented Table To create a fragmented table, use the FRAGMENT BY clause of the CREATE TABLE statement. Suppose that you want to create a fragmented table similar to the orders table of the stores_demo database. You decide on a round-robin distribution scheme with three fragments and consult with your database server administrator to set up three dbspaces, one for each of the fragments: dbspace1, dbspace2, and dbspace3. The following SQL statement creates the fragmented table: CREATE TABLE my_orders ( order_num SERIAL(1001), order_date DATE, customer_num INT, ship_instruct CHAR(40), backlog CHAR(1), po_num CHAR(10), ship_date DATE, ship_weight DECIMAL(8,2), ship_charge MONEY(6), paid_date DATE, PRIMARY KEY (order_num), FOREIGN KEY (customer_num) REFERENCES customer(customer_num)) FRAGMENT BY ROUND ROBIN IN dbspace1, dbspace2, dbspace3 IDS If the my_orders table resides in a Dynamic Server database, you might decide instead to create the table with expression-based fragmentation. Suppose that your my_orders table has 30,000 rows, and you want to distribute rows evenly across three fragments stored in dbspace1, dbspace2, and dbspace3. The following statement shows how you might use the order_num column to define an expression-based fragmentation strategy: CREATE TABLE my_orders (order_num SERIAL, ...) FRAGMENT BY EXPRESSION order_num < 10000 IN dbspace1, order_num >= 10000 and order_num < 20000 IN dbspace2, order_num >= 20000 IN dbspace3 ♦ XPS If the my_orders table resides in an Extended Parallel Server database, you might create the table with a system-defined hash distribution scheme to get even distribution across fragments. Suppose that the my_orders table has 120,000 rows, and you want to distribute rows evenly across six fragments stored in different dbspaces. You decide to use the SERIAL column order_num to define the fragments. Table Fragmentation Strategies 5-13 Creating a Fragmented Table from Nonfragmented Tables The following example shows how to use the order_num column to define a system-defined hash fragmentation strategy: CREATE TABLE my_orders (order_num SERIAL, ...) FRAGMENT BY HASH (order_num) IN dbspace1, dbspace2, dbspace3, dbspace4, dbspace5, dbspace6; You might notice a difference between SERIAL column values in a fragmented table and unfragmented tables. Extended Parallel Server assigns SERIAL values sequentially within fragments, but fragments might contain values from noncontiguous ranges. You cannot specify what these ranges are. Extended Parallel Server controls these ranges and guarantees only that they do not overlap. Tip: You can store table fragments in dbspaces or dbslices on Extended Parallel Server. ♦ Creating a Fragmented Table from Nonfragmented Tables You might need to convert nonfragmented tables into fragmented tables in the following circumstances: ■ You have an application-implemented version of table fragmentation. You will probably want to convert several small tables into one large fragmented table. The following section tells you how to proceed when this is the case. Follow the instructions in the section “Using More Than One Nonfragmented Table” on page 5-15. ■ You have an existing large table that you want to fragment. Follow the instructions in the section “Using a Single Nonfragmented Table” on page 5-15. Remember that before you perform the conversion, you must set up an appropriate number of dbspaces to contain the newly created fragmented tables. 5-14 IBM Informix Guide to Database Design and Implementation Creating a Fragmented Table from Nonfragmented Tables Using More Than One Nonfragmented Table You can combine two or more nonfragmented tables into a single fragmented table. The nonfragmented tables must have identical table structures and must be stored in separate dbspaces. To combine nonfragmented tables, use the ATTACH clause of the ALTER FRAGMENT statement. For example, suppose that you have three nonfragmented tables, account1, account2, and account3, and that you store the tables in dbspaces dbspace1, dbspace2, and dbspace3, respectively. All three tables have identical structures, and you want to combine the three tables into one table that is fragmented by the expression on the common column acc_num. You want rows with acc_num less than or equal to 1120 to be stored in dbspace1. Rows with acc_num greater than 1120 but less than or equal to 2000 are to be stored in dbspace2. Finally, rows with acc_num greater than 2000 are to be stored in dbspace3. To fragment the tables with this fragmentation strategy, execute the following SQL statement: ALTER FRAGMENT ON TABLE tab1 ATTACH tab1 AS acc_num <= 1120, tab2 AS acc_num > 1120 and acc_num <= 2000, tab3 AS acc_num > 2000; The result is a single table, tab1. The other tables, tab2 and tab3, were consumed and no longer exist. For information about how to use the ATTACH and DETACH clauses of the ALTER FRAGMENT statement to improve performance, see your Performance Guide. Using a Single Nonfragmented Table To create a fragmented table from a nonfragmented table, use the INIT clause of the ALTER FRAGMENT statement. For example, suppose you want to convert the table orders to a table fragmented by round-robin. The following SQL statement performs the conversion: ALTER FRAGMENT ON TABLE orders INIT FRAGMENT BY ROUND ROBIN IN dbspace1, dbspace2, dbspace3; Any existing indexes on the nonfragmented table become fragmented with the same fragmentation strategy as the table. Table Fragmentation Strategies 5-15 Rowids in a Fragmented Table Rowids in a Fragmented Table The term rowid refers to an integer that defines the physical location of a row. The rowid of a row in a nonfragmented table is a unique and constant value. Rows in fragmented tables, in contrast, are not assigned a rowid. Important: Informix recommends that you use primary keys as a method of access in your applications rather than rowids. Because primary keys are defined in the ANSI specification of SQL, using primary keys to access data makes your applications more portable. XPS IDS With Extended Parallel Server, you must use column values to identify the rows of a fragmented table. The database server does not support rowids for fragmented tables. ♦ To accommodate applications that must reference a rowid for a fragmented table, Dynamic Server allows you to explicitly create a rowid column for a fragmented table. However, Dynamic Server does not support the WITH ROWIDS clause for typed tables. To create the rowid column, use the following SQL syntax: ■ The WITH ROWIDS clause of the CREATE TABLE statement ■ The ADD ROWIDS clause of the ALTER TABLE statement ■ The INIT clause of the ALTER FRAGMENT statement When you create the rowid column, the database server takes the following actions: 5-16 ■ Adds the 4-byte unique value to each row in the table ■ Creates an internal index that it uses to access the data in the table by rowid ■ Inserts a row in the sysfragments system catalog table for the internal index ♦ IBM Informix Guide to Database Design and Implementation Fragmenting Smart Large Objects IDS Fragmenting Smart Large Objects You can specify multiple sbspaces in the PUT clause of the CREATE TABLE statement to achieve round-robin fragmentation of smart large objects on a column. If you specify multiple sbspaces for a CLOB or BLOB column, the database server distributes the smart large objects for the column to the specified sbspaces in round-robin fashion. Given the following CREATE TABLE statement, the database server can distribute large objects from the cat_photo column to sbcat1, sbcat2, and sbcat3 in round-robin fashion. CREATE TABLE catalog ( catalog_num SERIAL, stock_num SMALLINT, manu_code CHAR(3), cat_descr LVARCHAR, cat_photo BLOB) PUT cat_photo in (sbcat1, sbcat2, sbcat3; Modifying Fragmentation Strategies You can make two general types of modifications to a fragmented table. The first type consists of the modifications that you can make to a nonfragmented table. Such modifications include adding a column, dropping a column, changing a column data type, and so on. For these modifications, use the ALTER TABLE statements that you would normally use on a nonfragmented table. The second type of modification consists of changes to a fragmentation strategy. This section explains how to use SQL statements to modify fragmentation strategies. At times, you might need to alter a fragmentation strategy after you implement fragmentation. Most frequently, you will need to modify your fragmentation strategy when you use fragmentation with intraquery or interquery parallelization. Modifying your fragmentation strategy in these circumstances is one of several ways you can improve the performance of your database server system. Table Fragmentation Strategies 5-17 Reinitializing a Fragmentation Strategy Reinitializing a Fragmentation Strategy You can use the ALTER FRAGMENT statement with an INIT clause to define and initialize a new fragmentation strategy on a nonfragmented table or convert an existing fragmentation strategy on a fragmented table. You can also use the INIT clause to change the order of evaluation of fragment expressions. The following example shows how you might use the INIT clause to reinitialize a fragmentation strategy completely. Suppose that you initially create the following fragmented table: CREATE TABLE account (acc_num INTEGER, ...) FRAGMENT BY EXPRESSION acc_num <= 1120 in dbspace1, acc_num > 1120 and acc_num < 2000 in dbspace2, REMAINDER IN dbspace3; Suppose that after several months of operation with this distribution scheme, you find that the number of rows in the fragment contained in dbspace2 is twice the number of rows that the other two fragments contain. This imbalance causes the disk that contains dbspace2 to become an I/O bottleneck. To remedy this situation, you decide to modify the distribution so that the number of rows in each fragment is approximately even. You want to modify the distribution scheme so that it contains four fragments instead of three fragments. A new dbspace, dbspace2a, is to contain the new fragment that stores the first half of the rows that previously were contained in dbspace2. The fragment in dbspace2 contains the second half of the rows that it previously stored. To implement the new distribution scheme, first create the dbspace dbspace2a and then execute the following statement: ALTER FRAGMENT ON TABLE account INIT FRAGMENT BY EXPRESSION acc_num <= 1120 in dbspace1, acc_num > 1120 and acc_num <= 1500 in dbspace2a, acc_num > 1500 and acc_num < 2000 in dbspace2, REMAINDER IN dbspace3; As soon as you execute this statement, the database server discards the old fragmentation strategy, and the rows that the table contains are redistributed according to the new fragmentation strategy. 5-18 IBM Informix Guide to Database Design and Implementation Modifying Fragmentation Strategies for Dynamic Server You can also use the INIT clause of ALTER FRAGMENT to perform the following actions: ■ Convert a single nonfragmented table into a fragmented table ■ Convert a fragmented table into a nonfragmented table ■ Convert a table fragmented by any strategy to any other fragmentation strategy For more information, see the ALTER FRAGMENT statement in the Informix Guide to SQL: Syntax. IDS Modifying Fragmentation Strategies for Dynamic Server Dynamic Server allows you to use the ADD, DROP, and MODIFY clauses to change the fragmentation strategy. For syntax information about these options, see the ALTER FRAGMENT statement in the Informix Guide to SQL: Syntax. Using the ADD Clause When you define a fragmentation strategy, you might need to add one or more fragments. You can use the ADD clause of the ALTER FRAGMENT statement to add a new fragment to a table. Suppose that you want to add a fragment to a table that you create with the following statement: CREATE TABLE sales (acc_num INT, ...) FRAGMENT BY ROUND ROBIN IN dbspace1, dbspace2, dbspace3; To add a new fragment dbspace4 to the table sales, execute the following statement: ALTER FRAGMENT ON TABLE sales ADD dbspace4; If the fragmentation strategy is expression based, the ADD clause of ALTER FRAGMENT contains options to add a dbspace before or after an existing dbspace. Table Fragmentation Strategies 5-19 Modifying Fragmentation Strategies for Dynamic Server Using the DROP Clause When you define a fragmentation strategy, you might need to drop one or more fragments. With Dynamic Server, you can use the DROP clause of the ALTER FRAGMENT ON TABLE statement to drop a fragment from a table. Suppose you want to drop a fragment from a table that you create with the following statement: CREATE TABLE sales (col_a INT), ...) FRAGMENT BY ROUND ROBIN IN dbspace1, dbspace2, dbspace3; The following ALTER FRAGMENT statement uses a DROP clause to drop the third fragment dbspace3 from the sales table: ALTER FRAGMENT ON TABLE sales DROP dbspace3; When you issue this statement, all the rows in dbspace3 are moved to the remaining dbspaces, dbspace1 and dbspace2. Using the MODIFY Clause Use the ALTER FRAGMENT statement with the MODIFY clause to modify one or more of the expressions in an existing fragmentation strategy. Suppose that you initially create the following fragmented table: CREATE TABLE account (acc_num INT, ...) FRAGMENT BY EXPRESSION acc_num <= 1120 IN dbspace1, acc_num > 1120 AND acc_num < 2000 IN dbspace2, REMAINDER IN dbspace3; When you execute the following ALTER FRAGMENT statement, you ensure that no account numbers with a value less than or equal to zero are stored in the fragment that dbspace1 contains: ALTER FRAGMENT ON TABLE account MODIFY dbspace1 TO acc_num > 0 AND acc_num <=1120; You cannot use the MODIFY clause to alter the number of fragments that your distribution scheme contains. Use the INIT or ADD clause of ALTER FRAGMENT instead. 5-20 IBM Informix Guide to Database Design and Implementation Modifying Fragmentation Strategies for XPS XPS Modifying Fragmentation Strategies for XPS Extended Parallel Server supports the following options for the ALTER FRAGMENT ON TABLE statement: ■ ATTACH clause ■ DETACH clause ■ INIT clause Tables that use HASH fragmentation support only the INIT option. Extended Parallel Server does not support the ADD, DROP, and MODIFY options, the ALTER FRAGMENT ON INDEX statement or explicit ROWIDS columns. To handle add, drop, or modify operations, you can use the supported options in place of ADD, DROP, and MODIFY. Using the INIT Clause If changes to a fragmentation strategy require data movement, you can specify the INIT clause with an ALTER FRAGMENT ON TABLE statement. When you use the INIT clause, the database server creates a copy of the table with the new fragmentation scheme and inserts rows from the original table into the new table. Suppose you create the following prod_info table that distributes fragments by hash on the id column because your queries typically use an equality search on the id column: CREATE TABLE prod_info (id INT, color INT, details CHAR(100)) FRAGMENT BY HASH(id) IN dbsl; Table Fragmentation Strategies 5-21 Modifying Fragmentation Strategies for XPS Suppose at some point you recognize a need to perform other important queries that specify color column values but not id values. To handle this type of scenario, you might modify the data layout of the prod_info table to allow for better fragment elimination. The following ALTER FRAGMENT statement shows how you might use an INIT clause to change from a hash to a hybrid distribution scheme: ALTER FRAGMENT ON TABLE prod_info INIT FRAGMENT BY HYBRID(id) EXPRESSION color = 1 IN dbsl, color = 2 IN dbsl2, ... REMAINDER IN dbsl8; Using ATTACH and DETACH Clauses If you need to move data, you can use an ALTER FRAGMENT statement with the INIT clause. Otherwise, you can use ALTER FRAGMENT with the following options to modify the expression of an existing fragment: ■ Use the DETACH clause to remove the fragment whose expression you want to modify. ■ Use the ATTACH clause to reattach the fragment with the new expression. Suppose that you initially create the following fragmented table: CREATE TABLE account (acc_num INT, ...) FRAGMENT BY EXPRESSION acc_num <= 1120 IN dbspace1, acc_num > 1120 AND acc_num < 2000 IN dbspace2, REMAINDER IN dbspace3; The following statements modify the fragment that dbspace1 contains to ensure that no account numbers with a value less than or equal to zero are stored in the fragment: ALTER FRAGMENT ON TABLE account DETACH dbspace1 det_tab; CREATE TABLE new_tab (acc_num INT, ...) FRAGMENT BY EXPRESSION acc_num > 0 AND acc_num <=1120 IN dbspace1; ALTER FRAGMENT ON TABLE account ATTACH account, new_tab; INSERT INTO account SELECT * FROM det_tab; DROP TABLE det_tab; Important: You cannot use the ALTER TABLE statement with an ATTACH clause or DETACH clause when the table has hash fragmentation. However, you can use the ALTER TABLE statement with an INIT clause on tables with hash fragmentation. 5-22 IBM Informix Guide to Database Design and Implementation Modifying Fragmentation Strategies for XPS Using the ATTACH Clause to Add a Fragment You can use the ATTACH clause of the ALTER FRAGMENT ON TABLE statement to add a fragment from a table. Suppose that you want to add a fragment to a table that you create with the following statement: CREATE TABLE sales (acc_num INT, ...) FRAGMENT BY ROUND ROBIN IN dbspace1, dbspace2, dbspace3 To add a new fragment dbspace4 to the sales table, you first create a new table with a structure identical to sales that specifies the new fragment. You then use an ATTACH clause with the ALTER FRAGMENT statement to add the new fragment to the table. The following statements add a new fragment to the sales table: CREATE TABLE new_tab (acc_num INT, ...) IN dbspace4; ALTER FRAGMENT ON TABLE sales ATTACH sales, new_tab; After you execute the ATTACH clause, the database server fragments the sales table into four dbspaces: the three dbspaces of sales and the dbspace of new_tab. The new_tab table is consumed. Using the DETACH Clause to Drop a Fragment You can use the DETACH clause of the ALTER FRAGMENT ON TABLE statement to drop a fragment from a table. Suppose that you want to drop a fragment from a table that you create with the following statement: CREATE TABLE sales (acc_num INT)...) FRAGMENT BY EXPRESSION acc_num <= 1120 IN dbspace1, acc_num > 1120 AND acc_num <= 2000 IN dbspace2, acc_num > 2000 AND acc_num < 3000 IN dbspace3, REMAINDER IN dbspace4; To drop the third fragment dbspace3 from the sales table without losing any data, execute the following statements: ALTER FRAGMENT ON TABLE sales DETACH dbspace3 det_tab; INSERT INTO sales SELECT * FROM det_tab; DROP TABLE det_tab; Table Fragmentation Strategies 5-23 Granting and Revoking Privileges from Fragments The ALTER FRAGMENT statement detaches dbspace3 from the distribution scheme of the sales table and places the rows in a new table det_tab. The INSERT statement reinserts rows previously in dbspace3 into the new sales table, which now has three fragments: dbspace1, dbspace2, and dbspace4. The DROP TABLE statement drops the det_tab table because it is no longer needed. IDS Granting and Revoking Privileges from Fragments You need a strategy to control data distribution if you want to grant useful fragment privileges. One effective strategy is to fragment data records by expression. The round-robin data-record distribution strategy, on the other hand, is not a useful strategy because each new data record is added to the next fragment. A round-robin distribution nullifies any clean method of tracking data distribution and therefore eliminates any real use of fragment authority. Because of this difference between expression-based distribution and round-robin distribution, the GRANT FRAGMENT and REVOKE FRAGMENT statements apply only to tables that have expression-based fragmentation. When you create a fragmented table, no default fragment authority exists. Use the GRANT FRAGMENT statement to grant insert, update, or delete authority on one or more of the fragments. If you want to grant all three privileges at once, use the ALL keyword of the GRANT FRAGMENT statement. However, you cannot grant fragment privileges by merely naming the table that contains the fragments. You must name the specific fragments. When you want to revoke insert, update, or delete privileges, use the REVOKE FRAGMENT statement. This statement revokes privileges from one or more users on one or more fragments of a fragmented table. If you want to revoke all privileges that currently exist for a table, you can use the ALL keyword. If you do not specify any fragments in the command, the permissions being revoked apply to all fragments in the table that currently have permissions. For more information, see the GRANT FRAGMENT, REVOKE FRAGMENT, and SET statements in the Informix Guide to SQL: Syntax. 5-24 IBM Informix Guide to Database Design and Implementation Chapter Granting and Limiting Access to Your Database In This Chapter . . . . . . . . . . . . . . . . . . . . 6-3 Using SQL to Restrict Access to Data. . . . . . . . . . . . . 6-3 Controlling Access to Databases . . . . . . . . . . . . . 6-4 Granting Privileges . . . . . . . . . . . . . . . . . . . Database-Level Privileges . . . . . . . . . . . . . . . Connect Privilege. . . . . . . . . . . . . . . . . Resource Privilege . . . . . . . . . . . . . . . . Database-Administrator Privilege . . . . . . . . . . . Ownership Rights . . . . . . . . . . . . . . . . . . Table-Level Privileges . . . . . . . . . . . . . . . . Access Privileges . . . . . . . . . . . . . . . . . Index, Alter, and References Privileges . . . . . . . . . Under Privileges for Typed Tables . . . . . . . . . . . Privileges for Table Fragments . . . . . . . . . . . . Column-Level Privileges . . . . . . . . . . . . . . . Type-Level Privileges. . . . . . . . . . . . . . . . . Usage Privileges for User-Defined Types. . . . . . . . . Under Privileges for Named Row Types . . . . . . . . . Routine-Level Privileges . . . . . . . . . . . . . . . Language-Level Privileges . . . . . . . . . . . . . . . Automating Privileges . . . . . . . . . . . . . . . . Automating with a Command Script . . . . . . . . . . Using Roles . . . . . . . . . . . . . . . . . . . 6-5 6-6 6-6 6-7 6-7 6-8 6-8 6-9 6-10 6-11 6-11 6-12 6-14 6-14 6-15 6-15 6-16 6-17 6-18 6-18 . 6 Using SPL Routines to Control Access to Data Restricting Data Reads . . . . . . . Restricting Changes to Data . . . . . Monitoring Changes to Data . . . . . Restricting Object Creation . . . . . . . . . . . . . . . . . . . . . . . . . . . . . . . . . . . . . . . . . . . . . . . . . . . 6-21 6-22 6-23 6-23 6-24 . . . . . . . . . . . . . . . . . . . . . . . . . . . . . . . . . . . . . . . . . . . . 6-25 6-26 6-27 6-29 6-29 6-30 6-31 6-31 6-31 6-32 6-32 . . . . 6-34 Privileges and Views . . . . . . . . . . . . . . . . . . Privileges When Creating a View . . . . . . . . . . . . . Privileges When Using a View. . . . . . . . . . . . . . 6-34 6-34 6-35 Using Views . . . . . . . . . . . . . . . . . Creating Views . . . . . . . . . . . . . . . Typed Views . . . . . . . . . . . . . . Duplicate Rows from Views . . . . . . . . . Restrictions on Views . . . . . . . . . . . . . When the Basis Changes . . . . . . . . . . Modifying with a View . . . . . . . . . . . . Deleting with a View . . . . . . . . . . . Updating a View . . . . . . . . . . . . . Inserting into a View. . . . . . . . . . . . Using the WITH CHECK OPTION Keywords . . . Re-Execution of a Prepared Statement When the View Definition Changes . . . . . . . . . 6-2 IBM Informix Guide to Database Design and Implementation In This Chapter This chapter describes how you can control access to your database. In some databases, all data is accessible to every user. In others, some users are denied access to some or all the data. Using SQL to Restrict Access to Data You can restrict access to data at the following levels: ■ You can use the GRANT and REVOKE statements to give or deny access to the database or to specific tables, and you can control the kinds of uses that people can make of the database. ■ You can use the CREATE PROCEDURE or CREATE FUNCTION statement to write and compile a user-defined routine, which controls and monitors the users who can read, modify, or create database tables. ■ You can use the CREATE VIEW statement to prepare a restricted or modified view of the data. The restriction can be vertical, which excludes certain columns, or horizontal, which excludes certain rows, or both. ■ You can combine GRANT and CREATE VIEW statements to achieve precise control over the parts of a table that a user can modify and with what data. Granting and Limiting Access to Your Database 6-3 Controlling Access to Databases Controlling Access to Databases The normal database-privilege mechanisms are based on the GRANT and REVOKE statements, which “Granting Privileges” on page 6-4 discusses. However, you can sometimes use the facilities of the operating system as an additional way to control access to a database. No matter what access controls the operating system gives you, when the contents of an entire database are highly sensitive, you might not want to leave it on a public disk that is fixed to the computer. You can circumvent normal software controls when the data must be secure. When you or another authorized person is not using the database, it does not have to be available online. You can make it inaccessible in one of the following ways, which have varying degrees of inconvenience: ■ Detach the physical medium from the computer and take it away. If the disk itself is not removable, the disk drive might be removable. ■ Copy the database directory to tape and take possession of the tape. ■ Use an encryption utility to copy the database files. Keep only the encrypted version. Important: In the latter two cases, after making the copies, you must remember to erase the original database files with a program that overwrites an erased file with null data. Instead of removing the entire database directory, you can copy and then erase the files that represent individual tables. Do not overlook the fact that index files contain copies of the data from the indexed column or columns. Remove and erase the index files as well as the table files. 6-4 IBM Informix Guide to Database Design and Implementation Granting Privileges Granting Privileges The authorization to use a database is called a privilege. For example, the authorization to use a database is called the Connect privilege, and the authorization to insert a row into a table is called the Insert privilege. Use the GRANT statement to grant privileges on a database, table, view, or procedure or to grant a role to a user or another role. Use the REVOKE statement to revoke privileges on a database, table, view, or procedure or to revoke a role from a user or another role. IDS A role is a classification or work task that the DBA assigns, such as payroll. Assignment of roles makes management of privileges convenient. ♦ The following groups of privileges control the actions a user can perform on data: IDS ■ Database-level privileges ■ Ownership privileges ■ Table-level privileges ■ Column-level privileges ■ Type-level privileges ■ Routine-level privileges ■ Language-level privileges ♦ ■ Automating privileges For the syntax of the GRANT and REVOKE statements, see the Informix Guide to SQL: Syntax. Granting and Limiting Access to Your Database 6-5 Database-Level Privileges Database-Level Privileges The three levels of database privileges provide an overall means of controlling who accesses a database. Connect Privilege The least of the privilege levels is Connect, which gives a user the basic ability to query and modify tables. Users with the Connect privilege can perform the following functions: ■ Execute the SELECT, INSERT, UPDATE, and DELETE statements, provided that they have the necessary table-level privileges ■ Execute an SPL routine, provided that they have the necessary tablelevel privileges ■ Create views, provided that they are permitted to query the tables on which the views are based ■ Create temporary tables and create indexes on the temporary tables Before users can access a database, they must have the Connect privilege. Ordinarily, in a database that does not contain highly sensitive or private data, you give the GRANT CONNECT TO PUBLIC privilege shortly after you create the database. If you do not grant the Connect privilege to public, the only users who can access the database through the database server are those to whom you specifically grant the Connect privilege. If limited users should have access, this privilege lets you provide it to them and deny it to all others. Users and the Public Privileges are granted to single users by name or to all users under the name of public. Any privileges granted to public serve as default privileges. Prior to executing a statement, the database server determines whether a user has the necessary privileges. The information is in the system catalog. For more information, see “Privileges in the System Catalog Tables” on page 6-9. 6-6 IBM Informix Guide to Database Design and Implementation Database-Level Privileges The database server looks first for privileges that are granted specifically to the requesting user. If it finds such a grant, it uses that information. It then checks to see if less restrictive privileges were granted to public. If they were, the database server uses the less restrictive privileges. If no grant has been made to that user, the database server looks for privileges granted to public. If it finds a relevant privilege, it uses that one. Thus, to set a minimum level of privilege for all users, grant privileges to public. You can override that, in specific cases, by granting higher individual privileges to users. Resource Privilege The Resource privilege carries the same authorization as the Connect privilege. In addition, users with the Resource privilege can create new, permanent tables, indexes, and SPL routines, thus permanently allocating disk space. Database-Administrator Privilege The highest level of database privilege is database administrator, or DBA. When you create a database, you are automatically the DBA. Holders of the DBA privilege can perform the following functions: ■ Execute the DROP DATABASE, START DATABASE, and ROLLFORWARD DATABASE statements ■ Drop or alter any object regardless of who owns it ■ Create tables, views, and indexes to be owned by other users ■ Grant database privileges, including the DBA privilege, to another user ■ Alter the NEXT SIZE (but no other attribute) of the system catalog tables, and insert, delete, or update rows of any system catalog table except systables Warning: Although users with the DBA privilege can modify most system catalog tables, Informix strongly recommends that you do not update, delete, or insert any rows in them. Modifying the system catalog tables can destroy the integrity of the database. You cannot use the ALTER TABLE statement to modify the size of the next extent of system catalog tables. Granting and Limiting Access to Your Database 6-7 Ownership Rights Ownership Rights The database, and every table, view, index, procedure, and synonym in it, has an owner. The owner of an object is usually the person who created it, although a user with the DBA privilege can create objects to be owned by others. The owner of an object has all rights to that object and can alter or drop it without additional privileges. XPS For Generalized Key (GK) indexes, ownership rights are handled somewhat differently than they are for other objects. Any table that appears in the FROM clause of a GK index cannot be dropped until that GK index is dropped, even when someone other than the creator of the table creates the GK index. For more information, refer to “Using GK Indexes in a Data-Warehousing Environment” on page 11-19. ♦ Table-Level Privileges You can apply seven privileges, table by table, to allow nonowners the privileges of owners. Four of them, the Select, Insert, Delete, and Update privileges, control access to the contents of the table. The Index privilege controls index creation. The Alter privilege controls the authorization to change the table definition. The References privilege controls the authorization to specify referential constraints on a table. In an ANSI-compliant database, only the table owner has any privileges. In other databases, the database server, as part of creating a table, automatically grants to public all table privileges except Alter and References. When you automatically grant all table privileges to public, a newly created table is accessible to any user with the Connect privilege. If this is not what you want (if users exist with the Connect privilege who should not be able to access this table), you must revoke all privileges on the table from public after you create the table. 6-8 IBM Informix Guide to Database Design and Implementation Table-Level Privileges Access Privileges Four privileges govern how users can access a table. As the owner of the table, you can grant or withhold the following privileges independently: ■ Select allows selection, including selecting into temporary tables. ■ Insert allows a user to add new rows. ■ Update allows a user to modify existing rows. ■ Delete allows a user to delete rows. The Select privilege is necessary for a user to retrieve the contents of a table. However, the Select privilege is not a precondition for the other privileges. A user can have Insert or Update privileges without having the Select privilege. For example, your application might have a usage table. Every time a certain program is started, it inserts a row into the usage table to document that it was used. Before the program terminates, it updates that row to show how long it ran and perhaps to record counts of work its user performs. If you want any user of the program to be able to insert and update rows in this usage table, grant Insert and Update privileges on it to public. However, you might grant the Select privilege to only a few users. Privileges in the System Catalog Tables Privileges are recorded in the system catalog tables. Any user with the Connect privilege can query the system catalog tables to determine what privileges are granted and to whom. Database privileges are recorded in the sysusers system catalog table, in which the primary key is user ID, and the only other column contains a single character C, R, or D for the privilege level. A grant to the keyword of PUBLIC is reflected as a user name of public (lowercase). Granting and Limiting Access to Your Database 6-9 Table-Level Privileges Table-level privileges are recorded in systabauth, which uses a composite primary key of the table number, grantor, and grantee. In the tabauth column, the privileges are encoded in the list that Figure 6-1 shows. unconditional Update Insert Index unconditional Select su-idxar * if column privilege granted Figure 6-1 List of Encoded Privileges References Alter Delete A hyphen means an ungranted privilege, so that a grant of all privileges is shown as su-idxar, and -u------ shows a grant of only Update. The code letters are normally lowercase, but they are uppercase when the keywords WITH GRANT OPTION are used in the GRANT statement. When an asterisk (*) appears in the third position, some column-level privilege exists for that table and grantee. The specific privilege is recorded in syscolauth. Its primary key is a composite of the table number, the grantor, the grantee, and the column number. The only attribute is a three-letter list that shows the type of privilege: s, u, or r. Index, Alter, and References Privileges The Index privilege permits its holder to create and alter indexes on the table. The Index privilege, similar to the Select, Insert, Update, and Delete privileges, is granted automatically to public when you create a table. You can grant the Index privilege to anyone, but to exercise the privilege, the user must also hold the Resource database privilege. So, although the Index privilege is granted automatically (except in ANSI-compliant databases), users who have only the Connect privilege to the database cannot exercise their Index privilege. Such a limitation is reasonable because an index can fill a large amount of disk space. The Alter privilege permits its holder to use the ALTER TABLE statement on the table, including the power to add and drop columns, reset the starting point for SERIAL columns, and so on. You should grant the Alter privilege only to users who understand the data model well and whom you trust to exercise their power carefully. 6-10 IBM Informix Guide to Database Design and Implementation Table-Level Privileges The References privilege allows you to impose referential constraints on a table. As with the Alter privilege, you should grant the References privilege only to users who understand the data model well. IDS Under Privileges for Typed Tables You can grant or revoke the Under privilege to control whether users can use a typed table as a supertable in an inheritance hierarchy. The Under privilege is granted to public automatically when a table is created (except in ANSIcompliant databases). In an ANSI-compliant database, the Under privilege on a table is granted to the owner of the table. To restrict which users can define a table as a supertable in an inheritance hierarchy, you must first revoke the Under privilege for public and then specify the users to whom you want to grant the Under privilege. For example, to specify that only a limited group of users can use the employee table as a supertable in an inheritance hierarchy, you might execute the following statements: REVOKE UNDER ON employee FROM PUBLIC; GRANT UNDER ON employee TO johns, cmiles, paulz For information about how to use the UNDER clause to create tables in an inheritance hierarchy, see “Table Inheritance” on page 8-11. IDS Privileges for Table Fragments Use the GRANT FRAGMENT statement to grant insert, update, and delete privileges on individual fragments of a fragmented table. The GRANT FRAGMENT statement is valid only for tables that are fragmented with expression-based distribution schemes. Suppose you create a customer table that is fragmented by expression into three fragments, which reside in the dbspaces dbsp1, dbsp2, and dbsp3. The following statement shows how to grant insert privileges on the first two fragments only (dbsp1 and dbsp2) to users jones, reed, and mathews. GRANT FRAGMENT INSERT ON customer (dbsp1, dbsp2) TO jones, reed, mathews To grant privileges on all fragments of a table, use the GRANT statement or the GRANT FRAGMENT statement. Granting and Limiting Access to Your Database 6-11 Column-Level Privileges For information on the GRANT FRAGMENT and REVOKE FRAGMENT statements, see the Informix Guide to SQL: Syntax. Column-Level Privileges You can qualify the Select, Update, and References privileges with the names of specific columns. Naming specific columns allows you to grant specific access to a table. You can permit a user to see only certain columns, to update only certain columns, or to impose referential constraints on certain columns. You can use the GRANT and REVOKE statements to grant or restrict access to table data. This feature solves the problem that only certain users should know the salary, performance review, or other sensitive attributes of an employee. Suppose a table of employee data is defined as the following example shows: CREATE TABLE hr_data ( emp_key INTEGER, emp_name CHAR(40), hire_date DATE, dept_num SMALLINT, user-id CHAR(18), salary DECIMAL(8,2) performance_level CHAR(1), performance_notes TEXT ) Because this table contains sensitive data, you execute the following statement immediately after you create it: REVOKE ALL ON hr_data FROM PUBLIC For selected persons in the Human Resources department and for all managers, execute the following statement: GRANT SELECT ON hr_data TO harold_r In this way, you permit certain users to view all columns. (The final section of this chapter discusses a way to limit the view of managers to their employees only.) For the first-line managers who carry out performance reviews, you could execute a statement such as the following one: GRANT UPDATE (performance_level, performance_notes) ON hr_data TO wallace_s, margot_t 6-12 IBM Informix Guide to Database Design and Implementation Column-Level Privileges This statement permits the managers to enter their evaluations of their employees. You would execute a statement such as the following one only for the manager of the Human Resources department or whomever is trusted to alter salary levels: GRANT UPDATE (salary) ON hr_data to willard_b For the clerks in the Human Resources department, you could execute a statement such as the following one: GRANT UPDATE (emp_key, emp_name, hire_date, dept_num) ON hr_data TO marvin_t This statement gives certain users the ability to maintain the nonsensitive columns but denies them authorization to change performance ratings or salaries. The person in the MIS department who assigns computer user IDs is the beneficiary of a statement such as the following one: GRANT UPDATE (user_id) ON hr_data TO eudora_b On behalf of all users who are allowed to connect to the database, but who are not authorized to see salaries or performance reviews, execute statements such as the following one to permit them to see the nonsensitive data: GRANT SELECT (emp_key, emp_name, hire_date, dept_num, user-id) ON hr_data TO george_b, john_s These users can perform queries such as the following one: SELECT COUNT(*) FROM hr_data WHERE dept_num IN (32,33,34) However, any attempt to execute a query such as the following one produces an error message and no data: SELECT performance_level FROM hr_data WHERE emp_name LIKE '*Smythe' Granting and Limiting Access to Your Database 6-13 Type-Level Privileges IDS Type-Level Privileges Dynamic Server supports user-defined data types. When a user-defined data type is created, only the DBA or owner of the data type can apply type-level privileges that control who can use it. Dynamic Server supports the following type-level privileges: ■ Usage privilege, which controls authorization to use a user-defined data type ■ Under privilege, which controls the authorization to define a named row type as a supertype in an inheritance hierarchy Usage Privileges for User-Defined Types To control who can use an opaque type, distinct type, or named row type, specify the Usage privilege on the data type. The Usage privilege allows the DBA or owner of the type to restrict a user’s ability to assign a data type to a column, program variable (or table or view for a named row type), or assign a cast to the data type. The Usage privilege is granted to public automatically when a data type is created (except in ANSI-compliant databases). In an ANSIcompliant database, the Usage privilege on a data type is granted to the owner of the data type. To limit who can use an opaque, distinct, or named row type, you must first revoke the Usage privilege for public and then specify the names of the users to whom you want to grant the Usage privilege. For example, to limit the use of a data type named circle to a group of users, you might execute the following statements: REVOKE USAGE ON circle FROM PUBLIC; GRANT USAGE ON circle TO dawns, stevep, terryk, camber; 6-14 IBM Informix Guide to Database Design and Implementation Routine-Level Privileges Under Privileges for Named Row Types For named row types, you can grant or revoke the Under privilege, which controls whether users can assign a named row type as the supertype of another named row type in an inheritance hierarchy. The Under privilege is granted to public automatically when a named row type is created (except in ANSI-compliant databases). In an ANSI-compliant database, the Under privilege on a named row type is granted to the owner of the type. To restrict certain users’ ability to define a named row type as a supertype in an inheritance hierarchy, you must first revoke the Under privilege for public and then specify the names of the users to whom you want to grant the Under privilege. For example, to specify that only a limited group of users can use the named row type person_t as a supertype in an inheritance hierarchy, you might execute the following statements: REVOKE UNDER ON person_t FROM PUBLIC; GRANT UNDER ON person_t TO howie, jhana, alison For information about how to use the UNDER clause to create named row types in an inheritance hierarchy, see “Type Inheritance” on page 8-4. Routine-Level Privileges You can apply the Execute privilege on a user-defined routine (UDR) to authorize nonowners to execute the UDR. If you create a UDR in a database that is not ANSI compliant, the default routine-level privilege is PUBLIC; you do not need to grant the Execute privilege to specific users unless you have first revoked it. If you create a routine in an ANSI-compliant database, no other users have the Execute privilege by default; you must grant specific users the Execute privilege. The following example grants the Execute privilege to the user orion so that orion can use the UDR that is named read_address: GRANT EXECUTE ON read_address TO orion; Granting and Limiting Access to Your Database 6-15 Language-Level Privileges The sysprocauth system catalog table records routine-level privileges. The sysprocauth system catalog table uses a primary key of the routine number, grantor, and grantee. In the procauth column, the execute privilege is indicated by a lowercase e. If the execute privilege was granted with the WITH GRANT option, the privilege is represented by an uppercase E. For more information on routine-level privileges, see the Informix Guide to SQL: Tutorial. IDS Language-Level Privileges Dynamic Server allows users to create UDRs in stored procedure language (SPL) and the C and Java languages. To create a UDR, a user must have RESOURCE privileges in the database. In addition, to create a UDR in the C or Java language, a user must also have Usage privileges on those languages. By default, language usage privileges for UDRs are granted to user informix and users with the DBA privilege. However, only user informix can grant language usage privileges to other users. Users with the DBA privilege have language usage privileges, but cannot grant these privileges to other users. The following statement shows how user informix might grant the users mays, jones, and freeman permission to create a UDR in C: GRANT USAGE ON LANGUAGE C TO mays, jones, freeman Usage privileges for SPL routines is granted to public by default. Suppose the default Usage privileges on an SPL routine have been revoked from PUBLIC. The following statement shows how a user with the DBA privilege might grant Usage privileges on an SPL routine to users franklin, reeves, and wilson: GRANT USAGE ON LANGUAGE SPL TO franklin, reeves, wilson 6-16 IBM Informix Guide to Database Design and Implementation Automating Privileges Automating Privileges This design might seem to force you to execute a tedious number of GRANT statements when you first set up the database. Furthermore, privileges require constant maintenance, as people change jobs. For example, if a clerk in Human Resources is terminated, you want to revoke the Update privilege as soon as possible, otherwise the unhappy employee might execute a statement such as the following one: UPDATE hr_data SET (emp_name, hire_date, dept_num) = (NULL, NULL, 0) Less dramatic, but equally necessary, privilege changes are required daily, or even hourly, in any model that contains sensitive data. If you anticipate this need, you can prepare some automated tools to help maintain privileges. Your first step should be to specify privilege classes that are based on the jobs of the users, not on the structure of the tables. For example, a first-line manager needs the following privileges: ■ The Select and limited Update privileges on the hypothetical hr_data table ■ The Connect privilege to this and other databases ■ Some degree of privilege on several tables in those databases When a manager is promoted to a staff position or sent to a field office, you must revoke all those privileges and grant a new set of privileges. Define the privilege classes you support, and for each class specify the databases, tables, and columns to which you must give access. Then devise two automated routines for each class, one to grant the class to a user and one to revoke it. Granting and Limiting Access to Your Database 6-17 Automating Privileges Automating with a Command Script Your operating system probably supports automatic execution of command scripts. In most operating environments, interactive SQL tools such as DB-Access accept commands and SQL statements to execute from the command line. You can combine these two features to automate privilege maintenance. The details depend on your operating system and the version of the interactive SQL tool that you are using. You must create a command script that performs the following functions: ■ Takes a user ID whose privileges are to be changed as its parameter ■ Prepares a file of GRANT or REVOKE statements customized to contain that user ID ■ Invokes the interactive SQL tool (such as DB-Access) with parameters that tell it to select the database and execute the prepared file of GRANT or REVOKE statements In this way, you can reduce the change of the privilege class of a user to one or two commands. IDS Using Roles Another way to avoid the difficulty of changing user privileges on a case-bycase basis is to use roles. The concept of a role in the database environment is similar to the group concept in an operating system. A role is a database feature that lets the DBA standardize and change the privileges of many users by treating them as members of a class. For example, you can create a role called news_mes that grants connect, insert, and delete privileges for the databases that handle company news and messages. When a new employee arrives, you need only add that person to the role news_mes. The new employee acquires the privileges of the role news_mes. This process also works in reverse. To change the privileges of all the members of news_mes, change the privileges of the role. 6-18 IBM Informix Guide to Database Design and Implementation Automating Privileges Creating a Role To start the role creation process, determine the name of the role and the connections and privileges you want to grant. Although the connections and privileges are strictly in your domain, you need to consider some factors when you name a role. Do not use any of the following words as role names: alter connect DBA default delete execute index insert none null public references resource select update A role name must be different from existing role names in the database. A role name must also be different from user names that are known to the operating system, including network users known to the server computer. To make sure your role name is unique, check the names of the users in the shared memory structure who are currently using the database as well as the following system catalog tables: ■ sysusers ■ systabauth ■ syscolauth ■ sysprocauth ■ sysfragauth ■ sysroleauth When the situation is reversed and you are adding a user to the database, check that the user name is not the same as any of the existing role names. After you approve the role name, use the CREATE ROLE statement to create a new role. After the role is created, all privileges for role administration are, by default, given to the DBA. Important: The scope of a role is the current database only, so when you execute a SET ROLE statement, the role is set in the current database only. Granting and Limiting Access to Your Database 6-19 Automating Privileges Manipulating User Privileges and Granting Roles to Other Roles As DBA, you can use the GRANT statement to grant role privileges to users. You can also give a user the option to grant privileges to other users. Use the WITH GRANT OPTION clause of the GRANT statement to do this. You can use the WITH GRANT OPTION clause only when you are granting privileges to a user. For example, the following query returns an error because you are granting privileges to a role with the grantable option: GRANT SELECT on tab1 to rol1 WITH GRANT OPTION Important: Do not use the WITH GRANT OPTION clause of the GRANT statement when you grant privileges to a role. Only a user can grant privileges to other users. When you grant role privileges, you can substitute a role name for the user name in the GRANT statement. You can grant a role to another role. For example, say that role A is granted to role B. When a user enables role B, the user gets privileges from both role A and role B. However, a cycle of role granting cannot be transitive. If role A is granted role B, and role B is granted role C, then granting C to A returns an error. If you need to change privileges, use the REVOKE statement to delete the existing privileges and then use the GRANT statement to add the new privileges. Users Need to Enable Roles After the DBA grants privileges and adds users to a role, you must use the SET ROLE statement in a database session to enable the role. Unless you enable the role, you are limited to the privileges that are associated with public or the privileges that are directly granted to you because you own the object. 6-20 IBM Informix Guide to Database Design and Implementation Using SPL Routines to Control Access to Data Confirming Membership In Roles and Dropping Roles You can find yourself in a situation where you are uncertain which user is included in a role. Perhaps you did not create the role, or the person who created the role is not available. Issue queries against the sysroleauth and sysusers system catalog tables to find who is authorized for which table and how many roles exist. After you determine which users are members of which roles, you might discover that some roles are no longer useful. To remove a role, use the DROP ROLE statement. Before you remove a role, the following conditions must be met: ■ Only roles that are listed in the sysusers system catalog table as a role can be destroyed. ■ You must have DBA privileges, or you must be given the grantable option in the role to drop a role. Using SPL Routines to Control Access to Data You can use an SPL routine to control access to individual tables and columns in the database. Use a routine to accomplish various degrees of access control. A powerful feature of SPL is the ability to designate an SPL routine as a DBA-privileged routine. When you write a DBA-privileged routine, you can allow users who have few or no table privileges to have DBA privileges when they execute the routine. In the routine, users can carry out specific tasks with their temporary DBA privilege. The DBA-privileged routine lets you accomplish the following tasks: ■ You can restrict how much information individual users can read from a table. ■ You can restrict all the changes that are made to the database and ensure that entire tables are not emptied or changed accidentally. Granting and Limiting Access to Your Database 6-21 Restricting Data Reads ■ You can monitor an entire class of changes made to a table, such as deletions or insertions. ■ You can restrict all object creation (data definition) to occur within an SPL routine so that you have complete control over how tables, indexes, and views are built. For information about routines in SPL, see the Informix Guide to SQL: Tutorial. Restricting Data Reads The routine in the following example hides the SQL syntax from users, but it requires that users have the Select privilege on the customer table. If you want to restrict what users can select, write your routine to work in the following environment: ■ You are the DBA of the database. ■ The users have the Connect privilege to the database. They do not have the Select privilege on the table. ■ You use the DBA keyword to create the SPL routine (or set of SPL routines). ■ Your SPL routine (or set of SPL routines) reads from the table for users. If you want users to read only the name, address, and telephone number of a customer, you can modify the procedure as the following example shows: CREATE DBA PROCEDURE read_customer(cnum INT) RETURNING CHAR(15), CHAR(15), CHAR(18); DEFINE p_lname,p_fname CHAR(15); DEFINE p_phone CHAR(18); SELECT fname, lname, phone INTO p_fname, p_lname, p_phone FROM customer WHERE customer_num = cnum; RETURN p_fname, p_lname, p_phone; END PROCEDURE; 6-22 IBM Informix Guide to Database Design and Implementation Restricting Changes to Data Restricting Changes to Data When you use SPL routines, you can restrict changes made to a table. Channel all changes through an SPL routine. The SPL routine makes the changes, rather than users making the changes directly. If you want to limit users to deleting one row at a time to ensure that they do not accidentally remove all the rows in the table, set up the database with the following privileges: ■ You are the DBA of the database. ■ All the users have the Connect privilege to the database. They might have the Resource privilege. They do not have the Delete privilege (for this example) on the table being protected. ■ You use the DBA keyword to create the SPL routine. ■ Your SPL routine performs the deletion. Write an SPL procedure similar to the following one, which uses a WHERE clause with the customer_num that the user provides, to delete rows from the customer table: CREATE DBA PROCEDURE delete_customer(cnum INT) DELETE FROM customer WHERE customer_num = cnum; END PROCEDURE; Monitoring Changes to Data When you use SPL routines, you can create a record of changes made to a database. You can record changes that a particular user makes, or you can make a record each time a change is made. You can monitor all the changes a single user makes to the database. Channel all changes through SPL routines that keep track of changes that each user makes. If you want to record each time the user acctclrk modifies the database, set up the database with the following privileges: ■ You are the DBA of the database. ■ All other users have the Connect privilege to the database. They might have the Resource privilege. They do not have the Delete privilege (for this example) on the table being protected. Granting and Limiting Access to Your Database 6-23 Restricting Object Creation ■ You use the DBA keyword to create an SPL routine. ■ Your SPL routine performs the deletion and records that a certain user makes a change. Write an SPL routine similar to the following example, which uses a customer number the user provides to update a table. If the user happens to be acctclrk, a record of the deletion is put in the file updates. CREATE DBA PROCEDURE delete_customer(cnum INT) UNIX DEFINE username CHAR(8); DELETE FROM customer WHERE customer_num = cnum; IF username = 'acctclrk' THEN SYSTEM 'echo Delete from customer by acctclrk >> /mis/records/updates' ; END IF END PROCEDURE; To monitor all the deletions made through the procedure, remove the IF statement and make the SYSTEM statement more general. The following procedure changes the previous routine to record all deletions: CREATE DBA PROCEDURE delete_customer(cnum INT) DEFINE username CHAR(8); LET username = USER ; DELETE FROM tbname WHERE customer_num = cnum; SYSTEM 'echo Deletion made from customer table, by '||username ||'>>/hr/records/deletes'; END PROCEDURE; ♦ Restricting Object Creation To put restraints on what objects are built and how they are built, use SPL routines within the following setting: 6-24 ■ You are the DBA of the database. ■ All the other users have the Connect privilege to the database. They do not have the Resource privilege. IBM Informix Guide to Database Design and Implementation Using Views ■ You use the DBA keyword to create an SPL routine (or set of SPL routines). ■ Your SPL routine (or set of SPL routines) creates tables, indexes, and views in the way you define them. You might use such a routine to set up a training database environment. Your SPL routine might include the creation of one or more tables and associated indexes, as the following example shows: CREATE DBA PROCEDURE all_objects() CREATE TABLE learn1 (intone SERIAL, inttwo INT NOT NULL, charcol CHAR(10) ); CREATE INDEX learn_ix ON learn1 (inttwo); CREATE TABLE toys (name CHAR(15) NOT NULL UNIQUE, description CHAR(30), on_hand INT); END PROCEDURE; To use the all_objects procedure to control additions of columns to tables, revoke the Resource privilege on the database from all users. When users try to create a table, index, or view with an SQL statement outside your procedure, they cannot do so. When users execute the procedure, they have a temporary DBA privilege so the CREATE TABLE statement, for example, succeeds, and you are guaranteed that every column that is added has a constraint placed on it. In addition, objects that users create are owned by those users. For the all_objects procedure, whoever executes the procedure owns the two tables and the index. Using Views A view is a synthetic table. You can query it as if it were a table, and in some cases, you can update it as if it were a table. However, it is not a table. It is a synthesis of the data that exists in real tables and other views. The basis of a view is a SELECT statement. When you create a view, you define a SELECT statement that generates the contents of the view at the time you access the view. A user also queries a view with a SELECT statement. In some cases, the database server merges the select statement of the user with the one defined for the view and then actually performs the combined statements. For information about the performance of views, see your Performance Guide. Granting and Limiting Access to Your Database 6-25 Creating Views Because you write a SELECT statement that determines the contents of the view, you can use views for any of the following purposes: ■ To restrict users to particular columns of tables You name only permitted columns in the select list in the view. ■ To restrict users to particular rows of tables You specify a WHERE clause that returns only permitted rows. ■ To constrain inserted and updated values to certain ranges You can use the WITH CHECK OPTION (discussed on page 6-31) to enforce constraints. ■ To provide access to derived data without having to store redundant data in the database You write the expressions that derive the data into the select list in the view. Each time you query the view, the data is derived anew. The derived data is always up to date, yet no redundancies are introduced into the data model. ■ To hide the details of a complicated SELECT statement You hide complexities of a multitable join in the view so that neither users nor application programmers need to repeat them. Creating Views The following example creates a view based on a table in the stores_demo database: CREATE VIEW name_only AS SELECT customer_num, fname, lname FROM customer The view exposes only three columns of the table. Because it contains no WHERE clause, the view does not restrict the rows that can appear. The following example is based on the join of two tables: CREATE VIEW full_addr AS SELECT address1, address2, city, state.sname, zipcode, customer_num FROM customer, state WHERE customer.state = state.code 6-26 IBM Informix Guide to Database Design and Implementation Creating Views The table of state names reduces the redundancy of the database; it lets you store the full state names only once, which can be useful for long state names such as Minnesota. This full_addr view lets users retrieve the address as if the full state name were stored in every row. The following two queries are equivalent: SELECT * FROM full_addr WHERE customer_num = 105 SELECT address1, address2, city, state.sname, zipcode, customer_num FROM customer, state WHERE customer.state = state.code AND customer_num = 105 However, be careful when you define views that are based on joins. Such views are not modifiable; that is, you cannot use them with UPDATE, DELETE, or INSERT statements. For a discussion about how to modify with views, see page 6-29. The following example restricts the rows that can be seen in the view: CREATE VIEW no_cal_cust AS SELECT * FROM customer WHERE NOT state = 'CA' This view exposes all columns of the customer table, but only certain rows. The following example is a view that restricts users to rows that are relevant to them: CREATE VIEW my_calls AS SELECT * FROM cust_calls WHERE user_id = USER All the columns of the cust_calls table are available but only in those rows that contain the user IDs of the users who can execute the query. IDS Typed Views You can create a typed view when you want to distinguish between two views that display data of the same data type. For example, suppose you want to create two views on the following table: CREATE TABLE emp ( name VARCHAR(30), age INTEGER, salary INTEGER); Granting and Limiting Access to Your Database 6-27 Creating Views The following statements create two typed views, name_age and name_salary, on the emp table: CREATE ROW TYPE name_age_t ( name VARCHAR(20), age INTEGER); CREATE VIEW name_age OF TYPE name_age_t AS SELECT name, age FROM emp; CREATE ROW TYPE name_salary_t ( name VARCHAR(20), salary INTEGER); CREATE VIEW name_salary OF TYPE name_salary_t AS SELECT name, salary FROM emp When you create a typed view, the data that the view displays is of a named row type. For example, the name_age and name_salary views contain VARCHAR and INTEGER data. Because the views are typed, a query against the name_age view returns a column view of type name_age whereas a query against the name_salary view returns a column view of type name_salary. Consequently, the database server is able to distinguish between rows that the name_age and name_salary views return. In some cases, a typed view has an advantage over an untyped view. For example, suppose you overload the function myfunc() as follows: CREATE FUNCTION myfunc(aa name_age_t) ......; CREATE FUNCTION myfunc(aa name_salary_t) .....; Because the name_age and name_salary views are typed views, the following statements resolve to the appropriate myfunc() function: SELECT myfunc(name_age) FROM name_age; SELECT myfunc(name_salary) FROM name_salary; You can also write the preceding SELECT statements using an alias for the table name: SELECT myfunc(p) FROM name_age p; SELECT myfunc(p) FROM name_salary p; If two views that contain the same data types are not created as typed views, the database server cannot distinguish between the rows that the two views display. For more information about function overloading, see Creating UserDefined Routines and User-Defined Data Types. 6-28 IBM Informix Guide to Database Design and Implementation Restrictions on Views Duplicate Rows from Views A view might produce duplicate rows, even when the underlying table has only unique rows. If the view SELECT statement can return duplicate rows, the view itself can appear to contain duplicate rows. You can prevent this problem in two ways. One way is to specify DISTINCT in the select list in the view. However, when you specify DISTINCT, it is impossible to modify with the view. The alternative is to always select a column or group of columns that is constrained to be unique. (You can be sure that only unique rows are returned if you select the columns of a primary key or of a candidate key. Chapter 2 discusses primary and candidate keys.) Restrictions on Views Because a view is not really a table, it cannot be indexed, and it cannot be the object of such statements as ALTER TABLE and RENAME TABLE. You cannot rename the columns of a view with RENAME COLUMN. To change anything about the definition of a view, you must drop the view and re-create it. Because it must be merged with the user’s query, the SELECT statement on which a view is based cannot contain the following clauses or keywords: INTO TEMP ORDER BY The user’s query might contain INTO TEMP; if the view also contains it, the data would not know where to go. The user’s query might contain ORDER BY. If the view also contains it, the choice of columns or sort directions could be in conflict. A SELECT statement on which you base a view can contain the UNION keyword. In such cases, the database server stores the view in an implicit temporary table where the unions are evaluated as necessary. The user’s query uses this temporary table as a base table. Granting and Limiting Access to Your Database 6-29 Restrictions on Views When the Basis Changes The tables and views on which you base a view can change in several ways. The view automatically reflects most of the changes. When you drop a table or view, any views in the same database that depend on it are automatically dropped. The only way to alter the definition of a view is to drop and re-create it. Therefore, if you change the definition of a view on which other views depend, you must also re-create the other views (because they all are dropped). When you rename a table, any views in the same database that depend on it are modified to use the new name. When you rename a column, views in the same database that depend on that table are updated to select the proper column. However, the names of columns in the views themselves are not changed. For an example, recall the following view on the customer table: CREATE VIEW name_only AS SELECT customer_num, fname, lname FROM customer Now suppose that you change the customer table in the following way: RENAME COLUMN customer.lname TO surname To select last names of customers directly, you must now select the new column name. However, the name of the column as seen through the view is unchanged. The following two queries are equivalent: SELECT fname, surname FROM customer SELECT fname, lname FROM name_only When you drop a column to alter a table, views are not modified. If views are used, error -217 (Column not found in any table in the query) occurs. The reason views are not modified is that you can change the order of columns in a table by dropping a column and then adding a new column of the same name. If you do this, views based on that table continue to work. They retain their original sequence of columns. The database server permits you to base a view on tables and views in external databases. Changes to tables and views in other databases are not reflected in views. Such changes might not be apparent until someone queries the view and gets an error because an external table changed. 6-30 IBM Informix Guide to Database Design and Implementation Modifying with a View Modifying with a View You can modify views as if they were tables. Some views can be modified and others not, depending on their SELECT statements. The restrictions are different, depending on whether you use DELETE, UPDATE, or INSERT statements. A view is modifiable if the SELECT statement that defined it did not contain any of the following items: ■ A join of two or more tables ■ An aggregate function or the GROUP BY clause ■ The DISTINCT keyword or its synonym UNIQUE ■ The UNION keyword When a view avoids all these restricted features, each row of the view corresponds to exactly one row of one table. Deleting with a View You can use a DELETE statement on a modifiable view as if it were a table. The database server deletes the proper row of the underlying table. Updating a View You can use an UPDATE statement on a modifiable view. However, the database server does not support updating any derived column. A derived column is a column produced by an expression in the select list of the CREATE VIEW statement (for example, order_date + 30). The following example shows a modifiable view that contains a derived column and an UPDATE statement that can be accepted against it: CREATE VIEW response(user_id, received, resolved, duration) AS SELECT user_id,call_dtime,res_dtime, res_dtime-call_dtime FROM cust_calls WHERE user_id = USER; UPDATE response SET resolved = TODAY WHERE resolved IS NULL; Granting and Limiting Access to Your Database 6-31 Modifying with a View You cannot update the duration column of the view because it represents an expression (the database server cannot, even in principle, decide how to distribute an update value between the two columns that the expression names). But as long as no derived columns are named in the SET clause, you can perform the update as if the view were a table. A view can return duplicate rows even though the rows of the underlying table are unique. You cannot distinguish one duplicate row from another. If you update one of a set of duplicate rows (for example, if you use a cursor to update WHERE CURRENT), you cannot be sure which row in the underlying table receives the update. Inserting into a View You can insert rows into a view, provided that the view is modifiable and contains no derived columns. The reason for the second restriction is that an inserted row must provide values for all columns, and the database server cannot tell how to distribute an inserted value through an expression. An attempt to insert into the response view, as the previous example shows, would fail. When a modifiable view contains no derived columns, you can insert into it as if it were a table. However, the database server uses null as the value for any column that is not exposed by the view. If such a column does not allow nulls, an error occurs, and the insert fails. Using the WITH CHECK OPTION Keywords You can insert into a view a row that does not satisfy the conditions of the view; that is, a row that is not visible through the view. You can also update a row of a view so that it no longer satisfies the conditions of the view. To avoid updating a row of a view so that it no longer satisfies the conditions of the view, add the WITH CHECK OPTION keywords when you create the view. This clause asks the database server to test every inserted or updated row to ensure that it meets the conditions set by the WHERE clause of the view. The database server rejects the operation with an error if the conditions are not met. Important: You cannot include the WITH CHECK OPTION keywords when a UNION operator is included in the view definition. 6-32 IBM Informix Guide to Database Design and Implementation Modifying with a View In the previous example, the view named response is defined as the following example shows: CREATE VIEW response(user_id, received, resolved, duration) AS SELECT user_id,call_dtime,res_dtime,res_dtime -call_dtime FROM cust_calls WHERE user_id = USER You can update the user_id column of the view, as the following example shows: UPDATE response SET user_id = 'lenora' WHERE received BETWEEN TODAY AND TODAY-7 The view requires rows in which user_id equals USER. If user tony performs this update, the updated rows vanish from the view. However, you can create the view as the following example shows: CREATE VIEW response (user_id, received, resolved,duration) AS SELECT user_id,call_dtime,res_dtime,res_dtime-call_dtime FROM cust_calls WHERE user_id = USER WITH CHECK OPTION The preceding update by user tony is rejected as an error. You can use the WITH CHECK OPTION feature to enforce any kind of data constraint that can be stated as a Boolean expression. In the following example, you can create a view of a table for which you express all the logical constraints on data as conditions of the WHERE clause. Then you can require all modifications to the table to be made through the view. CREATE VIEW order_insert AS SELECT * FROM orders O WHERE order_date = TODAY -- no back-dated entries AND EXISTS -- ensure valid foreign key (SELECT * FROM customer C WHERE O.customer_num = C.customer_num) AND ship_weight < 1000 -- reasonableness checks AND ship_charge < 1000 WITH CHECK OPTION Because of EXISTS and other tests, which are expected to be successful when the database server retrieves existing rows, this view displays data from orders inefficiently. However, if insertions to orders are made only through this view (and you do not already use integrity constraints to constrain data), users cannot insert a back-dated order, an invalid customer number, or an excessive shipping weight and shipping charge. Granting and Limiting Access to Your Database 6-33 Privileges and Views Re-Execution of a Prepared Statement When the View Definition Changes The database server uses the definition of the view that exists when you prepare a SELECT statement with that view. If the definition of a view changes after you prepare a SELECT statement on that view, the execution of the prepared statement gives incorrect results because it does not reflect the new view definition. No SQL error is generated. Privileges and Views When you create a view, the database server tests your privileges on the underlying tables and views. When you use a view, only your privileges with regard to the view are tested. Privileges When Creating a View The database server tests to make sure that you have all the privileges that you need to execute the SELECT statement in the view definition. If you do not, the database server does not create the view. This test ensures that users cannot create a view on the table and query the view to gain unauthorized access to a table. After you create the view, the database server grants you, the creator and owner of the view, at least the Select privilege on it. No automatic grant is made to public, as is the case with a newly created table. The database server tests the view definition to see if the view is modifiable. If it is, the database server grants you the Insert, Delete, and Update privileges on the view, provided that you also have those privileges on the underlying table or view. In other words, if the new view is modifiable, the database server copies your Insert, Delete, and Update privileges from the underlying table or view and grants them on the new view. If you have only the Insert privilege on the underlying table, you receive only the Insert privilege on the view. 6-34 IBM Informix Guide to Database Design and Implementation Privileges When Using a View This test ensures that users cannot use a view to gain access to any privileges that they did not already have. Because you cannot alter or index a view, the Alter and Index privileges are never granted on a view. Privileges When Using a View When you attempt to use a view, the database server tests only the privileges that you are granted on the view. It does not test your right to access the underlying tables. If you create the view, your privileges are the ones noted in the preceding section. If you are not the creator, you have the privileges that the creator (or someone who had the WITH GRANT OPTION privilege) granted you. Therefore, you can create a table and revoke public access to it; then you can grant limited access privileges to the table through views. Suppose you want to grant access privileges on the following table: CREATE TABLE hr_data ( emp_key INTEGER, emp_name CHAR(40), hire_date DATE, dept_num SMALLINT, user-id CHAR(18), salary DECIMAL(8,2), performance_level CHAR(1), performance_notes TEXT ) The section “Column-Level Privileges” on page 6-11 shows how to grant privileges directly on the hr_data table. The following examples take a different approach. Assume that when the table was created, the following statement was executed: REVOKE ALL ON hr_data FROM PUBLIC Granting and Limiting Access to Your Database 6-35 Privileges When Using a View (Such a statement is not necessary in an ANSI-compliant database.) Now you create a series of views for different classes of users. For users who should have read-only access to the nonsensitive columns, you create the following view: CREATE VIEW hr_public AS SELECT emp_key, emp_name, hire_date, dept_num, user_id FROM hr_data Users who are given the Select privilege for this view can see nonsensitive data and update nothing. For Human Resources personnel who must enter new rows, you create a different view, as the following example shows: CREATE VIEW hr_enter AS SELECT emp_key, emp_name, hire_date, dept_num FROM hr_data You grant these users both Select and Insert privileges on this view. Because you, the creator of both the table and the view, have the Insert privilege on the table and the view, you can grant the Insert privilege on the view to others who have no privileges on the table. On behalf of the person in the MIS department who enters or updates new user IDs, you create still another view, as the following example shows: CREATE VIEW hr_MIS AS SELECT emp_key, emp_name, user_id FROM hr_data This view differs from the previous view in that it does not expose the department number and date of hire. Finally, the managers need access to all columns and they need the ability to update the performance-review data for their own employees only. You can meet these requirements by creating a table, hr_data, that contains a department number and computer user IDs for each employee. Let it be a rule that the managers are members of the departments that they manage. Then the following view restricts managers to rows that reflect only their employees: CREATE VIEW hr_mgr_data AS SELECT * FROM hr_data WHERE dept_num = (SELECT dept_num FROM hr_data WHERE user_id = USER) AND NOT user_id = USER 6-36 IBM Informix Guide to Database Design and Implementation Privileges When Using a View The final condition is required so that the managers do not have update access to their own row of the table. Therefore, you can safely grant the Update privilege to managers for this view, but only on selected columns, as the following statement shows: GRANT SELECT, UPDATE (performance_level, performance_notes) ON hr_mgr_data TO peter_m Granting and Limiting Access to Your Database 6-37 Chapter 7 Creating and Using Extended Data Types in Dynamic Server Chapter 8 Understanding Type and Table Inheritance in Dynamic Server Chapter 9 Creating and Using User-Defined Casts in Dynamic Server Section III Object-Relational Databases Chapter Creating and Using Extended Data Types in Dynamic Server In This Chapter . . . . . . . . . . . . . . . . 7-3 Informix Data Types . . . . . . . . . . Fundamental or Atomic Data Types. . . . Predefined Data Types . . . . . . . . BOOLEAN and LVARCHAR Data Types BLOB and CLOB Data Types . . . . . Other Predefined Data Types. . . . . Extended Data Types . . . . . . . . . Complex Data Types . . . . . . . User-Defined Data Types . . . . . . . . . . . . . . . . . . . . . . . . . . . . . . . . . . . . . . . . . . . . . . . . . . . . . . . . . . . . . . . . . . . . . . . . . . . . . . 7-4 7-5 7-5 7-5 7-5 7-6 7-7 7-8 7-8 Smart Large Objects . . . . BLOB Data Type . . . . CLOB Data type . . . . Using Smart Large Objects . Copying Smart Large Objects . . . . . . . . . . . . . . . . . . . . . . . . . . . . . . . . . . . . . . . . 7-10 7-10 7-10 7-12 7-13 Complex Data Types . . . . . . . . . . . . Collection Data Types . . . . . . . . . . Null Values in Collections . . . . . . . . Using SET Collection Types . . . . . . . Using MULTISET Collection Types . . . . Using LIST Collection Types . . . . . . . Nesting Collection Types . . . . . . . . Adding a Collection Type to an Existing Table . Restrictions on Collections . . . . . . . . . . . . . . . . . . . . . . . . . . . . . . . . . . . . . . . . . . . . . . . . . . . . . . . . . . . . . 7-14 7-15 7-16 7-17 7-18 7-19 7-20 7-20 7-21 . . . . . . . . . . . . . . . . . . . . . . . . 7 . . . . . . . . . . Named Row Types. . . . . . . . . . . . . . When to Use a Named Row Type . . . . . . . Choosing a Name for a Named Row Type . . . . Restrictions on Named Row Types . . . . . . . Using a Named Row Type to Create a Typed Table . Changing the Type of a Table . . . . . . . . . Using a Named Row Type to Create a Column. . . Using a Named Row Type Within Another Row Type Dropping Named Row Types. . . . . . . . . Unnamed Row Types . . . . . . . . . . . . . 7-2 IBM Informix Guide to Database Design and Implementation . . . . . . . . . . . . . . . . . . . . . . . . . . . . . . . . . . . . . . . . 7-21 7-22 7-23 7-24 7-25 7-26 7-28 7-29 7-30 7-30 IDS In This Chapter This chapter describes extended data types that you can use to build an object-relational database. The term object-relational is not associated with a particular method or model of database design, but instead refers to any database that uses Dynamic Server features to extend the functionality of the database. An object-relational database is not antithetical to a relational database but rather is an extension of functionality already present in a relational database. Typically, you use some combination of features from Dynamic Server to extend the kinds of data that your database can store and manipulate. These features include extended data types, smart large objects, type and table inheritance, user-defined casts, and user-defined routines (UDRs). The chapters in this section of the manual describe many of these features. For information about UDRs, see Creating User-Defined Routines and User-Defined Data Types and the Informix Guide to SQL: Tutorial. For an example of an object-relational database, you can create the superstores_demo database, which contains examples of some of the features available with Dynamic Server. For information about how to create the superstores_demo database, refer to the DB-Access User’s Manual. Creating and Using Extended Data Types in Dynamic Server 7-3 Informix Data Types Informix Data Types Figure 3-1 in Chapter 3, “Choosing Data Types,” provides a chart for selecting appropriate data types for the columns of a table depending on the type of data that will be stored. Figure 7-1 on page 7-4 shows a hierarchy of data types that reflects how the database server manages the data types. Figure 7-1 Informix Data Types DATA TYPES Built-in data types Predefined data Fundamental or Atomic Numeric Character Time Extended data types (see Figure 7-2) Simple Large Objects: TEXT BYTE LVARCHAR Smart Large Objects: BLOB, CLOB BOOLEAN 7-4 IBM Informix Guide to Database Design and Implementation Other predefined data types Fundamental or Atomic Data Types Fundamental or Atomic Data Types All Informix database servers support the fundamental, or atomic, data types. These types are fundamental because they are the smallest units that you can specify in a SELECT statement. Only Dynamic Server supports extended and predefined data types. The predefined data types are in a separate category because they share certain characteristics with extended data types but are provided by the database server. For a discussion of the fundamental data types, refer to Chapter 3, “Choosing Data Types.” Predefined Data Types The database server provides the predefined data types, just as it provides the fundamental data types. However, the predefined data types have certain characteristics in common with the extended data types. BOOLEAN and LVARCHAR Data Types BOOLEAN and LVARCHAR data types behave like built-in data types except that the system catalog tables define them as extended data types. For more information, refer to Chapter 3, “Choosing Data Types,” and to the system catalog tables in the Informix Guide to SQL: Reference. BLOB and CLOB Data Types The BLOB and CLOB data types are not fundamental data types because you can randomly access data from within the BLOB or CLOB. You can create a table with BLOB and CLOB columns, but you cannot insert data directly into the column. You must use functions to insert and manipulate the data. For more information, see “Smart Large Objects” on page 7-9. Creating and Using Extended Data Types in Dynamic Server 7-5 Predefined Data Types Other Predefined Data Types With the exception of BLOB, BOOLEAN, CLOB, and LVARCHAR, the predefined data types usually do not appear as data types for the columns of a table. Instead, the predefined data types are used with the functions associated with complex and user-defined data types and user-defined routines. The following table lists the remaining predefined data types. clientbinval indexkeyarray sendrecv ifx_lo_spec lolist stat ifx_lo_stat pointer stream impexp rtnparamtypes impexpbin selfuncargs For more information about these predefined data types, refer to Creating User-Defined Routines and User-Defined Data Types. 7-6 IBM Informix Guide to Database Design and Implementation Extended Data Types Extended Data Types Extended data types let you create data types to characterize data that cannot be easily represented with the built-in data types. However, you cannot use extended data types in distributed transactions. Figure 7-2 shows the extended data types. Figure 7-2 Extended Data Types DATA TYPES Built-in data types (see previous figure) Extended data types User-defined data types Complex data types Distinct Opaque DataBlade data types Collection types LIST SET Row types MULTISET Unnamed Row Named Row Creating and Using Extended Data Types in Dynamic Server 7-7 Extended Data Types Complex Data Types Complex data types describe either a collection of data objects, all of one type (LIST, SET, and MULTISET) or groups of objects of different types (named and unnamed rows.) User-Defined Data Types An extended data type is a data type that is not provided by the database server. You must provide all of the information that the database server needs to manage opaque data types or distinct data types. Distinct Data Types A distinct data type is an encapsulated data type that you create with the CREATE DISTINCT TYPE statement. A distinct data type has the same representation as, but is distinct from, the data type on which it is based. You can create a distinct data type from built-in types, opaque types, named row types, or other distinct types. You cannot create a distinct data type from any of the following data types: ■ SERIAL ■ SERIAL8 ■ Collection types ■ Unnamed row types When you create a distinct data type, you implicitly define the structure of the data type because a distinct data type inherits the structure of its source data type. You can also define functions, operators, and aggregates that operate on the distinct data type. For information about distinct data types, see “Casting Distinct Data Types” on page 9-15, the Informix Guide to SQL: Syntax, and the Informix Guide to SQL: Reference. 7-8 IBM Informix Guide to Database Design and Implementation Extended Data Types Opaque Data Types An opaque data type is an encapsulated data type that you create with the CREATE OPAQUE TYPE statement. When you create an opaque data type, you must explicitly define the structure of the data type as well as the functions, operators, and aggregates that operate on the opaque data type. You can use an opaque data type to define columns and program variables in the same way that you use built-in types. For information about creating opaque data types, see Creating User-Defined Routines and User-Defined Data Types and the Informix Guide to SQL: Syntax. DataBlade Data Types The diagram in Figure 7-2 on page 7-7 includes DataBlade data types although they are not actually data types. A DataBlade is a suite of userdefined data types and user-defined routines that provides tools for a specialized application. For example, different DataBlades provide tools for managing images, time-series, and astronomical observations. Such applications often require opaque data types as well as other user-defined data types. For information about developing a DataBlade, refer to the DataBlade API Programmer’s Manual and the DataBlade Developers Kit. For information about the DataBlades that Informix provides, contact your customer representative. Creating and Using Extended Data Types in Dynamic Server 7-9 Smart Large Objects Smart Large Objects Smart large objects are objects that are defined on a BLOB or CLOB data type. A smart large object allows an application program to randomly access column data, which means that you can read or write to any part of a BLOB or CLOB column in any arbitrary order. You can create BLOB or CLOB columns to store binary data or character data. BLOB Data Type You can use a BLOB data type to store any data that a program can generate: graphic images, satellite images, video clips, audio clips, or formatted documents saved by any word processor or spreadsheet. The database server permits any kind of data of any length in a BLOB column. Like CLOB objects, BLOB objects are stored in whole disk pages in separate disk areas from normal row data. The advantage of the BLOB data type, as opposed to CLOB, is that it accepts any data. Otherwise, the advantages and disadvantages of the BLOB data type are the same as for the CLOB data type. CLOB Data type You can use the CLOB data type to store a block of text. It is designed to store ASCII text data, including formatted text such as HTML or PostScript. Although you can store any data in a CLOB object, Informix tools expect a CLOB object to be printable, so restrict this data type to printable ASCII text. CLOB values are not stored with the rows of which they are a part. They are allocated in whole disk pages, usually areas away from rows. (For more information, see your Administrator’s Guide.) 7-10 IBM Informix Guide to Database Design and Implementation CLOB Data type The CLOB data type is similar to the TEXT data type except that the CLOB data type provides the following advantages: ■ An application program can read from or write to any portion of the CLOB object. ■ Access times can be significantly faster because an application program can access any portion of a CLOB object. ■ Default characteristics are relatively easy to override. Database administrators can override default characteristics for sbspace at the column level. Application programmers can override some default characteristics for the column when they create a CLOB object. ■ You can use the equals operator (=) to test whether two CLOB values are equal. ■ A CLOB object is recoverable in the event of a system failure and obeys transaction isolation modes when the DBA or application programmer specifies it. (Recovery of CLOB objects requires that your database system has the necessary resources to provide buffers large enough to handle CLOB objects.) ■ You can use the CLOB data type to provide large storage for a userdefined data type. ■ DataBlade developers can create indexes on CLOB data types. The disadvantages of the CLOB data type are as follows: ■ It is allocated in whole disk pages, so a short item wastes space. ■ Restrictions apply on how you can use a CLOB column in an SQL statement. (See “Using Smart Large Objects” on page 7-11.) ■ It is not available with all Informix database servers. Creating and Using Extended Data Types in Dynamic Server 7-11 Using Smart Large Objects Using Smart Large Objects To store columns of a BLOB or CLOB data type, you must allocate an sbspace. An sbspace is a logical storage unit that stores BLOB and CLOB data in the most efficient way possible. You can write Informix ESQL/C programs that allow users to fetch and store BLOB or CLOB data. Application programmers who want to access and manipulate smart large objects directly can consult the Informix ESQL/C Programmer’s Manual. In any SQL statement, interactive or programmed, a BLOB or CLOB column cannot be used in the following ways: ■ In arithmetic or Boolean expressions ■ In a GROUP BY or ORDER BY clause ■ In a UNIQUE test ■ For indexing, as part of an Informix B-tree index However, DataBlade developers have the capability to create indexes on CLOB columns. In a SELECT statement entered interactively, a BLOB or CLOB column can: ■ Specify null values as a default when you create a table with the DEFAULT NULL clause ■ Disallow null values using the NOT NULL constraint when you create a table ■ Be tested with the IS [NOT] NULL predicate From an ESQL/C program, you can use the ifx_lo_stat() function to determine the length of BLOB or CLOB data. 7-12 IBM Informix Guide to Database Design and Implementation Copying Smart Large Objects Copying Smart Large Objects Dynamic Server provides functions that you can call from within an SQL statement to import and export smart large objects. Figure 7-3 shows the smart-large-object functions. Figure 7-3 SQL Functions for Smart Large Objects Function Name Purpose FILETOBLOB() Copies a file into a BLOB column FILETOCLOB() Copies a file into a CLOB column LOCOPY() Copies BLOB or CLOB data into another BLOB or CLOB column LOTOFILE() Copies BLOB or CLOB data into a file For detailed information and the syntax of smart-large-object functions, see the Expression segment in the Informix Guide to SQL: Syntax. Important: Casts between BLOB and CLOB data types are not permitted. Creating and Using Extended Data Types in Dynamic Server 7-13 Complex Data Types Complex Data Types A complex data type is usually a composite of other existing data types. For example, you might create a complex data type whose components include built-in types, opaque types, distinct types, or other complex types. An important advantage that complex data types have over user-defined types is that users can access and manipulate the individual components of a complex data type. In contrast, built-in types and user-defined types are self-contained (encapsulated) data types. Consequently, the only way to access the component values of an opaque data type is through functions that you define on the opaque type. Figure 7-4 shows the complex data types that Dynamic Server supports and the syntax that you use to create the complex data types. Figure 7-4 Complex Data Types Complex Data Data Types Types Complex Row types Collection data types LIST 7-14 SET MULTISET IBM Informix Guide to Database Design and Implementation Named row type: CREATE ROW TYPE Unnamed row type: ROW Collection Data Types The complex data types that Figure 7-4 illustrates provide the following extended data type support: ■ Collection types. You can use a collection type whenever you need to store and manipulate collections of data within a table cell. You can assign collection types to columns. ■ Row types. A row type typically contains multiple fields. When you want to store more than one kind of data in a column or variable, you can create a row type. Row types come in two kinds: named row types and unnamed row types. You can assign an unnamed row type to columns and variables. You can assign a named row type to columns, variables, tables, or views. When you assign a named row type to a table, the table is a typed table. A primary advantage of typed tables is that they can be used to define an inheritance hierarchy. For more information about how to perform SELECT, INSERT, UPDATE, and DELETE operations on the complex data types that this chapter describes, see the Informix Guide to SQL: Tutorial. Collection Data Types Collection data types enable you to store and manipulate collections of data within a single row of a table. A collection data type has two components: a type constructor, which determines whether the collection type is a SET, MULTISET, or LIST, and an element type, which specifies the type of data that the collection can contain. (The SET, MULTISET, and LIST collection types are described in detail in the following sections.) The elements of a collection can be of most any data type. (For a list of exceptions, see “Restrictions on Collections” on page 7-19.) The elements of a collection are the values that the collection contains. In a collection that contains the values: {'blue', 'green', 'yellow', and 'red'}, 'blue' represents a single element in the collection. Every element in a collection must be of the same type. For example, a collection whose element type is INTEGER can contain only integer values. The element type of a collection can represent a single data type (column) or multiple data types (row). In the following example, the col_1 column represents a SET of integers: col_1 SET(INTEGER NOT NULL) Creating and Using Extended Data Types in Dynamic Server 7-15 Collection Data Types To define a collection data type that contains multiple data types, you can use a named row type or an unnamed row type. In the following example, the col_2 column represents a SET of rows that contain name and salary fields: col_2 SET(ROW(name VARCHAR(20), salary INTEGER) NOT NULL) Important: When you define a collection data type, you must include the NOT NULL constraint as part of the type definition. No other column constraints are allowed on a collection data type. After you define a column as a collection data type, you can perform the following operations on the collection: ■ Select and modify individual elements of a collection (from ESQL/C programs only). ■ Count the number of elements that a collection contains. ■ Determine if certain values are in a collection. For information on the syntax that you use to create collection data types, see the Data Type segment in the Informix Guide to SQL: Syntax. For information about how to convert a value of one collection type to another collection type, see the Informix Guide to SQL: Tutorial. Null Values in Collections A collection cannot contain null elements. However, when the collection is a row type, you can insert null values for any or all fields of a row type that a collection contains. Suppose you create the following table that has a collection column: CREATE TABLE tab1 (col1 INT, col2 SET(ROW(a INT, b INT) NOT NULL)); The following statements are allowed because only the component fields of the row type specify null values: INSERT INTO tab1 VALUES ( 25,"SET{ROW(NULL, NULL)}"); INSERT INTO tab1 VALUES ( 35,"SET{ROW(4, NULL)}"); INSERT INTO tab1 VALUES ( 45,"SET{ROW(14, NULL), ROW(NULL,5)}"); UPDATE tab1 SET col2 = "SET{ROW(NULL, NULL)}" WHERE col1 = 45; 7-16 IBM Informix Guide to Database Design and Implementation Collection Data Types However, each of the following statements returns an error message because the collection element specifies a null value: INSERT INTO tab1 VALUES ( 45, "SET{NULL)}"); UPDATE tab1 SET col2 = "SET{NULL}" WHERE col1 = 55; Using SET Collection Types A SET is an unordered collection of elements in which each element is unique. You define a column as a SET collection type when you want to store collections whose elements have the following characteristics: ■ The elements contain no duplicate values. ■ The elements have no specific order associated with them. To illustrate how you might use a SET, imagine that your human resources department needs information about the dependents of each employee in the company. You can use a collection type to define a column in an employee table that stores the names of an employee’s dependents. The following statement creates a table in which the dependents column is defined as a SET: CREATE TABLE employee ( name CHAR(30), address CHAR (40), salary INTEGER, dependents SET(VARCHAR(30) NOT NULL) ); A query against the dependents column for any given row returns the names of all the dependents of the employee. In this case, SET is the appropriate collection type because the collection of dependents for each employee should not contain any duplicate values. A column that is defined as a SET ensures that each element in a collection is unique. Creating and Using Extended Data Types in Dynamic Server 7-17 Collection Data Types To illustrate how to define a collection type whose elements are a row type, suppose that you want the dependents column to include the name and birthdate of an employee’s dependents. In the following example, the dependents column is defined as a SET whose element type is a row type: CREATE TABLE employee ( name CHAR(30), address CHAR (40), salary INTEGER, dependents SET(ROW(name VARCHAR(30), bdate DATE) NOT NULL) ); Each element of a collection from the dependents column contains values for the name and bdate. Each row of the employee table contains information about the employee as well as a collection with the names and birthdates of the employee’s dependents. For example, if an employee has no dependents, the collection for the dependents column is empty. If an employee has 10 dependents, the collection should contain 10 elements. Using MULTISET Collection Types A MULTISET is a collection of elements in which the elements can have duplicate values. For example, a MULTISET of integers might contain the collection {1,3,4,3,3}, which has duplicate elements. You can define a column as a MULTISET collection type when you want to store collections whose elements have the following characteristics: ■ The elements might not be unique. ■ The elements have no specific order associated with them. To illustrate how you might use a MULTISET, suppose that your human resources department wants to keep track of the bonuses awarded to employees in the company. To track each employee’s bonuses over time, you can use a MULTISET to define a column in a table that records all the bonuses that each employee receives. In the following example, the bonus column is a MULTISET: CREATE TABLE ( name address salary bonus ); 7-18 employee CHAR(30), CHAR (40), INTEGER, MULTISET(MONEY NOT NULL) IBM Informix Guide to Database Design and Implementation Collection Data Types You can use the bonus column in this statement to store and access the collection of bonuses for each employee. A query against the bonus column for any given row returns the dollar amount for each bonus that the employee has received. Because an employee might receive multiple bonuses of the same amount (resulting in a collection whose elements are not all unique), the bonus column is defined as a MULTISET, which allows duplicate values. Using LIST Collection Types A LIST is an ordered collection of elements that allows duplicate values. A LIST differs from a MULTISET in that each element in a LIST has an ordinal position in the collection. The order of the elements in a list corresponds with the order in which values are inserted into the LIST. You can define a column as a LIST collection type when you want to store collections whose elements have the following characteristics: ■ The elements have a specific order associated with them. ■ The elements might not be unique. To illustrate how you might use a LIST, suppose your sales department wants to keep a monthly record of the sales total for each salesperson. You can use a LIST to define a column in a table that contains the monthly sales totals for each salesperson. The following example creates a table in which the month_sales column is a LIST. The first entry (element) in the LIST, with an ordinal position of 1, might correspond to the month of January, the second element, with an ordinal position of 2, February, and so forth. CREATE TABLE sales_person ( name CHAR(30), month_sales LIST(MONEY NOT NULL) ); You can use the month_sales column in this statement to store and access the monthly sales totals for each salesperson. More specifically, you might perform queries on the month_sales column to find out: ■ The total sales that a salesperson generated during a specified month ■ The total sales for every salesperson during a specified month Creating and Using Extended Data Types in Dynamic Server 7-19 Collection Data Types Nesting Collection Types A nested collection is a collection type that contains another collection type. You can nest any collection type within another collection type. There is no practical limit on how deeply you can nest a collection type. However, performing inserts or updates on a collection that has been nested more than one or two levels can be difficult. The following example shows several ways in which you might create columns that are defined on nested collection types: col_1 SET(MULTISET(VARCHAR(20) NOT NULL) NOT NULL); col_2 MULTISET(ROW(x CHAR(5), y SET(INTEGER NOT NULL)) NOT NULL); col_3 LIST(MULTISET(ROW(a CHAR(2), b INTEGER) NOT NULL) NOT NULL); For information about how to access a nested collection, see the Informix Guide to SQL: Tutorial. Adding a Collection Type to an Existing Table You can use the ALTER TABLE statement to add or drop a column that is a collection type (or any other data type). For example, the following statement adds the flowers column, which is defined as a SET, to the nursery table: ALTER TABLE nursery ADD flower SET(VARCHAR(30) NOT NULL) You cannot modify an existing column that is a collection type or convert a non-collection type column into a collection type. For more information on adding and dropping collection-type columns, see the ALTER TABLE statement in the Informix Guide to SQL: Syntax. 7-20 IBM Informix Guide to Database Design and Implementation Named Row Types Restrictions on Collections You cannot use any of the following data types as the element type of a collection: ■ TEXT ■ BYTE ■ SERIAL ■ SERIAL8 You cannot use a CREATE INDEX statement to create an index on collection, nor can you create a functional index for a collection column. Named Row Types A named row type is a group of fields that are defined under a single name. A field refers to a component of a row type and should not be confused with a column, which is associated with tables only. The fields of a named row type are analogous to the fields of a C-language structure or members of a class in object-oriented programming. After you create a named row type, the name that you assign to the row type represents a unique type within the database. To create a named row type, you specify a name for the row type and the names and data types of its constituent fields. The following example shows how you might create a named row type called person_t: CREATE ROW TYPE person_t ( name VARCHAR(30) NOT NULL, address VARCHAR(20), city VARCHAR(20), state CHAR(2), zip VARCHAR(9), bdate DATE ); Creating and Using Extended Data Types in Dynamic Server 7-21 Named Row Types The person_t row type contains six fields: name, address, city, state, zip, and bdate. When you create a named row type, you can use it just as you would any other data type. The person_t can occur anywhere that you might use any other data type. The following CREATE TABLE statement uses the person_t data type: CREATE TABLE ( sport sportnum member since paidup ) sport_club CHAR(20), INT, person_t, DATE, BOOLEAN You can use most data types to define the fields of a row type. For information about data types that are not supported in row types, see “Restrictions on Named Row Types” on page 7-22. For the syntax you use to create a named row type, see the CREATE ROW TYPE statement in the Informix Guide to SQL: Syntax. For information about how to cast row type values, see Chapter 9, “Creating and Using User-Defined Casts in Dynamic Server.” When to Use a Named Row Type A named row type is one way to create a new data type in Dynamic Server. When you create a named row type, you are defining a template for fields of data types known to the database server. Thus the field definitions of a row type are analogous to the column definitions of a table: both are constructed from data types known to the database server. You can create a named row type when you want a type that acts as a container for component values that users need to access. For example, you might create a named row type to support address values because users need direct access to the individual component values of an address such as street, city, state, and zip code. When you create the address type as a named row type, users always have direct access to each of the fields. 7-22 IBM Informix Guide to Database Design and Implementation Named Row Types In contrast, if you create an opaque data type to handle address values, a C-language data structure stores all the address information. Because the component values of an opaque type are encapsulated, you would have to define functions to extract the component values for street, city, state, zip code. Thus, an opaque data type is a more complicated type to define and use. Before you define a data type, determine whether the type is just a container for a group of values that users can access directly. If the type fits this description, use a named row type. Choosing a Name for a Named Row Type You can give a named row type any name that you like provided that the name does not violate the conventions established for the SQL identifiers. The conventions for SQL identifiers are described in the Identifier segment in the Informix Guide to SQL: Syntax. To avoid confusing type and table names, the examples in this manual designate named row types with the _t characters at the end of the row type name. You must have the Resource privilege to create a named row type. The name that you assign to a named row type should not be the same as any other data type that exists in the database because all data types share the same name space. In an ANSI-compliant database, the combination owner.type must be unique within the database. In a database that is not ANSI-compliant, the name must be unique within the database. Important: You must grant USAGE privileges on a named row type before other users can use it. For information about granting and revoking privileges on named row types, see Chapter 11, “Implementing a Dimensional Database.” Creating and Using Extended Data Types in Dynamic Server 7-23 Named Row Types Restrictions on Named Row Types This section describes the restrictions that apply when you use named row types. Restrictions on Data Types Informix recommends that you use the BLOB or CLOB data types instead of the TEXT or BYTE data types when you create a typed table that contains columns for large objects. For backward compatibility, you can create a named row type that contains TEXT or BYTE fields and use that type to recreate an existing (untyped) table as a typed table. However, although you can use a named row type that contains TEXT or BYTE fields to create a typed table, you cannot use such a row type as a column. You can assign a named row type that contains BLOB or CLOB fields to a typed table or column. Restrictions on Constraints In a CREATE ROW TYPE statement, you can specify only the NOT NULL constraint for the fields of a named row type. You must define all other constraints in the CREATE TABLE statement. For more information, see the CREATE TABLE statement in the Informix Guide to SQL: Syntax. Restrictions on Indexes You cannot use a CREATE INDEX statement to create an index on a named row type column. However, you can use a user-defined routine to create a functional index for a row type column. Restrictions on SERIAL Data Types A named row type that contains a SERIAL or SERIAL8 data type cannot be used as a column type in a table. The following statements return an error when the database server attempts to create the table: CREATE ROW TYPE row_t (s_col SERIAL) CREATE TABLE bad_tab (col1 row_t) However, you can use a named row type that contains a SERIAL or SERIAL8 data type to create a typed table. 7-24 IBM Informix Guide to Database Design and Implementation Named Row Types For information about the use and behavior of SERIAL and SERIAL8 types in table hierarchies, see “SERIAL Types in a Table Hierarchy” on page 8-19. Using a Named Row Type to Create a Typed Table You can create a table that is typed or untyped. A typed table is a table that has a named row type assigned to it. An untyped table is a table that does not have a named row type assigned to it. The CREATE ROW TYPE statement creates a named row type but does not allocate storage for instances of the row type. To allocate storage for instances of a named row type, you must assign the row type to a table. The following example shows how to create a typed table: CREATE ROW TYPE person_t ( name VARCHAR(30), address VARCHAR(20), city VARCHAR(20), state CHAR(2), zip INTEGER, bdate DATE ); CREATE TABLE person OF TYPE person_t; The first statement creates the person_t type. The second statement creates the person table, which contains instances of the person_t type. More specifically, each row in a typed table contains an instance of the named row type that is assigned to the table. In the preceding example, the fields of the person_t type define the columns of the person table. Important: The order in which you create named row types is important because a named row type must exist before you can use it to define a typed table. Inserting data into a typed table is no different than inserting data into an untyped table. When you insert data into a typed table, the operation creates an instance of the row type and inserts it into the table. The following example shows how to insert a row into the person table: INSERT INTO person VALUES ('Brown, James', '13 First St.', 'San Carlos', 'CA', 94070, '01/04/1940') The INSERT statement creates an instance of the person_t type and inserts it into the table. For more information about how to insert, update, and delete columns that are defined on named row types, see the Informix Guide to SQL: Tutorial. Creating and Using Extended Data Types in Dynamic Server 7-25 Named Row Types You can use a single named row type to create multiple typed tables. In this case, each table has a unique name, but all tables share the same type. Important: You cannot create a typed table that is a temporary table. For information on the advantages of using typed tables when you implement your data model, see “Type Inheritance” on page 8-4. Changing the Type of a Table The primary advantage of typed tables over untyped tables is that typed tables can be used in an inheritance hierarchy. In general, inheritance allows a table to acquire the representation and behavior of another table. For more information, see “What Is Inheritance?” on page 8-3. The DROP and ADD clauses of the ALTER TABLE statement let you change between typed and untyped tables. Neither the ADD nor DROP operation affects the data that is stored in the table. Converting an Untyped Table into a Typed Table If you want to convert an existing untyped table into a typed table, you can use the ALTER TABLE statement. For example, consider the following untyped table: CREATE TABLE manager ( name VARCHAR(30), department VARCHAR(20), salary INTEGER ); 7-26 IBM Informix Guide to Database Design and Implementation Named Row Types To convert an untyped table to a typed table, both the field names and the field types of the named row type must match the column names and column types of the existing table. For example, to make the manager table a typed table, you must first create a named row type that matches the column definitions of the table. The following statement creates the manager_t type, which contains field names and field types that match the columns of the manager table: CREATE ROW TYPE manager_t ( name VARCHAR(30), department VARCHAR(20), salary INTEGER ); After you create the named row type that you want to assign to the existing untyped table, use the ALTER TABLE statement to assign the type to the table. The following statement alters the manager table and makes it a typed table of type manager_t: ALTER TABLE manager ADD TYPE manager_t The new manager table contains the same columns and data types as the old table but now provides the advantages of a typed table. Converting a Typed Table into an Untyped Table You also use the ALTER TABLE statement to change a typed table into an untyped table: ALTER TABLE manager DROP TYPE Tip: Adding a column to a typed table requires three ALTER TABLE statements to drop the type, add the column, and add the type to the table. Creating and Using Extended Data Types in Dynamic Server 7-27 Named Row Types Using a Named Row Type to Create a Column Both typed and untyped tables can contain columns that are defined on named row types. A column that is defined on a named row type behaves in the same way whether the column occurs in a typed table or untyped table. In the following example, the first statement creates a named row type address_t; the second statement assigns the address_t type to the address column in the employee table: CREATE ROW ( street city state zip ); TYPE address_t VARCHAR(20), VARCHAR(20), CHAR(2), VARCHAR(9) CREATE TABLE employee ( name VARCHAR(30), address address_t, salary INTEGER ); In the preceding CREATE TABLE statement, the address column has the street, city, state, and zip fields of the address_t type. Consequently, the employee table, which has only three columns, contains values for name, street, city, state, zip, and salary. Use dot notation to access the individual fields of a column that are defined on a row type. For information about using dot notation to access fields of a column, see the Informix Guide to SQL: Tutorial. When you insert data into a column that is assigned a row type, you need to use the ROW constructor to specify row literal values for the row type. The following example shows how to use the INSERT statement to insert a row into the employee table: INSERT INTO employee VALUES ('John Bryant', ROW('10 Bay Street', 'Madera', 'CA', 95400)::address_t, 55000); 7-28 IBM Informix Guide to Database Design and Implementation Named Row Types Strong typing is not enforced for an insert or update on a named row type. To ensure that the row values are of the named row type, you must explicitly cast to the named row type to generate values of a named row type, as the previous example shows. The INSERT statement inserts three values, one of which is a row type value that contains four values. More specifically, the operation inserts unitary values for the name and salary columns but it creates an instance of the address_t type and inserts it into the address column. For more information about how to insert, update, and delete columns that are defined on row types, see the Informix Guide to SQL: Tutorial. Using a Named Row Type Within Another Row Type You can use a named row type as the data type of a field within another row type. A nested row type is a row type that contains another row type. You can nest any row type within any other row type. No practical limit exists on how deeply you can nest row types. However, to perform inserts or updates on deeply nested row types requires careful use of the syntax. For named row types, the order in which you create the row types is important because a named row type must exist before you can use it to define a column or a field within another row type. In the following example, the first statement creates the address_t type, which is used in the second statement to define the type of the address field of the employee_t type: CREATE ROW ( street city state zip ); TYPE address_t VARCHAR (20), VARCHAR(20), CHAR(2), VARCHAR(9) CREATE ROW TYPE employee_t ( name VARCHAR(30) NOT NULL, address address_t, salary INTEGER ); Important: You cannot use a row type recursively. If type_t is a row type, then you cannot use type_t as the data type of a field contained in type_t. Creating and Using Extended Data Types in Dynamic Server 7-29 Unnamed Row Types Dropping Named Row Types To drop a named row type, use the DROP ROW TYPE statement. You can drop a type only if it has no dependencies. You cannot drop a named row type if any of the following conditions are true: ■ The type is currently assigned to a table. ■ The type is currently assigned to a column in a table. ■ The type is currently assigned to a field within another row type. The following example shows how to drop the person_t type: DROP ROW TYPE person_t restrict; For information about how to drop a named row type from a type hierarchy, see “Dropping Named Row Types from a Type Hierarchy” on page 8-10. Unnamed Row Types An unnamed row type is a group of typed fields that you create with the ROW constructor. An important distinction between named and unnamed row types is that you cannot assign an unnamed row type to a table. You use an unnamed row type to define the type of a column or field only. In addition, an unnamed row type is identified by its structure alone, whereas a named row type is identified by its name. The structure of a row type consists of the number and data types of its fields. The following statement assigns two unnamed row types to columns of the student table: CREATE TABLE student ( s_name ROW(f_name VARCHAR(20), m_init CHAR(1), l_name VARCHAR(20) NOT NULL), s_address ROW(street VARCHAR(20), city VARCHAR(20), state CHAR(2), zip VARCHAR(9)) ); The s_name and s_address columns of the student table each contain multiple fields. Each field of an unnamed row type can have a different data type. Although the student table has only two columns, the unnamed row types define a total of seven fields: f_name, m_init, l_name, street, city, state, and zip. 7-30 IBM Informix Guide to Database Design and Implementation Unnamed Row Types The following example shows how to use the INSERT statement to insert data into the student table: INSERT INTO student VALUES (ROW('Jim', 'K', 'Johnson'), ROW('10 Grove St.', 'Eldorado', 'CA', 94108)) For more information about how to modify columns that are defined on row types, see the Informix Guide to SQL: Tutorial. The database server does not distinguish between two unnamed row types that contain the same number of fields and that have corresponding fields of the same type. Field names are irrelevant in type checking of unnamed row types. For example, the database server does not distinguish between the following unnamed row types: ROW(a INTEGER, b CHAR(4)); ROW(x INTEGER, y CHAR(4)); For the syntax of unnamed row types, see the Informix Guide to SQL: Syntax. For information about how to cast row type values, see Chapter 9, “Creating and Using User-Defined Casts in Dynamic Server.” The following data types cannot be field types in an unnamed row type: ■ SERIAL ■ SERIAL8 ■ BYTE ■ TEXT The database server returns an error when any of the preceding types are specified in the field definition of an unnamed row type. Creating and Using Extended Data Types in Dynamic Server 7-31 Chapter Understanding Type and Table Inheritance in Dynamic Server In This Chapter . . 8 . . . . . . . . . . . . . . . . . . 8-3 What Is Inheritance? . . . . . . . . . . . . . . . . . . 8-3 Type Inheritance. . . . . . . . . . . . . . . Defining a Type Hierarchy . . . . . . . . . . Overloading Routines for Types in a Type Hierarchy . Inheritance and Type Substitutability . . . . . . Dropping Named Row Types from a Type Hierarchy. . . . . . . . . . . . . . . . . . . . . . . . . . 8-4 8-4 8-8 8-9 8-10 Table Inheritance . . . . . . . . . . . . . . The Relationship Between Type and Table Hierarchies Defining a Table Hierarchy . . . . . . . . . . Inheritance of Table Behavior in a Table Hierarchy . Modifying Table Behavior in a Table Hierarchy . . . Constraints on Tables in a Table Hierarchy . . . Adding Indexes to Tables in a Table Hierarchy . Triggers on Tables in a Table Hierarchy . . . . SERIAL Types in a Table Hierarchy . . . . . . . Adding a New Table to a Table Hierarchy . . . . Dropping a Table in a Table Hierarchy . . . . . . Altering the Structure of a Table in a Table Hierarchy. Querying Tables in a Table Hierarchy . . . . . . Creating a View on a Table in a Table Hierarchy . . . . . . . . . . . . . . . . . . . . . . . . . . . . . . . . . . . . . . . . . . . . . . . . . . . . . . . . . . . . . . . . . . . . . . . . 8-11 8-12 8-14 8-15 8-17 8-18 8-18 8-19 8-19 8-20 8-22 8-22 8-23 8-23 8-2 IBM Informix Guide to Database Design and Implementation IDS In This Chapter This chapter describes type and table inheritance and shows how to create type and table hierarchies to modify the types and tables within the respective hierarchies. What Is Inheritance? Inheritance is the process that allows a type or a table to acquire the properties of another type or table. The type or table that inherits the properties is called the subtype or subtable. The type or table whose properties are inherited is called the supertype or supertable. Inheritance allows for incremental modification so that a type or table can inherit a general set of properties and add properties that are specific to itself. You can use inheritance to make modifications only to the extent that the modifications do not alter the inherited supertypes or supertables. Dynamic Server supports inheritance only for named row types and typed tables. Dynamic Server supports only single inheritance. With single inheritance, each subtype or subtable has only one supertype or supertable. Understanding Type and Table Inheritance in Dynamic Server 8-3 Type Inheritance Type Inheritance Type inheritance applies to named row types only. You can use inheritance to group named row types into a type hierarchy in which each subtype inherits the representation (data fields) and the behavior (UDRs, aggregates, and operators) of the supertype under which it is defined. A type hierarchy provides the following advantages: ■ It encourages modular implementation of your data model. ■ It ensures consistent reuse of schema components. ■ It ensures that no data fields are accidentally left out. ■ It allows a type to inherit UDRs that are defined on another data type. Defining a Type Hierarchy Figure 8-1 provides an example of a simple type hierarchy that contains three named row types. person_t employee_t sales_rep_t 8-4 IBM Informix Guide to Database Design and Implementation Figure 8-1 Example of a Type Hierarchy Defining a Type Hierarchy The supertype at the top of the type hierarchy contains a group of fields that all underlying subtypes inherit. A supertype must exist before you can create its subtype. The following example creates the person_t supertype of the type hierarchy that Figure 8-1 on page 8-4 shows: CREATE ROW TYPE person_t ( name VARCHAR(30) NOT NULL, address VARCHAR(20), city VARCHAR(20), state CHAR(2), zip INTEGER, bdate DATE ); To create a subtype, specify the UNDER keyword and the name of the supertype whose properties the subtype inherits. The following example illustrates how you might define employee_t as a subtype that inherits all the fields of person_t. The example adds salary and manager fields that do not exist in the person_t type. CREATE ROW TYPE employee_t ( salary INTEGER, manager VARCHAR(30) ) UNDER person_t; Important: You must have the UNDER privilege on the supertype before you can create a subtype that inherits the properties of the supertype. For information about UNDER privileges, see Chapter 11, “Implementing a Dimensional Database.” Understanding Type and Table Inheritance in Dynamic Server 8-5 Defining a Type Hierarchy In the type hierarchy in Figure 8-1 on page 8-4, sales_rep_t is a subtype of employee_t, which is the supertype of sales_rep_t in the same way that person_t is the supertype of employee_t. The following example creates sales_rep_t, which inherits all fields from person_t and employee_t and adds four new fields. Because the modifications on a subtype do not affect its supertype, employee_t does not have the four fields that are added for sales_rep_t. CREATE ROW TYPE sales_rep_t ( rep_num INT8, region_num INTEGER, commission DECIMAL, home_office BOOLEAN ) UNDER employee_t; The sales_rep_t type contains 12 fields: name, address, city, state, zip, bdate, salary, manager, rep_num, region_num, commission, and home_office. Instances of both the employee_t and sales_rep_t types inherit all the UDRs that are defined for the person_t type. Any additional UDRs that are defined on employee_t automatically apply to instances of the employee_t type and to instances of its subtype sales_rep_t but not to instances of person_t. 8-6 IBM Informix Guide to Database Design and Implementation Defining a Type Hierarchy The preceding type hierarchy is an example of single inheritance because each subtype inherits from a single supertype. Figure 8-2 illustrates how you can define multiple subtypes under a single supertype. Although single inheritance requires that every subtype inherits from one and only one supertype, no practical limit exists on the depth or breadth of the type hierarchy that you define. Figure 8-2 Example of a Type Hierarchy That Is a Tree Structure person_t employee_t sales_rep_t . . . customer_t engineer_t . . . us_customer_t local_customers_t . . . non_us_customer_t regional_customers_t . . . The topmost type of any hierarchy is referred to as the root supertype. In Figure 8-2, person_t is the root supertype of the hierarchy. Except for the root supertype, any type in the hierarchy can be potentially both a supertype and subtype at the same time. For example, customer_t is a subtype of person_t and a supertype of us_customer_t. A subtype at the lower levels of the hierarchy contains properties of the root supertype but does not directly inherit its properties from the root supertype. For example, us_customer_t has only one supertype, customer_t, but because customer_t is itself a subtype of person_t, the fields and routines that customer_t inherits from person_t are also inherited by us_customer_t. Understanding Type and Table Inheritance in Dynamic Server 8-7 Overloading Routines for Types in a Type Hierarchy Overloading Routines for Types in a Type Hierarchy Routine overloading refers to the ability to assign one name to multiple routines and specify different types of arguments on which the routines can operate. In a type hierarchy, a subtype automatically inherits the routines that are defined on its supertype. However you can define a new routine on a subtype to override the inherited routine with the same name. For example, suppose you create a getinfo() routine on type person_t that returns the last name and birthdate of an instance of type person_t. You can register another getinfo() routine on type employee_t that returns the last name and salary from an instance of employee_t. In this way, you can overload a routine, so that you have a customized routine for every type in the type hierarchy, as Figure 8-3 shows. Figure 8-3 Example of Routine Overloading in a Type Hierarchy person_t getinfo() employee_t getinfo() sales_rep_t getinfo() When you overload a routine so that routines are defined with the same name but different arguments for different types in the type hierarchy, the argument that you specify determines which routine executes. For example, if you call getinfo() with an argument of type employee_t, a getinfo() routine defined on type employee_t overrides the inherited routine of the same name. Similarly, if you define another getinfo() on type sales_rep_t, a call to getinfo() with an argument of type sales_rep_t overrides the routine that sales_rep_t inherits from employee_t. For information about how to create and register user-defined routines (UDRs), see Creating User-Defined Routines and User-Defined Data Types. 8-8 IBM Informix Guide to Database Design and Implementation Inheritance and Type Substitutability Inheritance and Type Substitutability In a type hierarchy, a subtype automatically inherits all the routines defined on its supertype. Consequently, if you call a routine with an argument of a subtype and no routines are defined on the subtype, the database server can invoke a routine that is defined on a supertype. Type substitutability refers to the ability to use an instance of a subtype when an instance of a supertype is expected. As an example, suppose that you create a routine p_info() that accepts an argument of type person_t and returns the last name and birthdate of an instance of type person_t. If no other p_info() routines are registered, and you invoke p_info() with an argument of type employee_t, the routine returns the name and birthdate fields (inherited from person_t) from an instance of type employee_t. This behavior is possible because employee_t inherits the functions of its supertype, person_t. In general, when the database server attempts to evaluate a routine, the database server searches for a signature that matches the routine name and the arguments that you specify when you invoke the routine. If such a routine is found, then the database server uses this routine. If an exact match is not found, the database server attempts to find a routine with the same name and whose argument type is a supertype of the argument type that is specified when the routine is invoked. Figure 8-4 on page 8-10 shows how the database server searches for a routine that it can use when a get() routine is called with an argument of the subtype sales_rep_t. Although no get() routine has been defined on the sales_rep_t type, the database server searches for a routine until it finds a get() routine that has been defined on a supertype in the hierarchy. In this case, neither sales_rep_t nor its supertype employee_t has a get() routine defined over it. However, because a routine is defined for person_t, this routine is invoked to operate on an instance of sales_rep_t. Understanding Type and Table Inheritance in Dynamic Server 8-9 Dropping Named Row Types from a Type Hierarchy Figure 8-4 Example of How the Database Server Searches for a Routine in a Type Hierarchy person_t get() employee_t sales_rep_t The process in which the database server searches for a routine that it can use is called routine resolution. For more information about routine resolution, see Creating User-Defined Routines and User-Defined Data Types. Dropping Named Row Types from a Type Hierarchy To drop a named row type from a type hierarchy, use the DROP ROW TYPE statement. However, you can drop a type only if it has no dependencies. You cannot drop a named row type if either of the following conditions is true: ■ The type is currently assigned to a table. ■ The type is a supertype of another type. The following example shows how to drop the sales_rep_t type: DROP ROW TYPE games_t RESTRICT; To drop a supertype, you must first drop each subtype that inherits properties from the supertype. You drop types in a type hierarchy in the reverse order in which you create the types. For example, to drop the person_t type that Figure 8-4 shows, you must first drop its subtypes in the following order: DROP ROW TYPE sale_rep_t RESTRICT; DROP ROW TYPE employee_t RESTRICT; DROP ROW TYPE person_t RESTRICT; Important: To drop a type, you must be the database administrator or the owner of the type. 8-10 IBM Informix Guide to Database Design and Implementation Table Inheritance Table Inheritance Only tables that are defined on named row types support table inheritance. Table inheritance is the property that allows a table to inherit the behavior (constraints, storage options, triggers) from the supertable above it in the table hierarchy. A table hierarchy is the relationship that you can define among tables in which subtables inherit the behavior of supertables. A table inheritance provides the following advantages: ■ It encourages modular implementation of your data model. ■ It ensures consistent reuse of schema components. ■ It allows you to construct queries whose scope can be some or all of the tables in the table hierarchy. In a table hierarchy, a subtable automatically inherits the following properties from its supertable: ■ All constraint definitions (primary key, unique, and referential constraints) ■ Storage option ■ All triggers ■ Indexes ■ Access method Understanding Type and Table Inheritance in Dynamic Server 8-11 The Relationship Between Type and Table Hierarchies The Relationship Between Type and Table Hierarchies Every table in a table hierarchy must be assigned to a named row type in a corresponding type hierarchy. Figure 8-5 shows an example of the relationships that can exist between a type hierarchy and table hierarchy. Figure 8-5 Example of the Relationship Between Type Hierarchy and Table Hierarchy Type hierarchy Table hierarchy person_t person employee_t employee sales_rep_t sales_rep However, you can also define a type hierarchy in which the named row types do not necessarily have a one-to-one correspondence with the tables in a table hierarchy. Figure 8-6 shows how you might create a type hierarchy for which only some of the named row types have been assigned to tables. 8-12 IBM Informix Guide to Database Design and Implementation The Relationship Between Type and Table Hierarchies Figure 8-6 Example of an Inheritance Hierarchy in Which Only Some Types Have Been Assigned to Tables Type hierarchy Table hierarchy person_t customer_t retail_customer_t retail_customer whlsale_customer_t whlsale_customer Understanding Type and Table Inheritance in Dynamic Server 8-13 Defining a Table Hierarchy Defining a Table Hierarchy The type that you use to define a table must exist before you can create the table. Similarly, you define a type hierarchy before you define a corresponding table hierarchy. To establish the relationships between specific subtables and supertables in a table hierarchy, use the UNDER keyword. The following CREATE TABLE statements define the simple table hierarchy that Figure 8-5 on page 8-12 shows. The examples in this section assume that the person_t, employee_t, and sales_rep_t types already exist. CREATE TABLE person OF TYPE person_t; CREATE TABLE employee OF TYPE employee_t UNDER person; CREATE TABLE sales_rep OF TYPE sales_rep_t UNDER employee; The person, employee, and sales_rep tables are defined on the person_t, employee_t, and sales_rep_t types, respectively. Thus, for every type in the type hierarchy, a corresponding table exists in the table hierarchy. In addition, the relationship between the tables of a table hierarchy must match the relationship between the types of the type hierarchy. For example, the employee table inherits from person table in the same way that the employee_t type inherits from the person_t type, and the sales_rep table inherits from the employee table in the same way that the sales_rep_t type inherits from the employee_t type. Subtables automatically inherit all inheritable properties that are added to supertables. Therefore, you can add or alter the properties of a supertable at any time and the subtables automatically inherit the changes. For more information, see “Modifying Table Behavior in a Table Hierarchy” on page 8-17. Important: You must have the UNDER privilege on the supertable before you can create a subtable that inherits the properties of the supertable. For more information, see “Under Privileges for Typed Tables” on page 6-11. 8-14 IBM Informix Guide to Database Design and Implementation Inheritance of Table Behavior in a Table Hierarchy Inheritance of Table Behavior in a Table Hierarchy When you create a subtable under a supertable, the subtable inherits all the properties of its supertable, including the following ones: ■ All columns of the supertable ■ Constraint definitions ■ Storage options ■ Indexes ■ Referential integrity ■ Triggers ■ The access method In addition, if table c inherits from table b and table b inherits from table a, then table c automatically inherits the behavior unique to table b as well as the behavior that table b has inherited from table a. Consequently, the supertable that actually defines behavior can be several levels distant from the subtables that inherit the behavior. For example, consider the following table hierarchy: CREATE TABLE person OF TYPE person_t (PRIMARY KEY (name)) FRAGMENT BY EXPRESSION name < 'n' IN dbspace1, name >= 'n' IN dbspace2; CREATE TABLE employee OF TYPE employee_t (CHECK(salary > 34000)) UNDER person; CREATE TABLE sales_rep OF TYPE sales_rep_t LOCK MODE ROW UNDER employee; Understanding Type and Table Inheritance in Dynamic Server 8-15 Inheritance of Table Behavior in a Table Hierarchy In this table hierarchy, the employee and sales_rep tables inherit the primary key name and fragmentation strategy of the person table. The sales_rep table inherits the check constraint of the employee table and adds a LOCK MODE. The following table shows the behavior for each table in the hierarchy. Table Table Behavior person PRIMARY KEY, FRAGMENT BY EXPRESSION employee PRIMARY KEY, FRAGMENT BY EXPRESSION, CHECK constraint sales_rep PRIMARY KEY, FRAGMENT BY EXPRESSION, CHECK constraint, LOCK MODE ROW A table hierarchy might also contain subtables in which behavior defined on a subtable can override behavior (otherwise) inherited from its supertable. Consider the following table hierarchy, which is identical to the previous example except that the employee table adds a new storage option: CREATE TABLE person OF TYPE person_t (PRIMARY KEY (name)) FRAGMENT BY EXPRESSION name < 'n' IN person1, name >= 'n' IN person2; CREATE TABLE employee OF TYPE employee_t (CHECK(salary > 34000)) FRAGMENT BY EXPRESSION name < 'n' IN employ1, name >= 'n' IN employ2 UNDER person; CREATE TABLE sales_rep OF TYPE sales_rep_t LOCK MODE ROW UNDER employee; Again, the employee and sales_rep tables inherit the primary key name of the person table. However, the fragmentation strategy of the employee table overrides the fragmentation strategy of the person table. Consequently, both the employee and sales_rep tables store data in dbspaces employ1 and employ2, whereas the person table stores data in dbspaces person1 and person2. 8-16 IBM Informix Guide to Database Design and Implementation Modifying Table Behavior in a Table Hierarchy Modifying Table Behavior in a Table Hierarchy Once you define a table hierarchy, you cannot modify the structure (columns) of the existing tables. However, you can modify the behavior of tables in the hierarchy. Figure 8-7 on page 8-17 shows the table behavior that you can modify in a table hierarchy and the syntax that you use to make modifications. Figure 8-7 Table Behavior That You Can Modify in a Table Hierarchy Table Behavior Syntax Considerations Constraint definitions ALTER TABLE To add or drop a constraint, use the ADD CONSTRAINT or DROP CONSTRAINT clause. For more information, see “Constraints on Tables in a Table Hierarchy” on page 8-17. Indexes CREATE INDEX, ALTER INDEX For more information, see “Adding Indexes to Tables in a Table Hierarchy” on page 8-18 and the CREATE INDEX and ALTER INDEX statements in the Informix Guide to SQL: Syntax. Triggers CREATE/DROP TRIGGER You cannot drop an inherited trigger. However, you can drop a trigger from a supertable or add a trigger to a subtable to override an inherited trigger. For information about how to modify triggers on supertables and subtables, see “Triggers on Tables in a Table Hierarchy” on page 8-18. For information about how to create a trigger, see the Informix Guide to SQL: Tutorial. All existing subtables automatically inherit new table behavior when you modify a supertable in the hierarchy. Important: When you use the ALTER TABLE statement to modify a table in a table hierarchy, you can use only the ADD CONSTRAINT, DROP CONSTRAINT, MODIFY NEXT SIZE, and LOCK MODE clauses. Understanding Type and Table Inheritance in Dynamic Server 8-17 Modifying Table Behavior in a Table Hierarchy Constraints on Tables in a Table Hierarchy You can alter or drop a constraint only in the table on which it is defined. You cannot drop or alter a constraint from a subtable when the constraint is inherited. However, a subtable can add additional constraints. Any additional constraints that you define on a table are also inherited by any subtables that inherit from the table that defines the constraint. Because constraints are additive, all inherited and current (added) constraints apply. Adding Indexes to Tables in a Table Hierarchy When you define an index on a supertable in a hierarchy, any subtables that you define under that supertable also inherit the index. Suppose you have a table hierarchy that contains the tables tab_a, tab_b, and tab_c where tab_a is a supertable to tab_b, and tab_b is a supertable to tab_c. If you create an index on a column of tab_b, then that index will exist on that column in both tab_b and tab_c. If you create an index on a column(s) of tab_a, then that index will span tab_a, tab_b, and tab_c. Important: An index that a subtable inherits from a supertable cannot be dropped or modified. However, you can add indexes to a subtable. Indexes, unique constraints, and primary keys are all closely related. When you specify a unique constraint or primary key, the database server automatically creates a unique index on the column. Consequently, a primary key or unique constraint that you define on a supertable applies to all the subtables. For example, suppose there are two tables (a supertable and subtable), both of which contain a column emp_id. If the supertable specifies that emp_id has a unique constraint, the subtable must contain emp_id values that are unique across both the subtable and the supertable. Important: You cannot define more than one primary key across a table hierarchy, even if some of the tables in the hierarchy do not inherit the primary key. 8-18 IBM Informix Guide to Database Design and Implementation SERIAL Types in a Table Hierarchy Triggers on Tables in a Table Hierarchy You cannot drop an inherited trigger. However, you can create a trigger on a subtable to override a trigger that the subtable inherits from a supertable. Unlike constraints, triggers are not additive; only the nearest trigger on a supertable in the hierarchy applies. If you want to disable the trigger that a subtable inherits from its supertable, you can create an empty trigger on the subtable to override the trigger from the supertable. Because triggers are not additive, this empty trigger executes for the subtable and any subtables under the subtable, which are not subject to further overrides. SERIAL Types in a Table Hierarchy A table hierarchy can contain columns of type SERIAL and SERIAL8. However, only one SERIAL and one SERIAL8 column are allowed across a table hierarchy. Suppose you create the following type and table hierarchy: CREATE CREATE CREATE CREATE ROW ROW ROW ROW TYPE TYPE TYPE TYPE CREATE CREATE CREATE CREATE TABLE TABLE TABLE TABLE parent_t child1_t child2_t child3_t parent_tab child1_tab child2_tab child3_tab (a INT); (s_col SERIAL) UNDER parent_t; (s8_col SERIAL8) UNDER child1_t; (d FLOAT) UNDER child2_t; of of of of type type type type parent_t; child1_t UNDER parent_tab; child2_t UNDER child1_tab; child3_t UNDER child2_tab; The parent_tab table does not contain a SERIAL type. The child1_tab introduces a SERIAL counter into the hierarchy. The child2_tab inherits the SERIAL column from child1_tab and adds a SERIAL8 column. The child3_tab inherits both a SERIAL and SERIAL8 column. A 0 value inserted into the s_col or s8_col column for any table in the hierarchy inserts a monotonically increasing value, regardless of which table takes the insert. Understanding Type and Table Inheritance in Dynamic Server 8-19 Adding a New Table to a Table Hierarchy You cannot set a starting counter value for a SERIAL or SERIAL8 type in CREATE ROW TYPE statements. To set a starting value for a SERIAL or SERIAL8 column in a table hierarchy, you can use the ALTER TABLE statement. The following statement shows how to alter a table to modify the next SERIAL and SERIAL8 values to be inserted anywhere in the table hierarchy: ALTER TABLE child3_tab MODIFY (s_col SERIAL(100), s8_col SERIAL8 (200)) Except for the previously described behavior, all the rules that apply to SERIAL and SERIAL8 type columns in untyped tables also apply to SERIAL and SERIAL8 type columns in table hierarchies. For more information, see Chapter 3, “Choosing Data Types” and the Informix Guide to SQL: Reference. Adding a New Table to a Table Hierarchy After you define a table hierarchy, you cannot use the ALTER TABLE statement to add, drop, or modify columns of a table within the hierarchy. However, you can add new subtypes and subtables to an existing hierarchy provided that the new subtype and subtable do not interfere with existing inheritance relationships. Figure 8-8 illustrates one way that you might add a type and corresponding table to an existing hierarchy. The dashed lines indicate the added subtype and subtable. Figure 8-8 Example of How You Might Add a Subtype and Subtable to an Existing Inheritance Hierarchy 8-20 Type Hierarchy Table Hierarchy person_t person employee_t employee sales_rep_t sales_rep us_sales_rep_t us_sales_rep IBM Informix Guide to Database Design and Implementation Adding a New Table to a Table Hierarchy The following statements show how you might add the type and table to the inheritance hierarchy that Figure 8-8 shows: CREATE ROW TYPE us_sales_rep_t (domestic_sales DECIMAL(15,2)) UNDER employee_t; CREATE TABLE us_sales_rep OF TYPE us_sales_rep_t UNDER sales_rep; You can also add subtypes and subtables that branch from an existing supertype and its parallel supertable. Figure 8-9 shows how you might add the customer_t type and customer table to existing hierarchies. In this example, both the customer table and the employee table inherit properties from the person table. Figure 8-9 Example of Adding a Type and Table Under an Existing Supertype and Supertable customer_t Type Hierarchy Table Hierarchy person_t person employee_t employee sales_rep_t sales_rep customer The following statements create the customer_t type and customer table under the person_t type and person table, respectively: CREATE ROW TYPE customer_t (cust_num INTEGER) UNDER person_t; CREATE TABLE customer OF TYPE customer_t UNDER person; Understanding Type and Table Inheritance in Dynamic Server 8-21 Dropping a Table in a Table Hierarchy Dropping a Table in a Table Hierarchy If a table and its corresponding named row type have no dependencies (they are not a supertable and supertype), you can drop the table and its type. You must drop the table before you can drop the type. For general information about dropping a table, see the DROP TABLE statement in the Informix Guide to SQL: Syntax. For information about how to drop a named row type, see “Dropping Named Row Types” on page 7-30. Altering the Structure of a Table in a Table Hierarchy You cannot use the ALTER TABLE statement to add, drop, or modify the columns of a table in a table hierarchy. You can use the ALTER TABLE statement to add, drop, or modify constraints. The process of adding, dropping, or modifying a column of a table in a table hierarchy (or otherwise altering the structure of a table) can be a timeintensive task. To alter the structure of a table in a table hierarchy 8-22 1. Download data from all subtables and the supertable that you want to modify. 2. Drop the subtables and subtypes. 3. Modify the unloaded data file. 4. Modify the supertable. 5. Re-create the subtypes and subtables. 6. Upload the data. IBM Informix Guide to Database Design and Implementation Querying Tables in a Table Hierarchy Querying Tables in a Table Hierarchy A table hierarchy allows you to construct a SELECT, UPDATE, or DELETE statement whose scope is a supertable and its subtables—in a single SQL command. For example, a query against any supertable in a table hierarchy returns data for all columns of the supertable and the columns that subtables inherit from the supertable. To limit the results of a query to one table in the table hierarchy, you must include the ONLY keyword in the query. For more information about how to query and modify data from tables in a table hierarchy, see the Informix Guide to SQL: Tutorial. Creating a View on a Table in a Table Hierarchy You can create a view based upon any table in a table hierarchy. For example, the following statement creates a view on the person table, which is the root supertable of the table hierarchy that Figure 8-5 on page 8-12 shows: CREATE VIEW name_view AS SELECT name FROM person Because the person table is a supertable, the view name_view displays data from the name column of the person, employee, and sales_rep tables. To create a view that displays only data from the person table, use the ONLY keyword, as the following example shows: CREATE VIEW name_view AS SELECT name FROM ONLY(person) Important: You cannot perform an insert or update on a view that is defined on a supertable because the database server cannot know where in the table hierarchy to put the new rows. For information about how to create a typed view, see “Typed Views” on page 6-27. Understanding Type and Table Inheritance in Dynamic Server 8-23 Chapter Creating and Using UserDefined Casts in Dynamic Server In This Chapter . . . . . . . . 9 . . . . . . . . . . . . 9-3 . . . . . . . . . . . . . . . . . . . . . . . . . . . . . . . . . . . . . . . . . . . . . . . . 9-3 9-4 9-5 9-5 Casting Row Types . . . . . . . . . . . . . . Casting Between Named and Unnamed Row Types . Casting Between Unnamed Row Types . . . . . Casting Between Named Row Types . . . . . . Using Explicit Casts on Fields . . . . . . . . . Explicit Casts on Fields of an Unnamed Row Type Explicit Casts on Fields of a Named Row Type . Casting Individual Fields of a Row Type . . . . . . . . . . . . . . . . . . . . . . . . . . . . . . . . . . . . . . . . . . . . . 9-6 9-7 9-8 9-9 9-9 9-10 9-10 9-11 Casting Collection Data Types . . . . . . . . . . Restrictions on Collection-Type Conversions . . . Collections with Different Element Types . . . . . Using an Implicit Cast Between Element Types . Using an Explicit Cast Between Element Types . Converting Relational Data to a MULTISET Collection . . . . . . . . . . . . . . . . . . . . . . . . . . . . . . 9-12 9-13 9-13 9-13 9-14 9-14 Casting Distinct Data Types . . . . . . . . . . . Using Explicit Casts with Distinct Types . . . . . Casting Between a Distinct Type and Its Source Type . Adding and Dropping Casts on a Distinct Type . . . . . . . . . . . . . . . . . . . . . . 9-15 9-15 9-16 9-17 What Is a Cast? . . . . . . . . Creating User-Defined Casts . . Invoking Casts . . . . . . . Restrictions on User-Defined Casts Casting to Smart Large Objects . 9-2 . . . . . . . . 9-18 Creating Cast Functions for User-Defined Casts . . . . An Example of Casting Between Named Row Types . An Example of Casting Between Distinct Data Types . Multilevel Casting . . . . . . . . . . . . . . . . . . . . . . . . . . . . . . . . . 9-19 9-19 9-20 9-22 IBM Informix Guide to Database Design and Implementation . . . . . . IDS In This Chapter This chapter describes user-defined casts and shows how to use run-time casts to perform data conversions on extended data types. What Is a Cast? A cast is a mechanism that converts a value from one data type to another data type. Casts allow you to make comparisons between values of different data types or substitute a value of one data type for a value of another data type. Dynamic Server supports casts in the following types of expressions: ■ Column expressions ■ Constant expressions ■ Function expressions ■ SPL variables ■ Host variables (ESQL) ■ Statement local variable (SLV) expressions To convert a value of one data type to another data type, a cast must exist in the database or the database server. Dynamic Server supports the following types of casts: ■ Built-in cast. A built-in cast is a cast that is built into the database server. A built-in cast performs automatic conversions between different built-in data types. ■ User-defined cast. A user-defined cast often requires a cast function to handle conversions from one data type to another. To register and use a user-defined cast, you must use the CREATE CAST statement. Creating and Using User-Defined Casts in Dynamic Server 9-3 Creating User-Defined Casts A user-defined cast is explicit if you include the EXPLICIT keyword when you create a cast with the CREATE CAST statement. (The default is explicit.) Explicit casts are never invoked automatically. To invoke an explicit cast, you must use the CAST...AS keywords or the double colon (::) cast operator. A user-defined cast is implicit if you include the IMPLICIT keyword when you create a cast with a CREATE CAST statement. The database server automatically invokes implicit casts at runtime to perform data conversions. All casts are included in the syscasts system catalog table. For information about syscasts, see the Informix Guide to SQL: Reference. Creating User-Defined Casts When the database server does not provide built-in casts to perform conversions between two data types, you can create a user-defined cast to handle the data type conversion. User-defined casts are typically used to provide data type conversions for the following extended data types: 9-4 ■ Opaque data types. Developers of opaque data types must define casts to handle conversions between the internal/external representations of the opaque data type. For information about how to create and register casts for opaque data types, see Creating User-Defined Routines and User-Defined Data Types. ■ Distinct data types. You cannot directly compare a distinct data type to its source type. However, Dynamic Server automatically registers explicit casts from the distinct type to the source type and vice versa. A distinct type does not inherit the casts that are defined on its source type. In addition, the user-defined casts that you might define on a distinct type are not available to its source type. For more information and examples that show how to create and use casts on distinct types, see “Creating Cast Functions for User-Defined Casts” on page 9-18. ■ Named row types. In most cases, you can explicitly cast a named row type to another row-type value without having to create the cast. However, to convert between values of a named row type and some other data type, you must first create the cast to handle the conversion. IBM Informix Guide to Database Design and Implementation Invoking Casts For an example of how to create and use a user-defined cast, see “An Example of Casting Between Distinct Data Types” on page 9-19. For the syntax of the CREATE CAST statement, see the Informix Guide to SQL: Syntax. Invoking Casts For built-in casts and user-defined implicit casts, the database server automatically (implicitly) invokes the cast to handle the data conversion. For example, you can compare a value of type INT with SMALLINT, FLOAT, or CHAR values without explicitly casting the expression because the database server provides system-defined casts to transparently handle conversions between these built-in data types. When you define an explicit user-defined cast to handle conversions between two data types, you must explicitly invoke the cast with either the CAST...AS keywords or the double-colon cast operator (::). The following partial examples show the two ways that you can invoke an explicit cast: ... WHERE new_col = CAST(old_col AS newtype) ... WHERE new_col = old_col::newtype Restrictions on User-Defined Casts You cannot create a user-defined cast between two built-in data types. You also cannot create a user-defined cast that includes any of the following data types: ■ Collection data types: LIST, MULTISET, or SET ■ Unnamed row types ■ Smart-large-object data types: CLOB or BLOB ■ Simple-large-object data types: TEXT or BYTE Creating and Using User-Defined Casts in Dynamic Server 9-5 Casting Row Types In general, a cast between two data types requires that each data type represents an equal number of component values. For example, a cast between a row type and an opaque data type is possible if each field in the row type has a corresponding field in the opaque data type. When you want to perform conversions between two data types that have the same storage structure, you can use the CREATE CAST statement without a cast function. Otherwise, you must create a cast function that you then register with a CREATE CAST statement. For an example of how to use a cast function to create a userdefined cast, see “Creating Cast Functions for User-Defined Casts” on page 9-18. Casting Row Types You can compare or substitute between values of any two row types (named or unnamed) only when both row types have the same number of fields, and one of the following conditions is also true: ■ All corresponding fields of the two row types have the same data type. Two row types are considered structurally equivalent when they have the same number of fields and the data types of corresponding fields are the same. ■ User-defined casts exist to perform the conversions when two named row types are being compared. ■ System-defined or user-defined casts exist to perform the necessary conversions for corresponding field values that are not of the same data type. When the corresponding fields are not of the same data type, you can use either system-defined casts or user-defined casts to handle data conversions on the fields. If a built-in cast exists to handle data conversions on the individual fields, you can explicitly cast the value of one row type to the other row type (unless the row types are both unnamed row types, in which case an explicit cast is not necessary). 9-6 IBM Informix Guide to Database Design and Implementation Casting Between Named and Unnamed Row Types If a built-in cast does not exist to handle field conversions, you can create a user-defined cast to handle the field conversions. The cast can be either implicit or explicit. In general, when a row type is cast to another row type, the individual field conversions might be handled with explicit or implicit casts. When the conversion between corresponding fields requires an explicit cast, the value of the field that is cast must match the value of the corresponding field exactly because the database server applies no additional implicit casts on a value that has been explicitly cast. Casting Between Named and Unnamed Row Types To compare values of a named row type with values of an unnamed row type, you can use an explicit cast. Suppose that you create the following named row type and tables: CREATE CREATE CREATE INSERT ROW TYPE info_t (x CHAR(1), y CHAR(20)) TABLE customer (cust_info info_t) TABLE retailer (ret_info ROW (a CHAR(1), b CHAR(20))) INTO customer2 VALUES(ROW('t','philips')::info_t2) The following INSERT statements show how to create row type values for the customer and retailer tables: INSERT INTO customer VALUES(ROW('t','philips')::info_t) INSERT INTO retailer VALUES(ROW('f','johns')) To compare or substitute data from the customer table with data from retailer table, you must use an explicit cast to convert a value of one row type to the other row type. In the following query, the ret_info column (an unnamed row type) is explicitly cast to info_t (a named row type): SELECT cust_info FROM customer, retailer WHERE cust_info = ret_info::info_t Creating and Using User-Defined Casts in Dynamic Server 9-7 Casting Between Unnamed Row Types In general, to perform a conversion between a named row type and an unnamed row type, you must explicitly cast one row type to the other row type. You can perform an explicit cast in either direction: you can cast the named row type to an unnamed row type or cast the unnamed row type to a named row type. The following statement returns the same results as the previous example. However, the named row type in this example is explicitly cast to the unnamed row type: SELECT cust_info FROM customer, retailer WHERE cust_info::ROW(a CHAR(1), b CHAR(20)) = ret_info Casting Between Unnamed Row Types You can compare two unnamed row types that are structurally equivalent without an explicit cast. You can also compare an unnamed row type with another unnamed row type, if both row types have the same number of fields, and casts exist to convert values of corresponding fields that are not of the same data type. In other words, the cast from one unnamed row type to another is implicit if all the casts that handle field conversions are systemdefined or implicit casts. Otherwise, you must explicitly cast an unnamed row type to compare it with another row type. Suppose you create the following prices table: CREATE TABLE prices (col1 ROW(a SMALLINT, b FLOAT) col2 ROW(x INT, y REAL) ) The values of the two unnamed row types can be compared (without an explicit cast) when built-in casts exist to perform conversions between corresponding fields. Consequently, the following query does not require an explicit cast to compare col1 and col2 values: SELECT * FROM prices WHERE col1 = col2 In this example, the database server implicitly invokes a built-in cast to convert field values of SMALLINT to INT and REAL to FLOAT. If corresponding fields of two row types cannot implicitly cast to one another, you can explicitly cast between the types, if a user-defined cast exists to handle conversions between the two types. 9-8 IBM Informix Guide to Database Design and Implementation Casting Between Named Row Types Casting Between Named Row Types A named row type is strongly typed, which means that the database server recognizes two named row types as two separate types even if the row types are structurally equivalent. For this reason you must create and register a user-defined cast before you can perform comparisons between two named row types. For an example of how to create and use casts to handle conversions between two named row types, see “An Example of Casting Between Named Row Types” on page 18. Using Explicit Casts on Fields Before you can explicitly cast between two row types (named or unnamed) whose fields contain different data types, a cast (either system-defined or user-defined) must exist to handle conversions between the corresponding field data types. When you explicitly cast between two row types, the database server automatically invokes any explicit casts that are necessary to handle conversions between field data types. In other words, when you perform an explicit cast on a row type value, you do not have to explicitly cast individual fields of the row type, unless more than one level of casting is necessary to handle the data type conversion on the field. The row types and tables in the following example are used throughout this section to show the behavior of explicit casts on named and unnamed row types: CREATE DISTINCT TYPE d_float AS FLOAT; CREATE ROW TYPE row_t (a INT, b d_float); CREATE TABLE tab1 (col1 ROW (a INT, b d_float)); CREATE TABLE tab2(col2 ROW (a INT, b FLOAT)); CREATE TABLE tab3 (col3 row_t); Creating and Using User-Defined Casts in Dynamic Server 9-9 Using Explicit Casts on Fields Explicit Casts on Fields of an Unnamed Row Type When a conversion between two row types involves an explicit cast to convert between particular field values, you can explicitly cast the row type value but do not need to explicitly cast the individual field. The following statement shows how to insert a value into the tab1 table: INSERT INTO tab1 VALUES (ROW( 3, 5.66::FLOAT::d_float)) To insert a value from col1 of tab1 into col2 of tab2, you must explicitly cast the row value because the database server does not automatically handle conversions between the d_float distinct type of tab1 to the FLOAT type of table tab2: INSERT INTO tab2 SELECT col1::ROW(a INT, b FLOAT) FROM tab1 In this example, the cast that is used to convert the b field is explicit because the conversion from d_float to FLOAT requires an explicit cast (to convert a distinct type to its source type requires an explicit cast). In general, to cast between two unnamed row types where one or more of the fields uses an explicit cast, you must explicitly cast at the level of the row type, not at the level of the field. Explicit Casts on Fields of a Named Row Type When you explicitly cast a value as a named row type, the database server automatically invokes any implicit or explicit casts that are used to convert field values to the target data type. In the following statement, the explicit cast of col1 to type row_t automatically invokes the explicit cast that converts a field value of type FLOAT to d_float: INSERT INTO tab3 SELECT col2::row_t FROM tab2 The following INSERT statement includes an explicit cast to the row_t type. The explicit cast to the row type also invokes an explicit cast to convert the b field of type row_t from FLOAT to d_float. In general, an explicit cast to a row type also invokes any explicit casts on the individual fields (one-level deep) that the row type contains to handle conversions. INSERT INTO tab3 VALUES (ROW(5, 6.55::FLOAT)::row_t) 9-10 IBM Informix Guide to Database Design and Implementation Casting Individual Fields of a Row Type The following statement is also valid and returns the same results as the preceding statement. However, this statement shows all the explicit casts that are performed to insert a row_t value into the tab3 table. INSERT INTO tab3 VALUES (ROW(5, 6.55::float::d_float)::row_t) In the preceding examples, the conversions between the b fields of the row types require two levels of casting. The database server handles any value that contains a decimal point as a DECIMAL type. In addition, no implicit casts exist between the DECIMAL and d_float data types, so two levels of casting are necessary: a cast from DECIMAL to FLOAT and a second cast from FLOAT to d_float. Casting Individual Fields of a Row Type If an operation on a field of a row type requires an explicit cast, you can explicitly cast the individual field value without consideration of the row type with which the field is associated. The following statement uses an explicit cast on the field value to handle the conversion: SELECT col1 from tab1, tab2 WHERE col1.b = col2.b::FLOAT::d_float If an operation on a field of a row type requires an implicit cast, you can simply specify the appropriate field value and the database server handles the conversion automatically. In the following statement, which compares field values of different data types, a built-in cast automatically converts between INT and FLOAT values: SELECT col1 from tab1, tab2 WHERE col1.a = col2.b Creating and Using User-Defined Casts in Dynamic Server 9-11 Casting Collection Data Types Casting Collection Data Types In some cases, you can use an explicit cast to perform conversions between two collections with different element types. To compare or substitute between values of any two collection types, both collections must be of type SET, MULTISET, or LIST. ■ Two element types are equivalent when all component types are the same. For example, if the element type of one collection is a row type, the other collection type is also a row type with the same number of fields and the same field data types. ■ Casts exist in the database to perform conversions between any and all components of the element types that are not of the same data type. If the corresponding element types are not of the same data type, Dynamic Server can use either built-in casts or user-defined casts to handle data conversions on the element types. When the database server inserts, updates, or compares values of a collection data type, type checking occurs at the level of the element data type. Consequently, in a cast between two collection types, the data conversion occurs at the level of the element type because the actual data stored in a collection is of a particular element type. The following type and tables are used in the collection casting examples in this section: CREATE DISTINCT TYPE my_int AS INT; CREATE CREATE CREATE CREATE CREATE 9-12 TABLE TABLE TABLE TABLE TABLE set_tab1 (col1 set_tab2 (col2 set_tab3 (col3 list_tab (col4 m_set_tab(col5 IBM Informix Guide to Database Design and Implementation SET(my_int NOT NULL)); SET(INT NOT NULL)); SET(FLOAT NOT NULL)); LIST(INT NOT NULL)); MULTISET(INT NOT NULL)); Restrictions on Collection-Type Conversions Restrictions on Collection-Type Conversions Because each collection data type (SET, MULTISET, and LIST) has different characteristics, conversions between collections with different collection types are disallowed. For example, elements stored in a LIST collection have a specific order associated with them. This order would be lost if the elements inserted into a LIST collection could be inserted into a MULTISET collection. Consequently, you cannot insert or update elements from one collection with elements from a different collection type even though the two collections might share the same element type. The following INSERT statement returns an error because the column on which the insert is performed is a MULTISET collection and the value being inserted is a LIST collection: INSERT INTO m_set_tab SELECT col4 FROM list_tab -- returns error Collections with Different Element Types How you handle conversions between two collections that have the same collection type but different element types depends on the element type of each collection and the type of cast that the database server uses to convert one element type to another when the element types are different, as follows: ■ If a built-in cast or implicit user-defined cast exists to handle the conversion between two element types, you do not need to explicitly cast between the collection types. ■ If an explicit cast exists to handle the conversion between element types, you can perform an explicit cast on a collection. Using an Implicit Cast Between Element Types When an implicit cast exists in the database to convert between different element types of two collections, you do not need to use an explicit cast to insert or update elements from one collection into another collection. The following INSERT statement retrieves elements from the set_tab2 table and inserts the elements into the set_tab3 table. Although the collection column from set_tab2 has an INT element type and the collection column from set_tab3 has a FLOAT element type, a built-in cast implicitly handles the conversion between INT and FLOAT values. An explicit cast is unnecessary in this case. INSERT INTO set_tab3 SELECT col2 FROM set_tab2 Creating and Using User-Defined Casts in Dynamic Server 9-13 Converting Relational Data to a MULTISET Collection Using an Explicit Cast Between Element Types When a conversion between different element types of two collections is performed with an explicit cast, you must explicitly cast one collection to the other collection type. In the following example, the conversion between the element types (INT and my_int) requires an explicit cast. (A cast between a distinct type and its source type is always explicit). The following INSERT statement retrieves elements from the set_tab2 table and inserts the elements into the set_tab1 table. The collection column from set_tab2 has an INT element type and the collection column from set_tab1 has a my_int element type. Because the conversion between the element types (INT and my_int) requires an explicit cast, you must explicitly cast the collection type. INSERT INTO set_tab1 SELECT col2::SET(my_int NOT NULL) FROM set_tab2 To perform an explicit cast on a collection type, you must include the constructor (SET, MULTISET, or LIST), the element type, and the NOT NULL keyword. Converting Relational Data to a MULTISET Collection When you have data from a relational table you can use a collection subquery to cast a row value to a MULTISET collection. Suppose you create the following tables: CREATE TABLE tab_a ( a_col INTEGER); CREATE TABLE tab_b (ms_col MULTISET(ROW(a INT) NOT NULL) ); The following example shows how you might use a collection subquery to convert rows of INT values from the tab_a table to a MULTISET collection. All rows from tab_a are converted to a MULTISET collection and inserted into the tab_b table. INSERT INTO tab_b VALUES ( (MULTISET (SELECT a_col FROM tab_a))) 9-14 IBM Informix Guide to Database Design and Implementation Casting Distinct Data Types Casting Distinct Data Types A distinct type inherits none of the built-in casts of the built-in type that a distinct type might use as its source type. Consequently, the built-in casts that exist to implicitly convert a built-in data type to other data types are not available to the distinct type that uses the built-in type as its source type. However, when you create a distinct type on a built-in type, the database server provides two explicit casts to handle conversions from the distinct type to the built-in type and from the built-in type to the distinct type. Using Explicit Casts with Distinct Types To compare or substitute between values of a distinct type and its source type, you must explicitly cast one type to the other. For example, to insert into or update a column of a distinct type with values of the source type, you must explicitly cast the values to the distinct type. Suppose you create a distinct type, int_type, that is based on the INTEGER data type and a table with a column of type int_type, as follows: CREATE DISTINCT TYPE int_type AS INTEGER; CREATE TABLE tab_z(col1 int_type); To insert a value into the tab_z table, you must explicitly cast the value for the col1 column to int_type, as follows: INSERT INTO tab_z VALUES (35::int_type) Suppose you create a distinct type, num_type, that is based on the NUMERIC data type and a table with a column of type num_type, as follows: CREATE DISTINCT TYPE num_type AS NUMERIC; CREATE TABLE tab_x (col1 num_type); The distinct num_type inherits none of the system-defined casts that exist for the NUMERIC data type. Consequently, the following insert requires two levels of casting. The first cast converts the value 35 from INT to NUMERIC and the second cast converts from NUMERIC to num_type: INSERT INTO tab_x VALUES (35::NUMERIC::num_type) Creating and Using User-Defined Casts in Dynamic Server 9-15 Casting Between a Distinct Type and Its Source Type The following INSERT statement on the tab_x table returns an error because no cast exists to convert directly from an INT type to num_type: INSERT INTO tab_x VALUES (70::num_type) -- returns error Casting Between a Distinct Type and Its Source Type Although data of a distinct type has the same representation as its source type, a distinct type cannot be compared directly to its source type. For this reason, when you create a distinct data type, Dynamic Server automatically registers the following explicit casts: ■ A cast from the distinct type to its source type ■ A cast from the source type to the distinct type Suppose you create two distinct types: one to handle movie titles and the other to handle music recordings. You might create the following distinct types that are based on the VARCHAR data type: CREATE DISTINCT TYPE movie_type AS VARCHAR(30); CREATE DISTINCT TYPE music_type AS VARCHAR(30); You can then create the entertainment table that includes columns of type movie_type, music_type, and VARCHAR. CREATE TABLE entertainment ( video movie_type, compact_disc music_type, laser_disv VARCHAR(30) ); To compare a distinct type with its source type or vice versa, you must perform an explicit cast from one data type to the other. For example, suppose you want to check for movies that are available on both video and laser disc. The following statement requires an explicit cast in the WHERE clause to compare a value of a distinct type (music_type) with a value of its source type (VARCHAR). In this example, the source type is explicitly cast to the distinct type. SELECT video FROM entertainment WHERE video = laser_disc::movie_type 9-16 IBM Informix Guide to Database Design and Implementation Adding and Dropping Casts on a Distinct Type However, you might also explicitly cast the distinct type to the source type as the following statement shows: SELECT video FROM entertainment WHERE video::VARCHAR(30) = laser_disc To perform a conversion between two distinct types that are defined on the same source type, you must make an intermediate cast back to the source type before casting to the target distinct type. The following statement compares a value of music_type with a value of movie_type: SELECT video FROM entertainment WHERE video = compact_disc::VARCHAR(30)::movie_type Adding and Dropping Casts on a Distinct Type To enforce strong typing on a distinct type, the database server provides explicit casts to handle conversions between a distinct type and its source type. However, the creator of a distinct type can drop the existing explicit casts and create implicit casts, so that conversions between a distinct type and its source type do not require an explicit cast. Important: When you drop the explicit casts between a distinct type and its source type that the database server provides and instead create implicit casts to handle conversions between these data types, you diminish the distinctiveness of the distinct type. The following DROP CAST statements drop the two explicit casts that were automatically defined on the movie_type: DROP CAST(movie_type AS VARCHAR(30)); DROP CAST(VARCHAR(30) AS movie_type); After the existing casts are dropped, you can create two implicit casts to handle conversions between movie_type and VARCHAR. The following CREATE CAST statements create two implicit casts: CREATE IMPLICIT CAST (movie_type AS VARCHAR(30)); CREATE IMPLICIT CAST (VARCHAR(30) AS movie_type); Creating and Using User-Defined Casts in Dynamic Server 9-17 Casting to Smart Large Objects You cannot create a cast to convert between two data types if such a cast already exists in the database. If you create implicit casts to convert between the distinct type and its source type, you can compare the two types without an explicit cast. In the following statement, the comparison between the video column and the laser_disc column requires a conversion. Because an implicit cast has been created, the conversion between VARCHAR and movie_type is implicit. SELECT video FROM entertainment WHERE video = laser_disc Casting to Smart Large Objects The database server provides casts to allow the conversion of TEXT and BYTE objects to BLOB and CLOB data types. This feature allows users to migrate BYTE and TEXT data from legacy databases into BLOB and CLOB columns. The following example shows how to use an explicit cast to convert a BYTE column value from the catalog table in the stores_demo database to a BLOB column value and update the catalog table in the superstores_demo database: UPDATE catalog SET advert = ROW ( (SELECT cat_photo::BLOB FROM stores_demo:catalog WHERE catalog_num = 10027), advert.caption) WHERE catalog_num = 10027 The database server does not provide casts to convert BLOB to BYTE values or CLOB to TEXT values. 9-18 IBM Informix Guide to Database Design and Implementation Creating Cast Functions for User-Defined Casts Creating Cast Functions for User-Defined Casts If your database contains opaque data types, distinct data types, or named row types, you might want to create user-defined casts that allow you to convert between the different data types. When you want to perform conversions between two data types that have the same storage structure, you can use the CREATE CAST statement without a cast function. However, in some cases you must create a cast function that you then register as a cast. You need to create a cast function under the following conditions: ■ The conversion is between two data types that have different storage structures ■ The conversion involves the manipulation of values to ensure that data conversions are meaningful The following sections show how to create and use user-defined casts that require cast functions. An Example of Casting Between Named Row Types Suppose you create the named row types and table shown in the next example. Although the named row types are structurally equivalent, writer_t and editor_t are unique data types. CREATE ROW TYPE writer_t (name VARCHAR(30), depart CHAR(3)); CREATE ROW TYPE editor_t (name VARCHAR(30), depart CHAR(3)); CREATE TABLE projects ( book_title VARCHAR(20), writer writer_t, editor editor_t ); To handle conversions between two named row types, you must first create a user-defined cast. The following example creates a casting function and registers it as a cast to handle conversions from type writer_t to editor_t: CREATE FUNCTION cast_rt (w writer_t) RETURNS editor_t RETURN (ROW(w.name, w.depart)::editor_t); END FUNCTION; CREATE CAST (writer_t as editor_t WITH cast_rt); Creating and Using User-Defined Casts in Dynamic Server 9-19 An Example of Casting Between Distinct Data Types Once you create and register the cast, you can explicitly cast values of type writer_t to editor_t. The following query uses an explicit cast in the WHERE clause to convert values of type writer_t to editor_t: SELECT book_title FROM projects WHERE CAST(writer AS editor_t) = editor; If you prefer, you can use the :: cast operator to perform the same cast, as the following example shows: SELECT book_title FROM projects WHERE writer::editor_t = editor; An Example of Casting Between Distinct Data Types Suppose you want to define distinct types to represent dollar, yen, and sterling currencies. Any comparison between two currencies must take the exchange rate into account. Thus, you need to create cast functions that not only handle the cast from one data type to the other data type but also calculate the exchange rate for the values that you want to compare. The following example shows how you might define three distinct types on the same source type, DOUBLE PRECISION: CREATE DISTINCT TYPE dollar AS DOUBLE PRECISION; CREATE DISTINCT TYPE yen AS DOUBLE PRECISION; CREATE DISTINCT TYPE sterling AS DOUBLE PRECISION; After you define the distinct types, you can create a table that provides the prices that manufacturers charge for comparable products. The following example creates the manufact_price table, which contains a column for the dollar, yen, and sterling distinct types: CREATE TABLE manufact_price ( product_desc VARCHAR(20), us_price dollar, japan_price yen, uk_price sterling ); 9-20 IBM Informix Guide to Database Design and Implementation An Example of Casting Between Distinct Data Types When you insert values into the manufact_price table, you can cast to the appropriate distinct type for dollar, yen, and sterling values, as follows: INSERT INTO manufact_price VALUES ('baseball', 5.00::DOUBLE PRECISION::dollar, 510.00::DOUBLE PRECISION::yen, 3.50::DOUBLE PRECISION::sterling); Because a distinct type does not inherit any of the built-in casts available to its source type, each of the preceding INSERT statements requires two casts. For each INSERT statement, the inner cast converts from DECIMAL to DOUBLE PRECISION and the outer cast converts from DOUBLE PRECISION to the appropriate distinct type (dollar, yen, or sterling). Before you can compare the dollar, yen, and sterling data types, you must create cast functions and register them as casts. The following example creates SPL functions that you can use to compare dollar, yen, and sterling values. Each function multiplies the input value by a value that reflects the exchange rate. CREATE FUNCTION dollar_to_yen(d dollar) RETURN (d::DOUBLE PRECISION * 106)::CHAR(20)::yen; END FUNCTION; CREATE FUNCTION sterling_to_dollar(s sterling) RETURNS dollar RETURN (s::DOUBLE PRECISION * 1.59)::CHAR(20)::dollar; END FUNCTION; After you write the cast functions, you must use the CREATE CAST statement to register the functions as casts. The following statements register the dollar_to_yen() and sterling_to_dollar() functions as explicit casts: CREATE CAST(dollar AS yen WITH dollar_to_yen); CREATE CAST(sterling AS dollar WITH sterling_to_dollar); After you register the function as a cast, use it for operations that require conversions between the data types. For the syntax that you use to create a cast function and register it as a cast, see the CREATE FUNCTION and CREATE CAST statements in the Informix Guide to SQL: Syntax. In the following query, the WHERE clause includes an explicit cast that invokes the dollar_to_yen() function to compare dollar and yen values: SELECT * FROM manufact_price WHERE CAST(us_price AS yen) < japan_price; Creating and Using User-Defined Casts in Dynamic Server 9-21 Multilevel Casting The following query uses the cast operator to perform the same conversion shown in the preceding query: SELECT * FROM manufact_price WHERE us_price::yen < japan_price; You can also use an explicit cast to convert the values that a query returns. The following query uses a cast to return yen equivalents of dollar values. The WHERE clause of the query also uses an explicit cast to compare dollar and yen values. SELECT us_price::yen, japan_price FROM manufact_price WHERE us_price::yen < japan_price; Multilevel Casting A multilevel cast refers to an operation that requires two or more levels of casting in an expression to convert a value of one data type to the target data type. Because no casts exist between yen and sterling values, a query that compares the two data types requires multiple casts. The first (inner) cast converts sterling values to dollar values; the second (outer) cast converts dollar values to yen values. SELECT * FROM manufact_price WHERE japan_price < uk_price::dollar::yen You might add another cast function to handle yen to sterling conversions directly. The following example creates the function yen_to_sterling() and registers it as a cast. To account for the exchange rate, the function multiplies yen values by.01 to derive equivalent sterling values. CREATE FUNCTION yen_to_sterling(y yen) RETURNS sterling RETURN (y::DOUBLE PRECISION * .01)::CHAR(20)::sterling; END FUNCTION; CREATE CAST (yen AS sterling WITH yen_to_sterling); 9-22 IBM Informix Guide to Database Design and Implementation Multilevel Casting With the addition of the yen to sterling cast, you can use a single-level cast to compare yen and sterling values, as the following query shows: SELECT japan_price::sterling, uk_price FROM manufact_price WHERE japan_price::sterling) < uk_price; In the SELECT statement, the explicit cast returns yen values as their sterling equivalents. In the WHERE clause, the cast allows comparisons between yen and sterling values. Creating and Using User-Defined Casts in Dynamic Server 9-23 Chapter 10 Building a Dimensional Data Model Chapter 11 Implementing a Dimensional Database Section IV Dimensional Databases Chapter Building a Dimensional Data Model In This Chapter . . . . . . . . . 10 . . . . . . . . . . . 10-3 Overview of Data Warehousing . . . . Why Build a Dimensional Database? . What Is Dimensional Data? . . . . . . . . . . . . . . . . . . . . . . . . . . . . . . . . . . 10-4 10-5 10-7 Concepts of Dimensional Data Modeling The Fact Table . . . . . . . . Dimensions of the Data Model . . Dimension Elements . . . . Dimension Attributes . . . . Dimension Tables. . . . . . . . . . . . . . . . . . . . . . . . . . . . . . . . . . . . . . . . . . . . . . . . . . . . . . . . . . . . . . . . . . 10-10 10-12 10-13 10-13 10-14 10-15 . . . . . . Building a Dimensional Data Model . . . . . . . . . . . . . 10-16 Choosing a Business Process . . . . . . . . . . . . . . 10-17 Summary of a Business Process . . . . . . . . . . . . . 10-17 Determining the Granularity of the Fact Table . . . . . . . . 10-19 How Granularity Affects the Size of the Database . . . . . 10-19 Using the Business Process to Determine the Granularity . . . 10-19 Identifying the Dimensions and Hierarchies . . . . . . . . . 10-21 Choosing the Measures for the Fact Table . . . . . . . . . . 10-23 Using Keys to Join the Fact Table with the Dimension Tables . . 10-25 Resisting Normalization. . . . . . . . . . . . . . . . 10-26 Choosing the Attributes for the Dimension Tables . . . . . . . 10-27 Handling Common Dimensional Data-Modeling Problems . . Minimizing the Number of Attributes in a Dimension Table Handling Dimensions That Occasionally Change . . . . Using the Snowflake Schema . . . . . . . . . . . . . . . . . . . . . . . 10-29 10-29 10-31 10-33 10-2 IBM Informix Guide to Database Design and Implementation In This Chapter This chapter describes concepts and techniques of dimensional data modeling and shows how to build a simple dimensional data model. Chapter 11 shows how to use SQL to implement this dimensional data model. A dimensional data model is harder to maintain for very large data warehouses than a relational data model. For this reason, data warehouses typically are based on a relational data model. However, a dimensional data model is particularly well-suited for building data marts (a subset of a data warehouse). The general principles of dimensional data modeling that this chapter discusses are applicable for databases that you create with Dynamic Server or Extended Parallel Server. Although no single factor determines which database server you should use to build a dimensional database, the assumption is that large, scalable warehouses are built with Extended Parallel Server, while smaller warehouses, OLTP systems, and operational systems are built with Dynamic Server. To understand the concepts of dimensional data modeling, you should have a basic understanding of SQL and relational database theory. This chapter provides only a summary of data warehousing concepts and describes a simple dimensional data model. Building a Dimensional Data Model 10-3 Overview of Data Warehousing Overview of Data Warehousing In the broadest sense of the term, a data warehouse has been used to refer to a database that contains very large stores of historical data. The data is stored as a series of snapshots, in which each record represents data at a specific time. This data snapshot allows a user to reconstruct history and to make accurate comparisons between different time periods. A data warehouse integrates and transforms the data that it retrieves before it is loaded into the warehouse. A primary advantage of a data warehouse is that it provides easy access to and analysis of vast stores of information. Because the term data warehouse can mean different things to different people, this manual uses the umbrella terms data warehousing and data-warehousing environment to encompass any of the following forms that you might use to store your data: ■ Data warehouse A database that is optimized for data retrieval. The data is not stored at the transaction level; some level of data is summarized. Unlike traditional OLTP databases, which automate day-to-day operations, a data warehouse provides a decision-support environment in which you can evaluate the performance of an entire enterprise over time. Typically, you use a relational data model to build a data warehouse. ■ Data mart A subset of a data warehouse that is stored in a smaller database and that is oriented toward a specific purpose or data subject rather than for enterprise-wide strategic planning. A data mart can contain operational data, summarized data, spatial data, or metadata. Typically, you use a dimensional data model to build a data mart. 10-4 IBM Informix Guide to Database Design and Implementation Why Build a Dimensional Database? ■ Operational data store A subject-oriented system that is optimized for looking up one or two records at a time for decision making. An operational data store is a hybrid form of data warehouse that contains timely, current, integrated information. The data typically is of a higher level granularity than the transaction. You can use an operational data store for clerical, day-to-day decision making. This data can serve as the common source of data for data warehouses. ■ Repository A repository combines multiple data sources into one normalized database. The records in a repository are updated frequently. Data is operational, not historical. You might use the repository for specific decision-support queries, depending on the specific system requirements. A repository fits the needs of a corporation that requires an integrated, enterprise-wide data source for operational processing. Why Build a Dimensional Database? Relational databases typically are optimized for online transaction processing (OLTP). OLTP systems are designed to meet the day-to-day operational needs of the business and the database performance is tuned for those operational needs. Consequently, the database can retrieve a small number of records quickly, but it can be slow if you need to retrieve a large number of records and summarize data on the fly. Some potential disadvantages of OLTP systems are as follows: ■ Data might not be consistent across the business enterprise. ■ Access to data can be complicated. In contrast, a dimensional database is designed and tuned to support the analysis of business trends and projections. This type of informational processing is known as online analytical processing (OLAP) or decision-support processing. OLAP is also the term that database designers use to describe a dimensional approach to informational processing. Building a Dimensional Data Model 10-5 Why Build a Dimensional Database? A dimensional database is optimized for data retrieval and analysis. Any new data that you load into the database is usually updated in batch, often from multiple sources. Whereas OLTP systems tend to organize data around specific processes (such as order entry), a dimensional database tends to be subject oriented and aims to answer questions such as, “What products are selling well?” “At what time of year do products sell best?” “In what regions are sales weakest?” The following table summarizes the key differences between OLTP and OLAP databases. Relational Database (OLTP) Dimensional Database (OLAP) Data is atomized Data is summarized Data is current Data is historical Processes one record at a time Processes many records at a time Process oriented Subject oriented Designed for highly structured repetitive processing Designed for highly unstructured analytical processing Many of the problems that businesses attempt to solve with relational technology are multidimensional in nature. For example, SQL queries that create summaries of product sales by region, region sales by product, and so on, might require hours of processing on a traditional relational database. However, a dimensional database could process the same queries in a fraction of the time. 10-6 IBM Informix Guide to Database Design and Implementation What Is Dimensional Data? What Is Dimensional Data? Traditional relational databases are organized around a list of records. Each record contains related information that is organized into attributes (fields). The customer table of the stores_demo demonstration database, which includes fields for name, company, address, phone, and so forth, is a typical example. While this table has several fields of information, each row in the table pertains to only one customer. If you wanted to create a two-dimensional matrix with customer name and any other field (for example, phone number), you realize that there is only a one-to-one correspondence. Figure 10-1 shows a table with fields that have only a one-to-one correspondence. Figure 10-1 A Table with a One-To-One Correspondence Between Fields Customer Phone number ---> Ludwig Pauli 408-789-8075 ---------------- ---------------- Carole Sadler ---------------- 415-822-1289 ---------------- Philip Currie ---------------- ---------------- 414-328-4543 You could put any combination of fields from the preceding customer table in this matrix, but you always end up with a one-to-one correspondence, which shows that this table is not multidimensional and would not be well suited for a dimensional database. However, consider a relational table that contains more than a one-to-one correspondence between the fields of the table. Suppose you create a table that contains sales data for products sold in each region of the country. For simplicity, suppose the company has three products that are sold in three regions. Figure 10-2 shows how you might store this data in a relational table. Building a Dimensional Data Model 10-7 What Is Dimensional Data? Figure 10-2 A Simple Relational Table Product Region Unit Sales Football East 2300 Football West 4000 Football Central 5600 Tennis racket East 5500 Tennis racket West 8000 Tennis racket Central 2300 Baseball East 10000 Baseball West 22000 Baseball Central 34000 The table in Figure 10-2 on page 10-8 lends itself to multidimensional representation because it has more than one product per region and more than one region per product. Figure 10-3 shows a two-dimensional matrix that better represents the many-to-many relationship of product and region data. 10-8 IBM Informix Guide to Database Design and Implementation What Is Dimensional Data? Product Figure 10-3 A Simple Two-Dimensional Example Region central east west Football 5600 2300 4000 Tennis Racket 2300 5500 8000 Baseball 34000 10000 22000 Although this data can be forced into the three-field relational table of Figure 10-2, the data fits more naturally into the two-dimensional matrix of Figure 10-3. The performance advantages of the dimensional table over the traditional relational table can be great. A dimensional approach simplifies access to the data that you want to summarize or compare. For example, if you use the dimensional table to query the number of products sold in the West, the database server finds the west column and calculates the total for all row values in that column. To perform the same query on the relational table, the database server has to search and retrieve each row where the region column equals west and then aggregate the data. In queries of this kind, the dimensional table can total all values of the west column in a fraction of the time it takes the relational table to find all the west records. Building a Dimensional Data Model 10-9 Concepts of Dimensional Data Modeling Concepts of Dimensional Data Modeling To build a dimensional database, you start with a dimensional data model. The dimensional data model provides a method for making databases simple and understandable. You can conceive of a dimensional database as a database cube of three or four dimensions where users can access a slice of the database along any of its dimensions. To create a dimensional database, you need a model that lets you visualize the data. Suppose your business sells products in different markets and evaluates the performance over time. It is easy to conceive of this business process as a cube of data, which contains dimensions for time, products, and markets. Figure 10-4 shows this dimensional model. The various intersections along the lines of the cube would contain the measures of the business. The measures correspond to a particular combination of product, market, and time data. Figure 10-4 A Dimensional Model of a Business That Has Time, Product, and Market Dimensions e Market Tim Product 10-10 IBM Informix Guide to Database Design and Implementation Concepts of Dimensional Data Modeling Another name for the dimensional model is the star-join schema. The database designers use this name because the diagram for this model looks like a star with one central table around which a set of other tables are displayed. The central table is the only table in the schema with multiple joins connecting it to all the other tables. This central table is called the fact table and the other tables are called dimension tables. The dimension tables all have only a single join that attaches them to the fact table, regardless of the query. Figure 10-5 shows a simple dimensional model of a business that sells products in different markets and evaluates business performance over time. Figure 10-5 A Typical Dimensional Model Time dimension time_key day_of_week month quarter year holiday_flag Sales fact table Product dimension time_key product_key store_key dollars_sold units_sold dollars_cost product_key description brand category Store dimension store_key store_name address floor_plan_type Building a Dimensional Data Model 10-11 The Fact Table The Fact Table The fact table stores the measures of the business and points to the key value at the lowest level of each dimension table. The measures are quantitative or factual data about the subject. The measures are generally numeric and correspond to the how much or how many aspects of a question. Examples of measures are price, product sales, product inventory, revenue, and so forth. A measure can be based on a column in a table or it can be calculated. Figure 10-6 shows a fact table whose measures are sums of the units sold, the revenue, and the profit for the sales of that product to that account on that day. Figure 10-6 A Fact Table with Sample Records Product Code Account Code Day Code Units Sold Revenue Profit 1 5 32104 1 82.12 27.12 3 17 33111 2 171.12 66.00 1 13 32567 1 82.12 27.12 Before you design a fact table, you must determine the granularity of the fact table. The granularity corresponds to how you define an individual low-level record in that fact table. The granularity might be the individual transaction, a daily snapshot, or a monthly snapshot. The fact table in Figure 10-6 contains one row for every product sold to each account each day. Thus, the granularity of the fact table is expressed as product by account by day. 10-12 IBM Informix Guide to Database Design and Implementation Dimensions of the Data Model Dimensions of the Data Model A dimension represents a single set of objects or events in the real world. Each dimension that you identify for the data model gets implemented as a dimension table. Dimensions are the qualifiers that make the measures of the fact table meaningful because they answer the what, when, and where aspects of a question. For example, consider the following business questions, for which the dimensions are italicized: ■ What accounts produced the highest revenue last year? ■ What was our profit by vendor? ■ How many units were sold for each product? In the preceding set of questions, revenue, profit, and units sold are measures (not dimensions), as each represents quantitative or factual data. Dimension Elements A dimension can define multiple dimension elements for different levels of summation. For example, all the elements that relate to the structure of a sales organization might comprise one dimension. Figure 10-7 shows the dimension elements that the accounts dimension defines. Accounts Dimension Region Dimension elements Figure 10-7 Dimension Elements in the Accounts Dimension Territory Account Building a Dimensional Data Model 10-13 Dimensions of the Data Model Dimensions are made up of hierarchies of related elements. Because of the hierarchical aspect of dimensions, users are able to construct queries that access data at a higher level (roll up) or lower level (drill down) than the previous level of detail. Figure 10-7 shows the hierarchical relationships of the dimension elements: accounts roll up to territories, and territories roll up to regions. Users can query at different levels of the dimension, depending on the data they want to retrieve. For example, users might perform a query against all regions and then drill down to the territory or account level for detailed information. Dimension elements are usually stored in the database as numeric codes or short character strings to facilitate joins to other tables. Each dimension element can define multiple dimension attributes, in the same way dimensions can define multiple dimension elements. Dimension Attributes A dimension attribute is a column in a dimension table. Each attribute describes a level of summarization within a dimension hierarchy. The dimension elements define the hierarchical relationships within a dimension table; the attributes describe dimension elements in terms that are familiar to users. Figure 10-8 shows the dimension elements and corresponding attributes of the account dimension. Dimension elements Region Territory Dimension attributes Region Region size Region manager Territory Salesperson Account Account code Account name 10-14 IBM Informix Guide to Database Design and Implementation Figure 10-8 Attributes That Correspond to the Dimension Elements Dimensions of the Data Model Because dimension attributes describe the items in a dimension, they are most useful when they are text. Tip: Sometimes during the design process, it is unclear whether a numeric data field from a production data source is a measured fact or an attribute. Generally, if the numeric data field is a measurement that changes each time we sample it, it is a fact. If it is a discretely valued description of something that is more or less constant, it is a dimension attribute. Dimension Tables A dimension table is a table that stores the textual descriptions of the dimensions of the business. A dimension table contains an element and an attribute, if appropriate, for each level in the hierarchy. The lowest level of detail that is required for data analysis determines the lowest level in the hierarchy. Levels higher than this base level store redundant data. This denormalized table reduces the number of joins that are required for a query and makes it easier for users to query at higher levels and then drill down to lower levels of detail. The term drilling down means to add row headers from the dimension tables to your query. Figure 10-9 shows an example of a dimension table that is based on the account dimension. Figure 10-9 An Example of a Dimension Table Acct Code Account Name Territory Salesman Region Region Size Region Manager 1 Jane’s Mfg. 101 B. Adams Midwest Over 50 T. Sent 2 TBD Sales 101 B. Adams Midwest Over 50 T. Sent 3 Molly’s Wares 101 B. Adams Midwest Over 50 T. Sent 4 The Golf Co. 201 T. Scott Midwest Over 50 T. Sent Building a Dimensional Data Model 10-15 Building a Dimensional Data Model Building a Dimensional Data Model To build a dimensional data model, you need a methodology that outlines the decisions you need to make to complete the database design. This methodology uses a top-down approach because it first identifies the major processes in your organization where data is collected. An important task of the database designer is to start with the existing sources of data that your organization uses. After the process(es) are identified, one or more fact tables are built from each business process. The following steps describe the methodology you use to build the data model. To build a dimensional database 1. Choose the business processes that you want to use to analyze the subject area to be modeled 2. Determine the granularity of the fact tables 3. Identify dimensions and hierarchies for each fact table 4. Identify measures for the fact tables 5. Determine the attributes for each dimension table 6. Get users to verify the data model Although a dimensional database can be based on multiple business processes and can contain many fact tables, the data model that this section describes is based on a single business process and has one fact table. 10-16 IBM Informix Guide to Database Design and Implementation Choosing a Business Process Choosing a Business Process A business process is an important operation in your organization that some legacy system supports. You collect data from this system to use in your dimensional database. The business process identifies what end users are doing with their data, where the data comes from, and how to transform that data to make it meaningful. The information can come from many sources, including finance, sales analysis, market analysis, customer profiles. The following list shows different business processes you might use to determine what data to include in your dimensional database: ■ Sales ■ Shipments ■ Inventory ■ Orders ■ Invoices Summary of a Business Process Suppose your organization wants to analyze customer buying trends by product line and region so that you can develop more effective marketing strategies. In this scenario, the subject area for your data model is sales. After many interviews and thorough analysis of your sales business process, suppose your organization collects the following information: ■ Customer-base information has changed. Previously, sales districts were divided by city. Now the customer base corresponds to two regions: Region 1 for California and Region 2 for all other states. ■ ■ The following reports are most critical to marketing: ❑ Monthly revenue, cost, net profit by product line per vendor ❑ Revenue and units sold by product, by region, by month ❑ Monthly customer revenue ❑ Quarterly revenue per vendor Most sales analysis is based on monthly results but you can choose to analyze sales by week or accounting period (at a later date). Building a Dimensional Data Model 10-17 Summary of a Business Process ■ A data-entry system exists in a relational database. To develop a working data model, you can assume that the relational database of sales information has the following properties: ❑ The stores_demo database provides much of the revenue data that the marketing department uses. ❑ The product code that analysts use is stored in the catalog table as the catalog number. ❑ The product line code is stored in the stock table as the stock number. The product line name is stored as description. ❑ The product hierarchies are somewhat complicated. Each product line has many products, and each manufacturer has many products. ■ All the cost data for each product is stored in a flat file named costs.lst on a different purchasing system. ■ Customer data is stored in the stores_demo database. The region information has not yet been added to the database. An important characteristic of the dimensional model is that it uses business labels familiar to end users rather than internal tables or column names. After the business process is completed, you should have all the information you need to create the measures, dimensions, and relationships for the dimensional data model. This dimensional data model is used to implement the sales_demo database that Chapter 11 describes. The stores_demo demonstration database is the primary data source for the dimensional data model that this chapter develops. For detailed information about the data sources that are used to populate the tables of the sales_demo database, see “Mapping Data from Data Sources to the Database” on page 11-7. 10-18 IBM Informix Guide to Database Design and Implementation Determining the Granularity of the Fact Table Determining the Granularity of the Fact Table After you gather all the relevant information about the subject area, the next step in the design process is to determine the granularity of the fact table. To do this you must decide what an individual low-level record in the fact table should contain. The components that make up the granularity of the fact table correspond directly with the dimensions of the data model. Thus, when you define the granularity of the fact table, you identify the dimensions of the data model. How Granularity Affects the Size of the Database The granularity of the fact table also determines how much storage space the database requires. For example, consider the following possible granularities for a fact table: ■ Product by day by region ■ Product by month by region The size of a database that has a granularity of product by day by region would be much greater than a database with a granularity of product by month by region because the database contains records for every transaction made each day as opposed to a monthly summation of the transactions. You must carefully determine the granularity of your fact table because too fine a granularity could result in an astronomically large database. Conversely, too coarse a granularity could mean the data is not detailed enough for users to perform meaningful queries against the database. Using the Business Process to Determine the Granularity A careful review of the information gathered from the business process should provide what you need to determine the granularity of the fact table. To summarize, your organization wants to analyze customer buying trends by product line and region so that you can develop more effective marketing strategies. Building a Dimensional Data Model 10-19 Determining the Granularity of the Fact Table Customer by Product The granularity of the fact table always represents the lowest level for each corresponding dimension. When you review the information from the business process, the granularity for customer and product dimensions of the fact table are apparent. Customer and product cannot be reasonably reduced any further: they already express the lowest level of an individual record for the fact table. (In some cases, product might be further reduced to the level of product component because a product could be made up of multiple components.) Customer by Product by District Because the customer buying trends your organization wants to analyze include a geographical component, you still need to decide the lowest level for region information. The business process indicates that in the past, sales districts were divided by city, but now your organization distinguishes between two regions for the customer base: Region 1 for California and Region 2 for all other states. Nonetheless, at the lowest level, your organization still includes sales district data, so district represents the lowest level for geographical information and provides a third component to further define the granularity of the fact table. Customer by Product by District by Day Customer buying trends always occur over time, so the granularity of the fact table must include a time component. Suppose your organization decides to create reports by week, accounting period, month, quarter, or year. At the lowest level, you probably want to choose a base granularity of day. This granularity allows your business to compare sales on Tuesdays with sales on Fridays, compare sales for the first day of each month, and so forth. The granularity of the fact table is now complete. The decision to choose a granularity of day means that each record in the time dimension table represents a day. In terms of the storage requirements, even 10 years of daily data is only about 3,650 records, which is a relatively small dimension table. 10-20 IBM Informix Guide to Database Design and Implementation Identifying the Dimensions and Hierarchies Identifying the Dimensions and Hierarchies After you determine the granularity of the fact table, it is easy to identify the primary dimensions for the data model because each component that defines the granularity corresponds to a dimension. Figure 10-10 shows the relationship between the granularity of the fact table and the dimensions of the data model. Granularity of fact table: Dimensions: Figure 10-10 The Granularity of the Fact Table Corresponds to the Dimensions of the Data Model Customer by Product by District by Day Customer Product Geography Time With the dimensions (customer, product, geography, time) for the data model in place, the schema diagram begins to take shape. Tip: At this point, you can add additional dimensions to the primary granularity of the fact table, where the new dimensions take on only a single value under each combination of the primary dimensions. If you see that an additional dimension violates the granularity because it causes additional records to be generated, then you must revise the granularity of the fact table to accommodate the additional dimension. For this data model, no additional dimensions need to be added. Building a Dimensional Data Model 10-21 Identifying the Dimensions and Hierarchies You can now map out dimension elements and hierarchies for each dimension. Figure 10-11 shows the relationships among dimensions, dimension elements, and the inherent hierarchies. Dimension elements Attributes Vendor Vendor Product Product name Product line Product line name Product Customer Customer Name Company Region State State name District District name Year Quarter Month Day 10-22 IBM Informix Guide to Database Design and Implementation Order date Figure 10-11 The Relationships Between Dimensions, Dimension Elements, and the Inherent Hierarchies Choosing the Measures for the Fact Table In most cases, the dimension elements need to express the lowest possible granularity for each dimension, not because queries need to access individual low-level records, but because queries need to cut through the database in precise ways. In other words, even though the questions that a data warehousing environment poses are usually broad, these questions still depend on the lowest level of product detail. Choosing the Measures for the Fact Table The measures for the data model include not only the data itself, but also new values that you calculate from the existing data. When you examine the measures, you might discover that you need to make adjustments either in the granularity of the fact table or the number of dimensions. Another important decision you must make when you design the data model is whether to store the calculated results in the fact table or to derive these values at runtime. The question to answer is, “What measures are used to analyze the business?” Remember that the measures are the quantitative or factual data that tell how much or how many. The information that you gather from analysis of the sales business process results in the following list of measures: ■ Revenue ■ Cost ■ Units sold ■ Net profit Building a Dimensional Data Model 10-23 Choosing the Measures for the Fact Table Use these measures to complete the fact table in Figure 10-12. Product Dimension product code Time Dimension time code Sales Fact Table product code time code district code customer code Geography Dimension district code 10-24 revenue cost units sold net profit IBM Informix Guide to Database Design and Implementation Customer Dimension customer code Figure 10-12 The Sales Fact Table References Each Dimension Table Choosing the Measures for the Fact Table Using Keys to Join the Fact Table with the Dimension Tables Assume, for the moment, that the schema of Figure 10-12 on page 10-24 shows both the logical and physical design of the database. The database contains the following five tables: ■ Sales fact table ■ Product dimension table ■ Time dimension table ■ Customer dimension table ■ Geography dimension table Each of the dimensional tables includes a primary key (product, time_code, customer, district_code), and the corresponding columns in the fact table are foreign keys. The fact table also has a primary (composite) key that is a combination of these four foreign keys. As a rule, each foreign key of the fact table must have its counterpart in a dimension table. Furthermore, any table in a dimensional database that has a composite key must be a fact table, which means that every table in a dimensional database that expresses a many-to-many relationship is a fact table. Tip: The primary key should be a short numeric data type (INT, SMALLINT, SERIAL) or a short character string (as used for codes). Informix recommends that you do not use long character strings as primary keys. Building a Dimensional Data Model 10-25 Resisting Normalization Resisting Normalization If the four foreign keys of the fact table are tightly administered consecutive integers, you could reserve as little as 16 bytes for all four keys (4 bytes each for time, product, customer, and geography) of the fact table. If the four measures in the fact table were each 4-byte integer columns, you would need to reserve only another 16 bytes. Thus, each record of the fact table would be only 32 bytes. Even a billion-row fact table would require only about 32 gigabytes of primary data space. With its compact keys and data, such a storage-lean fact table is typical for dimensional databases. The fact table in a dimensional model is by nature highly normalized. You cannot further normalize the extremely complex many-to-many relationships among the four keys in the fact table because no correlation exists between the four dimension tables; virtually every product is sold every day to all customers in every region. The fact table is the largest table in a dimensional database. Because the dimension tables are usually much smaller than the fact table, you can ignore the dimension tables when you calculate the disk space for your database. Efforts to normalize any of the tables in a dimensional database solely to save disk space are pointless. Furthermore, normalized dimension tables undermine the ability of users to explore a single dimension table to set constraints and choose useful row headers. 10-26 IBM Informix Guide to Database Design and Implementation Choosing the Attributes for the Dimension Tables Choosing the Attributes for the Dimension Tables After you complete the fact table, you can decide the dimension attributes for each of the dimension tables. To illustrate how to choose the attributes, consider the time dimension. The data model for the sales business process defines a granularity of day that corresponds to the time dimension, so that each record in the time dimension table represents a day. Keep in mind that each field of the table is defined by the particular day the record represents. The analysis of the sales business process also indicates that the marketing department needs monthly, quarterly, and annual reports, so the time dimension includes the elements: day, month, quarter, and year. Each element is assigned an attribute that describes the element and a code attribute (to avoid column values that contain long character strings). Figure 10-13 shows the attributes for the time dimension table and sample values for each field of the table. Figure 10-13 Attributes for the Time Dimension time code order date month code month quarter code quarter year 35276 07/31/1999 7 july 3 third q 1999 35277 08/01/1999 8 aug 3 third q 1999 35278 08/02/1999 8 aug 3 third q 1999 Building a Dimensional Data Model 10-27 Choosing the Attributes for the Dimension Tables Figure 10-13 on page 10-27 shows that the attribute names you assign should be familiar business terms that make it easy for end users to form queries on the database. Figure 10-14 shows the completed data model for the sales business process with all the attributes defined for each dimension table. Product Dimension product code Time Dimension time code product name vendor vendor name product line product line name order date month quarter year Sales Fact Table product code Figure 10-14 The Completed Dimensional Data Model for the Sales Business Process time code district code customer code Geography Dimension district code revenue cost units sold net profit district state state name region Customer Dimension customer code customer name company Tip: The number of attributes that you define on each dimension table should generally be kept to a minimum. Dimension tables with too many attributes can lead to excessively wide rows and poor performance. For more information, see “Minimizing the Number of Attributes in a Dimension Table” on page 10-29. 10-28 IBM Informix Guide to Database Design and Implementation Handling Common Dimensional Data-Modeling Problems Handling Common Dimensional Data-Modeling Problems The dimensional model that the previous sections describe illustrates only the most basic concepts and techniques of dimensional data modeling. The data model you build to address the business needs of your enterprise typically involves additional problems and difficulties that you must resolve to achieve the best possible query performance from your database. This section describes various methods you can use to resolve some of the most common problems that arise when you build a dimensional data model. Minimizing the Number of Attributes in a Dimension Table Dimension tables that contain customer or product information might easily have 50 to 100 attributes and many millions of rows. However, dimension tables with too many attributes can lead to excessively wide rows and poor performance. For this reason, you might want to separate out certain groups of attributes from a dimension table and put them in a separate table called a minidimension table. A minidimension table consists of a small group of attributes that are separated out from a larger dimension table. You might choose to create a minidimension table for attributes that have either of the following characteristics: ■ The fields are rarely used as constraints in a query. ■ The fields are frequently compared together. Building a Dimensional Data Model 10-29 Minimizing the Number of Attributes in a Dimension Table Figure 10-15 shows a minidimension table for demographic information that is separated out from a customer table. Customer Table customer code Fact Table customer name demographics code customer code . . . demographics code Figure 10-15 A Minidimension Table for Demographics Information . . . Demographics Table demographics code income level martial status . . . In the demographics table, you can store the demographics key as a foreign key in both the fact table and the customer table, which allows you to join the demographics table directly to the fact table. You can also use the demographics key directly with the customer table to browse demographic attributes. 10-30 IBM Informix Guide to Database Design and Implementation Handling Dimensions That Occasionally Change Handling Dimensions That Occasionally Change In a dimensional database where updates are infrequent (as opposed to OLTP systems), most dimensions are relatively constant over time, because changes in sales districts or regions, or in company names and addresses, occur infrequently. However, to make historical comparisons, these changes must be handled when they do occur. Figure 10-16 shows an example of a dimension that has changed. Figure 10-16 A Dimension That Changes Customer 101 Bill Adams The Sports Palace Des Plaines Il . . . MOVED! Arlington Heights Building a Dimensional Data Model 10-31 Handling Dimensions That Occasionally Change You can use three methods to handle changes that occur in a dimension: ■ Change the value stored in the dimension column. In Figure 10-16, the record for Bill Adams in the customer dimension table is updated to show the new address Arlington Heights. All of this customer’s previous sales history is now associated with the district of Arlington Heights instead of Des Plaines. ■ Create a second dimension record with the new value and a generalized key. This approach effectively partitions history. The customer dimension table would now contain two records for Bill Adams. The old record with a key of 101 remains, and records in the fact table are still associated with it. A new record is also added to the customer dimension table for Bill Adams, with a new key that might consist of the old key plus some version digits (101.01, for example). All subsequent records that are added to the fact table for Bill Adams are associated with this new key. ■ Add a new field in the customer dimension table for the affected attribute and rename the old attribute. This approach is rarely used unless you need to track old history in terms of the new value and vice-versa. The customer dimension table gets a new attribute named current address, and the old attribute is renamed original address. The record that contains information about Bill Adams includes values for both the original and current address. 10-32 IBM Informix Guide to Database Design and Implementation Using the Snowflake Schema Using the Snowflake Schema A snowflake schema is a variation on the star schema, in which very large dimension tables are normalized into multiple tables. Dimensions with hierarchies can be decomposed into a snowflake structure when you want to avoid joins to big dimension tables when you are using an aggregate of the fact table. For example, if you have brand information that you want to separate out from a product dimension table, you can create a brand snowflake that consists of a single row for each brand and that contains significantly fewer rows than the product dimension table. Figure 10-17 shows a snowflake structure for the brand and product line elements and the brand_agg aggregate table. Brand Table brand code brand name brand manager Product Table product code product name . . . brand code product line code Product-Line Table product line code Brand_Agg Aggregate Table brand code product line name line manager total revenue total cost Sales Fact Table product code Figure 10-17 An Example of a Snowflake Schema time code account code customer code revenue cost units sold net profit Building a Dimensional Data Model 10-33 Using the Snowflake Schema If you create an aggregate, brand_agg, that consists of the brand code and the total revenue per brand, you can use the snowflake schema to avoid the join to the much larger sales table, as the following query on the brand and brand_agg tables shows: SELECT brand.brand_name, brand_agg.total_revenue FROM brand, brand_agg WHERE brand.brand_code = brand_agg.brand_code AND brand.brand_name = 'Anza' Without a snowflaked dimension table, you use a SELECT UNIQUE or SELECT DISTINCT statement on the entire product table (potentially, a very large dimension table that includes all the brand and product-line attributes) to eliminate duplicate rows. While snowflake schemas are unnecessary when the dimension tables are relatively small, a retail or mail-order business that has customer or product dimension tables that contain millions of rows can use snowflake schemas to significantly improve performance. If an aggregate table is not available, any joins to a dimension element that was normalized with a snowflake schema must now be a three-way join, as the following query shows. A three-way join reduces some of the performance advantages of a dimensional database. SELECT brand.brand_name, SUM(sales.revenue) FROM product, brand, sales WHERE product.brand_code = brand.brand_code AND brand.brand_name = 'Alltemp' GROUP BY brand_name 10-34 IBM Informix Guide to Database Design and Implementation Chapter Implementing a Dimensional Database In This Chapter . . . . . . . . . . . . . . . . 11-3 Implementing the sales_demo Dimensional Database . . . Using CREATE DATABASE . . . . . . . . . . Using CREATE TABLE for the Dimension and Fact Tables Mapping Data from Data Sources to the Database . . . Loading Data into the Dimensional Database . . . . Creating the sales_demo Database . . . . . . . . Testing the Dimensional Database . . . . . . . . . . . . . . . . . . . . . . . . . . . . . . . . . . . . 11-3 11-4 11-4 11-7 11-9 11-11 11-11 Logging and Nonlogging Tables in Extended Parallel Server Choosing Table Types . . . . . . . . . . . . Scratch and Temp Temporary Tables . . . . . . Raw Permanent Tables . . . . . . . . . . . Static Permanent Tables . . . . . . . . . . Operational Permanent Tables . . . . . . . . Standard Permanent Tables . . . . . . . . . Switching Between Table Types . . . . . . . . . . . . . . . . . . . . . . . . . . . . . . . . . . . . . . . . . 11-12 11-13 11-14 11-15 11-16 11-16 11-16 11-17 Indexes for Data-Warehousing Environments. . . . . . Using GK Indexes in a Data-Warehousing Environment Defining a GK Index on a Selection . . . . . . Defining a GK Index on an Expression . . . . . Defining a GK Index on Joined Tables . . . . . . . 11 . . . . . . 11-17 . . . . . . . . . . . . . . . . . . . . . . . . 11-19 11-19 11-20 11-20 11-2 IBM Informix Guide to Database Design and Implementation XPS In This Chapter This chapter shows how to use SQL to implement the dimensional data model that Chapter 10 describes. Remember that this database serves only as an illustrative example of a data-warehousing environment. For the sake of the example, it is translated into SQL statements. This chapter describes the sales_demo database, which is available with Extended Parallel Server. This chapter also describes the special table types and indexes available with Extended Parallel Server that are suited to the needs of data warehousing and other very large database applications. Implementing the sales_demo Dimensional Database This section shows the SQL statements that you can use to create a dimensional database from the data model in Chapter 10. You can use interactive SQL to write the individual statements that create the database or you can run a script that automatically executes all the statements that you need to implement the database. The CREATE DATABASE and CREATE TABLE statements create the data model as tables in a database. After you create the database, you can use LOAD and INSERT statements to populate the tables. Implementing a Dimensional Database 11-3 Using CREATE DATABASE Using CREATE DATABASE You must create the database before you can create any tables or other objects that the database contains. When an Informix database server creates a database, it sets up records that show the existence of the database and its mode of logging. The database server manages disk space directly, so these records are not visible to operating-system commands. When you create a database with Extended Parallel Server, logging is always turned on. However, you can create nonlogging tables within the database. For more information, see “Logging and Nonlogging Tables in Extended Parallel Server” on page 11-12. The following statement shows the syntax you use to create a database that is called sales_demo: CREATE DATABASE sales_demo Using CREATE TABLE for the Dimension and Fact Tables This section includes the CREATE TABLE statements that you use to create the tables of the sales_demo dimensional database. Referential integrity is, of course, an important requirement for dimensional databases. However, the following schema for the sales_demo database does not define the primary and foreign key relationships that exist between the fact table and its dimension tables. The schema does not define these primary and foreign key relationships because data-loading performance improves dramatically when the database server does not enforce constraint checking. Given that data-warehousing environments often require that tens or hundreds of gigabytes of data are loaded within a specified time, data-load performance should be a factor when you decide how to implement a database in a warehousing environment. Assume that if the sales_demo database is implemented as a live data mart, some data extraction tool (rather than the database server) is used to enforce referential integrity between the fact table and dimension tables. 11-4 IBM Informix Guide to Database Design and Implementation Using CREATE TABLE for the Dimension and Fact Tables Tip: After you create and load a table, you can add primary- and foreign-key constraints to the table with the ALTER TABLE statement to enforce referential integrity. This method is required only for express load mode. If the constraints and indexes are necessary and costly to drop before a load, then deluxe load mode is the best option. The following statements create the time, geography, product, and customer tables. These tables are the dimensions for the sales fact table. A SERIAL field serves as the primary key for the district_code column of the geography table. CREATE TABLE time ( time_code INT, order_date DATE, month_code SMALLINT, month_name CHAR(10), quarter_code SMALLINT, quarter_name CHAR(10), year INTEGER ); CREATE TABLE geography ( district_code SERIAL, district_name CHAR(15), state_code CHAR(2), state_name CHAR(18), region SMALLINT ); CREATE TABLE product ( product_code INTEGER, product_name CHAR(31), vendor_code CHAR(3), vendor_name CHAR(15), product_line_code SMALLINT, product_line_name CHAR(15) ); CREATE TABLE customer ( customer_code INTEGER, customer_name CHAR(31), company_name CHAR(20) ); Implementing a Dimensional Database 11-5 Using CREATE TABLE for the Dimension and Fact Tables The sales fact table has pointers to each dimension table. For example, customer_code references the customer table, district_code references the geography table, and so forth. The sales table also contains the measures for the units sold, revenue, cost, and net profit. CREATE TABLE sales ( customer_code INTEGER, district_code SMALLINT, time_code INTEGER, product_code INTEGER, units_sold SMALLINT, revenue MONEY(8,2), cost MONEY(8,2), net_profit MONEY(8,2) ); Tip: The most useful measures (facts) are numeric and additive. Because of the great size of databases in data-warehousing environments, virtually every query against the fact table might require thousands or millions of records to construct an answer set. The only useful way to compress these records is to aggregate them. In the sales table, each column for the measures is defined on a numeric data type, so you can easily build answer sets from the units_sold, revenue, cost, and net_profit columns. For your convenience, the file called createdw.sql contains all the preceding CREATE TABLE statements. 11-6 IBM Informix Guide to Database Design and Implementation Mapping Data from Data Sources to the Database Mapping Data from Data Sources to the Database The stores_demo demonstration database is the primary data source for the sales_demo database. Figure 11-1 on page 11-7 shows the relationship between data-warehousing business terms and the data sources. It also shows the data source for each column and table of the sales_demo database. Figure 11-1 The Relationship Between Data-Warehousing Business Terms and Data Sources Business Term Data Source Table.Column Name Sales Fact Table: product code sales.product_code customer code sales.customer_code district code sales.district_code time code sales.time_code revenue stores_demo:items.total_price sales.revenue units sold stores_demo:items.quantity sales.units_sold cost costs.lst (per unit) sales.cost net profit calculated: revenue minus cost sales.net_profit Product Dimension Table: product stores_demo:catalog.catalog_num product.product_code product name stores_demo:stock.manu_code and stores_demo:stock.description product.product_name product line stores_demo:orders.stock_num product.product_line_code product line name stores_demo:stock.description product.product_line_name (1 of 2) Implementing a Dimensional Database 11-7 Mapping Data from Data Sources to the Database Business Term Data Source Table.Column Name vendor stores_demo:orders.manu_code product.vendor_code vendor name stores_demo:manufact.manu_name product.vendor_name Customer Dimension Table: customer stores_demo:orders.customer_num customer.customer_code customer name stores_demo:customer.fname plus stores_demo:customer.lname customer.customer_name company stores_demo:customer.company customer.company_name Geography Dimension Table: district code generated geography.district_code district stores_demo:customer.city geography.district_name state stores_demo:customer.state geography.state_code state name stores_demo.state.sname geography.state_name region derived: If state = "CA" THEN region = 1, ELSE region = 2 geography.region Time Dimension Table: time code generated time.time_code order date stores_demo:orders.order_date time.order_date month derived from order date generated time.month_name time.month.code quarter derived from order date generated time.quarter_name time.quarter_code year derived from order date time.year (2 of 2) Several files with a .unl suffix contain the data that is loaded into the sales_demo database. The files that contain the SQL statements that create and load the database have a .sql suffix. 11-8 IBM Informix Guide to Database Design and Implementation Loading Data into the Dimensional Database UNIX WIN NT When your database server runs on UNIX, you can access the *.sql and *.unl files from the directory $INFORMIXDIR/demo/dbaccess. ♦ When your database server runs on Windows NT, you can access the *.sql and *.unl files from the directory %INFORMIXDIR%\demo\dbaccess. ♦ Loading Data into the Dimensional Database An important step when you implement a dimensional database is to develop and document a load strategy. This section shows the LOAD and INSERT statements that you can use to populate the tables of the sales_demo database. Tip: In a live data-warehousing environment, you typically do not use the LOAD or INSERT statements to load large amounts of data to and from Informix databases. Informix database servers provide different features for high-performance loading and unloading of data. When you create a database with Extended Parallel Server, you can use external tables to perform high-performance loading and unloading. For information about high-performance loading, see your Administrator’s Guide or high-performance loader documentation. The following statement loads the time table with data first so that you can use it to determine the time code for each row that is loaded into the sales table: LOAD FROM 'time.unl' INSERT INTO time The following statement loads the geography table. Once you load the geography table, you can use the district code data to load the sales table. INSERT INTO geography(district_name, state_code, state_name) SELECT DISTINCT c.city, s.code, s.sname FROM stores_demo:customer c, stores_demo:state s WHERE c.state = s.code Implementing a Dimensional Database 11-9 Loading Data into the Dimensional Database The following statements add the region code to the geography table: UPDATE geography SET region = 1 WHERE state_code = 'CA' UPDATE geography SET region = 2 WHERE state_code <> 'CA' The following statement loads the customer table: INSERT INTO customer (customer_code, customer_name, company_name) SELECT c.customer_num, trim(c.fname) ||' '|| c.lname, c.company FROM stores_demo:customer c The following statement loads the product table: INSERT INTO product (product_code, product_name, vendor_code, vendor_name,product_line_code, product_line_name) SELECT a.catalog_num, trim(m.manu_name)||' '||s.description, m.manu_code, m.manu_name, s.stock_num, s.description FROM stores_demo:catalog a, stores_demo:manufact m, stores_demo:stock s WHERE a.stock_num = s.stock_num AND a.manu_code = s.manu_code AND s.manu_code = m.manu_code; The following statement loads the sales fact table with one row for each product, per customer, per day, per district. The cost from the cost table is used to calculate the total cost (cost * quantity). INSERT INTO sales (customer_code, district_code, time_code, product_code, units_sold, cost, revenue, net_profit) SELECT c.customer_num, g.district_code, t.time_code, p.product_code, SUM(i.quantity), SUM(i.quantity * x.cost), SUM(i.total_price), SUM(i.total_price) - SUM(i.quantity * x.cost) FROM stores_demo:customer c, geography g, time t, product p,stores_demo:items i, stores_demo:orders o, cost x WHERE c.customer_num = o.customer_num AND o.order_num = i.order_num AND p.product_line_code = i.stock_num AND p.vendor_code = i.manu_code AND t.order_date = o.order_date AND p.product_code = x.product_code AND c.city = g.district_name GROUP BY 1,2,3,4; 11-10 IBM Informix Guide to Database Design and Implementation Creating the sales_demo Database Creating the sales_demo Database The sales_demo dimensional database uses data from the stores_demo database, so you must create both databases to implement the sales_demo database. For information about how to use the dbaccessdemo script to implement the sales_demo database, see the DB-Access User’s Manual. Testing the Dimensional Database You can create SQL queries to retrieve the data necessary for the standard reports listed in the business-process summary (see the “Summary of a Business Process” on page 10-17). Use the following ad hoc queries to test that the dimensional database was properly implemented. The following statement returns the monthly revenue, cost, and net profit by product line for each vendor: SELECT vendor_name, product_line_name, month_name, SUM(revenue) total_revenue, SUM(cost) total_cost, SUM(net_profit) total_profit FROM product, time, sales WHERE product.product_code = sales.product_code AND time.time_code = sales.time_code GROUP BY vendor_name, product_line_name, month_name ORDER BY vendor_name, product_line_name; The following statement returns the revenue and units sold by product, by region, and by month: SELECT product_name, region, month_name, SUM(revenue), SUM(units_sold) FROM product, geography, time, sales WHERE product.product_code = sales.product_code AND geography.district_code = sales.district_code AND time.time_code = sales.time_code GROUP BY product_name, region, month_name ORDER BY product_name, region; Implementing a Dimensional Database 11-11 Logging and Nonlogging Tables in Extended Parallel Server The following statement returns the monthly customer revenue: SELECT customer_name, company_name, month_name, SUM(revenue) FROM customer, time, sales WHERE customer.customer_code = sales.customer_code AND time.time_code = sales.time_code GROUP BY customer_name, company_name, month_name ORDER BY customer_name; The following statement returns the quarterly revenue per vendor: SELECT vendor_name, year, quarter_name, SUM(revenue) FROM product, time, sales WHERE product.product_code = sales.product_code AND time.time_code = sales.time_code GROUP BY vendor_name, year, quarter_name ORDER BY vendor_name, year Logging and Nonlogging Tables in Extended Parallel Server This section describes the different table types that can be particularly useful in data-warehousing environments. Extended Parallel Server logs tables by default, the same way that Dynamic Server logs tables. However, data-warehousing environments and other applications that involve large amounts of data (and few or no inserts, updates, or deletes) often require a combination of logged and nonlogged tables in the same database. In many cases, temporary tables are insufficient because they do not persist after the database session ends. To meet the need for both logging and nonlogging tables, Extended Parallel Server supports the following types of permanent tables and temporary tables: 11-12 ■ Raw permanent tables (nonlogging) ■ Static permanent tables (nonlogging) ■ Operational permanent tables (logging) ■ Standard permanent tables (logging) ■ Scratch temporary tables (nonlogging) ■ Temp temporary tables (logging) IBM Informix Guide to Database Design and Implementation Choosing Table Types If you issue the CREATE TABLE statement and you do not specify the table type, you create a standard permanent table. To change between table types, use the ALTER TABLE statement. For information about the syntax, refer to the Informix Guide to SQL: Syntax. Important: A coserver can use and access only its own dbspaces for temporary space. Although temporary tables can be fragmented explicitly across dbspaces like permanent tables, a coserver inserts data only into the fragments that it manages. Choosing Table Types The individual tables in a data-warehousing environment often have different requirements. To help determine the appropriate table type to use for your tables, answer the following questions: ■ Does the table require indexes? ■ What constraints does the table need to define? ■ What is the refresh and update cycle on the table? ■ Is the table a read-only table? ■ Does the table need to be logged? Figure 11-2 lists the properties of the six types of tables that Extended Parallel Server supports and shows how you can use external tables to load these types of tables. Use this information to select a table type to match the specific requirements of your tables. Implementing a Dimensional Database 11-13 Choosing Table Types Figure 11-2 Characteristics of the Table Types for Extended Parallel Server Type Permanent Logged Indexes Light Append Used Rollback Available Recoverable Restorable from Archive External Tables Load Mode SCRATCH No No No Yes No No No Express or deluxe load mode TEMP No Yes Yes Yes Yes No No Express or deluxe load mode RAW Yes No No Yes No No No Express or deluxe load mode STATIC Yes No Yes No No No No None OPERATIONAL Yes Yes Yes Yes Yes Yes No Express or deluxe load mode STANDARD Yes Yes Yes No Yes Yes Yes Deluxe load mode Scratch and Temp Temporary Tables Scratch tables are nonlogging temporary tables that do not support indexes, constraints, or rollback. Temp tables are logged temporary tables, although they also support bulk operations such as light appends. (Express mode loads use light appends, which bypass the buffer cache. Light appends eliminate the overhead associated with buffer management but do not log the data.) Temp tables support indexes, constraints, and rollback. Tip: SELECT...INTO TEMP and SELECT...INTO SCRATCH statements are parallel across coservers, just like ordinary inserts. Extended Parallel Server automatically supports fragmented temporary tables across nodes when those tables are explicitly created with SELECT...INTO TEMP and SELECT...INTO SCRATCH. 11-14 IBM Informix Guide to Database Design and Implementation Choosing Table Types Extended Parallel Server creates explicit temporary tables according to the following criteria: ■ If the query that you use to populate the Temp or Scratch table produces no rows, the database server creates an empty, unfragmented table. ■ If the rows that the query produces do not exceed 8 kilobytes, the temporary table resides in only one dbspace. ■ If the rows exceed 8 kilobytes, Extended Parallel Server creates multiple fragments and uses a round-robin fragmentation scheme to populate them. Raw Permanent Tables Raw tables are nonlogging permanent tables that use light appends. Express-mode loads use light appends, which bypass the buffer cache. You can load a raw table with express mode. For information about express-mode loads, see your Administrator’s Reference. Raw tables support updates, inserts, and deletes but do not log them. Raw tables do not support index or referential constraints, rollback, recoverability, or restoration from archives. Use raw tables for the initial data loading and scrubbing. Once these steps are completed, alter the table to a higher level. For example, if an error or failure occurs while you are loading a raw table, the resulting data is whatever was on the disk at the time of the failure. In a data-warehousing environment, you might choose to create a fact table as a raw table when both of the following conditions are true: ■ The fact table does not need to specify constraints and indexes, which are enforced by some different mechanisms. ■ Creating and loading the fact table is not a costly job. The fact tables could be useful but not critical for decision support, and if data is lost you can easily reload the table. Implementing a Dimensional Database 11-15 Choosing Table Types Static Permanent Tables Static tables are nonlogging, read-only permanent tables that do not support insert, update, and delete operations. When you anticipate no insert, update, or delete operations on the table, you might choose to create the table as a static table. With a static table, you can create and drop nonclustered indexes and referential constraints because they do not affect the data. Static tables do not support rollback, recoverability, or restoration from archives. Their advantage is that the database server can use light scans and avoid locking when you execute queries because static tables are read-only. Tip: Static tables are important when you want to create a table that uses GK indexes because a static table is the only table type that supports GK indexes. Operational Permanent Tables Operational tables are logging permanent tables that use light appends and do not perform record-by-record logging. They allow fast update operations. You can roll back operations or recover after a failure with operational tables, but you cannot restore them reliably from an archive of the log because the bulk insert records that are loaded are not logged. Use operational tables in situations where you derive data from another source so restorability is not an issue, but where you do not require rollback and recoverability. You might create a fact table as an operational table because the data is periodically refreshed. Operational tables support express load mode (in the absence of indexes and constraints) and data is recoverable. Standard Permanent Tables A standard table in Extended Parallel Server is the same as a table in a logged database that you create with Dynamic Server. All operations are logged, record by record, so you can restore standard tables from an archive. Standard tables support recoverability and rollback. If the update and refresh cycle for the table is infrequent, you might choose to create a standard table type, as you need not drop constraints or indexes during a refresh cycle. Building indexes is time consuming and costly, but necessary. 11-16 IBM Informix Guide to Database Design and Implementation Switching Between Table Types Tip: Standard tables do not use light append, so you cannot use express-load mode when you use external tables to perform the load. Switching Between Table Types Use the ALTER TABLE command to switch between types of permanent tables. If the table does not meet the restrictions of the new type, the alter fails and produces an explanatory error message. The following restrictions apply to table alteration: ■ You must drop indexes and referential constraints before you alter a table to a RAW type. ■ You must perform a level-0 archive before you alter a table to a STANDARD type, so that the table meets the full recoverability restriction. ■ You cannot alter a temp or scratch temporary table. Indexes for Data-Warehousing Environments In addition to conventional (B-tree) indexes, Extended Parallel Server provides the following indexes that you can use to improve ad hoc query performance in data-warehousing environments: ■ Bitmap indexes A bitmap index is a specialized variation of a B-tree index. You can use a bitmap index to index columns that can contain one of only a few values, such as marital status or gender. For each highly duplicate value, a bitmap index stores a compressed bitmap for each value that the column might contain. With a bitmap index, storage efficiency increases as the distance between rows that contain the same key decreases. You can use a bitmap index when both of the following conditions are true: ❑ The key values in the index contain many duplicates. ❑ More than one column in the table has an index that the optimizer can use to improve performance on a table scan. Implementing a Dimensional Database 11-17 Indexes for Data-Warehousing Environments ■ Generalized-key (GK) indexes GK indexes allow you to store the result of an expression, selection of a data set, or intersect of data sets from joined tables as a key in a B-tree or bitmap index, which can be useful in specific queries on one or more large tables. To create a GK index, all tables involved should be static tables. To improve indexing efficiency, Extended Parallel Server also supports the following functionality: ■ Automatically combine indexes for use in the same table access. You can combine multicolumn indexes with single-column indexes. ■ Read a table with an access method known as a Skip Scan. When it scans rows from a table, the database server only reads rows that the index indicates, and reads rows in the order that they appear in the database. The skip scan access method guarantees that no page is read twice. Pages are read sequentially, not randomly, which reduces I/O resource requirements. The skip scan also reduces CPU requirements because filtering on the index columns is unnecessary. ■ Use a hash semi-join to reduce the work to process certain multitable joins. A hash semi-join is especially useful with joins that typify queries against a star schema where one large (fact) table is joined with many small (dimension) tables. The hash semi-join can effectively reduce the set of rows as much as possible before the joins begin. An analysis of the types of queries you anticipate running against your database can help you decide the type of indexes to create. For information about indexes and indexing methods that you can use to improve query performance, see your Performance Guide. 11-18 IBM Informix Guide to Database Design and Implementation Using GK Indexes in a Data-Warehousing Environment Using GK Indexes in a Data-Warehousing Environment You can create GK indexes when you anticipate frequent use of a particular type of query on a table. The following examples illustrate how you can create and use GK indexes for queries on one or more large tables. The examples are based on tables of the sales_demo database. Defining a GK Index on a Selection Suppose a typical query on the sales fact table returns values where state = "CA". To improve the performance for this type of query, you can create a GK index that allows you to store the result of a select statement as a key in an index. The following statement creates the state_idx index, which can improve performance on queries that restrict a search by geographic data: CREATE GK INDEX state_idx ON geography (SELECT district_code FROM geography WHERE state_code = "CA"); The database server can use the state_idx index on the following type of query that returns revenue and units sold by product, by region, and by month where state = "CA". The database server uses the state_idx index to retrieve rows from the geography table where state = "CA" to improve query performance overall. SELECT product_name, region, month_name, SUM(revenue), SUM(units_sold) FROM product, geography, time, sales WHERE product.product_code = sales.product_code AND geography.district_code = sales.district_code AND state_code = "CA" AND time.time_code = sales.time_code GROUP BY product_name, region, month_name ORDER BY product_name, region; Implementing a Dimensional Database 11-19 Defining a GK Index on an Expression Defining a GK Index on an Expression You can create a GK index that allows you to store the result of an expression as a key in an index. The following statement creates the cost_idx index, which can improve performance for queries against the sales table that include the cost of the products sold: CREATE GK INDEX cost_idx ON sales (SELECT units_sold * cost FROM sales); The database server can use the cost_idx index for the following type of query that returns the names of customers who have spent more than $10,000.00 on products: SELECT customer_name FROM sales, customer WHERE sales.customer_code = customer.customer_code AND units_sold * cost > 10000.00; Defining a GK Index on Joined Tables You can create a GK index that allows you to store the result of an intersect of data sets from joined tables as a key in an index. Suppose you want to create a GK index on year data from the time dimension table for each entry in the sales table. The following statement creates the time_idx index: CREATE GK INDEX time_idx ON sales (SELECT year FROM sales, time WHERE sales.time_code = time.time_code); Important: To create the preceding GK index, the time_code column of the sales table must be a foreign key that references the time_code column (a primary key) in the time table. The database server can use the time_idx index on the following type of query that returns the names of customers who purchased products after 1996: SELECT customer_name FROM sales, customer, time WHERE sales.time_code = time.time_code AND year > 1996 AND sale.customer_code = customer.customer_code; 11-20 IBM Informix Guide to Database Design and Implementation A B C D E F G H I J K L M N O P Q R S T U V W X Y Z @ Index Index Numerics 9.3 features, overview Intro-6 A Access privileges 6-9 Aggregate function, restrictions in modifiable view 6-31 ALTER FRAGMENT statement ADD clause 5-19 ATTACH clause 5-23 DETACH clause 5-23 DROP clause 5-20 INIT clause 5-18 MODIFY clause 5-20 Alter privilege 6-10 ALTER TABLE statement changing column data type 3-24 changing table type 11-17 converting to typed table 7-27 converting to untyped table 7-27 privilege for 6-10 ANSI compliance level Intro-12 ANSI-compliant database buffered logging 4-6 character field length 1-8 cursor behavior 1-8 decimal data type 1-8 description 1-4 escape characters 1-8 identifying 1-9 isolation level 1-7 owner naming 1-6 privileges 1-7 reason for creating 1-4 SQLCODE 1-9 table privileges 6-8 transaction logging 1-6 transactions 1-5 Archive, and fragmentation 5-4 Attribute identifying 2-17 important qualities 2-17 nondecomposable 2-18 Availability, improving with fragmentation 5-4 B Bitmap index, description 11-17 BLOB data type description 7-10 restrictions in named row type 7-24 SQL restrictions 7-12 Boldface type Intro-6 BOOLEAN data type 3-17 Buffered logging 4-6 Building a relational data model 2-22 BYTE data type description 3-22 restrictions 7-21, 7-31 using 3-23 A B C D E F G H C Cardinality constraint 2-11 in relationship 2-15 Cast built-in 9-3 CAST AS keywords 9-4 collection data type 9-12 collection elements 9-14 description 9-3 distinct data type 9-4, 9-15 dropping 9-17 explicit, definition 9-3 implicit, definition 9-3 invoking 9-5 named row type 9-4, 9-10 operator 9-4 row type 9-6 unnamed row type fields 9-10 user-defined 9-3, 9-19 Chaining synonyms 4-13 CHAR data type 3-18 Character field length ANSI vs. non-ANSI 1-8 CHARACTER VARYING data type 3-19 CLOB data type description 7-10 restrictions in named row type 7-24 SQL restrictions 7-12 Codd, E. F. 2-36 Code set default 1-10 Code, sample, conventions for Intro-8 Collection data type casting 9-12 casting restrictions 9-13 different element types 9-13 element type 7-15 explicit cast 9-14 implicit cast 9-13 nested 7-20 restrictions 7-21 type checking 9-12 type constructor 7-15 2 I J K L M N O P Q R Column defining 2-24 named row type 7-28 of fragmented table, modifying 5-17 unnamed row type 7-30 Column-level privileges 6-12 Command script, creating a database 4-14 Comment icons Intro-7 Complex data types 7-14 Compliance with industry standards Intro-12 Composite key 2-27 Concurrency improving with fragmentation 5-4 SERIAL and SERIAL8 values 3-8 Connect privilege 6-6 Connectivity in relationship 2-10, 2-13 Constraint cardinality 2-11 defining domains 3-3 named row type restrictions 7-24 Contact information Intro-12 CREATE DATABASE statement dimensional data model 11-4 in command script 4-14 relational data model 4-4 CREATE FUNCTION statement, cast registration examples 9-21 CREATE INDEX statement 4-10 CREATE TABLE statement description 4-6 in command script 4-14 with FRAGMENT BY EXPRESSION clause 5-7 CREATE VIEW statement restrictions 6-29 using 6-26 WITH CHECK OPTION keywords 6-32 Cursor behavior ANSI vs. non-ANSI 1-8 IBM Informix Guide to Database Design and Implementation S T U V W X Y Z @ D Data loading with dbload utility 4-17 loading with external tables 4-17 Data mart, description 10-4 Data model attribute 2-17 building 2-22 defining relationships 2-9 description 2-3 dimensional 10-10, 10-16 entity relationship 2-5 many-to-many relationship 2-13 one-to-many relationship 2-13 one-to-one relationship 2-13 relational 2-3 telephone directory example 2-7 Data type BLOB 7-10 BYTE 3-22 changing with ALTER TABLE statement 3-24 CHAR 3-18 CHARACTER VARYING 3-19 choosing 3-4 chronological 3-13 CLOB 7-10 collection type 7-15 complex types 7-14 DATE 3-13 DATETIME 3-14 DECIMAL 3-11, 3-12 distinct 7-8 fixed-point 3-12 floating-point 3-10 INT8 3-7 INTEGER 3-7 INTERVAL 3-15 MONEY 3-12 NCHAR 3-18 NVARCHAR 3-19 opaque types 7-9 REAL 3-10 referential constraints 3-26 row types 7-15 SERIAL 3-8 SERIAL8 3-8 SERIAL, table hierarchies 8-19 A B C D E F G H SMALLFLOAT 3-10 smart large objects 7-10 TEXT 3-22 VARCHAR 3-19 Data warehouse, description 10-4 Database demonstration sales_demo 10-18, 11-4 superstores_demo 7-3 naming 4-4 populating new tables in 4-15 views on external database 6-30 Database administrator (DBA) 6-7 Database-level privileges Connect privilege 6-6 database-administrator privilege 6-7 description 6-6 Resource privilege 6-7 Data-warehousing model. See Dimensional data model. DATE data type description 3-13 display format 3-14 DATETIME data type description 3-14 display format 3-16 DB-Access creating database with 4-14 UNLOAD statement 4-17 DBA. See Database administrator. DBDATE environment variable 3-14 dbload utility, loading data 4-17 DBMONEY environment variable 3-13 dbslice, role in fragmentation 5-5 dbspace role in fragmentation 5-3 selecting 4-5 DBTIME environment variable 3-17 DECIMAL data type fixed-point 3-12 floating-point 3-11 Default locale Intro-4 Default value, of a column 3-25 Delete privilege 6-9, 6-34 DELETE statement I J K L M N O P Q R applied to view 6-31 privilege 6-6 privilege for 6-9 Dependencies, software Intro-4 Derived data, produced by view 6-26 Descriptor column 2-26 Dimension table choosing attributes 10-27 description 10-15 Dimensional data model building 10-16 dimension elements 10-13 dimension tables 10-15 dimensions 10-13 fact table 10-12 implementing 11-3 measures, definition 10-12 minidimension tables 10-29 Dimensional database, sales_demo 11-4 Distinct data type casting 9-4, 9-15 description 7-8 DISTINCT keyword, restrictions in modifiable view 6-31 Distribution scheme changing the number of fragments 5-18 definition 5-3 expression-based 5-6 using 5-7 with arbitrary rule 5-8 with range rule 5-8 hybrid 5-7 using 5-12 range 5-7 using 5-10 round-robin 5-6 using 5-9 system-defined hash 5-7 using 5-11 Documentation notes Intro-10 Documentation notes, program item Intro-11 Documentation, types of Intro-9 documentation notes Intro-10 machine notes Intro-10 release notes Intro-10 S T U V W X Y Z @ Domain characteristics 2-25 column 3-3 defined 2-25 DROP CAST statement, using 9-17 E Element type 7-15 Entity attributes 2-17 criteria for choosing 2-8 definition 2-5 occurrence 2-19 represented by a table 2-26 telephone directory example 2-9 Entity-relationship diagram discussed 2-20 reading 2-21 Environment variables Intro-6 Environment, Non-U.S. English 1-10 en_us.8859-1 locale Intro-4 Even distribution 5-9 Existence dependency 2-10 EXISTS keyword, use in condition subquery 6-33 Expression-based distribution scheme arbitrary rule 5-8 description 5-6 using 5-7 with range rule 5-8 Expression, cast allowed in 9-3 Extended 3-22 External tables, loading data with 4-17, 5-4 F Fact table description 10-12 determining granularity 10-19 granularity 10-12 Feature icons Intro-8 Features in 9.3 Intro-6 Field, in row types 7-21 finderr utility Intro-11 Index 3 A B C D E F G H First normal form 2-33 Fixed point 3-12 FLOAT data type 3-10 Floating point 3-10 Foreign key 2-28 Fragment altering 5-20, 5-22 changing the number of 5-18 description 5-3 FRAGMENT BY EXPRESSION clause 5-7 Fragmentation across coservers 5-5 backup-and-restore operations and 5-4 dbslice role in 5-5 description 5-3 expressions, how evaluated 5-9 goals 5-4 logging and 5-6 of smart large objects 5-17 reinitializing 5-18 types of distribution schemes 5-6 Fragmented table creating 5-12 creating from one nonfragmented table 5-15 modifying 5-17 Functional dependency 2-35 G Generalized-key index data warehouse 11-19 defining on a selection 11-19 on an expression 11-20 on joined tables 11-20 ownership rights 6-8 GK index. See Generalized-key index. Global Language Support (GLS) Intro-4 GL_DATETIME environment variable 3-17 4 I J K L M N O P Q R GRANT statement database-level privileges 6-5 table-level privileges 6-7 Granularity, fact table 10-12 GROUP BY keywords, restrictions in modifiable view 6-31 H Hash distribution scheme. See System-defined hash distribution scheme. Help Intro-9 Hierarchy See Inheritance. See Row type. See Table hierarchy. Hybrid distribution scheme description 5-7, 5-12 using 5-12 I Icons feature Intro-8 Important Intro-7 platform Intro-8 product Intro-8 Tip Intro-7 Warning Intro-7 Important paragraphs, icon for Intro-7 Index bidirectional traversal 4-11 bitmap, description 11-17 CREATE INDEX statement 4-10 data-warehousing environments 11-17 generalized-key 11-18, 11-19 named row type restrictions 7-24 Index privilege 6-10 Industry standards, compliance with Intro-12 INFORMIXDIR/bin directory Intro-5 IBM Informix Guide to Database Design and Implementation S T U V W X Y Z @ Inheritance 8-3 privileges in hierarchy 6-11 single 8-3 table hierarchy 8-11 type 8-4 type substitutability 8-9 INIT clause ALTER FRAGMENT 5-18 in a fragmentation scheme 5-18 Insert privilege 6-9, 6-34 INSERT statement privileges 6-6, 6-9 with a view 6-32 INT8 data type 3-7 INTEGER data type 3-7 INTERVAL data type description 3-15 display format 3-16 INTO TEMP keywords, restrictions in view 6-29 ISO 8859-1 code set Intro-4 Isolation level, ANSI vs. nonANSI 1-7 J Join, restrictions in modifiable view 6-31 K Key composite 2-27 foreign 2-28 primary 2-26 Key column 2-26 L Language privileges 6-16 Light appends, description 11-14 LIST collection type 7-19 Loading data dbload utility 4-17 external tables 4-17 Locale Intro-4, 1-10 A B C D E F G H Logging table characteristics 11-13 creation 11-3, 11-12 Logging, types 4-5 M Machine notes Intro-10 Mandatory entity in relationship 2-10 Many-to-many relationship 2-10, 2-13, 2-30 Message file for error messages Intro-11 Minidimension table, description 10-29 MODE ANSI keywords, logging 4-6 MODIFY clause of ALTER FRAGMENT 5-20 Modifying fragmented tables 5-17 MONEY data type description 3-12 display format 3-13 MULTISET collection type 7-18 N Named row type casting 9-4 column definition 7-28 creating a typed table 7-25 description 7-21 dropping 7-30 example 7-21 naming conventions 7-23 restrictions 7-24 when to use 7-22 NCHAR data type 3-18 Nesting collection types 7-20 row types 7-29 Nondecomposable attributes 2-18 Nonlogging table characteristics 11-13 creation 11-3, 11-12 Normal form 2-32 Normalization I J K L M N O P Q R benefits 2-32 first normal form 2-33 of data model 2-32 rules 2-32, 2-36 second normal form 2-35 third normal form 2-35 NOT NULL keywords, use in CREATE TABLE statement 4-6 Null value defined 3-24 restrictions in primary key 2-26 NVARCHAR data type 3-19 O ON-Archive 4-6 ondblog utility 4-6 One-to-many relationship 2-10, 2-13 One-to-one relationship 2-10, 2-13 Online analytical processing (OLAP) 10-5 Online help Intro-9 Online manuals Intro-9 Online transaction processing (OLTP) 10-5 ontape utility 4-6 Opaque data type casting 9-4 description 7-9 Operational data store 10-5 Operational table 11-16 Optional entity in relationship 2-10 ORDER BY keywords, restrictions in view 6-29 Owner naming ANSI vs. non-ANSI 1-6 Ownership 6-8 P Performance, buffered logging 4-6 Platform icons Intro-8 Populating tables 4-15 Predefined data types 7-6 S T U V W X Y Z @ Primary key composite 2-27 definition 2-26 system assigned 2-27 Privilege ANSI vs. non_ANSI 1-7 automating 6-17 column-level 6-12 Connect 6-6 database-administrator 6-7 database-level 6-6 Delete 6-9, 6-34 encoded in system catalog 6-9 Execute 6-15 granting 6-5 Index 6-10 Insert 6-9, 6-34 language 6-16 needed to create a view 6-34 on a view 6-35 Resource 6-7 routine-level 6-15 Select 6-9, 6-12, 6-34 table-level 6-8 typed tables 6-11 Update 6-9, 6-34 users and the public 6-6 views and 6-34 Product icons Intro-8 Program group Documentation notes Intro-11 Release notes Intro-11 PUBLIC keyword, privilege granted to all users 6-6 R Range distribution scheme description 5-7 using 5-10 Raw permanent table altering to 11-17 description 11-15 Recursive relationship 2-12, 2-31 Redundant relationship 2-32 References privilege 6-11 Referential constraint data type considerations 3-26 Index 5 A B C D E F G H Referential integrity, defining primary and foreign keys 2-28 Relational model description 2-3 resolving relationships 2-30 rules for defining tables, rows, and columns 2-24 Relationship attribute 2-17 cardinality 2-15 cardinality constraint 2-11 complex 2-31 connectivity 2-10, 2-13 defining in data model 2-9 entity 2-6 existence dependency 2-10 mandatory 2-10 many-to-many 2-10, 2-13 many-to-many, resolving 2-30 one-to-many 2-10, 2-13 one-to-one 2-10, 2-13 optional 2-10 recursive 2-31 redundant 2-32 using matrix to discover 2-11 Release notes Intro-10 Release notes, program item Intro-11 Repository, description 10-5 Resource privilege 6-7 REVOKE statement, granting privileges 6-5 Role CREATE ROLE statement 6-19 definition 6-18 granting privileges 6-20 rules for naming 6-19 SET ROLE statement 6-20 sysroleauth system catalog table 6-21 sysusers system catalog table 6-21 Round-robin distribution scheme description 5-6 using 5-9 Routine overloading 8-8 Routine resolution 8-10 Routine-level privileges 6-15 6 I J K L M N O P Q R Row defining 2-24 in relational model 2-24 Row type casting 9-6, 9-11 categories 7-15 nested 7-29 Rowid 5-16 S sales_demo database creating 11-4, 11-11 data model 10-18 data sources for 11-7 loading 11-9 sbspace 7-12 Scratch table 11-14 Second normal form 2-35 Security constraining inserted values 6-26, 6-32 database-level privileges 6-4 making database inaccessible 6-4 restricting access 6-26, 6-27, 6-34 table-level privileges 6-12 using operating-system facilities 6-4 with user-defined routines 6-3 Select privilege column level 6-12 definition 6-9 with a view 6-34 SELECT statement in modifiable view 6-31 on a view 6-34 privilege for 6-6, 6-9 Semantic integrity 3-3 SERIAL data type as primary key 2-26 description 3-8 initializing 3-8 referential constraints 3-26 reset starting point 6-10 restrictions 7-8, 7-21, 7-24, 7-31 table hierarchy 8-19 IBM Informix Guide to Database Design and Implementation S T U V W X Y Z @ SERIAL8 data type description 3-8 initializing 3-8 referential constraints 3-26 restrictions 7-8, 7-21, 7-24, 7-31 table hierarchy 8-19 SET collection type 7-17 Single inheritance 8-3 SMALLFLOAT data type 3-10 SMALLINT data type 3-7 Smart large object description 7-10 fragmenting 5-17 functions for copying 7-13 importing and exporting 7-13 sbspace storage for 7-12 SQL interactive uses 7-12 SQL restrictions 7-12 Software dependencies Intro-4 SQLCODE, ANSI vs. non-ANSI 1-9 Standard permanent table altering to 11-17 description 11-16 Star-join schema description 10-11 See also Dimensional data model. Static table 11-16 stores_demo database Intro-5 Substitutability 8-9 Subtable 8-3 Subtype 8-3 superstores_demo database Intro-5, 7-3 Supertable 8-3 Supertype 8-3 Synonym chains 4-13 in ANSI-compliant database 1-9 Synonyms for table names 4-11 sysfragexprudrdep system catalog table 5-4 sysfragments system catalog table 5-4 syssyntable system catalog table 4-12 System catalog table privileges 6-9 syscolauth 6-9 sysfragexprudrdep 5-4 A B C D E F G H sysfragments 5-4 systabauth 6-9 sysusers 6-9 System requirements database Intro-4 software Intro-4 System-defined hash distribution scheme description 5-7 using 5-11 T Table composite key, defined 2-27 converting to untyped table 7-27 converting untyped to typed 7-26 creating a table 4-6 descriptor column 2-26 dropping 4-9 foreign key, defined 2-28 index, creating 4-10 key column 2-26 loading data into 4-17 names, synonyms 4-11 ownership 6-8 primary key in 2-26 privileges 6-8 relational model 2-24 represents an entity 2-26 Table hierarchy adding new tables 8-20 defining 8-14 description 8-11 inherited properties 8-14 modifying table behavior 8-17 SERIAL types 8-19 triggers 8-19 Table inheritance, definition 8-11 Table-level privileges access privileges 6-9 Alter privilege 6-10 definition and use 6-8 Index privilege 6-10 References privilege 6-11 Temp table 11-14 TEXT data type description 3-22 I J K L M N O P Q R restrictions 7-21, 7-31 using 3-23 Third normal form 2-35 Tip icons Intro-7 Transaction ANSI vs. non-ANSI 1-6 definition 1-5 Transaction logging ANSI vs. non-ANSI 1-6 buffered 4-6 establishing with CREATE DATABASE statement 4-4 turning off for faster loading 4-18 Transitive dependency 2-35 Type constructor 7-15 Type hierarchy creating 8-4 description 8-4 dropping row types from 8-10 overloading routines 8-4 Type inheritance, description 8-4 Type substitutability 8-9 Typed table creating from an untyped table 7-26 definition 7-25 See also Fragmented table. U UNION keyword in a view definition 6-29 restrictions in modifiable view 6-31 UNIQUE keyword constraint in CREATE TABLE statement 4-6 restrictions in modifiable view 6-31 Unnamed row type description 7-30 example 7-30 restrictions 7-31 Untyped table converting to a typed table 7-26 definition 7-25 S T U V W X Y Z @ Update privilege definition 6-9 with a view 6-34 UPDATE statement applied to view 6-31 privilege for 6-6, 6-9 User-defined cast between data types 9-15 User-defined data type casting 9-4 description 7-8 User-defined routine granting privileges on 6-15 security purposes 6-3 Utility program dbload 4-18, 11-3, 11-12 V VARCHAR data type 3-19 View creating 6-26 deleting rows 6-31 description 6-25 dropped when basis is dropped 6-30 effect of changing basis 6-30 effects when changing the definition of 6-34 inserting rows in 6-32 modifying 6-31 null inserted in unexposed columns 6-32 privileges 6-34 restrictions on modifying 6-31 typed 6-27 updating duplicate rows 6-32 using WITH CHECK OPTION keywords 6-32 virtual column 6-31 Index 7 A B C D E F G H I J K L M W Warning icons Intro-7 WHERE keyword, enforcing data constraints 6-33 WITH CHECK OPTION keywords, CREATE VIEW statement 6-32 X X/Open compliance level Intro-12 Symbols ::, cast operator 9-4 8 IBM Informix Guide to Database Design and Implementation N O P Q R S T U V W X Y Z @