1
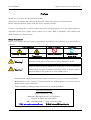
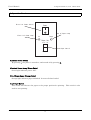
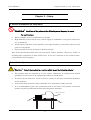
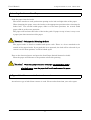
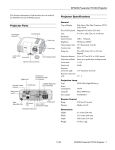
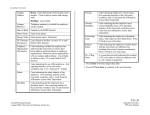
Quiet Braille Printer Series
U s e r ’s M a n u a l
Nippon Telesoft Co., Ltd.
User’s Manual
© Nippon Telesoft Co., Ltd. March 2003.
Preface
Thank you very much for purchasing a Gemini.
This printer is capable of printing both in Braille and in ink characters simultaneously.
Before using the printer, please read this user’s manual carefully.
If there is anything that you don’t understand about using the printer, or if you find mistakes or
omissions in this user’s guide, please contact us by letter, FAX, or telephone. The address and
phone numbers are shown below.
Safety Precautions:
This User’s manual describes safety precautions according to the following level and marks of
warning.
Warning marks
Warning
Caution
High
Temperature
Mark to Prohibit
Procedures
Actions Prohibited
Disconnect the
power plug
This precaution must be followed, or it could be a cause of fire or
【Warning】
electrical shock which could result in serious injuries or death.
This precaution must be followed, or it may be a cause of electrical
【Caution】
shock and/or any other accidents which may result in injuries and/or
partial damage of the products or surrounding assets.
・
Unauthorized reproduction of this document, in whole or in part, is strictly prohibited.
・
Modifications to the contents of this document for improvements or revisions may be
made without prior notification.
・
Product liability is limited within the country of original purchase.
For product inquiries
Nippon Telesoft Co., Ltd.
Hanzomon MK Building 1F 1-8-1 Kojimachi
Chiyoda-ku Tokyo 102-0083 Japan
TEL. +813-3264-0800
URL: www.nippontelesoft.com
FAX. +813-3264-0880
E-Mail: [email protected]
User’s Manual
© Nippon Telesoft Co., Ltd. March 2003.
Table of Contents
Chapter 1 – Overview of the Gemini ............................................................................. 1
1. Names and Functions of All Components ......................................................................................1
1.1 Full View Illustration of the Product ........................................................................................1
1.2 Illustration of reverse side ........................................................................................................2
2. Operation Panel...............................................................................................................................3
3. Alarms..............................................................................................................................................4
Chapter 2 – Setup .......................................................................................................... 5
1. Service Precautions (at setup time)................................................................................................5
2. Installation Space............................................................................................................................5
3. Operating Environment ..................................................................................................................6
4. Precautions For Moving ..................................................................................................................6
Chapter 3 – Connecting the Printer .............................................................................. 7
1. Cautions...........................................................................................................................................7
2. Insertion of the Electrical Cord ......................................................................................................7
3. Attachment of the Data Input Connectors .....................................................................................7
Chapter 4 – Handling of Supplies.................................................................................. 8
1. Types of Paper Supported ...............................................................................................................8
2. Loading Continuous Feed Paper ....................................................................................................9
3. Type of ink ribbon cassette that can be used .................................................................................9
4. Changing the ink ribbon cassette .................................................................................................10
Chapter 5 – Methods of Operation............................................................................... 11
1. Printing Procedures ......................................................................................................................11
Chapter 6 – Maintenance ............................................................................................ 13
1. Printing a Test Page ......................................................................................................................13
2. Changing the Fuse ........................................................................................................................14
Chapter 7 – Trouble Shooting ...................................................................................... 15
1. Procedures for Dealing with Each Incident .................................................................................15
Printer Will Not Power Up ............................................................................................................15
In case of a paper jam....................................................................................................................15
Printing Will Not Start (Unable to Receive Data)........................................................................16
Not Printing the Data Properly ....................................................................................................16
Printing is out of Alignment..........................................................................................................17
Ink Printing is Too Light ...............................................................................................................17
Wrinkles between the Braille Dots ...............................................................................................17
Stops during Printing ....................................................................................................................17
Procedures for Error Alarms .........................................................................................................18
Chapter 8 – Printer Specifications............................................................................... 19
User’s Manual
© Nippon Telesoft Co., Ltd.
March 2003.
Chapter 1 – Overview of the Gemini
1. Names and Functions of All Components
1.1 Full View Illustration of the Product
OperationPanel
PaperCutterHandle
PaperFeedHandle
Operation Panel
For details, refer to the Switch Panel explanation.(Page 3 - Chapter 1-2)
Paper Feed Handle
By turning this handle paper will be fed into the printer.
Paper Cutter Handle
Press down on the handle to pull off paper at desired length.
【Caution】: Always turn off the electrical power before turning the Paper Feed
Handle.
1
User’s Manual
© Nippon Telesoft Co., Ltd.
March 2003.
1.2 Illustration of reverse side
ElectricalCable
RS-232C
Fuse
USB
Parallel
Electrical cable
This is the cable to connect to electrical power. Insert the plug into an electrical outlet.
Fuse
The fuse is located here. Should the fuse burn out, replace it.
【Requirement】:Always turn off the power and disconnect the power cable before
changing fuse.
RS-232C
This is the 25-pin D-shell RS-232C communications connector.
(Please use a cross cable.)
Parallel
This is the 36-pin parallel port communications connector.
D-SUB
9pinfemale
1
2
3
4
5
6
7
8
SHELL
D-SUB
25pinmale
4
5
2
3
6
7
20
8
1
SHELL
USB
This is the USB communications connector.
(It is impossible to use USB but for the upgraded version after Windows 2000 only.)
2
User’s Manual
© Nippon Telesoft Co., Ltd.
March 2003.
2. Operation Panel
ElectricalPowerSwitch
Power
OutofPaperLamp
ElectricalPowerLamp
PL
Paper
PaperSet
Frontside
LoadPaperSwitch
Backside
Electrical Power Switch
By pressing |, the power is turned on, and turned off by pressing O.
Electrical Power Lamp (Green Color)
Green light indicates power “ON”.
Out of Paper Lamp (Orange Color)
Orange light indicates paper unloaded. It turns off when loaded.
Load Paper Switch
This switch will advance the paper to the proper position for printing.
used for test printing.
3
This switch is also
User’s Manual
© Nippon Telesoft Co., Ltd.
3. Alarms
When electrical power is turned on
When there is no paper loaded: one short beep followed by another short beep
When paper is loaded: two long beeps
When test printing: two short beeps followed by two more short beeps
When the Load Paper Switch is pressed
When paper loading completes: One long beep
When paper doesn’t load: a 2-second long beep
Startup Error Alarm
Three short beeps followed by three more short beeps
Communications Error Alarm
Two short beeps followed by two more short beeps
Incorrect data input error alarm
Four short beeps followed by four more short beeps
4
March 2003.
User’s Manual
© Nippon Telesoft Co., Ltd.
March 2003.
Chapter 2 – Setup
1. Service Precautions (at setup time)
【Prohibited】:Avoid use of the printer in the following areas they may be cause
for malfunctions:
•
Direct sunlight, near air conditioners or outside.
•
High humidity, such as those near a water supply or humidifier, or any place with water,
oil, or chemicals.
•
Avoid contact with dust, waste particles, near open windows, or locations with any toxic
gases or iron powder.
•
Secure electrical cord so it cannot be detached easily.
Also, do not install the printer near any televisions, radios, speakers, short-wave radios, or
anything that is magnetic or emits radio waves. If you use it adjacent to any of these items,
it can interfere with reception.
2. Installation Space
【Caution】:Install the product in a location which meets the following criteria:
•
The product must be installed on a level surface. Otherwise, it could prevent normal
printing or be the cause of an unexpected accident or break-down.
•
To relieve the internal heat, secure at least a 4-inch (10 cm) space around the perimeter
of the enclosure.
•
Install close from electrical outlet and make sure connection is firmly secured.
•
It is recommended to place the continuous form at the back of the printer so that the
printer can pull up and wind the form into the printer smoothly.
BraillePrinter
Paper
Table
5
User’s Manual
© Nippon Telesoft Co., Ltd.
March 2003.
3. Operating Environment
•
Temperature: 41 - 95F (5 - 35C)
•
Humidity: 20 - 80% (no condensation)
4. Precautions For Moving
【Warning】
•
Due to its construction, the product is fairly heavy.
Please avoid allowing children or
anyone with inadequate strength to attempt moving it.
•
Violent shaking or vibrations at the time of moving may cause product failures.
【Requirement】
•
Move the product only after the electrical power has been turned off and the power cord
has been unplugged.
•
When unplugging the power cord, please pull while holding the plug; do not pull on the
electrical cord.
6
User’s Manual
© Nippon Telesoft Co., Ltd.
March 2003.
Chapter 3 – Connecting the Printer
1. Cautions
【Prohibited】
•
When making the electrical ground connection, under no circumstances should the
connection ever be made to a gas pipe. If the ground is connected to another electronic
device, it could cause a product failure.
【Warning】
•
Please make all connections after carefully reading each product’s user’s manual.
•
Perform all connections only after positively confirming that electrical power to the
printer unit and the host (personal computer) is off.
2. Insertion of the Electrical Cord
After confirming that the electrical power switch on the printer is turned off, insert the plug
into an electrical outlet.
3. Attachment of the Data Input Connectors
Attach the communications cable to the parallel port, RS-232C port, or USB port connector.
The input data conversions from the parallel port, the RS-232C port, or the USB port will be
done automatically.
(It is impossible to use USB but for the upgraded version after Windows 2000 only.)
【Caution】:Always use flow control with data input through the RS-232C port.
Be sure to enable “XON/XOFF” in the communications settings on the PC.
7
User’s Manual
© Nippon Telesoft Co., Ltd.
Chapter 4 – Handling of Supplies
1. Types of Paper Supported
Continuous tractor feed perforated Braille forms
Form Width: 9.5 - 11 inches
Form Length: 10 - 14 inches
Weight: 90Kg - 130Kg
【Caution】:Do not print on anything which is outside of these specifications
(stickers, foils, vinyl chloride, etc.).
8
March 2003.
User’s Manual
© Nippon Telesoft Co., Ltd.
March 2003.
2. Loading Continuous Feed Paper
Load the paper into the feeder.
The feeder attaches to each perforation opening on the left and right sides of the paper.
When changing the paper, move the feeder to the appropriate partition after releasing the
feeder lock.
For 9.5-inch width paper, slide it to the inner partition, for 11-inch width
paper, slide it to the outer partition.
The paper will load onto the holes of the feeder guide. If paper its tip is bent, it may cause
a paper jam when insertion of the paper.
【Caution】:Technique for Releasing the Lock
The paper feeder is fitted to rounded and square rails. There is a lever attached to the
outside of the paper feeder. If you push this lever upwards, the lock will be released; if you
return it to the down position, it will be locked again.
Turn on the electrical power and press the Load Paper Switch (forward or back).
Then the paper will advance to the position selected for printing.
【Caution】:When changing continuous feed paper, be sure to turn off the
electrical power, turn the paper feed handle and remove the paper.
3. Type of ink ribbon cassette that can be used
An exclusive type of ink ribbon cassette is used. Please order them from your sales agent.
9
User’s Manual
© Nippon Telesoft Co., Ltd.
March 2003.
4. Changing the ink ribbon cassette
【Caution】:Make sure to Turn Off the power first, then start the following works.
And also, DO NOT remove any parts except the Ink Ribbon Cassette
and the Ink Ribbon Cassette Cover.
Boot up the printer once by turning it on.
As part of the initialization sequence of the printer, the dot matrix print head is moved to
the center position.
Turn off the electrical power and remove the cover over the ink ribbon cassette portion of the
printer.
Screws
RibbonKnob
Technique for removing the ink ribbon cassette cover
The cover is secured with screws on both sides. Loosen the screws with a Phillips
screwdriver, and take apart them from the cover then remove the cover.
Removing the ink ribbon cassette.
Pull the ink ribbon cassette towards you away from the print head and it can be easily
removed.
【High temperature caution】:Wait at least 30 minutes before replacing
the ribbon. It can be very dangerous immediately after printing due to the
high temperatures of the print head.
Installing the ink ribbon cassette.
Turning the knob on the ink ribbon cassette, remove any of the slack from the ribbon.
The ribbon is installed so that it is in the gap between the paper guide and the print head.
After installation, turn the ribbon knob and remove any slack from the ribbon.
Technique for attaching the ink ribbon cassette cover
Put the cover back to the body where it belongs. Put the screws on both sides and drive
them into the body with a Phillips screwdriver.
10
User’s Manual
© Nippon Telesoft Co., Ltd.
March 2003.
Chapter 5 – Methods of Operation
1. Printing Procedures
Connecting the data input connector
Connect the communications cable to the RS-232C, parallel or USB connector.
(It is impossible to use USB but for the upgraded version after Windows 2000 only.)
【Caution】:When inserting or removing the communications cable, always first turn off
the power to the printer unit as well as other peripherals.
Turning on the power switch
First turn on power at the host side (personal computer, etc.). Then turn on the printer
power.
When turning power off, first the printer, then the personal computer.
Loading paper
Load the paper into the feeder.
Data input
Input some data from the host (personal computer, etc.) side. Please consult the respective
manuals for installation and operational procedures of each software program on the host
computer.
Printer mode, character codes, and so forth are configured within the host printer software.
It is also possible to schedule multiple print jobs in succession.
Initiating Printing
Printing will start as soon as data is input.
Note: When the paper is about to run out, the last sheet will stop at the roller before the
cutting position. The Out of Paper Lamp will come on and the buzzer will sound. Pull
out the paper a little.
Load the new paper into the feeder and press the Load Paper Switch. Continuation of
the printing will then begin.
11
User’s Manual
© Nippon Telesoft Co., Ltd.
March 2003.
Cutting the Paper
After the completion of printing, the paper will come out up the position of the cutter. Press
down on the Paper Cutter Handle and pull the paper out diagonally towards you and the
paper will be cut.
Reverse Side Printing (Braille Reverse Side Mode)
Turn off the power and load the previously printed-paper with the blank side facing up.
Turn on the power again and it will begin printing as soon as the reverse side data is
received.
12
User’s Manual
© Nippon Telesoft Co., Ltd.
March 2003.
Chapter 6 – Maintenance
1. Printing a Test Page
Even without a data input connection, the printer can perform a simple stand-alone test
print.
There are 2 types of printer test patterns.
Load the paper. See “Chapter 4 Section 2 - Loading Continuous Feed Paper”.(Page 9)
While depressing the Load Paper Switch, turn on the electrical power.
Front: Test pattern 1
Back: Test pattern 2
The print test page alarm sounds and the paper automatically move to the print start
position and commence printing the test page.
Please check closely to see if there are any missing or extra dots.
If either extra dots are output or dots are missing, please contact the sales representative.
Testpattern1
Testpattern2
13
User’s Manual
© Nippon Telesoft Co., Ltd.
March 2003.
2. Changing the Fuse
The fuse unit is located at the bottom rear of the printer near the electrical cable.
【Requirement】:Always turn off the power and disconnect the power cable before
changing fuse.
250V3A
With a flathead screwdriver,
rotate the fuse cover counter-clockwise
and pull out the fuse case cover.
Pull out the fuse from the fuse case
and insert the equivalent replacement fuse.
When you change the fuse, please use a spare of them.
In case of out of spare, please use the equivalent one.
Return the fuse to its original position in the fuse case and reinstall the fuse cover by
turning clockwise until it won’t turn anymore.
14
User’s Manual
© Nippon Telesoft Co., Ltd.
March 2003.
Chapter 7 – Trouble Shooting
1. Procedures for Dealing with Each Incident
If the problem is not resolved even after following the trouble shooting procedures listed
below, first verify the equipment type, the software in use, and the communications cable,
and then contact the sales agent.
Printer Will Not Power Up
•
Make sure that the electrical cable is firmly inserted into the outlet.
•
Check if the fuse has been blown. To change the fuse, please refer to page 14 “Chapter 6
Section 2 Changing the Fuse”.
•
When error sound rings at the start, confirm whether the switch of the control panel is
set correctly.
In case of a paper jam
•
When there is a paper jam, turn off the power supply once, and turn it on - after making
sure of its initialize action - and turn it off again, then remove the paper as turning the
paper feed handle.
•
When there is a paper jam on insertion of paper, please check whether a paper is pitched
properly to the right and the left side as confirming the position of the left and right
tractor. If paper its tip is bent, it may cause a paper jam when insertion of the paper.
•
When paper jams very often inside the printer, the major cause for the trouble are as
follows:
o
The adjustment of the height of Braille dot is too high.
o
The wrong control timing.
o
Worn-out of the roller.
Please contact the sales agent.
15
User’s Manual
© Nippon Telesoft Co., Ltd.
March 2003.
Printing Will Not Start (Unable to Receive Data)
•
Check that there is paper loaded into the feeder.
•
Verify that the cable being used is firmly connected at both the printer and the PC.
If you changed the switch settings, verify that the switches are correct. Additionally, try
restoring the switch settings to what they were just before printing was last done
successfully.
•
If you are using an RS-232C cable, please verify that the installed software and printer
driver are properly configured for RS-232C cable output.
o
Also please verify that the communications settings and the communications
speed on the printer Settings Panel match the communications settings and speed
of the software and printer driver.
o
Furthermore, there are some personal computers that have several RS-232C ports.
Please verify that the port that you are using matches the settings within the
software and printer driver that you are using.
•
If you are using a printer (parallel port) cable, please verify whether the configuration
settings of the software and printer driver you are using are correct for printer cable
output.
•
When error sound rings at receiving the data, confirm whether the switch of the control
panel is set correctly. Especially, check if the software to support and the switch for
format matches correctly or not, and also, when RS-232C communication check if it is
set to do flow control by confirming the switch and setup of software at the personal
computer’s side.
Not Printing the Data Properly
•
If the Braille or ink characters of some rows are scrambled, or are missing dots, or have
excess dots here and there, please perform a test print. Refer to “Chapter 6 Section 1.
Printing” (Page 13) for instructions. If excess or missing dots are also occurring on the
printer test page, please contact the sales agent.
•
Verify the settings of the printer output software and the printer name.
16
User’s Manual
© Nippon Telesoft Co., Ltd.
March 2003.
Printing is out of Alignment
•
When the printing is going beyond the page length, please verify the page size settings
of the printer output software.
•
When the printing is not off by a full line but is slipping just a little bit, it may be a
failure in the paper roller due to wear. Please contact the sales agent.
Ink Printing is Too Light
•
Please change the ink ribbon cassette.
Wrinkles between the Braille Dots
•
If you are doing your printing in places which are high in humidity, wrinkles between
the Braille dots may occur.
Please try printing on a day where the weather is good or
in a dry location or try using the low speed print mode.
Stops during Printing
•
If the PC is configured for usage of a screen saver or system standby, or to cut the power
to the hard drive, there are cases where it may not be possible to print a long document.
If you are printing long documents, please configure the PC so that the power
management always keeps the power on.
•
If there is a paper jam, turn off the power. When you reboot the printer, the paper lock
will be released as part of the initialization sequence. Afterwards, turn the power back
on again and eject the clogged paper by using the Paper Cutter Handle.
•
If communications are through the RS-232C interface, please verify that the settings on
the host side are configured for “Using Flow Control”.
17
User’s Manual
© Nippon Telesoft Co., Ltd.
March 2003.
Procedures for Error Alarms
•
When there is no paper: one 2-second beep
Reload the paper again and press the Load Paper Switch.
•
Startup Error Alarm: Three short beeps followed by three more short beeps
Contact the sales agent.
•
Communications Error Alarm: Two short beeps followed by two more short beeps
Check the connection of the communications cable that is being used.
Verify the settings on the host side for the communications port.
Verify the settings on the host side for the printer driver.
•
Abnormal Data Input Error Alarm: Four short beeps followed by four more short beeps
Verify the printer configuration settings of the printer software.
If there is printer output data remaining from the printer driver, please cancel it all
and print again.
18
User’s Manual
© Nippon Telesoft Co., Ltd.
March 2003.
Chapter 8 – Printer Specifications
Braille
Printing system
Eccentric pressure line printing
Braille composition
6 dot or 8 dot Braille / graphics 0.09 inches dot spacing
Character types
English letters / Numerals / Symbols / Major language
Character codes
NABCC6 / NABCC8 / EBCC
Characters per line
32
Printing speed
32 cps
Printing system
24-pin dot matrix impact
Print Method
Bi-directional, shortest distance printing
Braille Construction
ANK10, 12, 15 cpi/24 X 24 dot Kanji, 180 dpi Resolution
Character types
English ASCII coded characters/Level 1 and 2 Kanji / All EU
Ink
language characters / bitmap images
Character codes
ASCII / JIS0208-1983
Characters per line
ANK 92 / Kanji 69
Printing speed
ANK 90cps / Kanji 60cps
Ink ribbon
Type: Original
Life span: 1,400,000 characters
Common Specifications
Lines per page
25 lines (11 X 11.5 inches paper)
Paper feed system
Tractor feed
Paper
Continuous tractor feed with dual sided perforations
Width: 9.5-11 inches, Weight: 90-130kg
Print buffer
512KB
Interfaces
RS-232C (Serial) / Parallel / USB
Communications speed
9600bps
Power supply
100-120 / 200-240V 50 / 60Hz
Power consumption
130W
Fuse
250V 3A
Outside dimensions
Inches: 18.5(W) X 16.5(D) X 12.6(H);
Weight
24.5kg
19