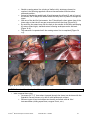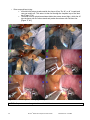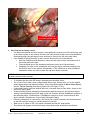
1
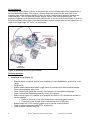
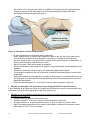
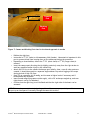
da Vinci® Mitral Valve Repair
via Lateral Approach
Procedure Guide
Disclaimer
The following material has been reviewed and approved by the following independent surgeons, who
are not Intuitive Surgical employees:
Douglas Murphy MD
Department of Cardiothoracic Surgery
St. Joseph Hospital, Atlanta, Georgia
J. Michael Smith MD
Department of Surgery
Division of Cardiothoracic Surgery
Good Samaritan Hospital, Cincinnati, Ohio
It is based on information provided by Drs. Murphy and Smith, and also includes contributions from
Leland Siwek MD
Department of Cardiothoracic Surgery
Sacred Heart Medical Center, Spokane, Washington
Wiley Nifong MD, Assoc. Professor of Cardiothoracic Surgery
Director of Robotic Surgery
Brody School of Medicine
East Carolina University, Greenville, North Carolina
This procedure guide is provided for general information only and is not provided as formal medical
training or certification. Intuitive Surgical trains only on the use of the da Vinci Surgical System.
Intuitive Surgical does not provide clinical training nor does it provide or evaluate surgical
credentialing or train in surgical procedures or techniques. This material presents the opinions of
and techniques used by the above surgeons and not those of Intuitive Surgical. Before performing any
clinical procedure utilizing the System, physicians are responsible for receiving sufficient training and
proctoring to ensure that they have the requisite training, skill and experience necessary to protect
the health and safety of the patient.
For technical information, including full cautions and warnings on using the da Vinci System, please
refer to the System User Manual. Read all instructions carefully. Failure to properly follow
instructions, notes, cautions, warnings and danger messages associated with this equipment may lead
to serious injury or complications for the patient.
While clinical studies support the use of the da Vinci Surgical System as an effective tool for
minimally invasive surgery, outcomes cannot be guaranteed, as surgery is patient and procedure
specific.
© 2006 Intuitive Surgical. All rights reserved. Intuitive®, Intuitive Surgical®, da Vinci®, da Vinci® S™, InSite®,
TilePro™ and EndoWrist® are trademarks or registered trademarks of Intuitive Surgical. All other product names
are trademarks or registered trademarks of their respective holders. PN 871401 Rev. A 4/06
da Vinci ® Mitral Valve Repair Procedure Guide
PN 871401 Rev. A 5/2006
1
Procedure Guide dVMVR
TABLE OF CONTENTS:
1. INTRODUCTION:
•
•
Patient Benefits
Surgical Benefits
2. INSTRUMENTS AND ACCESSORIES
•
•
•
•
•
•
•
OR equipment and robotic supplies
Recommended EndoWrist® Instruments
Recommended laparoscopic instrumentation
Recommended sutures
Other surgical supplies
Perfusion
Supplies for postoperative care
3. PATIENT SELECTION, POSITIONING, PORT PLACEMENT AND DOCKING
• Patient Selection
o
o
Patient types for early cases
Mitral valve exposure technique for early cases
Contraindications
•
o
OR Configuration
•
Patient Preparation
o
o
o
o
•
Anesthesia set up
Patient positioning
OR table considerations
Cannulation preparation
o
Port Placement
o
o
o
o
•
•
Overhead View
dVMVR Lateral Approach port placement
Camera port
Working port and instrument arm port placement
Port placement for atrial retraction
EndoWrist Atrial Retractor port set-up
o
Cannulation
Docking
o
o
Standard da Vinci® System
da Vinci® S™ System
4. PROCEDURE STEPS
a.
b.
c.
d.
e.
f.
g.
h.
Pericardiotomy
Initiation of Cardio-Pulmonary-Bypass
Left Atriotomy and Mitral Valve Exposure
Mitral Valve Repair
De-airing and Atriotomy Closure
Conclusion of Cardio-Pulmonary-Bypass
Hemostatic Control and Closure of Chest Incisions
Decannulation
5. POST-OPERATIVE CARE
•
•
•
2
Post-operative pain management
Internal hospital follow-up and discharge
External hospital follow-up
da Vinci ® Mitral Valve Repair Procedure Guide
PN 871401 Rev. A 5/2006
1. INTRODUCTION
da Vinci® Mitral Valve Repair (dVMVR) using a lateral approach represents the most effective and
least invasive treatment for mitral valve prolapse available today. The enhanced visualization of the
valve, the precision and dexterity afforded by the da Vinci or da Vinci S instrumentation and the
active participation of the assistant surgeon all increase the chances of providing repair -- the gold
standard in surgical treatment -- using only 1-2 cm incisions. Using da Vinci’s 3rd instrument arm, to
undertake Dynamic Atrial Retraction™ puts the cardiac surgeon in total control of the repair
procedure.
1a. Patient Benefits: Compared to other surgical approaches, da Vinci Mitral Valve Repair offers
patients numerous potential benefits, including:
o Increased chance of receiving a repair, the gold-standard treatment
o Less blood loss and need for blood transfusions
o Reduced risk of wound infections since a large incision and rib spreading is avoided
o Decreased pain and scarring after surgery
o Shorter hospital stay
o Faster recovery
o Quicker return to normal daily activities
1b. Surgical Benefits:
o Surgeons experienced in da Vinci Mitral Valve Repair are more frequently able to successfully
repair rather than replace the mitral valve because the da Vinci System provides them with
extended surgical capabilities. In fact, da Vinci may allow surgeons to repair as many as 96%
of valves, compared with just 60% using sternotomy.1
o The features of the da Vinci System enhance the cardiac surgeon’s ability to repair more
complex valve abnormalities (Barlow’s, bileaflet repairs & chordae reconstructions).
o The lateral approach with da Vinci MVR allows exposure of the mitral valve in its natural state
without distortion of the annulus.
o The technique is reproducible, which enables cardiac surgeons to offer the benefits of MIS to
their patients (short LOS, minimal pain, quick recovery, minimal blood loss, better cosmesis)
o With the da Vinci System the assisting surgeon has complete access to the mitral valve and
can assist during complex steps of the procedure. By providing the capacity to use up to four
surgical instruments simultaneously (two operated by the console surgeon and two operated
by the assistant), da Vinci Mitral Valve Repair can greatly facilitate an effective and efficient
repair.
1
96.2% received a repair with da Vinci Surgery, as reported by Douglas Murphy, MD, compared to 60% of patients in the
Fall 2005 Sternotomy database, where 42,000 out of 70,000 received a replacement. See Society for Thoracic Surgeons &
Duke Clinical Research Institute. Executive Summary. STS Fall 2005 Report. Murphy D, Smith M, Siwek L, Langford D,
Robinson JR, Reynolds B, Seshadri-Kreaden U, Engel A. Multicenter Mitral Valve Study: a Lateral Approach using the da
Vinci Surgical System. Pending publication. Data on file with Intuitive Surgical, Inc.
da Vinci ® Mitral Valve Repair Procedure Guide
PN 871401 Rev. A 5/2006
3
2. INSTRUMENTS & ACCESSORIES
• OR equipment and da Vinci® supplies
Basic cardiac surgery room set up, including:
o Warming blanket (Bear-Hugger)
o Cautery unit (set at 15-20 W for COAG)
o CO2 insufflator (set a 8 mmHg, high flow)
o TEE – ultrasound system
o Mayo-stand for da Vinci/Cardiovations™ Supplies
o Gel Pad or towel for patient positioning
o R2 pads (external defibrillator electrodes)
o Scope warmer (Thermos®)
o Intuitive Surgical High Mag camera head (45 FOV)
o Intuitive Surgical Wide Angle camera head (60 FOV)
o Intuitive Surgical 30º endoscope
o Intuitive Surgical 0º endoscope
•
Recommended EndoWrist instrumentation
o 1 Permanent Cautery Spatula (PN# 4xx184)
o 1 Valve Hook (PN# 4xx192) (optional 2nd Valve Hook for analyzing valve before repair:
“Carpentier” technique)
o 2 Large Needle Drivers (PN# 4xx006)
o 1 Resano Forceps (PN# 4xx181)
o 1 Curved Scissors (PN# 4xx178)
o 1 Atrial Retractor (PN# 4xx204)
o 1 DeBakey Forceps (PN# 4xx036)
o 1 Long-Tip Forceps (PN# 4xx048) or alternatively 1 Pericardial Dissector (PN# 4xx203)
•
Recommended Laparoscopic instrumentation
o Cardiovations Forceps, Straight, Double-Acting (PN# FRSD225)
o Cardiovations Scissors, Curved (PN# SCC225)
o Cardiovations Needle Drivers, Curved, Locking (PN# NDCX223)
o Cardiovations Suture Snare (PN# HK180222)
o Cardiovations Knot Pusher (PN# KP1) or knot-pusher with “closed” eye to avoid suture
“loss” during knot-tying
o Straight 5mm or long Ball Tip sucker for Cell Saver suction
o Extendable handle with magnet tip for needle retrieval
o Cardiovations Atrial Retractor set (PN# ARS/PN# ARSL with large blades or pediatric set)
or Estech Atrial Retractor system as back up (pediatric & adult blades)
o OR table rail mounting arm for retractor post (MediFlex®, Storz® or similar)
o ATS Medical® suture hook (www.atsmedical.com) or alternatively blunt Nerve Hook
o Above-listed instrumentation is also available in similar designs from other manufacturers
e.g. Geister or Estech (www.estechlics.com)
•
Recommended Sutures
o Diaphragmatic stay suture:
Gore-Tex® CV-2, TH-26 #TU02B (2x) alternatively Gore-Tex CV-4, TH 18
# 4UO2B
o Pericardial stay suture:
Gore-Tex CV-4, TH 18 # 4UO2B (46” long) (3x) alternatively 2-0 Ticron®
T16 (3x)
o Right atrium retraction stitch:
2-0 Ticron T16 pledgeted (1x)
4
da Vinci ® Mitral Valve Repair Procedure Guide
PN 871401 Rev. A 5/2006
o
o
o
o
Atrium closure:
Gore-Tex CV-4 TT-17 (2x) alternatively Gore-Tex CV-4, TH 18 # 4NO2B
(2x)
Closure of aortic cardioplegia needle puncture (if antegrade cardioplegia delivered
directly in aortic root):
Gore-Tex CV-4 TT-17 pledgeted (1x)
Leaflet repair:
Medtronic® U-Clip V50 or V60 alternatively 4-0 Prolene® RB1 or 4-0
Cardionyl™
4-0 Prolene BB for sliding leaflet repair
Annuloplasty:
Ethibond™ SH-2 # X582 (single packs) with soft pledgets
2-0 Ticron Y-5 (without pledget) multipack #2852-56 for compression
stitch
Medtronic U-Clip V100 for annuloplasty band
•
Other surgical supplies
o Mitral Ring Sizers [Edwards® Cosgrove™, Medtronic Duran™ (Medtronic now offers sizers that
can be handled with robotic instrumentation) or ATS Medical®]—holes drilled into them
and string put through
o 20 mm Ethicon® Flexipath Trocar (used as port in working incision)
o ATS Medical Thoracic Port System (www.atsmedical.com) for thoracic access when using
manual mechanical atrial retractor system
o If using mechanical atrial retractor (Cardiovations or Estech) a 14Fr or 16 Fr Cook
Introducer Set should be used for passing atrial retractor rod through thoracic wall
o Becton, Dickinson 14 GA Angiocath x 5.25 inch (5x) for passing stay sutures through
thoracic wall
o Luer Lock caps (5x) to cover ends of BD’s Angiocath™s and keeping CO2 insufflation
initially
•
Perfusion
o Cell Saver
o DLP® Intracardiac/pericardial Sump 20 Fr. (Medtronic PN# 12112, 20 Fr., 12" length or
12012 20 Fr., 15" length)
EndoBalloon Technique:
o 15Fr. /17Fr. /19Fr. Arterial Biomedicus Cannulas – for SVC
o Cardiovations EndoReturn Arterial Cannula – 21Fr. or 23Fr.
o Cardiovations EndoClamp Aortic Cannula 100cm
o Cardiovations QuickDraw Venous Catheter 22Fr. or 25Fr.
o Cardiovations EndoPlege Sinus Catheter (optional)
o Cardiovations EndoVent Pulmonary Catheter (optional)
o Alternatively the Estech™ RAP system can be used (www.estechlics.com)
Cross-clamp Technique:
o Scanlan® CardioVasive™ Chitwood Transthoracic cross clamp (PN#9909-912-13)
o Cardiovations EndoReturn Arterial Cannula 21 Fr. or 23 Fr.
o Cardiovations QuickDraw Venous Catheter 22/25 Fr.
o Cardiovations EndoPlege Sinus Catheter
o Cardiovations EndoVent Pulmonary Catheter
o 16 gauge 5.25 gauge in SVC
o 17 Fr. Arterial Biomedicus Cannulae for SVC (recommended, since clamp can kink SVC)
da Vinci ® Mitral Valve Repair Procedure Guide
PN 871401 Rev. A 5/2006
5
o
•
6
14 Angio 5.25” x 1 for cardioplegia with small slit in end for plegia or DLP Medtronic
Aortic Root Cannula with Flow-Guard (PN#11012L or 11014L)
Supplies for postoperative care
o Chest tube: 19 Fr. Blake Drains x 2—1 pericardial, 1 chest or 28FR curved chest tube
o Pain medication: Papavarine 300mgs/10cc + 90cc NS or Marcaine ¼% with Epi
o On-Q pain pump system (www.iflo.com)
da Vinci ® Mitral Valve Repair Procedure Guide
PN 871401 Rev. A 5/2006
3. PATIENT SELECTION, POSITIONING, PORT PLACEMENT AND DOCKING
Patient selection
• Patient types for early cases:
o Relatively thin patient (BMI < 30) without skeletal deformities
o Age < 70, few co-morbidities
o No previous cardiac or thoracic surgery
o Patients with isolated mitral valve disease without need for concomitant tricuspid valve
repair or atrial ablation
o Start with simple repairs like posterior prolapse (P2)
•
Mitral valve exposure technique for early cases:
o Teams need to be facile in the set up of manual mechanical atrial retractors (like the
Cardiovations or Estech Retractor system) before using the robotically controlled
EndoWrist Atrial Retractor with the 4th arm.
o It is recommended to perform at least 10dVMVR with manual mechanical retractors to
develop the necessary skills to expose the Mitral Valve endoscopically and have a bail-out
option available should the robotic EndoWrist Atrial Retractor not perform as desired.
o Only when sufficiency with manual mechanical retractors in a robotic assisted procedure
with the da Vinci Surgical System has been achieved is it recommended that you apply
Dynamic Atrial Retraction™ with the EndoWrist Atrial Retractor using the 4th arm.
•
Contraindications
o The standard contraindications for cardiac surgery, both conventional and minimally
invasive, should be practiced when selecting patients for robotic procedures. In these
procedures requiring retrograde femoral perfusion it is recommended to screen the
patients by either CT or MRI for severe atherosclerosis and pulmonary adhesions. Specific
attention should be paid to check on patient’s intolerance to single lung ventilation.
o The feasibility of performing a dVMVR should be evaluated on an individual basis and may
not be fully appraised until the thoracic cavity has been entered and/or the pericardium
opened. It is recommended that you consult an experienced dVMVR surgeon regarding
patients with difficult mitral valve prolapse and co-morbidities .
o
Experienced teams have operated on patients with the following disease states, which
should be considered relative contraindications per experience level:
Heavily calcified mitral annulus
Morbid obesity (chest wall thickness exceeding 110mm)
Right pleural scarring
Severe aortoiliac atherosclerosis
Patients with previous median sternotomy
Aortic valve insufficiency (especially when using Endo-Balloon Cardiovations)
Dilatation of the ascending aorta (especially when using Endo-Balloon
Cardiovations)
Significant cardiac enlargement (insufficient space in thoracic activity)
Previous history of coronary surgery
History of pericarditis
da Vinci ® Mitral Valve Repair Procedure Guide
PN 871401 Rev. A 5/2006
7
OR configuration
The following figure [Figure 1] shows an overhead view of the recommended OR configuration for a
da Vinci Mitral Valve repair. The Surgeon’s Console should be situated on the same side of the
operating table as the assisting surgeon to allow for easier communication between assistant and
console surgeon. This also gives the console surgeon a direct view onto the patient side. The
perfusion equipment should be positioned at the left side on the foot-end of the OR table in order to
keep the necessary tubing short. Care should be taken to allow enough space for the Patient Cart to
come in at a slight angle (15˚ to 30˚) to the patient.
Figure 1: Operating Room Set up for dVMVR
Patient preparation
•
Anesthesia set up [Figure 2]:
o
o
o
o
o
o
o
o
o
o
8
Bilateral radial or brachial arterial lines (mandatory if using EndoBalloon, optional for crossclamp)
Peripheral IV
Double lumen endotracheal tube or single lumen if proficient with endo bronchial blocker
Place transesophageal echo probe
Insert Cardiovations EndoPlege coronary sinus catheter for retrograde cardioplegia
Insert Cardiovations EndoVent pulmonary artery vent catheter
Right internal jugular (IJ) catheter to be prepped into field for 17Fr Biomedicus cannula for
venous drainage:
Passed to the level of the right atrium under echocardiographic control
Connected to the femoral venous cannula and then to CPB pump
Double lumen left IJ CVP (internal jugular vein for central venous pressure)
Confirm catheter placement with TEE or angiography
Confirm cardiac anatomy with TEE
da Vinci ® Mitral Valve Repair Procedure Guide
PN 871401 Rev. A 5/2006
•
Patient Positioning [Figure 2, 3 & 4]:
o Position patient at right edge of table allowing patients right arm to drop alongside the
operating table rail in order to maximally expose the right chest/axilla [Figure 2]
OR table edge
Figure 2: Patient positioned on right edge of OR table
CAUTION: It is recommended that you do not position the right arm over the patient’s head, as this
can lead to potential brachial plexus injury.
o
Patient’s head rotated to the left side to create more space for 4th arm [Figure 3]
Patient’s head
rotated to the left
Figure 3: Patient’s head positioning and anesthesia set up
da Vinci ® Mitral Valve Repair Procedure Guide
PN 871401 Rev. A 5/2006
9
o Place roll or a 6-8” gel pad [size similar to a 1000ml IV soft bag] under the right mid-thorax
(caudal of scapula) in the transversal axis to lift thorax and drop shoulder (this helps
spreading the intercostals spaces) [Figure 4]
Subscapular roll
Patient arm off the
table in a towel-sling
Figure 4: Subscapular roll and arm positioning
o
o
o
o
o
o
o
o
Be sure arterial lines are protected during positioning
Attach a Mediflex arm or similar scope/retractor holder to the left side of the table at the
level between left nipple and left shoulder of the patient, if manual mechanical atrial
retractor system is used, or as a back up for manual atrial retractor system (Cardiovations or
Estech) when EndoWrist Atrial Retractor is used.
Shave if necessary. Both groins should be prepared.
Mark the landmarks of the sternal notch, xyphoid, intercostals spaces and inframammary fold
(optional)
The thorax, abdominal and groin region are aseptically prepared and draped.
Towels might be stapled to the skin to allow for extremely lateral and posterior sterile field
preparation.
When plastic drapes are being applied to women or obese males it is recommended to cut out
the drape part over the breast to make manipulation of the tissue and exposure of the inframammary fold possible.
Rotate the operating table 15° to the left in order to raise the patient’s right side.
• OR table considerations (For experienced teams using the EndoWrist Atrial Retractor)
If the EndoWrist Atrial Retractor is used for Dynamic Atrial Retraction, specific characteristics need
to be taken in consideration regarding the operating table set up:
•
10
OR table set up for EndoWrist Atrial Retractor as second left hand instrument (standard da Vinci
and da Vinci S) [Figure 5]:
o OR table head rest should be lowered one step
o OR table rotated 15° to the left in order to raise the patient’s right side
o OR table should be in its lowest position to allow 4th arm to reach over patients head
o Slight Trendelenburg position can be used to lower patient’s head even more and increase
space above for the 4th arm if necessary
da Vinci ® Mitral Valve Repair Procedure Guide
PN 871401 Rev. A 5/2006
Head rest one
“step” down
Table rotated
15° to the left
Slight
Trendelenburg
can be applied
to lower
patients head
even more
Table at
lowest height
Figure 5: OR table set up for Atrial retractor as second left hand instrument with standard da
Vinci and da Vinci S
CAUTION: Set-up joint set up characteristic for standard da Vinci4th arm: In order to clear the
patient’s head and reach over to the left instrument port, the 4th arm on the standard da Vinci needs
to be brought into its highest position in the vertical axis. This, plus the OR table in the lowest
position will allow for the arm to reach.
•
OR table set up for EndoWrist Atrial Retractor as second right hand instrument (da Vinci S only)
[Figure 6]:
o OR table head rest should be lowered one step
o OR table rotated 15° to the left in order to raise the patient’s right side and drop the left leg
to create space for 4th arm
o OR table leg board should be flexed down to lower the patient’s left leg and increase space
above for the 4th arm
Head rest one
“step” down
Leg board down
Table rotated 15° to the left
Figure 6: OR table set up for Atrial retractor as second right hand instrument with da Vinci S
da Vinci ® Mitral Valve Repair Procedure Guide
PN 871401 Rev. A 5/2006
11
NOTE: When using the robotic Atrial Retractor in a port of the right side of the camera, arm 3 of the
da Vinci S System may collide with the patient’s left hip. Therefore, it is recommended that you
place the patient’s groin over the “flex” point of the OR table in order to flex the legs downward and
create space for instrument arm 3.
•
Cannulation preparation
o The right femoral side is preferred for logistical reasons, but either groin can be used.
o The first incision is a 3 to 5 cm oblique incision in the right groin to access the femoral
vessels. This incision is made as small as possible and parallel to the inguinal ligament to
reduce complications and promote cosmesis.
o Dissect out the R femoral (common) artery and encircle above and below the planned
cannulation site. Control branches per routine. Purse-string suture placed for introduction of
arterial cannula.
o Expose the anterior surface of the R femoral vein.
o Do not cannulate yet to avoid effect of Heparin during port placement
Port placement
dVMVR Lateral Approach Port Placement
Placing the ports very lateral in this approach allows for:
o Excellent mitral valve exposure, including the subvalvular structures, with minimal retraction
and distortion.
o Minimal intracardiac catheter migration due to reduced distortion.
o Active participation of the surgical assistant during complex procedure steps due to direct
access to the mitral valve structures with minimal interference from the atrial retractor,
endoscope or robotic instruments.
Camera port
o The planned endoscope and working port incisions can be marked [Figure 7].
o The most critical part of port selection is proper placement of the camera port. If this port is
too medial, there will not be much working space in the right chest before going on bypass,
and excessive retraction on the atrial septum will be needed to see the mitral valve.
o At least 2-3 cm lateral to the nipple in the male and as lateral as possible in the female works
the best. If surgeon has experience with an anterior thoracotomy, the camera port is placed
in the most lateral aspect of the typical 5 cm incision.
12
da Vinci ® Mitral Valve Repair Procedure Guide
PN 871401 Rev. A 5/2006
2-3 cm
Camera
Port
Working
Port
Figure 7: Camera and Working Port sites for the lateral approach in a male
o Deflate the right lung
o Incise skin in 4th ICS (male) or inframammary fold (female). Hemostasis is important in this
o
o
o
o
o
o
port to prevent blood from running down on the endoscope during the procedure.
Depending on chest habitus, either the 4th ICS (short chest) or 5th ICS (longer chest) is
entered.
Insert the camera port directing the tip slightly posteriorly away from the right atrium to
avoid any possible cardiac injury by the cannula tip.
Attach the CO2 line to the camera endoscope port initially; later, once all other ports are
created, it should be moved to a separate Angiocatheter to prevent fogging of the scope
during periods of high CO2 flow.
Start CO2 at a pressure of 6-8 mmHg, and increase to higher levels if necessary and if
hemodynamically tolerable.
Insert normal magnifying camera (wide angle), with a 30° endoscope angled up, and scan
right thoracic cavity for adhesions.
Confirm that the right lung is well deflated and that the right-side of the heart can be
accessed.
NOTE: This is an important time to judge the position of the camera port, as it is possible to move
the port up an interspace if necessary through the same skin incision.
da Vinci ® Mitral Valve Repair Procedure Guide
PN 871401 Rev. A 5/2006
13
o Aim the endoscope at the pulmonary veins with the camera facing the heart and not rotated.
If the angle of the endoscope shaft to view the pulmonary vein-L atrial junction is 0º with the
intercostals space (scope coming out of the chest perpendicular to the thoracic wall), your
camera port location is good [Figure 8].
0º angle with camera port
Figure 8: optimal 0º camera angle to view atrial junction
14
da Vinci ® Mitral Valve Repair Procedure Guide
PN 871401 Rev. A 5/2006
o If the camera head has to be tilted more than 45º toward the right costal margin to view the
pulmonary veins, it may be necessary to move the endoscope port up an interspace. This is
necessary because if the angle is more than 45º, there may be a problem with interference
between the endoscopic camera and the right robotic arm later on [Figure 9].
Right robotic arm port
within “collision “ zone of
the camera arm
~45 º angle
with camera
port
Figure 9: Suboptimal camera angle to view atrial junction may result in collisions with the
right robotic arm
If a manual mechanical retractor system is used (Cardiovations or Estech), it is recommended that
you place the port for the retractor handle at this point during the procedure:
o Under endoscopic camera view, insert an 18 G finder needle parasternally just lateral
to the RIMA in the same ICS as the camera port to identify the insertion site.
o Under endoscopic view, insert a #16 Cook pacemaker lead introducer kit (applying
Seldinger technique) adjacent to the finder needle.
da Vinci ® Mitral Valve Repair Procedure Guide
PN 871401 Rev. A 5/2006
15
Working Port and Instrument Arm Port Placement
o Remove the endoscope
o Create a working port in the same ICS as the camera port, 3-4 cm lateral to it.
NOTE: If the working port is too close to the camera port, access for the assistant can be inhibited.
If the working port is placed more lateral, then access for the assistant will be good, but there may
be little room to place Angiocaths for traction sutures. This is really an issue only in a patient with a
small chest or if the patient has not been adequately prepped and draped laterally and posteriorly.
In general, more lateral is better because the working port trajectory will be oriented straight at the
heart rather than in a posterior direction.
o The working port for mitral valve surgery is made 3.5 cm in length if a manual mechanical
o
o
o
o
o
o
o
retractor system is used (Cardiovations or Estech). This length coincides with the size of the
atrial retractor blade, since it has to be passed through this incision.
If the EndoWrist Atrial Retractor is used, the working port incision can be limited to 2cm, just
large enough to allow a mitral valve sizer (Edwards, Medtronic, ATS Medical, etc.) to be
introduced through the incision.
When making the working incision, feel with a finger to be sure you are in the same ICS as the
camera port. There are two reasons to be in the same ICS:
First, it provides optimal hand-eye-alignment for the patient-side assistant,
facilitating surgical assistance.
Second, if at some later point conversion to a thoracotomy approach may be
necessary, the camera port and the working port can be connected to a larger
thoracotomy incision.
With the left index finger through the working port, the lung and diaphragm can be protected
while performing the following steps.
14GA (5,25”) Angiocath catheters are inserted through the intercostals spaces in the anterior
axilliary line (AAL) or mid-axilliary line (MAL) for the retrieval of traction sutures to the
diaphragm (typically 6th ICS) and pericardium (1x 4th/5th ICS, 1x 3rd/4th ICS). Remember that
the intercostal branches are running along the caudal edge of the ribs. Therefore, when
introducing the angiocath catheters, go in at a perpendicular angle to the chestwall in the
midline of the intercostal space.
The DLP® sump is inserted through a 2mm incision in the MAL (4th/5th ICS).
Create the right instrument-arm port in either the 5th or 6th ICS (caudal of camera port). In
large males, one ICS is satisfactory but two interspaces is ideal to allow easy access for the
assistant to the working port [Figure 10]. Typical position of this port is either on the AAL or
slightly medial of AAL (keep 3-4 finger breadth between camera port and right instrument
arm port).
Create the left instrument arm port in either the 3rd ICS or one ICS up from the camera port.
Typical position of this port is 2-3cm medial of the AAL (keep 3-4 finger breadth between
camera port and left instrument-arm port).
NOTE: In the first several procedures it may be useful to confirm the robotic arm site selection using
a long Veress needle through a small skin incision to test the location and orientation of the planned
port.
16
da Vinci ® Mitral Valve Repair Procedure Guide
PN 871401 Rev. A 5/2006
o With this set up, the position of the da Vinci ports describe a triangle with the camera port so
that there is sufficient space for the instruments arm to work without interference. The standard
port placement for the camera and da Vinci instrument ports looks as follows [Figure 10].
3-4 finger
breadths
3-4 finger
breadths
1 ICS
1–2 ICS
Figure 10: Triangular placement of camera port, working port and instrument arm ports
Port Placement for Atrial Retraction
•
Manual Mechanical Retractor Set-up
o Under endoscopic camera view, find the previously placed introducer sheath
o Insert left atrial retractor handle through sheath until tip of the handle is visible on
the endoscopic view.
o Peel sheath away and position the tip of the handle just inside the chest wall.
o Secure with the Mediflex laparoscopic holding arm (or similar) [Figure 11].
o The mechanical atrial retractor should be assembled intrathoracically at this time,
which:
Saves pump time
Reduces fiddle factor for the patient side assistant, since the da Vinci Patient
Cart is not yet docked and access to the chest is free
o Under endoscopic vision, reach retractor blade (preferably size 2.5 x 3.5 cm) through
thoracotomy. Use the specific retractor blade clamp that comes with the
Cardiovations or Estech system.
da Vinci ® Mitral Valve Repair Procedure Guide
PN 871401 Rev. A 5/2006
17
o
o
o
o
Line retractor rod “thread section” up with blade and screw together until tight. It is
recommended that you practice this before the first case in a thoracic model with the
patient-side assistant.
An anterior 14GA Angiocath next to the retractor rod can be used to wash off the
retractor blade after assembly in order to avoid dragging tissue particles from the
body wall passage into the heart once it is opened and the retractor applied.
Pull the retractor up to the anterior thoracic wall and clamp slightly to hold location
with the holding arm. This way, the atrial retractor is readily available once the
arteriotomy is performed.
It is also possible to assemble the manual mechanical atrial retractor system with the
da Vinci System and under 3-D vision at a later point during the procedure.
Retractor
Handle
Camera and
3.5cm
Service Port
in 4th
L Arm 3rd
R Arm 5th or 6th
Angios for
traction sutures
Sump
Angio for
diaphragm
traction
Figure 11: port set up in right chest with manual mechanical atrial retractor system
(Cardiovations or Estech)
18
da Vinci ® Mitral Valve Repair Procedure Guide
PN 871401 Rev. A 5/2006
•
EndoWrist Atrial Retractor Port Set-up (for teams experienced in da Vinci MVR)
NOTE: Due to the different mechanical concepts of the 4th arm on a standard da Vinci and a da Vinci
S System the EndoWrist Atrial Retractor can be used in the following configurations:
• Second left-hand: standard da Vinci and da Vinci S
• Second right-hand: da Vinci S only
Which configuration is used on a da Vinci S System (2nd left or 2nd right) depends on the surgeon’s
preference.
o
Atrial Retractor as second left-hand instrument (standard da Vinci and da Vinci S)
[Figure 12]:
Triangulation of camera port, left instrument and right instrument port as usual for
dVMVR (described above)
Atrial Retractor should be placed one ICS above camera port and should always be
closer to the camera port than towards the left instrument arm to avoid
instrument arm collisions (keep 3-4 finger breadth between Atrial Retractor port
and left instrument port)
Depending on the patient’s chest anatomy, the lateral location of the retractor
port needs to be adjusted (if a flat chest, port probably needs to be more lateral;
in barrel chest, port needs to be more medial, sometimes even more medial than
camera port)
To optimize cosmesis and avoid penetration of breast tissue in women, the incision
should be kept away from the right breast by placing the skin incision for the
retractor port as lateral as possible. Then, when inserting the cannula into the
chest, the skin is distracted medially.
da Vinci ® Mitral Valve Repair Procedure Guide
PN 871401 Rev. A 5/2006
19
Atrial
Retractor
3rd ICS
Camera
4th ICS
Working
port 4th ICS
Left
3rd ICS
Right
5/6th ICS
Angiocaths for traction sutures
(pre-loaded with suture snares)
Figure 12: Port set up for Atrial Retractor as a second left-hand instrument
20
da Vinci ® Mitral Valve Repair Procedure Guide
PN 871401 Rev. A 5/2006
Atrial Retractor as second right-hand instrument (da Vinci S only) [Figure 13]:
• Triangulation of camera port, left instrument and right instrument ports as usual
for dVMVR (described above)
• Atrial retractor should be placed one ICS below camera port and should always be
closer to the camera port than to the right instrument-arm in order to avoid
instrument arm collisions (keep 3-4 finger breadth between atrial retractor port
and right instrument port)
• Depending on the patient’s chest anatomy, the lateral location of the retractor
port needs to be adjusted (in a flat chest, port probably needs to be more lateral;
in barrel chest, port needs to be more medial -- sometimes even more medial than
camera port)
da Vinci ® Mitral Valve Repair Procedure Guide
PN 871401 Rev. A 5/2006
21
Camera
4th ICS
Left
3rd ICS
Atrial
Retractor
5th ICS
Working
port 4th ICS
Right
5/6th ICS
Angiocaths for traction sutures
Figure 13: Port set up for Atrial Retractor as a second right-hand instrument
22
da Vinci ® Mitral Valve Repair Procedure Guide
PN 871401 Rev. A 5/2006
•
Cannulation
o Heparinize patient
o Vein – 5-0 Prolene purse-string, Seldinger technique, TEE guidance (bicaval view), wire
first then Cardiovations QuickDraw Venous Catheter 22Fr. or 25Fr.
o Artery - Cardiovations EndoReturn Arterial Cannula – 21Fr. or 23Fr.
o If using the Cardiovations EndoBalloon for cross-clamping: TEE guidance (aortic valve,
ascending view), wire first, then Cardiovations EndoClamp Aortic Cannula 100cm
Docking
CAUTION: Once the Patient Cart is docked to the patient, the OR table should not be moved.
•
Standard da Vinci System (3-arm procedure with manual mechanical atrial retractor system
used):
o Before roll up, check for the “sweet spot” on the camera arm (90° angle between the camera
arm joints) to help ensure correct Patient Cart set-up during docking. The camera arm elbow
should be pointed towards the patient’s feet.
o The da Vinci Patient Cart is rolled in at a 0-30° angle to accommodate for the natural position
of the mitral valve in the chest (depending on patient's anatomy). The center column should
be lined up with the camera port in the right chest. [Figure 14]
0-30°
Figure 14: Patient Cart rolled in at a slight angle to accommodate for the natural position of the
mitral valve in the patient’s chest.
o Once the camera arm is right over the camera port cannula, the Patient Cart can be locked
(brakes down).
o Then, the camera arm is docked to the camera port and the endoscope inserted to assist
during set up of the other arm. At this point in the setup, the surgeon can take responsibility
for clutching and positioning the camera arm in order to free the assistant for additional
setup duties.
o With a finger through the working port and the other hand releasing the set-up joint button,
insert the right da Vinci arm through the right-arm port, against the finger. The da Vinci arm
can be advanced using the shoulder.
da Vinci ® Mitral Valve Repair Procedure Guide
PN 871401 Rev. A 5/2006
23
o The black trocar is removed and the appropriate instrument is inserted and advanced — with
o
o
o
o
o
the clutch engaged — through the port (guided by the surgeon’s finger through the working
port) and steered into the view of the endoscope.
The instrument tip is placed slightly back from the pericardium to compensate for mediastinal
shift back towards the surgeon as the finger is removed from the working port and CO2
insufflation is lost.
The surgeon and assistant then exchange places and the left instrument arm is inserted in a
similar fashion. Again, anticipate movement of the mediastinum toward the da Vinci
instruments each time the CO2 rapidly escapes from the open working port .
Right da Vinci instrument = Large Needle Driver; left da Vinci instrument = Resano Forceps.
Clutch the da Vinci instruments into the center of the video image.
Place a 20mm Ethicon Flexipath port into the working port. Tailor the length if necessary to
extend about .5 to 1.0 cm into the pleural space. This soft, flexible port is used so there is no
working port interference with the right instrument arm when dissection is carried out far to
the left, up over the aorta. It is also easy to occlude this soft port to allow insufflation of the
pleural space with CO2 [Figure 15].
Stopcock
closed
Soft 20mm port in
service port
CO2 moved to
angiocath
Figure 15: da Vinci Patient Cart docked
24
da Vinci ® Mitral Valve Repair Procedure Guide
PN 871401 Rev. A 5/2006
•
Standard da Vinci System (4-arm procedure with EndoWrist Atrial Retractor)
o Before roll-up, the check the “sweet spot” on the camera arm (90° angle between the
camera arm joints) to help ensure correct Patient Cart set-up during docking. The camera
arm elbow should be pointed towards the patient’s feet.
o The 4th arm needs to be brought in at its highest position in the vertical axis in order to clear
the patient’s head and reach over to the left instrument port. This, plus the OR table in the
lowest position, will allow the arm to reach.
o The da Vinci Patient Cart is rolled in at a 0-30° angle to accommodate for the natural position
of the mitral valve in the chest (depending on patient's anatomy). The central column should
be lined up ~7-10cm caudal of the camera port in the right chest to allow more space on the
left for the da Vinci arms. [Figure 16]
0-30°
~7-10cm caudal
Figure 16: Patient Cart rolled in at a slight angle and offset towards the patient’s feet to provide
more space for the 3rd instrument arm on the left side.
o Once the camera arm is over the camera port cannula, the Patient Cart can be locked (brakes
down).
o Then the camera arm is docked to the camera port and the endoscope inserted to assist
o
o
o
o
o
during set up of the other arm. At this point in the setup, the surgeon can take responsibility
for clutching and positioning the camera arm in order to free the assistant for additional
setup duties.
With a finger through the working port and the other hand releasing the set-up joint button,
insert the right da Vinci arm (Yellow) against the finger, through the right-arm port. The da
Vinci arm can be advanced using the shoulder.
The black trocar is removed and the appropriate instrument is inserted and advanced — with
the clutch engaged — through the port (guided by the surgeon’s finger through the working
port) and steered into the view of the endoscope.
The instrument tip is placed slightly back from the pericardium to compensate for mediastinal
shift back towards the surgeon as the finger is removed from the working port and CO2
insufflation is lost.
The surgeon and assistant then exchange places and the Green instrument arm is inserted in a
similar fashion. Dock this arm, but do not engage the Atrial Retractor instrument yet.
Then the 3rd instrument arm (Red) is inserted, the black trocar removed and the appropriate
instrument inserted and advanced — with the clutch engaged — through the port (guided by
the surgeon’s finger through the working port) and steered into the view of the endoscope.
da Vinci ® Mitral Valve Repair Procedure Guide
PN 871401 Rev. A 5/2006
25
Once again, anticipate movement of the mediastinum toward the da Vinci instruments each
time the working port is left open, as the CO2 rapidly escapes.
o Right da Vinci instrument: Large Needle Driver, left da Vinci instrument: Resano Forceps.
o Clutch the da Vinci instruments into the center of the video image.
o Place a 20mm Ethicon Flexipath port into the working port.
The arm set up is as follows (AR left of camera):
• Yellow: right instrument
• Green: EndoWrist Atrial Retractor
• Red: left instrument
•
da Vinci S System (3-arm procedure using manual mechanical atrial retractor system)
o Docking procedure as described above for the standard da Vinci System in a 3-arm
procedure
NOTE: For docking of the da Vinci S System, it is recommended that you insert the metal instrument
arm cannulas into the patient with support of the black, blunt obdurator first (cannulas not attached
to the da Vinci instrument arm). Once all cannulas are placed, move the da Vinci arm in close
proximity to the cannula’s proximal end and dock to the cannula using the port clutch and arm
clutch.
•
da Vinci S System (4-arm procedure with EndoWrist Atrial Retractor used as a second left-hand
instrument)
o Before roll up, check the “sweet spot” on the camera arm (90° angle between the camera
arm joints) to help ensure correct Patient Cart set-up during docking. The camera elbow
should be pointed towards the patient’s feet.
o The da Vinci S is rolled in at a 0-30° angle to accommodate for the natural position of the
mitral valve in the chest (depending on patient's anatomy). The central column should be
lined up ~7-10cm caudal of the camera port in the right chest to allow more space on the left
for the da Vinci arms. [Figure 17]
0-30°
~7-10cm caudal
Figure 17: Patient Cart rolled in at a slight angle and offset towards the patient’s feet to provide
more space for the 4th instrument arm on the left side.
26
da Vinci ® Mitral Valve Repair Procedure Guide
PN 871401 Rev. A 5/2006
o Once the camera arm is directly over the camera port cannula, the Patient Cart can be locked
(brakes down).
o Then the camera arm is docked to the camera port, and the endoscope inserted to assist
o
o
o
o
o
o
o
o
during set up of the other arm. At this point in the setup, the surgeon can take responsibility
for clutching and positioning the camera arm in order to free the assistant for additional
setup duties.
With a finger through the working port and the other hand releasing the set-up joint button,
dock the right da Vinci arm X to the instrument cannula in the right arm port.
The black trocar is removed and the appropriate instrument is inserted and advanced — with
the clutch engaged — through the port (guided by the surgeon’s finger through the working
port), and steered into the view of the endoscope.
The instrument tip is placed slightly back from the pericardium to compensate for mediastinal
shift back towards the surgeon as the finger is removed from the working port and CO2
insufflation is lost.
The surgeon and assistant then exchange places and instrument arm Y is docked to the
cannula in a similar fashion. Dock this arm, but do not engage the Atrial Retractor yet.
Next, the left instrument arm (Z) is docked to the cannula, the black trocar removed and the
appropriate instrument inserted and advanced — with the clutch engaged — through the port
(guided by the surgeon’s finger through the working port) and steered into the view of the
endoscope. Once again, anticipate movement of the mediastinum toward the da Vinci
instruments each time the working port is left open, as the CO2 rapidly escapes.
Right da Vinci instrument: Large Needle Driver, left da Vinci instrument: Resano Forceps.
Clutch the da Vinci instruments into the center of the video image.
Place a 20mm Ethicon Flexipath port into the working port.
The arm set up is as follows (AR left of camera):
• X: Right instrument
• Y: Atrial Retractor
• Z: Left instrument
•
da Vinci S System (4-arm procedure with EndoWrist Atrial Retractor used as a second right-hand
instrument)
o Before roll up, check for the “sweet spot” on the camera arm (90° angle between the camera
arm joints) to help ensure correct Patient Cart set up during docking. The camera elbow
should be pointed towards the patient’s head.
o The da Vinci S is rolled in at a 0-30° angle to accommodate for the natural position of the
mitral valve in the chest (depending on patient's anatomy). The central column should be
lined up ~7-10cm cephalad of the camera port in the right chest to allow more space on the
left for the da Vinci arms. [Figure 18]
da Vinci ® Mitral Valve Repair Procedure Guide
PN 871401 Rev. A 5/2006
27
0-30°
~7-10cm cephalad
Camera elbow towards
patient’s head
Figure 18: Patient Cart rolled in at a slight angle and offset towards the patient’s feet to provide
more space for the 4th instrument arm on the left side.
o Once the camera arm is right over the camera port cannula, the Patient Cart can be locked
(brakes down).
o Next, the camera arm is docked to the camera port and the endoscope inserted to assist
o
o
o
o
o
o
o
o
during set up of the other arm. At this point in the setup, the surgeon can take responsibility
for clutching and positioning the camera arm in order to free the assistant for additional
setup duties.
With a finger through the working port and the other hand releasing the set-up joint button,
dock the left da Vinci arm Y to the instrument cannula in the left-arm port.
The black trocar is removed, and the appropriate instrument is inserted and advanced — with
the clutch engaged — through the port (guided by the surgeon’s finger through the working
port) and steered into the view of the endoscope.
The instrument tip is placed slightly back from the pericardium to compensate for mediastinal
shift back towards the surgeon as the finger is removed from the working port and CO2
insufflation is lost.
The surgeon and assistant then exchange places and the X instrument arm is docked to the
cannula in a similar fashion. Dock this arm, but do not engage the Atrial Retractor instrument
yet.
Next, the right instrument arm (Z) is docked to the cannula, the black trocar removed and
the appropriate instrument inserted and advanced — with the clutch engaged — through the
port (guided by the surgeon’s finger through the working port) and steered into the view of
the endoscope. Again, anticipate movement of the mediastinum toward the da Vinci
instruments each time the working port is left open, as the CO2 rapidly escapes.
Right da Vinci instrument: Large Needle Driver, left da Vinci instrument: Resano Forceps.
Clutch the da Vinci instruments into the center of the video image.
Place a 20mm Ethicon Flexipath port into the working port.
The arm set up is as follows (AR right of camera):
• X: Atrial Retractor
• Y: Left instrument
• Z: Right instrument
28
da Vinci ® Mitral Valve Repair Procedure Guide
PN 871401 Rev. A 5/2006
o In order to allow rapid da Vinci instrument changes and facilitate the patient-side assistance,
a sterile, draped Mayo-stand with the requisite laparoscopic instrumentation can be
positioned adjacent to and in front of the right chest ports [Figure 19].
Figure 19: Mayo-stand with laparoscopic instrumentation in front of da Vinci ports to facilitate
assistance
da Vinci ® Mitral Valve Repair Procedure Guide
PN 871401 Rev. A 5/2006
29
4. PROCEDURE STEPS
a. Pericardiotomy
NOTE: In order to increase the available working space in the right chest, two different approaches
can be used:
1. The working port can be occluded to insufflate the cavity with CO2. With the 20mm Flexipath port
(Ethicon), it is sufficient to simply place the hand over the port (requires good coordination between
console surgeon and assistant at OR table). With the ATS ports, one may put the plastic obturator
that comes with the ports back into the port to seal it for CO2:
2. Going on pump just before the pericardiotomy will deflate the heart inside the pericardium and
create space in the chest. This prolongs the pump time slightly, but facilitates placement of stay
sutures as well as the following procedure steps.
o
In order to have a good overview of the right thoracic cavity in the beginning of the case, it is
recommended that you start with the 30˚ endoscope looking up, attached to the 60FOV wideangle camera head. This will facilitate all stay suture placement and exposure of the anatomy
for CPB control.
NOTE: Before placing any stay sutures, all the Angiocaths can be preloaded with Cardiovations
suture snares in order to speed up suture passing, which can be time-consuming to coordinate
with a laparoscopically untrained assistant. The tip of the suture snare can be directed inside the
thoracic cavity by having the patient-side assistant guide it with his/her finger through the
working port
o
o
o
o
o
o
o
30
Some patients require a diaphragmatic tension stitch to avoid interference with the right
instrument entering the thoracic cavity.
Left da Vinci instrument: Resano Forceps. Right da Vinci instrument: Large Needle Driver
After passing a suture (2-0 Gore-Tex) through the working port, place a “figure of 8” suture in
the central tendon of the diaphragm.
Next, the console surgeon hands the needle back to the assistant; before the assistant pulls
the suture out, the console surgeon puts the closed grip of his da Vinci instrument through the
suture loop to avoid tissue rupture or pulling the stitch out [Figure 20 a]
The assistant pulls the needle-end out, makes equal lengths and passes both ends back to the
da Vinci instruments [Figure 20 b]
The right da Vinci instrument can then bluntly push the right diaphragm down to the right.
The crochet hook is passed through the Angiocath, placed for this diaphragmatic traction
suture to retrieve the suture ends [Figure 20 c].
da Vinci ® Mitral Valve Repair Procedure Guide
PN 871401 Rev. A 5/2006
o
With the suture ends engaged in the crochet hook, the Angiocath is advanced to trap the
sutures and then hook and Angiocath are withdrawn simultaneously. This should be standard
maneuver for all traction sutures [Figure 20 d]
a
c
b
d
Figure 20 a-b: Stay suture technique
da Vinci ® Mitral Valve Repair Procedure Guide
PN 871401 Rev. A 5/2006
31
o
o
Right instrument is changed to a Permanent Cautery Spatula and electrosurgical unit is set to
15W on coagulation. You can go higher on the coag setting, but more smoke will develop.
Alternatively, this step can be performed with a Curved Scissors in the right hand.
The pericardium is opened anteriorly and the opening extended inferiorly down to the phrenic
at the IVC, then superiorly up over the ascending aorta in order to expose as much aorta as
possible [Figure 21].
Extend Pericardiotomy
as high up on the
aorta as possible
Pericardiotomy
Extend Pericardiotomy to 0.5 cm
above Phrenic Nerve
Figure 21: Layout of the Pericardiotomy
o
o
o
o
o
32
Pericardial traction sutures (4-0 Gore-Tex) are then placed in the edge of the pericardial flap
and retrieved through the lateral Angiocaths.
These traction sutures are passed through the edge and the two cut ends are passed back to
the da Vinci instruments and retrieved with the crochet hook through the previously placed
Angiocaths [Figure 22]
(Optional) Additionally, an anterior stay suture can be placed to expose the aortic root for
visualization, which is helpful for placing the transthoracic cross clamp or to monitor the
EndoBalloon when going on bypass. [Figure 22]
(Optional) For facilitating initial exposure of the atrium after atriotomy, a pledgeted 4-0
Gore-Tex stitch can be placed in the edge of the right atrium and brought out through an
Angiocath in the 3rd or 4th ICS lateral to the RIMA [Figure 22]
The DLP sump, which has been previously placed through the chest wall is then located and
positioned near the planned L atriotomy. It is valuable to do this while still using the wideangle camera and before being cross-clamped. (If you forget to do this, it is possible for the
assistant to find this suction catheter with a finger through the working port and deliver it to
the L atriotomy using a shafted instrument, but this will use up cross-clamp time).
da Vinci ® Mitral Valve Repair Procedure Guide
PN 871401 Rev. A 5/2006
Pericardial Stay Sutures
(Optional)
Anterior stay
suture for aorta
exposure
(Optional)
Pledgeted Exposure – stitch in right atrium
AORTA
Planned left
atriotomy
SVC
RSPV
RIPV
Figure 22: Layout of pericardial traction sutures and left atriotomy.
o
Camera Head Swap
The endoscopic camera head is changed from the wide-angle camera head to the highmag camera head.
To change to the high mag camera head, turn off the Camera Control Units (CCUs) and
swap the camera head cables plus focus cable.
Perform black balance and white balance on the CCUs.
Recalibrate the scope alignment (continue to use the 30º up scope) with the sterile
target and safe settings on the Surgeon’s Console.
NOTE: This change takes only a couple minutes if the team is prepared. If you stay with the wide
angle, you will not be able to see as much detail as may be needed. If you start with the High-Mag
camera, you will find that there is very little visual working space before going on bypass.
NOTE: When using a da Vinci S System, the System will sound an alarm since it lost the video signal
input (when the power to the Camera Control Units was turned off for the camera head swap). Push
“Silence Alarm” and “Fault Override” on the left user interface panel to override the video signal
loss. After the High Mag camera head is connected and powered, the System should function as
before.
da Vinci ® Mitral Valve Repair Procedure Guide
PN 871401 Rev. A 5/2006
33
b. Initiation of Cardio-Pulmonary-Bypass
•
Cardiovations EndoBalloon system
o The EndoClamp is passed into the ascending aorta using echo guidance.
o Establish the mean systemic pressure planned for the pump run.
o Allow patient's temperature to drop to 34°C.
o Using the endoscopic camera, check for good venous drainage.
o Initiate pulmonary vent catheter drainage.
o Flush antegrade and retrograde catheters until blood is present.
o Focus the endoscopic camera on the ascending aorta, and use the right and left instruments
to hold open the edges of the pericardium if necessary to visualize the aorta. Turn CO2 flow
to a constant0.5L/min (since the working port will now be constantly open there is no reason
to flow based on pressure).
o Inflate the EndoClamp while removing “slack” from the catheter.
o Alternatively, 30mg adenosine can be administered once the balloon is inflated in order to
speed up cardiac arrest and avoid EndoBalloon migration.
o Confirm position with the hemodynamic monitor, echo and visualization of the aorta. Give
antegrade cardioplegia.
o Begin venting the ascending aorta, secure the EndoClamp, and begin retrograde cardioplegia.
o The endoscopic visualization of the proximal ascending aorta is a very valuable informationsource for the final positioning of the EndoClamp. Correct seating of the EndoClamp can be
assessed by an “aortic bulge” and collapsed proximal aorta [Figure 23].
Aortic “bulge”
compatible with the
EndoClamp
Vented
collapsed
proximal aorta
RA
Figure 23: Endoscopic verification of correct EndoClamp position
•
34
Transthoracic Cross-clamp (Chitwood Clamp)
o A 3-0 or 4-0 pledgeted suture is placed in the anterior ascending aorta with two Large Needle
Drivers
o For delivery of antegrade cardioplegia, either a 14 Angiocath (5.25” x 1, cut a small slit in
end for plegia) or DLP Medtronic Aortic Root Cannula with Flow-Guard (PN#11012L or 11014)
is used.
da Vinci ® Mitral Valve Repair Procedure Guide
PN 871401 Rev. A 5/2006
o
Introduce Cardioplegia cath/cannula through anterior chest. The console surgeon assists with
guiding into aorta and holds while securing to cardioplegia line externally.
NOTE: The DLP Medtronic Aortic root cannula can be secured in the aorta by placing two V50 U-clips
opposite each other through the flange and the tunica adventitia. When removing the cannula after
conclusion of CPB, the U-clips will easily pull out of the adventitia.
o
o
o
o
nd
After cooling the patient to 26ºC, the transthoracic aortic cross-clamp is inserted in the 2 or
rd
3 intercostal space in and mid-axillary line.
Place clamp on aorta under endoscopic vision with exposure aided by console surgeon, one
arm in transverse sinus and the other anterior to aorta. Care should be taken not to injure the
aorta, pulmonary artery or left atrial appendage.
Clamp aorta and deliver antegrade cardioplegia. Confirm aortic root distention visually with
da Vinci endoscope and via TEE.
Retrograde cardioplegia delivered through Cardiovations EndoPlege coronary sinus catheter
c. Left Atriotomy and Mitral Valve Exposure
•
Left atriotomy
o Move the camera and instruments anterior to the pulmonary veins to visualize the left atrium.
o A left atriotomy is performed using Resano Forceps in the left and Curved Scissors in the
right.
o Incise the atrium right at the junction of the pulmonary veins and the left atrium.
o Assistant uses the rigid sucker (ball tipped) to evacuate the left atrium. With the pulmonary
vent on, it is usually possible to easily evacuate the left atrium.
o Extend the atriotomy inferiorly and posteriorly (3cm to 4cm in length) to prevent visual
interference from the posterior atriotomy edge.
o Keeping the atriotomy a simple direct incision rather than dissecting the intra-atrial groove
makes closure easier; further, dissecting the intra-atrial groove is not necessary or helpful
with the more lateral approach.
•
Mitral Valve exposure with manual mechanical atrial retractor system (Cardiovations or Estech)
o If the manual mechanical atrial retractor system has not been already assembled before
system docking, it needs to be done at this point with the support of the da Vinci System,
under 3D vision.
o Pass the atrial retractor blade in through the working port with the specific retractor blade
clamp that comes with the Cardiovations or Estech system. The assistant should pay attention
to the correct orientation of the retractor blade.
o If laparoscopic alignment of the retractor rod and the blade is challenging by using the
manufacturer clamp the da Vinci instruments might be used for blade manipulation.
o The retractor blade can be inserted into the atriotomy by grasping its edges at a right angle.
o If difficulty is encountered advancing the blade into the left atrium, it is usually because the
atriotomy is not large enough. A stepwise extension of the atriotomy inferiorly and posteriorly
will facilitate retractor blade placement and eventually prevent the inferior posterior edge of
the atriotomy from being retracted anteriorly and obstructing the view of the valve.
NOTE: The retractor blade selection is based on the left atrial size by echo and displacement of the
heart to the left side. Most commonly, a 2.5 x 5cm or 3.5 x 5cm blade is used. Nevertheless, a back
up set of retractor blades should be readily available. If the desired blade falls into the right pleural
space, consider postponing retrieval until after closure rather than using cross-clamp time for this
task.
da Vinci ® Mitral Valve Repair Procedure Guide
PN 871401 Rev. A 5/2006
35
o With the retractor blade in the left atrium, the assistant advances the retractor rod down to
the blade and begins spinning it clockwise.
o The da Vinci instruments position the blade to engage the spinning retractor rod under 3Dvision [Figure 24].
o Screw in until tight.
Figure 24: Retractor handle screwed in under 3D vision
o As the retractor rod is pulled up, the left atrium will open to provide mitral valve exposure.
o Only retract as much as necessary to display the valve with minimal distortion.
o The DLP sump sucker is then positioned in the left superior pulmonary vein.
•
36
Dynamic Atrial Retraction™ assistance for mitral valve exposure with the EndoWrist Atrial
Retractor
o Engage the EndoWrist Atrial Retractor instrument on the corresponding instrument arm
o Patient-side assistant clutches the instrument arm with the Atrial Retractor and aims in the
same direction (same trajectory) as the left and right da Vinci instruments.
o Under endoscopic vision, clutch the Atrial Retractor instrument into view. Aim with the tip of
the retractor instrument blades towards the atriotomy.
o Watch the patient-side monitor for any messages regarding instrument insertion. If the
message “Move instrument out of cannula” appears, the Atrial Retractor has not yet cleared
the cannula end and needs to be inserted further.
o In patients with smaller chests (small intra-thoracic space), it may be necessary to place the
tips of Atrial Retractor instrument into the atriotomy in order to clear the cannula end and
allow the console surgeon to take over control.
o Once the instrument is ready for surgeon control, the console surgeon should swap to the
corresponding instrument arm and take over control of the Atrial Retractor.
da Vinci ® Mitral Valve Repair Procedure Guide
PN 871401 Rev. A 5/2006
NOTE: For details about how to operate a da Vinci Surgical System equipped with a 4th arm, refer to
the Users Manual for the specific da Vinci model. Only a surgeon trained on the use of a 4th arm da
Vinci System should use the EndoWrist Atrial Retractor instrument in dVMVR.
CAUTION: Because the EndoWrist Atrial Retractor instrument has a long-blade section (> 40mm) and
an opening angle of 60˚ (versus usually 30˚), it moves more quickly than other EndoWrist
instruments. It is therefore recommended that you train with the EndoWrist Atrial Retractor in a
thoracic model before using it in a first case.
o
o
o
o
o
o
o
Before inserting the Atrial Retractor instrument into the atriotomy, use either the left or the
right da Vinci instrument (use the da Vinci instrument opposite from the Atrial Retractor
instrument) to lift up slightly on the atriotomy for easier insertion.
Keep the instrument nearest the Atrial Retractor instrument out of the way, so you do not
hinder insertion into the atriotomy.
The patient-side assistant might support initial atrial exposure with a rigid sucker through the
working port.
With the tips of the Atrial Retractor instrument closed (blades overlapping), move it slowly
into the atriotomy until the blade portion of the instrument is sufficiently deep inside the
atrium. Avoid quick movements on the master, since these will translate to fast tipmovements of the Atrial Retractor inside the heart.
Slowly open the blades of the retractor while simultaneously lifting up on the atrial septum.
Moving the Atrial Retractor in different directions may enhance mitral valve exposure.
Once desired mitral valve exposure is achieved, swap back to the corresponding da Vinci
instrument arm. This will lock the EndoWrist Atrial Retractor in place and return instrument
control back to the console surgeon.
NOTE: Avoid quick movements on the master controls, since this will translate to fast tip-movements
of the Atrial Retractor inside the heart. Make sure other da Vinci instruments are out of the way of
the EndoWrist Atrial Retractor to avoid internal collisions.
o
Throughout the procedure, mitral valve exposure can now be dynamically adjusted to meet
surgical needs by swapping back to the Atrial Retractor instrument and moving to a new
position.
d. Mitral Valve Repair
o Left instrument should be changed to a Resano Forceps for atraumatic handling of the valve
tissue. Do not use DeBakey Forceps, Large Needle Driver or Long Tip Forceps, as tissue
damage may occur.
o Assess the mitral valve and subvalvular apparatus with Resano Forceps (left) and Valve Hook
(right). If a “Carpentier”-style analysis is preferred, use two Valve Hook instruments.
•
Leaflet repair and annular plication
o Mitral repair techniques are standard. For cutting leaflet tissue, use Curved Scissors.
o Knot tying can be performed intra- or extra-corporeally with the help of the surgical
assistant.
o For intra-corporeal suture placement and knot tying, it is recommended that you use Resano
Forceps in the left and a Large Needle Driver in the right if tissue grasping is required.
Otherwise, two Large Needle Drivers or one DeBakey plus one Large Needle Driver will work.
Do not use a Large Needle Driver on tissue.
da Vinci ® Mitral Valve Repair Procedure Guide
PN 871401 Rev. A 5/2006
37
o A distinct advantage of the da Vinci approach is the simultaneous use of the EndoWrist
instruments and the patient-side assistant instruments. The surgeon’s assistant passes suture,
can follow the sutures, tie with a knot tier or retract. This provides numerous advantages —
for example, the facilitation of accurate placement of Gore-Tex chordae.
•
Tips for Suturing:
o Suture stitch:
Assistant Surgeon (AS) hands suture over to the console surgeon’s (CS) right da Vinci
instrument with the needle oriented in laparoscopic grasper in a way so that the CS
can pick it up.
For a single stitch, the CS simply hands the needle back to the AS.
For a “figure of 8” stitch, the CS pulls some of the suture through after the needle
passes the tissue and places the second stitch. Then the CS hands the needle back
to the AS. However, before the AS pulls the suture out, the CS puts the closed grip
of his da Vinci instrument through the suture loop to avoid tissue rupture or pulling
the stitch out [Figure 25].
CS builds loop with
robotic instruments to
protect suture
AS withdraws needle
Figure 25: Left and right da Vinci instruments build a suture loop
NOTE: To facilitate needle passing between da Vinci and non-da Vinci instruments, the console
surgeon and assistant surgeon should orient the needle in their respective needle driver
instruments so that the other surgeon can pick it up easily. In addition, care should be taken to
orient it in a way that it passes easily through the working port without dropping it.
o
38
Suture following
da Vinci ® Mitral Valve Repair Procedure Guide
PN 871401 Rev. A 5/2006
Should a running suture line (closing of leaflet cleft, atriotomy closure) be
required, the following approach can save time and make effective suture
placement quicker.
Instead of passing the needle back & forth between the AS and CS and in & out of
the thorax, the CS keeps the needle inside the body after he passes it through the
tissue.
With one of the da Vinci instruments, the CS should pull a short suture loop of the
tissue edge so that the AS can pass a suture hook into that loop [Figure 26 a].
By retrieving the suture loop with the hook to the outside of the body and keeping
the suture strand tight, standard suture following technique can be achieved
[Figure 26 b].
This maneuver is repeated until the running suture line is completed [Figure 26
c,d].
a
c
b
d
Figure 26 a-d: Suture following technique with suture hook
CAUTION: Care should be taken by the AS to not over-cross the suture strands.
o
Intra-corporeal knot tying:
Cut suture off ~2-3" from where it passed through the tissue (can be done with the
EndoWrist Curved Scissors or by the AS with laparoscopic scissors.
Different types of knot techniques can then be performed with da Vinci
instrumentation (sliding square knot, surgeon’s knot, etc.)
da Vinci ® Mitral Valve Repair Procedure Guide
PN 871401 Rev. A 5/2006
39
o
Extra-corporal knot tying:
AS holds both suture strands outside the thorax (Gore-Tex 36" or 46" is used) and
cuts one needle off. This suture is then fed through the loophole/eye of the knot
tier [Figure 27 a].
The scrub nurse or physician assistant holds that suture strand tight, while the AS
ties the knots with the other strand and pushes them down with the knot tier
[Figure 27 b-f].
a
b
c
d
e
f
Figure 27 a-f: Extracorporeal knot-tying technique
CAUTION: Keep suture strands organized to avoid “air” – knots.
40
da Vinci ® Mitral Valve Repair Procedure Guide
PN 871401 Rev. A 5/2006
After knots are tied, the suture is cut with robotic or laparoscopic scissors. For
handling and knot tying with Gore-Tex suture, refer to Gore-Tex technical
information (www.goremedical.com).
•
Annuloplasty
o Following leaflet repair, ring size can be determined by assistant passage of ring sizers into
the left atrium and positioning with the da Vinci instruments [Figure 28]. Make sure to put a
suture line on the sizer for easy retrieval in the event it is lost in the thoracic cavity.
o The Edwards® Cosgrove™ ring sizers fit through the ATS port and can be handled easily by the
EndoWrist Debakeys and a Large Needle Driver (Medtronic also offers a newer Duran™ sizer
that can be handled with robotic instrumentation).
o If the 20mm Flexipath port (Ethicon) is used, remove it from the working port and introduce
the valve sizer directly through the skin incision. Take care to avoid dragging tissue particles
from the body wall passage into the heart.
o When another ring is desired but the sizer has a non-detachable handle, then one can use the
Edwards Cosgrove sizer and match it to the desired sizer outside the operative field.
Figure 28: Sizing the annuloplasty band/ring
da Vinci ® Mitral Valve Repair Procedure Guide
PN 871401 Rev. A 5/2006
41
o Working with Medtronic V100 U-Clip™ [Figure 29 & 30]
o
o
o
Two needles loaded onto a nitinol clip with a blue and white marking.
After passing the needles through tissue and band, the nitinol clip can be released and
will anchor the band on the annulus.
In order to avoid the clip ends reaching into the valve orifice and providing a thrombus
formation, point post-operatively it is important to place the colored needles in a
specific order: blue end always clockwise, white end always counter-clockwise.
Figure 29: V100 U-Clip before and after release
Grasp U-Clip here with
Large Needle Driver
Grasp Release mechanism at junction with
Large Needle Driver and pull off straight to
release U-Clip
Figure 30: V100 U-Clip release mechanism
o There are two techniques for placing the annuloplasty band with Medtronic V100 U-Clips
Technique A [Figure 31]
1. Drive needle (blue end) through the right trigone. Center the clip within the annulus
bite. Drive both needles through the annuloplasty band so that both slide releases are
clear of the band and a balanced clip arm overlap will be achieved when released.
2. Deploy only the slide-release mechanism on the clip arm closest to the right trigone
(white end). Temporarily leave the other clip arm (blue end) attached, which will
facilitate the subsequent clip placement without compromising ring stability.
3. The subsequent clips are placed in a clockwise fashion. When the clip is fully seated
and balanced, the remaining release on the previous clip is deployed.
4. Next, deploy the proximal release on the current clip. Repeat this STEP until the final
clip is placed.
5. In conclusion, the furthest clip away from the initial starting point is always left
unreleased until the next clip is fully placed.
42
da Vinci ® Mitral Valve Repair Procedure Guide
PN 871401 Rev. A 5/2006
2
Figure 31: Order of U-Clip
placement Technique A
(more clips might be needed
depending on valve size)
1
3
9
8
4
7
6
5
Technique B (mark the middle of the band with a suture to validate correct placement at
P2) [Figure 32]
1. Drive needle (blue end) through the right trigone. Center the clip within the
annulus bite. Drive both needles through the annuloplasty band so that both slide
releases are clear of the band and a balanced clip arm overlap will be achieved
when released.
2. Deploy only the slide-release mechanism on the clip arm closest to the right
trigone (white end). Temporarily leave the other clip arm (blue end) attached,
which will facilitate the subsequent clip placement without compromising ring
stability.
3. The next clip is placed in the left trigone by driving the needle (white end) through
the left trigone.
4. Deploy only the slide-release mechanism on the clip arm closest to the left trigone
(blue end).
5. The subsequent clips are placed in a clockwise fashion starting next to the first clip
on the right trigone. When the clip is fully seated and balanced, the remaining
release on the previous clip is deployed.
6. Next, deploy the proximal release on the current clip. Repeat this STEP until the
final clip is placed.
7. In conclusion, the furthest clip away from the initial starting point is always left
unreleased until the next clip is fully placed.
Figure 32: Order of UClip placement
Technique B (more clips
might be needed
depending on valve size)
1
9
2
8
3
7
6
da Vinci ® Mitral Valve Repair Procedure Guide
PN 871401 Rev. A 5/2006
5
4
43
o Should a full annuloplasty ring be desired or a valve replacement become necessary, sutures
are placed first posteriorly and then anteriorly [Figure 33].
o Exteriorly the sutures are placed in suture guides. Then placed through the ring, then back
into the suture guides.
o After all sutures are placed the ring is passed to the da Vinci instruments and lowered to the
annulus.
Figure 33: Suture order for full ring or valve replacement.
o Sutures are then tied either intra-corporeally by the console surgeon or extra-corporeally with
support from the surgeon’s assistant, under endoscopic view.
o The repair can be tested with standard saline test. Connect a Foley catheter or similar to the
tip of the testing syringe and reach that end to the da Vinci instruments for set up in the
valve.
CAUTION: When testing the valve or irrigating the left ventricle and atrium avoid injecting any air
into the left ventricle.
o Following repair the DLP sump (vent catheter) is repositioned across the mitral valve to the
left ventricle apex and placed to suction with an atmospheric vent valve or needle. Be sure
the perfusionist applies adequate suction to this vent [Figure 34].
44
da Vinci ® Mitral Valve Repair Procedure Guide
PN 871401 Rev. A 5/2006
Vent catheter placed
across the repaired valve
Figure 34: Sump sucker repositioning after mitral valve repair
e. De-Airing and atriotomy closure
o If a manual mechanical retractor system is used guide the retractor out of the atriotomy, pull
up and lock in place at the anterior thoracic wall (the retractor blade can be unscrewed and
extracted through the working port once atriotomy is closed, this will save pump time)
o If the EndoWrist Atrial Retractor is used, remove and extract out of the cannula:
With the EndoWrist Atrial Retractor, move left and right da Vinci instruments out of
the atrium and to the side.
Close the blade tips of the instrument and move slowly out of the atriotomy.
Straighten the wrist of the instruments and close the tips to facilitate removal from
the da Vinci arm for the patient side assistant. (This is different to other EndoWrist
instruments where you want to have the tips open before removal).
NOTE: The EndoWrist Atrial Retractor could also be repositioned to the atrial edge and support
atriotomy closure before removal.
o To facilitate de-airing the DLP sump is placed across the Mitral Valve.
o Tie 4-0 Gore-Tex in each corner (Large Needle Driver right, Resano left), run to the middle
o
o
o
o
o
around sump sucker and maintain tension. Follow instructions under d. Mitral Valve Repair,
Section Tips for Suturing from above [Figure 26 a-d & Figure 27 a-f].
If ventricular pacing wires are desired then this is the best time to place them. Access to the
inferior RV wall is good.
Venous drainage is then retarded forcing blood through the lungs into the left heart where
venting is accomplished by the DLP sump in the left ventricle and the EndoBalloon catheter in
the ascending aorta. (Cardiovations ™ EndoBalloon system) or de-Air via Atriotomy & then
Aortic catheter (Transthoracic Cross-clamp [Chitwood Clamp])
Following resumption of contractility, the venous line is again retarded, and blood advances
to the left ventricle where it is vented without LV ejection.
When no air is visible on TEE, the retard is lessened and the DLP sump pulled
The patient side surgeon ties left atriotomy suture knots under endoscopic surveillance.
NOTE: All Gore-Tex sutures are tied with at least 12 knots.
da Vinci ® Mitral Valve Repair Procedure Guide
PN 871401 Rev. A 5/2006
45
f. Conclusion of Cardio-Pulmonary-Bypass
• Cardiovations EndoBalloon system
o Venous return is retarded to advance blood through pulmonary veins, left atrium, and left
ventricle. The left ventricular vent and EndoClamp ascending aorta vents are venting. The
left lung may be ventilated.
o The EndoClamp is then released.
o The venous retard is then released.
•
Transthoracic Cross-clamp (Chitwood Clamp)
o Unclamp Aorta
o Continue de-airing via plege catheter, check for air on TEE
o Place a pledgeted 4-0 Gore-Tex purse string around cardioplegia needle (2 Large Needle
Driver)
o Once heart is beating and de-aired remove the cardioplegia needle and tie the purse string
extra-corporeal with pump down to decompress
g. Hemostatic control and Closure of the Chest incisions
o The left atriotomy is inspected for bleeding with the endoscope.
o If a manual mechanical atrial retractor has been used the anterior chest wall hole at the
retractor handle site should be inspected. Occasionally this area needs coagulation and
rarely a suture (2-0 Gore-Tex “figure of 8” and tied with a knot tier).
o Suck out thoracic cavity
o If the surgeons chooses to close the pericardium the use of V100 U-clips (2 Large Needle
Driver) is recommended
o da Vinci instruments removed, Patient Cart undocked and rolled away from patient.
o Inspect all port locations with the endoscope for bleeding and coagulate or suture if
necessary.
o Inflate the right lung.
o Place a single chest drain through the right instrument arm port.
o Close the port incisions with subcuticular sutures and rarely subcutaneous sutures.
h. Decannulation
o Wean from CPB
o Assess Mitral Valve Repair on TEE and decannulate
o Close vessel punctures and groin incision per standard suture protocol
46
da Vinci ® Mitral Valve Repair Procedure Guide
PN 871401 Rev. A 5/2006
5. POST-OPERATIVE CARE
•
Post-operative pain management
o Pain medication: Papavarine 300mgs/10cc + 90cc NS or Marcaine ¼% with Epi applied
directly after surgery at port sites through syringe
o Mid-term pain management by En-Q pain pump system at camera /working ports
•
Internal hospital follow-up and discharge
o Patient transferred to Intensive Care Unit
o Infective endocarditis prophylaxis is mandatory.
o No specific postoperative measures are required after valve repair.
o If the patient is in atrial fibrillation, permanent anticoagulation is recommended.
o If the patient is in sinus rhythm, anticoagulation or antiplatelet drugs are advised for the
immediate postoperative period (approximately 8 weeks).
o Patient discharged from hospital if
Free of hemodynamic problems
Free of excessive bleeding
No chest wound infections
Only required short mechanical ventilation time
Free of major adverse cardiac events
•
External hospital follow-up
o Follow up echocardiogram 30 - 90 days post-operatively is recommended to assess the
continued adequacy of the repair.
da Vinci ® Mitral Valve Repair Procedure Guide
PN 871401 Rev. A 5/2006
47