1
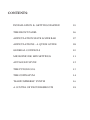
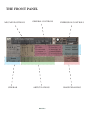
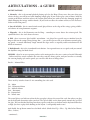
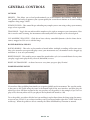
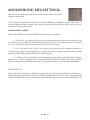
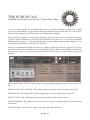
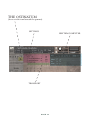
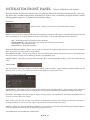
SKAILA KANGA
HARP
R
E
D
U
X
USER MANUAL
by
S P I T F I R E
Welcome.
Thanks for being part of the Spitfire Audio project.
We’ve tried to make this as brief and interesting as possible but we also understand that reading manuals is
a bore, so stick this next to your loo and give it a read whenever you can.
About Spitfire:
Spitfire was formed in 2008 by a group of successful British composers as a means of producing the tools
they needed for their busy work schedules. Sick of dry, humourless, ugly, unrealistic sounding libraries,
Spitfire set about redefining the way samples were created.
Our aim is to reproduce the conditions of top movie recording sessions and approach sampling as if we
were recording a film score one note at a time. To record performances, and parts thereof, not scientifically
created samples. To capture the timbre of a world-class set of players but also to record the room they were
playing in.
About Skaila Kanga Harp Redux
Spitfire Harp Redux features the legendary talents of Skaila Kanga recorded at one of the greatest scoring
stages in the world and sampled deeply to provide you with the definitive orchestral harp VI. If this is your
first Spitfire purchase you’ll enjoy featuring this instrument as a source for both inspiring and super realistic
pieces of work of your making. If you already own Spitfire products you’ll hear how the Harp perfectly integrates with those products as Skaila was recorded “in-situ” as if she were performing with a full symphony
orchestra. Using the same room and careful positioning the Harp will sit “perfectly” in your mix with other
Spitfire instruments with perfect spacial alignment.
Recorded by Jake Jackson at Lyndhurst Hall - Air Studios, one of the finest scoring stages in the world
through a huge array of priceless vintage microphones via Neve “Montserrat” pre-amps and then into digital
at 96k via the best Prism AD converters: this is an unparalleled signal chain.
About this REDUX edition
Spitfire are delighted to relaunch their classic Skaila Kanga Harp library, with added content, a whole new
engine and front end control.
NEW FEATURES INCLUDE:
• A new articulation - ‘Slid’ notes - specifically recorded and designed for glissando building, but also a
great new playable sound in its own right!
• Pedalling options - you can now set the harp pedals graphically and then play the white notes - makes
playing glisses easy!
• Re-scripted from the ground up - using the engine from our latest BML range, and fully tweaked for
smoother dynamic response
EVEN IF YOU ARE AN EXPERIENCED HARP USER A QUICK LOOK AT THIS MANUAL WILL BE
WELL WORTH IT AS WE HAVE CHANGED SOME FUNDAMENTALS OF IT’S OPERATION.
PA G E 2
System Requirements
KONTAKT - this Harp library requires the full version of Kontakt to run, it will not work in the Kontakt
‘Player’: please make sure you have the absolute latest version of either Kontakt 4 or Kontakt 5. 98% of all enquiries to our support dept. are cured by the upgrade. This is a cutting edge library and it simply won’t work on
anything but the latest versions.
RECOMMENDED SPEC:
The better your computer, the better the performance of Harp REDUX. But not to worry if you’re not spec’d
up to the hilt. All programs are provided with a set of parameters that enable you to tone back the CPU demands of any given patch. But moving forward, we’re confident this module will keep your computer busy for
many years to come! We recommend a combination of high processor speeds, a good chunk of memory and
a devoted 7200rpm eSata, USBII, Thunderbolt, or Firewire audio drive. The more memory you have, the less
demand placed on your drive, and having a totally devoted drive gives you the chance to load less into memory
and reduce load times. The higher the speed of your CPU, the more capable your computer will be to deal with
some of the amazing, but complicated scripts we’ve written.
PCs:
We recommend an i5, or i7 Quad or 8 Core machine with 8 Gig or above memory. Vista 64 or Windows 7.
However, it will work with SP2, Pentium or Athlon XP 1.4GHz 1Gig RAM.
MACs:
We recommend a Mac-Pro Intel Based Dual, Quad or 8 Core machine with 8 Gig or above memory. Mac OS
10.6.1 (Snow Leopard). However, we have made the module work satisfactorily on a Mac Mini 2.4 GHz and a
MacBook Pro 2.4GHz Intel Core 2 Duo.
DRIVES:
Firewire, USBII, or eSata, 7200rpm. Ask your dealer for drives that are suitable for “AV use”. We always recommend as small a drive as possible, as the platter will be smaller and the seek time less. The library will eventually
take up 25 Gig on your hard drive. If using several large libraries, or a number of Spitfire modules from the
same machine, we really recommend having your samples distributed over a number of drives. Lacie eSata or
Quadras 7200rpm we highly recommend. Moreover, an exciting development lies in the recent arrival of some
amazing solid state (SSD) drives. With seek times reduced to a fraction (0.1ms vs 6-9ms) of what standard
drives can offer, we are certain you will be able to reduce your sampler’s “pre-load” (page 24.) buffer tenfold
meaning you’ll be able to load enormous orchestral palettes into a single machine.
HOST:
The Kontakt 4 platform should work comfortably on most commonly found platforms and DAWs. As always
make sure you’re as up-to-date as you can afford! If you’re planning on building or adding Spitfire to an already
large orchestral palette, we recommend running your library independently of your DAW, either on your host
computer (e.g. via Re-Wire) or on a slave device (e.g.. via Midi or MOL). This will assist your load in times, and
will allow your DAW to do what it does best, sort out all your note ons and note offs!
PA G E 3
CONTENTS:
INSTALLATION & GETTING STARTED
05
THE FRONT PANEL06
ARTICULATION STAVE & SIDE BAR
07
ARTICULATIONS - A QUICK GUIDE
08
GENERAL CONTROLS10
MICROPHONE/ MIX SETTINGS11
ADVANCED STUFF12
THE PUNCH COG13
THE OSTINATUM14
“HARPOSPHERES” SYNTH16
A COUPLE OF TROUBLESHOOTS18
INSTALLATION
Because you’re reading this manual, we can presume you have successfully downloaded Harp REDUX. Included in your download email are some detailed installation instructions, please follow these carefully before
going any further. We’ll see you back here, when you’re installed!
GETTING STARTED
Before opening Kontakt please make sure you have THE LATEST VERSION OF KONTAKT 4.2.4 OR 5 INSTALLED. 95% of all service enquiries relating to spurious or strange behaviour of our wares are solved by
installing the most recent version.
As this is NOT a Kontakt Player Library
YOU WILL NOT SEE THE MODULE IN THE “LIBRARY” PANE.
Simply navigate to the Harp via the “FILE” browser pane.
If you have never used Kontakt before we wholeheartedly recommend your familiarise yourself with the basics
of patch (or instrument) loading, multi management, outputting and MIDI routing detailed in the Kontakt
user-manual provided with your copy of Kontakt or in the “documentation” folder of your Kontakt file.
PA G E 5
THE FRONT PANEL
MIC/ MIX POSITIONS
SIDE BAR
GENERAL CONTROLS
ARTICULATIONS
PA G E 6
EXPRESSION CONTROLS
HARP PEDALLING
ARTICULATION STAVE & SIDE BAR
ARTICULATION ICONS
i
Make sure Kontakt displays the instrument load status as pictured. If the left hand bar
is illuminated and red it’s in a queue and hasn’t started loading yet, if the middle bar is lit and yellow the instrument is still loading up.
ARTICULATIONS - Click on these notes to select the different articulations, or indeed press their associated key switches. You can do this whilst your playing so if you want to say switch from a “normale”
articulation to a “flageolet” hit the key whilst you’re playing your last note and the next note will be a
flageotlet A brief guide to these articulations is displayed overleaf.
To save on RAM not all articulations are loaded so make sure when clicking or keyswitching between articulations it is loaded. This is denoted by the RAM chip beneath the articulation being
black. If it is greyed out simply click this chip. Conversely if you want to save RAM and there is an
articulation you don’t need click the ram chip to unload, it will then become greyed out.
SIDE BAR DISPLAY AND ADVANCED TOOLS
On the left of your articulation stave is a side bar that displays the name of the articulation you’re currently playing. Beneath it are three options.
KEYSWITCH SHIMMIER - This shimmys the position of all the keyswitches left or right by clicking
and dragging while holding the mouse button down, convenient if you’re creating your own “multi”
instruments and don’t want to hit keyswitches by mistake.
KEYSWITCH TO CC SELECTOR - Use this to assign a CC controller to act as articulation/ keyswitcher. Click on “CC” and you’ll be prompted to move the controller you wish to use in order for the
instrument to “learn” how you’d like to select articulations.
ARTICULATION LOCK - Many composers like to have a single articulation loaded to each instance
of an instrument. Once you have unloaded all unwanted and have settled to your preferred articulation click this to lock so you can’t accidentally hit keyswitches and suddenly become mute. This way of
working is particularly vital if you’re using slave computers where not all UIs will be instantly visible to
you (use this in conjunction with the template builder presets).
PA G E 7
ARTICULATIONS - A GUIDE
1.
ARTICULATIONS
2.
3.
4.
5.
1. Normale - this is the normal plucked playing style for the Harp. Please note, that you when you
release the key, you will hear a hand damping sample play. If you wish to play a run of notes, hold the
sustain pedal down, and then release the sustain pedal when you wish to hear the damping sample of
Skaila damping the strings with her hands. (If you wish to reduce the volume of this, use the ‘Releases’
slider on the front panel.)
2. Pres de la Table - this is a more brittle sound, played closer to the edge of the strings, giving a different balance of string harmonic response.
3. Flageolet - this is the Harmonics on the Harp - sounding an octave above the written pitch. The
symbol for this is the circle above the note.
4. Slid - these is our new ‘gliss builder’ articulation - it is played in a specific way to simulate how the
fingers slide on the strings when glissing. But - - you can also just use this as an alternate normale playing patch - it sounds fabulously rough around the edges and is a superbly usable articulation for all
kinds of situations!
5. Bisbigliando - this is the ‘tremolando’ articulation - fast repeated notes at a set pitch, and you control
the dynamic using the Mod wheel.
GLISSES - these lie on two separate patches to the main patches: they are a variety of useful Glissandi
- laid out with key-switch controls: the active key-switch is always green, and you can also see visually
the current playing style on the panel: you can also click here to change these.
Patch 1 - Manual Gliss:
There are Key-switches from C1-A1 controlling the scale used:
C1 - Major
C#1 - Harmonic Minor
D1 - Melodic Minor
D#1 - Pentatonic
E1 - Diminished
F1 - Whole-tone
The actual glisses are laid out so that the key you play is always the root of the scale, but where you play
on the keyboard determines what you hear. The Speed slider on the front panel controls the speed of
the gliss. We have divided the Harp into four registers, and these are laid out on the keyboard from low
to high. Just have a play while looking at this layout - it will quickly make sense!
And finally, for up/down control use the Mod-wheel. (Mod-wheel Up - Gliss... Up, Mod-wheel Down,
Gliss... Down.)
- continued....
PA G E 8
Patch 2 - Legato Gliss
With this Gliss patch you hold two keys to perform the run you want. eg. To perform an upwards C major
run you hold down C and press E. To do a downwards C major run you’d hold down E and press C.
The scales are played as follows:
1 semitone = Whole tone scale (ie C to C# = C whole up)
2 interval = minor harmonic (ie. C to D = C minh up)
3 interval = minor melodic (ie. C to D# = C minm up)
4 interval = major (ie C to E = C maj up)
5 interval = pentatonic (ie. C to F = C pent up)
6 interval = diminished (ie. C to F# = C dim up)
There are two keyswitches = scaled gliss and full/swirl gliss. The scaled gliss are the 4 registers of glissandi
as mentioned previously.
The Speed slider again controls the speed of the run. As before, it sounds more complicated than it is, have
a play and you’ll find it becomes clear!
PA G E 9
GENERAL CONTROLS
OPTIONS
PRESETS - This allows you to load predetermined sets of articulations affectionately called “Brush
Sets” quickly and easily to optimise your system quickly for essential articulations or to start building
templates using empty “shells”.
PURGE UNUSED - This control keeps unloading any samples you are not using to keep your memory
usage as low as possible.
TRANSPOSE - Toggle this on and tweak the number to the right to transpose your instrument. Note
this is not the same as tuning, the instrument will actually offset the samples to the selected pitch.
CC1 MAPPED VEL(OCITY) - Click this to have velocity controlled dynamics (for the shorts for instance) mapped to CC1 as it is with the longs.
ROUND ROBINS & LEGATO
ROUND ROBINS - This refers to the number of round robins (multiple recordings of the same notes
that cycle around as you repeatedly play a note) your instrument uses, the number can be dragged up
and down (1-8) to save you memory.
RESET FROM F7 - This enables you to control the round robin cycle (so it sounds identical every time
you play) toggle on & play the key selected (default F0) to reset.
RESET ON TRANSPORT - As above but resets every time you press play! Genius!
HARP PEDALLING PATCH
We now have Harp pedalling functionality as an option globally on the instrument. The way this works,
is that you set the pedals using the icons at the bottom right of the user interface, and then play the
white keys: these will then respond in the way you have set the pedals. So for example, if you set D to
play as Db, then any white note D you play on the keyboard will sound as a Db.
To set the pedals, you either click the bar icon and drag it up for flat or down for sharp using the mouse,
or you can use CCs 65-71 to set them (and these can be reassigned with a right click / CTRL click in the
usual way). When the pedals are all set centrally, the White and Black keys function as normal.
PA G E 1 0
MICROPHONE/ MIX SETTINGS
Welcome to the wonderful world of Air Studios and the mixes of our chief
engineer Jake Jackson.
Use the chip icons beneath the faders to load unload different microphones and the faders above to
tweak the balance of them. Turning a fader all the way down will also unload the mics, conversely turning the fader back up will reload.
MICROPHONES / MIXES
Right/ Ctrl click on mics to change Kontakt channel/output assignment.
C - Close mics, a selection of valve mics placed for optimum focus close to the instrument. This
mic control is great to add in for added definition and at times a bit of “rounding of sound”, in isolation
it can be a way of achieving a more intimate or pop-music style sound.
T - Tree. This refers to the “Decca” tree of three mics placed above the conductors podium. A
set of priceless vintage Neumann M50s. These are placed to give the ultimate sound of the harp, the hall
and are the default mic position that loads in with each patch.
A - Ambient. A set of condenser mics placed high up in the gallery away from Skaila. This mic
position gives a massive amount of stereo spread and room sound over Kanga’s harp. Great mixed in
with the other mics but also ideal fed to your Ls & Rs speaker sends for true surround information.
SURROUND USE:
Right click on the mic names to adjust the output of the mics. This will also allow for surround use. A
simple Quad setup would be to route the T out of your L&R and the A to your Ls & Rs. Some people like
a little bit of close in the C but we feel that live signal should be left clear away from your dialogue track.
PA G E 1 1
ADVANCED STUFF.
MICROPHONE MIX TO ARTICULATION LINKER
The small notation symbol locks the microphone mix or tweak you’ve made to the articulation selected. This means if you want to boost any perceived
inconsistencies in volume between say different articulations you can. Or indeed if you want to roll off
some of the hall ambience for a shorter more spikey articulations this is how to fine tune.
CLOSE MIC PAN COLLAPSER
To the right of the above is a selector that opens the mic collapser:
The close mics are a stereo mix and this collapser allows you to refine how the
stereo image is handled. All our musicians are recorded in-situ, ie where they
would be seated on a standard scoring session, giving you a fantastic spectral
spread when putting different Spitfire modules together, which helps define
the detail. This panning tool helps you to manage and tweak this to your own
tastes.
STEREO WIDTH - Allows you to control how far the stereo image reaches. All the way to the right
would be like having your two pan pots panned hard. All the way to the left would be like having both
pots centre,
STEREO PAN - Then allows you to control where in the pan field the centre of this image is placed.
ADVANCED ARTICULATION SELECTION.
For those of you who want to tweak your articulation selection further. To create set-ups that closely
integrate with notation software or indeed performance patches that react to the way you play this deep
editor may be for you. It’s accessed by holding CMD (or CTRL on PC) and clicking the articulation
icon? Can be closed by clicking the X to the bottom right of the UI.
LATCH TOGGLE - Switches this way of selecting the articulation on.
“WITH” SELECTOR - Selects how you would like to select.
PARAMETERS - Edit these to select a range in which this articulation would be selected.
PA G E 1 2
THE PUNCH COG
(Available on Instruments saved in the “Punch Cog” folder)
As we record our samples like you would a film score, we actively encourage our musicians to make
every note sound different. To play with the flair that would be expected from them on a score shoot.
We like tuning imperfections, little squeeks, the odd breath of a human!
However much we apply our exacting taste principals onto our range we’re never going to meet with
everyone’s preferred quality bar, or needs and expectations of a project. So we present to you Blake
Robinson’s coup de grace.... A way of punching notes in and out like we used to in the old days. A way
of customising your library to fit your taste and needs.
If there is a round robin you don’t like where the tuning is a bit fruity. Load in a “Punch Cog” instrument, and switch to the articulation you were using. Play until you find the Round Robin you don’t like
and then stop. Observe the pictured cog bottom left of the front panel/ UI, and click on it to get this
dialogue:
HOW SHOULD WE TWEAK - Then your last note played will be displayed, if this is correct get tweaking.
REMOVE ALL NOTE TWEAKS - This removes all custom changes you have made with the Cog.
SKIP THIS RR - Will simply make it always jump along to the next round robin in the cycle.
ADJUST TUNE/ VOL - Will adjust the tuning and or volume of the last played note.
ADJUST RELEASE - This will alter the level of the release trigger (which will effect the percieved decay
of that note).
SAMPLE START - If it feels loose adjust to the right, tight adjust to the left.
PA G E 1 3
THE OSTINATUM
(Acces via the icon beneath the spanner)
SETTINGS
RHYTHM COMPUTER
TRANSPORT
PA G E 1 4
OSTINATUM FRONT PANEL - “Why let ALBION have all the fun?!”
We’ve ported this over from the Albion range (see page 19). Best used with short articulations this ever evolving device that can offer instant chaotic inspiration, be used to create scientifically designed rhythms, ostinati
and arpeggiated sequences, to shimmering tremolando effects.
SETTINGS:
LOAD/ SAVE - Allows you to store your preciously made Ostinati.
MODE - Selects how the Ostinatum will interpret your playing. Ostinatum will sequence a maximum of 10 notes (one for
each of your fingers). It needs to arrange them into a note order “1-10” and this determines how it does that.
OFF - The default postion Ostinatum remains dormant.
ORDER PRESSED - This will organise the notes in the order you pressed them.
ASCENDING - From bottom to top.
DESCENDING - From top to bottom.
CONTROL KEYSWITCHES - Allows you to set up a section of the keyboard that controls the state of the ostinatum.
These keyswitch let you turn it off, or set the Mode.
SOLO KEYSWITCHES - Allows you to dedicate a section of the keyboard to keyswitches that solo each ostinatum track.
The first KS turns all tracks on, the following KS solo each individual track.
CHORD MODE - This ignores any note order and simply plays everything polyphonically, great for measured trem style
effects.
TRANSPORT:
This is a real time “note order” display. So with “Ascending” mode activated a c major triad played from middle C up will
show up 1=C4, 2 = E4, 3 =G4. These note numbered assignments are processed in the....
THE RHYTHM COMPUTER
NOTE MENU - Click these to place a note into the computer at the length you desire. Trash removes and scroll down
different pre-designed sequences to the right of this. The cog allows you further fine tuning and configuration tools.
LENGTH - This displays the note lengths in sequence that you have selected from the Note Menu. Drag down here to
create rest versions of the note length.
KEY - Under each note you can then select which key (displayed in real time in the Transport) this note is attached to.
Scroll up and down to select. So in the sequence pictured a C triad will sound C,E,C,C,C,C.
OFFSET - Adjust these bars up and down to adjust the velocity levels of each notes, this will bring your rhythm sequence
to life and provide you with all sorts of surprising syncopated accents.
NOW HIT PLAY ON YOUR DAW AND ENJOY!
PA G E 1 5
HARP MERCURY SYNTH
2.
3.
1.
7.
4.
10.
5.
6.
7.
PA G E 1 6
8.
9.
THE HARP REDUX MERCURY SYNTH
Although these sound excellent out of the box we’ve also given you an easy to use and ingenious front panel.
1. Lo & Hi Pass Filters
LPF = Low, HPF = Hi. Adjust the graph on the LPF to chop off the top end, HPF to chop off the bottom.
So if you want to reduce your fizzing synth sound to a muted sub tone drag the LPF graph from right to left.
2. Wobble Amount
Three modulator windows that give you wobble, or sometimes, WAB WAB WAB! Adjust the AMT to
effect the amount of WAB WAB.
3. Wobble Frequency
Adjust the graph to change the frequency or speed of your wobbles. For tempo sync’d modulators this
will tune coarsely to provide you with 8th triplet 16th, etc etc.
4. A.D.S.R.
Attack, Decay, Sustain Release envelope. These knobs will adjust the shape of the sound from a volume
point of view. Adjust attack to make the sound come thudding in or gradually fade in. Adjust release to make
the sound go from a sharp end or off to a gradual decay. For an 808 style bass pull up one of the subbier sounds
and pull the attack all the way to the right. The release to about mid way (to taste) and play some short notes.
5. FX Parameter Display
We’ve pre-loaded a selection of FX. Activate by clicking the FX icons along this bar.
6. Portamento Glide On/ Off Toggle
Click this to make the sound monophonic (so you only can play one note at a time) and to activate the
portamento glide function.
7. Portamento Glide Amount
Now that your Glide toggle is on hold one key down and whilst holding press another. Because you’re
in monophonic mode the sound will transition from the first pitch you depressed to the second, this fader
controls the time this transition takes.
8. Yoke X&Y FX Selector
The yoke (10.) is a dual FX controller that adjusts your FX parameters in real time for fantastic sequencing options. Y = vertical controller, X = horizontal. Scroll down to select which FX you wish to control.
9. Yoke X&Y FX Parameter Selector
Determines which parameter from your selected FX you wish to map to the X or Y yoke controller.
You can also alter the FX parameters further and map them direct to the Yoke controller (right/ ctrl click) by
accessing the additional FX parameter Bar; Command/ Right Click on the FX Icon you’d like to acces additional parameters for.
PA G E 1 7
A COUPLE OF TROUBLESHOTS
It is our hope that you keep in touch with us to let us know how you’re getting on, how you’re using Skaila
Kanga’s Harp, how you’re finding it, and, if we were to consider looking at areas in the future, what you’d like
us to look at. From this we’ll form a consensus and wholeheartedly pledge that we will act upon it wherever
possible or practical.
A couple of commonly asked questions...
• This library really isn’t behaving how I’d expect. - OK, so we’re now officially blue in the face. But before you
go ANY further please check you are using the ABSOLUTE latest version of Kontakt. Visit your trusty service
centre and we hope this page remains relatively under-thumbed.
• My instrument or patch seems to be playing just bits of sound, some keys are missing, and there’s lots of clicks
and crackles. - Make sure that your patch is fully loaded (detailed on the front panel, page 8). Some of these are
biggies so can take a while. But if problems persist make sure Kontakt memory manager is activated:
then:
You’ll have to restart this instance of Kontakt to feel it’s benefits.
Another reason your system may be struggling is that you’re using too many mics live for the spec of your
machine. Try cutting the mics as detailed on the front panel to see if this cures your problem. If it does, don’t
worry you can still use these mics, just play in your parts with one active (we recommend the T(ree)) and then
activate multiple mics and render down (eg. freeze function in Logic Studio). Some DAWS (ahem, Logic) only
use one core of your computer when recording but will use more when playing back so again try recording with
just one mic then dial in others once you’re happy.
If you’re still suffering may we suggest you try and manage your pre-load buffer. Kontakt pre-loads some samples into memory so that when you hit a note Kontakt plays it out from RAM whilst addressing the rest of your
samples from your hard drive(s). The slower your drives, the more you may want to rely on RAM, the faster
the drives, or smaller RAM available, the more you may want to rely or your drives. If you’re using the latest
generation of SSDs you’ll find you can radically reduce your pre-load buffer. Referring to the plate above tick
the “Instruments Default Pre-Load Buffer Size” and drag the fader to a setting you’re happy with.
PA G E 1 8
A QUICK THANKS
Christian & Paul would like to thank the cabal of genius assembled herein. To Dominic Kelly and the searing
talents of Skaila Kanga, to Alison Burton and the whole of the Air-Studios team. To Jake Jackson for wrangling
and controlling this beast. To the remarkable talents, immense intellect and invention of Andy Blaney and
Blake Robinson, and our TTTGFT team of reprobates in KX, Joe Rubel, Toby Warren & Stanley Gabriel.
Most of all we’d like to thank the amazing support and loyalty of our user-base, our Facebook friends and everyone on VI Control.
We are in the same boat as all of you. We’re not software developers by trade, so appreciate your honesty in
paying your way to be a part of our family and not distributing this illegally. But more importantly, if you have
any ideas or criticism please let us know directly via our website or helpdesk and in a constructive manner .
You never know, you just may have thought of something that we hadn’t considered. Indeed it is through all
the wonderful feedback we’ve had regarding the harp that we have been able to present the new “redux” version
and we hope to continue improving our libraries into the future. We want to make our entire range the best
there is, and we rely on you to help us achieve that..... With thanks,
Christian & Paul.
COPYRIGHT SPITFIRE AUDIO LLP 2013
www.spitfireaudio.com