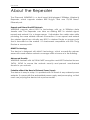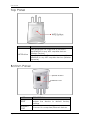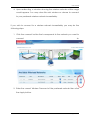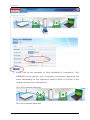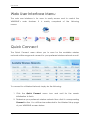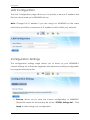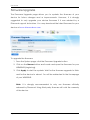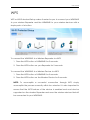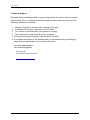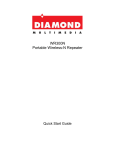
1
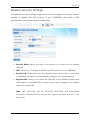
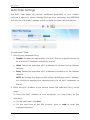
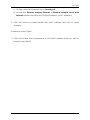
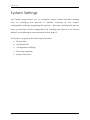
WR600NSI Portable Wireless-N Repeater WR600NSI DUAL BAND WALL PLUGGED 300Mbps WIRELESS-N REPEATER User Manual © Copyright 2014 All rights reserved. No part of this document may be reproduced, republished, or retransmitted in any form or by any means whatsoever, whether electronically or mechanically, including, but not limited to, by way of photocopying, recording, information recording, or through retrieval systems without the express written permission. We reserve the right to revise this document at any time without the obligation to notify any person and/or entity. All other company or product names mentioned are used for identification purposes only and may be trademarks of their respective owners. LIMITATION OF LIABILITY AND DAMAGES THE PRODUCT AND THE SOFTWARES WITHIN ARE PROVIDED "AS IS," BASIS. THE MANUFACTURER AND MANUFACTURER‟S RESELLERS (COLLECTIVELY REFERRED TO AS “THE SELLERS”) DISCLAIM ALL WARRANTIES, EXPRESS, IMPLIED OR STATUTORY, INCLUDING WITHOUT LIMITATION THE IMPLIED WARRANTIES OF NON-INFRINGEMENT, MERCHANTABILITY OR FITNESS FOR A PARTICULAR PURPOSE, OR ANY WARRANTIES ARISING FROM COURSE OF DEALING, COURSE OF PERFORMANCE, OR USAGE OF TRADE. IN NO EVENT WILL THE SELLERS BE LIABLE FOR DAMAGES OR LOSS, INCLUDING BUT NOT LIMITED TO DIRECT, INDIRECT, SPECIAL WILLFUL, PUNITIVE, INCIDENTAL, EXEMPLARY, OR CONSEQUENTIAL, DAMAGES, DAMAGES FOR LOSS OF BUSINESS PROFITS, OR DAMAGES FOR LOSS OF BUSINESS OF ANY CUSTOMER OR ANY THIRD PARTY ARISING OUT OF THE USE OR THE INABILITY TO USE THE PRODUCT OR THE SOFTWARES, INCLUDING BUT NOT LIMITED TO THOSE RESULTING FROM DEFECTS IN THE PRODUCT OR SOFTWARE OR DOCUMENTATION, OR LOSS OR INACCURACY OF DATA OF ANY KIND, WHETHER BASED ON CONTRACT, TORT OR ANY OTHER LEGAL THEORY, EVEN IF THE PARTIES HAVE BEEN ADVISED OF THE POSSIBILITY OF SUCH DAMAGES. THE ENTIRE RISK AS TO THE RESULTS AND PERFORMANCE OF THE PRODUCT OR ITS SOFTWARE IS ASSUMED BY CUSTOMER. BECAUSE SOME STATES DO NOT ALLOW THE EXCLUSION OR LIMITATION OF LIABLITY FOR DAMAGES, THE ABOVE LIMITATION MAY NOT APPLY TO THE PARTIES. IN NO EVENT WILL THE SELLERS‟ TOTAL CUMULATIVE LIABILITY OF EACH AND EVERY KIND IN RELATION TO THE PRODUCT OR ITS SOFTWARE EXCEED THE AMOUNT PAID BY CUSTOMER FOR THE PRODUCT. Page 2 of 34 User Manual Contents About the Repeater .................................................................................................... 4 Minimum System Requirements.................................................................. 5 Package Contents ....................................................................................... 5 Device Design ............................................................................................... 7 SMART LED Indicator .................................................................................... 9 The Web User Interface ............................................................................................. 10 Web User Interface Menu ......................................................................... 14 Setup............................................................................................................. 16 Wireless ......................................................................................................... 18 System Settings ............................................................................................ 24 Device Status .............................................................................................. 30 WPS ............................................................................................................... 31 Setup the Device ....................................................................................................... 32 Page 3 of 34 User Manual About the Repeater The Diamond WR600NSI is a dual band Wall-plugged 300Mbps Wireless-N Repeater, which supports wireless 802.11b/g/n, and one 10/100 Base-T Ethernet port. Repeat and Extend the WiFi Network WR600NSI supports robust 802.11n technology with up to 300Mbps data transfer rate. The Repeater can take an existing 802.11n wireless signal, repeat and extend it to a longer range. It eliminates the cable wires while providing the same reliable network connection. It can repeat and extend the wireless signal from virtually any 802.11n wireless Router or access point that is launched on the market. It is backwards compatible with 802.11b/g Routers or access points. MIMO Technology The device is designed with MIMO technology, which successfully reduces areas with weak wireless network coverage within a home or in the building. Advanced Security WR600NSI features with 64/128-bit WEP encryption and WIFI Protected Access (WPA), WPA2 to ensure the network security and prevent unauthorized access to you network. Portable without the Need of External Power Supply The device is easy to setup. It is portable with no need of any external power adaptor. It comes with the embedded power supply and power plug, so that users can just plug the device into a power socket. Page 4 of 34 User Manual Minimum System Requirements Your computer must meet the following minimum requirements. Any operating system can be used Web Browser 233MHz processor (or higher) Ethernet network adapter Or Wireless network adapter Wireless router or AP Package Contents Package contents are listed below. For any missing items, please contact your dealer immediately. Product contents vary for different models. WR600NSI Ethernet cable Easy Start Guide Resource CD Page 5 of 34 User Manual Note: You may also download the Easy Start Guide and the User Manual by visiting this link: www.diamondmm.com Page 6 of 34 User Manual Device Design Front Panel LABEL STATE SMART LED Indicator 3 BARS Connected 2 BARS 1 BAR Connected Connected LABEL STATE OFF 2.4GHz Blinking OFF 5.0GHz Blinking Power LED ON DESCRIPTION 95% and above (Excellent) 55-94% (Recommended) 10-54% (Weak) DESCRIPTION No Wireless Device is connected. A Wireless Device is connected and is actively transmitting / receiving data No Wireless Device is connected. A Wireless Device is connected and is actively transmitting / receiving data WR600NSI is Plugged to a working Power Outlet Page 7 of 34 User Manual Top Panel LABEL WPS Button DESCRIPTION Press this button for 2 seconds to connect theWR600NSI to any WPS capable devices (Wireless Device) Press this button for 5 seconds to connect the WR600NSI to any WPS capable devices (Wireless Repeater) Bottom Panel Reset Button Ethernet Port LABEL RESET ETHERNET PORT Page 8 of 34 DESCRIPTION Press the Reset button for 5 seconds to restore the device to default factory settings Connect to computers/Ethernet devices User Manual SMART LED Indicator Your WR600NSI is equipped with a SMART LED indicator which determines the signal strength from your wireless Repeater as seen below: NOTE: Wireless reception and throughput may vary according to the number of Wireless Devices that are in use, and at the same time, other nearby wireless devices, structure types, building materials, and other interferences present. Page 9 of 34 User Manual The Web User Interface The Web User Interface of your WR600NSI allows you to configure the various features of your WR600NSI. This will serve as your main tool in monitoring and configuring all of your WR600NSI‟s main features. Accessing the Web User Interface NOTE: To avoid any conflicts in accessing the Web User Interface, it is strongly advised to do the following: Simply access the Web User interface through an Ethernet connection. This is achieved by connecting your Computer and your WR600NSI through an Ethernet cable. If present, kindly turn off the wireless adapter of your computer. You may enable the wireless adapter after completing the setup. This is to avoid IP address conflict which might block you from accessing the Web user interface. Remove temporary Internet files. To access the Web User Interface through an Ethernet connection: 1. Connect your computer to the WR600NSI device using an Ethernet cable. NOTE: before proceeding to step 2, please check the SMART LED of the device; the LED should be in GREEN WEAK status and BLINKING. 2. Launch any web browser. You would automatically be redirected to your WR600NSI‟s web user interface. 3. If in any case it does not, type 10.0.10.254 on the address bar and press Enter. You will then be redirected to the Home page of your WR600NSI‟s web user interface. (For multiple devices you will need to change the default 10.0.10.254 address to a different IP address. Example the second unit can be changed to 10.0.10.253 and so on for the third. Page 10 of 34 User Manual 4. Upon redirecting, a window showing the wireless networks within range would appear. You may close this mini window or choose to connect to your preferred wireless network immediately. If you wish to connect to a wireless network immediately you may do the following steps: 1. Click the connect button that corresponds to the network you want to connect to. 2. Enter the correct Wireless Password of the preferred network then click the Apply button. Page 11 of 34 User Manual 3. Kindly wait for the repeater to finish initializing its connection. Your WR600NSI would reboot upon successful connection displaying the status depending on the frequency band (2.4GHz or 5.0GHz) of the wireless network you connected to: For 2.4GHz wireless networks For 5.0GHz wireless networks Page 12 of 34 User Manual NOTE: To know if you have successfully connected to your device, you may also check the LEDs of your WR600NSI; the SMART LED Indicator would be in STABLE GREEN light. Page 13 of 34 User Manual Web User Interface Menu The web user interface is for users to easily access and to control the WR600NSI‟s main features. It is mainly comprised of the following menus: Quick Connect The Quick Connect menu allows you to scan for the available wireless networks within range and connect to your preferred wireless network as well. To connect to a Wireless Network, simply do the following: 1. Click the Quick Connect menu icon and wait for the search initialization to finish. 2. Determine your preferred wireless network then click its corresponding Connect button. You will then be redirected to the Wireless Setup page of your WR600NSI as seen below: Page 14 of 34 User Manual 3. Input the Wireless network s passphrase on the WPA Passphrase (Wireless Password) text box then click Apply. Kindly wait for the repeater to finish initializing the connection. Your repeater would reboot upon successful connection. NOTE: To know if you have successfully connected to your device, check the LEDs of your WR600NSI; it would be in STABLE GREEN light. Page 15 of 34 User Manual Channel. You may opt to change your wireless channel when you are getting poor reception. You may choose the least channel used in your area for better wireless performance. Channel Bandwidth. Here you can set your Channel Bandwidth to 20MHz and 20/40MHz. It is strongly suggested to leave this in Auto to achieve the best efficiency. HT Data Rate and HT Guard Interval. These options are recommended to be set to Auto for maximum efficiency. Page 20 of 34 User Manual Wireless Security Settings The Wireless Security Settings page allows you to change the Security Mode, enable or disable the WPS feature of your WR600NSI, and add a WPS enabled device by entering the needed PIN. Security Mode. Select the type of encryption you want for your wireless network. WPS. Allows you to enable or disable the WPS feature of your WR600NSI. Enrollee PIN. Enter this PIN on the Wireless Device that will be connecting to WR600NSI repeater to automatically configure the wireless device. Registrar PIN. Here you can enter the WPS-PIN of the Wireless Devices and click apply for the WR600NSI to allow access and configure your wireless device automatically Note: WPS will work only for WPA-PSK, WPA2-PSK and WPA/WPA2 encryption. Wireless Devices should also support the WPS feature to use this option. Page 21 of 34 User Manual MAC Filter Settings The MAC Filter page will provide additional protection to your wireless network. It allows or denies Wireless Devices from accessing the WR600NSI with the use of the MAC address which is unique for every network device. To add a MAC Filter: 1. Specify your preferred Policy. Disable. Disables the application of a MAC Filter to a specific device or to all the MAC Addresses specified in the list. Allow. Allows the specified MAC Addresses to connect to the Wireless network. Deny. Denies the specified MAC Addresses connection to the Wireless network. NOTE: By clicking the Apply button without specifying a MAC Address, you would be applying the selected policy to all MAC addresses on the list. 2. Enter the MAC Address of the device where the selected Policy would apply. To know the MAC Address of your computer, you may simply do the following: a. On the Start menu click Run. b. On the input box of the Run window, type in: cmd to open the command prompt. Page 22 of 34 User Manual c. On the command prompt key in ipconfig/all. d. Locate the Ethernet Adapter Ethernet or Ethernet Adapter Local Area Network section and find the „Physical Address (MAC Address). 3. Click the button located beside the MAC Address text box to apply changes. To remove a MAC Filter: 1. Click the button that corresponds to the MAC address that you wish to remove from the list. Page 23 of 34 User Manual System Settings The System page allows you to configure various system oriented settings such as changing the devices IP Address, backing up the current configuration settings, upgrading the device‟s firmware, restoring the device from a previously saved configuration file, resetting the device to its factory default, and defining a user password for the Web UI. The System s page has the following submenus: Device Info Local Network Configuration Settings Firmware upgrade System Password Page 24 of 34 User Manual Device Information Allows you to view basic device information regarding your WR600NSI such as the firmware version and its build date, the device s serial number, MAC addresses of various interfaces, and view the Wireless status as well. Firmware Version. Shows the current firmware version of the device Build Date. Shows the date the firmware was created. Serial Number. Shows the device‟s serial number. ETH/Bridge and Wireless MAC address. Shows the MAC address of the different Interfaces. Wireless Status. Shows the wireless device‟s wireless status. Page 25 of 34 User Manual LAN Configuration The LAN Configuration page allows you to specify a device IP address and Device subnet mask your WR600NSI will use. Note: Change this IP address if you are using two WR600NSI on the same network to avoid the occurrence of IP address conflict within your network. Configuration Settings The configuration settings page allows you to back up your WR600NSI‟s current settings, do a firmware upgrade, and restore an existing configuration by using the backed up file. Backup. Allows you to save the current configuration of WR600NSI. Default file name for the backup file will be “RT2880_Settings.dat”. Click Apply to start saving your configuration. Page 26 of 34 User Manual Update. Here you can load the saved configuration of your WR600NSI. Click browse and load the saved settings then click the Apply button. Restore. Click on the apply button to reset the unit back to its default factory settings. Page 27 of 34 User Manual Firmware Upgrade The Firmware Upgrade page allows you to update the firmware of your device for future changes and or improvements. However, it is strongly suggested to only upgrade your device firmware if it was advised by a Diamond support technician. You may download the latest firmware for your device at www.diamondmm.com To upgrade the firmware: 1. From the System page, click the Firmware Upgrade button. 2. Click on the Browse button and locate and open the firmware for your WR600NSI (single.img). 3. Click Apply to start the update. Wait for the firmware upgrade to finish and for the device to reboot. You will be redirected to the Homepage of your WR600NSI. Note: It is strongly recommended to only use firmware officially released by Diamond. Using third party firmware will void the warranty of the device. Page 28 of 34 User Manual System Password Set a password on the web user interface to prevent other users from getting access to the web UI and avoid unwanted changes from your settings. To add a system password, simply type in your preferred password and click on apply to activate this feature. To disable the password, simply remove the password and click apply to save your settings. Note: Forgotten passwords cannot be recovered. Reset the device to its factory default by pressing the reset button found beside the Ethernet port of WR600NSI for 5 seconds. Page 29 of 34 User Manual Device Status The device status page shows the current status of the AP, and also the wireless devices that are currently connected wirelessly to your WR600NSI. Page 30 of 34 User Manual WPS WPS or Wifi Protected Setup makes it easier for you to connect your WR600NSI to your wireless Repeater and the WR600NSI to your wireless devices with a simple push of a button. To connect the WR600NSI to a Wireless Repeater via WPS: 1. Press the WPS button of WR600NSI for 5 seconds. 2. Press the WPS button on your Repeater for 2 seconds. To connect the WR600NSI to a Wireless Device via WPS: 1. Press the WPS button of WR600NSI for 2 seconds. 2. Press the WPS button on the Wireless Device for 2 seconds. NOTE: To accomplish a successful connection through WPS, simply accomplish the process correctly within two minutes. It is also important to ensure that the WPS feature of the device is enabled and must also be supported on the wireless Repeater and even the wireless devices that will be connected to your WR600NSI. Page 31 of 34 User Manual Setup the Device In setting up your device kindly follow the instructions provided below. A diagram has also been provided for additional reference. 1 2 1. Plug your WR600NSI to a power outlet. 2. Connect your WR600NSI to the computer using an Ethernet cable through their respective Ethernet ports. 3. Launch a web browser and you will automatically be redirected to the Web User Interface of your WR600NSI. If in any case it does not open, kindly type 10.0.10.254 on the address bar and hit enter. 4. Select your SSID (wireless network/wifi name) from the list and click the Connect button. 5. Type the password for the wireless network of your Repeater and click apply. The WR600NSI will reboot and will redirect to the user interface Page 32 of 34 User Manual with the status dependent on the frequency band of your wireless Repeater: For 2.4GHz wireless networks For 5.0GHz wireless networks 6. Disconnect the Ethernet cable from WR600NSI and computer then place the device at the location where it can get sufficient reception from your wireless Repeater. Page 33 of 34 User Manual Technical Support Diamond Technical Support staff is here to help resolve any issues that you may be experiencing. Prior to contacting technical support please make sure you have the following information available. 1. 2. 3. 4. 5. 6. Model #: (Printed on the bar code, located on the box) Installation CD Version: (printed on the CD label) The version of Windows that your system is running. The manufacturer and model # of your computer. CPU type and speed (example: Intel Pentium4 2.4GHZ) A complete description of the problem that you are experiencing including any steps that you performed to try to resolve the issue. Technical Support Options Free Telephone Support 818-357-5165 (long distance rates may apply) Mon - Fri, 8 - 4:30 PST http://www.diamondmm.com Page 34 of 34