1
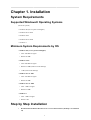
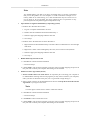
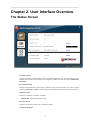
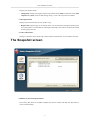
Returnil Multi-Snapshot User Manual
English version
Returnil Multi-Snapshot User Manual: English version
Copyright © 2007 - 2010 Returnil. All rights reserved.
Table of Contents
Overview .................................................................................................................... iv
What is the Returnil Multi-Snapshot? ...................................................................... iv
1. Installation ............................................................................................................... 1
System Requirements ............................................................................................ 1
Step by Step Installation ........................................................................................ 1
2. User Interface Overview ............................................................................................. 4
The Status Screen ................................................................................................. 4
The Snapshot screen .............................................................................................. 5
3. Contact Us ............................................................................................................... 7
4. About Returnil .......................................................................................................... 8
Overview ............................................................................................................. 8
Strategy and Mission ............................................................................................. 8
Leading IT Security Partner .................................................................................... 8
iii
Overview
What is the Returnil Multi-Snapshot?
Intro
Returnil Multi-Snapshot will provide effortless snapshot restore capability when integrated into the
next upgrade of our product line. During the beta testing phase, we are releasing it as a stand alone
utility to enable concurrent testing of the main 3.2 beta product to provide greater efficiency and to
progress to the final release in a faster time frame.
For those familiar with creating and deploying snapshots, as well as those new to the technology, the
multi-snapshot utility is both intuitive and easy to use. It can be used in manual as well as automatic
mode with a single time period available at this stage to provide as simple a testing environment as
possible. Thank you to all who test Returnil Multi-Snapshot and send us feedback as we go forward.
iv
Chapter 1. Installation
System Requirements
Supported Windows® Operating Systems
(32-64 bit systems)
• Windows XP (service pack 2 and higher)
• Windows Server 2003
• Windows Vista
• Windows Server 2008
• Windows 7
Minimum System Requirements by OS
• Windows XP (service pack 2 and higher)
• CPU: 300 MHz or higher
• RAM: 128 MB
• Windows Vista
• CPU: 800 MHz or higher
• RAM: 512 MB (without Aero® desktop)
• 1 GB (with Aero® desktop)
• Windows Server 2003
• CPU: 750 MHz or higher
• RAM: 128 MB
• Windows Server 2008
• CPU: 1 GHz or higher
• RAM: 512 MB
• Windows 7
• CPU: 1 GHz or higher
• RAM: 1 GB
Step by Step Installation
1.
Download the installation file and save it to a convenient location. (Desktop is recommended)
1
Installation
Note
You should backup your data if you have not already done so. We also recommend
that you test the product on a test computer or virtual environment. Though it is extremely stable in our initial testing, it is a beta and therefore may have issues we are
not yet aware of. If you encounter any issues, please be sure to report them to [email protected] [mailto:[email protected]]
2.
Open the file to begin the installation (by Operating System)
• Windows XP / Windows Server 2003:
1. Log into a computer Administrator account
2. Double click the installation file downloaded in Step 1
3. Select the appropriate language and then click OK
4. Go to Step 3
• Windows Vista / Windows Server 2008 / Windows 7:
1. Right click the file downloaded in Step 1 and select "Run As Administrator" from the right
click menu
2. Right Click "Allow" when challenged by the UAC (User Account Control) feature
3. Select the appropriate language and then click OK
4. Go to step 3
3.
RMSE 2010 setup welcome screen
1. Click Next to continue with the installation
• Proceed to Step 5
2. Click Cancel to exit the setup wizard if you do not wish to proceed. Stopping the process at
this point will not harm your computer and nothing will be installed.
4.
End User License Agreement (EULA)
1. Please read the entire text of the EULA. An important part of securing your computer is
to understand the licensing terms for all programs you may want to install on your computer;
and if you have not done this in the past, now is a good time to begin doing so…
2. Place a check in the box to the immediate left of the text "I accept the terms in the License
Agreement" if you agree to the terms.
Note
You must agree to these terms in order to install the software.
3. Click Next to continue with the installation
• Proceed to Step 6
4. Click Back to return to Welcome screen
5. Click Cancel to exit the setup wizard if you do not wish to proceed. Stopping the process at
this point will not harm your computer and nothing will be installed.
2
Installation
5.
Destination Folder (Where do you want to install the program?)
1. Keep the default installation path or click the Browse… button to select a different location.
We suggest that you keep the default installation path, but are free to install as required, even
if the installation location is not on the system partition.
2. Click Next to proceed
3. Click Back to return to the EULA screen or,
• Proceed to Step 7
4. Click Cancel to exit the setup wizard if you do not wish to proceed. Stopping the process at
this point will not harm your computer and nothing will be installed.
6.
Registering your copy
• This is a beta and already has a 30 day limit applied to each build and requires no registration
to use during the testing phase. You DO NOT need to enter a valid Serial Number so please
ignore this screen for testing purpose
• Click Next to proceed
• Click Back to return to the EULA screen or,
• Click Cancel to exit the setup wizard if you do not wish to proceed. Stopping the process at
this point will not harm your computer and nothing will be installed.
7.
Optional Settings
• Configure the appropriate disk cache size to store your snapshots.
• Click Next to proceed
• Click Back to return to the EULA screen or,
• Click Cancel to exit the setup wizard if you do not wish to proceed.
8.
Ready to begin the installation:
• Click Install to proceed
• Click Back to return to the Destination Folder screen or,
• Click Cancel to exit the setup wizard if you do not wish to proceed. Stopping the process at
this point will not harm your computer and nothing will be installed.
9.
Installation:
Please be patient while the installation process completes. A progress bar is provided for your
convenience and no further action on your part is required at this time. DO NOT INTERRUPT
the installation process at this point. Doing so may damage your computer or the program you
are attempting to install.
10. Click Complete to finish the installation process.
Note
You must restart your computer to complete the installation of Returnil Multi-Snapshot!
3
Chapter 2. User Interface Overview
The Status Screen
• Protection Status
Displays information about whether you have available snapshots to use. If no snapshots are available this line will show as OFF; if there are snapshots available this line will show as Multi-Snapshot Mode
• Protected Partition
Displays the partition that is protected by a Snapshot. Note: During the testing, only the %system%
partition (usually the C:\ drive) will be displayed and snapshots are limited to the partition shown.
• Snapshot Count
Displays the number of available snapshots
• Manage link: Opens the Snapshot screen
• Resource Status:
Displays the amount of cache space used and available
• Auto Take Snapshot
4
User Interface Overview
Displays the snapshot mode.
• Change link: Changes the snapshot engine from manual mode (OFF) to automatic mode (Take
snapshot every hour) when clicked. During testing, 1 hour is the only interval available.
• Subscription Status
Displays the termination date for your product copy.
• Register link: Opens a page on our website where you can purchase licensing for Returnil products. This product is not available for subscription licensing as the software is released as a Beta
for testing purposes only.
• License Information:
Displays “Unknown” due to the fact this is Beta software and therefore, not licensable at this time..
The Snapshot screen
• Rollback to selected Snapshot button:
Does exactly that. Select an available snapshot from the list window and then click this button to
restore to that snapshot.
5
User Interface Overview
Note
Restore requires system restart.
• Create a New Snapshot button:
Use this to create a new snapshot or restore point if required.
Note
You have to wait at least 3 minutes between individual snapshot creations.
• Delete selected Snapshot button:
Deletes the selected snapshot.
Note
Once deleted, the snapshot is not recoverable!
6
Chapter 3. Contact Us
For additional information, support material and specific contacts, please consult our website a
www.returnilvirtualsystem.com/support [http://www.returnilvirtualsystem.com/support] .
7
Chapter 4. About Returnil
Overview
Returnil is a privately held company with offices in Helsinki, Finland; St. Petersburg, Russia and
Nanjing, China. Founded in 2007, Returnil is led by a strong executive team with years of experience in
managing and developing security companies and products. Returnil's unmatched team and technology
is backed by the VTB - Venture Fund, Russia's first venture capital fund, with a successful track
record in investing primarily to high-growth companies dealing with IT, nano- and biotechnologies
and other areas requiring high-tech innovation. Our strong financial backing guarantees our customers'
and partners' sustainability and the continual development of our security software products.
Strategy and Mission
Returnil aspires to be the most innovative security solution provider for enterprises of all sizes and
for home users. Based on its reliable RVS solution - a system virtualization solution coupled with
Anti-virus that ensures a simple, smart and strong approach to information security, the mission of
Returnil is to provide the crucially needed last line of defense against the ever growing threats of the
online world.
Leading IT Security Partner
With more than 100 partners around the world, our products are available through our online store at
the Returnil website, resellers, ISPs and also as an OEM solution. Our products are actively used by
individual users, small businesses, large enterprises, non-profit organizations, schools and Universities, government agencies, as well as by OEMs.
8