1
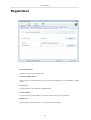
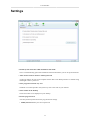
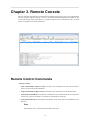
Returnil Virtual System
Lite 2011 User Manual
English version
Returnil Virtual System Lite 2011 User Manual: English version
Copyright © 2007 - 2010 Returnil. All rights reserved.
Table of Contents
Overview .................................................................................................................... iv
What is Returnil Virtual System (RVS)? .................................................................. iv
How does Virtualization fit into my overall Security? .................................................. v
Why Use Returnil Virtual System? .......................................................................... v
1. Installation ............................................................................................................... 1
System Requirements ............................................................................................ 1
Step by Step Installation ........................................................................................ 2
2. User Interface ........................................................................................................... 5
System Protection ................................................................................................. 5
Extended Partition Protection .................................................................................. 7
System Guard ....................................................................................................... 8
Virtual Disk ......................................................................................................... 9
Registration ........................................................................................................ 10
Settings ............................................................................................................. 11
3. Remote Console ...................................................................................................... 12
Remote Control Commands .................................................................................. 12
Client List Screen ................................................................................................ 14
4. Contact Us ............................................................................................................. 15
5. About Returnil ........................................................................................................ 16
Overview ........................................................................................................... 16
Strategy and Mission ........................................................................................... 16
Leading IT Security Partner .................................................................................. 16
iii
Overview
What is Returnil Virtual System (RVS)?
Intro
Utilizing its powerful virtualization technology, Returnil Virtual System allows you to work on a
copy of the operating system of your computer, thus facilitating the possibility of keeping your real
operating system in an unchanged, preserved, hence safe condition. With RVS' virtualization turned
ON, you can renew the working-copy of your operating system from the original as many times as you
want, or need to, by just simply restarting your system. Additionally, you can create a virtual storage
disk within your computer where you can save documents, data, and files while using the System Safe
(Virtual System) feature. Using the File Manager utility, you can choose to pick and save any changes
you want to your real system (this feature is only available in the Premium versions).
Returnil Virtual System's protection concept is very easy to understand. It provides an impenetrable,
yet extremely simple to use mechanism to prevent unwanted or malicious changes from being made
to your supported Windows® Operating System and the drive where Windows® is installed. You
operate a copy of your system in a virtual environment, so anything you do will happen in the virtual
environment, to the copy, and not to the real operating system. If your computer is attacked or gets
infected with malware, all you need to do is simply restart your PC to erase all changes induced by
it. Once restarted, the working-copy of your system is renewed, enabling you to go on working as if
nothing ever happened. At the same time, Returnil Virtual System can create a virtual storage disk
for you; the purpose of this storage space is to provide a place for you to save your data when the
System Safe (Virtual System) mode is turned ON. You can customize the size of this disk to meet
your individual requirements.
When the System Safe (Virtual System) protection is OFF, you can install or remove programs, save
documents within the Windows® disk drive, install security upgrades and software patches, alter configurations, and update user accounts. All changes made will remain following a restart of the computer.
Returnil Virtual System is designed to take the risk and worry out of exposing your computer to all
types of malicious software, downloads, websites, or any accidental unwanted changes that might
have adverse effects on it, or infect it with harmful viruses, spyware and other malicious programs.
By copying your system to the random access memory (RAM) rather than to the hard disk, Returnil
Virtual System also provides better speed and reliability.
Features
• Keeps your system safe when connected to the Internet
• Viruses, Trojans, Worms, Adware, Spyware, Keyloggers, Rootkits and unwanted content disappear
with a simple reboot
• Enforces settings and protects your Internet privacy
• Helps reduce overall disk wear by copying and operating your system from memory rather than
the hard disk
• Saves time and money by considerably speeding up the system
• Reduces or eliminates the need for routine disk de-fragmentation
• Leaves absolutely no traces of computer activities
• Eliminates the dangers of evaluating new software
iv
Overview
• Seamless integration with supported Windows Operating Systems
• Easy to use, simple to configure, and the one tool in your arsenal that will be there to save the day
when all else fails
• RVS is your last "line of defense" against malicious software
How does Virtualization fit into my overall Security?
Layered approach - A true layered approach to security is based on the following principles:
Prevention: The most obvious examples of this are your Firewall, Separation of programs and data
storage, Microsoft® Security Updates, Email Filters, Internet content scanners, parental controls, User
Account Control, EXE and program control, Policy, Best practices, and even Obscurity to some extent.
Detection: This is provided by your Antivirus, Antispyware, RootKit scanners, Antimalware, and
integrity checkers.
Cure: Enforcement of clean machine state with Virtualization.
You try to keep the content from infecting your system, yet you are still getting infected; why? This is
because prevention and detection/removal methods are incapable of enforcing a desired state. Be this
because the rules were not strict enough, your antivirus is not updated to detect or properly remove the
content, or even if your Operating System is vulnerable to a previously unknown exploit is irrelevant;
the fact remains that you can never be entirely certain your security will protect you!
Returnil Virtual System closes this gap in your security, period. By cloning your System Partition,
RVS ensures that unwanted or malicious content is not able to make the changes it needs to make
to the portion of the hard drive where Windows is installed in order to infect your system. This in
essence provides a LONG TERM CURE by maintaining a clean computer rather than trying to block
or chase malware around your system.
Why Use Returnil Virtual System?
The Early Days
From the earliest days of Malware research it was known that signature based solutions would be at
best, a stop-gap approach to true system security and system integrity protection.
The technology was widely accepted and, in the early days at least, was adequate to address current
threats. As the Malware developers became more sophisticated, the gap began to dwindle quickly and
in time has turned 180 degrees in favor of these same developers. Where the security industry once
held the advantage over their malicious adversaries, they became complacent with too much faith in
the efficacy of brute-force detection and removal methods that have done nothing to stop, or even
slow malicious content development.
Returnil's Solution
This is why we at Returnil began to look for a better mousetrap. To this end we quickly decided that the
best way to address the growing threats was to take a risk and explore ways in which the security could
become proactive. We further committed ourselves to developing a solution that would not require
signatures, bulky and resource hogging detection/removal engines, filters, blockers, rules, or any other
v
Overview
brute force methodologies to achieve our goals. Additionally, the software had to be simple, light
weight, AND totally effective against anything we threw at it; needing nothing more than a simple
system reboot to erase any unwanted changes automatically.
We are proud to announce that we not only met these development goals, we exceeded them!
vi
Chapter 1. Installation
System Requirements
Supported Windows® Operating Systems
(32 - 64 bit systems)
• Windows XP (service pack 2 and higher)
• Windows Server 2003
• Windows Vista
• Windows Server 2008
• Windows 7
Supported Windows® File Systems
• FAT16
• FAT32
• NTFS
Minimum System Requirements by OS
• Windows XP (service pack 2 and higher)
• CPU: 300 MHz or higher
• RAM: 128 MB
• Windows Vista
• CPU: 800 MHz or higher
• RAM: 512 MB (without Aero® desktop)
• 1 GB (With Aero® desktop)
• Windows Server 2003
• CPU: 750 MHz or higher
• RAM: 128 MB
• Windows Server 2008
• CPU: 1 GHz or higher
• RAM: 512 MB
• Windows 7
• CPU: 1 GHz or higher
• RAM: 1 GB
1
Installation
Step by Step Installation
1.
Download the installation file and save it to a convenient location. (Desktop is recommended)
Note
You should backup your data if you have not already done so. A critical component
of securing your computer involves protecting your data against emergencies and unexpected circumstances (natural disaster, hardware failure, stolen equipment, etc). While
RVS is designed to protect your system from unwanted or malicious software and data changes, it cannot protect you from physical dangers so this would be an excellent
time to learn about data replication (backing up your data and files) and disk imaging
(Think of this as taking a "picture" of your disk drives as they are right now that can be
used to recover from a catastrophe.)
2.
Open the file to begin the installation (by Operating System)
• Windows XP / Windows Server 2003:
1. Log into a computer Administrator account
2. Double click the installation file downloaded in Step 1
3. Select the appropriate language and then click OK
4. Go to Step 3
• Windows Vista / Windows Server 2008 / Windows 7:
1. Right click the file downloaded in Step 1 and select "Run As Administrator" from the right
click menu
2. Right Click "Allow" when challenged by the UAC (User Account Control) feature
3. Select the appropriate language and then click OK
4. Go to step 3
3.
Returnil Virtual System Labs setup welcome screen
1. Click Next to continue with the installation
• Proceed to Step 4
2. Click Cancel to exit the setup wizard if you do not wish to proceed. Stopping the process at
this point will not harm your computer and nothing will be installed.
4.
End User License Agreement (EULA)
1. Please read the entire text of the EULA. An important part of securing your computer is
to understand the licensing terms for all programs you may want to install on your computer;
and if you have not done this in the past, now is a good time to begin doing so…
2. Place a check in the box to the immediate left of the text "I accept the terms in the License
Agreement" if you agree to the terms.
Note
You must agree to these terms in order to install the software.
2
Installation
3. Click Accept to continue with the installation
• Proceed to Step 5
4. Click Back to return to Welcome screen
5. Click Cancel to exit the setup wizard if you do not wish to proceed. Stopping the process at
this point will not harm your computer and nothing will be installed.
5.
Destination Folder (Where do you want to install the program?)
1. Keep the default installation path or click the Browse… button to select a different location.
Important
The target directory MUST be within your System Partition (usually the C:\ Drive or
alternately, the disk your Operating System is installed on) For Multi-boot systems
you will need to install a separate copy of the software within each Operating System.
2. Click Next to proceed
3. Click Back to return to the EULA screen or,
4. Click Cancel to exit the setup wizard if you do not wish to proceed. Stopping the process at
this point will not harm your computer and nothing will be installed.
6.
Registering your copy of Returnil Labs
• Enter your License Number in the appropriate field
• Click the Buy Now button if you want to purchase a license for the current release version
of Returnil Labs or send us an email requesting a tester’s License Number for the Returnil
Virtual System Lab edition.
Note
Licensing for Lab versions are time-limited and will only be valid during the current
testing period.
• Click Next to proceed.
• Click Back to return to the EULA screen or,
• Click Cancel to exit the setup wizard if you do not wish to proceed. Stopping the process at
this point will not harm your computer and nothing will be installed.
7.
Optional Settings
• Configure the appropriate disk cache size
• Restrict program access: This will cause RVS to request the valid password to access the program and its features. Once the option box is checked, you can then click the "Modify Password" button to configure a new password (default is a blank entry)
• Disable System Protection while in Windows Safe-mode: This is a troubleshooting and emergency option that is activated by default. We strongly recommend that you do not deactivate
this option.
• Click Next to proceed
• Click Back to return to the EULA screen or,
3
Installation
• Click Cancel to exit the setup wizard if you do not wish to proceed.
8.
Ready to begin the installation
1. Click Install to proceed.
2. Click Back to return to the Destination Folder screen or,
3. Click Cancel to exit the setup wizard if you do not wish to proceed. Stopping the process at
this point will not harm your computer and nothing will be installed.
9.
Installing Returnil Virtual System Labs version
Please be patient while the installation process completes. A progress bar is provided for your
convenience and no further action on your part is required at this time. DO NOT INTERRUPT
the installation process at this point. Doing so may damage your computer or the program you
are attempting to install.
10. Create a Virtual Disk (Partition)
Note
You can not go back from this screen due to the fact that RVS has already begun the
process of installing its drivers. You must complete the process and restart your computer at the appropriate step.
• Choose a new destination or keep the target directory default for your Virtual storage disk.
• Change or accept the suggested size for your Virtual Disk.
• Assign a new letter or accept the default assignment for your Virtual Disk.
• Choose whether you want the Virtual storage disk to be mounted with windows boot.
• Click Create to proceed.
• Click Skip to cancel the creation of a Virtual Disk and proceed with the installation.
11. Installing the Virtual Disk
Please be patient while the installation process completes. A progress bar is provided for your
convenience and no further action on your part is required at this time. DO NOT INTERRUPT
the installation process at this point. Doing so may damage your computer or the program you
are attempting to install.
12. Click Complete to finish installation process
4
Chapter 2. User Interface
System Protection
System Protection mode
• Click the Start button to turn protection on. Without a restart of your computer, this will start Session Lock mode where the protection will be automatically turned off after restart of your computer.
• Click the Stop button to turn the protection off.
Note
This will require a restart of your computer.
• Enable Protection automatically at Windows boot:
Activate this option if you want the protection to persist over restarts of your computer (Protection
always on mode).
• Advanced options
• Drop changes (default): This option is activated by default when you turn RVS’s protection
on. As this implies, all changes during the current virtual session will be lost at restart of your
computer.
5
User Interface
• Save changes: Activation of this option will cause Returnil to save all changes made during the
current virtual session to your real hard disk drive.
Warning
This means all changes and is as though you did not have the protection turned on. This
should only be used by experienced users!
Exclusions
This is a new feature that allows you to exclude chosen folders on your System Partition while using
Returnil’s protection.
• Start
Will cause folder exclusions to be activated and all content saved within these folders will be saved
to your real hard disk drive.
• Modify
Will allow you to edit the exclusions list by adding new line items.
• Remove
Allows you to delete an exclusion list line item.
• Click Cancel to return to keep you current settings
6
User Interface
Extended Partition Protection
Returnil now supports cloning of alternate partitions. The program will automatically list all available,
non-system partitions and drives on your computer. To turn on protection for these drives, simply
select a listed drive and then click the Change Protection button to open the Protection Mode settings
for the target drive.
Change Protection
• Activate protection for this partition: X:\
• Deactivate protection for this partition: X:\
• Enable Protection automatically at Windows boot: The drive will be protected with the start of
Windows
• Do not create the cache on this partition: Activation of this option will force Returnil to save the
cache for this drive on a different drive.
• Create the cache file on this partition: Select an alternate location for this drive’s cache.
• Click OK to save your changes
• Click Cancel to return to keep you current settings
7
User Interface
System Guard
In our labs version, the Anit-Execute tool you may be familiar with from the 2x series is integrated into
the program interface. The design automates much of the inclusion process so some configurability
may be missing in this Labs edition.
• Click the Start button to turn the Anit-Execute protection ON.
• Click the Stop button to turn the protection off.
• Show dialog to users if there is no rule to match
Activate this option to be warned and to configure a rule if required.
8
User Interface
Virtual Disk
• Virtual Disk File
Displays the path and filename for your Virtual Disk.
• Virtual Disk status
Displays the assigned drive letter if the Virtual Disk is mounted.
• Mount/Dismount button
Click to mount or dismount the Virtual Disk.
• Mount Virtual Disk automatically at Windows start
Activate this option if you want the Virtual Disk to be loaded with Windows.
• Mount Virtual Disk as read-only
As the text implies, users will only be allowed to read the contents of the disk.
• Virtual Disk Drive letter
Keep the current assignment or assign a new letter for the Virtual Disk.
9
User Interface
Registration
• License Information
Displays your current registration status.
• Check for Updates button
Opens a page on our website where you can check for the availability of a version update or product
release.
• Serial Code
Unique number for that installation of Returnil Labs.
• License Number
If you have a new License Number, enter it here when renewing your registration.
• Register Now
Opens a page on our website where you can purchase new licensing.
10
User Interface
Settings
• Disable System Protection while in Windows Safe-mode
This is a troubleshooting option that should not be deactivated unless you are an experienced user.
• Allow Session Lock for all users without password
As the text implies, all users of the computer will be able to turn RVS protection on without being
challenged to enter a password.
• Show program icon in the tray area
The RVS icon will be placed in the system tray next to the clock on your task bar.
• Show toolbar on the desktop
Causes the toolbar to be displayed on your desktop.
• Restrict program access
Activates password protection for the program and its settings.
• Modify Password: Edit your current password.
11
Chapter 3. Remote Console
The new RVS Lite 2011 Remote Console allows the administrator greater control over both the RVS
Lite 2011 program and the computer on which it is installed. Small and targeted, yet scalable for use
in networks ranging from simple Home to complex Entreprise level environments, with very little
impact to computer or network performance.
Remote Control Commands
• Remote Control
• Start Virtual Mode (requires restart): Activates the virtualization on the selected client in
always on mode (starts with Windows).
• Stop Virtual Mode (requires restart): Deactivates the virtualization on the selected client.
• Start Quick Virtual Mode: Activates the virtualization on the selected client for the current boot
session only. Once the computer is restarted, the virtualization will be off.
• Turn ON Exclusion List: Selected files and folders on the client will be excluded from virtualization.
Note
The Exclusion List is created and maintained on the client.
12
Remote Console
• Tun OFF Exclusion List: Files and folders on the Eclusion List will no longer be Excluded
from virtualization.
• Modify Exclusion List (Add/Remove): Add or Remove file/folder paths on clients.
• Start System Guard: Activates the System Guard feature.
Warning
The System Guard feature can be used regardless of whether the virtualization is active
or not and can cause Microsoft/Windows updates to fail. Due to this, we strongly recommend that the administrator should ensure that the System Guard feature is deactivated on the client before attempting to apply these updates.
• Stop System Guard: does exactly this on the selected client.
• Change Password: Opens a screen that can be used to change the client's access control password.
• Change Server: Change the IP address for the server on the selected client.
• Set License Number (requires restart): Allows the Administrator to assign a new License Number to the selected client.
• Modify Client Settings: Change all settings set on client(s).
• Power
• Restart: Restarts the selected client computer.
• Shut Down: Turns the selected client computer off.
• Group Manager
• New Group: Allows you to create a new group from the available clients for easier management
in complex networks.
• Rename Selected Group: Allows you to edit the name(s) of your group(s).
• Delete Selected Group: Will remove the selected group.
• Chat Allows the administrator to communicate whith the user of the selected client computer via
a simple chat window.
Note
The chat can only be initiated from the console and the screen that will be seen at the client
is exactly the same as the one opened at the console.
• Remote Desktop: Opens a screen displaying the desktop of the selected cleint.
Note
This is only a display of the activity and does not allow for remote control of the user's
desktop.
• Remote Shell: Allows the administrator to control the client via command line (remote command
prompt).
13
Remote Console
Client List Screen
• Group Management Window
• Information: Displays the name of the selected Group and then oders the clients within that
group by network IP address.
• OS: Displays the version of Windows used on the listed client computer.
• PC Name: Displays the assigned name of the listed client computer.
• Exclusion List
• Started: The virtualization Exclusion List is enabled on the listed client computer.
• Stopped: The virtualization Exclusion List is deactivated on the listed client computer.
• System Guard
• Started: The System Guard feature is active on the listed client computer.
• Stopped: The System Guard feature is deactivated on the listed client computer.
• Virtual Mode: Displays a green shield with the word OFF if the virtualization is deactivated and
a red shield with the word ON when the virtualization is active on the the listed client computer.
• Save Changes
• NO: When Virtual Mode is ON, all changes will be dropped at restart of your PC.
• YES: When Virtual Mode is ON, all changes will be saved at restart of your PC.
• License Type: Displays Trial Version or Full Version depending on your current licensing for
the listed client program.
• Event Log Window: displays a log for all client connections during the current console session.
• Information tab: When a group, rather than an individual client WITHIN that group is selected,
this tab displays the number of clients within that group.
• Client IP tab
• License Number: Displays the current License Number assiged to the selected client.
• Installation ID: Displays a unique identifier of your software.
• Screen: Displays the current screen resolution on the selected client computer.
• Version: Displays the current version of RVS installed on the selected client computer.
14
Chapter 4. Contact Us
For additional information, support material and specific contacts, please consult our website a
www.returnilvirtualsystem.com/support [http://www.returnilvirtualsystem.com/support] .
15
Chapter 5. About Returnil
Overview
Returnil is a privately held company with offices in Helsinki, Finland; St. Petersburg, Russia and
Nanjing, China. Founded in 2007, Returnil is led by a strong executive team with years of experience in
managing and developing security companies and products. Returnil's unmatched team and technology
is backed by the VTB - Venture Fund, Russia's first venture capital fund, with a successful track
record in investing primarily to high-growth companies dealing with IT, nano- and biotechnologies
and other areas requiring high-tech innovation. Our strong financial backing guarantees our customers'
and partners' sustainability and the continual development of our security software products.
Strategy and Mission
Returnil aspires to be the most innovative security solution provider for enterprises of all sizes and
for home users. Based on its reliable RVS solution - a system virtualization solution coupled with
Anti-virus that ensures a simple, smart and strong approach to information security, the mission of
Returnil is to provide the crucially needed last line of defense against the ever growing threats of the
online world.
Leading IT Security Partner
With more than 100 partners around the world, our products are available through our online store at
the Returnil website, resellers, ISPs and also as an OEM solution. Our products are actively used by
individual users, small businesses, large enterprises, non-profit organizations, schools and Universities, government agencies, as well as by OEMs.
16