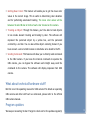
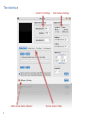
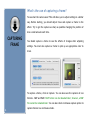
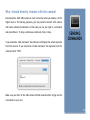
1
1 This Page 2 The Software 4 The Interface 5 Camera Settings 6 Capturing Frame 7 Getting Mean Colors 8 Tracking Objects 13 Sending Commands 14 Troubleshooting User’s Manual This manual helps you start using the CMUCam Pro software. First install the software, and start exploring what you can do with it. And don’t forget to connect the Camera! Installing Launch the setup from the CD (or from the hard drive if you have downloaded the setup). Select the appropriate install location after accepting the license agreement, and proceed. After the program installation is finished, you can launch the program from start menu. THE SOFTWARE Overview Below is a list of key features which makes the software stand apart from the rest: Serial Port Selection: You can select the serial ports for CMU camera and servomotor board (if you want to track objects through an external servo board). Note that CMU camera best operates at the baud rate of 115,200 and change it only after reading the official manual of CMU camera. Camera Settings: By this feature, you can adjust various camera settings such as Color Mode, Brightness/Contrast, Camera Window Size, Frame Rate, White Balance, Automatic Gain, etc. You should adjust settings and capture a frame to see the results. Frame Capturing: This feature allows you to see what camera is seeing. You can capture, load or save a frame dump from the CMU camera. You can also capture a frame dump to pick up a color, which in turn can be 2 used to track an object through color. Getting Mean Colors: This feature will enable you to get the mean color values in the current image. This is useful in determining color deviation and for performing automated tracking. The mean color values will be between 16 and 240 due to limits of each color channel on the camera. Tracking an Object: Through this feature, you’ll be able to track objects in two modes. Generic tracking and tracking by color. The software will represent the perceived object by a yellow box, and the perceived centroid by a red dot. You can also utilize object centering feature if you have connect a servo to CMU camera or attached a servo board to the PC. Sending Commands: This feature will allow you to directly send commands to the CMU camera. If you know the internal commands to operate the CMU camera, you can bypass the software and straight away send the commands to the camera. The software will display responses from CMU camera. What about technical/hardware stuff? But this is not the operating manual for CMU camera! For details on operating CMU camera and other stuff such as commands, please refer to the official CMU camera manual. Program updates We keep on innovating! So don’t forget to check out for the updates regularly! 3 The interface Serial Port Settings CMU Camera Status Indicator 4 CMU Camera Settings Various Camera Tasks Why should I change the settings? For better tracking! To exactly see what camera sees, change color mode to YCrCb. To enhance image quality, adjust brightness and contrast. If the ambient light is not pure white, you can toggle Auto White Balance to adjust colors. If the ambient light levels are not constant, you can toggle Auto Gain. You can also adjust the size of Camera Window and change Frame Rate, if you are communicating with the camera at lower baud rates. CAMERA SETTINGS Note that the settings cannot be changed if camera is disconnected or is busy. And if communication is lost, you’ll have to re-apply the settings. 5 What’s the use of capturing a frame? To see what the camera sees! This will allow you to adjust settings in a better way. Before starting, you should adjust focus and capture a frame to the effect. Try to get the capture as sharp as possible changing the position of lens a small amount each time. CAPTURING FRAME You should capture a frame to see the effects of changes after adjusting settings. You must also capture a frame to pick up an appropriate color to track. To capture a frame, click on Capture. You can also save the captures in two formats – BMP and RAW. RAW format can be reloaded later; however, a BMP file cannot be reloaded later. You can also check continuous capture option to 6 capture frames in a continuous mode. What should I do with mean colors? By mean color values and variance data of the current image, you can determine the color deviation and perform automated tracking. The mean color values will be between 16 and 240 due to limits of each color channel on the camera. GETTING MEAN COLORS Essentially three different outputs will be displayed, along with their RGB color code on the top. One is Average Mean, which will display the absolute mean values. The others are - maximum deviation from average mean and minimum deviation from average mean. The mean values together with the deviation values can be very much useful for detecting change in a scene. You can also determine average mean of an image to take the reference of color values to track by color. 7 How do I track them? You can track an object in two ways. Automatic tracking and tracking by a color. It is always a good idea to adjust the camera settings properly before starting tracking process, so as to minimize errors due to lighting problems. When an object is being successfully tracked, the frame display area will TRACKING OBJECTS display a yellow rectangle depicting the corners of the object, along with a red dot representing the centroid of the object. It will move according to the movement of the object. If the size of the object fluctuates frequently, you might need to adjust the brightness/contrast/other display settings until it is stable. If you know the internal commands of the camera, you can as well look at the responses from the camera, under Send Command dialog. 8 Automatic tracking In automatic tracking, just hold the object in center of the camera’s field of view and click on Track. The software will automatically pick up the color of the object in the central region of the camera and will start tracking it. The camera actually goes through a series of steps when you perform automated tracking. First it shrinks the window to 1/4th size to the center. Then it gets the mean color of the frame and restores the window to original size. Then it starts tracking the object by that mean color. Automatic tracking is not the best way to track if the objects color matches with the background and/or other objects. Don’t check the check box Track Object by a Color if you want to perform automated tracking. When the camera is tracking, the camera status will change to Tracking Object and the status indicator will be Green. 9 Tracking by a color Tracking by a color is more accurate than automated tracking due to the exact color picked up. Tracking by color involves following steps: 1) Place the object so that it comes into the field of view of the camera and then capture frame. 2) Adjust settings if the object is out of focus or lighting is inappropriate. Re-capture if necessary. 3) Double click on the object (which you want to track) in the image. 4) Check the Track Object by a Color check box. 5) Click on Track. 6) Watch the object being tracked! You can also observe the mean color of an object before tracking an object by color. It is essential that you pick up a color which is least deviated from the 10 color of rest of the object. Object centering Through object centering, the software will try to center the camera on the center of color mass, using servomotors. There are two ways you can perform object centering. Through a servomotor attached to CMU camera CMU camera has built-in functionality to center camera on object through servo motor. You are required to attach a servo motor to the servo pin on the CMU camera and select the option Object Centering by CMU Servo before starting the tracking process. Note that since you can attach only one servo to the CMU camera, you will be able to track the object by only one axis (say left/right tracking). 11 Through an external servomotor board The other way is to perform object centering through external servomotor board attached to a serial port. Make sure you have two free serial ports (one for CMU camera and one for servomotor board) to use this functionality. In this approach, the software tries to center camera on object. You can now perform center camera on object by three axes (Left/Right, Up/Down as well as Back/Forth). Below are the steps to perform object centering: 1) Connect the servomotor board to a free serial port, and then select corresponding serial port in the software. 2) Select the option Object Centering by Servo Board. 3) Select the axes by which you want to track the object. 4) Track! 12 Why I should directly interact with the camera? Good question. Well CMU camera is much more than what you believe. At the higher level or for learning purposes, you may need to interact with camera with some advanced commands. In that case you can just type in a command and press Return. To stop a continuous command, click on Stop. If you entered a valid command, the software will display the actual response SENDING COMMANDS from the camera. If you entered an invalid command, the response from the camera will be “NCK”. Make sure you refer to the CMU camera official manual before trying out the commands on your own. 13 Camera status remains ‘Disconnected’ Make sure the camera is properly connected and you’ve selected the correct serial port. This can also happen if you’ve selected improper baud rate or the camera is getting inadequate power supply. You’ll not be able to operate the software if the camera is not connected. TROUBLESHOOTING I cannot see any com ports in the list Make sure any other instance of the software is not running. If any other application is utilizing the serial port, then close the application. If you ran out of com ports, then free some of them! I get a weird screen or lines if I dump a frame This is due to inadequate power supply. If you are using batteries, replace them. If you’re using an AC adaptor, cross check the voltage ratings specified in the official CMU camera manual. I adjusted the settings but nothing happened This happens when you change the settings when camera is busy. Try changing settings when the camera is in idle state. 14 Contact us on [email protected] if there is a problem you can’t solve.