1
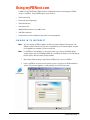
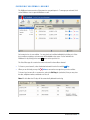
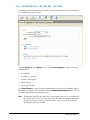
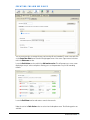
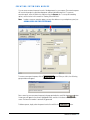
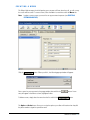
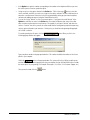
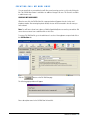
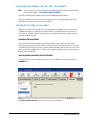
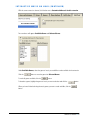
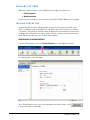
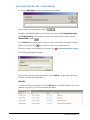
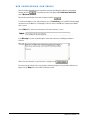
m y P B N e xmty P. BcNoe xm aann uua la l t . c oM m M Table of Contents TABLE OF CONTENTS................................................................................................................. 2 USING MYPBNEXT.COM............................................................................................................ 3 SIGNING IN TO MYPBNEXT................................................................................................... 3 CHECKING VOICEMAIL ONLINE............................................................................................. 4 CHANGING YOUR VOICEMAIL GREETING............................................................................. 5 CHANGING YOUR PASSWORD ............................................................................................. 6 CALL FORWARDING (FOLLOW ME) FEATURE ....................................................................... 7 CREATING FOLLOW ME RULES ............................................................................................. 9 NOTIFICATIONS ................................................................................................................... 13 INBOUND FAXES ................................................................................................................. 15 ADDRESS BOOK................................................................................................................... 16 BILLING INFORMATION ....................................................................................................... 18 ADDING USERS AND THEIR EXTENSIONS ......................................................................... 20 CREATING EXTENSION QUEUES ......................................................................................... 21 CREATING A MENU............................................................................................................. 23 SELECTING A MENU GREETING.......................................................................................... 25 CREATING CALL ME NOW LINKS........................................................................................ 26 CHECKING VOICEMAIL USING THE TELEPHONE ................................................................ 28 INTERACTIVE MUSIC ON HOLD........................................................................................... 28 HELP AND TECHNICAL SUPPORT ........................................................................................ 30 AVAILABLE OPTIONS........................................................................................................... 31 TALKING PROPERTIES ......................................................................................................... 31 WEB CONFERENCING.......................................................................................................... 34 PBNext User Manual 2 Using myPBNext.com In addition to the Call Manager, PBNext features a Web-based interface for managing your PBNext account or myPBNext. Using myPBNext gives you the ability to: Check voicemail log Record your personal greetings Check inbound faxes Forward your calls Add detailed information to your address book Hold Web conferences Create extensions with recorded messages about real estate properties SIGNING IN TO MYPBNEXT Note: As of this writing, myPBNext supports only Microsoft Internet Explorer 5.0 and newer. The PBNext Installer will ensure that you have a compatible version of Internet Explorer installed. (It will upgrade your computer if you do not have one). Note: For myPBNext to work properly, you must have cookies set to at least the Medium privacy setting, and you must have Scripting enabled. Also, myPBNext will likely not work with pop-up blockers (such as Norton Internet Security) enabled. 1. Open Internet Explorer and go to http://www.myPBNext.com to access myPBNext. 2. Login to myPBNext, using the same information you use to connect to the PBNext telephone system. Once you have logged in, you will go directly to the Call Center screen. PBNext User Manual 3 CHECKING VOICEMAIL ONLINE The Mailboxes feature contains all the extensions you participate in. To manage your voicemail, click on the Mailboxes icon to open the Mailboxes screen. Each extension has its own mailbox. You may check each mailbox individually by clicking on it. Note that a mailbox containing a voice message will be bolded on the screen. You can minimize the button at the top of the list. Mailboxes list by clicking on the arrow The Voice Messages list contains the current voicemails in the mailbox selected. To listen to your voicemails, select the desired voicemail from the list and click When you are finished, you may click Play. Delete to remove the message from your voice mailbox. To view a log of recent calls to an extension, select the Call Log tab (see below). Here you may view the date, telephone number, and duration of the call. Note: All calls older than 15 days will be automatically deleted from the log. PBNext User Manual 4 CHANGING YOUR VOICEMAIL GREETING To change your personal voicemail greeting, click on the Preferences icon. The Preferences screen will open. Click on appear: Record a new voicemail greeting. When you click it, the following pop-up window will Type your phone number in the pop-up window box. This number should be the number of the closest phone to your computer. Select the button on the pop-up window. The system will call you. When you pick up the receiver, record your voicemail greeting after the tone and press # when finished. To review your recorded greeting, click Play my current voicemail greeting. The greeting will be played through your computer speakers. PBNext User Manual 5 CHANGING YOUR PASSWORD To change your password, click on the Preferences icon. The Preferences screen will open. Click on appear: Change my current password. When you click it, the following pop-up window will Type in your current password and your new password twice, then click the button to cancel the procedure. button. Your password will be updated. Click the PBNext User Manual 6 CALL FORWARDING (FOLLOW ME) FEATURE To forward your personal extensions’ incoming calls to another outside number, click on the Preferences icon. The Preferences screen will open. Select the Settings tab. In the Options section, select the Forwarding type you desire. The settings available include: No forwarding Forward if not connected Forward if I don’t respond Always forward Use my follow me rules In the Phone Number box, type in the phone number where you wish your calls forwarded to. Type in the number of seconds you want your phone to ring in the Maximum Queue/Ring Time box. You may also select the time zone from the drop down menu. Note: The Maximum Queue/Ring Time box allows you to change the “ring time” for an incoming call. (This feature allows you to control how long a call will stay ringing on your phone until it goes through to voicemail or forwards to an outside number). It does not control how long a call will ring after it has been forwarded. PBNext User Manual 7 By default all voice messages are stored in the PBNext voice mail. If you prefer to have your voice messages stored on another device, such as your cell phone, then you will need to select the tab labeled ‘Follow Me Rules’ for advanced options. Click the button. Your preferences will be updated. PBNext User Manual 8 CREATING FOLLOW ME RULES You can create new rules to manage the way your incoming calls are forwarded. To create a new rule, click on the Create New Rule button located in the right upper corner of the screen. Type a name for the new rule in the Rule name text box. Locate the Rule Actions section and click on Add another action. This will prompt you to a new screen displaying an array of actions and options allowing you to set the parameters for your call forwarding features. Locate the Rule Name text box and create a name for the new rule. Under the section for Rule Actions select an action from the drop-down menu. The following options are available: PBNext User Manual 9 Forward to number Alert my PC Send Text Message FORWARD TO NUMBER If you select the Forward to number action, then you will need to specify the phone number you would like the call forwarded to by typing the number in the text box provided under the options section. Additionally, you will need to specify the number of rings the action will try. Type a number (maximum of 99) in the provided text box. If the box is left blank, then the rule will be omitted. You can add another action to the rule by clicking the blue icon labeled Add another action. ALERT MY PC If you select the Alert my PC action from the drop down list, a small text box will appear under the options section. You will need to specify the waiting time for the action (e.g. 30 seconds). SEND TEXT MESSAGE If you select the Send Text Message action from the drop down list, then you will need to: Type the number you wish the message to be routed to Select a Carrier from the drop list Specify how many seconds you wish the action to wait for When you’re done creating rules you will need to select options for what you want the program to do if all actions should fail. Locate the section labeled Default Action. PBNext User Manual 10 The following actions are available under the Default Action section: Forward to extension Send the caller to voice mail (default) Hang up FORWARD TO EXTENSION If you select Forward to extension you will need to specify the extension in the provided text box. SEND THE CALLER TO VOICE MAIL Select this option if you want the caller forwarded to your voice mail. HANG UP Select this option if you do not wish to forward the caller. RULE OPTIONS When you are done with the default action settings, locate the Rule Options section at the bottom of the screen. You will need to specify the Maximum hold time. Type in the number of minutes you wish to put your callers on hold. When you are done selecting your options, click the Save Changes button at the bottom of the screen. To activate this rule, you will need to add it to your Follow Me Schedule. PBNext User Manual 11 FOLLOW ME SCHEDULE Click on the Follow Me Schedule tab. This will prompt you to a new interface that will display your current Follow Me Schedule. Click on the blue icon labeled Add rule to schedule. Again, this will prompt you to a new screen. PBNext User Manual 12 NOTIFICATIONS Type your email address here Send mp3 file to email inbox Alert is docked on task bar Click on the Notifications tab to begin configuring the way you would like to receive email and voicemail notifications. EMAIL NOTIFICATIONS Enter your email address in the email text box. VOICE MAILS For each of your extensions there are two options for how you would like to be notified when a new voicemail is received. Notify client Send email NOTIFY CLIENT Select this option to have a message alert displayed on your monitor. The alert will be docked on the task bar at the bottom of the screen. SEND EMAIL * Select this option to have voice mails sent to your email inbox as a MP3 file. * A MP3 file is the digital audio format used in Windows with the extension .mp3, and it is used to allow different sound qualities to be recorded. The highest quality (16-bit samples at 44100 Hz) uses 18KB of storage [memory] per second. PBNext User Manual 13 SAVING YOUR NOTIFICATION SETTINGS If you are satisfied with your notifications settings, click the save button. PBNext User Manual 14 INBOUND FAXES To view all incoming faxes, click on the Faxes icon. The Faxes screen will open: To print a fax, click on the fax you wish to print. The selected fax will open up in an Adobe Acrobat file. Once the fax is open, click on the printer icon in Acrobat to print. Note: PBNext can only receive faxes; it is not able to send faxes. PBNext User Manual 15 ADDRESS BOOK To list and view your contact addresses, click on the Address Book icon. The Address screen will be displayed: To add a new contact to your address book, click the will appear in the Contacts column, highlighted in blue. button. A new contact entry Type the information about your new contact into the appropriate boxes. When you’ve entered the button. Your contact will be saved, and the name of information you want, click the the new contact will appear in the Contacts column. PBNext User Manual 16 ADDRESS BOOK (CONTINUED) You may type notes regarding the contact into the Notes box. When you’ve entered the information you want, click the button. The PBNext Address Book Importer allows you to import/update your PBNext contacts from the data contained in your Microsoft Outlook contacts. To import contacts, click the and follow the instructions on the screen. button To delete a contact, select the contact to be deleted in the Contacts column and click the button. When you click it, the following pop-up window will appear: Click the button to delete the contact or the button to cancel the procedure. PBNext User Manual 17 BILLING INFORMATION To view a detailed bill for your PBNext account, click on the eCare icon. The eCare screen will open. Billing information includes: Billing statement Previous Charges Current Charges Account Charges Phone Call Detail Charges. Each call made and received is displayed in terms of telephone number, connection time, and total charge. PBNext User Manual 18 To change the billing dates you wish to view, go to the drop-down menu in the upper right-hand corner and select the arrow button to view the appropriate range. To print a copy of your billing statement, click the corner. button in the upper right-hand PBNext User Manual 19 ADDING USERS AND THEIR EXTENSIONS To add users and their extensions to your telephone system, click on the Admin icon and select the Users and Extensions tab. Note: Adding a new user to your system may prompt additional monthly charges. You may have to call customer support to upgrade your account before you can add new users here. If this is the case, a message will appear on the screen with the customer service phone number. To add a new user and their extension, click the pop-up window will appear: button. When you click it, the following Type the name of the new user in the pop-up window box, then click the button. A new entry will appear in the column, highlighted in blue. The extension number is automatically generated, but you can change it by typing a new number in the Extension Num box. Fill in the user information (username, password, etc.) in the boxes on the right-hand side of the screen. If you want to grant the user access to the Admin and eCare areas, check the Admin Privileges box. Click the button to complete the process. To delete a user, simply select that user from the list and click the button. PBNext User Manual 20 CREATING EXTENSION QUEUES You can create an extension queue for each of the departments in your company. The extension queues will contain the people in a particular department and their individual extensions. To create an extension queue, select the Admin icon and then select the Queues tab. To set up call forwarding options, see the section in this manual for ‘Creating Follow Me Rules’. Note: In order to create an extension queue, you must first add users to your telephone system (see ADDING USERS AND THEIR EXTENSIONS). To create a new extension queue, click the pop-up window will appear: button. When you click it, the following button. Enter a name for your new extension queue in the pop-up window box, and click the A new entry will appear in the column, highlighted in blue, and also in the boxes on the right of the screen. The extension number is automatically generated. To delete a queue, simply select the queue from the list and click the button. PBNext User Manual 21 CREATING EXTENSION QUEUES (CONTINUED) Once you have created the extension name and number for your queue, you can select the people you want included in the queue by using the Non-Members and the Queue Members lists. In the Non-Members list, click on the person you want included in the queue and use the arrow button to move them to the Queue Members list. You can move all the members of the Non-Members button. list to the Queue Members list by using the All arrow button to move If you want to remove a person from the Queue Members list, use the them to the Non-Members list. You can move all the members of the Queue Members list to the NonMembers list by using the All button You can determine whether a call made to a selected queue will be forwarded to another number if a connection is not made. At the Forward Mode box, click on the arrow mode you want. If you selected Call Forwarding, type in the phone number you want the call to be forwarded to in the Forward Number box. button to view the appropriate choice and select the You have the option to change the “ring time” of a queue. This option determines how long a call will ring before being forwarded to the forwarded number you have selected. Type in the number of seconds you want the call to ring in the Maximum Queue/Ring Time box. “Ring time” does not affect how long a call will ring at the forwarded number. To record a greeting for your queue, click the following pop-up window will appear: button. When you click it, the Type your phone number in the pop-up window box. This number should be the number of the closest phone to your computer. button on the pop-up window. The system will call you. When you pick up the Select the receiver, record your voicemail greeting after the tone and press # when finished. Once you are finished, click the button. PBNext User Manual 22 CREATING A MENU The Menus folder manages the initial greeting your customers will hear when they call, as well as ways those calls will be routed. To create a menu, select the Admin icon and then select the Menus tab. Note: Click the In order to create a menu, you must first set up your extension queues (see CREATING EXTENSION QUEUES). button. When you click it, the following pop-up window will appear: Enter a name for your new menu in the pop-up window box and click the entry will appear in the Menus column, highlighted in blue. To delete a menu, simply select the menu from the list and click the button. A new button. The Option and Action boxes allow you to assign the options your callers will receive when they dial the phone number assigned to a particular menu. PBNext User Manual 23 In the Option box, type the number corresponding to the number on the telephone dial that you want the caller to press to receive a particular option. Assign an action to the option selected in the Action box. Click on the arrow button to view the actions available, and click on an action to assign it to the option selected. The Action field may be an extension or another menu. Extensions in the list are generated by setting up your extension queues, and menus by adding new menus (using the Create Menu function). You can also assign “default” as one of your menu options. If you type in the word “default” in the Option box and select an action in the Action box, the system will perform that action if the caller does not make another selection from the menu. For example, if you type in “default” and select the action to “transfer” the call to yourself, the caller would hear the menu greeting and, without pressing any keys, get transferred to your extension. At this point, you should record a greeting telling people not to make a selection. To record a greeting for this menu, click the following pop-up window will appear: button. When you click it, the Type your phone number in the pop-up window box. This number should be the number of the closest phone to your computer. button on the pop-up window. The system will call you. When you pick up the Select the receiver, record your voicemail greeting after the tone and press # when finished. Make sure to include the menu options in your greeting. (For example: Please press 1 for Sales, 2 for Customer Support, etc.) Once you are finished, click the button. PBNext User Manual 24 SELECTING A MENU GREETING You may want more than one menu greeting for your company, depending on the time of day (operating hours and after-hours, etc.). To apply such a greeting to an existing menu, select the Admin icon and then select the Phone Numbers tab. From the drop-down menu, click on the arrow menu you want the greeting to apply to. To record the greeting, click the window will appear: button to view the menus available, and click on the button. When you click it, the following pop-up Type your phone number in the pop-up window box. This number should be the number of the closest phone to your computer. button on the pop-up window. The system will call you. When you pick up the Select the receiver, record your voicemail greeting after the tone and press # when finished. Once you are finished, click the button. To enable the new greeting to be played, check the Play greeting before start menu box. To remove the greeting, simply uncheck the box. PBNext User Manual 25 CREATING CALL ME NOW LINKS You can create links on your website that will allow users browsing your site to call you by clicking the link. The Call Me Now feature is available at no additional charge to all users. This feature is available to administrators only. HOW CALL ME NOW WORKS When the user clicks the Call Me Now link, a pop-up window will appear that asks for the user’s telephone number. After entering the phone number, the user will be connected to the call menu you have selected. Note: You will have to know how to place a clickable (hyperlinked) button or word on your website. We cannot show customers how to add these links to their sites. To create a Call Me Now link, go to the administrator’s section of the mypbnext.com portal and click on the Call Me Now tab. Click the button on the Call Me Now page. The following pop-up window will appear: Enter a descriptive name for the Call Me Now link and click . PBNext User Manual 26 CREATING CALL ME NOW LINKS (CONTINUED) The name you have created will automatically appear in the Name box on the Call Me Now page. In the Menu box, type in the menu you want to place callers into, or use the arrow the appropriate menu from the drop-down menu. Click the button to select button to continue. The final version of the URL link will appear in the URL box. Copy the entire link and place it as a clickable (hyperlinked) button or word on your website. You can link a single word to the same URL. This linked word will go to the same site as the full link. You can place this link multiple times on one page. You can also place it on as many different pages as you wish. To route Call Me Now calls to different menus, create new Call Me Now links and place them on your website. PBNext User Manual 27 CHECKING VOICEMAIL USING THE TELEPHONE Note: To use this feature, your password must be a five-digit numeric password. (If your password is not currently five digits, see CHANGING YOUR PASSWORD). First, dial your PBNext phone number and when the recorded greeting begins, press #. When the recording asks for your extension, enter your extension on the phone keypad. Then, when prompted, enter your password. Your voicemails will play. INTERACTIVE MUSIC ON HOLD PBNext has secured licensing that allows us to offer well-known recordings for your on-hold music at no additional charge to you. Administrators have the option to set different genres of hold music for each extension. In addition, callers can change genres or change selections within a genre simply by using their telephone key pad. HOW MUSIC ON HOLD WORKS An incoming caller will hear hold music when placed on hold. The music genre the caller hears is selected by the administrator. Callers placed on hold have the option to change the genre of music they are listening to by pressing the star key (*) on their telephone key pad. Callers have access only to those genres selected by the administrator. A caller can also change to a different selection within the genre by pressing the pound key (#). HOW TO CHANGE HOLD MUSIC FOR AN EXTENSION To change hold music, go to the administrator’s section of the mypbnext.com portal and click on the Hold Music tab. Under Per-extension override, select the extension you want to change. PBNext User Manual 28 INTERACTIVE MUSIC ON HOLD (CONTINUED) With the correct extension selected, click the box next to Customize hold music for this extension. Two new boxes will appear: Available Genres and Selected Genres. Under Available Genres, select the genre of music you would like to make available for the extension. Click the button to move the genre into Selected Genres. To make all genres available, click the button. To deselect a genre, highlight the genre of music you want to deselect and click the button. When you have finished selecting the music genres you want to make available, click the button. PBNext User Manual 29 AVAILABLE OPTIONS PBNext offers additional options, to which additional fees may apply. Those options are: • Talking Properties • Web Conferencing To purchase any of these options, contact Customer Care at (877) 772-6398. Additional fees may apply. TALKING PROPERTIES Designed especially for realtors, Talking Properties allows you to create extensions that will connect callers to recorded messages about properties for sale. When callers enter an extension, also known as a “Property ID,” they will receive information about the property they are interested in. At the end of the recording, callers will be asked if they want to speak to a realtor or receive a return call later. Any user on the PBNext account will have access to add or delete a property. HOW TO CREATE A TALKING PROPERTY To create a Talking Property, click on the Talking Properties icon in the mypbnext.com portal. The Talking Properties screen will appear: On the Talking Properties screen, select an existing property from the left column, or click to create a message for a new property. PBNext User Manual 30 TALKING PROPERTIES (CONTINUED) If you choose Add Property, the following pop-up window will appear: Enter the address for the new property and click . The address you entered will appear on the left side of the screen and under Property Information. Under Talking Property, select an extension number for this property, enter it in the box beside Extension Num, and click . In the Transfer To box, type the name of the person to whom calls related to this property should be directed, or click on the arrow button and select a name from the drop-down menu. When you are ready to record a greeting for the property, click Record a new home description. The following pop-up window will appear: Enter your phone number in the pop-up window box and click Call me. Your phone will ring. Answer the phone, record your greeting, and press #. CALL LOG To access the call log for this property, click on the Call Log tab on the Talking Properties section of the mypbnext.com portal. A log of calls for this property will appear: PBNext User Manual 31 TALKING PROPERTIES (CONTINUED) TRACKING ADS You can use the Call Log feature to track the effectiveness of your property ads. You must create a unique extension and a new greeting for each ad source you are tracking. To track an ad, click . In the pop-up window, enter the source of the ad, e.g. “LA TIMES”, as part of the address: Enter the remainder of the address (city, state, ZIP) and click . Select a unique extension for this property and enter it in the box beside Extension Num. Complete the Transfer To box and click Record a new home description. You must record a new greeting for each extension. Repeat this process for each different ad source. When you click on the Call Log tab, the ad source for each call will appear in the Home column. PBNext User Manual 32 WEB CONFERENCING You can use PBNext to host a web conference. Available for a small monthly fee, web conferencing allows you to instant message, draw on a white board, display slide shows, and share applications with a number of users simultaneously online. HOW TO HOST A WEB CONFERENCE To host a web conference, click on the Web Conferences icon in the mypbnext.com portal. The Web Conference screen will appear: To schedule a web conference, click the window will appear: button. The following pop-up PBNext User Manual 33 WEB CONFERENCING (CONTINUED) Enter the number of people that will attend the conference (including the moderator) in the pop-up window and click . The number you select will appear under Conference Information, next to Maximum attendees. Enter the time and the date of the web conference and click . To invite the attendees to your web conference, go to the Invitations box on the Web Conference page and enter the email addresses of the people you wish to invite on the To: line. Separate each address with a comma. On the Subject line, enter an announcement of the web conference, such as In the Message box, enter a brief description of the web conference, including the moderator interface: When all of the information for your invitation is complete, click . For more information about how to use the web conferencing features once your web conference has begun, click the Help button on the Web Conference toolbar. PBNext User Manual 34 HELP AND TECHNICAL SUPPORT Any time you need help, call 1-877-7- PBNEXT (1-877-772-6398) and the next available Customer Service Representative will assist you. Make sure you have your account number, username, and security code ready because our Customer Support Center will need this information. If we don’t already have one on file, our system will also ask for an email address where it can send information. CAUTION: Do not share your password! PBNext representatives will never ask you for your password. To download a copy of this manual and Acrobat Reader (if necessary) click on the Help icon. For more information on PBNext, logon to www.PBNext.com. For more information about DelTel, Inc and other services provided under DelTel, Inc, please logon to WWW.DELTEL.COM. PBNext User Manual 35