1
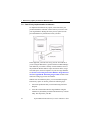
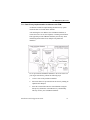
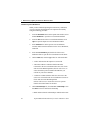
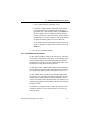
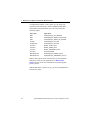
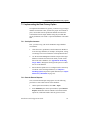
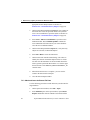
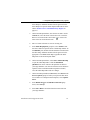
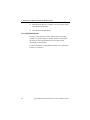
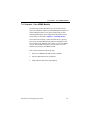
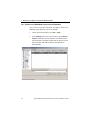
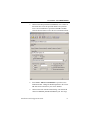
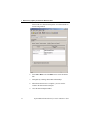
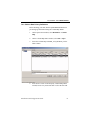
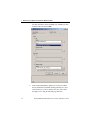
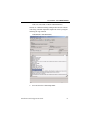
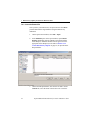
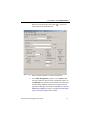
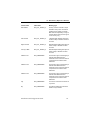
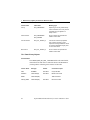
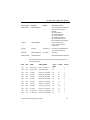
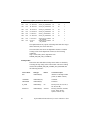
7. Data Privacy Option for Oracle
E-Business Suite
This section contains information on using the Optim Data Privacy
option in conjunction with the Optim Test Data Management
Solution for Oracle E-Business Suite.
The data privacy option enables you to mask sensitive data on nonproduction instances of an Oracle E-Business database (including
test, training, and development environments). The data privacy
definitions provide the means to easily de-identify, mask and
transform sensitive data in the HRMS module of Oracle
Applications version 11.5.10.
If your current Test Data Management configuration does not
include the Data Privacy option and you would like that
functionality, contact your IBM sales representative.
This chapter includes the following topics:
• Data Privacy Overview
• Installing the Data Privacy Option
• Data Privacy Implementation
• Scenario - Core HRMS Module
• Data Privacy Reference Material
Installation and Configuration Guide
53
7. Data Privacy Option for Oracle E-Business Suite
Prerequisites
The Data Privacy option is an added feature of the Test Data
Management Solution and has the same hardware and software
requirements as outlined in Section 1.1 Hardware and Software
Requirements. For more information, see the Detailed System
Requirements document for the Test Data Management Solution
for Oracle E-Business Suite at the following site:
http://www.ibm.com/support/
search.wss?tc=SSC4TGP&sort=des&dc=DA420&dtm
54
Optim TDM and DP Solutions for Oracle E-Business Suite
7.1 Data Privacy Overview
7.1 Data Privacy Overview
Every company is required to protect personal employee
information such as addresses and Social Security numbers. Use
the Optim Data Privacy option to efficiently maintain a working
database of employee information that is secure and safe to use for
test, development and training environments.
Different approaches can be used to mask data in your Oracle EBusiness database. The following approaches involve extracting
and inserting data into a target database.
• You can mask the extracted data from an Optim Extract Request
when you insert it into your target database.
• When you use Data Privacy in conjunction with Test Data
Management, a more secure approach is to mask the extracted
data when you insert data into a clone of your production
database. The masked clone is then used as a source for
subsequent non-production databases environments.
Installation and Configuration Guide
55
7. Data Privacy Option for Oracle E-Business Suite
7.1.1 Data Privacy Implementation Architecture
To implement the Data Privacy option, extract data from your
production database and mask sensitive data as you insert it into
your target database. During the insert process, Optim uses the
provided Data Privacy definitions to mask your data.
In this approach, you must first set up your test environment. If
you are using the Data Privacy option with the Test Data Management Solution, you will have already created a database clone of
the production database and run scripts to truncate tables, reorganize table spaces, and reset sequences in your new target database.
See Section 1.2 Creating an Oracle E-Business Target Environment and Appendix B. Truncating Target Tables for more information on setting up your test environment.
With the test environment in place, you can mask data using the
Data Privacy option. To do this, perform the following steps:
56
1.
Extract the production data you will mask using an Extract
Request.
2.
Insert the extracted data into the target database using the
Data Privacy definitions provided in the Data Privacy Column
Map. This step masks your data.
Optim TDM and DP Solutions for Oracle E-Business Suite
7.1 Data Privacy Overview
7.1.2 Data Privacy Implementation Architecture with TDM
An alternate method for implementing the Data Privacy option
masks the data in a cloned master database.
After masking the new database (the Gold Master database) is
used as the source for test, development, or training environments.
This approach provides additional flexibility and security when
distributing masked data across multiple non-production
databases.
To set up a masked Gold Master database to use as the source for
your target environment, perform the following steps:
1.
Create a clone of the production database.
2.
Extract the data to be privatized from the clone by running an
Optim Extract Request.
3.
Insert the extracted data into the cloned database using the
data privacy definitions in the Data Privacy Column Map.
This step creates your Gold Master database.
Installation and Configuration Guide
57
7. Data Privacy Option for Oracle E-Business Suite
You can use the Gold Master database as your secure source for
your target environment. To create a target environment, perform
the following steps:
1.
Clone the masked Gold Master database to a target database.
2.
Extract the masked data from Gold Master using the Optim
Test Data Management Solution for Oracle E-Business.
3.
Insert the extracted data into the target database.
4.
You can then run truncate scripts to reduce the database size
and run reset scripts to reset the target database sequences
(optional).
Note:
58
For more information on truncating your database see
Appendix B. Truncating Target Tables on page 123.
For more information on resetting database sequences see
Resetting Sequences on page 31.
Optim TDM and DP Solutions for Oracle E-Business Suite
7.2 Installing the Data Privacy Option
7.2 Installing the Data Privacy Option
Before you can successfully mask the Core HRMS data, you must
properly install and configure the Optim Data Privacy option.
Perform the following steps:
1.
Install and configure the Test Data Management Solution
2.
Import data privacy definitions
3.
Create data privacy objects
7.2.1 Install and Configure the Test Data Management Solution
Before you can use the Data Privacy option you must install and
configure Optim as described in Chapter 2. Installing Optim.
The Data Privacy option uses many of the Optim Data Privacy
tables. These tables must be loaded when configuring the first
workstation.
7.2.2 Import Data Privacy Definitions
The Optim Data Privacy option installation includes an import file
that contains the Optim data privacy definitions needed to extract
and mask Core HRMS data from your Oracle E-Business source
database and insert the data into your target database.
Import the file into the Optim Directory and verify that the
definitions are imported successfully.
The import file contains the following definitions, which are
needed to extract the complete business object defined by the
Installation and Configuration Guide
59
7. Data Privacy Option for Oracle E-Business Suite
Oracle E-Business module, mask the data, and insert the data into
the target database.
Module
Object
Object Name
Core Human Resources
Management Systems (HRMS)
Access Definition
ADCHR11510DP
Extract Request
ERCHR11510DP
Insert Request
IRCHR11510DP
Table Map
TMCHR11510DP
Column Map
CMPHN11510DP
CMADR11510DP
CMCHR11510DP
• Access Definition - An Access Definition identifies the Start
Table, related tables, primary keys, relationships, and selection
criteria that define the data you want to extract from your source
database.
• Extract Request - An Extract Request initiates the Extract
Process, which allows you to copy a set of related rows from
one or more tables and stores this data in an Extract File. The
Extract Request references an Access Definition that defines the
data to be extracted.
• Insert Request - An Insert Request initiates the Insert Process,
which copies data from a source file into specified destination
tables. The Insert Request specifies an Extract File containing
the data you want to insert into your target database and the
parameters needed to run the process. The Insert Request
references a Table Map to map the destination for the data to be
inserted.
• Table Map - A Table Map defines specifications for correlating
source and destination tables of compatible data. A Table Map
can map tables that have different names, modify table names,
60
Optim TDM and DP Solutions for Oracle E-Business Suite
7.2 Installing the Data Privacy Option
exclude tables from a process, or include Column Maps for
greater control over the data. Table Maps can be used in a
Convert, Insert, or Load process, or with the Create Utility.
• Column Map - A Column Map defines the specifications for
mapping columns of compatible data between source and
destination tables. You can map columns that have different
names, modify data, or exclude columns from a process. You
can include one or more Column Maps in a Table Map when
you create a request to compare, convert, insert, load, or restore
data.
Import the Optim Data Privacy Definitions
Use the following procedure to import the data privacy definitions
into your Optim directory.
1.
In the Optim main window, select Utilities > Import.
2.
In the Import window, Process tab, click the Input File
browse button to open the Open window.
3.
Open OAHRCHR11510DP.txt from the Import/gaAD folder.
4.
Select all available check boxes in the Definitions box.
5.
Select Overwrite existing definitions (if definitions already
exist in the Optim directory).
6.
On the DB Aliases tab, enter the DB Alias for your source and
target databases in New DB Alias. (The Optim definitions
include the default source DB Alias PSTSRC and target DB
Alias PSTAPP.)
7.
Select File > Run, or click the Run icon.
8.
Click the Show process log icon
to check for errors and
view the status of the Import process.
9.
Close the Import window.
Installation and Configuration Guide
61
7. Data Privacy Option for Oracle E-Business Suite
Validate Imported Definitions
When you have finished importing the Data Privacy definitions,
you can verify that the definitions were imported successfully
using the following procedure:
1.
From the Definitions menu on the Optim main window, select
Access Definition to open the Access Definition Editor.
2.
From the File menu on the Access Definition Editor, select
Open to open the Open an Access Definition window.
3.
In the Identifier box in the Open an Access Definition
window, double-click the identifier for the Access Definition,
A4SOAE.
4.
In the Access Definition grid, double-click the Access
Definition name to open the Access Definition in the editor.
5.
On the Tables tab, note the Type value for each listed table:
• “Table” indicates that the import was successful.
• “DB Alias Unknown” indicates that the DB Alias
referenced in the Access Definition does not exist. Check
and correct the Default Qualifier (dbalias.tableowner) to
ensure the dbalias portion matches the DB Alias you
created for your source database.
• “Unknown” indicates that the table does not exist or the
tableowner referenced in the Access Definition is incorrect.
Check and correct the Default Qualifier
(dbalias.tableowner) to ensure the tableowner portion
matches the schema name for the table.
6.
On the Relationships tab, clear Use new relationships. Note
the Status value for each listed relationship:
• Blank indicates that the relationship is defined and not new.
62
Optim TDM and DP Solutions for Oracle E-Business Suite
7.2 Installing the Data Privacy Option
• “New” indicates that the relationship is new.
• “Unknown” indicates that the relationship is not defined
because the table has been deleted from the database or
Optim Directory, or the Default Qualifier on the Tables tab
has been changed. You can change the Default Qualifier
(dbalias.tableowner) to ensure the dbalias portion matches
the DB Alias for your source database. You can also import
the Optim definitions again for the source DB Alias.
• “Ref” indicates that the relationship is ignored because the
parent or child table is specified as a reference table on the
Tables tab.
7.
Close the Access Definition Editor.
7.2.3 Create Data Privacy Objects
To mask name and address columns, the Data Privacy option first
creates master lookup tables with realistic yet fictionalized entries
from the sample data that was loaded during Optim installation.
The Data Privacy option uses a view of these lookup tables as the
foundation for lookup-based masking functions.
To mask name entries, Optim matches unique Oracle ID numbers
from the master lookup table and the destination table. Optim uses
the corresponding values from the lookup table to create a view.
To mask address entries, Optim accesses multiple lookup tables
and creates a view with data from different geographies. As with
masking names, Optim matches the unique Oracle IDs from the
various source tables and the destination table. The resulting view
maintains geographically realistic address data that will be used in
masking your data.
The Data Privacy option provides a script in the sql folder of the
installation directory to create the objects that are necessary for
using the option.
Installation and Configuration Guide
63
7. Data Privacy Option for Oracle E-Business Suite
Use SQL*Plus to run the “create_optim_ebs_dp_objects.sql”
script and create Data Privacy objects including control tables,
lookup tables, and materialized views. The script creates the
following objects.
Object Type
Object Name
Table
OPTIM_EBS_DP_LKP_CONTROL
Table
OPTIM_EBS_DP_NAMES_LKP_MASTER
Table
OPTIM_EBS_DP_ADDRS_LKP_MASTER
Package
OPTIM_EBS_DP_LKP_PKG
Package Body
OPTIM_EBS_DP_LKP_PKG
Procedure
INSERT_CNTRL_DATA
Procedure
INSERT_NAMES_DATA
Procedure
INSERT_ADDRESSES_DATA
Procedure
CREATE_MVIEWS
Materialized View
OPTIM_EBS_DP_NAMES_LKP_MV
Materialized View
OPTIM_EBS_DP_ADDRESSES_LKP_MV
Many of these objects can be customized to meet the particular
data privacy needs of your organization. See Data Privacy
Objects on page 84 for more information on customizing data
privacy objects.
With the Data Privacy objects set up, you can now implement the
Data Privacy option.
64
Optim TDM and DP Solutions for Oracle E-Business Suite
7.3 Implementing the Data Privacy Option
7.3 Implementing the Data Privacy Option
To implement the Data Privacy option, you must set up your target
database environment. Once you have the proper environment in
place, extract data from the production database and insert the
extracted data into the target database using the provided data
privacy definitions. The result is a privatized database with usable
data.
7.3.1 Set Up Environment
First, you must set up your Oracle E-Business target database
environment.
1.
Clone the source (production) Oracle E-Business database to
create the target database (for example, development, testing,
or training). This clone contains the current production data.
2.
Use the Test Data Management truncate scripts on the target
database to truncate the tables from which you will extract
data in the source database. (See Appendix B. Truncating
Target Tables.) Reorganize the target table spaces to reduce
the size of the database.
3.
Ensure that the Optim Server is configured with connectivity
to both the source and target databases (see Chapter 2.
Installing Optim). Import the Optim definitions (see Import
Data Privacy Definitions on page 59).
7.3.2 Run the Extract Request
Next, run an Extract Request using Optim. Use the following
procedure to extract data from the source database.
1.
On the Optim main window, select File > Open.
2.
In the Identifier pane on the Open window, expand Extract
Request and double-click the identifier associated with the
import file, A4SOAE. Double-click the grid row for the
Installation and Configuration Guide
65
7. Data Privacy Option for Oracle E-Business Suite
appropriate Extract Request.(Refer to the table in
Section 7.2.3 Create Data Privacy Objects on page 63).
3.
On the Extract Request Editor, General tab, enter a name for
the Extract File or use the specified default. Verify that the
correct Access Definition is specified. (Refer to the table in
Section 7.2.3 Create Data Privacy Objects on page 63).
4.
Select Tools > Edit Access Definition to open the Access
Definition Editor. Ensure Default Qualifier contains the
correct DB Alias and Creator ID for your source database.
Close the Access Definition Editor.
5.
On the Extract Request Editor, Objects tab, verify that only
Objects are selected, not Extended Objects.
6.
Select File > Run to create the Extract File.
7.
On the Extract File Variable Values dialog, enter values to
identify the selection criteria that Optim will use to extract
user data. Set the boundaries for the Person IDs that will be
used to generate privatized data from the view. Set the upper
and lower limits of the PERSON_FROM and PERSON_TO
variable values.
8.
When the Extract Process is complete, you can view the
results in the Extract Process Report.
9.
Close the Extract Request Editor.
7.3.3 Mask and Insert the Extract File Data
Use the following procedure to mask and insert your data into the
target database.
66
1.
On the Optim main window, select File > Open.
2.
In the Identifier pane on the Open window, expand Insert
Request and double-click the identifier associated with the
Optim TDM and DP Solutions for Oracle E-Business Suite
7.3 Implementing the Data Privacy Option
Insert Request, A4SOAE. Double-click the grid row for the
Insert Request to open the Insert Request Editor (Refer to the
table in Section 7.2.3 Create Data Privacy Objects on
page 63).
3.
On the Insert Request Editor, enter the Server Name. On the
General tab, select the name of the Source File or click the
Retrieve last created Source File button
to retrieve the
name of the last created Extract File.
4.
Enter a Control File name or select an existing one.
5.
In the Table Map Options group box, select Named. Click
the browse button to open the Select a Table Map window. In
the Identifier pane, double-click the identifier associated with
the Table Map, A4SOAE. Double-click the grid row for the
appropriate Core HRMS Table Map to populate the Table
Map name on the Insert Request Editor.
6.
On the Insert Request Editor, select Tools > Edit Table Map
to open the Table Map Editor. Click the Destination
Qualifier down arrow and select the qualifier for tables in
your target database. (You can also click the browse button to
open the Select a Default Destination Qualifier window.)
Close the Table Map Editor and save changes.
7.
On the Insert Request Editor, General tab, select Insert in the
Process Options group box when you request the first Insert
for a module. For subsequent Insert Requests, select Update/
Insert.
8.
In the Disable Triggers and Disable Constraints group
boxes, select Always.
9.
Select File > Run to insert data from the Extract File into
your target database.
Installation and Configuration Guide
67
7. Data Privacy Option for Oracle E-Business Suite
10. When the Insert Process is complete, you can view the results
in the Insert Process Report.
11. Close the Insert Request Editor.
7.3.4 Verify Masked Data
Be sure to verify that your sensitive data has been successfully
masked. Use Optim Compare or another method to confirm that
the values in your target database have been replaced with
meaningful yet fictional data.
For more information on using Optim Compare refer to the Optim
Compare User Manual.
68
Optim TDM and DP Solutions for Oracle E-Business Suite
7.4 Scenario - Core HRMS Module
7.4 Scenario - Core HRMS Module
The following scenario illustrates how to use the Data Privacy
option in conjunction with the Test Data Management Solution for
Oracle E-Business Suite. The scenario assumes that you have
already installed Optim, and configured the DB Aliases used in
this scenario (as described in Chapter 2. Installing Optim).
The scenario also assumes you have the Data Privacy option as
part of your Test Data Management Solution configuration, and
have created a target database with a subset of your Core HRMS
records. The personal information you will extract from your
database was created by the HRMS module.
This scenario includes the following steps:
1.
Extract Core HRMS data from the source database.
2.
Edit the Optim Data Privacy definitions.
3.
Mask and insert data in the target database.
Installation and Configuration Guide
69
7. Data Privacy Option for Oracle E-Business Suite
7.4.1 Extract Core HRMS Data from the Source Database
Once you have set up the environment, use Optim to extract Core
HRMS personal data from your source database.
70
1.
On the Optim main window, select File > Open.
2.
In the Identifier pane on the Open window, expand Extract
Request and double-click the identifier associated with the
Extract Request, A4SOAE. Double-click the grid row for the
Extract Request, ERCHR11510DP, to open the Extract
Request Editor.
Optim TDM and DP Solutions for Oracle E-Business Suite
7.4 Scenario - Core HRMS Module
3.
On the Extract Request Editor, General tab, enter a name for
the Extract File or use the specified default. Verify that the
correct Access Definition is specified (ADCHR11510DP).
Click the browse button to select the Access Definition name.
4.
Select Tools > Edit Access Definition to open the Access
Definition Editor. Change the Default Qualifier to the correct
DB Alias and Creator ID for your source database.
5.
On the Extract File Variable Values dialog, enter Person ID
values for PERSON_FROM and PERSON_TO. The range
Installation and Configuration Guide
71
7. Data Privacy Option for Oracle E-Business Suite
between the two values should equal or exceed the number of
entries being masked.
72
6.
Select File > Run or click the Run icon to create the Extract
File.
7.
Disregard any warnings about NEW relationships.
8.
When the Extract Process is complete, you can view the
results in the Extract Process Report.
9.
Close the Extract Request Editor.
Optim TDM and DP Solutions for Oracle E-Business Suite
7.4 Scenario - Core HRMS Module
7.4.2 Edit the Data Privacy Definitions
Before inserting your data, edit the Optim HRMS definition for
privatizing age information using the Column Map Editor.
1.
On the Optim main window, select Definitions > Column
Map.
2.
On the Column Map Editor window, select File > Open.
3.
Select the Column Map with PER_ALL_PEOPLE_F in the
Table column.
4.
In the Source section of the Respecify Column Map Tables
window, browse for your Extract File or select the file from
Installation and Configuration Guide
73
7. Data Privacy Option for Oracle E-Business Suite
the drop down menu. Select the PER_ALL_PEOPLE_F table
from the Table list and click OK.
5.
74
In the Column Map Editor, update row 14 with a new Data
Privacy definition. The default masking technique is to age a
column value by 2 years, 6 months, 40 weeks, and 15 days,
and apply a rule, using the following Age Function:
Optim TDM and DP Solutions for Oracle E-Business Suite
7.4 Scenario - Core HRMS Module
AGE(+2Y,+6M,+40W,+15D,RU=NEXTPAYDAY)
Instead, use a different masking technique that alters the column
value using a Default Adjustment. Update the value by using the
following the Age Function:
AGE(DEF,RU=NEXTPAYDAY)
6.
Save and close the Column Map Editor.
Installation and Configuration Guide
75
7. Data Privacy Option for Oracle E-Business Suite
7.4.3 Insert the Extract File
Once you have your Extract File, use Optim to insert the HRMS
personal data into the target database using the Data Privacy
definitions.
76
1.
On the Optim main window, select File > Open.
2.
In the Identifier pane on the Open window, expand Insert
Request and double-click the identifier associated with the
Insert Request, A4SOAE. Double-click the grid row for the
appropriate Insert Request (see the table in Section 7.2.3
Create Data Privacy Objects on page 63) to open the Insert
Request Editor.
3.
On the Insert Request Editor, enter the Server Name. On the
General tab, select the name of the Source File or click the
Optim TDM and DP Solutions for Oracle E-Business Suite
7.4 Scenario - Core HRMS Module
Retrieve last created Source File button
name of the last created Extract File.
to retrieve the
4.
Enter a Control File name or select an existing one.
5.
In the Table Map Options group box, select Named. Click
the browse button to open the Select a Table Map window. In
the Identifier pane, double-click the identifier associated with
the Table Map, A4SOAE. Double-click the grid row for the
appropriate Table Map (see the table in Section 7.2.3 Create
Data Privacy Objects on page 63) to populate the Table Map
name on the Insert Request Editor window.
Installation and Configuration Guide
77
7. Data Privacy Option for Oracle E-Business Suite
6.
On the Insert Request Editor, select Tools > Edit Table Map
to open the Table Map Editor. Click the Destination
Qualifier down arrow and select the qualifier for tables in
your target database. (You can also click the browse button to
open the Select a Default Destination Qualifier window.)
Close the Table Map Editor and save changes.
7.
On the Insert Request Editor, General tab, select Insert in the
Process Options group box when you request the first Insert
process for a module. For subsequent Insert Requests, select
Update/Insert.
8.
In the Disable Triggers and Disable Constraints group
boxes, select Always.
9.
Select File > Run to insert data from the Extract File into
your target database.
10. When the Insert Process is complete, you can view the results
in the Insert Process Report.
11. Close the Insert Request Editor.
7.4.4 Verify the Target Database
Log on to Oracle E-Business and access the target database. Verify
that the personal data has been masked. Select the HRMS system
and navigate to the employee information screen. Verify that the
HRMS data has been masked.
You now have a working database with privatized and usable data.
78
Optim TDM and DP Solutions for Oracle E-Business Suite
7.5 Data Privacy Reference Material
7.5 Data Privacy Reference Material
This section covers the following information:
• Masking methods
• Oracle HRMS Database Tables
• Oracle HRMS Columns for Masking
• Data Privacy Objects
7.5.1 Masking Methods
Depending on the column, the Data Privacy option masks sensitive
data using one of several functions. For detailed information on
each function refer to the Optim Common Elements Manual.
Lookup Function
For names and addresses, the Data Privacy option uses lookup
tables to mask information while keeping the data usable. The
Column Map lookup function populates the destination column
based on a “view” that is created from the source table using an
SQL script. The Lookup Function selects values based on the
entries in the source table.
Hash Lookup Function
The Hash Lookup Function obtains the value for a destination
column from a lookup table, according to a hashed value derived
from a source column. The Hash Lookup Function allows you to
consistently mask data using the same source and lookup tables in
any environment.
AGE Function
The Age Function is used to age values in a source column. The
source column can contain character, numeric, date, or timestamp
data. Note that a CHAR or VARCHAR column has a maximum
Installation and Configuration Guide
79
7. Data Privacy Option for Oracle E-Business Suite
length of 256 bytes. The Age Function is formatted as:
AGE(parameters)
TRANS COL Function
The TRANS COL function can mask data that has no inherent
format or a format that is not widely known. TRANS COL
maintains the format and character type of the source data at the
destination.
Data types CHAR, VARCHAR and non-float numeric can be
masked with TRANS COL. Alphabetic and numeric characters are
masked, but any other characters in the source data are copied to
the destination without being changed. You can generate unique
values for unique source data. For non-unique source data, you can
generate a different value for each occurrence of the same source
and you can generate values with a length different from the
source. The source data format and character type determines the
format and character type of the destination data. If the source data
is uppercase alphabetic characters, the output generated at the
destination is uppercase alphabetic.
For more information on the TRANS COL function, see the
TRANS COL Data Privacy Function support document at the
following site:
http://www-01.ibm.com/support/
docview.wss?rs=0&context=SSCGNPF&context=SSCGNPH&co
ntext=SSC253J&dc=DB550&dc=DB560&uid=swg21424217&lo
c=en_US&cs=utf-8&lang=
80
Optim TDM and DP Solutions for Oracle E-Business Suite
7.5 Data Privacy Reference Material
7.5.2 Oracle HRMS Database Tables
Below are the Oracle Core HRMS Schema tables that contain the
personal information that is masked using the Data Privacy option:
• PER_ALL_PEOPLE_F
• PER_PHONES
• PER_ADDRESSES
PER_ALL_PEOPLE_F
The PER_ALL_PEOPLE_F table holds personal information for
individuals associated with the HR department. Individuals
include employees, applicants, ex-employees, ex-applicants,
contacts and other site-specific categories of people.
PER_PHONES
The PER_PHONES table holds phone numbers for current
employees, former employees and other contacts.
PER_ADDRESSES
The PER_ADDRESSES table holds address information for
current and ex-employees and other contacts. See Oracle
documentation for pertinent information regarding the handling of
primary addresses.
Installation and Configuration Guide
81
7. Data Privacy Option for Oracle E-Business Suite
7.5.3 Oracle HRMS Columns for Masking
The following columns in the Core HRMS tables will be
considered for masking.
Column Name
Table Name
Masking Type
Last Name
PER_ALL_PEOPLE_F
Values are masked with a meaningful
Last Name from the Lookup Table.
First Name
PER_ALL_PEOPLE_F
Values are masked with a meaningful
First Name from the Lookup Table.
Middle Name
PER_ALL_PEOPLE_F
If the source columns are populated,
the new value is randomly picked
(name or initial) from the Lookup View
based PERSON_ID.
Known As
PER_ALL_PEOPLE_F
Values are randomly substituted only if
source is not null.
Previous Name
PER_ALL_PEOPLE_F
If the record qualifies for Previous
Name, non-null values from the source
data are populated from Lookup
values.
Email ID
PER_ALL_PEOPLE_F
Lookup values are populated based on
person ID and the new masked name
assigned to the non-production
environment. User can determine the
e-mail suffix based on lookup values
setup.
Employee Number
PER_ALL_PEOPLE_F
The Optim Random function is used to
mask the data in this column.
Replacement values must conform to
the same formatting as the original
source value. The masking technique
will synchronize data to the
EMPLOYEE_NUMBER in the
PER_ALL_ASSIGNMENTS_F table
and other applicable areas.
National Identifier/SSN PER_ALL_PEOPLE_F
This column uses the Optim Trans Col
Function for U.S. geography data to
mask government ID data.
82
Optim TDM and DP Solutions for Oracle E-Business Suite
7.5 Data Privacy Reference Material
Column Name
Table Name
Masking Type
Date of Birth
PER_ALL_PEOPLE_F
This key column is used as a unique
identifier in many cases. The data is
masked and the validity is checked.
Birth dates are replaced by a range of
random dates ensuring that the age is
not too old or young.
Town of Birth
PER_ALL_PEOPLE_F
Standard Optim masking techniques
of either Lookup or Random functions
are used.
Region of Birth
PER_ALL_PEOPLE_F
Standard Optim masking techniques of
either Lookup or Random functions
are used.
Country of Birth
PER_ALL_PEOPLE_F
Standard Optim masking techniques of
either Lookup or Random functions
are used.
Address Line 1
PER_ADDRESSES
The first line is given a meaningful yet
fictional street address and the
remainder is set to null unless there is
a requirement for multi-line street
addresses.
Address Line 2
PER_ADDRESSES
The first line is given a meaningful yet
fictional street address and the
remainder is set to null unless there is
a requirement for multi-line street
addresses.
Address Line 3
PER_ADDRESSES
The first line is given a meaningful yet
fictional street address and the
remainder is set to null unless there is
a requirement for multi-line street
addresses.
City
PER_ADDRESSES
This column is set from a list of town or
city names.
Zip
PER_ADDRESSES
This field is masked as a valid value
based on City and State.
Installation and Configuration Guide
83
7. Data Privacy Option for Oracle E-Business Suite
Column Name
Table Name
Masking Type
County
PER_ADDRESSES
Depending on the City, State and Zip
Code combination, the county value is
populated using the algorithm or
lookup values.
Phone Number
PER_ADDRESSES
Phone numbers are replaced with
realistic random data.
PER_PHONES
License Number
PER_ALL_PEOPLE_F
If the source values are populated,
then a random number or null is
replaced on the target database. There
is no Oracle application integrity built
on this column value.
Work Phone
PER_ALL_PEOPLE_F
Phone numbers are replaced with
realistic random data.
7.5.4 Data Privacy Objects
Control Table
The OPTIM_EBS_DP_LKP_CONTROL table is the control table,
which allows the end users to control the Source and Destination
(Lookup) tables. Following is the structure of the table:
Column Name
Data type
Default
Column Description
SEQ
NUMBER
NOT NULL
Unique identifier
MODULE
VARCHAR2(3)
NOT NULL
Module name 'CHR'
NAME
VARCHAR2(60)
TABLE_NAME
VARCHAR2(30)
84
Table information
NOT NULL
Name of the table
Optim TDM and DP Solutions for Oracle E-Business Suite
7.5 Data Privacy Reference Material
Column Name
Data type
Default
Column Description
QUICKCODE
VARCHAR2(10)
Source/destination indicator (also
indicates whether name or
address)
SN - Source Name
DN - Destination Name
SA - Source Address
DA - Destination Address
DK - Destination Known As
DE - Destination Email Address
CCODE
VARCHAR2(30)
Country Code (2 Digit)
should match with Oracle
Country Code
ACTIVE
CHAR(1)
NOT NULL 'Y' Y/N value to enable/disable the
use of the particular table
SQLTEXT
VARCHAR2(4000)
NOT NULL
DESCRIPTION
VARCHAR2(100)
SQL string
Description/additional information
By default, the Data Privacy option inserts the following rows in
the Control Table.
SEQ
Mod.
NAME
TABLE_NAME
QUICK
CODE
1001
CHR
1002
CHR
2001
CCODE
ACTIVE
Names Source
PER_ALL_PEOPLE_F
SN
Y
Address Source
PER_ADDRESSES
SA
Y
CHR
AU-Names
OPTIM_AU_LASTNAME
DN
AU
Y
2002
CHR
CA-Names
OPTIM_CA_LASTNAME
DN
CA
N
2003
CHR
DE-Names
OPTIM_DE_LASTNAME
DN
DE
N
2004
CHR
ES-Names
OPTIM_ES_LASTNAME
DN
ES
Y
2005
CHR
FR-Names
OPTIM_FR_LASTNAME
DN
FR
Y
2006
CHR
IT-Names
OPTIM_IT_LASTNAME
DN
IT
Y
2007
CHR
UK-Names
OPTIM_UK_LASTNAME
DN
GB
Y
2008
CHR
US-Names
OPTIM_US_LASTNAME
DN
US
Y
4001
CHR
AU- Addresses
OPTIM_AU_ADDRESSES
DA
AU
Y
4002
CHR
CA- Addresses
OPTIM_CA_ADDRESSES
DA
CA
Y
Installation and Configuration Guide
85
7. Data Privacy Option for Oracle E-Business Suite
4003
CHR
UK- Addresses
OPTIM_UK_ADDRESSES
DA
GB
Y
4004
CHR
DE- Addresses
OPTIM_DE_ADDRESSES
DA
DE
Y
4005
CHR
ES- Addresses
OPTIM_ES_ADDRESSES
DA
ES
Y
4007
CHR
FR- Addresses
OPTIM_FR_ADDRESSES
DA
FR
N
4006
CHR
IT- Addresses
OPTIM_IT_ADDRESSES
DA
IT
Y
4000
CHR
US- Addresses
OPTIM_US_ADDRESSES
DA
US
Y
9001
CHR
E-mail Format
DE
Y
9002
CHR
Known As
Format
OPTIM_EBS_DP_NAMES
_LKP_MASTER
OPTIM_EBS_DP_NAMES
_LKP_MASTER
DK
Y
The Optim Data Privacy option will lookup data from these target
tables and mask your source table data.
The control table also inserts an SQLTEXT column. To find the
existing values for the SQLTEXT column, use the following
command:
SQL> Select Table_Name, SQLTEXT from
OPTIM_EBS_DP_LKP_CONTROL;
Lookup Tables
Data in the name and address lookup master tables are loaded by
executing the SQL string in the Control Table. The names lookup
master table (OPTIM_EBS_DP_NAMES_LKP_MASTER) has
the following structure:
Column Name
Data type
NID
VARCHAR2(30)
Identifier. The last digit Indicates
gender. (M -Male/F -Female)
LASTNAME
VARCHAR2(100)
Last Name
FIRSTNAME
VARCHAR2(30)
First Name
E_CODE
VARCHAR2(3)
US
Ethnicity Code (AU, CA, FR, IT,
DE, ES, US, GB)
ETHNICITY
VARCHAR2(50)
American
Ethnicity (Australian, Canadian,
French, Italian, German,
Spanish, American, UK)
86
Default
Column Description
Optim TDM and DP Solutions for Oracle E-Business Suite
7.5 Data Privacy Reference Material
The address lookup master table
(OPTIM_EBS_DP_ADDRD_LKP_MASTER) has the following
structure:
Column Name
Data type
SEQ
NUMBER
Identifier
ADDRESS_LINE1
VARCHAR2(100)
Address Line 1
ADDRESS_LINE2
VARCHAR2(100)
Address Line 2
ADDRESS_LINE3
VARCHAR2(100)
Address Line 3
CITY
VARCHAR2(100)
Town or City
COUNTY
VARCHAR2(100)
County - For US Address only
STATE
VARCHAR2(4)
POSTAL_CODE
VARCHAR2(16)
COUNTRY
VARCHAR2(2)
Note:
Default
CA
Column Description
State - For US Address only
Zip Code
US
Two digit Country Code
There are city-county-state combinations in Optim Data
Privacy tables which do not exist as combinations in
Oracle. If addresses are masked with an invalid
combination, you will get a note/error message in the
Addresses Form. The error can be avoided by selecting
appropriate combination of city, county and state.
Modifying the Control Table
For greater customization, you may modify the values of the
control table. To manually change the values, run the following
processes in sequence:
1.
Insert data into control table.
2.
Insert data into the Names Master Lookup table.
3.
Insert data into the Address Master Lookup table.
4.
Create materialized views.
Installation and Configuration Guide
87
7. Data Privacy Option for Oracle E-Business Suite
Notes: While making changes to the control table, remember
that the value for MODULE is always ‘CHR’ for HRMS
Data.
88
•
The value in the CCODE should match the Oracle
Country Code.
•
If you manually change any target table names for Names
and Addresses in the TABLE_NAME column, the values
in the SQLTEXT column must also be changed to reflect
the modifications.
•
If the ACTIVE column value for a row is set to N, then
that table will not be used in a master lookup table or
materialized view.
•
By default, the Data Privacy option masks e-mail
addressees by generating a user name from the first initial
and last name of the masked entry from the name lookup.
The default domain name is ‘xyzco.com’. To make
changes to the default settings, you must manually edit
the control table.
Optim TDM and DP Solutions for Oracle E-Business Suite