1
IBM Optim
Edit User Manual
Version 7 Release 3
IBM Optim
Edit User Manual
Version 7 Release 3
Note
Before using this information and the product it supports, read the information in “Notices” on page 79.
Version 7 Release 3 (September 2010)
This edition applies to version 7, release 3 of IBM Optim and to all subsequent releases and modifications until
otherwise indicated in new editions.
© Copyright IBM Corporation 1994, 2010.
US Government Users Restricted Rights – Use, duplication or disclosure restricted by GSA ADP Schedule Contract
with IBM Corp.
Contents
About this Guide . . . . . . . . . . . v
Organization of Edit User Manual .
.
.
.
.
.
. v
Chapter 1. Purpose of Edit component . 1
Common Elements and Utilities . . . . . . .
Optim Directory and Common Optim Objects .
Options . . . . . . . . . . . . . .
. 1
. 1
. 2
Chapter 2. Processing Flow . . . . . . 3
Contents . . . . . . . . . . .
Sample Database Tables . . . . .
Process Flow Scenario . . . . . .
Getting Started . . . . . . .
Using the Table Editor . . . . .
Displaying a Specific Subset of Data
Editing Data . . . . . . . .
Undo Editing . . . . . . . .
Displaying and Editing Related Data
Setting Preferences . . . . . .
Manipulating the Display. . . .
Printing Reports . . . . . . .
Saving an Edit Definition . . . .
.
.
.
.
.
.
.
.
.
.
.
.
.
.
.
.
.
.
.
.
.
.
.
.
.
.
.
.
.
.
.
.
.
.
.
.
.
.
.
.
.
.
.
.
.
.
.
.
.
.
.
.
. 3
. 3
. 4
. 5
. 7
. 8
. 10
. 17
. 20
. 24
. 25
. 26
. 26
Chapter 3. Edit . . . . . . . . . . . 27
Open the Table Editor . . . . .
Create a New Edit Definition .
Editor Options Dialog . . . .
Select an Existing Edit Definition
Open Edit Definition Dialog . .
Using the Table Editor . . . . .
Table Editor Components . . .
Edit Window . . . . . . .
Display Options . . . . . .
Edit Preferences . . . . . .
© Copyright IBM Corp. 1994, 2010
.
.
.
.
.
.
.
.
.
.
.
.
.
.
.
.
.
.
.
.
.
.
.
.
.
.
.
.
.
.
.
.
.
.
.
.
.
.
.
.
.
.
.
.
.
.
.
.
.
.
.
.
.
.
.
.
.
.
.
.
28
28
29
31
31
32
32
34
39
41
Browse Data . . . . . . . . .
Display Multiple Tables . . . .
Locate Specific Data . . . . .
Find Specific Data . . . . . .
Exclude Rows . . . . . . .
Include Rows . . . . . . . .
Display Data - Show Hidden Rows
Edit Data . . . . . . . . . .
Editing Tools . . . . . . . .
Evaluating Expressions . . . .
Large Object (LOB) Columns . .
Auditing Changes . . . . . .
Commit and Restore Data . . . .
Handle Rows in Error . . . . . .
Resolve Concurrent Update Conflicts .
Printing . . . . . . . . . .
Saving . . . . . . . . . . .
.
.
.
.
.
.
.
.
.
.
.
.
.
.
.
.
.
.
.
.
.
.
.
.
.
.
.
.
.
.
.
.
.
.
.
.
.
.
.
.
.
.
.
.
.
.
.
.
.
.
.
.
.
.
.
.
.
.
.
.
.
.
.
.
.
.
.
.
.
.
.
.
.
.
.
.
.
.
.
.
.
.
.
.
.
44
45
51
52
52
53
54
56
56
60
61
63
64
67
68
69
70
Appendix. Command Line Interface . . 71
71
Run the Table Editor . . . . . . . . . . .
Syntax . . . . . . . . . . . . . . .
Command Line Keywords . . . . . . . .
Override Keywords. . . . . . . . . . .
Command Line Examples . . . . . . . . .
Run the Table Editor Directly from the Command
Line . . . . . . . . . . . . . . . .
Run the Table Editor Using a Parameter File . .
Using Overrides . . . . . . . . . . . .
72
72
72
74
75
75
76
76
Notices . . . . . . . . . . . . . . 79
Trademarks .
.
.
.
.
.
.
.
.
.
.
.
.
. 81
Index . . . . . . . . . . . . . . . 83
iii
iv
IBM Optim: Edit User Manual
About this Guide
™
The IBM™ Optim solution includes the components Archive, Compare, Edit, and
Move. This User Manual provides information on how to use Edit to browse and
edit sets of relational data.
This release runs in the Microsoft™ Windows™ environment and supports the IBM
DB2™, Oracle, Sybase Adaptive Server Enterprise (ASE), Microsoft SQL Server, and
IBM Informix™ database management systems. Additional database management
systems may be supported in future releases.
Organization of Edit User Manual
The information provided here is organized as follows:
Chapter 1, “Purpose of Edit component,” on page 1
Provides general information about Edit.
Chapter 2, “Processing Flow,” on page 3
Provides an overview of the sample database included with Edit and a
sample scenario that describes the steps to display tables to edit or browse.
Chapter 3, “Edit,” on page 27
Explains how to use Edit to browse or edit data. Edit provides a consistent
method for retrieving subsets of relational data to browse or edit.
“Command Line Interface,” on page 71
Explains the use of the Command Line Interface that allows you to open
the Table Editor and browse tables without first opening Edit.
© Copyright IBM Corp. 1994, 2010
v
vi
IBM Optim: Edit User Manual
Chapter 1. Purpose of Edit component
Edit browses and edits sets of relationally intact data in database tables. Edit
handles an arbitrarily complex data model consisting of any number of tables and
relationships and ensures a referentially intact set of data.
Edit is easy to use, simple in concept, yet powerful in supporting complex
database structures. Intuitive dialogs simplify data entry tasks and provide data
options for browsing and editing relationally intact sets of data.
Programmers and DBAs can easily inspect and edit sets of related data at the same
time in the same window. Edit eliminates the time-consuming efforts of manually
“assembling” data from different tables and database management systems.
Intelligent window handling technology allows you to display multiple dialogs,
pop-up windows, context sensitive online help, and tutorials.
Common Elements and Utilities
To carry out its functions, components of Optim™ (Archive, Compare, Edit, and
Move) rely upon user-defined objects as supplements to objects defined to the
database (for example, tables, primary keys, relationships, stored procedures).
These user-defined objects (collectively, Optim objects) are stored in the Optim
Directory.
The Common Elements Manual explains the Optim objects and features common to
all or most of these products.
The Export and Import Utility, to copy Optim objects from one Optim Directory to
another, is also explained in the Common Elements Manual.
Optim Directory and Common Optim Objects
The Optim Directory is a set of tables in which Optim tracks processing status and
stores objects needed for processing. You must use the Configuration program to
create or configure the Optim Directory tables and stored procedures needed to
access the Directory.
Objects in the Optim Directory that are common to the Optim components include:
v Access Definitions. An Access Definition identifies a set of related data to be
processed. It references the database tables and their relationships, and provides
criteria to select specific rows within tables.
An Access Definition is sometimes used in an Edit Process.
v DB Aliases. A DB Alias provides parameters needed to connect with a specific
database. It is used as a high-order qualifier for an object or table name, in order
to access the appropriate database.
A DB Alias is needed anytime a process references a database object; for
example, to qualify the name of a Optim primary key, Optim relationship, or a
database table referenced in an Access Definition.
v Primary Keys. Primary key columns uniquely identify each row in a database
table.
© Copyright IBM Corp. 1994, 2010
1
A primary key can be used to create an Optim relationship, and is also required
to enable the row selection (Point and Shoot) feature for an Access Definition.
v Relationships. A relationship is a defined connection between the rows of two
tables that determines the parent or child rows to be processed and the order in
which they are processed.
Relationships determine the data to be retrieved from related tables and may be
available in the database. However, you can also define relationships to
supplement those in the database. Generally, a relationship is needed in a
process that uses an Access Definition.
Options
Options are used to maintain the environment. Generally, Product Options
parameters enforce site and system requirements, while you can use Personal
Options to customize Optim use at each workstation.
Refer to the Installation and Configuration Guide and the Common Elements Manual .
Security options allow you to establish as many as three levels of security for using
Optim. Functional security allows you to control user access to the interface for
functions provided by Optim, object security allows you to control access to
specific objects in the Optim Directory, and Archive File security allows you to
control access to data in Archive Files. All security options are documented in the
Installation and Configuration Guide .
Edit processing is discussed in the following sections.
2
IBM Optim: Edit User Manual
Chapter 2. Processing Flow
Edit has a powerful Table Editor for browsing and editing related data that spans
any number of tables. An overview of the use of the Table Editor and the
processing flow when editing data are exemplified in this section.
Components of the Table Editor are explained in detail in “Using the Table Editor”
on page 32.
This sample scenario proceeds through the basics of selecting and editing data,
using tables that correlate to those in the sample database distributed with Optim.
Use the comprehensive Help facility in Edit at any time to obtain more
information about a specific topic or function. You can select Help from the menu
in most dialogs or right-click and select What's This from the shortcut menu to
obtain context-specific help. Help is also available by pressing F1.
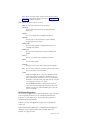
Contents
This section briefly describes the sample database and provides an overview of the
key functions for browsing and editing data in a sample scenario.
Included in this section are:
v
v
v
v
v
v
Getting started
Using the Table Editor
Displaying a specific subset of data
Editing data
Using the shortcut menus
Restoring editing changes
v
v
v
v
Displaying multiple tables by joining
Unjoining tables
Manipulating the display
Printing and saving
Sample Database Tables
The sample database tables distributed with Optim, which correlate to the tables
used in examples in this manual, are as follows:
v OPTIM_SALES
v OPTIM_CUSTOMERS
v OPTIM_ORDERS
v OPTIM_DETAILS
v
v
v
v
v
v
OPTIM_ITEMS
OPTIM_MALE_RATES
OPTIM_FEMALE_RATES
OPTIM_SHIP_TO
OPTIM_SHIP_INSTR
OPTIM_STATE_LOOKUP
© Copyright IBM Corp. 1994, 2010
3
Note: The tables used in examples in this manual do not contain the prefix
“OPTIM_” in their names.
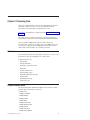
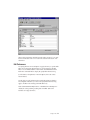
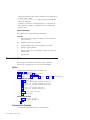
The major relationships between pairs of tables in the sample database are shown
in the following diagram. The arrows indicate the flow from parent to child.
In this diagram, the relationships between tables are represented by three-letter
codes consisting of the letter "R", the first letter of the parent table, and the first
letter of the child table.
The relationships between tables are as follows:
v OPTIM_SALES is a parent of OPTIM_CUSTOMERS (relationship RSC)
v OPTIM_CUSTOMERS is a parent of OPTIM_ORDERS (relationship RCO)
v OPTIM_ORDERS is a parent of OPTIM_DETAILS (relationship ROD)
v OPTIM_ITEMS is a parent of OPTIM_DETAILS (relationship RID)
The sample database includes four additional tables:
v OPTIM_CUSTOMERS2
v OPTIM_ORDERS2
v OPTIM_DETAILS2
v OPTIM_ITEMS2
These four tables are distributed empty and are related in the same way as the
similarly named tables above. The empty tables are provided for demonstrating the
facilities in Optim.
For a complete description of the sample database tables, see the Installation and
Configuration Guide .
Process Flow Scenario
The following scenario directs you through the process of editing data. Using
relational data from the sample database, you retrieve data, select a subset of the
data, use various editing capabilities, and join related data.
As you follow these steps and use the Table Editor, you create an Edit Definition.
An Edit Definition defines the set of data retrieved and displayed and can be
saved and reused or shared with other users.
4
IBM Optim: Edit User Manual
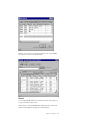
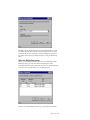
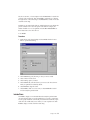
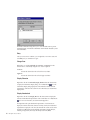
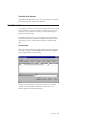
Getting Started
To open the Table Editor, select New from the File menu in the Edit main window,
then select Edit from the Actions submenu to display the Table Editor and the
Editor Options dialog.
Use the Editor Options dialog to specify parameters for the initial set of data to
display in the Table Editor.
The Editor Options dialog contains three group boxes: Access, Initial Display and
Mode. For this scenario, enter the following parameters.
Access Group Box
The Access group box defines how the Table Editor fetches data. You can select a
table name or an Access Definition. An Access Definition can be used to define a
set of related data, including the list of tables, selection criteria, and editor layout
attributes. If you edit the same set of data repeatedly, an Access Definition can be
used to save time by storing these specifications for reuse.
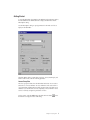
For this scenario, select the Table button, then click the browse button
the Table box to display the Select a Table dialog.
next to
Chapter 2. Processing Flow
5
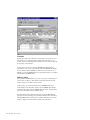
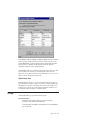
Tables are organized in the Select a Table dialog by the fully qualified name. The
fully qualified name of a table consists of: dbalias.creatorid.tablename.
dbalias The DB Alias is the set of specifications that Edit uses to identify, locate,
and access a particular database. In the left pane of the dialog,
double–click the DB Alias that represents the database that contains the
sample database tables.
For details on DB Aliases, refer to the Common Elements Manual .
creatorid
Creator IDs are assigned when Edit is installed and configured. Determine
the Creator ID of the sample database from your system administrator.
Note: This qualifier may be referred to by a different name based on the
DBMS (for example, schema or owner ID).
tablename
The table name to use for this scenario is CUSTOMERS.
The Select a Table dialog is divided into two areas. The DB Aliases are listed on
the left, and the corresponding database table names appear on the right. The list
is sorted alphabetically.
To display a list of table names for a particular DB Alias, double-click the DB Alias.
You can also click the DB Alias and select Refresh.
Use any of the following methods to select the CUSTOMERS table name:
v Select the table name and press Enter.
v Select the table name and click Open.
v Double-click the table name.
v Type the entire table name directly into the Pattern box and click Open.
6
IBM Optim: Edit User Manual
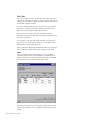
Initial Display Group Box
You can specify which data to display in the Table Editor. Choose to include all
rows, or assign selection criteria to define a specific subset of data.
For this scenario, select Data to include all rows.
Mode Group Box
Select Edit as Default in the Mode box because this scenario demonstrates the edit
capabilities. Browse as Default mode and Browse Only mode are used when data
is to be browsed, but not edited.
After you make your selections in the Editor Options dialog, click OK to display
the first 500 rows of data from the CUSTOMERS table in the Table Editor.
Note: The default fetch limit is 500. You can change the Personal Options setting
for fetch limit, if necessary, to suit your requirements. Refer to the Common
Elements Manual . To cancel the retrieval of data, you can click Cancel in the Table
Editor.
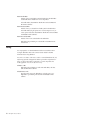
Using the Table Editor
The Table Editor displays data from the selected table. The data displays in an edit
window. An edit window contains toolbar buttons next to the table name in the
heading. Toolbar buttons allow you to select display options and menu commands
that pertain specifically to the corresponding table.
Column headings shown in bold type indicate primary key columns. In the
example, CUST_ID is the primary key for the CUSTOMERS table. Use the scroll
bars to display columns or rows that do not fit within the confines of the edit
window. Click the scroll bar to display the number of columns or rows. A plus (+)
sign after the number of rows indicates that the number of available rows exceeds
the fetch limit.
Chapter 2. Processing Flow
7
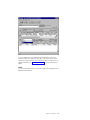
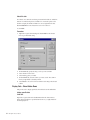
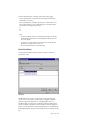
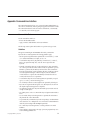
Displaying a Specific Subset of Data
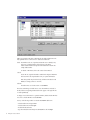
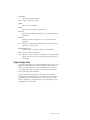
You can set selection criteria to limit the data in the Table Editor. Click the Options
button
on the edit window toolbar to display the edit window Options menu. Click
Table Specifications to display the submenu.
8
IBM Optim: Edit User Manual
There are several ways to display a subset of the data from a table in the Table
Editor. You can:
v Specify the columns to display and the order in which they are displayed.
v Define simple selection criteria or complex SQL Where clauses to limit the rows
that are fetched.
v Define sort criteria.
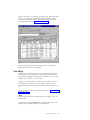
For this scenario, define a subset of data to limit the data to customers from the
state of New Jersey only. Click Selection Criteria to display the Table
Specifications dialog. The columns of the CUSTOMERS table display on the
Selection Criteria tab of the Table Specifications dialog.
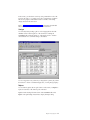
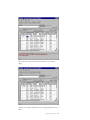
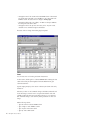
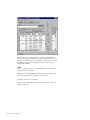
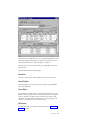
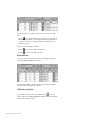
Click the grid row for the STATE column and type the statement = ‘NJ' as shown.
Select Close from the File menu to fetch new data from the CUSTOMERS table.
Chapter 2. Processing Flow
9
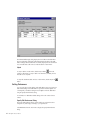
The Table Editor displays the subset of rows from the CUSTOMERS table that
contain NJ in the STATE column.
Table Specifications can be reset by clicking the Options button on the edit window
toolbar, selecting Reset, and then clicking the submenu command for the criteria to
be reset.
Editing Data
There are four levels of control for editing data in Edit. Each level of control
provides specific ways to display, modify, insert, delete, and copy data.
Menu Bar
Select commands from the menu bar in the Table Editor to control all
tables displayed in the Table Editor.
Edit Window Toolbar
Select commands from the toolbar in an edit window to control the specific
table displayed in the edit window.
Grid Heading Shortcut Menu
Right-click a grid heading of a column in the edit window grid to display
the grid heading shortcut menu. Select commands from a grid heading
shortcut menu to control the specific column in a table. The grid heading
shortcut menu contains commands that allow you to find, replace, exclude,
include, sort, and hide rows based on the data contained in the column in
which you right-clicked.
Grid Column Shortcut Menu
Right-click a row in the edit window grid to display the grid column
shortcut menu. Select commands from the grid column shortcut menu to
control the specific row you right-clicked. Along with the normal cut, copy,
and paste options, the grid column shortcut menu contains commands that
allow you to clear, insert, repeat, and delete a row.
10
IBM Optim: Edit User Manual
In this scenario, you edit data in several ways using commands from each of the
four levels. By doing so, you sample some of the tools and functions available in
Edit. You also prepare to understand the functions available to undo editing
changes, discussed in the next section.
Refer to “Table Editor Components” on page 32 for information about the Table
Editor menu bar, the edit window toolbar, and the shortcut menus.
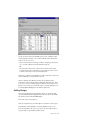
Overtype
You can modify data by clicking a grid row and overtyping the data. Click the
ADDRESS column in the first grid row of the edit window containing the
CUSTOMERS table. Change the address to “1600 Pennsylvania Ave.” and then
click outside the row to commit the change to the database.
You can overtype data in any column. If you change data in a primary key column
that results in a violation of referential integrity rules, a warning message displays.
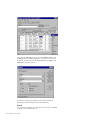
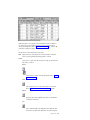
Replace
You can selectively replace data in a grid column. For this scenario, use Replace to
replace all occurrences of the ‘62700' zip code with ‘99999'.
Right-click in the heading of the ZIP column of the CUSTOMERS table. Click
Replace on the grid heading shortcut menu to display the Replace dialog.
Chapter 2. Processing Flow
11
Type 62700 in the Find what box and type 99999 in the Replace with box. Select
the Wrap check box in the Direction group box. You can find each occurrence of
the zip code and selectively replace it by clicking Find Next, then Replace. Click
Replace All to replace all occurrences.
The Status bar at the bottom of the Replace dialog indicates the number of
replacements performed. Click Close to return to the Table Editor.
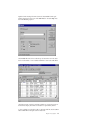
Exclude
You can selectively exclude data in an edit window. For this scenario, use Exclude
to hide the rows with the 99999 zip code.
12
IBM Optim: Edit User Manual
Right-click in the heading of the ZIP column and select Exclude from the grid
heading shortcut menu. Type 99999 in the Find what box. Select the Wrap check
box in the Direction group box.
Click Exclude All to hide all rows with the zip code 99999 from view. The Status
bar shows the number of rows excluded. Click Close to return to the Table Editor.
A bold line separates rows before and after excluded rows. Position the pointer on
the bold line to display the number of excluded rows represented by the line.
To show excluded rows, right click in the row before the bold line and select Show
Next or Show All from the grid column shortcut menu.
Chapter 2. Processing Flow
13
Repeat
You can copy and repeat a row in the edit window using the grid column shortcut
menu.
For this scenario, click the grid row of the CUSTOMERS table containing the
address “1600 Pennsylvania Ave.” Right-click and select Repeat from the grid
column shortcut menu.
The row containing the “1600 Pennsylvania Ave.” address is repeated.
Since the repeated row does not have a unique primary key, the status column of
the row indicates that the row has an error. Additionally, an error message displays
in the message bar.
To resolve the error, type a unique value in the primary key column.
14
IBM Optim: Edit User Manual
Type “99999” in the CUST_ID column. Click outside the row to commit the
change.
Modify the other columns of the inserted row by overtyping the data in the row, as
follows:
Chapter 2. Processing Flow
15
v
Overtype the name of the customer in the CUSTNAME column of the inserted
row with the name “XYZ Video.” Press the Tab key to move the pointer to the
ADDRESS column. The status of the row changes to Pending (Upd).
Overtype the address with a new address, “123 Main St.” then press Tab M to
move the pointer to the CITY column.
v Overtype the name of the city with a new name, such as “Anytown.” Click
outside the row to commit the changes to the database.
v
The status of the row changes from Pending (Upd) to Updated.
Insert
You can insert a new row from the grid column shortcut menu.
For this scenario, click the grid row of the CUSTOMERS table containing the value
“00210” in the CUST_ID column. Right-click and select Insert from the grid
column shortcut menu.
Type the unique primary key value “99998” in the CUST_ID column of the newly
inserted row.
Each time you edit a row and commit the change to the database, Edit tracks and
records the change as an Undo Level. To set up the demonstration of the undo
capability of Edit in the next section, enter data in the new row one column at a
time. Commit the change to each column by clicking outside the row after each
change.
Edit the
v Type
v Type
v Type
v Type
16
IBM Optim: Edit User Manual
following columns.
“Movie Time” in the CUSTNAME column.
“3 High St.” in the ADDRESS column.
“Anytown” in the CITY column.
“NJ” in the STATE column.
Note: For this scenario, it is not necessary to enter data in the other columns in the
new row, some of which have data entered by default. For example, a question
mark character is entered by default in columns that can be NULL. For more
information about defaults, see “Edit Preferences” on page 41.
Each time you click outside the row, the change to the row is committed to the
database and the status of the row is Inserted.
Undo Editing
Edit allows you to selectively restore data to a prior commit point using various
Undo commands. You can undo changes to the current fetch set in each table in
the Table Editor. Depending on the specific undo command you use, you can undo
changes to a row, to a table, or to all of the tables.
Each time you commit a change to a row, Edit records an Undo Level. You can
back out changes you make to a row up to the number of Undo Levels. The
default number of Undo Levels is 5 per row, and the maximum number per row is
20.
You set the number of Undo Levels in Edit Preferences. Refer to “Manipulating the
Display” on page 25.
Undo
The Undo command on the row shortcut menu backs out changes to a row, one
change at a time.
Click the grid row of the CUSTOMERS table containing the value “99998” in the
CUST_ID column. Right-click to display the row shortcut menu.
Chapter 2. Processing Flow
17
In this example, data was entered column by column and committed to the
database after each entry. Select Undo to undo the last entry made, which was the
entry of NJ in the STATE column. The city, address, customer name, and customer
ID number you entered can also be undone, in the reverse order of entry, by
selecting Undo repeatedly.
Undo...
You can also select the version of a row within the fetch set to restore, up to the
number of Undo Levels specified.
Click the grid row of the CUSTOMERS table containing the value “99998” in the
CUST_ID column. Right-click to display the row shortcut menu.
Select Undo... from the row shortcut menu.
The Undo Row List dialog displays each committed version of the row, up to the
number of Undo Levels.
18
IBM Optim: Edit User Manual
Select the version of the row that contains the CUST_ID value only. Click OK to
restore that version of the row in the Table Editor.
Undo All
You can select Undo All from the row shortcut menu to back out all changes to a
row, up to the number of Undo Levels.
Click the grid row of the CUSTOMERS table containing the value “99998” in the
CUST_ID column. Right-click to display the row shortcut menu.
Chapter 2. Processing Flow
19
Select Undo All from the row shortcut menu. All of the changes to that row,
including the insertion of the row, are undone.
Edit Window Toolbar Undo Button
You can use the Undo button
on the edit window toolbar to undo changes to
all rows in the table in the edit window.
Note: Edit backs out all changes to rows in the current fetch set, up to the number
of Undo Levels per row.
Edit Window Options Menu Undo Commands
Click the Options button
window Options menu.
on the edit window toolbar to display the edit
You can use the following Undo commands on the edit window Options menu.
Undo Last
Select Undo Last to undo the last change to a row in the current fetch set
for the table.
Undo Errors
Select Undo Errors to undo changes that result in error conditions to any
rows in the current fetch set for the table.
Table Editor Tools Menu Undo Commands
Click the Tools menu in the Table Editor to select from the following Undo
commands.
Undo All
Select Undo All to undo changes to all rows in all tables in the Table
Editor. Edit backs out changes to rows in the current fetch set for each
table, up to the number of Undo Levels per row.
Undo Errors
Select Undo Errors to undo changes that result in error conditions to any
rows in the current fetch set for the table in the current fetch set for each
table.
Displaying and Editing Related Data
You can browse and edit data in related tables with the Table Editor. The Join
command allows you to select a table or several tables.
A relationship must exist between the table in the Table Editor and the table you
select to join. If the tables are not related, you are prompted to create a
relationship. If more than one relationship exists between the tables, a dialog
displays to allow you to specify the relationship to use. Related data from the
joined table displays in a new edit window.
in the edit window toolbar, or right-click in a row and
Click the Join button
select Join from the row shortcut menu to display the Select Table(s) dialog.
20
IBM Optim: Edit User Manual
Initially, the list is populated with names of tables with the same DB Alias and
Creator ID as the table you are joining to in the Table Editor. You can change the
pattern to display tables from any database to which you have access. You can also
select options to list only related tables. Refer to “Select Table(s) Dialog” on page
46 for more information about using the Select Table(s) dialog.
Join ORDERS Table
In the sample database, the ORDERS table is related to the CUSTOMERS table. For
this scenario, double-click the ORDERS table in the Select Table(s) dialog. If a
relationship does not exist between the table you select and the table in the Table
Editor, you are prompted to create a relationship.
The related rows from the ORDERS table display in a separate edit window in the
Table Editor.
Chapter 2. Processing Flow
21
Join Arrow
The first grid column in any edit window contains the Join arrow. The Join arrow
indicates the row for which related data is displayed in joined tables. You can
move the Join arrow by clicking another row in the Join arrow column or by using
the arrow keys on the keyboard.
For this scenario, the Join arrow in the CUSTOMERS table indicates the row
containing the value “00110” in the CUST_ID column. The ORDERS table displays
the rows related to that CUSTOMERS row. When you move the Join arrow to a
different row in the CUSTOMERS table, the corresponding related rows are fetched
and displayed in the ORDERS table.
Multi-way Joining
From any table in the Table Editor, you can join to more than one table. When you
join more than one table to a single table, the joined tables share the same edit
window, though only one table is shown at a time.
For this scenario, join another related table to the CUSTOMERS table. In the
sample database, the SALES table is related to the CUSTOMERS table. Click the
Join button in the toolbar in the CUSTOMERS table edit window. Double-click the
name of the SALES table in the Select Table(s) dialog.
The SALES table displays and shares the edit window with the ORDERS table.
Click the down arrow in the drop down box that contains the name of the SALES
table. The ORDERS table is listed in the box with the SALES table. You can select
the table to display in the edit window by clicking on the table name.
22
IBM Optim: Edit User Manual
You can configure Edit to automatically display the table that has at least one
related row when you move the Join arrow. This “Auto Switch” option is useful
when there are only related rows in one subordinate table for each parent row. For
additional information, see “Stack Tables” on page 50 or see the Common Elements
Manual .
Indent
You can use the Indent function to view the list of tables in the Table Editor. Select
Indent from the Tools menu.
Chapter 2. Processing Flow
23
The Indented Table Display dialog displays the list of tables in the Table Editor.
The list is indented to indicate the relationships between the tables in the Table
Editor. Bold type indicates tables that are currently displayed in each edit window.
You can double-click a table name to switch the table in an edit window.
Unjoin
To unjoin a table in an edit window, click the Unjoin button
in the edit
window toolbar. When you unjoin a table in an edit window, all tables joined to
that table are also unjoined.
To unjoin all subordinate tables and close an edit window, click the Unjoin All
button.
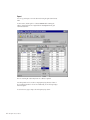
Setting Preferences
You can specify the way data displays in the Table Editor using several options in
Edit. Default settings for the Table Editor are specified in Personal Options. You
can temporarily override the settings in Personal Options from the Table Editor
using the Specify Edit Preferences dialog.
For information on Table Editor default settings, refer to the Common Elements
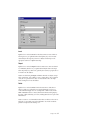
Manual .
Specify Edit Preferences Dialog
The Specify Edit Preferences dialog contains check boxes and spin boxes that
change the way data displays according to your specifications.
Select Preferences from the Tools menu to display the Specify Edit Preferences
dialog.
24
IBM Optim: Edit User Manual
For more information, refer to “Edit Preferences” on page 41.
Manipulating the Display
In addition to setting preferences for the Table Editor, you can manipulate the way
columns and rows display in an edit window using toolbar buttons and shortcut
menu commands.
Lock Columns
You can lock the position of a column to continue to display the column as you
scroll data in the edit window horizontally.
Right-click in the heading of the CUSTNAME column in the CUSTOMERS table
and select Lock from the shortcut menu. The CUSTNAME column repositions to
the left of the display and locks in place as you scroll horizontally.
To unlock the column, right-click in the heading of the CUSTNAME column and
select Unlock from the shortcut menu. The column unlocks, but remains in
position to the left of the display. To reposition the columns to the original order,
right-click and select Reset Grid Attributes from the shortcut menu.
Hide Columns
You can exclude columns from the display in the edit window to view fewer
columns.
Right-click in the heading of the YTD_SALES column in the CUSTOMERS table
and select Hide from the shortcut menu. The YTD_SALES column is hidden from
view. You can also hide a column by dragging the right boundary of the column in
the heading to the left boundary of the column.
Chapter 2. Processing Flow
25
To view hidden columns, right-click and select Unhide All from the grid heading
shortcut menu.
Sort
You can sort the rows of data in a table before you edit.
Right-click in the heading of the CUST_ID column in the CUSTOMERS table and
select Sort from the shortcut menu. Select Ascending or Descending to sort the
rows numerically.
Printing Reports
From the Table Editor, you can print the following reports:
Edit Definition Report
Summarizes all the qualifiers, table names, and corresponding
specifications that comprise the Edit Definition.
In the Table Editor, select Print from the File menu and select Definition
from the submenu.
Data from All Tables
Includes all rows from all tables joined and displayed in the Table Editor.
In the Table Editor, select Print from the File menu and select Data and
All from the submenus.
Data from Selected Rows
Includes all rows you selected from all tables joined in the Table Editor.
In the Table Editor, drag the pointer to select contiguous rows you want to
print in each table. Select Print from the File menu and select Data and
Selected from the submenus.
Data from a Selected Table
Includes all rows from a selected table in the Table Editor. Right-click in
the grid heading in a selected table. Select Print from the shortcut menu.
Saving an Edit Definition
When you close the Table Editor, you are prompted to save an Edit Definition. The
Edit Definition contains an Access Definition and all of the parameters specified
while using the Table Editor such as joined tables and editing and browsing
specifications.
An Edit Definition allows you to open the Table Editor without having to respecify
tables, preferences, display options, and joined tables. You can also share the Edit
Definition with other users
Since an Edit Definition contains an Access Definition, you are also prompted to
name and save the Access Definition. If you chose not to save the Access
Definition, an embedded copy remains as part of the Edit Definition.
An Access Definition defines the set of tables and selection criteria that you
specified in the Table Editor. You can reuse the Access Definition to specify the
same set of data at a later time, use the Access Definition with another Optim
component and share the Access Definition with other users.
Refer to the Common Elements Manual for detailed information about saving
definitions.
26
IBM Optim: Edit User Manual
Chapter 3. Edit
Edit provides a full-function Table Editor that you can use to browse and edit
relational sets of data from several databases online. Using Edit, you can access
data simultaneously from a variety of DBMSs including DB2® CS, DB2 MVS, DB2
UDB, Oracle, Sybase ASE, SQL Server, and Informix®.
In the Table Editor, tools are available to help you:
v
v
v
v
Manage the data display.
Display related data from multiple tables.
Specify criteria for each table.
Commit changes and remove or “Undo” changes.
Edit tracks your activities in the Table Editor and stores this information in an Edit
Definition. The Edit Definition contains the parameters you specified to display
data and information about the set of tables in the Table Editor.
After you name and save an Edit Definition, it is stored in the Optim Directory
and can be reused and made available to other users. An Edit Definition provides
a quick and consistent method to access a set of data.
The fully qualified name of an Edit Definition consists of: identifier.name.
identifier
Identifier that serves as the prefix for the Edit Definition name (1 to 8
characters).
name
Name assigned to the Edit Definition (1 to 12 characters).
When you name an Edit Definition, it is helpful to use a logical set of naming
conventions to organize definitions for easy identification.
The information about the set of data is stored in an Access Definition. Edit
automatically creates and modifies the Access Definition as you browse and edit
data. The Access Definition contains the name of the table you start with and the
names of all subsequently joined tables. It also includes the selection criteria for
each table and the relationship used for joining. An Access Definition can be saved
in the Optim Directory for reuse and to make it available to other users, or stored
in the Edit Definition.
When you open the Table Editor with a new Edit Definition, you can name a
database table or a stored Access Definition to start the data display.
v If you begin with a database table, you create a “local” Access Definition. The
Access Definition is stored as part of the Edit Definition and is only available to
that definition.
v If you begin with an Access Definition, you specify a “named” Access
Definition. The Access Definition is stored in the Optim Directory and is
available to other Actions and other users.
While using the Table Editor, you can change an Access Definition from local to
named or named to local. When you finish browsing and editing, Edit prompts
you to save or discard changes to the Access Definition. At this time you can save
© Copyright IBM Corp. 1994, 2010
27
a local Access Definition as a named Access Definition. If you discard the changes
to a named Access Definition, they are not available when you use the Edit
Definition again. However, changes to a local Access Definition are automatically
saved when you save the Edit Definition.
This section explains how to browse and edit data, including how to create and
retrieve an Edit Definition, manipulate the display, and perform the following
tasks:
v Create a new Edit Definition beginning with a single table or an Access
Definition.
v Open an existing Edit Definition.
v Use the components of the Table Editor.
v Browse data, including changing the display using grid facilities and other Table
Editor tools, such as joining tables.
v Edit data, including committing and restoring changes.
v Save an Edit Definition.
Open the Table Editor
Use the Table Editor to browse or edit data. There are different ways to open the
Table Editor depending on whether you want to create a new Edit Definition or
use an existing Edit Definition.
Create a New Edit Definition
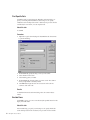
To create a new Edit Definition:
About this task
Procedure
1.
2.
3.
4.
5.
6.
28
Select New from the File menu in the main window.
Select Edit from the Actions submenu to open the Table Editor and the Editor
Options dialog.
Specify a table name or a named Access Definition on the Editor Options
dialog.
Designate the initial display.
Specify the mode for the initial display: Edit as default, Browse as default or
Browse Only.
Click OK.
IBM Optim: Edit User Manual
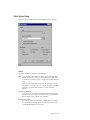
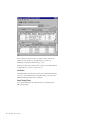
Editor Options Dialog
When you create a new Edit Definition, the Editor Options dialog is displayed.
.
Access
Specify these initial Access parameters for the Table Editor.
Table
Specify the fully qualified name of the table to display in the Table Editor.
Click the down arrow to select from a list of previously used table names
or click the browse button to display a complete list of available tables and
views.
When you open the Table Editor with a table and subsequently save the
Edit Definition, you have the option of saving the list of tables and related
specifications in a named Access Definition or as part of the Edit
Definition.
Named Access Definition
Specify the name of an existing Access Definition. Click the down arrow to
select from a list of previously used Access Definitions, or click the browse
button to display a list of available Access Definitions.
Prompt for AD overrides
If you specify a named Access Definition, select this check box to display
the Access Definition Override Options dialog. This dialog allows you to
override the Default Qualifier or Start Table.
Chapter 3. Edit
29
Override Default Qualifier
Overrides the Default Qualifier. Click the down arrow to select
from a list of previously used qualifiers or click the browse button
to open the Select a Default Qualifier dialog.
Override Start Table
Overrides the Start Table. Click the down arrow to select a table
from the Access Definition.
Always prompt for variable values
Displays the prompt string for variables in the Access Definition,
regardless of whether or not a value has been assigned. Clear the check
box to display the prompt string only when a value for a variable is not
assigned.
Initial Display
Choose from the following to select the initial display in the Table Editor.
Data
Displays data from the specified table or the Start Table from the specified
Access Definition (any selection criteria in the Access Definition specified
for Start Table is applied). The number of retrieved rows depends on the
Fetch Limit specified in Personal Options and Product Options.
Columns
Displays the Columns tab of the Table Specifications dialog. Set the display
mode and create column associations for Large Object (LOB) columns.
Associations correlate the type of object with the appropriate application to
use for editing.
Selection Criteria
Displays the Selection Criteria tab of the Table Specifications dialog.
Specify selection criteria to limit the data initially displayed in the Table
Editor.
SQL Where Clause
Displays the SQL tab of the Table Specifications dialog. Specify SQL Where
Clause to limit the data displayed in the Table Editor.
Sort Criteria
Displays the Sort tab of the Table Specifications dialog. Specify sort criteria
to sort the data initially displayed in the Table Editor.
30
IBM Optim: Edit User Manual
Note: To select a different Start Table or change other parameters, select Respecify
Editor Options from the Tools menu in the Table Specifications dialog. Refer to the
Common Elements Manual for detailed information about using the dialog.
Mode
Choose the initial mode for the Table Editor.
Edit as Default
Sets the Table Editor to default to Edit mode, enabling you to edit the
displayed data. (You can switch to Browse mode for individual tables in
the Table Editor using the edit window Options menu.)
Browse as Default
Sets the Table Editor to default to the Browse mode. (You can switch to
Edit mode for individual tables in the Table Editor using the edit window
Options menu.)
Browse Only
Sets the Table Editor to the Browse mode only. You cannot switch the
mode for any table when you select this option.
Alternate Path
An alternate method for opening the Table Editor is to select Edit from the Actions
menu in the main window. By default, the last Edit Definition you used is
displayed.
Your next step depends on your purpose:
v To create a new Edit Definition, select New from the File menu in the Table
Editor.
v To create a new Edit Definition modeled on an existing one, open the desired
Edit Definition and select Save As from the File menu in the Table Editor.
v To create and store a copy of the current Edit Definition and continue editing it,
select Save Copy As from the File menu in the Table Editor.
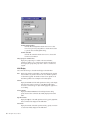
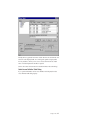
Select an Existing Edit Definition
Use these steps to select an existing Edit Definition:
Procedure
Select Open from the File menu in the main window to open the object
selection dialog.
2. Double-click Edit in the Identifier list to expand the Edit Definition object list.
3. Double-click the Edit Definition Identifier to display the corresponding list of
Edit Definitions.
1.
4.
Double-click the desired Edit Definition to open the Table Editor.
Open Edit Definition Dialog
The Open Edit Definition dialog is divided into two areas. The object identifiers
are on the left and associated objects appear on the right. The list of objects varies
depending on the identifier you select.
Chapter 3. Edit
31
Pattern
You can specify a Pattern to limit the list of requests in the Open dialog. An Edit
Definition name consists of two parts: identifier.name. The Pattern must also have
two parts. You can use the % (percent) wild card to represent one or more
characters or use the _ (underscore) wild card to represent a single character in an
object definition name. (The underscore must be selected as the SQL LIKE
character on the General tab of Personal Options.)
Note: After you specify a Pattern, click Refresh to redisplay the list based on your
criteria.
Using the Table Editor
Use the Table Editor to browse or edit relational data from a variety of databases
simultaneously. The tools available in the Table Editor allow you to manage the
display and edit the data. This section describes the components of the Table
Editor and the display options available.
Table Editor Components
The Table Editor displays one or more related tables, each in an edit window. Each
table relates to the table displayed in the edit window above it.
32
IBM Optim: Edit User Manual
The components of the Table Editor allow you to describe the Edit Definition, add
tables to the display, manipulate and choose preferences for the display of each
table, and perform functions on tables individually or collectively.
The Table Editor can have several edit windows open, depending on how many
tables are joined.
The Table Editor includes the following details:
Description
Enter text to describe the set of tables edited or browsed (up to 40 characters).
Default Qualifier
The default qualifier is the two-part prefix used to qualify any unqualified table
names in the Table Editor.
Cancel Button
The cancel button is enabled when data is being fetched from the database. Click
Cancel to halt the fetch operation. If you cancel the fetch operation, an incomplete
fetch set is obtained for the table in progress. Empty fetch sets result for tables
subordinate to the table with the incomplete fetch set. A message appears in the
status bar for each table involved in the cancel operation.
Edit Window
The Table Editor displays each table in an edit window. Refer to “Edit Window”
on page 34 for details.
Chapter 3. Edit
33
Tools Menu
In addition to the standard File, Edit, and Tools menu commands, you can select
the following commands from the Tools menu.
Preferences
Displays the Specify Edit Preferences dialog. Refer to “Edit Preferences” on
page 41 for additional information.
Convert AD to Local
Converts a named Access Definition to a local Access Definition.
Note: A local Access Definition is stored with the Edit Definition and is
available only to that Edit Definition.
Respecify Variable Values
Modifies the default values assigned to substitution variables in an Access
Definition. This menu command is available only if there are substitution
variables specified in the Access Definition. Select this command to open
the Variable Values dialog, modify the variable values, and automatically
obtain a new fetch set. For complete information, refer to the Common
Elements Manual .
Indent
Lists the names of multiple joined tables in the Table Editor in an indented
format. Refer to “Display Multiple Tables” on page 45.
Undo All
Removes changes to all rows in the current fetch set for all displayed
tables. Refer to “Display Multiple Tables” on page 45 for details.
Undo Errors
Restores rows in error to the last valid state, for all displayed tables. Refer
to “Commit and Restore Data” on page 64for details.
Show Excluded Rows
Displays all rows previously excluded from all tables using the shortcut
menu Exclude or Include options. Refer to “Locate Specific Data” on page
51 for information about display options.
Edit Window
Each table selected for display in the Table Editor is displayed in an edit window.
Each edit window contains display options and menu choices that pertain to the
corresponding table.
34
IBM Optim: Edit User Manual
Note: Binary data is not displayed. Cells containing binary data are shaded. To
view binary data, use the hexadecimal display. For more information about
viewing and editing binary data, see “Edit Data” on page 56. Also, numeric SQL
variant data is displayed as binary.
An edit window contains the following components:
Table
Displays the name of the table shown in the edit window. If the table
name is not fully qualified, the default qualifier is assumed.
Toolbar
Select actions or options from the edit window toolbar for the table in the
edit window, as follows:
Format
or
Switch between columnar and side label format. Refer to “Display
Options” on page 39.
Undo
Undo changes to all rows in the current fetch set for the table.
Refer to “Commit and Restore Data” on page 64 for details.
Options
Display the edit window Options menu. Refer to "Edit Window"
for additional information.
Join
Join an additional table in the Table Editor. The additional table
must relate to the table in the Table Editor. If a relationship does
Chapter 3. Edit
35
not exist, Edit prompts for the information to create a relationship.
If more than one relationship exists, you select from a dialog that
contains a list of the relationships. Refer to “Display Multiple
Tables” on page 45 for additional information.
Unjoin
Remove the table and all subordinate joined tables from the Table
Editor. See “Display Multiple Tables” on page 45 for additional
information.
Refetch Rows
Retrieve a new fetch set of rows for the table. If other users are
simultaneously accessing this data, refetch rows periodically to
ensure you have current data.
Note: You can undo changes to the current fetch set only. If you
refetch rows, you cannot undo changes to the previous fetch set.
See “Commit and Restore Data” on page 64 for additional
information.
Mode
or
Switch between Data mode and Expression mode.
For Data mode, all editing is committed as entered. For Expression
mode, all editing is evaluated before it is committed. Click
Evaluate Expression on the shortcut menu to evaluate expressions
before committing to the database.
Navigation
Scroll side label display to the first row, previous row, next row, or
last row, respectively.
Filtering
Indicates whether Table Specifications, such as Selection Criteria, are
defined for the table. Filtering OFF indicates no criteria are defined.
Join Arrow
Position the Join Arrow to display related rows in joined table(s). See
“Display Multiple Tables” on page 45 for additional information.
To move the arrow to a different row, click the Join Arrow grid column in
the desired row or use the up/down arrows on your keyboard.
36
IBM Optim: Edit User Manual
Note: The Join Arrow grid column and the Status grid column are shown
when a table is displayed in columnar format only. See “Display Options”
on page 39 for additional information.
Status Indicates the status of each row, as follows:
blank The row in the current fetch set has not changed.
Untouched
The row in the current fetch set has not changed (Side label
display only).
Updated
The row has changed and is committed to the database.
Updated(*)
Changes to the row have been undone, except for LOB data
changes, which cannot be undone.
Pending (Upd)
The row has been updated or changed, but the change is not
committed to the database.
Pending (Ins)
The row has been inserted, but has not been committed to the
database.
Inserted
The row is new and has been committed to the database.
Deleted
The row has been deleted.
Evaluated
Expressions in the row have been evaluated and are acceptable.
Error
The row contains at least one error. Refer to the message bar at the
bottom of the dialog for more information.
Locked
If Edit cannot display the new version of an updated or inserted
row, the row is placed in Locked status. This situation can occur
when a database trigger modifies the row before it is inserted into
the database. Position the pointer on the status grid cell of a locked
row to display the reason the row is locked.
Click the Refetch Rows button on the edit window toolbar to
acquire a new fetch set to display the committed versions of the
updated or inserted rows. If the Audit Tables option is active, the
row is not committed.
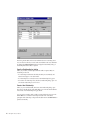
Edit Window Options Menu
Use the edit window Options menu to select edit and display options for the table
in the corresponding edit window. You can switch between Edit and Browse
modes, choose various display options, and select other table specifications, as
described in the following paragraphs.
Preferences you select on the Options menu apply to the corresponding edit
window only.
Note: If the Force Browse Only check box on the Edit tab in Product Options is
selected, the controls pertaining to editing data are disabled. (Refer to the
Installation and Configuration Guide .)
Chapter 3. Edit
37
Click the Options button
window Options menu.
in the edit window toolbar to display the edit
Browse
Switches between Browse mode and Edit mode for the corresponding
table. This selection is unavailable if Browse Only is selected for the
default data display.
Display Attributes
Switches between including or excluding column attribute information in
the column headings.
Display Deleted Rows
Switches between displaying or hiding rows that you delete from this
table. Deleted rows appear dimmed when displayed.
Table Specifications
Opens the submenu to allow you to set table specifications. Table
specifications are part of the Access Definition. Table specifications allow
you to limit the amount of data obtained from the database in a fetch set.
The available table specification options are as follows:
Columns
Set the display mode and create column associations for Large
Object (LOB) columns. Associations correlate the type of object
with the appropriate application to use for editing.
Selection Criteria
Specify selection criteria for one or more columns to limit the data
to fetch from any table.
SQL
Create an SQL WHERE clause to define complex selection criteria
for one or more columns in any table to limit the data to fetch.
Sort
Select sort criteria to arrange rows in ascending or descending
order for one or more columns, in order of priority.
Note: Refer to the Common Elements Manual for complete
information and details about table specifications.
Reset
Opens the submenu to allow you to reset the table specifications to the
original settings.
Show SQL
Displays a dialog containing the SQL used to obtain the fetch set. You can
use the SQL dialog to review, print, and save SQL used to retrieve the
current fetch set for the table in the active Edit Definition. To save or print
SQL, select the appropriate command from the File menu on the SQL
dialog.
Insert Row
Creates a blank grid row for data entry to add a new row to the table in
the database. The blank grid row is inserted after the last displayed row in
the edit window.
Show Excluded Rows
Displays all rows previously excluded from the table (rows are excluded
using the shortcut menu Exclude command). To display excluded rows
individually, right click a row and select Show Next from the shortcut
menu.
38
IBM Optim: Edit User Manual
Remove Locked Rows
Removes rows in Locked status from the display and allows you to
continue to edit the current fetch set.
Undo Errors
Removes changes to rows in the table that result in an error condition. See
“Commit and Restore Data” on page 64.
Undo Last
Removes the last change to the table. See “Commit and Restore Data” on
page 64.
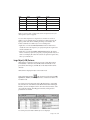
Rows meeting Criteria
Displays a message to indicate the number of rows that meet the selection
criteria. You can choose to increase the fetch limit for the table up to the
maximum established in Product Options.
For example, when the number of rows that satisfy the criteria is 711, but
the fetch limit is 500 and can be increased, the following is displayed:
However, if the fetch limit is at maximum, the following is displayed:
Unsupported Columns
Indicates there is at least one unsupported data type in the table. Select
Unsupported Columns to display a dialog that contains a list of the
unsupported columns and the corresponding data type for each.
Display Options
The Table Editor provides several ways to manipulate the display. You can perform
functions on all tables, individual tables, or specific rows.
An edit window has two format options, columnar and side label. You can switch
or
button on the edit window
between the two formats by clicking the
toolbar. The default format is columnar. Most of the examples throughout this
sectionl are shown in columnar format.
Chapter 3. Edit
39
Columns
When a table is displayed in columnar format, the Join Arrow grid column and the
Status grid column are to the left of the table columns.
In the following example, the edit window shows several rows of data in columnar
format.
In columnar format, the column headings display across the top of the edit
window and the data displays in columns beneath the headings. Note that the
headings for primary key column(s) display in bold type.
Side Label
In side label format, the column headings are displayed down the left side of the
edit window and the data is displayed to the right of the headings.
Use the navigation buttons on the edit window toolbar to scroll the display. This
format focuses on a single row and can display more columns for the row than the
columnar format. Side label format is useful to edit data in very wide columns.
In the following example, the edit window shows data in side label format.
40
IBM Optim: Edit User Manual
When a table is displayed in side label format, the relative position of a row in the
fetch set and the status of the row is noted in the status bar at the bottom of the
edit window.
Edit Preferences
You specify preferences in Personal Options to apply each time you open the Table
Editor. You can change the edit preferences for a specific instance of the Table
Editor or for an individual table in an edit window. Select Preferences from the
Tools menu of the Table Editor to display the Specify Edit Preferences dialog.
(For full details on edit preferences in Personal Options, refer to the Common
Elements Manual .)
Use this dialog to specify preferences that override edit preferences selected in
Personal Options. Preferences you select on the Specify Edit Preferences dialog
apply to all tables in the currently opened Table Editor only.
Note: If the Force Browse Only check box on the Edit tab in Product Options is
selected, the controls pertaining to editing data are disabled. (Refer to the
Installation and Configuration Guide .)
Chapter 3. Edit
41
Auto Switch
Select this check box to automatically switch subordinate tables in a
“stack” of two or more joined tables. When you scroll and no related rows
exist in the displayed subordinate table, Edit automatically switches to
display the next table in the stack that has at least one related row.
Display Column Attributes
Select this check box to include column attributes with the column
heading. This information is useful when inserting a row or determining
column dimensions.
Display Deleted Rows
Select this check box to display rows you delete (deleted rows appear
dimmed). Clear this check box to remove deleted rows from the display.
Single View
Select this check box to disable the Join capability when the first item in
the Table Editor is a view. Browsing and editing is more efficient using
Single View mode because relationship information is bypassed. However,
to browse or edit related data, you must clear the check box.
Side Label Display
Select this check box to display all tables in the side label format. You can
toggle between side label format and columnar format for individual tables
using the edit window toolbar. See “Display Options” on page 39.
Warn on Cascade
Select this check box to display a warning when you delete rows in the
active table. Rows in other tables may be deleted or column values set to
NULL (if the relationship between the tables uses the “SET NULL” delete
42
IBM Optim: Edit User Manual
rule) when you delete rows in the active table. The Delete Confirmation
dialog displays the names of affected tables including tables that are in the
Table Editor.
Note: Consider the potential consequences before you disable this
warning. A Delete action can affect rows that are not displayed or currently
active in the Table Editor. Data deleted from tables that are not active in
the Table Editor cannot be restored.
Use NULL as Insert Default
Select this check box to specify NULL as the default value for null eligible
columns when you insert a row. Clear the check box to direct Edit to insert
a default value other than NULL. The inserted value depends on column
data type and includes blank, zero, current date, current time and current
timestamp.
Note: Site management may set Product Options to restrict the use of this
function.
User Supplies Defaults
Select this check box to require usersupplied values for every column that
cannot accept a default value. Clear the check box to specify that Edit
inserts a default value. The inserted value depends on column data type
and includes blank, zero, current date, current time and current timestamp.
Note: Site management may set Product Options to restrict the use of this
function.
Prompt for Variables
Select this check box to display the prompt string for a value for each
variable before the fetch set is obtained, regardless of whether or not a
value has been assigned. Clear the check box to display the prompt string
only when a value for a variable has not been assigned. (This menu
command is applicable when there are substitution variables specified in
the Access Definition.) Refer to the Common Elements Manual .
Retain SelCrit for Self-Ref Rels
Select this check box to apply selection criteria each time a table is
self-referenced in the Table Editor. Clear the check box to ignore selection
criteria when a table is self-referenced. The default setting for this option is
specified in the Edit tab of the Personal Options dialog. Refer to the
Common Elements Manual for more information.
Note: A table can be self-referenced only when the Table Editor is in
Browse mode.
Display Row Count
Specify the maximum number of rows to display from the fetch set for
each table that has tables joined to it. Click Defaults to use the Display
Row Count value specified on the Edit tab of the Personal Options dialog.
Undo Levels
Specify the number of times (1 to 20) you can undo a commit to any row
in an active Edit Definition. The number of undo levels may affect the
performance and speed of Edit.
An undo level is defined as a change to a row that is committed to the
database. However, if a change to a row results in an error condition, the
change is not committed to the database, but still counts as one undo level.
Chapter 3. Edit
43
Click Defaults to use the value specified on the Edit tab of the Personal
Options dialog.
Default Data Display
Browse
Select this check box to choose the Browse mode by default for
each new table joined to the Table Editor. You can switch to Edit
mode using the edit window Options menu for individual tables,
as required.
Browse Only
Select this check box to choose the Browse Only mode by default
for each table added to the Table Editor. You cannot switch to Edit
mode using the edit window Options menu.
Edit
Select this check box to choose the Edit mode by default for each
table added to the Table Editor. You can switch to Browse mode
using the edit window Options menu for individual tables, as
required.
Command Buttons
OK
Click OK to save and apply the selected preferences to any new
tables you join, but not to the tables currently in the Table Editor.
Cancel
Click Cancel to close the dialog without applying or saving
changes to the Edit Preferences.
Apply Click Apply to apply and save the selected preferences to tables in
the Table Editor and any new table you join.
Defaults
Click Defaults to return Edit Preferences to the default settings
(specified in Personal Options).
Browse Data
You can browse or edit data according to your purpose. You can select Edit as
default, Browse as default, or Browse Only when you begin a new Edit Definition.
v If you select Edit as default or Browse as default, you can switch between the
edit and browse modes using the edit window Options menu.
v
If you select Browse Only, you cannot switch to edit mode. In the Browse Only
mode, you can open more than one instance of the same table.
Edit provides several ways to organize and manipulate data in the Table Editor to
allow you to browse data efficiently. For example, you can specify selection criteria
to limit the size of the fetch set and display a more manageable set of data. When
a table contains a large number of rows, it can be very useful to selectively exclude
rows from the display.
This section describes how to use the following tools:
Join tables
Join tables in the Table Editor to display related data from one or more
additional tables.
Indent
Display the names of all tables joined in the Table Editor in an indented
format to clarify relationships between tables.
44
IBM Optim: Edit User Manual
Unjoin tables
Remove tables from the Table Editor.
Find
Search for specific data in a table.
Exclude
Remove rows from the display.
Include
Display only rows that satisfy a specified criteria.
Show next
Display the first excluded row between the row you selected and the next
displayed row.
Show all
Display all excluded rows between the row you selected and the next
displayed row.
Sort
Rearrange rows displayed in the Table Editor in ascending or descending
order based on a specific column.
Rearrange column order
Position the columns to display the desired data more efficiently.
Hide
Remove a column from the display.
Lock
Reposition a column to the left (columnar display) or to the top (side label
display) of the other columns. The column stays in that position when you
scroll the data.
Display Multiple Tables
You can join multiple tables to any table in the Table Editor. When you open a new
Edit Definition in the Table Editor, a single table displays initially, regardless of
whether you specify a table name or an Access Definition. However, because an
Access Definition can include several tables, if you specify an Access Definition,
the Start Table displays in the Table Editor.
Use Join to display related data from other tables. When you join tables, the
related data in the joined table displays in a new edit window in the Table Editor.
A relationship must exist between the tables to join them. You can join several
tables to a single table, or join additional tables to each joined table. Each joined
table displays in a new edit window.
Chapter 3. Edit
45
Note: A table can be joined more than once. In Browse mode, a table may be
joined in the same viewable area of the Table Editor (e.g., A to B to A).
Additionally a table may be self-referenced (e.g., A to A).
In Edit mode a table may be joined more than once, but only in a different branch
of stacked tables (e.g., A to B to C, and A to D to C).
Join Button
Click the Join button in the edit window toolbar to join another table. Depending
on how you open the Table Editor, the Select Table(s) dialog or the Select Access
Definition Table dialog displays when you click Join.
Select Table(s) Dialog
If you open the Table Editor with a table name and you click Join, the Select
Table(s) dialog displays.
46
IBM Optim: Edit User Manual
Initially, the list is populated with names of tables that have the same DB Alias and
Creator ID as the displayed table. You can change the qualifier to display tables
from any database to which you have access. Select a table from the list of table
names. A relationship between the tables is required.
(Refer to the Common Elements Manual for detailed information about this dialog.)
Select Access Definition Table Dialog
If you open the Table Editor with an Access Definition and click Join, the Select
Access Definition Table dialog displays.
Chapter 3. Edit
47
This dialog lists the tables in the Access Definition that are not currently joined.
You can select from this list, or select a table not included in the Access Definition
by clicking the Additional Tables button to display the Select Table(s) dialog. A
relationship between the tables is required.
Specify a Relationship for Joining
When you join tables, a relationship between the tables is required. Only one
relationship can be used.
v If a relationship exists between the tables, the table joins automatically and
related rows display in a new edit window.
v If a relationship does not exist, the Create a New Relationship dialog opens.
v If more than one relationship exists, the Select a Relationship dialog opens. You
can select the relationship to use from a list.
Create a New Relationship
When you join an unrelated table, the Create a New Relationship dialog opens.
The name of the table already in the Table Editor is shown in the Parent Table box
in the Create a New Relationship dialog, by default.
You can join from parent to child or child to parent. Click the down arrow in the
Parent Table box to switch the relationship. Select the name of the table to
participate in the relationship as the parent. The table name in the Child Table box
updates automatically.
48
IBM Optim: Edit User Manual
Click OK to open the Relationship Editor. Use the Relationship Editor to specify
the columns that participate in the relationship and complete the creation of the
new relationship. The new relationship is stored in the Optim Directory. Refer to
the Common Elements Manual for detailed information on using the Relationship
Editor.
Select from Multiple Relationships
When you join a table that is related by more than one relationship, the Select a
Relationship dialog opens. The Select a Relationship dialog lists all the
relationships between the tables and identifies the source of each relationship. The
source can be from a specific DBMS or from the Optim Directory.
Select any one of the relationships listed to use to join the table, then click OK.
Chapter 3. Edit
49
Stack Tables
You can join more than one table to any table. When several tables are joined to a
single table, the joined tables are "stacked" in a single edit window, in the order in
which they were joined. The most recently joined table is displayed by default, and
the other tables in the stack are hidden.
The name of the displayed table appears in a drop-down box in the edit window.
Click the arrow to display the list of tables stacked in the edit window. Click a
table name in the list to display that table in the edit window.
Note: You can use Auto Switch in the Specify Edit Preferences dialog to
automatically switch to the next table in the stack when the selected table does not
have at least one related row.
You can display any table in the stack and join other tables to any table in the
stack. In many cases, a database table is related to two or more tables, creating
different paths for joining and browsing the data.
When a stacked table is displayed, all subordinate joined tables are also displayed.
When a stacked table is hidden, all subordinate joined tables are also hidden.
Indent
When several tables are joined in the Table Editor, you can use the Indent
command to display the names of the joined tables in an indented format. The
indented format shows the relationships between the joined tables. Select Indent
from the Tools menu to open the Indented Table Display dialog.
Note: Table names that are not shown in bold type are stacked and not currently
displayed in the Table Editor. To view a stacked table, select the table name and
click OK.
50
IBM Optim: Edit User Manual
Default Qualifier
The default qualifier is the two-part prefix for unqualified table names in the Table
Editor.
Grid Details
Lvl
Indicates the display level of each table, subordinate tables, and stacked
tables in the Table Editor, where 1 represents the highest level or Start
Table.
Table
Names each table in the Table Editor. The first table in the list is the Start
Table.
Stacked
Indicates that the joined table is stacked and hidden in the Table Editor.
Relationship Name
Names the relationship. The first table in the list is always the Start Table.
Note: The initials of the table names are used in parent/child order,
preceded by an R, by default. For example, a relationship between
CUSTOMERS and ORDERS is named RCO.
Parent/Child Indicator
Indicates whether the table is the parent or the child in the relationship.
Relationship Type
Indicates the type of relationship:
v Defined to a specific DBMS.
v Generic or specific Optim relationship
Unjoin Tables
Click the Unjoin button
in the edit window toolbar to unjoin the table in the
edit window, and all subordinate joined tables. If the table is part of a stack when
you click unjoin, the next table in the stack populates the edit window.
Unjoined tables may or may not be saved as part of the Edit Definition or the
Access Definition, depending on how you opened the Table Editor and whether
you choose to save the definitions when you exit.
v If you opened the Table Editor with an Access Definition, all new tables joined
and unjoined are saved as part of the Access Definition when you exit the Table
Editor, unless you choose not to save the Access Definition when prompted
upon exit.
v If you opened the Table Editor with a table, only those tables that are still
joined when you exit are saved. The tables are saved as part of the Edit
Definition.
Whenever you make any change to tables in the Table Editor, you are prompted to
save the Edit Definition and the Access Definition when you exit the Table Editor
or open a different Edit Definition.
Locate Specific Data
Edit provides tools to locate specific data from the fetch set in the Table Editor.
Chapter 3. Edit
51
Find Specific Data
Use Find to search for specific data in the Table Editor. In the Find dialog, you
specify a search string and direct Find to locate the string. You also specify
whether the search should proceed forward or backward, wrap to search all of the
available data, be case-sensitive, or locate complete words.
About this task
To use Find:
Procedure
1.
2.
Right-click in a grid column heading and select Find from the shortcut menu
to open the Find dialog.
On the Criteria tab, specify the string or value you want to find.
Select a direction for the search.
Select matching options, as needed.
On the Columns tab, select the columns you want to search. The column in
which you right-clicked is selected by default.
6. Click Find Next to begin the search and to locate and scroll to the next
occurrence of the search value.
3.
4.
5.
Results
For detailed information about the Find dialog, refer to the Common Elements
Manual .
Exclude Rows
Use Exclude to remove one or more rows that satisfy the specified criteria from the
display in the Table Editor.
About this task
In the Exclude dialog, you specify a search string. You also specify whether the
search should proceed forward or backward, wrap to search all of the available
52
IBM Optim: Edit User Manual
data, be case-sensitive, or locate complete words. Click Find Next to locate the first
occurrence of the search string. Then, click Exclude to exclude the row containing
the single instance of the search string or click Exclude All to exclude all rows that
contain the search string.
Excluded rows are retained in the fetch set. A thick line between rows indicates the
presence of hidden rows. Position the pointer on the thick line to display the
number of hidden rows. You can right-click and select Show Excluded Rows on
the shortcut menu to show all of the rows.
To use Exclude
Procedure
1.
Right-click in a grid column heading and select Exclude from the shortcut
menu to open the Exclude dialog.
On the Criteria tab, specify the string or value you want to exclude.
Select a direction for the search.
Select matching options, as needed.
On the Columns tab, select the columns you want to search. The column in
which you right-clicked is selected by default.
6. Select Find Next to begin the search.
7. Select Exclude to hide rows one at a time, or select Exclude All to hide all
rows that satisfy the specified criteria.
2.
3.
4.
5.
Include Rows
Use Include to display rows in the Table Editor that satisfy the specified criteria
only, and exclude all other rows. In the Include dialog, you specify a search string.
You also specify whether the search should proceed forward or backward, wrap to
search all of the available data, be case-sensitive, or locate complete words. Click
Include to display rows that contain the search string.
Chapter 3. Edit
53
About this task
Rows that do not contain the search string are retained in the fetch set. A thick line
between rows indicates the presence of hidden rows. Position the pointer on the
thick line to display the number of hidden rows. You can right-click and select
Show Excluded Rows on the shortcut menu to show all of the rows.
To use Include
Procedure
1.
Right-click in a grid column heading and select Include from the shortcut
menu to open the Include dialog.
On the Criteria tab, specify the string or value you want to include.
Select a direction for the search.
Select matching options, as needed.
On the Columns tab, select the columns you want to search. The column in
which you right-clicked is selected by default.
6. Select Include to choose all rows that contain the search string in the selected
columns.
2.
3.
4.
5.
Display Data - Show Hidden Rows
Edit provides tools to display specific data from the fetch set in the Table Editor.
display specific data
Show Next
Right-click in a grid column and select Show Next from the shortcut menu to
display the first excluded row positioned between the row you right-clicked and
the next displayed row.
54
IBM Optim: Edit User Manual
Show All
Right-click in a grid column and select Show All from the shortcut menu to
display all excluded rows positioned between the row you right-clicked and the
next displayed row.
Sort:
There are several ways to sort data in the Table Editor:
v You can right-click in a column heading and select Sort from the shortcut menu.
Select Ascending or Descending to rearrange the rows according to the data in
the column in which you right-clicked.
You can select sort criteria to arrange rows in ascending or descending order for
each specified column, in order of priority, when data is initially displayed in
the Table Editor. Refer to “Create a New Edit Definition” on page 28.
v You can select Sort from the Table Specifications submenu available from the
edit window Options menu. Specify sort criteria for the table in the edit
window to arrange rows in order for each specified column, in order of priority.
Refer to the description of the “Edit Window Options Menu” on page 37.
v
Manipulate Grid Display
Edit provides tools to manipulate the grid columns displayed in the Table Editor.
Rearrange Grid Columns:
You can rearrange the order of the columns displayed in the edit window. Use the
mouse to drag the column heading to the desired position.
Hide/Unhide:
Use Hide to exclude a column from the display. Right-click in a grid column
heading and select Hide from the shortcut menu to exclude the column. Select
Unhide All to show all columns.
Lock and Unlock:
This section describes the use of Lock and Unlock in columnar or sidelabel format.
Columnar
Use Lock to reposition a column to the left of the other columns in the edit
window and retain the column in that position when you scroll the display
to the left or right. Right-click in a grid column heading and select Lock
from the shortcut menu to reposition and lock the column. You can lock
more than one column.
To unlock a column, right-click in the grid column heading and select
Unlock from the shortcut menu. The column is unlocked and repositioned
immediately to the right of any other locked columns.
To reset columns to the original order, unlock all columns, then right click
in the grid heading and select Reset Grid Attributes.
Side Label
Use Lock to reposition a column (represented as a grid row) to the top of
the other columns in the edit window and retain the column in that
position when you scroll the display to up or down. Right-click in a grid
cell and select Lock from the shortcut menu to reposition and lock the
column at the top. You can lock more than one column, as required.
Chapter 3. Edit
55
To unlock the column, right-click in the column and select Unlock from the
shortcut menu. The column is unlocked and repositioned immediately
below any other locked columns.
To reset columns to the original order:
v Switch the display format to columnar,
v Unlock all columns,
v Right click in the grid heading and select Reset Grid Attributes.
Reset Grid Attributes
Right-click in a grid column heading and select Reset Grid Attributes from the
shortcut menu to rearrange and resize the grid columns to the original order and
width.
Use Reset Grid Attributes to unhide hidden columns and unlock locked columns
as well.
Note: Attributes defined in the Access Definition are not reset with the Reset Grid
Attributes command.
Edit Data
Edit provides several ways to edit data in the Table Editor. You can edit one or
more tables at the same time. After you edit data in a row, move the pointer to a
different row to commit the data.
Editing Tools
In addition to overtyping column data in a grid cell, you can use shortcut menu
commands to perform the following editing functions.
Note: If a grid cell is shaded and you cannot overtype the data, the cell may
contain one or more binary numbers 0X00, 0X09, 0X0A, or 0X0D. You can edit the
data in hexadecimal format using the shortcut menu command Edit Cell, Display,
Hex.
Replace
Use Replace to substitute one string or value for another.
1. Right-click in a grid column heading and select Replace from the shortcut
menu to open the Replace dialog.
2. On the Criteria tab,
3. Specify the string or value you want to replace and the string or value to use as
the replacement.
4. Select a direction for the search (up or down).
5. Select matching options, as needed (that is, whole word, case-sensitive).
6. On the Columns tab, select the grid columns you want to search. The column
in which you right-clicked is selected by default.
7. Select Find Next to begin the search.
8. Select Replace to replace items one at a time or select Replace All to replace all
occurrences of the specified value.
56
IBM Optim: Edit User Manual
Insert
Right-click a row and select Insert from the shortcut menu to insert a blank row
following the row you right-clicked. The related primary key value is inserted
automatically in the foreign key column for a database relationship or in the
appropriate columns for an Optim relationship.
Repeat
Right-click a row and select Repeat from the shortcut menu to insert an identical
row immediately after the row you right-clicked. Modify the data in the unique
index and primary key columns and, optionally other columns, to prepare the row
for insertion into the database.
Note: Rows added using the Repeat and Insert commands are subject to unique
index considerations. If any added row causes a unique index to have a duplicate
value, the row is placed in Error status. You must edit the value to be unique
before inserting the row into the database.
Delete
Right-click a row and select Delete from the shortcut menu to delete the row.
When you delete a row, Edit checks to ensure that deleting the row does not
violate referential integrity rules. If a cascading delete or NULL results and the
Warn on Cascade check box is selected, the Delete Confirmation dialog displays
the names of tables affected by your action, including tables that are not part of the
Edit Definition.
Note: Use caution to avoid unintended results. Delete can affect rows that are not
displayed or even currently active in the Table Editor. You should consider the
potential consequences before deleting a row.
Chapter 3. Edit
57
The Delete Confirmation dialog allows you to cancel the delete action to prevent
unintended results. A check mark in the In Use column indicates the table is joined
in the Table Editor.
Retry
After you correct an error condition, you can right-click a row in Error status and
select Retry to try to commit the row again.
Change Case
Right-click a row and select Edit Cell then Lowercase or Uppercase from the
shortcut menu to automatically change the case of text in a grid cell.
Lowercase
Converts the column data in the cell to all lower-case letters.
Uppercase
Converts the column data in the cell to all upper-case letters.
Display Character
Right-click a cell and select Edit Cell, Display, Character from the shortcut menu
to display the Column Data Display dialog. (For a CLOB, click the
icon.) The
Column Data Display dialog displays data offset information and the character
representation of the data in the column. For more information, see Column Data
Display, below.
Display Hexadecimal
Right-click a cell and select Display, Hex from the shortcut menu to display the
character and hexadecimal representations of the column data. For a LOB, click the
icon. For more information, see Column Data Display, below.
The digits that make up the hexadecimal representation of each character are
displayed on the lines below that character. For binary columns, the hexadecimal
representation is displayed on two lines (the character line contains no data and is
shaded). For CLOB columns, the hexadecimal representation includes all bytes,
including carriage returns, line feeds, and the byte order mark (BOM).
58
IBM Optim: Edit User Manual
For the hexadecimal display of character columns, the following applies:
v UTF-16 and Extract File or Archive File data will display the hexadecimal
representation on four lines.
v UTF-8 or multi-byte data will display the character over the first byte, and a
period will be displayed over any additional bytes. For example, the UTF-8
French character À is displayed as two bytes:
À.
C8
30
Note:
– For data in multi-byte format (for example, Oracle JA16SJIS), the character
and hexadecimal representations are each displayed in different fonts and
may not be aligned.
– For release 5.3 or earlier Extract Files and Archive Files, the hexadecimal
representation is displayed on two lines only.
– You cannot edit data in UTF-8 or JA16SJIS format.
Column Data Display
Use the Column Data Display dialog to display a character or hexadecimal
representation of data.
Data Offset
Data Offset displays the location of data, in bytes, from the beginning of the
column or file. You can modify any of the data by overtyping it. Click OK to
update the original data and put the row in Pending(Update) status. For a
hexadecimal display of data in UTF-8 or multi-byte format, the number of bytes
per line is displayed in parentheses, and if the number of characters displayed is
greater or less than the number of characters displayed per row (as determined by
the Characters per Row option), the offset and bytes per line are displayed in italic
type.
Chapter 3. Edit
59
Note: When you display the Column Data Display dialog by rightclicking a
truncated LOB, or by clicking a Native LOB bitmap icon, you can browse the data
only.
Options Button
Click the options button to display the following:
Characters per Row
Select the number of characters to display per row: 64, 128, 256, or
512.
Clear Data
Remove data from the row. Available when text can be modified
only.
File Type
For CLOB data only. If the correct encoding scheme for the CLOB
file is not displayed, select the encoding scheme, UTF-8 or UTF-16.
For UTF-8, the hexadecimal representation is displayed on two
lines. For UTF-16, the hexadecimal representation is displayed on
four lines.
If a file does not include a byte order mark, the default encoding
scheme is based on the data type, CLOB (UTF-8) or NCLOB
(UTF-16).
Export LOB
Right-click and select Edit Cell, LOB Data, Export to export LOB data to a file.
Enter a name for the Export File. This option is valid for Native LOBS only (refer
to “Large Object (LOB) Columns” on page 61).
Import LOB
Right-click and select Edit Cell, LOB Data, Import to import the contents of a LOB
file. Enter a name for the file to import. This option is valid in Edit mode, for
Native LOBS only (refer to “Large Object (LOB) Columns” on page 61).
Set Null
Right-click and select Edit Cell, LOB Data, Set Null to set the contents of a Native
LOB or truncated Non-Native LOB to NULL.
Evaluating Expressions
You can process changes in either Data or Expression mode. In Data mode, all
editing is committed as entered. In Expression mode, all editing is evaluated before
it is committed.
Use the edit window toolbar buttons to switch modes.
v Data Mode interprets your edited values as data (default).
v Expression Mode interprets your edited values as expressions.
For example:
60
Mode
Specify
Column
Result
Data
4*5
CHAR(20)
4*5
IBM Optim: Edit User Manual
Mode
Expression
Specify
Column
Result
4*5
NUMBER(4,2)
Error
SYSDATE
DATE
Error
4*5
CHAR(20)
20
4*5
N(4,2)
20
SYSDATE
DATE
Actual system date
Note: You cannot evaluate a column name used in an expression; however, all
other expression syntax is supported.
You can evaluate expressions in a single cell or in an entire row and choose
whether or not to commit the change. It is helpful to evaluate expressions and
display possible results before committing the changes to the database. The
Evaluate commands are available only for rows in Pending status.
v Right-click a row and select Edit Cell, Evaluate from the shortcut menu to
calculate the value of the expression you specify and replace the original value
with the calculated value.
v Right-click a row and select Pending, Evaluate Expression from the shortcut
menu to evaluate any expressions you specify (or system generated values) in an
entire row and display the results. The results do not replace the original values,
unless you commit the row.
Large Object (LOB) Columns
LOB columns are columns that contain large amounts of data either in Binary
Format (BLOBs) or Character Format (CLOBs). Tables with LOB data can be
processed like other data types, and LOB data can be edited and browsed like
other data.
LOB columns are displayed in Native or Non-Native mode.
in the edit window toolbar and select Table
Note: Click the Options button
Specifications, Columns, from the Options menu to switch between Native and
Non-Native mode.
For columns processed in Non-Native mode, LOB data displays as normal table
data, unless the size of the LOB exceeds the Maximum Non-Native LOB Length
limitation, set in Personal Options. (Refer to the Common Elements Manual .) If the
size exceeds the maximum, the LOB appears truncated, and the grid cell is
protected and cross-hatched.
For columns processed in Native LOB mode, icons are displayed.
Chapter 3. Edit
61
The following options are available for LOB columns processed in Native LOB
mode:
icon to edit the LOB data using the application associated with the
v Click the
LOB. When editing LOB data, you cannot edit other data in the Table Editor. If
an application association has not been established for the LOB data, you are
prompted to create one.
Note: You cannot undo changes to LOB data.
v Click the
icon to browse a CLOB in character mode.
v Click the
icon to browse the LOB in hex mode.
Display Attributes
You can get additional information about a LOB, by clicking the Options button
and selecting Display Attributes from the menu.
The LOB data type (BLOB) or (CLOB) is displayed. Additionally, if the DBMS is
UDB, the maximum data length is also displayed.
LOB Column Associations
To create LOB column associations, click the Options button
in the edit
window toolbar and select Table Specifications, Columns to display the Columns
tab of the Table Specifications dialog.
62
IBM Optim: Edit User Manual
Use the Association column of the Columns tab to associate a LOB-type column
with the application required to view or edit the LOB data (MS Word, NotePad,
Paint, etc.), in one of two ways:
v Enter a file name extension for the type of LOB (for example, type the extension
.doc to associate a LOB Word document with Microsoft Word).
OR
v Use the drop-down list to select a column name to reference. The first three
characters of data in the corresponding row of the referenced column are used
as the file name extension for the associated LOB column.
Note: When you attempt to edit LOB data for which an application association has
not been established, you are prompted to create one.
When you attempt to edit LOB data associated with an application that is
inaccessible from the workstation, Windows 2000 displays the Open with... dialog
to allow you to select an accessible application. (Older versions of Windows may
display an error message. You can manually assign an accessible application to use
by selecting Options, File Types from the Windows View menu.)
Auditing Changes
The Audit option directs Edit to track database changes. To activate the Audit
option, select Personal from the Options menu in the main window. On the Edit
tab, select the check box labeled Auditing Active.
Refer to the Common Elements Manual .
Note: Site management may set Product Options to restrict the use of this option.
The Audit table, called PSTAUDIT, is stored in the Optim Directory. You can
review the Audit table in the same way you browse any other database table, as
long as the table is not protected by database security.
Chapter 3. Edit
63
Note: Users must have database Insert and Delete authority for the Audit table if
the Auditing function is active. To restrict access to the PSTAUDIT table, Select
authority should not be granted.
If the Audit option is active for the table being edited, and the database is unable
to write to the Audit Table, Edit does not commit the changes to the row and the
row is placed in Error status.
If the Audit option is active and Edit cannot display the new version of an
updated or inserted row, Edit does not commit the changes to the row and the row
is placed in Locked status. (For example, when a database trigger modifies the row
before it is inserted into the database.)
Commit and Restore Data
Edit provides unique facilities for restoring data. The database commit point, the
fetch set, and the number of Undo Levels you specify determine the extent to
which data is restored.
Fetch Set
A fetch set is the set of rows Edit reads from a single table in the database. Each
table has a unique fetch set. A new fetch set is retrieved when:
v A join is requested. The related rows in the joined table are fetched.
v
v
v
v
64
The
The
The
The
Refetch Rows button is selected to refresh the fetch set for the table.
Sort criteria are redefined for a table.
Selection criteria are redefined for a table.
SQL WHERE clause is redefined for a table.
IBM Optim: Edit User Manual
v The position of the Join Arrow in an upper level table is changed, thereby
changing the row in focus and fetching a new set of related rows for subordinate
joined tables.
Pending Status
When you make changes to a row, the row is placed in Pending Status. Rows in
Pending status can be reset, committed to the database, or evaluated.
Right-click in a grid row and select Pending from the shortcut menu. Then select
one of the following options:
Reset
Resets the pending status of the row and discards changes to the row that
have not been committed to the database.
Commit
Commits changes to the row to the database. You can also commit changes
by moving the pointer to a different row.
Commit Data
You can commit changes to the database by moving the pointer to a different row.
You can also commit changes using the shortcut menu. Each instance of a commit
counts as an undo level. An undo level is defined as a change to a row that is
committed to the database.
If an error condition results when you attempt to commit data to the database, the
data is not committed, but the attempt still counts as an undo level. Edit allows
you to restore the data you modify to a specific commit point.
The number of commit instances you can undo is limited by the maximum
number of undo levels per row specified on the Specify Edit Preferences dialog or
the Edit tab in Personal Options. Refer to the Common Elements Manual .
You can specify 1 to 20 undo levels. Select a reasonable value to satisfy your needs.
Since each undo level must be stored while editing, a large number can affect the
performance and speed of Edit.
Restore Data
Edit allows you to selectively restore data to a prior commit point using Undo. You
can undo changes to an individual row, to an individual table, or to the current
fetch set for every table displayed in the Table Editor (except changes to LOB data,
which cannot be undone).
Note: The data in the current fetch set for each table can be restored, up to the
maximum number of undo levels specified per row, or to the version originally
displayed. If the data is refetched, you cannot undo changes to the previous fetch
set.
Choose from the following Undo options:
Shortcut Menu Undo Commands
Use menu selections to undo changes only to the row that you
right-clicked.
Chapter 3. Edit
65
Edit Window Toolbar Undo Command
to undo changes to all rows in the current fetch set for the table
Click
in the corresponding edit window.
Tools Menu Undo Command
Select Undo from the Tools menu to undo changes to all rows in the
current fetch set for all tables displayed in the Table Editor.
Shortcut Menu Undo Commands
Right-click a specific row to display the shortcut menu Undo commands:
Undo
Removes the last change you made to the row in the current fetch set.
Undo...
Displays the Undo Row List dialog. The Undo Row List dialog displays
each successive version of the row you commit in the current fetch set up
to the maximum number of undo levels, and the original version of the
row in the fetch set. The most recent change is listed first. If the number of
versions exceeds the number of undo levels, a blank row is inserted before
the original to represent the missing versions.
Click the version of the row to restore.
Undo All
Removes all changes to the corresponding row in the current fetch set.
Edit Window Toolbar Undo Button
Click the Undo button
in the edit window toolbar to undo changes to all
rows in the corresponding table in the current fetch set.
66
IBM Optim: Edit User Manual
Tools Menu Undo Command
Select Undo from the Tools menu to restore rows to the original versions obtained
in the current fetch set for all tables in the Table Editor.
Handle Rows in Error
As you edit data or insert new rows of data into a database table, errors may result
for reasons designed to protect your database. For example, an error can occur if
you Repeat (or copy) or Insert new rows and you do not modify the unique or
required columns appropriately.
If a pending action results in an error, the row changes to Error status, Edit does
not commit the change, and the problem is described in the message bar. You can
undo the change or make a correction before attempting to commit the change
again.
List Constraints
When an error occurs as the result of a table constraint, it may be useful to display
a list of table constraints. Select List Constraints from the edit window Options
menu to display the Select a Constraint dialog.
The Select a Constraint dialog provides information about each of the defined
constraints for the specified table. Double-click a constraint name to view
additional details in the Constraint Display dialog.
Chapter 3. Edit
67
The Constraint Display dialog displays the table name, constraint name, and the
constraint text.
Resolve Concurrent Update Conflicts
A concurrent update conflict can occur in a multi-user environment when another
user modifies a row in a particular table between the time you fetch the row from
that table, and the time you modify and attempt to commit it.
This situation can occur because Edit does not apply locks to the rows until you
actually modify and commit data. Fetching the data, regardless of whether you are
browsing or editing, does not automatically apply locks. Typically, concurrent
updates can occur when you:
v
v
v
v
Update a modified row.
Update a deleted row.
Delete an updated row.
Undo a change to an updated row.
When a concurrent update occurs, the Concurrent Update Resolution dialog
displays the table name and the row in conflict. You can compare the current value
of the row to the pending value you are committing. Select Proceed to apply your
change to the row, or select Skip to ignore your change.
68
IBM Optim: Edit User Manual
The Continue to notify for conflicts on a multi-row change check box is enabled
when you perform a single operation that results in changes to many rows (for
example, Replace All). To prevent displaying the Concurrent Update Resolution
dialog as each row is updated, clear the check box. When the operation is
complete, the check box resets to selected by default.
Although highly unlikely, it is possible that another user may modify a row while
you are in the process of resolving a concurrent update for that row. If this
happens, the row is placed in Error status in the Table Editor. You can revise your
entries or undo the change that caused the error.
Optim Primary Keys
Unlike database primary keys, you can use Edit to define primary keys that are
not unique. When you update or delete a row that has a non-unique primary key,
Edit attempts to locate the row that matches the row in the current fetch set. If a
matching row is found, the row can be updated or deleted. If a matching row is
not found, the change is handled as a concurrent update.
Printing
From the Table Editor, you can print the following reports:
Edit Definition Report
Summarizes all the qualifiers, table names, and corresponding
specifications that comprise the Edit Definition.
In the Table Editor, select Print from the File menu and select Definition
from the submenu.
Chapter 3. Edit
69
Data from All Tables
Includes all rows from all tables joined and displayed in the Table Editor.
Stacked tables that are hidden from view are not printed.
In the Table Editor, select Print from the File menu and select Data and
All from the submenus.
Data from Selected Rows
Includes all rows you selected from all tables joined in the Table Editor.
In the Table Editor, drag the pointer arrow to select contiguous rows you
want to print in each table. Select Print from the File menu and select Data
and Selected from the submenus.
Data from a Selected Table
Includes all rows from a selected table in the Table Editor.
Right-click in the grid heading in a selected table. Select Print from the
shortcut menu.
Saving
You are prompted to save the Edit Definition and the Access Definition when
closing the Table Editor. Refer to the Common Elements Manual for detailed
information about saving definitions.
You can also save data to a file. Data is saved in a comma delimited text file (.txt).
Any bit map grid cells are skipped and check box grid cells are represented as T
(True) or F (False). This feature is useful when you want to import data into
another application. You can save data in two ways:
All Data to a File
Right-click in the grid heading of a table in the Table Editor, and select
Save and All from the submenu.
Selected Data to a File
Drag the pointer arrow in the Table Editor to select the rows to save.
Right-click in a grid heading and select Save and Selected from the
submenu.
70
IBM Optim: Edit User Manual
Appendix. Command Line Interface
The command line interface allows you to create and maintain Edit Definitions, as
well as browse and edit data, without opening the graphical user interface for Edit.
The command line interface can be run from the command line, or automatically
— in a batch file, or from another program.
Command Line Tasks
Use the command line interface to:
v Browse and edit database tables.
v Apply overrides to Edit Definitions and Access Definitions.
The following sections explain and describe how to perform each type of task.
Guidelines
The typical command begins with PR0CMND followed by command line
keywords and associated arguments. The following guidelines apply:
v The first operation argument must be prefixed with a forward slash (/) or dash
(). To start the Table Editor, for example, use /E or -E.
v A command line keyword may be prefixed by a forward slash (/) or dash (),
but it is not required. Example: PST, /PST, and -PST are equal and valid
keywords.
v Generally, command line keywords can be specified in any order, separated by
one or more spaces without commas. When overrides are specified for a process
defined in a parameter file, the OV keyword must follow other command line
keywords and precede the override parameters. The first override keyword and
associated argument must begin on the following line, and each additional
override must be on a separate line. The END keyword must follow the last
override, and must also be on a separate line.
v A command line keyword and associated argument are separated by an equals
sign (=) or a colon (:), with no intervening spaces.
v An override keyword and associated argument are separated by a blank space.
v Keywords are recognized without regard to case. (Most keywords are shown in
this chapter using bold and uppercase for emphasis.)
v An argument associated with a keyword that includes spaces must be enclosed
in single or double quotes.
v Use double quotes to enclose a command line keyword argument that includes a
macro.
v You can include all keywords and arguments in a parameter file and reference
the parameter file on the command line.
v In a parameter file, command line keywords corresponding to an Edit Definition
can be entered on one or multiple lines. You can include several Edit Definitions
in the file; each must begin with the REQUEST parameter.
v Use override keywords and arguments to override specifications in an Edit
Definition.
v A keyword that is inappropriate for the type of processing requested may cause
a fatal conflicting-parameter error.
© Copyright IBM Corp. 1994, 2010
71
v The following relational operator symbols and mnemonics are acceptable for use
in selection criteria overrides:
=, <, >, <=, >=, !=, !<, !>, <>, ^=, ^<, ^>, EQ, NE, LT, GT, LE, GE, BETWEEN,
LIKE, IN, IS, NOT, NULL.
v Comments in a parameter or override file must begin on a separate line and
start with two forward slashes (//). Blank lines may also be included in the
parameter stream.
Syntax Conventions
The syntax conventions used to describe these statements are:
KEYWORD
Keywords are shown in uppercase for emphasis, but can be specified in
lower or mixed case.
text
Variable text is shown in lowercase italics.
()
Statement delimiter to group a series of qualifiers for a parameter.
[]
Indicates an optional parameter.
{}
Indicates a choice of two or more settings from which one (and only one)
must be selected.
|
Separates options.
Run the Table Editor
The following sections describe the command line syntax, command line
keywords, and override keywords you can use to run the Table Editor.
Syntax
Use the following command line syntax to run Edit processes.
PR0CMND /E [ PST=optimdirectory]
{ TABLE=dbalias.cid.tablename | AD=identifier.adname |
REQUEST=identifier.name | @path.filename.txt }
OUTPUT=filename[ + ] ] [ FULL{ + | - } ] [SAVE{ + | - } ][ JOIN {+|-}][OV={overridefilename |*}]
Access Definition Overrides
[
[
[
[
[
[
[
[
DEFQUAL dbalias[ .cid ] ]
\SEL [ [ dbalias. ]cid. ]tablename1 columnname1 operator value
SEL [ [ dbalias. ]cid. ]tablename1 columnnamen operator value ]
SEL [ [ dbalias. ]cid. ]tablenamen columnname1 operator value ]
...]
SQL [ [ dbalias. ]cid. ]tablename sqlwhereclause
SQL [ [ dbalias. ]cid. ]tablenamen sqlwhereclause ]
...]
STARTTAB [ [ dbalias. ]cid. ]tablename ]
VAR variablename value ]
Edit Definition Overrides
[ DISPLAY { DATA | SEL | SQL | SORT } ]
[ MODE { EDIT | BROWSE | BROWSEONLY } ]
[ END ]
Command Line Keywords
Use the following command line keywords to run Edit processes.
72
IBM Optim: Edit User Manual
PR0CMND
Type PR0CMND to initiate command line processing. Note that the
character following PR is the number 0 (zero).
Note: The default path to PR0CMND is
c:\program files\IBM Optim\RT\bin.
/E
Command to start the Table Editor (required). Specify /E or –E.
PST=
The Optim Directory for processing. If processing uses the current (default)
Optim Directory, this keyword is not needed.
optimdirectory
Optim Directory name.
TABLE=
The table to display in the Table Editor.
dbalias.cid. tablename
Three-part table name.
AD=
The Access Definition used to select data.
identifier.adname
Two-part name of an existing Access Definition.
REQUEST=
The Edit Definition.
identifier.name
The qualifier and name of the Edit Definition.
@path.filename.txt
@ followed by the full path and name of a text file of parameters for the
process(es) to run. Alternatively, you can provide parameters for the
process on the command line.
OUTPUT=
File for process reports for all processes in a parameter file. If you use the
OUTPUT keyword more than once, the last file specified is used for all
processes.
If you do not use this keyword, the report is displayed after each process
and you must close the report dialog to execute the next process. In a
UNIX™ or Linux™ environment, the report is displayed to the console.
filename
The name of the file. If you do not provide the full path, the file is
saved in the default Data Directory, identified in Personal Options.
+
FULL
Append reports to an existing file.
Indicator for additional access to the user interface from within the Table
Editor.
+
New and Open commands are available from the Table Editor File
menu.
–
The New and Open commands are not available from the File
menu (default).
SAVE Indicator for additional access to the user interface from within the Table
Editor.
Appendix. Command Line Interface
73
JOIN
OV=
+
Save commands are available from the Table Editor File menu
(default).
–
Save commands are not available from the File menu.
Indicator for additional access to the user interface from within the Table
Editor.
+
The Join command is available in the Table Editor (default).
–
The Join command is not available, however, if the Edit Definition
is based on an Access Definition, you can join to tables referenced
in the Access Definition.
Source of process overrides. The OV keyword must follow all other
command line keywords.
override filename.txt
The name of a text file containing process overrides only, with each
override on a separate line.
*
If you use a parameter file, the asterisk indicates that overrides
follow on successive lines of the file. The first override (keyword
and associated argument) must begin on the following line, and
each additional override must be on a separate line.
Override Keywords
Overrides allow you to override certain parameters in Edit Definitions and objects
when running the Table Editor from the command line.
Access Definition Override Keywords
DEFQUAL
Override for the Default Qualifier in the Access Definition used for
processing.
dbalias[ .cid ]
One or two-part default qualifier for tables referenced in Access
Definition.
SEL
Override for, or addition to, selection criteria specification in Access
Definition. Selection criteria must conform to SQL syntax with each
override on a separate line.
[ [ dbalias. ] cid. ] tablename
One, two, or three-part table name. If tablename is not fully
qualified, the default qualifier is used.
columnname
Name of column to which criteria applies.
operator
Logical operator appropriate for your DBMS.
value
SQL
Value or list of values appropriate for the operator, expressed.as
literals or substitution variables (:variablename)
Override for SQL WHERE specification for a table referenced in the Access
Definition. Each override must be on a separate line.
[ [ dbalias. ]cid. ] tablename
One, two, or three-part table name. If tablename is not fully
qualified, the default qualifier is used.
74
IBM Optim: Edit User Manual
sqlwhereclause
The SQL WHERE clause.
STARTTAB
Override for the Start Table in the Access Definition.
[ [ dbalias. ] cid. ] tablename
One, two, or three-part table name.
If the table name is not fully qualified, the default qualifier is used.
VAR
Override for the value in substitution variable used in the process.
variablename
Name of the substitution variable.
value
The corresponding value for the variable.
Edit Definition Override Keywords
DISPLAY
Override the display options for the initial fetch set.
DATA Display all rows (up to the Maximum Fetch Rows limit) in the
initial fetch set for the table browsed or edited (default).
SEL
Open the Table Specifications dialog, where you can enter selection
criteria for the initial fetch set.
SQL
Open the Table Specifications dialog, where you can specify an
SQL WHERE Clause for the initial fetch set.
SORT Open the Table Specifications dialog, where you can select sort
options for the initial fetch set.
MODE
Override the mode in the Edit Definition for newly joined tables.
EDIT
Set edit as the default mode for newly joined tables.
BROWSE
Set browse as the default mode.
BROWSEONLY
Set browse only as the default mode.
END
End of overrides in parameter file.
Command Line Examples
The following examples illustrate how to run the Table Editor directly from the
command line, using a parameter file, and using overrides.
Run the Table Editor Directly from the Command Line
To run the Table Editor directly from the command line, specify the following:
PR0CMND /E
{TABLE=tablename | AD=accessdefinitionname | REQUEST=editdefinitionname}
PR0CMND
Type PR0CMND to begin the command line sequence. Note that the
character following PR is the number 0 (zero).
Note: The default path to PR0CMND is
c:\program files\IBM Optim\RT\bin.
Appendix. Command Line Interface
75
Specify /E or –E to start the Table Editor.
/E
TABLE=tablename
Enter the command line keyword TYPE= and follow with a fully qualified
table name.
AD=accessdefinitionname
Enter the command line keyword AD= followed by the name of the Access
Definition (identifier.name).
REQUEST=editdefinitionname
Enter the command line keyword REQUEST= followed by the name of the
Edit Definition (identifier.name).
In the following examples, you specify parameters on the command line.
v To start the Table Editor to display a database table named
ORACLE.SALES.ORDERS, specify:
PR0CMND /E
TABLE=ORACLE.SALES.ORDERS
v To start the Table Editor to display tables in the Access Definition named
SALES.QUOTES, specify:
PR0CMND
/E
AD=SALES.QUOTES
v To start the Table Editor to display tables in the Edit Definition named
SALES.NEW, specify:
PR0CMND
/E
REQUEST=SALES.NEW
Run the Table Editor Using a Parameter File
To run the Table Editor from an ASCII text file, specify:
PR0CMND /E @filename
PR0CMND
Type PR0CMND to begin the command line sequence. Note that the
character following PR is the number 0 (zero).
Note: The default path to PR0CMND is c:\program files\IBM
Optim\RT\bin.
/E
Specify /E or –E to run the Table Editor with the parameters contained in
the specified parameter file.
@filename
Enter the @ sign followed by the name of the file that contains the
parameters.
Note: If the parameter file is not in the default Data Directory, you must
specify the full directory path.
File Format
Refer to “Run the Table Editor” on page 72 for command line syntax when
formatting process parameters in a text file. To start the Table Editor using a
parameter file named PARMS.TXT, specify:
PR0CMND
/E
@PARMS.TXT
Using Overrides
The following examples describe how to format a file that contains overrides for an
Access Definition:
76
IBM Optim: Edit User Manual
v Create a parameter file named NEWSTATS.TXT that contains the following
comments and overrides:
AD=SALES.CUST
DEFQUAL
FULL+
/OV=*
ORACLE1.TELEMSTARTTAB
CUSTOMERSSEL CUSTOMERS
STATE='NJ'SEL
CUSTOMERS
To open the Table Editor from the command line, specify:
PR0CMND
/E
@C:\NEWSTATS.TXT
v Create an override file named MARKET.TXT that contains the overrides
including a variable named PROMO1 with a value of California and criteria that
limits the data to all customer numbers greater than 5500.
VAR PROMO1
CASQL
CUSTOMERS
CUSTID=>'5500'
To open the Table Editor from the command line, specify:
PR0CMND
/E
AD=MARKET.DATA
/OV=C:\TEMP\MARKET.TXT
The following examples describe how to format a file that contains overrides for
an Edit Definition:
v Create a parameter file for the initial fetch set in a new Edit Definition. The file
named NEWEDIT.TXT contains the following:
TABLE=SYBASE.MARKET.ORDERS
DISPLAY
FULL+ /OV=*
SELEND
To open the Table Editor from the command line, specify:
PR0CMND
/E
@NEWEDIT.TXT
v Create a parameter file for an existing Edit Definition. The file named
EDITMODE.TXT contains the following:
REQUEST=MARKET.DATA
MODE
JOIN
/OV=*
BROWSEONLYEND
To open the Table Editor from the command line, specify:
PR0CMND
/E
@C:\TEMP\EDITMODE.TXT
v Create an override file for the initial fetch set in a new Edit Definition. The file
named ONEOVER.TXT contains the following:
DISPLAY
SEL
To open the Table Editor from the command line, specify:
PR0CMND
/E
AD=SALES.NEW
/OV=C:\TEMP\ONEOVER.TXT
Appendix. Command Line Interface
77
ZIP='08540'END
78
IBM Optim: Edit User Manual
Notices
This information was developed for products and services offered in the U.S.A.
IBM® may not offer the products, services, or features discussed in this document
in other countries. Consult your local IBM representative for information on the
products and services currently available in your area. Any reference to an IBM
product, program, or service is not intended to state or imply that only that IBM
product, program, or service may be used. Any functionally equivalent product,
program, or service that does not infringe any IBM intellectual property right may
be used instead. However, it is the user's responsibility to evaluate and verify the
operation of any non-IBM product, program, or service.
IBM may have patents or pending patent applications covering subject matter
described in this document. The furnishing of this document does not grant you
any license to these patents. You can send license inquiries, in writing, to:
IBM Director of Licensing
IBM Corporation
North Castle Drive
Armonk, NY 10504-1785
U.S.A.
For license inquiries regarding double-byte (DBCS) information, contact the IBM
Intellectual Property Department in your country or send inquiries, in writing, to:
IBM World Trade Asia Corporation
Licensing 2-31 Roppongi 3-chome, Minato-ku
Tokyo 106-0032, Japan
The following paragraph does not apply to the United Kingdom or any other
country where such provisions are inconsistent with local law:
INTERNATIONAL BUSINESS MACHINES CORPORATION PROVIDES THIS
PUBLICATION “AS IS” WITHOUT WARRANTY OF ANY KIND, EITHER
EXPRESS OR IMPLIED, INCLUDING, BUT NOT LIMITED TO, THE IMPLIED
WARRANTIES OF NON-INFRINGEMENT, MERCHANTABILITY OR FITNESS
FOR A PARTICULAR PURPOSE. Some states do not allow disclaimer of express or
implied warranties in certain transactions, therefore, this statement may not apply
to you.
This information could include technical inaccuracies or typographical errors.
Changes are periodically made to the information herein; these changes will be
incorporated in new editions of the publication. IBM may make improvements
and/or changes in the product(s) and/or the program(s) described in this
publication at any time without notice.
Any references in this information to non-IBM Web sites are provided for
convenience only and do not in any manner serve as an endorsement of those Web
sites. The materials at those Web sites are not part of the materials for this IBM
product and use of those Web sites is at your own risk.
IBM may use or distribute any of the information you supply in any way it
believes appropriate without incurring any obligation to you.
© Copyright IBM Corp. 1994, 2010
79
Licensees of this program who wish to have information about it for the purpose
of enabling: (i) the exchange of information between independently created
programs and other programs (including this one) and (ii) the mutual use of the
information which has been exchanged, should contact:
IBM Corporation
Software Interoperability Coordinator, Department 49XA
3605 Highway 52 N
Rochester, MN 55901
U.S.A.
Such information may be available, subject to appropriate terms and conditions,
including in some cases, payment of a fee.
The licensed program described in this information and all licensed material
available for it are provided by IBM under terms of the IBM Customer Agreement,
IBM International Program License Agreement, or any equivalent agreement
between us.
Any performance data contained herein was determined in a controlled
environment. Therefore, the results obtained in other operating environments may
vary significantly. Some measurements may have been made on development-level
systems and there is no guarantee that these measurements will be the same on
generally available systems. Furthermore, some measurements may have been
estimated through extrapolation. Actual results may vary. Users of this document
should verify the applicable data for their specific environment.
Information concerning non-IBM products was obtained from the suppliers of
those products, their published announcements or other publicly available sources.
IBM has not tested those products and cannot confirm the accuracy of
performance, compatibility or any other claims related to non-IBM products.
Questions on the capabilities of non-IBM products should be addressed to the
suppliers of those products.
All statements regarding IBM's future direction or intent are subject to change or
withdrawal without notice, and represent goals and objectives only.
All IBM prices shown are IBM's suggested retail prices, are current and are subject
to change without notice. Dealer prices may vary.
This information is for planning purposes only. The information herein is subject to
change before the products described become available.
This information contains examples of data and reports used in daily business
operations. To illustrate them as completely as possible, the examples include the
names of individuals, companies, brands, and products. All of these names are
fictitious and any similarity to the names and addresses used by an actual business
enterprise is entirely coincidental.
COPYRIGHT LICENSE:
This information contains sample application programs in source language, which
illustrate programming techniques on various operating platforms. You may copy,
modify, and distribute these sample programs in any form without payment to
IBM, for the purposes of developing, using, marketing or distributing application
programs conforming to the application programming interface for the operating
80
IBM Optim: Edit User Manual
platform for which the sample programs are written. These examples have not
been thoroughly tested under all conditions. IBM, therefore, cannot guarantee or
imply reliability, serviceability, or function of these programs.
Each copy or any portion of these sample programs or any derivative work, must
include a copyright notice as follows:
© (your company name) (year). Portions of this code are derived from IBM Corp.
Sample Programs. © Copyright IBM Corp. _enter the year or years_. All rights
reserved.
If you are viewing this information softcopy, the photographs and color
illustrations may not appear.
Trademarks
IBM, the IBM logo, DB2, Informix, Optim and ibm.com® are trademarks or
registered trademarks of International Business Machines Corporation in the
United States, other countries, or both. If these and other IBM trademarked terms
are marked on their first occurrence in this information with a trademark symbol
(® or ™), these symbols indicate U.S. registered or common law trademarks owned
by IBM at the time this information was published. Such trademarks may also be
registered or common law trademarks in other countries. A current list of IBM
trademarks is available on the Web at “Copyright and trademark information” at
www.ibm.com/legal/copytrade.shtml.
Microsoft, Windows, and Windows NT are trademarks of Microsoft Corporation in
the United States, other countries, or both.
Other company, product, or service names may be trademarks or service marks of
others.
Notices
81
82
IBM Optim: Edit User Manual
Index
A
Access Definitions
convert to local 34
definition 1
in an Edit Definition 27
override options 29, 30
select a table to join 48
Audit Option 63
Auto Switch
edit preferences 42
stacked tables 50
B
BLOB columns 61, 62
Browse Data
browse only mode 44
default data display 44
switch to edit 38
tools for editing 44
C
CLOB columns 61, 62
Columnar Display
description of 40
switch to side label 39
Command Line Interface 71, 77
run process request 75
syntax guidelines 71
Commit
edit changes 65
pending status 65
restore using undo 65
Concurrent Updates 68
D
Data Mode
description of 60
switch to expression mode 36
DB Alias
definition 1
Default Data Display 44
Delete
confirmation 58
warn on cascade 42, 57
Display
column attributes 38, 42
deleted rows 38, 42
hex data format 58, 59
LOB data 30
edit window options 38
row count 43
E
Edit Data
commit changes
65
© Copyright IBM Corp. 1994, 2010
Edit Data (continued)
concurrent updates 68
data or expression mode 60
delete a row 57
error handling 67
find data 52
insert a row 57
join tables 45
Optim primary keys 69
pending status 65
protected cell 56
repeat a row 57
replace data 56
restore using undo 65
select tables to join 47
set table specifications 38
translate case 58
translate hexadecimal 58
undo commands 66
Edit Definitions
Access Definition overrides 29
browse or edit mode 31
creating 28
description of 27
editor options 29
printing 69
prompt for variable values 30
saving changes 51
selecting 32
set preferences 41
specify data or criteria 30
Edit Preferences
auto switch 42
default data display 44
display column attributes 42
display deleted rows 42
display row count 43
prompt for values 43
retain Selection Criteria 43
side label display 42
single view 42
undo levels 43
use NULL as default 43
user supplies defaults 43
warn on cascade 42
Edit Window
browse/browse only 38
columnar display 40
components 35
description of 33
display options 35, 39
filtering on/off 36
join arrow 36
join button 35, 46
mode button 36
options button 35
options menu 37
refetch button 36
side label display 40
toolbar buttons 35
undo button 66
Edit Window (continued)
unjoin button 36
unjoin tables 51
Editor Options
initial display 30
modes 31
Environment v
Evaluate, data or expression mode
60
Exclude
how to 53
specific rows 52
Expression Mode
description of 60
evaluate expressions 36
36,
F
Fetch Set
cancel retrieval 33
criteria to limit 44
display row count 43
excluded rows 53
find data in 52
refetch rows 36
restore using undo 65
retrieve a new 64
Find
how to 52
specific data 52
H
Hex format
command 56
Hex format data display 58
Hide/Unhide Columns 55
I
Include
how to 54
specific rows
Fetch Set 54
Increase Fetch Limit 39
Indented Table Display 50
show relationships 34, 50
Insert a blank row 38, 57
J
Join
Access Definition tables 48
create a relationship 48
indent tables 50
join arrow 36
multiple relationships 49
multiple tables 45
related tables 35
83
S
Join (continued)
select tables to join 47
single view 42
specify a relationship 48
stacked tables 50
unjoin tables 36, 51
Join Button 20, 46
Sample
Scenario 4
Sample Database 3
Save
an Edit Definition 51
selected data to a file 70
Self-Referencing Relationships
retaining Selection Criteria 43
Show
all excluded rows 55
excluded rows 38
next excluded row 54
SQL 38
Show Excluded Rows 34
Side Label Display
description of 40
set preference 42
switch to columnar 39
Single View 42
Sort 55
Stacked Tables
default qualifier 51
in the Table Editor 50
indented table display 50
Status
of rows 37
L
List Constraints 67
LOB columns 61, 63
Lock/Unlock Columns
55
M
Multi-Way Joins
45
O
Open
refresh the display 6
select/open an object 6
Optim
overview 1, 2
Optim Directory
storing objects 1
T
P
Pending Status
commit/restore 65
evaluate expressions 61
update 59
update/insert 37
PR0CMND 71
Primary Keys
definition 2
Print
Edit Definition report 69
table data to a file 69
Protected cells, editing data in
56
R
Refetch rows 36
Relationships
creating 48
definition 2
for joining tables 48
Remove Locked Rows 39
Repeat 57
Replace 56
Reset
grid attributes 56
pending status 65
table specifications 38
Respecify Editor Options 31
Respecify Variable Values 34
Retain Selection Criteria
self-referencing relationships
Rows meeting Criteria 39
Table Editor
browse mode 44
Cancel button 33
components of 33
create an Edit Definition 28
display options 39
edit options 37
edit window 35
exclude rows 52
hide/unhide columns 55
include rows 54
join multiple tables 45
lock/unlock columns 55
locked rows 37
menu commands 34
print reports 69
rearrange columns 55
reset grid attributes 56
save data to a file 70
set edit preferences 41
show relationships 50
stacked tables 50
status of each row 37
unjoin tables 51
Table Specifications
filtering on/off 36
for editing data 38
reset 38
Translate
hexadecimal 58
upper/lower case 58
43
U
Undo
all changes
84
IBM Optim: Edit User Manual
66
Undo (continued)
commands 34
remove last change 66
selected change 66
Undo Errors 39
Undo Last 39
Undo Levels
description of 43
to restore data 65
Unjoin Tables 51
Unsupported Columns 39
Use NULL as Insert Default
User Supplies Defaults 43
V
Variables
display prompt string
prompt for value 30
respecify values 34
W
Warn on Cascade
42
43
43
Printed in USA