1
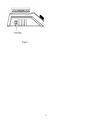
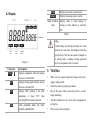
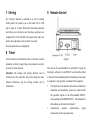
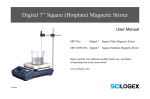
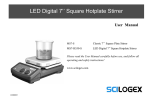
Magnetic Hotplate-Stirrer with Timer
User Manual
OptiMag-ST
Magnetic Hotplate-Stirrer with Timer
Please read the User Manual carefully before use, and follow all operating and
safety instructions!
Technical specifications and outline are subject to change without prior
notice.
Contents
Service ............................................................................ 1
Warranty ......................................................................... 1
1 Safety Instructions .................................................. 2
2 Proper Use .............................................................. 3
3 Inspection................................................................ 4
3.1 Receiving Inspection ............................................ 4
3.2 Listing of Items ..................................................... 4
4.
Control .................................................................... 4
4.1 Control elements ................................................... 4
4.2 Display .................................................................. 2
5
6
Trial Run ................................................................. 2
Function: Heating ................................................... 3
6.1 Working with external temperature sensor ........... 4
6.2 Residual heat warning(HOT) .......................... 4
7
8
9
10
11
12
13
Stirring .................................................................... 5
Timer ...................................................................... 5
Remote Control....................................................... 5
Faults ...................................................................... 6
Maintenance and Cleaning ..................................... 6
Associated Standards and Regulations ................... 7
Specifications.......................................................... 8
14 Ordering information............ Error! Bookmark not
defined.
• Certification
• Description of problem (i.e., hardware or software)
• Methods and procedures adopted to resolve the problems
• Your contact information
Preface
Welcome to the “(Hotplate) Timer Magnetic Stirrer User
Manual”. Users should read this Manual carefully, follow
the instructions and procedures, and be aware of all the
cautions when using this instrument.
Warranty
This instrument is warranted to be free from defects in
materials and workmanship under normal use and service,
for a period of 24 months from the date of invoice. The
warranty is extended only to the original purchaser. It shall
not apply to any product or parts which have been damaged
on account of improper installation, improper connections,
misuse, accident or abnormal conditions of operation.
For warranty claims please contact your local supplier. You
may also send the instrument directly to manufacturer,
enclosing the invoice copy and by giving reasons for the
claim.
Service
When service is required, please contact our Service
Department or local distributor for technical support:
Chemglass Life Sciences
3800 N Mill Road
Vineland, NJ 08360 USA
1-800-843-1794
www.chemglass.com
Please provide the customer care representative with the
following information:
• Serial number(on the rear panel)
1
1 Safety Instructions
substances or around water.
• Gradually increase the speed, reduce the speed if:
- Stirring bar breaks away due to high speed
- The instrument is not running smoothly, or the
container is not centered on the plate
• Temperature must always be set to at least 50C lower than
the flash point of the media used.
• Be aware of hazards due to:
- Flammable materials or media with a low boiling
temperature
- Overfilling of media
- Unsafe container
• Process pathogenic materials only in closed vessels.
Warning!
•
Read the operating instructions carefully
before use.
•
Ensure that only trained staff work with the
instrument.
Risk of burn!
•
Caution when touch the housing parts and
the hotplate which can reach temperature of
340°C.
•
Pay attention to the residual heat after
switching off.
Protective ground contact!
•
• If the case of the stirrer bar is PTFE, please note:
Make sure that the electrical socket is
grounded (protective ground contact) before
use.
- Elemental fluorine, three fluoride and alkali metals will
corrode the PTFE and Halogen alkanes make it expand at
room temperature
• When operating wear personal safety protection to avoid
the risk from:
- Splashing and evaporation of liquids
- Release of toxic or combustible gases
• Use the instrument in a spacious area on a stable, clean,
non-slip, dry and fireproof surface. Do not operate the
instrument in explosive atmospheres, with hazardous
- Molten alkali,alkaline earth metals or their solution, as
well as the powder in second and third ethnic of the
Periodic Table of Elements will have chemical reaction
with PTFE when temperature reaches 300 ~ 400C .
• Check the instrument and accessories prior to each use.
2
Do not use damaged components. Safe operation is only
guaranteed with the accessories listed in the “Accessories”
section. Accessories must be securely attached to the
device and must be removed when not in use. Always
disconnect the power before fitting accessories.
• When using the external temperature sensor, the tip of the
measuring sensor must be at least 5-10mm from vessel’s
bottom and wall.
• The instrument can only be fully disconnected from the
main power supply by turning off the main or disconnecting
the plug.
• The voltage stated on the label must correspond to the
main power supply.
• Ensure that the main power supply cable does not touch
the hotplate. Do not cover the device.
• The instrument must only be operated by adults.
• Keep away from high magnetic fields.
•
•
•
Do not use more than 2000 meters above sea level
Temperature between 0℃and 40℃
Installation Type: Product is designed to connect the
indoor outlet, where voltage fluctuation is not more
than ±10% compared with normal.
•
Observe the minimum distances between multiple
units, and distances to the rear wall and above the
assembly (min. 100 mm).
>100mm
>100mm
Figure 1
This device is not suitable for using in residential areas or
other constraints mentioned in Chapter 1.
2 Proper Use
The instrument is designed for mixing and/or heating
liquids in laboratories:
3
3 Inspection
4. Control
3.1 Receiving Inspection
4.1 Control elements
Unpack the equipment carefully and check for any damage
which may have arisen during transport. Please contact
manufacturer/supplier for technical support.
Note:
If there is any apparent damage to the unit, do not
attempt to operate.
3.2 Listing of Items
The package includes the following items:
Items
Qty
Main unit
1
Power cable
1
Stirrer bar
1
User Manual
1
Figure 2 LCD Digital Hotplate Timer Magnetic Stirrer
Table 1
4
Figure 3
5
Items
Function
switch
knob
Turning the knob, switches the
parameters setting interface,
followed
by
Temperature
setting, Speed setting, Timer
setting,
switching
cycle.
Pressing the knob turns the
three setting options on/off.
Parameter
setting
knob
At the parameter setting
interface, set the parameter by
turning the knob. Pressing the
knob turns on the initializer.
LCD
display
LCD displays the real-time
working state and all settings.
Heating
knob Heat
When the heating function is
switched ON, the LED Heat is
lit.
Stirring
knob Stir
When the stirring function is
switched ON, the LED Stir is
lit.
LCD
Digital
Hotplate
Timer
Magnetic
Descriptions
Stirrer
Timer
knob timer
When the timer function is
switched ON, the LED Timer is
lit.
Power
switch
Switch ON or OFF.
Table 2
6
4.2 Display
Probe
Display when using external probe.
Remote
Display when using remote control.
Rated value/Real
value
Display values in when heating or
stirring or timer function is switched
ON.
Table 3
Note:
If both heating and stirring functions have been
started at the same time, heat display always has
higher priority. If in this case speed is changed via
the stirring knob, it displays stirring speed and
reverts to temperature after 5 seconds.
Figure 5
Characters
Descriptions
Temp & °C
Displays temperature when the heating
function is switched ON.
Stir
Hot
Timer
Displays stirring speed when the stirring
function is switched ON.
Displays HOT warning if the plate
temperature is above 50°C after
switching OFF the heating function.
Timer parameter when the timer
function is switched ON.
5 Trial Run
•
Make sure the required operated voltage and power
supply voltage match.
•
•
Ensure the socket is properly grounded.
Plug in the power cable, ensure the power is on and
begin initializing.
•
Add the medium into the vessel with an appropriate
stirring bar.
•
Place vessel on the work plate.
•
•
•
•
•
•
•
Set the target stirring speed and begin.
Observe the stirring bar and LCD display.
Set the target temperature and start heating.
Observe the real temperature on LCD display.
Set the timer.
Timer ends, the heating function stops.
Stops stirrer function.
If these operations above are normal, the device is ready to
operate. If these operations are not normal, the device may
be damaged during transportation, please contact
manufacturer/supplier for technical support.
Warning !
Do not remove the vessel when the instrument is
operating.。
6 Function: Heating
The device is controlled by digital temperature control
technology, which has two separate safety circuits. The
hotplate is kept at a constant temperature by a digital
control circuit. The hotplate temperature can also be
controlled from a separate, adjustable safety circuit. The
two temperature sensors (PT1000) internal for temperature
control are built into the hotplate. The single external
PT1000 can control the temperature of sample.
•
•
Plug in the external PT1000.
Set the temperature via rotating the temperature
control knob slowly to the target value, press
parameter set knob and switch on the heating function.
•
When the heating function is switched on, the LED
“Heat” will light up and the LCD will display the
actual temperature.
•
The set temperature will be displayed on the
right-hand side of the LCD as well as Temp and °C
characters.
•
The heating function is switched on or off by pushing
heating knob.
Instrument is turned on for the setting zone temperature
setting when the last shutdown temperature, the common
case, set the heating temperature display the actual
temperature may have the following differences:
- Hotplate center and outer edge.
- The sample container and the container.
In order to ensure the accuracy of the liquid temperature
inside the container, please use the PT1000 external
temperature sensor.
6.1 Working with the PT1000 external
temperature sensor
following at this time:
•
•
Turn off the power
Ensure the external temperature sensor is positioned
sample container correctly
•
Turn on the power, set the target temperature and
switch on the heating function
•
If the unit is still not functioning correctly, please
contact manufacturer/supplier
6.2 Residual heat warning(HOT)
Figure 6
The PT1000 external temperature sensor is the
manufacturer’s optional accessory. If the sensor is plugged
in, “Probe” will be shown on the digital display to indicate
the sensor is operating. The setting value of external
temperature sensors and actual temperature are displayed.
The safety circuit controls hotplate temperature.
Comparing with the temperature control of the hotplate, the
external temperature sensor can control the medium’s
temperature more precisely. The external temperature
sensor must be put in sample container, if detect anomalies,
heating will automatically shut down. Please do the
In order to help prevent the risk of burns from the hotplate,
this instrument has a residual heat warning function. When
the heating function is switched off (and the power cord is
still plugged in) and the heating plate temperature is still
above 50°C, “Hot” will flash to warn that it is unsafe to
touch.. When the hotplate temperature drops to below 50°C,
the display will automatically switch off. To completely
turn off the unit, pull out the plug. When the plug is pulled
out, the residual heat warning function will not function.
7 Stirring
9 Remote Control
The “stirring” function is switched on or off via rotating
stirring knob. The speed is set on the knob (100 to 1500
rpm in steps of 10 rpm). When both the heating function
and stirring are switched on and the above operations are
completed, the LCD will shift to the speed value and revert
back to the temperature value in about 5 seconds.
The last speed value set is displayed.
8 Timer
Turn the Function switch knob to time set interface, turn the
parameter set knob to target time, press parameter set knob,
to switch on timer function.
Attention: The heating and stirring function can be
switched on at the same time only when setting the timer
function. Otherwise, only the stirring function can be
switched on.
Figure 7
The unit can be controlled from an external PC (using the
third-party software) via the RS232C serial interface fitted
to the unit. Data communication from laboratory instrument
to computer is only possible on demand of the computer.
•
The functions of the interface lines between laboratory
instrument and automation system are selected from
the specified signals of the EIA-standard RS232C,
corresponding with DIN66020 Part 1. The allotment of
the bushing can be taken from Figure 7.
•
Transmission
method:
Asynchronous
transmission in start-stop-operation.
signal
•
Mode of transmission: Fully Duplex. 1 start bit; 7
character bits; 1 parity bit [straight (even)); 1 stop bit
•
Transmission speed: 9600 bit/s
Note:
Forbid to insert or remove the
communication line when switch on!
RS232C
10 Faults
•
Instruments can’t be powered ON
- Check whether the power line is unplugged
- Check whether the fuse is broken or loose
•
Fault in power during self-test
- Switch OFF the unit, then switch ON and reset
the instruments to factory default setting.
•
Stir speed cannot reach set point
- Excessive medium viscosity may cause abnormal
speed reduction of the motor
•
Unit cannot be powered off when switched off.
- Check if the residual heat warning function is still
ON and hotplate temperature is above 50℃(the
LCD still work and “Hot” flash).
If these faults are not resolved, please contact
manufacturer/supplier.
11 Maintenance and Cleaning
Correct usage and maintenance of the equipment can
extend the service life of equipment. Please keep the
instrument dry and clean, quickly remove and overflowing
liquid, use non-abrasive cleaner to clean up the outer
surface, please do not connect with the power supply if wet.
If wet solids or liquid enter into the instrument, please
disconnect the power supply and do not use, contact the
manufacturer/supplier for more advice.
•
Do not use a spray cleanser on the instrument when
cleaning.
•
•
Unplug the power cord when cleaning.
Only use recommended cleansers:
Dyes
Construction
materials
Cosmetics
Foodstuffs
Fuels
Isopropyl alcohol
Water containing surfactant /
Isopropyl alcohol
Water containing surfactant /
Isopropyl alcohol
Water containing surfactant
Water containing surfactant
•
Before using other method for cleaning or
decontamination, the user must ascertain with the
manufacturer that this method will not harm the
instrument. Wear the proper protective gloves during
cleaning of the instrument.
12 Associated
Regulations
Standards
Note:
•
Electronic equipment cannot cleaned with a
detergent cleaner.
•
Repairing equipment must be cleaned and
avoid the contamination of dangerous
substances, put the equipment into original
package box and returned.
•
When the equipment hasn’t been used for
long time, please leave it in power-off
condition at dry, clean,room temperature,
stable environment.
and
Construction in accordance with the following safety
standards:
EN 61010-1
UL 3101-1
CAN/CSA C22.2(1010-1)
EN 61010-2-10
Construction in accordance with the following EMC
standards:
EN 61326-1
Associated EU guidelines:
EMC-guidelines: 89/336/EWG
Instrument guidelines: 73/023/EWG
13 Specifications
Temperature display accuracy
[°C]
±0.1
The safety temperature of the
hotplate [℃]
360
Temperature sensor in medium
PT1000
±0.2
Items
Digital model
Voltage [VAC]
200-240 / 100-120
Frequency [Hz]
50 / 60
Power [W]
550
Stirring point position quantity
1
Max. stirring quantity (H2O) [L]
20
Control accuracy of heating
temperature with temperature
sensor [℃]
Max. magnetic bar [L×Ø, mm]
80×10
Residual heat warning
50℃
Motor type
Brushless motor
Set time limits
1min-99h 59min
Max. power input of motor [W]
18
Dimensions [WxDxH ,mm]
280x160x85
Max. power output of motor
[W]
10
Weight [kg]
2.8
Speed range [rpm]
100-1500,
Permitted ambient temperature
[°C]
5 – 40
Rotary speed display
LCD
Permitted relative humidity
80%
Plate material
Stainless steel
Dimensions of workplate (mm)
Ø 135
Protection class acc. to DIN
60529
IP42
Heating power [W]
500
RS232 interface
Yes
Temperature range [°C]
Room temperature 340,
Step:1
Temperature display [°C]
LCD
Table 4