1
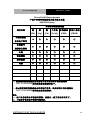
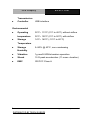
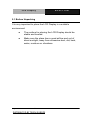
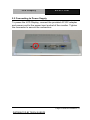
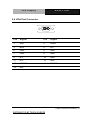
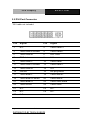
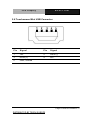
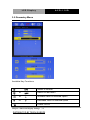
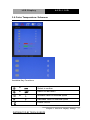
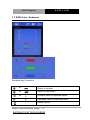
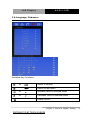
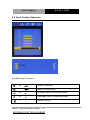
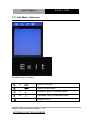
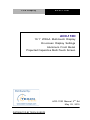
LCD Displa y ACD-110D ACD-110D 10.1” WXGA Multi-touch Display On-screen Display Settings Aluminum Front Bezel Projected Capacitive Multi-Touch Screen nd ACD-110D Manual 2 Ed May 22, 2015 DISTRIBUTED BY TEXIM EUROPE LCD Displa y ACD-110D Copyright Notice This document is copyrighted, 2015. All rights are reserved. The original manufacturer reserves the right to make improvements to the products described in this manual at any time without notice. No part of this manual may be reproduced, copied, translated, or transmitted in any form or by any means without the prior written permission of the original manufacturer. Information provided in this manual is intended to be accurate and reliable. However, the original manufacturer assumes no responsibility for its use, nor for any infringements upon the rights of third parties, which may result from its use. The material in this document is for product information only and is subject to change without notice. While reasonable efforts have been made in the preparation of this document to assure its accuracy, AAEON, assumes no liabilities resulting from errors or omissions in this document, or from the use of the information contained herein. AAEON reserves the right to make changes in the product design without notice to its users. DISTRIBUTED BY TEXIM EUROPE i LCD Displa y ACD-110D Acknowledgments ® ® Intel is registered trademarks of Intel Corporation. IBM, PC/AT, PS/2 are trademarks of International Business Machines Corporation. ® ® Microsoft Windows is a registered trademark of Microsoft Corporation. RTL is a trademark of Realtek Semi-Conductor Co., Ltd. C&T is a trademark of Chips and Technologies, Inc. UMC is a trademark of United Microelectronics Corporation. ITE is a trademark of Integrated Technology Express, Inc. SiS is a trademark of Silicon Integrated Systems Corp. VIA is a trademark of VIA Technology, Inc. All other product names or trademarks are properties of their respective owners. DISTRIBUTED BY TEXIM EUROPE ii LCD Displa y ACD-110D Packing List The LCD monitor should be packaged with the following items. Please check that all of them are included and in good condition. 1 ACD-110D 1 Utility CD-ROM Contains User’s Manual (in PDF format), Drivers and Utilities 1 VGA Cable 1 Touchscreen Mini USB Cable 1 AC/DC 12V Power Adapter with Lock If any of these items are missing or damaged, please contact your distributor or sales representative immediately. DISTRIBUTED BY TEXIM EUROPE iii LCD Displa y ACD-110D Safety & Warranty Please read the following safety instructions carefully. It is advised that you keep this manual for future references 1. Disconnect this device from any AC supply before cleaning. 2. While cleaning, use a damp cloth instead of liquid or spray detergents. 3. For any pluggable equipment, the power outlet must be installed near the device and easily accessible. 4. Keep this device away from humidity. 5. Place this device on a solid surface during installation. Dropping it or letting it fall could cause damage. 6. The openings on the device’s enclosure are for dissipating heat. DO NOT COVER THE OPENINGS. 7. Make sure the voltage of the power source is correct before connecting the device to the power outlet. 8. Position the power cord so that people cannot step on it. Do not place anything over the power cord. 9. All cautions and warnings on the device should be noted. 10. If the device is not to be used for a long time, disconnect it from the power supply to avoid damage by transient over-voltage. 11. Never pour any liquid into the openings. This could cause fire or electric shock. 12. If any of the following situations arises, please the contact our service personnel: DISTRIBUTED BY TEXIM EUROPE iv LCD Displa y ACD-110D i. Damaged power cord or plug ii. Liquid intrusion to the device iii. Exposure to moisture iv. Device is not working as expected or in a manner as described in this manual v. The device is dropped or damaged vi. Any obvious signs of damage displayed on the device 13. DO NOT LEAVE THIS DEVICE IN AN UNCONTROLLED ENVIRONMENT WHERE THE STORAGE TEMPERATURE IS BELOW -10° C (14°F) OR ABOVE 60° C (140° F) TO PREVENT DAMAGE. 14. As most electronic components are sensitive to static electrical charge, be sure to ground yourself to prevent static charge when installing the internal components. Use a grounding wrist strap and contain all electronic components in any static-shielded devices. DISTRIBUTED BY TEXIM EUROPE v LCD Displa y ACD-110D FCC This device complies with Part 15 FCC Rules. Operation is subject to the following two conditions: (1) this device may not cause harmful interference, and (2) this device must accept any interference received including interference that may cause undesired operation. Caution: It may cause the danger of explosion if battery is incorrectly replaced. Replace only with same or equivalent type recommended by the manufacturer. DISTRIBUTED BY TEXIM EUROPE vi LCD Displa y ACD-110D China RoHS Requirements 产品中有毒有害物质或元素名称及含量 AAEON Display 有毒有害物质或元素 部件名称 铅 汞 镉 (Pb) (Hg) (Cd) (Cr(VI)) (PBB) (PBDE) × ○ ○ ○ ○ ○ × ○ ○ ○ ○ ○ 外壳 × ○ ○ ○ ○ ○ 液晶模块 × ○ ○ ○ ○ ○ 触控模块 × ○ ○ ○ ○ ○ 电源 × ○ ○ ○ ○ ○ 印刷电路板 及其电子组件 外部信号 连接器及线材 六价铬 多溴联苯 多溴二苯醚 O:表示该有毒有害物质在该部件所有均质材料中的含量均在 SJ/T 11363-2006 标准规定的限量要求以下。 X:表示该有毒有害物质至少在该部件的某一均质材料中的含量超出 SJ/T 11363-2006 标准规定的限量要求。 备注: 一、此产品所标示之环保使用期限,系指在一般正常使用状况下。 二、上述部件物质触控模块为选购品。 DISTRIBUTED BY TEXIM EUROPE vii LCD Displa y ACD-110D Contents Chapter 1 General Information 1.1 Introduction ................................................................ 1-2 1.2 Features .................................................................... 1-3 1.3 General Specification ................................................ 1-4 1.4 Dimensions ................................................................ 1-6 Chapter 2 Hardware Installation 2.1 Before Unpacking ...................................................... 2-2 2.2 Connecting to Power Supply ..................................... 2-3 2.3 Connecting to the Computer ..................................... 2-4 2.4 VGA Port Connector.................................................. 2-5 2.5 DVI Port Connector ................................................... 2-6 2.6 Touchscreen Mini USB Connector ............................ 2-7 2.7 VESA Wall Mount ...................................................... 2-8 2.8 Mounting the Display ................................................. 2-10 Chapter 3 On-screen Display Settings 3.1 On-screen Display (OSD) Board. .............................. 3-2 3.2 OSD Main Menu. ....................................................... 3-3 3.3 Input Source. ............................................................. 3-4 3.4 Contrast/ Brightness- Submenu. ............................... 3-5 3.5 Geometry Menu......................................................... 3-6 3.6 Color/ Temperature- Submenu. ................................ 3-7 DISTRIBUTED BY TEXIM EUROPE viii LCD Displa y ACD-110D 3.7 RGB Color- Submenu. .............................................. 3-8 3.8 Language- Submenu. ................................................ 3-9 3.9 Auto Config- Submenu. ............................................. 3-10 3.10 Resolution- Submenu. ............................................. 3-11 3.11 Exit Menu- Submenu. .............................................. 3-12 Chapter 4 Touch Screen Driver Installation 4.1 Introduction ................................................................ 4-2 4.2 Installation ................................................................. 4-2 DISTRIBUTED BY TEXIM EUROPE ix LCD Displa y ACD-110D Chapter 1 General Information Chapter 1 General Information 1-1 DISTRIBUTED BY TEXIM EUROPE LCD Displa y ACD-110D 1.1 Introduction Thank you for purchasing the ACD-110D Industry Display Panel TFT LCD monitor. The LCD monitor has been designed to provide the best performance for many applications. Its compact and slim profile is well suited in working locations where space is at a premium. Complying with the power management regulations of VESA DPMS, the LCD monitor is extremely energy efficient and power saving while displaying sharper, more brilliant, crisper and flicker-free images. Other features include low radiation and near zero electromagnetic fields emissions. Fully compatible with a PC, the LCD monitor supports DDC1/DDC2B-compliant “Plug & Play” specification, making installation a breeze. The On-screen Display menu provides user a user-friendly interface to make right adjustment for most optimal display. Chapter 1 General Information 1-2 DISTRIBUTED BY TEXIM EUROPE LCD Displa y ACD-110D 1.2 Features 10.1” WXGA (1280 x 800) TFT LCD Display IP65 Aluminum Front Bezel P-CAP Touchscreen Support (7H, two-point multi-touch) VESA 75, Panel Mount and Stand Support Chapter 1 General Information 1-3 DISTRIBUTED BY TEXIM EUROPE LCD Displa y ACD-110D 1.3 General Specification Type Color TFT, LED backlight Size 10.1" TFT LCD Construction IP65 aluminum front bezel and SGCC chassis Mounting VESA 75/ Panel Mount/ Stand Input signal VGA, DVI-D Control OSD (On Screen Display) on the panel Power Supply External power adapter Dimension 10.47” (W) x 7.22”(H) x 1.57”(D) (265.9mm x 183.4mm x 40mm) Gross Weight 4.4 lb (2.6 Kg) Net Weight 2.64 lb (1.4 Kg) Power Input 12V DC Brightness 250 nits Contrast Ratio 600:1 Viewing Angle 160°(H)/ 160°(V) Resolution 1280 x 800 Color 262k colors Touchscreen Type Projected Capacitive Resolution 2048 x 2048 Light >86% Chapter 1 General Information 1-4 DISTRIBUTED BY TEXIM EUROPE LCD Displa y ACD-110D Transmission Controller USB interface Environmental Operating 32°F~ 113°F (0°C to 45°C) without airflow temperature 32°F~ 122°F (0°C to 50°C) with airflow Storage 14°F~ 140°F (-10°C to 60°C) Temperature Storage 5~90% @ 40°C, non-condensing Humidity Vibration 1g rms/5-500Hz/random operation Shock 15 G peak acceleration (11 msec. duration) EMC CE/FCC Class A Chapter 1 General Information 1-5 DISTRIBUTED BY TEXIM EUROPE LCD Displa y 1.4 Dimensions Chapter 1 General Information 1-6 DISTRIBUTED BY TEXIM EUROPE ACD-110D LCD Displa y ACD-110D Chapter 2 Hardware Installation Chapter 2 Hardware Installation 2-1 DISTRIBUTED BY TEXIM EUROPE LCD Displa y ACD-110D 2.1 Before Unpacking It is very important to place the LCD Display in a suitable environment. The surface for placing the LCD Display should be stable and leveled. Make sure the place has a good airflow and out of direct sunlight; away from excessive dust, dirt, heat, water, moisture or vibrations. Chapter 2 Hardware Installation 2-2 DISTRIBUTED BY TEXIM EUROPE LCD Displa y ACD-110D 2.2 Connecting to Power Supply To power the LCD Display, connect the provided AC-DC adapter and power cord to the power input socket of the monitor. Tighten the connector to secure the connection. Chapter 2 Hardware Installation 2-3 DISTRIBUTED BY TEXIM EUROPE LCD Displa y ACD-110D 2.3 Connecting to the Computer Turn off the computer and the LCD Display before connecting. Use the Monitor-to-PC VGA、DVI-D cable to connect the LCD Display to your computer. The connectors are the same at both ends. Tighten the screws on the connector to secure the connection. Chapter 2 Hardware Installation 2-4 DISTRIBUTED BY TEXIM EUROPE LCD Displa y ACD-110D 2.4 VGA Port Connector Pin Signal Pin Signal 1 Red 2 Green 3 Blue 4 N.C. 5 GND 6 GND 7 GND 8 GND 9 N.C. 10 GND 11 N.C. 12 SDA 13 HSYNC 14 VSYNC 15 SCL Chapter 2 Hardware Installation 2-5 DISTRIBUTED BY TEXIM EUROPE LCD Displa y ACD-110D 2.5 DVI Port Connector *DVI cable not included. Pin Signal Pin Signal 1 N.C. 2 TMDS Data 2+ 3 TMDS Data 2/4 shield 4 TMDS Data 4- 5 TMDS Data 4+ 6 DDC clock 7 DDC data 8 N.C. 9 TMDS Data 1- 10 TMDS Data 1 11 TMDS Data 1/3 shield 12 TMDS Data 3- 13 TMDS Data 3+ 14 +5V 15 Ground 16 Hot plug detect 17 TMDS data 0- 18 TMDS data 0+ 19 TMDS data 0/5 shield 20 TMDS data 5- 21 TMDS data 5+ 22 TMDS clock shield 23 TMDS clock+ 24 TMDS clock- C1 N.C. C2 N.C. C3 N.C. C4 N.C. C5 N.C. Chapter 2 Hardware Installation 2-6 DISTRIBUTED BY TEXIM EUROPE LCD Displa y ACD-110D 2.6 Touchscreen Mini USB Connector Pin Signal Pin Signal 1 +5V 2 DATA (-) 3 DATA (+) 4 N.C. 5 GND, Ground Chapter 2 Hardware Installation 2-7 DISTRIBUTED BY TEXIM EUROPE LCD Displa y ACD-110D 2.7 VESA Wall Mount Mounting the LCD Display with UL Listed wall mount Brackets only. The LCD Display can be mounted on a monitor arm or wall mount plate. Caution: When mounting the LCD Display, make sure to tighten the retention screws or bolts accordingly till they are fully secured. Overtightening may cause them to become stripped, rendering them useless. Monitor Arm or Wall mount Plate Installation The LCD Display has Video Electronics Standards Association (VESA) standard mounting holes tapped into the rear panel. The holes are M4-sized and are set 75mm x 75mm apart. Chapter 2 Hardware Installation 2-8 DISTRIBUTED BY TEXIM EUROPE LCD Displa y ACD-110D VESA Mounting Holes To mount the LCD Display onto a monitor arm or wall mount plate, please follow the steps below. Step 1: Line up the threaded holes on the monitor rear panel with the screw holes on the monitor arm or wall mount plate. Step 2: Secure the monitor to the arm or stand with the retention screws supplied with the monitor arm or stand. Chapter 2 Hardware Installation 2-9 DISTRIBUTED BY TEXIM EUROPE LCD Displa y ACD-110D 2.8 Mounting the Display Step 1: Get the wallmount bracket and sponge ready. Sponge Wall mount bracket Step 2: Remove the six screws (three on each side) at the back and place the wallmount brackets onto the display. Secure the brackets with the original six screws. 1 Step 3: Place the sponge onto the brackets Sponge 3-screw Chapter 2 Hardware Installation 2-10 DISTRIBUTED BY TEXIM EUROPE Wall mount bracket LCD Displa y ACD-110D Step 4: Insert the display to the surface (opening) where you are going to 2 mount the display Opening wall Step 5: Attach the mounting clips to the four fillisters on the wallmount 3 brackets and tighten the four M4x60 screws to secure the brackets 2 M4x60 screw 1 4-mounting clip Chapter 2 Hardware Installation 2-11 DISTRIBUTED BY TEXIM EUROPE LCD Displa y ACD-110D Chapter 3 On-screen Display Settings Chapter 3 On Screen Display Control DISTRIBUTED BY TEXIM EUROPE 3-1 LCD Displa y ACD-110D 3.1 On-screen Display (OSD) Board Buttons Function Auto Automatically adjust the clock, phase, H-position and V-position. Enable fullscreen for the most optimal settings Menu / Enter Opens the OSD menu. Enters/confirms the selected options. Move the selector to the next option. UP / Right / Increase / Increase the gauge value of the Input select selected option. Down/ Left / Decrease Change input source. Move the selector to the previous option. Decrease the gauge value of the selected option. Power Turn the monitor ON or OFF. Chapter 3 Onscreen Display Settings 3-2 DISTRIBUTED BY TEXIM EUROPE LCD Displa y ACD-110D 3.2 OSD Main Menu Power On/Off the LCD Monitor Power On/Off the LCD Monitor or or Increase the gaguge value of the selected option Increase the gaguge value of the selected option Available orKey FunctionsDecrease the gaguge value of the selected option Decrease the gaguge value of the selected option or or or or or or or or or or or or or or or Slected to confirm Slected to confirm Select to the confirm Power On/Off LCD Monitor Power On/Off the LCD Monitor Return to last Return tomenu last menu Return tothe lastgaguge menu value of the selected option Increase Increase the gaguge of the selected option Increase value ofvalue selected option Decrease the gaguge of theoption selected option Decrease value ofvalue selected Decrease the gaguge value of the selected option Power On/Off the LCD Monitor Power On/Off Slected to confirm Slected to confirm Increase the gaguge value of the selected option Return to last menu Return to last menu Decrease the gaguge value of the selected option or Slected to confirm or Return to last menu Chapter 3 Onscreen Display Settings DISTRIBUTED BY TEXIM EUROPE 3-3 LCD Displa y ACD-110D 3.3 Input Source Power On/Off the LCD Monitor Power On/Off the LCD Monitor or or Increase the gaguge value of the selected option Increase the gaguge value of the selected option Available orKey FunctionsDecrease the gaguge value of the selected option Decrease the gaguge value of the selected option or or or or or or or or or or or or or or or Slected to confirm Slected to confirm Select to the confirm Power On/Off LCD Monitor Power On/Off the LCD Monitor Return to last Return tomenu last menu Return tothe lastgaguge menu value of the selected option Increase Increase the gaguge of the selected option Increase value ofvalue selected option Decrease the gaguge of theoption selected option Decrease value ofvalue selected Decrease the gaguge value of the selected option Power On/Off the LCD Monitor Power On/Off Slected to confirm Slected to confirm Increase the gaguge value of the selected option Return to last menu Return to last menu Decrease the gaguge value of the selected option or Slected to confirm or Return to last menu Chapter 3 Onscreen Display Settings 3-4 DISTRIBUTED BY TEXIM EUROPE LCD Displa y ACD-110D 3.4 Contrast/ Brightness- Submenu Power On/Off the LCD Monitor Power On/Off the LCD Monitor or or Increase the gaguge value of the selected option Increase the gaguge value of the selected option Available orKey FunctionsDecrease the gaguge value of the selected option Decrease the gaguge value of the selected option or or or or or or or or or Slected to confirm Slected to confirm Select to the confirm Power On/Off LCD Monitor Power On/Off the LCD Monitor Return to last Return tomenu last menu Return tothe lastgaguge menu value of the selected option Increase Increase the gaguge of the selected option Increase value ofvalue selected option Decrease the gaguge of theoption selected option Decrease value ofvalue selected Decrease the gaguge value of the selected option Power On/Off the LCD Monitor Power On/Off Slected to confirm Slected to confirm Increase the gaguge value of the selected option Return to last menu Chapter 3 Onscreen Display Settings 3-5 Return to last menu Decrease the gaguge value of the selected option or or or or or or DISTRIBUTED BY TEXIM EUROPE or Slected to confirm LCD Displa y ACD-110D 3.5 Geometry Menu Power On/Off the LCD Monitor Power On/Off the LCD Monitor or or Increase the gaguge value of the selected option Increase the gaguge value of the selected option Available orKey FunctionsDecrease the gaguge value of the selected option Decrease the gaguge value of the selected option or or or or or or or Slected to confirm Slected to confirm Select to the confirm Power On/Off LCD Monitor Power On/Off the LCD Monitor Return to last Return tomenu last menu Return tothe lastgaguge menu value of the selected option Increase Increase the gaguge of the selected option Increase value ofvalue selected option Decrease the gaguge of theoption selected option Decrease value ofvalue selected Decrease the gaguge value of the selected option Power On/Off the LCD Monitor Power On/Off Slected to confirm or Slected to confirm or Chapter 3or Onscreen Display Increase Settings 3-6 the gaguge value of the selected option or Return to last menu or Return to last menu DISTRIBUTED BY TEXIM EUROPE Decrease the gaguge value of the selected option or or or LCD Displa y ACD-110D 3.6 Color Temperature- Submenu Power On/Off the LCD Monitor Power On/Off the LCD Monitor or or Increase the gaguge value of the selected option Increase the gaguge value of the selected option Available orKey FunctionsDecrease the gaguge value of the selected option Decrease the gaguge value of the selected option or or or or or or or Slected to confirm Slected to confirm Select to the confirm Power On/Off LCD Monitor Power On/Off the LCD Monitor Return to last Return tomenu last menu Return tothe lastgaguge menu value of the selected option Increase Increase the gaguge of the selected option Increase value ofvalue selected option Decrease the gaguge of theoption selected option Decrease value ofvalue selected Decrease the gaguge value of the selected option Power On/Off the LCD Monitor Power On/Off Slected to confirm or Slected to confirm or Increase the gaguge of theDisplay selected option3-7 or Chapter value 3 Onscreen Settings or Return to last menu or Return to last menu DISTRIBUTED BY TEXIM EUROPE Decrease the gaguge value of the selected option or or or or Slected to confirm LCD Displa y ACD-110D 3.7 RGB Color- Submenu Power On/Off the LCD Monitor Power On/Off the LCD Monitor or or Increase the gaguge value of the selected option Increase the gaguge value of the selected option Available orKey FunctionsDecrease the gaguge value of the selected option Decrease the gaguge value of the selected option or or or or or or or Slected to confirm Slected to confirm Select to the confirm Power On/Off LCD Monitor Power On/Off the LCD Monitor Return to last Return tomenu last menu Return tothe lastgaguge menu value of the selected option Increase Increase the gaguge of the selected option Increase value ofvalue selected option Decrease the gaguge of theoption selected option Decrease value ofvalue selected Decrease the gaguge value of the selected option Power On/Off the LCD Monitor Power On/Off Slected to confirm or Slected to confirm or the gaguge value of the selected option or Chapter 3or Onscreen Display Increase Settings 3-8 Return to last menu or Return to last menu DISTRIBUTED BY TEXIM EUROPE Decrease the gaguge value of the selected option or or or or Slected to confirm LCD Displa y ACD-110D 3.8 Language- Submenu Power On/Off the LCD Monitor Power On/Off the LCD Monitor or or Increase the gaguge value of the selected option Increase the gaguge value of the selected option Available orKey FunctionsDecrease the gaguge value of the selected option Decrease the gaguge value of the selected option or or or or or or or or or or or or or or or Slected to confirm Slected to confirm Select to the confirm Power On/Off LCD Monitor Power On/Off the LCD Monitor Return to last Return tomenu last menu Return tothe lastgaguge menu value of the selected option Increase Increase the gaguge of the selected option Increase value ofvalue selected option Decrease the gaguge of theoption selected option Decrease value ofvalue selected Decrease the gaguge value of the selected option Power On/Off the LCD Monitor Power On/Off Slected to confirm Slected to confirm Increase the gaguge value of the selected option Return to last menu Return to last menu Chapter 3 Onscreen Display Settings 3-9 Decrease the gaguge value of the selected option DISTRIBUTED BY TEXIM EUROPE or Slected to confirm LCD Displa y ACD-110D 3.9 Auto Config- Submenu Power On/Off the LCD Monitor Power On/Off the LCD Monitor or or Increase the gaguge value of the selected option Increase the gaguge value of the selected option Available orKey FunctionsDecrease the gaguge value of the selected option Decrease the gaguge value of the selected option or or or or or or or Slected to confirm Slected to confirm Select to the confirm Power On/Off LCD Monitor Power On/Off the LCD Monitor Return to last Return tomenu last menu Return tothe lastgaguge menu value of the selected option Increase Increase the gaguge of the selected option Increase value ofvalue selected option Decrease the gaguge of theoption selected option Decrease value ofvalue selected Decrease the gaguge value of the selected option Power On/Off the LCD Monitor Power On/Off Slected to confirm or Slected to confirm or Increase the gaguge value of the selected option or or Return to last menu last menu Chapter 3or Onscreen DisplayReturn Settings to3-10 Decrease the gaguge value of the selected option or or or DISTRIBUTED BY TEXIM EUROPE or Slected to confirm LCD Displa y ACD-110D 3.10 Resolution- Submenu Power On/Off the LCD Monitor Power On/Off the LCD Monitor or or Increase the gaguge value of the selected option Increase the gaguge value of the selected option Available orKey FunctionsDecrease the gaguge value of the selected option Decrease the gaguge value of the selected option or or or or or or or or or or or or or or or Slected to confirm Slected to confirm Select to the confirm Power On/Off LCD Monitor Power On/Off the LCD Monitor Return to last Return tomenu last menu Return tothe lastgaguge menu value of the selected option Increase Increase the gaguge of the selected option Increase value ofvalue selected option Decrease the gaguge of theoption selected option Decrease value ofvalue selected Decrease the gaguge value of the selected option Power On/Off the LCD Monitor Power On/Off Slected to confirm Slected to confirm Increase the gaguge value of the selected option Return to last menu Return to last menu Decrease the gaguge value of the selected option Chapter 3 Onscreen Display Settings Slected to confirm or DISTRIBUTED BY TEXIM EUROPE or Return to last menu 3-11 LCD Displa y ACD-110D 3.11 Exit Menu- Submenu Power On/Off the LCD Monitor Power On/Off the LCD Monitor or or Increase the gaguge value of the selected option Increase the gaguge value of the selected option Available orKey FunctionsDecrease the gaguge value of the selected option Decrease the gaguge value of the selected option or or or or or or or Slected to confirm Slected to confirm Select to the confirm Power On/Off LCD Monitor Power On/Off the LCD Monitor Return to last Return tomenu last menu Return tothe lastgaguge menu value of the selected option Increase Increase the gaguge of the selected option Increase value ofvalue selected option Decrease the gaguge of theoption selected option Decrease value ofvalue selected Decrease the gaguge value of the selected option Power On/Off the LCD Monitor Power On/Off Slected to confirm or Slected to confirm or Increase the gaguge value of the selected option or or Return to last menu or Return to last menu Chapter 3 Onscreen Display Settings 3-12 Decrease the gaguge value of the selected option or or or DISTRIBUTED BY TEXIM EUROPE or Slected to confirm LCD Displa y ACD-110D Chapter 4 Touchscreen Driver Installation Chapter 4 Touchscreen Driver Installation DISTRIBUTED BY TEXIM EUROPE 4-1 LCD Displa y ACD-110D 4.1 Introduction The ACD-110D Series touch screen uses Projected Capacitive Multi-Touch technology to provide more accurate sensing capacity than other technologies. The touch screen is specially designed for any infotainment application and has been approved for FCC Class A standards. 4.2 Installation Insert the CD-ROM into your disk drive to install the necessary drivers. Step 1- Install Touch Panel Driver 1. Open the STEP6-TOUCH folder followed by the XP folder 2. Open ModifyDBArea.exe The system will help you install the driver automatically ® Note 1: Drivers are not required for Windows 7 and Linux Ubuntu 14.04 ® Note 2: Only single touch is supported for Windows XP Chapter 4 Touchscreen Driver Installation 4-2 DISTRIBUTED BY TEXIM EUROPE Contact details The Netherlands Belgium UK & Ireland Elektrostraat 17 NL-7483 PG Haaksbergen Zuiderlaan 14 bus 10 B-1731 Zellik St. Mary’s House, Church Lane Carlton Le Moorland Lincoln LN5 9HS T: +31 (0)53 573 33 33 F: +31 (0)53 573 33 30 E: [email protected] T: F: E: T: F: E: Germany North +32 (0)2 462 01 00 +32 (0)2 462 01 25 [email protected] Germany South +44 (0)1522 789 555 +44 (0)845 299 22 26 [email protected] Austria Bahnhofstrasse 92 D-25451 Quickborn Martin-Kollar-Strasse 9 D-81829 München Warwitzstrasse 9 A-5020 Salzburg T: +49 (0)4106 627 07-0 F: +49 (0)4106 627 07-20 E: [email protected] T: +49 (0)89 436 086-0 F: +49 (0)89 436 086-19 E: [email protected] T: F: E: Nordic region General information Sdr. Jagtvej 12 DK-2970 Hørsholm T: F: E: +45 88 20 26 30 +45 88 20 26 39 [email protected] 2015 version 2.0 [email protected] www.texim-europe.com +43 (0)662 216 026 +43 (0)662 216 026-66 [email protected]