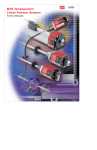
1
V1.00.000 2013-06-20 LAUNCH X-431 PAD Sensorbox User’s Manual All rights reserved! No part of this publication may be reproduced, stored in a retrieval system or transmitted, in any form or by any means of electronic, mechanical, photocopying and recording or otherwise, without the prior written permission of LAUNCH. This manual is designed only for the use of this unit. LAUNCH is not responsible for any use of this manual on the other units. The manual and all the samples herein can be changed without prior notice. Neither LAUNCH nor its affiliates shall be liable to the purchaser of this unit or third parties for damages, losses, costs or expenses incurred by purchaser or third parties as a result of: accident, misuse, or abuse of this unit, or unauthorized modifications, repairs, or alterations to this unit, or failure to strictly comply with LAUNCH operating and maintenance instructions. LAUNCH shall not be liable for any damages or problems arising from the use of any options or any consumable products other than those designated as Original LAUNCH Products or LAUNCH Approved Products Notice: other product names used herein are for identification purposes only and may be trademarks of their respective owners. LAUNCH disclaims any and all rights in those marks. This device is only for professional technicians and maintenance personnel. Registered Trademark LAUNCH is a registered trademark of LAUNCH TECH. CO., LTD. (LAUNCH) in China and other countries. In other countries where any of the LAUNCH trademarks, service marks, domain names, logos and company names is not registered, LAUNCH claims other rights associated with unregistered trademarks, service marks, domain names, logos and company names. Other products or company names referred to in this manual may be trademarks of their respective owners. You may not use any trademarks, service marks, domain names, logos or company name of LAUNCH or any third party without permission from the owner of the applicable trademarks, service marks, domain names, logos or company name. You may visit LAUNCH at http://www.cnlaunch.com for the information of Launch's and the other specialized diagnostic tools, or contact Launch by visiting http://www.X431.com or writing to Customer Center, LAUNCH TECH. CO., LTD., Launch Industrial Park, North of Wuhe Avenue, Banxuegang, Bantian, Longgang, Shenzhen, Guangdong. P.R. China, to request written permission to use materials on this manual for purposes or for all other questions relating to this manual. i LAUNCH X-431 PAD Sensorbox User’s Manual Precaution on Operation z z z z z z z z z The appliance is a sophisticated electronic device, never have it clashed when in use. Main unit screen may flash at the moment of engine ignition, which is normal. You may unplug the main unit if the program can not be actuated or confused screen occurs. Plug again to continue the operation. Make sure the appliance is properly connected to the DLC to avoid communication interruptions. During operation, keep the screen upward and leveled. Be careful when plugging and unplugging the main cable and diagnostic connector. Tighten the screw before operation to avoid unexpected disconnecting and/or damage to the port. Handle with care. Avoid collision. Unplug the power after operation. After the operation, the stylus shall be inserted into its slot on the main unit, and put away the cable and connector, etc accessories to the box to avoid the lost. Unplug the power cable by holding the connector, not the cable itself. ii LAUNCH X-431 PAD Sensorbox User’s Manual Table of Contents 1 FOREWORD .................................................................................1 1.1 PRODUCT SUMMARY ..................................................................1 1.2 PRODUCT FEATURES ..................................................................1 1.3 PRODUCT FUNCTION ..................................................................1 1.4 TECHNICAL PARAMETERS ..........................................................1 2 STRUCTURE AND ACCESSORIES ..........................................3 2.1 SENSORBOX STRUCTURE ...........................................................3 2.2 SENSORBOX ACCESSORIES .........................................................4 3 SENSOR SIMULATION ..............................................................6 3.1 CONNECTIONS ...........................................................................6 3.2 SIMULATION TEST ......................................................................6 3.2.1 DC voltage simulation.......................................................7 3.2.2 Fixed frequency simulation ...............................................8 3.2.3 Predefined waveform simulation .......................................9 3.2.4 Hand-painted waveform simulation ................................12 3.2.5 Precautions on checking vehicle sensor ..........................13 4 AUTO MULTIMETER ...............................................................14 4.1 MAIN MENU ............................................................................14 4.2 TEST SAMPLE ...........................................................................15 iii LAUNCH X-431 PAD Sensorbox User’s Manual 1 Foreword 1.1 Product summary X-431 PAD is a new generation of sophisticated automotive diagnostic product with colorful screen and powerful functions developed by LAUNCH. It provides an optional function of automotive sensor simulation test. “Sensor simulation test” function is specially designed to diagnose and simulate vehicle sensor faults quickly and conveniently, including "DC voltage simulation", "Fixed frequency simulation", "Predefined waveform simulation" and "Hand-painted waveform simulation". Vehicle sensors are the signal input devices for electrical control systems, which can transform all kinds of running parameters, such as vehicle speed, coolant temperature, engine RPM, air flow, throttle opening, etc., into the electronic signal for the vehicle computer who can optimize the engine running status per the above-mentioned parameters to keep the engine working in a prime status. Meanwhile, it integrates the functions of automobile multimeter, which enables users to perform voltage, resistance and frequency test. (The function utilizes the same hardware device as the sensor module) 1.2 Product features DC voltage simulation Fixed frequency simulation Predefined waveform simulation Hand-painted waveform simulation 1.3 Product function It features automotive sensor simulation test and multimeter test function. 1.4 Technical parameters Sensorbox Parameters Scope Precision ±5% Voltage range -5V~+5V 1 LAUNCH X-431 PAD Sensorbox User’s Manual Max output current 70mA Predefined frequency range 0~150Hz Square-wave signal pulse frequency 0~15KHz Square-wave signal duty ratio 10%~90% Multimeter Parameters Scope Precision ±5% Voltage test Testing range DC-400V~+400V Input impedance 10Mohm Resistance test Testing range 0~40Mohm Frequency test Testing range 0~25KHz Input impedance 1000Gohm Input voltage 1~12V 2 LAUNCH X-431 PAD Sensorbox User’s Manual 2 Structure and Accessories 2.1 Sensorbox structure Fig. 2-1 Structural diagram of Sensorbox Table 2-1 shows the ports and indicators for X-431 PAD sensorbox No. Name Description 1 Data receiving indicator Indicator (green) for receiving data from main unit. 2 Data sending indicator Indicator (green) for sending data to main unit. 3 Power indicator It keeps steady on (red) after Sensorbox is powered on. 4 B type USB port Connect to main unit with USB cable when it is 3 LAUNCH X-431 PAD Sensorbox User’s Manual applied as separated USB device. 5 Power connector Connect to power supply through the power adaptor. 6 COM Common terminal of multimeter 7 VΩHz Testing terminal of multimeter 2.2 Sensorbox accessories X-431 PAD sensorbox accessories include sensor test cable, probe etc. See Table 2-2. As the product configuration can be different, the accessories included with the product may differ from the accessories listed on this manual. Please see the packing list attached to the product for the detailed accessories. Table 2-2 Accessory checklist No. Name 1 sensor test cable 2 Sensor probe 3 Multimeter probe 4 Electronic control converting cable 1 5 Electronic control converting cable 2 Picture 4 LAUNCH 6 Electronic control converting cable 3 7 Electronic control converting cable 4 X-431 PAD Sensorbox User’s Manual 5 LAUNCH X-431 PAD Sensorbox User’s Manual 3 Sensor Simulation 3.1 Connections 1. 2. 3. Firstly, power on the main unit (Connect one end of the power adaptor into the power interface of X-431 PAD main unit, and the other end to the DC 12V power supply. Alternatively it can be also powered by cigarette lighter cable and double clip power cord); Plug one end of the sensor test cable (black) into the "COM" interface of the sensorbox, then connect the other end to the test probe or electronic control converting cable; Connect one end of the sensor test cable (red) into the "VΩHz" interface of the sensorbox, and then connect the other end to the test probe or electronic control converting cable. Note: Choose corresponding cables and test probes according to different terminals. 3.2 Simulation test Simulation test enables users to exactly judge if the sensor is good or not to avoid replacing components blindly. For example, the trouble code indicates the fault is in water temperature sensor itself. But we need to confirm whether the fault results from water temperature sensor or the connections between ECU and sensors, or ECU itself. In this case, we can make full use of simulation test to input the signal of simulating water temperature sensor, instead of water temperature sensor, to the microcomputer. If the engine works better and the fault vanishes, the fault is in the water temperature sensor. If the fault still occurs, input the signal to the corresponding terminals of ECU. Consequently, if the fault disappears, the fault lies in the connection between water temperature sensor and ECU, otherwise, the fault exists in ECU. After all connections are properly made (refer to Chapter 3.1 for details), power on and enter the function menu interface, then click "Sensor" to enter the test selection screen. See Fig. 3-1. 6 LAUNCH X-431 PAD Sensorbox User’s Manual Fig.3-1 3.2.1 DC voltage simulation In Fig. 3-1, click [DC voltage simulation], the interface is shown as Fig. 3-2: Fig.3-2 In Fig. 3-2, click the "Settings" button, then click "+" or "-" to adjust the output 7 LAUNCH X-431 PAD Sensorbox User’s Manual voltage value. Alternatively, user can also click edit box, then use the on-screen keyboard to input the desired value directly. After selecting or inputting the desired voltage based on the working characteristics of sensor, click the "Start" button, then the X-431 PAD will begin to output the simulation voltages. Please note the red probe is the output terminal of simulation voltage. Button descriptions: [Settings]: allows you to adjust the voltage. [Start]: confirms the current operation. [Return]: returns to the previous interface. 3.2.2 Fixed frequency simulation This option enables you to simulate the square wave signal of pulse frequency of 0.1 ~ 15 kHz, amplitude range of -5V ~ +5 V and duty cycle 10% ~ 90%. In Fig. 3-1, click "Fixed frequency simulation" to enter a screen similar to Fig. 3-3. Fig.3-3 Button descriptions: [Settings]: adjusts the voltage value, duty cycle ratio and frequency of current square wave signal. [Start]: confirms the current operation. 8 LAUNCH X-431 PAD Sensorbox User’s Manual [Return]: returns to the previous interface. After setting, click [Start] to perform the test. 3.2.3 Predefined waveform simulation X-431 PAD provides some common sensor waveforms which have been predefined to facilitate users to simulate sensor signals. As long as you call out the predefined waveform, then click "Start" to start simulating output of corresponding sensor waveform and no more parameter settings of simulation waveform are required. In Fig. 3-1, click "Predefined waveform simulation" to enter the screen shown as Fig.3-4. Fig.3-4 Here, click [Select waveform] button, a screen similar to Fig. 3-5 will appear. 9 LAUNCH X-431 PAD Sensorbox User’s Manual Fig.3-5 In Fig. 3-5, the upper left setting column stands for sensor types and the lower part indicates waveform. Click / to turn to next / previous page. The sensor types are explained as below: ECT: Coolant Temperature Sensor EVP: EGR Valve Position Sensor HO2S: Heated Oxygen Sensor IAT: Intake Air Temperature Sensor MAF: Mass Air Flow Sensor MAP: Manifold Absolute Pressure Sensor TP: Throttle Position Sensor VAF: Volume Air Flow Sensor VSS: Vehicle Speed Sensor For example, click "ECT" – "Warm (NTC Thermistor)" in Fig. 3-5, the right screen will display the waveform of the sensor. See Fig. 3-6. 10 LAUNCH X-431 PAD Sensorbox User’s Manual Fig.3-6 In Fig. 3-6, click [OK] button, then the pre-defined waveform has been set. See Fig. 3-7. Fig.3-7 In Fig. 3-7, click [Start] button to perform simulation test. 11 LAUNCH X-431 PAD Sensorbox User’s Manual 3.2.4 Hand-painted waveform simulation This option offers great convenience for users to simulate special waveform or fault wave. Users only draw the shape of waveform which needs to be simulated in left drawing area, and then configure some parameters on the bottom, namely high level, low level, and cycle of waveform, then click [Start], X-431 PAD will output a waveform as desired. Warning: Just draw a complete periodic waveform (when it is outputted, the system will regard the waveform in the drawing area as a periodic one). Users should draw an as large as wave in drawing zone so that the system can sample more points to reduce tolerance. While drawing, just pay attention to the shape of waveform, high level, low level and period can be ignored, which can be set in the Configure option. In Fig. 3-1, click "Hand-painted waveform simulation", a screen similar to Fig. 3-8 will appear. Fig.3-8 Button descriptions: [Save]: save the current waveform. [Load]: loads the previously saved hand-drawn waveform. [Settings]: sets the parameters of cycle, high level and low level. [Select waveform]: click to call out the predefined waveform for reference. [Start]: continues the following operation. 12 LAUNCH X-431 PAD Sensorbox User’s Manual [Return]: returns to the previous interface. 3.2.5 Precautions on checking vehicle sensor Hold the connector when plugging or unplugging it. Do not pull the cable for unplugging. At first check the fuse, fusible line and terminals. Then check others after eliminating these faults. When measuring voltage, the ignition switch should be on and the battery voltage should not be less than 11V. When measuring voltage, please shake the lead lightly in the vertical and horizontal direction for more precision. When checking whether there is open in the line, disconnect the CEU and the relevant sensor at first, then measure the resistance among the ports of sensor in order to determine whether open-circuit / contact fault exists or not. When checking if there is a short in the line, please disconnect the CEU and the relevant sensor, then measure the resistance value of the ports between the connected port and the vehicle body. If the resistance value is more than 1MΩ, no fault occurs. Before disassembling the engine electrical control system cable, cut off the power supply, that is, turn the ignition switch OFF and disconnect the cables on the battery poles. Contact the test probe and the two terminals/ the two leads to be measured when measuring the voltage between the two terminals or the two leads. Contact the red test probe to the terminal/ the cable to be measured, and the black probe to the ground when measuring voltage of one terminal/ one cable. When checking the continuity of the terminals, contacts and leads, the method for measuring their resistances can be used. Check the faults in the terminals of the CEU to sensors, relays, etc. There are two test probes in the testing wire. The black one is the common signal terminal (signal GND); the red one is the input terminal for voltage, resistance, and frequency test and output terminal for simulation voltage, simulation frequency and oxygen sensor. Please choose the correct probes to match the different terminals. 13 LAUNCH X-431 PAD Sensorbox User’s Manual 4 Auto Multimeter 4.1 Main Menu Make sure X-431 PAD main unit and the sensorbox are properly connected (Refer to Chapter 3.1 Connections for details), power on X-431 PAD main unit and enter the function menu interface, click "Multimeter" to display the test menu. See Fig. 4-1. Fig.4-1 Click the desired test as shown on Fig.4-1 to perform related test. The operation method on Resistance test and Frequency test is identical to that of Voltage test. Here just take Voltage test as an example for demonstration. Click "Voltage test" to enter Fig. 4-2. 14 LAUNCH X-431 PAD Sensorbox User’s Manual Fig.4-2 Button descriptions: [Clear]: erases the currently displayed waveform and display it starting from the left. [Zoom In]: reduces the range and zoom in the waveform. [Zoom Out]: increase the range and zoom out the waveform. [Start]: starts or stops the testing process. [Adjustment]: adjust the range. [Return]: return to the previous interface. 4.2 Test sample Knock sensor testing (1) Resistance test for knock sensor Switch ignition "OFF", unplug the wire connector of knock sensor, test the resistance between the wire terminal and the case of knock sensor with "Resistance test" function, it shall be ∞(disconnected), and if it is 0Ω(conductive), which means the knock sensor shall be replaced. For the magnetostriction knock sensor, it can also test the resistance by the "Resistance measurement" function; the resistance shall be compliant with the specified value (see specific service manual for the detailed data), otherwise, the knock sensor shall be 15 LAUNCH X-431 PAD Sensorbox User’s Manual replaced. (2) Checking for the output signal of knock sensor Unplug the wire connector of knock sensor, check voltage between knock sensor connector terminal and ground wire of knock, it should be output pulse voltage; otherwise, the knock sensor shall be replaced. Coolant temperature sensor testing (1) Resistance test for coolant temperature sensor On vehicle testing: Switch ignition "OFF" and unplug the wire connector of coolant temperature sensor, then use the "Resistance measurement" to test the Resistance between two terminals of sensor. The relationship between the resistance and the temperature is in inversely proportion (negative temperature coefficient), which shall be less than 1kΩ during warming up. Independent testing: Unplug the wire connector of coolant temperature sensor, then remove the sensor from the engine; place the sensor into a breaker with water and heat the water, then use the "Resistance measurement" to test the Resistance between two terminals of coolant temperature sensor at different water temperature. Compared the measured value with the standard value, if the Resistance is not compliant with the standard, then the coolant temperature sensor shall be replaced. (2) Output signal voltage testing for coolant temperature sensor After installing the coolant temperature sensor, plug the wire connector of sensor, and then switch ignition ON, test the output signal voltage between the two terminals of wire connector. The tested voltage shall be in inverse proportional with the coolant temperature. When the harness of coolant temperature sensor is disconnected, the voltage shall be about 5V if the ignition switch is ON. 16 LAUNCH X-431 PAD Sensorbox User’s Manual Warranty THIS WARRANTY IS EXPRESSLY LIMITED TO PERSONS WHO PURCHASE LAUNCH PRODUCTS FOR PURPOSES OF RESALE OR USE IN THE ORDINARY COURSE OF THE BUYER’S BUSINESS. LAUNCH electronic product is warranted against defects in materials and workmanship for one year (12 months) from date of delivery to the user. This warranty does not cover any part that has been abused, altered, used for a purpose other than for which it was intended, or used in a manner inconsistent with instructions regarding use. The exclusive remedy for any automotive meter found to be defective is repair or replacement, and LAUNCH shall not be liable for any consequential or incidental damages. Final determination of defects shall be made by LAUNCH in accordance with procedures established by LAUNCH. No agent, employee, or representative of LAUNCH has any authority to bind LAUNCH to any affirmation, representation, or warranty concerning LAUNCH automotive meters, except as stated herein. Disclaimer THE ABOVE WARRANTY IS IN LIEU OF ANY OTHER WARRANTY, EXPRESSED OR IMPLIED, INCLUDING ANY WARRANTY OF MERCHANTABILITY OR FITNESS FOR A PARTICULAR PURPOSE. Order Information Replaceable and optional parts can be ordered directly from your LAUNCH authorized tool supplier. Your order should include the following information: 1. Quantity 2. Part number 3. Item description Customer Service Department If you have any questions on the operation of the unit, please call: +86-755-84528767 If your unit requires repair service, return it to the manufacturer with a copy of the sales receipt and a note describing the problem. If the unit is determined to be in warranty, it will be repaired or replaced at no charge. If the unit is determined to be out of warranty, it will be repaired for a nominal service charge plus return freight. Send the unit prepaid to: Attn: Customer Service Department LAUNCH TECH. CO., LTD. 17 LAUNCH X-431 PAD Sensorbox User’s Manual Launch Industrial Park, North of Wuhe Avenue, Banxuegang, Bantian, Longgang, Shenzhen, Guangdong P.R.China, 518129 Launch website: http: //www. cnlaunch.com 18 Statement: LAUNCH reserves the rights to make any change to product designs and specifications without notice. The actual object may differ a little from the descriptions in the manual in physical appearance, color and configuration. We have tried our best to make the descriptions and illustrations in the manual as accurate as possible, and defects are inevitable, if you have any question, please contact local dealer or after-sale service center of LAUNCH, LAUNCH does not bear any responsibility arising from misunderstandings.