1
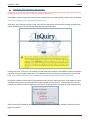
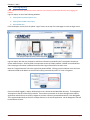
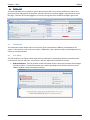
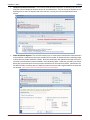
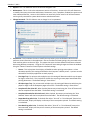
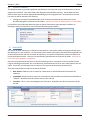
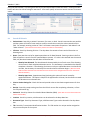
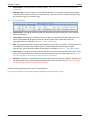
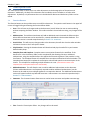
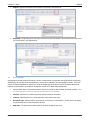
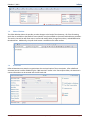
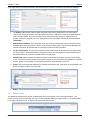
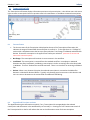
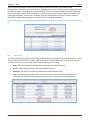
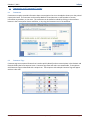
InQuiry User’s Guide October 17, 2012 ShadowPrint Emdat Proprietary Page 0 T a bl e o f C o n t en t s Table of Contents ........................................................................................................................................................i Introduction ................................................................................................................................................................1 Requirements .............................................................................................................................................................2 1. Installing The Runtime Components ..............................................................................................................3 2. Starting InQuiry ..............................................................................................................................................4 3. Home Tab .......................................................................................................................................................5 3.1 Information .............................................................................................................................................5 3.2 User Menu ..............................................................................................................................................5 3.3 Workflow Summary ................................................................................................................................9 4. Search All ........................................................................................................................................................9 4.1 Search All Criteria ................................................................................................................................ 10 4.2 Search All Icons .................................................................................................................................... 11 5. Workflow ..................................................................................................................................................... 12 5.1 Dictation Status ................................................................................................................................... 14 5.2 Marked For Review.............................................................................................................................. 15 5.3 Preliminary .......................................................................................................................................... 15 5.4 Final ..................................................................................................................................................... 16 5.5 Repository (Search All) ........................................................................................................................ 17 5.6 Invalidated ........................................................................................................................................... 17 6. Transcription Viewer ................................................................................................................................... 17 7. Transcription Editor ..................................................................................................................................... 21 7.1 Function Buttons ................................................................................................................................. 21 7.2 Demographics ...................................................................................................................................... 22 7.3 Editor Window ..................................................................................................................................... 23 7.4 Associates ............................................................................................................................................ 23 7.5 Authenticators ..................................................................................................................................... 24 8. Transcription Info ........................................................................................................................................ 25 8.1 Current Status...................................................................................................................................... 25 8.2 Append and Previous versions ............................................................................................................ 25 8.3 Activity Log .......................................................................................................................................... 26 9. Comments and Comment Tagging .............................................................................................................. 27 9.1 Comments ........................................................................................................................................... 27 9.2 Comment Tags ..................................................................................................................................... 27 10. Problem List ................................................................................................................................................. 28 11. Facsimiles or Services .................................................................................................................................. 29 InQuiry Emdat Proprietary Page i October 17, 2012 InQuiry 11.1 Search Criteria ..................................................................................................................................... 29 11.2 Pending Faxes ...................................................................................................................................... 30 11.3 Facsimiles Functions ............................................................................................................................ 31 11.4 Grouping and Sorting........................................................................................................................... 31 11.5 Facsimiles Icons ................................................................................................................................... 32 12. Shadow Print ............................................................................................................................................... 33 13. InVision ........................................................................................................................................................ 34 13.1 Reports ................................................................................................................................................ 34 13.2 New Report.......................................................................................................................................... 34 13.3 Scheduled Reports ............................................................................................................................... 37 13.4 Saved Reports ...................................................................................................................................... 38 14. My Templates .............................................................................................................................................. 40 14.1 Welcome.............................................................................................................................................. 40 14.2 Document Templates .......................................................................................................................... 40 14.3 Dictation Templates ............................................................................................................................ 41 14.4 Print Your Templates ........................................................................................................................... 42 15. Removing InQuiry Components .................................................................................................................. 43 16. Support ........................................................................................................................................................ 44 InQuiry Emdat Proprietary Page ii Introduction InQuiry is a highly customizable HIPAA-compliant web-based application with various features that allows health care providers to review, edit, search, and electronically authenticate transcribed dictation. InQuiry integrates a patient demographic database, referring physician information, a medical spell check, and the facilities Electronic Medical Records system. This allows health care providers to quickly and easily complete a quality document. Over the course of many years InQuiry has grown into a tool that helps to produce a more reliable and consistent document than with traditional transcription services. InQuiry Emdat Proprietary Page 1 InQuiry October 17, 2012 R e qu i r em en t s For Emdat InQuiry software to work properly within your Windows environment (Macintosh or Apple computers are NOT supported by Emdat), you are required to meet the following software and hardware requirements: Minimum Requirements: Windows XP (Note: Windows 98, 2000 and NT4 users - Emdat does not support any versions of Windows prior to Windows XP, please upgrade Windows before calling Emdat) RAM: 512 MB Hard Drive Free Space: 1 GB Windows Internet Explorer 7 or higher Windows Media Player: 7 or higher A monitor capable of displaying a resolution of 800 x 600 pixels Internet Connection: Dial up Recommended Requirements: Vista, or Windows 7 RAM: 1 GB or higher Hard Drive Free Space: 1 GB Sound Card with Speakers (or Stereo Headphones) Windows Internet Explorer 7 or higher Windows Media Player: 9 or higher A monitor capable of displaying a resolution of 1024x768 pixels or higher Internet Connection: High Speed Cable or DSL Microsoft Silverlight 4 or better. InQuiry Emdat Proprietary Page 2 InQuiry October 17, 2012 1. Installing The Runtime Components (Note: If you are on a network with multiple users, please make sure your Windows Login ID has installing and uninstalling privileges. If you are not sure, please contact your PC support department. ) If the EMDAT runtime components have not been installed they can be downloaded manually from the website: http://www.emdat.com/runtime/EmdatComponents.exe Alternately, upon reaching the login screen if the runtime components have not been installed, the login fields will be disabled and the user will be presented with the following screen: Clicking on the red “Click Here” link will begin the download and installation of the EMDAT runtime components required to access the InQuiry application. An explanation of what the Runtime Components do can be found here: http://www.emdathelp.com/activekb/questions/190/Explanation+Of+Runtime+Components During the installation process when prompted please select the Run option each time. Some network security setups do not allow users to run executable files downloaded from the internet. In these situations it may be necessary to manually install the application, save the file to the Hard Disk, or contact the system administrator. After the successful installation of the Runtime Components enter a User Name, Password, and Client code to login to an account. InQuiry Emdat Proprietary Page 3 InQuiry October 17, 2012 2. Starting InQuiry (Note: Obtain a username, password and client code from your company's system administrator prior to logging into InQuiry.) Log into InQuiry at one of the following websites: https://www.mytranscriptions.com https://www.emdat.com/inquiry www.emdat.com If the third option is used, click the yellow “Login” button at the top of the web page to reach the login screen. Log into InQuiry with the User, Password, and Client information provided by the Transcription Company or System administrators. All three fields are required to access the InQuiry website. EMDAT recommends that users keep login information confidential and not share login information with other users. Note the “Forgot Password” link to the right of the password field. Clicking on this link allows users who have submitted a valid email address to receive their InQuiry passwords by email if it is lost or forgotten. Once successfully logged in, InQuiry will display the user’s Home tab and Workflow Summary. The Navigation Tabs appear at the top of the InQuiry website. These tabs are persistent at all times throughout the InQuiry application and allow users to quickly navigate to the most commonly accessed destinations. Each Navigation Tab is explored individually as each has a unique function in the overall application. Not all Navigation Tabs will be available to all users. InQuiry Emdat Proprietary Page 4 InQuiry October 17, 2012 3. Home Tab The Home tab allows users to perform various administrative tasks, set up various preferences, and to see a general summary and graph of the workflow. Note the user who is currently logged in is greeted at the top of the page. If the User ID currently logged in is incorrect, the Log Out link is located at the upper right corner. Information 3.1 The Information section allows users to see a history of the improvements, additions, and updates to the system. It also contains a link to this user manual. Additionally, other important news may be displayed in this section on a situational basis. User Menu 3.2 The links under the User Menu section allow access to preferences, maintenance functions, and information customized for the user and client. Not all links in the User Menu will be available to all users. InQuiry Help Desk Support: This link provides contact information for the transcription company that manages the Client account. If contact information has not been provided, this link will direct the user to the EMDAT helpdesk number and support websites. Emdat Proprietary Page 5 InQuiry October 17, 2012 Telephone Dictation Instructions: This link will provide detailed information to dictating users who are using the InTouch Telephone dictation service to record dictations. This link will not be available to nondictating users or users at hospitals and clinics who are not using the InTouch telephone dictation system. Folder Notification Options: This will allow InQuiry users to receive email notifications about dictations in the workflow. Notifications inform the recipient of the number of dictations that are awaiting review in the Preliminary folder and Referral folder. Real Time Notification will update the Provider via email in real time as transcriptions become available in the Preliminary folder. Otherwise, providers can choose which days and at what times to receive email notifications for the Preliminary folder. Notifications for the Referral folder are always sent at 7 AM in the client’s time zone and are generated for the days that are selected. (Note that the names of workflow folders are customizable) InQuiry Emdat Proprietary Page 6 InQuiry October 17, 2012 Reports: This is an additional link to the InVision Navigation Tab. Maintenance: This is a link to the maintenance section of the client. Access to this link will allow users to modify client setup, Associates and Patients, Documents, Users, Templates, Shadow Print options and other advanced features. Access to this link does not necessarily confer access to all of these features and is typically reserved for system administrators and advanced users. Change Password: This link allows a user to change his or her password. Preferences: This link allows the user to modify the way InQuiry prints and behaves while the user performs various functions in the application. Due to the nature of these settings, they are saved to the local machine and not to the user login. This means that users can have different Preferences selected when using different computers. Using the “Ok” button will save setting changes and close the window. Using the “Restore” button will set all options to default settings. InQuiry o Printer: This is the printer that InQuiry will default to when printing transcriptions. Unless otherwise specified, this setting will default to the Computer’s default printer. A printer must be selected for the InQuiry application to work properly. o First Page Tray: For printers with multiple trays, this setting will determine which tray the paper for Page 1 comes from. This is helpful for clients who are using custom paper letterheads when printing documents. The default setting is “Auto Select.” o All Other Pages Tray: For printers with multiple trays, this setting will determine which tray the paper for Page 2 and all subsequent pages comes from. The default setting is “Auto Select.” o Complete All after Print All: When checked, documents printed using the “Print All” button will also be completed from that folder. The default setting is unchecked. o Complete Selected after Print Selected: When checked, documents printed using the “Print Selected” button will also be completed from that folder. The default setting is unchecked. o Popup Batch Log after Print: If checked, after either “Print All” or “Print Selected” function has been executed, InQuiry will display a summary of the transcriptions printed. The default setting is unchecked. o Print Batch Log after Print: If checked, after either “Print All” or “Print Selected” buttons has been executed, InQuiry will also print a summary of the transcriptions printed. The default setting is unchecked. Emdat Proprietary Page 7 InQuiry October 17, 2012 InQuiry o Complete After Download: If checked, after either “Download All Transcriptions” or “Download Selected Transcriptions” function has been executed, a prompt will appear asking the user if those transcriptions should be completed from the current workflow folder. o Auto-Print and Complete every 5 minutes: If checked, allows a user to go to any workflow screen and “Activate” this feature. This will make that screen, and whatever search criteria were selected, perform the auto-print/complete functions. In order for this feature to work properly, the InQuiry web page must be left open. The default settings are unchecked and 5 minutes. o Always Show Confirmation Dialog: When using the Print/Complete/Fax All or Selected buttons, the user will be prompted to confirm they want to perform the selected action. Because there is no “undo” button for these actions the default setting is checked on. o Auto Spellcheck: If checked, anytime a change is made in the editor in Edit mode, and a save is requested, the spellcheck of the editor is activated. The default setting is checked on. o Auto-Refresh Search every 0 minutes: This will make the selected workflow and whichever criteria are entered automatically refresh at a specified interval. The default setting is zero (never). o Always Maximize InQuiry Windows: If checked, anytime a new Internet Explorer window opens, it will automatically stretch to the maximum available screen size. The default setting is checked on. o Always Confirm Job Completion: If checked, after “Complete” or “Complete/Next” is clicked in the Transcription Viewer, the user will be prompted to confirm Transcription Completion. Emdat Proprietary Page 8 InQuiry October 17, 2012 Workflow Summary 3.3 The Workflow Summary provides a graphical representation and numerical count of the documents in various stages of the workflow. Only active folders are displayed in the workflow summary. Active folders the user does not have access to will be displayed with disabled gray links and graphic bars. Only Documents the user has access to will be counted in the Summary. Clicking on the name of a workflow folder in the summary will automatically link the user to the Workflow Navigation Tab and the chosen folder. (Note that the names of workflow folders are customizable) It is possible to count individual document types or groups of document types separately in addition to displaying a total if the hospital or clinic utilizes the document groups feature. 4. Search All The Search All folder allows users to search for transcriptions in the system without knowing specifically where that document is in the workflow. It is also the only way to locate transcriptions that have been completed from all the workflow folders and into the Search All repository. Documents located with the Search All feature can be interacted with normally. Users are not automatically granted access to the Search All folder. (Note that the name of the Search All folder is customizable) Searches can be generated using some or all of the following criteria. Using fewer criteria may allow a wider range of matching transcriptions, but an insufficiently restricted search can return more transcriptions than are useful. Conversely, narrowing the search criteria too far may exclude documents unintentionally. There are three possible sub-tabs for the Search All folder. Basic Search: Allows the user to search for transcriptions in the Workflow and in the Search All repository. Invalidated: Allows the user to search for transcriptions that have been removed from the workflow or “deleted.” By default users do not have access to this sub-tab. Facsimiles: This is a link to the Navigation tab “Facsimiles” By default users do not have access to this sub-tab. InQuiry Emdat Proprietary Page 9 InQuiry October 17, 2012 Using the Search button, or pressing the Enter key on your keyboard will initiate the search. Pressing the Clear button will clear the criteria to begin a new search. Users must specify at least one search criterion to initiate a search. Search All Criteria 4.1 Patient Name: Search by a patient’s last name, first name, or both. Partial name searches are possible and the system will look for exact matches as well as names that contain the value entered into this field. For example, entering a value of “John” will locate transcriptions for patients “John Adams” and “Adam Johnson.” (Note that the name of the patient name field is customizable) Clinician: Search by Dictating Clinician. The drop down list contains all users at the Client who are dictating users. Dates: Date searches can be for Appointment Dates or for Date Dictated. Entering a value in the first field will perform a search from the specified date to present. If a value is also entered into the second field, only dictations between the two dates will be returned. o Show by Date Dictated: The date dictated is determined by the InTouch server if the dictating clinician uses InTouch telephone dictation service. The timestamp is created when the dictator completes a dictation. If the dictating clinician uses InSync to upload dictations via a hand held recorder, the timestamp is created by the recorder when the dictation begins. (Note that hand held recorders that have inaccurate date and time values in their configurations will return inaccurate dates of dictation.) o Show by Appt. Date: (Appointment Date) Selecting this option will search instead by appointment dates. This option is helpful if the appointment is known, but the dictator created the dictation at an unknown time. View In-Patient Listings for: Check this box and provide a date to view Patient appointments for that day. Receipt: Search by receipt codes given from the InTouch server after completing a dictation, or from the InSync dictation log. Patient ID: Search by Patient ID or Medical Record Number (MRN). (Note that the name of the Patient ID field is customizable) Location: Search by Location, valid Locations can be selected in the drop down box. Document Type: Search by Document Type, valid Document Types can be selected in the drop down box. TID: Search by Transcription Identification Number. The TID number is a unique number assigned to only one transcription in the system. InQuiry Emdat Proprietary Page 10 InQuiry October 17, 2012 Order Number: Search by Order or Account number. (Note that the name of the Order Number field is customizable) Comment Tags: Comment Tags are custom defined identifiers for commonly encountered problems. Transcriptions may have more than one Comment Tag. Users can search for a specific Comment Tag, Any Comment Tag, or no Comment Tags. Search All Icons 4.2 Play Dictation: Pressing the dictation button will download and play the audio file in your browser’s default media player. Transcription: Pressing the transcription button will open up a preview of the typed document. This button is unavailable for documents that have not been typed. More information about the transcription button is available in Section 6: Transcription Viewer. Edit: Pressing the edit button will open up the editing screen for the transcription. This button will not be available for TIDs that have not been typed, or have already been authenticated or signed electronically. More information about the edit button is available in Section 7: Transcription Editor. Cover Letter: Pressing the cover letter button will open a preview of the document cover letter. Cover letters are not generated for transcriptions without associates who receive documents by mail. (Note that specific dictators or document types may not generate cover letters) Envelope: Pressing the envelope button will open a preview of the document envelope. Envelopes are not generated for transcriptions without associates who receive documents by mail. (Note that specific dictators or document types may not generate envelopes) A detailed article explaining InQuiry Icons can be found here: http://www.emdathelp.com/activekb/questions/280/Explanation+Of+InQuiry+Icons InQuiry Emdat Proprietary Page 11 InQuiry October 17, 2012 5. Workflow The contents of the Workflow tab are highly customizable and can be configured to the specific needs of the client. The Dictation status folder is always active, but all other folders in the workflow may not be in use by the client, or can be made unavailable to specific users. Folders that are not in use are labeled “Not Used.” Folders that the user does not have access to are grayed out. Accessible folders are displayed as links, or sub tabs below the standard navigation tabs. The names of the workflow folders can also be renamed, but their function and place in the work flow will remain unchanged. The following Workflow buttons are available in each folder except the Dictation Status Folder. Custom: The custom check box is used to specify customized print settings for documents that are printed while the check box is active. The user can specify Top, Bottom, Left, and Right margins and line spacing percentage. Transcription Selection Boxes: The check boxes on the left side of the results window are used in conjunction with the Print Selected, Print Selected Cover Letters, Print Selected Envelopes, Complete Selected, and Fax Selected buttons. Using the Blue Diamond select all buttons will select all transcriptions in the results window. InQuiry Emdat Proprietary Page 12 InQuiry October 17, 2012 Show Labels: This button toggles between displaying the labels for the icons in the results window. Advanced users, or users with limited screen resolutions can toggle off icon labels to conserve screen space. Print Selected/Print All: Prints the selected transcriptions only without cover letters or envelopes. Selecting the Print All button will print all transcriptions in the results window. Print Selected Cover Letters/Print All Cover Letters: Prints the selected transcriptions with cover letters. Selecting the Print All Cover Letters button will print all transcriptions in the results window with cover letters. Print Selected Envelopes/Print All Envelopes: Prints the selected transcriptions with envelopes and cover letters. Selecting the Print All Envelopes button will print all transcription envelopes in the results window with envelopes. Complete Selected/Print All: Completes the selected files from the folder moving them to the next stage in the workflow. Selecting the Complete All button will complete all transcriptions in the results window. Fax Selected/Fax All: Faxes the selected transcriptions to a specified associate. Selecting the Fax All button will fax all transcriptions in the results window to one associate. Legend: Displays definitions for color coded transcriptions. InQuiry Emdat Proprietary Page 13 InQuiry October 17, 2012 Dictation Status 5.1 Transcriptions in the Dictation Status folder have recently been uploaded to the transcription company and have not been delivered as completed documents. A search of transcriptions in Dictation Status can be made using most of the fields described in Section 4: Search All. Two actions can be performed on Dictations that are in the Dictation Status workflow folder. Mark a Transcription STAT: A Transcription can be marked as a higher priority STAT dictation. Transcriptions marked STAT are completed before other transcriptions and may have a higher cost per line. Transcriptions that appear in pink have been marked STAT. (Note that the color of STAT dictations is customizable) InQuiry Play Dictation: Pressing the dictation button will download and play the audio file in your browser’s default media player. Emdat Proprietary Page 14 InQuiry October 17, 2012 Marked For Review 5.2 Transcriptions in the Marked for Review and Marked for Review 2 folders have been typed by the transcription company. Transcriptions in the Review folders have been completed, but may require additional edits from Staff members. A search of transcriptions in Marked for Review can be made using most of the fields described in Section 4: Search All. Transcriptions in the Marked for Review folders print with a “Preliminary” watermark by default. Documents in the Review folder commonly have comments from the Transcription Company detailing why the document was selected for the Marked for Review folder. Play Dictation: Pressing the dictation button will download and play the audio file in the browser’s default media player. Transcription: Pressing the transcription button will open up a preview of the typed document. More information about the transcription button is available in Section 6: Transcription Viewer. Edit: Pressing the edit button will open up the editing screen for the transcription. More information about the edit button is available in Section 7: Transcription Editor. Cover Letter: Pressing the cover letter button will open a preview of the document cover letter. Cover letters are not generated for transcriptions without associates who receive documents by mail or fax. (Note that specific dictators or document types may not generate cover letters) Envelope: Pressing the envelop button will open a preview of the document envelope. Envelopes are not generated for transcriptions without associates who receive documents by mail or fax. (Note that specific dictators or document types may not generate envelopes) Preliminary 5.3 Transcriptions in the Preliminary folder have been typed by the transcription company and are now ready for provider review. If the Provider is using the electronic signature option, completing individual documents from the Preliminary folder using the Transcription viewer is the action that applies the electronic signature to the document. The preliminary folder is the last folder in the workflow that users are allowed to edit transcriptions. Transcriptions in the Preliminary folder print with a “Preliminary” watermark by default. Play Dictation: Pressing the dictation button will download and play the audio file in the browser’s default media player. Transcription: Pressing the transcription button will open up a preview of the typed document. More information about the transcription button is available in Section 6: Transcription Viewer. Edit: Pressing the edit button will open up the editing screen for the transcription. More information about the edit button is available in Section 7: Transcription Editor. Cover Letter: Pressing the cover letter button will open a preview of the document cover letter. Cover letters are not generated for transcriptions without associates who receive documents by mail or fax. (Note that specific dictators or document types may not generate cover letters) InQuiry Emdat Proprietary Page 15 InQuiry October 17, 2012 Envelope: Pressing the envelop button will open a preview of the document envelope. Envelopes are not generated for transcriptions without associates who receive documents by mail. (Note that specific dictators or document types may not generate envelopes) Download All/Download Selected: In the Preliminary Folder there is a new button in the workflow screen that allows the user to download a PDF or Word copy of the document and save it to the PC. Final 5.4 Transcriptions in the Final folders have been typed by the transcription company, and if the electronic signature option is being used, authenticated by the provider. Documents in the Final folder are prepared to print for the chart, paper record, or to send to referring associates who receive their copies by mail. Transcriptions in the Final folders print without a watermark by default. Play Dictation: Pressing the dictation button will download and play the audio file in the browser’s default media player. Transcription: Pressing the transcription button will open up a preview of the typed document. More information about the transcription button is available in Section 6: Transcription Viewer. Cover Letter: Pressing the cover letter button will open a preview of the document cover letter. Cover letters are not generated for transcriptions without associates who receive documents by mail or fax. (Note that specific dictators or document types may not generate cover letters) Envelope: Pressing the envelop button will open a preview of the document envelope. Envelopes are not generated for transcriptions without associates who receive documents by mail. (Note that specific dictators or document types may not generate envelopes) InQuiry Emdat Proprietary Page 16 InQuiry October 17, 2012 Repository (Search All) 5.5 The Repository (Search All) folder is the final destination in the workflow. This link will open the Search All navigation tab. For more information see Section 4: Search All. Invalidated 5.6 The Invalidated folder is where discarded transcriptions are kept in case they need to be retrieved or restored to the workflow. This link will open the Search All navigation tab in the invalidated sub tab. By default Users do not have access to the Invalidated sub tab. For more information see Section 4: Search All. 6. Transcription Viewer The Transcription Viewer is a preview of the typed document. In addition to providing a large preview of the document, at the top of the Transcription Viewer are several function buttons. The question mark button in the upper left corner will toggle hiding and showing the function button labels. In the far right, the Workflow folder the transcription is currently in is displayed. InQuiry Print: This button will open Internet Explorer’s Print Dialog. Emdat Proprietary Page 17 InQuiry October 17, 2012 Custom: The custom button will allow a user to specify customized print settings for the document. The user is allowed to specify Top, Bottom, Left, and Right margins and line spacing percentage. Print Preview: The Print Preview button will open the print preview screen, displaying how the document will appear on paper after it is printed. Fax: The fax button will open the Fax on Demand dialog box. InQuiry Emdat Proprietary Page 18 InQuiry October 17, 2012 Download: The Download button appears in the Transcription viewer and allows users to save a copy of the Dictation in Word or PDF format to their PC. This button is only available for files in the Preliminary folder when it is enabled. Previous/Next: The Previous and Next buttons allow users to page through the Transcriptions searched for in the workflow folders. Info: The Info button contains information about the transcription, including demographic information and an activity log. It is also where a transcription can be invalidated by InQuiry users or returned to a previous state in the workflow. The Info button is covered comprehensively in Section 8: Transcription Info. Edit: The Edit button shifts the Transcription Viewer into edit mode. The Edit button is covered comprehensively in Section 7: Transcription Editor. Play Dictation: Pressing the dictation button will download and play the audio file in your browser default media player. Complete/next and complete: Complete moves transcriptions forward in the workflow. If the document is in the Preliminary folder and is completed by the dictating clinician or additional authenticator, using the complete button also applies the electronic signature if the provider is using that feature. The Complete button will complete the transcription selected and close the window. The Complete/next button will complete the transcription selected and open the next transcription in the Viewer. This is helpful for completing multiple dictations in a row. (Note that the names of the Complete/next and Complete buttons are customizable) InQuiry Emdat Proprietary Page 19 InQuiry October 17, 2012 Comment: The Comment button allows users to read or leave comments. Cumulative: The cumulative button combines all transcriptions from the search results into one document. This feature was designed for “Sticky Paper” or “Roll Paper” as a method of conserving the expense. Printing cumulated transcriptions removes the white space between dictations. Patient Info: This button allows users to edit patient contact information. Exit: Closes the Transcription Viewer. InQuiry Emdat Proprietary Page 20 InQuiry October 17, 2012 7. Transcription Editor The Transcription Editor is where users can make adjustments to the demographics of the patient and document. Additionally, the body of the document can be edited to correct mistakes or to make other adjustments. By default, only documents that are in the Marked for Review and Preliminary Folders can be edited. Function Buttons 7.1 The function buttons at the top allow users to modify the document. The question mark button in the upper left corner will toggle hiding and showing the function button labels. Save: This will save any changes made to the document, but will allow the user to continue editing without reopening the editor window. If the editor window is closed without saving, any changes will be lost. Add Associate: The Add Associate button will add an additional section beneath the Editor window where Referred Associates can be searched for, created, and added to the Associate Database. The Associates section is covered comprehensively in Section 7.4: Associates. Save & Close: This will save any changes made to the document, but will also close the editor window and return the user to the Transcription Viewer. Play Dictation: Pressing the dictation button will download and play the audio file in your browser default media player. Complete/next and Complete: Complete moves transcriptions forward in the workflow. If the document is in the Preliminary folder, and is completed by the dictating clinician or additional authenticator, using the complete button also applies the electronic signature if the provider is using that feature. The Complete button will complete the transcription selected and close the window. The Complete/next button will complete the transcription selected and open the next transcription in the Viewer. This is helpful for completing multiple dictations in a row. (Note that the names of the Complete/next and Complete buttons are customizable) Add Authenticator: This will allow the user to add an additional authenticator to the document. Fellows and Resident doctors are frequently required to add an additional authenticator, but this feature can be used any time multiple signatures are required or desired. The Additional Authenticators section will appear beneath any Referred Associates. Authenticators are covered comprehensively in Section 7.5: Authenticators. Comment: The Comment button allows users to read or leave comments and update comment tags. Patient Info: This button allows users to edit patient contact information. Exit: Closes the Transcription Editor. Any changes will not be saved. InQuiry Emdat Proprietary Page 21 InQuiry October 17, 2012 Append: Appends the opened transcription to a specific Transcription ID. Unappend: Unappending the Transcription will remove the link between the selected transcription and the transcription it was appended to. Demographics 7.2 Demographics include patient information, but also include health care provider and appointment information. Additionally, any custom fields requested by the client can be updated in the demographics section. Users can search the Patient Database for patients by using the Magnifying Glass button next to the Patient Name field. Patients can be located in the database by Name or Patient ID or Medical Record Number. Patient Information includes Patient Name, Patient ID, and Birth date, Gender, and Order number. (Note that the Patient Name, Patient ID, and Order Number fields are customizable) Clinician: Indicates the healthcare provider who dictated the document. Location: Indicates where or in what department the patient was seen. Document Type: Indicates which work type the transcription is formatted as. A letter work can appear very differently from a Chart Note when printed. Appt Date: The appointment date indicates the date the patient was seen. InQuiry Emdat Proprietary Page 22 InQuiry October 17, 2012 7.3 Editor Window The Editor Window allows the provider to make changes to the body of the document. All of the formatting tools that are available to the Medical Transcriptionist are also available to client staff and healthcare providers. The tools in the tool bar will allow users to create and modify tables, change font and size, and add Bulleted or Numbered lists. Additionally, the spell check button is available on the editor toolbar. 7.4 Associates Referred Associates are people or organizations who received copies of the transcription. After a Referred Associate section has been added using the “Add Associate” button in the Transcription Editor, the Associate’s contact information can be entered into the left hand side. InQuiry Emdat Proprietary Page 23 InQuiry October 17, 2012 In the right section are some check boxes that affect how the associate is handled in the Associate Database. The Primary radial button indicates which associate is the primary associate for the Transcription. Typically the primary associate is the one to whom the letter is addressed. Other associates have been CC’d or Carbon Copied. Only one associate can be made the primary associate. Additionally, if no primary associate is required, there is a radial button at the top of the first Referred Associate labeled “No Primary.” Add/Update in Database: If the associate is new this check box will add the associate to the Associate Database when the Transcription is saved. If the associate already exists in the Associate Database the associate record will be updated with any changes or new information provided. Fax This Transcription: This check box indicates that an auto fax will be generated for this associate for this transcription. If both Add/Update in Database and Fax This Transcription are both checked, future documents where this associate is added will also be auto faxed. Patient’s PCP: When checked, the copied associate is indicated as the Patient’s Primary Care Provider, or PCP. The Primary Care Provider is automatically copied on all transcriptions associated with a specific patient. Primary Care Providers can still be removed from the Referred Associate list. Search: Search the Associate Database for available associates to add. Associates can be located by Last Name, First Name, and/or Associate Code. Delete: The Delete button will remove the Associate. 7.5 Authenticators The Additional Authenticators section is added using the function button in the Transcription Editor. This section consists of a drop down box with a list of all the available additional authenticators. If an authenticator is no longer required, the red “X” button will remove the authenticator. InQuiry Emdat Proprietary Page 24 InQuiry October 17, 2012 8. Transcription Info The Transcription Info button displays information pertinent to the transcription. It also allows users with access rights to move a transcription back to a previous state in the workflow or to invalidate unwanted transcriptions. Current Status 8.1 The Current status of the Transcription is displayed at the top of the Transcription Information; this indicates the stage of the workflow the transcription is currently in. To the right there is a “Change To:” section with a drop down menu that has up to three selections: No Change, Invalidated, and Marked for Review. Choose the save option in the upper left to finalize your selection. (Note that not all users will have access to all three options) No Change: The transcription will maintain its current status in the workflow. Invalidated: The transcription is removed from the standard workflow. Incomplete or unwanted dictations are often invalidated. Invalidating a transcription is similar to moving a file to the Recycle Bin in Windows. The file is “deleted” but could be retrieved. There is no time limit on retrieving invalidated files. Review: When a user chooses this option the selected transcription is returned to the Marked for Review 1 or Marked for Review2 folders. Typically only dictating users have access to this selection and use it to return a document to the review folder for additional staff editing. 8.2 Append and Previous versions The Append section gives information on which, if any, Transcription IDs are appended to the selected transcription and what status in the workflow they are currently in. Pressing the “Info” button next to each of the Transcription IDs on the list will redirect the user to the Information screen for that transcription. InQuiry Emdat Proprietary Page 25 InQuiry October 17, 2012 The Prior Versions section will allow users to see the previous versions of the Transcription’s body. Demographics are not saved in the prior versions, although a prior version is created anytime changes are made and the save button is pressed in the Transcription Editor. If a prior version is available, clicking on it will open the text in another window. If the user wants to revert to this prior version a restore button is available in the upper right hand corner of the screen. By default, users do not have access to the prior versions or restore functionality. Additional information on restoring prior versions can be found here: http://www.emdathelp.com/activekb/questions/132/Restore+A+Previous+Version+Of+A+Transcribed+Docume nt Activity Log 8.3 The activity log tracks what activities have been performed for the transcription and the associated user. There are four columns in the Activity Log table. Older activity entries may be hidden but can be revealed using the “View Archived” link. The activity log can be sorted by clicking on the heading. Date: The Activity Log tracks the date and time that the action was performed. Action: A brief description of the action performed by the user. Action By: The user ID or name of the individual who performed the action. Type: The type of login that was used to execute the action. Note that some types of logins, like “Associate” are used to indicate automated functions that are carried out by the EMDAT server. InQuiry Emdat Proprietary Page 26 InQuiry October 17, 2012 9. 9.1 Comments and Comment Tagging Comments Comments are used to provide information about a transcription that is not intended to show up on the printed transcription itself. The comment can be used by Medical Transcriptionists or staff members to convey information to providers, or vice versa. The comments can be viewed or edited by clicking on the comment buttons in the Transcription Viewer and Editor, or by using the Comments Icon in the workflow. 9.2 Comment Tags Comment tags are an optional feature that is used to quickly identify and sort transcriptions in the Review1 and Review2 folders that have common issues. Comment tag names and colors are customizable. Transcriptions with Comment Tags are identified with a unique icon. Transcriptions with multiple Comment Tags will appear with a tri-color icon. InQuiry Emdat Proprietary Page 27 InQuiry October 17, 2012 10. Problem List Problem Lists are rarely used templates that pertain to a specific patient. They are inserted into other dictations similarly to Dictation Templates. However, instead of being associated with a Clinician, the Problem List belongs to a patient, and can be inserted into the patient’s documents regardless of the dictating provider. They can be updated by dictating an update or via the Problem List tab. Problem Lists can be divided into multiple categories with customizable headings. (Note that there is an additional monthly fee to maintain problem lists. For additional information, please contact your transcription company.) InQuiry Emdat Proprietary Page 28 InQuiry October 17, 2012 11. Facsimiles or Services Facsimiles or faxes are generated through Fax on Demand or by utilizing the EMDAT AutoFax feature. To track faxes or to resend faxes the Facsimiles tab is available. The Facsimiles tab looks similar to the Search All but the search fields have been optimized for searching through faxes and recipients. By default, users do not have access to the Facsimiles tab. Using the Search button, or pressing the Enter key on your keyboard will initiate the search. Pressing the Clear button will clear the criteria to begin a new search. 11.1 Search Criteria Recipient Name: Search by name for the associate that the fax was sent to. Location: Search for the Location that the fax originated from. Dates Faxed: Search for a date range when the fax was created. This field does not search for when the fax was received, but when the fax was created. Additionally, the Dates Faxed field is only used in conjunction with a Status. However, it is not available with faxes that are pending authorization as they have not been created yet. Error Description: Search for faxes with a specific error. This field is only used in conjunction with the Failed Status. InQuiry o Answering Machine: The fax server called an answering machine when attempting to establish a connection. o Busy: The fax server received a busy signal when attempting to establish a connection. o Error Detected on Line: The fax server encountered a large amount of interference attempting to establish a connection. o Fax Number Length Invalid: The fax number submitted does not have the required number digits to successfully dial out. All fax numbers must have the 10 digit phone number including area code. Hyphens and dashes are not required. o No Answer: The fax server was unable to connect with any device. o On Client Do Not Call List: The fax server has been attempting to contact a fax machine at the specified number and has repeatedly failed due to Voice Answered or Answering Machine errors and has been automatically added to the Client Do Not Call List. InQuiry users with access to the Facsimiles tab can remove numbers from the Client Do Not Call list with the “Remove DNC” button. o On Server Do Not Call List: A fax recipient has called in and requested that EMDAT place the fax number on the Do Not Call list. Numbers on the Server do not call list affect every client. Only EMDAT may remove a number from the Server Do Not Call List. o Transmission Error: The fax server was interrupted or lost the connection while transmitting the fax. o Voice Answered: A human voice answered the fax server’s connection attempt. Emdat Proprietary Page 29 InQuiry October 17, 2012 Patient ID: Search by Patient Medical Record Number. Patient Name: Search by Patient Name or partial. Fax Number: Search by the fax number the transcription was sent to. Transcription ID: Search by the Transcription ID of the sent fax. Status: Search by faxes in a specific status. 11.2 o All Faxes: if this field is blank, the search will look for all faxes regardless of the status. o Pending Authorization: Faxes that are waiting for approval to send. This includes faxes that are waiting to pass the auto-fax trigger. o Queued: Faxes that are created and waiting in the fax server queue to be faxed. o Failed: Faxes that were created but failed to successfully send. o Succeeded: Faxes that were successfully sent to the recipient. o Cleared: Faxes that were removed from the failed fax list. Failed faxes that have been selected for refax are automatically cleared. Last Signature: Search for the last authenticator listed on the Transcription. Pending Faxes Use the Pending Faxes page to search for TIDs that will queue up for AutoFax, but that have not passed the AutoFax trigger point. Pending Faxes is located in the Services Tab, under the pull down menu “Faxes.” The Search Criteria are similar to those in the standard Faxes tab. Recipient Name: Search by name for the associate that the fax was sent to. Location: Search for the Location that the fax originated from. Patient ID: Search by Patient Medical Record Number. Patient Name: Search by Patient Name or partial. Fax Number: Search by the fax number the transcription was sent to. Transcription ID: Search by the Transcription ID of the sent fax. Dictator: Search by the Clinician that dictated the TID. Last Signature: Search for the last authenticator listed on the Transcription. Results Per Page: Specify the number of TIDs that will display per page. InQuiry Emdat Proprietary Page 30 InQuiry October 17, 2012 11.3 Facsimiles Functions Refax Selected Faxes: Queues up selected faxes to send to the same fax number again. Print Selected Faxes: Prints the Transcription as it would appear when faxed. Print Selected Transcriptions: Prints the Transcriptions as they appear in InQuiry. Print Selected Cover Letters: Prints the Cover Letters for selected Transcriptions. Print Selected Envelopes: Prints the Envelopes for selected Transcriptions. 11.4 Grouping and Sorting The listed search results are very customizable so that users can easily find the report based on specific criteria. Grouping Section: Click and Drag an available column to this area to group reports by that column’s criteria. Column Names: Click on a column to sort by that column. Columns can be added or removed using the Choose Column button. The available columns are Status, Patient ID, Patient Name, Author, Fax Recipient, Fax Number, Date Created, Date Faxed, Error Description, Signer, Tran Associate ID, Tran Fax ID, Transcription ID, and Workflow Folder. InQuiry Emdat Proprietary Page 31 InQuiry October 17, 2012 Filtering Row: The Filtering is used to further refine a search for a specific value. To search for a specific value type or use a pull down menu in the appropriate column. The results will automatically refresh when another field is selected or tabbed to. Actions (Filtering Row): The following actions are available in the filtering row: 11.5 o Clear Filters: Available only when filters have been chosen, this button will clear out all specified filters. o Refresh: Refresh search results using newly specified filters. o Choose Columns: Add or remove columns from the Report list. Facsimiles Icons Refax: Queue the fax to resend to the same fax number. Info: Display the Info screen detailed in section 8. Download: Download the TIFF image generated that is sent through the fax service. InQuiry Emdat Proprietary Page 32 InQuiry October 17, 2012 12. Shadow Print Also under the Services Tab, Shadow Print is service that automatically prints transcriptions to a specified printer after the document has passed a trigger point in the workflow. Shadow Print is managed through the InQuiry application and has a manual for installation, configuration, and maintenance. The Shadow Print manual can be found here: https://www.emdat.com/software/shadowprint.asp InQuiry Emdat Proprietary Page 33 InQuiry October 17, 2012 13. InVision The InVision tab contains the administrative reporting tools. By default InQuiry users do not have access to the InVision tab. Access to the InVision tab does not indicate that the user has access to all reports. 13.1 Reports Clicking on a report will take you to the New Report tab. 13.2 New Report Run Now / Configure Schedule Reports can be run immediately or scheduled to run once or on a reoccurring basis. Run now – Select this option to run the selected report now without the results going to the Scheduled Reports tab. Once completed, the report will be presented in a new Internet browser window. Reports can be saved as a file after they are complete. Configure Schedule – Select this option for reports that take longer to run, need to be run on a reoccurring basis, or need to run at a specific time in the future. Reports that are scheduled will appear in the Scheduled Reports tab. Scheduled reports are saved as files and once complete can be downloaded in the Saved Reports tab. Report Parameters The options in this section change depending on what report is selected. Parameters with a red asterisk beside the name are required. Below are some guidelines for date fields: For Reports to be run immediately: enter a date as 'm/d/yyyy', such as 2/25/2010. Or click the Calendar control button and select the date from the pop–up calendar. For Scheduled Reports: Click the down–arrow to select relative system dates. All relative dates are dependent on the date when the report actually runs. After selecting a relative system date, it can be modified by entering plus (+) or minus (–) and the number of days. InQuiry Emdat Proprietary Page 34 InQuiry October 17, 2012 The available relative dates are: o Today – @Today o Yesterday – @Today - 1 o First Day of Current Month – @FirstOfMonth o First Day of Previous Month – @FirstOfPreviousMonth o Last Day of Previous Month – @LastOfPreviousMonth o First Day of Current Quarter – @FirstOfQuarter o First Day of Previous Quarter – @FirstOfPreviousQuarter o Last Day of Previous Quarter – @LastOfPreviousQuarter Report Schedule If Configure Schedule is selected at the top of the window, this section will be available. Schedule Name – Use this field to give the report a unique name that will be recognizable in the list of saved reports. Format – The following formats are available: o CSV – ‘Comma–separated values’ reports contain the raw report data in comma–separated fields. These reports can be opened in Excel. o MHTML – ‘MIME HTML’ reports will open using Internet Explorer when viewed. o PDF – ‘Portable Document Format’ reports will open using your default PDF viewer. o XML – ‘Extensible Markup Language’ reports contain the raw report data in XML format. Active – Use this checkbox to determine if the scheduled report will be active. Inactive reports will still be added to the scheduled reports tab, but will not run automatically. They can still be run manually. Schedule – Select how often the report will run. o Once – The report will run a single time and be added to the user's Saved Reports. Now – The report will run immediately. On – The report will run at the specified date and time. o InQuiry Daily – The report will run every day based on schedule criteria, report will appear in Saved Reports each time the report is run. Also select the time the report will run on the days scheduled. Every __ Day(s) – The report will run every X days depending on the value entered. Maximum entry is every 6 days. Every Weekday – The report will run every weekday. Emdat Proprietary Page 35 InQuiry October 17, 2012 InQuiry o Weekly – The report will run every week based on schedule criteria, report will appear in Saved Reports each time the report is run. You can select what time the report will run on the days scheduled. Every __ Weeks(s) – The report will run every X week depending on the value entered. Maximum entry is every 52 weeks. On – The report will run on the selected day(s) of the week. o Monthly – The report will run every month based on schedule criteria, report will appear in Saved Reports each time the report is run. You can select what time the report will run on the days scheduled. Day(s) __ of every __ month(s) – User can select that the report run on a certain day or days (comma delimited list of days) of every X months. Maximum entry is every 12 months. The __ __ of every __ month(s) – User can select that the report run during a specific week on a specific day of every X months. Maximum entry is every 12 months. Emdat Proprietary Page 36 InQuiry October 17, 2012 13.3 Scheduled Reports This lists the reports scheduled in InVision. The list is very customizable so that a report can be found based on specific criteria. Grouping Section – Click and drag an available column to this area to group reports by that column’s criteria. Column Names – Click on a column to sort by that column. Columns can be added or removed using the Choose Column button discussed below. The available columns are: Category, Last Modified, Modified By, Owner, Owner ID, Is Active, Description, Format, Last Run, Next Run, Status, and Report Filtering Row – This row allows you to input specific information into the available columns to limit results by those criteria. To enter search criteria, type the information or use the pull down menu in the appropriate column. The results will automatically refresh when another field is selected or tabbed to. Actions (Filtering Row) – The following actions are available in the filtering row: o o o InQuiry Clear Filters – This button is only available if there are current filters. This button will clear out all filters that are specified. Refresh – This button will refresh search results using the selected filtering criteria. Choose Columns – This button to add or remove columns from the Report List. Report Information – Use the Plus and Minus buttons to expand or contract information about individual reports or groups. Information about the report, schedule, and specified parameters are available when clicking on an individual report’s row. Emdat Proprietary Page 37 InQuiry October 17, 2012 o o o o o 13.4 Check Box – Use this checkbox to mark the report as Selected. All checkboxes are selected with the button to the left of the Actions column name. Edit Button – Clicking this button opens a new window with options that are the same as InVision > New Report. Changes that are saved will modify the report in the row of the edit button clicked. Copy Button – Clicking this button opens a new window with options that are the same as InVision > New Report. Changes that are saved will create a new report row in the scheduled reports list. Delete Button – This button deletes the scheduled report. To keep a scheduled report, edit it so that it is inactive rather than deleting it. Run Button – This button will run the scheduled report immediately in the same way that selecting Run Now in InVision > New Report would do. Delete Selected / All buttons – Use these buttons to delete selected schedules or all schedules in the current filtered list. Use the checkbox located in the report information to select specific reports for use with the Delete Selected button. Saved Reports This lists the reports that have run based on the schedule in InVision. The list is very customizable so that you can easily find the report based on specific criteria. Grouping Section – Click and drag an available column to this area to group reports by that column’s criteria. Column Names – Click on a column to sort by that column. Columns can be added or removed using the Choose Column button discussed below. The available columns are: Category, Owner, Owner ID, Scheduled, Subscription, Ran, Expires, Description, Format, Status, and Report. Filtering Row – This row allows users to input specific information into the available columns to limit results by those criteria. To enter search criteria, type the information or use the pull down menu in the appropriate column. The results will automatically refresh when a new field is selected or tabbed to. Actions (Filtering Row) – The following actions are available in the filtering row: InQuiry Emdat Proprietary Page 38 InQuiry October 17, 2012 o o o Report Information – Use the Plus and Minus buttons to expand or contract information about individual reports or groups. Clicking the report row will prompt you to download or open the report file. The report file type is specified in the schedule. o o o InQuiry Clear Filters – This button is only available if there are current filters. This button will clear out all filters that are specified. Refresh – This button will refresh search results using the selected filtering criteria. Choose Columns – This button to add or remove columns from the Report List. Check Box – Use this checkbox to mark the report as Selected. You can select all checkboxes with the button to the left of the Actions column name. Delete Button – This button will delete the scheduled report. To keep the scheduled report, edit it so that it is inactive rather than deleting it. Download Button – This button will prompt you to download or open the report file. The report file type is specified in the schedule. Delete Selected / All buttons – Use these buttons to delete selected schedules or all schedules in the current filtered list. Use the checkbox located in the report information to select specific reports for use with the Delete Selected button. Emdat Proprietary Page 39 InQuiry October 17, 2012 14. My Templates My Templates navigation tab allows dictating users to create and modify document templates to suit specific needs. Creating document templates assists the Medical Transcriptionists in creating completed documents quickly and accurately. Additionally, it helps ensure that documents are uniform and complete. The My Templates navigation tab consists of four sub tabs and is inactive by default. 14.1 Welcome The Welcome tab is intended for new users and provides a brief overview of the My Templates tab. Users can select a specialty on this page or leave it unchanged from the default of ‘General.’ Choosing a specialty allows the user to select from a library of sample or default document templates in the Document Templates and Dictation Templates sub tabs. Note that on most My Templates screens a Silverlight audio player is available to guide users through the functionality of the page. Users who do not have Microsoft Silverlight installed will be prompted to install it before the audio tutorials can be played. 14.2 Document Templates Document Templates establish a framework for the Medical Transcriptionist to work in. When a typist first receives a dictation, it is also downloaded with the associated document template. After selecting a specialty from the Welcome sub tab a list of available Document Types are displayed. Each document type can have multiple document templates, one for each location. Alternately, a single document template can be created for all locations or any combination. InQuiry Emdat Proprietary Page 40 InQuiry October 17, 2012 To begin editing, select one document type from the list and choose next. At the top of the window the Document Type and Location are indicated in red. On the left, locations that have document template associated with them are listed. Selecting a location in this window will open the associated template in the edit window. Add: Select to add a location to the list of available templates. Copy: Select to copy the document template of one location to another. Remove: Deletes the location and the template associated with it. Choose Template from Global Library: Opens the template library associated with the specialty selected (if any) on the Welcome sub tab. Choosing a template will overwrite any existing text. Document templates in the Library can be previewed before updating the existing template. The Document Template can be further modified by using the editor window. All of the tools available in the Transcription Editor are available to use when modifying a Document Template. 14.3 Dictation Templates Dictation Templates are similar to Document Templates except that they are not associated with any particular Document Type or Location. Dictation Templates are also sometimes called “Normals” and can be inserted at any time into any document. At the top of the window the Dictation Template selected is indicated in red. InQuiry Emdat Proprietary Page 41 InQuiry October 17, 2012 Existing Dictation Templates are listed on the left. Selecting a Dictation Template will open the template in the editor window. Add: Select to add a new Dictation Template. Copy: Copy an existing Dictation Template to a new name. Remove: Deletes the Dictation Template. Note that dictation templates that are available to all dictating users cannot be deleted. The Dictation Template can be further modified by using the editor window. All of the tools available in the Transcription Editor are available to use when modifying a Dictation Template. 14.4 Print Your Templates Print Your Templates will allow users to print out their dictation and document templates for review or personal records. Document Templates, Dictation Templates or both can be printed. If a user selects multiple documents to edit in the Document Templates sub tab, the user has the option of printing only those templates. InQuiry Emdat Proprietary Page 42 InQuiry October 17, 2012 15. Removing InQuiry Components Remove InQuiry components by accessing the Control Panel and Add/Remove Programs (Windows XP) or Programs and Features (Windows Vista and 7) Section. Locate the application EMDAT Runtime Components and choose the option to Uninstall. InQuiry Emdat Proprietary Page 43 InQuiry October 17, 2012 16. Support We offer the following support options in the event that you need further assistance with InQuiry: Emdat Knowledge Base Home: www.emdathelp.com Help Desk Request: www.emdat.com/ticket Phone Support - (608) 270-6400 ext. 1 (Help Desk support is provided weekdays 7AM - 7PM CST) InQuiry Emdat Proprietary Page 44