1
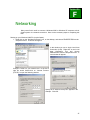
Orator Digital Dictation System User’s Manual Software Version 4x Bytescribe Development Company 3603 Pine Lane SE Suite C Bessemer, AL 35202 2 Table of Contents Letter from Bytescribe Development Company 5 Chapter 1 – System Setup Initial Setup of the Orator System Adding Users Configuration Settings Job Types System Optimization Your Orator and The Internet System Backup System Fault Tolerance System Maintenance 7 7 8 8 8 8 9 9 10 10 Chapter 2 – Creating and Editing User Profiles The Orator Users Window Adding a User Profile Editing and Deleting a User Profile 11 11 12 14 Chapter 3 – Orator Operation and Management Management File Menu Options Menu Help Menu 15 16 16 16 Chapter 4 – Viewing and Managing Dictation Files Changing Job Status Changing Job Type Creating Reports Organizing the Dictation Browser 17 19 20 20 20 Chapter 5 – Orator Configuration Configuration Settings 21 21 Chapter 6 – Dictation Features Dictation Functions Description of the Dictation Functions About Location Codes 27 27 28 29 Chapter 7 – Transcription Features Transcription Functions Description of the Transcription Functions About Location Codes 31 31 32 33 Appendix A – Export Utility Appendix B – Internet File Transfer Appendix C – Custom Prompts Appendix D – Using a Hunt Group (Rollover) Appendix E – Printer Installation Appendix F – Networking Appendix G – Network Topography Topography Appendix H – The ReRecording Manager 35 39 41 43 45 47 53 55 Frequently Asked Questions 57 Troubleshooting 59 3 This Page Intentionally Left Blank 4 Dear Orator User, Thank you for joining the many companies who are currently operating successful transcription services with the Orator Dictation System as the hub of their operations. We believe that you will share their high level of satisfaction by integrating the Orator System into your present workflow. If you are establishing a new company at this time, let us offer sincere congratulations to you and say that Bytescribe Development Company will work with you in every way to insure that your new dictation system performs in a manner pleasing to you. The Orator is a reliable alternative to other dictation systems; providing necessary features and services at a reasonable cost. Bytescribe also provides features for the transfer of voice files over the Internet. The Export Utility converts files from the native Orator file format into compressed TrueSpeech files that are suitable for Internet or modem transfer. With little additional setup, you can upload your TrueSpeech files to an FTP site with DocShuttle, a file transfer solution developed by Bytescribe. This allows any transcriptionist with Internet access to transcribe dictation exported from the Orator. The export utility can also be configured to distribute files over a local area network. This is just one example of the many ways your new Orator system can serve your dictation and transcription needs. We’re sure you are ready to begin setting up your new Orator system, so let us say thank you again and best wishes for your company. Bytescribe Development Company 5 This Page Intentionally Left Blank 6 Chapter 1 System Setup This chapter describes the steps necessary to set up and configure the Orator dictation system. Upon receiving the system, the computer and monitor should be unboxed and set up on a desk or countertop. All appropriate cables and phone lines should be connected. Once the system is started and the Orator program is running, it is necessary to set up the users to the system and change any desired configuration settings. System optimization and maintenance is also discussed in this chapter. Initial Setup of the Orator System Below is listed a set of Quick Start Instructions for setting up the Orator system. Use this checklist as a guide, after removing the Orator system from the shipping box, for completing your system setup. Review the Inventory Checklist to insure that you have received all items marked as shipped. Remove the tray containing the manual, cables, keyboard and software. DO NOT PLUG POWER CABLES INTO WALL OUTLETS BEFORE CONNECTING TO DEVICES. Remove the Orator system from the box and place the system on a desk or counter or other elevated location. The system will perform better over a long period of time if the system is located in an area free from dust, smoke and debris (carpet fiber, hair, etc.). Unpack the monitor (if included) and place it near to the Orator system. Connect the power cord, keyboard, and mouse to the Orator system. Connect the monitor power cord to the monitor. Connect the monitor cable to the video adapter socket on the back of the Orator system. Plug the power cords into a UPS (Uninterruptible Power Supply) or an electrical outlet. A UPS is highly recommended (see FAQ regarding UPS installation). Connect all phone lines. Also connect a network cable to the system if applicable. Do not attach a printer to the Orator at this time, but see the instructions for doing so in the appendix. Start the Orator system by pressing the power button on the front. If the system doesn’t start, follow the troubleshooting options in the appendix. NOTE: The system may start when plugged into a wall outlet or UPS. This is normal, as the system has a feature to restart after a power failure. The system begins to boot after the power switch is depressed. Once the system has fully booted and all drivers are fully initialized, the main Orator window will appear on the screen. 7 Adding Users Before a user can dictate or transcribe from the Orator system, a User Profile for the user must be created. Click the User List button on the main Orator window to add, modify or delete a Orator user. A user can be a dictator or transcriptionist. Adding new users is simple and only takes a moment. User Profiles are discussed in detail in Chapter 2. Configuration Settings There are a number of configuration settings within the Orator system that may be modified to suite the needs of a particular facility. The Orator system is initially configured with the default values for these settings. Global settings, which affect all users on the system, can be modified by selecting Options | Settings from the main Orator menu. For details about global configuration settings, see Chapter 5. Individual user settings, which only affect a single user, may be modified in the User Profile. For details about individual settings and user profiles, please see Chapter 2. Job Types Recorded dictation is stored in folders labeled “Typex” with x representing the number of the Type folder. In this manner the system administrator can segregate the dictation of physicians, departments, clinics, etc. These folders cannot be renamed, but the number of folders required can be expanded from the default of nine types to a maximum of 99 types. See Chapter 5 for instructions in changing the number of job types. System Optimization All Orator systems are delivered optimally configured. In order to maintain maximum stability and up-time it is best to leave the system in its original configuration. This configuration has been developed both from the feedback of our customers as well as from extensive testing by Bytescribe. You can further promote system stability by: 8 • not loading any additional software to the system that is not approved by Bytescribe. Loading additional software may impede performance of the system and potentially void any warranties that apply. • avoiding screen savers. Most screen savers prove to require significant resource requirements. A blank screen saver or no screen saver is preferred. • not installing virus protection programs. Since many dictation systems run continually, it is necessary to consider system performance when no one is present at the computer. Most virus protection programs are intrusive themselves, requiring high system resources during their scans. Virus programs by default run continually in the background. To protect Orator performance, run virus protection programs on another computer that is networked to the Orator system. Virus protection programs can scan files on another networked computer with the same degree of thoroughness. • not modifying the power management settings, which can cause the hard drives to go into a sleep mode when idle for long periods. • leaving windows update utility disabled. Because the Orator system has already been optimized there is no need for the update utility to be enabled. This utility requires an internet connection which poses a high risk of predatory activity or virus infection via the Internet. Your Orator System and the Internet As a business owner, you most likely have some type of Internet connection for your company. In most cases this connection to the Internet is in the form of broadband (Cable Modem or DSL) service. Unlike “dialup” Internet service, broadband Internet service requires the business owner to be responsible in maintaining security of all systems connected to the service within their own site. This is because broadband Internet service basically connects together all computers on a network segment in that they can more easily “see” each other. Potentially, someone on an Internet network segment can discover how to hack into these visible systems by defeating a computer’s security settings in order to run software, store or delete files, or introduce viruses. If you are currently using broadband connection to the Internet, please review the following safeguards. Following these guidelines will not only protect the extremely sensitive medical data that will be stored on your system, but will promote the stability and consistent performance of your dictation system. • Your Orator system is configured to be a “stand-alone” system. This means that it functions best in its existing configuration and doesn’t require any operating system updates, patches, or hot fixes. The Windows update utility has been disabled in order to maintain the existing system configuration you have now. Your new system will continue to function in the same manner as when you first install it as long as you not install new software or modify the existing system configuration. • Your Orator system should NOT be connected to a network hub that provides internet connectivity to other computers. Because many Orator administrators need to transfer dictation to transcripionists via the internet, it is important to understand that there are many networking solutions that allow you to transfer your dictation files over the Internet and still maintain security of your Orator system. Please refer to the Appendix G – Network Topography for a proven secure solution. • Bytescribe offers technical support to our customers via a remote connection by dialing into your system at your request via a standard phone line. In some cases, however, customers have the knowledge and ability to set up their own remote connectivity via pcAnywhere or other remote control software. This connectivity may be via a dial-up connection similar to the remote control method used by Bytescribe, but it may be desirable by some customers to connect remotely via the Internet. While this is possible, a remote connection via the Internet can be difficult to secure because it requires the system to be visible on the Internet. For these security reasons Bytescribe promotes the use of a dial-up connection for all remote support and administration. System Backup You should give consideration to maintaining a backup of your recorded voice files. There are thirdparty applications that back files up to recordable media like CD/DVD-ROM disks or to tape. Also you could back your files up on another computer that is networked to your dictation computer. Also, determine the length of time necessary to archive these files before permanently deleting them. This will almost always be dictated by the amount of free disk space available if not burning the files onto recordable media. 9 System Fault Tolerance Some Orator systems come with mirrored hard drives and a Restore Image. Drive mirroring translated means there is real-time duplication of all data on two drives. If one drive stops functioning, the remaining functional drive will continue to keep the system up and running until the failed drive can be replaced. This protects the system in the event of hardware failure. Drive mirroring does not protect a system from software corruption. If the operating system is corrupted by viruses or other third-party software, the resolution is a complete replacement of the system files, which can be accomplished via the System Restore CD. Refer to the previous pages to protect your system from software corruption. System Maintenance Basic maintenance procedures can prolong the life of the Orator system and improve system performance. Some basic maintenance issues to consider are the following: • Use an Uninterruptible Power Supply. Using a UPS will prevent power surges and voltage spikes from damaging your system, as well as provide continuous power to your system in the event of a power outage in your area. Weather related damage to the system is not covered by warranty. If possible, use surge protectors on phone lines since damaging voltage spikes can travel on phone lines as well. Disconnect phone lines during electrical storms. • Place the Orator System in a cool and clean location. Locating the system at an elevated location, like a table, can help in preventing dust from collecting in the power supply fan and other internal components. This will promote airflow through the system, prolonging the life of the system. • Keep your Orator system clean. Occasionally turn the system off and remove the computer cover to clean the system. Using a can of compressed air, available at office supply stores, blow out any dust from the interior of the system. The CPU fan and chassis fans are located inside, while the power supply fan vents out the back of the computer Do NOT use a household vacuum cleaner or similar device attachments to remove dust from the system. Doing so could potentially damage the system as the suction can generate static electricity. • Reboot your system at least every two weeks. Do this successfully by clicking the START button at the lower left corner of the screen, then click Shut Down… and in the window that appears choose “Shut down” in the field. Finally, click OK. The Limited Warranty and the Support Agreement included with the shipped Orator system stipulates that no additional software should be installed on an Orator system without the approval of Bytescribe Development Company. Unauthorized software installation constitutes the voiding of any warranty covering the successful functionality of the Orator system. A hardware peripheral device (keyboard, external storage device, USB device, etc.) may be added to the Orator system as long as software is not required to be installed as well. Before removing or changing any system hardware you should speak with a technical support representative at Bytescribe. Doing so without first contacting Bytescribe can void your warranty. You should not install additional screen saver files or modify the existing settings. Doing so could impede performance and potentially introduce a virus into the system. There are predatory programs that pose as screen savers and you should always be cautious of any program you may find on the Internet for download. 10 Chapter 2 User Profiles Each dictator and transcriptionist using the Orator system must have a User Profile. A User Profile normally includes a unique 4-digit ID necessary for the user to access to the system when calling in. Other fields in the User Profile include User Name, Default Job Type, Backspace and Rewind Intervals, and several other individual settings. A User Profile is easy to create. The Orator Users Window Shown below is the Orator Users window. This window can be seen by clicking the User List button on the main Orator menu. The Orator Users window lists all users and displays individual settings for each user. Users can be added, deleted or edited using the buttons at the bottom of the window or by right-mouse-clicking on a user in the list and selecting options from a pop-up menu that appears. A report of all users can be created by selecting File | Create Report from the Orator Users menu. Orator Users Window Icons, appearing by the user name, represent either a Dictator or transcriptionist. The window can be sorted by clicking any column header. Clicking the ID column header once, for example, will sort the window in ascending numeric ID order. Clicking the ID column header again will sort the window in descending numeric ID order. 11 Adding a User Profile To create a new User Profile, click the Add button at the bottom of the Orator Users window. This will display the Add New Users window shown below. Simply fill in the fields shown and click the OK button. The only mandatory fields are the User Name and 4-Digit User ID fields. If a value is not entered in a field, a default value will be used by the Orator system. Add New User Window A brief description of each field is discussed below. User Type: The user type options are Dictator or Transcriptionist. When a user calls into the Orator system, the user is prompted for a 4-digit ID. Based on the ID code entered, the system identifies the user as either a Dictator or Transcriptionist and prompts the user accordingly. User Name: The user name is used in reports to identify dictation jobs that have been dictated or transcribed by the user. ID Number: Each user must be assigned a unique ID number in order to have access when calling the system. The system responds to the user based on the ID and other settings in the User Profile. The default number of digits in the ID is four. Default Job Type: The Orator system organizes dictation files based on job type. Job types are folders within the Orator system that separate dictation. If a dictator is assigned a default job type, he will not be prompted to select a job type when calling into the system. Reports will be recorded directly into the default job type folder. Likewise, if assigned a default job type, a transcriptionist will not be prompted for a job type before receiving jobs in the particular type folder. Backspace Interval: The backspace interval determines how far back in a job a user will be placed when selecting the Backspace function (either by pressing a telephone key or by releasing the foot pedal of a transcribe station). The units are deciseconds meaning that 10 units = 1 second. Valid values range from 0 to 99 (or rather from 0 sec to 10 sec). 12 Rewind Interval: The rewind interval determines how far back in a job a user will be placed when selecting the Rewind function (either by pressing a telephone key or by pressing the Rewind foot pedal of a transcribe station). The units are deciseconds meaning that 10 units = 1 second. Valid values range from 0 to 99 (or rather from 0 sec to 10 sec). Location Code: A two-digit location code can be entered in this field. This code can be used to segregate a physician’s dictation for two or more different locations (hospitals, clinics, etc.). This feature is explained in greater detail in Chapter 6 – Dictation Features, and Chapter 7 – Transcription Features. Custom Key Mapping: Users who use a non-standard dictate or transcribe station with the Orator system may need to change the key mapping in the User Profile. For example, if a user is using a Dictaphone Dictate Station that sends a D tone when pressing the Record button, the D tone needs to be recognized as the Record function. The Custom Key Mapping window is shown below. This window is displayed when clicking the button next to the Custom Key Mapping field in the Add New Users window. A drop down menu is below each telephone touch-tone. Simply select the function that you wish to have associated with the tone. NOTE: Modifying a key mapping does NOT automatically modify the system voice prompts. Custom Key Mapping Window User must enter medical record numbers: This setting applies only to dictators. If this checkbox is selected, the user will be prompted to enter the patient medical record number before each new dictation job. The medical record number is stored with the job filename. If needed, this field can be used to store a birthday or other identifying number. See Appendix G-Creating Custom Prompts. Prompt user to verify medical record numbers: If this checkbox is selected, the physician will be prompted to re-enter the patient medical record number to verify accuracy of the number. If entered incorrectly the physician will not be allowed to begin dictation and the system will return to the original prompt for medical record number. 13 Play user confirmation prompt after login: This setting applies only to dictators. If this checkbox is selected, a prompt indicating the user’s name will be played to confirm that the user entered the correct user ID. However, the physician will need to record a name before it can be played back. To record a name first login using the assigned ID number, then enter a job type. The dictator will then be prompted to press two (2) to begin recording or star (*) for more options. Press star (*) then press two (2) and then one (1) to begin recording. End recording by pressing pound (#). Follow voice prompts to return, or hang up. Editing a User Profile Any User Profile may be edited by double clicking on the user in the user list, or by highlighting a user and clicking the Edit button. Any of the fields may then be edited. Click the OK button when finished. Deleting a User Profile To delete a user, select the user you wish to delete and click the Delete button. You will be prompted to confirm the deletion. 14 Chapter 3 Orator Operation and Management This chapter describes the information that appears on the main Orator screen and the function of each menu option. The Orator Digital Dictation System window is shown below. This main window displays all system activity. User List Dictation Browser History Reports Help File Orator System Window Orator is scalable up to 120 analog ports or 144 digital ports within a single system. The main window displays each available port and its current status. The data group at the bottom of the window shows the number of voice files waiting to be transcribed, the combined file size of these files, and the total backlog time in one minute intervals. Free Disk is the amount of hard drive space remaining to receive new dictation files. Total Disk is the current maximum amount of hard drive space which both used and free disk space. Total Disk can increase by replacing the existing drives with larger capacity drives. 15 Menu Options and their Functions This section describes each Orator menu option and its function. Each menu option may be selected by clicking it with a mouse. File Menu Exit This menu option will close and exit the Orator program. The system will not receive calls or allow dictation or transcription if the main Orator window is closed. To restart the Orator program after it has been closed, double-click the Orator icon on the desktop on in the desktop tray. Options Menu Dictation Browser This menu option will open the Dictation Browser discussed in Chapter 4. The Dictation Browser will display all dictated voice files on the system. Using this window, you may change the status of jobs, run reports, move jobs to different job types, and sort the job list by different columns. For more details about managing dictation jobs, see Chapter 4. User List This menu option opens the Orator Users window discussed in Chapter 2. It is used to create and manage User Profiles for all system users. Users can be dictators or transcriptionists. Each user requires a unique 4-digit ID. A User Profile also contains custom settings for the individual. For details about setting up new users, see Chapter 2. History Reports A report generator, able to sort and screen using a variety of variables. Settings This menu option will open the Configuration Settings window. Custom settings that affect the operation of the Orator system appear in the Configuration Settings window. If changes are made to the system settings, the Orator program must be restarted before changes will take effect. System configuration settings are discussed in detail in Chapter 5. Help Menu Contents This menu option displays the Orator Help window. The Orator Help is a standard Microsoft Windows help file that includes detailed information about the Orator system. About The About window displays version and copyright information about the Orator software. 16 Chapter 4 Viewing and Managing Dictation Files Dictated reports are stored on the Orator system as voice files. The dictated voice files are often referred to as jobs. To view the voice files on the system, select the Options | Voice Files menu option from the main Orator window. The Dictation Browser shown below will appear. Orator Browser Window The Dictation Browser window allows you to: • • • • change the status of dictation jobs move jobs to different job types run standard and custom reports sort jobs by any of the columns shown The status bar at the bottom of the Browser window displays the number of selected files and their total size and length. Multiple files may by selected by holding down the Ctrl key and clicking various files. The status or job type of selected files can be changed by right-mouse-clicking on the selected jobs and choosing appropriate options from the pop-up menu that appears. Any column may be sorted by clicking on the column header at the top of each column. Descriptions of the columns are explained on the following page. 17 The Dictation Browser window contains ten columns of information about each voice file. description of each column is shown below. A 1) File Name The voice files are named using the following convention: S MMDD-NNN DDDD TTTT LL RRRRRR.vox. The beginning letter of the voice file indicates the status (S) of the voice file. The table below shows the types of initial letters and the corresponding significance of the letter as pertaining to the file status. Letter N S D P A Status New (Ready to be transcribed) Stat Dictation (Priority Dictation) Completed Pending (Dictation not complete) Aborted The next segment of the file name (MMDD-NNN) is the job number. The job number is a combination of the date and sequence of the dictated file. Month and day MMDD are followed by dash (-) and then the sequence number. For example, a job number 1204-002 would indicate the second file dictated on December 04. The next segment (DDDD) of the file name is the four-digit code of the dictating author. The following segment (TTTT) indicates the four-digit code of the transcriptionist who typed the file. The next segment (LL) indicates the two-digit location code (if utilized). The final segment (RRRRRR) is the medical record number entered (if applicable). The last portion of the file (.vox) is the file extension. 2) Medical Record Number If the dictator for a given job entered a medical record number, it will appear in this column. Dictators may or may not be prompted to enter a medical record number before each dictation job, depending upon how the dictator was created in the User Profile. See Chapter 2 – Creating and Editing User Profiles for an explanation of this setting. 3) Status This column denotes the current job status for each file. This concurs with the first letter of the file name. The possible job status categories are: New Stat (Priority Dictation) Completed Pending (Dictation not complete) Aborted Completed and Aborted jobs will be purged from the system after a set number of days. The PurgeDays parameter in the system configuration file determines this period of time. For more information, see Chapter 5. 4) Job This is a unique number by which any file may be found. The naming convention is as follows: The first four numbers represent the month and day (MMDD) followed by dash (-) and then the sequence number. For example, a job number 1204-002 would indicate the second file dictated on December 04. 18 5) Job Type The next column is the job type selected by the dictator. Job types are used to separate various types of dictation. When a dictator logs onto the system, he is prompted to select a job type – or his User Profile will specify a default job type. Jobs recorded by the dictator are marked with that particular job type. Transcriptionists may then work on dictation of a particular type. The administrator may change the job type of a particular job at any time once the dictation has been completed. By right-mouse-clicking on a selected job or group of jobs, a pop-up menu will appear allowing the administrator to change the job type. 6) Dictator This column displays the user’s name that recorded the dictation. 7) Transcriber The name in this column indicates the person who is transcribing the file. Note that this column will only have an entry when a transcriptionist has started or finished transcribing the file. 8) Location Code This code indicates the location of the dictator according to his/her User Profile. 9) Size This column specifies the amount of disk space used by the particular voice file. 10) Length This column specifies the length of the voice file in minutes and seconds. 11) Date Dictated This column specifies the date and time the voice file was started by the physician. The date is shown in the standard MM/DD/YY format. The time is displayed as hours:minutes:seconds followed by AM or PM. This field does not change. 12) Date Modified This column specifies the date and time the voice file was modified by a physician or transcriptionist. The date is shown in the standard MM/DD/YY format. The time is displayed as hours:minutes:seconds followed by AM or PM. This field will change. Changing Job Status The administrator of the system may change the status of any voice file. A job will have one of the following statuses: Pending, New, Stat, Completed or Aborted. To change the status of a job, simply right-mouse click on the job you wish to change and select Change Status To from the pop-up menu that appears. Then select the status that you wish. You may change the status of multiple jobs by first highlighting the jobs and then right-mouse clicking on the selected jobs and choosing from the pop-up menu. You may highlight multiple files by holding down the Ctrl key while clicking the desired jobs. 19 Changing Job Type The job type for a particular dictation file designates how that dictation has been grouped. It may be desirable for all of one dictator’s work to be in a particular job type, or it may be desirable to have similar dictation reports grouped together by a particular work type (i.e. Discharge Summaries, History and Physicals, Consultations, etc.). Grouping dictation together by job type allows a transcriptionist to receive work in her queue by particular type. To change the job type for a job or group of jobs, you may rightmouse-click on the selected job(s). A pop-up menu will appear allowing you to select a different job type. Creating Reports The Dictation Browser allows the user to create standard and custom reports. Standard reports may be selected from the Reports menu option. A quick report can be generated by highlighting any jobs you wish to list in the report and then choosing Reports | Quick Report from the Dictation Browser menu. This is a powerful way of creating most any type of report. Another method of report generation is the Custom Report option. If you would like a report showing all dictation jobs completed for a particular transcriptionist (for example), you would do the following: Choose Reports | Custom Report (see left), then select the dictator name from the drop-down list, then click the Create button. More than one field can be used in this window to further define your report criteria. You can also import records into Microsoft Excel. Simply hold the Control button on your keyboard, highlight the desired jobs and select Reports | Export to Excel from the Dictation Browser menu. This will create a file called report1.csv. If Microsoft Excel is installed on the computer, Excel will automatically open the report. Otherwise, the report file will be created in the installation directory (E:\Dictation System). Organizing the Dictation Browser The Dictation Browser window can be sorted to organize the files listed in any order you choose. The column headers act as sorting buttons for items in that specific column. Click on the header once to sort all files in ascending order (first to last), or click a second time to sort all files in descending order (last to first). The number “1” and the letter “A” are the lowest values, so sorting in ascending order would place these values first on the listing. More than one column can be selected, which composes a primary and then a secondary sort. For example, if you first click the “Type” header to sort all files by job type in ascending order, then click the “Dictator” header to sort the Dictator names, the browser will display all files by job type and within each job type the files will be listed by Dictator name from A to Z. Experiment with this to become familiar with its functionality. 20 Chapter 5 Orator Configuration This chapter describes the steps necessary to configure the Orator Dictation System. Configuration settings are used by the Orator at startup to determine how it will function. These configuration settings may be modified using the Configuration Settings window. Configuration Settings The system configuration settings can be viewed and edited by selecting Options | Settings from the main Orator menu. Selecting this option opens the Configuration Settings window. Shown in the window are several startup parameters for the program. Some sample settings are shown below: Orator Configuration Settings Window 21 The values to the right of each parameter can be changed if necessary. The function of each parameter is described in the table below. If a value is edited, the program must be restarted before the changes will take effect. If a parameter is not present in the configuration file, a default value for the setting is used by the system. Parameter: Default Value: Range of Values: Description: Notes: NumRings 1 1–9 Sets the number of rings before the system will answer a call. Parameter: Default Value: Range of Values: Description: Notes: PurgeDays 30 1 – 365 Sets the number of days at which files will be purged from the system. Files purged will have Completed, Deleted or Aborted status. Parameter: Default Value: Range of Values: Description: Notes: KeyMapDict pcr-sefbtmjh---- KeyMapDict = Sets the global settings for key pad functions for dictators. String will always be 16 characters long. Multiple keys can have same function. Chart below describes possible values. 1 2 3 4 5 6 7 8 9 * 0 # a b c d p c r - s e f b t m j h - - - - Possible Values for Each Key Function play record rewind pause save end of file fast forward beginning of file abort menu job type header prompt – job number quick save disconnect 22 p c r a or s e f b t m j h q d Parameter: Default Value: Range of Values: Description: Notes: KeyMapDict = KeyMapTran -phrsfbcedjuprfSets the global settings for key pad functions for transcriptionists. String will always be 16 characters long. Multiple keys can have same function. Chart below describes possible values. DAC transcribe stations use the a, b, c, 1 tones for play, rewind, fast forward and pause respectively. 1 2 3 4 5 6 7 8 9 * 0 # a b c d - p h r s f b c e d j u p r f - Possible Values for Each Key Function pause play header prompt rewind skip fast forward beginning of file complete end of file speed down job type speed up a or p h r s f b c e d j u Parameter: Default Value: Range of Values: Description: Notes: RecFormat 5 4-6 Sets the recording format for all sound files recorded by Orator system. If value=4, format is 6KHz ADPCM. If value=5, format is 8KHz PCM. If value=6, format is 8KHz ADPCM. All sound files have .vox extensions when recorded. When files are being converted to .wav file format, the value is generally set to 5. Parameter: Default Value: Range of Values: Description: Notes: JobTypes 9 1 – 99 Sets the number of Job Types recognized by the Orator system. Each Job Type is a separate folder on the computer hard drive where dictation files are stored. Folders are named Type1, Type2, etc. These type folders are used to separate dictation files for better organization. If the number of Job Types is greater than 9, users will be prompted to enter a 2-digit job number. 23 Parameter: Default Value: Range of Values: Description: Notes: Volume 0 0-2 Sets the overall volume for the system. A value=0 is normal volume, value=1 is louder, value=2 is loudest. Parameter: Default Value: Range of Values: Description: CloseOnHangup 0 0 or 1 Determines whether a job is forced to New status if a dictator terminates by hanging up a call without pressing 5 to complete. If value=0, a hang up will leave a job in Pending status. If value=1, a hang up will leave a job in New status. Notes: Parameter: Default Value: Range of Values: Description: Notes: Parameter: Default Value: Range of Values: Description: Notes: Parameter: Default Value: Range of Values: Description: Notes: Parameter: Default Value: Range of Values: Description: Notes: Parameter: Default Value: Range of Values: Description: 24 CloseOnlyAtEnd 0 0 or 1 Determines whether a transcriptionist must be at the end of a dictation before signing off a job. If value=0, a transcriptionist can sign off a job at any time by pressing 8. If value=1, a transcriptionist can only sign off a job by pressing 8 is he/she is at the end of the dictation. Otherwise 8 has no effect. TimeOut 0 0 - 999 Sets a limit of time at which a line would be reset if inactive. TimeOut value is in 10 second increments (i.e. TimeOut=12 equals 120 seconds). If value=0, function is disabled. If value > 1, system monitors activity on each line. If the interval of inactivity = TimeOut value, the line is reset. JumpAhead 0 0 - 99 Sets the number of seconds that the JumpAhead key moves forward through the current dictation job. This is a transcription function only. This is basically a rapid fast forward function. If the JumpAhead value=20, pressing the corresponding key would enable a transcriptionists to move 20 seconds ahead through a dictation job by pressing the key. NoiseThreshold 0 0 - 999 Determines the period of time for which a loop current drop must be present on a line before it is recognized as a disconnect signal. Values are in 10ms units (i.e. 500 = 5 seconds) The NoiseThreshold parameter is used to make all ports on a system less sensitive to erroneous loop current drops due to noise on a line. This setting will prevent unexpected disconnects during dictation. IdlePrompt 0 0 or 1 Determines if user is prompted to record when in idle mode. Parameter: Default Value: Range of Values: Description: Notes: Parameter: Default Value: Range of Values: Description: Notes: Parameter: Default Value: Range of Values: Description: Notes: Parameter: Default Value: Range of Values: Description: Notes: Parameter: Default Value: Range of Values: Description: Notes: Parameter: Default Value: Range of Values: Description: ErrorLog 0 0 or 1 Determines whether an error log of system events is created. Value=1 enables creation of the log; value=0 disables creation. Log is saved as errorlog.txt in the installation directory. Errors that are recorded include unexpected line events, erroneous ID entry, program shutdown and various system events. ClearPrevUser 0 0 or 1 Setting that allows a user to log into the system when the user’s ID is being used on another port. If the user logs in on a new port, the same user ID will be cleared from any previous port. This setting is useful if a system does not always clear a line after the user has disconnected. Without this setting, the user would hear “User already logged on” if the user dialed in previously and the line did not clear. It is important that no two users share an ID if using this setting. RecordIdleInterval 300 0 - 600 Sets the number of seconds of silence after which recording will terminate. By default, recording will terminate after 300 seconds (5 minutes) of silence. The limit of silence can be modified with this parameter. ContRewFFwd 1 0 or 1 Determines whether there is an incremental rewind or fast forward if the foot pedal is pressed and held. This value should be 1 for DAC and Dictaphone Transcribe Stations and the value should be 0 for PC-Dart stations. PC-Dart stations send repeated tones to the system as the foot pedal is depressed, so the incremental rewind/ffwd function is accomplished a different way. CompleteStatus C C or D Determines whether jobs signed off by a transcriptionist have a Completed status or a Deleted status. The Deleted (D) status is for backward compatibility. This parameter also affects the Browser window. Register Unique registration number for Orator system. 25 This page intentionally left blank 26 Chapter 6 Dictation Features This chapter describes the available functions that a dictator may use while dictating on the Orator system. To access the Orator system in dictate mode, the dictator must call the system from a standard touch-tone phone. The dictation system will answer with the default prompt “Please enter your 4-digit ID at any time” unless the Orator administrator has customized the welcome prompt. The dictator will enter a unique ID code assigned to him by the administrator. The dictator may then be prompted to select a job type or to enter the medical record number for the first job – depending on settings in the dictator’s User Profile. If the user has a pending dictation file that has not been completed, the user will be notified of this with voice prompts. Once the requested information has been entered, the dictator will be in dictate mode, meaning that he can begin recording. At this point he may use any of the functions outlined in this chapter. Dictation Functions The chart below shows the dictation functions available and their corresponding telephone touch-tones. (1) (2) (3) Play Record Rewind (4) (5) (6) Pause Save File End of File (7) (8) (9) Fast Forward Beginning of File Abort Job (*) (0) (#) Additional Menu Options Select Job Type Job Number Prompt Dictate Pad Template 27 Description of the Dictation Functions (1) PLAY Press 1 on the telephone keypad to play back recorded dictation. This function rewinds approximately one second and can be pressed multiple times. To rewind in longer increments of time before playing back the dictation, use the Rewind function (3) or the Beginning of File function (8). (2) RECORD Press 2 on the telephone keypad to begin recording dictation. A tone will sound alerting you that recording has begun. The record function begins recording at the current position of the voice file so that it is important to be positioned at the end of a file when recording unless you wish to insert dictation. (3) REWIND (Review) Press 3 on the telephone keypad to rewind 3 seconds and play back dictation. This can be pressed repeatedly to rewind incremental amounts. (4) PAUSE Press 4 on the telephone keypad to pause dictation. Pausing dictation puts the line in idle mode. While the line is idle, a clicking sound is audible. (5) SAVE Press 5 on the telephone keypad to save the current dictation. Pressing this option will prompt you to save the job as normal priority dictation or “stat” (high) priority dictation. Select the appropriate option to complete the job. Once dictation has been saved, it is ready to be transcribed and cannot again be retrieved by the author. (6) END OF FILE Press 6 on the telephone keypad to move to the end of the current dictation file. It is important to move to the end of a file when appending dictation so that previous dictation is not overwritten. (7) FAST FORWARD Press 7 on the telephone keypad to fast forward through the dictation. Using this function advances the current position 3 seconds and continues playing the dictation. (8) BEGINNING OF FILE Press 8 on the telephone keypad to move to the beginning of the current dictation file. This is used before playing back the entire file. (9) ABORT JOB Press 9 on the telephone keypad to abort the current dictation file. 28 (*) ADDITIONAL MENU OPTIONS Press * on the telephone keypad hear additional menu options. These options are summarized below. *1 – Search for dictation by medical record number. ** – Find the next occurrence of a search by medical record number and 5 to exit this mode *2 – Record the user’s name into a prompt. This prompt is played back to the transcriptionists to identify the dictator. *7 – Change job types. *3 – Return to previous menu. (0) SELECT JOB TYPE Press 0 on the telephone keypad to select a different job type. Job types are a way of grouping dictation files of similar type. The number of job types can be customized in the configuration file – see the section on Configuration Settings in Chapter 5. (#) JOB NUMBER PROMPT Press # on the telephone keypad to play the header prompt indicating the job number of the job currently being dictated. This unique job number can be used later to retrieve this current dictation job. About Location Codes The system administrator may create location codes for some or all dictators. There is more than one way to utilize this feature., A physician (dictator) could have a unique user id for each location from which he/she dictates. For example, Dr. Smith has two user id numbers. When he enters “4545” the system knows he is in location 01 (dictating from the hospital) and when he enters “4546” the system knows he is in location 02 (dictating from his clinic). This is because he has two User Profiles created with this information. In another scenario the physician has only one ID number (one User Profile), but enters a location code manually after logging in. The physician will be prompted for a two-digit location code if the User Profile is modified by removing any digits in the Location Code field. 29 This Page Intentionally Left Blank 30 Chapter 7 Transcription Features This chapter describes the available functions that a transcriptionist may use while transcribing dictation. To access the system in transcribe mode, the transcriptionist must call the system from a standard touch-tone phone. The dictation system will answer with the default prompt “Please enter your 4-digit ID at any time” unless the Orator administrator has customized the welcome prompt. The transcriptionist will enter a unique ID code assigned by the Orator administrator. The transcriptionist may then be prompted to select a job type. Once selected, a transcriptionist will be ready to begin transcribing within that job type, using the foot pedal to control the transcribe functions. The phone keypad functions can also be used. The keypad functions are shown below. Transcription Functions The chart below shows available transcribe functions and their corresponding telephone touch-tones. (1) (2) (3) Play Pause File Statistics (4) (5) (6) Rewind Skip File Fast Forward (7) (8) (9) Beginning of File Complete Job End of File (*) (0) (#) Decrease Speed / Advanced Menu Select Job Type Increase Speed Transcribe Pad Template 31 Description of the Transcription Functions (1) PLAY Press 1 on the telephone keypad to play back recorded dictation. This is the same as pressing Play on the foot pedal. (2) PAUSE Press 2 on the telephone keypad to pause dictation. This is equivalent to releasing Play on the foot pedal. (3) FILE STATISTICS Press 3 on the telephone keypad to listen to the file statistics. The header file on each dictated file includes voice prompts indicating length of dictation, percentage complete, dictator's name, job number, date and time of dictation, and number of files remaining. (4) REWIND Press 4 on the telephone keypad to rewind dictation 3 seconds. This is equivalent to pressing Rewind on the foot pedal. This setting can be modified in the User Profile. (5) SKIP FILE Press 5 on the telephone keypad to skip the current dictation file in queue. This will place the current job in last order of jobs currently in queue. (6) FAST FORWARD Press 6 on the telephone keypad to move forward in the dictation 3 seconds. This is equivalent to pressing FFWD on the foot pedal. This setting can be modified in the User Profile. (7) BEGINNING OF FILE Press 7 on the telephone keypad to move to the beginning of the current dictation file. This is used prior to listening to an entire dictated file. (8) COMPLETE JOB Press 8 on the telephone keypad to mark a dictation file as completed. Once it has been marked as completed, it is removed from the transcriptionist’s queue. (9) END OF FILE Press 9 on the telephone keypad to move to the end of the current dictation file. 32 (*) DECREASE SPEED / ADVANCED MENU When a transcriptionist has accessed a dictation job, this key functions to decrease the speed at which the job is played back. There are various speed settings. Use this function to set the speed to the next lower level. NOTE: This feature is only available with files recorded in RecFormat=6 (see Chapter 5System Configuration). When no job has been selected, this key prompts the user with more menu options. These options are summarized below. *1 – Search for dictation by medical record number. *2 – Search for dictation by job number. ** – Find the next occurrence of a search. *3 – Return to previous menu. (#) INCREASE SPEED Press # on the telephone keypad to increase the speed of the dictator’s voice. There are various speed settings. Use this function to set the speed to the next higher level. (0) SELECT JOB TYPE Press 0 on the telephone keypad to select a different job type. Job types are a way of grouping dictation files of similar type. The number of job types can be customized in the configuration file – see the section on Configuration Settings in Chapter 5. About Location Codes The system administrator may establish location codes for some or all transcriptionists. There is more than one way to utilize this feature. A transcriptionist could have a unique user id for each location from which he/she transcribes. For example, Susan Smith has two user id numbers. When she enters “7878” the system knows she is working on location 01 (transcribing hospital files) and when she enters “7879” the system knows she is working on location 02 (transcribing clinic files). This is because she has two User Profiles created with this information. . In another scenario the transcriptionist has only one ID number (one User Profile), but enters a location code manually after logging in. The transcriptionist will be prompted for a two-digit location code if the User Profile is modified by removing any digits in the Location Code field. Two transcriptionists can work on the same job type, but with different location codes assigned only one will have access to their files of specific location. 33 This Page Intentionally Left Blank 34 Appendix A Export Utility The Export Utility (shown in the figure below) is a Windows program that converts sound files recorded by the Bytescribe Orator Digital Dictation System into Truespeech .wav files. Bytescribe Export Utility Window The Export Utility takes each file through a two-stage conversion process. In the first phase of the conversion process, the original *.vox files are converted to 8 KHz, 16 bit, mono .wav files. In the second phase the .wav files are compressed to TrueSpeech .wav file format. TrueSpeech files require only about 3.6MB of disk space per hour of recorded dictation. The speed of conversion is greatly dependent upon the speed of the processing computer. Installation To install the Export Utility, run the setup.exe program located in the Utilities folder on the Orator C: drive. NOTE: This installation file can only be copied or installed to another PC over a network connection, as the setup file size is too large to fit on a floppy disk. The install wizard will walk you through the installation process. Leave all default settings (directories and program groups) as they appear in the installation wizard. After installation, the Export.exe program and other program files will appear in the "c:\program files\bytescribe\Export" directory. A shortcut to the Export program will be created on the Windows desktop. 35 Setting up the Input and Output Directories The Export Utility will convert vox files from a given input directory and copy the converted TrueSpeech wav files to an output directory. The input and output directories are stored in a grid that can be edited by selecting the View | Directories menu. A Directories window is shown below. Export Utility Directories Window The user can use the grid to add, edit, or delete input and output directories. Pressing the Save button will save any changes in the Directories window. The Options Window The Export Utility will convert two types of vox input files: PCM 8 KHz and ADPCM 8 KHz. The correct format needs to be selected in order for the output files to be audible after the conversion process. If the proper file format is not selected, the output file produced will be inaudible. The conversion process may be scheduled to run periodically. All options may be set by selecting View | Options from the main menu. The Options window is shown below. Vox Format: Set to either ADPCM – 8Khz or PCM – 8Khz. This setting must match the RecFormat setting in the Orator SETTINGS list. If RecFormat=5 then leave Vox Format set at the default of PCM – 8Khz. If RecFormat=6 then set Vox Format as ADPCM – 8Khz. If Orator is set to RecFormat=4 files cannot be successfully converted. Prefix for converted files: The file, when converted, changes status from New (N) to either Deleted (D) or Completed (C). Newer versions of Orator software change the status from New to Completed once dictation is transcribed. However, for Export running on older Orator versions it may be necessary to change from New to the legacy Deleted status. The default setting is “Completed”. 36 Scheduled Conversion: Allows the export utility to automatically start every x number of minutes. Note: You should not set the interval low enough that the conversion program doesn’t have enough time to finish before the next conversion session begins. This can potentially lock up the system. NOTE: Scheduled conversions will not run if Export Utility window is closed. Scheduled Timer On: Checking this box starts the timer. The Export Utility will now start within the number of minutes set in the Timer Interval, and continue until the box is unchecked. Timer Interval (minutes): A number between 1 and 999. Remember not to set this number too low. Create Error Log: Generates a log of errors in the event the utility cannot run or has difficulty with a file(s). Generate Underscores in Output File: Some Internet file servers have difficulty reading file names with spaces in the name. If you have difficulty transferring files to your FTP site and the site administrator informs you that it is due to the filename structure, try checking this box and then converting and sending the files again. Running the Conversion Process To start the actual conversion process, select Run | Convert All Files or Run | Convert Selected Files from the main menu. Hold down the CTRL key if selecting multiple files. Once a vox file is converted the first letter of the filename is changed to a "D" or "C" and a red flag appears next to it. Use View | Refresh to refresh the screen and display only nonconverted files. During the conversion process, the status window shown below will be displayed. 37 This page intentionally left blank 38 Appendix B Internet File Transfer Many clients wish to send voice files to their transcriptionists via the Internet. This can be accomplished by setting up an FTP server. Transcriptionists may access files from the FTP server using their own Internet connection. Advantages of setting up an FTP server include the following: • • • • Simultaneous access to unlimited number of transcriptionists No long distance charges Reduces the need for extra lines on the dictation system Lower set up costs for each transcriptionist Since many transcriptionists have modem Internet connections (usually 56K or 28.8K baud), it is desirable to create voice files that are as small as possible so that the download times for the transcriptionists are minimal. The Orator system initially records voice files in a “vox” file format. A .vox file is ideal for dictation systems because it provides constant pitch speed control. However, it is often not ideal for Internet file transfer due to file size considerations (usually about 28MB per hour of dictation). The Export Utility converts .vox files to smaller “wav” files, creating a 3.6MB file about per hour of dictation. A transcriptionist with a 56Kb connection can download a one hour .wav file in about 9 minutes. The transcriptionists can then use the Bytescribe WavPlayer product, or any software that plays .wav files, to transcribe these converted files.The diagram below shows the path by which vox files are converted to wav files and transferred to transcriptionists. 39 Transferring .vox Files There are increasing numbers of transcriptionists or transcription companies that have high speed Internet connections such as cable modem or DSL connections. With these fast Internet connections the users are capable of downloading larger files quickly. In these cases it is not necessary to convert files from vox format to wav format. This simplifies the process by eliminating the conversion step. Vox files created using RecFormat=4 (see Chapter 5System Configuration) can be sent directly to an FTP server for access by remote transcriptionists. The transcriptionists can then use the Bytescribe WavPlayer to transcribe these files. It should be noted, however, that use of RecFormat=4 generates a sound file that is audible but poorer in quality than the converted .wav file. 5-Minute .vox File Recorded in RecFormat=4 900KB [can’t convert to .wav] 5-Minute .vox File Recorded in RecFormat=5 2,350KB [.wav size = 315KB] The diagram below shows the path by which vox files are transferred to transcriptionists. 40 Appendix C Custom Prompts Your company may desire to modify one or more default voice prompts in order to identify your company or match a prompt to a change in the mapping of keys. All prompts are stored in the E:\Dictation System\Prompts folder. Listed are the main system prompts, which are sometimes modified: welcome.vox – A prompt for user ID number. A company may also desire to record their company name before prompting for the ID number. This information should all be recorded within the welcome.vox voice file. welcome2.vox – A prompt for user ID number. If the number of user ID digits is changed from the default of four (4) the welcome2.vox file will be automatically substituted for welcome.vox. transcribe.vox – A prompt to a transcriptionist for a key to either play, rewind, fast-forward, or close a file. userlogged.vox – If a user ID other than four digits is required, this prompt should be modified to reflect the correct number. To modify a voice prompt, you call into the dictation system as a physician would to dictate a new file. After you have logged in a chosen a job type (try to locate a job type with no files in it) to record your prompt into, dictate the new prompt as you would like it to be heard by your users. When finished, close the file and open Windows Explorer to locate your new prompt. It will be located in E:\Dictation System\Type? where “?” is the number of the job type you recorded the prompt into. Rename the file you recorded to the name of the prompt you are modifying (welcome.vox for example). Right-click on the file and choose CUT. Then go into the E:\Dictation System\Prompts folder and rename the prompt by changing the last three letters from vox to old. Finally, right-click on the Prompts folder and choose PASTE to place the new prompt into the prompts folder. 41 This Page Intentionally Left Blank 42 Appendix D Using a Hunt Group (Rollover) Your phone company may be able to provide you with a service known as “Hunt Group” or “Rollover Lines”. This feature allows you, the owner of multiple telephone lines, to publish only one telephone number for access to these multiple telephone lines. Each time this one number is dialed the telephone system will “hunt” for the next non-busy line connected to your system within the Hunt Group. So, instead of passing out many different numbers to many different users, you only distribute one, yet everyone can have simultaneous access up to the number of incoming lines. Let’s look at an example: Mary has established a new transcription company and has purchased eight telephone lines to connect to her new Orator system. The telephone company has just installed the following numbers: 555-5551 555-5552 555-5553 555-5554 555-5555 555-5556 555-5557 555-5558 Mary has also ordered a hunt group for all eight numbers to be placed in. The telephone number for her hunt group is 555-5551, the first number in the hunt group. This is the number that she gives to her users (dictators and transcriptionists). The next morning the physicians begin calling Mary’s system. Dr. Smith calls at 8am and 5555551 becomes busy. Then Dr. Williams calls at 8:03am and 555-5552 becomes busy. Then Sally, a transcriptionist, calls at 8:07am and 555-5553 becomes busy. Then Dr. Jones calls at 8:10am and 555-5554 becomes busy. (Remember that all these users have dialed 555-5551 to connect to the system) A hunt group will always look for the lowest available number in the group to complete a connection. Therefore, if Dr. Williams hangs up before the others, then 555-5552 will become available and the next user to call the hunt group will be given 555-5552 and not 5555555. If Mary wants the Orator window to reflect this number order, so that each telephone line 1-8 represents lines 1-8 in order on the screen, she must plug telephone lines into the system as shown on the next page: 43 555-5554 555-5558 44 555-5553 555-5557 555-5552 555-5556 555-5551 555-5555 Appendix E Printer Installation If you would like to add a printer to your Orator Digital Dictation System in order to print reports, logs, etc. you can do so by following the instructions provided by the manufacturer in relation to a Windows 2000 Professional system. You can connect your printer to either the parallel printer port (sometimes known as the LPT1 port) or with a USB cable to the USB port if your printer is USB ready. See the picture below. Parallel Printer Connection USB Printer Connection In many cases the printer software is installed first, then the printer is connected to the system. If you attempt to connect your printer before loading the printer software the system will try to install the printer automatically with printer drivers that may be stale (out of date). That is why it’s important to read the instructions that are packed with your printer before connecting it to the Orator. IMPORTANT: Printers attached to PC’s require “spooling” which uses resources on a system. Large print jobs can degrade system performance by spooling into system memory or the virtual memory pool. 45 This Page Intentionally Left Blank 46 Appendix F Networking Many users find it useful to connect a Windows 2000 or Windows XP computer to their Orator system via a network connection. Here are the necessary steps to completing this task. Starting on your Windows 2000 PC (not the Orator): 1. Right-click on the “My Network Places” icon, on the desktop, and choose PROPERTIES from the drop-down menu. A window will appear: In this window you see a single Local Area Connection (LAN). Right-click on the Local Area Connection icon and choose PROPERTIES from the drop-down menu. A new window will appear: Configure TCP/IP for you network card. In the list at right we would double-click on “Internet Protocol (TCP/IP)” to open the following window: Specify the IP address exactly as it appears in the example. Click OK. 47 Now verify that the network-naming scheme is correct. Right-click on the “My Computer” icon at the top-left corner of the screen (desktop), then choose PROPERTIES from the drop-down list that appears. The following window will appear: Now, choose the Network Identification tab at the top of the window. You will then see the following: Be certain that the computer name is different from “ORATOR” and the workgroup name is identical (in this example “WORKGROUP” must be used on all computers). You can make changes to the Computer Name and the Workgroup Name by clicking the Properties button. Note: The Orator system already has a Workgroup name of “WORKGROUP” so use this workgroup name on this PC as well if possible. Click OK and the computer will request a restart if changes were made. 48 Now, let’s move over to the Orator system. Look at the following screen as a guide for opening Computer Management: Computer Management looks like this: 49 Notice that we’ve selected the Users folder in the left pane and a user list has appeared in the right pane. In the above example the user “Guest” has no red X on it, indicating that it is enabled. All systems ship with this user disabled. Double-Click on the user and a properties window will appear: Notice that the “Account is disabled” check box is unchecked. Uncheck your box and click OK. Now let’s set the IP address for this system so that the two computers will talk to each other with the same protocol. Right-click on Network Places icon on the desktop and choose PROPERTIES from the drop-down menu. A window will appear with “Local Area Connection” listed. Double-click on this Icon. A window opens with network components listed similar to that seen on the other networked Windows 2000 system. Double-click on the “Internet Protocol (TCP/IP)” component. The following window appears: Configure the IP address manually to make your properties appear the same as that in the window shown. Click OK. 50 Finally, you want to make the Orator E: drive a sharable resource so that the networked PC can see it in its Network Places and you can map a drive to it. Double-click on My Computer icon to see a list of system drives. In the window, right-click on the E: drive and choose PROPERTIES from the dropdown menu. A window appears with tabs across the top. Click on the “Sharing” tab, and then click the “New Share” button at the bottom of the window. The following window appears: In the Share Name field create a new share name of “E” and click OK. Then close any remaining windows on screen. That should do it. You now have access to the E: drive on the Orator, using TCP/IP protocol as a Guest on the Orator computer, a part of the workgroup named “Workgroup”. When you double-click the My Network Places icon on the networked Windows 2000 system you’ll see the Orator E: drive listed as a shared resource. Right-click on the icon and choose Map Network Drive from the drop-down list. A drive letter will be assigned in the next window so that every time you double-click on that drive letter in the future, E: drive on the Orator will appear. When you do open the E: drive you’ll see the Dictation Files folder listed. Open this folder to find the Browser.exe program we discussed. You can right-click on this Browser.exe program and choose Send To->Desktop (create shortcut) and a shortcut to the Orator Browser will be placed on your Windows desktop. 51 This page intentionally left blank 52 Appendix Network Topography G An Existing PC Network with DSL/Cable Broadband Connection Out to Internet DSL/Cable Modem Win98 PC #1 Win2000 PC #3 Network Hub Win98 PC #2 WinXP PC #4 An Expanded Network With Additional System and Network Segment Win98 PC #1 Win98 PC #2 Network Hub Cable/DSL Modem Leased IP 24.207.47.12 Leased IP 24.207.47.13 Win2000 PC #3 Leased IP 24.207.47.14 Leased IP 24.207.47.15 Static IP 192.168.120.100 Crossover Cable Static IP 192.168.120.50 WinXP PC #4 w/2 Network Cards Orator System 53 On the previous page the expanded network scheme (blue) is designed to incorporate the new Orator system onto a new and protected segment of the existing network called 192.168.120.xxx. The existing network (grey) could be identified in one of many ways, the best being by the IP or Internet Protocol address 24.207.47.xxx with xxx being the number of a specific computer on this segment. In the expanded network diagram a second network card has been installed in the WinXP PC #4 so that a crossover cable can be connected between it and the Orator system and bypassing the existing network hub. Once connected, the Orator system can only communicate with WinXP PC #4 because it does not lease an IP address from the Internet modem like the other PC’s and therefore cannot communicate with them. This prevents internet hackers from disabling the Orator or stealing data from its folders via the cable/DSL modem. The WinXP PC #4 system, in this scenario, would run the Export Utility to convert files located on the Orator to .wav files that would be stored on WinXP PC #4. Because WinXP PC #4 also has a network connection to the existing network it has Internet access and can transfer .wav files over the Internet via DocShuttle or another FTP solution. 54 Appendix H The ReRecording Manager The ReRecording Manager is a utility that allows unattended re-recording from other digital dictation systems into the Orator system. A script controls the operating procedure of each channel. Bytescribe ReRecording Manager Double-clicking on any channel opens the Edit Channel Settings window for that channel. Within the settings window you can modify the operating parameters for the script, as well as creation/modification of the script itself. Specifically, a script tells a channel what number to dial, how long to wait before entering a user id, how many files to record, when to hang up, and so on. 55 Commands Below is a list of commands and their description. "PICK UP" Takes the line off-hook. This is similar to taking a phone off-hook. "CALL <telephone number>" Example: "CALL,,2054259" This command will cause the system to dial the specified number and wait until it connects or until it receives some other signal such as a busy signal. If it has establishes a connection, it continues to the next line. Otherwise the script will terminate. "DIAL <digits>" Example: "DIAL 1234,,45,,4456" This command will send the specified digits as touch-tones. The commas indicate pauses. This is used to send tones to respond to prompts by the other system. "RECORD" This command begins recording a file into the Orator system. The file is saved in the directory specified by the PATH statement in the Settings file (autodial.ini). The command will cause the script to record until a period of silence is detected. The script will not continue to the next line until this silence is detected and the recording stops. "HANG UP" This command causes the line to go on-hook. This is similar to hanging a phone on hook. "CLOSE" This command causes the script to terminate and the program to close. completely exit the program. Use this to "PATH <directory where to record files>" Example: "PATH c:\dictation system\type1\" This command is only necessary if you wish to change the path where the file will be recorded. Otherwise the program will use the default PATH in the settings file. Sample Script The following script will call into a system, enter the access numbers, and record 3 files. It will then disconnect. "PICK UP" "CALL ,9195551212" "DIAL 9876,,01,,1" "RECORD" "DIAL 8,,1" "RECORD" "DIAL 8,,1" "RECORD" "DIAL 8,,1" "RECORD" "HANG UP" 56 Frequently Asked Questions How often should I reboot the Orator system? Microsoft and other IT professionals recommend that users of Windows© based operating systems reboot once each week. What is a UPS and do I need one? UPS is short for Uninterruptible Power Supply, a box that connects between your computer and an electrical wall outlet to provide continual power over a short period of time in the event of an electrical outage. They are great for short blinks when the power goes out then comes back on within a matter of seconds or a few minutes. Be aware that low-cost UPS’s provide only a brief period (few minutes) of backup power before the battery is drained and the system dies from no power anyway. What the battery backup provides in the event of a sustained power failure is the time necessary to shut down your system “clean” which is by clicking the START button at the lower left corner of the screen, then clicking Shut Down… and in the window that appears choosing “Shut down” in the field. Finally, click OK. If you purchase a “Smart” UPS (one that has the ability to shut your system down automatically) don’t install the third-party software immediately. Instead, connect your UPS to the system using the cables provided, and then configure your new UPS through the POWER settings in the Control Panel. Many different Smart UPS types can be configured here with the same result. Installed UPS software has resulted in system lockups. If the Windows 2000 operating system can identify your UPS and communicate with it without the third-party software, you are better off not using the third-party software. What is the storage capacity of the Orator Digital Dictation System? The storage capacity of the Orator system is dependent upon the size of the system hard drive. Since Bytescribe continually uses new hardware and components, the hard drives often increase in capacity. A 20 GB hard drive is capable of storing up to 1800 hours of dictation. Why has my system stopped answering/recording dictation? When the Orator system disk space is full, recording will stop and no other calls will be accepted until files are deleted from the system to free disk space. 57 This Page Intentionally Left Blank 58 Troubleshooting System won’t start (BOOT) when I press the power button. Check power to the wall outlet. Reconnect power cable to system and outlet. Unplug the plug in keyboard and mouse cables. Verify the color of the plugs match the color of the sockets on the system. Have you just unpacked your system after a move or during shipping? If so, then check the interior connections (PCI cards, ribbon cables, etc.) or have a service technician check them for you. If you have just installed new hardware of any kind, pull the hardware and attempt to start the system. Contact Bytescribe Development Company for further assistance. I hear the system starting but nothing appears on the monitor? Check power to the wall outlet. Reconnect power cable to monitor and outlet. Check the power button on the monitor. Be certain it is depressed/ switched on. Check the connection to the system. Be certain both retaining screws are tight and secure. Contact Bytescribe Development Company for further assistance. I’m having trouble networking another PC to my Orator. What are the steps? See Appendix F for step-by-step instructions. My system isn’t purging files after x number of days. Why are files not being purged? If you have files on your system that are marked “D” status for deleted from an earlier software version and not “C” status for completed. Your current software version doesn’t recognize the “D” status files and will not purge them. You will need to delete them manually from their type folders. My physicians can call the system but they can’t dictate. Your hard drive has filled up. Check your setting for PurgeDays and make sure it isn’t set too high. Delete some dictation files manually. 59