1
C<
CXcP]
2^\QdbcXQ[T
6Pb 3TcTRc^a
>_TaPcX]V <P]dP[
8] =^acW 0\TaXRP c^ R^]cPRc h^da ]TPaTbc bc^RZX]V [^RPcX^] SXP[ c^[[UaTT
<B0 8]cTa]PcX^]P[ SXP[
# !(%&""$# ^a
'<B0!!!! C^ R^]cPRc
'<B0&&&&
<8=4 B054CH 0??;80=24B 2><?0=H !
0[[ AXVWcb ATbTaeTS
<P]dUPRcdaTS Qh
<B0 8=BCAD<4=C 38E8B8>=
?> 1^g #!& ?XccbQdaVW ?T]]bh[eP]XP
; ATe $!"
" !!
» H2C?:?8
E9:D >2?F2= >FDE 36 42C67F==J C625 3J 2== :?5:G:5F2=D H9@ 92G6 @C H:== 92G6
E96 C6DA@?D:3:=:EJ 7@C FD:?8 @C D6CG:4:?8 E96 AC@5F4E =Z\V R_j aZVTV `W T`^a]Vi
VbfZa^V_e eYZd Z_decf^V_e hZ]] aVcW`c^ Rd UVdZX_VU `_]j ZW Ze Zd fdVU R_U dVcgZTVU Z_
RTT`cUR_TV hZeY eYV ^R_fWRTefcVc¶d Z_decfTeZ`_d @E96CH:D6 :E 4@F=5 72:= E@ A6C7@C>
2D 56D:8?65 2?5 A6CD@?D H9@ C6=J @? E9:D AC@5F4E 7@C E96:C D276EJ 4@F=5
DFDE2:? D6G6C6 A6CD@?2= :?;FCJ @C 562E9
CWT fPaaP]cXTb \PST Qh <X]T BPUTch 0__[XP]RTb 2^\_P]h fXcW aTb_TRc c^ cWT _a^SdRc PaT e^XSTS XU
cWT _a^SdRc Xb ]^c dbTS P]S bTaeXRTS X] PRR^aSP]RT fXcW cWT X]bcadRcX^]b X] cWXb \P]dP[ ?[TPbT
_a^cTRc h^dabT[U P]S ^cWTab Qh U^[[^fX]V cWT\ FT T]R^daPVT ^da Rdbc^\Tab c^ faXcT ^a RP[[
aTVPaSX]V cWXb T`dX_\T]c _aX^a c^ dbT ^a U^a P]h PSSXcX^]P[ X]U^a\PcX^] aT[PcXeT c^ dbT ^a aT_PXab
»
42FE:@?
5^a bPUTch aTPb^]b cWXb T`dX_\T]c \dbc QT ^_TaPcTS Qh `dP[XUXTS _Tab^]]T[ ^][h ATPS P]S
d]STabcP]S cWT X]bcadRcX^] \P]dP[ R^\_[TcT[h QTU^aT ^_TaPcX]V
CWXb X]bcad\T]c R^]bXbcb ^U bdQPbbT\Q[XTb fWXRW PaT T[TRca^bcPcXRP[[h bT]bXcXeT >_T]X]V cWT
X]bcad\T]c U^a \PX]cT]P]RT ^a aT_PXa Xb c^ QT RPaaXTS ^dc Qh PdcW^aXiTS _Tab^]]T[ ^][h 0e^XS
d]_a^cTRcTS c^dRWX]V ^U cWT bdQPbbT\Q[XTb fWXRW R^d[S RPdbT T[TRca^bcPcXR SXbRWPaVT FPaaP]ch Xb
e^XS XU SP\PVTb c^ bdQPbbT\Q[XTb PaT RPdbTS Qh T[TRca^bcPcXR SXbRWPaVT
>_TaPcX]V <P]dP[
CPQ[T ^U 2^]cT]cb
ERS]V `W 4`_eV_ed
2WP_cTa
8]bcad\T]c BPUTch P]S 2TacXUXRPcX^]b »
F0A=8=6 BPUTch ;X\XcPcX^]b P]S ?aTRPdcX^]b !
3PcT ^U 8]bcad\T]c <P]dUPRcdaT #
<PaZX]V 2TacXUXRPcTb P]S 0__a^eP[b #
3TR[PaPcX^] ^U 2^]U^a\Xch $
4[TRca^]XR 8]cTaUTaT]RT $
2WP_cTa !
@dXRZ BcPac !
Cda]X]V >= cWT CXcP] 2^\QdbcXQ[T 6Pb 3TcTRc^a !
5XVdaT ! D]STabcP]SX]V cWT 3Xb_[Ph
!
Cda]X]V >55 cWT CXcP] 2^\QdbcXQ[T 6Pb 3TcTRc^a !!
2WP_cTa "
DbX]V cWT CXcP] 2^\QdbcXQ[T 6Pb 3TcTRc^a "
Cda]X]V >= cWT CXcP] 2^\QdbcXQ[T 6Pb 3TcTRc^a "
8]bcP[[X]V cWT QPccTah _PRZ 586DA4 " "
5XVdaT " 1PccTah ?PRZ 8]bcP[[PcX^]
"
5aTbW 0Xa BTcd_ 50B "!
»
F0A=8=6 "!
1PccTah ;XUT 8]SXRPc^a ""
1PccTah FPa]X]V ""
1PccTah BWdc 3^f] "#
»
»
»
F0A=8=6 "#
20DC8>= "$
F0A=8=6 "$
1d\_ 2WTRZ "$
C>2
CPQ[T ^U 2^]cT]cb
>_TaPcX]V <P]dP[
<TPbdaX]V 6Pb 2^]RT]caPcX^]b "%
»
F0A=8=6 "&
EXTfX]V ?TPZ ATPSX]V ?40: "&
2WP_cTa #
BTccX]V d_ cWT CXcP] 2^\QdbcXQ[T 6Pb 3TcTRc^a #
?^fTa BhbcT\b #
CPQ[T # 2P_PRXch ATSdRcX^]b 4g_TRcTS
U^a 00 0[ZP[X]T 1PccTaXTb Pc 2^[STa CT\_TaPcdaTb
#
1PccTah ?PRZ AT\^eP[ #
1PccTah 2WPaVX]V #
»
20DC8>= #!
5XVdaT # 1PccTah ?PRZ AT\^eP[ #!
5XVdaT #! 1PccTah ?PRZ 2WPaVX]V
#!
C^ 2WPaVT cWT 1PccTah ?PRZ #"
C^ 2WPaVT cWT 1PccTah ?PRZ X] P ETWXR[T #"
0[ZP[X]T 1PccTah ?PRZ #"
CPQ[T #! 1PccTaXTb 0__a^eTS U^a dbT X] cWT
CXcP] 2^\QdbcXQ[T 6Pb 3TcTRc^a 0[ZP[X]T
1PccTah ?PRZ ##
C^ AT_[PRT cWT 1PccTaXTb ##
5XVdaT #" 0[ZP[X]T 1PccTah AT_[PRT\T]c ##
2WP_cTa $
BTc D_ P]S 2P[XQaPcX^] 0RRTbbX]V cWT 8]bcad\T]cb BTcd_
$
$
5XVdaT $ 8]bcad\T]c BTcd_ 1dcc^]
$
C^ 0RRTbb 8]bcad\T]c BTcd_ <^ST $!
2WP]VX]V BRP[T D]Xc 586DA4 $! $!
2WP]VX]V cWT 0[Pa\ ;TeT[ $!
5XVdaT $! 2WP]VX]V BRP[T D]Xc P]S 0RRTbbX]V ;> 0[Pa\ $!
C^ 2WP]VT cWT 78 0;0A< ;TeT[ $"
C>2!
>_TaPcX]V <P]dP[
CPQ[T ^U 2^]cT]cb
5XVdaT $" 2WP]VX]V cWT 0[Pa\ ;TeT[ $"
5XVdaT $# 2WP]VX]V cWT 78 0;0A< ;TeT[ $"
0RRTbbX]V cWT 2P[XQaPcX^] <^ST $#
5XVdaT $$ 0RRT_cX]V cWT 2WP]VT $#
5XVdaT $% 0RRT_cX]V cWT 2WP]VT $#
5XVdaT $& 2P[XQaPcX^] BTcd_ $$
5XVdaT $' 0RRT_cX]V cWT 2WP]VT $$
2P[XQaPcX^] 5PX[daT $%
2WP_cTa %
FPaaP]ch <PX]cT]P]RT P]S Ca^dQ[TbW^^cX]V %
<B0 ?^acPQ[T 8]bcad\T]c FPaaP]ch %
2[TP]X]V P]S ?TaX^SXR 2WTRZb %!
»
F0A=8=6 %!
2[TP]X]V P]S A^dcX]T 2PaT %"
»
F0A=8=6 %"
Bc^aPVT %"
»
F0A=8=6 %"
BWX_\T]c %"
Ca^dQ[TbW^^cX]V %#
CPQ[T % Ca^dQ[TbW^^cX]V 6dXST[X]Tb %#
AT_PXa ?a^RTSdaTb %$
1PccTah ?PRZ AT_[PRT\T]c %$
BT]b^a AT_[PRT\T]c 586DA4 % %$
5XVdaT % BT]b^a AT_[PRT\T]c
»
%$
F0A=8=6 %%
<PX] 4[TRca^]XRb 1^PaS AT_[PRT\T]c %%
»
»
20DC8>= %%
F0A=8=6 %%
C>2"
CPQ[T ^U 2^]cT]cb
>_TaPcX]V <P]dP[
2WP_cTa &
?TaU^a\P]RT B_TRXUXRPcX^]b &
CPQ[T & 2TacXUXRPcX^]b &
CPQ[T &! 8]bcad\T]c B_TRXUXRPcX^]b &
CPQ[T &" 2><1DBC81;4 60B Ch_XRP[ ?TaU^a\P]RT
B_TRXUXRPcX^]b &!
CPQ[T &# 2><1DBC81;4 60B 2a^bb ATUTaT]RT 5PRc^ab
U^a CXcP] 3TcTRc^a &!
2WP_cTa '
AT_[PRT\T]c P]S 0RRTbb^ah ?Pacb '
CPQ[T ' 0RRTbb^ah ?Pacb ;Xbc '
CPQ[T '! AT_[PRT\T]c ?Pacb ;Xbc '
C>2#
>_TaPcX]V <P]dP[
2WP_cTa
8]bcad\T]c BPUTch P]S 2TacXUXRPcX^]b
4YRaeVc "
:_decf^V_e DRWVej R_U 4VceZWZTReZ`_d
The Titan Combustible Gas Detector is for use by trained and
qualified personnel. It is designed to be used when performing a
hazard assessment to:
• Assess potential worker exposure to combustible gases and vapors
• Determine the appropriate combustible gas and vapor
monitoring needed for a workplace.
The Titan Combustible Gas Detector is equipped to detect
Combustible gases and certain combustible vapors.
•
•
•
•
» H2C?:?8
Read and follow all instructions carefully.
Bump check before each use.
Calibrate when bump check fails.
Check calibration more frequently if exposed to silicone,
silicates, lead-containing compounds, hydrogen sulfide, or high
contaminant levels.
• Recheck calibration if unit is subjected to physical shock.
• Check sample system (if used) for proper operation before each days use.
• Use only to detect gases/vapors for which sensor is installed.
• Do not use to detect combustible dusts or mists.
• Make sure adequate oxygen is present.
• Do not block sensors.
• Do not place end of sampling line (if used) in liquids.
• Response times vary, based on gas/vapor and length of
sampling line (if used).
• Have a trained, qualified person interpret instrument readings.
• Do not replace alkaline cells in a hazardous area.
• Do not recharge NiMH battery packs in a hazardous area.
• Do not alter or modify instrument.
INCORRECT USE CAN CAUSE SERIOUS PERSONAL INJURY
OR DEATH.
2WP_cTa
8]bcad\T]c BPUTch P]S 2TacXUXRPcX^]b
>_TaPcX]V <P]dP[
DRWVej =Z^ZeReZ`_d R_U AcVTRfeZ`_d
Carefully review the following safety limitations and precautions
before placing this instrument in service:
• The Titan Combustible Gas Detector is designed to detect
combustible gases and vapors in air only.
• Perform the following checks before each day’s use to verify
proper instrument operation:
• Bump check (see Chapter 3, "Using the Titan
Combustible Gas Detector"). Calibrate if the readings
are not within the specified limits.
• Check sampling system (if used) for proper operation.
To check for leaks in the flow system, close inlet of the
instrument with one finger of the left hand; then,
depress the aspirable bulb. Immediately seal the
aspirator bulb outlet with one finger of the right hand. As
long as both fingers are held in place, the bulb should
remain deflated. If the bulb fills, there is a leak in the
flow system which includes: the filament, aspirator bulb,
or inlet and outlet fitting gaskets. To check the aspirator
exhaust valve for leakage, close inlet of the instrument
with one finger of the left hand; then depress the
aspirator bulb. The bulb should not completely inflate in
less than six seconds.
• Check calibration more frequently if the unit is subjected to
physical shock or high levels of contaminants. Also, check
calibration more frequently if the tested atmosphere contains
the following materials, which may desensitize the combustible
gas sensor and reduce its readings:
• Organic silicones
• Silicates
• Lead-containing compounds
• Hydrogen sulfide exposures over 200 ppm or
exposures over 50 ppm for one minute.
• The minimum concentration of a combustible gas in air that can
ignite is defined as the Lower Explosive Limit (LEL). A
combustible gas reading of "100" indicates the atmosphere is
above 100% LEL and an explosion hazard exists. In such
cases, the instrument LockAlarm feature activates. Move away
from contaminated area immediately.
!
>_TaPcX]V <P]dP[
2WP_cTa
8]bcad\T]c BPUTch P]S 2TacXUXRPcX^]b
• Do not use the Titan Combustible Gas Detector to test for
combustible gases in the following atmospheres as this may
result in erroneous readings:
• Oxygen-deficient or oxygen-rich atmospheres
• Reducing atmospheres
• Furnace stacks
• Inert environments
• Atmospheres containing combustible airborne mists
or dusts.
• Do not use the Titan Combustible Gas Detector to test for
combustible gases in atmospheres containing vapors from
liquids with a high flash point [above 100oF (38oC)] as this may
result in erroneously low readings.
• Do not block sensor openings as this may cause inaccurate
readings. Do not press on the face of the sensors, as this may
damage them and cause erroneous readings. Do not use
compressed air to clean the sensor holes, as the pressure may
damage the sensors.
• Allow sufficient time for unit to display accurate reading.
Response times vary based on the type of sensor being used
(see Chapter 7, "Performance Specifications"). Additionally,
when using a sampling pump, allow a minimum of 0.7 seconds
per foot of sample line to allow the sample to be drawn through
to the sensors.
• Keep the probe tip (if used) above liquid surfaces; otherwise,
liquid may enter the system and block the sample flow, causing
inaccurate readings and/or internal damage.
• All instrument readings and information must be interpreted by
someone trained and qualified in interpreting instrument
readings in relation to the specific environment, industrial
practice and exposure limitations.
• Replace alkaline cells or recharge NiMH battery-pack in
non-hazardous area only. Use only battery chargers listed in
this manual; other chargers may damage the battery pack and
the unit. Dispose of batteries in accordance with local health
and safety regulations.
• Do not alter this instrument or make any repairs beyond those
specified in this manual. Only MSA-authorized personnel may
repair this unit; otherwise, damage may result.
"
2WP_cTa
8]bcad\T]c BPUTch P]S 2TacXUXRPcX^]b
>_TaPcX]V <P]dP[
5ReV `W :_decf^V_e >R_fWRTefcV
The date of manufacture of your Titan Combustible Gas Detector
is written on a label on the main printed circuit board.
>Rc\Z_X 4VceZWZTReVd R_U 2aac`gR]d
The Titan Combustible Gas Detector has been successfully tested
by DMT - Deutsche Montan Technologie - for electrical safety
according to the European Standards:
1. EN 50 014 - December 1999
2. EN 50 018 - August 1996
3. EN 50 020 - August 1996
Based on the directive 94/9/EC ATEX 100a), an EC type
examination certificate without measuring function has
been issued.
<0=D502CDA4A
<B0 0D4A 6\Q7
CWXT\P]]bcaPbbT
3 !$( 1Ta[X]
0DC7>A8I43 A4?A4B4=C0C8E4
<X]T BPUTch 0__[XP]RTb 2^\_P]h
2aP]QTaah F^^Sb 3aXeT
2aP]QTaah C^f]bWX_ ?0 %%%
DB0
8=BCAD<4=C
CXcP] 2^\QdbcXQ[T 6Pb 3TcTRc^a
8=BCAD<4=C ;014;8=6
4g 886 44g XP S 882 C"C#
0[ZP[X]T C"C# ! c^ $ 2
=X<7 C"C# ! c^ $# 2
42CH?4 4G0<8=0C8>= 24AC85820C4
3<C1EB 0C4G 4 G
@D0;8CH 0BBDA0=24 =>C85820C8>=
24 '
4<2 2>=5>A<0=24 '(""%442
4= $' ! 4= $!&!
#
>_TaPcX]V <P]dP[
2WP_cTa
8]bcad\T]c BPUTch P]S 2TacXUXRPcX^]b
5VT]RcReZ`_ `W 4`_W`c^Zej
MANUFACTURED BY:
MSA AUER GmbH
Thiemannstrasse 1
D-12059 Berlin
This is to declare that the…
MSA Titan Combustible Gas Detector
complies with the provisions of the council directive 94/9/EC
(ATEX)This declaration is based on the EC-Type Examination
Certificate BVS 01 ATEX E 001X
BVS/DMT, of Germany, in accordance with Annex III of the ATEX
Directive 94/9/EC
Quality Assurance Notification issued by Ineris of France,
Notified Body number 0080, in accordance with Annex IV and
Annex VII of the ATEX Directive 94/9/EC
We additionally declare that this product is in conformance with
the EMC Directive 89/336/EEC in accordance with EN 50270-2
and EN50081-2
MSA AUER GmbH
Berlin, January 2001
Dr. Axel Schubert, R & D Instruments
6]VTec`_ZT :_eVcWVcV_TV
The Titan Combustible Gas Detector is in conformance with the
EMC Directive 89/336/EEC in accordance with EN 50081-2 and
EN 50270-2.
This instrument generates, uses, and can radiate radio frequency
energy. Operation of this instrument may cause interference, in
which case, the user may be required to take corrective action.
This device is test equipment and is not subject to FCC technical
regulations. However, it has been tested and found to comply
with the limits for a Class A digital device specified in Part 15 of
the FCC regulations.
$
2WP_cTa
8]bcad\T]c BPUTch P]S 2TacXUXRPcX^]b
>_TaPcX]V <P]dP[
This digital apparatus does not exceed the Class A limits for
radio noise emissions from digital apparatus set out in the Radio
Interference Regulations of the CRTC.
There is no guarantee that interference will not occur. If this
instrument is determined to cause interference to radio or
television reception, try the following corrective measures:
• Reorient or relocate the receiving antenna
• Increase separation between the instrument and the
radio/TV receiver
• Consult an experienced radio/TV technician for help.
%
>_TaPcX]V <P]dP[
2WP_cTa ! @dXRZ BcPac
4YRaeVc #
BfZT\ DeRce
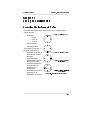
It is your responsibility to know how to use the Titan Combustible
Gas Detector. When used properly, it will alert you to the
presence of combustible gases and vapors. These conditions are
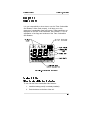
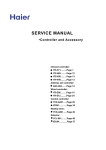
displayed on the face of the instrument. See FIGURE 2-1 for an
explanation of the flags and numbers of the Titan Combustible
Gas Detector.
5XVdaT ! D]STabcP]SX]V cWT 3Xb_[Ph
Efc_Z_X @? eYV
EZeR_ 4`^SfdeZS]V 8Rd 5VeVTe`c
To turn ON the Titan Combustible Gas Detector:
1. Install the battery pack (if not already installed).
2. Push the button on the front of the unit.
!
2WP_cTa ! @dXRZ BcPac
>_TaPcX]V <P]dP[
The instrument then performs a Self-test where the:
• display check occurs (every segment on the display
momentarily illuminates)
• display back light illuminates
• audible alarm sounds
• alarm lights illuminate.
Once the Self-test is complete, the instrument enters the Measure
mode and is ready for use.
Efc_Z_X @77 eYV
EZeR_ 4`^SfdeZS]V 8Rd 5VeVTe`c
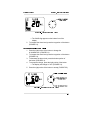
To turn OFF the Titan Combustible Gas Detector:
• Push and hold the button for five seconds.
• After two seconds, "OFF" displays and
the bar graph disappears to indicate instrument
turn-OFF.
!!
>_TaPcX]V <P]dP[
2WP_cTa " DbX]V cWT CXcP] 2^\QdbcXQ[T 6Pb 3TcTRc^a
4YRaeVc $
FdZ_X eYV EZeR_
4`^SfdeZS]V 8Rd 5VeVTe`c
Efc_Z_X @? eYV EZeR_
4`^SfdeZS]V 8Rd 5VeVTe`c
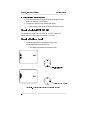
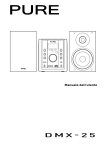
8]bcP[[X]V cWT QPccTah _PRZ 586DA4 " 1. Slide the battery pack toward the top of the instrument.
2. Swing the battery pack up and into the body of the instrument.
3. Secure the battery pack by installing the screws in the bottom
of the battery pack and instrument.
• The screw must be snug to ensure that the battery pack
properly seals to the instrument. Do not over-tighten.
4. Once the battery pack is installed, the Titan Combustible Gas
Detector will turn ON.
5XVdaT " 1PccTah ?PRZ 8]bcP[[PcX^]
"
2WP_cTa " DbX]V cWT CXcP] 2^\QdbcXQ[T 6Pb 3TcTRc^a
>_TaPcX]V <P]dP[
The instrument now performs the following Self-test where the:
• Display check occurs
(every segment on the display momentarily illuminates)
• Display back light illuminates
• Audible alarm sounds
• Alarm lights illuminate
• Internal instrument diagnostic occurs
(any detected internal errors appear on the display).
When Self-test ends, the instrument displays the setup:
•
•
•
•
•
•
Low Alarm Level shows for three seconds
High Alarm Level shows for three seconds
Battery Capacity shows for three seconds
Sensor Warm-up shows for 12 seconds
Fresh Air Setup shows for five seconds
Gas Concentrations appear on the display.
5aTbW 0Xa BTcd_ 50B
(for automatic zero adjustment of the
Titan Combustible Gas Detector sensor)
NOTE:
The Fresh Air Setup (FAS) function has safety limits.
If a hazardous level of gas is present, the Titan
Combustible Gas Detector ignores the FAS
command and goes into alarm.
» H2C?:?8
Do not activate the Fresh Air Setup unless you are certain
you are in fresh, uncontaminated air; otherwise, inaccurate
readings can occur which can falsely indicate that a
hazardous atmosphere is safe. If you have any doubts as
to the quality of the surrounding air, do not use the Fresh
Air Setup feature. Do not use the Fresh Air Setup as a
substitute for bump checks. The bump check is required
to verify span accuracy. Failure to follow this warning can
result in serious personal injury or death.
Persons responsible for the use of the Titan Combustible Gas
Detector must determine whether or not the Fresh Air Setup
"!
>_TaPcX]V <P]dP[
2WP_cTa " DbX]V cWT CXcP] 2^\QdbcXQ[T 6Pb 3TcTRc^a
option should be used. The user’s abilities, training and normal
work practices must be considered when making this decision.
1. Turn ON the Titan Combustible Gas Detector.
• Once the instrument self- check is complete and the
setup is displayed, FAS flashes for five seconds.
2. To perform a Fresh Air Setup, push the button while the FAS
flashes.
3. To skip the FAS, wait five seconds.
• If the button is not pushed, the option of performing an
FAS stops flashing after the five seconds have expired.
1PccTah ;XUT 8]SXRPc^a
• The battery condition icon is continuously displayed in the
upper-right corner of the screen, regardless of the
selected page.
• As the battery charge dissipates, segments of the battery icon
go blank until only the outline of the battery icon remains.
1PccTah FPa]X]V
A Battery Warning indicates that a nominal 20 minutes of
operation remain before instrument batteries are
completely depleted.
NOTE:
Duration of remaining instrument operation during
Battery Warning depends on:
• Ambient temperatures
(The battery warning is likely to be shorter in colder
temperatures, particularly with alkaline batteries)
• Whether the battery warning is reset
(it comes ON again every five minutes).
When the Titan Combustible Gas Detector goes into
Battery Warning, the:
• Battery Life indicator flashes
• Alarm sounds
• Alarm lights flash.
To silence the Battery Warning, push the button.
""
2WP_cTa " DbX]V cWT CXcP] 2^\QdbcXQ[T 6Pb 3TcTRc^a
>_TaPcX]V <P]dP[
• Once the battery warning is silenced, the alarm reactivates in
approximately five minutes.
• The Titan Combustible Gas Detector continues to operate until
the instrument is turned OFF or battery shutdown occurs.
1PccTah BWdc 3^f]
When the batteries can no longer operate the instrument, the
instrument goes into Battery Shutdown mode:
•
•
•
•
Battery Indicator remains ON
Alarm sounds continuously
Alarm lights flash
After approximately five minutes, the instrument automatically
turns OFF.
» H2C?:?8
When Battery Shutdown condition sounds, stop using the
instrument; it can no longer alert you of potential hazards
since it does not have enough power to operate properly.
You must:
1. Leave the area immediately.
2. Turn OFF the instrument if it is ON.
3. Report to the person responsible for maintenance.
4. Replace or recharge the battery pack.
Failure to follow this procedure could result in serious
personal injury or death.
For Alkaline Battery packs, replace batteries when the
"Battery Low" or "Battery Shutdown" alarms occur. When
replacing alkaline batteries, replace ALL batteries with fresh
ones at the same time. Do not mix new and partiallydischarged batteries. If the batteries are improperly replaced
or improperly mixed, the "Battery Low" and "Battery
Shutdown" alarms may fail to function, which could result
in serious personal injury or death.
Do not use rechargeable batteries in Alkaline Battery Packs.
The Alkaline battery warning and alarm set points are not
optimized for rechargeable batteries. The low battery warning
and alarm could occur too quickly to be noticed. Using
rechargeable batteries in the Alkaline battery pack could
result in serious personal injury or death.
"#
>_TaPcX]V <P]dP[
NOTE:
2WP_cTa " DbX]V cWT CXcP] 2^\QdbcXQ[T 6Pb 3TcTRc^a
The instrument recognizes the type of installed battery
pack (rechargeable NiMH or alkaline) and
automatically adjusts the low battery warning and
alarm setpoints.
» 42FE:@?
During "Battery Low" condition, prepare to exit the work
area since the instrument could go into "Battery Shutdown"
at any time, resulting in loss of sensor function. Depending
on the age of the batteries, ambient temperature and other
conditions, the instrument "Battery Low" and "Battery
Shutdown" times could be shorter than anticipated.
» H2C?:?8
Recharge or replace the batteries when the "Battery Low"
or "Battery Shutdown" conditions occur.
Do not reuse a NiMH battery without recharging, even if
the battery regains some charge after a period of non-use.
3f^a 4YVT\
The bump check is simple and should only take about one
minute. Perform this check before each use.
1. Turn ON the Titan Combustible Gas Detector in clean, fresh air.
2. Verify that readings indicate no gas is present.
3. Attach calibration cap to the Titan Combustible Gas Detector.
4. Attach regulator (supplied with calibration kit) to the cylinder.
5. Connect tubing (supplied with calibration kit) to the regulator.
6. Attach other end of tubing to the calibration cap.
7. Open the valve on the regulator.
• The regulator flow rate is 0.25 lpm.
• The reading on the Titan Combustible Gas Detector
display should be within limits stated on the calibration
cylinder.
• If necessary, change cylinder to introduce other
calibration gases.
"$
2WP_cTa " DbX]V cWT CXcP] 2^\QdbcXQ[T 6Pb 3TcTRc^a
>_TaPcX]V <P]dP[
• If the reading is not within these limits, the Titan
Combustible Gas Detector requires calibration.
See Chapter 5, "Setup and Calibration."
>VRdfcZ_X 8Rd 4`_TV_ecReZ`_d
The Titan Combustible Gas Detector is designed to detect
combustible gases and vapors in the atmosphere.
NOTE:
When sampling with accessory sampling lines, the
shortest possible length should be used to minimize
the time needed to obtain a valid reading.
• Alarms sound when concentrations reach:
• Alarm Set point or
• 100% LEL (Lower Explosive Limit).
• When the combustible gas indication reaches the LO-ALARM
set point:
• Alarm sounds
• Alarm lights flash
• LO ALARM flag above the concentration flashes.
• To silence the alarm, press the button.
NOTE: The alarm will stay silent if the alarm condition
has cleared.
• When the combustible gas indication reaches the HI-ALARM
setpoint:
• Alarm sounds
• Alarm lights flash
• HI ALARM flag above the concentration flashes.
• It is not possible to silence the alarm until the gas concentration
is below the LO ALARM setpoint. If the gas concentration goes
below the LO ALARM press the button to silence the alarm.
NOTE:
The alarm remains ON if the alarm condition has
cleared. You must reset the HI ALARM.
• When the combustible gas indication reaches 100% LEL:
• The LockAlarmTM circuit locks the combustible gas
reading and alarm
• Alarm sounds
"%
>_TaPcX]V <P]dP[
2WP_cTa " DbX]V cWT CXcP] 2^\QdbcXQ[T 6Pb 3TcTRc^a
• Alarm lights flash
• "100" appears on the display and flashes.
• This alarm cannot be reset with the button.
» H2C?:?8
If the 100% LEL alarm condition is reached, you may be in
a life-threatening situation; there is enough gas in the
atmosphere for an explosion to occur. In addition, any rapid
up-scale reading followed by a declining or erratic reading
can also be an indication that there is enough gas for an
explosion. If either of these indications occur, leave and
move away from the contaminated area immediately. Failure
to follow this warning can result in serious personal injury
or death.
• After moving to a safe, fresh-air environment, reset the alarm by
turning OFF the instrument and turning it ON again.
GZVhZ_X AVR\ CVRUZ_X A62<
• The PEAK flag appears below the Battery indicator on the
display to show the highest level of gas recorded by the Titan
Combustible Gas Detector since turn-ON.
• To view the Peak Reading:
1. Press the button.
• The back light turns ON.
2. Press the button again.
• The PEAK flag appears
3. View the PEAK Reading for five seconds.
"&
>_TaPcX]V <P]dP[
2WP_cTa # BTccX]V d_ cWT CXcP] 2^\QdbcXQ[T 6Pb 3TcTRc^a
4YRaeVc %
DVeeZ_X fa eYV EZeR_ 4`^SfdeZS]V
8Rd 5VeVTe`c
A`hVc DjdeV^d
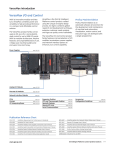
The Titan Combustible Gas Detector is supplied with:
• a replaceable cell, alkaline battery pack or
• an optional NiMH battery pack
• an optional NiMH battery pack with a vibrating alarm.
The nominal run times by battery type:
• Alkaline: 13 hours
• NiMH:
11 hours
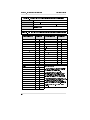
NOTE: In colder temperatures, battery output may be
severely reduced. See TABLE 4-1 for capacity
reductions expected for alkaline batteries at
these temperatures.
CPQ[T # 2P_PRXch ATSdRcX^]b 4g_TRcTS
U^a 00 0[ZP[X]T 1PccTaXTb Pc 2^[STa CT\_TaPcdaTb
C4<?4A0CDA4
&^^5 ! ^^2
"!^ 5 2
# 5 ^2
4G?42C43 20?028CH A43D2C8>=
=^]T
!$
%
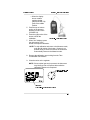
1PccTah ?PRZ AT\^eP[
To remove the battery pack from the Titan Combustible Gas
Detector (FIGURE 4-1).
1. Remove the screw from the bottom of the battery pack.
2. Gently pull out the pack by lifting the bottom out of its recess;
then, slide it down.
1PccTah 2WPaVX]V
• Charge only NiMH battery packs.
#
2WP_cTa # BTccX]V d_ cWT CXcP] 2^\QdbcXQ[T 6Pb 3TcTRc^a
>_TaPcX]V <P]dP[
5XVdaT # 1PccTah ?PRZ AT\^eP[
• Charge the Titan NiMH battery packs by using the
Delta Fast Charger in non-hazardous areas only (FIGURE 4-2).
» 42FE:@?
This instrument is designed for use only with the battery
charger listed in this manual. Use of other battery chargers
may result in damage to the battery pack and instrument.
Dispose of used batteries in accordance with local health
and safety regulations.
• Prior to charging, the Titan Combustible Gas Detector must be
turned OFF, or its battery pack removed.
• In normal, room-temperature environments, the charger is
capable of charging a completely depleted pack in three hours .
NOTE:
Allow very cold battery battery packs to stabilize
for 1/2-hour at room temperature before attempting
to charge.
5XVdaT #! 1PccTah ?PRZ 2WPaVX]V
#!
>_TaPcX]V <P]dP[
2WP_cTa # BTccX]V d_ cWT CXcP] 2^\QdbcXQ[T 6Pb 3TcTRc^a
C^ 2WPaVT cWT 1PccTah ?PRZ
• Connect the charger (P/N _________) cable to the charging
stand.
• Charger status is indicated by the LED color:
• Red
Charging is in process.
• Green
Charging is complete; the pack is fully charged and
ready for use.
• Red Flashing
Failure mode; remove battery pack from charger.
• LED OFF
No battery pack connected.
C^ 2WPaVT cWT 1PccTah ?PRZ X] P ETWXR[T
1. Connect the input cable assembly to the vehicle lighter and the
input to the charger assembly.
2. Connect the charger (P/N ______) cable to the charging stand.
• Charger status is indicated by the LED color:
• Red
Charging is in process.
• Green
Charging is complete; the pack is fully charged and
ready for use.
• Red Flashing
Failure mode; remove battery pack from charger.
• LED OFF
No battery pack connected.
• Once the battery pack is charged, it can be disconnected from
the charger and ready for immediate use.
0[ZP[X]T 1PccTah ?PRZ
NOTE:
Replace alkaline batteries in non-hazardous areas only.
• The Titan Replaceable battery pack can be used as a:
• Full-time battery pack or
• Backup power source.
#"
2WP_cTa # BTccX]V d_ cWT CXcP] 2^\QdbcXQ[T 6Pb 3TcTRc^a
>_TaPcX]V <P]dP[
See TABLE 4-2 for batteries approved for use in the Titan
Combustible Gas Detector alkaline battery pack.
CPQ[T #! 1PccTaXTb 0__a^eTS U^a dbT X] cWT
CXcP] 2^\QdbcXQ[T 6Pb 3TcTRc^a 0[ZP[X]T 1PccTah ?PRZ
10CC4AH
3daPRT[
<= $
EPacP #%
D;2D;
•
•
4DA>?4
C"
•
842
C#
•
C"
C#
•
•
C^ AT_[PRT cWT 1PccTaXTb
1. Remove battery pack from the instrument by removing the
screw located in the bottom of the battery pack.
2. Gently lift the pack out of its recess and pull it out of the unit.
3. Loosen the two screws that hold the plastic battery cover to
the battery pack.
4. Remove the plastic cover, exposing the replaceable batteries.
5. Remove the depleted batteries.
NOTE: Follow local regulations regarding battery disposal.
6. Install the new batteries, observing the direction of the positive
(+) battery terminal.
• The instrument will not operate if any or all cells
are reversed.
7. Replace the plastic battery cover and tighten the screw.
8. Re-install the battery pack in the instrument.
5XVdaT #" 0[ZP[X]T 1PccTah AT_[PRT\T]c
##
>_TaPcX]V <P]dP[
2WP_cTa $ BTcd_ P]S 2P[XQaPcX^]
4YRaeVc &
DVe Fa R_U 4R]ZScReZ`_
2TTVddZ_X eYV :_decf^V_ed DVefa
The Instrument Setup mode allows the user to change internal
values such as:
• Scale unit:
• % LEL
• Vol% or
• % UEG.
• Alarm setpoints
• Calibrating value.
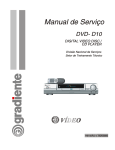
The button is used like a
joy-stick (FIGURE 5-1):
• Press the top portion of
the button to increase
the value.
• Press the bottom
portion of the button to
decrease the value.
• Press the right portion
of the button to go
forward and to
accept (Acc).
• Press the left portion of
the button to go
backward or to escape.
5XVdaT $ 8]bcad\T]c BTcd_ 1dcc^]
$
2WP_cTa $ BTcd_ P]S 2P[XQaPcX^]
>_TaPcX]V <P]dP[
C^ 0RRTbb 8]bcad\T]c BTcd_ <^ST
1. Turn the instrument ON by pushing and holding the button
until CAL appears on the display.
2. To enter the Set-up mode, release the button.
• Now you can change the scale unit and alarm levels.
2WP]VX]V BRP[T D]Xc 586DA4 $!
To change the setup from "% UEG" to "% LEL", press the
bottom portion of the button and scroll to "% LEL".
2WP]VX]V cWT 0[Pa\ ;TeT[
1. Press the right portion of the button to go to the
LO ALARM selection (FIGURE 5-2).
• The display shows the current alarm level.
5XVdaT $! 2WP]VX]V BRP[T D]Xc P]S 0RRTbbX]V ;> 0[Pa\
$!
>_TaPcX]V <P]dP[
2WP_cTa $ BTcd_ P]S 2P[XQaPcX^]
5XVdaT $" 2WP]VX]V cWT 0[Pa\ ;TeT[
• The CALIB flag appears on the bottom line of the
display.
2. To increase the alarm level, press the top portion of the button
(FIGURE 5-3).
C^ 2WP]VT cWT 78 0;0A< ;TeT[
1. Press the right portion of the button to change the
HI ALARM level (FIGURE 5-4).
2. To increase the alarm level, press the top portion of the button
(FIGURE 5-4).
3. To decrease the alarm level, press the bottom portion of
the button (FIGURE 5-4).
4. To accept the change, press the right portion of the button.
• The display will change to "Acc" (FIGURE 5-4) .
5. Press the right portion of the button to accept (FIGURE 5-5).
5XVdaT $# 2WP]VX]V cWT 78 0;0A< ;TeT[
$"
2WP_cTa $ BTcd_ P]S 2P[XQaPcX^]
>_TaPcX]V <P]dP[
5XVdaT $$ 0RRT_cX]V cWT 2WP]VT
0RRTbbX]V cWT 2P[XQaPcX^] <^ST
• After finishing the Alarm Setup, the unit accesses the
Calibration mode.
• The ZERO flag appears on the bottom line on the display
(FIGURE 5-6).
• While the Titan Combustible Gas Detector zero calibrates, the
bar graph goes to the middle position.
1. Press the right portion of the button to go to Span calibration
(FIGURE 5-6).
2. Plug the calibration cap on the Titan Combustible
Gas Detector (FIGURE 5-7).
3. Connect the hose with the regulator and the calibration cap
(FIGURE 5-7).
4. Open the valve on the regulator.
• The value on the display increases.
• The bar graph increases.
5XVdaT $% 0RRT_cX]V cWT 2WP]VT
$#
>_TaPcX]V <P]dP[
2WP_cTa $ BTcd_ P]S 2P[XQaPcX^]
• When the display
shows a stable
reading, the bar
graph (FIGURE 5-8)
goes to the middle
position.
5. Press the top or bottom
portion of the button to
obtain the correct value
(FIGURE 5-8).
6. Press the right portion of the
button to finish the
calibration.
5XVdaT $& 2P[XQaPcX^] BTcd_
7. When "Acc" displays, press
the right portion of the
button to accept the calibration.
NOTE: To skip calibration and return to the Measure mode,
push the left portion of the button. If button is not
pushed during a 10-minute interval, the instrument
automatically returns to the Measure mode.
8. Remove the calibration cap or tubing from the Titan
Combustible Gas Detector.
9. Close the valve on the regulator.
NOTE: Since residual gas may be present, the instrument
may briefly go into an exposure alarm after the
calibration sequence is completed.
5XVdaT $' 0RRT_cX]V cWT 2WP]VT
$$
2WP_cTa $ BTcd_ P]S 2P[XQaPcX^]
>_TaPcX]V <P]dP[
2P[XQaPcX^] 5PX[daT
If the Titan Combustible Gas Detector cannot calibrate the
sensor, the instrument goes into an alarm which remains until the
button is pushed. A sensor that could not be calibrated is
indicated by the SENSOR flag on the bottom line.
• Check the calibration setup and verify that the right gas
concentration is being used.
$%
>_TaPcX]V <P]dP[
2WP_cTa % FPaaP]ch <PX]cT]P]RT P]S Ca^dQ[TbW^^cX]V
4YRaeVc '
HRccR_ej >RZ_eV_R_TV R_U
Ec`fS]VdY``eZ_X
>D2 A`ceRS]V :_decf^V_e HRccR_ej
1. Warranty8C4<
2WPbbXb P]S T[TRca^]XRb
0[[ bT]b^ab d][Tbb ^cWTafXbT
b_TRXUXTS
ATRWPaVTPQ[T QPccTaXTb
F0AA0=CH ?4A8>3
;XUTcX\T <B0 fX[[ bd__^ac _a^SdRc
U^a UXeT hTPab PUcTa _a^SdRcX^] T]Sb
Cf^ hTPab
Cf^ hTPab
This warranty does not cover filters, fuses, etc. Certain other
accessories not specifically listed here may have different
warranty periods. This warranty is valid only if the product is
maintained and used in accordance with Seller’s instructions
and/or recommendations. The Seller shall be released from
all obligations under this warranty in the event repairs or
modifications are made by persons other than its own or
authorized service personnel or if the warranty claim results
from physical abuse or misuse of the product. No agent,
employee or representative of the Seller has any authority to
bind the Seller to any affirmation, representation or warranty
concerning this product. Seller makes no warranty
concerning components or accessories not manufactured by
the Seller, but will pass on to the Purchaser all warranties of
manufacturers of such components. THIS WARRANTY IS IN
LIEU OF ALL OTHER WARRANTIES, EXPRESSED,
IMPLIED OR STATUTORY, AND IS STRICTLY LIMITED TO
THE TERMS HEREOF. SELLER SPECIFICALLY
DISCLAIMS ANY WARRANTY OF MERCHANTABILITY OR
OF FITNESS FOR A PARTICULAR PURPOSE.
%
2WP_cTa % FPaaP]ch <PX]cT]P]RT P]S Ca^dQ[TbW^^cX]V
>_TaPcX]V <P]dP[
2. Exclusive Remedy- It is expressly agreed that Purchaser’s
sole and exclusive remedy for breach of the above warranty,
for any tortious conduct of Seller, or for any other cause of
action, shall be the repair and/or replacement at Seller’s
option, of any equipment or parts thereof, which after
examination by Seller is proven to be defective.
Replacement equipment and/or parts will be provided at
no cost to Purchaser, F.O.B. Seller’s Plant. Failure of
Seller to successfully repair any nonconforming product
shall not cause the remedy established hereby to fail of its
essential purpose.
3. Exclusion of Consequential Damages- Purchaser specifically
understands and agrees that under no circumstances will
seller be liable to purchaser for economic, special, incidental
or consequential damages or losses of any kind whatsoever,
including but not limited to, loss of anticipated profits and
any other loss caused by reason of nonoperation of the
goods. This exclusion is applicable to claims for breach of
warranty, tortious conduct or any other cause of action
against seller.
4]VR_Z_X R_U AVcZ`UZT 4YVT\d
As with all electronic equipment, the Titan Detector will operate
only if it is properly maintained.
» H2C?:?8
Repair or alteration of the Titan Detector, beyond the procedures
described in this manual or by anyone other than a person
authorized by MSA, could cause the instrument to fail to perform
properly. Use only genuine MSA replacement parts when
performing any maintenance procedures described in this
manual. Substitution of components can seriously impair
instrument performance, alter intrinsic safety characteristics
or void agency approvals.
FAILURE TO FOLLOW THIS WARNING CAN RESULT IN
SERIOUS PERSONAL INJURY OR DEATH.
%!
>_TaPcX]V <P]dP[
2WP_cTa % FPaaP]ch <PX]cT]P]RT P]S Ca^dQ[TbW^^cX]V
4]VR_Z_X R_U C`feZ_V 4RcV
Periodically clean the Titan Detector case with a soft damp cloth.
On diffusion instruments: clean sensor holes on the instrument
front if they are blocked with dirt.
1. Remove the sensor cap.
2. Clean the sensor cap holes with a paper clip, wire, or similar
device. The holes may also be cleaned with oil-free
compressed air.
3. Replace sensor membrane with a new one.
» H2C?:?8
Do not attempt to clean the sensor cap while it is in place;
sensor damage may occur. The top of the sensor is very
fragile; do not touch or apply pressure to the top of any
sensor. If a sensor is damaged, it can cause the unit to
give false readings.
De`cRXV
• When not in use, store your Titan Detector in a safe, dry place
between 23o and 104o F (-5o and 40oC).
• The Titan Detector with the NiMH rechargeable battery pack
can be stored on charge indefinitely.
» H2C?:?8
After storage, always recheck instrument calibration before
use. During storage, sensors may drift or become inoperative
and may not provide warnings of dangers to the health and
lives of users.
DYZa^V_e
1. Remove battery pack before shipment. When returning the
Titan Detector for repairs, disconnect the normally used
battery pack from unit, and include it in the container.
2. Pack the Titan Detector in its original shipping container with
suitable padding. If the original container is unavailable, an
equivalent container may be substituted. Seal instrument in
a plastic bag to protect it from moisture. Use sufficient
%"
2WP_cTa % FPaaP]ch <PX]cT]P]RT P]S Ca^dQ[TbW^^cX]V
>_TaPcX]V <P]dP[
padding to protect it from the rigors of handling. Damage
due to improper packaging or damage in shipment is not
covered by the instrument’s warranty.
Ec`fS]VdY``eZ_X
The Titan Detector will operate reliably for years when cared for
and maintained properly. If the instrument becomes inoperative,
follow the Troubleshooting Guidelines in TABLE 6-1; these
represent the most likely causes of a problem. You may return
inoperative instruments to MSA for repair.
•
<B0 8]bcad\T]c 3XeXbX^]
AT_PXa P]S BTaeXRT 3T_Pac\T]c
2aP]QTaah F^^Sb 3aXeT
2aP]QTaah C^f]bWX_ ?0
%%%$!&
'<B08=BC
To contact MSA International, please call:
•
# !(%&"
^a
'<B0&&&&
The instrument displays an error code if it detects a problem
during startup or operation. See TABLE 6-1 for a brief description
of the error and proper corrective action. When an inoperative
component is located by using the guidelines, it may be replaced
by using one of the following "Repair Procedures":
CPQ[T % Ca^dQ[TbW^^cX]V 6dXST[X]Tb
A4?;024
?A>1;4<
3^Tb ]^c cda] >=
3^Tb ]^c R^\_[TcT P
10CC4AH
38B?;0H
?02:
<>3D;4
•
BT[UCTbc
•
3Xb_[Ph bTV\T]cb \XbbX]V
^a bcdRZ
4AA \TbbPVT PUcTa
QPccTah X]bcP[[PcX^]
4AA \TbbPVT SdaX]V dbT
1PccTah _PRZ S^Tb ]^c
RWPaVT
2^\QdbcXQ[T bT]b^a S^Tb
]^c RP[XQaPcT
B4=B>A
•
<08=
4;42CA>=82B
•
•
•
•
•
•
8] P[[ ^U cWT PQ^eT RPbTb P]S U^a \P]h ^cWTa _a^Q[T\b h^d \Ph aTcda] cWT CXcP] 3TcTRc^a
c^ <B0 U^a aT_PXab
%#
>_TaPcX]V <P]dP[
2WP_cTa % FPaaP]ch <PX]cT]P]RT P]S Ca^dQ[TbW^^cX]V
CVaRZc Ac`TVUfcVd
1PccTah ?PRZ AT_[PRT\T]c
AT\^eT cWT 1PccTah ?PRZ
1. Remove the two battery mounting screws on the back of
the instrument.
2. Pull out the battery pack by gripping it at the edge of the
battery pack case and pulling it away from the unit.
AT_[PRT cWT 1PccTah ?PRZ
3. Insert the front of the battery pack under the lip on the case
and snap the bottom of the battery pack into the case.
4. Install and tighten the battery mounting screw.
BT]b^a AT_[PRT\T]c 586DA4 % 1. Verify that the instrument is turned OFF; remove battery pack.
2. Remove the sensor cover screw and cover.
3. Gently lift out the sensor to be replaced; properly dispose
of sensor.
4. Carefully align the new sensor contact pins with the sockets
on the printed circuit board.
5XVdaT % BT]b^a AT_[PRT\T]c
%$
2WP_cTa % FPaaP]ch <PX]cT]P]RT P]S Ca^dQ[TbW^^cX]V
>_TaPcX]V <P]dP[
5. Press the new sensor into place.
6. Replace the sensor cap.
7. Re-install the screws to hold down the sensor cap.
» H2C?:?8
Verification of calibration response is required; otherwise,
the instrument will not perform as required, and persons
relying on this product for their safety could sustain serious
personal injury or death.
<PX] 4[TRca^]XRb 1^PaS AT_[PRT\T]c
» 42FE:@?
Before handling the circuit boards, ensure you are properly
grounded; otherwise, static charges from your body could
damage the electronics. Such damage is not covered by
the warranty. Grounding straps and kits are available from
electronics suppliers.
1. Turn OFF the power.
2. Remove the battery pack.
3. Remove the sensor cap and sensor.
4. Remove the two remaining case mounting screws from the
internal top part of the case.
5. Tilt the circuit board up at a 90 degree angle to remove the
circuit board.
6. Carefully position the circuit board in the case.
7. Replace and secure the circuit board with the two mounting
screws.
8. Replace the battery pack and mounting screw securing the
battery pack.
9. Completely recalibrate the Titan Detector.
» H2C?:?8
Verification of calibration response is required; otherwise,
the instrument will not perform as required, and persons
who rely on this product for their safety could sustain serious
personal injury or death.
%%
>_TaPcX]V <P]dP[
2WP_cTa & ?TaU^a\P]RT B_TRXUXRPcX^]b
4YRaeVc (
AVcW`c^R_TV DaVTZWZTReZ`_d
CPQ[T & 2TacXUXRPcX^]b
DB
20=030
D; ( " U^a 2[Pbb 3Xe 6a^d_b 0 1 2 P]S 3
2B0 2!!! =^ $& U^a 2[Pbb 3Xe 6a^d_b 0 1 2 P]S 3
4= $ #4= $ '4= $! 88!6 44g XP S 882 C"C#
70I0A3>DB
0[ZP[X]T
00) EPacP3daPRT[[ C"C#
;>20C8>=B
4DA>?4
!>2 c^ $>2
=X<7 C"C# ! c^ $#>2
0B=IB %&( 4g XP b 882C# C" EPacP 0[ZP[X]T 00
0DBCA0;80 !>2 c^ $>2 \X]
0B=IB % &&(
DB
#& 25A _Pac $
4<2A58
4DA>?4
4= $!&! 4= $' !
0DBCA0;80 2cXRZ T\XbbX^]b 2B?A 20=030
2B0 2!!! =^ $!
?4A5>A<0=24 4DA>?4
842 $!( 8?$# \X]
0DBCA0;80 0B=IB % &&( % &&(#
24) ;E3 [^f e^[cPVT SXaTRcXeT 4=% U^a RWPaVTab
B054CH
4DA>?4
P]S PRRTbb^aXTb aT`dXaX]V VaTPcTa cWP] $ E02 ^a &$ E32
24 4G 88 !6
44gXPS882 C" EPacP 0[ZP[X]T 00 !>2 c^ $>2
0C4G
4DA>?4
3XaTRcXeT (#(24
24) 4<2A58
CPQ[T &! 8]bcad\T]c B_TRXUXRPcX^]b
C4<?4A0CDA4
A0=64
F0A<D? C8<4
<40BDA4<4=C
<4C7>3
502C>AHB4C
0;0A<
B4C?>8=CB
=^a\P[
4gcT]STS
2^\QdbcXQ[T 6Pb
7XVW 0[Pa\
;^f 0[Pa\
! c^ $^ 2
! c^ $^ 2
! bTR^]Sb
2PcP[hcXR BT]b^a
;4;
;4;
&
2WP_cTa & ?TaU^a\P]RT B_TRXUXRPcX^]b
>_TaPcX]V <P]dP[
CPQ[T &" 2><1DBC81;4 60B Ch_XRP[ ?TaU^a\P]RT B_TRXUXRPcX^]b
A0=64
A4B>;DC8>=
A4?A>3D2818;8CH
A4B?>=B4 C8<4
c^ ;4;
;4; ^a E^[
" ;4; c^ $ ;4; aTPSX]V ^a $ ;4; c^ Ud[[bRP[T aTPSX]V
( ^U UX]P[ aTPSX]V X] " bTR^]Sb ]^a\P[ cT\_TaPcdaT aP]VT
SXUUdbX^] \^STL
CPQ[T &# 2><1DBC81;4 60B 2a^bb ATUTaT]RT 5PRc^ab U^a CXcP] 3TcTRc^a
2><1DBC81;4 60B
0RTc^]T
0RTch[T]T
0Rah[^]XcaX[T
1T]iT]T
1dcP]T
" 1dcPSXT]T
]1dcP]^[
2PaQ^] 3Xbd[UXST
2hR[^WTgP]T
!! 3X\TcWh[QdcP]T
!" 3X\TcWh[_T]cP]T
4cWP]T
4cWh[ 0RTcPcT
4cWh[ 0[R^W^[
4cWh[T]T
5^a\P[STWhST!
6Pb^[X]T d][TPSTS
7T_cP]T
7hSa^VT]
]7TgP]T
8b^QdcP]T
8b^Qdch[ 0RTcPcT
8b^_a^_h[ 0[R^W^[
<TcWP]T
<TcWP]^[
<TcWh[ 8b^Qdch[ ZTc^]T
&!
<D;C8?;H ;4;
A4038=6 1H
&
'
(
'
!!
!
!
&
!
'
&
$
"
%
"
(
$
$
%
<D;C8?;H ;4;
A4038=6 1H
<TcWh[RhR[^WTgP]T
<TcWh[ 4cWh[ :Tc^]T
<TcWh[ CTacXPah 1dch[ 4cWTa
<X]TaP[ B_XaXcb
Xb^>RcP]T
]?T]cP]T
?a^_P]T
'
?a^_h[T]T
'
(
BchaT]T!
CTcaPWhSa^UdaP]
(
C^[dT]T
EX]h[ 0RTcPcT
(
E<? =P_cWP
%
Gh[T]T
!
A4B?>=B4 =>C4B)
CWT R^\_^d]Sb \Ph aTSdRT cWT bT]bXcXeXch
^U cWT R^\QdbcXQ[T VPb bT]b^a Qh _^Xb^]X]V
^a X]WXQXcX]V cWT RPcP[hcXR PRcX^]
! CWTbT R^\_^d]Sb \Ph aTSdRT cWT
bT]bXcXeXch ^U cWT R^\QdbcXQ[T VPb bT]b^a
Qh _^[h\TaXiX]V ^] cWT RPcP[hcXR bdaUPRT
" 5^a P] X]bcad\T]c RP[XQaPcTS ^] ?T]cP]T
\d[cX_[h cWT SXb_[PhTS ;4; eP[dT Qh cWT
R^]eTabX^] UPRc^a PQ^eT c^ VTc cWT cadT ;4;
# CWTbT R^]eTabX^] UPRc^ab bW^d[S QT dbTS
^][h XU cWT R^\QdbcXQ[T VPb Xb Z]^f]
$ CWTbT R^]eTabX^] UPRc^ab PaT ch_XRP[ U^a P
CXcP] 2^\QdbcXQ[T VPb 3TcTRc^a 8]SXeXSdP[
d]Xcb \Ph ePah Qh !$ Ua^\ cWTbT
eP[dTb
2><1DBC81;4 60B
>_TaPcX]V <P]dP[
2WP_cTa ' AT_[PRT\T]c P]S 0RRTbb^ah ?Pacb
4YRaeVc )
CVa]RTV^V_e R_U 2TTVdd`cj ARced
CPQ[T ' 0RRTbb^ah ?Pacb ;Xbc
?0AC
?0AC =>
CXcP] 3TcTRc^a _T]cP]T RP[XQaPcTS
"
;4; bT]b^a
!#!#'
=X<7 QPccTah _PRZ
!($"
=X<7 1PccTah _PRZ eXQaPcX]V
!($!
0[ZP[X]T QPccTah _PRZ
2WPaVTa =X<7
$
!($#
!!# E32
$ E02
0RRTbb^aXTb
BP\_[X]V [X]T
$ \ CTU[^] R^X[TS ]^]R^]SdRcXeT
&
BP\_[X]V [X]T
$ \ CTU[^] R^]SdRcXeT
!
(!$
!
(!%
BP\_[X]V [X]T $ \ CTU[^] R^]SdRcXeT
!
(!&
<P]dP[ Pb_XaPc^a \^Sd[T
!$#$
6Pb \XbTa aTVd[Pc^a \^ST[ A?
&
5[^f aTVd[Pc^a
#%&'($
2P[XQaPcX^] VPb _T]cP]T
'#$"!
2P[XQaPcX^] ZXc \^ST[ X]R[ !$ [_\ aTVd[Pc^a P]S W^bT
#&&
BP\_[X]V [X]T " \ CTU[^] R^]SdRcXeT
#%$
!''
#(
2WPaVTa
CPQ[T '! AT_[PRT\T]c ?Pacb ;Xbc
586DA4
?0AC2><?>=4=C
?0AC =>
1T[c R[X_
BT]b^a RP_ PbbT\Q[h X]R[ bRaTf
"
$$
;43 RP_
"
$#
2P[XQaPcX^] RP_ X]R[ bRaTf
"
(&"
5a^]c RPbT PbbT\Q[h
?aX]cTS RXaRdXc Q^PaS PbbT\Q[h X]R[ SXb_[Ph
'