1
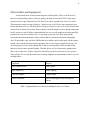
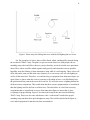
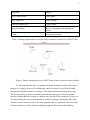
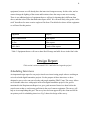
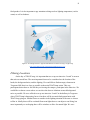
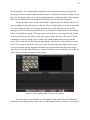
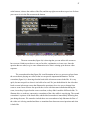
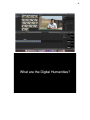
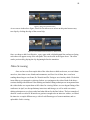
THATCamp Clients: Dr. Tom Ewing, Dr. Quinn Warnick By: Harjas Ahuja, Jack Cobb, David Shapiro CS 4624 Multimedia and Hypertext Dr. Edward Fox 1 Table Of Contents Executive Summary Work Accomplished …....………………………….………………...2 Project Requirements Report Problem Specification ……………………………………………….………3 Needs and Objectives ……………………………………………….……… 3 Group Roles ……………………………………………….…….... 4 Deliverables and Equipment ………………………………………………….……. 4 Design Report Scheduling Interviews ………………………………………………………... 8 Questionnaire ………………………………………………………... 9 Equipment ………………………………………………………... 10 Filming Locations ……………………………………………………….. 11 Scope of Videos ………………………………………………………... 12 Implementation Report Timeline ………………………………………………………… 13 Group Roles/Teamwork ……………...……………...…………….…………… 14 Storyboard ………………………………………….…………… 14 Editing ……………………………………………………...…… 15 Prototype Report Prototype Video …………………………….……………………15 Future Videos …………………………….………………….…....19 Final Cut Pro …………………………….………………….…….20 Refinement Report Video Shooting …………………………….……………………..20 Video Editing …………………………….………………….…….22 Interview Question Refinement …………... ……………..….……………….…....22 Testing Report Audio Editing Techniques ………………………….………………....23 Video Editing Techniques ………………………….………………....24 Video Screening …………………………….………………........25 References 2 Executive Summary *This section is written around 5/5/15 and completion of the project* Work Accomplished Taking stock of what we actually accomplished, it is quite different from what was the original plan. Initially, our clients thought that it would be best to get some interviews about various projects related to the humanities before the weekend of the camp. This was done for two reasons primarily. The first and most important was to get familiar with the camera equipment and how to edit since we had no prior experience in this regard. Then, during the weekend of camp, we would be again be getting interviews, but from the attendees about camp and their thoughts. This was to be for a second set of videos that would again be short interviews, but feature the camp. We would also be gathering extra footage (b roll) for a short film about the camp atmosphere and what the conference is like. Leading up to camp, we actually were able to get close to the intended amount of interviews. We were able to get the experience that we needed before camp so that we didn’t make mistakes during the important interviews. After talking with our clients before camp, we decided to change the type of videos that we were trying to get done. Our clients decided that it would be best to have a couple short length videos that were able to keep the interest of the viewers better than quite a few interviews of attendees. In this regard, we still got the same number of videos and the b roll of the camp that we were initially trying to. However, we made these interviews into two different compilations/montages of the weekend of camp. Both videos used clips and audio from the interviews while showing the b roll of camp in some cases so it wasn’t super boring. The first video is about THATCamp and what the attendees thought of it and the way it was run. The second video is more centered around the attendees thoughts on the humanities and technology’s influence on it. In the end, we did not produce the number of intended videos, but we were able to document the camp in a way that was more applicable and interesting for the client’s purpose and desires. 3 Project Requirements Report *This section is written around 2/25/15 and before we began the project* Problem Specification For our project, we are creating videos for The Humanities and Technology (THAT) Camp Virginia that is being held here at Virginia Tech. It will take place on Friday April 10th and Saturday April 11th. There are several different types of videos that are going to be produced, all with slightly different objectives in mind. Some are before camp while some are during the camp as well. This is not planned to be a traditional documentary, but in some ways it still is. This is mostly due to the nature of the event and the amount of time we have until the weekend of the camp. We did not want to change how things ran, so we are producing this documentary around that fact. Needs and Objectives The first set of videos leading up to camp are a series of smaller interviews with people who are working on or are a part of any type of a digital humanities project. The outcome that we are expecting is that these videos will be very short, to the point, and exciting, so that we can generate interest for THAT Camp and hopefully garner further interest for camp. These videos will be released on the THAT Camp twitter feed and also put up on the website. In addition to generating interest for camp, these interviews allow people who are working on their projects an opportunity to talk about what the are working on and showcase their hard work. It also may attract more people who would love to help with the project. The second set of videos will be captured during the weekend of the camp. These videos will be set up in an interview fashion where people can talk about any projects that they are working on or their experiences with the digital humanities. This is a different approach to capturing the camp because since the camp has many different “scrum” type situations where people just quickly meet up and have mini pow wows. It can be difficult to capture good video and audio of those types of situations. Having people volunteer for these interviews allows us to still get footage of the event and more personal information on various different projects. This proposed solution seems like it would be an effective medium for us to capture the weekend’s proceedings. Once filmed, these interviews are being planned on being released as soon as possible, hopefully while the event is still ongoing, to attract more attention for the event. 4 The last portion of filming that we are planning on doing of the camp is to get a walkthrough of the layout. The purpose of this shot is to allow people who were unable to attend to get a feel for what goes on in the camp and during that weekend. Since the camp is laid out in both Newman Library and Torgerson Hall, the shot is going to be a walkthrough of the various events that are going on, and the overall atmosphere. It is not going to really include any interviews, but it is not finalized at this point. It may end up including some short cuts of video from both different sets of interviews, and some unseen footage from the event, more specifically centered around one or two of the main meetings. This video would most likely be used as a final overview of the entire event, but ultimately would be as focused on any specific project because that is what both sets of the previous interviews would be for. Group Roles Now we are going to establish the timeline for our project, the deliverables, group roles, and how we will go about capturing the video for each portion of the project. No one in our group has had previous video production experience, so we are all going to be helping each other out with the various roles that we are each going to be doing for the production. Jack will be doing much of the editing of the videos. Harjas will be doing most of the set production and lighting. David will primarily be doing the filming and audio. Harjas will also be helping out with the audio. As mentioned before, since our group is rather inexperienced with these tasks, we will all be assisting with all the roles, and none are set in stone. If we find that one of the group is a prodigy or just much better at one role versus another, we will make sure that we are utilizing them in that role as much as possible so that we are producing the best video possible. Due to our lack of experience, All the members of our group have attended the class held by Innovation Space about advanced videography as well as went tp the the TV Productions Studio in Whitemore Hall. Both of those places were great resources and were able to answer the questions that we had about our project. We also took the class from Innovation Space so that we can use the better cameras, sound equipment, and lighting that they offer for reservations. They also will allow us to use their machines for editing the videos if we want to use their high end software. Using the more high end editing software has its advantages over using something that is free such as Windows Movie Maker, especially if you need color restoration, graphic overlays, or multiple video tracks that need to be synced or scenes edited out of them. 5 Deliverables and Equipment As discussed, there are three main categories of deliverables. There is the first set of interviews and resulting videos, which are going to be done by the time THAT Camp comes around, which is April 10th and 11th. This first set of videos is going to be at least 10 videos. That means we need to average just above 1 interview per week. Due to time constraints from breaks and other work, we will most likely average two interviews per week, which would result in more than 10 interviews in total. That would give us the freedom to ensure quality editing and be able to take a week off before camp and make sure we were all caught up in editing and fully prepared for camp. For each interview, we are going to get one of the Sony professional camcorders that Innovation Space offers to those that have taken the advanced videography class. If unavailable, they also have DSLRs that are available, and are also good. All the camera rentals come with the necessary audio equipment, but we can request a tripod if necessary. We are also going to get one of the lighting kits so that we can be prepared if the location of the interview does not have optimal lighting. The table below is a list of necessary equipment for these type of interviews. Figure 1 shows the most likely layout for the interviews in a generic office setting. The set will obviously have to change slightly to accommodate for office size and available space. Equipment Purpose Sony Camera/DSLR Film Capture Stage Lights (x3) Proper lighting Lapel Microphone Capture Audio Audio Transmitter Receive microphone audio and input to camera Table 1: Equipment that we will use for filming the first set of videos 6 Figure 1: Room setup for filming interviews with the full lighting kits in a room For The second set of videos, those will be filmed, edited, and hopefully released during the weekend of THAT Camp. The plan is to get oneonone interviews with people who are attending camp who would like to discuss a project that they are involved with or are passionate about. These videos would be edited together really quickly and released as soon as possible, hopefully soon after filming, to draw attention to camp while it is still ongoing. These videos will all be shot on the same set and in the same location, so we can set up a nice set with lighting to use for all the interviews. Therefore, we would need to get equipment from Innovation Space yet again. Since we know when this event is occurring so far ahead of time, we will definitely have the professional Sony camcorder reserved for our use. We will also reserve a lighting kit that has all the necessary components. This would mean that there is more equipment that we would need than the lighting used for the first set of interviews. The table below is a list of the necessary components that we would need to reserve from Innovation Space to ensure that we have everything for proper filming. Figure 2 also shows the setup for the interviews held during THAT Camp. There was also some talk about a video “confessional” booth where people attending camp can share their quick thoughts on camp. That will be included in the figure as well, and all equipment for that has also been accounted for. 7 Equipment Purpose Sony Camera/DSLR Film Capture Stage Lights (x4) Proper lighting Lapel Microphone (x2) Capture Audio Audio Transmitter Receive microphone audio and input to camera Tripod Setup camera properly Table 2: Filming equipment that we will use for the second set of interviews at THAT Camp Figure 2: Setup for doing interviews at THAT Camp, where a room may not be available For The third and final video, it is going to be filmed during the weekend of the camp is going on. It is going to be more of a walkthrough, and will consist of a lot of B Roll footage interspersed with leftover interview footage or video booth confessional footage about camp. This will most likely be the last video that is released due to the type of video it is, and the amount of editing that has to be done. In addition, since the goal of the second set of videos is to be released during the camp to draw attention to it while its going on, the editing of this video will have to take a backseat to those. The only equipment that we would need is the exact same from the second set of videos, minus the lighting equipment. We do not need the lighting 8 equipment, because we will already have the interview footage necessary for this video, and we can not change the lighting of the rooms and locations where the camp events are occurring. There is one additional piece of equipment that we will get for shooting that is different from above, and that is the GoPro that Innovation Space offers. We will most likely also get the “selfie stick” that allows for some creative angles to film from. The table below shows all the equipment we will need for this portion. Equipment Purpose Sony Camera/DSLR Film capture Go Pro Film capture Selfie Stick Creative film capture Table 3: Equipment that we will use to shoot B roll footage and stills for use in the final video Design Report *This section is written around 2/25/15 and before we began the project* Scheduling Interviews An important design aspect for our project involves us interviewing people who are working on or involved with digital humanities projects. For the purpose of these interviews we have designed a survey to be sent out to faculty and people attending THATCamp. The survey allows us to schedule interviews with people involved in digital humanities projects. Our goal as mentioned in the Requirements Report is to get a good amount of interviews done before the actual event so that we can become proficient in the use of camera equipment. The survey will help us in accomplishing this goal. The survey has also been approved by the client and will be our primary tool for scheduling interviews. Fig.3 shows the design of the survey. 9 Figure 3: Questionnaire that is used to ask faculty about availability for project interviews Questionnaire The second design aspect for our project is a set of questions that we have formulated to ask the people who we interview to better understand their involvement with THATCamp. These questions will make them talk about their digital humanities projects in detail and what THATCamp means to them. We are still in the process of finalizing these questions with our client before we start conducting the formal interviews. Here is a draft of questions that we intend to ask: Q1. Please describe a digital humanities project that you have or intend to work on. Q2. Describe a few benefits that technology has brought to the humanities department. Q3. How does THATCamp serve to benefit the digital humanities project you are working on? 10 Q4. Can you name a few people who could be good resources for our project? Equipment Another design aspect of our project is the equipment we use to conduct interviews. This includes video cameras, external microphones, lighting, tripods, etc. Choice of equipment is very important in our final product, so we have consulted with Innovation Space on what equipment will be most effective in producing our videos. For our video cameras, we will be using Sony PMWEX1R high definition video cameras. These cameras are capable of capturing video up to a resolution of 1080p, at 60 frames per second. They provide about 240 minutes of continuous use on one battery charge. Each camera will be lent to us with one extra battery, so battery life should not pose any type of restriction when we are recording. We have taken a class on advanced video capture, where we were trained on topics such as configuring the PMWEX1R to different lighting situations and filming from various venues. It is important that we configure the camera properly in order to capture the highest quality shots, and come out with a professional looking final result. We plan to use one GoPro camera mounted on a specially designed headband to capture BRoll from a first person perspective. We believe that this footage will provide a unique element to our video documenting of THATCamp. For our microphones, we will be using wireless lavalier microphones when conducting interviews. In order to capture the highest possible quality when conducting interviews, we have been recommended by Innovation Space to use a wireless lavalier microphone; this way the audio coming from the interview subject does not have to travel far before it is recorded by a microphone. We will have a boom microphone on hand if needed, but are not expecting to use it. We also plan to use the shotgun microphone attached to the camera while capturing BRoll with the PMWEX1R.. We have been trained by Innovation Space on how to attach external microphones to the camera, and how to properly attach one to the interview subject. Lavalier microphones consist of a transmitter and a receiver. The receiver must be powered on and have strong batteries in it. The boom microphone will plug directly into the video camera. We have also been trained on how to configure all of these microphones. For our lighting needs, we will be renting a Lowell light kit from Innovation Space. We plan to use a 3 piece light kit, with 2 LED spotlights and one softbox. These will be primarily used to light an area for conducting interviews. We will arrange the lights according to those as shown in Figure 4. We have been trained by Innovation Space on how to properly light a scene. It is important to have sufficient lighting when filming a scene so we have a professional looking 11 final product. It is also important to pay attention to things such as lighting temperature (cool to warm) as well as shadows. Figure 4: An example of how to light an individual for an interview using a 3 light setup http://www.bhphotovideo.com/images/Lightfinterviews1.jpg Filming Locations On the day of THATCamp, it is important that we set up our interview “booth” in an area that suits our needs best. The most important factors to be considered are the location of the booth, the background noise, and the lighting. We would like to find an empty classroom in Torgerson Hall, that is as close as possible to the main THATCamp action. This way, participants do not have to feel like they are leaving the camp to participate in the interview. We would like to choose a room where we can close the doors to eliminate as much background noise as possible. We were offered to set up our interview “booth” in the hallway in Torgerson where THATCamp is happening, but we fear there will be too much background noise with THATCamp going on. Another factor to consider is the lighting situation of the area we choose to film in. Ideally there will be overhead fluorescent lights that we can adjust to our liking, but more importantly we are hoping there will be windows to allow for natural light. We were 12 recommended by Innovation Space to keep lights in scene low, and use lights from our lighting kit to illuminate the scene we are filming. When collecting BRoll, we would like for our shots to be as candid as possible. That is why we will be using a GoPro mounted in a first person perspective. The idea is that the person filming will be participating in various THATCamp activities and capturing footage according to what he is doing/seeing. We will also be using the Sony camcorders along with tripods to get stable, smooth BRoll. Scope of Videos The purpose of all three distinct types of videos that we will be creating has been discussed lightly before. However, it needs to be expanded upon because the design of the project is due to the scope of the different videos. Although the project was intended to be a documentary of THATCamp, after our meeting with the client, it was decided that we will be going with three different sets of videos, all with slightly different purposes. The first set of videos will be produced in the weeks leading up to camp, and will be showcasing different digital humanities projects that already exist at Virginia Tech. The purpose of this is to try and generate interest in the camp and to get those people to attend THATCamp. Since these videos will be released through the THATCamp Virginia Twitter feed, they will be highlight the projects and other eye catching aspects of digital humanities. The length of the videos is one of the most important factors that we have to consider while producing our videos. This is due to the fact that people tend to have a very short attention span when dealing with videos on the internet, so we must take advantage of that fact and produce our videos in such a way that they have the most profound effect. The second set of videos will be produced while at camp by interviewing camp participants. It doesn’t matter if they are just attending camp or if they are a part of a humanities project, anyone and everyone associated to digital humanities will be an important resource to us. The purpose of these videos is to showcase the atmosphere of the camp and to give people a place to express their feelings about digital humanities. These videos will be a little bit longer than the first set. They will also be released through the twitter account, so again we must consider the attention span of the intended audience. However, since these videos will be about camp events, it will draw the attention of people who made it to camp, or people who wanted to go but were unable to do so. A fair assumption to make here would be that the attention span of this audience will be slightly more since they will be more interested in the content of the videos due to their attendance at the camp. The last video is a quick walkthrough of the camp while the camp is going on during the weekend. Since this is a timelapse video and 13 there will be no interview footage, it is not going to be very long. However, it will still be longer than the first set of video interviews. Implementation Report *This section is written around 3/10/15 and during the early stages of the project* Timeline There is not a set timeline for the various videos that we will be creating through the course of the project. However, as discussed previously, we will be creating the first set of videos all the way up until the 10th and 11th of April, which is the date of THAT Camp. That weekend we will be shooting the video for the second set of videos as well as the video exhibiting the walkthrough of the camp activities. Upon completion of the camp, we expect to have all footage produced and available for release and use for THAT Camp. Therefore, we will be rolling out videos as we are creating them. That is another benefit of the fact that these videos are intended to be very small scale and short so that they can be used as a teaser for the weekend of camp. Depending on how many interviews we are able to get during camp and how much footage we get for the walkthrough, we hope to have them all edited and cut together within the following week or two. However, this only applies if we do not have any equipment malfunctions or any software problems at Innovation Space that makes it difficult to edit the videos and produce them within that timeframe. 14 Figure 5 : Illustrates the planned schedule of shooting for the various tasks. Blue is the start time and orange is the duration Group Roles / Teamwork As stated earlier all of our group members have little or no experience with video production and handling equipment. However the class at Innovation Space helped us get a head start on the different types of equipment and services available to us. This was a major factor when designing the project timeline and in our communications with the client. We have designed the project timeline in such a way that it will allow us to get plenty of hands on experience with using equipment and producing few videos before the camp actually takes place. The way our current timeline stands we have all the group members contributing equally to every aspect of the project and we will keep switching roles such that every members gets a chance to experience all the different aspects of the project. This project plan and division of roles was much appreciated by the client as well. Storyboard S ince we are creating videos, it is helpful to have a storyboard. Storyboards allow you to outline the video and ensure that you have key scenes in place in the video and create descriptions for those moments. It is a better way to ensure the pace of the video and allows you to create an outline for the video before shooting even occurs. It also allows everyone involved 15 in shooting the video and production to be on the same page for what the scope of the video is. Another benefit of utilizing a storyboard is that you are forced to make crucial decisions early on and it helps to get all the important details of the scene presented. That way, you are also more likely to eliminate unnecessary footage and content, which is extremely important for our videos since there purpose is to be short and concise. Editing Editing will consist of gathering all of the video footage, audio, and still shots (if any), and organizing it into useable, indexed material. This consists of labeling and tagging each shot with relevant information (Who is in the shot, what topic, location of shot, date/time of shot) and important timestamps (What time major events happen in the shot). Organizing our media in this way will make the rest of the editing process much more efficient. At this point we can begin to piece together our final product. We will only be using footage we collected ourselves, we do not plan to use any type of stock footage or pictures. We will be editing all footage using Final Cut Pro X, in the Innovation Space lab. Using Final Cut Pro X, we will create title screens, credits, and other text screens. Final Cut Pro X will also allow us to splice clips together as well as trim clips to fit our needs. We will also be doing post production on the video footage to adjust light and color levels. Prototype Report *This section is written around 3/25/15 and during the early stages of the project* Prototype Video Thus far, we have only talked about the videos that we are planning on doing, but this section of the report will deal with what we have done already, and show screens from one of the already finished interviews, as well as the editing and flow of the videos. The first set of videos that lead up to the actual weekend of camp are the only ones that we have worked on thus far, because the other set of interviews and the other video are going to be shot during the weekend of THAT Camp. We have done a few interviews, but unfortunately the footage was corrupted, and we lost significant portions of the interview and as such they are no longer usable. We are rescheduling the interviews to reshoot and get the material again. We have footage from an interview with Karan Bhatia, who is a fellow student in CS 4264, and is doing a project about 16 Soviet Era history. We contacted Karan along with a few other groups from our class that all have projects that are related to digital humanities and we asked if they would be willing to do an interview. His group’s project is to redo and help implement a website that allows for navigation and access to various topics and information related to the Soviet Union and its history. For this prototype video, we have constructed a complete interview that also allows us to use as a template for the other interviews that we will be creating leading up to camp, after which we will be editing the interviews from that weekend. Most of the interviews that we will be doing prior to the weekend of camp will have a very similar flow and questions, so this template will be very helpful for editing. The below screen shots will show various aspects of the editing we have been doing for the videos as well as key aspects of the interview video itself. The first screenshot is a picture of Final Cut Pro, which is the editing software that we use to edit the videos. This is what it looks like after just importing the video that we want, and about to create a new movie, which is just the term for a new video, no matter what the length. As you can see, we have the footage already imported, and ready to be selected and broken down into various clips. Down to the right and left, there are various tools that we use to create the video, which we will be discussed further in depth in a later section. Figure 6: Screen capture from early interview editing The picture that is featured below is a screenshot of what it looks like after editing has been done to the original footage, and we have a video formatted how we want it. As you can see 17 at the bottom, it shows the outline of the film, and the top right screen shows a preview of where your cursor is at in the film stream on the bottom. Figure 7: This screen dump is quick shot of the interview being edited and the flow of the video The next screenshot (figure 8a) is showing that you can utilize title screens to have text on a blank screen that we can use for titles, explanation, or in our case, show the question that we asked, or give some information as to what is coming up in the next video sequence. The screenshot after that (figure 8b) is an illustration on how we get text overlayed onto the screen that is playing our video so that we can provide important information. The last screenshot (figure 8c) is showing what the break slide in between scenes looks like. It is very quick, but not too quick to where it isn’t able to be read. We just decided that for the video that break screens in between scenes that illustrate the question to be a nice way to change from scene to scene. In an effort to also provide the viewer with that same information during the scene, incase they forgot what the scene was about, or they didn’t catch the full break slide. To illustrate this, we took two consecutive screenshots of the video while it was playing. The second screenshot is a picture of the break slide, and the third screenshot is immediately following that, just during the scene. We wanted to include those two screenshots to help illustrate the flow of the video as it is being watched and how we transition from between scenes/questions and what it looks like. 18 19 Figures 8a (top), 8b (middle), 8c (bottom): Illustrate the transition from showing the questions and into the scene, where you can quickly tell what question is being answered Future Videos Next, we will be talking about the flow of the set of videos to be shot during the weekend of THATCamp 2015. The experience that we gained while taking these primary interviews will be very valuable to us come April since this teaches us how to use the equipment efficiently and also editing of videos using Final Cut Pro. There will be two sets of videos that we will be shooting during the weekend of camp, the first set will be interviews of people attending camp and the prototype of those will be very similar to the primary interviews we have conducted. We will be changing the set of questions we ask these people since they will be directly connected to camp and more valuable resources. Not all of the interviews here will be used in our main documentary, rather some of them will make up for Broll as we showcase the events of camp. The second video of this set of videos will be a comprehensive video of camp that will highlight all major events that take place over the weekend. It will be very important for our team to split up roles efficiently in order to capture all necessary events at camp. As the material of this video will be very important for our project we need to make sure the editing is done correctly and the file does not get corrupted like one of our previous interviews. We will be working very hard over the next couple of weeks to edit and capture as many videos as we can to become proficient before the weekend of camp. The prototype for our final video will consist of recording all major events of camp along with all the interviews and Broll material. The final step will be to bring 20 everything together in an organized way and edit all the recordings using Final Cut Pro and turn our footage into usable video. Final Cut Pro We are using Final Cut Pro to edit all of our footage, and create our deliverables. Innovation Space is providing both the software (Final Cut Pro) and the hardware (iMacs) to make this possible. Each interview will follow the same template as described in the following paragraph. Each interview will open with a title screen. This title screen was created using the Titles menu in Final Cut Pro. Under the titles menu, we have selected the “center right aligned elastic title” This contains one main title with two right aligned sub titles directly below. We are using a black and white color scheme that can be seen in other title screens throughout the video. In the following clip, the interviewee is responding to the question “What are the Digital Humanities.” In this clip we again use the Titles menu but this time it is overlaid over the clip of the interviewee talking instead of being a stand alone title screen. In this case, we use a “lower left aligned” title screen, and white text because it provides the best contrast. The purpose of overlaying the title onto the video clip is to provide clarification to the viewer on what is being talked about. Each clip obtained by using the trimming tool. This allows us to pick only the important footage we want in our final product from the much larger sections of footage obtained when we are recording interviews. This also allows us to cut out the footage between interview questions, and created smoother transitions. Refinement Report *This section is written around 4/7/15 and right around the time of THATCamp filming* Video Shooting In order to improve the overall quality of the footage we are gathering, we will focus on background noise, lighting, configuring the recording equipment correctly, paying special detail to setting up our shot, and focusing on our interview subject. Our first two interviews were shot 21 in the software engineering lab in the basement of McBryde Hall. This room has one server that is up and running 24/7. Although we recognized that it would create background noise, we thought that use on a directional audio recorder and post production would take care of this issue. Even with the use of a directional audio recorder, that background noise could still be heard, and post production efforts were futile. We plan to take care when lighting the scene to reduce shadows behind the subject, as well as minimize natural lighting. The problem natural lighting poses is if the sunlight level changes (such as a clouds moving in front of the sun), the camera needs to be white balanced again. We will also focus on configuring our equipment properly before beginning to record. We will use auto focus instead of manual focus, because we have found it is just as effective if not more effective. We plan to frame our future interviews in a way that the interview subject is not in the direct center of the shot, but instead off to the side a bit. We found that it looks better this way, and gives more of an interview “feel.” We will also pay special attention to our interview subject, making sure they keep eye contact with the interviewer, pause before and after their responses (for editing purposes) as well as refrain from playing with hands, playing with hair, touching face, fidgeting, etc. During the weekend of THATCamp, we were able to get some great footage of the camp proceeding and interviews. The conference began around midday on Friday, and we were able to move around between the four different workshops that were going on initially and get some great Broll footage of the event. We shot some footage of campus as well that we hoped that we could use for some of the compilation video of camp. We did not get any interviews shot on Friday, because the conference organizers thought that it would be better to wait until Saturday, when there are a few more people attending, and not throwing anyone off the event. On Saturday, we arrived before the workshops started at 9 am, and we set up an interview location on the first floor of Newman Library. After discussing the location with Dr Warnick, we got his input on which chairs to use, and we even moved a fake plant to try and help improve the background. After a couple interviews, one of the people attending the event gave us some wonderful tips and advice on how to setup the interview set and lighting, to help eliminate the shadows and get the best shot possible. We also had a second camera setup as well as the audio recorder incase something went wrong with the EX1R or the batteries went dead in the audio kit. The batteries actually did go out on one of the interviews, so we did a great job in planning ahead for that circumstance. In total we got about 15 interviews recorded of event attendees, where one was Dr Ewing and another was the main event organizer, Amanda French. In addition to the 22 interviews, we also recorded some additional B roll for use in the main video of the camp. That footage was of a couple of the workshops and the closing ceremonies once the camp was done at 4 pm. Video Editing In an effort to increase the quality of the videos, we are planning to learn more about what editing features we can utilize in innovation space. Since we will be using final cut pro to edit our videos, we have been familiarizing ourselves with the necessary tools, as well as learning more about the lesser utilized features, so we can edit the videos the best we can with the full power of the software at our disposal. To help make the interview videos more engaging, we have started to make it a point of using fade in and fade outs to various relevant materials, whether it is screenshots of websites video of artifacts. This helps to keep the viewer engaged and interested in the content that is being displayed. To take it a step further, the staff at innovation space has been really helpful in teaching us more about the editing features that we are using so that we are able to create better videos. They are there to help people in innovation space with their editing if they have questions, but we have been using them in a slightly different manner, where we will ask them for small amounts of help if we need it, but we will also get their opinions on what they consider to be the best ways to edit scenes and videos together. We have also been looking more into transitions between scenes, and have begun using cross dissolves to make those transitions better. In addition to visual transitions between scenes, we have been using the audio effects that are available in final cut pro. You can very easily separate the audio from the video, and once that is done, you can keep the audio as voice over for showing other material we have, for instance, a screenshot, or shot of artifacts. We have also been using another feature of the audio effects, and that has been the logarithmic audio fade. This feature allows us to fade the audio going into the next scene, or beginning the scene, so the sound seems less harsh and abrupt. Also, the logarithmic fade sounds a lot better than just a linear fade of the audio because the logarithmic fade sounds more akin to how natural audio decays versus a linear fade. Interview Question Refinement The quality of our interview questions that we had initially drafted had to be refined over time. Our goal was to pose thought provoking questions to our interviewees so that we can show what digital humanities means to different people. Our first two interviewees were seniors 23 majoring in Computer Science and group leaders for different digital humanities groups. We focussed on asking them very straightforward, to the point questions just as we had mentioned in the Questionnaire in the design report. Our goal was to understand the motivation behind them choosing to work on a digital humanities project and get a brief description of the work that they were doing. Our next interviewee was a Phd student doing research in the Computer Science department. His research was primarily focussed on translating regular english language pages into Arabic. For this interview we had to change the requirements for the Interview Questions and had to let the interviewee take charge by going through important aspects of his research. The only important question that we had to include in this interview was for him to describe how his research related to the digital humanities. The refinement of interview questions was dependent on a couple of factors, such as the person we were interviewing and also how much experience the person had working with digital humanities. The biggest challenge that we came across while refining questions was when we were scheduled to interview one of our clients. Dr. Warnick had a great amount of experience with digital humanities and is directly involved with THATCamp. We wanted to change our questions to make them more specific to his project and the workshop he was leading at camp. Our group decided that the best way to go about it was to discuss the questions with him beforehand so we don't miss out on any important information. He helped us reformat a couple questions that would sync with his answers in a better manner. We now have a set of three to drafts for potential questions that we could ask people at camp depending on their experiences. Testing Report *This section is written around 4/25/15 and after we filmed camp and in post production* Audio Editing Techniques Upon inspection of footage shot on Saturday, April 11th, it was to our dismay that a small fraction of the audio we had collected was not satisfactory. However, we were prepared for such an incident, and were collecting audio from a secondary source as well, using a professional audio recorder. Using Final Cut Pro, we were able to accomplish the following: 1. Remove sub satisfactory audio from accompanied video clip. 2. Add audio from audio recorder to clip and 24 sync both tracks. The result was a clean looking clip with clear audio. We used this technique to doctor 2 clips. While conducting interviews, we dealt with intermittent background noise, coming from a nearby elevator. In a few clips we shot, it was slightly noticeable. In order to fix this problem, we applied a specialized filter to the audio track. This filter was included with Final Cut Pro and is specifically designed to reduce background noise within a specific frequency. We were successful in cleaning up our footage, to the point tho no background noise can be heard. We feel this contributed to the overall quality of our final product. We chose to include background music to our videos, because it adds a nice tone to the videos. Incorporating this into our project posed several challenges that required a bit of creativity to overcome. Choosing the correct volume for background music can be tough, especially when dealing with many clips with slightly different audio levels. The final decision must take into account each clip, and compliment it well. We slowly fade in the music a few seconds after the video begins, and fade out a few seconds after the final title screen is displayed. This giver the final product a much smoother feel, without abrupt changes in the audio. Finally, we made audio related changes to each interview clip. Because we show many different interview clips back to back to back, we found it necessary to fade out the audio quickly at the end of each clip, as well as fade in quickly at the beginning of each clip. This created much smoother transitions between the many clips we play. Video Editing Techniques Final Cut Pro has a variety of video editing techniques that helped us in making our transitions smooth. Adding transitions gave our videos more fluidity and allowed for a fluid change from clip to clip. Once the transition was added we could even adjust its parameters. Final Cut Pro also allowed us to modify the transition effect in motion. The feature that we used the most to edit our videos was the cross dissolve that allowed us to select an edit point, then apply the transition with a few quick actions. 25 Figure 9: Edit point in Final Cut Pro As we can see in the above figure, Final Cut Pro allows us to select an edit point between any two clips by clicking the edge of the second clip. Figure 10: Cross dissolve between scenes in Final Cut Pro Once we chose to add Cross Dissolve, a grey space with a slight diagonal line and arrows facing each other will appear on top of the edit point. This can be seen in the figure above. The effect can be previewed by playing the clip beginning before the transition. Video Screening Once we have our first couple edits of the video that we think are decent, we watch them ourselves, show them to our friends and roommates, and for a few of them, have even been sending them along to our clients, Dr. Warnick and Dr. Ewing to see what they think. We do this in an effort to get constructive criticism for how we can improve the videos. Both of the above sections dealing with different Video Editing and Audio Editing techniques are incorporated into the videos before we export them as full videos for viewing. Before we even began filming of the conference in April, we shot preliminary interviews and footage, as well as tried out various editing techniques to see what worked and what did not for the final videos. The best example of chain of events was after Dr Warnick was gracious enough to do an interview with us, we edited his interview a couple different ways, with a few different types of scene transitions, and we uploaded it for his viewing. 26 From the feedback he gave us on his video and the several other interviews about various digital humanities related projects, we were able to improve both his interview as well as the other we had already shot and edited. We were also able to test some new ways of shooting and capturing audio that we were able to utilize for the weekend of camp and capture the best interviews possible. The first video that we finished of the weekend, we again uploaded it for our clients and were able to get preliminary feedback. From there, we were able to make any changes that were necessary to improve the quality of the videos, like adding more relevant b roll footage, and lowering the volume of the background track a minor amount, which would seem like an insignificant change, but ultimately can change the entire video. Since videos can not really be “tested”, it is extremely important to get feedback from outside sources, especially those with no prior knowledge of the interviews, so that we will get honest and critical feedback about the videos that help to gauge the quality of the videos. 27 References Apple (author) "Adding Transition Between Clips." Final Cut Pro 7 User Manual. Apple. Web. 6 May 2015. < https://documentation.apple.com/en/finalcutpro/usermanual/index.html#chapter=47%26section =2%26tasks=true > Perlmutter, Patrick. "Applying the Cross Dissolve Transition in Final Cut Pro X." Tutorial for Final Cut Pro X. Infinit Community. Web. 25 Apr. 2015. < http://infinit.io/community/applyingthecrossdissolvetransitioninfinalcutprox/ > Jensen, Doug. "Mastering the Sony PMWEX1 & EX1R." Instructional Videos and Innovative Production Tools for Video, Television and Digital Photography. Vortex Media. Web. 5 Apr. 2015. < http://www.vortexmedia.com/DVD_EX1.html > Robertson, Mark. "WHEN AND HOW TO USE A WIRELESS LAVALIER MIC." Reel Videos: Tutorials, Tips and Interviews. Reeleso, 8 Aug. 2012. Web. 7 Apr. 2015. < http://www.reelseo.com/wirelesslavaliermic/ > "Zoom H4n Audio Recorder Operating Guide." Computing and Technology Help Pages. The Evergreen State College. Web. 8 Apr. 2015. < http://wikis.evergreen.edu/computing/index.php/Zoom_H4n_Audio_Recorder_Operating_Guid e > Driscoll, Edward. "RECORDING GOOD AUDIO FOR VIDEO." Videomaker, 1 Apr. 2009. Web. 2 Apr. 2015. <http://www.videomaker.com/article/14216recordinggoodaudioforvideo> 28 Grula, Lorraine. "Video Lighting Techniques for Videos and Documentaries." Make A Documentary. DesktopDocumentaries. Web. 5 Apr. 2015. < http://www.desktopdocumentaries.com/videolightingtechniques.html > "Reducing Background Noise in FCP." Apple Support Communities. Apple, 3 Nov. 2009. Web. 15 Apr. 2015. <https://discussions.apple.com/thread/2221200> Innovation Space Website: http://www.is.vt.edu/ THATCamp Website: http://virginia2015.thatcamp.org/