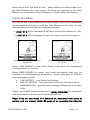
1
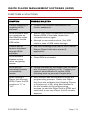
COPYRIGHT© 2014 RIDDELL INC. ALL RIGHTS RESERVED. REPRODUCTION OF THIS MANUAL IN ANY MEDIUM WITHOUT THE EXPRESS PERMISSION OF RIDDELL IS PROHIBITED. LIMITED RIGHTS NOTICE TECHNICAL DATA/DOCUMENTATION P/N R63314 v1.08 Introduction ................................................................................4 Warnings .....................................................................................5 Product Overview ........................................................................7 Setup Summary ......................................................................... 11 Equipment Guide - Alert Monitor ............................................... 12 Battery Care ............................................................................................ 12 Controls and Indicators ........................................................................... 13 Navigation – Screens & Menus ............................................................... 15 Equipment Guide - Player Unit ................................................... 19 Battery Care ............................................................................................ 19 Controls and Indicators ........................................................................... 19 Installation into Helmets ......................................................................... 23 Software Guide – InSite Player Management .............................. 30 Equipment Assignments ......................................................................... 30 Alert Monitor Setup ............................................................................ 30 Player Unit Setup ................................................................................ 32 Player Setup ............................................................................................ 35 System Settings ....................................................................................... 38 Team Management ................................................................................. 39 Multi-Team Setup ............................................................................... 39 Transfers Between Teams ................................................................... 41 Deleting Players or Equipment ........................................................... 46 Using InSite................................................................................ 47 P/N R63314 v1.08 Page | 2 Before Play .............................................................................................. 47 During Play - Using Alerts........................................................................ 49 Alert Types .......................................................................................... 50 Viewing New Alerts ............................................................................. 51 Alert Response .................................................................................... 51 After Play ................................................................................................ 52 Equipment Management .................................................................... 52 Alert Management .............................................................................. 53 Maintenance ............................................................................. 55 Cleaning InSite Equipment ...................................................................... 55 Battery Care ............................................................................................ 56 Long-Term (End-of-Season) Storage ....................................................... 56 Reconditioning ........................................................................................ 56 Software and Firmware Updates ............................................................ 58 Troubleshooting ........................................................................ 65 Alert Monitor .......................................................................................... 65 Player Unit .............................................................................................. 67 Sending Test Alerts (Test Mode) ......................................................... 67 InSite Player Management Software (ISPM) ........................................... 70 Contact Information................................................................... 71 Compliance Information............................................................. 71 Warranty ................................................................................... 72 P/N R63314 v1.08 Page | 3 For over 80 years, Riddell has been the recognized leader in helmet technology and innovation. Founded with the mission to make sports equipment safer, better and easier to use, Riddell continues to address the evolving protective equipment needs of the athlete. Today, Riddell equipment is seen on football fields from coast-to-coast, protecting every level of player—from youth athletes to NFL professionals. Riddell is always working on the next generation of helmet technology. Its newest product introduction, the Riddell InSite Impact Response System, is the latest in a series of recent innovations incorporating state-of-the-art features that are new to the football field. Riddell InSite is a new integrated monitoring and alerting tool designed specifically for the proactive protection of football players. As the first to implement head impact monitoring and recording systems, Riddell developed InSite using data collected by Riddell’s Sideline Response System (SRS) with Head Impact Telemetry (HITS). Since 2004, Riddell SRS has analyzed millions of impacts from youth to elite football competition, and its data has led to impactful changes to rules, how the game is played and coached, and has informed new helmet designs with enhanced protective benefits. Riddell InSite utilizes new integrated technology to monitor and record significant head impacts sustained during a football game or practice. Coaches and other sideline staff will now have Riddell InSite’s unique vantage point of what goes on inside the helmet at the time of contact. InSite is designed to alert team staff of high risk single and multiple head impacts, and enable improved identification and management of concussion. You must read this User Guide completely before set-up and use of the InSite Impact Response System. If you need assistance with use of the system, please contact InSite Customer Support at (800) 725-5338 or [email protected]. At Riddell, improving athlete protection remains paramount. Helmet technology innovations such as InSite underscore Riddell’s commitment to designing and manufacturing the best protective equipment for football players at all levels. P/N R63314 v1.08 Page | 4 Contact in football may result in CONCUSSION-BRAIN INJURY which no helmet can prevent. Symptoms include: loss of consciousness or memory, dizziness, headache, nausea or confusion. If you have symptoms, immediately stop playing and report them to your coach, trainer and parents. Do not return to a game or practice until all symptoms are gone and you have received MEDICAL CLEARANCE. Ignoring this warning may lead to another and more serious or fatal brain injury. Do not use your helmet to butt, ram or spear an opposing player. This is in violation of the football rules and such use can result in severe head or neck injuries, paralysis or death to you and possible injury to your opponent. NO HELMET CAN PREVENT HEAD OR NECK INJURIES A PLAYER MIGHT RECEIVE WHILE PARTICIPATING IN FOOTBALL. Riddell InSite alerts the sideline to significant, single or multiple impacts that MAY result in a concussion or other head injury. Riddell InSite is NOT a medical device. Riddell InSite is NOT a protective device. RIDDELL INSITE DOES NOT DIAGNOSE CONCUSSIONS OR OTHER HEAD INJURIES AND IS NOT INTENDED TO BE USED AS A DIAGNOSTIC DEVICE. Serious injury and/or concussion may occur even if no alert is reported. Riddell InSite transmits alerts at research-based thresholds; however, concussion may occur at impacts below these thresholds. Riddell InSite is intended to be used as a supplement to a team’s concussion protocol. Riddell InSite should not be used to replace the existing Safety Plans and Concussion protocols the team, school or organization has in place. In all instances when the Alert Monitor signals an Alert, staff should execute its concussion assessment protocol. The Centers for P/N R63314 v1.08 Page | 5 Disease Control (CDC, www.cdc.gov/concussion) and USA Football (http://usafootball.com/health-safety/concussion-awareness) offer concussion management guidelines. Riddell InSite must be properly installed and configured by the user to allow for correct function and transmission of impact Alerts (see Setup Summary, p.11, for installation instructions). For proper performance, the Riddell InSite Alert Monitor must be used within fifty (50) yards of the instrumented players (see During Play - Using Alerts, p.49). If a Player Unit generates an Alert outside the communication range of fifty yards, the Alert is saved and transmitted when the equipment is again within range. DO NOT MODIFY, CHANGE, OR ALTER THE DEVICE IN ANY WAY. Player units must be reconditioned annually to ensure proper performance. For questions regarding Riddell InSite or reconditioning: o Call 1 (800) 275-5338 between 8 a.m. and 6 p.m. C.S.T. o On the web, go to: http://www.riddell.com/ o Email [email protected] P/N R63314 v1.08 Page | 6 The InSite Impact Response System is composed of the following components: 1. InSite Alert Monitor (with two rechargeable AA batteries) 2. USB cable and AC charger 3. InSite Overliner (included with new helmet purchase, or retrofit package sold separately) 4. InSite Player Unit (included with new helmet purchase, or retrofit package sold separately) 5. InSite Player Management (ISPM) software (not shown) P/N R63314 v1.08 Page | 7 INSITE ALERT MONITOR The Alert Monitor is a handheld device that wirelessly receives Alerts from InSite Player Units located in each athlete’s helmet. Alerts inform sideline personnel that an impact event has occurred that presents elevated risk of head injury to the athlete (see HIT Severity Profile (HITsp), p.49). Alerts are stored for on-field review on the LCD display, and may be transferred to a computer using the InSite Player Management software. Two rechargeable AA batteries are provided with your Alert Monitor, and must be installed and charged before use (see Battery Care, p.19). USB CABLE AND AC CHARGER The USB cable connects the Alert Monitor to a laptop or desktop, which functions both to charge the Alert Monitor batteries and to download stored Alert data to the InSite Player Management software. An AC charger is also included, which plugs into any 110V AC wall outlet. When used together with the USB cable, the AC charger supplies electricity to recharge Alert Monitor batteries. INSITE OVERLINER The InSite Overliner provides integrated mounting and positioning for the Player Unit within a comfortable, removable and washable padded helmet liner. The Overliners are attached using your helmet’s hardware and hookand-loop fasteners. P/N R63314 v1.08 Page | 8 INSITE PLAYER UNIT Player Units installed within Riddell helmets measure impacts as they occur on field. When an impact exceeds a predetermined threshold specific to the player’s level of play and playing position, an Alert is sent wirelessly to the Alert Monitor on the sidelines. The athlete’s playing position and level of play are selected by the InSite Impact Response System administrator during setup of player profiles (see Player Setup, p.35). Each InSite Player Unit is comprised of a flexible sensor array (“Sensor”) and a small wireless radio transceiver (“Transmitter”). Power is provided by a non-rechargeable battery through an advanced power management system that automatically puts the unit into sleep mode when it is motionless, and into active operation once it detects motion. This functionality enables a typical battery life of approximately one year depending on usage. The Player Unit’s battery must be replaced once each year during reconditioning by a Riddell factory-authorized reconditioning center. Please call Riddell Customer Service at (800) 275-5338 for the factoryauthorized reconditioning center nearest you. Failure to replace the battery each year will result in loss of power and the Player Unit will become inoperable. P/N R63314 v1.08 Page | 9 INSITE PLAYER MANAGEMENT (ISPM) SOFTWARE InSite Player Management software is used to set up and interact with InSite equipment, enabling the user to: Create and edit player and team profiles Add and manage Alert Monitors and Player Units Review, store, and export Alert data downloaded from the Player Units to the Alert Monitor(s) Maintain and update InSite Impact Response System software for Alert Monitors, Player Units, and InSite Player Management software. P/N R63314 v1.08 Page | 10 In order to ensure successful setup, the following steps must be complete: 1) Install and charge Alert Monitor batteries (see Battery Care, p.19). Install Player Units in helmets as required and complete InSite Player Setup Form for subsequent use when configuring InSite software (see Installation into Helmets, p.23). Note: Player Units may be supplied pre-installed in the helmet. 2) Install InSite Player Management software on your computer. Administrator-level access rights are required for installation (see Software Guide – InSite Player Management, p30). 3) Configure InSite using InSite Player Management software Software Guide – InSite Player Management, p30). (see a) Register and accept Terms and Conditions of use b) Add Alert Monitor(s) (see Alert Monitor Setup, p.30) c) Add Player Units (see Player Unit Setup, p.32) d) Assign Player Units to Players (see Player Setup, p.35) 4) Synchronize Alert Monitor(s) with InSite Player Management software. Synchronization transfers setup programming to the Alert Monitor from InSite Player Management software. (see Player Setup, p.35) 5) Check in All Player Unit(s) with Alert Monitor. Check-ins transfer setup programming to Player Units from the Alert Monitor(s) (see Check In Player Units, p.48). P/N R63314 v1.08 Page | 11 BATTERY CARE The Alert Monitor comes with rechargeable batteries that are fully charged during manufacture, but may partially discharge during subsequent storage and shipping. Upon initial use (or after a prolonged storage period), the batteries may require charging, and three to four full charge/discharge cycles before reaching maximum capacity. If the batteries will not be in use for a month or longer, Riddell recommends that they be removed from the Alert Monitor and stored in a cool, dry place. Actual Alert Monitor battery run-time depends upon frequency and duration of use, user habits, and Alert indicators selected by the user. Typical Alert Monitor battery life is one to two weeks of normal use. To begin use, the batteries must be installed in the Alert Monitor and charged using the following procedure: 1) Remove the battery door by depressing the V-latch shown with thumb(s) while sliding the battery cover down and off the back of the Alert Monitor. 2) Install the supplied AA rechargeable batteries into the Alert Monitor with positive (+) and negative (-) battery terminals in the correct orientation as shown. P/N R63314 v1.08 Page | 12 3) To charge, connect the USB cable between the Alert Monitor and: a) A powered USB 2.0 port on the computer, or b) The supplied AC charger. Note: The Alert Monitor will charge through the computer when the USB 2.0 ports are powered (computer is operating). When the computer is in Off, Sleep, or Hibernation states, the USB 2.0 ports may be unpowered, and the Alert Monitor will not charge. The Alert Monitor is not designed for use with USB 3.0 (“SS”) ports. 4) The Battery Status Indicator ( ) located at the top left corner of the display will show four bars when fully charged (allow six to eight hours for full charge). Riddell recommends the Alert Monitor be recharged weekly for best results. CONTROLS AND INDICATORS 1) UP Button - Press to scroll upward to highlight the desired menu option. 2) HOME Button - Press to return directly to the home screen (see Navigation – Screens & Menus, p.15). 3) DOWN Button - Press to scroll downward to highlight the desired menu option. 4) BACK Button - Press to return to previous screen. 5) SELECT Button - Press to select the highlighted menu item. 6) LED Indicator - This indicator will blink either red or green depending upon the notification. a) New Alert - The red LED will blink when a new Alert is received if the LED Alert function in the SETTINGS menu is turned on (see SETTINGS Menu, p.18). P/N R63314 v1.08 Page | 13 b) USB Connected – The red LED will blink continuously while the Alert Monitor is connected to the computer via a USB cable and the software is running to indicate that the Alert Monitor is connected to a PC via USB 2.0. Note: While connected, the Alert Monitor wireless radio does not operate except for configuration functions. Therefore, the Alert Monitor does not communicate with Player Units or receive Alerts while connected. c) Polling Player Units (Normal Operation) - When the Alert Monitor is turned on the green LED blinks rapidly for ten seconds. Following this startup period, the green LED will cycle on for two seconds and then off for eight seconds, indicating normal operation. 7) Power Button a) On - Press to power on the Alert Monitor. b) Off - Press and hold until backlight turns off (about two seconds) to power off. 8) USB Port Cover - open to access the USB port and charge the batteries or interface with the ISPM software. P/N R63314 v1.08 Page | 14 NAVIGATION – SCREENS & MENUS HOME SCREEN This screen is shown when the Alert Monitor is initially powered on. 1) Battery Charge Indicator 2) Audible Alert Icon 3) Vibration Alert Icon 4) LED Alert Icon 5) Current Time – see SETTINGS Menu, p.18, to set the current time. 6) Current Date – see SETTINGS Menu, p.18, to set the current date. 7) Helmet Graphic - This graphic displays a warning symbol when a new alert is registered. Select the ALERTS menu to view the details of the alert. 8) Main Menu - Use the UP/DOWN and SELECT buttons to select the desired menu option ALERTS MENU When the ALERTS menu is highlighted and selected, the Alert History screen appears with the three most recently recorded Alerts displayed. The UP/DOWN buttons can be used to scroll through all Alerts on the Alert Monitor. The time (if Alert happened on the current day) or date (if Alert happened on prior days) of the Alert is displayed to the right of the player’s name. As each player name is highlighted the Player Number will appear next to the helmet graphic. P/N R63314 v1.08 Page | 15 Home Screen with ALERTS menu highlighted Alert History screen showing Alerts and Player Number To view the Alert detail, highlight the desired Alert on the Alert History screen using the UP/DOWN buttons and press the SELECT button. More detailed information will be shown. Alerts are classified either as “Single Impact” or “Multiple Impact” (see Alert Types, p.50). Single Impact Alerts - are created for those impacts whose severities are above a predetermined threshold for the player position and play level as assigned in the player management software. Multiple Impact Alerts - are created by a combination of 1. Time-weighted cumulative impact exposure score, composed from a subset of the highest magnitude impacts experienced over the last seven days, and 2. Magnitude of the most recent incoming impact. Riddell recommends that Alerts be downloaded to InSite Player Management software on a daily basis, so that Alert information is saved permanently within InSite Player Management software, and to maintain free memory on the Alert Monitor to receive incoming Alerts. The Alert Monitor has memory for up to 204 Alerts, and when memory has capacity for less than 50 Alerts, the Alert Monitor will display: ‘ALERTS ALMOST FULL. CONNECT INSITE SOON’. If memory becomes full, existing Alerts stored on the Alert Monitor will be lost when new P/N R63314 v1.08 Page | 16 Alerts arrive from the field of play. When Alerts are downloaded from the Alert Monitor, the most recent 25 Alerts are retained by the Alert Monitor for convenient on-field reference of recent team Alert history. CHECK-INS MENU The CHECK-INS menu displays how many Player Units have established communication (checked in) with the Alert Monitor for the day. For the example shown below with two equipped players: 2 OUT OF 2 will be displayed if all Player Units have checked in, -OR 1 OUT OF 2 will be displayed if only one Player Unit has checked in. HOME screen with CHECK-INS menu highlighted CHECK-INS screen, showing check-ins for the day Select VIEW ABSENT to see which Player Units have not established communication for the day. Select VIEW ERRORS to review error code information that may be available for malfunctioning equipment. Some examples of possible error messages include: LOW BATTERY – Low Player Unit battery BAD HIT SENSOR - Indicates failure of Player Unit electronics UNKNOWN ERR – general error message, followed by a numeric code Please call Riddell Customer Service at (800) 275-5338 for assistance with interpretation of Errors and equipment service. Player Units will only check in if powered on, awakened from sleep by motion, and are present within 50 yards of an operating Alert Monitor P/N R63314 v1.08 Page | 17 (see Check In Player Units, p.48). If a Player Unit does not check in, see Player Unit – Symptoms & Solutions, p.68, for further assistance. SETTINGS MENU The SETTINGS screen has three selections enabling Alert Monitor settings to be changed by the user: ALERT METHODS – Methods can be individually enabled or disabled and can be used one at a time or in any combination. AUDIBLE – When turned on, the Alert Monitor beeps when an Alert is received. VIBRATION - When turned on, the Alert Monitor vibrates when an Alert is received. LED - When turned on, the Alert Monitor blinks the red LED when an Alert is received. TIME/DATE SET TIME and SET DATE - Allows the user to set the current time and date on the Alert Monitor by using UP and DOWN arrow buttons. CONFIGURATION SET CONTRAST - Allows the user to set the screen contrast to make brighter or darker. ABOUT - Displays the Alert Monitor name, team Name, and firmware revision number. USER TESTS – Walks the user through a diagnostic test sequence to ensure proper functionality of the screen, buttons, and Alerting methods. This feature can be used at the user’s discretion to confirm Alert Monitor function as desired. P/N R63314 v1.08 Page | 18 BATTERY CARE InSite Player Units are powered by a factory-installed non-rechargeable battery. The Player Unit’s battery must be replaced once each year during reconditioning by a Riddell factory-authorized reconditioning center. Please call Riddell Customer Service at (800) 275-5338 for the factory-authorized reconditioning center nearest you. Failure to replace the battery each year will result in loss of power and the Player Unit will become inoperable. The Alert Monitor ‘VIEW ERRORS’ menu will display a low battery message for affected Player Units that remain operating. Player Units with loss of power will not check in with the Alert Monitor, and will appear on the ‘VIEW ABSENT’ menu. CONTROLS AND INDICATORS The Player Unit transmitter is located in a protective pouch in each InSite Overliner. It is used to transmit impact data to the Alert Monitor, and is connected to the sensor pad. The Player Unit has two basic states while powered on – active and sleep. The Player Unit will manage its own power state to maximize battery life based on recent activity detected by a motion sensor. The Player Unit can also be placed in a Deep Sleep or “off” condition for shipping or end of season storage. The two buttons on the player unit are used to place the unit into several different states and functionality modes based on which button is pressed and how long it is held. A summary table of button commands and LED feedback is located at the end of this section (see Summary of Player Unit Button Commands and LED Feedback, p.22). P/N R63314 v1.08 Page | 19 1) Power button Power on - Press for one second. The red LED will blink four times to indicate startup. Alternatively, if already on, the yellow LED will light while the button is depressed, and the Player Unit will remain on after button release. Power off (deep sleep) - Press and hold for ten seconds until the yellow LED “blinks off” for the second time, then release. Red and yellow LEDs blink alternately to indicate Player Unit turning off. Test mode - Press and hold for six seconds until the yellow LED blinks off, then release. The red and yellow LEDs will blink six times alternately, indicating test mode (see Sending Test Alerts (Test Mode), p.67). Note: Do not press and hold power button for longer than fifteen seconds, as the unit will enter a button lock-out state and be unresponsive for five to ten minutes. This feature prevents accidental turn-off during on-field use. 2) Check-in button Configuration mode - To add a Player Unit through the player management software, when prompted, press and hold for five seconds until the yellow LED blinks rapidly (signaling configuration mode), then release. Check-in function – To command the Player Unit to check in with the Alert Monitor, press and hold for two seconds until the red LED blinks off once, then release. The yellow LED will flash P/N R63314 v1.08 Page | 20 once per second until it checks in with the Alert Monitor and flashes the red and yellow LEDs five times simultaneously. Note: Do not press and hold the check-in button for longer than eight seconds, as the unit will enter a button lock-out state and be unresponsive for five to ten minutes. 3) Red LED - for feedback patterns, see Summary of Player Unit Button Commands and LED Feedback, p.22. 4) Yellow LED - for feedback patterns, see Summary of Player Unit Button Commands and LED Feedback, p.22. 5) Serial number – A nine-digit number that identifies a particular Player Unit. This number will appear in the Player Management software when the Player Unit is added. This number is used to assign individual Player Unit hardware to a Player. P/N R63314 v1.08 Page | 21 SUMMARY OF PLAYER UNIT BUTTON COMMANDS AND LED FEEDBACK P/N R63314 v1.08 Page | 22 INSTALLATION INTO HELMETS Proper installation and setup of the InSite Impact Response System is required for correct product operation. Please keep in mind the following key points and instructions as you prepare for use: InSite Player Units and Overliners are designed to fit specific Riddell helmet models and sizes (see www.riddell.com). To ensure player safety and proper impact measurement performance, use InSite only with compatible helmet types. InSite Alert thresholds are assigned based on Playing Position and Skill Level. For correct operation of InSite, Playing Position and Skill Level must be properly assigned to each player when configuring InSite (see Player Setup, p.35). Do not fold, crease, or tear the Player Unit sensor at any point during installation as this may affect impact sensor and system performance. Please contact Riddell Customer Service at (800) 275-5338 for assistance with damaged equipment. When installing InSite Player Units in helmets, it is necessary to create a list of assigned equipment that will be used to set up the InSite Player Management software. For your convenience, an InSite Player Setup form is available online at http://insitemfg.riddell.com/insite_software.php. Please record and save the following for each Player Unit, to be used in software setup: Player name Jersey number InSite Player Unit serial number Playing position and skill level A detailed video on installation can be found on the Riddell website. The following tools and equipment are required to complete installation: Phillips screwdriver Riddell Pad Installation Tool (optional, available separately) InSite-compatible Riddell Helmet(s) InSite Player Unit(s) P/N R63314 v1.08 Page | 23 InSite Overliner(s) InSite Setup Form(s) and pen or pencil RIDDELL REVOLUTION SPEED The following instructions apply to Riddell Revolution Speed helmets. For other Riddell helmets please refer to www.riddell.com. Riddell recommends that the Revolution Speed helmets installation video is viewed prior to installation. Visit www.riddell.com/innovation to find this video. 1) Remove original Overliner and S-pads (face pads) a) For the first installation of an InSite retrofit, begin by removing the standard Overliner from the helmet. Use the Phillips screwdriver to remove the upper facemask attachment screws. Rotate the facemask forward and remove the original Overliner. b) Remove original S-pads (face pads) from helmet. 2) Assemble InSite Player Unit to InSite Overliner Note: New InSite Player Units are shipped pre-assembled to InSite Overliners. For new installations, proceed to step 3). The following procedure is used to re-assemble the Player Unit and Overliner after washing the Overliner. P/N R63314 v1.08 Page | 24 a) Position the InSite Player Unit over the Overliner with the graphics side facing out and the hook and loop fasteners against the Overliner. b) Pass the left sensor pad and left S-pad sensor (see Product Overview, p.7) through the left side of the InSite Overliner. Align the two sensor pad regions with the outlines printed on the Overliner, and press into place to secure with the hook and loop fasteners. Install ¾” thickness left S-pad provided with installation kit and secure in place with hook and loop closure. Note: Ensure that S-pad sensors are properly aligned prior to installing the 3/4" S-pads. P/N R63314 v1.08 Page | 25 c) Insert the Player Unit transmitter into the Overliner by passing it through the Overliner opening. Secure the pocket flap closed with the hook and loop fastener. d) Pass the right side pad and right S-pad through the right side of the InSite Overliner. Align the two sensor pad regions with the outlines printed on the Overliner, and press into place to secure with the hook and loop fasteners. Install ¾” thickness right Spad provided with installation kit and secure in place with hook and loop closure P/N R63314 v1.08 Page | 26 e) Align the remaining back, crown, and forehead sensor pads with their respective Overliner outlines and press into place to secure with the hook and loop fasteners. 3) Install InSite Overliner and Player Unit in Helmet a) Place the Player Unit/Overliner assembly within the helmet interior. b) Position the forehead area of the sensor over the forehead pad and attach the InSite Overliner assembly to the helmet at the upper facemask attachment points using the facemask screws. c) Gently pull out the helmet’s left side pad and slip it inside the left side of the InSite Overliner, making sure to slide the Overliner fully over the pad. P/N R63314 v1.08 Page | 27 d) Return the left side pad and left jaw pad to the installed position. e) Make sure the Player Unit case is positioned in the recess between the left and crown pads inside the helmet. f) Repeat steps 3)d) and 3)e) above for the right side pad and right S- pad. g) At this point the InSite Overliner and Player Unit are fully installed in the helmet. Fine tuning of final positioning should be performed to ensure all pads and InSite Overliners are properly positioned. With final positioning completed, tuck in the Overliner neck tabs at the rear of the helmet and secure to the hook and loop fasteners on the back side of the helmet liner back pad. P/N R63314 v1.08 Page | 28 P/N R63314 v1.08 Page | 29 Note: To install InSite Player Management software on a Windows PC or Mac, it is necessary to have Administrator-level access rights. Please contact your system administrator as needed to establish access rights to install software. InSite Player Management software requires a computer with the following system requirements for successful installation: Windows XP (Service Pack 3 or higher), Vista, Windows 7, Windows 8, or later (with administrator-level access rights) Mac OSX 10.6 or later To install software, download from http://www.riddell.com/innovation and follow the on-screen instructions. To begin programming InSite, you need access to a computer with InSite Player Management software installed, all Alert Monitor and Player Unit equipment you would like to program, and the setup information you recorded while installing Player Units in players’ helmets (see Installation into Helmets, p.23). EQUIPMENT ASSIGNMENTS ALERT MONITOR SETUP The charged Alert Monitor must first be set up to interface with InSite Player Management software on the computer. To set up the Alert Monitor: 1) Press the power button on the bottom of the Alert Monitor if the screen is blank. A splash screen will appear for a few seconds and then the Home screen will appear. 2) Connect one end of the USB cable to the Alert Monitor, and the other end to a USB 2.0 port on the computer. P/N R63314 v1.08 Page | 30 3) On the computer, click on the InSite Player Management software icon, located in the Start Menu (PC) or the Applications folder (Mac), to launch the program. InSite Player Management Software Icon 4) Upon first launch of the software, the user will be prompted to accept the End User License Agreement (EULA) and complete product registration information (required). Follow on-screen instructions to complete. 5) After registration is complete, the software will automatically search for a connected Alert Monitor. Once the software has detected an Alert Monitor the following screen will appear: Click “Next” to go to the next screen. 6) Enter a name for the Alert Monitor and a team name in the boxes and click “Next”. P/N R63314 v1.08 Page | 31 7) After a few seconds the “Alert Monitor Added Successfully” screen should appear. 8) If another Alert Monitor needs to be added, click “Add Another”, connect another Alert Monitor with the USB cable, and repeat steps 5) through 7). Up to two Alert Monitors may be assigned to a team; subsequent Alert Monitor additions will result in creation of a new team. Each InSite system can support up to four teams. Note: To return to the Alert Monitor Wizard if exited, select the “ALERT MONITOR” sub-menu on the “EQUIPMENT ASSIGNMENT” tab of the software and click the “+” symbol in the lower left corner. PLAYER UNIT SETUP Once Alert Monitors have been added using the Alert Monitor Wizard, all Player Units must be added to the system: 1) Confirm that an Alert Monitor from the team you wish to add Player Units to is connected to your computer via the provided USB cable. 2) Click “Add a Player Unit” to launch the “Player Unit Wizard.” The following screen will be displayed: P/N R63314 v1.08 Page | 32 Note: To return to the Player Unit Wizard if exited, select the “PLAYER UNIT” sub-menu in the “EQUIPMENT ASSIGNMENT” tab of the software and click the “+” symbol in the lower left corner. Press the “Next” button on the Player Unit Wizard screen. The following window appears: After installing the Player Unit in a player’s helmet, click “Next”. 3) Press and hold the check-in button on the player unit for five seconds until the yellow LED on the Player Unit starts flashing P/N R63314 v1.08 Page | 33 rapidly twice each second, then release. Click “Next” on the screen. The following screen with the Player Unit serial number appears, indicating that the Player Unit was added successfully. Note: InSite Player Management software will identify the Player Unit and add it to the equipment list. The serial number printed on the hardware added should match the serial number displayed in software. Riddell recommends adding all Player Units prior to assigning any Player Units to players by repeating steps 2) through 3) for each Player Unit. This is the fastest way to set up new equipment. P/N R63314 v1.08 Page | 34 PLAYER SETUP Once you have completed adding all Player Units, information for each player must be entered and a Player Unit must be assigned to each player. 1) Click “Assign to a Player” 2) After reading through the instructions and pressing “Continue”, the following screen will appear. Click the plus sign in the lower left corner to create a new player. P/N R63314 v1.08 Page | 35 A default new player line is shown, highlighted in grey. 3) Fill in the following player information or select from the dropdown menus, using setup information recorded during installation of Player Units in helmets (Installation into Helmets, p.23): First name Last name Jersey number Player position – position most frequently played by player Player Unit – select Player Unit number recorded in the Player Setup Log corresponding to the specific InSite hardware installed in each player’s helmet Play level – Youth, High School, College, Professional 4) Click “Save Changes” to save the information. 5) Click the + button at the bottom of the page to add another player. A new player information line will appear in the window. To add all remaining players’ information and assign a Player Unit to each player, repeat steps 2) through 4) for each player. After setup of players and Player Unit assignments has been completed, a software message will confirm successful completion. P/N R63314 v1.08 Page | 36 6) After all player and equipment assignments have been completed in the software, connect an Alert Monitor to the computer if not currently connected. 7) If the “SYNC REQUIRED” button is showing in the upper right hand corner of the window, click on the button to synchronize the Alert Monitor. Note: This button can be seen on all InSite Player Management software screens. Follow the directions on the pop-up window to finish setting up this team’s equipment, and then click “OK”. 8) If prompted, plug in the additional (2nd) Alert Monitor for this team and repeat step 6) above. 9) The “SYNC REQUIRED” button will change after all Alert Monitors on this team are up to date. The button will now remain in this state until changes are made to the team’s players or equipment assignments, at which time the button will change back to “SYNC REQUIRED”. 10) Press the Power button on the Player Unit once to turn it on. The red LED will flash four times to indicate the Player Unit is powered on. Note: Alternatively, if already on, the yellow LED will light while the button is depressed, and Player Unit will remain on after button release. 11) If you haven’t already done so, command a directed check-in of specific Player Units as required (see Check In Player Units, p.48). P/N R63314 v1.08 Page | 37 12) Repeat steps 6) through 11) with Alert Monitors and Player Units for additional teams until all equipment is up-to-date. SYSTEM SETTINGS This screen allows the user to change various default settings and manually update firmware. 1) Team Name - Allows the user to modify the team name. The team name for the Alert Monitor that is currently connected to the computer will be displayed. 2) Edit / Save Changes - Click this button to edit the team name, and again to save the changes. Alert Monitors must be synced to acknowledge the changes. 3) Delete Team - Click this button to delete the currently displayed team. Note: Clicking OK will delete all players and equipment for that team. Riddell recommends Exporting to File all Alerts from any team before deleting. (see Alert Management, p.53) P/N R63314 v1.08 Page | 38 4) Update Alert Monitor Firmware - Opens the Alert Monitor Firmware Wizard. Follow on-screen Wizard instructions to complete update (see Alert Monitor Firmware Updates, p.59). Note: InSite Player Management software will automatically notify the user when firmware updates become available (see Software and Firmware Updates, p.58). 5) Update Player Unit Firmware - Opens the Player Unit Firmware Wizard. Follow on-screen Wizard instructions to complete update (see Player Unit Firmware Updates, p.62). Note: InSite Player Management software will automatically notify the user when firmware updates become available. (see Software and Firmware Updates, p.58) TEAM MANAGEMENT MULTI-TEAM SETUP To create a new team, add an unpaired Alert Monitor to InSite Player Management software by first opening the software, then connecting the Alert Monitor to the computer with USB cable, and finally following the Alert Monitor Wizard instructions onscreen. Select “Create New” under Team Name when prompted, and enter the desired team name. When multiple teams are created, a team selection menu appears at the top of the screen. Equipment and player information is managed on P/N R63314 v1.08 Page | 39 a per-team basis. Each InSite Player Management installation can support up to four teams with up to two Alert Monitors each. When an Alert Monitor is connected to the computer via the USB cable, information for that Alert Monitor’s team is automatically displayed. To view information for other teams, an Alert Monitor for that team must be connected, or the computer must have no Alert Monitor connected. Note: When adding new equipment or players, be sure to first select the appropriate team from the menu at the top of the screen, and connect to Alert Monitor(s) that belong to that team (Player Unit Setup, p.32). Alert Monitor name and team name can be found in ABOUT in the Alert Monitor’s menu (SETTINGS Menu, p.18). P/N R63314 v1.08 Page | 40 TRANSFERS BETWEEN TEAMS When multiple teams have been created within InSite Player Management software, “Transfer” buttons appear on both the Player Setup and Equipment Assignment screens in the Player Management Software. The transfer button allows you to move a player or equipment from one team to another. When equipment or players are transferred, all Alert Monitors from both affected teams in the transfer will need to be synchronized. Riddell recommends that transfers or any other team configuration modification is done after use, and before midnight when the next day's check-in cycle begins. If you make changes the same day as a game or practice, you must command directed check-ins for all affected Player Units (see Check In Player Units, p.48). PLAYER TRANSFERS Transferring a player is useful if that player is moving from one team to another. You cannot transfer a player across computers or software installations. When a player is transferred, if they have a Player Unit assigned, that Player Unit will also get transferred to the new team. If you wish to just transfer a player and not the Player Unit, from the Player Setup tab, click EDIT, then click “Not Assigned” from the “Assigned Player Unit” dropdown menu for the player, then click “Save Changes” to unassign the Player Unit before transferring the player. P/N R63314 v1.08 Page | 41 To transfer a player from one team to another, perform the following steps under the Player Set Up tab: Find and select the player you wish to transfer. Click the “Transfer” button on the bottom right of the screen. Select the team you wish to transfer the player to and click “OK”. If the player had a Player Unit assigned, all the Alert Monitors on the current team and on the team the player was transferred to will need to be synchronized. P/N R63314 v1.08 Page | 42 Command a directed check-in on the Player Unit after the transfer by holding down the check-in button on the Player Unit for two seconds until the red LED blinks off once (see Check In Player Units, p.48). PLAYER UNIT TRANSFERS Player Units can be transferred to other teams set up through the software. You cannot transfer a Player Unit across computers or software installations. When a Player Unit is transferred, if it is assigned to a player, that player will automatically become unassigned from that player unit. To transfer the Player Unit and the player, follow the instructions for transferring a player (see Player Transfers, pg.41). To transfer a Player Unit from one team to another, perform the following steps under the Equipment Assignments tab, Player Unit subtab: 1) Find and select the Player Unit you wish to transfer. 2) Click the “Transfer” button on the middle right of the screen. P/N R63314 v1.08 Page | 43 3) Select the team you wish to transfer the Player Unit to and click “OK”. 4) Plug in an Alert Monitor assigned to the equipment’s new team and follow the Player Unit Synchronization Wizard prompts to complete the transfer process. If the Player Unit was assigned to a player, the Alert Monitors for the previous team will also need to be synchronized. To update new settings for the previous team, connect an Alert Monitor from the previous team and if the Alert Monitor does not automatically sync, click the yellow “Sync Required” button. P/N R63314 v1.08 Page | 44 5) The transferred player unit should now attempt to check in. If it does not do so, command a directed check-in on the Player Unit after the transfer by holding down the check-in button on the Player Unit for two seconds until the red LED blinks off once (see Check In Player Units, p.48). ALERT MONITOR TRANSFERS A team can have up to two Alert Monitors depending on the requirements of the team staff. A team must always have at least one Alert Monitor. An Alert Monitor may be transferred between teams when one team has two Alert Monitors and the other team only has one. To transfer an Alert Monitor from one team to another, perform the following steps under the “Equipment Assignments” tab, “Alert Monitor” subtab: 1) Find and select the Alert Monitor you wish to transfer. 2) Click the “Transfer” button. 3) Select the team you wish to transfer the Alert Monitor to and click “OK”. 4) All Alert Monitors on the previous team and the new team will need to be synchronized, including the recently transferred one. P/N R63314 v1.08 Page | 45 5) All affected Player Units will need to check in with their respective Alert Monitors (see Check In Player Units, p.48). DELETING PLAYERS OR EQUIPMENT Players and equipment may be deleted in the Player Setup and Equipment Assignments tabs, respectively. To do so: 1) Highlight the player or equipment you wish to delete, and click the minus sign button. 2) Sync Alert Monitors from all affected teams when prompted (see Player Setup, steps 6) through 9), p.35). 3) Power down all deleted Player Units that will not be reassigned within 24 hours to conserve battery life (see Controls and Indicators, p. 19). Note: InSite Player Management software requires at least one Alert Monitor to be assigned to a team at all times. For teams with P/N R63314 v1.08 Page | 46 a single Alert Monitor that must be replaced, add the second replacement Alert Monitor to the team, Sync both Alert Monitors, and Check-In all Player Units, before deleting the first (see Alert Monitor Setup, p.30). If desired, all player units on a team can be deleted by pressing the “Delete All” button. This will delete all of your Player Units on your team and unassign them from players. Note: This does not delete the players that the player units were assigned to; they can be reassigned to player units after this process. BEFORE PLAY Before a practice or game, the following procedures must be completed to ensure accurate equipment assignments and reporting of impact Alerts. P/N R63314 v1.08 Page | 47 SYNCHRONIZE EQUIPMENT 4) Ensure all Alert Monitors for the team(s) are synchronized, powered on, and brought to the field to receive (see Player Setup, steps 6) through 9), p.35). Note: All Alert Monitors assigned to active teams should be powered on and present at the sidelines during all games or practices. This will prevent Player Units from wasting battery power trying to communicate with Alert Monitors that are not being used. If an Alert Monitor is not being actively used, Riddell recommends deleting the Alert Monitor from the installation until needed (see Deleting Players or Equipment, p.46). CHECK IN PLAYER UNITS Player Units are updated with current configuration information each time the Player Unit completes a check-in with an Alert Monitor. This happens automatically following the first motion trigger after midnight, and after initial setup of the Player Unit with a system. If player settings are changed on an existing system, it may be necessary to command a directed check-in on the Player Unit to transfer updated settings before use. To command a directed check-in, hold the check-in button for two seconds until the red LED blinks off once, then release. Check-in is confirmed with five flashes of both red and yellow LEDs on the Player Unit. Note: Player Units automatically check in once (and only once) each day while operating. Player Units will attempt to check in when first activated by motion after 12 a.m. each day; new check-in cycles begin at 12 a.m. Programming changes made to the system after a Player Unit has checked in for the day will be transferred to the Player Unit the following day, unless a directed check-in is performed to update Player Unit programming. CHECKING PLAYER ATTENDANCE Player attendance may be verified as follows: P/N R63314 v1.08 Page | 48 1) On the Alert Monitor, navigate to the CHECK-INS menu on the HOME screen, and press the SELECT button to view Check-In information. 2) The display will show how many Player Units out of the total have established communication for the day. 3) Select VIEW ABSENT to see which Player Unit(s) have not checked in that day. For those not checked in, ensure Player Units are: a) Powered on, b) Within radio range (50 yards) of an operating Alert Monitor, and c) Properly configured and assigned to Players using InSite Player Management software. 4) For Player Units not checked in automatically, hold the check-in button for two seconds until the red LED turns off and on again, then release. Check-in is confirmed with five flashes of both red and yellow LEDs on the Player Unit. Confirm check-ins through the CHECK-IN menu on the Alert Monitor. DURING PLAY - USING ALERTS During a game, Player Units monitor and record significant impacts, and will transmit Alerts to the Alert Monitor(s) when impact exposure thresholds are exceeded. The Player Unit has a communication range of up to 50 yards. Alerts received on the Alert Monitor can be viewed using the ALERTS MENU (see ALERTS Menu, p.15). If an Alert is generated while the Player Unit is out of communication range (50 yards), the Alert will be stored on the Player Unit until it is successfully transmitted to an Alert Monitor. Player name, jersey number, date of impact, time of impact, and alert type (single or multiple) will be displayed on the Alert Monitor when the Alert is received. The Alert will remain active on the Alert Monitor until it is acknowledged (see Viewing New Alerts, p.51). HIT SEVERITY PROFILE (HITSP) P/N R63314 v1.08 Page | 49 InSite Player Units monitor impact exposure using a novel impact exposure metric called HITsp (HIT Severity Profile). HITsp combines effects of the following into a single numerical index: Linear and rotational acceleration, Impact location, and Impact duration Since 2004, Riddell has collected millions of impacts on-field at all levels of play using the Sideline Response System. Based on data collected during this novel research, HITsp and InSite Alert thresholds were developed. While InSite does not diagnose concussions or other head injuries and is not intended to be used as a diagnostic device, HITsp does provide for a more specific correlation of on-field injuries and impact exposure than single factors alone 1. ALERT TYPES InSite provides two types of impact Alerts, “Single Impact” and “Multiple Impact”. Both Alert types indicate that atypically high head-impact exposure has been experienced by the player, and that clinical best practices should be used to conduct an assessment for potential head injury (concussion). Alert thresholds are customized based on level of play and playing position on the field. Alerts report atypically high exposure relative to other players of similar level of play at the same playing position. Single Impact Alerts - Alerts impacts whose severities are above the predetermined threshold for the player position and play level as assigned using InSite Player Management software. Single event Alerts exceed the 99th percentile HITsp value for that skill level and playing position (i.e. the top 1%) based on field data collected using the Riddell Sideline Response System. 1 Greenwald RM, Gwin JT, Chu JJ, Crisco JJ., “Head impact severity measures for evaluating mild traumatic brain injury risk exposure”, Neurosurgery, 2008 Apr, 62(4):789-98, discussion 798. P/N R63314 v1.08 Page | 50 Multiple Impact Alerts - are a proprietary cumulative exposure Alert created by a combination of: 1) Cumulative Impact Exposure Score – all impacts exceeding the 95th percentile (i.e. top 5%) are added to a timeweighted rolling 7-day index. 2) Magnitude of the most recent received impact. When the sum of the cumulative index and the most recent received impact exceeds a pre-determined cumulative exposure threshold, a Multiple Impact Alert is generated. If a Player has a high cumulative score, relatively small single impacts may result in over-exposure and generation of a Multiple Impact Alert. VIEWING NEW ALERTS When new Alerts are recorded they will appear in the ALERTS menu (see ALERTS Menu, p.15). The helmet and exclamation point icons will blink until the detailed alert information has been viewed on the Alert Monitor. Alerts may be viewed by highlighting and selecting them from the Alert List. Unread Alerts screen showing helmet Alert icon Alert Detail Screen ALERT RESPONSE Alerts (either single or multiple) are indicative of higher-than-normal impact exposure. When an Alert is received, you should deploy your program’s concussion and head injury assessment protocol immediately. P/N R63314 v1.08 Page | 51 For more information, see http://www.cdc.gov/concussion/ CDC concussion guidelines: AFTER PLAY EQUIPMENT MANAGEMENT The following steps should be followed after every practice or game: 1) Player Units Leave Player Units in helmets and leave them powered on. The Player Units will enter a sleep state when left motionless for several minutes. 2) Alert Monitor(s) Download Alerts from Alert Monitor and charge as needed (see Downloading Alerts from the Alert Monitor, p.53). 3) Software Review Alerts using InSite Player Management software (see Alert Management, p.53). Make any equipment/team configuration changes for the following day’s game or practice, and Sync the Alert Monitors for all affected teams. Follow directions on the pop-up window to finish setting up each team’s equipment, and then click “OK”. P/N R63314 v1.08 Page | 52 ALERT MANAGEMENT This screen allows the user to view, analyze and delete alerts that have been downloaded from the Alert Monitor(s). Alerts are displayed by team. To see alerts received for players on each team, select the appropriate team name from the dropdown menu. 1) Alert Management Highlighted selection displays ALERT MANAGEMENT screen. 2) Player Info - Player information is displayed along with the Alert Type: either single or multiple. 3) Mark as Read - When this button is clicked, the highlighted alert will be marked as read. 4) Delete - When this button is clicked, the highlighted selection will be deleted. 5) Export to File - When this button is clicked, the highlighted alert will be exported as a .csv file. DOWNLOADING ALERTS FROM THE ALERT MONITOR Riddell recommends that Alerts be downloaded to InSite Player Management software from Alert Monitors on a daily basis, so that Alert information is saved within InSite Player Management software, and to maintain free memory on the Alert Monitor to receive incoming Alerts. Alerts are downloaded from the Alert Monitor to InSite Player Management software using the following procedure: 1) Open InSite Player Management software 2) Connect the Alert Monitor via the USB cable to the computer P/N R63314 v1.08 Page | 53 The application will automatically check the Alert Monitor for new alerts and download them to software. New Alerts downloaded from the Alert Monitor are now available for review under the Alert Management tab (see Alert Management, p.53). Riddell recommends weekly charging of the Alert Monitor (see Battery Care, p.19). The Alert Monitor is charged through its USB 2.0 port, using either: 1) The USB 2.0 connection to a computer while the computer is operating, or 2) The AC charger supplied with the Alert Monitor. P/N R63314 v1.08 Page | 54 To keep your equipment in peak operating condition, perform these maintenance procedures at periodic intervals. CLEANING INSITE EQUIPMENT ALERT MONITOR The Alert Monitor may be cleaned with mild soap, water, and a soft cloth. Dampen the cloth with soapy water, and clean Alert Monitor gently. Avoid spraying any cleaners directly onto the monitor housings. Caution: Avoid use of strong detergents or cleaning solvents, as they could damage the Alert Monitor and void warranty. Do not use rubbing alcohol or other solvents to clean the Alert Monitor screen. Permanent damage may result. PLAYER UNIT The Player Unit and sensor pad may be cleaned with mild soap, water, and a soft cloth. Dampen the cloth with soapy water, and clean Player Unit gently. Caution: Avoid use of strong detergents or cleaning solvents, as they could damage the Player Unit and void the warranty. Do not submerge Player Unit sensor pad or transmitter in liquid or machine wash. OVERLINER The Overliner can be disassembled from the helmet and Player Unit for cleaning. To clean the Overliner, hand wash using a sparing amount of mild household laundry detergent, rinse completely, and hang to air dry. Caution: When disassembling/reassembling the Player Unit from/to the Overliner, care must be taken to avoid creasing or tearing the Player Unit Sensor. P/N R63314 v1.08 Page | 55 BATTERY CARE ALERT MONITOR The Alert Monitor comes with rechargeable batteries that are fully charged during manufacture, but may partially discharge during subsequent storage and shipping. Upon initial use (or after a prolonged storage period), the battery may require charging, and three to four full charge/discharge cycles before reaching maximum capacity. If the batteries will not be in use for a month or longer, Riddell recommends that they be removed from the Alert Monitor and stored in a cool, dry place. Actual battery run-time depends upon the power demands made by the equipment it powers and usage patterns. Typical Alert Monitor battery life is one to two weeks of normal use. LONG-TERM (END-OF-SEASON) STORAGE The following steps should be followed after every season: 1) Remove the batteries from all Alert Monitors. 2) Power off the Player Unit by holding the power button for about ten seconds until the yellow LED blinks off for the second time, then release. Red and yellow LEDs blink alternately to indicate Player Unit turning off. 3) Return the instrumented helmets for reconditioning to a Riddell factory-authorized reconditioning center in advance of the following season. Please call Riddell Customer Service at (800) 275-5338 for the factory-authorized reconditioning center nearest you. RECONDITIONING Riddell recommends reconditioning Player Units once per year, at which time each Player Unit is factory tested and the internal battery is replaced (see Long-Term (End-of-Season) Storage above). Failure to recondition the Player Unit will result in loss of battery power and the Player Unit will become inoperable. P/N R63314 v1.08 Page | 56 RE-ASSIGNING RECONDITIONED PLAYER UNITS During reconditioning, player units are deconfigured (have their settings and memory cleared) to ensure that users must reconfigure their equipment properly for the new season. Typically equipment and helmet assignments change year to year, and this method avoids issues that arise when InSite attempts to use a Player Unit with old settings, especially if the Player Unit is now assigned to a different player or even a different team. To reconfigure player units they need to be deleted from past teams/players and reassigned to their current teams/players: 1) First, delete all existing Player Units from your team(s), using the Equipment Assignments tab: Go to the Player Unit tab and click on the “Delete All” button. This will delete all of your Player Units on your team and unassign them from players. Alternatively, you can delete each reconditioned Player Unit individually using the minus sign button in the lower left corner. P/N R63314 v1.08 Page | 57 Note: This does not delete the players to which the player units were assigned; they can be reassigned to player units at the end of this process. Sync Alert Monitors from all affected teams when prompted. Power down all deleted Player Units that will not be reassigned within 24 hours to conserve battery life (see Controls and Indicators, p.19). 2) After syncing all affected Alert Monitors, add the reconditioned Player Units to their new teams (see Player Unit Setup, steps 1) through 3), p.32). 3) After being added to their teams, the reconditioned Player Units can be assigned to players as usual (see Player Setup steps 2) through 4), p.38). Note: All affected equipment (Player Units and Alert Monitors) should be synced and checked in before play. This process will need to be done each season for every reconditioned Player Unit. Following this procedure ensures that the reconditioned Player Units behave the same as brand new ones. SOFTWARE AND FIRMWARE UPDATES When the computer is connected to an active internet connection, InSite Player Management software will automatically check for updates upon startup, both for InSite Player Management software, and for firmware for Alert Monitors and Player Units. When updates are available, the updates will download automatically as a background process. When download is complete, the user will be prompted through the update wizards - first for software, then for Alert Monitor firmware, and finally for Player Unit firmware. P/N R63314 v1.08 Page | 58 To implement firmware updates manually at any other time, select the “SYSTEM SETTINGS” tab in the InSite Player Management software, click the “UPDATE FIRMWARE” button for the desired hardware, and follow the instructions onscreen (see System Settings, items 4) and 5), p.39). SOFTWARE UPDATES Note: To install InSite Player Management software on a Windows PC or Mac, it is necessary to have Administrator-level access rights. Please contact your system administrator as needed to establish access rights to install software. When a software update is available, the update will automatically download in the background while the InSite Player Management software is running and computer is connected to the Internet. Once the download is complete, the user will be prompted to install the update during the next startup of the software. Follow the instructions onscreen to complete the installation or contact your network administrator. ALERT MONITOR FIRMWARE UPDATES When prompted to update Alert Monitor firmware during software startup, select the team name whose hardware you wish to update. This will launch the Alert Monitor firmware wizard. Updated firmware will be downloaded through the active internet connection and the suggested update will be displayed. P/N R63314 v1.08 Page | 59 Click “Next”. The Alert Monitor will begin its update and display a progress indicator. To finish the firmware update on the Alert Monitor, remove the battery door and place the Alert Monitor into Device Firmware Update (DFU) mode following the onscreen instructions. The button is directly below the small (1 mm) hole in the housing near the bottom left corner of the battery recess, and a paper clip may be used to activate the button. When depressed, the switch provides tactile feedback and the Alert Monitor screen will go blank. P/N R63314 v1.08 Page | 60 Click “Next”. The update progress indicator will be displayed again until the update is complete. Note: Alert Monitors can be updated without an internet connection. P/N R63314 v1.08 Page | 61 PLAYER UNIT FIRMWARE UPDATES When prompted to update Player Unit firmware, select the team name whose hardware you wish to update. This will launch the Player Unit Firmware Wizard: Click “Next”. The suggested update will be displayed. Click “Next”. The firmware must first be uploaded to the Alert Monitor that is plugged in. P/N R63314 v1.08 Page | 62 Click “Next”. The Alert Monitor will begin its upload of Player Unit firmware and display a progress indicator. A list of all outdated Player Units is displayed. Player Units are updated individually by selecting each Player Unit from the list and clicking “Next”. P/N R63314 v1.08 Page | 63 Follow the on-screen instructions for the selected Player Unit and click “Next”. The update progress indicator will be displayed again until the update is complete. Note: Player Units can be updated without an internet connection. P/N R63314 v1.08 Page | 64 The following troubleshooting procedures may be used to identify and resolve concerns regarding InSite operation. For additional assistance, please contact Riddell Customer Service at (800) 275-5338. ALERT MONITOR SYMPTOMS & SOLUTIONS SYMPTOM POSSIBLE SOLUTION Alert Monitor will not power on. Check that batteries are installed in the correct orientation (see Battery Care, p.19). Batteries may be fully discharged . Connect Alert Monitor to computer (or AC charger and wall outlet) via the USB cable and charge using the procedure in this manual (see Battery Care, p.19). If batteries fail to charge adequately, replace with size AA nickel-metal hydride (NiMH) rechargeable batteries (Energizer Recharge 2300 mAh, or equivalent). Alert Monitor is on but is not operating properly or the display isn’t normal. Turn Alert Monitor off and then back on again. Perform the diagnostic test on the Alert Monitor by selecting SETTINGS CONFIGURATIONS USER TESTS and following the prompts onscreen. Alert Monitor does not communicate with the Player Management software when connected via USB cable. Disconnect Alert Monitor from computer. Turn the Alert Monitor off and back on again. Shut down and restart InSite Player Management software. Reconnect Alert Monitor to computer. P/N R63314 v1.08 If the above steps do not work, try a different USB cable or USB 2.0 port. Page | 65 SYMPTOM POSSIBLE SOLUTION Player Unit does not check in with Alert Monitor (shown as ABSENT). Verify that all hardware (Alert Monitors and Player Units) has been set up correctly in the software and that all hardware is synced (see Equipment Assignments, p.30). Player Unit does not check in with Alert Monitor (shown as ABSENT). Verify that the Player Unit is powered on and is active (see Player Unit – Controls and Indicators, p.19). Verify Alert Monitor is unplugged from USB cable and powered on. Verify Player Unit is within range (50 yards) of an operating Alert Monitor. Command a directed Player Unit check-in by pressing check-in button for two seconds (see Check In Player Units, p.48). Alert Monitor is not receiving alerts. It is generally difficult to discern whether an impact was too great or small in magnitude simply by observing collisions on the field. However, if the Alert Monitor does not seem to be receiving alerts: o Verify player position and play level has been set properly in InSite Player Management software, and that all hardware has been synced. o Ensure Alert Monitors and Player Units are powered on, and that Player Units have checked in with their associated Alert Monitor(s). o Check that the Alert Monitors and Player Units are within range (50 yards). Place the Player Unit into Test Mode and send a Test Alert to verify the system is performing correctly (see Sending Test Alerts (Test Mode), p.67). P/N R63314 v1.08 Page | 66 SYMPTOM POSSIBLE SOLUTION Alert Monitor is receiving alerts even when removed from a team. Unless all hardware is synced when changes are made in software, hardware will try to communicate as it was last set up. Verify settings in software, sync all Alert Monitors, and command directed check-ins for all Player Units to complete transfer of new settings. Alert Monitor has Player Unit check-in errors. Select VIEW ERRORS to review error code information that may be available for malfunctioning equipment. Some examples of possible Error messages include: o LOW BATTERY – Low Player Unit battery o BAD HIT SENSOR - Indicates failure of Player Unit electronics o UNKNOWN ERR – general error message, followed by a numeric code Please call Riddell Customer Service at (800) 2755338 for assistance with interpretation of errors and equipment service. Alert Monitor will not power off. View any unviewed alerts (see Viewing New Alerts, p.51). PLAYER UNIT SENDING TEST ALERTS (TEST MODE) A Player Unit can send a Test Alert by placing it in Test Mode. A simulated impact will then be initiated by the Player Unit and transmitted to the Alert Monitor for viewing to confirm communication and alerting between Player Unit and Alert Monitor. To enter Test Mode: P/N R63314 v1.08 Page | 67 1) Press and hold the power button on the Player Unit for six seconds until the yellow LED blinks off once, and release. The red and yellow LEDs will flash alternately six times. The Player Unit is now in Test Mode. 2) To generate an Alert, press and hold for two seconds until the LED blinks off once, then release: The check-in button to generate a Single Alert, or The power button to generate a Multiple Alert. 3) The red and yellow LEDs will flash simultaneously three times, followed by the yellow LED flashing as the Player Unit waits to communicate the Alert to the Alert Monitor. A series of simultaneous LED flashes indicates that the Alert has been transmitted. Alert transmission should happen within 20 seconds. 4) Once the Alert has been transmitted, the Helmet Alert Icon should begin to flash on the Alert Monitor. Highlight “X NEW ALERTS” on the main menu and press the SELECT button to view the Alert History screen. The text line of the test alert should be flashing. Highlight it and press the SELECT button again to view more detailed alert information. 5) To exit Test Mode, press and hold the Check-In button for five seconds until the red LED flashes off and back on twice, then release. The red LED will flash five times. Alternately, wait ten minutes without sending new Test Alerts and the Player Unit will time out of Test Mode and return to normal operation. SYMPTOMS & SOLUTIONS SYMPTOM POSSIBLE SOLUTION Player Unit does not power on. Player Unit may have unintentionally been placed in button lock-out mode. Wait ten minutes, then try again. If the Player Unit still fails to power on, call Riddell Customer Service at (800) 275-5338 for instructions on how to return to a Riddell-authorized reconditioning center for battery replacement. P/N R63314 v1.08 Page | 68 SYMPTOM POSSIBLE SOLUTION The lighting pattern is not flashing as expected. The Player Unit was likely placed into a different operating mode than desired. Power cycle the Player Unit off/on (see Player Unit – Controls and Indicators, p.19). Player Unit does not seem to be sending alerts as expected. Place the player unit in Test Mode and create a test impact to verify the system is performing correctly. (see Sending Test Alerts (Test Mode), p.67) Player Unit seems either too sensitive (many alerts) or not sensitive enough (not alerting on large impacts). It is generally difficult to discern whether an impact was too great or small in magnitude simply by observing collisions on the field. The system is designed to alert only the top 1% of single impacts, and to atypically high cumulative exposure levels. However, if the player unit appears to be Alerting improperly, check the player level and position assigned within InSite Player Management software. Sync all Alert Monitors and check in all Player Units to ensure proper configuration. Player Unit does not check in with Alert Monitor (shown as ABSENT). Verify that all hardware (Alert Monitors and Player Units) have been set up correctly using ISPM software and that all hardware is synced (see Equipment Assignments, p.30). Player Unit does not check in with Alert Monitor (shown as ABSENT). Verify Alert Monitor is unplugged from USB cable and powered on. Verify that the Player Unit is powered on and is active (see Player Unit – Controls and Indicators, p.19). Verify Player Unit is within range (50 yards) of an operating Alert Monitor. Command a directed Player Unit Check-In by pressing check-in button for two seconds (see Check In Player Units, p.48). P/N R63314 v1.08 Page | 69 INSITE PLAYER MANAGEMENT SOFTWARE (ISPM) SYMPTOMS & SOLUTIONS SYMPTOM POSSIBLE SOLUTION Trouble installing or updating ISPM software Contact your network administrator for further assistance. ISPM software does not recognize an Alert Monitor when connected via the USB cable. Ensure USB cable connections are secure. Restart ISPM. If this fails, restart the computer and try again. Cannot add or remove hardware through ISPM software. See error message pop-ups for more details. Ensure Player Units have power (if applicable). ISPM software freezes or has other navigating issues. Close ISPM and restart. ISPM pop-up indicates firmware compatibility issues. Update firmware as necessary (see Software and Firmware Updates, p.58). Contact your network administrator to update ISPM following start-up prompts if applicable. When adding a Player Unit through ISPM, Player Unit ID number is “0” or “00”. Alert Monitor was disconnected during the programming process. Delete the Player Unit from the software (see Deleting Players or Equipment, p.46), plug Alert Monitor in for the duration of the programming process, re-add the Player Unit in ISPM, and verify that a non-zero Player Unit ID number appears. P/N R63314 v1.08 Attempt to use another short (1m) USB cable in case of USB cable damage. Page | 70 For Sales & Customer Service support, please contact: Riddell – Customer Support Group 9801 W. Higgins Rd, Suite 800 Rosemont, IL 60018 P: (800) 275-5338 [email protected] www.riddell.com FEDERAL COMMUNICATIONS COMMISSION (FCC) The following statements apply to the InSite Player Unit and Alert Monitor, as required by the Federal Communications Commission (FCC): Compliance Statement (Part 15.19) This device complies with part 15 of the FCC Rules. Operation is subject to the following two conditions: 1) This device may not cause harmful interference, and 2) This device must accept any interference received, including interference that may cause undesired operation. Warning (Part 15.21) Changes or modifications not expressly approved by the party responsible for compliance could void the user’s authority to operate the equipment. INDUSTRY CANADA (IC) The following statement applies to the InSite Player Unit and Alert Monitor, as required by Industry Canada (IC): Compliance Statement (RSS-GEN, Section 7.1.3) Operation is subject to the following two conditions: 1) This device may not cause harmful interference, and 2) This device must accept any interference received, including interference that may cause undesired operation. P/N R63314 v1.08 Page | 71 Avis de conformité insérés dans le manuel d'utilisation des appareils radio exempts de licence (7.1.3) Le présent appareil est conforme aux CNR d'Industrie Canada applicables aux appareils radio exempts de licence. L'exploitation est autorisée aux deux conditions suivantes : 1) l'appareil ne doit pas produire de brouillage, et 2) l'utilisateur de l'appareil doit accepter tout brouillage radioélectrique subi, même si le brouillage est susceptible d'en compromettre le fonctionnement. Riddell warrants InSite to be free from defects in materials and workmanship for a period of one (1) year from the date of purchase provided there has been normal use and proper maintenance. To the extent permitted by law and not otherwise, this warranty is in lieu of all other warranties, express or implied, whether Statutory or otherwise, including any implied warranties of merchantability or fitness for any particular purpose. Manufacturer shall not be liable for any consequential damages resulting from the use of its products. The device covered by this warranty should be returned to Riddell, along with proof of purchase. P/N R63314 v1.08 Page | 72