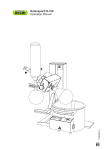
1
Operation Manual
®
Rotavapor R-3
093244 en
Table of contents
Table of contents
1
2
3
4
5
6
3
About this manual . . . . . . . . . . . . . . . . . . . . . . . . . . . . . . . . . . .
Safety. . . . . . . . . . . . . . . . . . . . . . . . . . . . . . . . . . . . . . . . . .
2.1
User qualification . . . . . . . . . . . . . . . . . . . . . . . . . . . . . . . .
2.2
Proper use . . . . . . . . . . . . . . . . . . . . . . . . . . . . . . . . . . .
2.3
Improper use . . . . . . . . . . . . . . . . . . . . . . . . . . . . . . . . . .
2.4
Safety warnings and safety signals used in this manual . . . . . . . . . . . . .
2.5
Product safety. . . . . . . . . . . . . . . . . . . . . . . . . . . . . . . . . .
2.5.1 Instrument-related hazards . . . . . . . . . . . . . . . . . . . . . . . . . . .
2.5.2 Other hazards . . . . . . . . . . . . . . . . . . . . . . . . . . . . . . . . . .
2.5.3 Safety measures . . . . . . . . . . . . . . . . . . . . . . . . . . . . . . . .
2.5.4 Safety elements . . . . . . . . . . . . . . . . . . . . . . . . . . . . . . . . .
2.6
General safety rules . . . . . . . . . . . . . . . . . . . . . . . . . . . . . . .
Technical data . . . . . . . . . . . . . . . . . . . . . . . . . . . . . . . . . . . . .
3.1
Scope of delivery . . . . . . . . . . . . . . . . . . . . . . . . . . . . . . . .
3.2
Technical data overview . . . . . . . . . . . . . . . . . . . . . . . . . . . . .
3.3
Materials used. . . . . . . . . . . . . . . . . . . . . . . . . . . . . . . . . .
Description of function . . . . . . . . . . . . . . . . . . . . . . . . . . . . . . . .
4.1
Functional principle of a Rotavapor R-3 . . . . . . . . . . . . . . . . . . . . .
4.1.1 Front side view of the Rotavapor R-3 . . . . . . . . . . . . . . . . . . . . . .
4.1.2 Rear side view of the Rotavapor R-3 . . . . . . . . . . . . . . . . . . . . . .
Installation . . . . . . . . . . . . . . . . . . . . . . . . . . . . . . . . . . . . . . .
5.1
Installation site. . . . . . . . . . . . . . . . . . . . . . . . . . . . . . . . . .
5.2
Electrical connections . . . . . . . . . . . . . . . . . . . . . . . . . . . . . .
5.3
Assembling the Rotavapor R-3 . . . . . . . . . . . . . . . . . . . . . . . . .
5.3.1 Drive unit . . . . . . . . . . . . . . . . . . . . . . . . . . . . . . . . . . . .
5.3.2 Glass parts . . . . . . . . . . . . . . . . . . . . . . . . . . . . . . . . . . .
5.3.3 Vacuum and electrical connections . . . . . . . . . . . . . . . . . . . . . . .
5.4
Heating bath medium . . . . . . . . . . . . . . . . . . . . . . . . . . . . . .
5.5
Functional test of vacuum tightness . . . . . . . . . . . . . . . . . . . . . . .
Operation . . . . . . . . . . . . . . . . . . . . . . . . . . . . . . . . . . . . . . .
6.1
Switching the instrument ON and OFF and setting the heating bath temperature
6.2
Mounting the bath guide . . . . . . . . . . . . . . . . . . . . . . . . . . . .
6.3
Mounting the evaporating flask . . . . . . . . . . . . . . . . . . . . . . . . .
6.4
Lowering and raising the evaporating flask . . . . . . . . . . . . . . . . . . .
6.5
Adjusting the immersion angle of the evaporating flask into the heating bath . .
6.6
Selecting the distillation conditions . . . . . . . . . . . . . . . . . . . . . . .
6.7
Distilling . . . . . . . . . . . . . . . . . . . . . . . . . . . . . . . . . . . . .
6.8
Aspirating solvent directly into the evaporating flask . . . . . . . . . . . . . . .
6.9
Optimizing the distillation conditions . . . . . . . . . . . . . . . . . . . . . .
6.10 When the distillation is complete . . . . . . . . . . . . . . . . . . . . . . . .
6.11 Removing the evaporating flask . . . . . . . . . . . . . . . . . . . . . . . . .
.
.
.
.
.
.
.
.
.
.
.
.
.
.
.
.
.
.
.
.
.
.
.
.
.
.
.
.
.
.
.
.
.
.
.
.
.
.
.
.
.
.
.
.
.
.
.
.
.
.
.
.
.
.
.
.
.
.
.
.
.
.
.
.
.
.
.
.
.
.
.
.
.
.
.
.
.
.
.
.
.
.
.
.
.
.
.
.
.
.
.
.
.
.
.
.
.
.
.
.
.
.
.
.
.
.
.
.
.
.
.
.
.
.
.
.
.
.
.
.
.
.
.
.5
.6
.6
.6
.6
.7
.9
.9
11
11
12
12
13
13
13
14
15
15
17
18
19
19
19
20
20
21
23
24
24
25
25
26
26
27
29
30
31
32
33
34
34
R-3 Operation Manual, Version C
Table of contents
7
8
9
10
11
4
Maintenance and repairs . . . . . . . . . . .
7.1
Customer service . . . . . . . . . . . .
7.2
Regular service and checks . . . . . . .
7.2.1 System tightness . . . . . . . . . . . .
7.2.2 Housing, cables and accessories . . . .
7.3
Sealing system and hoses. . . . . . . .
7.3.1 Removing the vapor duct . . . . . . . .
7.3.2 Cleaning the seals . . . . . . . . . . . .
7.3.3 Replacing the seals . . . . . . . . . . .
7.4
Heating bath . . . . . . . . . . . . . .
7.5
Glass components . . . . . . . . . . .
Troubleshooting . . . . . . . . . . . . . . . .
8.1
Problem, cause and corrections . . . . .
Shutdown, storage, transport and disposal .
9.1
Storage and transport . . . . . . . . . .
9.2
Disposal . . . . . . . . . . . . . . . . .
9.3
Health and safety clearance form . . . .
Spare parts. . . . . . . . . . . . . . . . . . .
10.1 Glass assembly V . . . . . . . . . . . .
10.2 Glass assembly C . . . . . . . . . . . .
10.3 Sealing system . . . . . . . . . . . . .
10.4 Various glass parts . . . . . . . . . . .
10.5 Miscellaneous . . . . . . . . . . . . . .
Declaration of conformity. . . . . . . . . . .
.
.
.
.
.
.
.
.
.
.
.
.
.
.
.
.
.
.
.
.
.
.
.
.
.
.
.
.
.
.
.
.
.
.
.
.
.
.
.
.
.
.
.
.
.
.
.
.
.
.
.
.
.
.
.
.
.
.
.
.
.
.
.
.
.
.
.
.
.
.
.
.
.
.
.
.
.
.
.
.
.
.
.
.
.
.
.
.
.
.
.
.
.
.
.
.
.
.
.
.
.
.
.
.
.
.
.
.
.
.
.
.
.
.
.
.
.
.
.
.
.
.
.
.
.
.
.
.
.
.
.
.
.
.
.
.
.
.
.
.
.
.
.
.
.
.
.
.
.
.
.
.
.
.
.
.
.
.
.
.
.
.
.
.
.
.
.
.
.
.
.
.
.
.
.
.
.
.
.
.
.
.
.
.
.
.
.
.
.
.
.
.
.
.
.
.
.
.
.
.
.
.
.
.
.
.
.
.
.
.
.
.
.
.
.
.
.
.
.
.
.
.
.
.
.
.
.
.
.
.
.
.
.
.
.
.
.
.
.
.
.
.
.
.
.
.
.
.
.
.
.
.
.
.
.
.
.
.
.
.
.
.
.
.
.
.
.
.
.
.
.
.
.
.
.
.
.
.
.
.
.
.
.
.
.
.
.
.
.
.
.
.
.
.
.
.
.
.
.
.
.
.
.
.
.
.
.
.
.
.
.
.
.
.
.
.
.
.
.
.
.
.
.
.
.
.
.
.
.
.
.
.
.
.
.
.
.
.
.
.
.
.
.
.
.
.
.
.
.
.
.
.
.
.
.
.
.
.
.
.
.
.
.
.
.
.
.
.
.
.
.
.
.
.
.
.
.
.
.
.
.
.
.
.
.
.
.
.
.
.
.
.
.
.
.
.
.
.
.
.
.
.
.
.
.
.
.
.
.
.
.
.
.
.
.
.
.
.
.
.
.
.
.
.
.
.
.
.
.
.
.
.
.
.
.
.
.
.
.
.
.
.
.
.
.
.
.
.
.
.
.
.
.
.
.
.
.
.
.
.
.
.
.
.
.
.
.
.
.
.
.
.
.
.
.
.
.
.
.
.
.
.
.
.
.
.
.
.
.
.
.
.
.
.
.
.
.
.
.
.
.
.
.
.
.
.
.
.
.
.
.
.
.
.
.
.
.
.
.
.
.
.
.
.
.
.
.
.
.
.
.
.
.
.
.
.
.
.
.
.
.
.
.
.
.
.
.
.
.
.
.
.
35
35
36
36
36
36
37
37
37
37
38
39
39
41
41
42
42
44
44
45
46
46
48
49
R-3 Operation Manual, Version C
1
1
About this manual
About this manual
This manual describes the Rotavapor R-3 and provides all information required for its safe operation and
to maintain it in good working order.
It is addressed to laboratory personnel and operators in particular.
Read this manual carefully before installing and running your system and note the safety precautions
in chapter 2 in particular. Store the manual in the immediate vicinity of the instrument, so that it can be
consulted at any time.
No technical modifications may be made to the instrument without the prior written agreement of Buchi.
Unauthorized modifications may affect the system safety or result in accidents. Technical data are
subject to change without notice.
NOTE
The symbols pertaining to safety (WARNINGS and ATTENTIONS) are explained in chapter 2.
This manual is copyright. Information from it may not be reproduced, distributed or used for competitive
purposes, nor made available to third parties. The manufacture of any component with the aid of this
manual without prior written agreement is also prohibited.
The English manual is the original language version and serves as basis for all translations into
other languages. If you need another language version of this manual, you can download available
versions at www.buchi.com.
The following product names and any registered and unregistered trademarks mentioned in this
manual are used for identification purposes only and remain the exclusive property of their respective
owners:
s Rotavapor® is a registered trademark of Büchi Labortechnik AG
5
R-3 Operation Manual, Version C
2
2
Safety
Safety
This chapter highlights out the safety concept of the instrument and contains general rules of behavior
and warnings from direct and indirect hazards concerning the use of the product.
For the users safety, all safety instructions and safety messages in the individual chapters shall be strictly
observed and followed. Therefore, the manual must always be available to all persons performing the
tasks described herein.
2.1
User qualification
The instrument may only be used by laboratory personnel and other persons who on account of
training and professional experience know of the potential dangers that can develop when operating the
instrument.
Untrained personnel, or persons who are currently being trained, require careful supervision by a
qualified person. The present Operation Manual serves as a basis for training.
2.2
Proper use
The rotary evaporator has been designed for use in technical laboratories and in production. It is authorized for use in applications that work with the evaporation and condensation of solvents.
s
s
s
s
s
2.3
Evaporation of solvents and suspensions
Synthesis and cleaning of refined chemicals
Recycling and concentration of solvents
Re-crystallization
Drying of powders and granulates
Improper use
Applications not mentioned in section 2.2 are considered to be improper. Applications which do not
comply with the technical data (see section 3 of this manual) are also considered to be improper.
The operator bears the sole risk for any damages or hazards caused by improper use!
The following uses are expressly forbidden:
s Use of the instrument in explosive environments
s Use of the instrument to process substances that are used as food, feed, cosmetic or pharmaceutical afterwards
s The production and processing of materials that can cause spontaneous reactions (e.g. explosives;
metal hydrids or solvents that can form peroxides)
s Processing with explosive gas mixtures
s Processing with oil
s Working without the evaporating flask being immersed in the heating bath (risk of breakage)
s The drying of hard, brittle materials (e.g., stones, soil samples) that might cause damage to the
receiving flask
s Sudden shock-cooling of the evaporating flask and other glass parts
s Installation or use of the instrument in rooms, which require ex-protected instruments
6
R-3 Operation Manual, Version C
2
2.4
Safety
Safety warnings and safety signals used in this manual
DANGER, WARNING, CAUTION and NOTICE are standardized signal words for identifying levels of
hazard seriousness of risks related to personal injury and property damage. All signal words, which are
related to personal injury are accompanied by the general safety sign.
For your safety it is important to read and fully understand the below table with the different signal
words and their definitions!
Sign
no
Signal word
Definition
Risk level
DANGER
Indicates a hazardous situation which, if not avoided, will
result in death or serious injury.
★★★★
WARNING
Indicates a hazardous situation which, if not avoided, could
result in death or serious injury.
★★★☆
CAUTION
Indicates a hazardous situation which, if not avoided, may
result in minor or moderate injury.
★★☆☆
NOTICE
Indicates possible property damage, but no
practices related to personal injury.
★☆☆☆
(property damage only)
Supplementary safety information symbols may be placed in a rectangular panel on the left to the
signal word and the supplementary text (see below example).
Space for
supplementary
safety
information
symbols.
!
SIGNAL WORD
Supplementary text, describing the kind and level of hazard / risk seriousness.
s
s
s
List of measures to avoid the herein described, hazard or hazardous situation.
...
...
Table of supplementary safety information symbols
The below reference list incorporates all safety information symbols used in this manual and their
meaning.
Symbol
Meaning
General warning
Electrical hazard
7
R-3 Operation Manual, Version C
2
Safety
Explosive gases, explosive environment
Harmful to life-forms
Hot item, hot surface
Device damage
Inhalation of substances
Explosive substances
Fragile items / content
Heavy weight, avoid overexertion
Wear protective mask
Wear laboratory coat
Wear protective goggles
Wear protective gloves
8
R-3 Operation Manual, Version C
2
Safety
Additional user information
Paragraphs starting with NOTE transport helpful information for working with the device or its supplementaries. NOTEs are not related to any kind of hazard or damage (see example below).
NOTE
Useful tips for the easy operation of the instrument.
2.5
Product safety
The Rotavapor R-3 is designed and built in accordance with current state-of-the-art technology.
Nevertheless, risks to users, property, and the environment can arise when the instrument is used
carelessly or improperly.
The manufacturer has determined residual dangers emanating from the instrument
s If the instrument is operated by insufficiently trained personnel.
s If the instrument is not operated according to its proper use.
Appropriate warnings in this manual serve to make the user alert to these residual dangers.
2.5.1
Instrument-related hazards
Pay attention to the following safety notices:
!
Danger
Death or serious poisoning by inhalation of hazardous heating bath liquids.
s
s
s
s
s
s
s
!
Do not inhale fumes from the heating bath
Keep the heating bath temperature on a low level
Obtain the material safety data sheets of all used liquids
Wear appropriate personal protective equipment
Do not use liquids of unknown composition
Directly withdraw released fumes and gaseous substances by sufficient ventilation
Only operate the instrument in ventilated environments
Warning
Death or serious injuries by formation of explosive atmospheres inside the instrument.
s
s
s
s
!
Directly withdraw released fumes and gaseous substances by sufficient ventilation at filling
Before operation, check all gas connections for correct installation
Establish inert system atmosphere before processing substances that can form explosive or
reactive gases or powders
Check for proper earth connection to lead off electrostatic charges
Warning
Death or serious injuries by use in explosive environments.
s
s
s
s
9
Do not operate the instrument in explosive environments
Do not operate the instrument with explosive gas mixtures
Before operation, check all gas connections for correct installation
Directly withdraw released gases and gaseous substances by sufficient ventilation
R-3 Operation Manual, Version C
2
!
Safety
Caution
Risk of minor or moderate burns when handling hot parts.
s
s
Do not touch hot parts or surfaces
Let the evaporating flask cool down for some minutes after use
Notice
Risk of instrument short-circuits and damage by liquids.
s
s
s
s
s
Do not spill liquids over the instrument or its component parts
Wipe off any liquids instantly
Ensure a safe positioning of the evaporating flask for storage
Do not move the instrument when it is loaded with liquid
Keep external vibrations away from the instrument
Notice
Risk of instrument damage by internal overpressure.
s
s
Exchange clogged filters immediately
Dispose of filter immediately
Notice
Risk of instrument damage by wrong mains supply.
s
s
External mains supply must meet the voltage given on the type plate
Check for sufficient grounding
Notice
Risk of glass breakage by exessive strains.
s
s
s
10
Mount all glassware parts without strains
Check glassware for proper fixing regularly and readjust fixing points if necessary
Do not use defective glassware
R-3 Operation Manual, Version C
2
2.5.2
Safety
Other hazards
The following warning sticker(s) can be found on the housing or assemblies of the Rotavapor:
Symbol
2.5.3
Meaning
Location
Hot item, hot surface
Sticker / label, located on top of the housing and
at the racks
Safety measures
!
Warning
Death or serious poisoning by contact or incorporation of harmful solvents at use.
s
s
s
s
s
s
s
s
s
11
Before operation, inspect sealings and hoses for good condition
Exchange worn out or defective parts immediately
Before operation, check the instrument for correct assembling and proper sealing
Only operate the instrument in ventilated environments
Directly withdraw released gases and gaseous substances by sufficient ventilation
Wear safety goggles
Wear safety gloves
Wear a suitable protective mask
Wear a laboratory coat
R-3 Operation Manual, Version C
2
2.5.4
Safety
Safety elements
Electronics
The heating bath is equipped with a mechanical over-temperature protection. The mechanical
over-temperature protection consists of a bimetal thermostat that, in case of over temperature (over
145 °C), directly interrupts the power supply. It has to be set back manually after the bath has cooled down
(see also chapter 8). The electronic over-temperature protection controls the temperature limit (actual
bath temperature may not exceed the given temperature by 2 °C for more than 2 minutes), the heating
rate (actual temperature may not rise by more than 5 °C during 5 seconds) and the function of the
temperature sensor.
s The heating bath is equipped with safety fuses.
s The heating bath is equipped with a thermostatic control of the bath temperature - to prevent the
product from overheating
Parts in direct contact with the instrument
s
s
s
s
s
Combi-clips for fixing the evaporating flask and for safe removal of fixed ground-glass joints.
Ball joint clip for safe fixing of the receiving flask.
Rods and holders for fixing the glass assemblies.
Electronic over-current protection at the drive unit.
Safety spring preventing the vapor duct from dropping out.
Glass
s Use of high quality, inert 3.3 borosilicate glass.
s Use of hose connections GL-14 for preventing glass breakage.
Optional
s The protective shield (optional accessory) protects operators from broken glass, solvent splashes
and hot heating medium in case of accidents or an implosion.
s With the support rod the cold trap can additionally be clamped.
2.6
General safety rules
Responsibility of the operator
The head of laboratory is responsible for training his personnel. The operator shall inform the
manufacturer without delay of any safety-related incidents which might occur during operation of
the instrument. Legal regulations, such as local, state and federal laws applying to the instrument
must be strictly followed.
Duty of maintenance and care
The operator is responsible for ensuring that the instrument is operated in proper condition only,
and that maintenance, service, and repair jobs are performed with care and on schedule, and by
authorized personnel only.
Spare parts to be used
Use only genuine consumables and genuine spare parts for maintenance to assure good system
performance and reliability. Any modifications to the spare parts used are only allowed with the
prior written permission of the manufacturer.
Modifications
Modifications to the instrument are only permitted after prior consultation and with the written approval
of the manufacturer. Modifications and upgrades shall only be carried out by an authorized Buchi
technical engineer. The manufacturer will decline any claim resulting from unauthorized modifications.
12
R-3 Operation Manual, Version C
3
3
Technical data
Technical data
This chapter introduces the reader to the instrument specifications. It contains the scope of delivery,
technical data, requirements and performance data.
3.1
Scope of delivery
Check the scope of delivery according to the order number.
NOTE
For detailed information on the listed products, see www.buchi.com or contact your local dealer.
3.2
Technical data overview
Technical data
Rotavapor R-3
Glass assemblies
Dimensions (W x H x D)
Weight
Connection voltage
V, C
430 x 535 x 315 mm
13-14 kg (depending on the glass
assembly)
24 VDC
Fusage
Mains connection
Frequency
Power consumption
Installation category
Degree of protection
Pollution degree
Rotation speed range
Flask size
Max. flask content
Temperature control range
Display scale
Regulation accuracy
Environmental conditions
Temperature
Altitude
via connection to heating bath R-3 or
external power supply (available on
request)
30 W
II
IP21
2
20-280 rpm
50-4000 ml
3 kg
scale 0–10
R-3 Heating bath
285 x 240 x 330 mm
4 kg
100-120 V or 220-240 V ± 10%
T 12.5 A L 250V (100-120 V version) /
T 6.3 A L 250V (220-240 V version)
3-pole (P, N, E) via power cord
50 / 60 Hz
1700 W
II
IP21
2
up to 4000 ml
room temperature – 95 °C
Set / actual temperature
± 1 °C
for indoor use only
10-40 °C
up to 2000 m
maximum relative humidity 80% for temperatures up to 31 °C, and then linearly
Humidity
decreasing to 50% at 40 °C
Bath content
4l
water, distilled water
we recommend to add borax in a concenHeating medium
tration of 0.5 g/l when using deionised
water
pressure increase of 10 mbar per
Vacuum tightness of system 3 minutes at a pressure of
< 100 mbar
Temperature resistance
< 160 °C
protective shield
13
R-3 Operation Manual, Version C
3
3.3
Technical data
Materials used
Materials used
Component
Material designation
Housing Rotavapor
Aluminium (anodized) and stainless steel
Housing bath and housing components
PBT partially glass reinforced
Bath
Stainless steel
Protective ring
PBT partially glass reinforced
Protective shield
Polycarbonate
Centre rotation drive
Stainless steel
Flange connection to cold trap
Aluminum
Seal
NBR, PTFE
14
R-3 Operation Manual, Version C
4
4
Description of function
Description of function
This chapter explains the basic principle of the instrument shows how it is structured and gives a
functional description of the assemblies.
4.1
Functional principle of a Rotavapor R-3
With a Rotavapor, single step distillations are performed quickly and in a product friendly manner. The
basis of this procedure is the evaporation and condensation of solvents using a rotating evaporator flask
under vacuum. Distilling products under vacuum increases the performance and helps to protect the
products.
Standard vacuum applications
Due to its sophisticated sealing system a highly stable vacuum level can be reached in combination
with a vacuum controller and a vacuum pump. The vacuum also eliminates unwanted or hazardous
emissions of vapors during the process and serves as an important safety feature. The low pressure
decreases the boiling point of the medium inside the Rotavapor. This allows to treat the product gently
at even higher evaporation performance compared to environmental pressure operation.
15
R-3 Operation Manual, Version C
4
Description of function
Evaporation area
The solvent is heated by means of a heating bath. At liquids, the turbulent mixing inside the rotating
evaporating flask results in an increased evaporation rate. The rotation also prevents a local overheating
of the mixture and bumping.
Rotation drive including vapor duct
The drive unit ensures that the evaporating flask rotates evenly. The integrated vapor duct transports the
vapor from the evaporation area to the cooling area.
Cooling area
The solvent vapor flows very quickly into the condenser. Here, the energy in the solvent vapor is transferred to the cooling medium (mostly water), so that the solvent condenses.
Receiving flask
The receiving flask collects the condensed solvent.
Vacuum
The vacuum reduces the boiling temperature and thus increases the distillation performance.
The evaporating performance is influenced by the distillation pressure (vacuum), the heating bath
temperature, and the rotation speed and size of the evaporating flask. For information on the optimum
distillation conditions, see chapter Operation.
NOTE
For information about minimum distillation conditions see section 6, Operation.
16
R-3 Operation Manual, Version C
4
4.1.1
Description of function
Front side view of the Rotavapor R-3
Condenser
Stop cock for vacuum regulation
Hose to continually feed the evaporating flask with
solvent
Lock button to block the drive unit
Knob for rotation speed of evaporating flask
Receiving flask for condensed solvent
Quick action jack to raise and lower the evaporating
flask
17
Vertical end stop
Heating bath display
Buttons to adjust the temperature of the heating bath
Main switch
Heating bath handle
Stainless steel heating bath
! Evaporating flask
" Combi-clip
# Clamping lever for immersion angle adjustment
R-3 Operation Manual, Version C
4
4.1.2
Description of function
Rear side view of the Rotavapor R-3
Evaporating flask
Water bath
Fuse
Power supply for heating bath
Power supply for the drive unit of the R-3
(24 VDC)
18
Connection cable between heating bath and drive unit
Replenishment hose
Cooling water connection of condenser
Cooling water connection of condenser
Vacuum connections to condenser
R-3 Operation Manual, Version C
5
5
Putting into operation
Installation
This chapter describes how the instrument is installed and gives instructions on initial startup.
NOTE
Inspect the instrument for damages during unpacking. If necessary, prepare a status report immediately to inform the postal company, railway company or transportation company. Keep the original
packaging for future transportation.
5.1
Installation site
Place the instrument on a stable, horizontal plane and consider the maximum product dimensions.
Perform the distillations under vacuum with the Rotavapor R-3 placed inside a fume hood. If this is
not possible due to shortage of space, mount the protective shield (optional accessory) and lead the
exhaust gas from the pump into the fume hood.
5.2
Electrical connections
The Rotavapor is aimed to be installed mobile. It is available with multiple kinds of power plugs to
meet most local installation requirements.
Clearance at installation site
s The instrument is connected to mains via a power plug. The plug must be freely accessible at any
time to be unplugged in case of emergency.
Demands on the mains circuit
The mains circuit must
๗ provide the voltage that is given on the type plate of the instrument.
๗ be able to handle the load of the connected instruments.
๗ be equipped with adequat fusage and electrical safety measures, in particular proper grounding.
See also technical data (section 3.2) of all components regarding the different minimum system
requirements!
NOTE
s Additional electrical safety measures such as residual current breakers may be necessary to
meet local laws and regulations!
s
External connections and extension lines must be provided with an grounded conductor lead
(3-pole couplings, cord or plug equipment). All used power cords must meet the input power
requirements.
Notice
Risk of instrument damage by wrong mains supply.
s
s
19
External mains supply must meet the voltage given on the type plate
Check for sufficient grounding
R-3 Operation Manual, Version C
5
5.3
Assembling the Rotavapor R-3
5.3.1
Drive unit
Putting into operation
To complete the tower of the Rotavapor take the motor unit and unscrew the screw on the underside
of the drive unit ().
Loosen the clamping lever for immersion angel adjustment (). Place the drive unit on the axis of the
tower (). The “angle-limiter” on the axis must be placed in the cavity of the rear cover of the drive
unit.
The motor must be placed within a space of approx. 4 -5 mm space between motor unit and tower
(). Fix the motor with the thumb screw on the bottom side of the motor (). Make sure that the motor
can not be removed from the tower.
20
R-3 Operation Manual, Version C
5
Putting into operation
Finalize the mounting of the motor by tightening the clamping lever on the drive unit (). Place the
Rotavapor on the laboratory table and add the heating bath in front of the tower.
!
Caution
Risk of minor or moderate injury by wrong assembly
s
s
5.3.2
Screw in the fixing thumb screw completely.
Tighten the angle fixing leverage.
Glass parts
Mount the sealing on the flange of the condenser ().
Take the vapor duct and put it trough the motor unit. This should give a click when it is mounted properly and be tight on the Rotavapor (). Place the condenser together with the seal in the flange
of the drive unit (). Take care that the seal is placed around the vapor duct without damaging the
PTFE part.
21
R-3 Operation Manual, Version C
5
Putting into operation
Hold the condenser with your left hand until the flange is tightened to avoid that the condenser is falling
down. To connect the condenser with the drive unit, fix it with the flange screw connection (). Secure
the receiving flask with the clip provided for this purpose (). Put the stop cock in the condenser ().
You can also secure the glass assemblies V and C using the corresponding optional support rod (rod
is not included and is available as an accessory).
22
R-3 Operation Manual, Version C
5
5.3.3
Putting into operation
Vacuum and electrical connections
Connect the hose for providing the condenser with the cooling medium () and (). (There is no
distinction between in and out of the cooling medium). For this purpose use hose connections GL-14.
The used hoses must all have the same inner diameter (approximately 6 mm). For safety reasons,
secure the hoses with commercial hose pivoting clamps or cable binders. Check the hoses from time
to time and replace them when they are brittle. Connect an adequate vacuum source to the condenser
() to apply the needed vacuum to the system.
Connect the main power cable to the heating bath (). Plug the connection cable from the drive unit
to the 24 VDC part on the rear side of the heating bath ().
23
R-3 Operation Manual, Version C
5
!
Putting into operation
Caution
Risk of minor or moderate cuts when handling damaged glass parts.
s
s
s
s
5.4
Handle glass parts with care
Visually inspect every glass part before mounting
Exchange damaged glass parts immediately
Do not touch cracks or bits of broken glass with bare hands
Heating bath medium
The heating bath is suitable for the operation up to 95°C. We recommend using only water as heating
bath medium. When the heating bath is used with water, please consider the following notes: Depending
on the water hardness a mixture of normal water with distilled water to a ratio of 1:1 volume shares
is allowed. The use of the heating bath with pure distilled or deionised water is not allowed due to
the corrosiveness towards stainless steel. In case the use of pure deionised or distilled water as
heating medium can not be avoided, the addition of 1 - 2 g borax (Na2B4O7 x 10 H2O) per liter water is
mandatory.
5.5
Functional test of vacuum tightness
Carry out the functional test after all described steps for putting the instrument into operation are
finished.
NOTE
The functional test can only be carried out with a vacuum controller installed or when you have a pressure
measuring device (manometer) connected to the hose between the vacuum source and the Rotavapor.
24
R-3 Operation Manual, Version C
6
6
Operation
Operation
This chapter explains the operating elements and possible operating modes. It gives instructions on
how to operate the instrument properly and safely.
6.1
Switching the instrument ON and OFF and setting the heating bath
temperature
Switch ON/OFF the instrument with the main switch (). To adjust the water bath temperature push
the button UP and DOWN on the heating bath (). During the adjustment the set temperature is
displayed (). Heating activity is indicated by a dot on the display (
).
NOTE
As soon as the power plug is connected and the main switch is turned on, the bath starts heating if the
actual temperature is below the set temperature. For this reason, make sure that there is always water
in the bath to prevent instrument damage.
25
R-3 Operation Manual, Version C
6
6.2
Operation
Mounting the bath guide
The bath guide serves to adjust the optimal space between the Rotavapor handle and the bath. Install
the bath guide, so that the two holes on it fit in the Rotavpor base. The bath is now placed in front of
the guide and the space can easily be adjusted.
6.3
Mounting the evaporating flask
The evaporating flask is attached to the vapor duct (). Take care that the vapor duct is getting no
damage from accidentally contacting the flask. To prefix the flask, flip the metal bracket over the flask
neck (). By screwing the Combi-clip clockwise the flask is connected to the vapor duct ().
!
NOTICE
Risk of contamination and glass breakage.
s
s
s
s
s
26
Clean and dry the exterior of the flask before installation and removal
Do not drop the flask
Savely support the flask at handling
Savely store the flask onto a matching flask ring or holder
Keep limbs out of crushing zone
R-3 Operation Manual, Version C
6
6.4
Operation
Lowering and raising the evaporating flask
To move the drive unit with the evaporating flask, press the lift brake inside the handle (). After
unlocking the drive unit you are able to move it up and down ().
!
Caution
Risk of minor or moderate burns when handling a hot heating bath.
s
Make sure that no liquid can overflow from the bath when the evaporating flask is submerged.
Take care not to contact the heating bath pan while lowering the flask into the heating bath.
27
R-3 Operation Manual, Version C
6
Operation
To limit the flask position to a fixed one, lower the flask as deep as necessary into the bath by means of
the quick-action jack (). Then unscrew the position limitation () at the tower of the Rotavapor and
place it as high as possible.
!
CAUTION
Risk of minor or moderate cuts when handling damaged glass parts.
s
s
s
s
28
Handle glass parts with care
Visually inspect every glass part for good condition before mounting
Exchange damaged glass parts immediately
Do not touch cracks or bits of broken glass with bare hands
R-3 Operation Manual, Version C
6
6.5
Operation
Adjusting the immersion angle of the evaporating flask into the heating bath
If you need to operate at a different angle, e.g. when operating with a small flask, the angle can be
changed as follows.
s 4URNOFFTHEINSTRUMENT
s 3TABILIZETHEGLASSASSEMBLYWITHONEHANDANDLOOSENTHESCREWONTHEUNDERSIDEOFTHE
drive unit.
s 3ETTHECONDENSERINTHEDESIREDPOSITIONBYTILTINGTHEDRIVEUNITACCORDINGLY
s 2ETIGHTENTHESCREWONTHEUNDERSIDEOFTHEDRIVEUNIT
Notice
Risk of glass breakage.
s
s
29
Do not change the immersion angle while the instrument is operating.
Always support the glass assembly with one hand when loosening the anchoring.
R-3 Operation Manual, Version C
6
6.6
Operation
Selecting the distillation conditions
To achieve optimal distillation conditions, the distillation energy supplied by the heating bath must be
removed by the condenser.
To ensure this, operate the instrument according to the following rule of thumb:
Cooling water: max. 20 °C
Vapor: 40 °C Bath: 60 °
How are these conditions achieved?
s 3ETTHEBATHTEMPERATURETOª#
s 3ETTHECOOLINGWATERTEMPERATURENOTHIGHERTHANª#
s !LLOWCOOLINGWATERTOmOWTHROUGHTHECONDENSERATAPPROXIMATELYnLH
s $ElNETHEOPERATINGVACUUMINSUCHAWAYTHATTHEBOILINGPOINTOFTHESOLVENTISª#
Advantages associated with bath temperatures of 60 °C:
s 4HEEVAPORATINGmASKCANBEREPLACEDWITHOUTRISKOFBURNS
s 4HEEVAPORATIONRATEOFTHEWATERFROMTHEHEATINGBATHISLOWLOWENERGYLOSS
s 4HEHEATINGBATHENERGYISUSEDATAGOODDEGREEOFEFlCIENCY
This rule can also be applied to lower bath temperatures, e.g.:
Cooling water: 0 °C
Vapor: 20 °
Bath: 40 °C
30
R-3 Operation Manual, Version C
6
6.7
Operation
Distilling
To start operating the instrument, the following conditions have to be fulfilled:
s All electrical connections are established correctly.
s !LLSEALINGAREINSERTEDCORRECTLY
s !LLJOINTSAREGREASED
To start operating the instrument, proceed as follows:
s 3WITCHONTHEINSTRUMENT
s !LLOWCOOLINGWATERWITHATEMPERATURENOTHIGHERTHANª#TOmOWTHROUGHTHECONDENSERAT APPROXnLH
s 3ETTHEHEATINGBATHTEMPERATURETOTHEDESIREDVALUEASDESCRIBEDABOVEANDWAITUNTILTHE heating medium has reached its operating temperature.
s &ILLTHESOLUTIONYOUWANTTODISTILLATEINTOTHEEVAPORATINGmASKANDMAKESUREITDOESNOTEXCEED
the filling weight of 3 kg.
s -OUNTTHEEVAPORATINGmASKSEECHAPTER
s 4OADJUSTTHEROTATIONSPEEDOFTHEEVAPORATINGmASKTURNTHEKNOBONTHEFRONTSIDEOFTHEDRIVE
unit (). The rotation speed can be adjusted between 20 to 280 rpm.
31
R-3 Operation Manual, Version C
6
s
Operation
4OAPPLYTHENEEDEDVACUUMTOTHEINSTRUMENTSWITCHONTHEEXTERNALVACUUMSOURCE
or open the corresponding isolating valve. The vacuum can be adjusted while closing or opening
the stop cock at the condenser ().
NOTE
s Choose the pressure in such a way that the boiling point of the solvent is 40 °C. Set the rotation
speed to maximum.
s Use the quick-action jack to submerge the flask into the bath.
s After the set vacuum has been reached, wait for about 1–2 minutes to see whether distillation
begins.
s If the distillation does not start, optimize the parameters (decrease the pressure gradually or
increase the bath temperature, both possibilities lead to an increased distillation capacity, see
also chapter 6.9.)
6.8
Aspirating solvent directly into the evaporating flask
Use the stop cock to fill the evaporating flask during the distillation. Place the hose into the flask from
where you like to fill the solvent (see position in the figure above). Set the Rotavapor under vacuum.
Open the stop cock (see position in the figure above) and aspirate the solvent into the evaporating
flask. Fill the solution you want to distill into the evaporating flask and make sure it does not exceed the
filling weight of 3 kg.
32
R-3 Operation Manual, Version C
6
6.9
Operation
Optimizing the distillation conditions
Depending on the solvent being distilled, the distillation might have to be re-optimized. In the optimized case, the condenser should have condensation up to 2/3 to 3/4 of the condenser height.
If this is not the case, there are two possibilities to optimize the distillation:
s 7HENTHEHEATINGBATHHASREACHEDª#SLOWLYREDUCETHEPRESSURE4HUSTHEBOILINGPOINTOF
the solvent is reduced and ΔT increases resulting in an increase of distillation capacity.
s 7HENTHEHEATINGBATHHASREACHEDª#INCREASETHEBATHTEMPERATURE4HUSΔT increases
resulting in an increase of distillation capacity as well.
NOTE
When the bath temperature is increased, not all of the additional energy is used for distillation but a
major part is discharged into the environment due to the increasing difference between the heating
bath and the ambient temperature.
33
R-3 Operation Manual, Version C
6
6.10
Operation
When the distillation is complete
When the distillation is complete, replace the receiving flask to eliminate the risk of back evaporation.
Then, continue distillation. Repeat this process until all desired solvent is distilled off. At the end of the
distillation, stop the rotation, pull the flask off and aerate the system. If you do not intend to immediately
perform another distillation, turn off the heating bath and cooling water supply to save energy and
resources.
6.11
Removing the evaporating flask
Turn the Combi-clip counterclockwise (), while supporting the flask with the other hand. Remove
the metal bracket from the flask and release the flask (see postion and ).
34
R-3 Operation Manual, Version C
7
7
Maintenance and repairs
Maintenance and repairs
This chapter gives instructions on maintenance work to be performed in order to keep the instrument in a good and safe working condition. All maintenance and repair work requiring the opening or
removal of the instrument housing must be carried out by trained personnel and only with the tools
provided for this purpose.
NOTE
Use only genuine consumables and spare parts for any maintenance and repair work in order to
assure warranty and continued system performance. Any modifications of the Rotavapor R-3 or parts
of it need prior written permission of the manufacturer.
CAUTION
!
Risk of minor or moderate cuts when handling damaged glass parts.
s
s
s
s
Handle glass parts with care
Visually inspect every glass part for good condition before mounting
Exchange damaged glass parts immediately
Do not touch cracks or bits of broken glass with bare hands
Notice
Risk of instrument damage by liquids and detergents.
s
s
s
s
7.1
Empty the heating bath and all glass accessories prior to maintenance and repair action
Do not spill liquids over the instrument or parts of it
Wipe off any liquids instantly
For the housing, use ethanol or sopy water as detergent only
Customer service
Only authorized service personnel are allowed to perform repair work on the instrument. Authorization requires a comprehensive technical training and knowledge of possible dangers which might arise
when working at the instrument. Such training and knowledge can only be provided by Buchi.
Addresses of official Buchi customer service offices are given on the Buchi website under:
www.buchi.com. If malfunctions occur on your instrument or you have technical questions or application problems, contact one of these offices.
The customer service offers the following:
s Spare part delivery
s Repairs
s Technical advice
35
R-3 Operation Manual, Version C
7
7.2
Maintenance and repairs
Regular service and checks
To maintain the system in good working order the checks described in this section should be
performed regularly. Defective or worn out parts must be exchanged directly to ensure safe use and
optimal efficiency.
7.2.1
System tightness
To evaluate the system tightness, evacuate the unit to below 100 mbar and then close the vacuum
line. The rate of pressure rise must not exceed 30 mbar per 10 minutes.
A greater pressure rise indicates a leakage. In such a case, recheck all connections, sealing rings and
valves for proper seating.
7.2.2
Housing, cables and accessories
Check the housing cables and accessories for visible defects (cracks, kinks etc.). Clean housing parts
regularly with a damp cloth. Soapy water can be used as cleaning agent.
All housing parts must be completely dried before the system can be connected to mains
again!
!
WARNING
Death or serious burns by electric current at cleaning.
s
s
s
7.3
Switch off the instrument
Disconnect the power cord and prevent unintentional restart
Wait until the instrument is completely dry before reconneting to mains
Sealing system and hoses
Check for wear and clean the vacuum seal at least every six month.
Check all other sealings and hoses for wear at least yearly.
Visually examine the hose connections regularly. When hoses become cracked and brittle, replace
them with new ones. Grease the stop cock joint regularly to achieve optimum tightness of the system.
๓Exchange sealings with scratches or other harms directly.
NOTE
s To prevent damaging the seals never apply grease or touch them with sharp objects.
s PTFE sealings need a 10 hours run-in period to reach their optimum tightness condition. This is
normal for a PTFE seal.
36
R-3 Operation Manual, Version C
7
7.3.1
Maintenance and repairs
Removing the vapor duct
To remove the vapor duct proceed as follows:
s 3WITCHOFFTHEINSTRUMENT
s 2EMOVETHEEVAPORATINGmASKFROMTHEINSTRUMENT
s 0RESSTHEBUTTONONTHEFRONTOFTHEDRIVEUNITSEEPOSTION).
s 4URNTHE#OMBICLIPCLOCKWISEUNTILTHEVAPORDUCTISRELEASEDSEEPOSTIONS and ).
7.3.2
Cleaning the seals
To prolong the lifetime of the seals, rinse them regularly with water, especially if “bumping” occurred
during the distillation or if working with crystalline products. Afterwards, dry them with a soft cloth. To
remove the seals, see chapter 5.3.2.
7.3.3
Replacing the seals
Seals are subject to wear and tear, thus you should check them regularly and replace them, if necessary,
e.g. if they do not pass the vacuum sealing test described in chapter 5.5 anymore. For this purpose,
see chapter 5.3.2.
The lifetime of a seal depends on the application which where carried out with the instrument. A usual
lifetime is between 3 and 12 months.
7.4
Heating bath
The inner surface of the heating bath should be cleaned if:
s 4HEHEATINGBATHISCALCIlEDORCONTAMINATED
s 4HESTAINLESSSTEELSURFACEOFTHEBATHISDIRTYORRUSTY
s #ALCIlCATIONONTHESTEELSURFACEAPPEARS
For this purpose, remove the heating bath from the Rotavapor R-3, empty it and unplug the main power
supply. In the case of minor calcifications, use a non-abrasive cleaning agent (e.g. a bathroom cleaner
or “Scotch-BriteTM”). If the calcification is persistent, use e.g. acetic acid to remove it. Rinse the bath
thoroughly afterwards.
37
R-3 Operation Manual, Version C
7
7.5
Maintenance and repairs
Glass components
To prolong the lifetime of the glass components, consider the following:
Rinse glass components with water and commercial cleaning agent (e.g. a mild soap solution).
NOTE
We recommend cleaning all the glass components manually.
s Use an alkaline cleaner to remove dirt, e.g. algae, adhering within the condenser coil.
NOTE
When a thin copper wire is introduced into the condenser coil, the risk of dirt adhering to the
condenser coil is reduced.
s Remove grease from joints. After you have cleaned and completely dried each glass component,
visually inspect the components for glass splinters or cracks. Since these components are under
vacuum when the Rotavapor R-3 is operating, they are subject to strain.
Regularly check the glass components for damages and only use glassware that is in perfect
condition. Glassware with cracks, stars or other damages can break during operation.
38
R-3 Operation Manual, Version C
8
8
Troubleshooting
Troubleshooting
This chapter helps to resume operation after a minor problem has occurred with the instrument. It lists
possible occurrences, their probable cause and suggests how to remedy the problem. The troubleshooting table below lists possible malfunctions and errors of the instrument. The operator is enabled to
correct some of those problems or errors by him/herself. For this, appropriate corrective measures are
listed in the column “Corrective measure”. The elimination of more complicated malfunctions or errors is
usually performed by a Buchi technical engineer who has access to the official service manuals. In this
case, please refer to your local Buchi customer service agent.
8.1
Problem, cause and corrections
Malfunctions and their remedy
Malfunction
Possible cause
Corrective measure
Instrument does not work
s
Mains switch off
s
Switch on mains switch
s
Instrument is not connected to
power supply
s
Check if mains connection is
okay
s
Fuse defective
s
Replace the fuse. If the malfunction occurs again, contact the
Buchi customer service.
s
Mains switch off
s
Switch on mains switch
s
Instrument is not connected to
power supply
s
Check mains connection
s
Over temperature protection was
activated
s
Let the bath cool down and
empty it. Then push the temperature sensor reset button at the
bottom side of the heating bath
e.g. by means of a tooth stick,
see picture below
s
Fuse defective
s
Replace the fuse. If the
malfunction occurs again,contact
the Buchi customer service.
s
Joints have not been greased
s
Grease joints
s
Hose connections have not been
fixed correctly or are defective
s
Check hose connections
s
Hoses are leaky (brittle)
s
Replace hoses
s
Sealing system has been installed
incorrectly
s
Check sealing system
s
Seal is defective
s
Replace seal
s
Reduce evaporation at Rotavapor
s
Empty receiving flask
s
Water pressure of water jet
pump is too low
s
Open water tap completely
s
Manually decrease the pressure
until the distillation starts again
Bath does not heat
System is leaking
Vacuum is not reached
Distillation not optimized
39
R-3 Operation Manual, Version C
8
Troubleshooting
Malfunctions and their remedy (cont.)
Malfunction
Possible cause
Corrective measure
Distillation stopped,
although not dried out
completely
s
Back evaporation from the receiving
flask is too strong
(especially for solvent mixtures)
s
Empty receiving flask and restart
distillation
s
Malfunction in distillation procedure
which is not exactly defined
(e.g. sudden cooling, heat flow too
low, etc.)
s
Decrease the pressure manually
until the distillation starts again
40
R-3 Operation Manual, Version C
9
9
Shutdown, storage, transport and disposal
Shutdown, storage, transport and disposal
This chapter instructs how to shut down and disposal of the instrument. Information about storage
and shipping conditions can also be found here.
9.1
Storage and transport
Switch off the instrument and remove the power cord. To disassemble the Rotavapor follow the installation instructions in section 5 in reverse order. Remove all liquids and other residues before packging
the instrument.
NOTE
It is recommended to ship the instrument and its accessories in original packaging to reduce the risk
of possible transport damages.
!
Warning
Death or serious poisoning by contact or incorporation of harmful substances.
s
s
s
s
s
s
s
!
Wear safety goggles
Wear safety gloves
Wear a suitable protective mask
Wear a laboratory coat
Clean the instrument and all accessories thoroughly to remove possibly dangerous substances
Do not clean dusty parts with compressed air
Store the instrument and its accessories at a dry place in its original packaging
Caution
Risk of minor or moderate injury by heavy weight of the instrument.
s
s
s
s
41
Lift the instrument carefully and avoid overexertion
Do not drop the instrument or its transport box
Place the instrument on a stable, even and vibration-free surface
Keep limbs out of crushing zone
R-3 Operation Manual, Version C
9
9.2
Shutdown, storage, transport and disposal
Disposal
To dispose of the instrument in an environmentally friendly manner, a list of materials is given in
chapter 3. This helps to ensure that the components are separated and recycled correctly.
Make especially sure to dispose of the gas springs appropriately. Please follow valid regional and
local laws concerning disposal.
NOTE
When you send the instrument back to the manufacturer for repair work, please copy the health and
safety clearance form on the following page, fill it in and enclose it in the instrument package.
9.3
Health and safety clearance form
Declaration concerning safety, potential hazards and safe disposal of waste, e.g. used oil.
Safety and health of our staff, laws and regulations regarding the handling of dangerous goods,
occupational health and safety regulations, safety at work laws and regulations regarding safe disposal
of waste, e.g. waste oil, require that for all Rotavapors and other products this form must be send to
our office duly completed and signed before any equipment is repaired or dispatched or to our premises.
Products will not be accepted for any procedure and handling and repair / DKD calibration will not
start before we have received this declaration.
a) Fax or post a completed copy of this form to us in advance. The declaration must arrive before the
equipment. Enclose a second, completed copy with the product. If the product is contaminated you
must notify the carrier (GGVE, GGVS, RID, ADR).
b) Inevitably, the repair process will be delayed considerably, if this information is missing or this
procedure is not obeyed. We hope for your understanding for these measures which are beyond
our control and that you will assist us in expediting the repair procedure.
c) Make sure that you know all about the substances which have been in contact with the equipment
and that all questions have been answered correctly and in detail.
42
R-3 Operation Manual, Version C
9
Shutdown, storage, transport and disposal
Health and Safety Clearance
Declaration concerning safety, potential hazards and safe disposal of waste.
For the safety and health of our staff, laws and regulations regarding the handling of
dangerous goods, occupational health and safety regulations, safety at work laws and
regulations regarding safe disposal of waste, e.g. chemical waste, chemical residue or
solvent, require that this form must be duly completed and signed when equipment or
defective parts were delivered to our premises.
Instruments or parts will not be accepted if this declaration is not present.
Equipment
Model:
Part/Instrument no.:
1.A Declaration for non dangerous goods
We assure that the returned equipment
has not been used in the laboratory and is new
was not in contact with toxic, corrosive, biologically active, explosive, radioactive or
other dangerous matters.
is free of contamination. The solvents or residues of pumped media have been
drained.
1.B Declaration for dangerous goods
List of dangerous substances in contact with the equipment:
Chemical, substance
Danger classification
We assure for the returned equipment that
all substances, toxic, corrosive, biologically active, explosive, radioactive or
dangerous in any way which have pumped or been in contact with the equipment
are listed above.
the equipment has been cleaned, decontaminated, sterilized inside and outside and
all inlet and outlet ports of the equipment have been sealed.
2. Final Declaration
We hereby declare that
- we know all about the substances which have been in contact with the equipment
and all questions have been answered correctly
- we have taken all measures to prevent any potential risks with the delivered
equipment.
Company name or stamp:
Place, date:
Name (print), job title (print):
Signature:
Health and Safety Clearance_20081110.doc_20081110
43
Version 1.0
Page 1/1
R-3 Operation Manual, Version C
10
10
Spare parts
10.1
Glass assembly V
Spare parts
11055921
040627
11055922 P+G
028606
040625
000646
000636
048237
023875
023900
028096
032339 (STJ 29/32)
032341 (STJ 24/40)
003275
List of parts
Order number
Part name
11057056
Glass assembly R-3 V complete with 1 l
receiving flask, without seal and vapor
duct
Diagonal condenser R-3 V (23875 +
23900) + Hose clips GL-14 complete
Glass assembly R-3 V complete with 1 l
receiving flask, P+G
Diagonal condenser R-3 V (23875 +
23900) + Hose clips GL-14 complete,
P+G
Set of hose connections GL-14, 4x bent /
2x straight / 6x screw caps
Vapor duct short STJ 24/40 with Combi
Clip
Vapor duct short STJ 29/32 with Combi
Clip
11055921
11057057
11055922
038000
032341
032339
Order number
Part name
000646
PTFE-Hose 4,7X300 mm
000636
Gasket KD 22
028096
PTFE hose, 600 mm
040625
PTFE drain disk
003275
Clip for receiving flask S35
040627
Stop cock STJ 18.8/38
028606
Drain sleeve
023375
Combi Clip 29,2/32
037642
027267
Combi Clip 24/40
037287
44
Set of hose connections straight GL-14,
4 pieces, 4x olive straight with screw caps
Set of hose connections bent, GL-14,
4 pieces, 4x olive bent with screw caps
R-3 Operation Manual, Version C
10
10.2
Spare parts
Glass assembly C
027479
000672
027462
040628
040641
032013
040627
027344
000646
028606
052892
052891
048237
028096
023875
023900
032339 (STJ 29/32)
032341 (STJ 24/40)
003275
000636
List of parts
Order number
Part name
Order number
Part name
040627
Stop cock STJ18.8/38
038000
Set of hose connections GL-14, 4x bent / 2x
straight / 6x screw caps
003275
Clip for receiving flask S35
023875
Screw cap GL-10
000672
Glass assembly C05 complete with 1 l
receiving flask, without seal and vapor
duct
Cold trap outer part (including 23900 +
23875 + hose clips GL-14 complete)
Cold trap complete (including 40641 +
23900 +23875 + 00672 + 27462 +
27479)
Cold trap inner trap
027479
Cap for cold trap
023900
FPM-O-ring 3*2.7 mm
027462
Seal PTFE/ Viton complete
Set of hose connections straight GL-14, 4
pieces, 4x olive straight with screw caps
Vapor duct short STJ 24/40 with Combi
Clip
Vapor duct short STJ 29/32 with Combi
Clip
028606
Drain sleeve
Set of hose connections bent, GL-14, 4
pieces, 4x olive bent with screw caps
023375
040640
040641
040645
037642
032341
037287
052893
R-3 Support rod complete
032013
Rubber band
Combi Clip 29,2/32
027344
Cross sleeve
027267
Combi Clip 24/40
000636
Gasket KD 22
040628
Stop cock STJ18.8/38 C
028096
PTFE hose, 600mm
000646
PTFE-Hose 4,7X300mm
032339
45
R-3 Operation Manual, Version C
10
10.3
Spare parts
Sealing system
Sealing system
10.4
Product
Order number
Gasket KD 22 (vacuum seal)
000636
Various glass parts
Vapor duct
Glass
STJ
without Combi-Clip
with Combi-Clip
V&C
29.2/32
032002
032339
V&C
24/40
032335
032341
Evaporating flasks (pear-shaped)
Content
STJ 29/32
STJ 24/40
50 ml
000431
008750
100 ml
000432
008751
250 ml
000433
008754
500 ml
000434
008758
1000 ml
000435
000440
2000 ml
000436
008765
3000 ml
000437
008767
4000 ml
047991
047990
Drying flasks (pear-shaped)
Content
STJ 29/32
STJ 24/40
500 ml
000452
011579
1000 ml
000453
000420
2000 ml
000454
011580
Distillation spider with 5 flasks
46
Content
Order number
50 ml with STJ 24/29
001332
100 ml with STJ 24/29
001333
R-3 Operation Manual, Version C
10
Spare parts
Reitmeyer traps agains foaming
Product
Order number
STJ 29/32
36576
STJ 24/40
36577
Receiving flasks
Content
uncoated
50 ml
000421
100 ml
000422
250 ml
000423
500 ml
000424
1000 ml
000425
2000 ml
000426
Beaker flasks
1.5 l version
Beaker flask complete
Drying flask
STJ 29,2/32
034230
034269
STJ 24/40
034247
034770
Beaker flask complete
Drying flask
STJ 29,2/32
034764
034767
STJ 24/40
034765
034768
0.5 l version
Intermediate piece
Content
Order number
Intermediate piece with valve
001006
Intermediate piece without valve
001004
Cold trap holder
47
Product
Order number
Support rod complete
052893
R-3 Operation Manual, Version C
10
10.5
Spare parts
Miscellaneous
Miscellaneous
Product
Order number
Floating balls 450 pieces
036405
Top cover B-491
048230
Water control valve ½”
011606
Vacuum hose Ø 16/6
017622
Cooling water hose silicone Ø 9/6
004133
Nyflex hose Ø14/8
004113
Glisseal grease 60g
001330
External power supply 24 VDC
11055312
48
R-3 Operation Manual, Version C
11
11
Declarations and requirements
Declaration of conformity
49
R-3 Operation Manual, Version C
BÜCHI Labortechnik AG
CH-9230 Flawil 1 / Switzerland
T +41 71 394 63 63
F +41 71 394 65 65
www.buchi.com
Quality in your hands