1
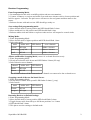
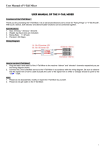
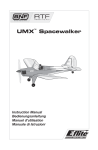
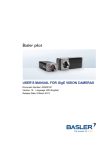
Micron Radio Control
+44 1653 696008
www.micronradiocontrol.co.uk
SuperMicro MX-Rx62H
A DSM2 5 channel micro receiver module with 2 x on-board linear servos and 2A brushed ESC. Provides vtail and delta-wing mixing plus swapping directional channel between rudder and aileron.
Specification:
Size:
Weight:
Voltage:
Servo Travel:
Servo Pull:
24 x 24.2 x 8.4mm
3.4gm
3.3V – 5V
7mm
35gm @ 4.2V
The motor connections are via solder pads on the circuit board. The receiver is available with an optional 2
pin 1.27mm pitch socket soldered onto these pads. This connector is the same as used on the AR6410 and
PKZ3352.
The default channel for the directional servo is rudder (ch4). 2 x JST-SH sockets may be used for an external
aileron (ch2) servo and reversed aileron. When the directional servo is mapped to aileron, the JST-SH
sockets provide rudder and reversed rudder.
Receiver Installation
The receiver module must be installed rigidly to avoid control vagueness should the module move as the
servos are operated. Double-sided foam tape strips and/or minimal hot glue can be used at the corners to
install the receiver.
The receiver module is not insulated. Make sure that it does not come into contact with anything
conductive.
Receiver Binding
1. Ensure the transmitter is switched off.
2. Plug the flight battery into the receiver's connector. After approx 5 seconds the LED on the receiver
board will start flashing rapidly to indicate that is in bind mode.
3. Switch on your transmitter in bind mode – you will need to consult the transmitter user manual as
there is a wide variation in techniques for entering bind mode.
4. If bind is successful, the LED will light continuously (no flashing) after approx 10 seconds.
Depending on the version of the receiver firmware, the LED may continue flashing until it lights up
solid or may stop flashing and go dark for several seconds.
5. If bind fails, alter the orientation between receiver and transmitter aerials, go to step 1 and try again.
SuperMicro MX-Rx62H
1
Receiver Programming
Enter Programming Mode:
1. Set transmitter throttle stick to middle position and turn on transmitter.
2. Connect 1S battery to receiver and within 2 seconds move elevator stick to lowest position and
hold for approx. 2 seconds. The pitch servo will move to the end, pause and then return to the
centre.
3. Release elevator stick and receiver LED should go steady on.
Save settings/Exit programming mode:
1. Move throttle stick to lowest position and LED should flash 3 times
2. Move rudder stick to left position and LED should flash 1 time
3. Release rudder stick and within a couple seconds receiver will respond to control sticks
Mixing Mode:
1. Enter Programming Mode
2. Move throttle stick to highest position and LED should flash 1 time
3. Select mix mode:
mode
rudder stick LED flashes
servo channels
normal
full right
1
rudder / elevator
delta wing ½ way left
2
aileron / elevator
v-tail
3
rudder / elevator
full left
Aileron and Rudder Swapping Mode (control of on-board direction servo):
1. Enter Programming Mode
2. Slowly move throttle stick down until LED flashes 2 times (I/2 way)
3. Select direction servo channel:
channel
rudder stick LED flashes
rudder
full right
1
aileron
full left
2
The JST-SH sockets will be connected to the channel not connected to the on-board servo.
Swapping control of the two On-board Servos:
1. Enter Programming Mode
2. Slowly move Throttle stick up until LED flashes 2 times (½ way)
3. Select mode:
mode
rudder stick LED flashes
normal
full left
2
swapped
full right
1
Returning Receiver to Default Settings:
1. Enter Programming Mode
2. Move throttle stick to lowest position LED should flash 3 times
3. Toggle elevator stick from full up to full down positions 2 or 3 times
4. LED should flash 3 times
5. This places receiver settings to default mode
SuperMicro MX-Rx62H
2