1
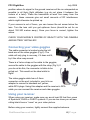
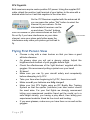
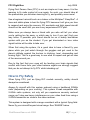
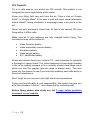
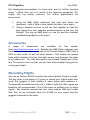
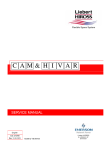
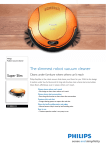
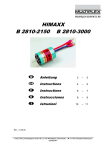
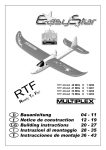
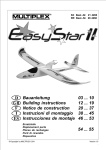
FPV Flight Box – User Guide v1.4
Complete First Person View Flight Box
August 2008
FPV Flight Box
July 2008
Contents
FPV Flight Box – User Guide v1.4 ............................................................ 1 Introduction ............................................................................................... 3 Required Accessories ........................................................................... 3 Intermediate Kit – CAM35 ................................................................. 3 Advanced Kit – CAM45 ..................................................................... 3 Package Contents..................................................................................... 4 Installation/Getting Started ....................................................................... 5 Charging your video goggles ................................................................ 5 Installing the camera ............................................................................. 5 Connecting your video goggles ............................................................ 6 Using your receiver ............................................................................... 6 Flying First Person View ........................................................................... 7 How to Fly Safely ...................................................................................... 8 Troubleshooting ...................................................................................... 10 Range ..................................................................................................... 11 Accessories............................................................................................. 12 Recording Flights .................................................................................... 12 Recording.............................................................................................. 12
FirstPersonView.co.uk 2008
2|Page
FPV Flight Kit
Introduction
Congratulations on your purchase of the FPV Flight Kit! We hope you will
enjoy this system.
This equipment offers a breakthrough in the way you fly radio controlled
aircraft. With this system you’ll be flying from the cockpit of your model,
rather than watching it fly around in front of you. Experience the amazing
view of the world from above just like being in a real plane.
Required Accessories
While your FPV Flight Kit comes with almost everything you need, you
will also need to provide the following items.
• 35MHz transmitter/receiver to fly with. This 2.4GHz system is not
compatible with 2.4GHz radios!
• A slow, easy to fly RC trainer aircraft.
• Computer with USB port to charge video goggles, or other USB
charger – eg an iPod/ iPhone charger.
• Suitable 12v dc power source for the video receiver (12v gel cell
suggested, or 3S 1000mAh + LiPo, or car cigar lighter power). Intermediate Kit – CAM35 • Battery (approx 12v) with JST connector for onboard camera. This
camera draws less than 200mAh. (The smallest, lightest suitable
battery that we have found is the Etec 3S 11.1V 250mAh LiPo
battery
these
are
available
from
our
friends
at www.micronradiocontrol.co.uk. This will give approximately one
hour safe use). Advanced Kit – CAM45 • Battery with JST connector for onboard camera. (The built-in psu
will take anything from 3v to 20v and draws about 200mAh. For
minimum weight and size we use and recommend a 2S, 300mAh+
LiPo available from www.robotbirds.com (0300 2S1P 405624).
This will give approximately one hours safe use.) Page |3
FPV Flight Box
July 2008
Package Contents
•
•
•
•
•
•
•
•
•
•
•
•
•
•
•
Video goggles
Light blocker for video goggles
Spare nosepiece for video goggles
Control cable for video goggles (with battery installed)
Adapter cables for video goggles
o RCA connectors
o IPod 3.5mm 4 pole style connector
o 3.5mm jack red and yellow connectors
Earphones for video goggles
Remote control for video goggles
USB charger for video goggles
Camera with integrated transmitter and power supply
Bracket and screws for camera
Receiver unit
RCA cable for receiver unit
Antenna for receiver unit
Power lead for receiver with DC plug (white dashes = positive)
JST to white Molex adaptor cable for CAM35 (Intermediate Kit)
Video Goggles
Intermediate Kit CAM35 Camera
Control Unit
Advanced Kit CAM45 Camera
707 Receiver
Receiver
FirstPersonView.co.uk 2008
4|Page
FPV Flight Kit
Installation/Getting Started
Once you’ve read through this manual, we suggest you put the video
goggles on to charge before doing anything else. A first charge can take
from 10 minutes to 2 hours; make sure your battery is fully charged!
Charging your video goggles
To charge your video goggles, plug the USB charge lead into a computer
(or other USB charger EG an iPod/iPhone charger) and then connect the
other end to the side of the video goggles control cable. The control unit
should be switched off during charging.
The light on the control unit will be on until the battery is fully charged. A
fully charged battery should give 2.5-3 hours of use.
Installing the camera
When choosing a place to mount your camera on the aircraft, select a
location that will give you a good forward view with part of the aircraft in
view as an attitude reference point.
Locate the U bracket that is included in the kit, and attach the mount to
the plane with screws or zip-ties. You may also want to consider gluing
this bracket into place to make sure it is secure.
Using the included screws, secure the
camera to the bracket. The two forward
holes as indicated in Fig 1 should be
used for mounting. Your camera
shouldn’t be able to move and should be
pointing slightly below horizontally. It is
generally best to position the camera so
that you have a little over two thirds
Fig 1
ground and a little less than one third sky
in your picture so that the camera light
adjustment is correct for viewing ground detail.
For the CAM45 use the attached sticky pad to attach the transmitter (the
small unit attached by 3 wires) to your aircraft so the antenna is vertical.
Ideally this should be placed with the aerial as high as possible and in a
Page |5
FPV Flight Box
July 2008
position where its signal to the ground receiver will be as unimpeded as
possible in all likely flight attitudes (e.g do not place it between the
motors of a twin!). Place the transmitter at least 5cm away from the
camera – these cameras give out small amounts of RF interference
which might otherwise be picked up.
If your camera is out of focus, you can loosen the set screw below the
lens. Turn the lens until you get optimum focus (should be set for an
object 150-300 metres away). Once your focus is correct, tighten the
screw.
CHECK YOUR MODEL’S CENTRE OF GRAVITY WITH THE CAMERA
AND BATTERY INSTALLED! Connecting your video goggles
The cable connector is located under the left
hand arm of the video goggles (Fig 2). The
cable will only plug in one way, if it does not fit,
try it the other way around.
There is a Velcro strap on the cable to the goggles,
secure the cable to the goggles with the strap (Fig 3). If
you do not do this, the connector is liable to be
pulled out. This would not be ideal whilst in
flight!
Fig 2
The video goggle cable has a 3.5mm
connector on the end, included in your kit is an
adapter to convert to standard red, yellow,
white RCA plugs. Using this adapter and the receiver’s RCA
cable you can connect the receiver and video goggles.
Fig 3
Using your receiver
When using your receiver, make sure you are at least 35 feet from users
of Spektrum, FHSS or FASST systems. If you are too close you will see
rolling black lines or “snow” on your video picture.
Before using your receiver, tightly connect the supplied antenna.
FirstPersonView.co.uk 2008
6|Page
FPV Flight Kit
Both receivers require centre positive DC power. Using the supplied DC
cable, attach the positive (red) terminal of your battery to the wire with a
dashed white line on it and the negative to the other wire.
On the 707 Receiver supplied with the advanced kit
you can press the yellow “Set” button to select the
channel of your camera. On the
intermediate kit receiver use the
up and down “Control” buttons
until the channel of your camera shows on the LCD.
Channel Select
Do not fly if you have interference on your video
channel, once your plane gets further away the
interference may make your picture get too bad to
fly.
Flying First Person View
•
•
•
•
•
•
•
•
•
Choose a day with a clear horizon so that you have a good
attitude reference.
On gloomy days you will get a gloomy picture. Adjust the
brightness and contrast of your goggles before flight.
Check the effectiveness of the ‘light blockers’ supplied with the
goggles. We recommend putting a jacket over your head!
Sit down!
Make sure you can fly your aircraft safely and competently
before attempting to fly FPV.
Take your time when beginning to fly FPV, there is no rush!
Make sure all your batteries are fully charged!
Make your first FPV flights using an RC Buddy Box Training
System so that the spotter (instructor) can take control should
the need arise. For your first flights we strongly recommend
letting your experienced modeller friend get the model up to a
safe height visually, you having a play about, then letting your
experienced modeller friend do the circuit and landing.
If you wear glasses, make sure you have them on as well as the
goggles.
Page |7
FPV Flight Box
July 2008
Flying First Person View (FPV) is not as simple as it may seem. It is like
learning to fly radio control all over again. As such, you should take all
the precautions you did when learning to fly, and possibly some more!
Use a beginner’s aircraft such as a trainer or the Multiplex® EasyStar®. A
slow and stable plane is best for flying FPV because it will give you time
to respond and enjoy the scenery. 3D, aerobatic and high speed aircraft
should not be used until you are a very experienced FPV pilot.
Make sure you always have a friend with you who will tell you when
you’re getting too far away, or which way to turn if you can’t find your
way home. If possible your friend should be on a buddy box/trainer
system with you as the student. If you get disoriented or lose video
signal he/she will be able to take over.
When first using the system, it’s a good idea to have a friend fly your
plane while you just watch through the goggles and get used to the
plane’s attitude against the horizon in climbing, level, descending and
turning flight. This is a great way to see what to expect and get an idea
of the area around you.
Due to the fact that your eyes will be feeding your brain signals that
conflict with those from your other balance organs we strongly suggest
that you do not attempt to fly FPV whilst standing up! How to Fly Safely
When flying FPV, just as flying R/C models normally, safety should
always be considered.
Always fly aircraft with this system onboard using a traditional 35MHz
radio (depending on your country). This system is not compatible with
2.4GHz radio systems, not only will you experience severely reduced
range you’ll also see heavy interference on your video feed from using a
2.4GHz transmitter so close to the video receiver.
This system is designed with a range consistent with a typical flying field.
Never fly your aircraft beyond visual range. See ‘RANGE’ below.
FirstPersonView.co.uk 2008
8|Page
FPV Flight Kit
Fly in a safe area as you would any R/C aircraft. This product is not
designed for use in high-density public areas.
Know your flying field very well from the air. Take a look on Google
Earth® or Google Maps® to be able to pick out major visual references
before takeoff. Losing orientation is surprisingly easy once you’re in the
air!
Never use your equipment closer than 35 feet to the nearest R/C pilot
flying with a 2.4GHz radio.
Make sure all of your batteries are fully charged before flying. This
includes but may not be limited to:
•
•
•
•
•
Video Receiver battery
Video transmitter/ camera battery
Aeroplane battery
Video goggle battery
R/C transmitter battery
Check and double check your model’s CG – and remember to complete
a thorough r/c range check. The video equipment is best range checked
in the air by getting someone to fly a normally piloted visual large circuit
whilst you use the goggles (ground range is always poor). This also
gives you the chance to see if your site has suddenly been afflicted by a
source of interference.
Don’t forget all your normal r/c pre-light checks and procedures.
Flying your aircraft safely is your responsibility, this system can give you
a lot more freedom in the air – don’t abuse that by not being safe!
Before flying please also study our full 3 page safety guideline
document on our website.
Page |9
FPV Flight Box
July 2008
Troubleshooting
No video in goggles.
•
•
•
•
•
•
•
•
•
Is your receiver on the correct channel?
Do you have power to your transmitter, camera, and are your
video goggles turned on?
Are your batteries charged?
Are all of your plugs secured and connected tightly?
Do you see video if you connect your receiver to your TV?
Do you see video if you connect your goggles to another video
source (eg a DVD player/ Freeview box, etc.)?
Try reconnecting all of your cables on the video goggles.
Try removing the battery from the video goggle’s controller unit
and then reseating it.
If you have the CAM45 and you are not using an OSD is the
jumper on your camera’s OSD port still there?
There is static/ snow on the video feed.
•
•
Move your receiver away from interference sources such as:
o Microwave ovens
o Cordless phones
o Bluetooth devices (perhaps on your mobile phone?)
o Wireless internet/networking devices
Is your antenna on the receiver screwed on tight and upright?
Rolling bands of black on the video.
•
Move away from Spektrum users!
Smoke comes out of transmitter or receiver when connecting.
•
You just plugged in your battery backwards! Send it in for repair.
FirstPersonView.co.uk 2008
10 | P a g e
FPV Flight Kit
Range
As stated above, this system is designed with a range consistent with a
typical flying field. Never fly your aircraft beyond visual range. Typically
this will mean you should keep your model within 500 metres of you.
There are various external factors that can affect the usable range.
2.4GHz does not go through buildings, people, trees etc. It needs clear
line of sight. It also needs a clear 'margin' either side of the clear line of
sight - otherwise you get multipath interference. Also - wifi, microwave
ovens and all sorts of other devices produce interference on the 2.4GHz
band. If you are trying to use it in a small park in London then you will be
disappointed. The useable range will be just a few metres. And if you
use it out in the country, well away from houses, masts etc, air to ground,
then you'll get several hundred metres. (More with the 8dbi Panel
antennae – perhaps seven hundred metres or more - but note that the
Panel antennae needs to be facing in the general direction of your
model.)
There are other issues. The camera has a dipole aerial. The standard
supplied video Rx aerial is a dipole. These aerials are nominally ‘omni’
directional but in practice their ‘RF Antenna Gain Pattern’ is shaped like
a doughnut. There is very little transmitting (or receiving) from the ends
of these aerials: Unsurprisingly they work best when the two aerials are
aligned side to side. So if your model has the aerial pointing straight up,
and your receiver has the aerial pointing straight up, and the model is a
few hundred metres away and a few hundred feet up then you will get a
good signal. If you then bank the model hard away from the video Rx,
then the Rx is trying to pick up the signal from the bottom of the dipole,
through the body of the model (and perhaps through the battery, r/c gear
etc.). You will get 'drop out'. The same thing will happen if you fly the
model vertically above the Rx aerial. In this case you are in the 'dead
zones' on both antennae. (It is just the same physics behind why you
should never point your Tx aerial at your r/c model.)
The 10mW video Tx systems supplied with your FirstPersonView Flight
Kit are the maximum power you can legally use for airborne use in the
UK and the rest of Europe.
P a g e | 11
FPV Flight Box
July 2008
Our strategy/recommendation for those who want to further increase
range / reduce drop out is to invest in the receiving equipment. We
supply only top quality receivers. For further improvement we
recommend:
1. Using an 8dBi Patch antennae (but note that these are
directional – with a ‘field of view’ rather like that of your eyes.)
2. Using a diversity receiver to link two Rx's together so that the
best signal from two separate aerials/receivers is the one fed
through. (We use an 8dBi patch on one Rx and the standard
omnidirectional dipole on the other.)
Accessories
A range of accessories are available for this system
from www.firstpersonview.co.uk. Besides the 8dBi Patch antennae and
the diversity receiver device, we use an On Screen Display (OSD) with a
GPS on the model as well as other sensors. This means we always
know which direction is home, how high we are, how far away, the state
of our battery etc. You may also want to use a Head Tracker and a Pan
and Tilt camera mount so that you can look around whilst flying just by
moving your head.
Recording Flights
We use an Archos AV500 recorder and cannot praise it highly enough.
The key point to be aware of if trying to record your flights whilst also
using the goggles is that splitting a video signal also weakens it.
Commercially available two into one Y leads to split the video signal are
therefore not recommended. (This is the same as splitting your tv aerial
signal.) The diversity receiver has two video outputs that don't suffer
from this, so we invariably have the AV500 on one output and the
goggles connected to the other.
FirstPersonView.co.uk 2008
12 | P a g e