1
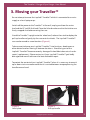
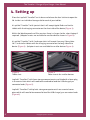
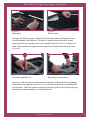
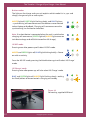
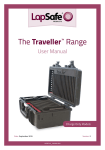
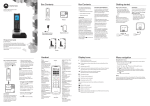
The Traveller™ Range
User Manual
Charge & Sync Models
Date: September 2015
Version: 2
LAPSF215_22032013V2
The Traveller™ Charge & Sync Range - User Manual
2
Copyright LapSafe® Products
The Traveller™ Charge & Sync Range - User Manual
Contents
Page No
Section Title
Section No
4
Introduction
1
4
Important actions
2
5
Moving your Traveller™
3
6-9
Setting up
4
10 - 11
Charging
5
11 - 13
Syncing
6
13
Warranty
7
14
Care & maintainance
8
14
Health & Safety
9
15
Safety declaration
10
Copyright LapSafe® Products
3
The Traveller™ Charge & Sync Range - User Manual
1. Introduction
Thank you for purchasing a LapSafe® Traveller™. We have made every effort to
ensure it will provide you with many years of satisfactory use.
The LapSafe® Traveller™ will support most USB charging tablets and it has been
supplied with a two metre long mains lead fitted with a 5amp fuse. USB charging
is low voltage (5 volts) and therefore intrinsically safe and each USB connection is
individually protected with a resetting fuse.
Your LapSafe® Traveller™ has been designed to be simple to use and it is ready to
receive your devices.
All our products are manufactured to a high standard and we constantly monitor
for any issues. Should you encounter any difficulties with any element of using
your LapSafe® Traveller™ we would like to know about it, so please call us on
0800 130 3456 or visit lapsafe.com
2. Important actions
Upon delivery of your new Traveller™ you must:
4
•
Take a note and store in a safe place your Traveller™’s serial number which
can be found inside your case. The silver plate will hold your serial number
that begins with TRV (Figure 1). You will need to quote this number for all
enquiries relating to your Traveller™.
•
Visit lapsafe.com/activate to activate your Lifetime warranty. Your warranty
will not be valid unless you do this.
•
Read the section on ‘Health & Safety’ (Section 10)
Copyright LapSafe® Products
The Traveller™ Charge & Sync Range - User Manual
3. Moving your Traveller™
Do not attempt to move the LapSafe® Traveller™ while it is connected to a mains
supply or a host laptop or pc.
Switch off the power to the Traveller™ at the wall, unplug and stow the mains
lead and the PC to USB link lead. Close the lid and make sure that the latches are
firmly snapped shut before moving the case.
Stand the Traveller™ upright onto the ‘wheel end’, release the catch to deploy the
pull-up handle and gently tip the case onto its wheels. The LapSafe® Traveller™
can now be moved to a new location (Figure 2).
Take care not to bump your LapSafe® Traveller™ into furniture, doorframes or
other obstacles when moving it between locations. Should any part of the
LapSafe® Traveller™ become severely damaged it should be taken out of use for
repair / replacement. Please contact us if your LapSafe® Traveller™ gets badly
damaged and we will advise on the best method of repair.
To protect the content of you LapSafe® Traveller™ when it is necessary to move it
up or down stairs we recommend that it is carried between two people using the
handles on each end.
Figure 1
Serial plate
Figure 2
Pull-up handle
Copyright LapSafe® Products
5
The Traveller™ Charge & Sync Range - User Manual
4. Setting up
Place the LapSafe® Traveller™ on its base and release the four latches to open the
lid. Inside is an individual storage slot for each of your tablets.
A LapSafe® Traveller™ with ‘portrait slots’ will accept Apple iPads and similar
tablets with the charging connector on the short side of the device (Figure 3).
Within the Weatherproof and Slim versions there is a larger slot for a host laptop if
required. (Adapter inserts are available for smaller devices shown in Figure 4).
A LapSafe® Traveller™ with ‘landscape slots’ will accept Samsung Galaxy Note
10.1” and similar tablets with the charging connector on the long side of the
device (Figure 3). (Adapter inserts are available for smaller devices Figure 4).
Figure 3
Tablet slots
Figure 4
Foam inserts for smaller devices
LapSafe® Travellers™ with foam storage compartments are fitted with a foam plug
in the central slot which will need to be removed to load the USB charge/sync
connector leads (Figure 5).
LapSafe® Travellers™ with plastic storage compartments have a central cover
piece which will need to be removed to load the USB charge/sync connector leads
(Figure 6).
6
Copyright LapSafe® Products
The Traveller™ Charge & Sync Range - User Manual
Figure 5
Foam plug
Figure 6
Plastic cover
To load the USB charge/sync leads, first withdraw the power management unit
(small black box) from the case. To do this, carefully remove the four screws
securing the retaining plate to the inner side of the case (Figure 7) and ease the
plate and the power management unit upwards to remove them from the case
(Figure 8).
Figure 7
Unscrewing power unit
Figure 8
Removing securing plate
Connect a USB charge/sync lead into each individual USB socket along the edges
of the power management unit (Figure 9). and carefully lower this assembly back
into the foam. Refit the screws through the retaining plate. Each USB charge/sync
lead now has to be routed to an individual device.
Copyright LapSafe® Products
7
The Traveller™ Charge & Sync Range - User Manual
Figure 9
Connecting USB leads
LapSafe® Travellers™ with foam storage compartments
With the foam plug removed from the central slot locate the small individual
split-holes designed to hold each lead (Figure 10).
Measure the required amount of the charge/sync lead to remain above the
surface of the foam. Push 50mm (2”) of the remaining lead into the appropriate
split-hole. Repeat for each lead (Figure 11).
Avoid tangles by fitting each individual lead separately, in the manner described.
When all 16 leads are in position the foam plug can be replaced to cover the
charge/sync leads.
Figure 10
Routing leads to device slots
8
Figure 11
Feeding cables through
Copyright LapSafe® Products
The Traveller™ Charge & Sync Range - User Manual
LapSafe® Travellers™ with plastic storage compartments
With the central cover piece removed, feed each USB charge/sync lead through
the end of the central slot and route it to one of the storage compartments.
Measure the required amount of charge/sync lead to remain above the surface
of the plastic and secure the lead to the plastic tab using a cable-tie (Figure 12
& 13). Position the locking end of the cable-tie inside central slot and repeat for
each lead.
Avoid tangles by fitting each individual lead separately and stow any excess lead
into the central slot below the cable ties.
When all 16 leads are in position the cover piece can be replaced.
Figure 12
Routing leads to device slots
Figure 13
Feeding cables through
Once cabling is finished
Load your tablets into their individual storage compartments and connect a
charge/sync lead to each device.
(Make sure the charge/sync connectors all face upwards)
Note: The foam in the lid of the LapSafe® Traveller™ allows room for the
connectors when the lid is closed.
Copyright LapSafe® Products
9
The Traveller™ Charge & Sync Range - User Manual
5. Charging
Choose a suitable location for the LapSafe® Traveller™ to charge and/or sync.
If you have purchased the weatherproof version of the LapSafe® Traveller™ you
will need to open the lid in order to connect the mains lead (Figure 14).
If you have purchased any of the other versions of the LapSafe® Traveller™ the
mains lead connection is on the outside of the case, at the left hand end (Figure
15).
Figure 14
Weatherproof mains connection
Figure 15
Other mains connection
Connect the mains lead to the power management unit and plug it into a suitable
power outlet.
Take care that the power lead does not create a trip-hazzard. Always ensure
that the tablets are properly connected to the charge/sync leads (see ‘fitting
and charging devices’) before switching on power.
When switching the power on to your LapSafe® Traveller™ for the first time:
The standard default settings dictate ‘Full Auto’ (charge then sync) mode. A blue
‘on’ light and slow flashing amber light will indicate that there is power to the
Traveller™ and any connected devices will begin to charge. The amber light will
stop flashing during charging and when the devices are fully charged the amber
light will blink at short intervals.
10
Copyright LapSafe® Products
The Traveller™ Charge & Sync Range - User Manual
Should a host laptop/PC be connected for syncing, either at ‘switch on’ or during
the charging period, a green light will flash slowly until one or more devices begin
to synchronise. Devices will only begin to synchronise once they are fully charged
and the Traveller™ will return each device to the charge status to maintain
optimum readiness approximately an hour after syncing commences.
To override the ‘Full Auto’ mode, press the mode button on the power
management unit as described in section 6.
6. Syncing
The LapSafe® Traveller™ is supplied with a USB A to USB B lead for connecting to a
host PC or laptop (Figure 16).
Sync – (synchronising) describes an automatic process that is performed by the
software on a computer when it is connected to another computer. This is usually
between a ‘Host’ computer and a ‘Slave’ computer, or a number of ‘Slave’
computers, for the purpose of having the data on all devices the same or
synchronised.
Apple iTunes is the syncing software that facilitates all communications between
the host PC or laptop and the iPads. For more information on iTunes visit:
www.apple.com/itunes.
When synchronising software is not present the USB charge & sync case operates
as a USB hub, allowing ‘drag and drop’ access to the device drives.
Connect the USB B end of the connector lead into the power management unit
and plug the USB A end of the lead into a suitable port on the host PC. The
connection will be detected by the power management unit and will react
according to the mode of operation selected.
Copyright LapSafe® Products
11
The Traveller™ Charge & Sync Range - User Manual
Button modes
The lights on the charge and sync unit explains which mode it is in; sync and
charge, charge and sync or auto cycles:
AMBER light off, GREEN light flashing slowly, and BLUE light on
– synchronising will commence once the devices are connected
to host laptop or MacBook. Charging will commence once the
synchronising has finished or timed out.
Note: If no host device is connected when the unit is switched on
charging will commence. (GREEN light off, AMBER light comes on
to indicate charge and will blink to confirm full charge).
‘All Off’ mode
Pressing once after power-up will select ‘All Off’ mode.
AMBER and GREEN lights off, BLUE light blinking briefly = Power
on with no activity.
From the ‘All Off’ mode, pressing the black button again will select ‘All Charge’
mode.
‘All Charge’ mode
Pressing twice after power-up, will also select ‘All Charge’ mode.
BLUE and GREEN lights off, AMBER light flashing slowly - waiting
for iPads/tablets to be connected = charging on standby.
Figure 16
Connecting supplied USB lead
12
Copyright LapSafe® Products
The Traveller™ Charge & Sync Range - User Manual
BLUE and GREEN lights off AMBER light solid = One or more
devices are charging.
BLUE and GREEN lights off AMBER light blinking briefly = All
connected devices are fully charged.
‘All Sync’ mode
Pressing three times after power-up will also select ‘All Sync’ mode.
BLUE and AMBER lights off, GREEN light flashing slowly = sync
on standby waiting for devices and a host PC or laptop to be
connected
BLUE and AMBER lights off, GREEN light solid = syncing one or
more devices
BLUE and AMBER lights off, GREEN light blinking briefly = All
connected devices have synchronised for the preset period.
(Default is set to one hour, after which the Traveller™ will return
each device to charge status to maintain optimum readiness.
From the ‘All Sync’ mode, pressing the black button again, returns the module to
the default ‘Sync then Charge’ mode.
7. Warranty
All of our products come with a Lifetime Parts & Labour Warranty. To activate your
FREE Lifetime* Parts and Labour Warranty, please go on-line and register at
lapsafe.com/activate
Copyright LapSafe® Products
13
The Traveller™ Charge & Sync Range - User Manual
8. Care and maintainance
Dos
• Padlock your case when not in use (not provided)
• Read the Health and Safety guidelines in the user guide and share this
information with all users
• Activate your warranty at lapsafe.com/activate
• Unplug charging leads before taking devices out of the case
Don’ts
• Do not move the case without disconnecting the mains power
• Do not move the case with the mains lead trailing put it in the special holster
• Do not leave case in the view of a window for security
• Do not try to modify the case in anyway without contacting LapSafe® first to
check that it is safe to do so
9. Health & Safety
Safety is of paramount importance to LapSafe Products® and as such this section
should be read carefully.
Under no circumstances should the power management unit within the LapSafe®
Traveller™ be removed from the case, opened or modified in any way.
The condition of the mains lead and the 3-pin power plug (plugs may differ in
other countries) should be checked on a regular basis by a qualified person.
Should the mains lead become damaged, a qualified person must replace it with
a lead of equivalent rating, before using the case again. Please contact us if you
have any questions about mains lead replacement.
Care should be taken to ensure that all charging leads and connectors are fully
inside the LapSafe® Traveller™ before the lid is closed because the edges of the
case could damage them should they become trapped. Any suspected damaged
lead should be inspected immediately and replaced if necessary by a qualified
person.
14
Copyright LapSafe® Products
The Traveller™ Charge & Sync Range - User Manual
Safety Declaration
Recent guidance from the Health and Safety Executive regarding “Laptop computer charging products safety
alert” requires interpretation from each manufacturer as regards to their product compliance. The HSE
statement can be found at: www.hse.gov.uk/services/education/safety121009.htm
CE Testing, Conformity and Declaration of LapSafe® Products
At LapSafe® Products we are proud to confirm that our electrical products, have been thoroughly tested and certified (by an
authorised and/or INDEPENDENT testing house) and accordingly have been clearly CE marked.
Full CE compliance, which includes the requirements of LVD and EMC directives, is a STANDARD FEATURE of LapSafe® Products, as
are many more “built in” safety features. CE Marking can be found on the product serial number plate, usually at the lower rear of
the cabinet. CE Declaration of Conformity Certificate is issued with each product in the User Guide Pack.
You may obtain further copies of the certificate specific to your product and serial number, or any further information and advice,
upon request to our Customer support– call direct 01787 226147 or FREEPHONE the switchboard on 0800 130 3456
or email [email protected].
Rest assured that your LapSafe® Product has been designed and built with Safety as the highest priority since we first introduced
the concept of the “mobile laptop trolley” into the UK market in the last century. This is, indeed, why we are called “Lap SAFE”.
Residual Voltage
The HSE has raised a concern (having identified at least one particular manufacturer’s trolleys with this “characteristic”) that many
manufacturers’ trolleys (if indeed not the vast majority), may have a momentary residual voltage on the pins of the mains plug and
that this could, if you touched the pins within a second or two of unplugging, result in an electric shock.
LapSafe® Products have been designed from the outset with safety internal circuitry as standard so as NOT to retain or present any
significant residual voltage in this way. In fact, it is virtually impossible to get any such significant electric shock from our cabinets
in normal use.
However, regardless of how safe any particular trolley may be, we endorse the recommendations for employing common sense
practise as a generic rule for any mobile electrical appliance, such as switching off the mains socket before unplugging the power
leads and NOT moving the trolleys without disconnecting and unplugging the power leads at both ends. Two of the wheels are fitted with locks as standard and should be kept locked as a reminder when power is connected and as a general safety rule as per
the user instructions supplied with each cabinet.
For further information call LapSafe® products on
0800 130 3456 or visit our website at lapsafe.com
*Mentor™ range from January 2010
*
LAPSF076_23052011V2
Copyright LapSafe® Products
15
The Traveller™ Charge & Sync Range - User Manual
Powering
Smart Technologies
16
Copyright LapSafe® Products