1
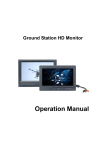
Ground Station
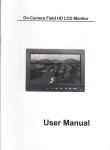
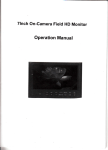
HD Monitor
Operation Manual
User manual
Dear Users:
This HD LCD Monitor employs advanced integrate circuits
and high quality TFT LCD modules, high definition,
consumption, steady function, and low radiation emission.
tow
lf you
are still looking for the ideal Monitor for FPV or aerophotography, it
is your best choice. Designed specially for FPV and outdoor users.
The monitor has very bright image(adjustable) and very wide power
supply range(6
-
18V). This monitor also has
a very
important
feature for FPV users, it doesn't have ''blue screen" problem when
the signal getE weak. This feature makes you able to fly much
further and never lose image. When VTX is not connected ,it just
show static, never turn blue or black.
To ensure the hest use of this product, please
read this manual carelully beforehand.
CAUTION
1. Please use the adapter attached in the accessory, if necessary,
please use qualified adapter.
2. Please do not expose this product to direct sunlight, heat, or
humid conditions.
3. Please keep away from strong light whiie using this product to
ensure the image effect and long-term use.
4. Please avoid heaw impact or drop onto the ground.
5. Please do not use chemical solutions to clean this product.
P,ease wipe with a olean soff cloth to maintain the brightness of
the surface.
6. V\iithout adjustab{e componenl ln the unit, please do not take
apart or repair the unit by yourself, to avoid damage the product.
h,*
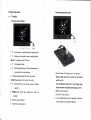
Product Advanced Features
.
The first ground stand HD monitor, designed specially for outdoor
CONTENTS
users, does not have "blue screen', is your best choice FpV or
aerophotography
.
High resolution 800*480,contrast ratio 500:1 and brightness
450cd/m' ( 8' ) .Brightness 400cd/ff (7), seizing much more clear
world
r
,, Product instruction
.
monitor
---
Multi color format support, enter the menu manuaily to select the
Panellnstructlon ---._---
same format as your cam.
lnput porl
.
Analog composite video AV input, connect the aerial camera
.
16:9 aspect ratio, switch the display mode 16:9 and 4:3
.
Connecl with the camera, as a monitor or secondary monitor of
I
instruction ---------------------s5
r 8" monitor --6
Panel instruction ---__@
6
lnput port
aerial
r
7"
High brighlness,contrasl ratio&Dizzy-proof monitor with sun
shade, to see clearly under sunshine.
the tripod.
Panel button
. llenu
Note
:
The Video Formal Mode is PAL, il you use NTSC cam or
other formal, please choose
it in the m€nu to get the most
suitable view on the monitor.
Supported video tormat: NTSC M, PAL M, NTSC BG, PAL
NTSC DK, PAL DK, PAL I and SECAIV BG.
N,
instfuetion
shooting
4. Parameterg.3 . Trouble
.---.--
7
I
opelation instructi,on---10
2, Operatlon instructlon
.
o 114-20 thread hole is included in the bottom, easily to mount on
in8lruction----
-_.-tl
.-...*-_..--*12
1. Product instruction
.
T"monitori nputpoili nstruction
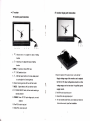
7" monitor
7" monitor panel lnstruction
I i i : I i i
?I345]86S10't,t
i
tl
l
{ , Volume down or to adjust the value of sefting function
2. ) , Volume up or to adjust the value of setting function
1
.
3.MUEU, To activate or close OSD menu
4. V ,
5.
A'
OSD selection button
OSD item select button orNo menu sta{e press
itlo
cycle adjust the 5 level brightness
6.
lnfrared receiving windoq NO uee for ihis monitor
7. MODE: Signal selection, NO use {or this monitor
8.
0 ,
Power ON/OFF, for the monitor working or standby
selection
POWER:Pow€r DC12V input voltage port, core and
external
10
Red RCA, audio input port
11
Yellow RCA, video input port
1
. Black DC power
1
2V input pod,(core * and external -)
Supply voltage range of the monitor can be adapted
for DC 5 to
18V.
User configuratlon should be in thi$ voltage range,
and no less than 1A qualified power supply current.
2" Red RCA, audio input port
3. Yellow RCA, video input port
4. 1/4 incf! bracket screw holes, can be easily eonnected to
the hot shoe mount, tripod fixed installation.
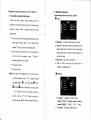
S" monitor
8" monitor input port instruction
8" monitor panel instruction
i
E
re
1. {,
i
Volume down or to adjust the value of setting
fun6tion
2.
5,
Volume up or to adjust the value of setting
function
3.MENU: To activate or close OSD menu
4. V,
5.
n,
OSD selection button
1
OSD item select butlon or No menu state press it
7.
MODE: Signal selection, NO
e, *,
pOWER
use for thi$ monitor
olt/oFF bufion, for the monitor workiflg or
standby selection
9. POWER: Power DC12V input voltage port, core and
external
10. Red RCA, audio input port
11
.Yellow RCA. video input port
1
2V input port,(core
.
and extemal -)
Supply voltage range of th€ monitor can b€ adapted
to cycle adjust the 5 level brightness
6. tnfiared receiving window, NO use for this monitor
. Black DC power
,or DC 6 to 't8V. User configuration should be in this
\
I
I
voltage range, and no less than 1A qualilied power
supply curr€nt,
2. Red RCAaudio signal input port
3. Yellow RCAvideo signal input port
4. 1/4 inch bracket screw holes, can be easily connected to
lhe hot shoe mount, lripod fixed installation.
2. Operation instruction (same as 7. &
r
g,'monitoi
OSD Menu lnstruction
)
ln the working state enter into menu, as below
Panel button operation instruction
Before the feature sefiing, pfease carefully check ihe
fl
tcotorl
equipment is connected correctly. Access to the corresponding
signals and power. Monitor
in
standby mode (red power
indicator light).
''O' Po*"r
on button. After powered, press this button to boot
(green power indicator lighl),
if in the working
state,
,epr"ss '' O"button, monitor recover standby state.
-A'
To adjust the brightness in the picture.
image, please note the sense of picture when adjust,
adjust brightness shortcuts button. ln the working state, if
not enter lhe menu operation, press ,, A,'5g1166
proportion too large or small, will make the picture lose
the color of showy-
16
X Saturaflon:
achieve brightness 5 level changes
X Tint: On
'<'Volume down button
")"
X Brighnes€:
X Contrasl To adiust the brightest and darkest ratio of the
To adjust color concentration
NTSC Video mode, the image cotor tint
difference is adlustiable by tint.
Volume up butto*
'MENU' OSD button. Press'lErau"button on the monitor, enter
into OSD operation. Press
the needed options:
EI{ tunction
ilf,(
[J(
sound
).
cotor
Afier
'' ("or')'button on the
confirm, then
"V"or'A''
)
C(
ffi
(
x
Language
uenu)
button lo select
adiust
)
EI ( osD
)
setect the option, press
unit or remote controller to
use ' ("or',)
,,button
to select
the
options. Repress "MENU" button to exit the OSD menu.
English.
EsFanol.
H
: LanguagesforOSD as below:
ffi6+X, Francais, Itallano- Deubch
Xff+X. H6F. A+9, Pycc
Position:
To adiust the OSD position in
horizontal(L/R)
X
vertical(U/D)
X
X
X
3. Trouble shooting
V position: To adjust the OSD position in
3.1. Only black and white picture.
.
HPosition, Toadjustthepictureinhorizontal.
OSD Timeout: To adlust the time on the screen
Please check saturation. brightness & contrast adiustment.
3.2, NO picture after put on the power
r
Transparent: Toadjusttheleveloftransparent.
Check video signat cable whether connecting correct, make
sure use the gualified signal cable and connect the monitor
El
( Function)
correctly.
I
Check the optional power adapter or power(battery) should
qualified specificalion and normal power supply
3.3. The image color distortion or abnormal, eg. lack some
color.
r
Please check signal cable connecl correctly or not. The
cable damage or loose will cause poor transfer, then above
x
x
x
x
x
malfunction will happen.
Reset: Back to original setting.
3.4. The image has a
Color system: Selection for color video system
Display ratio: Screen display ratio selection 16:9/4:3
r
L/R flip: lmage flip L/R
UID
Check the signal connector is plugged in tight or not, and
the socket connecting is loose and so on.
flip: lmage flip U/D
E ( Sound )
similar interference fringe, smearing and
dark.
r
Remark:
lf there are still other problems, please contact wilh our related
deals.
.
lf interruptive image occurs, it maybe that the signal frequency
isn't matcfled with normal standard.
.
X
Volume:To ad,iust the volume
lt is a normal condition that some bilght lines appear on the
screen when you turn off the unit.
4. ParametstlB
Panel slze
i.0 inch
8.0 inch
Panel type
IFT LCD
IFT LCD
R€solution
800x3 (RGB) x480
800x3 {BGB) x480
Backlisht
LED
LED
Horizontal
f
30 -50 kHz
requ6ncy tange
50
Field fiequency rango
Dot pltch
^75
Hz
0.0642 (w) x0.t790 (H)
mm
30
-
50
-75
400 cdl
Brightness
H2
0.0736 (W) x0.2072 (H) mm
16:9
16:9
Display rallo
60 kHz
d
450
cd/d
Contrast ratio
500:,
500
Hesponse time
15 ms
15 ms
70'l70"(-/F) 50"/60" ru/D)
70Y7o"(uR) 50'/70' (UiD)
Viewing angle
DC
lnput volt8g€
6 -16V
working temperature
-20[
Storage tomperature
-30t-70t
Unil wEight
6
"18V
-20c
-60c
DC
s5W
Power consumption
unit size (mm)
:1
182
-60t
{L} x127tW}x32(H)
3639
-30c-707
2Os {L) x147 (!Y)
511 0
x35
{H)