1
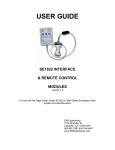
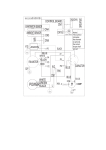
USER GUIDE
SE1822 INTERFACE
& REMOTE CONTROL
MODULES
Version 1.5
For use with the Endec model 1822 Emergency Alert System Encoder/Decoder
D. Mandelbaum Engineering
2174 Chandler St.
Camarillo, CA 91345-4611
805-987-7881
www.DMEngineering.com
1.
Theory of Operation
1.1
The DME SE1822 Interface Module is a microprocessor controlled
interface that generates the required RS232 command set codes
used by the Endec Model 1822 E.A.S. Encoder/Decoder. The
Interface Module is connected to the DB9 “COM 2” port on the rear
of the Endec and uses the 5 or 8 VDC provided by the Endec for all
power requirements of the Interface Module and the associated
Remote Control. Upon contact closure across the “RWT”,
(Required Weekly Test), terminal block on the Interface Module, or
by depressing the Transmit RWT buttons on the Remote Control,
the proper codes are transmitted in the correct order to activate the
transmission of the RWT. A “PEND RLY” terminal block is provided
on the Interface Module for connecting the Endec “Decoder Active”
relay contacts to the Module when the SE1822 Remote Control is
used. This will notify the operator of a pending alert by a flashing
“Alert Pending” LED on the Remote Control. A 6 wire modular jack
(RJ12) is provided to interface the SE1822 Remote Control or user
defined custom interface connections, such as an automation
system or other normally open switch contacts, to the Interface
Module. RFI protection for the system is included as a part of the
Interface Module and cable design for operation in areas where an
RF environment may be encountered.
1.2
The DME 1822 Remote Control is a passive device containing
switches and indicators to remotely activate the RWT and/or to
relay a pending RMT, (Required Monthly Test). LED indicators are
provided for the following functions. The “Alert Pending” LED
flashes yellow while an alert is pending and a green “Sending Data”
LED is activated when the proper buttons are pushed to initiate
either the RWT or to relay the RMT. An RJ12 modular connector is
provided for interface to the SE1822 Interface Module using the
supplied 50 ft. connecting cable.
1.3
Familiarization with the sections 5.4 and 5.7 of the Endec User
Guide and Reference Manual dealing with filters and relay
programming is recommended for assurance that the Endec is
properly programmed to operate with this system
2.
Connections
2.1
The Interface Module is attached to the “COM 2” DB9 connector on
the rear of the Endec. Secure the Module to the Endec using the
captive screws provided as a part of the Module. If the supplied
Remote Control is to be used with no other user connections
please skip to 2.7.
2
2.2
If the SE1822 Interface Module is being used only for RWT
activation by an automation system or other customer supplied
contact closure, connect Normally Open contact closure wires to
the “RWT” terminal block on the Module.
2.3
For simultaneous operation using the Remote Control and an
external contact closure, such as automation, for initiating the RWT,
connect the Normally Open contact wires to the “RWT” terminal
block on the Module as well as connecting the RJ12 modular
connecting cable to the connector.
2.4
For simultaneous operation using the Remote Control and user
defined external contact closures, such as an automation system or
push buttons, for initiating an RWT, relay of an RMT, and/or using
the LED drivers and power, the use of a 6 circuit dual modular
adapter may be used. This adapter may be purchased at your local
supply store.
2.5
All connections required to relay a pending RMT, initiate a RWT,
access the LED driver lines, access power and ground may be
found at the RJ12 modular connector on the Interface Module. The
pin-out is as follows when viewed looking from left to right with pins
1-5 of the DB9 on the opposite end of the Module in the up position:
1. Initiate RWT (momentary to ground)
2. Initiate RMT relay (momentary to ground)
3. Ground
4. “Sending Data” LED anode, cathode to ground
5. 5-8 VDC current limited with a 100 ohm, 1/10 watt
series resistor
6. “Alert Pending” LED cathode, Anode to +5-8 VDC
2.6
End of message information for an automation system may be
provided by connection to the “Encoder Active” relay contacts on
the rear of the Endec. These contacts are closed while the Endec
is encoding a message and open at the conclusion of the message
transmission. (See section 5.7 of the Endec User Guide)
2.7
Remote Control operation of the interface module requires that the
“Decoder Active” terminals on the rear of the Endec be connected
to the Interface Module “Pend Rly” terminal block. Polarity of the
connection is not a factor. Use the supplied twisted pair wire.
2.8
Connect the 50 ft. connecting cable to the Interface Module RJ12
jack with the ferrite RFI core at the Module end. Connect the other
end of the cable to the modular RJ12 jack under the removable
3
cover of the Remote Control. The cover is removed by pressing on
the arrow on the bottom panel and sliding the panel off of the
Remote Control box.
2.9
Note that the modular connecting cable is a “reversing” type of
cable, and use of a “non-reversing” type of cable may damage the
Interface module. This type of damage will not be covered under
warranty.
2.10
End of message information for an automation system may be
provided by connection to the “Encoder Active” relay contacts on
the rear of the Endec. See section 2.6 above.
3.
Programming the Endec for use with the SE1822 Interface Module
3.1
The following areas of the Endec must be programmed for proper
interface with the SE1822 Interface Module. Depending on
whether or not you are using the Remote control, certain areas of
programming may or may not need to be addressed.
3.2
The “COM 2” port must be configured for remote control operation.
To do this go to menu.device.port.type.hand control, where
“port” is “COM 2”. (Note: the only allowable ports for this device are
COM 2, 3, & 6. COM 4 & 5 have baud rate issues.)
3.3
The User password must be 1111, the factory default password.
There can be no exceptions without custom programming of the
Interface Module. Custom programming is available at an
additional charge. Please contact DME if custom programming is
desired.
3.4
To change the User password to 1111, use the menu.change
password command on the Endec. You will need the
administrator’s password to do this change, and if it is not available
consult section 14.3 of the Endec user manual. If the SE1822
Interface Module is only being used for RWT functions there is no
further programming required.
3.5
To assure that the default filter “pending” relay program controls the
“decoder active” relay, and to check the current setting and/or
change the setting, go to menu.relay command on the Endec.
Scroll to the “decoder active” relay and press the pick key. The
currently assigned relay program will be displayed first. If it is other
than “pending”, you may scroll up or down to select the “pending”
program. Note that all alerts handling automatic relay, timed relay,
timed ignore, or manual relay will activate the “decoder active”
4
relay. If you have any of these actions programmed, the alert
pending light on the SE1822 remote will flash upon receipt of the
alert.
3.6
To assure that the desired filter is properly setup see section 5.4 of
the Endec user manual. Proper settings of the RMT are discussed
as well as setting the hold time for release of the RMT. The default
filter settings are normally adequate and only the hold time may
need to be adjusted to suit the users individual needs.
3.7
Open the printer cover plate and lift the printer slider plate up
(rather than pulling it forward). Locate the JP16 terminals
underneath the metal cup that holds the paper (near the right hand
edge). Make sure there is a jumper placed on JP16 as this enables
power to pin 9 of the Com ports. This 5-8 VDC is used to power
the SE1822. Refer to section 12 of your Endec user manual.
4.
Operation
4.1
If the SE1822 Interface Module is to be operated without the
remote control the only necessary action is to supply a set of
normally open contacts to the “RWT” terminal block on the rear of
the module. The RWT will be broadcasted immediately upon
contact closure. For more complex user defined connections for
operations such as RMT relay and remote LED signaling see
section 2.5 above.
4.2
If the SE1822 Remote Control is to be used, either by itself or in
conjunction with the external contact closure for initiation of the
RWT, operation is simple. Depressing the two “Transmit RWT”
buttons simultaneously initiates the RWT. The “Sending Data” LED
momentarily lights green to verify the command has been
recognized.
4.3
When an RMT is received by the Endec, the proper filter has been
installed, relay activation programming has been done, and wiring
between the Endec and Interface Module has been performed as
described, the flashing “Alert Pending” LED will announce the
presence of a pending alert. The LED will flash for the duration of
the hold time or until the pending alert has been relayed.
Depressing the two “Relay Pending RMT” buttons simultaneously
does this. The “Sending Data” LED momentarily lights green to
verify the command has been recognized.
5
5.0
Supplied Materials
• SE1822 Interface Module
• SE1822RC Remote Control
• 50’ Modular connecting cable with ferrite
• 12” twisted pair wire for connection between the Interface Module
and the Endec “decoder active” terminals
• Velcro mounting materials
• This User Manual
6.0
Warranty
6.1
All materials and workmanship are warranted for a period of one
year from the date of purchase. Damages incurred by misapplication,
carelessness, introduction of foreign materials into the enclosures or
circuitry, or damages caused by natural disaster are not covered under
this warranty.
7.0
Technical Support
If you have questions, experience difficulties with the product or
require further information please contact DME at:
805-987-7881
Or
Contact technical support at:
www.DMEngineering.com
Trademark Information:
“Endec” is a trademark of Sage Alerting Systems, Inc.
Stamford, CT 06902
“Velcro” is a trademark of Velcro Industries, B.V., and Velcro America
Manchester, NH 03103
6