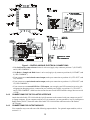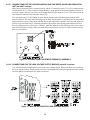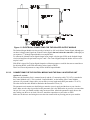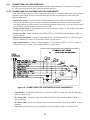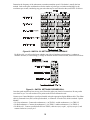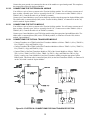
1
INSTRUCTION MANUAL
TENSION MANAGER™
Digital Tension Controller
DOC # 801-1382
217 Pickering Road
Rochester, NH 03867 U.S.A.
For assistance, please call:
TECHNICAL SERVICE -
Installations, Start-Up, Troubleshooting, Repairs, Field
Service, Returns.
CUSTOMER SERVICE -
Replacement Parts, Individual Products, Questions about
Orders, Manuals.
SALES - Product Information, Systems Application Questions, Placing
orders for standard products and special systems.
Telephone: (603) 332-6150
Fax: (603) 332-3758
E-Mail : [email protected]
Internet: www.dfe.com
©2001 Dover Flexo Electronics, Inc. All rights reserved. Dover Flexo Electronics has made reasonable effort to ensure accuracy of this
document. However, NO WARRANTY, whether expressed or implied, is given regarding the completeness or correctness of information in
this document. Dover Flexo Electronics shall not be held liable for damages of any kind arising from the use of this document. Dover Flexo
Electronics reserves the right to make changes, additions, and deletions to this document without notice and without obligation.
TABLE OF CONTENTS
1.0
1.1
1.2
1.3
1.4
1.5
1.6
PRODUCT DESCRIPTION
General Description . . . . . . . . . . . . . . . . . . . . . . . . . . . . . . . . . . . . . . . .
Descriptions / Comparisons of Different Versions . . . . . . . . . . . . . . . .
Exploded Views of Product . . . . . . . . . . . . . . . . . . . . . . . . . . . . . . . . . .
Specifications . . . . . . . . . . . . . . . . . . . . . . . . . . . . . . . . . . . . . . . . . . . . .
Features of Standard Units . . . . . . . . . . . . . . . . . . . . . . . . . . . . . . . . . .
Features of Option Modules . . . . . . . . . . . . . . . . . . . . . . . . . . . . . . . . .
1
1
2
3
5
6
2.0
2.1
2.2
2.3
2.4
2.5
INSTALLATION
Dimensions . . . . . . . . . . . . . . . . . . . . . . . . . . . . . . . . . . . . . . . . . . . . . .
Selection of Mounting Locations . . . . . . . . . . . . . . . . . . . . . . . . . . . . . .
Installation Instructions . . . . . . . . . . . . . . . . . . . . . . . . . . . . . . . . . . . . .
Physical and Electrical Connections for standard modules . . . . . . . . .
Electrical Connections for Options . . . . . . . . . . . . . . . . . . . . . . . . . . . .
7
10
11
12
15
3.0
3.1
3.2
3.3
CALIBRATION AND SETUP
Initial Test of the system . . . . . . . . . . . . . . . . . . . . . . . . . . . . . . . . . . . .
Calibration and Setup of the Control Module . . . . . . . . . . . . . . . . . . . .
Calibration of the Speed Module (if used) . . . . . . . . . . . . . . . . . . . . . . .
22
23
36
4.0
4.1
OPERATING INSTRUCTIONS
Overview . . . . . . . . . . . . . . . . . . . . . . . . . . . . . . . . . . . . . . . . . . . . . . . .
38
5.0
CARE AND MAINTENANCE . . . . . . . . . . . . . . . . . . . . . . . . . . . . . . . .
44
6.0
TROUBLESHOOTING . . . . . . . . . . . . . . . . . . . . . . . . . . . . . . . . . . . . .
45
7.0
REPLACEMENT PARTS . . . . . . . . . . . . . . . . . . . . . . . . . . . . . . . . . . .
47
APPENDICES
A.
Transducer Electrical Connections . . . . . . . . . . . . . . . . . . . . . . . . . . . .
B.
RCT Function Listing . . . . . . . . . . . . . . . . . . . . . . . . . . . . . . . . . . . . . . .
C.
PCLink Screens . . . . . . . . . . . . . . . . . . . . . . . . . . . . . . . . . . . . . . . . . . .
D.
Typical Tensions for Web Materials . . . . . . . . . . . . . . . . . . . . . . . . . . .
48
52
54
57
Terms and Conditions . . . . . . . . . . . . . . . . . . . . . . . . . . . . . . . . . . . . . . . . . . .
58
i
LIST OF ILLUSTRATIONS
1.
2.
3.
4.
5.
6.
7.
8.
9.
10.
11.
12.
13.
14.
15.
16.
17.
18.
19.
20.
21.
22.
23.
24.
25.
26.
27.
Exploded View . . . . . . . . . . . . . . . . . . . . . . . . . . . . . . . . . . . . . . . . . . . .
Control and High Voltage Dimensions . . . . . . . . . . . . . . . . . . . . . . . . .
Module Dimensions for the IO, MV, SP, TLS, TO, & DTI Modules . . . .
Remote Control Terminal Dimensions . . . . . . . . . . . . . . . . . . . . . . . . .
User Interface Dimensions . . . . . . . . . . . . . . . . . . . . . . . . . . . . . . . . . .
Remote Pneumatic Assembly Dimensions . . . . . . . . . . . . . . . . . . . . . .
Dual Valve Pneumatic Assembly . . . . . . . . . . . . . . . . . . . . . . . . . . . . . .
DIN Rail Mounting Instructions . . . . . . . . . . . . . . . . . . . . . . . . . . . . . . .
Control Module Electric Connections . . . . . . . . . . . . . . . . . . . . . . . . . .
Connections for Remote Pneumatic Assembly . . . . . . . . . . . . . . . . . . .
Switch Settings for High Voltage Module . . . . . . . . . . . . . . . . . . . . . . .
Electric Connections for High Voltage Module . . . . . . . . . . . . . . . . . . .
Electric Connections for Isolated Output Module . . . . . . . . . . . . . . . . .
Connections for Dual Valve Servo Module . . . . . . . . . . . . . . . . . . . . . .
Electrical Connections for the Medium Voltage Module . . . . . . . . . . . .
Connections for Customer Supplied Components . . . . . . . . . . . . . . . .
Switch 502 Settings for Speed Module . . . . . . . . . . . . . . . . . . . . . . . . .
Switch 501 Settings for Speed Module . . . . . . . . . . . . . . . . . . . . . . . . .
Switch Settings for Rider Roll . . . . . . . . . . . . . . . . . . . . . . . . . . . . . . . .
Electrical Connections for Dual Transducer Module . . . . . . . . . . . . . . .
Model C Transducer Wiring . . . . . . . . . . . . . . . . . . . . . . . . . . . . . . . . . .
Model RF Transducer Wiring . . . . . . . . . . . . . . . . . . . . . . . . . . . . . . . . .
Models TR & NW Transducer Wiring . . . . . . . . . . . . . . . . . . . . . . . . . .
Model LT Transducer Wiring . . . . . . . . . . . . . . . . . . . . . . . . . . . . . . . . .
PCLink Screens: Run, Configuration 1 & 2 . . . . . . . . . . . . . . . . . . . . . .
PCLink Screens: TLS, Soft Start, Calibration, & Diagnostic . . . . . . . . .
PCLink Screens: Data Transfer, Tuning, & Miscellaneous Features . .
ii
2
7
8
8
9
9
10
11
13
14
14
15
16
17
17
18
19
20
20
21
48
49
50
51
54
55
56
SECTION 1
PRODUCT DESCRIPTION
..............................................................
1.1 GENERAL DESCRIPTION
The TensionManager™ tension control system performs automatic, closed loop control of tension in a variety of
machine processes. It operates by accepting an electrical tension signal from tension transducers, along with the
desired tension setpoint, comparing them, and producing an output signal which acts upon a brake, clutch, or
motor. This process occurs continuously, so that the effect is to keep process tension constant.
The controller is divided into three basic functions:
•
The transducer interface provides excitation voltage to the transducers, amplifies the tension signals that they
produce, and calibrates the signal so that it becomes a direct indicator of process tension. This function is
performed by circuits inside the Control Module.
•
The regulator accepts an automatic setpoint representing the desired tension from a machine operator or
machine control system, compares it to the process tension signal, and uses the difference to develop a
compensated signal which can be tuned to react to machine speed, roll diameters, and other factors. The User
Interface or Remote Control Terminal is used to transfer the tension setpoint from a machine operator to the
Control Module, which provides the remainder of these functions.
•
The output module accepts the varying compensated signal and converts it to the type of variable output the
machine requires. A variety of output modules are available to produce air pressure for pneumatic brakes or
clutches; high voltages for electromagnetic or magnetic particle brakes or clutches, or low voltages for motor
drives.
Other optional modules are available to tailor the control system to the application and to provide additional
required functions.
1.2 DESCRIPTIONS / COMPARISONS OF THE DIFFERENT VERSIONS
1.2.1
“D” VERSION
Applications which require a 0-10V control signal (such as those with motor drives) typically use the D
version controller. The standard D version controller consists of the Control Module only. This module is
provided in a metal enclosure with a DIN clip for DIN rail mounting. The unit accepts 24 Vdc as the input
power source. The unit provides a 0 - 10Vdc output signal proportional to tension, and also a compensated 0
- 10Vdc, non-isolated control output signal. As for input signals, the unit will accept a standard transducer
signal, 0 - 10Vdc roll diameter signal, 0 - 10Vdc roll speed signal, 0 - 10Vdc line speed signal, and a 0 10Vdc remote tension signal. It also produces a +5 or +10V transducer excitation voltage.
The Control Module comes with the PCLink user interface. This consists of software to run on a PC or
laptop computer, plus a cable to make the electrical connection. PCLink is used to configure the controller
and can then be used as an operator interface, or the optional Remote Control Terminal (RCT) or User
Interface Panel can be used. The Control Module also has a port to interface to a host computer or PLC. If
none of these interfaces are chosen the end user could also connect their own Auto and Manual set
potentiometers, and Auto/Manual-Tension On/Off switches.
An isolated output module is available as an option to the D version. This module is also provided in a metal
enclosure with a DIN clip for DIN Rail mounting. The module provides isolation from ground for the
compensated 0 - 10Vdc Control Output signal. The unit also provides an isolated 4 - 20mA Control Output
signal. This version of output module is typically used to interface to a motor drive whose signal inputs are
referenced to line voltage.
1
1.2.2
“P” VERSION
Applications which require a pneumatic output to drive a brake or clutch typically use the P version
controller. P version controllers are used to actuate any air operated brake or clutch. The standard P version
controller consists of the Control Module, plus a pneumatic output module. The standard pneumatic
output module consists of a Servo Valve and Regulator mounted in a metal enclosure, with a connector to
facilitate connection to the Control Module.
An optional, lower cost output module is also available, which consists of a servo valve card, pneumatic
fittings, and connector installed in a metal enclosure. Either unit derives its power from the Control Module.
The output range of the Pneumatic Module is approximately 0.5 to 75 psi. The Control Module provides
output signals (0 - 10Vdc & 1 - 5Vdc) for operating either device.
1.2.3
“V” VERSION
Applications which require a high voltage output to drive an electromagnetic or magnetic particle brake or
clutch, or an eddy current drive, typically use the V version controller. This version controller consists of the
Control module, plus a V output module. The standard V output module is provided in a metal enclosure
with a DIN clip for DIN rail mounting, and produces a 0 to 45, 90, or 180 Vdc compensated output signal,
and requires 115/230 Vac input power.
An optional medium voltage V output module can be used to drive lower voltage magnetic particle brakes or
clutches. This module is used in conjunction with the basic version Control Module. This module is provided
in a metal enclosure with a DIN clip for DIN rail mounting. The unit requires 24 Vdc input power, and
provides a compensated 0 - 24Vdc @ 2 Amps output signal.
1.3 EXPLODED VIEW
Figure 1 - EXPLODED VIEW OF BASIC MODULE
2
1.4 SPECIFICATIONS
1.4.1
CONTROL MODULE (Std with all versions)
Input Power:
............
Input Signals Accepted: . . . . . . . . . .
“
”
“
............
“
”
“
............
“
”
“
............
Output Signal:
............
“
”
............
“
”
............
Transducer Signal:
............
Zero (Tare) Range:
............
Calibration Range:
............
Temperature Range: . . . . . . . . . . . .
System Accuracy:
............
Output Range:
............
Taper Tension Range (Option): . . . .
Unit Weight:
............
1.4.2
ISOLATED OUTPUT MODULE (option to the D version)
Power Input:
Outputs:
“ ”
Unit Weight:
1.4.3
24 Vdc @ 0.20 to 0.50 Amps depending on number of modules
(Source not supplied).
0 - 10Vdc roll diameter signal,
0 - 10Vdc roll speed signal,
0 - 10Vdc line speed signal, and
0 - 10Vdc remote tension signal.
0 - 10Vdc proportional to tension,
0 - 10 Vdc compensated, non-isolated control output,
0-1mA tension output
500mVdc per pair at rated load, 1.0 Vdc with Extended Range
Option
95% of transducer rating, minimum
25:1
32° to 104° F (0 - 40° C)
1 - 3 % Typical
0 - 100 % Maximum
0 - 100 %
5 lbs. (2.27 kg)
............
............
............
............
+/- 15Vdc from control module
0-10V and/or 4-20mA isolated control output standard,
0-10V and/or 4-20mA isolated tension output optional.
2.5 lbs. (1.13 kg)
PNEUMATIC OUTPUT UNITS
1. Servo Valve and Regulator on Bracket (std with the P version)
Input
. . . . . . . . . . . . 200psig (13,8 bar) Max.
Output
. . . . . . . . . . . . 0.5 to 75 psi (,03 to 5,17 bar)
Servo Valve Drive Signal . . . . . . 0 - 100 mA (From Control Module)
Air Connections: In . . . . . . . . . . . 3/8" Plastic Tubing (5/16", 8mm optional)
“
”
Out . . . . . . . . . 1/4" Plastic Tubing (6mm)
Unit Weight on Bracket . . . . . . . . 3.1 lbs (1.41 kg)
Unit Weight in enclosure . . . . . . . 12.2 lbs (5.53 kg)
2. Dual valve servo unit (Option with the P version)
Power Input
. . . . . . . . . . . . 24 Vac/dc @ 200mA
Input
. . . . . . . . . . . . 100 PSI (6,9 bar) Max.
Output
. . . . . . . . . . . . 0 to 75 PSI (0 to 5,2 bar)
Drive Signal
. . . . . . . . . . . . 1-5 Vdc (From Control Module)
Air Connections: In . . . . . . . . . . . 1/4" barb fitting
“
”
Out . . . . . . . . . 1/4" barb fitting
Unit Weight
. . . . . . . . . . . . 2.3 lb. (1.04 kg)
1.4.4
HIGH VOLTAGE MODULE (std with V version)
Power Input:
“ ”
Outputs:
“ ”
Weight:
1.4.5
............
............
............
............
............
115/230 Vac 50/60 Hz single Phase @ 5 Amps,
+/- 15Vdc from control module & 24 Vdc for relay
0 - 24 / 45 / 90 Vdc @ 4 Amps, with 115 Vac input
0 - 45 / 90 /180 Vdc @ 4 Amps, with 230 Vac input
5 lbs. (2.27 kg)
MEDIUM VOLTAGE MODULE (option to V version)
Power Input:
“ ”
Output:
Unit Weight:
............
............
............
............
24Vdc @ 2.05 Amps
+/- 15Vdc from control module
0-24Vdc @ 2 Amps, Compensated
2.5 lbs. (1.13 kg)
3
1.4.6
PC/LAPTOP INTERFACE (std with all versions)
Power Input
Communications type
Protocol
Connector type
Software medium
1.4.7
............
............
............
+10 Vdc (supplied by Control Module)
3 ½" 1 mA
1.86 lbs. (0.84 kg)
REMOTE CONTROL TERMINAL (option to all versions)
Power Input
Communications type
Protocol
Display
Unit Weight
1.4.9
+5 Vdc (supplied by Control Module)
RS232-D
Proprietary
9-pin D subminiature
1.44 MB floppy disk
USER INTERFACE (option to all versions)
Power Input
Tension Meter
Unit Weight
1.4.8
............
............
............
............
............
............
............
............
............
............
+5 Vdc (supplied by Control Module)
RS232-D
Proprietary
2-line, 16-character LCD
0.66 lbs. (0.30 kg)
HOST INTERFACE (option to all versions)
Communications type
RS485 Addresses
Protocol
Connector type
............
............
............
............
RS232-D or RS485 (single or multidrop)
1 to 9, A to Z
ModBus RTU
9-pin D subminiature
1.4.10 SPEED MODULE
Power Input
............
DC tachometer voltage range . . . . . .
Pulse tachometer frequency range . .
Rider roll voltage range . . . . . . . . . . .
Unit Weight
............
+/- 15V (from control module)
4 to 250 Vdc
200 Hz to 50kHz
5 Volt min
2.3 lbs. (1.04 kg)
1.4.11 TENSION-ON MODULE
Power input
............
Relay contact type
............
Voltage and current ratings . . . . . . . .
“
”
............
“
”
............
Unit Weight:
............
+/-15 Vdc (from control module)
NO and NC SPDT
0.5A @ 125 Vdc
1.0A @ 30 Vdc
0.5A @ 110 Vdc
2.3 lbs. (1.04 kg)
1.4.12 TENSION LIMIT SWITCH MODULE
Power input
............
Relay contact type
............
Voltage and current ratings . . . . . . . .
“
”
............
“
”
............
Unit Weight:
............
+/- 15 Vdc (from control module)
NO and NC SPDT
0.5A @ 125 Vdc
1.0A @ 30 Vdc
0.5A @ 110 Vdc
2.3 lbs. (1.04 kg)
1.4.13 DUAL TRANSDUCER MODULE
Power input
............
Relay contact type
............
Voltage and current ratings . . . . . . . .
“
”
............
“
”
............
Unit Weight
............
+/-15 Vdc (from control module)
NO and NC SPDT
0.5A @ 125 Vdc
1.0A @ 30 Vdc
0.5A @ 110 Vdc
2.3 lbs. (1.04 kg)
4
1.5 FEATURES OF STANDARD UNITS
1.5.1
CONTROL MODULE
• 0 - 10 Volt DC Tension Out. Proportional to web tension. Used as an input to other control systems,
computers or data collection devices.
• 4 - 20mA Tension Out. Proportional to web tension. Used as an input to other control systems, computers
or data collection devices.
• Automatic Control Mode. The controller output is determined by the difference between web tension and
the AUTO tension set point. The internal regulator automatically varies the output as required to maintain
set tension.
• Emergency Stop. Controller immediately goes to full output or zero (Switch Selectable). Normally full
output is used on unwinds to stop the roll of material quickly. Zero output is used for rewind or
intermediate controllers.
• Manual Control Mode. The controller output is determined only by the Manual setpoint. No change
occurs unless the potentiometer is turned. Used during machine set-up or during trouble-shooting
• Output Direction. Select between normal and reverse. Most applications use the normal selection with the
controller output going up as tension falls below the set level. The Reverse selection causes output to go
down when tension falls below the set level. Reverse Output is used in intermediate tension zones where
the transducers are located after the nip rolls they control, and for driven unwinds.
• Sample and Hold. Locks the controller output at whatever level it may be when an external contact closes,
and holds it there until the contact opens. Usually used in flying splice applications to prevent instability
during the splice.
• Set-up Storage/Recall. Allows the operator to store all operating parameters related to a particular job,
material or process for later retrieval.
• Soft Start. Typically used on unwinds. Actuated either automatically upon a loss of tension below the
preset trip point (after an adjustable delay), immediately upon an external contact closure, or by machine
speed. Controller output is reduced to a preset low level to prevent brake lock-up when the machine starts.
When tension rises above the trip point, the controller goes back to the automatic control mode. Does not
operate in the MANUAL control mode. Actuation by machine speed may require the optional “Speed
Module”.
• Speed Follow. This is a special function normally used to control tension in an intermediate zone. The
Control Module contains a regulator circuit, separate from the tension regulator, that accepts a line speed
signal and, optional, a nip roll speed signal. The line speed signal causes the output of the controller to
follow (go up and down with) line speed. The output of the tension regulator then trims the follower output
as needed to maintain set tension.
• Taper Tension. Used for rewind applications. Causes tension to decrease as roll diameter increases. Helps
produce a better quality roll by eliminating telescoping, crushed cores, too tight or too loose rolls. The two
methods that are available are diameter calculator and rider roll. The diameter calculator method requires
machine speed and roll speed signals. The rider roll method requires a follower roll in contact with the
rewind roll, or some other roll-sensing device such as a sonic rangefinder to detect roll diameter. The
device must have a 0 - 10 Volt DC output. Taper is adjustable from 0 to 100%.
• Transducer Voltage Selection. Choose between 5 Vdc and 10 Vdc excitation for the tension transducers.
5 Vdc is standard. 10 Vdc is used for the extended range option, and always with the Low Tension
Transducer.
• Remote Tension Amplifier (RTA). The internal tension amplifier is bypassed and the tension signal is
provided by an external remote device such as the TI-13. This allows the use of special indicator functions,
such as intrinsic safety, which are not available in the TensionManager™.
1.5.2
SERVO VALVE AND REGULATOR UNIT
• Provides 0.5-75 psi of output air pressure.
• Affordable, high performance control with fast response and high volume.
5
1.5.3
HIGH VOLTAGE OUTPUT MODULE
1.5.4
• A.C. Select. Selectable A.C. input, 115Vac 50/60Hz or 230Vac 50/60Hz
• Selectable Output. Provides four different outputs, switch selectable. 0 -24Vdc, 0 - 45Vdc, 0 - 90Vdc
available with 115VAC input. 0 - 180Vdc with 230VAC input. All output are rated at 4 Amps.
PC/LAPTOP INTERFACE
• Software and a cable to connector to a standard PC or Laptop serial port
1.6 FEATURES OF OPTION MODULES
1.6.1
ISOLATED OUTPUT MODULE (option to D versions)
• Isolation. The Isolation Module will isolate from ground the 0 - 10 Vdc control signal or a 4 - 20 mA
control signal, both are available at the same time. Also available (by internal jumper select) is the 0 - 10
Vdc proportional to tension signal, which will be isolated. Either the control signal OR the tension signal
can be selected, but not both at the same time.
1.6.2
DUAL VALVE SERVO UNIT (option to P versions)
• Provides 1.0-75 psi output air pressure
• A low cost solution for pneumatic applications.
1.6.3
MEDIUM VOLTAGE OUTPUT MODULE (option to V versions)
• 12Volt. Provides 0 - 12 Vdc @ 2 Amps.
• 24Volt. Provides 0 - 24 Vdc @ 2 Amps.
1.6.4
USER INTERFACE (option to all versions)
• A panel which contains the most commonly-needed controls and indicators: Tension meter, Manual and
Auto set potentiometers, Tension On/Off and Auto/Manual switches, TLS indicator and reset switch
• Designed for rear mounting in a cutout in a machine’s control panel
• Also available in a front mount version
• Connects to Control Module using a single cable
1.6.5
REMOTE CONTROL TERMINAL (RCT) (option to all versions)
• A handheld unit which contains a display and keypad
• Can be used to configure a TensionManager™, or can be used as a permanent Operator Interface
• Allows transfer of setups between Control Modules
• Connects to Control Module using a single cable
1.6.6
HOST INTERFACE (option to all versions)
• Makes use of machine’s existing control interface
• Allows a central control point for the entire machine
• Setpoint and other control information to be provided by the host computer or PLC
• Takes advantage of the widely used MODBUS RTU protocol
1.6.7
SPEED MODULE (option to all versions)
• Used to interface to high-voltage DC or pulse tachometers in machines
• Also used to interface to rider potentiometers for diameter input
1.6.8
TENSION-ON MODULE (option to all versions)
• Provides NO or NC dry contact based upon controller’s Tension mode
• Can be used to interface with motor drives, PLCs, panel control logic, or indicators
1.6.9
TLS MODULE (options to all versions)
• Provides NO or NC dry contact based upon controller’s TLS (tension limit switch) alarm
• Can be used to interface with motor drives, PLCs, panel control logic, or indicators
1.6.10 DUAL TRANSDUCER MODULE (option to all versions)
• Provides automatic switching between two sets of transducers
• Multiple transducers allow greater tension ranges or dual web paths
6
SECTION 2
INSTALLATION
2.1 DIMENSIONS
CONTROL MODULE & HIGH VOLTAGE OUTPUT MODULE
Figure 2 - CONTROL AND HIGH VOLTAGE MODULE DIMENSIONS
7
ISOLATED OUTPUT, MEDIUM VOLTAGE, SPEED, TLS,
TENSION-ON, & DUAL TRANSDUCER MODULES
Figure 3 - MODULE DIMENSIONS FOR THE IO, MV, SP, TLS, TO, & DTI MODULES
Figure 4 - REMOTE CONTROL TERMINAL DIMENSIONS
8
Figure 5 - USER INTERFACE DIMENSIONS
Figure 6 - REMOTE PNEUMATIC ASSEMBLY (IN ENCLOSURE)
9
Figure 7 - DUAL VALVE PNEUMATIC ASSEMBLY
2.2 SELECTION OF MOUNTING LOCATION
2.2.1.
MOUNTING LOCATION FOR CONTROL, OUTPUT MODULES (EXCEPT PNEUMATIC UNITS)
AND OPTION MODULES
These units are designed for mounting on a 35mm DIN rail in a control cabinet. Be sure the location is free of
vibration, and is dry and clean. The units also require +24Vdc, so it would be convenient if they were located
close to your +24V power supply.
The High Voltage Output Module also requires 115Vac or 230Vac. Make sure this voltage is also available
within the cabinet.
2.2.2
USE OF THE PC/LAPTOP INTERFACE
The PC/Laptop interface consists of software and a cable to connect between the PC or Laptop and the
Control Module. This interface can be used as a programming terminal for configuring the
TensionManager™, or it can be used as a complete operator terminal if desired. If the unit is to be used as an
operator interface, be sure to use normal precautions for mounting your laptop or PC.
2.2.3.
MOUNTING LOCATION FOR PNEUMATIC UNITS
The Pneumatic units are designed for mounting close to your brake or clutch. They will therefore require
shop air to be brought to their input, and the output is brought to the clutch or brake. In addition, a connection
cable must be run between the pneumatic unit and the Control Module. Choose a location which is free from
vibration.
For more reliable operation, you should consider installing an inline filter assembly to keep oil and water
from entering the pneumatic assembly.
10
2.2.4.
MOUNTING LOCATION FOR OPERATOR INTERFACES
Regardless of the type of operator interface you will use, you should select a location which is convenient to
the operator and which, if possible, is close to other machine controls. Take care to choose a location that the
modules won’t be struck and damaged by anything or anyone, and which is not in the presence of debris or
liquids. The location should also be free from excessive vibration.
2.2.4.1
MOUNTING LOCATION FOR THE USER INTERFACE
The User Interface is designed for mounting in a panel from the front. An alternate version is designed fro
rear mounting with a slightly smaller panel cutout. Refer to Fig. 5 for the dimensions of the two mounting
panels that are available.
2.2.4.2
MOUNTING LOCATION FOR REMOTE CONTROL TERMINAL
The RCT is a small handheld unit which can be used as a programming terminal for configuring the
TensionManager™, or it can be used as a complete operator terminal if desired. If the unit is to be used as
an operator interface, its small size makes it possible to mount just about anywhere.
2.2.4.3
USE OF THE HOST INTERFACE
When the Host Interface is used, set point and other control information comes directly from a host PC or
PLC. Therefore this device operator interface is also used as the operator interface for the
TensionManager™, and no additional components need to be located.
2.3 INSTALLATION INSTRUCTIONS
2.3.1.
INSTALLATION OF CONTROL, OUTPUT (except pneumatic) AND OPTION MODULES
The modules are fastened by Din Rail Clips attached to the rear of each module. These clips are sized for
35mm wide Din Rails. Once your DIN rail is installed, hook the DIN clip onto the top of the DIN rail and
push the enclosure at the bottom until you hear the clip snap into place.
To remove the Modules from the Din Rail you may need to remove the cover. This is accomplished by
removing the three screws that fasten the cover to the base plate. Depending on which module is being
installed or removed, there are two different DIN clips that may be used on the module and each has it’s own
removal procedure. See Fig. 8 to assist in removal. On the small modules (Approx. 4" x 5") there is an orange
DIN clip. This module can be removed by using a flat tip screwdriver and either inserting it behind the
module and forcing the tab away from the Din Rail or inserting the screwdriver through the hole in the back
of the module and forcing the tab away from the Din Rail.
On the large module (Approx. 6" x 7") there will be a green DIN clip. This clip has a tab with a hole in it. To
remove this module, place a small flat tip screwdriver through the hole in the base plate and into the hole in
the tab and pull the tab down. A second method is to obtain a probe with a hook in it and insert it up and in
back of the module and catch the hole in the tab and pull down.
Figure 8 - DIN RAIL MOUNTING INSTRUCTIONS
11
2.3.2
INSTALLATION OF THE PC/LAPTOP INTERFACE SOFTWARE
This section involves installation of a software program on the user’s PC. It assumes the user is familiar with
installation of software. Place the first diskette in the disk drive (or CD in the CD-ROM drive). Using
Windows Explorer, browse to A: (or D: for a CD) and double-click on the fire “SETUP”. Follow the
instructions provided on the screen. Installation is straightforward. The installation program assumes that the
communications port you are using is COM1. It is possible that this port is used by on your computer. If this
is the case, select a communications port that is available. When complete, remove the diskette or CD from
your computer.
2.3.3
INSTALLATION OF PNEUMATIC OUTPUT MODULES
These modules should be attached to your machine in the area of your clutch or brake. Drill four #10 or M4
holes in a pattern 4" x W x 7 ½" H. Use four screws to attach the Pneumatic Unit to your machine.
If you are using an oil and water filter, install it in close proximity to the Pneumatic Unit, following the
instructions that come with the filter assembly.
2.3.4
INSTALLATION OF USER INTERFACES
The standard User Interface is designed for mounting in a panel from the front. Refer to Fig. 5 for front mount
panel cutout dimensions and location of mounting holes. An alternate version is designed for rear mounting
with a slightly smaller panel cutout. Refer to Fig. 5 for rear mount panel cutout dimensions and location of
mounting holes You will also need to find a small stud or drill a fifth hole to attach a ground wire.
Mark your panel and cut a square hole to mount the User Interface, taking care not to disturb other equipment
within the machine. You may want to use a rag to prevent metal filings from entering electronic components.
Then drill four 0.150" mounting holes in the correct pattern for attaching the User Interface, plus a fifth hole
for the ground wire.
Assemble your panel to the machine from the front or the rear (depending on the panel you are using) using
#6 or M3 screws, nuts and washers. Attach the ground wire using a fifth set of hardware.
2.4 ELECTRICAL CONNECTIONS FOR STANDARD FEATURES
2.4.1
ELECTRICAL CONNECTIONS BETWEEN THE CONTROL MODULE AND THE MACHINE
(including power supply connections, see fig.9)
2.4.1.1 NECESSARY CONNECTIONS
The following connections are required for proper operation of the TensionManager™:
1. Make your 24VDC power connection to the terminal block labeled “POWER”, positions 1 (+24 DC) and
2 (24V Common).
2. Make your single transducer connection to the terminal block labeled “XDUCER”, positions 1 (EXC +), 2
(EXC -), 3 (SIG +) and 4 (SIG -). For the Dual Transducer option use , see Fig. 10)
2.4.1.2 CONNECTIONS REQUIRED FOR FEATURES
The following connections are required in order to use certain features or modes of operation. Use the
terminal block labeled “CUST CONN”.
• If a 0-10V diameter input signal is used, make the connection to positions 1 (“ROLL DIA 0-10V”) and 9
(“SIG COMMON).
• If a 0-10V line speed input signal is used, make the connection to positions 2 (“LINE SPD 0-10V”) and 9
(“SIG COMMON”)
• If a 0-10V roll speed signal is used, make the connection to positions 3 (“ROLL SPD 0-10V”) and 9 (“SIG
COMMON”).
• If a Remote 0-10V tension signal is used, make the connection to positions 4 (“RTA 0-10V”) and 9 (“SIG
COMMON”).
• If the E-Stop feature is to be used, apply a dry contact to positions 6 (“E-STOP”) and 9 (“SIG COMMON”).
12
Figure 9 - CONTROL MODULE ELECTRICAL CONNECTIONS
• If the Soft Start by contact closure feature is to be used, apply a dry contact to positions 7 (“S START”)
and 9 (“SIG COMMON”).
• If the Ratio or Sample and Hold feature is to be used, apply a dry contact to positions 8 (“S START”) and
9 (“SIG COMMON”).
• If you want to use a non-isolated control output, make your connection to positions 10 (“CTL OUT”) and
12 (Common)
• If you want to use a non-isolated tension output, make your connection to positions 11 (“TEN OUT”) and
12 (“SIG COMMON”).
• If you want to use an external LED for a TLS output, you can apply your LED connection in series with
an appropriate dropping resistor, connected to your external power supply, to positions 13 (“TLS OUT”)
and 9 (“SIG COMMON”). Make sure the current does not exceed 100 mA and the voltage does not exceed
+15Vdc.
2.4.2
CONNECTIONS FOR THE PC/LAPTOP INTERFACE
Attach the end of cable #721-1646 with the 9-pin D connector to the external serial port connect on your PC
or Laptop computer. If your computer only has a 25-pin connector, you may purchase a 9-to-25-pin adapter at
Radio Shack (#26-287). Insert the other end of cable #721-1646 into the connector on the CM marked
‘RCT/Laptop’.
2.4.3
CONNECTIONS FOR OUTPUT MODULES
Your controller may come with one of the following output modules. For optional output modules, refer to
section 2.5.1.
13
2.4.3.1 CONNECTIONS FOR THE CONTROL MODULE AND THE SERVO VALVE AND REGULATOR
UNIT (std with P version)
Make sure the Pneumatic Unit is mounted securely and the 15' connecting cable (723-1672) is attached to the
Control Module at (J3). This is marked “Output Modules” on the bottom of the Control Module enclosure. If
you need a longer cable you can order it at any length under DFE part number 723-1671. The other end of the
cable should be attached to the Pneumatic unit at (J1).
You must obtain two 1/8" NPT fittings to insert into the threads in the input and output openings in the
bottom of the unit. The other end of the fittings can be barb, fast-disconnect, or anything else you may need to
adapt to the hoses you are using. Make sure the shop air provided to this pneumatic unit is dry and that the air
pressure is no more than 100 psi. Attach the pneumatic supply hose to the opening at the bottom left side of
the unit, making sure there are no leaks. Likewise, attach the output hose from the fitting at the lower right of
your unit to the brake or clutch. Make sure all the hoses and wiring do not come in contact with any moving
parts on your machine.
Figure 10 - CONNECTIONS FOR REMOTE PNEUMATIC ASSEMBLY
2.4.3.2 CONNECTIONS FOR THE HIGH VOLTAGE OUTPUT MODULE (std with V version)
You will first need to configure the HV unit for the correct output voltage. Remove the three screws holding
the cover onto the module. Output voltage selection is accomplished by setting the appropriate switch settings
on switch SW301 located on the HV output circuit card.
Figure 11 - SWITCH SETTINGS FOR HIGH VOLTAGE MODULE
14
Figure 12 - ELECTRICAL CONNECTIONS FOR HIGH VOLTAGE MODULE
Connect your Control Module to your High Voltage Output Module using ribbon cable 721-1617. The ribbon
cable is connected from (J301) on the HV output module, to connector J3 on the CM, which is marked
“Output Module” See Fig. 9.
Connect the same +24 Vdc which powers your Control Module to TB303-1 (+24 supply) and TB303-2 (+24V
return) on the HV module.
Connect 115VAC or 230Vac (depending on the output you want) to TB302-1 (AC Hi) and TB302-2 (AC Lo).
Connect the output of the High Voltage Module to your electromagnetic or particle brake or clutch. Make the
connections to Tb301-1 (HV Output) and Tb301-2 (HV Return).
Finally connect the green ground wire connected to the rear of the module to a good earth ground. Brake or
clutch must be connected
2.5 ELECTRICAL CONNECTIONS FOR OPTIONS
2.5.1
CONNECTIONS FOR optional OUTPUT MODULES
2.5.1.1
CONNECTIONS FOR THE CONTROL MODULE AND THE ISOLATED OUTPUT MODULE
(Option to D Version)
The Isolated Output module can be used to provide an isolated 0-10V or isolated 4-20mA signal. This signal
is usually a compensated control output, to be fed to a motor drive or PLC. If an isolated 0-10V or 4-20mA
tension signal is desired, the isolated output module can be used to produce that instead. If both isolated
signals are needed, two isolated modules must be used.
For either an isolated control or tension output signal, make a connection between J201 on the Isolated
Output module to J3 on the Control Module using output ribbon cable assembly 721-1617.
To configure the module for Isolated Control Output, locate jumper selection pins JP201 on the Isolated
Output circuit card and place the jumper on positions 1 and 2. To calibrate for Isolated Tension Signal
Output, place the jumper on pins 2 and 3.
15
Figure 13 - ELECTRICAL CONNECTIONS FOR THE ISOLATED OUTPUT MODULE
The Isolated Output Module can also provide a isolated 0 to 10V and 4-20mA Tension Signal, although you
can have isolated control signals or isolated Tension Signals but not both at the same time. (Although you
can connect a 2nd Isolated Output Module to accomplish this).
To calibrate for Isolated Tension Signal Output locate jumper selection pins JP201 on the Isolated Output
circuit card and place the pin header on pins 2 and 3. For Control Signal Output the header will have to be
on pins 1 and 2.
With JP201 selected for Tension Signal Output the calibration sequence would be the same as stated above
for adjusting RT201 and RT202 and looking at the signals at TB201.
There are no more adjustments or setups for the Isolated Output Module.
2.5.1.2
CONNECTIONS FOR THE CONTROL MODULE AND THE DUAL VALVE SERVO UNIT
(option to P version)
Make sure the Pneumatic Unit is mounted securely and the 15' connecting cable (723-1672) is attached to
the Control Module at (J3). This is marked “Output Modules” on the bottom of the Control Module
enclosure. (If you need a longer cable, you can order it at any length under DFE part number 723-1671).
The other end of the cable should be attached to the Pneumatic Unit at (J1).
The pneumatic unit contains two barb fittings to attach to your air supply and the hose to your clutch or
brake. Make sure the shop air provided to this pneumatic unit is dry and that the air pressure is no more than
100 psi. If it is not, you should consider using an external filter. Attach the pneumatic supply hose to the
unit, making sure there are no leaks. Likewise, attach the output hose to your brake or clutch.
Make sure all the hoses and wiring does not come into contact with any moving parts on your machine.
16
Figure 14 - CONNECTIONS FOR DUAL VALVE SERVO MODULE
2.5.1.3. CONNECTIONS FOR THE CONTROL MODULE AND THE MEDIUM VOLTAGE OUTPUT
MODULE (option to V version)
Make sure the Medium Voltage Output Module is mounted, and connected to the Control Module (CM) by
ribbon cable. The ribbon cable is connected from (J401) on the MV output module to (J3) on the CM.
Connect your Control Module to your Medium Voltage Output Module using ribbon cable 721-1617. The
ribbon cable is connected from (J301) on the MV output module, to connector J3 on the CM, which is
marked “Output Module”
Connect the same +24 VDC which powers your Control Module to TB402-1 (+24 supply) and TB402-2
(+24V return) on the Medium Voltage Output Module.
Connect the output of the Medium Voltage Module to your electromagnetic or particle brake or clutch.
Make the connections to Tb401-1 (MV Output) and Tb401-2 (MV Return).
Finally connect the green ground wire connected to the rear of the module to a good earth ground.
Figure 15 - ELECTRICAL CONNECTIONS FOR THE MEDIUM VOLTAGE MODULE
17
2.5.2
CONNECTIONS FOR USER INTERFACES
Although the standard operator interface supplied with the TensionManager™ is an interface to a laptop or
PC, your system may have one of the following operator interfaces.
2.5.2.1 CONNECTIONS FOR CUSTOMER-SUPPLIED COMPONENTS
If you wish to connect your own control components, refer to Fig. 13. You may connect one or more of these
controls by removing the 10-position terminal block plug from the User Interface PCB and making the
following connections:
• Manual/Auto switch - Connect an SPDT or DPDT alternate action switch between TB701-3 (Auto/Man
switch input) and TB701-6 (power return). You will be in Manual mode when the switch is open and in
Auto mode when the switch is closed. You can label the positions of the switch, or you can wire the unused
side of a DPDT switch to create an indicator lamp or LED.
• Tension On/Off switch - Connect a momentary action switch between TB701-3 (Ten On/Off switch input)
and TB701-6 (power common).
• Tension On LED - Connect the anode of the LED to TB701-9 (TenOnLED) and the cathode to TB701-6
(power common).
• Manual set potentiometer - Connect a 10k potentiometer‘s CW terminal to TB701-7 (+10V); its wiper to
TB701-1 (Man0-10V), and its CCW terminal to TB701-5 (signal return).
• Auto set potentiometer - Connect a 10k potentiometer ‘s CW terminal to TB701-7 (+10V); its wiper to
TB701-2 (Aut0-10V), and its CCW terminal to TB701-5 (signal return).
Figure 16 - CONNECTIONS FOR CUSTOMER SUPPLIED COMPONENTS
• Tension Meter - Connect the + terminal of a 1 mA meter to TB701-8 (Ten0-1mA) and the - terminal to
TB701-5 (signal return).
• TLS Alarm LED - Connect the anode of the LED to TB701-10 (TLS) and the cathode to TB701-6
(power common).
• TLS Reset switch - Connect a momentary action switch between TB701-10 (TLS) and TB701-6 (power
common).
When done, reinsert the 10-position terminal block into the receptacle on the User Interface PCB.
18
2.5.2.2
CONNECTIONS FOR THE USER INTERFACE
Connections between the units can be made by the customer or a connecting cable (723-1622) can be
supplied by DFE. In any case the connections are to be made from TB701 on the User Interface to TB2 on
the Control Module.
2.5.2.3
CONNECTIONS FOR THE REMOTE CONTROL TERMINAL
Insert one end of cable #721-1620 into the connector in the front end of the RCT and the other end into the
connector on the CM marked ‘RCT/Laptop’.
2.5.2.4
CONNECTIONS FOR THE HOST INTERFACE
Attach a cable with a female 9-pin D subminiature cable to the 9-pin male connector on the bottom of the
Control Module marked ‘Host’.
2.5.3
CONNECTIONS FOR OPTION MODULES
Option modules are connected to the Control module using ribbon cable #723-1642. This cable distributes
power from the Control Module to the option module(s) and routes signal between modules.
The cable has five identical connectors. One end of the cable plugs into the connector at the bottom of the
Control Module labeled “Option Modules”, and any one of the other connectors can be plugged into the
connector at the bottom of the option mode labeled “Control Module”.. Note: The connectors are polarized
so that they can only be inserted into modules one way. You may find it more convenient to swap the cable
end-for-end to make the wiring neater. Connectors and cable not used should be bundled up with a cable tie
2.5.3.1
CONNECTIONS FOR THE SPEED MODULE
The Speed Module can accept a line (machine) speed tachometer, either D.C. voltage or Pulse train, also it
will accept a Roll speed tachometer, either D.C. voltage or Pulse train, and as a third and last input it will
accept a Rider-Roll potentiometer. It can also accept a combination, such as DC tach for line speed and
Pulse train for roll speed, or Pulse train for line speed and Rider roll for diameter input.
You will first need to configure your Speed Module for the types of inputs you will be using. Remove the
three screws holding the cover onto the module. Set the cover and screws aside.
For DC tachometers, you need to know the maximum output voltage at maximum line speed. Based on this
voltage, set SW502 as follows:
Figure 17 - SWITCH 502 SETTINGS FOR SPEED MODULE
For Pulse tachometers, you need to know the peak pulse voltage as well as the maximum frequency the
pulse signals will have. The data sheet that came with the pulse tachometer should give this data or allow
you to calculate it. The amplitude can also be measured using an oscilloscope.
19
Determine the frequency of the tachometer at maximum machine speed. Calculation is usually the best
method. Look on the pulse tach data sheet for the number of pulses per revolution and multiply by the
revolutions per second, considering any gear ratios that may be used. Based on that, set SW501 as follows:
Figure 18 - SWITCH 501 SETTINGS FOR SPEED MODULE
For Rider rolls, you will need to know whether your rider roll produces an increasing (+) voltage as
diameter increases, or a decreasing (-) voltage as diameter increases. Based on that, set SW503 as follows:
Figure 19 - SWITCH SETTINGS FOR RIDER ROLL
Once the speed module has been set up, you will need to make your electrical connections. Do not put the
cover back on yet. You will need access to points on the PCB to calibrate the unit.
Connect your Control Module to your Speed module using the appropriate Option Ribbon cable. The ribbon
cable is connected from (J501) on the speed module, to connector J4 on the CM, which is marked “Option
Module”.
• For Line tachometer - Connect the tachometers (+) to TB501-1 and the tachometers (-) to TB501-2.
• For Roll tachometer - Connect the tachometers (+) to TB501-3 and the tachometers (-) to TB501-4.
• For Rider roll - Connect your Rider Roll Pot to TB502, clockwise (cw) to pin 1, wiper(w) to pin 2, and
counter-clockwise (ccw) to pin 3.
20
Connect the green ground wire connected to the rear of the module to a good earth ground. This completes
the connections required for the Speed Module.
2.5.3.2
CONNECTIONS FOR THE TENSION ON MODULE
You will have a pair of wires to connect to the Tension On Relay module. You will want to connect one of
these to either “normally open” (NO) or “normally closed” (NC). Connect one to either TB604-1 (NO) or
TB604-3 (NC). Connect the other wire to TB604-2 (common).
Connect your Control Module to your Tension On Relay module using the appropriate Option Ribbon cable.
The ribbon cable is connected from (J601) on the Tension On Relay module, to connector J4 on the CM,
which is marked “Option Module”.
2.5.3.1
CONNECTIONS FOR THE TLS MODULE
You will have a pair of wires to connect to the Tension On Relay module. You will want to connect one of
these to either “normally open” (NO) or “normally closed” (NC). Connect one to either TB604-1 (NO) or
TB604-3 (NC). Connect the other wire to TB604-2 (common).
Connect your Control Module to your TLS Relay module using the appropriate Option Ribbon cable. The
ribbon cable is connected from (J601) on the TLS Relay module, to connector J4 on the CM, which is
marked “Option Module”.
2.5.3.1
CONNECTIONS FOR THE DUAL TRANSDUCER MODULE
• Connect Transducer A to TB602 on the Dual Transducer Module as follows: TB602-1 (+Exc), TB602-2 (Exc), TB602-3 (+Sig), and TB602-4 (-Sig).
• Connect Transducer B to TB603 on the Dual Transducer Module as follows: TB603-1 (+Exc), TB603-2 (Exc), TB603-3 (+Sig), and TB603-4 (-Sig).
• Connect TB601 of the Dual Transducer Module to TB3 of the Control Module as follows: TB601-1 to
TB3-1 (+Exc), TB601-2 to TB3-2 (-Exc), TB601-3 to TB3-3 (+Sig), and TB601-4 to TB3-4 (-Sig).
Finally, connect your Control Module to your Dual Transducer module using the appropriate Option
Ribbon cable. The ribbon cable is connected from (J601) on the Dual Transducer module, to connector J4
on the CM, which is marked “Option Module”.
Figure 20 - ELECTRICAL CONNECTIONS FOR DUAL TRANSDUCER OPTION
21
SECTION 3
CALIBRATION AND SETUP
...............
3.1 INITIAL TEST OF SYSTEM
Before turning system power on for the first time, unplug all of the terminal blocks containing either +24Vdc or
line voltage (115VAC or 230VAC) on TensionManager™ components or accessories. Turn system power on.
Then verify that all voltages and DC voltage polarity is correct for all power connections. If so, turn power off,
plug your terminal blocks back in, and turn power on again. You should notice that a flashing green LED is
visible in a window on the top of the Control Module. If so, you can continue with startup. If not, refer to Section
6, Troubleshooting.
3.1.1
TEST OF STANDARD COMPONENTS
3.1.1.1 VERIFYING OPERATION OF THE PC/LAPTOP INTERFACE (Std. with all versions of
controller)
If the modular cable is not yet plugged in to both the Control Module and the computer, plug it in now. Turn
the computer on. Click on the DFE icon to run the PCLink software program.
The program will open asking you for appropriate serial COM port to be used. You can choose between
COM1 and COM4. Once chosen click OK. DFE logo and Tension Manager™ logo will be displayed. Click
on File...new... to create a new file of current session.
The program will open with the TensionManager Run screen displayed. You will see various machine
parameters listed, Current Tension, Line Speed, Output, some buttons, etc. You will also see a Status box
which shows various status conditions in the CM, including Tension On/Off showing that Tension is Off, and
Auto/Manual Control mode showing that the mode is Manual.
Press the Tension On/Off button. This should enable controller output and the word “Off” in the button
should change to “On” and remain that way. If it does, this means that the PC and the CM are successfully
communicating with each other. If not, carefully recheck your connections and try again. Press the Tension
On/Off button once again to turn Tension Off.
In section 3.1.2, you will need to turn Tension On again, and enter Manual set points of 50% and 100%. To
adjust the Manual set point, first place your pointing device in the Manual Set Point box and double-click it.
You will notice that this darkens the box. Enter the set point you want. Notice the value shown in the “Output
%” box - the value has not yet taken effect. Now press the Tab key. Notice that the “Output %” box shows
this value.
3.1.1.2 INITIAL CHECK OF A PNEUMATIC UNIT (Std. with P version)
If desired, you can perform a simple check of the Pneumatic Unit to see whether it is operating properly. To
do this you will need to temporarily put an air pressure gauge capable of reading up to at least 100 PSI (6.9
bar) onto the output hose.
With the Control Module in Manual Mode and Tension On, vary the Manual set point between 0 and 100%.
The air pressure reading should follow the set point between 0 PSI (0 bar) and 75 PSI (5.17 bar).
3.1.1.3 INITIAL CHECK OF THE HV OUTPUT MODULE (Std. with V version)
With the CM in the Manual Mode and set for 0% output, with Tension On there should be 0 volts at TB301pin 1 referenced to TB301-pin 2. With the CM in the Manual Mode, and set for 100% output, there should
be 22 / 45 / 90 volts at TB301-pin 1 referenced to TB301-pin 2, depending on your switch SW301 settings
3.1.2
TEST OF OPTIONAL COMPONENTS
3.1.2.1 INITIAL CHECK OF THE ISOLATED OUTPUT MODULE (option for D version)
With the Control Module in the Manual Mode and set for 100% output, turn Tension On. There should be 10
volts at TB201-pin 1, referenced to TB201-pin 3. The Isolated Output Module can also output a 4-20mA
(isolated) signal. To calibrate the 4-20mA signal put the Control Module in the Manual Mode and with 0%
output from the CM adjust RT202 on the Isolated Output circuit card for a 4mA signal at TB201-pin 2
22
referenced to TB201-pin 3, next with 100% output from the CM adjust RT201 for a 20mA output at TB201pin 2 referenced to TB201-pin 3.
3.1.2.2 INITIAL CHECK OF MV OUTPUT MODULE
With the CM in the Manual Mode and set for 0% output, with Tension On there should be 0 volts at TB401pin 1 (TP406) referenced to TB401-pin 2 (TP405). With the CM in the Manual Mode, and set for 100%
output, there should be 24 volts at TB401-pin 1 referenced to TB401-pin 2, if not then adjust RT401 on the
MV circuit card. Load must be connected.
3.1.2.3. VERIFYING OPERATION OF THE RCT
If the modular cable (DPN 723-1620) is not yet plugged into both the RCT and the CM, plug it in now. If the
CM is powered up and working, the RCT should go through an initialization sequence, showing on its display
software versions, etc. When the initialization sequence is complete, the display will show measured Tension
and the word “OFF” (indicating that the controller’s output is disabled) on the first line of the display, and the
words “Manual Setpoint” and its value on the second display line. This indicates that the initialization
sequence has been completed successfully.
Press the Up-Arrow key. This should enable controller output and the word “OFF” in the first display line
should change to “ON”. If it does, this means the RCT and the CM are successfully communicating with each
other. If not, refer to the Troubleshooting section for information on what to do next. Press the Down-Arrow
key once again to turn Tension Off.
In section 3.1.2, you will need to turn Tension On again, and enter Manual Set points of 50% and 100%. To
adjust the Manual set point, press the Right-Arrow key and hold it. You will notice the value change slowly at
first, then rapidly. When the set point approaches the desired value, release the key. If you undershot the
desired value, hold the Right-Arrow key down again, for a shorter period of time. If you overshot the desired
value, press and hold the Left-Arrow key for a short period of time.
3.2 SETUP AND CALIBRATION OF THE CONTROL MODULE
Your TensionManager™ will need to be configured for the type of inputs your machine will provide to the
controller, as well as the type of output you want the controller to produce. Once you have identified these, they
need to be entered into the TensionManager™ using either the RCT or PCLink. Then you should proceed to the
setup of the Speed Module (if used). Once setup is complete, you can continue to operate your machine using the
RCT or PCLink as an operator interface, or you can use the User Interface or Customer Supplied interface
instead
3.2.1 SETUP AND CALIBRATION OF THE CONTROL MODULE USING A PC/LAPTOP
When using a PC or Laptop running PCLink software, it will be useful to know how to navigate through the
screens and to gain access to the functions required.
When you first run PCLink, a selection box for a COM port will appear. The standard COM port is COM2. If
your computer has a different COM port available, you should select it here.
In the Windows toolbar, choose File->New. This will bring up the Run screen, which is the screen which will
be present under normal operating conditions. You can change to the other screens required for setup and
calibration by going to the Windows toolbar, and choosing User Screens. The following is a description of
each screen will describe what parameters appear on each screen. Views of each screen can be found in
Appendix C.
• The Run screen shows the current measured Tension, the unit of measure, the current Line Speed, the
controller’s Output, the current Roll Diameter, the current Auto and Manual set points, the current taper
percentage, and controls to switch tension mode On or Off, control mode Auto or Manual, and Taper mode
Enabled or Disabled. It also allows you to reset a TLS alarm. Alarms and special modes are displayed in a
status area at the bottom of the screen.
• The Configuration 1 screen shows the Tension Zone, the type of Actuator Device the controller is
connected to, the Control Format which the controller is to use, and the Control Action and Output Level
the controller is to produce.
23
• The Configuration 2 screen allows the user to adjust how the controller obtains Roll Diameter
information, how often the diameter information is Updated within the controller, the Linespeed Threshold
the controller uses for freezing the roll diameter, selections for conditions which will turn Tension Off,
selection of the type of Operator Interface to be used, and for communications, the ID address of the
controller (for multiloop communications).
• The TLS screen allows the user to configure High and Low tension alarm modes and set points and a delay
filter.
• The Soft Start screen allows the user to configure how the controller is to enter soft start mode, and what
output to produce when it is in soft start, and a delay filter.
• The Calibration screen allows the user to set the full-scale tension range, the calibration weight, and
calibrate one or two transducers (when the Dual Transducer option is used);and set the core and full roll
sizes and set the web’s width and maximum line speed.
• The Miscellaneous Features screen allows the user to select output limiting, power-on tension and control
modes, tension switch source, and network ID.
• The Diagnostic screen - Read/Write Pins screen allows the user to select processor pins to view or
manipulate (used for troubleshooting only). Tuning Limits screen allows the user to extend the range of
tuning (for special applications).
• The Data Transfer screen allows the user to store, retrieve and print setups from the CM and disk files, or
restore the controller’s settings to preset values..
• The Tuning screen allows the user to adjust controller tuning parameters for a particular machine.
It is important to know how changes take effect in the controller:
• When changes to a displayed numeric value are made by using the up-arrow or down-arrow keys to the right
of a value, the change takes place within the controller immediately.
• When changes to a displayed numeric value are made by placing the cursor in the box, clicking the box and
entering a number from the keyboard, the change does not take effect until the TAB key is pressed.
• When changes are made to settings by pushing a “button” on the screen, the change takes effect in the
controller immediately.
Important: changes are not stored in permanent memory until you go to the Data Transfer screen and make the
change permanent by Storing the setup. You can store the setup as the Default, which means that the setup will
be used when the controller is first turned on, or you can store it as one of ten numbered setups, to be recalled
upon demand.
3.2.1.1 SETUP FOR UNWINDS
This section will describe functions you may need to set your controller up for a standard unwind application.
(If you have a surface winder, setup is the same as for an intermediate application. Refer to section 3.2.2.2 for
this). You will at least need to verify the selections in the functions described in the Setup section, then
calibrate your controller as described in the Calibration section. The Features section describes features
which you may want to use, but which are not required for operation. Once this is complete you will need to
tune your controller as described in the Tuning section.
1. Setup, using a PC/Laptop (unwinds)
First, go to the Configuration 1 screen and in the box labeled “Tension Zone” press the button for
Unwind. In the box labeled “Actuator Device” press the button to select the type of Actuator device you
are using on your machine. The controller can operate in a mode which develops its output based on
tension and set point only, or if roll diameter and line speed information is available, it can use roll
diameter and line speed to result in more responsive control. To set the mode, go to the box labeled
“Control Format” and press the button for Standard Closed Loop if no diameter signal is used, or the
button for Line Speed Follow, TT & Dia Comp if you want to use a roll diameter signal. If you want the
controller’s output to increase when tension decreases (as when using a brake or clutch), press the button
for Standard mode in the box labeled “Control Action”. If you want the controller’s output to decrease
when tension decreases (as when using a motor driven unwind), press the Reverse button instead. If you
are using an actuator device such as a brake or clutch, whose output only goes from 0 to some positive
24
value, choose 0 to +V (Unipolar) in the box labeled “Output Level”. If you are using an actuator device
such as a motor with drive, which requires and output that can go negative OR positive, choose -V to +V
(Bipolar) instead.
Go to Configuration Screen 2. If in Configuration Screen 1 you have chosen Line Speed Follow, TT &
Dia Comp, you will need to tell the controller information about roll diameter. In the box labeled
“Diameter Source”, choose either Direct Diameter (if you are using a direct roll sensing device (such as a
rider roll or ultrasonic sensor), or Tach Ratio Calculated if diameter will be calculated from a ratio of
tachometer signals. In the box labeled “Diameter Limits” set the minimum roll diameter in the Core Size
box, and the maximum roll diameter in the Full Roll Size box. In the box marked “Line Speed”, set the
maximum line speed in the Max Line Speed box. If you are using the tach ratio method for obtaining roll
diameter, in the box marked “Diameter Update”, you will need to set the value in the Diameter Update
Time box (a good initial update time is 1 second) and the threshold line speed for the diameter calculator
to begin working in the Threshold Line Speed box (a good initial threshold value is 10% of the
maximum). In the box labeled “Tension off by Switch select”, you can select what conditions will cause
tension to turn Off (besides the normal Tension Off command in the operator interface). You can check
the appropriate boxes to add TLS Lo, TLS Hi, and ESTOP.
2. Calibration, using a PC/Laptop (unwinds)
Go to the Calibration screen. You will first need to go to the “Tension Source” box to select where the
controller gets its tension information from. Normally this would be from Transducer A, but if you have
the Dual Transducer option you will need to complete the calibration procedure below for each pair of
transducers by selecting Transducer B the second time. If you are accepting a 0-10V tension signal from
an external source, you should select External, in which case no transducer calibration sequence will be
required.
In the box labeled “Set Range”, set your full scale tension value, such as 100 or 500 (units will be entered
in the Run screen). If you are calibrating one or two sets of transducers, you will need to enter the weight
you will be using to calibrate them in the box labeled “Set Calibration Weight”. (If you are using an
External 0-10V tension source, your calibration is complete).
You are now ready to calibrate your transducers. For the first (or only) set, make sure Transducer A is
selected in the “tension Source” box. Then press the button labeled “Yes” in the box “Calibrate
Transducer Now?”, and follow the directions on the screen.
If you have the Dual Transducer option, repeat the procedure, selecting Transducer B this time.
In the box marked “Line Speed”, set the maximum line speed in the Max Line Speed box.
When complete, you will probably want to change your tension source back to Transducer A.
3. Features, using a PC/Laptop (unwinds)
You can have tensions above or below specified levels cause an alarm contact to close by using the TLS
(tension limit switch) feature. If you want to use this feature, go to the TLS screen. You can set up TLS
Low and Hi modes independently by going to the appropriate “TLS LO Mode” or “TLS HI Mode box”
and adjusting the settings. You can choose to have the alarm remain on after the tension condition has
gone away by selecting Latched mode, or have the alarm reset itself after the tension condition goes away
by selecting Momentary mode. You can also set independent Low and High trip points by entering the
trip tension values in the “Set TLS LO Point” and “Set TLS HI Point” boxes. You can specify a time delay
to prevent false alarm triggering by entering a time delay value in the box labeled “TLS Delay”.
When using a brake or clutch, you may want to use the Soft Start feature to prevent output from increasing
when your machine is stopped. To do this go to the Soft Start screen. In the box labeled “Soft Start
Select”, you can choose how you want to activate soft start. You may use one or more of the methods
shown. If you have chosen line speed activation, you will need to enter the line speed which will activate
soft start in the box labeled “Soft Start Line Speed Trip Point”. If you have chosen tension activation, you
will need to enter the tension level to activate soft start in the box labeled “Soft Start Tension Trip Point”.
For either of these two methods, you will need to enter the time delay before entering soft start in the box
labeled “Soft Start Delay”, and you will need to specify the output level you want your controller to
produce while in soft start mode, in the box labeled “Soft Start Output”.
25
The controller has some other features which you may want to use. These are shown in the
“Miscellaneous Features” screen. You can cause your controller’s positive output to be limited to a certain
level by changing the setting in the box labeled “OutputLimit+”, and if you are using a motor drive, you
can limit the controller’s negative output by changing the setting in the box labeled “OutputLimit-“..
These are set as a percentage of full output in either direction. If the controller is used in a splicing
application, you can cause the controller to instantaneously multiply or divide its output by entering a
value in the box labeled “Ratio Multiplier”. To cause the ratio output to persist for a period of time after
the trigger switch is opened, enter a delay time in the box labeled “Ratio Delay”. Normally when power is
applied to your controller, you will want it to come up with Tension Off and in Manual mode. If you want
it to come up with Tension On and/or Auto mode, these settings can be changed by pressing the
appropriate buttons in the box labeled “Power On Modes”. If you want an external switch to turn tension
On and Off instead of the Laptop or PC, you can change the setting of the box labeled “Tension Switch
Source” to External. If you are using the TensionManager™’s host interface in RS485 mode, you can
change the device address in the box labeled “Network ID”. The range of acceptable addresses is 0
through 9 and A through Z.
4. Tuning, using a PC/Laptop (unwinds)
The stable operation of the controller is dependent on proper tuning of the PID. This tuning is
accomplished by the adjustment of three parameters, GAIN, STABILITY, and RESPONSE.
Unfortunately the tuning adjustments cannot be set at the factory as applications vary. The factory
settings are approximate and will probably not be correct for your application.
•
Gain - The GAIN adjustment controls the overall sensitivity of the controller and regulates the amount
of response to any change of running tension. If GAIN is set too low the controller may operate at a
lower tension than that set by the auto set point. Setting the GAIN too high will cause the controller to
over react and thus be unstable.
•
Stab - The STABILITY adjustment sets the damping or “ramp” of the PID output. If set too high the
controller will react too quickly to changes in tension and cause jerking or oscillation. Setting the
STABILITY too low will cause the controller reaction to be sluggish and tension may vary as the PID
“hunts” for the correct setting.
•
Resp - The RESPONSE adjustment sets the sensitivity of the controller to tension changes. Setting
the RESPONSE too low may cause the controller to ignore smaller/slower tension changes, setting it
too high may cause the controller to be unstable as it attempts to quickly compensate for small changes
in running tension.
•
Tension Trim - The TENSION TRIM adjustment governs the amount of influence the tension signal
has on the controller output. For a standard closed loop control the TENSION TRIM should be set to
100%. If configured as a speed follow tension trim, or diameter compensated speed follow with
tension trim application the TENSION TRIM should be set as low as possible to maintain operating
tension, usually about 10% (never more than 20%).
If you have set the controller’s control format to Line Speed Follow with Diameter Compensation
and Tension Trim, you can vary the amount that tension trims the output signal in the box labeled
Tension Trim. 10% is usually a good starting point for this setting.
3.2.1.2 SETUP FOR INTERMEDIATES (and SURFACE UNWINDS or REWINDS)
This section will describe functions you may need to set your controller up for an intermediate application, or
for unwind or rewind surface winder applications. You will at least need to verify the selections in the
functions described in the Setup section, then calibrate your controller as described in the Calibration section.
The Features section describes features which you may want to use, but which are not required for operation.
Once this is complete you will need to tune your controller as described in the Tuning section.
1. Setup, using a PC/Laptop (intermediates)
First, go to the Configuration 1 screen and in the box labeled “Tension Zone” press the button for
Intermediate. In the box labeled “Actuator Device” press the Motor Drive button. The controller will
operate in a mode which develops its output based on tension and line speed. To set the mode, go to the
box labeled “Control Format” and press the button for Line Speed Follow Tension Trim. In the box
26
labeled “Control Action”, if your transducers are mounted before the drive nip in the web path, you want
the controller’s output to increase when tension decreases, press the Standard button. Otherwise if your
transducers are mounted after the drive nip in the web path, you want the controller’s output to decrease
when tension decreases, so press the Reverse button. In the box labeled “Output Level”, since you want
your output to go negative OR positive, choose -V to +V (Bipolar).
Go to Configuration Screen 2. Most of these choices do not apply for an intermediate or surface driven
winder. But in the box labeled “Tension off by Switch select”, you can select under what conditions you
would like to have tension turn Off (besides the normal Tension Off command in the operator interface).
You can check the appropriate boxes to add TLS Lo, TLS Hi, and ESTOP.
2. Calibration, using a PC/Laptop (intermediates)
Go to the Calibration screen. You will first need to go to the “Tension Source” box to select where the
controller gets its tension information from. Normally this would be from Transducer A, but if you have
the Dual Transducer option you will need to complete the calibration procedure below for each pair of
transducers by selecting Transducer B the second time. If you are accepting a 0-10V tension signal from
an external source, you should select External, in which case no transducer calibration sequence will be
required.
In the box labeled “Set Range”, set your full scale tension value, such as 100 or 500 (units will be entered
in the Run screen). If you are calibrating one or two sets of transducers, you will need to enter the weight
you will be using to calibrate them in the box labeled “Set Calibration Weight”. (If you are using an
External 0-10V tension source, your calibration is complete).
You are now ready to calibrate your transducers. For the first (or only) set, make sure Transducer A is
selected in the “tension Source” box. Then press the button labeled “Yes” in the box “Calibrate
Transducer Now?”, and follow the directions on the screen.
If you have the Dual Transducer option, repeat the procedure, selecting Transducer B this time.
In the box marked “Line Speed”, set the maximum line speed in the Max Line Speed box.
When complete, you will probably want to change your tension source back to Transducer A.
3. Features, using a PC/Laptop (intermediates)
You can have tensions above or below specified levels cause an alarm contact to close by using the TLS
(tension limit switch) feature. If you want to use this feature, go to the TLS screen. You can set up TLS
Low and Hi modes independently by going to the appropriate “TLS LO Mode” or “TLS HI Mode box”
and adjusting the settings. You can choose to have the alarm remain on after the tension condition has
gone away by selecting Latched mode, or have the alarm reset itself after the tension condition goes away
by selecting Momentary mode. You can also set independent Low and High trip points by entering the
trip tension values in the “Set TLS LO Point” and “Set TLS HI Point” boxes. You can specify a time delay
to prevent false alarm triggering by entering a time delay value in the box labeled “TLS Delay”.
The controller has some other features which you may want to use. These are shown in the
“Miscellaneous Features” screen. You can cause your controller’s positive output to be limited to a certain
level by changing the setting in the box labeled “OutputLimit+”, and if you are using a motor drive, you
can limit the controller’s negative output by changing the setting in the box labeled “OutputLimit-“..
These are set as a percentage of full output in either direction. Normally when power is applied to your
controller, you will want it to come up with Tension Off and in Manual mode. If you want it to come up
with Tension On and/or Auto mode, these settings can be changed by pressing the appropriate buttons in
the box labeled “Power On Modes”. If you want an external switch to turn tension On and Off instead of
the Laptop or PC, you can change the setting of the box labeled “Tension Switch Source” to External. If
you are using the TensionManager™’s host interface in RS485 mode, you can change the device address
in the box labeled “Network ID”. The range of acceptable addresses is 0 through 9 and A through Z.
4. Tuning, using a PC/Laptop (intermediates)
The stable operation of the controller is dependent on proper tuning of the PID. This tuning is
accomplished by the adjustment of three parameters, GAIN, STABILITY, and RESPONSE.
Unfortunately the tuning adjustments cannot be set at the factory as applications vary. The factory
settings are approximate and will probably not be correct for your application.
27
•
Gain - The GAIN adjustment controls the overall sensitivity of the controller and regulates the amount
of response to any change of running tension. If GAIN is set too low the controller may operate at a
lower tension than that set by the auto set point. Setting the GAIN too high will cause the controller to
over react and thus be unstable.
•
Stab - The STABILITY adjustment sets the damping or “ramp” of the PID output. If set too high the
controller will react too quickly to changes in tension and cause jerking or oscillation. Setting the
STABILITY too low will cause the controller reaction to be sluggish and tension may vary as the PID
“hunts” for the correct setting.
•
Resp - The RESPONSE adjustment sets the sensitivity of the controller to tension changes. Setting
the RESPONSE too low may cause the controller to ignore smaller/slower tension changes, setting it
too high may cause the controller to be unstable as it attempts to quickly compensate for small changes
in running tension.
•
Tension Trim - The TENSION TRIM adjustment governs the amount of influence the tension signal
has on the controller output. For a standard closed loop control the TENSION TRIM should be set to
100%. If configured as a speed follow tension trim, or diameter compensated speed follow with
tension trim application the TENSION TRIM should be set as low as possible to maintain operating
tension, usually about 10% (never more than 20%).
If you have set the controller’s control format to Line Speed Follow Tension Trim, you can vary the
amount that tension trims the output signal in the box labeled Tension Trim. 10% is usually a good
starting point for this setting.
3.2.1.3 SETUP FOR REWINDS
This section will describe functions you may need to set your controller up for a standard rewind application.
(If you have a surface winder, setup is the same as for an intermediate application. Refer to section 3.2.1.2 for
this). You will at least need to verify the selections in the functions described in the Setup section, then
calibrate your controller as described in the Calibration section. The Features section describes features
which you may want to use, but which are not required for operation. Once this is complete you will need to
tune your controller as described in the Tuning section.
1. Setup, using a PC/Laptop (rewinds)
First, go to the Configuration 1 screen and in the box labeled “Tension Zone” press the button for
Rewind. In the box labeled “Actuator Device” press the button to select the type of Actuator device you
are using on your machine. The controller can operate in a mode which develops its output based on
tension and set point only, or if roll diameter and line speed information is available, it can use roll
diameter and line speed to result in more responsive control. To set the mode, go to the box labeled
“Control Format” and press the button for Standard Closed Loop if no diameter signal is used, or the
button for Line Speed Follow, TT & Dia Comp if you want to use a roll diameter signal. If you want the
controller’s output to increase when tension decreases (as when using a clutch), press the button for
Standard mode in the box labeled “Control Action”. If you want the controller’s output to decrease when
tension decreases (as when using a motor driven rewind), press the Reverse button instead. If you are
using an actuator device such as a clutch, which requires an output which goes from 0 to some positive
value, choose 0 to +V (Unipolar) in the box labeled “Output Level”. If you are using an actuator device
such as a motor with drive, which requires and output that can go negative OR positive, choose -V to +V
(Bipolar) instead.
Go to Configuration Screen 2. If in Configuration Screen 1 you have chosen Line Speed Follow, TT &
Dia Comp, OR if you intend to use taper tension, you will need to tell the controller information about roll
diameter. In the box labeled “Diameter Source”, choose either Direct Diameter (if you are using a direct
roll sensing device (such as a rider roll or ultrasonic sensor), or Tach Ratio Calculated if diameter will
be calculated from a ratio of tachometer signals. In the box labeled “Diameter Limits” set the minimum
roll diameter in the Core Size box, and the maximum roll diameter in the Full Roll Size box.. If you are
using the tach ratio method for obtaining roll diameter, in the box marked “Diameter Update”, you will
need to set the value in the Diameter Update Time box (a good initial update time is 1 second) and the
threshold line speed for the diameter calculator to begin working in the Threshold Line Speed box (a
good initial threshold value is 10% of the maximum). In the box labeled “Tension off by Switch select”,
28
you can select what conditions will cause tension to turn Off (besides the normal Tension Off command in
the operator interface). You can check the appropriate boxes to add TLS Lo, TLS Hi, and ESTOP.
2. Calibration, using a PC/Laptop (rewinds)
Go to the Calibration screen. You will first need to go to the “Tension Source” box to select where the
controller gets its tension information from. Normally this would be from Transducer A, but if you have
the Dual Transducer option you will need to complete the calibration procedure below for each pair of
transducers by selecting Transducer B the second time. If you are accepting a 0-10V tension signal from
an external source, you should select External, in which case no transducer calibration sequence will be
required.
In the box labeled “Set Range”, set your full scale tension value, such as 100 or 500 (units will be entered
in the Run screen). If you are calibrating one or two sets of transducers, you will need to enter the weight
you will be using to calibrate them in the box labeled “Set Calibration Weight”. (If you are using an
External 0-10V tension source, your calibration is complete).
You are now ready to calibrate your transducers. For the first (or only) set, make sure Transducer A is
selected in the “tension Source” box. Then press the button labeled “Calibrate Transducer Now?”, and
follow the directions on the screen.
If you have the Dual Transducer option, repeat the procedure, selecting Transducer B this time. In the
box marked “Line Speed”, set the maximum line speed in the Max Line Speed box.
When complete, you will probably want to change your tension source back to Transducer A.
3. Features, using a PC/Laptop (rewinds)
You can have tensions above or below specified levels cause an alarm contact to close by using the TLS
(tension limit switch) feature. If you want to use this feature, go to the TLS screen. You can set up TLS
Low and Hi modes independently by going to the appropriate “TLS LO Mode” or “TLS HI Mode box”
and adjusting the settings. You can choose to have the alarm remain on after the tension condition has
gone away by selecting Latched mode, or have the alarm reset itself after the tension condition goes away
by selecting Momentary mode. You can also set independent Low and High trip points by entering the
trip tension values in the “Set TLS LO Point” and “Set TLS HI Point” boxes. You can specify a time delay
to prevent false alarm triggering by entering a time delay value in the box labeled “TLS Delay”.
When using a brake or clutch, you may want to use the Soft Start feature to prevent output from increasing
when your machine is stopped. To do this go to the Soft Start screen. In the box labeled “Soft Start
Select”, you can choose how you want to activate soft start. You may use one or more of the methods
shown. If you have chosen line speed activation, you will need to enter the line speed which will activate
soft start in the box labeled “Soft Start Line Speed Trip Point”. If you have chosen tension activation, you
will need to enter the tension level to activate soft start in the box labeled “Soft Start Tension Trip Point”.
For either of these two methods, you will need to enter the time delay before entering soft start in the box
labeled “Soft Start Delay”, and you will need to specify the output level you want your controller to
produce while in soft start mode, in the box labeled “Soft Start Output”.
The controller has some other features which you may want to use. These are shown in the
“Miscellaneous Features” screen. You can cause your controller’s positive output to be limited to a certain
level by changing the setting in the box labeled “OutputLimit+”, and if you are using a motor drive, you
can limit the controller’s negative output by changing the setting in the box labeled “OutputLimit-“..
These are set as a percentage of full output in either direction. If the controller is used in a splicing
application, you can cause the controller to instantaneously multiply or divide its output by entering a
value in the box labeled “Ratio Multiplier”. To cause the ratio output to persist for a period of time after
the trigger switch is opened, enter a delay time in the box labeled “Ratio Delay”. Normally when power is
applied to your controller, you will want it to come up with Tension Off and in Manual mode. If you want
it to come up with Tension On and/or Auto mode, these settings can be changed by pressing the
appropriate buttons in the box labeled “Power On Modes”. If you want an external switch to turn tension
On and Off instead of the Laptop or PC, you can change the setting of the box labeled “Tension Switch
Source” to External. If you are using the TensionManager™’s host interface in RS485 mode, you can
change the device address in the box labeled “Network ID”. The range of acceptable addresses is 0
through 9 and A through Z.
29
4. Tuning, using a PC/Laptop (rewinds)
The stable operation of the controller is dependent on proper tuning of the PID. This tuning is
accomplished by the adjustment of three parameters, GAIN, STABILITY, and RESPONSE.
Unfortunately the tuning adjustments cannot be set at the factory as applications vary. The factory
settings are approximate and will probably not be correct for your application.
•
Gain - The GAIN adjustment controls the overall sensitivity of the controller and regulates the amount
of response to any change of running tension. If GAIN is set too low the controller may operate at a
lower tension than that set by the auto set point. Setting the GAIN too high will cause the controller to
over react and thus be unstable.
•
Stab - The STABILITY adjustment sets the damping or “ramp” of the PID output. If set too high the
controller will react too quickly to changes in tension and cause jerking or oscillation. Setting the
STABILITY too low will cause the controller reaction to be sluggish and tension may vary as the PID
“hunts” for the correct setting.
•
Resp - The RESPONSE adjustment sets the sensitivity of the controller to tension changes. Setting
the RESPONSE too low may cause the controller to ignore smaller/slower tension changes, setting it
too high may cause the controller to be unstable as it attempts to quickly compensate for small changes
in running tension.
•
Tension Trim - The TENSION TRIM adjustment governs the amount of influence the tension signal
has on the controller output. For a standard closed loop control the TENSION TRIM should be set to
100%. If configured as a speed follow tension trim, or diameter compensated speed follow with
tension trim application the TENSION TRIM should be set as low as possible to maintain operating
tension, usually about 10% (never more than 20%).
If you have set the controller’s control format to Line Speed Follow with Diameter Compensation
and Tension Trim, you can vary the amount that tension trims the output signal in the box labeled
Tension Trim. 10% is usually a good starting point for this setting.
3.2.2
SETUP AND CALIBRATION OF THE CONTROL MODULE USING THE RCT
When using the RCT it will be useful to know how to navigate through the menu system and to gain access to
the functions required. Refer to Appendix B for a list of functions.
When the RCT is first powered up and during normal operation, the Default screen is displayed. The Default
screen contains the controller’s current operating modes, set point, and current tension value. Before the unit
is calibrated, the tension value will be zero.
Pressing the DO key puts the RCT into the Menu screen, where Menu groups are displayed. The Menu
screen organizes functions into three Menu groups, Operator, Setup, and Diagnostic. When you first enter the
Menu screen, the group “Operator Menus” will be displayed. To set up the controller you will need to press
the Down-Arrow key so that “Setup Menus” is displayed.
Pressing the DO key again puts you into the Function screen. In the Function screen you use the Up-Arrow
or Down-Arrow keys to select a particular function. Functions are numbered for ease of access.
Finally, pressing the DO key puts the RCT into the Action screen, where the value of the function you have
selected can actually be modified. This can be done in three ways, depending on the function:
• For a function with a numeric value, this value can be adjusted upward by using the Right-Arrow (+) key, or
downward using the Left-Arrow (-) key.
• For a function with a list of choices, you can use the Up-Arrow or Down-Arrow keys to find the choice you
want, then press the Right-Arrow key to activate the choice. An asterisk will appear to indicate that the
choice has taken effect.
• For a function with a sequence of steps (such as Transducer Calibration), the display will instruct you which
key(s) to press at the right time.
Pressing the EXIT key at any time discards any pending changes and returns you to the Default screen.
30
3.2.2.1 SETUP FOR UNWINDS
This section will describe functions you may need to set your controller up for a standard unwind application.
(If you have a surface winder, setup is the same as for an intermediate application. Refer to section 3.2.2.2 for
this). You will at least need to verify the selections in the functions described in the Setup section, then
calibrate your controller as described in the Calibration section. The Features section describes features
which you may want to use, but which are not required for operation. Once this is complete you will need to
tune your controller as described in the Tuning section.
1. Setup, using the RCT (unwinds)
The controller can operate in a mode which develops its output based on tension and set point only, or if
roll diameter information is available, it can use roll diameter to result in more responsive control. To set
the mode, go to function #21-Ctrl Format and choose mode A-Standard Closed Loop if no diameter
signal is used, or mode C-LSFolDiaCompTTrm if you want to use a roll diameter signal.
If you have chosen mode C in function #21, you will need to give the controller information about the
diameter information. Enter minimum and maximum roll diameters in function #22-Set Core Sz and #23Set Flrol Sz. In function #24-Dia Input, choose whether the diameter information will be provided by a
Direct roll sensing device (such as a rider roll or ultrasonic sensor), or whether the diameter is to be
computed based upon a ratio of tachometer signals, Tach ratio calc.
If you chose the tachometer ratio in function #24, you will need to set function #25-Dia Update time in
function #25. A good initial update time is 1 second. You will need to set function #26-Max Ln Speed.
You will also need to set the threshold line speed for the diameter calculator to begin working in function
#27-Ln Threshold. A good initial threshold value is 10% of the maximum.
If you want the controller’s output to increase when tension decreases (as when using a brake or clutch),
choose Standard mode in function #28-Ctrl Action. If you want the controller’s output to decrease when
tension decreases (as when using a motor driven unwind), choose Reverse mode in function #28.
If you are using a device such as a brake or clutch, whose output only goes from 0 to some positive value,
choose 0 to +V in function #29-Output Level. If you are using a device such as a motor with drive, which
requires and output that can go negative OR positive, choose -V to +V instead.
Finally, you need to choose Unwind Zone in function #61-Tension Zone.
2. Calibration, using the RCT (unwinds)
In function #30-Sel TensSrc you need to select where the controller gets its tension information from.
Normally this would be from Xdcr A, but if you have the Dual Transducer option you will need to
complete the calibration procedure below for each pair of transducers by selecting Xdcr B the second
time. If you are accepting a 0-10V tension signal from an external source, you should select External, in
which case no transducer calibration sequence will be required.
In function #31-Set Range, you will need to set your full scale tension value, such as 100 or 500 (units are
chosen in the Operator menus).
If you are calibrating one or two sets of transducers, you will need to enter the weight you will be using to
calibrate them in function #32-Set Cal Wt.
You are now ready to calibrate your transducers. For the first (or only) set, make sure Xdcr A is selected
in function #30-Sel TensSrc. Then go to function #33-Calbrt Xducer, press DO, and follow the
directions on the display.
If you have the Dual Transducer option, repeat the procedure, setting function #30-Sel TensSrc to Xdcr B
before you begin. When complete, you will probably want to change your tension source back to Xdcr A.
If you are using an external tension source, calibration is performed in that device, so no calibration is
required for the TensionManager™.
3. Features, using the RCT (unwinds)
When using a brake or clutch, you may want to use the Soft Start feature to prevent output from increasing
when your machine is stopped. If so, go to function #34-Soft Strt Sel and choose how you want to
activate soft start. You may use one or more of the methods shown. If you have chosen line speed
activation, you will need to enter the line speed which will activate soft start in function #35-SS SpdTrip
31
Pt, and if you have chosen tension activation, you will need to enter the tension level to activate soft start
in function #36-SS Trip Point. For either of these two methods, you will need to enter the time delay
before entering soft start in function #37-SS Delay. Then you will need to specify the output level you
want your controller to produce while in soft start mode, in function #38-SS Outpt Lvl.
You can have tensions above or below specified levels cause an alarm contact to close by using TLS
(tension limit switch). You can choose to have the alarm remain on after the tension condition has gone
away by selecting Latched mode, or have the alarm reset itself after the tension condition goes away by
selecting Momentary mode in functions #39-TLS Lo Mode or #40-TLS Hi Mode. The trip levels are set
in functions #41-TLS Lo Setpt and #42-TLS Hi Setpt. You can specify a time delay to prevent false
alarm triggering in function #43-TLS delay.
You can cause your controller’s positive output to be limited to a certain level by changing the setting of
function #44-OutputLimit+, and if you are using a motor drive, you can limit the controller’s negative
output by changing the setting of function #45-OutputLimit-. These are set as a percentage of full output
in either direction.
If the controller is used in a splicing application, to can cause the controller to instantaneously multiply or
divide its output by entering a value in function #46-Ratio Multipr. To cause the output to persist for a
period of time after the trigger switch is opened, specify that delay time in function #47-Ratio Delay.
Normally when power is applied to your controller, you will want it to come up with Tension Off and in
Manual mode. If you want it to come up with Tension On and/or Auto mode, these settings can be
changed in function #48-PwOn Tens Md, and #49-PwOn Cont Md.
If you want an external switch to turn tension On and Off instead of the RCT, you can change the setting
of function #50-TenSw Src to External. You can have the TLS Lo, TLS Hi alarms, or and E-Stop
condition turn tension Off by modifying the settings of function #51-TenOffBySw &:.
If the tension shown in the RCT display is changing too rapidly or too slowly, you can adjust the setting of
function #52-Disp Update.
Normally, if you are in a function, the RCT will remain there indefinitely, waiting for you to make
changes and then hit the DO or EXIT key. But if you want the RCT to automatically return to the Default
screen after a period of time, you may specify this time period in function #53-Func Timeout.
If you are using the TensionManager™’s host interface in RS485 mode, you can change the device
address in function #54-Unit ID. The range of acceptable addresses is 0 through 9 and A through Z.
4. Tuning, using the RCT (unwinds)
The stable operation of the controller is dependent on proper tuning of the PID. This tuning is
accomplished by the adjustment of three parameters, GAIN, STABILITY, and RESPONSE.
Unfortunately the tuning adjustments cannot be set at the factory as applications vary. The factory
settings are approximate and will probably not be correct for your application.
•
55-Adj Gain - The GAIN adjustment controls the overall sensitivity of the controller and regulates the
amount of response to any change of running tension. If GAIN is set too low the controller may
operate at a lower tension than that set by the auto set point. Setting the GAIN too high will cause the
controller to over react and thus be unstable.
•
56 Adj Stab - The STABILITY adjustment sets the damping or “ramp” of the PID output. If set too
low the controller will react too quickly to changes in tension and cause jerking or oscillation. Setting
the STABILITY too high will cause the controller reaction to be sluggish and tension may vary as the
PID “hunts” for the correct setting.
•
57 Adj Resp - The RESPONSE adjustment sets the sensitivity of the controller to tension changes.
Setting the RESPONSE too low may cause the controller to ignore smaller/slower tension changes,
setting it too high may cause the controller to be unstable as it attempts to quickly compensate for
small changes in running tension.
If you have set the controller’s control format to C LSFolDiaCompTTrim in function #21-Ctrl Format,
you can vary the amount that tension trims the output signal in function #58-Tension Trim.
32
3.2.2.2 SETUP FOR INTERMEDIATES (and surface driven Unwinds and Rewinds)
This section will describe functions you may need to set your controller up for an intermediate application, or
for unwind or rewind surface winder applications. You will at least need to verify the selections in the
functions described in the Setup section, then calibrate your controller as described in the Calibration section.
The Features section describes features which you may want to use, but which are not required for operation.
Once this is complete you will need to tune your controller as described in the Tuning section.
1. Setup, using the RCT (intermediates)
The control mode used for these application is set in function #21-Ctrl Format. Choose mode BLSFolTrm, which is Line Speed Follower with Tension trim. You will need to set function #26-Max Ln
Speed.
If you want the controller’s output to increase when tension decreases (as when your transducers are
installed before the drive nip in the web path), choose Standard mode in function #28-Ctrl Action. If you
want the controller’s output to decrease when tension decreases (as when your transducers are installed
after the drive nip in the web path), choose Reverse mode in #28-Ctrl Action..
Since you are using a motor with drive, which requires and output that can go negative OR positive, you
will need to set #29-Output Level to -V to +V.
Finally, you need to choose Intermediate in function #61-Tension Zone.
2. Calibration, using the RCT (intermediates)
In function #30-Sel TensSrc you need to select where the controller gets its tension information from.
Normally this would be from Xdcr A, but if you have the Dual Transducer option you will need to
complete the calibration procedure below for each pair of transducers by selecting Xdcr B the second
time. If you are accepting a 0-10V tension signal from an external source, you should select External, in
which case no transducer calibration sequence will be required.
In function #31-Set Range, you will need to set your full scale tension value, such as 100 or 500 (units are
chosen in the Operator menus).
If you are calibrating one or two sets of transducers, you will need to enter the weight you will be using to
calibrate them in function #32-Set Cal Wt.
You are now ready to calibrate your transducers. For the first (or only) set, make sure Xdcr A is selected
in function #30-Sel TensSrc. Then go to function #33-Calbrt Xducer, press DO, and follow the
directions on the display.
If you have the Dual Transducer option, repeat the procedure, setting function #30-Sel TensSrc to Xdcr B
before you begin. When complete, you will probably want to change your tension source back to Xdcr
A.If you are using an external tension source, calibration is performed in that device, so no calibration is
required for the TensionManager™.
3. Features, using the RCT (intermediates)
For intermediate-type applications, none of the Soft Start functions are used.
You can have tensions above or below specified levels cause an alarm contact to close by using TLS
(tension limit switch). You can choose to have the alarm remain on after the tension condition has gone
away by selecting Latched mode, or have the alarm reset itself after the tension condition goes away by
selecting Momentary mode in functions #39-TLS Lo Mode or #40-TLS Hi Mode. The trip levels are set
in functions #41-TLS Lo Setpt and #42-TLS Hi Setpt. You can specify a time delay to prevent false
alarm triggering in function #43-TLS delay.
You can cause your controller’s positive output to be limited to a certain level by changing the setting of
function #44-OutputLimit+, and if you are using a motor drive, you can limit the controller’s negative
output by changing the setting of function #45-OutputLimit-. These are set as a percentage of full output
in either direction.
Ratio functions are not normally used for intermediate-type applications.
Normally when power is applied to your controller, you will want it to come up with Tension Off and in
Manual mode. If you want it to come up with Tension On and/or Auto mode, these settings can be
33
changed in function #48-PwOn Tens Md, and #49-PwOn Cont Md.
If you want an external switch to turn tension On and Off instead of the RCT, you can change the setting
of function #50-TenSw Src to External. You can have the TLS Lo, TLS Hi alarms, or and E-Stop
condition turn tension Off by modifying the settings of function #51-TenOffBySw &:.
If the tension shown in the RCT display is changing too rapidly or too slowly, you can adjust the setting of
function #52-Disp Update.
Normally, if you are in a function, the RCT will remain there indefinitely, waiting for you to make
changes and then hit the DO or EXIT key. But if you want the RCT to automatically return to the Default
screen after a period of time, you may specify this time period in function #53-Func Timeout.
If you are using the TensionManager™’s host interface in RS485 mode, you can change the device
address in function #54-Unit ID. The range of acceptable addresses is 0 through 9 and A through Z.
4. Tuning, using the RCT (intermediates)
The stable operation of the controller is dependent on proper tuning of the PID. This tuning is
accomplished by the adjustment of three parameters, GAIN, STABILITY, and RESPONSE.
Unfortunately the tuning adjustments cannot be set at the factory as applications vary. The factory
settings are approximate and will probably not be correct for your application.
•
55-Adj Gain - The GAIN adjustment controls the overall sensitivity of the controller and regulates the
amount of response to any change of running tension. If GAIN is set too low the controller may
operate at a lower tension than that set by the auto set point. Setting the GAIN too high will cause the
controller to over react and thus be unstable.
•
56 Adj Stab - The STABILITY adjustment sets the damping or “ramp” of the PID output. If set too
low the controller will react too quickly to changes in tension and cause jerking or oscillation. Setting
the STABILITY too high will cause the controller reaction to be sluggish and tension may vary as the
PID “hunts” for the correct setting.
•
57 Adj Resp - The RESPONSE adjustment sets the sensitivity of the controller to tension changes.
Setting the RESPONSE too low may cause the controller to ignore smaller/slower tension changes,
setting it too high may cause the controller to be unstable as it attempts to quickly compensate for
small changes in running tension.
Since you have set the controller’s control format to B LSFolTTrim in function #21-Ctrl Format,
you can vary the amount that tension trims the output signal in function #58-Tension Trim. 10% is
usually a good starting point for this setting.
3.2.2.3 SETUP FOR REWINDS
This section will describe functions you may need to set your controller up for a standard rewind application.
(If you have a surface winder, setup is the same as for an intermediate application. Refer to section 3.2.1.2 for
this). You will at least need to verify the selections in the functions described in the Setup section, then
calibrate your controller as described in the Calibration section. The Features section describes features
which you may want to use, but which are not required for operation. Once this is complete you will need to
tune your controller as described in the Tuning section.
1. Setup, using the RCT (rewinds)
The controller can operate in a mode which develops its output based on tension and set point only, or if
roll diameter information is available, it can use roll diameter to result in more responsive control. To set
the mode, go to function #21-Ctrl Format and choose mode A-Standard Closed Loop if no diameter
signal is used, or mode C-LSFolDiaCompTTrm if you want to use a roll diameter signal.
If you have chosen mode C in function #21, or if you want to use Taper, you will need to give the
controller information about the diameter information. Enter minimum and maximum roll diameters in
function #22-Set Core Sz and #23-Set Flrol Sz. In function #24-Dia Input, choose whether the diameter
information will be provided by a Direct roll sensing device (such as a rider roll or ultrasonic sensor), or
whether the diameter is to be computed based upon a ratio of tachometer signals, Tach ratio calc.
If you chose the tachometer ratio in function #24, you will need to set function #25-Dia Update time in
function #25. A good initial update time is 1 second. You will need to set function #26-Max Ln Speed.
34
You will also need to set the threshold line speed for the diameter calculator to begin working in function
#27-Ln Threshold. A good initial threshold value is 10% of the maximum.
You will want the controller’s output to increase when tension decreases, so choose Standard mode in
function #28-Ctrl Action..
If you are using a device such as a clutch, whose output only goes from 0 to some positive value, choose 0
to +V in function #29-Output Level. If you are using a device such as a motor with drive, which requires
and output that can go negative OR positive, choose -V to +V instead.
Finally, you need to choose Rewind in function #61-Tension Zone.
2. Calibration, using the RCT (rewinds)
In function #30-Sel TensSrc you need to select where the controller gets its tension information from.
Normally this would be from Xdcr A, but if you have the Dual Transducer option you will need to
complete the calibration procedure below for each pair of transducers by selecting Xdcr B the second
time. If you are accepting a 0-10V tension signal from an external source, you should select External, in
which case no transducer calibration sequence will be required.
In function #31-Set Range, you will need to set your full scale tension value, such as 100 or 500 (units are
chosen in the Operator menus).
If you are calibrating one or two sets of transducers, you will need to enter the weight you will be using to
calibrate them in function #32-Set Cal Wt.
You are now ready to calibrate your transducers. For the first (or only) set, make sure Xdcr A is selected
in function #30-Sel TensSrc. Then go to function #33-Calbrt Xducer, press DO, and follow the
directions on the display.
If you have the Dual Transducer option, repeat the procedure, setting function #30-Sel TensSrc to Xdcr B
before you begin. When complete, you will probably want to change your tension source back to Xdcr A.
If you are using an external tension source, calibration is performed in that device, so no calibration is
required for the TensionManager™.
3. Features, using the RCT (rewinds)
When using a clutch, you may want to use the Soft Start feature to prevent output from increasing when
your machine is stopped. If so, go to function #34-Soft Strt Sel and choose how you want to activate soft
start. You may use one or more of the methods shown. If you have chosen line speed activation, you will
need to enter the line speed which will activate soft start in function #35-SS SpdTrip Pt, and if you have
chosen tension activation, you will need to enter the tension level to activate soft start in function #36-SS
Trip Point. For either of these two methods, you will need to enter the time delay before entering soft
start in function #37-SS Delay. Then you will need to specify the output level you want your controller to
produce while in soft start mode, in function #38-SS Outpt Lvl.
You can have tensions above or below specified levels cause an alarm contact to close by using TLS
(tension limit switch). You can choose to have the alarm remain on after the tension condition has gone
away by selecting Latched mode, or have the alarm reset itself after the tension condition goes away by
selecting Momentary mode in functions #39-TLS Lo Mode or #40-TLS Hi Mode. The trip levels are set
in functions #41-TLS Lo Setpt and #42-TLS Hi Setpt. You can specify a time delay to prevent false
alarm triggering in function #43-TLS delay.
You can cause your controller’s positive output to be limited to a certain level by changing the setting of
function #44-OutputLimit+, and if you are using a motor drive, you can limit the controller’s negative
output by changing the setting of function #45-OutputLimit-. These are set as a percentage of full output
in either direction.
If the controller is used in a splicing application, you can cause the controller to instantaneously multiply
or divide its output by entering a value in function #46-Ratio Multipr. To cause the output to persist for a
period of time after the trigger switch is opened, specify that delay time in function #47-Ratio Delay.
When power is applied to your controller, you will want it to come up with Tension Off and in Manual
mode. If you want it to come up with Tension On and/or Auto mode, these settings can be changed in
function #48-PwOn Tens Md, and #49-PwOn Cont Md.
35
If you want an external switch to turn tension On and Off instead of the RCT, you can change the setting
of function #50-TenSw Src to External. You can have the TLS Lo, TLS Hi alarms, or and E-Stop
condition turn tension Off by modifying the settings of function #51-TenOffBySw &:.
If the tension shown in the RCT display is changing too rapidly or too slowly, you can adjust the setting of
function #52-Disp Update.
Normally, if you are in a function, the RCT will remain there indefinitely, waiting for you to make
changes and then hit the DO or EXIT key. But if you want the RCT to automatically return to the Default
screen after a period of time, you may specify this time period in function #53-Func Timeout.
If you are using the TensionManager™’s host interface in RS485 mode, you can change the device
address in function #54-Unit ID. The range of acceptable addresses is 0 through 9 and A through Z.
4. Tuning, using the RCT (rewinds)
The stable operation of the controller is dependent on proper tuning of the PID. This tuning is
accomplished by the adjustment of three parameters, GAIN, STABILITY, and RESPONSE.
Unfortunately the tuning adjustments cannot be set at the factory as applications vary. The factory
settings are approximate and will probably not be correct for your application.
•
55-Adj Gain - The GAIN adjustment controls the overall sensitivity of the controller and regulates the
amount of response to any change of running tension. If GAIN is set too low the controller may
operate at a lower tension than that set by the auto set point. Setting the GAIN too high will cause the
controller to over react and thus be unstable.
•
56 Adj Stab - The STABILITY adjustment sets the damping or “ramp” of the PID output. If set too
low the controller will react too quickly to changes in tension and cause jerking or oscillation. Setting
the STABILITY too high will cause the controller reaction to be sluggish and tension may vary as the
PID “hunts” for the correct setting.
•
57 Adj Resp - The RESPONSE adjustment sets the sensitivity of the controller to tension changes.
Setting the RESPONSE too low may cause the controller to ignore smaller/slower tension changes,
setting it too high may cause the controller to be unstable as it attempts to quickly compensate for
small changes in running tension.
If you have set the controller’s control format to C LSFolDiaCompTTrim in function #21-Ctrl
Format, you can vary the amount that tension trims the output signal in function #58-Tension Trim.
10% is usually a good starting point for this setting.
3.3 CALIBRATION OF THE SPEED MODULE (IF USED)
3.3.1.
CALIBRATION OF THE D.C. LINE TACHOMETER.
Run the machine at the maximum expected operating speed. Measure the tachometers voltage at TB501 pins
1 & 2. If needed you can run the machine at half speed an then double the measured voltage at TB501. Once
the Max Input Amplitude is known, set-up SW502 for the proper voltage range. Again run the machine at full
or half operating speed, and now read the voltage at Test point TP505 (+) referenced to TP502 (-) and adjust
the “DC Line Span” potentiometer (RT505) for 10.00 volts DC, or only 5.00 volts DC if you are running at
half speed.
3.3.2.
CALIBRATION OF THE D.C. ROLL TACHOMETER
Run the press at full line speed (or half speed) and read the voltage at test point TP506 (+) referenced to
TP502 (-) and adjust the “DC Roll Span” potentiometer (RT506) for 10.00 volts DC, or 5.00 volts DC at half
speed.
3.3.3
CALIBRATION OF THE PULSE LINE TACHOMETER
Once you have set-up switch SW501 with the proper settings for amplitude and frequency, run the press at
full speed (or half) and read the voltage at test point TP505 (+) referenced to TP502 and adjust the “Pulse
Line Span” potentiometer (RT501) for 10.00 volts DC, or only 5.00 volts DC if you are running at half speed.
36
3.3.4
CALIBRATION OF THE PULSE ROLL TACHOMETER
Once you have set up switch 501 with the proper settings for amplitude and frequency, run the machine at full
speed (or Half) and measure the voltage at test point TP506 (+) referenced to test point TP502 (-) and adjust
the “Pulse Line Speed” potentiometer (RT501) for 10.00 volts DC or only 5.00 volts DC at half speed.
3.3.5.
CALIBRATION OF THE RIDER ROLL POTENTIOMETER
Connect a voltage meter to test point TP504 (+) and TP502 (-). Adjust the Rider Roll pot to a position which
represents the core diameter or minimum roll diameter desired and then adjust the Rider Offset pot (RT503)
on the Speed Module for zero volts at TP504. Adjust the Rider Roll pot to a position which represents full
roll diameter or the maximum roll diameter desired, then adjust Rider Span pot (RT504) for 10.0 volts at
TP504. The Offset and Span pot’s on the Speed Module can be adjusted to offset about 9.0 volts of the 10.0
volt range obtainable from the Rider Roll Pot.
37
SECTION 4
OPERATING INSTRUCTIONS
4.1 OVERVIEW
Although the TensionManager™ can have one of five different control interfaces, basic operation of the unit
remains the same, and most indicators and adjustments are common to all interfaces. Refer to the following
section appropriate to the user interface your machine has.
4.1.1
OPERATION USING THE PC/LAPTOP INTERFACE (PCLink)
4.1.1.1 BASIC OPERATION
When your controller is properly set up, it should maintain constant tension while the machine is running as
speeds, roll diameters, or other conditions change. However during startup of a new roll you may want to
change modes, set point or other settings. These can be done using the Run screen on the PCLink PC/Laptop
program.
When this type of operator interface is used, the Run screen is shown on the PC monitor or Laptop display. It
shows the machine’s current tension, line speed, and roll diameter (when the machine is used on an unwind or
rewind) and the controller’s present output. It also shows the controller settings for Manual set point, Auto set
point, and Taper percent. Buttons are also provided to turn tension On or Off, change mode from Manual to
Auto, and enable or disable Taper.
A separate Status area at the bottom of the screen shows whether controller Tension is Off or On, controller
mode is Manual or Auto, and whether any of the following special modes are active: E-Stop, Soft Start, Ratio,
TLS Lo, or TLS Hi. One more status indicator shows whether communications between the PC/Laptop and
the CM is active.
Here are the parameters you may need to change during normal operation:
• Changing between Tension On and Tension Off - This setting determines whether the controller will
produce any output. When tension is Off, the controller’s output will be zero regardless of the controller’s
Manual or Auto mode setting. When tension is On, the controller’s output is determined either by the
Manual Setpoint, or by the Auto Setpoint combined with controller tuning and the machine’s operating
state.To toggle Tension On Off, press Tension On/Off button using your mouse. You will notice that the
mode displayed in the Status area changes.
• Changing between Auto and Manual modes - When the controller is in Manual mode and Tension is
On, the controller’s output is determined only by the setting of the Manual Setpoint. When in Auto mode,
the controller’s output is determined by the setting of the Auto Setpoint, the machine’s measured tension
and other factors, and the setting of controller tuning parameters. An indicator in the Status area shows
whether the controller is in Manual or Auto mode. To toggle between Manual and Auto modes, press the
Man/Auto button on the Run screen. You will notice that the Man/Auto mode displayed in the Status area
changes.
• Modifying the Manual set point - The Manual set point represents the percentage of output you want the
controller to generate while in Manual mode. It may be useful to use Manual mode when you are using a
new material, when you have a roll of material in poor condition, or when starting up a new roll. In these
cases you can cause your brake, clutch or drive to produce tension, and when you find the right tension
setting for the material you want to run, you can use that as your Auto set point and go to Auto mode. To
modify the Manual set point, you can enter the value directly by placing the cursor in the box containing
the Manual set point value followed by the “Tab” button (do not use Enter) on your keyboard. If you want
to adjust the Manual set point slightly upward or downward, you can click on the up or down buttons to
the right of the displayed value. You can also hold the mouse button down while the cursor is on either
button. This will cause the set point to advance upward or downward. When done, the number shown in
the box represents the percentage of full output you want the controller to produce when the controller is
in Manual mode.
38
• Modifying the Auto set point - The Auto set point represents the tension you want the controller to
maintain in your machine automatically. When you know the correct setting for the material you want to
run, the Auto set point should be adjusted to that value so that the controller can maintain it. In some cases
(for example when the machine is stopped), the controller may not be able to hold the set point exactly,
but once the machine starts running again, will take over and hold it. To adjust the Auto set point, you can
enter the value directly by placing the cursor in the box containing the Auto set point value followed by
the “Tab” button (do not use Enter) on your keyboard. If you want to adjust the Auto set point slightly
upward or downward, you can click on the up or down buttons to the right of the displayed value. You can
also hold the mouse button down while the cursor is on either button. This will cause the set point to
advance upward or downward. When done, the number shown in the box represents the Tension you want
the controller to maintain when the controller is in Auto mode.
• Modifying Roll Diameter - If your controller is used on an Unwind or Rewind, a diameter calculator may
be used to sense roll diameter. When a roll is changed, better control will result when you restart the
machine if you enter the new roll diameter in the box provided.
• Changing units for Tension readout - You can choose to display web tension in units other than those
with which you have calibrated the controller. To do this, there is a list box labeled “Units” which allows
you to select the units of measure that you prefer. If you choose to display tension in units such as PLI
(pounds per lineal inch) or N/cm (Newtons per centimeter of web width), it is necessary to enter the
present web width into a separate box labeled “Web Width” in order to obtain an accurate tension reading.
Be sure to change this whenever you change the width of your material.
If E-Stop, Soft Start, or Ratio appear active in the Status area at the bottom of the screen, these are special
modes which override standard closed loop control during Auto mode operation. These modes are caused
by conditions within the machine, and should disappear once conditions change. The Output produced
while these modes are active will appear in the Output window. However if the display persists you may
want to have a technician examine the machine to see if there is a problem.
If your controller has been set up for Latched TLS operation, TLS Lo or Hi alarm conditions may also
appear in the Status area. Depending on how your controller has been set up it may be necessary to reset
the TLS alarm before it is possible to turn Tension On again. To do this, press the TLS Reset button.
This will reset the alarm and make it possible to turn Tension On again. One more status indicator shows
whether communications between the PC/Laptop and the CM is active.
4.1.1.2 STORING AND RECALLING SETUPS USING PCLINK
It is important to understand a few things about how TensionManager™ operating parameters are stored in
internal memory, as well as how PCLink handles this information. When you initially connect to a
TensionManager™ using PCLink, the Operating setup, which consists of all the parameters the controller is
currently using, is sent to PCLink for display and modification. As changes are made in the PCLink screen,
these are sent to the controller for it to use as the Operating setup. However, these changes are not yet saved
in the TensionManager™’s permanent memory. If you make some changes and a power failure occurs, the
changes you have made since the last time you saved a setup will be lost. In order to save these changes, you
must store them as a stored setup. The TensionManager™ is able to store up to 10 setups, plus one special
one, called the Default setup. The Default setup is the one that the TensionManager™ loads as the Operating
setup when power is first turned on. One of the other ten setups can be recalled whenever the machine
operator wants. If you wish to save a setup for future recall, you can choose to store it as the Default setup, or
as one of the ten other stored setups.
To save a setup containing a set of operating parameters that work well for a particular job, you must go to
the Menu Bar at the top of the screen, labeled “User Screens”, then choose “Data Transfer”. The Data
Transfer screen will appear with a number of list boxes and control buttons. There is a list box in the area
labeled “Store Setup”, which you will use to choose where you want to save your setup. Once you have done
this, press the STORE button. This will store the setup containing all of the operating parameters shown, in
the appropriate memory area in the Control Module.
To recall a setup containing a set of operating parameters, again use the Data Transfer screen. The list box in
the area labeled “Recall Setup” allows you to choose any of the stored setups described above. After you
choose one, press the RECALL button, and that setup will be ready for use.
39
4.1.1.3 SAVING AND RECALLING SETUPS AS DISK FILES
If your application has a requirement for a large number of setups, you may want to store some of them as
files on your computer’s disk for later recall. To take one of the TensionManager™’s stored setups and
transfer it to a disk file, you will need to get into the Data Transfer screen to load the setup into PCLink from
the Control Module. The list box in the area labeled “Download Setup” allows you to choose which of the
setups you want. Once you have done this, press the DOWNLOAD button. This loads the setup information
into a reserved area. Then press the SAVE SETUP IN A FILE button. You will be asked to choose a file
name. Once you have done this, the setup will be stored on disk.
To take a setup stored as a disk file and transfer it to the Control Module, click on the Windows tool bar File>Open, and choose the file. When you press OK, the file information will be transferred to a reserved area.
Then in the Data Transfer screen, in the area labeled “Upload Setup”, choose the setup number you want to
save the file information as. Then press the UPLOAD NOW button. The setup will then be stored in the CM’s
memory. (Note: If you choose the Default Setup, the setup information will automatically be transferred to
the CM’s Operating Setup for use)
4.1.1.4 PRINTING A SETUP USING PCLINK
It may be useful to print out the contents of one of the stored setups on your PC’s printer. To do this, you will
need to get into the Data Transfer screen again to load the setup into PCLink from the Control Module. The
list box in the area labeled “Download Setup” allows you to choose which of the setups you want. Once you
have done this, press the DOWNLOAD button. This loads the setup information into a reserved area. Then
press the PRINT button. Proceed as you would if you wanted to print a document.
4.1.2
OPERATION USING THE USER INTERFACE (OR USING CUSTOMER SUPPLIED
COMPONENTS)
Default Mode of operation is using PCLink Laptop/PC Software or an RCT. If you want to use a User
Interface, you need to specifically chose this option from PCLink Configuration screen 2 or from RCT in
setup menu —> control source function.
You can use “Tension Off” and “TLS Reset” buttons on the User Interface all the time for Emergency
irrespective of which control source you are using.
When your controller is properly set up, it should maintain constant tension while the machine is running
while speeds, roll diameters, or other conditions change. However during startup of a new roll you may want
to change modes, set point or other settings. These can be done with the following adjustments and controls
which are present on the User Interface (see Fig. 5). Some or all of them may also be present if Customer
Supplied Components have been installed.
Tension On/Tension Off mode switch and indicator - This setting determines whether the controller will
produce any output. When tension is Off, the controller’s output will be zero regardless of the controller’s
Manual or Auto mode setting. When tension is On, the controller’s output is determined either by the Manual
Setpoint, or by the Auto Setpoint combined with controller tuning and the machine’s operating state.
An indicator light is provided to indicate when tension is turned On. To turn tension On or Off, press the
momentary pushbutton switch. You will see the indicator light go On or Off.
Auto/Manual mode switch and indicator - When the controller is in Manual mode and Tension is On, the
controller’s output is determined only by the setting of the Manual Setpoint. When in Auto mode, the
controller’s output is determined by the setting of the Auto Setpoint, the machine’s measured tension and
other factors, and the setting of controller tuning parameters.
This is a two-position switch. On the User Interface, the controller is in Manual mode when the switch is in
the “Out” position. The controller is in Auto mode when the switch is in the “In” position, and an indicator
LED also lights up. To change modes simply change the position of the switch.
Tension Meter - This is the actual process tension that the controller sees and uses to maintain control. The
actual tension may vary from job to job, depending on material and material width. The meter can be used by
the operator to verify proper operation of the machine. When in Auto mode, the meter should be nearly
constant as machine speeds and roll diameters vary. If large tension swings are seen, it may be necessary to
re-tune the controller, or to examine whether other parts of the machine are operating properly.
Manual Setpoint - This setting represents the percentage of output you want the controller to generate while
40
in Manual mode. It may be useful to use Manual mode when you are using a new material, when you have a
roll of material in poor condition, or when starting up a new roll. In these cases you can cause your brake,
clutch or drive to produce tension, and when you find the right tension setting for the material you want to
run, you can use that as your Auto set point and go to Auto mode.
The setting is controlled by adjusting the Manual set point potentiometer upward or downward. Just
remember that the numbers represent percentage of full output and not a tension setting.
Auto Setpoint - This setting represents the tension you want the controller to maintain in your machine when
the controller is in Auto mode. When you know the correct setting for the material you want to run, the Auto
set potentiometer should be adjusted to that value so that the controller can maintain it automatically. In some
cases (for example when the machine is stopped), the controller may not be able to hold the set point exactly,
but once the machine starts running again, will take over and hold it.
TLS alarm - When this indicator is active, it means the tension has gone above or below preset levels. These
levels are entered into the controller during the setup and calibration of the machine but can be changed at
any time (with the use of either the RCT or the PCLink PC/Laptop interface). Usually the indicator will
remain lit only as long as the condition exists, but if operation has been configured for “latched” mode, it will
be necessary to reset the indicator using the TLS Reset switch.
TLS Reset - This switch is used to reset the TLS alarm once it is active. When this button is pressed the alarm
will reset and you can continue to operate as normal.
4.1.3
OPERATION USING THE REMOTE CONTROL TERMINAL
4.1.3.1 BASIC OPERATION
When your controller is properly set up, it should maintain constant tension while the machine is running
while speeds, roll diameters, or other conditions change. However during startup of a new roll you may want
to change modes, set point or other settings. These can be done using the keypad of the Remote Control
Terminal (see Fig. 4).
The Remote Control Terminal contains a two-line LCD display which contains variable information. In its
normal powered-up state, the unit displays the actual operating tension on the first line of the display, along
with either “ON” or “OFF” to indicate whether tension is On or Off. On the second line of the display the unit
normally displays either the Manual or Auto set point, depending on whether the controller is in Manual or
Auto mode.
• Changing between Tension On and Tension Off - This setting determines whether the controller will
produce any output. When tension is Off, the controller’s output will be zero regardless of the controller’s
Manual or Auto mode setting. When tension is On, the controller’s output is determined either by the
Manual Setpoint, or by the Auto Setpoint combined with controller tuning and the machine’s operating
state. At the end of the first display line, the word “Off” or “On” is displayed. To toggle Tension On Off,
press the up-arrow/Ten On/Off key. You will notice that the mode displayed at the end of the first line
changes
• Changing between Auto and Manual modes - When the controller is in Manual mode and Tension is On, the
controller’s output is determined only by the setting of the Manual Setpoint. When in Auto mode, the
controller’s output is determined by the setting of the Auto Setpoint, the machine’s measured tension and
other factors, and the setting of controller tuning parameters. The second line of the display indicates
whether the controller is in Manual or Auto mode, along with the set point for that mode. To toggle between
Manual and Auto modes, press the down-arrow/Man/Auto key. You will notice the second line changes to
show the new mode and new set point.
• Modifying set points - When you are in Manual mode, the Manual set point is shown on the second line of
the display. This setting represents the percentage of output you want the controller to generate while in
Manual mode. It may be useful to use Manual mode when you are using a new material, when you have a
roll of material in poor condition, or when starting up a new roll. In these cases you can cause your brake,
clutch or drive to produce tension, and when you find the right tension setting for the material you want to
run, you can use that as your Auto set point and go to Auto mode. To adjust the Manual set point while in
Manual mode, press the right-arrow/+ key to increase the set point, or the left-arrow/- key to lower the set
point. Holding the key down causes the set point to increase or decrease at a faster rate. The number shown
in the display represents the percentage of full output you want the controller to produce. When you are in
41
Auto mode, the Auto set point is shown on the second line of the display. This setting represents the tension
you want the controller to maintain in your machine automatically. When you know the correct setting for
the material you want to run, the Auto set point should be adjusted to that value so that the controller can
maintain it. In some cases (for example when the machine is stopped), the controller may not be able to hold
the set point exactly, but once the machine starts running again, will take over and hold it. To adjust the
Auto set point while in Auto mode, press the right-arrow/+ key to increase the set point, or the left-arrow/key to lower the set point. Holding the key down causes the set point to increase or decrease at a faster rate.
The number shown in the display represents the current Auto set point.
You can choose to display web tension in units other than those with which you have calibrated the
controller. To do this, press the DO key. OPERATOR MENUS will be displayed on the first line. Press the
DO key again. Function #01-Disp Select will be displayed. Press the DO key again. The present
measurement unit will appear on the second line, with an asterisk next to it. You can now use the “UpArrow” or “Down-Arrow” keys to select the units of measure that you prefer. When the correct unit is
displayed, press the “Right-Arrow” key. An asterisk will appear next to the unit you have selected. Then
press the DO key again. (If you choose to display tension in units such as PLI [pounds per lineal inch] or
N/cm [Newtons per centimeter of web width], it is necessary to enter the present web width in order to
obtain an accurate tension reading. Function #01-Disp Select will be displayed on the first line. Press the
Down-Arrow key until function #07-Set Web Width is displayed. Press the DO key again. The present web
width will be displayed. You can now enter the new web width by pressing the “+” key to increase the
displayed value, or “-“ to decrease the displayed value. When done, press the DO key). Finally press the
EXIT key. Be sure to change the web width setting whenever you change the width of your material.
If your controller is used on an Unwind or Rewind, a diameter calculator may be used to sense roll diameter.
When a roll is changed, better control will result when you restart the machine if you enter the new roll
diameter. To do this, press the DO key. OPERATOR MENUS will be displayed on the first line. Press the
DO key again. Function #01-Disp Select will be displayed. Press the Down-Arrow key until function #06Set Roll Diameter is displayed. Press the DO key again. The current roll diameter will be displayed on the
second line. You can now change this to the new roll diameter by pressing the “+” key to increase the
displayed value, or “-“ to decrease the displayed value. When done, press the DO key followed by the EXIT
key.
Occasionally you may notice that the second display line changes and alternates the Auto or Manual mode
and set point with other information. This other information can be one or more of the following: TLS Lo,
TLS Hi, E-Stop, Soft Start, or Ratio. Most of the time, this information is provided to indicate that
controller output may be different from what might normally be expected, since the controller is in one of
these special modes. These modes are caused by conditions within the machine, and should disappear once
conditions change. However if the display persists you may want to have a technician examine the machine
to see if there is a problem.
If your controller has been set up for Latched TLS operation, the display may continue to indicate TLS Lo
or Hi. Also, depending on how your controller has been set up it may be necessary to reset the TLS alarm
before it is possible to turn Tension On again. To do this, press the EXIT key while the TLS alarm is
displayed. This will reset the alarm and make it possible to turn Tension On again.
4.1.3.2 STORING AND RECALLING SETUPS USING THE RCT
Changes made to controller settings during an operating session are automatically saved in the controller’s
permanent memory so that if power is turned off, the controller will be able to operate properly when it is
turned on again. However you can also save additional setups if, for example, you are processing different
materials with different set points, different tuning settings, and so forth. The TensionManager™ allows you
to store up to ten setups for later recall. To do this, press the DO key. OPERATOR MENUS will be displayed
on the first line. Press the DO key again. Function #01-Disp Select will be displayed. Press the Down-Arrow
key until function #09-Store Setup is displayed. Press the DO key again. The screen will show “Default”.
You should use the “Down-Arrow” or “Up-Arrow” keys to choose the setting number you want to use. When
you choose a number, press the DO key again. The display will show a series of dots indicating progress.
When the dots disappear from the second display line, the storage is complete. Press the EXIT key to return
to the main screen.
42
To recall one of the ten previously-stored setups, press the DO key. OPERATOR MENUS will be displayed
on the first line. Press the DO key again. Function #01-Disp Select will be displayed. Press the Down-Arrow
key until function #10-Recall Setup is displayed. Press the DO key again. The screen will show “Default”.
You should use the “Down-Arrow” or “Up-Arrow” keys to choose the setting number you want to recall.
When you choose the setup, press the DO key again. The display will show a series of dots indicating
progress. When the dots disappear from the second display line, the recall is complete. Press the EXIT key to
return to the main screen.
4.1.4
OPERATION USING THE HOST INTERFACE
When your controller is configured to use the Host interface, all controller functions are operated by your
machine’s host computer or PLC. Access to TensionManager™ functions is provided by this host computer’s
own hardware. Refer to your machine’s user manual for information on access to TensionManager™
functions.
43
SECTION 5
CARE AND MAINTENANCE
Your Dover Flexo Tension Manager™ has been manufactured of quality materials. With proper application
and installation your transducers will be relatively maintenance free and long lasting. Any changes in your
application which affect the dynamics of your equipment such as web speed, net force, material, etc. could
possibly require upgrading of load rating or roll change. Contact Dover for specific information and
engineering approval.
44
SECTION 6
TROUBLESHOOTING
This is a list of problems which could occur during initial start-up or afterwards. The probable causes are listed
with the most likely one first and the least likely one last.
1. TRANSDUCER ROLL SHAKES, VIBRATES, or BOUNCES
a. Roll is not balanced.
b. Shaft is not clamped tightly in transducers. Coupling screws are loose or shaft diameter is undersize.
c. Transducer mounting bolts are not tight.
d. Shaft is too weak or there is too much shaft extension between the ends of the roll and the transducers.
e. Shaft is bent or too weak.
f. Roll is turning at its natural frequency. Call our TECHNICAL SERVICE DEPARTMENT for analysis of
operating conditions and solution to problem.
2. CAN NOT ADJUST TENSION METER TO READ ZERO WHEN WEB IS SLACK
a. Transducer roll is too heavy.
b. Transducers are pre-loaded.
3. TENSION METER READS BACKWARDS
a. Transducers are installed backwards with force arrow pointing in opposite direction.
b. Transducer cables are connected wrong at controller/indicator terminal strip. Signal wires are reversed.
4. TENSION METER NEEDLE PEGS HIGH OR LOW
a. Meter is not electrically adjusted to zero.
b. Transducers are pre-loaded.
c. Transducer cable has broken wire, poor connection or short circuit.
d. A strain gage has failed. To verify: Unplug the transducer cable and use an ohm-meter to measure the
resistance of the gages at the connector on the transducer. Measure between pins A,B, and A,C. In each
case, the resistance should be about 100 ohms. Measure the resistance between any pin and the outside of
the transducer. The meter should read infinite resistance. Apply a force to the roll by hand or by using a
rope and a weight, in the direction of the tension force and maintain it while again measuring between
pins A,B and A,C. The resistance should be only a few ohms different from before.
e. Failure in the tension amplifier circuit of the controller/indicator.
5. TENSION METER DOES NOT READ ZERO WHEN WEB IS SLACK AND READING DRIFTS
WITH TIME.
a. Meter is not calibrated.
b. Transducers are pre-loaded.
c. The structure the transducers are mounted on is weak.
d. Transducer cable has a broken wire, poor connection or short circuit.
e. A strain gage is cracked. Perform the test in 4d above.
45
6. TENSION METER DOES NOT READ THE SAME EACH TIME THE SAME FORCE IS APPLIED
(poor repeatability)
a. Transducers are pre-loaded.
b. The structure the transducers are mounted on is weak.
c. The shaft coupling cap screws are loose.
7. TENSION METER READING DOES NOT CHANGE WHEN FORCE IS APPLIED TO ROLL.
METER READS ZERO.
a. Meter is not calibrated.
b. Gap between shaft coupling and beam housing is not even.
c. Transducer roll is too heavy.
d. Transducer cable has broken wire, poor connection or short circuit.
e. Transducer cables connected incorrectly, or to wrong transducers.
f. Failure of tension amplifier circuit in controller/indicator. Unit not turned on.
8. TENSION METER NEEDLE BOUNCES
a. Web tension is fluctuating because of machine speed fluctuations, bent roll shafts, worn idler roll
bearings, chattering unwind brake, flat spot in unwind or rewind roll, etc.
b. Shaft is loose in the transducers. Shaft coupling cap screws are loose or shaft diameter is under-size.
c. Transducer mounting bolts are loose.
d. Tension controller is not adjusted properly. See controller Instruction Manual for procedure.
46
SECTION 7
REPLACEMENT PARTS
(DFE P/N)
1. REPLACEMENT PCB ASSEMBLIES
723-1581
723-1582
723-1584
723-1585
103-0013
723-1586
723-1587
723-1588
723-1609
723-1589
722-1385
Remote Control Terminal card
Control Module card
Isolated output card
High voltage output card
SCR for above
Medium voltage output card
Speed module card
TLS/Tension On relay card
Dual transducer relay card
User interface card
Tension meter for above (specify scale range)
2. REPLACEMENT CABLES
723-1620
721-1617
721-1642
723-1622
721-1646
723-1671
723-1672
CM-to-RCT cable, 6'
CM-to-output module cable
CM-to-option module cable
CM-to-User Interface cable assembly
CM-to-PC/Laptop cable
TensionManager™ Pneumatic unit cable, length to be specified
TensionManager™ Pneumatic unit cable, 15'
3. REPLACEMENT FUSES
108-0003 Replacement fuse for High Voltage output module, 115V operation
108-0141 Replacement fuse for High Voltage output module, 230V operation
4. REPLACEMENT TERMINAL BLOCK PLUGS
106-0203
106-0191
106-0196
106-0194
106-0202
2-position plug
3-position plug
4-position plug
10-position plug
16-position plug
5. REPLACEMENT ENCLOSURES (INCLUDE ALL HARDWARE AND DIN CLIP WHERE
APPLICABLE)
723-1658 Small enclosure assembly (for output or option modules)
723-1657 Large enclosure assembly (for CM or output module)
723-1673 Enclosure for pneumatic unit
47
Appendix A:
Transducer Electrical Connections
Figure 21 - MODEL C TRANSDUCER WIRING
48
Figure 22 - MODEL RF TRANSDUCER WIRING
49
Figure 23 - MODELS TR & NW TRANSDUCER WIRING
50
Figure 24 - MODEL LT TRANSDUCER WIRING
51
Appendix B:
Listing of RCT Functions
Functions are listed in the order which they display.
Fcn#,
* Indicates default value
Fcn
Fcn Type
Choices
Operator Menu Functions ---------------------------------------------------------------------------------------------------------------Setpoint * / Output percent / Line Speed / Roll diameter
01 Display select
1
02 Manual setpoint
3
03 Auto setpoint
3
Off * / On
04 Taper Enable
1
05 Set taper
3
0 % - 100 % (default 0 %)
06 Set roll diameter
3
[coresize] - [fullroll]
07 Set Web Width
3
0.1 (unit) - 9999.9 (unit) (default 0.1 unit)
lb * / oz / N / g / Kg / PLI / N/cm / g/cm / Kg/cm / oz/in
08 Tension units
1
09 Store setup
1
Setup 1 through setup 10
10 Recall setup
1
Setup 1 through setup 10
Setup Menu Functions --------------------------------------------------------------------------------------------------------------------20
21
Control Source
Control format
1
1
22
23
24
25
26
27
Set core size
Set full roll size
Diameter input
Diameter update
Max Line Speed
Linespeed threshold
3
3
1
3
3
4
28
29
30
31
32
33
34
35
36
37
38
39
40
41
42
43
44
45
46
47
Control action
Output level
Select tension source
Set range
Set calibration weight
Calibrate transducer
Soft start select
Soft start LS trip point
Soft start tens trip pt
Soft start delay
Soft start output level
TLS Lo mode
TLS Hi mode
TLS Lo setpoint
TLS Hi setpoint
TLS Delay
Output Limit +
Output Limit Ratio Mult
Ratio Delay
1
1
1
3
4
5
2
4
4
3
3
1
1
4
4
1
3
3
1
1
RCT * / Econo / Host
A Standard Closed Loop *
B Line Speed Follower, Tens. Trim
C Line Speed Follower, Dia. Comp, Tens. Trim
0.1 (unit) - 9999.9 (unit) (default 0.1 unit)
0.1 (unit) - 9999.9 (unit) (default 0.1 unit)
Direct * / Tach ratio calc
0.5 * - 5 sec
0.1 (unit) - 9999.9 (unit) (default 0.1 unit)
0.1 * - [maxline] (linespeed below which the roll diameter is frozen)
(default 10%)
Standard * / Reverse
0 to +V * / -V to +V
Xdcr A * / Xdcr B/External
0.1 (unit) - 9999.9 (unit) (default 0.1 unit)
0.1 (unit) - [maxval] (unit) (default 0.1 unit)
-special sequenceOff * / By Line Speed / By Tension / By Switch
0.1 (unit) - [maxval] (unit) (default 0.1 units)
0.1 (unit) - [maxval] (unit) (default 0.1 unit)
1 sec - 60 sec (default 1 sec)
0 % - 100 % (default 0%)
Off * / Momentary
Off * / Momentary
0.1 (unit) - [maxval] (unit) (default 0.1 unit)
0.1 (unit) - [maxval] (unit) (default 0.1 unit)
1 sec * -10 sec (0.5 sec increment) (default 1 sec)
0-100% (default 100%)
0-100% (default 100%)
0.1x * - 10x (0.1x increment)
1 sec *-10 sec (0.5 sec increment) (default 1 sec)
52
Fcn#,
Fcn
Setup Menu Functions continued..
Choices
* Indicates default value
48
49
50
51
52
53
54
55
56
57
58
59
60
61
Off * / On
Manual * / Auto
Internal * (whichever of RCT, Econo or Host is chosen) / External
None / TLS Lo / TLS Hi / EStop
0.5 * to 5 sec in 0.5 sec increments
10 to 60 sec in 10 sec increments, plus “Off *”
0...9, A...Z
0 % - 100 % (default 10 %)
0 % - 100 % (default 10 %)
0 % - 100 % (default 0 %)
0 % - 100 % (default 0 %)
To Default *, To Setup 1-10
From Default *, From Setup 1-10
Unwind * / Intermediate / Rewind
PowerOn Tension
PowerOn Control
TenSw Src
TenOff BySw&:
Display update
Function Timeout
Unit ID
Adjust gain
Adjust stability
Adjust response
Adjust trim
Upload setup
Download Setup
Tension Zone
Fcn Type
1
1
1
2
1
1
1
3
3
3
3
9
8
1
Troubleshooting Menu Functions ----------------------------------------------------------------------------------------SA
RA
Select ADCn
Read ADC
1
6
SD Select DACn
WD Write DACn
SI
Select input port n
1
7
1
RP
GL
GH
SL
SH
RL
RH
RC
6
3
3
3
3
3
3
1
Read input port n
Gain Lo
Gain High
Stability Lo
Stability Hi
Response Lo
Response Hi
Reinitialize controller
Tension * / Rider / Ratch / Ltach / Man Set
Tension (Range 0->255 Decimal) / Line Speed / Roll Speed /
Roll dia (Range 0->255 Decimal)
Output * / Tension / Ten Trim / MLTK DAC’s
(Range 0 - 4095 Decimal)
Ten On Off * / Ten Off / Ten On / Man Auot / Estop / Sstart /
Pulse
PPO0 / PPOA
0.0 - 9999.9 (default 0.0)
0.0 - 9999.9 (default 10.0)
0.0 - 9999.9 (default 0.0)
0.0 - 9999.9 (default 10.0)
0.0 - 9999.9 (default 0.0)
0.0 - 9999.9 (default 10.0)
No * / Yes
* Indicates default value
53
Appendix C:
PCLink Screens
Figure 25 - PCLINK SCREENS: RUN, CONFIGURATION1 & 2
54
Figure 26 - PCLINK SCREENS: TLS, SOFT START, CALIBRATION, & DIAGNOSTIC
55
Figure 27 - PCLINK SCREENS: DATA TRANSFER, TUNING, & MISCELLANEOUS FEATURES
56
Appendix D:
Typical Tensions for Various Materials
TYPICAL TENSIONS FOR WEB MATERIALS
ACETATE
FOIL
.5 lb. per mil per inch of width
Aluminum
Copper
.5 lb. per mil per inch of width
"
.5 lb.
CELLOPHANE
.75 lb. per mil per inch of width
NYLON
.25 lb. per mil per inch of width
PAPER 15 lb *
.4 lb. per inch of width
20 lb
.5 lb.
30 lb
.75 lb. "
40 lb
1.25 lb. "
60 lb
2.0 lb.
80 lb
3.0 lb.
100 lb
4.0 lb.
* based on 3000 sq. ft. ream
PAPERBOARD 8pt
12pt
15pt
20pt
25pt
30pt
"
"
"
"
3.0 lb. per inch of width
4.0 lb.
4.5 lb.
5.5 lb.
6.5 lb.
8.0 lb.
"
"
"
"
"
POLYETHYLENE
.12 lb. per mil per inch of width
POLYESTER (Mylar)
.75 lb. per mil per inch of width
POLYPROPYLENE
.25 lb. per mil per inch of width
POLYSTYRENE
RUBBER
GAUGE
10 mil
12 mil
16.5 mil
26 mil
SARAN
STEEL GAUGE - INS
.001 -.005
.006 -.025
.026 -.040
.041 -.055
.058 -.070
.071 -.090
.091 -.120
.121 -.140
.141 -.165
.166 -.200
.201 -.275
.276 -.380
VINYL
1.0 lb. per mil per inch of width
AT 25% STRETCH
1.75
1.10
4.09
2.47
AT 50% STRETCH
3.68
2.03
8.17
4.97
.15 lb per mil per inch of width
UNWIND-PSI
1000
850
750
650
550
450
450
400
400
400
400
300
REWIND-PSI
4000
3500
3000
2600
2200
1800
1400
1200
1000
900
800
700
.05 lb.per mil per inch of width
*** For laminated webs, sum the tension for the individual webs and add 0.1 lb per inch of width.
57
TERMS AND CONDITIONS OF SALE AND SHIPMENT
1. THE COMPANY
5/1/00
Dover Flexo Electronics, Inc. is hereinafter referred to as the
Company.
work covered by the purchase order is delayed by the Buyer,
upon demand by Company payments shall be made on the
purchase price based upon percentage of completion.
2. CONFLICTING OR MODIFYING TERMS
No modification of, additions to or conflicting provisions to these
terms and conditions of sale and shipment, whether oral or written, incorporated into Buyer's order or other communications are
binding upon the Company unless specifically agreed to by the
Company in writing and signed by an officer of the Company.
Failure of the Company to object to such additions, conflicts or
modifications shall not be construed as a waiver of these terms
and conditions nor an acceptance of any such provisions.
7. TAXES
Any tax, duty, custom, fee or any other charge of any nature
whatsoever imposed by any governmental authority on or measured by any transaction between the Company and the Buyer
shall be paid by the Buyer in addition to the prices quoted or
invoiced.
8. RETURNS
Written authorization must be obtained from the Company's
factory before returning any material for which the Buyer expects
credit, exchange, or repairs under the Warranty. Returned material (except exchanges or repairs under the Warranty) shall be
subject to a minimum re-stocking charge of 15%. Non-standard
material or other material provided specially to the Buyer's specification shall not be returnable for any reason. All material returned, for whatever reason, shall be sent with all freight charges
prepaid by the Buyer.
3. GOVERNING LAW
This contract shall be governed by and construed according to
the laws of the state of New Hampshire, U.S.A. The parties agree
that any and all legal proceedings pursuant to this contract shall
take place under the jurisdiction of the courts of the State of New
Hampshire in the judicial district of Strafford County.
4. PENALTY CLAUSES
Penalty clauses of any kind contained in orders, agreements or
any other type of communication are not binding on the Company
unless agreed to by an officer of the Company in writing.
9. SHIPPING METHOD AND CHARGES
All prices quoted are F.O.B. the Company's factory. The Company shall select the freight carrier, method and routing. Shipping
charges are prepaid and added to the invoice of Buyers with
approved credit, however the Company reserves the right to ship
freight-collect if it prefers. Shipping charges will include a charge
for packaging. Company will pay standard ground freight charges
for items being returned to Buyer which are repaired or replaced
under the Warranty.
5. WARRANTY
Dover Flexo Electronics,Inc. warrants its' products to be free of
defects in material and workmanship for five years from date of
original shipment. Warranty is valid on products purchased on or
after April 2, 1999. During the warranty period the Company will
repair or replace defective products free of charge if such products are returned with all shipping charges prepaid and if, upon
examination, the product is shown to be defective. This warranty
shall not apply to products damaged by abuse, neglect, accident,
modification, alteration or mis-use. Normal wear is not warranteed. All repairs and replacements under the provisions of this warranty shall be made at Dover Flexo Electronics or at an authorized repair facility. The Company shall not be liable for expenses
incurred to repair or replace defective products at any other
location or by unauthorized persons or agents. This warranty
contains all of the obligations and warranties of the Company.
There are no other warranties, either expressed or implied. No
warranty is given regarding merchantability or suitability for any
particular purpose. The Company shall not be liable in either
equity or law for consequential damages, losses or expenses
incurred by use of or inability to use its' products or for claims
arising from same. No warranty is given for products of other
manufacturers even though the Company may provide these
products with its' own or by themselves. The provisions of this
warranty can not be changed in any way by any agent or employee of the Company. Notice of defects must be received within
the warranty period or the warranty is void.
10. CANCELLATION, CHANGES, RESCHEDULING
Buyer shall reimburse Company for costs incurred for any item on
order with the Company which is cancelled by the Buyer. Costs
shall be determined by common and accepted accounting practices.
A one-time hold on any item ordered from the Company shall be
allowed for a maximum of 30 days. After 30 days, or upon notice
of a second hold, Company shall have the right to cancel the
order and issue the appropriate cancellation charges which shall
be paid by Buyer. Items held for the Buyer shall be at the risk and
expense of the Buyer unless otherwise agreed upon in writing.
Company reserves the right to dispose of cancelled material as it
sees fit without any obligation to Buyer.
If Buyer makes, or causes to make, any change to an order the
Company reserves the right to change the price accordingly.
11. PRICES
Prices published in price lists, catalogs or elsewhere are subject
to change without notice and without obligation. Written quoted
prices are valid for thirty days only.
12. EXPORT SHIPMENTS
Payment for shipments to countries other than the U.S.A. and
Canada or to authorized distributors shall be secured by cash in
advance or an irrevocable credit instrument approved by an
officer of the Company. An additional charge of 10% will apply to
any letter of credit. There will be an extra charge for packaging
and documentation.
6. PAYMENTS
Standard terms of credit are net 30 days from date of shipment,
providing satisfactory credit is established with the Company.
Amounts past due are subject to a service charge of 1.5% per
month or portion thereof or 18% per annum. The Company reserves the right to submit any unpaid late invoices to a third party
for collection and Buyer shall pay all reasonable costs of such
collection in addition to the invoice amount. All quoted prices and
payments shall be in U.S. Dollars.
If the Company judges that the financial condition or payment
practices of the Buyer does not justify shipment under the standard terms or the terms originally specified, the Company may
require full or partial payment in advance or upon delivery. The
Company reserves the right to make collection on any terms
approved in writing by the Company's Finance Department. Each
shipment shall be considered a separate and independent transaction and payment therefore shall be made accordingly. If the
13. CONDITION OF EQUIPMENT
Buyer shall keep products in good repair and shall be responsible
for same until the full purchase price has been paid.
14. OWNERSHIP
Products sold are to remain the property of the Company until full
payment of the purchase price is made.
58
INDEX
0-10 Volt DC Tension Out . . . . . . . . . . . . . . . . . . . . . 5
4-20mA Tension Out . . . . . . . . . . . . . . . . . . . . . . . . . 5
Remote Control Terminal
. . . . . . . . . . . . . . . . . . . . . . . . 4,6,8,11,19,23,30,41
function list . . . . . . . . . . . . . . . . . . . . . . . . . . . 52-53
Remote Tension Amp . . . . . . . . . . . . . . . . . . . . . . . . 5
Replacement Parts . . . . . . . . . . . . . . . . . . . . . . . . . 44
Response, adjust . . . . . . . . . . . . . . . . . 26,28,32,34,36
Rewinds . . . . . . . . . . . . . . . . . . . . . . . . . 28-30, 34-36
Rider Roll . . . . . . . . . . . . . . . . . . . . . . . . . . . . . 4,20,37
Auto Control Mode . . . . . . . . . . . . . . . . . . . . . . . . . . . 5
Cables . . . . . . . . . . . . . . . . . . . . . . . . . . . . . . . . . . . 47
Calibration . . . . . . . . . . . . . . . . . . . . . . . . . . . . . . . . 22
Care and Maintenance . . . . . . . . . . . . . . . . . . . . . . 44
Circuit Cards . . . . . . . . . . . . . . . . . . . . . . . . . . . . . . 47
Control Module . . . . . . . . . . . . . . . 1,3,5,7,10,11,12,23
Customer Supplied Components . . . . . . . . . . . 18,40
Sample and Hold . . . . . . . . . . . . . . . . . . . . . . . . . . . . 5
Soft Start . . . . . . . . . . . . . . . . . . . . . . . . . . . . . . . 5,13
Specifications . . . . . . . . . . . . . . . . . . . . . . . . . . . . . . . 3
modules . . . . . . . . . . . . . . . . . . . . . . . . . . . . . . . 3-4
interfaces . . . . . . . . . . . . . . . . . . . . . . . . . . . . . . . . 4
Speed Follow . . . . . . . . . . . . . . . . . . . . . . . . . . . . . . . 5
Speed Module . . . . . . . . . . . . . . 4,6,8,10,11,19,20,34
Stability, adjust . . . . . . . . . . . . . . . . . . . 26,28,32,34,36
Storage and Recall . . . . . . . . . . . . . . . . . . . . . . . 5,39
DC Tachs . . . . . . . . . . . . . . . . . . . . . . . . . . . . . 4,19,36
Description . . . . . . . . . . . . . . . . . . . . . . . . . . . . . . . 1-2
Dimensions . . . . . . . . . . . . . . . . . . . . . . . . . . . . . 7-10
Dual Transducer Module . . . . . . . . . . . 4,6,8,10,11,21
Emergency-stop . . . . . . . . . . . . . . . . . . . . . . . . . . 5,12
Electrical Connections . . . . . . . . . . . . . . . . . . . . 12-21
options . . . . . . . . . . . . . . . . . . . . . . . . . . . . . . . . . 15
transducers . . . . . . . . . . . . . . . . . . . . . . . . . . . 45-48
Enclosures . . . . . . . . . . . . . . . . . . . . . . . . . . . . . . . . 44
Exploded View . . . . . . . . . . . . . . . . . . . . . . . . . . . . . . 2
TLS Module . . . . . . . . . . . . . . . . . . . . . 4,6,8,10,11,21
Taper Tension . . . . . . . . . . . . . . . . . . . . . . . . . . . . . . 5
Tension On Module . . . . . . . . . . . . . . . . . . . . 4,6,8,21
Terminal Blocks . . . . . . . . . . . . . . . . . . . . . . . . . . . . 44
Terms and Conditions . . . . . . . . . . . . . . . . . . . . . . . 58
Trim, adjust . . . . . . . . . . . . . . . . . . . . . . . . . . 26,28,30
Transducer Voltage Selection . . . . . . . . . . . . . . . . . . 5
Troubleshooting . . . . . . . . . . . . . . . . . . . . . . . . . 45-46
Typical Tensions . . . . . . . . . . . . . . . . . . . . . . . . . . . 51
Features, std. . . . . . . . . . . . . . . . . . . . . . . . . . . . . . . . 5
on Option Modules . . . . . . . . . . . . . . . . . . . . . . . . . 6
Fuses . . . . . . . . . . . . . . . . . . . . . . . . . . . . . . . . . . . . 44
Gain, adjust . . . . . . . . . . . . . . . . . . . . . 26,28,32,34,36
Unwinds . . . . . . . . . . . . . . . . . . . . . . . . . 24-26, 31-32
User Module . . . . . . . . . . . . . 4,6,9,10,11,12,18,19,40
High Voltage . . . . . . . . . . . . . . . . . . . 3,6,7,10,11,14,22
Host Interface . . . . . . . . . . . . . . . . . . . . . . 4,6,11,19,43
Versions . . . . . . . . . . . . . . . . . . . . . . . . . . . . . . . . . 1-2
Installation . . . . . . . . . . . . . . . . . . . . . . . . . . . . . . . . 11
Intermediates . . . . . . . . . . . . . . . . . . . . . 26-28, 33-34
Isolated Output Module . . . . . . . 3,6,8,10,11,15,21,22
Manual control mode . . . . . . . . . . . . . . . . . . . . . . . . . 5
Medium Voltage . . . . . . . . . . . . . . . . 3,6,8,10,11,17,23
Mounting Locations . . . . . . . . . . . . . . . . . . . . . . . . . 10
Operation Instructions . . . . . . . . . . . . . . . . . . . . . . . 38
Operator Interface . . . . . . . . . . . . . . . . . . . . . . . . . . . 9
Output Direction . . . . . . . . . . . . . . . . . . . . . . . . . . . . . 5
PC/Laptop Interface . . . . . . . . . 4,6,10,12,13,22,23,38
PCLink software . . . . . . . . . . . . . . . . . . . . . . . 38,39,40
user screens . . . . . . . . . . . . . . . . . . . . . . . . . . 54-56
Pneumatic Modules . . . . . . . . . . . . . . . . . 3,6,12,14,22
remote pneumatic assembly . . . . . . . . . . . . . 3,9,14
dual valve assembly . . . . . . . . . . . . . . . . . . . 3,10,16
Pulse Tachs . . . . . . . . . . . . . . . . . . . . . . . . . . . 4,36,37
59
217 PICKERING ROAD
ROCHESTER, NEW HAMPSHIRE 03867-4630 U.S.A
TEL: 603-332-6150
FAX: 603-332-3758
E-MAIL: [email protected] Internet: www.dfe.com
CANADA
MEXICO
UNITED KINGDOM
EUROPE
TAIWAN
KOREA
AUSTRALIA
COLOMBIA
INDIA
CHILE
©2001 DOVER FLEXO ELECTRONICS, INC.
ALL RIGHTS RESERVED
DOC 801-1382
F & C 0701 PRINTED IN USA