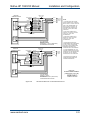
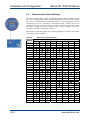
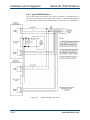
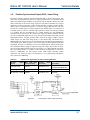
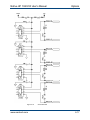
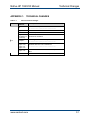
1
Ndrive HP 10/20/30
USER'S MANUAL
P/N: EDU170 (Revision 1.14)
Dedicated to the Science of Motion
Aerotech, Inc.
101 Zeta Drive, Pittsburgh, PA, 15238
ph: 412-963-7470 fax: 412-963-7459
www.aerotech.com
Product Registration
Register online at: http://www.aerotech.com/prodreg.cfm
Technical Support
United States:
Phone: 412-967-6440
Fax: (412) 967-6870
Email: [email protected]
United Kingdom:
Phone: +44 118 9409400
Fax: +44 118 9409401
Email: [email protected]
Germany:
Phone: +49 911 9679370
Fax: +49 911 96793720
Email: [email protected]
Revision History
Revision 1.00
Revision 1.01
Revision 1.02
Revision 1.03
Revision 1.04
Revision 1.05
Revision 1.06
Revision 1.07
Revision 1.08
Revision 1.09
Revision 1.10
Revision 1.11
Revision 1.12
Revision 1.13
Revisoin 1.14
April 23, 2002
May 13, 2002
September 3, 2002
November 26, 2002
February 25, 2003
July 22, 2003
December 5, 2003
January 26, 2004
May 25, 2004
July 22, 2004
September 22, 2004
August 24, 2005
November 11, 2005
January 5, 2006
October 2, 2006
Product names mentioned herein are used for identification purposes only and may be trademarks of their respective
companies.
© Aerotech, Inc. 2005, 2006
Ndrive HP 10/20/30 User’s Manual
Table of Contents
TABLE OF CONTENTS
DECLARATION OF CONFORMITY .............................................. xi
CHAPTER 1:
1.1.
1.2.
1.3.
1.4.
1.5.
INTRODUCTION ................................................ 1-1
Feature Summary .....................................................................1-2
Connection Overview................................................................1-3
Functional Diagram...................................................................1-4
Ordering Information .................................................................1-5
Specifications ............................................................................1-7
1.5.1. Electrical Specifications ...............................................1-7
1.5.2. Mechanical Specifications ...........................................1-8
1.5.3. Environmental Specifications.....................................1-10
CHAPTER 2: INSTALLATION and CONFIGURATION .............. 2-1
2.1.
2.2.
2.3.
2.4.
2.5.
2.6.
2.7.
2.8.
2.9.
2.10.
2.11.
Safety Procedures and Warnings .............................................2-1
Wiring, Grounding, and Shielding Techniques .........................2-2
2.2.1. Minimizing EMI Interference ........................................2-2
2.2.2. Minimizing 50/60 HZ Line Interference ........................2-3
Power Connections...................................................................2-4
2.3.1. Control Power Connections (TB101) ...........................2-4
2.3.2. Motor Power Connections (TB102) .............................2-5
2.3.3. 40/80 VDC Power Transformers..................................2-6
Typical AC Wiring with AUXPWR Option .................................2-7
Motor and Feedback Connections..........................................2-10
2.5.1. DC Brush Motor in Torque Mode Configuration ........2-10
2.5.1.1.
DC Brush Motor Phasing ........................2-11
2.5.2. DC Brush Motor with Tachometer Feedback
Configuration..............................................................2-12
2.5.3. Brushless Motor Configuration ..................................2-13
2.5.3.1.
Brushless Motor Phasing ........................2-14
2.5.3.2.
Brushless Motor Hall-Effect
Feedback Connections ...........................2-15
2.5.3.3.
Hall-Effect Phasing..................................2-16
2.5.4. Stepper Motor Configuration......................................2-18
2.5.4.1.
Stepper Motor Phasing Process .............2-18
Encoder Feedback Connections.............................................2-19
2.6.1. Encoder Phasing........................................................2-20
End of Travel (EOT) Limit Input Connections .........................2-21
2.7.1. End of Travel (EOT) Limit Phasing ............................2-21
Communication Channel Settings ..........................................2-22
Connecting Multiple Drives .....................................................2-23
2.9.1. I/O and Signal Wiring Requirements .........................2-24
Emergency Stop Sense Input (TB201) ...................................2-25
2.10.1. Typical ESTOP Interface ...........................................2-26
PC Configuration and Operation Information..........................2-27
CHAPTER 3: TECHNICAL DETAILS .......................................... 3-1
3.1.
Auxiliary I/O Connector (J205)..................................................3-1
3.1.1. Secondary Encoder Channel (J205)............................3-2
3.1.2. User Outputs 8-11 (J205) ............................................3-4
3.1.3. User Inputs 8-11 (J205) ...............................................3-5
www.aerotech.com
iii
Table of Contents
Ndrive HP 10/20/30 User’s Manual
3.2.
3.3.
3.4.
3.5.
3.6.
CHAPTER 4:
4.1.
4.2.
4.3.
4.4.
CHAPTER 5:
5.1.
5.2.
5.3.
CHAPTER 6:
6.1.
6.2.
6.3.
iv
3.1.4. High Speed User Inputs 12-13 (J205) ......................... 3-6
3.1.5. Analog Input 0 (J205) .................................................. 3-6
3.1.6. Analog Output 0 (J205)................................................ 3-6
Position Synchronized Output (PSO) / Laser Firing ................. 3-7
3.2.1. Single Axis Laser Firing .............................................3-10
Motor Feedback (J207)...........................................................3-11
3.3.1. End of Travel Limit Inputs ..........................................3-12
3.3.2. Hall Effect and Thermistor Inputs ..............................3-13
3.3.3. Brake Output..............................................................3-14
3.3.3. Brake Output..............................................................3-14
3.3.4. Encoder Interface ......................................................3-14
3.3.4.1.
Line Driver Encoder (Standard) ..............3-15
3.3.4.2.
MXH Option.............................................3-16
RS-232 / RS-422 Port (J206)..................................................3-19
FireWire Bus (J201, J202, J203) ............................................3-21
Voltage-to-Current Mode Operation .......................................3-22
3.6.1. Parameter Setup and Hardware Configuration .........3-23
3.6.2. Saving Parameters to the flash memory on the
drive ...........................................................................3-23
3.6.3. Operation ...................................................................3-24
3.6.4. Faults .........................................................................3-24
OPTIONS ........................................................... 4-1
–IOPSO and –IOPSOH Option Boards .................................... 4-1
4.1.1. Brake Configuration Jumpers ...................................... 4-2
4.1.2. Analog Outputs (TB301) .............................................. 4-3
4.1.3. Brake / Relay (TB301) ................................................. 4-4
4.1.4. Analog Inputs (TB302)................................................. 4-8
4.1.5. User Power Connector (TB303) .................................. 4-9
4.1.6. Opto-Isolated Outputs (TB304).................................... 4-9
4.1.7. Opto-Isolated Inputs (TB305) ....................................4-11
4.1.8. PSO / Absolute Encoder Interface (J301) .................4-13
4.1.9. SSI Net (2 channels) (J302, J303) ............................4-16
–DUALPSO and –TRIPLEPSO Laser Firing Options.............4-18
4.2.1. PSO Tracking Rate Configuration .............................4-19
–ENET (Ethernet) Option J204...............................................4-21
–RDP Resolver Input ..............................................................4-22
4.4.1. Resolver/Inductosyn Setup........................................4-24
4.4.1.1.
Configuring the Hardware .......................4-24
4.4.1.2.
Configuring the Analog Feedback
Signals ....................................................4-25
4.4.1.3.
Configuring the Commutation
Initialization .............................................4-29
ACCESSORIES.................................................. 5-1
Standard Interconnection Cables ............................................. 5-1
Joystick Interface ...................................................................... 5-5
Handwheel Interface ...............................................................5-10
TROUBLESHOOTING ....................................... 6-1
Problems, Causes, and Solutions............................................. 6-1
Ndrive HP Control Board Test Points ....................................... 6-2
Ndrive HP Control Board Assembly.......................................... 6-3
www.aerotech.com
Ndrive HP 10/20/30 User’s Manual
6.4.
6.5.
6.6.
6.7.
6.8.
Table of Contents
Ndrive HP Power Board Assembly ...........................................6-5
LED Indicators...........................................................................6-7
JTAG Programming Connector ................................................6-8
Fuse / Battery Replacement .....................................................6-9
Preventative Maintenance ......................................................6-10
6.8.1. Cleaning .....................................................................6-10
APPENDIX A: GLOSSARY OF TERMS ................................... A-1
APPENDIX B: WARRANTY and FIELD SERVICE................... B-1
APPENDIX C: TECHNICAL CHANGES ................................... C-1
APPENDIX D: REV. 0 to REV A COMPARISON ..................... D-1
D.1.
D.2.
D.3.
INDEX
Connector Renumbering.......................................................... D-2
Option Changes ....................................................................... D-3
E-Stop Interface for Rev. 0 ...................................................... D-5
.....................................................................Index-1
READER’S COMMENTS .............................................. Comment-1
www.aerotech.com
v
Table of Contents
Ndrive HP 10/20/30 User’s Manual
∇ ∇ ∇
vi
www.aerotech.com
Ndrive HP 10/20/30 User’s Manual
List of Figures
LIST OF FIGURES
Figure 1-1.
Figure 1-2.
Figure 1-3.
Figure 1-4.
Figure 1-5.
Ndrive HP 10/20/30 Networked Digital Drives ..........................1-1
Ndrive HP Hardware .................................................................1-3
Functional Diagram...................................................................1-4
Ndrive HP Dimensions (with -IO Option) ..................................1-8
Ndrive HP Dimensions (without the -IO Option) .......................1-9
Figure 2-1.
Figure 2-2.
Figure 2-3.
Figure 2-4.
Figure 2-5.
Figure 2-6.
Figure 2-7.
Figure 2-8.
Figure 2-9.
Figure 2-10.
Figure 2-11.
Figure 2-12.
Figure 2-13.
Figure 2-14.
Figure 2-15.
Figure 2-16.
Figure 2-17.
Figure 2-18.
Figure 2-19.
Figure 2-20.
Figure 2-21.
Figure 2-22.
Figure 2-23.
Figure 2-24.
Back-Propagation Line Filter Connection .................................2-3
Isolation Transformer Connection (Eliminates 50/60 Hz
AC Coupling).............................................................................2-3
AUXPWR Option.......................................................................2-4
Bus Power.................................................................................2-5
TM3 and TM5 Transformer Options .........................................2-6
40 Volt DC Bus from 115 and 230 VAC Source .......................2-7
80 Volt DC Bus from 115 and 230 VAC Source .......................2-8
160 Volt DC Bus from 115 and 230 VAC Source .....................2-9
DC Brush Motor (Torque Mode) Configuration.......................2-10
DC Brush Motor Wiring with Tachometer ...............................2-12
Brushless Motor Configuration ...............................................2-13
Hall-Effect Feedback Connections .........................................2-15
Hall-Effect Feedback Inputs in the Nstat Utility.......................2-15
Motor Phasing .........................................................................2-17
Stepper Motor Configuration...................................................2-18
Encoder Feedback Connections.............................................2-19
Encoder Phasing Reference Diagram ....................................2-20
Encoder and Hall Signals in the Nstat Utility Program ...........2-20
End of Travel Limit input Connections ....................................2-21
Limit Inputs in the Nstat Utility.................................................2-21
Recommended Star Daisy Chain Configuration.....................2-23
FireWire Daisy Chain ..............................................................2-24
ESTOP Sense Input (TB201)..................................................2-25
Typical Emergency Stop Circuit..............................................2-26
Figure 3-1.
Figure 3-2.
Figure 3-3.
Figure 3-4.
Figure 3-5.
Figure 3-6.
Figure 3-7.
Figure 3-8.
Figure 3-9.
Figure 3-10.
Figure 3-11.
Figure 3-12.
Figure 3-13.
Secondary Encoder Channel (J205).........................................3-3
User Outputs (J205)..................................................................3-4
All User Inputs 8-13 (J205) .......................................................3-5
PSO Diagram – Basic Single Axis Firing ..................................3-7
Advanced 1 - 3 Axis Firing ........................................................3-9
Data Capture/Data Update Modes .........................................3-10
End of Travel Limit Inputs .......................................................3-12
Hall-Effect and Thermistor Inputs (J207) ................................3-13
Line Driver Encoder Interface – Standard (J207) ...................3-15
Optional MXH Analog Encoder Interface (J207) ....................3-18
RS-232/RS-422 Connector (J206)..........................................3-20
Normal Operation....................................................................3-22
Stand-Alone Configuration......................................................3-22
Figure 4-1.
Figure 4-2.
–IOPSO Option Board (690D1579 Rev. A) ..............................4-1
–IOPSOH Option Board (690D1623 Rev. 0) ............................4-2
www.aerotech.com
vii
List of Figures
Ndrive HP 10/20/30 User’s Manual
Figure 4-3.
Figure 4-4.
Figure 4-5.
Figure 4-6.
Figure 4-7.
Figure 4-8.
Figure 4-9.
Figure 4-10.
Figure 4-11.
Figure 4-12.
Figure 4-13.
Figure 4-14.
Figure 4-15.
Figure 4-16.
Figure 4-17.
Figure 4-18.
Figure 4-19.
Figure 4-20.
Figure 4-21.
Figure 4-22.
Figure 4-23.
Figure 4-24.
Analog Output Connector (TB301) ........................................... 4-3
Brake Connected to TB301 ...................................................... 4-5
Brake Connected to J207 ......................................................... 4-5
Suppression for DC Brake Systems ......................................... 4-6
Suppression for AC and DC Brake Systems ............................ 4-7
Optional Analog Input Connector (TB302) ............................... 4-8
Connecting Outputs in Current Sinking Mode ........................4-10
Connecting Outputs in Current Sourcing Mode......................4-10
Inputs Connected in Current Sinking Mode............................4-11
Inputs Connected in Current Sourcing Mode .........................4-12
Absolute Encoder Interface (J301) .........................................4-14
PSO Interface .........................................................................4-15
(RS-485) Absolute Encoder Interface (J301) .........................4-15
J301/J302/J303.......................................................................4-17
Two/Three Axis Laser Firing Interconnection .........................4-18
PSO Tracking Rate Block Diagram ........................................4-19
Ethernet Interface (J204) ........................................................4-21
Resolver Option Assembly (690D1599 Rev. 0)......................4-23
Analog Output Connector (TB301) .........................................4-25
Resolver Located at Maximum of SIN Signal .........................4-27
Rotating the Resolver (to see a circle) ...................................4-27
Optimized Resolver Feedback Configuration .........................4-28
Figure 5-1.
Figure 5-2.
Figure 5-3.
Figure 5-4.
Joystick Interface ...................................................................... 5-5
Single Axis Joystick Interface to J205 of the Ndrive................. 5-6
Single Axis Joystick Interconnect to J205 of the Ndrive........... 5-7
Two-Axis Joystick Interface to the I/O on the –IOPSO
Option........................................................................................ 5-8
Two-Axis Joystick Connection to the I/O on the –IOPSO
Option........................................................................................ 5-9
Handwheel Interconnection to J205 of the Ndrive..................5-10
Handwheel with flying leads (no connector) ...........................5-11
BBA32 interface used to connect a Handwheel with
flying leads (no connector)......................................................5-12
Figure 5-5.
Figure 5-6.
Figure 5-7.
Figure 5-8.
Figure 6-1.
Figure 6-2.
Ndrive HP Control Board Assembly (690D1577 Rev. A) ......... 6-3
Ndrive HP Power Board Assembly (690D1576 Rev. A)........... 6-5
Figure D-1.
Figure D-2.
Connector/LED Comparison.................................................... D-1
Typical Emergency Stop Circuit (Rev. 0)................................. D-5
∇ ∇ ∇
viii
www.aerotech.com
Ndrive HP 10/20/30 User’s Manual
List of Tables
LIST OF TABLES
Table 1-1.
Table 1-2.
Table 1-3.
Models, Options, and Voltage Configurations ..........................1-5
Accessories...............................................................................1-6
Electrical Specifications ............................................................1-7
Table 2-1.
Table 2-2.
Ferrite Bead Part Numbers .......................................................2-2
TB101 Auxiliary AC Supply Input (when TB102 AC input
< 85 VAC) .................................................................................2-4
TB102 Main AC Power Input and Motor Power Output............2-5
Ndrive HP Switch Settings (S2) ..............................................2-22
FireWire Card and Cable Part Numbers.................................2-23
Electrical Noise Suppression Devices ....................................2-25
Table 2-3.
Table 2-4.
Table 2-5.
Table 2-6.
Table 3-1.
Table 3-2.
Table 3-3.
Table 3-4.
Table 3-5.
Table 3-6.
Table 3-7.
Table 3-8.
Table 3-9.
Table 3-10.
Table 3-11.
Table 3-12.
Table 3-13.
Table 3-14.
Table 3-15.
Table 3-16.
Table 3-17.
Table 3-18.
Table 3-19.
Table 3-20.
Table 4-1.
Table 4-2.
Table 4-3.
Table 4-4.
Table 4-5.
Table 4-6.
Table 4-7.
Table 4-8.
Table 4-9.
Table 4-10.
Auxiliary I/O Connector Pin Assignment (J205) .......................3-1
Auxiliary I/O Connector Mating Connector (J205) ....................3-2
Auxiliary Encoder Pin Assignment on Connector J205 ............3-2
User Outputs Pin Assignment on Connector J205 ...................3-4
User Inputs Pin Assignment on Connector J205......................3-5
High Speed User Inputs Pin Assignment on Connector
J205 ..........................................................................................3-6
Auxiliary I/O Connector Pin Assignment (J205) .......................3-6
Auxiliary I/O Connector Pin Assignment (J205) .......................3-6
PSO Encoder Signal Sources and Pre-Scaling Methods .........3-7
PSO Output Sources ................................................................3-8
Motor Feedback Connector Pin Assignment (J207)...............3-11
Motor Feedback Connector Mating Connector (J207) ...........3-11
End of Travel Limit Inputs Pin Assignment on Connector
J207 ........................................................................................3-12
Hall-Effect Inputs Pin Assignment on Connector J207...........3-13
Brake Output Pin Assignment on Connector J207 .................3-14
Motor Feedback Connector Pin Assignment (J207)...............3-14
MXH Option Specifications .....................................................3-17
J206 RS-232 / RS-422 Connector Pin Assignment................3-19
RS-232 / RS-422 Port Connector Mating Connector
(J206) ......................................................................................3-19
J201, J202, J203 FireWire Connector Pin Assignment ..........3-21
–IOPSO Option Board Jumpers ...............................................4-1
–IOPSOH Output Device Numbers ..........................................4-2
Analog Output Connector Pin Assignment (TB301) .................4-3
Voltage and Current Specifications (TB301) ............................4-4
Brake / Relay Connector Pin Assignment (TB301) ..................4-4
Brake / Relay Connector Pin Assignment (J207) .....................4-4
Optional Analog Input Connector Pin Assignment
(TB302) .....................................................................................4-8
User Power Connector Pin Assignment (TB303) .....................4-9
Opto-Isolated Output Connector Pin Assignment
(TB304) .....................................................................................4-9
-IOPSO Output Device Specifications (TB304) ........................4-9
www.aerotech.com
ix
List of Tables
Ndrive HP 10/20/30 User’s Manual
Table 4-12.
Table 4-16.
Table 4-17.
Table 4-18.
Table 4-19.
Table 4-20.
Table 4-21.
Table 4-22.
Table 4-23.
PSO / Absolute Encoder Interface Connector Pin
Assignment (J301) ..................................................................4-13
PSO / Absolute Encoder Mating Connector (J301) ................4-13
Laser Output Opto-Isolator Specifications..............................4-14
J302, J303 2-Channel SSI Net Connector Pin
Assignment .............................................................................4-16
SSI Net Cable Part Numbers..................................................4-18
Ethernet Connector Pin Assignment (J204) ...........................4-21
NConnect I/O Cable part Numbers.........................................4-21
Resolver Connector Pin Assignment (J401, J402).................4-22
Resolver Mating Connector ....................................................4-22
Resolver Jumper Configuration ..............................................4-22
Resolver Test Points...............................................................4-23
External Power Pin Assignment (J403) ..................................4-23
Table 5-1.
Table 5-2.
Table 5-3.
Table 5-4.
Standard Interconnection Cables ............................................. 5-1
Combined Motor & Feedback Cables....................................... 5-2
Individual Motor Cables ............................................................ 5-3
Individual Feedback Cables...................................................... 5-4
Table 6-1.
Table 6-2.
Table 6-3.
Table 6-4.
Table 6-5.
Table 6-6.
Table 6-7.
Table 6-8.
Table 6-9.
Table 6-10.
Table 6-11.
Amplifier Faults, Causes, and Solutions................................... 6-2
Ndrive HP Control Board Test Points ....................................... 6-2
Ndrive HP Control Board Jumper Selections ........................... 6-4
Ndrive HP Power Board Jumper Selections............................. 6-6
Ndrive HP Power Board Fuse Information ............................... 6-6
LED Indicator Description ......................................................... 6-7
JTAG Programming Connector – Internal (P10) ...................... 6-8
Fuse Replacement Part Numbers (Ndrive Control Board) ....... 6-9
Fuse Replacement Part Numbers (Ndrive Power Board) ........ 6-9
Battery Replacement Part Number (Ndrive HP Control
Board) ....................................................................................... 6-9
Preventative Maintenance ......................................................6-10
Table C-1.
Table C-2.
Current Technical Changes ..................................................... C-1
Technical Change Archive....................................................... C-2
Table D-1.
J205 Auxiliary I/O Connector Pin Assignments ....................... D-4
Table 4-13.
Table 4-14.
Table 4-15.
∇ ∇ ∇
x
www.aerotech.com
Ndrive HP 10/20/30 Manual
Regulatory Information
DECLARATION OF CONFORMITY
Manufacturer’s Name
and Address:
Aerotech, Inc.
101 Zeta Drive
Pittsburgh, PA 15238-2897
Declares that the product: Ndrive HP 10/20/30
Conforms to the following product specifications, with the exceptions listed below.
EMC:
EN 61800-3:1997
EN 61326-1:1997
EMC requirements for power drives
EMC requirements for laboratory equipment
EN 55011:1998
EN 61000-3-2:1995
EN 61000-3-3:1995
EN 61000-4-2:1995
EN 61000-4-3:1995
EN 61000-4-4:1995
EN 61000-4-5:1995
EN 61000-4-6:1995
EN 61000-4-11:1995
RFI Limits and Measurement
Harmonic Current Emissions
Voltage Fluctuation and Flicker
ESD Immunity
Radiated RFI/EMI Immunity
EFT/Burst Immunity
Surge Immunity
Conducted Immunity
Voltage Dips and Interruptions
Safety:
EN 61010-1:2001
Safety Requirements
Use:
This product is intended for light industrial manufacturing or laboratory use.
and complies with EMC directive 89/336/EEC and 73/23/EEC low voltage directive.
Exceptions to the test standards include:
ESD Immunity testing per EN 61000-4-2 resulted in the unit reseting to a safe state when
the FireWire connector was directly subjected to the ESD test requirements. This condition
has been further minimzed on revision A of the product to prevent the possibility of this
occurrence.
Voltage Dips and Interruptions per EN61000-4-11 was successfully tested internally at
Aerotech on April 26, 2002
EFT/Burst Immunity per EN 61000-4-4 resulted in the unit reseting to a safe state when
the cables were subjected to the EFT test requirements (Not applicable for cables less
than 3 meters in length).
Pittsburgh, PA
April, 2002
David F. Kincel_________________________
Quality Assurance Manager
Alex Weibel ___________________________
Engineer Verifying Compliance
www.aerotech.com
xi
Regulatory Information
Ndrive HP 10/20/30 Manual
General notes concerning the test setup
This product was tested at F-Squared Laboratories, in Burton, OH on April 16-18, 2002.
The report numbers are NY011602-01-01E and NY011602-01-02E.
The Ndrive HP was tested while powered from a 230VAC source with a brushless
servomotor, connected via PMC-15 and BFC-15 (15 foot) cables. In order for the
product to conform to the radiated emission standards, the motor cable must be shielded
and the shield must be connected to the earth ground. A metal D-style connector with a
metal backshell must be used when connecting to the D-style connectors on the Ndrive
HP. The shield of the feedback cable must be connected to the metal backshell.
The following modifications ensure compliance:
•
Install a snap-on Ferrishield ferrite attenuator, P/N SS28B2034, on the FireWire cable
at the unit.
•
Install a Curtis, P/N F1600CA-10, EMI line filter on the AC input.
•
Install two snap-on Ferrishield ferrite attenuators, P/N SS28B2032 and CS28B1984,
on the AC cable between the EMI line filter and the Ndrive.
•
Connect earth ground to the mounting screw at the AC input.
•
Install a SCI, 25-pin, D-style, Spectrum EMI filter adapter, P/N SCI-56-725-001, in
series with the motor feedback cable at the unit. Current generation units (Revision A)
have integral filtering built-in, which should preclude the use of this EMI filter, based
upon similar product testing.
Safety related requirements to ensure compliance (exceptions to EN 61010-1):
•
The Ndrive must be installed within an enclosure with construction compliant unlimited
circuits.
•
The end user is responsible for meeting the final protective ground requirements.
•
The AC power inlet located on the front of the Ndrive is the power disconnect. The
end user is responsible for determining and providing a supply disconnect for the
system.
•
The end user is responsible for preventing unexpected startup.
•
Connection requirements are described in the technical documentation provided with
the product. The end user is responsible for making the proper connections and
meeting any required interlock requirements for the product application.
•
Voltages greater than 60V may be present inside the Ndrive after a discharge time of
5 seconds.
•
The end user must provide protection for power interruption / restoration, if required.
•
The end user must provide earth fault current protection, if required.
•
The end user must provide protection against lightning and power switching surges, if
required.
•
Control and Emergency Stop requirements are to be determined and provided by the
end user.
•
Wire and cabling provided with the Ndrive meet Aerotech’s electrical and listed
environmental requirements. The end user must meet the final requirements.
Failure to follow these procedures may result in serious
injury, damage and/or excessive emissions or reduced
immunity of the equipment.
∇ ∇ ∇
xii
www.aerotech.com
Ndrive HP 10/20/30 User’s Manual
CHAPTER 1:
Introduction
INTRODUCTION
Aerotech’s Network Digital Drives (Ndrive HP) complement the Automation 3200
System (see Figure 1-1). Connected via the IEEE-1394 (FireWire®) communication bus,
these drives provide deterministic behavior, auto-identification, and easy software setup
from the Nmotion SMC software controller. Featuring a high-speed Harvard architecture
DSP, the drives have fully digital current and servo loops providing selectable 1-20 kHz
servo loop closure, 40 MHz line driver encoder data rate, and an optional Ethernet port
for access to third party networked I/O solutions. The Ndrive HP also features an
optional on-board brake relay, programmable resolution multiplication up to x 65,536,
with a 200 kHz maximum amplified sine wave input frequency, and up to three-axis
Position Synchronized Outputs (laser firing). In addition, the use of the commercially
standard FireWire communication link makes integration to the Automation 3200
network plug-n-play easy.
Figure 1-1.
www.aerotech.com
Ndrive HP 10/20/30 Networked Digital Drives
1-1
Introduction
Ndrive HP 10/20/30 User’s Manual
1.1.
1-2
Feature Summary
•
Software configurable for brush, brushless and stepper motor operation
•
Standard 100 VDC – 320 VDC Bus, optional 20 VDC – 80 VDC Bus, requires
the -AUXPWR option
•
Fully isolated power stage
•
5 VDC, 500 mA fused user output power for encoder and Hall effect signals,
etc.
•
Two mounting orientations optimized for heat transfer or minimal panel space
utilization
•
Full protection against the following failure modes:
1.
Control supply under voltage
2.
Continuous current overload
3.
Power stage bias supply under-voltage
4.
Power stage output short circuit (phase to phase and phase to ground)
5.
DC bus over voltage
6.
IGBT device over temperature sense
•
Line driver square wave or analog sine wave quadrature encoder primary
position and velocity feedback
•
Line driver square wave auxiliary quadrature encoder input or output for PSO
(laser firing), etc.
•
4 opto-isolated user outputs standard
•
6 opto-isolated user inputs standard, 2 of which are high speed
•
2 differential analog inputs (one standard and one available with the –IOPSO
option)
•
2 analog outputs (one standard and one available with the –IOPSO option)
www.aerotech.com
Ndrive HP 10/20/30 User’s Manual
1.2.
Introduction
Connection Overview
The Ndrive HP consists of two power connections (motor power and input power), three
FireWire ports, an optional Ethernet connection, an RS-232/RS-422 connector, LED
indicator lamps and two D-Style connectors for Auxiliary I/O (15 and 26 pin) and Motor
Feedback (25 pin). An –IOPSO or -IOPSOH option is also available, which has
connectors for PSO, absolute encoder, SSI Net, analog I/O, digital I/O, and user power.
Refer to Figure 1-2 for connector locations.
Figure 1-2.
www.aerotech.com
Ndrive HP Hardware
1-3
Introduction
Ndrive HP 10/20/30 User’s Manual
1.3.
Functional Diagram
The standard package includes the bus power supply that operates from 85-250 VAC
(120 – 350 VDC). The power supply is included with the standard package for off-line
operation without the need for an isolation transformer. A soft start circuit is included to
prevent high inrush currents.
Figure 1-3.
1-4
Functional Diagram
www.aerotech.com
Ndrive HP 10/20/30 User’s Manual
1.4.
Introduction
Ordering Information
The Ndrive HP is available in three models with continuous power, ranging from 1,360
to 4,080 watts. A list of these models, and the available voltage configurations, are
shown in Table 1-1. See Table 1-2 for a list of available accessories.
Table 1-1.
Model
Ndrive HP 10B
Ndrive HP 20B
Ndrive HP 30B-S
Options
–IOPSO and
–IOPSOH
–DUALPSO
–TRIPLEPSO
–PSOOPTO1
–PSOOPTO2
–PSOOPTO3
–PSOOPTO4
–MXH
–ENET
MCK-NDRIVE
–S
–AUXPWR
–HS
–3P
Models, Options, and Voltage Configurations
Peak Output Current
10
20
30
Continuous Output Current (peak)
5
10
15
- One additional 18-bit analog outputs (+/- 10 Volts)
- One additional 16-bit differential analog inputs (+/- 10 Volts)
- One fail safe brake (or user) relay output
- 8 optically isolated logic inputs (5 – 24 VDC), user defined as current
sourcing or sinking.
- Two bi-directional RS-422 encoder inputs/outputs (SSI Net)
- One absolute/RS-485 encoder interface for secondary encoder channel
- Optically isolated laser firing (PSO) output
- Eight in/out optically isolated current sourcing/sinking logic outputs (5 - 24
VDC); rated for 1 ampere on the -IOPSOH option.
Two axis Position Synchronized Output (Laser Firing)
Three axis Position Synchronized Output (Laser Firing)
Opto isolator for PSO (5V, high speed, high current, HCPL2601), standard.
Opto isolator for PSO (15VDC, high speed, low current, 6N136)
Opto isolator for PSO (30VDC, low speed, high current, 4N33)
Opto isolator for PSO (5-25VDC, 40kHz, 50mA, TIL117-M)
Programmable encoder multiplier up to x 2,048, supports PSO (laser firing)
and encoder quadrature output
10/100BASE-T Ethernet port
Mating connector kit for J206 and J207 (J205 is always provided)
Shunt resistor network (Standard on the Ndrive HP 30)
Auxiliary 85-240 VAC input to power logic circuitry. Required for "keep alive"
or 40-80 VDC bus operation. 40-120 VDC operation requires external
transformer to generate 28-85 VAC bus power input.
Heat sink with fins
3 Phase AC input
* Consult factory for availability
www.aerotech.com
1-5
Introduction
Ndrive HP 10/20/30 User’s Manual
Table 1-2.
Accessories
TV0.3-28
TV0.3-56
TV1.5
TV2.5
TV5
LF
UFM
JI
1-6
Accessories
0.3 kVA autotransformer; 28 or 56 VAC out for 40 or 80 VDC bus,
115/230 VAC, 50/60 Hz input
0.3 kVA autotransformer; 56 or 115 VAC out for 80 or 160 VDC bus,
115/230 VAC, 50/60 Hz input
1.5 kVA isolation transformer; 115/230 VAC input; 28, 43, 56, 70, 115
VAC output
2.5 kVA isolation transformer; 115/230 VAC input; 28, 43, 56, 70, 115
VAC output
5 kVA isolation transformer; 115/230 VAC input; 28, 43, 56, 70, 115
VAC output
AC Line Filter, general noise suppression (not for CE Compliance)
AC Line Filter Module (required to meet CE Compliance)
Industrial Joystick
www.aerotech.com
Ndrive HP 10/20/30 User’s Manual
1.5.
Introduction
Specifications
1.5.1. Electrical Specifications
Table 1-3.
Electrical Specifications
Description
Main Supply Input Voltage
Main Supply Input Frequency
Main Supply Inrush Current
Main Supply Maximum Continuous Input Power
Optional Supply Input Voltage
Optional Supply Input Frequency
Optional Supply Maximum Input Power
Output Voltage (depends on AC input voltage)
See 2.4.2.
Peak Output Current (2 sec)
Continuous Output Current
Peak Power Output (includes AC line droop)
Continuous Power Output (includes AC line droop)
Efficiency
Power Amplifier Bandwidth (parameter selectable)
PWM Switching Frequency
Minimum Load Inductance
Maximum Shunt Regulator Dissipation
Maximum Heat Sink Temperature
Heat Sink Size (Typical)
Weight
Modes of Operation
Feedback Inputs
Auxiliary Power Outputs
Protective Features
Isolation
Indicator (power)
Indicator (enabled)
www.aerotech.com
Units
VAC
Hz
A
Watts
VAC
Hz
Watts
Ndrive HP 10
Ndrive HP 20
Ndrive HP 30
240 VAC Max. (Single or 3 Phase)
50-60
23
1500
3000
4500
85-240
50-60
100
VDC
40-350
A(pk)
A(pk)
Watts
Watts
%
kHz
kHz
mH
Watts
C°
Volume
Standard
lb (kg)
with –IOPSO or
–IOPSOH option
Brushless, Brush, and Stepper
10
5
2,720
1,360
20
30
10
15
5,440
8,160
2,720
4,080
97
5 kHz max
20
1 mH @320 VDC (0.8 @ 160 VDC bus)
40 (optional)
40
65
1’ x 2’ x 0.25”
5.0 (2.27)
5.4 (2.45)
Hall A-Pin 10, Hall B-Pin 5, Hall C-Pin 11: Hall effect device inputs for commutation,
0 to 5 VDC, internal pull-up, 10K input. Commutation signals used with brushless
motors to provide motor rotation position information to the amplifier. This allows the
three motor phases currents to be varies, or commutated to rotate the motor in the
desired direction and speed. TTL level input.
sine/sine-N-Pin 17, Pin 18, cosine/cosine-N-Pin 14, Pin 15: Encoder input 0 to
5VDC, internal pull-up, 10K input.
5V-Pin 16: On board 5V power supply. 500 mA maximum output.
5V-Pin 3: On board 5V power supply. 500 mA maximum output (for encoder).
Output short circuit
Peak over current
DC bus over voltage
RMS over current
Over temperature
Control power supply under voltage
Power stage bias supply under voltage
Designed to EN61010/UL3101
Optical and transformer isolation between control and power stages.
LED indicates drive power.
LED indicates drive enabled.
1-7
Introduction
Ndrive HP 10/20/30 User’s Manual
1.5.2. Mechanical Specifications
The outline dimensions for the Ndrive HP are shown in Figure 1-4 and Figure 1-5.
Units should be separated from each other and surrounded by one inch of free air space.
This will also allow the standard 228 mm (9 inch) FireWire cable to interconnect them.
Figure 1-4.
Ndrive HP Dimensions (with -IO Option)
The Ndrive HP case temperature may exceed 75°C in
some applications.
1-8
www.aerotech.com
Ndrive HP 10/20/30 User’s Manual
Figure 1-5.
Introduction
Ndrive HP Dimensions (without the -IO Option)
The Ndrive HP case temperature may exceed 75°C in
some applications.
www.aerotech.com
1-9
Introduction
Ndrive HP 10/20/30 User’s Manual
1.5.3. Environmental Specifications
The environmental specifications for the Ndrive HP are listed below.
•
Temperature:
Ambient
Operating -
5° - 40°C (41° - 104°F)
Storage -
-20 - 70°C (-4 - 158°F)
•
Humidity:
Maximum relative humidity is 80% for temperatures up
to 31°C. Decreasing linearly to 50% relative humidity at
40°C. Non-condensing.
•
Altitude
Up to 2000 m.
•
Pollution
Pollution degree 2 (normally only non-conductive
pollution).
•
Use
Indoor use only.
∇ ∇ ∇
1-10
www.aerotech.com
Ndrive HP 10/20/30 Manual
Installation and Configuration
CHAPTER 2: INSTALLATION and CONFIGURATION
This section covers the hardware configurations using the switches, jumpers, connectors,
and power connections when used with a brush, brushless, or stepper motor. Wiring,
grounding, shielding techniques, and the motor phasing process are also covered.
Aside from the obvious requirements of AC input and motor wiring, the only other
typical requirement is to set the Ndrive HPs communication channel number via switch
S2.
2.1.
Safety Procedures and Warnings
The following statements apply wherever the Warning or Danger symbol appears within
this manual. Failure to observe these precautions could result in serious injury to those
performing the procedures and/or damage to the equipment.
If the equipment is used in a manner not specified by the
manufacturer, the protection by the equipment may be
impaired. The user should practice caution when following
the given procedures. Deviation from this may result in
damage to the equipment or machinery.
To minimize the possibility of electrical shock and bodily
injury, ensure that the motor is decoupled from the
mechanical system and no harm to personnel will result if
the motor begins to spin.
To minimize the possibility of electrical shock and bodily
injury when any electrical circuit is in use, ensure that no
person is exposed to the circuitry.
To minimize the possibility of bodily injury, make certain
that all electrical power switches (all switches external to
the amplifier) are in the off position prior to making any
mechanical adjustments.
www.aerotech.com
2-1
Installation and Configuration
2.2.
Ndrive HP 10/20/30 Manual
Wiring, Grounding, and Shielding Techniques
To reduce electrical noise in the Ndrive, the user should observe the motor and input
power wiring techniques explained in the following sections (suitable for use on a circuit
capable of delivering not more than 5,000A, 240V).
Signal shielding is very important and the wiring should be
physically isolated from motor, AC power and all other
power wiring.
2.2.1. Minimizing EMI Interference
The Ndrive HPs are high efficiency PWM amplifiers operating at a 20 kHz switching
rate.
This switching rate can generate Electromagnetic Interference (EMI) into the MHz band.
To minimize this EMI, it is recommended that the motor leads be twisted together with
the motor cable grounding wire and surrounded with a foil or braided shield.
In addition to the EMI effects, electro-static (capacitive) coupling to the motor frame is
very high, requiring the frame to be grounded in order to eliminate a shock hazard.
Additional electro-static coupling exists between the three twisted motor leads and the
foil shield of the motor cable.
This coupling forces high frequency currents to flow through the returning earth ground
of the motor cable. To minimize this problem and maintain low levels of EMI radiation,
perform the following.
1.
2.
3.
4.
5.
Use shielded cable to carry the motor current and connect the shield to earth
ground.
Use a cable with sufficient insulation. This will reduce the capacitive coupling
between the leads that, in turn, reduces the current generated in the shield wire.
Provide strong earth ground connections to the amplifier, additional heat sink,
and the motor. Offering electrical noise a low impedance path to earth ground
not only reduces radiated emissions, but also improves system performance.
If possible, do not route motor cables near cables carrying logic signals and use
shielded cable to carry logic signals.
Ferrite beads or Aerotech’s FBF-1 or FBF-2 filter adapters, may be used on the
motor leads to reduce the effects of amplifier EMI/RFI, produced by PWM
(pulse width modulation) amplifiers. Refer to the FBF-1 and FBF-2 drawings on
your software or documentation CD ROM for more information on the ferrite
beads.
Table 2-1.
Ferrite Bead Part Numbers
Wire Gauge
1.62814mm (#14 AWG)
1.29032mm (#16 AWG)
1.02362mm (#18 AWG)
0.81280mm (#20 AWG)
2-2
Aerotech PN.
EIZ01027
EIZ01025
EIZ01001
EIZ01025
Third Party PN.
#2643002402 Elna Fair-Rite Products
#2643250402 Elna Fair-Rite Products
#2673000801 Elna Fair-Rite Products
#2643250402 Elna Fair-Rite Products
www.aerotech.com
Ndrive HP 10/20/30 Manual
Installation and Configuration
2.2.2. Minimizing 50/60 HZ Line Interference
Operating the Ndrive HP from an off-line source of 115 VAC or 230 VAC may create
some additional issues. There is a potential problem of EMI generated from the switching
power stage of the Ndrive propagating through the bridge rectifier and out through the
AC1 and AC2 input AC line connections. Back-propagation of noise into the AC lines
can be minimized using a line filter (refer to Figure 2-1).
Figure 2-1.
Back-Propagation Line Filter Connection
Second, a potential problem that exists with off line connections is 50/60 Hz electrostatic
coupling between the frame of the AC motor and the AC1/AC2 AC input power. Since
AC1 is referenced to earth ground at the source, the DC bus of the amplifier “swings” at
50/60 Hz with respect to the motor frame.
The path of current caused by this coupling between the motor frame and the amplifier
stage passes through the current feedback sensing devices of the amplifier. Depending on
the magnitude of this current, a 50/60 Hz disturbance may be visible in the position error.
To eliminate this problem, an isolation transformer can be used to block the 50/60 Hz
from being seen by the motor frame (refer to Figure 2-2).
Figure 2-2.
Isolation Transformer Connection (Eliminates 50/60 Hz AC Coupling)
www.aerotech.com
2-3
Installation and Configuration
2.3.
Ndrive HP 10/20/30 Manual
Power Connections
The Ndrive HP may powered by one or two separate AC voltages. One for motor bus
power and optionally a second for control power, as described in the following two subsections. If the optional control power input is present, it must be powered.
2.3.1. Control Power Connections (TB101)
The -AUXPWR option allows the Ndrive HP to remain operational when the motor
power is removed, such as when an external emergency stop circuit is required. If the
Ndrive HP was purchased with the -AUXPWR option, a separate AC input (TB101) has
been included on the amplifier. The internal power supply of the Ndrive HP requires a
minimum of 85 VAC input to operate properly. The figure below shows the connection
to the separate AC power board. The connection is made to the AC input board with a
three terminal connector (Aerotech Part #ECK00213), provided. See Section 2.4. for
various typical AC wiring options. TB101 is also typically utilized when an emergency
stop circuit is present. See Section 2.10 for a typical ESTOP sense input wiring
configuration.
The AUXPWR input is an option that, if present, must be powered. It is typically used
when the AC bus input power is less than 85 VAC at TB102 AC1, AC2 (or AC3).
TB101 is also typically utilized when an emergency stop circuit is present. Optional
Supply Connections to AL1, AL2 and the Protective Ground should be at least 1.02362
mm (#18 AWG) wire rated @ 300 V (3 Amp external fusing may be required for AL2,
AL1 is fused internally at 3 Amps).
Figure 2-3.
Table 2-2.
Label
AL1
AL2
2-4
AUXPWR Option
TB101 Auxiliary AC Supply Input (when TB102 AC input < 85 VAC)
Description
Optional 85-240 VAC Control Power Input
Optional 85-240 VAC Control Power Input
Protective Ground (Required for Safety)
Wire Size
1.02362 mm (#18 AWG)
1.02362 mm (#18 AWG)
1.02362 mm (#18 AWG)
www.aerotech.com
Ndrive HP 10/20/30 Manual
Installation and Configuration
2.3.2. Motor Power Connections (TB102)
The three-phase motor terminal connections are made at connections A, B, and C. Motor
Connections ØA, ØB, ØC and its Protective Ground should be made with 1.62814 mm
(#14 AWG) wire rated at 300 V. Motor frame and shield connect to (ground).
Input power to the Ndrive is made at the AC1 and AC2 terminals with earth ground
connected to
(ground). A three-phase power input is also available (AC3, requires 3
Phase Option). Connections at AC1, AC2 and AC3 and its Protective Ground should be
made with 1.62814 mm (#14 AWG) wire rated at 300V.
Figure 2-4.
Table 2-3.
Label
AC1
AC2
AC3
ØA
ØB
ØC
Bus Power
TB102 Main AC Power Input and Motor Power Output
Description
240 Volt Max. AC Input
240 Volt Max. AC Input
Optional 3-Phase AC Input* (240 VAC Max)
Protective Ground (Required for Safety)
Protective Ground to Motor (Required for Safety)
Phase A Motor Power
Phase B Motor Power
Phase C Motor Power
Wire Size
1.62814 mm (#14 AWG)
1.62814 mm (#14 AWG)
1.62814 mm (#14 AWG)
1.62814 mm (#14 AWG)
1.62814 mm (#14 AWG)
1.62814 mm (#14 AWG)
1.62814 mm (#14 AWG)
1.62814 mm (#14 AWG)
External fuses or circuit breaker (15 Amps Max., time delay type) are required for the
AC 1, AC2 and AC3 AC inputs for optimum protection. The protective devices should
be located near the Ndrive HP. For optimum protection, use 12 Amp protective devices if
possible (15 Amp devices may be required in applications requiring maximum power).
www.aerotech.com
2-5
Installation and Configuration
Ndrive HP 10/20/30 Manual
2.3.3. 40/80 VDC Power Transformers
The TV0.3-56 power transformer is an optional accessory for the Ndrive HP. The
transformer allows the generation of 56 VAC from a 115 VAC and 230 VAC source
respectively. When rectified by the Ndrive HP, 56 VAC yields an 80 VDC power bus.
The TV0.3-28 power transformer is an optional accessory available for the Ndrive HP.
This transformer allows for the generation of 28 VAC from a 115 VAC or 230 VAC
source, respectively. When rectified by the Ndrive, 28 VAC yields a 40 VDC power bus.
The following three figures illustrate the six combinations available for both AC input
voltages and all three DC bus voltages, as well as the use of the -AUXPWR option.
A TM3 and TM5 transformer package is also available to power up to four Ndrives,
providing 300 or 500 watts of power.
Figure 2-5.
2-6
TM3 and TM5 Transformer Options
www.aerotech.com
Ndrive HP 10/20/30 Manual
2.4.
Installation and Configuration
Typical AC Wiring with AUXPWR Option
The user may connect an Ndrive to a 115/230 VAC source and generate a 40, 80 160
VDC Bus for the motor power. The following three figures illustrate the six
combinations available for both AC input voltages and all three DC bus voltages, as well
as the use of the -AUXPWR option.
Ndrive HP
AUXPWR OPTION
AC1
TRANSFORMER
INTERNAL
THERMAL
SWITCH
RED 28v
#18 WHT
#18 WHT
AC HI
splice
AC LO
115v BLK
100v ORN
MAIN
SUPPLY
PRIMARY FUSE
4A SLO-BLO
GRN 0v
115VAC
50/60 HZ
INPUT
SAFTEY
2
NOTES:
0v GRAY
AC2
115v BRN
4
YEL 28v
100v GRN
2
splice
0v BLU
BLK 0v
1. THE AUXPWR OPTION IS USED
WHEN THE MAIN SUPPLY POWER IS
BELOW 100VAC. TYPICALLY 28-56VAC
INPUT. THIS COREESPONDS TO A
BUS VOLTAGE OF 40-80VDC.
2. FOR 100VAC PRIMARY INPUT,
PARALLEL THE 100VAC TAPS AND
LEAVE THE 115VAC TAPS
UNTERMINATED.
OPTIONAL
SUPPLY
FRAME GROUND
AL1
3. FOR 200VAC PRIMARY INPUT,
SERIES THE 100VAC TAPS AND LEAVE
THE 115VAC TAPS UNTERMINATED.
AL2
TV0.3-28 WIRING
PRIMARY = 115VAC
SECONDARY = 28VAC (40VDC BUS)
TRANSFORMER P/N EAX01007
Ndrive HP
AUXPWR OPTION
AC1
TRANSFORMER
INTERNAL
THERMAL
SWITCH
RED 28v
#18 WHT
#18 WHT
AC HI
splice
GRN 0v
230VAC
50/60 HZ
INPUT
SAFTEY
3
5. IT IS RECOMMENDED THAT THE
OPTIONAL AND MAIN SUPPLIES ARE
CONNECTED TO THE SAME SOURCE
AS SHOWN. THIS WILL ENSURE
PROPER SOFT START OPERATION.
6. ADDITIONAL OR ALTERNATIVE
FUSING MAY BE REQUIRED FOR
OPTIMUM PROTECTION.
splice
0v GRAY
AC2
AC LO
115v BLK
100v ORN
MAIN
SUPPLY
PRIMARY FUSE
3A SLO-BLO
4. WHEN USING AN ISOLATION
TRANSFORMER, EARTH GROUNDING
OF "AC LO" INPUT TAP REDUCES
ELECTRICAL AND AUDIABLE NOISE
EMMISSIONS AND PROVIDES
INCREASED SERVO PERFORMANCE.
115v BRN
4
YEL 28v
100v GRN
BLK 0v
0v BLU
3
splice
OPTIONAL
SUPPLY
FRAME GROUND
AL1
AL2
TV0.3-28 WIRING
PRIMARY = 230VAC
SECONDARY = 28VAC (40VDC BUS)
TRANSFORMER P/N EAX01007
Figure 2-6.
www.aerotech.com
Ndrive HP
AUXPWR INTERCONNECT
(40VDC BUS / TV0.3-28)
620B1346-1
620B1346-101.DWG
40 Volt DC Bus from 115 and 230 VAC Source
2-7
Installation and Configuration
Ndrive HP
AUXPWR OPTION
AC1
TRANSFORMER
INTERNAL
THERMAL
SWITCH
RED 56v
PRIMARY FUSE
4A SLO-BLO
#18 WHT
AC HI
splice
#18 WHT
AC LO
115v BLK
115VAC
50/60 HZ
INPUT
SAFTEY
100v ORN
MAIN
SUPPLY
Ndrive HP 10/20/30 Manual
GRN 0v
2
NOTES:
0v GRAY
AC2
1. THE AUXPWR OPTION IS USED
WHEN THE MAIN SUPPLY POWER
IS BELOW 100VAC. TYPICALLY
28-56VAC INPUT. THIS
COREESPONDS TO A BUS
VOLTAGE OF 40-80VDC.
115v BRN
4
YEL 56v
BLK 0v
100v GRN
2
splice
0v BLU
2. FOR 100VAC PRIMARY INPUT,
PARALLEL THE 100VAC TAPS AND
LEAVE THE 115VAC TAPS
UNTERMINATED.
OPTIONAL
SUPPLY
FRAME GROUND
AL1
AL2
3. FOR 200VAC PRIMARY INPUT,
SERIES THE 100VAC TAPS AND
LEAVE THE 115VAC TAPS
UNTERMINATED.
TV0.3-56 WIRING
PRIMARY = 115VAC
SECONDARY = 56VAC (80VDC BUS)
TRANSFORMER P/N EAX01006
Ndrive HP
AUXPWR OPTION
AC1
TRANSFORMER
INTERNAL
THERMAL
SWITCH
RED 56v
PRIMARY FUSE
3A SLO-BLO
#18 WHT
#18 WHT
AC LO
115v BLK
230VAC
50/60 HZ
INPUT
SAFTEY
100v ORN
MAIN
SUPPLY
5. IT IS RECOMMENDED THAT THE
OPTIONAL AND MAIN SUPPLIES
ARE TURNED ON AT THE SAME
TIME TO ENSURE PROPER SOFT
START OPERATION.
AC HI
splice
GRN 0v
3
6. ADDITIONAL OR ALTERNATIVE
FUSING MAY BE REQUIRED FOR
OPTIMUM PROTECTION.
splice
0v GRAY
AC2
4. WHEN USING AN ISOLATION
TRANSFORMER, EARTH
GROUNDING OF "AC LO" INPUT
TAP REDUCES ELECTRICAL AND
AUDIABLE NOISE EMMISSIONS
AND PROVIDES INCREASED
SERVO PERFORMANCE.
115v BRN
4
YEL 56v
BLK 0v
100v GRN
0v BLU
3
splice
OPTIONAL
SUPPLY
FRAME GROUND
AL1
Ndrive HP
AUXPWR INTERCONNECT
(80VDC BUS / TV0.3-56)
AL2
TV0.3-56 WIRING
PRIMARY = 230VAC
SECONDARY = 56VAC (80VDC BUS)
TRANSFORMER P/N EAX01006
Figure 2-7.
2-8
620B1346-2
620B1346-201.DWG
80 Volt DC Bus from 115 and 230 VAC Source
www.aerotech.com
Ndrive HP 10/20/30 Manual
Ndrive HP
AUXPWR OPTION
AC1
TRANSFORMER
INTERNAL
THERMAL
SWITCH
RED 56v
PRIMARY FUSE
4A SLO-BLO
#18 WHT
#18 WHT
AC HI
splice
115VAC
50/60 HZ
INPUT
AC LO
115v BLK
SAFTEY
100v ORN
MAIN
SUPPLY
Installation and Configuration
2
GRN 0v
0v GRAY
AC2
splice
4
115v BRN
YEL 56v
100v GRN
2
splice
0v BLU
BLK 0v
2. FOR 100VAC PRIMARY INPUT,
PARALLEL THE 100VAC TAPS AND
LEAVE THE 115VAC TAPS
UNTERMINATED.
OPTIONAL
SUPPLY
FRAME GROUND
3. FOR 200VAC PRIMARY INPUT,
SERIES THE 100VAC TAPS AND
LEAVE THE 115VAC TAPS
UNTERMINATED.
AL1
AL2
TV0.3-56 WIRING
PRIMARY = 115VAC
SECONDARY = 115VAC (160VDC BUS)
TRANSFORMER P/N EAX01006
Ndrive HP
AUXPWR OPTION
AC1
TRANSFORMER
INTERNAL
THERMAL
SWITCH
RED 56v
PRIMARY FUSE
3A SLO-BLO
#18 WHT
AC HI
splice
#18 WHT
3
splice
0v GRAY
splice
4
230VAC
50/60 HZ
INPUT
SAFTEY
GRN 0v
AC2
AC LO
115v BLK
100v ORN
MAIN
SUPPLY
NOTES:
1. THE AUXPWR OPTION IS USED
WHEN THE MAIN SUPPLY POWER IS
BELOW 100VAC. TYPICALLY 28-56VAC
INPUT. THIS COREESPONDS TO A
BUS VOLTAGE OF 40-80VDC. THE
CONFIGURATION SHOWN IS FOR
ISOLATED 115VAC (160VDC BUS)
OPERATION.
115v BRN
YEL 56v
BLK 0v
100v GRN
0v BLU
3
4. WHEN USING AN ISOLATION
TRANSFORMER, EARTH GROUNDING
OF "AC LO" INPUT TAP REDUCES
ELECTRICAL AND AUDIABLE NOISE
EMMISSIONS AND PROVIDES
INCREASED SERVO PERFORMANCE.
5. IT IS RECOMMENDED THAT THE
OPTIONAL AND MAIN SUPPLIES ARE
CONNECTED TO THE SAME SOURCE
AS SHOWN. THIS WILL ENSURE
PROPER SOFT START OPERATION.
6. ADDITIONAL OR ALTERNATIVE
FUSING MAY BE REQUIRED FOR
OPTIMUM PERFORMANCE.
splice
OPTIONAL
SUPPLY
FRAME GROUND
Ndrive HP
AUXPWR INTERCONNECT
(160VDC BUS / TV0.3-56)
AL1
AL2
TV0.3-56 WIRING
PRIMARY = 230VAC
SECONDARY = 115VAC (160VDC BUS)
TRANSFORMER P/N EAX01006
Figure 2-8.
www.aerotech.com
620B1346-3
620B1346-301.DWG
160 Volt DC Bus from 115 and 230 VAC Source
2-9
Installation and Configuration
2.5.
Ndrive HP 10/20/30 Manual
Motor and Feedback Connections
The Ndrive HP can be integrated into a system using three basic configurations: DC
Brush (Velocity or Torque mode), brushless, and stepper motors. Brush and brushless
motors may have two feedback devices.
2.5.1. DC Brush Motor in Torque Mode Configuration
The DC brush motor configuration is shown in Figure 2-9. See Section 2.6.1 for the
correct encoder phasing information if Aerotech’s standard cabling is not used.
Figure 2-9.
2-10
DC Brush Motor (Torque Mode) Configuration
www.aerotech.com
Ndrive HP 10/20/30 Manual
Installation and Configuration
2.5.1.1. DC Brush Motor Phasing
If an Aerotech motor is used with Aerotech provided cabling, no motor phasing process
is required.
A DC brush motor is phased correctly when a positive motion command causes
clockwise (CW) motor rotation, as viewed looking at the motor from the front mounting
flange. This assumes the CntsPerMetricUnit/CntsPerEnglishUnit/CntsPerRotaryUnit axis
parameters are set to a positive value. This required phasing, is determined solely by
which motor lead is connected to the ØA and ØC motor terminals. Motor phasing is
unrelated to the resultant direction of motion commanded from within a motion program.
After correctly phasing the motor, you may reverse the motor direction when
commanding a positive move from a motion program, by negating the sign of the
CntsPerMetricUnit/CntsPerEnglishUnit/CntsPerRotaryUnit axis parameters.
To determine this, connect a voltmeter to the motor leads of an un-powered motor.
Rotate the motor by hand clock-wise (CW). Swap the voltmeter connections to the motor
until the voltmeter indicates a positive voltage. The motor lead now connected to the
positive lead of the voltmeter, is the + motor lead as indicated in the Figure above, and
should be connected to the ØA motor terminal. The other motor lead connects to the ØC
motor terminal.
www.aerotech.com
2-11
Installation and Configuration
Ndrive HP 10/20/30 Manual
2.5.2. DC Brush Motor with Tachometer Feedback Configuration
The DC brush motor configuration is shown in Figure 2-10. See section 2.6.1 for the
correct encoder phasing information if Aerotech’s standard cabling is not used. The
tachometer may be connected to TB302 or J205 as shown in the picture below. Note, that
tachometer feedback uses analog input 0, so it may not be used when tachometer
feedback is used. To configure the axis parameters in this mode, see the "Brush Motors
in Velocity Mode" topic in the Nview HMI help.
The analog input that the tachometer is connected to is scaled for ± 10V input maximum.
The tachometer voltage must not exceed ± 10 volts or the velocity loop will become
unstable, possible causing a runaway condition. Based upon the tachometer voltage
rating, a resistor-scaling network may be required to limit the tachometer voltage to ±
10V at maximum speed. If noise is present on the tachometer signal, a high quality 1 uF
capacitor may be required across the tachometer leads, before any voltage divider,
required to limit the maximum input voltage to the analog input.
The motor and tachometer are correctly phased, when rotated clockwise by hand and the
tachometer generates a positive voltage as displayed on analog input 0 and the motors
back EMF generates a negative voltage at motor terminal A (with the voltmeter common
probe at motor terminal C).
Figure 2-10.
2-12
DC Brush Motor Wiring with Tachometer
www.aerotech.com
Ndrive HP 10/20/30 Manual
Installation and Configuration
2.5.3. Brushless Motor Configuration
This mode is used with a brushless motor only. See Section 2.6., if Aerotech’s standard
cabling is not used, for information on correctly phasing the motor, encoder, and Hall
feedback devices.
Figure 2-11.
www.aerotech.com
Brushless Motor Configuration
2-13
Installation and Configuration
Ndrive HP 10/20/30 Manual
2.5.3.1. Brushless Motor Phasing
When configuring the Ndrive HP to run a non-Aerotech brushless motor, the motor leads
(A, B and C on TB102) must be correctly connected for proper operation. If an Aerotech
motor is used with Aerotech provided cabling, no motor phasing process is required.
If an Aerotech brushless motor is used with the Ndrive HP,
motor phase and Hall connections can be easily
determined by referring to the system interconnection
drawing in Figure 2-11.
An AC brushless motor is correctly phased when a positive motion command causes
clockwise (CW) motor rotation, as viewed looking at the motor from the front mounting
flange. This assumes a positive CntsPerMetricUnit/CntsPerEnglishUnit /
CntsPerRotaryUnit axis parameter. This required phasing is determined by which motor
lead is connected to the ØA, ØB and ØC motor terminals.
Motor phasing is unrelated to the direction of motion commanded from within a motion
program. After correctly phasing the motor, you may reverse the motor direction when
commanding a positive move from a motion program, by negating the sign of the
CntsPerMetricUnit / CntsPerEnglishUnit/CntsPerRotaryUnit axis parameter.
Be sure to first configure the axis parameters before
running the A3200\Programs\Samples\MsetDebug.Pgm.
See the “Getting Started” section in the Nview help for
configuration information.
Motor phasing may be determined by two methods. The first of which, is by actively
driving
the
motor
open
loop,
under
program
control.
The
A3200\Programs\Samples\MsetDebug.Pgm may be used for this purpose. The motor
phasing is correct when the program causes the motor to move in a positive direction, as
defined in Figure 2-17. Swapping any two motor lead connections, will correct a
reversed motor rotation.
The second method is a non-powered method, whereby the motor is disconnected from
the controller and connected in the test configuration as defined in Figure 2-14 This will
identify motor (and Hall signal) leads A, B and C. These sequences and the generated
output motor phase voltages (motor output connections ØA, ØB, and ØC) are shown in
Figure 2-14 The voltages generated are made by moving the motor/forcer by hand in a
positive (CW) motion direction.
2-14
www.aerotech.com
Ndrive HP 10/20/30 Manual
Installation and Configuration
2.5.3.2. Brushless Motor Hall-Effect Feedback Connections
The Hall-Effect feedback signals on an AC brushless motor are correctly phased when
the hall states correspond to the states at each of the electrical angles shown in Figure 214 The Hall states, which correspond to the electrical angles, are indicated in Figure 2-14
A “0” for the given Hall input indicates zero voltage or logic low, where a “1” indicates
five volts or logic high. These logic levels may be viewed within the Nstat utility, on the
Diagnostic tab, as shown in Figure 2-13.
Figure 2-12.
Figure 2-13.
www.aerotech.com
Hall-Effect Feedback Connections
Hall-Effect Feedback Inputs in the Nstat Utility
2-15
Installation and Configuration
Ndrive HP 10/20/30 Manual
2.5.3.3. Hall-Effect Phasing
For an AC brushless motor with an unknown hall sequence, one of two simple tests can
be performed on the motor to determine the proper connections to the Ndrive HP.
Be sure to first configure the axis parameters before
running the A3200\Programs\Samples\MsetDebug.Pgm.
See the “Getting Started” section in the Nview help for
configuration information.
The first of which, is by actively driving the motor under program control. The
A3200\Programs\Samples\MsetDebug.Pgm may be used for this purpose. The hall
signals must be swapped until they generate the sequence as defined in Figure 2-14.
After the Hall sequence is correct, the program can then correctly determine if a
commutation offset is required. The test program will indicate the required value of the
CfgMotOffsetAng axis parameter to correctly phase the motor.
The second method is a non-powered method, whereby the motor is disconnected from
the controller and connected in the test configuration as defined in Figure 2-14. This will
identify the hall signal (and motor) leads A, B and C. The equipment needed for the nonpowered test is a two-channel oscilloscope and three resistors (typically 10 K ohm, 1/2
watt) wired in a Wye configuration.
The tests outlined below do not require that the amplifier
be turned on since Figure 2-14 illustrates the generated
output voltage of the amplifier relative to the input Hall
sequences.
Before performing the test in Figure 2-14, ensure that the
motor leads are completely disconnected from the
amplifier.
Connect the ends of the three resistors to three motor leads. Use one channel of the
oscilloscope to monitor motor terminal A with respect to the Wye neutral (eg., the point
where all three resistors are connected together). Turn the shaft of the motor CW and
note the generated voltage. This voltage represents the phase A to neutral Counter EMF
(CEMF). With the second oscilloscope probe, determine the Hall switch that is in phase
with this voltage. Similarly, phase B and C should be aligned with the other two Hall
switches. This will identify each motor and hall lead, which are in-phase with each other.
Any motor and hall lead set may be phase A. The relative phasing between this set and
the other two sets will then determine which is phase B and phase C.
Refer to Figure 2-14 and note the generated output voltages of the amplifier relative to
the Hall sequences applied to Hall A, Hall B, and Hall C connections at connector J207.
For proper operation, the CEMF generated motor phase voltages should be aligned to the
amplifier’s output generated voltage with the given Hall effect sequence shown in Figure
2-14.
2-16
www.aerotech.com
Ndrive HP 10/20/30 Manual
Figure 2-14.
www.aerotech.com
Installation and Configuration
Motor Phasing
2-17
Installation and Configuration
Ndrive HP 10/20/30 Manual
2.5.4. Stepper Motor Configuration
This mode is used with a stepper motor only. See Section 2.6.1, if Aerotech’s standard
cabling is not used, for information on correctly phasing the motor feedback devices.
Figure 2-15.
Stepper Motor Configuration
2.5.4.1. Stepper Motor Phasing Process
A stepper motor is phased correctly when a positive motion command causes the motor
to rotate in a clockwise (CW) direction, assuming a positive scaling factor, as determined
by the CntsPerMetricUnit/CntsPerEnglishUnit/CntsPerRotaryUnit axis parameter. To
correct the phasing, reverse the connections to the θA and θB terminals on the Ndrive
HP. This is important because the end of travel (EOT) limit inputs are relative to motor
rotation. After correctly phasing the motor, you may reverse the motor direction when
commanding a positive move from a motion program, by negating the sign of the
CntsPerMetricUnit/CntsPerEnglishUnit/CntsPerRotaryUnit axis parameter.
2-18
www.aerotech.com
Ndrive HP 10/20/30 Manual
2.6.
Installation and Configuration
Encoder Feedback Connections
One encoder feedback device must always be used for all motor types, except for stepper
motors. Each of the two encoder channels in the Ndrive HP, accept a differential line
driver encoder. DC Brush and brushless motors may have a separate position and a
velocity feedback device. An analog sine wave encoder may be used with Aerotech’s
MXH multiplier box to multiply the encoder resolution and simultaneously convert it to a
differential line driver encoder signal, acceptable by the Ndrive HP.
Signal shielding is very important and the wiring should be
physically isolated from motor, AC power and all other
power wiring.
Figure 2-16.
www.aerotech.com
Encoder Feedback Connections
2-19
Installation and Configuration
Ndrive HP 10/20/30 Manual
2.6.1. Encoder Phasing
Figure 2-17 illustrates the required encoder phasing for clockwise motor rotation, or
positive forcer movement through the stationary magnet track. If the motor is not visible,
or may not be manually moved by hand, it may be actively driven open loop, under
program control, by running the A3200\Programs\Samples\MsetDebug.Pgm program.
This program will move the motor in a positive direction, allowing the position of the
encoder to be monitored in the “Pos Fdbk” field of the Diagnostics tab of the Nstat
utility, as shown in Figure 2-18. The program should cause the encoder to produce a
more positive position as the program executes. If it counts more negative, swap the
connections to the controllers SIN and the SIN-N encoder inputs, or you may invert the
sign of the CfgFbkVelMultiplier and CfgFbkPosMultiplier parameters. However, if this
axis is configured for dual loop, two feedback devices, one for position and one for
velocity feedback, invert the sign of only the one parameter associated with the
incorrectly phased feedback device.
Figure 2-17.
Figure 2-18.
2-20
Encoder Phasing Reference Diagram
Encoder and Hall Signals in the Nstat Utility Program
www.aerotech.com
Ndrive HP 10/20/30 Manual
2.7.
Installation and Configuration
End of Travel (EOT) Limit Input Connections
End of Travel (EOT) Limits are required to define the end of the physical travel. They
are also used for homing, which defines an absolute reference for the user coordinate
system. EOT Limits are relative to positive motion, which is defined as clockwise rotary
motion or positive linear motor motion. Positive or clockwise motion is stopped by the
CW or clockwise EOT limit input, etc.
Figure 2-19.
Figure 2-20.
End of Travel Limit input Connections
Limit Inputs in the Nstat Utility
2.7.1. End of Travel (EOT) Limit Phasing
If the EOT limits are reversed, swap the connections to the CW and CCW inputs at the
Ndrive HP J207 connector. The level of the EOT limit inputs may be viewed on the
Diagnostic tab of the Nstat utility, as shown in Figure 2-19.
www.aerotech.com
2-21
Installation and Configuration
2.8.
Ndrive HP 10/20/30 Manual
Communication Channel Settings
Each Ndrive HP must have a unique communication channel number defined by switch
S2. It is recommended that they be sequential beginning with the first device number.
The 1st device as indicated by the switch settings in row 1 of the following table will be
configured by the Axis 1 parameters in the Nparam utility. Assuming all axes are
selected on the “Axis” menu in Nparam, they will be the parameters in the first column.
The Ndrive configured as Row 2 indicates below, will be configured by the axis
parameters in column 2 of the Nparam utility, etc.
Information on connecting options such as analog and digital I/O, and laser firing (PSO)
is provided in Chapter 4: Options.
Table 2-4.
Ndrive #
1
2
3
4
5
6
7
8
9
10
11
12
13
14
15
16
17
18
19
20
21
22
23
24
25
26
27
28
29
30
31
32
2-22
Ndrive HP Switch Settings (S2)
7
!
!
!
!
!
!
!
!
!
!
!
!
!
!
!
!
!
!
!
!
!
!
!
!
!
!
!
!
!
!
!
!
6
!
!
!
!
!
!
!
!
!
!
!
!
!
!
!
!
!
!
!
!
!
!
!
!
!
!
!
!
!
!
!
!
Switch Settings - (Off is indicated by “ - ” )
5
4
3
2
1
!
!
!
!
!
!
!
!
!
!
!
!
!
!
!
!
!
!
!
!
!
!
!
!
!
!
!
!
!
!
!
!
!
!
!
!
!
!
!
!
!
!
!
!
!
!
!
!
!
!
!
!
!
!
!
!
!
!
!
!
!
!
!
!
!
!
!
!
!
!
!
!
!
!
!
!
!
!
!
!
!
!
!
!
!
!
!
!
!
!
!
!
!
!
!
!
-
0
!
!
!
!
!
!
!
!
!
!
!
!
!
!
!
!
-
www.aerotech.com
Ndrive HP 10/20/30 Manual
2.9.
Installation and Configuration
Connecting Multiple Drives
Following are two interconnection diagrams and a chart showing the part numbers of the
FireWire Bus PCI card and the various interconnect cables and their part numbers.
Table 2-5.
FireWire Card and Cable Part Numbers
Part Number
NFire-PCI
NFire-Multi
NFire-PCI-TI-LP
NConnect-4500-66
NConnect-1800-66
NConnect-900-66
NConnect-381-66
NConnect-228-66
Description
FireWire OHCI compliant PCI interface card
FireWire card, with USB 2.0 and GigaBit Ethernet LAN
Low Profile OHCI compliant PCI FireWire card
FireWire cable, 4.5 M (15 feet) long, 6 pin to 6 pin
FireWire cable, 1.8 M (6 feet) long, 6 pin to 6 pin
FireWire cable, 900 mm (3 feet) long, 6 pin to 6 pin
FireWire cable, 381 mm (15 inches) long, 6 pin to 6 pin
FireWire cable, 228 mm (9 inches) long, 6 pin to 6 pin
Figure 2-21.
www.aerotech.com
Recommended Star Daisy Chain Configuration
2-23
Installation and Configuration
Ndrive HP 10/20/30 Manual
Figure 2-22.
FireWire Daisy Chain
Before connecting any device to the FireWire bus, the
device should be powered up and tested independently to
prevent damaging linked equipment.
Ndrive HPs, HLs, CPs, MPs, Nservos, Nsteps and Npaqs
should always have their FireWire cables connected in a
star configuration to minimize the FireWire cable lengths
(see Figure 2-21).
2.9.1. I/O and Signal Wiring Requirements
The I/O, communication, and encoder feedback connections are typically very low power
connections. Wire and connectors used for signal wiring should be rated for at least 30 V
and have a current capacity of at least 0.25 Amp. Wires and connectors used for low
voltage power connections such as +5V should have a current capacity of at least 1 Amp
(encoder feedback +5V supply may require 0.6 Amps in some applications). In some
applications, especially when there are significant wire distances, a larger wire size may
be required to reduce the voltage drop that occurs along the wire. This increase may be
necessary in order to keep the voltage within a specified range at a remote point.
When signal wiring is in close proximity to wiring operating at voltages above 60 Volts
the insulation rating of the signal wiring will also need to be rated for the higher voltage.
Signal wiring should have a voltage rating of at least 300 Volts when in proximity to AC
power or motor power wiring.
Signal shielding is very important and the wiring should be
physically isolated from motor, AC power and all other
power wiring.
2-24
www.aerotech.com
Ndrive HP 10/20/30 Manual
Installation and Configuration
2.10. Emergency Stop Sense Input (TB201)
This input is to be activated by an external fail-safe emergency stop circuit. It is not
intended to be an emergency stop circuit in itself. It is scaled for an input voltage of 5-24
volts. Using a higher input voltage requires adding an external series resistor to limit the
current.
If the ESTOP bit is enabled in the FaultMask axis parameter, the ESTOP input must be
driven to prevent the ESTOP fault condition.
For typical ESTOP wiring, see the following drawing.
Figure 2-23.
ESTOP Sense Input (TB201)
Connecting the E-Stop input to a relay or other EMI/RFI
noise producing device/circuit, requires one or more noise
suppression devices, such as those in Table 2-6, or other
appropriate devices.
Table 2-6.
Electrical Noise Suppression Devices
Device
RC (.1uf / 200 ohm) Network
Varistor
www.aerotech.com
Aerotech P.N.
EIC240
EID160
Third Party P.N.
Electrocube RG1782-8
Littlefuse V250LA40A
2-25
Installation and Configuration
Ndrive HP 10/20/30 Manual
2.10.1. Typical ESTOP Interface
The user may connect an emergency stop circuit to the Ndrive. It will disable power to
the motor by removing power to the power stage of the drive, while maintaining power to
the control section, as shown in the following Figure 2-24. For Rev. 0, see Appendix D.
Figure 2-24.
2-26
Typical Emergency Stop Circuit
www.aerotech.com
Ndrive HP 10/20/30 Manual
Installation and Configuration
2.11. PC Configuration and Operation Information
The Getting Started Guide (PN: EDU175) included with the Nmotion SMC’s software
package, provides a quick start guide with basic information. The Nview help included
with the software provides additional information for configuring the Ndrive HP to the
PC as well as information on hardware requirements, getting started, utilities and system
operation, and on using the Nview HMI user application.
∇ ∇ ∇
www.aerotech.com
2-27
Installation and Configuration
2-28
Ndrive HP 10/20/30 Manual
www.aerotech.com
Ndrive HP 10/20/30 User’s Manual
Technical Details
CHAPTER 3: TECHNICAL DETAILS
3.1.
Auxiliary I/O Connector (J205)
The J205, Auxiliary I/O connector provides 6 inputs, 4 outputs and a secondary bidirectional RS-422 line driver encoder interface. See the following sub-sections for
details on each type of signal within the J205 connector.
Table 3-1.
Auxiliary I/O Connector Pin Assignment (J205)
Pin #
1
2
Label
Auxiliary Sine +
Auxiliary Sine -
3
In 12 +
4
In 12 -
5
In 13 +
6
In 13 -
7
8
9
10
11
12
13
14
15
Out 8
Out 9
Out 10
Auxiliary Cosine +
Auxiliary Cosine +5 Volt
Analog 0 In+
Analog 0 InOut Com
16
Out 11
17
18
In 8
In 9
19
Auxiliary Marker -
20
Auxiliary Marker +
21
22
23
24
25
26
Common
(+5 Volt )
Analog 0 Out
A Gnd
In Com
In 10
In 11
Description
Secondary RS-422 Channel - Sine+
Secondary RS-422 Channel - SineInput 12 High Speed Opto. +
(user interrupt)
Input 12 High Speed Opto. (user interrupt)
Input 13 High Speed Opto. +
(user interrupt)
Input 13 High Speed Opto. (user interrupt)
Output 8
Output 9
Output 10
Secondary RS-422 Channel - Cosine+
Secondary RS-422 Channel - Cosine+5 Volt (500mA. max.)*
Analog Input 0 + (Differential)
Analog Input 0 - (Differential)
Output Common
Output 11 / optional PSO Laser Firing
Output
Input 8
Input 9
Secondary RS-422 Channel - Mrk+ / PSO
out.
Secondary RS-422 Channel - Mrk- / PSO
out.
Common (+5 Volt User Supply)
Analog Output 0
Analog Common
Input Common
Input 10
Input 11
In/Out/Bi.
Bi-directional
Bi-directional
Input
Input
Input
Input
Output
Output
Output
Bi-directional
Bi-directional
Output
Input
Input
Output
Input
Input
Bi-directional
Bi-directional
Output
Input
Input
* Total user +5 V power is limited to 500 mA, by an internal re-settable fuse.
www.aerotech.com
3-1
Technical Details
Ndrive HP 10/20/30 User’s Manual
Table 3-2.
Auxiliary I/O Connector Mating Connector (J205)
Aerotech
ECK01259
ECK00600
EIZ00294
Connector
Back shell
Screw Locks, Qty. 2
Third Party Source
Kycon K86-AA-26P
Cinch DA24658
TRW D-20419-16
All of the external power provided by the Ndrive HP to the user is limited to 500 mAmps
and protected by a re-settable fuse. Should an over-current condition occur, the device
will open to protect against the overload. To reset the device, remove the overload
condition.
Please note, that the inputs and outputs on the Auxiliary
connector (J205), begin with number 8, as shown in
Table 3-1. Inputs and outputs 0 – 7 are present on the
optional –IOPSO card.
3.1.1. Secondary Encoder Channel (J205)
The encoder channel can be used as an input for master/slave operation (handwheel) or
for dual feedback systems or for an encoder input/output for multi-axis laser firing (see
Chap. 4 for more information). The EncoderDivider axis parameter configures the
input/output state of this encoder channel. This interface may not be multiplied by the
MXH option and must be a 5-volt RS-422 line driver encoder. It allows up to an 8 MHz
encoder signal (31 nsec minimum edge separation), producing 32 million counts per
second, after times four (x4) quadrature decoding. See Table 3-2 for the mating
connector part number. The Auxiliary Marker output has a 0.02 us propagation delay
typical, when used as the PSO firing output.
Table 3-3.
Auxiliary Encoder Pin Assignment on Connector J205
Pin #
1
2
10
11
12
Label
Auxiliary Sine +
Auxiliary Sine Auxiliary Cosine +
Auxiliary Cosine +5 Volt
19
Auxiliary Marker -
20
Auxiliary Marker +
21
Common (+5 Volt )
Description
Secondary RS-422 Channel - Sine+
Secondary RS-422 Channel - SineSecondary RS-422 Channel - Cosine+
Secondary RS-422 Channel - Cosine+5 Volt (500mA. max.)*
Secondary RS-422 Channel - Mrk+ /
PSO out.
Secondary RS-422 Channel - Mrk- /
PSO out.
Common (+5 Volt User Supply)
In/Out/Bi.
Bidirectional
Bidirectional
Bidirectional
Bidirectional
Output
Bidirectional
Bidirectional
-
* Total user +5 V power is limited to 500 mA, by an internal re-settable fuse.
3-2
www.aerotech.com
Ndrive HP 10/20/30 User’s Manual
Figure 3-1.
www.aerotech.com
Technical Details
Secondary Encoder Channel (J205)
3-3
Technical Details
Ndrive HP 10/20/30 User’s Manual
3.1.2. User Outputs 8-11 (J205)
All outputs (Figure 3-2) are rated for 40 volts and 80 mAmps per channel. Power
dissipation may not exceed 90 mWatts per channel.
* Output 11, shown in the following Figure, may be defined as a low-speed PSO (Laser
Firing output), however, it is only rated for a maximum output frequency of 1 kHz, with
a typical propagation delay of 250 us. The auxiliary marker output on pins 19 and 20 of
J205 may be opto-isolated by the user and software configured as the PSO output via the
EncoderDivider axis parameter and the PSOCONTROL command, see the Nview help
for more information. See Section 3.2 for more information on the PSO option.
See Table 3-2 for the mating connector part number.
Table 3-4.
User Outputs Pin Assignment on Connector J205
Pin #
7
8
9
12
15
Label
Out 8
Out 9
Out 10
+5 Volt
Out Com
16
Out 11
21
Common (+5 Volt)
Description
Output 8
Output 9
Output 10
+5 Volt (500mA. max.)*
Output Common
Output 11 / optional PSO Laser Firing
Output
Common (+5 Volt User Supply)
In/Out/Bi.
Output
Output
Output
Output
Output
-
* Total user +5 V power is limited to 500 mA, by an internal re-settable fuse.
Figure 3-2.
3-4
User Outputs (J205)
www.aerotech.com
Ndrive HP 10/20/30 User’s Manual
Technical Details
3.1.3. User Inputs 8-11 (J205)
Inputs 8-11, as shown in Figure 3-3, are scaled for an input voltage of 5-24 volts. A
higher input voltage requires adding external series resistors to limit the current to 20
milliamps. Inputs 8-10 may also be used as CW, CCW and Home EOT limit inputs,
respectively, by setting bit 22 of the DriveIOConfig axis parameter.
See Table 3-2 for the mating connector part number.
Table 3-5.
Pin #
12
17
18
21
24
25
26
User Inputs Pin Assignment on Connector J205
Label
+5 Volt
In 8
In 9
Common (+5 Volt)
In Com
In 10
In 11
Description
+5 Volt (500mA. max.)*
Input 8 / CCW EOT Input
Input 9 / CW EOT Input
Common (+5 Volt User Supply)
Input Common
Input 10 / Home Input
Input 11
In/Out/Bi.
Output
Input
Input
Input
Input
* Total user +5 V power is limited to 500 mA, by an internal re-settable fuse.
Figure 3-3.
www.aerotech.com
All User Inputs 8-13 (J205)
3-5
Technical Details
Ndrive HP 10/20/30 User’s Manual
3.1.4. High Speed User Inputs 12-13 (J205)
The high-speed inputs shown in Figure 3-3, are scaled for a 5 volt input voltage. A
higher input voltage requires adding an external series resistor to limit the current to 7
milliamps. For example, 24 volt operation requires an external 2,700 ohm 1/2 watt
resistor in series with one of the input pins. The high-speed inputs (inputs 12 and 13)
have a delay of 50 nanoseconds (typical).
See Table 3-2 for the mating connector part number.
Table 3-6.
Pin #
3
4
5
6
12
21
24
High Speed User Inputs Pin Assignment on Connector J205
Label
In 12 +
In 12 In 13 +
In 13 +5 Volt
Common (+5 Volt )
In Com
Description
Input 12 High Speed Opto. + (user interrupt)
Input 12 High Speed Opto. - (user interrupt)
Input 13 High Speed Opto. + (user interrupt)
Input 13 High Speed Opto. - (user interrupt)
+5 Volt (500mA. max.)*
Common (+5 Volt User Supply)
Input Common
In/Out/Bi.
Input
Input
Input
Input
Output
-
* Total user +5 V power is limited to 500 mA, by an internal re-settable fuse.
3.1.5. Analog Input 0 (J205)
The analog inputs accept a signal within the range of -10 through +10 volts DC. Signals
outside this range may damage the input. For analog input technical information, see
Section 4.1.4.
See Table 3-2 for the mating connector part number.
Table 3-7.
Pin #
13
14
23
Auxiliary I/O Connector Pin Assignment (J205)
Label
Analog 0 In+
Analog 0 InA Gnd
Description
Analog Input 0 + (Differential)
Analog Input 0 - (Differential)
Analog Common
In/Out/Bi.
Input
Input
-
* Total user +5 V power is limited to 500 mA, by an internal re-settable fuse.
3.1.6. Analog Output 0 (J205)
The analog output may be programmed to output a signal within the range of -10 through
+10 volts DC. For analog output technical information, see Section 4.1.2. Shown in the
Table below are the pins relating to the signals described in this section.
See Table 3-2 for the mating connector part number.
Table 3-8.
Pin #
22
23
Auxiliary I/O Connector Pin Assignment (J205)
Label
Analog 0 Out
A Gnd
Description
Analog Output 0
Analog Common
In/Out/Bi.
Output
-
* Total user +5 V power is limited to 500 mA, by an internal re-settable fuse.
3-6
www.aerotech.com
Ndrive HP 10/20/30 User’s Manual
3.2.
Technical Details
Position Synchronized Output (PSO) / Laser Firing
The Ndrive includes a Position Synchronized Output (PSO or Laser Firing) option. This
feature may be programmed to generate an output synchronized to axes positions, based
upon a user-defined trigger condition, most typically, but not limited to firing a laser. The
Ndrive offers three levels of laser firing, single axis (std.) and two and three axis. Trigger
signals may be derived from the primary encoder channel, secondary encoder channel,
either of the two optional SSI Net ports or a software trigger. Both SSI Net ports may
provide axes encoder signals or marker signals to/from another Ndrive at a maximum of
a 20 MHz. data rate (50 nsec. minimum edge separation). Single axis tracking is limited
to a 20 MHz. data rate and multi-axis to a 5 MHz tracking rate. The PSOTRACK
command may be used to scale the encoder input signal to limit the maximum tracking
rate. The synchronized output pulse is solely generated within sophisticated and versatile
high-speed hardware, allowing minimal delays between the trigger condition and the
output. Single axis PSO laser firing latency is 200 nanoseconds. -DUALPSO and TRIPLEPSO laser firing latency is 275 nanoseconds, not including the propagation delay
of the output device. Refer to Figure 3-4 for a basic single-axis block diagram of the PSO
capabilities, or Figure 3-5 and Figure 3-6 for a more detailed block diagram of the multiaxis capabilities that also apply to single-axis firing. The output may be either an opencollector output (dedicated PSO output or user output 11) or a differential RS-422 output.
The opto-isolated output is available in three different configurations as shown in
Table 3-9. Additionally, the PSO options provide Data Capture and Data Update
capabilities, also shown in Figure 3-5 and Figure 3-6. For programming information,
refer to the Nview HMI Help.
Table 3-9.
Encoder
Source
PSO Encoder Signal Sources and Pre-Scaling Methods
Signal
Max. Data Rate
(w/o pre-scalar)
Encoder
Input
(pre-scalar)
Primary Encoder
32 Mhz.
PSOTRACK cmd.
Secondary Encoder
32 Mhz.
PSOTRACK cmd.
SSI Net Ports 1 and 2
20 Mhz.
PSOTRACK cmd.
Figure 3-4.
www.aerotech.com
Encoder Output
(pre-scalar)
CfgFbkEncQuadDivider
axis parameter (MXH only)
None
CfgFbkEncMxhSetup axis
parameter
PSO Diagram – Basic Single Axis Firing
3-7
Technical Details
Table 3-10.
Ndrive HP 10/20/30 User’s Manual
PSO Output Sources
PSO Output Type
High Speed Opto-Isolator - J301
Opto-Isolated Output 11 - J205
RS-422
Marker
output
on
Secondary Encoder - J205
Maximum
Frequency
Table 4-14
1 KHz
Standard
or
Option
-IOPSO option
Standard
Requires
Isolation
No
No
10 MHz
Standard
Yes
User
The pre-scaler in the block diagram is used to normalize the resolution of axes with
different machine step sizes or to scale down (divide) the maximum input frequency to
the PSO tracking hardware. The PSO hardware operates in machine counts, so all axes
must be scaled, or normalized to like units. This allows a trigger to be generated from a
true vectorial position change. Each of the three possible tracking channels has a prescaler, which may be used to divide the number of encoder counts on that channel. Each
pre-scaler defaults to 1 and may divide the input feedback pulses by up to 1,023.
The trigger condition may be a software trigger under program control, various other
hardware triggers, or most typically a user-defined change in vectorial position, on one to
three axes. This vectorial position change is monitored via hardware, allowing an output
pulse to be generated in less than 275 nanoseconds (200 nsec. for single axis) after the
trigger is detected, not including the propagation delay of the output device. This is
accomplished via hardware that monitors the designated axes positions, calculates the
sum of the squares of the axes positions and compares it to the desired (squared) position
trigger value. All of the mathematical squaring of the positions occurs in hardware for
speed. The comparison of the squared command to feedback position occurs at an 8 Mhz.
rate for multi-axis firing and at a 20 MHz. rate for single axis firing. Furthermore, this
vectorial position trigger value is queued via a 255 level queue, in hardware to the
triggering hardware, with each trigger advancing thru the queue to the next trigger value.
This allows the trigger value to be specified as a series of incremental trigger points, if
desired.
The absolute accuracy is excellent, although, point-to-point accuracy may vary, due to
the calculated feedback squared firing distance jumping past the (internally squared) user
programmed firing distance. This small error is accumulated and subtracted from the next
firing distance, maintaining absolute accuracy. For example, if the user programs a
trigger to occur after a vectorial change in position of 5 machine steps. Internally, this is
squared, and the axes positions are internally squared and compared to 25. If they are
equal to or greater than 25, a trigger event occurs. The comparison occurs at an 8 Mhz.
rate (125 nano-seconds), so, should the sum of the square of the axes change in position
be equal to 9 during a sample period, no trigger occurs. However, on the next sample, the
sum of the squares of the axes positions could now be equal to 36. A trigger event would
now occur (36 is greater than 25) and the remainder (11) is then stored to be summed
with the squared feedback positions during the next sample period.
The output pulse is also user programmable. It may be a single, or multiple pulses per
trigger event. It too is generated in hardware and fed from a 255 level queue, allowing
trigger events to advance thru the queue, varying the output pulse per trigger event.
The window modes allow firing to occur, or be enabled, based upon axes being within a
user-defined window. This window may be one or two-dimensional. The +/- and
Enter/Exit Detection block within the block diagram is used to prevent false triggering
due to one bit dither on an axis, etc. Window modes may not be pre-scaled as indicated
in the block diagram.
3-8
www.aerotech.com
Ndrive HP 10/20/30 User’s Manual
Figure 3-5.
Technical Details
Advanced 1 - 3 Axis Firing
The Data Capture and Data Update modes allow data to be captured or written to the I/O
on the occurrence of the internal or external trigger. Data Capture mode allows position,
digital inputs, etc. to be captured. Data Update mode allows analog or digital outputs to
be set by the same trigger. The capture and update modes are defined in Figure 3-6. For a
full description of these modes, refer to the Nview HMI help.
These Capture/Update modes, share four FIFO's (queue's) with Window 1 and Window
2, preventing the window-firing modes from being used with the Capture/Update mode.
Using a queue from a window, precludes using that window (1 or 2) for firing, however,
queues from window 1 may be used for data capture/update mode, while queues from
window 2 may be used for window firing purposes. The Capture/Update modes vary for
Window 1 and Window 2, see Figure 3-6.
The data capture mode rate for analog inputs is limited to approximately 100,000
samples per second due to A/D conversion rate. The data update mode for analog outputs
is limited to 500,000 Hertz due to internal serial bus design constraints.
www.aerotech.com
3-9
Technical Details
Ndrive HP 10/20/30 User’s Manual
Figure 3-6.
Data Capture/Data Update Modes
3.2.1. Single Axis Laser Firing
Single axis firing requires no additional encoder signals and is capable of tracking the
axis position at up to a 20 MHz. tracking rate (50 nsec. minimum edge separation). It
may be programmed to fire from any available encoder source, see Table 3-9. Single axis
firing provides one feature not present with the multi-axes firing option, it allows for
directional based firing. This means that you may program a firing distances for the
positive and negative motion separately. Single axis window firing and Capture/Update
modes may be used with single-axis firing, limited only by the use of the Windows
internal shared queues.
See Figure 3-4 for a basic single-axis block diagram of the PSO capabilities or Figure 3-5
and Figure 3-6 for a more detailed block diagram of the multi-axis capabilities that also
apply to single-axis firing.
3-10
www.aerotech.com
Ndrive HP 10/20/30 User’s Manual
3.3.
Technical Details
Motor Feedback (J207)
The 25-pin “D” style connector contains all of the required feedback inputs for a servo
loop. This connector has inputs for a 3-channel encoder, three limit switches, and three
Hall-effect devices. Each of these inputs provides feedback for the DSP microprocessor
controlled position, velocity and current loops.
See Section 2.6.1 Encoder Phasing for information on interfacing non-Aerotech motors.
Table 3-11.
Pin #
1
2
3
4
5
6
7
8
9
10
11
12
13
14
15
16
17
18
19
20
21
22
23
24
25
Motor Feedback Connector Pin Assignment (J207)
Label
Frame
Thermistor
+5 Volt
Common
HB
MkrMkr+
N.C.
N.C.
HA
HC
CW/+Lmt.
Brake Cos+
Cos+5 Volt
Sin+
SinN.C.
Common
Common
Hm.Lmt.
N.C.
CCW/-Lmt.
Brake +
Description
Chassis Frame
Motor over temperature Thermistor
+5 Volt Power for Encoder (500mA. max.)*
Signal Common
Hall Effect Sensor B (Brushless Motors only)
Encoder Marker Reference Pulse Encoder Marker Reference Pulse +
No Connection
No Connection
Hall Effect Sensor A (Brushless Motors only)
Hall Effect Sensor C (Brushless Motors only)
Clockwise End of travel limit
Optional Brake - Output
Encoder Cosine +
Encoder Cosine +5V Power for Limit Switches (500mA. max.)*
Encoder Sine +
Encoder Sine No Connection
Signal Common for Limit Switches
Signal Common for Encoder
Home Switch Input
No Connection
Counterclockwise End of travel limit
Optional Brake + Output
In/Out/Bi.
N/A
Input
Output
N/A
Input
Input
Input
N/A
N/A
Input
Input
Input
Output
Input
Input
Output
Input
Input
N/A
N/A
N/A
Input
N/A
Input
Output
* Total user +5 V power is limited to 500 mA, by an internal re-settable fuse.
Table 3-12.
Connector
Back shell
Motor Feedback Connector Mating Connector (J207)
Aerotech
ECK00101
ECK00656
Third Party Source
Cinch P/N DB25P
Amphenol P/N 17-1726-2
All of the external power provided by the Ndrive to the user is limited to 500 mAmps
and protected by a re-settable fuse. Should an over-current condition occur, the device
will open to protect against the overload. To reset the device, remove the overload
condition.
www.aerotech.com
3-11
Technical Details
Ndrive HP 10/20/30 User’s Manual
3.3.1. End of Travel Limit Inputs
Two of the three limit inputs are end-of-travel sensing (CW Limit and CCW Limit) while
the third is a reference limit (Home Limit). All of the end of travel limit inputs accept 524 VDC logic signals. The Pin Assignment for the connector is shown in the table below.
See Table 3-12 for the mating connector part number.
Alternatively, opto-isolated user inputs 8-10 may be used as the end-of-travel limit inputs
(see Section 3.1.3).
Table 3-13.
Pin #
12
16
20
22
24
End of Travel Limit Inputs Pin Assignment on Connector J207
Label
CW/+Lmt.
+5 Volt
Common
Hm.Lmt.
CCW/-Lmt.
Description
Clockwise End of travel limit
+5 Volt Power for Limit Switches (500mA. max.)*
Signal Common for Limit Switches
Home Switch Input
Counterclockwise End of travel limit
In/Out/Bi
Input
Output
N/A
Input
Input
* Total user +5 V power is limited to 500 mA, by an internal re-settable fuse.
Figure 3-7.
3-12
End of Travel Limit Inputs
www.aerotech.com
Ndrive HP 10/20/30 User’s Manual
Technical Details
3.3.2. Hall Effect and Thermistor Inputs
The Hall-effect switch inputs are highly recommended for AC brushless motor
commutation but not absolutely required; see the Nview help for more information on
axis configuration. The Hall-effect inputs accept 5-24 volt DC logic signals. The Pin
Assignment for the connector is shown in the table below.
The thermistor input is used to detect an over temperature condition in a motor, via a
positive temperature coefficient device. That is, as the temperature of the device
increases, so does the resistance of the device. Under normal operating conditions, the
resistance of the thermistor is low (i.e., 100 ohms). This will be seen as a low input
signal. After the temperature causes the thermistor’s resistance to increase above 1K
ohms, the signal will be seen as a logic high, triggering an over temperature fault.
See Table 3-12 for the mating connector part number.
Table 3-14.
Pin #
3
5
10
11
21
Hall-Effect Inputs Pin Assignment on Connector J207
Label
+5 Volt
HB
HA
HC
Common
Description
+5 Volt Power for Encoder (500mA. max.)*
Hall Effect Sensor B (Brushless Motors only)
Hall Effect Sensor A (Brushless Motors only)
Hall Effect Sensor C (Brushless Motors only)
Signal Common for Encoder
In/Out/Bi.
Output
Input
Input
Input
N/A
* Total user +5 V power is limited to 500 mA, by an internal re-settable fuse.
Figure 3-8.
www.aerotech.com
Hall-Effect and Thermistor Inputs (J207)
3-13
Technical Details
Ndrive HP 10/20/30 User’s Manual
3.3.3. Brake Output
The brake output provides a direct connection to the brake the relay on the optional IOPSO board. The brake output will be present on this connector only when the -IOPSO
option board is present, allowing the brake signal to utilize the existing feedback cable
without the need for additional wiring.
See Section 4.1.3 for more information on the brake output.
See Table 3-12 for the mating connector part number.
Table 3-15.
Pin #
13
25
Brake Output Pin Assignment on Connector J207
Label
Brake Brake +
Description
Optional Brake Relay - Output
Optional Brake Relay + Output
In/Out/Bi.
Output
Output
3.3.4. Encoder Interface
The three encoder signals consists of the following: sine (Sin), cosine (Cos), and marker
(Mkr) as well as their complimentary signals: sine-n (Sin-N), cosine-n (Cos-N), and
marker-n (Mkr-N).
The encoder interface accepts an RS-422 differential quadrature signal in the range of 0
to 5 Volts DC. It allows up to an 8 MHz encoder signal (31 nsec minimum edge
separation), producing 32 million counts per second, after times four (x4) quadrature
decoding.
Typically, the encoder interface accepts this RS-422 signal in line driver format;
however, it may be factory configured as an option to accept this signal as an analog
signal for the MXH option (see Section 3.3.4.2 for more information).
See Section 2.6.1. Encoder Phasing for information on interfacing non-Aerotech motors.
See Table 3-12 for the mating connector part number.
Table 3-16.
Pin #
1
3
6
7
14
15
17
18
21
Motor Feedback Connector Pin Assignment (J207)
Label
Frame
+5 Volt
MkrMkr+
Cos+
CosSin+
SinCommon
Description
Chassis Frame
+5 Volt Power for Encoder (500mA. max.)*
Encoder Marker Reference Pulse Encoder Marker Reference Pulse +
Encoder Cosine +
Encoder Cosine Encoder Sine +
Encoder Sine Signal Common for Encoder
In/Out/Bi.
N/A
Output
Input
Input
Input
Input
Input
Input
N/A
* Total user +5 V power is limited to 500 mA, by an internal re-settable fuse.
All external power provided by the Ndrive to the user is protected by a re-settable fuse.
Should an over-current condition occur, the device will open to provide protection
against the overload. To reset the device, remove the over-current condition.
3-14
www.aerotech.com
Ndrive HP 10/20/30 User’s Manual
Technical Details
3.3.4.1. Line Driver Encoder (Standard)
The primary encoder input is standardly configured for a differential line driver encoder,
in the range of 0 to +5 volts. It allows up to an 8 MHz encoder signal (31 nsec minimum
edge separation), producing 32 million counts per second, after times four (x4)
quadrature decoding. An analog encoder is used with the MXH option; see Figure 3-10
for more information.
Figure 3-9.
Line Driver Encoder Interface – Standard (J207)
The Ndrive HP is factory configured for either a square
wave differential encoder (default), OR an analog encoder
(MXH option).
www.aerotech.com
3-15
Technical Details
Ndrive HP 10/20/30 User’s Manual
3.3.4.2. MXH Option
The MXH encoder input options are defined for a differential analog encoder in the
range of 0 to +5 volts. The maximum encoder input frequency is limited to 200 kHz, or
less if the encoder signals are to be output via the SSI Net, see Table 3-17. The MXH
multiplies the resolution up to 512 times, in addition to the controller’s x4 multiplication,
providing a maximum of x 2048 multiplication (8.388607 GHz effective data rate), as
shown in the first two columns of Table 3-17.
The MXH multiplication factor is determined by the CfgFbkEncMultFactorMXH axis
parameter, which is then multiplied x4 additionally by the controller. Each time this axis
parameter is changed, the controller will internally re-program its logic. This reprogramming cycle will take about 3.5 minutes. The LED’s will indicate that the internal
MXH option is being internally erased and then re-programmed, and that the axis may
not be enabled during this time. While the -MXH option is being erased, the LED’s will
indicate the pattern shown to the upper right. When the -MXH option is being reprogrammed, the LEDs will alternate between the two patterns shown to the lower right.
The Ndrive contains digital potentiometers to adjust the gain, offset and phase balance of
the analog Sine and Cosine inputs. The digital potentiometer settings are controlled by
the CfgFbkEncCosGain, CfgFbkEncCosOffset, CfgFbkEncPhase, CfgFbkEncSineGain,
CfgFbkEncSineOffset axis parameters. The –MXH option is compatible with the –
DUALPSO and –TRIPLEPSO options. A differential line driver encoder may be used
also, see Figure 3-9 for more information.
The specifications for the -MXH multiplier option are shown in Table 3-17. The
following table indicates the maximum specifications for the MXH option when the
signals are output via the SSI Net. Otherwise, the only limit is the maximum input
frequency of 200 kHz. See Figure 3-9 for MXH typical input circuitry. The Pin
Assignment is indicated in Table 3-11.
3-16
www.aerotech.com
Ndrive HP 10/20/30 User’s Manual
Table 3-17.
MXH Option Specifications
CfgFbkEncMultFactorMXH Axis
Parameter
Total
Multiplication
10
X40
50
X200
100
X400
200
X800
250
X1000
500
Technical Details
(1,2)
X2000
Applicable only when signals are output via the SSI Net
Clock Freq.
Min Edge
Min Pulse
Max Input
Freq (kHz) (4)
Separation (µs) (4)
Width (µs) (4)
(MHz) (3)
40
200
.025
.025
20
200
.05
.05
10
200
.1
.1
5
125
.2
.2
40
200
.025
.025
20
100
.05
.05
10
50
.1
.1
5
25
.2
.2
40
100
.025
.025
20
50
.05
.05
10
25
.1
.1
5
12.5
.2
.2
40
50
.025
.025
20
25
.05
.05
10
12.5
.1
.1
5
6.25
.2
.2
40
40
.025
.025
20
20
.05
.05
10
10
.1
.1
5
5
.2
.2
40
20
10
5
20
10
5
2.5
.025
.05
.1
.2
.025
.05
.1
.2
1. Interpolation includes x4 from quadrature – i.e., MXH50 has a net interpolation of x200 (x50
from MXH and x4 from quadrature).
2. Configurable via the CfgFbkEncMultFactorMXH axis parameter from 1 to 512 in increments
of 1.0, yielding a multiplication from x4 to x2048.
3. Defined by the CfgFbkEncMxhSetup axis parameter, for SSI Net use; must be limited to 20
MHz for PSO tracking applications.
4. Absolute maximum input frequency limited to 200 kHz due to 1.25 MHz sample rate, lesser
limit applies only when signals are output via the SSI Net.
www.aerotech.com
3-17
Technical Details
Ndrive HP 10/20/30 User’s Manual
Figure 3-10.
3-18
Optional MXH Analog Encoder Interface (J207)
www.aerotech.com
Ndrive HP 10/20/30 User’s Manual
3.4.
Technical Details
RS-232 / RS-422 Port (J206)
The RS-232C and RS-422 (factory option) ports may not be used simultaneously. They
are one physical port, converted to each interface by the appropriate line driver/receiver,
as shown in Figure 3-11. Connecting the RS-232 port to a user’s PC requires only a
standard 9-pin cable (not a null modem). Currently, the RS-232C port serves only a
secondary means to upgrade the firmware in the Ndrive, which is done primarily through
the FireWire port.
Table 3-18.
Pin #
1
2
3
4
5
6
7
8
9
J206 RS-232 / RS-422 Connector Pin Assignment
Label
Frame
RS-232 TXD
RS-232 RXD
RS-422 TXD+
Common
RS-422 TXDRS-422 RXD+
RS-422 RXD+5 Volt
Description
Chassis Frame
RS-232 Transmit Output
RS-232 Receive Input
RS-422 Transmit Output +
Signal Common
RS-422 Transmit Output RS-422 Receive Input +
RS-422 Receive Input +5 Volt Power Output *
In/Out/Bi.
N/A
Output
Input
Output
N/A
Output
Input
Input
Output
* Total user +5 V power is limited to 500 mA, by an internal re-settable fuse.
Table 3-19.
RS-232 / RS-422 Port Connector Mating Connector (J206)
9-Pin D-style Connector
Connector
Back shell
Aerotech
ECK00137
ECK01021
www.aerotech.com
Third Party Source
Cinch DE-9P
Amphenol 17-1724-2
3-19
Technical Details
Ndrive HP 10/20/30 User’s Manual
Figure 3-11.
3-20
RS-232/RS-422 Connector (J206)
www.aerotech.com
Ndrive HP 10/20/30 User’s Manual
3.5.
Technical Details
FireWire Bus (J201, J202, J203)
The FireWire bus is the high-speed communications media to the Ndrive, operating at
400 megabits per second. All command and configuration information is sent via the
FireWire. All three ports are effectively in parallel, allowing any port to be used when
daisy-chaining the Ndrive HPs together or with other devices such as the Npaq (as shown
in Figure 2-22). The FireWire bus power is independent of the Ndrive power, should the
drive fail, communication will be maintained with the other devices.
Table 3-20.
J201, J202, J203 FireWire Connector Pin Assignment
Pin #
1
Label
Bus Power
2
Physical Ground
3*
4*
5*
6*
7
8
9
TPB# –
TPB# +
TPA# –
TPA# +
Frame
Frame
Frame
Description
FireWire Adapter Power
FireWire Common
(isolated from Signal Common)
Port # Communication Signal
Port # Communication Signal
Port # Communication Signal
Port # Communication Signal
Chassis Frame
Chassis Frame
Chassis Frame
In/Out/Bi.
In/Out
N/A
Bidirectional
Bidirectional
Bidirectional
Bidirectional
N/A
N/A
N/A
* Port 0, 1, and 2, respectively, as represented in the table by a “ # ”.
The FireWire connector’s J201-J203 have pin 1, the power pin, protected by a re-settable
fuse. Should an over-current condition occur, the device will open, to protect against the
overload. To reset the device, remove the overload condition.
www.aerotech.com
3-21
Technical Details
3.6.
Ndrive HP 10/20/30 User’s Manual
Voltage-to-Current Mode Operation
The firmware (version 2.06 and later) on the Ndrive supports a voltage-to-current mode.
This mode allows the unit to run in a standalone mode, attached to a master
position/velocity loop controller.
The standard operating mode of the Ndrive uses an OHCI IEEE-1394 connection from a
host PC running the Nmotion SMC (software motion controller) to control servos. This
connection is required for proper operation in this mode, since the fire wire connection
provides positioning and synchronization information to the drive.
Figure 3-12.
Normal Operation
The Voltage-to-Current mode of the Ndrive allows for a connection to a host controller
that outputs +/- 10V DC as a torque (current) command. In this mode, a connection to the
fire wire is not required (synchronization is performed internally), except for parameter
configuration.
Figure 3-13.
Stand-Alone Configuration
This mode allows the drive to be used in a general-purpose current-control mode with
older existing control hardware.
3-22
www.aerotech.com
Ndrive HP 10/20/30 User’s Manual
Technical Details
3.6.1. Parameter Setup and Hardware Configuration
Setup for the Voltage-to-Current mode should be performed using the Automation 3200
SMC. This software interface should be used to configure the parameters on the drive.
The parameters of principal concern are:
!
Current Loop Parameters (gains, offsets, etc.)
!
Feedback configurations (feedback types, channels, etc.)
!
Commutation Information (pole pairs, counts per cycle, etc)
!
Current Clamp/RMS Current Trap
These are the parameters that will need to be saved to the flash memory within the
Ndrive, before the standalone mode is activated. To enter the normal, A3200 operating
mode, power down the drive and set DIP switches #6 and #7 to the ON position.
Once the parameters are correctly configured to run the motor with the A3200 (and
verified) they can then be saved to the flash memory.
This initial setup should only need to be performed once
for a given system type. If the parameter settings for a
given axis in the system have already been verified, then
on all future systems the A3200 software can be used to
load the parameters for that axis into the Ndrive so that
they can be saved to the flash memory on that drive. Reconfiguration should only need to be done for a different
system, or if it is expected that some other system
parameter may have changed.
3.6.2. Saving Parameters to the flash memory on the drive
Open the Ndebug.exe utility and select the axis (by typing AX n, where n is the 1-based
axis number, of the axis you wish to select). Save the parameters to flash memory by
typing:
FLASHWRITE 1 0 0
This will save the current system configuration into the flash memory on the Ndrive.
To enter the voltage-to-current mode, power down the Ndrive and set DIP switches #6
and #7 to the OFF position. When the unit is powered on again, it will auto-boot into the
voltage-to-current mode.
www.aerotech.com
3-23
Technical Details
Ndrive HP 10/20/30 User’s Manual
3.6.3. Operation
In the Voltage-to-Current mode, the Ndrive acts as a simple voltage-to-current controller.
Analog Input 0 provides the current/torque command. Analog input 0 is accessible
through either the -IOPSO option board or the J205 connector.
To emulate a standalone drive, the Ndrive also uses Input #8 (least-significant input bit
on the J205 connector) as a drive enable input, and Output #8 (least-significant output bit
on the J205 connector) as a fault output indicator. These I/O points utilize a default
polarity that makes them fail-safe. Both are optically isolated. See Figure 3-2 and
Figure 3-3 for I/O connection information. Also, note that the fault output requires a pullup resistor to an external power supply.
The analog input is configured to accept input voltages from -10V to +10V. In this mode,
+10V is equivalent to peak amplifier current command in the negative (CCW) direction,
while –10V is equivalent to peak amplifier current command in the positive (CW)
direction. The drives peak current is defined by the drive part number (i.e. Ndrive HL 20
indicates that the peak output current will be 20 amps.)
The analog input is differential, utilizing pins J205-13 (Analog input 0+) and J205-14
(Analog input 0-). See Figure 4-8 for more information.
The diagrams above indicate that current flow through pins
17 and 24 will enable the axis to drive current through the
motor (failsafe; by default, no motor current will be
present). Also, they indicate that a fault condition will be
indicated by no current flow from pin 7 to pin 15 through
the fault output (failsafe; by default, no current flow
indicates a drive fault. When the drive is powered up and
no fault condition exists, the opto-isolator will conduct
current).
3.6.4. Faults
A Drive Fault in the standalone mode can be caused by any of the following issues:
!
Drive Over-Current (Peak current commanded for 1 second)
!
Motor Over-Current (RMS threshold)
!
Thermistor Over-Temperature Fault (Motor)
!
Amplifier Temperature Fault
!
Loss of Bus Power
∇ ∇ ∇
3-24
www.aerotech.com
Ndrive HP 10/20/30 User’s Manual
CHAPTER 4:
4.1.
Options
OPTIONS
–IOPSO and –IOPSOH Option Boards
See the following sections for details on the connector Pin Assignment and technical
information for the –IOPSO and –IOPSOH options.
The –IOPSO expansion board has 8 opto-isolated inputs (sinking or sourcing) and 8
outputs (sinking or sourcing ), two 18-bit analog outputs, two 16-bit differential analog
inputs, SSI Net, absolute encoder interface and brake relay, and includes a HCPL2601
opto-isolator.
Figure 4-1.
Table 4-1.
Jumper
JP1
JP2
JP3
–IOPSO Option Board (690D1579 Rev. A)
–IOPSO Option Board Jumpers
Setting
1-2, 3-4 *
1-3
1-2 *
2-3
1-2
2-3 *
Description
Brake Option at J207
Auxiliary relay Output Option at TB301 (Remove 1-2, 3-4 and 2-4)
Input 0 at TB305-3 is input 0
Input 0 at TB305-3 drives the external Reset Input
PSO (Laser Firing) Output is Active High
PSO (Laser Firing) Output is Active Low
* factory default setting
www.aerotech.com
4-1
Ndrive HP Options
Ndrive HP 10/20/30 User’s Manual
The -IOPSOH expansion board has 8 opto-isolated inputs (sinking or sourcing) and 8
outputs (sinking or sourcing ) rated at 1 A per channel, two 18-bit analog outputs, two
16-bit differential analog inputs, SSI Net, absolute encoder interface and brake relay, and
includes a HCPL2601 opto-isolator.
TOP VIEW
Figure 4-2.
Table 4-2.
Output
Bit 0
Bit 1
Bit 2
Bit 3
Bit 4
Bit 5
Bit 6
Bit 7
–IOPSOH Option Board (690D1623 Rev. 0)
–IOPSOH Output Device Numbers
Desinator
M49
M58
M43
M59
M37
M60
M31
M60
M25
M62
M18
M63
M12
M64
M6
M65
Description
Sourcing Driver
Sinking Driver
Sourcing Driver
Sinking Driver
Sourcing Driver
Sinking Driver
Sourcing Driver
Sinking Driver
Sourcing Driver
Sinking Driver
Sourcing Driver
Sinking Driver
Sourcing Driver
Sinking Driver
Sourcing Driver
Sinking Driver
Aerotech P/N
ECS01079
ECS01079
ECS01079
ECS01079
ECS01079
ECS01079
ECS01079
ECS01079
ECS01079
ECS01079
ECS01079
ECS01079
ECS01079
ECS01079
ECS01079
ECS01079
3d Party P/N
NEC PS710E-1A
NEC PS710E-1A
NEC PS710E-1A
NEC PS710E-1A
NEC PS710E-1A
NEC PS710E-1A
NEC PS710E-1A
NEC PS710E-1A
NEC PS710E-1A
NEC PS710E-1A
NEC PS710E-1A
NEC PS710E-1A
NEC PS710E-1A
NEC PS710E-1A
NEC PS710E-1A
NEC PS710E-1A
4.1.1. Brake Configuration Jumpers
Setting JP1 to 1-2, 3-4 allows connection of the brake relay to pins 13 and 25 of the
motor feedback connector (J207). See Figure 4-4 in section 4.1.2 for more information.
4-2
www.aerotech.com
Ndrive HP 10/20/30 User’s Manual
Options
4.1.2. Analog Outputs (TB301)
Both analog outputs are driven by an 18-bit AD1868 digital to analog converter and
buffered by TL084 op-amps, producing a single-ended output voltage in the range of ±
10 volts. This produces a resolution of 76.3 uVolts per bit of the D/A. The output current
is limited to less than 50 mA. Note that the analog outputs are referenced to TB302-1 (as
shown in Figure 4-3). Analog output 0 is also available at J205, see Section 3.1.6. The
analog outputs will be zero volts during reset.
Table 4-3.
Pin #
1
2
Analog Output Connector Pin Assignment (TB301)
Label
Analog 0 Out
Analog 1 Out
Description
Analog Output 0
Analog Output 1
In/Out/Bi.
Output
Output
The analog output common may be found at J205 pin 23
or TB302 pin 1.
Figure 4-3.
www.aerotech.com
Analog Output Connector (TB301)
4-3
Ndrive HP Options
Ndrive HP 10/20/30 User’s Manual
4.1.3. Brake / Relay (TB301)
The relay output is typically used to automatically drive a fail-safe brake on a vertical
axis, however, it may also be used as a general purpose relay. See the
BrakeOnDriveDisable axis parameter for information on activating the brake output
automatically, or the BRAKE command for manually toggling the output, both in the
Nview HMI help. In order to help the user to interface to the brake relay the remainder of
this section will be presented as a step-by-step procedure.
Step #1 Brake Relay Specifications
The user must verify that the application will be within the specifications of the Brake
Relay contacts. These specifications are provided below in Table 4-4.
Table 4-4.
Voltage and Current Specifications (TB301)
Relay K1 Contact Ratings
Maximum Switched Voltage
150 VDC, 125 VAC
Maximum Switched Current
1A
Maximum Carrying Current
1A
Maximum Switched Power
30W (DC), 60 VA (AC)
Note: The maximum power that may be switched is voltage dependent.
Initial Contact Resistance
50 milliohms max. @ 10 mA, 6 VDC
The user must not exceed the Maximum Current or
Maximum Power specifications.
Step #2 Select Brake Interface Connector
The Normally Open (N/O) contacts of the Brake Relay are accessible through TB301 and
the Motor Feedback connector (J207). The Normally Closed (N/C) contact of the Brake
Relay is only accessible through TB301 (Figure 4-4). The Motor Feedback connector
(J207) allows the brake wires to be included in the motor feedback cable and eliminate
the need for a separate brake cable.
Table 4-5.
Pin #
3
4
Label
Relay-N.C.
Relay-Com.
5
Relay-N.O.
Table 4-6.
4-4
Brake / Relay Connector Pin Assignment (TB301)
Pin #
Label
13
Brake -
25
Brake +
Description
(Brake) Relay Output Normally Closed Contact
(Brake) Relay Output Common Contact
(Brake) Relay Output Normally Open Contact
(See JP1-A, JP1-B)
In/Out
Output
Output
Output
Brake / Relay Connector Pin Assignment (J207)
Description
(Brake-) Relay Output Normally Open Contact
(See JP1-A, JP1-B)
(Brake+) Power connection (See JP1-A, JP1-B)
In/Out
Output
Output
www.aerotech.com
Ndrive HP 10/20/30 User’s Manual
Options
Figure 4-4 is an example of a 24 VDC Brake connected to TB301. In this example, JP1A and JP1-B must be configured. If JP1-A and JP1-B are configured to 1-3 then J207
pins 13 and 25 will be unused. If JP1-A is set 1-2 and JP1-B is set 3-4, a connection
between pins 13 and 25 of J207 is required. In this case, J207 functions as an interlock to
prevent the Brake from releasing if the Motor Feedback connector is not connected.
Figure 4-4.
Brake Connected to TB301
The user is responsible for providing fuse protection for
the Brake circuit.
Figure 4-5 is an example of a 24 VDC Brake connected to the Motor Feedback connector
(J207). In this example, the external 24 VDC power source is connected to TB301. Also
note that JP1-A is set 1-2 and JP1-B is set 3-4.
Figure 4-5.
Brake Connected to J207
The user may reconfigure the connections for the brake,
such that the positive supply lead is switched by the relay
instead of the supply common.
www.aerotech.com
4-5
Ndrive HP Options
Ndrive HP 10/20/30 User’s Manual
Step #3 Suppression and Snubber requirements
Due to the inductive effects of the brake, suppression and/or snubber, components are
needed to reduce arcing and prevent damage to the Brake Relay contacts. Suppression
can also reduce the electrical noise that is emitted when the circuit is switched off.
Following are three suppression circuit examples.
Example #1: Figure 4-4 is an example of a typical 24 VDC brake circuit. In this
example, the Varistor, is the suppression device, connected across the
brake. This method of suppression is used in circuits operating at
voltages up to 25 VDC and AC circuits operating at voltages up to 18
VAC. If the voltage is greater than 25 VDC or 18 VAC, one of the other
suppression methods should be used.
Example #2: Figure 4-6 is an example of a suppression circuit that can be used for
systems using a DC supply. In this example, the diode is the suppression
component, which is connected across the brake. It is important that the
diode be installed, so that it is normally reversed biased. This diode must
have a reverse voltage rating greater than the users DC power supply and
a maximum current rating of at least 1 Ampere. Due to the time needed
for this suppression device to dissipate the energy released by the load
inductance there may be a slight delay (less than 1 second) before the
brake responds to its power being switched off. If this delay is
unacceptable, Example #3 should be used.
Figure 4-6.
Suppression for DC Brake Systems
The user may reconfigure the connections for the brake,
such that the positive supply lead is switched by the relay
instead of the supply common.
4-6
www.aerotech.com
Ndrive HP 10/20/30 User’s Manual
Options
Example #3: Figure 4-7 is a suppression circuit that can be used for both AC and DC
circuits. In this method, a resistor, capacitor and a varistor are used across
the load (see Figure 4-7). In some cases, better results are obtained by
installing the suppression devices across the relay contacts. The ratings
and values for these components are described below.
Resistor (R): is calculated by the following formula, Power rating = ½
Watt.
Resistor (ohms) = Voltage / Load current
If the resistance of the Resistor is too low the relay contacts may fuse
together, so if the Resistor is less than 24 ohms use a 24 ohm resistor.
If the resistance of the Resistor is too high, the contacts may be damaged
due to excessive arcing, so if the Resistor is greater than 240 ohms use a
240 ohm resistor.
Capacitor (C): .1 uF, rated for AC circuits, and a voltage rating of not less
than 250 Volts. If the voltage rating of the capacitor is too low, the
Varistor may not be able to protect it and it may fail.
Varistor (V): Rated for the maximum voltage of the users power supply,
Typically, a varistor rated for a standard 120 VAC line should work well.
Verify that the capacitor voltage rating is greater than the clamp voltage of
the varistor. If the voltage rating of the varistor is too low, it may conduct
during normal operation and overheat. If the voltage rating of the varistor
is too high, it may not protect the capacitor (C) against over-voltage
conditions.
Figure 4-7.
Suppression for AC and DC Brake Systems
The user may reconfigure the connections for the brake,
such that the positive supply lead is switched by the relay
instead of the supply common.
www.aerotech.com
4-7
Ndrive HP Options
Ndrive HP 10/20/30 User’s Manual
4.1.4. Analog Inputs (TB302)
Both analog inputs are differential, buffered by a precision unity gain differential
INA105 amplifier and converted to digital by a 16-bit ADS8320 analog to digital
converter allowing an input voltage in the range of ±10 volts. This produces a resolution
of 305 uVolts per bit of the A/D. Refer to Figure 4-8. To interface to a single-ended
(non-differential) voltage, ground the negative (-) input and connect your signal to the
positive (+) input. Analog input 0 is also available at J205, see Section 3.1.5. The analog
inputs have a 25k Ohm input, impedance and should be driven by a low impedance
source such as an op-amp output.
Table 4-7.
Pin #
1
2
3
4
5
Optional Analog Input Connector Pin Assignment (TB302)
Label
A Ground
Analog0 In
Analog0 In
Analog1 In
Analog1 In
+
+
-
Figure 4-8.
4-8
Description
Analog Common
Non-Inverting Analog Input 0
Inverting Analog Input 0
Non-Inverting Analog Input 1
Inverting Analog Input 1
In/Out/Bi.
N/A
Input
Input
Input
Input
Optional Analog Input Connector (TB302)
www.aerotech.com
Ndrive HP 10/20/30 User’s Manual
Options
4.1.5. User Power Connector (TB303)
This connector provides access to the Ndrive HPs internal power supply, which may be
used to power external devices (500 mAmps maximum). It also provides a connection to
power the opto-isolated PSO (Laser Firing) output (see Figure 4-14).
Table 4-8.
Pin #
1
2
3
4
5
User Power Connector Pin Assignment (TB303)
Label
+5 User Return
+5 User Return
+5 Ext.
FP
FM
Description
User +5 Volt Signal Common
User +5 Volt Signal Common
User +5 Volt Power *
Power for PSO opto-isolated output
Common for PSO opto-isolated output
In/Out/Bi
Output
Output
Output
Input
N/A
* Total user +5V power from all outputs is limited to 500 mA by an internal re-settable fuse.
4.1.6. Opto-Isolated Outputs (TB304)
The outputs are software configurable via the DriveIOConfig axis parameter as sourcing
or sinking, and are driven by a PS2802-4 opto-isolator that is rated for 40 volts maximum
and up to 80 mA/channel, not to exceed 90 mW per channel. Figure 4-9 and Figure 4-10
illustrate how to connect to an output in current sinking and current sourcing modes.
The connection must always be made to both the Output
Common Plus and Output Common Minus to prevent
glitches on the outputs (see Figure 4-9 and Figure 4-10).
Table 4-9.
Pin #
1
2
3
4
5
6
7
8
9
10
Label
OP
OM
Output 0
Output 1
Output 2
Output 3
Output 4
Output 5
Output 6
Output 7
Table 4-10.
Opto-Isolated Output Connector Pin Assignment (TB304)
Description
Output Common Plus
Output Common Minus
Output 0 (Optically-Isolated)
Output 1 (Optically-Isolated)
Output 2 (Optically-Isolated)
Output 3 (Optically-Isolated)
Output 4 (Optically-Isolated)
Output 5 (Optically-Isolated)
Output 6 (Optically-Isolated)
Output 7 (Optically-Isolated)
In/Out/Bi
Input
Input
Output
Output
Output
Output
Output
Output
Output
Output
-IOPSO Output Device Specifications (TB304)
Specification
Maximum Power Dissipation
Maximum Voltage
Maximum Sink/Source Current
Output Saturation Voltage
Rise / Fall Time
Maximum Output Frequency
www.aerotech.com
-IOPSO Value
90 mWatts / Channel
40 Volt Maximum
80 mAmps / Channel
~ 0.7 – 0.9 Volts
250 usec (typical)
1 kHz
-IOPSOH Value
600 mWatts / Channel
24 Volt Maximum
1 Amperes / Channel
~ 0.32 Volts
1 msec (typical)
100 Hz
4-9
Ndrive HP Options
Ndrive HP 10/20/30 User’s Manual
Figure 4-9.
Connecting Outputs in Current Sinking Mode
Figure 4-10.
Connecting Outputs in Current Sourcing Mode
Suppression diodes must be installed on outputs that are used to drive relays or other
inductive devices to protect the output devices from being damaged by the inductive
spikes that occur when the device is turned off. Suppressor diodes can be installed on all
outputs to provide greater protection. The 1N914 diode is recommended for this
application. It is important that the diode be installed correctly (normally reversed
biased). See Figure 4-9 for an example of a current sinking output with diode
suppression and Figure 4-10 for an example of a current sourcing output with diode
suppression.
4-10
www.aerotech.com
Ndrive HP 10/20/30 User’s Manual
Options
4.1.7. Opto-Isolated Inputs (TB305)
The inputs are configured for 5-24 volt logic, using a higher input voltage, requires
adding external series resistors to limit the current. The opto-isolator is a PS2506L-4
device. The inputs may be connected to current sourcing or current sinking devices, as
shown in Figure 4-11 and Figure 4-12. Each 4-bit bank of inputs (0-3 or 4-7) must be
connected to either all current sourcing or all current sinking devices. Also, note in the
table below, that inputs 0-3 and inputs 4-7 have two different common inputs, pin 1 and
pin 2, respectively. See Section 3.3.1 for opto-isolated EOT limit inputs.
Table 4-11.
Opto-Isolated Input Connector Pin Assignment (TB305)
Pin #
Label
Description
1
C0-3
Input Common for inputs 0 - 3
2
C4-7
Input Common for inputs 4 - 7
3
Input 0
Input 0 (Optically-Isolated) – See pin 1
4
Input 1
Input 1 (Optically-Isolated) – See pin 1
5
Input 2
Input 2 (Optically-Isolated) – See pin 1
6
Input 3
Input 3 (Optically-Isolated) – See pin 1
7
Input 4
Input 4 (Optically-Isolated) – See pin 2
8
Input 5
Input 5 (Optically-Isolated) – See pin 2
9
Input 6
Input 6 (Optically-Isolated) – See pin 2
10
Input 7
Input 7 (Optically-Isolated) – See pin 2
Figure 4-11.
www.aerotech.com
In/Out/Bi
Input
Input
Input
Input
Input
Input
Input
Input
Input
Input
Inputs Connected in Current Sinking Mode
4-11
Ndrive HP Options
Ndrive HP 10/20/30 User’s Manual
Figure 4-12.
4-12
Inputs Connected in Current Sourcing Mode
www.aerotech.com
Ndrive HP 10/20/30 User’s Manual
Options
4.1.8. PSO / Absolute Encoder Interface (J301)
This connector utilizes the RS-485 port and the (analog sine wave) encoder channel as an
absolute encoder interface. The absolute encoder channel accepts a differential analog
encoder up to 200 kHz. Typically, this is a 1 Volt P-P signal varying about a 2.5 Volt
reference. The two RS-422 channels provide buffered and/or multiplied MXH encoder
signals to the user, for laser firing or other purposes. Additionally, the –IOPSO option
provides a RS-422 output and an open-collector laser-firing signal to the user. Only one
of these signals may be used, as illustrated in Figure 4-14. Jumper JP3 defines the active
state of the open-collector output, which has three options, as defined in Table 4-12. See
Section 3.2 for more information on the laser firing (PSO) option. Note that the two RS422 channels are two of the same channels available on the J302 and J303 connectors.
For information on the RS-422 ports, see Figure 4-16 in Section 4.1.9.
See Figure 4-14 for the firing output.
Table 4-12.
Pin #
1
2
3
4
5
6
7
8
9
10
11
12
13
14
15
PSO / Absolute Encoder Interface Connector Pin Assignment (J301)
Label
Chassis Frame Ground
Sin-N
Sin
Cosine-N
Cosine
Common (+5 Volt External)
Absolute Sine + Input
Absolute Sine - Input
Absolute Cosine + Input
Absolute Cosine – Input
PSO-IOC/RS-422-M Output
RS-422-P Output
+5 Volt External – See Pin 6
RS-485-M
RS-485-P
Table 4-13.
15-pin D-Style
Connector
Back shell
Description
Chassis Frame Ground
SSI Net #1 Sin-N
SSI Net #1 Sin
SSI Net #1 Cosine-N / Marker-N
SSI Net #1 Cosine / Marker
Common
Absolute Encoder Interface
Absolute Encoder Interface
Absolute Encoder Interface
Absolute Encoder Interface
PSO / RS-422 - Output *
RS-422 +
External +5 Volt supply
RS-485 – for Abs. Encoder
RS-485 + for Abs. Encoder
In/Out/Bi
N/A
Bi-directional
Bi-directional
Bi-directional
Bi-directional
N/A
Input
Input
Input
Input
Output
Output
Output
Bi-directional
Bi-directional
PSO / Absolute Encoder Mating Connector (J301)
Aerotech
ECK00100
ECK01022
Third Party Source
Keltron P/N DN-15PYSH-G
Amphenol P/N 17-1725-2
We recommend using the opto-isolated output, where
possible, to maintain the isolation between the Ndrive HP
and the laser. This prevents noise and current spikes
(from laser firing pulses) from being conducted through the
Ndrive. This requires the user to power the opto-isolator at
TB303 (see Section 4.1.5. for more information).
www.aerotech.com
4-13
Ndrive HP Options
Table 4-14.
Ndrive HP 10/20/30 User’s Manual
Laser Output Opto-Isolator Specifications
M12 Device (Option#)
See Figure 4-14
* HCPL-2601
(-PSOOPTO1 option, std)
6N136
(-PSOOPTO2 option)
4N33
(-PSOOPTO3 option)
TIL117-M
(-PSOOPTO4 option)
Nominal
Frequency
5 MHz
750 KHz
10 KHz
40 KHz
Figure 4-13.
4-14
Propagation
Delay (Typ.)
.05 us.
.45 us.
3 us.
2 us.
Power Supply
Voltage
(VLaser)
Output
Current
Sink
5 VDC
10 mA
5-15 VDC
2 mA
5-25 VDC
50 mA
5-25 VDC
50 mA
Absolute Encoder Interface (J301)
www.aerotech.com
Ndrive HP 10/20/30 User’s Manual
Figure 4-14.
Options
PSO Interface
Output 11 and the Auxiliary Marker on J205 (pins 19 and 20) may also be defined as the
PSO Laser Firing output via the PSOCONTROL command. See Section 3.2 for
connection and other information.
Figure 4-15.
www.aerotech.com
(RS-485) Absolute Encoder Interface (J301)
4-15
Ndrive HP Options
Ndrive HP 10/20/30 User’s Manual
4.1.9. SSI Net (2 channels) (J302, J303)
Each of the two SSI Net interfaces is a two-channel bidirectional RS-422 interface, most
typically for quadrature encoders. This allows one channel for the sine signal and one
channel for the cosine signal. Alternatively, one of the SSI Net interfaces may be used to
provide an encoder marker signal to another SSI Net interface if used. Each of these two
SSI Net interfaces are both available on the J302 and J303 connectors, as illustrated in
the following table. Note that the J205 encoder channel may also be used as an
input/output for multi-axis PSO firing.
The SSI Net is designed for daisy-chaining encoder signals from one Ndrive to another
for two/three-axis PSO (laser firing). This allows one Ndrive containing the –DUALPSO
or –TRIPLEPSO options to track the vectorial position change of two/three axes in realtime. These encoder signals may also be used for user-defined purposes. Refer to
Figure 4-16 and Figure 4-17. These four channels are bi-directional and configured via
the PsoSsi1Config and PsoSsi2Config axis parameters; see the Nview help for more
information. Note that SSI Net #1 is also available on the J301 connector (see Section
4.1.8.). The signals from these ports will be the same as the differential line driver
encoder signal input to the Ndrive, unless the –MXH option is present. The signal output,
when the –MXH option is present, will be of a pulse width determined by the –MXH
clock frequency, as indicated in Table Table 3-17.
The SSI Net #1 and #2 interfaces are both physically
hardwired to the J302 and J303 connectors. If SSI Net #1
is configured as an input, a signal driven into the SSI Net
#1 connections on J302 will also be present on the SSI
Net #1 connections of J303, effectively making SSI Net #1
on J303 an (un-buffered) output of this same signal.
Likewise, this would also be true for the SSI Net #2
interface.
Table 4-15.
Pin #
1
2
3
4
5
6
7
8
4-16
J302, J303 2-Channel SSI Net Connector Pin Assignment
Label
Sin-N
Sin
Cosine-N
Sin-N
Sin
Cosine
Cosine-N
Cosine
Description
SSI Net #1 Sin-N
SSI Net #1 Sin
SSI Net #2 Cosine-N / Marker-N
SSI Net #2 Sin-N
SSI Net #2 Sin
SSI Net #2 Cosine / Marker
SSI Net #1 Cosine-N / Marker-N
SSI Net #1 Cosine / Marker
In/Out/Bi.
Bi-directional
Bi-directional
Bi-directional
Bi-directional
Bi-directional
Bi-directional
Bi-directional
Bi-directional
www.aerotech.com
Ndrive HP 10/20/30 User’s Manual
Figure 4-16.
www.aerotech.com
Options
J301/J302/J303
4-17
Ndrive HP Options
4.2.
Ndrive HP 10/20/30 User’s Manual
–DUALPSO and –TRIPLEPSO Laser Firing Options
The Ndrive HP allows two and three-axis laser firing via its -DUALPSO and TRIPLEPSO options. To accomplish this, the encoder signals from a second/third Ndrive
must be jumpered (or daisy-chained) from that Ndrive to the Ndrive with the DUALPSO or -TRIPLEPSO options. This requires an encoder signal from another axis
via the J205 connector (Section 3.1.1) or via one of the two SSI Net connectors. If the
J205 connector is used, it must be configured as an output via the EncoderDivider axis
parameter. If the SSI Net is used it requires a cable (see Table 4-16 and Figure 4-17)
from J302 to J302 of each Ndrive (J302 to J302 or J303 to J303 of the other Ndrive, both
connectors have two bi-directional ports). The ports on each drive must then be
configured via their PsoSsi1Config/PsoSsi2Config and PsoMrk1Config/PsoMrk2Config
axis parameters, out and in, respectively, so the encoder signals are supplied to the
Ndrive with the -DUALPSO or TRIPLEPSO options. Additionally, the
CfgEncMxhSetup axis parameter must be configured for a 20 MHz. clock or less, so as
not to exceed the 31 nsec. minimum edge separation specification. Also, the PSO prescalars may be required to limit each encoder being tracked to a 5 MHz. data rate (which
does not affect the servo feedback loop data rate). The figure below also shows
two/three-axis firing, which are very similar. See the Nview HMI help for more
information on parameter configurations.
Note that the J205 encoder channel may be configured as an output via the
EncoderDivider axis parameter, allowing other multi-axis PSO firing configurations.
Figure 4-17.
Table 4-16.
4-18
Two/Three Axis Laser Firing Interconnection
SSI Net Cable Part Numbers
Part #
Description
NConnect-SSINet-4500
NConnect-SSINet-3000
NConnect-SSINet-1500
NConnect-SSINet-900
4.5 M (15 FT) SSI Net Cable
3.0 M (10 FT) SSI Net Cable
1.5 M (5 FT) SSI Net Cable
0.9 M (3 FT) SSI Net Cable
www.aerotech.com
Ndrive HP 10/20/30 User’s Manual
Options
4.2.1. PSO Tracking Rate Configuration
PSO Track Rate Configuration applies to an Ndrive with
either the -DUALPSO or -TRIPLEPSO options, and the
MXH option, with high encoder data rates.
A) The maximum clock frequency of the MXH multiplier should be limited to 20 MHz.
when using the -DUALPSO or -TRIPLEPSO options. This is due to a maximum encoder
date rate of approximately 32 MHz. on the Ndrive’s encoder input ports. The 20 MHz.
clock rate is achieved by setting the “Clock Select 1” field of the CfgFbkEncMxhSetup
axis parameter (value of 0x1 as shown below). This must be done when using DUALPSO or -TRIPLEPSO options in order to ensure that encoder count information is
not lost.
The 20 MHz. data rate limitation effectively limits the maximum speed of the axis (see B
below). In addition, the -DUALPSO or -TRIPLEPSO options have a maximum tracking
rate of 5 MHz. due to hardware limitations. The PSO data rate can be reduced to 5 MHz.
while allowing the servo loop to operate at 20 MHz. by using the following
PSOTRACK <axis> SCALE 4 4 4 command. This command divides the encoder
signals before the PSO counters by a factor of 4 and therefore limits the frequency seen
by the PSO tracking counters to 5 MHz. However, the servo loop is still able to run at the
full 20 MHz. rate.
The effective PSO programming resolution is now 1/4 that of the servo loop (full)
resolution. PSODISTANCE commands should be entered 4 times lower than the full
resolution in this case.
Figure 4-18.
www.aerotech.com
PSO Tracking Rate Block Diagram
4-19
Ndrive HP Options
Ndrive HP 10/20/30 User’s Manual
Example:
It is desired to generate a pulse output every 1,000 encoder counts in -DUALPSO or
-TRIPLEPSO mode. The individual axis speeds approach 20 MHz. during the
motion and therefore exceed the 5 MHz. -DUALPSO or -TRIPLEPSO tracking
limitation. The PSOTRACK <axis> SCALE 4 4 command must be used and the
PSODISTANCE values reduced by a factor of 4 as follows…
PSODISTANCE X FIXED 250 STEPS ; distance specified with ¼
; actual resolution
B) In order to run the servo loop at full encoder resolution and data rates above 20 MHz.,
Ndrive software versions 2.02 and above contain the CfgFbkEncMxhQuadDiv axis
parameter which acts as an MXH output divider. This parameter allows you to specify a
lower resolution for the MXH quadrature output signal only (used by -DUALPSO or TRIPLEPSO options on other drives). The effective resolution is the full resolution, as
derived using CfgFbkEncMultFactorMXH axis parameter, divided by the
CfgFbkEncMxhQuadDiv axis parameter.
The servo loop always runs at the full resolution as
determined by the CfgFbkEncMultFactorMXH axis
parameter. The CfgFbkEncMxhQuadDiv axis parameter
does not affect servo loop resolution.
Example:
An application uses a 4um linear encoder with an MXH option on an Ndrive. It is
desired to move the motor at a maximum speed of 200mm/second and track using
the -DUALPSO or -TRIPLEPSO option.
CfgFbkEncMultFactorMXH = 500
; value for 2nm servo loop
; resolution
Encoder resolution = 250 lines /mm * 500 * 4 = 500,000 counts / mm (2nm)
Encoder data rate at 200mm/sec = 500,000 * 200 = 100Mhz
This exceeds the -DUALPSO or -TRIPLEPSO maximum encoder tracking rate of 5
MHz. and must be reduced by 100/5 = 20. Set the CfgFbkEncMxhQuadDiv axis
parameter to 20 to achieve this. The user must now program the PSODISTANCE
command in units of 40nm instead of 2 nm.
4-20
www.aerotech.com
Ndrive HP 10/20/30 User’s Manual
4.3.
Options
–ENET (Ethernet) Option J204
The optional Ethernet port provides connectivity to a 10/100Base-T ModBus TCP
network. This is typically used for adding analog and digital I/O to the controller. See the
Ethernet I/O help on the Window’s Start bar on the Automation 3200 menu.
Table 4-17.
Pin #
1
2
3
4
5
6
7
8
Ethernet Connector Pin Assignment (J204)
Label
TX +
TX RX +
Unused
Unused
RX Unused
Unused
Description
Transmit Data +
Transmit Data Receive Data +
RC Terminated
RC Terminated
Receive Data RC Terminated
RC Terminated
In/Out/Bi.
Output
Output
Input
N/A
N/A
Input
N/A
N/A
Additionally, the -IOPSO options provide analog and digital inputs and outputs, see
Section 4.1. for more information.
Figure 4-19.
Table 4-18.
Ethernet Interface (J204)
NConnect I/O Cable part Numbers
Part Number
NConnect-IO-900
NConnect-IO-1500
NConnect-IO-3000
NConnect-IO-4500
Description
Ethernet crossover cable 900mm (3 ft.)
Ethernet crossover cable 1500mm (5 ft.)
Ethernet crossover cable 3000mm (10 ft.)
Ethernet crossover cable 4500mm (15 ft.)
www.aerotech.com
4-21
Ndrive HP Options
4.4.
Ndrive HP 10/20/30 User’s Manual
–RDP Resolver Input
The optional resolver input provides two industry standard resolver or Inductosyn
channels, which may each be used as a feedback device. Each may be separately
configured for resolver or inductosyn input, as shown in Table 4-21. The standard
reference output frequency is 10 kHz., optionally it may be configured as 5 or 7.5 kHz.,
at the factory.
The Sine and Cosine feedback signals should be adjusted for 2 volts RMS (2.8 volts
Peak) via the CfgFbkRDGain axis parameter. The resolver can be physically aligned to
the motor, by using the MSET CNC programming command. This physical relationship
may also be defined via the CfgMotOffsetAng axis parameter. All of which is described
in Section 4.4.1. See the Nview help for information on configuring the axis parameters
for an axis with resolver feedback.
Table 4-19.
Pin #
Shell
1
2
3
4
5
6
7
8
9
10
11
12
13
14
15
Resolver Connector Pin Assignment (J401, J402)
Label
Shield
Enc Cos +
Enc Mrk +
Common
Sin +
Sin Enc Cos Enc Sin +
Common
Reference
Enc Sin Enc Mrk Common
Cos +
Cos -
Description
Connector shell for cable shield termination
Optional Encoder Cosine + output
Optional Encoder Marker + output
Resolver Common input
Resolver Sine + input
Resolver Sine - input
Optional Encoder Cosine - output
Optional Encoder Sine + output
Reserved
Resolver Reference Common input
Resolver Reference output
Optional Encoder Sine - output
Optional Encoder Marker - output
Resolver Common input
Resolver Cosine + input
Resolver Cosine - input
In/Out/Bidir.
Input
Output
Output
Input
Input
Input
Output
Output
N.A.
Input
Output
Output
Output
Input
Input
Input
Note that the following mating connector is always provided with the resolver option,
which may be ordered separately as part number, MCK-15HDD.
Table 4-20.
Resolver Mating Connector
15-Pin male D-style con.
Connector
Back shell
Table 4-21.
JP #
JP1
JP2
4-22
Aerotech
ECK01287
ECK01021
Third Party Source
Amphenol 17HD-015P-AA000
Amphenol 17-1724-2
Resolver Jumper Configuration
Resolver
1-2 (Channel 1) - Default
1-2 (Channel 2) - Default
Inductosyn
2-3 (Channel 1)
2-3 (Channel 2)
www.aerotech.com
Ndrive HP 10/20/30 User’s Manual
Table 4-22.
Resolver Test Points
Test Point Number
TP4
TP10
TP11
TP12
TP20
TP21
TP22
Description
Signal Common
Sine input Channel 1
Cosine input Channel 1
Reference signal Channel 1
Sine input Channel 2
Cosine input Channel 2
Reference signal Channel 2
Figure 4-20.
Table 4-23.
Pin #
1
2
3
Options
Resolver Option Assembly (690D1599 Rev. 0)
External Power Pin Assignment (J403)
Label
+12 VDC
-12 VDC
Common
Description
+12 Volts DC
-2 Volts DC
Signal Common
www.aerotech.com
In/Out
Input
Input
N.A
4-23
Ndrive HP Options
Ndrive HP 10/20/30 User’s Manual
4.4.1. Resolver/Inductosyn Setup
There are three fundamental steps of configuring the RDP option board:
•
Configuring the Resolver Hardware
•
Configuring the Resolver’s Analog Feedback Signals
•
Configuring the Commutation Parameters
4.4.1.1. Configuring the Hardware
There is a limited amount of hardware configuration capability on the RDP option board.
Most of which is configured at the factory (i.e., must be ordered as a factory option).
These features include carrier frequency and the number of R/D converter channels, one
or two.
There are two jumpers located on the RDP board. These
are used to select the reference signal for the converter
chip (i.e. SIN vs. COS). Jumper JP1 selects the reference
for channel 1 and jumper JP2 selects the reference for
channel 2. NOTE: Typically these jumpers only require
being changed when inductosyns are used.
The SIN reference is a fixed-phase signal, which is in phase with the reference signal
used by the resolver. The COS reference is a variable-phase signal which may be phased
shifted with respect to the reference of the resolver/inductosyn to optimize the alignment
of the feedback (required for inductosyns, which nominally provide a 90 degree phase
shift on feedback; optional for resolvers with significant phase loss). The default phase
offset is 90 degrees. For most inductosyns, this value will need to be varied from system
to system to optimize performance. See Figure 4-22 below for example phasing.
Note that some Aerotech systems may have an optional
pre-amplifier board. This may be installed within the
mechanics itself, as is the case with an Aerotech
AOM360D optical mount. If so, the first step is to adjust
the P1 potentiometer on the pre-amplifier board to
equalize the Sine and Cosine feedback signals to the
same amplitude.
4-24
www.aerotech.com
Ndrive HP 10/20/30 User’s Manual
Figure 4-21.
Options
Analog Output Connector (TB301)
4.4.1.2. Configuring the Analog Feedback Signals
Using the Encoder Feedback Configuration Utility to set up a resolver /
inductosyn
The RDP option of the Ndrive can be optimally aligned quickly, using the Encoder
Feedback Configuration utility within the Nscope.exe utility.
When the Ndrive is configured for Resolver Feedback (via the CfgFbkPosType axis
parameter), then the currently selected channel (1 or 2, defined via the CfgFbkPosChan
axis parameter) of the RDP board will output its analog inputs for SIN/COS into the
analog input channels of the Encoder Configuration Feedback utility (a utility also used
to configure the -MXH option). The values sampled by the analog inputs reflect the peak
value of the carrier-frequency sine waves used by the Resolver to Digital converter.
The Position feedback type, at present, dictates which
analog channels are sampled.
There are two axis parameters, which are used to configure the analog feedback from a
resolver or inductosyn for optimum performance:
•
CfgFbkRDGain defines the peak amplitude of the reference sine wave to the
resolver.
•
CfgFbkRDCosPhase defines the phase delay on the Cosine phase of the dualphase oscillator.
www.aerotech.com
4-25
Ndrive HP Options
Ndrive HP 10/20/30 User’s Manual
When to use the CfgFbkRDCosPhase axis Parameter:
The Cosine reference signal can be adjusted from approximately 0 degrees (i.e. in phase
with the SINE reference signal) to 180 degrees, with a nominal value of 90 degrees. This
axis parameter is primarily for use with inductosyns, which have a nominal phase shift
from the reference signal of 90 degrees. This value may vary from system to system, and
therefore can be adjusted to ensure that the alignment of the feedback signals to the
reference signal is at its optimum, for better performance.
This signal can also be used to adjust for resolvers that have a large amount of phase lag.
Typically, less than 5 degrees of phase lag is acceptable and does not require use of the
COS reference.
Use of this axis parameter requires that the jumper on the
RDP board for this channel (JP1 for channel 1 or JP2 for
channel 2) be set from 2-3 instead of from 1-2. Also, in
order for the A/D’s to sample properly, the appropriate bit
in the CfgFbkRDConfig axis parameter should be set to 1
(bit 0 for channel 1 or bit 1 for channel 2).
For most resolvers, use of the CfgFbkRDCosPhase axis parameter is not required. If this
axis parameter is not being used, the jumpers should be set to 1-2 and the bits in the
CfgFbkRDConfig axis parameter should be set to 0. Skip to the section on adjusting the
R/D Gain.
Adjusting the CfgFbkRDCosPhase axis Parameter:
After starting the Encoder Feedback Configuration utility, make sure the proper axis is
selected and then start collecting data continuously. Set the CfgFbkRDGain axis
parameter to 0 to minimize the gain. This can be done through the Ndebug.exe utility.
Rotate the resolver or inductosyn until the analog signals are at one of the vertical or
horizontal lines; this will ease location of a maximum. See Figure 4-22 below for an
example. Adjust the CfgFbkRDCosPhase axis parameter until you locate a local
maximum. This can be done through the Ndebug.exe utility. When the maximum has
been found, rotate the motor in a complete circle to ensure you see a circle. If not, the P1
amplitude potentiometer on the pre-amplifier board (if present) may need adjusted.
4-26
www.aerotech.com
Ndrive HP 10/20/30 User’s Manual
Figure 4-22.
Figure 4-23.
www.aerotech.com
Options
Resolver Located at Maximum of SIN Signal
Rotating the Resolver (to see a circle)
4-27
Ndrive HP Options
Ndrive HP 10/20/30 User’s Manual
For this to function, you MUST have the proper jumper set
to 2-3 for this channel and the bit in the CfgFbkRDConfig
axis parameter set to 1. Otherwise, erratic results may
occur.
Adjusting the gain of the R/D converter
Once the phase is adjusted for optimum conversion for inductosyns, adjust the
CfgFbkRDGain axis parameter until you see the analog signals peaking between
approximately 5,000 (on the low end) and 60,500 (on the high end) counts. This axis
parameter can be adjusted via the Ndebug.exe utility. These numbers equate to
approximately 0.38 to 4.62 volts on a zero- to 5-volt scale, or ± 8.48 volts on a ± 10V
scale (i.e. via the Nstat.exe utility), depending upon where you measure the signals. This
nominally provides 2V RMS (2.83 volts peak) to the converter chip on the RDP option
board, which is required for optimum operation. See Figure 4-24 below, for an example
of an optimum circle.
Figure 4-24.
4-28
Optimized Resolver Feedback Configuration
www.aerotech.com
Ndrive HP 10/20/30 User’s Manual
Options
4.4.1.3. Configuring the Commutation Initialization
The commutation of brushless motors with resolver feedback may be initialized two
ways. The first method uses the number of motor pole pairs combined with the maximum
resolution of the R/D board to determine an initial commutation position. The second
method initializes the motor normally using the Hall-effect feedback signals.
Setting the CfgMotType axis parameter to auto-MSET can
be used if the R/D auto-configuration or Hall-effect signals
cannot be used.
R/D auto-configuration typically CAN’T be used with
inductosyns as they have multiple electrical cycles per
revolution of the motor. R/D auto-configuration will ONLY
work if you have EXACTLY 1 cycle of the Sine and Cosine
signals per revolution of the motor.
The Commutation Initialization method of the R/D is specified through bit 8 of the
CfgFbkRDConfig axis parameter.
Setting this bit to 1, utilizes Hall-effect commutation initialization (i.e. commutation is
initialized similar to encoder feedback). Note that this requires proper Hall effect to backEMF configuration and/or proper commutation phase shift axis parameter setting; see
brushless motor setup information for more details.
Setting this bit to 0 uses the R/D auto-Configuration, when the axis is enabled.
The position feedback type dictates which channel is used
for commutation initialization. Typical configuration of the
R/D has the CfgFbkPosType axis parameter set to 6 and
CfgFbkVelType axis parameter set to 0 (use position). If
two resolvers or inductosyns are used in a dual-loop
mode, the position source will generate the commutation
initialization, but the velocity source will maintain
commutation position after enable. Dual-Loop with
resolvers and other feedback sources is not advisable.
www.aerotech.com
4-29
Ndrive HP Options
Ndrive HP 10/20/30 User’s Manual
Finding the Proper Commutation Offset in R/D Auto-Configuration Mode
The R/D Auto-Configuration mode assumes that the zero crossing of the R/D Converter
is aligned with the 0 angle of commutation on the Ndrive. Therefore, to determine the
commutation offset angle, perform the following steps:
The resolver absolute counter may be read in the Ndebug
utility via the command sequence: “DSPMEMREAD 2
0xEB0006” for channel 1, or 0xEB0007 for channel 2.
1.
Open the Nstat.exe utility.
2.
Select the tab, which displays the absolute resolver feedback register.
3.
Rotate the resolver until you have an approximate zero value on the feedback
register (note that this value will roll over at 65,535).
4.
Begin with an MSET value of 0 degrees, execute MSET commands with an
increasing angle until you see a value of 0 indicated for the absolute resolver
angle. This MSET angle is the desired commutation offset.
5.
Enter the value from step 4 into the CfgMotOffsetAng axis parameter. Note that
for negative values, you must add 360 degrees (valid parameter range is 0-360
degrees).
∇ ∇ ∇
4-30
www.aerotech.com
Ndrive HP 10/20/30 User’s Manual
CHAPTER 5:
5.1.
Accessories
ACCESSORIES
Standard Interconnection Cables
The following three tables show a summary of the standard cables used for
interconnecting various items to the Ndrive. The “-xx”, in the tables below is used to
specify the length in decimeters and the “-yy,” specifies the length in feet.
To identify your cable or for a drawing, see your documentation CD or software CD
ROM.
Table 5-1.
Standard Interconnection Cables
Cable Part Number
C13803-xx*
C15291-xx*
C15805-xx*
C1650X
C1839X
C18982
C19360-xx*
C19791
C19792
C19793
C19794
C19851
C19891-xx*
C19892-xx*
C20251-xx*
ECZ01231
Description
DC Brush Motor Cable
(DC MTR & FB-25DU FL-24MS-MAX107DM)
Encoder Feedback Cable
(BL FB-25DU-17MS 9DU-MAX120DM)
Motor Cable
(BL MTR FL 4MS)
Encoder Feedback Cable
(BL FB-25DU-25DU-MAX120DM)
Encoder Feedback Cable
(BL FB-25DU-25DU 9DU-MAX120DM)
Motor and Encoder Feedback Cable
(BL MTR&FB-FL-25DU-25DU-107DM MAX)
Motor Cable
(BL MTR-FL-4DU-MAX450DM)
Joystick Extension Cable with Flying Leads
(JSXT-FLY-XX)
Joystick Extension Cable with D Style Connectors
(JSXT-26HD-XX)
Two-Axis Joystick Adapter Cable (J205 on two Ndrive HPs)
Two-Axis Joystick Adapter Cable with Flying Leads (J205 and –IO
option)
Hi-Flex Motor Cable
(BL MTR-FL-4DU-HF-46DM)
Auxiliary I/O to SSI Net 1 Cable
Auxiliary I/O to SSI Net 2 Cable
Stepper Motor Cable
BBA32 Interconnect Cable
* The “-xx” indicates length in decimeters “-yy” would indicate length in feet.
www.aerotech.com
5-1
Accessories
Table 5-2.
Ndrive HP 10/20/30 User’s Manual
Combined Motor & Feedback Cables
Ndrive
Part Number (s)
Used On
C18982-xx*
BFMCDNT-yy*
Motor Output
Description
BL
MTR
MAX107DM
Obsolete
Stage/Motor
&
FB-25DU
FL-25DU-
Any brushless motor stage having a single 25 pin “D” style
connector for motor power, encoder, limits and halls.
ABL1000 series
ALS130 & ALS135 series (Single connector version)
ANT series, AVL125, & ADR175
ASR1000, 1100, & 2000 series (with –25D option)
Motor/Encoder
/ Limits / Halls
Motor Feedback
C13803-xx*
DC MTR
MAX107DM
&
FB-25DU
FL-24MS-
Motor Output
Any stage having a DC brush motor with a single 24 pin “MS”
style connector for motor power, encoder, limits and brake.
Motor/Encoder
/ Limits / Brake
Motor Feedback
C20251-xx*
SM MTR & FB-25DU FL-23B-MAX107DM
Motor Output
Any stage having a stepper motor with a single 23 pin Burndy
style connector for motor power, encoder, limits and brake.
Motor/Encoder
/ Limits / Brake
Motor Feedback
* The “-xx” indicates length measured in decimeters “-yy” indicates length measured in feet.
5-2
www.aerotech.com
Ndrive HP 10/20/30 User’s Manual
Table 5-3.
Accessories
Individual Motor Cables
Ndrive
Motor Output
Motor Output
Part Number (s)
Description
Used On
C15805-xx*
PMCNT-yy*
BL MTR-FL-4MS-MAX450DM
Obsolete
Any brushless motor stage having a 4 pin “MS”style connector
for motor power.
BM/BMS motors (with -MS option)
BMxxxE motors
C19360-xx*
BL MTR-FL-4DU-MAX450DM
PMCHPDNT-yy*
Obsolete
Any brushless motor stage having a 4 pin “D” style connector
for motor power.
BM/BMS motors (with -D25 option)
ABL2000 & 8000 series
ABR1000 Series
ADR160 - 240 series
ADRT series
ALA1000 series
ALS130, 135, 2200, 3600, 5000, 5000WB, 20000,
& 25000 series
ARA125 series
ASR1000, 1100, & 2000 series (with –HPD option)
ATS1100-H series
LMA & LMAC series
Stage/Motor
Motor
Motor
* The “-xx” indicates length measured in decimeters “-yy” indicates length measured in feet.
www.aerotech.com
5-3
Accessories
Table 5-4.
Ndrive HP 10/20/30 User’s Manual
Individual Feedback Cables
Ndrive
Motor Feedback
Part Number (s)
Description
Used On
C16501-xx*
BL FB-25DU-25DU-MAX120DM
C16505-xx*
BL FB-25DU-25DU-MAX240DM
BFCMX-yy *
Obsolete
Any brushless motor stage having a 25 pin “D” style connector for
encoder, limits, halls and brake.
BM/BMS motors (with -D25 option)
ABL2000 & 8000 series
ABR1000 Series
ADR160 - 240 series
ADRT series
ALA1000 series
ALS130, 135, 2200, 3600, 5000, 5000WB, 20000, &
25000 series
ARA125 series
ASR1000, 1100, & 2000 series (with –HPD option)
ATS1100-H series
LMA & LMAC series
C18391-xx*
C18393-xx*
BFCD-yy*
Motor Feedback
Stage/Motor
Encoder/Limits
/ Halls / Brake
BL FB-25DU-25DU 9DU-MAX120DM
BL FB-25DU-25DU 9DU-MAX240DM
Obsolete
Any Brushless motor stage having a 25 pin “D” style connector for
encoder, halls, & brake and a 9 pin “D” connector for limits.
BM/BMS motors (with –D25 option)
Encoder / Halls
/ Brake
Limits
C15291-xx*
C15297-xx*
BFC-yy*
BL FB-25DU-17MS 9DU-MAX120DM
BL FB-25DU-17MS 9DU-MAX240DM
Obsolete
Any stage having a BM/BMS motor with a 17 pin “MS” style
connector for encoder, halls, & brake and a 9 pin “D” connector for
limits.
Encoder / Halls
/ Brake
Motor Feedback
Limits
* The “-xx” indicates length measured in decimeters “-yy” indicates length measured in feet.
5-4
www.aerotech.com
Ndrive HP 10/20/30 User’s Manual
5.2.
Accessories
Joystick Interface
The user may connect an Aerotech JI (not JBV, or JP4) joystick or their own joystick and
switches to the Ndrive (Refer to Figure 5-1). The joystick interlock input must be set to
the logic low state to indicate the joystick is connected. The zero velocity null-point for
each joystick is approximately 2.5 volts. Be sure to set the JoyStickMinVoltage and
JoyStickMaxVoltage task parameters. Also, the two potentiometers may be connected to
analog inputs on two different Ndrives since each Ndrive standardly has one analog
input.
Subsequent drawings illustrate how to connect a single axis and a two-axis joystick (both
single- and two-axis) to the Ndrive in various ways, and the cables required to so do. A
two-axis joystick requires 2 analog inputs (provided by the –IOPSO option).
When using an external potentiometer (such as a joystick) to drive the Ndrive analog
inputs, it must be manually calibrated.
1)
Set the joystick potentiometer at mid point (detent position) and record the
voltage from the Nstat window.
2)
Record the voltage at the maximum and minimum deflections of the
potentiometer. Subtract the two voltages.
3)
Set the JoyStickMaxVoltage task parameter to the mid point voltage from
step 1 plus 1/2 the voltage difference from step 2.
4)
Set the JoyStickMinVoltage task parameter to the mid point voltage from
step 1 minus 1/2 the voltage difference from step 2.
If two different Ndrives are being used to read the joystick, only one Ndrive should be
used to provide 5V power to the potentiometers. The second Ndrive should connect
differentially to the second joystick potentiometer by connecting the Analog Input- to
common and the Analog Input+ to the potentiometers wiper.
Figure 5-1.
www.aerotech.com
Joystick Interface
5-5
Accessories
Ndrive HP 10/20/30 User’s Manual
A standard Aerotech JI joystick may be connected to J205 of the Ndrive as a single axis
joystick via the following cable, shown below (Figure 5-2 and Figure 5-3). Figure 5-2
indicates the required cable and Figure 5-3 indicates the interconnection of the joystick to
the Ndrive.
Be sure to set only one of the JoyStickAnalogHorizInput or the JoyStickAnalogVertInput
task parameters. Also, define only one axis each of the SlewPair1 through SlewPair8 task
parameters.
TO
Ndrive HP
J205
+5V
EXT_INCOM
EXT_IN2
ANALOG_IN+
COM
ANALOG_INAGND
EXT_IN1
EXT_IN3
ECX00570
8 COND. #24
LENGTH A.R. SEE NOTE 2.
TO
JOYSTICK
BLU
CONNECTOR SHIELDING
+5V
BLK
WHT
GRN
RED
BRN
S2
X POT
WRAP 6" COPPER FOIL (EIA281)
OVER GROMMET, SHIELD & DRAIN WIRE
COM
#5 GROMMET SUPPLIED
W/BACKSHELL
S1
INTERLOCK
SHIELD
FOLD BACK FOIL SHIELD
SUCH THAT THE SILVER
PART IS OUTSIDE
26 HD MALE, #K86-AA-26P, (ECK01259)
BACKSHELL, #17-1725-2, (ECK01022)
SEE NOTE 3 FOR CONNECTOR VIEW
FOLD BACK & TWIST
SHIELD DRAIN WIRE
& WIRE TO PIN 12
COVER
IF REQUIRED.
15 LINE FEMALE "D"
745493-2, ECK00783
BACKSHELL, #17-1725-2, (ECK01022)
JACKSOCKETS, #207719-3, (ECK00129)
A.R.
2. CABLE LENGTH
CAUTION, CABLE LENGTHS (XX) ARE IN DECIMETERS
EXAMPLE: C19792-30
30 = 30 DECIMETERS (3 METERS) = 10FT.
Ndrive HP JOYSTICK
EXTENSION CABLE
(JSXT-26HD-XX)
3. CONNECTOR VIEW FROM SOLDER SIDE.
C19792-XX
630B1979-2
630B1979-201.DWG
Figure 5-2.
5-6
Single Axis Joystick Interface to J205 of the Ndrive
www.aerotech.com
Ndrive HP 10/20/30 User’s Manual
Ndrive HP
JOYSTICK INTERFACE
Accessories
NOTES:
1. USING C19792-XX CABLE WILL ONLY PROVIDE 1 AXIS OF SLEWING.
REQUIRES Ndrive HP TO HAVE REV. "A" CONTROL BOARD.
2. THE JI JOYSTICK MUST BE USED WITH THE Ndrive HP. JBV OR JP4
JOYSTICK VERSIONS ARE NOT COMPATIBLE.
26HD
FEMALE
J205
AUX
I/O
C19792-XX
JOYSTICK EXT.
CABLE
1
Ndrive HP
JOYSTICK INTERCONNECT
(C19792-XX CABLE)
620B1345-2
JI
INDUSTRIAL
JOYSTICK
2
620B1345-201.DWG
Figure 5-3.
www.aerotech.com
Single Axis Joystick Interconnect to J205 of the Ndrive
5-7
Accessories
Ndrive HP 10/20/30 User’s Manual
A standard Aerotech JI joystick may be connected to the I/O on the –IOPSO option via
the following cable for a two-axis joystick. Figure 5-4 indicates the required cable and
the Figure 5-5 indicates the interconnection of the joystick to the Ndrive.
TO
Ndrive HP
IOPSO
TB303-3
TB305-1
TB305-4
TB302-2
TB303-1
TB302-1
TB302-3
TB302-5
TB302-4
TB305-3
TB305-5
TB303-2
TO
JOYSTICK
ECX01009
16 COND. #24
LENGTH A.R. SEE NOTE 2.
REV "-"
REV "A"
VIO
RED
BLU
YEL
GRN
W/GRN
BRN
W/BRN
BLK
ORN
GRY
+5V
IP
IN2
A1+
GND
AGND
A1A2A2+
IN1
IN3
GND
FERRULE, #3200014 (EIK01001) TYP. 12 PLS.
ADD BRADY WIRE MARKERS SEE NOTE 3.
CONNECTOR SHIELDING
1
+5V
2
3
S2
X POT
4
COM
6
7
13
12
Y POT
S1
INTERLOCK
SHIELD
WRAP 6" COPPER FOIL (EIA281)
OVER GROMMET, SHIELD & DRAIN WIRE
#5 GROMMET SUPPLIED
W/BACKSHELL
FOLD BACK FOIL SHIELD
SUCH THAT THE SILVER
PART IS OUTSIDE
FOLD BACK & TWIST
SHIELD DRAIN WIRE
& WIRE TO PIN 12
IF REQUIRED.
15 LINE FEMALE "D"
745493-2, ECK00783
BACKSHELL, #17-1725-2, (ECK01022)
JACKSOCKETS, #207719-3, (ECK00129)
COVER
SEE NOTE 3
A.R.
6in.
2. CABLE LENGTH
CAUTION, CABLE LENGTHS (XX) ARE IN DECIMETERS
EXAMPLE: C19791-30 30 = 30 DECIMETERS (3 METERS) = 10FT.
3. WIRE MARKERS
FLAG WIRES WITH BRADY LABELS
COMPUTER FILE NO. 630B1979-1A1.
Figure 5-4.
5-8
Ndrive HP
EXTENSION CABLE
(JSXT-FLY-XX)
C19791-XX
630B1979-1
630B1979-1A1.DWG
Two-Axis Joystick Interface to the I/O on the –IOPSO Option
www.aerotech.com
Ndrive HP 10/20/30 User’s Manual
Accessories
NOTES:
1. USING C19791-XX CABLE WILL PROVIDE 2 AXES OF SLEWING. REQUIRES
Ndrive HP TO HAVE THE "IOPSO" OPTION INSTALLED.
Ndrive HP
JOYSTICK INTERFACE
2. THE JI JOYSTICK MUST BE USED WITH THE Ndrive HP. JBV OR JP4
JOYSTICK VERSIONS ARE NOT COMPATIBLE.
IOPSO INTERFACE
TB4 / TB302
TB5 / TB303
TB7 / TB305
AGND
1
A1+
2
A1-
3
A2+
4
A2-
5
GND
1
GND
2
+5V
3
IP
1
IN1
3
IN2
4
IN3
5
REV. "A" UNITS
REV. "-" UNITS
W/GRN
YEL
BRN
BLK
W/BRN
C19791-XX
JOYSTICK EXT.
CABLE
GRN
SHIELD
VIO
1
RED
ORN
BLU
GRY
Ndrive HP
JOYSTICK INTERCONNECT
(C19791-XX CABLE)
JI
INDUSTRIAL
JOYSTICK
2
620B1345-1
Figure 5-5.
www.aerotech.com
Two-Axis Joystick Connection to the I/O on the –IOPSO Option
5-9
Accessories
Ndrive HP 10/20/30 User’s Manual
5.3.
Handwheel Interface
The user may connect a handwheel or any device producing differential quadrature
signals, for manual positioning of the axes. See the Nview HMI help for information on
enabling the handwheel via software commands. The handwheel may be connected to
J205 of the Ndrive as shown in Figure 5-6 below, or the I/O available on the –IOPSO
option, shown in subsequent Figures.
10 FT. OR AR. LENGTH
1. INSTALL LABEL TO BACK OF HANDWHEEL
2
TO
Ndrive HP
J205
HANDWHEEL
5V
12
RED
1
5V
MODEL:
HWA32-26HD-XX
630B1983-2 REV. S/N: XXXXXX
COM
21
BLK
2
0V
TYPE 4 - MIA424
SIN
1
BRN
3
A
SIN-N
2
BLU
4
A-N
COS-N
11
WHT
5
B
COS
10
GRN
6
B-N
SUMTAK
LGF-043-100
(ECZ00201)
100 LINES/REV
XX = CABLE LENGTH IN DECIM
XXXXXX = WORK ORDER NUM
2. CABLE LENGTH
CAUTION, CABLE LENGTHS (XX) ARE IN DECIMETERS
EXAMPLE: HWA32-26HD-30
30 = 30 DECIMETERS (3 METERS) = 10FT.
3. CONNECTOR VIEW FROM SOLDER SIDE.
ECX00570 CABLE
8 COND. #24 SHIELDED
26 PIN HD MALE, #K86-AA-26P (ECK01259)
BACKSHELL, 17-1725-2 (ECK01022)
SEE NOTE 3 FOR CONNECTOR VIEW
NC
TERMINAL, #52949, AMP (EIK00234) TYP. 6 PLS.
ADD BRADY WIRE MARKERS TO TERMINALS.
HWA32-26HD-XX
Ndrive HP
HANDWHEEL
(HWA32-26HD-XX)
HWA32-26HD-XX
A.R.
630B1983-2
630B1983-201.DWG
Figure 5-6.
Handwheel Interconnection to J205 of the Ndrive
A handwheel with flying leads (no connector) may also be connected to the Ndrive via
the Aerotech BBA32 to J205, per the next two drawings.
5-10
www.aerotech.com
Ndrive HP 10/20/30 User’s Manual
Accessories
10 FT. OR AR. LENGTH
TO
Ndrive HP
J205
VIA
BBA32
2
12
RED
1
5V
COM 21
BLK
2
0V
SIN
1
BRN
3
A
SIN-N
2
BLU
4 A-N
COS-N 11
WHT
5
COS 10
GRN
6 B-N
5V
GND
1. INSTALL LABEL TO BACK OF HANDWHEEL
HANDWHEEL
B
SUMTAK
LGF-043-100
(ECZ00201)
100 LINES/REV
G
ECX00570 CABLE
8 COND. #24 SHIELDED
NC
MODEL:
HWA32-FLY-XX
630B1983-1 REV. S/N: XXXXXX
XX = CABLE LENGTH IN DECIMETERS
XXXXXX = WORK ORDER NUMBER
TYPE 4 - MIA00424
2. CABLE LENGTH
CAUTION, CABLE LENGTHS (XX) ARE IN DECIMETERS
EXAMPLE: HWA32-FLY-30
30 = 30 DECIMETERS (3 METERS) = 10FT.
3. THIS HANDWHEEL IS INTENDED TO BE USED WITH THE
BBA32 BREAK-OUT BLOCK. REFERENCE 620B1344-1.
FERRULE, #3200014 (EIK01001) TYP. 7 PLS.
ADD BRADY WIRE MARKERS TO WIRES.
TERMINAL, #52949, AMP (EIK00234) TYP. 6 PLS.
ADD BRADY WIRE MARKERS TO TERMINALS.
HWA32-FLY-XX
Ndrive HP
HANDWHEEL
(HWA32-FLY-XX)
A.R.
HWA32-FLY-XX
630B1983-1
630B1983-101.DWG
6in.
Figure 5-7.
www.aerotech.com
Handwheel with flying leads (no connector)
5-11
Accessories
Ndrive HP 10/20/30 User’s Manual
NOTES:
J205
AUX
I/O
26HD
FEMALE
Ndrive HP
BBA32 AUX I/O INTERFACE
THE BBA32 CONSISTS OF THE FOLLOWING PARTS:
1 - ECZ01230 (PHOENIX BREAK-OUT MODULE)
1 - ECZ01231 (26 PIN HD M/F CABLE 2.5FT.)
26 PIN HD
M/F CABLE
ECZ01231
2.5FT.
PHOENIX 26-PIN HD
BREAKOUT MODULE
ECZ01230
SHOWN FOR REFERENCE
BBA32
AUX I/O
INTERFACE
1. AUX_SIN+
2. AUX_SIN3. OPTO1+
4. OPTO15. OPTO2+
6. OPTO27. EXT_OUT1
8. EXT_OUT2
9. EXT_OUT3
10. AUX_COS+
11. AUX_COS12. +5V
13. ANALOG_IN+
14. ANALOG_IN15. EXT_OUTCOM
16. EXT_OUT4
17. EXT_IN1
18. EXT_IN2
19. AUX_MRK20. AUX_MRK+
21. COM
22. ANALOG1_OUT
23. AGND
24. EXT_INCOM
25. EXT_IN3
26. EXT_IN4
Ndrive HP BBA32
AUX I/O INTERCONNECT
BBA32
620B1343-1
620B1343-101.DWG
Figure 5-8.
BBA32 interface used to connect a Handwheel with flying leads (no connector)
∇ ∇ ∇
5-12
www.aerotech.com
Ndrive HP 10/20/30 Manual
CHAPTER 6:
6.1.
Troubleshooting
TROUBLESHOOTING
Problems, Causes, and Solutions
This section covers symptoms, probable causes, and solutions related to Ndrive HP
operation. Table 6-1 lists the most common symptoms of irregular operation and the
possible causes and solutions for these faults. More information can be found in the
Nview HMI help file.
Before performing the tests described in Table 6-1, be
aware of lethal voltages inside the controller and at the
input and output power connections. A qualified service
technician or electrician should perform these tests.
No user serviceable parts inside.
Motor/Ndrive HP chassis may exceed 50°C.
Disconnect power to Ndrive HP main supply and optional
supply before servicing.
Hazardous voltages may be present at Mains inlet and
motor connectors.
Voltages must be mechanically secured before applying
power.
Motors must be mechanically secured before applying
power.
www.aerotech.com
6-1
Troubleshooting
Ndrive HP 10/20/30 Manual
Risk of electric shock.
Residual voltages inside the Ndrive HP controller may
exceed 60 Volts after AC power has been disconnected
for 10 seconds.
Table 6-1.
Amplifier Faults, Causes, and Solutions
Symptom
Motor spins uncontrollably.
Brushless motor will not
spin.
Amplifier faults (“ENABLE”
LED de-energizes) when
motor decelerates.
Amplifier Faults ("ENABLE
" LED de-energizes).
6.2.
Possible Cause and Solution
Encoder (sine and cosine) signals are improperly
connected. See Section 2.5. for motor phasing
information.
Motor phases A, B, and C connected incorrectly relative to
Hall A, Hall B, and Hall C inputs. See Section 2.5. for
motor phasing information.
Bus over voltage detected (Ndrive HP 10/20). This
condition indicates an excessive regeneration condition.
The Ndrive HP 10/20 requires that a shunt regulator be
added to the unit.
1. RMS current exceeded - run at lower current.
2. Over temperature condition - Turn off and let amplifier
cool down. Provide better ventilation.
3. Defective on board power supply - Return for repair.
Ndrive HP Control Board Test Points
The following test point is available on the control board internal to the Ndrive HP. The
internal power board has no test points.
6-2
Table 6-2.
Ndrive HP Control Board Test Points
Test Point
Function
TP4
Signal Common (Analog and Digital)
www.aerotech.com
Ndrive HP 10/20/30 Manual
6.3.
Troubleshooting
Ndrive HP Control Board Assembly
Figure 6-1 highlights the important components located on the control board assembly.
The Ndrive HP is jumper selectable, providing the user with quick reconfiguration
capability of operating modes. Table 6-3 list the jumpers and the default configurations
for the Ndrive HP Control board (the -IOPSO option board and jumper configurations
are listed in Chapter 3).
S2 defines the Ndrive HP communication channel number and is the only userconfigurable switch/jumper on the control board (see Section 2.8).
J207
J206
TB201
J204
J205
J203
J201
J202
P9
JP1
J11
JP6
TP4
S1
JP4
JP5
B1
F2
JP3
JP2
JP7
P8
F3
F4
F1
S2
P10
J12
J10
Figure 6-1.
www.aerotech.com
J9
Ndrive HP Control Board Assembly (690D1577 Rev. A)
6-3
Troubleshooting
Ndrive HP 10/20/30 Manual
Table 6-3.
Jumpers
JP1
JP2
JP3
JP4
Ndrive HP Control Board Jumper Selections
Position
1-2
2-3 *
All in *
All out
In *
Out
1-2 *
3-4 *
5-6 *
7-8 *
1-2
2-3 *
JP5
JP6A
JP6B
JP6C
JP6D
JP7
Function
Signal Common isolated from Frame Ground (Chassis)
Signal Common connected to Frame Ground (Chassis)
Auxiliary Encoder Channel 2 is an input
Auxiliary Encoder Channel 2 is an output
100 Ohm Terminator present for RS-485 port on J301
100 Ohm Terminator not present for RS-485 port on J301
In for 100 Terminator on RS-422 Port 2 (J301, J302, J303)
In for 100 Terminator on RS-422 Port 1 (J301, J302, J303)
In for 100 Terminator on RS-422 Port 3 (J302, J303)
In for 100 Terminator on RS-422 Port 4 (J302, J303)
Watch Dog Timer Enabled
Watch Dog Timer Disabled
* indicates factory default setting
Switch S1 is for factory use only and should not be
changed by the user.
.
6-4
www.aerotech.com
Ndrive HP 10/20/30 Manual
6.4.
Troubleshooting
Ndrive HP Power Board Assembly
Figure 6-2 highlights the important components located on the power board assembly.
Table 6-4 lists the jumpers and their default configurations for the Ndrive HP Power
board.
TB102
TB101
DS1
JP6
F5
F4
F1
JP2
JP1
JP4
J8
F3
JP3
J6
F2
JP5
K1
Figure 6-2.
www.aerotech.com
TB103
Ndrive HP Power Board Assembly (690D1576 Rev. A)
6-5
Troubleshooting
Ndrive HP 10/20/30 Manual
Table 6-4.
Jumpers
JP1
JP2
JP3
JP4
JP5
JP6
Ndrive HP Power Board Jumper Selections
Positions
In *
Out
In *
Out
1-2
2-3
1-2
2-3*
1-2*
2-3
1-2*
2-3
Function
85 – 240 VAC Input Power Applied at TB102
Less than 850 VAC Applied at TB102
85 – 240 VAC Input Power Applied at TB102
Less than 85 VAC Applied at TB102
Shunt Option not Present (std. On Ndrive HP 10, 20)
Shunt Option Present (std. On Ndrive HP 30)
115 VAC Shunt Option (165VDC Bus)
230 VAC Shunt Option (330VDC Bus)
Bus under-voltage detection enabled
Bus under-voltage detection disabled
FireWire Bus power source
Disable FireWire Bus power source
* Factory Default
All jumpers are factory-configured and should not be
changed by the user.
Table 6-5.
Ndrive HP Power Board Fuse Information
Fuse
Description
F1
Supply Main Fusing for L1 VAC Bus Input
F2
F3
F4
F5
Shunt Option (-S)
Control Power Fuse
Encoder 5 Volt Power
Optional 115/230 VAC Control Power Supply
Input
Size
Ndrive 10: 5A S.B., 3AG
Ndrive 20: 10A S.B., 3AG
Ndrive 30: 10A S.B., 3AG
2 A S.B. (5 mm)
.5 A S.B.
.9A Auto. Reset-able
3 A S.B.
F1 and F2 are standard socketed fuses. F3 and F5 are soldered to the circuit board. See
Chapter 5: Troubleshooting for fuse replacement information.
6-6
www.aerotech.com
Ndrive HP 10/20/30 Manual
6.5.
Troubleshooting
LED Indicators
The following LEDs are available on each Ndrive HP. Full Ndrive HP status is available
via the Nmotion SMC and its utilities.
These LED’s may also flash, to indicate that the internal MXH option is being reprogrammed internally, see Section 3.3.4.2 for more information on the LED-flashing
pattern which indicates the re-programming cycle is occurring.
Table 6-6.
Label
ACTV
CLMT
ENB
FLT
INPOS
KRNL
LMT+
LMTPERR
RMS
LED Indicator Description
Description
Reset indicator
Current is clamped at the value determined by the ThresholdClampIAmp
axis parameter
Axis is enabled
An axis fault has occurred, see Fault axis parameter
Axis is in position
Nmotion SMC controller is running
Positive end of travel limit input active
Negative end of travel limit input active
Position Error has exceeded the ThresholdPosError axis parameter
RMS motor current has exceeded the ThresholdAvgIAmp axis parameter
www.aerotech.com
6-7
Troubleshooting
6.6.
Ndrive HP 10/20/30 Manual
JTAG Programming Connector
The JTAG connector is for Aerotech use only.
Table 6-7.
Pin #
1
2
3
4
5
6
7
8
9
10
11
12
13
14
6-8
JTAG Programming Connector – Internal (P10)
Label
TDI
Common
TDO
Common
TCK
Common
JTAG-TDI
Reset
TMS
Power
JTAG-TDO
DE-N
TRST-N
Description
JTAG Data Input
Signal Common
JTAG Data Output
Signal Common
JTAG Programming Clock
Signal Common
Test Data Input
Key Position (No Connection)
Reset
Test Mode Select
3.3 Volt Standard (5 Volt Optional)
Test Data Output
Data Enable
Test Reset
In/Out/Bi.
Input
N.A.
Output
N.A.
Input
N.A.
Input
N.A
Input
Input
Output
Output
Input
Input
www.aerotech.com
Ndrive HP 10/20/30 Manual
6.7.
Troubleshooting
Fuse / Battery Replacement
Table 6-9 lists the manufacturer and Aerotech’s part number for typical replacement
fuses. Additional fuse information can be found on the system drawing supplied with the
unit.
Table 6-8.
Fuse Replacement Part Numbers (Ndrive Control Board)
Fuse
Description
Third Party P/N
F1
F2-4
Control Power Fuse
FireWire 5 Volt Power Fuse
RAYCHEM SMD250
RAYCHEM SMD250
Aerotech
P/N
EIF00002
EIF00002
Size
5A
5A
F1-F4 are reset-able semiconductor fuses, soldered to the circuit board.
Table 6-9.
Fuse Replacement Part Numbers (Ndrive Power Board)
Fuse
Description
F1
Supply Main
Fusing
for
AC1
VAC
Bus Input
Ndrive HP 10
Ndrive HP 20
Ndrive HP 30
F2
Shunt Option (-S)
F3
Control Power Fuse
F4
Encoder 5 Volt Power
F5
Optional (Aux) 85/240 VAC
Control Power Supply Input
AC1
Third Party
P/N
Littlefuse
313005
Littlefuse
326010
Littlefuse
326010
Littlefuse
235002
Littlefuse
230.500S
Raychem
RUSB090
Littlefuse
230003S
Aerotech
P/N
Size
EIF00105
5 A S.B. (3AG)
EIF00117
10 A S.B. (3AG)
EIF00117
10 A S.B. (3AG)
EIF00195
2 A S.B. (5 mm)
EIF01010
.5 A S.B.
EIF01003
.9A
EIF01013
3 A S.B.
F1 and F2 are normal socketed fuses. F3 - F5 are soldered to the circuit board.
Disconnect power to Ndrive HP main supply and optional
supply before servicing.
Table 6-10.
Battery
B1
Battery Replacement Part Number (Ndrive HP Control Board)
Description
3 V Coin Cell
www.aerotech.com
Third Party P/N
Ray-O-Vac BR1225
Aerotech P/N
ECZ01079
6-9
Troubleshooting
6.8.
Ndrive HP 10/20/30 Manual
Preventative Maintenance
The Ndrive HP and external wiring should be inspected monthly. Inspections may be
required at more frequent intervals, depending on the environment and use of the system.
Table 6-11 lists the recommended checks that should be made during these inspections.
The Ndrive HP (all Aerotech equipment) is not to be used
in a manner not specified by Aerotech, Inc.
Table 6-11.
Preventative Maintenance
Check
Visually Check chassis for loose or
damaged parts / hardware.
Note: Internal inspection is not required.
Inspect cooling vents.
Check
for
fluids
or
electrically
conductive material exposure.
Visually inspect
connections.
all
cables
and
Action to be Taken
Parts should be repaired as required. If internal
damage is suspected, these parts should be
checked and repairs made if necessary.
Remove any accumulated material from vents.
Any fluids or electrically conductive material
must not be permitted to enter the Ndrive.
Note: Disconnect power to avoid shock hazard.
Tighten or re-secure any loose connections.
Replace worn or frayed cables. Replace broken
connectors.
6.8.1. Cleaning
The Ndrive HP chassis can be wiped with a clean, dry, soft cloth. The cloth may be
slightly moistened if required with water or isopropyl alcohol to aid in cleaning if
necessary. In this case, be careful not to allow moisture to enter the Ndrive HP or onto
exposed connectors / components. Fluids and sprays are not recommended because of the
chance for internal contamination, which may result in electrical shorts and/or corrosion.
The electrical power must be disconnected from the Ndrive HP while cleaning. Do not
allow cleaning substances or other fluids to enter the Ndrive HP or to get on to any of the
connectors. Cleaning labels should be avoided to prevent erasing label information.
∇ ∇ ∇
6-10
www.aerotech.com
Ndrive HP 10/20/30 Manual
APPENDIX A:
Glossary of Terms
GLOSSARY OF TERMS
Abbe Error
The positioning error resulting from angular motion and an offset
between the measuring device and the point of interest.
Abbe Offset
The value of the offset between the measuring device and the
point of interest.
Absolute Move
A move referenced to a known point or datum.
Absolute Programming
A positioning coordinate reference where all positions are
specified relative to a reference or “home” position.
AC Brushless Servo
A servomotor with stationary windings in the stator assembly
and permanent magnet rotor. AC brushless generally refers to a
sinusoidally wound motor (such as BM series) to be commutated
via sinusoidal current waveform. (see DC brushless servo)
Acceleration
The change in velocity as a function of time.
Accuracy
An absolute measurement defining the difference between
actual and commanded position.
Accuracy Grade
In reference to an encoder grating, accuracy grade is the
tolerance of the placement of the graduations on the encoder
scale.
ASCII
American Standard Code for Information Interchange. This code
assigns a number to each numeral and letter of the alphabet.
Information can then be transmitted between machines as a
series of binary numbers.
Axial Run-Out
Positioning error of the rotary stage in the vertical direction when
the tabletop is oriented in the horizontal plane. Axial run-out is
defined as the total indicator reading on a spherical ball
positioned 50 mm above the tabletop and centered on the axis
of rotation.
Axis of Rotation
A centerline about which rotation occurs.
Back EMF, Kemf
The voltage generated when a permanent magnet motor is
rotated. This voltage is proportional to motor speed and is
present whether or not the motor windings are energized.
Backlash
A component of bidirectional repeatability, it is the nonresponsiveness of the system load to reversal of input
command.
Ball Screw
A precision device for translating rotary motion into linear
motion. A lead screw is a low-cost lower performance device
performing the same function. Unit consists of an externally
threaded screw and an internally threaded ball nut.
Ball Screw Lead
The linear distance a carriage will travel for one revolution of the
ball screw (lead screw).
Bandwidth
A measurement, expressed in frequency (hertz), of the range
which an amplifier or motor can respond to an input command
from DC to -3dB on a frequency sweep.
Baud Rate
The number of bits transmitted per second on a serial
communication channel such as RS-232 or a modem.
www.aerotech.com
A-1
Glossary of Terms
Ndrive HP 10/20/30 Manual
BCD
Binary Coded Decimal - A number system using four bits to
represent 0-F (15).
Bearing
A support mechanism allowing relative motion between two
surfaces loaded against each other. This can be a rotary ball
bearing, linear slide bearing, or air bearing (zero friction).
Bidirectional Repeatability
CAM Profile
Cantilevered Load
A technique used to perform nonlinear motion that is
electronically similar to the motion achieved with mechanical
cams.
A load not symmetrically mounted on a stage.
Closed Loop
A broad term relating to any system where the output is
measured and compared to the input. Output is adjusted to
reach the desired condition.
CNC
Computer Numerical Control. A computer-based motion control
device programmable in numerical word address format.
Coefficient of Friction
Defined as the ratio of the force required to move a given load to
the magnitude of that load.
Cogging
Non-uniform angular/linear velocity. Cogging appears as a
jerkiness, especially at low speeds, and is due to magnetic poles
attracting to steel laminations.
Commutation
The action of steering currents to the proper motor phases to
produce optimum motor torque/force. In brush-type motors,
commutation is done electromechanically via the brushes and
commutator. A brushless motor is electronically commutated
using a position feedback device such as an encoder or Hall
effect devices. Stepping motors are electronically commutated
without feedback in an open-loop fashion.
Commutation, 6-Step
Also referred to as trapezoidal commutation. The process of
switching motor phase current based on three Hall effect signals
spaced 120 electrical degrees beginning 30 degrees into the
electrical cycle. This method is the easiest for commutation of
brushless motors.
Commutation,
Also referred to as modified sine commutation. The process of
switching motor phase current based on three Hall effect signals
spaced 120 electrical degrees beginning at 0 electrical degrees.
This method is slightly more difficult to implement than standard
6-step, but more closely approximates the motor’s back EMF.
The result is smoother control and less ripple. Aerotech’s BA
series self-commutate using this method.
Modified 6-Step
Commutation, Sinusoidal
A-2
See Repeatability.
The process of switching motor phase current based on motor
position information, usually from an encoder. In this method,
the three phase currents are switched in very small increments
that closely resemble the motor’s back emf. Sinusoidal
commutation requires digital signal processing to convert
position information into three-phase current values and,
consequently, is most expensive to implement. The result,
however, is the best possible control. All Aerotech controllers, as
well as the BAS series amplifiers, commutate using this method.
www.aerotech.com
Ndrive HP 10/20/30 Manual
Glossary of Terms
Coordinated Motion
Multi-axis motion where the position of each axis is dependent
on the other axis, such that the path and velocity of a move can
be accurately controlled. Drawing a circle requires coordinated
motion.
Critical Speed
A term used in the specification of a lead screw or ball screw
indicating the maximum rotation speed before resonance
occurs. This speed limit is a function of the screw diameter,
distance between support bearings, and bearing rigidity.
Current Command
Motor driver or amplifier configuration where the input signal is
commanding motor current directly, which translates to motor
torque/force at the motor output. Brushless motors can be
commutated directly from a controller that can output current
phase A and B commands.
Current, Peak
An allowable current to run a motor above its rated load, usually
during starting conditions. Peak current listed on a data sheet is
usually the highest current safely allowed to the motor.
Current, RMS
Root Mean Square. Average of effective currents over an
amount of time. This current is calculated based on the load and
duty cycle of the application.
Cycle
When motion is repeated (move and dwell) such as repetitive
back-and-forth motion.
DC Brushless Servo
A servomotor with stationary windings in the stator assembly
and permanent magnet rotor. (See AC Brushless Servo)
Deceleration
The change in velocity as a function of time.
Duty Cycle
For a repetitive cycle, the ratio of on-time to total cycle time used
to determine a motor’s RMS current and torque/force.
Dwell Time
Time in a cycle at which no motion occurs. Used in the
calculation of RMS power.
Efficiency
Ratio of input power vs. output power.
Electronic Gearing
Technique used to electrically simulate mechanical gearing.
Causes one closed loop axis to be slaved to another open or
closed loop axis with a variable ratio.
Encoder Marker
Once-per-revolution signal provided by some incremental
encoders to accurately specify a reference point within that
revolution. Also known as Zero Reference Signal or Index Pulse.
Encoder Resolution
Measure of the smallest positional change, which can be
detected by the encoder. A 1000-line encoder with a quadrature
output will produce 4000 counts per revolution.
Encoder, Incremental
Position encoding device in which the output is a series of
pulses relative to the amount of movement.
Feedback
Signal that provides process or loop information such as speed,
torque, and position back to the controller to produce a closedloop system.
Flatness (of travel)
Measure of the vertical deviation of a stage as it travels in a
horizontal plane.
www.aerotech.com
A-3
Glossary of Terms
Ndrive HP 10/20/30 Manual
Force, Continuous
The value of force that a particular motor can produce in a
continuous stall or running (as calculated by the RMS values)
condition.
Force, Peak
The maximum value of force that a particular motor can
produce. When sizing for a specific application, the peak force is
usually that required during acceleration and deceleration of the
move profile. The peak force is used in conjunction with the
continuous force and duty cycle to calculate the RMS force
required by the application.
Friction
The resistance to motion between two surfaces in contact with
each other.
G.P.I.B.
A standard protocol, analogous to RS-232, for transmitting
digital information. The G.P.I.B. interface (IEEE-488) transmits
data in parallel instead of serial format. (See IEEE-488)
Gain
Comparison or ratio of the output signal and the input signal. In
general, the higher the system gain, the higher the response.
Grating Period
Hall Effect Sensors
HED
Feedback device (HED) used in a brushless servo system to
provide information for the amplifier to electronically commutate
the motor.
Hall Effect Device. (See Hall Effect Sensors)
HMI
Human Machine Interface. Used as a means of getting operator
data into the system. (See MMI)
Home
Reference position for all absolute positioning movements.
Usually defined by a home limit switch and/or encoder marker.
Home Switch
A sensor used to determine an accurate starting position for the
home cycle.
Hysteresis
A component of bidirectional repeatability. Hysteresis is the
deviation between actual and commanded position and is
created by the elastic forces in the drive systems.
I/O
Input / Output. The reception and transmission of information
between control devices using discrete connection points.
IEEE-488
A set of codes and formats to be used by devices connected via
a parallel bus system. This standard also defines communication
protocols that are necessary for message exchanges, and
further defines common commands and characteristics. (See
G.P.I.B.)
Incremental Move
A-4
Actual distance between graduations on an encoder.
A move referenced from its starting point (relative move).
Inertia
The physical property of an object to resist changes in velocity
when acted upon by an outside force. Inertia is dependent upon
the mass and shape of an object.
Lead Error
The deviation of a lead screw or ball screw from its nominal
pitch.
Lead Screw
A device for translating rotary motion into linear motion. Unit
consists of an externally threaded screw and an internally
threaded carriage (nut). (See Ball Screw)
www.aerotech.com
Ndrive HP 10/20/30 Manual
Glossary of Terms
Life
The minimum rated lifetime of a stage at maximum payload
while maintaining positioning specifications.
Limit Switch
A sensor used to determine the end of travel on a linear motion
assembly.
Limits
Sensors called limits that alert the control electronics that the
physical end of travel is being approached and motion should
stop.
Linear Motor
A motor consisting of 2 parts, typically a moving coil and
stationary magnet track. When driven with a standard servo
amplifier, it creates a thrust force along the longitudinal axis of
the magnet track.
Load Carrying Capability
The maximum recommended payload that does not degrade the
listed specifications for a mechanical stage.
Master-Slave
Type of coordinated motion control where the master axis
position is used to generate one or more slave axis position
commands.
MMI
Man Machine Interface used as a means of getting operator
data into the system. (See HMI)
Motion Profile
A method of describing a process in terms of velocity, time, and
position.
Motor Brush
The conductive element in a DC brush-type motor used to
transfer current to the internal windings.
Motor, Brushless
Type of direct current motor that utilizes electronic commutation
rather than brushes to transfer current.
Motor, Stepping
Specialized motor that allows discrete positioning without
feedback. Used for non-critical, low power applications, since
positional information is easily lost if acceleration or velocity
limits are exceeded.
NC
Numerical Control. Automated equipment or process used for
contouring or positioning. (See CNC). Also, a Normally-Closed
switch.
NO
A Normally-Open switch.
NEMA
National Electrical Manufacturer’s Association. Sets standards
for motors and other industrial electrical equipment.
Non-Volatile Memory
Memory in a system that maintains information when power is
removed.
Open Collector
A signal output that is performed with a transistor. Open
collector output acts like a switch closure with one end of the
switch at circuit common potential and the other end of the
switch accessible.
Open Loop
Control circuit that has an input signal only, and thus cannot
make any corrections based on external influences.
Operator Interface
Device that allows the operator to communicate with a machine.
A keyboard or thumbwheel is used to enter instructions into a
machine. (See HMI or MMI)
www.aerotech.com
A-5
Glossary of Terms
Ndrive HP 10/20/30 Manual
Optical Encoder
A linear or angular position feedback device using light fringes to
develop position information.
Opto-Isolated
System or circuit that transmits signal with no direct electrical
connections, using photoelectric coupling between elements.
Orthogonality
The condition of a surface or axis perpendicular (offset 90°) to a
second surface or axis. Orthogonality specification refers to the
error from 90° from which two surfaces of axes are aligned.
Overshoot
In a servo system, referred to the amount of velocity and/or
position overrun from the input command. Overshoot is a result
of many factors including mechanical structure, tuning gains,
servo controller capability, and inertial mismatch.
PID
A group of gain terms in classical control theory (Proportional
Integral Derivative) used in compensation of a closed-loop
system. The terms are optimally adjusted to have the output
response equal the input command. Aerotech controllers utilize
the more sophisticated PID FvFa loop which incorporates
additional terms for greater system performance.
Pitch (of travel)
Angular motion of a carriage around an axis perpendicular to the
motion direction and perpendicular to the yaw axis.
Pitch Error
PLC
Programmable Logic Controller. A programmable device that
utilizes “ladder logic” to control a number of input and output
discrete devices.
PWM
Pulse Width Modulation. Switch-mode technique used in
amplifiers and drivers to control motor current. The output
voltage is constant and switched at the bus value (160 VDC with
a 115 VAC input line).
Quadrature
Refers to the property of position transducers that allows them to
detect direction of motion using the phase relationship of two
signal channels. A 1000-line encoder will yield 4000 counts via
quadrature.
Radial Run-Out
Positioning error of the rotary stage in the horizontal direction
when the tabletop is oriented in the horizontal plane. Radial runout is defined as the total indicator reading on a spherical ball
positioned 50 mm above the tabletop and centered on the axis
of rotation.
Ramp Time
Range
Time it takes to accelerate from one velocity to another.
The maximum allowable travel of a positioning stage.
RDC
Resolver to Digital Converter. Electronic component that
converts the analog signals from a resolver (transmitter type)
into a digital word representing angular position.
Repeatability
The maximum deviation from the mean (each side) when
repeatedly approaching a position. Unidirectional repeatability
refers to the value established by moving toward a position in
the same direction. Bidirectional repeatability refers to the value
established by moving toward a position in the same or opposite
direction.
Resolution
A-6
Positioning error resulting from a pitching motion.
The smallest change in distance that a device can measure.
www.aerotech.com
Ndrive HP 10/20/30 Manual
Glossary of Terms
Retro-reflector
An optical element with the property that an input light beam is
reflected and returns along the same angle as the input beam.
Used with laser interferometers.
Roll (of travel)
Angular motion of a carriage around an axis parallel to the
motion direction and perpendicular to the yaw axis.
Roll Error
Positioning error resulting from a roll motion.
Rotor
The rotating part of a magnetic structure. In a motor, the rotor is
connected to the motor shaft.
RS-232C
Industry standard for sending signals utilizing a single-ended
driver/receiver circuit. As such, the maximum distance is limited
based on the baud rate setting but is typically 50-100 feet. This
standard defines pin assignments, handshaking, and signal
levels for receiving and sending devices.
RS-274
Industry standard programming language. Also referred to as Gcode machine programming. A command set specific for the
machine tool industry that defines geometric moves.
RS-422
Industry communication standard for sending signals over
distances up to 4000 feet. Standard line driver encoder
interfaces utilize RS-422 because of the noise immunity.
Run-Out
The deviation from the desired form of a surface during full
rotation (360 degrees) about an axis. Run-out is measured as
total indicated reading (TIR). For a rotary stage, axis run-out
refers to the deviation of the axis of rotation from the theoretical
axis of rotation.
Servo System
Refers to a closed loop control system where a command is
issued for a change in position and the change is then verified
via a feedback system.
Settling Time
Time required for a motion system to cease motion once the
command for motion has ended.
Shaft Radial Load
Maximum radial load that can be applied to the end of the motor
shaft at maximum motor speed.
Shaft Run-Out
Deviation from straight-line travel.
Slot-less
Describes the type of laminations used in a motor that eliminates
cogging torque due to magnetic attraction of the rotor to the
stator slots.
Stator
Non-rotating part of a magnetic structure. In a motor, the stator
usually contains the mounting surface, bearings, and nonrotating windings.
Stiction
Friction encountered when accelerating an object from a
stationary position. Static friction is always greater than moving
friction, and limits the smallest possible increment of movement.
Straightness of Travel
Measure of the side-to-side deviation of a stage as it travels in a
horizontal plane.
Torque
Rotary equivalent to force. Equal to the product of the force
perpendicular to the radius of motion and distance from the
center of rotation to the point where the force is applied.
www.aerotech.com
A-7
Glossary of Terms
Ndrive HP 10/20/30 Manual
Torque, Continuous
Torque needed to drive a load over a continuous time.
Torque, Peak
Maximum amount of torque a motor can deliver when the
highest allowable peak currents are applied.
Torque, RMS
Root Mean Square is a mathematical method to determine a
steadfast or average torque for a motor.
Torque, Stall
The maximum torque without burning out the motor.
Total Indicated Reading
(TIR)
The full indicator reading observed when a dial indicator is in
contact with the part surface during one full revolution of the part
about its axis of rotation.
Tuning
In a servo system, the process of optimizing loop gains (usually
PID terms) to achieve the desired response from a stage or
mechanism from an input command.
Unidirectional
Repeatability
See Repeatability
Velocity Command
Motor driver or amplifier configuration where the input signal is
commanding motor velocity. Motors with analog tachometers are
normally driven by this driver configuration.
Wobble
An irregular, non-repeatable rocking or staggering motion of the
table top of a rotary stage. Wobble is defined as an angular error
between the actual axis of rotation and the theoretical axis of
rotation.
Yaw (of travel)
Rotation about the vertical axis, perpendicular to the axis of
travel. Angular movement (error) that affects straightness and
positioning accuracy.
Yaw Error
Positioning error resulting from a yaw motion.
∇ ∇ ∇
A-8
www.aerotech.com
Ndrive HP 10/20/30 Manual
APPENDIX B:
Warranty and Field Service
WARRANTY and FIELD SERVICE
Aerotech, Inc. warrants its products to be free from defects caused by faulty materials
or poor workmanship for a minimum period of one year from date of shipment from
Aerotech. Aerotech's liability is limited to replacing, repairing or issuing credit, at its
option, for any products that are returned by the original purchaser during the warranty
period. Aerotech makes no warranty that its products are fit for the use or purpose to
which they may be put by the buyer, where or not such use or purpose has been
disclosed to Aerotech in specifications or drawings previously or subsequently
provided, or whether or not Aerotech's products are specifically designed and/or
manufactured for buyer's use or purpose. Aerotech's liability or any claim for loss or
damage arising out of the sale, resale or use of any of its products shall in no event
exceed the selling price of the unit.
Aerotech, Inc. warrants its laser products to the original purchaser for a minimum
period of one year from date of shipment. This warranty covers defects in
workmanship and material and is voided for all laser power supplies, plasma tubes and
laser systems subject to electrical or physical abuse, tampering (such as opening the
housing or removal of the serial tag) or improper operation as determined by Aerotech.
This warranty is also voided for failure to comply with Aerotech's return procedures.
Laser Products
Claims for shipment damage (evident or concealed) must be filed with the carrier by the
buyer. Aerotech must be notified within (30) days of shipment of incorrect materials.
No product may be returned, whether in warranty or out of warranty, without first
obtaining approval from Aerotech. No credit will be given nor repairs made for
products returned without such approval. Any returned product(s) must be accompanied
by a return authorization number. The return authorization number may be obtained by
calling an Aerotech service center. Products must be returned, prepaid, to an Aerotech
service center (no C.O.D. or Collect Freight accepted). The status of any product
returned later than (30) days after the issuance of a return authorization number will be
subject to review.
Return Procedure
After Aerotech's examination, warranty or out-of-warranty status will be determined. If
upon Aerotech's examination a warranted defect exists, then the product(s) will be
repaired at no charge and shipped, prepaid, back to the buyer. If the buyer desires an
airfreight return, the product(s) will be shipped collect. Warranty repairs do not extend
the original warranty period.
Returned Product
Warranty
Determination
After Aerotech's examination, the buyer shall be notified of the repair cost. At such
time, the buyer must issue a valid purchase order to cover the cost of the repair and
freight, or authorize the product(s) to be shipped back as is, at the buyer's expense.
Failure to obtain a purchase order number or approval within (30) days of notification
will result in the product(s) being returned as is, at the buyer's expense. Repair work is
warranted for (90) days from date of shipment. Replacement components are warranted
for one year from date of shipment.
Returned Product
Non-warranty
Determination
At times, the buyer may desire to expedite a repair. Regardless of warranty or out-ofwarranty status, the buyer must issue a valid purchase order to cover the added rush
service cost. Rush service is subject to Aerotech's approval.
Rush Service
www.aerotech.com
B-1
Warranty and Field Service
On-site Warranty
Repair
Ndrive HP 10/20/30 Manual
If an Aerotech product cannot be made functional by telephone assistance or by sending
and having the customer install replacement parts, and cannot be returned to the
Aerotech service center for repair, and if Aerotech determines the problem could be
warranty-related, then the following policy applies:
Aerotech will provide an on-site field service representative in a reasonable amount of
time, provided that the customer issues a valid purchase order to Aerotech covering all
transportation and subsistence costs. For warranty field repairs, the customer will not
be charged for the cost of labor and material. If service is rendered at times other than
normal work periods, then special service rates apply.
If during the on-site repair it is determined the problem is not warranty related, then the
terms and conditions stated in the following "On-Site Non-Warranty Repair" section
apply.
On-site Nonwarranty Repair
If any Aerotech product cannot be made functional by telephone assistance or
purchased replacement parts, and cannot be returned to the Aerotech service center for
repair, then the following field service policy applies:
Aerotech will provide an on-site field service representative in a reasonable amount of
time, provided that the customer issues a valid purchase order to Aerotech covering all
transportation and subsistence costs and the prevailing labor cost, including travel time,
necessary to complete the repair.
Company Address
Aerotech, Inc.
Phone: (412) 963-7470
101 Zeta Drive
Fax:
(412) 963-7459
Pittsburgh, PA
15238-2897
∇ ∇ ∇
B-2
www.aerotech.com
Ndrive HP 10/20/30 Manual
APPENDIX C:
Table C-1.
Version
TECHNICAL CHANGES
Current Technical Changes
Section(s)
Affected
All
Figure 1-5
Section 4.1.8.
Page xii,
Declaration of
Conformity
1.14
Technical Changes
Chapter 4
Figure 2-9,
Figure 2-10,
Figure 2-11,
Figure 2-15
Figure 4-14
Table 5-1
www.aerotech.com
Description
Removed MXU option
For Aerotech Use: update per Issue Tracker ID 536
Corrected dimensions without I/O Board.
Corrected pin numbers in PSO interface schematic.
Updated CE declaration
Added high current I/O Board option
For Aerotech Use: update per Issue Tracker ID 461
Updated cable wire color combinations
For Aerotech Use: update per Issue Tracker ID 727
Updated schematic to show a transistor output device in
M12.
Cable interconnection information updated
C-1
Technical Changes
Table C-2.
Version
1.13
1.12
1.11
1.10
1.09
Ndrive HP 10/20/30 Manual
Technical Change Archive
Section(s) Affected
Fig. 4-3
Section 4.1.3.
3.1.1.
3.1.1.
Chapter 4
Chapter 4
Description
Corrected typo. in Brake circuit.
Added notes to Brake section.
Changed pictures to new product colors.
Swapped AC1 And AC3 in Figure 2.6
No Technically Relevant Changes
Corrected Power Board Fuse F1
∇ ∇ ∇
C-2
www.aerotech.com
Ndrive HP 10/20/30 Manual
APPENDIX D:
Rev. 0 to Rev. A Comparison
REV. 0 to REV A COMPARISON
The figure below shows the connector and LED changes between Rev. 0 and the Rev. A.
Figure D-1.
Connector/LED Comparison
UPDATED
The four LEDS and the seven segment LED have been replaced by 10 individual LEDs.
Green LED's indicate active conditions and red LED's indicate faults and errors.
The auxiliary connector (J6 in Rev 0 and called J206 in Rev A) is now a 26-pin, highdensity "D" style connector. See Table D-1 for the complete pin-out of J205 the
Auxiliary connector.
MOVED
The RS-232 and Auxiliary connectors had their physical locations swapped.
NEW
A Power LED and a dedicated optically isolated emergency stop sense input have been
added.
www.aerotech.com
D-1
Rev. 0 to Rev. A Comparison
D.1.
Ndrive HP 10/20/30 Manual
Connector Renumbering
All connectors and terminal blocks have been renumbered. Each is a 100, 200 or 300
series number within a column. The first column is 100 series, comprising the AC and
motor terminal blocks, TB101 and TB102. The second column comprises the FireWire
connectors down through the motor feedback connector, sequentially numbered from
J201 through J207, respectively, with the ESTOP connector being TB201. The third
column being the connectors on the -IOPSO option, numbered J301-J303 and TB301
through TB305, top to bottom.
D-2
www.aerotech.com
Ndrive HP 10/20/30 Manual
D.2.
Rev. 0 to Rev. A Comparison
Option Changes
The -IOPSO3 and -IOPSO4 options are obsolete now that the -IOPSO outputs may be
software configured as either sourcing or sinking.
New Features
•
The pin-out of J205 has changed due to a larger connector being added.
Summaries of the changes follow, see Table D-1 for the complete pin-out.
•
There are now 4 optically isolated user current sinking outputs standard, on
J205. They are set as $OUT8 through $OUT11. This implies that they are
outputs 8 through 11. Outputs 0-7 are on the -IOPSO option.
•
There are now 6 optically isolated user inputs standard, 2 of which are high
speed, user configurable as sourcing or sinking, on J205. They are read as $IN813. This implies that they are inputs 8 through 13. Inputs 0-7 are on the -IOPSO
option.
•
A motor over-temperature thermistor input was added at J207 pin 2.
•
One of the two analog outputs is now available standard on J205, as well as
TB301 of the -IOPSO option.
•
One of the two analog inputs is now available standard on J205, as well as
TB302 of the -IOPSO option.
•
User digital inputs on the -IOPSO options now have two input commons, one
for each set of four inputs at TB305. They are pins 1 and 2 as shown in the
margin.
•
The auxiliary encoder (secondary feedback) may now be configured as an
output, to prevent the user from having to purchase an -IOPSO option for twoaxis laser firing, jumper selectable via JP2-4. This allows it to drive another axis
auxiliary encoder channel for dual axis firing, on J206.
•
A dedicated optically-isolated emergency stop sense input on TB201.
•
Joystick, handwheel and typical ESTOP usage now supported and documented
in the manual for Rev. A Ndrives. These will eventually be added to the ROM's
in .dwg format also.
•
Single and dual axis PSO (Laser Firing) users may now use optically isolated
Output 11 as the firing output, so the -IOPSO option is not required.
•
Manual for Rev. 0 Ndrives have been renamed with "Rev. 0" in filename and is
still distributed with all other Aerotech product manuals.
www.aerotech.com
D-3
Rev. 0 to Rev. A Comparison
Table D-1.
Pin #
1
2
3
4
5
6
7
8
9
10
11
12
13
14
15
16
17
18
19
20
21
22
23
24
25
26
Ndrive HP 10/20/30 Manual
J205 Auxiliary I/O Connector Pin Assignments
Label
Auxiliary Sine +
Auxiliary Sine In 12 +
In 12 In 13 +
In 13 Out 8
Out 9
Out 10
Auxiliary Cosine +
Auxiliary Cosine +5 Volt
Analog 0 In+
Analog 0 InOut Com
Out 11
In 8
In 9
Auxiliary Marker Auxiliary Marker +
+5 Volt External
Analog 0 Out
A Gnd
In Com
In 10
In 11
Description
Secondary Encoder Channel
Secondary Encoder Channel
Input 12 High Speed Opto. +
Input 12 High Speed Opto. Input 13 High Speed Opto. +
Input 13 High Speed Opto. Output 8
Output 9
Output 10
Secondary Encoder Channel
Secondary Encoder Channel
+5 Volt (500mA. max.)
Analog Input 0 + (Differential)
Analog Input 0 - (Differential)
Output Common
Output 11 (Opt. PSO Output)
Input 8
Input 9
Secondary Encoder Channel
Secondary Encoder Channel
+5 Volt External *
Analog Output 0
Analog Common
Input Common
Input 10
Input 11
In/Out/Bi.
Input
Input
Input
Input
Input
Input
Output
Output
Output
Input
Input
Output
Input
Input
Output
Input
Input
Input
Input
Output
Output
Input
Input
* Total user +5 V power is limited to 500 mA, by an internal resettable fuse.
D-4
www.aerotech.com
Ndrive HP 10/20/30 Manual
D.3.
Rev. 0 to Rev. A Comparison
E-Stop Interface for Rev. 0
Refer to Chapter 2, Section 2.10.1 for Rev. A Ndrive HP.
Figure D-2.
www.aerotech.com
Typical Emergency Stop Circuit (Rev. 0)
D-5
Rev. 0 to Rev. A Comparison
Ndrive HP 10/20/30 Manual
∇ ∇ ∇
D-6
www.aerotech.com
Ndrive HP 10/20/30 Manual
Index
INDEX
1
Brushless Motor Configuration... 2-10, 2-13,
2-14
Bus Power Supply....................................1-4
10/100BASE-T Ethernet................ 1-5, 4-21
2
20 kHz Switching Rate ............................2-2
3
-3P Option ...............................................1-5
4
40/80 VDC Power Transformer...............2-6
4N33 ......................................................4-14
5
50/60 Hz Torque Disturbance..................2-3
6
6N136 ....................................................4-14
A
AC Power Connections............................2-4
AC1 Input Terminal......................... 2-3, 2-5
AC2 Input Terminal......................... 2-3, 2-5
AC3 Input Terminal.................................2-5
AL1..........................................................2-4
AL2..........................................................2-4
Amplifier Related Problems ....................6-1
Analog Inputs (TB302)............................4-8
Analog Output Connector Pinouts ...........4-3
Auxiliary I/O
Connector Pinouts .3-1, 3-2, 3-5, 3-6, D-4
-AUXPWR...............................................1-5
B
Back-Propagation Line Filter Connection2-3
Battery .....................................................6-9
Battery Replacement................................6-9
Brake / Relay (TB301) Current
Specifications ......................................4-4
Brake / Relay (TB301) Voltage
Specifications ......................................4-4
Brake / Relay Connector Pinouts.............4-4
Brake Configuration Jumpers ..................4-2
www.aerotech.com
C
Cable Interconnections ............................5-1
Capacitive Coupling ................................2-2
Cleaning.................................................6-10
Connector.................................................1-3
Connector Pinouts
Auxiliary I/O .........3-1, 3-2, 3-5, 3-6, D-4
FireWire ............................................3-21
J205 .......................3-1, 3-2, 3-5, 3-6, D-4
J206 ...................................................3-19
J207 ................................ 3-11, 3-13, 3-14
Motor Feedback.............. 3-11, 3-13, 3-14
RS-232/RS-422 .................................3-19
Continuous Output Current......................1-5
Control Board ..........................................6-3
Assembly .............................................6-3
Jumpers........................................ 6-3, 6-4
Test Points ...........................................6-2
Control Board Options.............................1-5
-DUALPSO .........................................1-5
ENET...................................................1-5
MXH....................................................1-5
-TRIPLEPSO.......................................1-5
D
Determining Proper Connections to the
NDrive
Equipment .........................................2-16
Device Settings ......................................2-22
Dimensions ..............................................1-9
DIP switch ...............................................1-3
Drive Package ..........................................1-4
-DUALPSO..............................................1-5
E
Electrical Noise Reduction ......................2-2
Electrical Specifications ..........................1-7
Electrostatic Coupling..............................2-3
EMI Interference......................................2-2
-ENET............................................ 1-5, 4-21
Environmental Specifications
Humidity............................................1-10
Temperature ......................................1-10
Operating.......................................1-10
Storage ..........................................1-10
Ethernet (J204).......................................4-21
INDEX-1
Index
Ndrive HP 10/20/30 Manual
Grounding Techniques ............................ 2-2
FireWire ...................................2-27, 3-21
J203
FireWire ...................................2-27, 3-21
J204 ....................................................... 4-21
J205
Connector Pinouts ......... 3-1, 3-2, 3-5, 3-6
J205
Connector Pinouts .............................. D-4
J206
Connector Pinouts ............................. 3-19
J206 ....................................................... 3-19
J207 ................................................3-11, 4-2
Connector Pinouts .......... 3-11, 3-13, 3-14
J301 ....................................................... 4-13
Joystick Interface.....................................5-5
JTAG .......................................................6-8
JTAG Programming Connector ...............6-8
Jumpers
Control Board......................................6-4
-IOPSO................................................4-1
Power Board........................................6-6
H
L
Handwheel Interface ............................. 5-10
Hardware Function .................................. 1-3
Hardware Overview ................................ 1-3
HCPL-2601 ........................................... 4-14
High Inrush Currents ............................... 1-4
-HS .......................................................... 1-5
Laser Output Opto-Isolator Specifications 38, 4-14
LED indicator ..........................................1-3
LED Indicators ........................................6-7
Description..........................................6-7
Limit and Hall Effect Inputs.................. 3-13
Line Driver Encoder (Standard) ............ 3-15
Line Filter Connection.............................2-3
Line Interference .....................................2-3
Logic High............................................. 2-14
Logic Low ............................................. 2-14
F
Features ................................................... 1-1
Feedback Connections.........2-10, 2-15, 2-21
Field Service Information....................... C-1
FireWire .......................................2-27, 3-21
Card and Cable Part Numbers........... 2-23
Connector Pinouts............................. 3-21
J201..........................................2-27, 3-21
J202..........................................2-27, 3-21
J203..........................................2-27, 3-21
Minimizing Cable Lengths................ 2-24
Part Numbers .................................... 2-23
Preferred Configuration .................... 2-24
FireWire Bus ................................2-27, 3-21
FireWire: ............................................... 2-24
Fuse Replacement ................................... 6-9
G
I
Input Power ............................................. 1-3
AC1, AC2, AC3...........................2-3, 2-5
Main Supply........................................ 2-5
Motor Frame Connections .................. 2-5
Shield Connection............................... 2-5
TB102 ................................................. 2-5
Input Power Wiring Techniques.............. 2-2
Integrated............................................... 2-10
Integrated Configurations....2-10, 2-15, 2-21
-IOPSO...........................................1-5, 4-10
-IOPSO Option
Jumpers ............................................... 4-1
-IOPSO Option Board
Analog Inputs (TB302) ....................... 4-8
Opto-Isolated Inputs (TB305) ........... 4-11
PSO / Absolute Encoder Interface (J301)
...................................................... 4-13
Isolation transformer ............................... 2-3
J
J201
FireWire ...................................2-27, 3-21
J202
INDEX-2
M
Models.....................................................1-5
Motor.......................................................1-3
Motor and Feedback Connection Basic
Configurations................................... 2-10
Brushless ........................................... 2-10
DC Brush .......................................... 2-10
Stepper .............................................. 2-10
Motor and Feedback Connections2-10, 2-15,
2-21
Motor Connections ...... 2-4, 2-10, 2-15, 2-21
Motor Feedback
Connector Pinouts .......... 3-11, 3-13, 3-14
Motor Feedback..................................... 3-11
MXH ................................................. 3-11
Motor Feedback
Connector............................................4-2
Motor Frame Connection.........................2-5
Motor Output Terminals
A, B, and C.......................................... 2-5
www.aerotech.com
Ndrive HP 10/20/30 Manual
Index
Ndrive Hardware .....................................1-3
Noise
Back-propagation ................................2-3
Fuses....................................................6-6
Jumpers................................................6-6
Power Board Options
-3P (3-Phase AC Input) .......................1-5
-AUXPWR (Auxiliary Power) ............1-5
-HS (Heat Sink) ...................................1-5
-S (Shunt) ............................................1-5
Power Connections .......................... 1-3, 2-4
Preventative Maintenance......................6-10
PSO / Absolute Encoder Interface (J301) . 413
PSO / Absolute Encoder Interface (J301)
Pin Assignments ................................4-13
-PSOOPTO1 .................................. 1-5, 4-14
-PSOOPTO2 .................................. 1-5, 4-14
-PSOOPTO3 .................................. 1-5, 4-14
-PSOOPTO4 ..........................................4-14
O
R
Option, TM3 ............................................2-6
Option, TM5 ............................................2-6
Option, Transformer ................................2-6
Optional AC Power Supply Input ............2-4
Optional Analog Input Connector Pinouts.48
Options ....................................................1-5
Opto-Isolated Input Connector
Pin Assignments................................4-11
Opto-Isolated Inputs (TB305)................4-11
Opto-Isolated Output Connector
Current Sinking Mode .......................4-10
Pin Assignment ...................................4-9
Output Current, Peak ...............................1-5
Relay K1 Contact Ratings........................4-4
Revision History .....................................C-1
RS-232/RS-422......................................3-19
Connector Pinouts .............................3-19
Motor Phasing.............................. 2-18, 2-19
-MXH ......................................................1-5
-MXH Option
Specifications ....................................3-17
Clock Frequency ...........................3-17
Interpolation..................................3-17
Max Input Frequency ....................3-17
Minimum Edge Separation ...........3-17
Minimum Pulse Width ..................3-17
MXH......................................................3-11
Options ..............................................3-16
N
P
P10
JTAG Programming Connector...........6-8
Part Numbers
FireWire Card and Cables .................2-23
Phase/Hall Sequence..............................2-16
Pin Assignments
Opto-Isolated Input Connector ..........4-11
PSO / Absolute Encoder Interface (J301)
......................................................4-13
SSI Net (J302, J303)..........................4-16
User Power Connector.........................4-9
PinAssignments
Opto-Isolated Output Connector .........4-9
Pinouts
Analog Output Connector ...................4-3
Brake / Relay Connector .....................4-4
Optional Analog Input Connector .......4-8
Power.......................................................1-5
Power Board ............................................6-5
Assembly.............................................6-5
www.aerotech.com
S
-S 1-5
S2
Switch Settings ..................................2-22
Safety Procedures ....................................2-1
Shield Connection....................................2-5
Shielding Techniques...............................2-2
Soft Start Circuit ......................................1-4
SSI Net (J302, J303)
Pin Assignments ................................4-16
SSI Net Cables .......................................4-18
Standard Encoder Input..........................3-15
Standard Interconnection Cables .............5-1
Standard Package.....................................1-4
Stepper Motor Configuration ....... 2-10, 2-18
Switch S2 ...............................................2-22
Switching Rate.........................................2-2
T
Tachometer connection..........................2-12
TB101 ......................................................2-4
AL1 .....................................................2-4
AL2 .....................................................2-4
Ground.................................................2-4
Optional AC Power Supply Input........2-4
TB102 ......................................................2-5
TB301 (Brake / Relay) Current
Specifications ......................................4-4
TB301 (Brake / Relay) Voltage
Specifications ......................................4-4
INDEX-3
Index
Ndrive HP 10/20/30 Manual
TB305.................................................... 4-11
TB4.......................................................... 4-8
Three-Phase Motor Terminal Connections 25
TIL117-M.............................................. 4-14
TM3 Option............................................. 2-6
TM5 Option............................................. 2-6
Transformer Option................................. 2-6
-TRIPLEPSO........................................... 1-5
Troubleshooting ...................................... 6-1
TV0.3-28 power transformer (optional) .. 2-6
TV0.3-56 power transformer (optional) .. 2-6
Two Axis Laser Firing .......................... 4-18
Typical AC Wiring.................................. 2-7
Typical ESTOP Interface ...................... 2-26
U
Unknown Phase/Hall Sequence............. 2-16
User Power Connector Pin Assignments .4-9
V
Voltage configurations ............................1-5
W
Warnings .................................................2-1
Warranty Information............................. C-1
Wiring Techniques ..................................2-2
∇ ∇ ∇
INDEX-4
www.aerotech.com
READER’S COMMENTS
Ndrive HP User’s Manual
P/N EDU170, October 2, 2006
Please answer the questions below and add any suggestions for improving this document.
Is the manual:
Yes
No
Adequate to the subject
Well organized
Clearly presented
Well illustrated
How do you use this document in your job? Does it meet your needs? What improvements, if any, would
you like to see? Please be specific or cite examples.
Name
Title
Company Name
Address
Mail your comments to:
AEROTECH, INC.
Technical Writing Department
101 Zeta Drive
Pittsburgh, PA.
15238 U.S.A.
or
Fax to:
412-967-6870