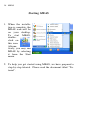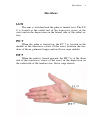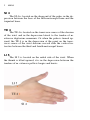
1
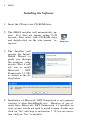
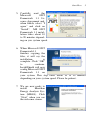
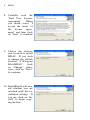
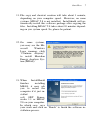
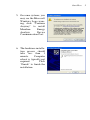
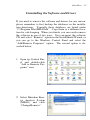
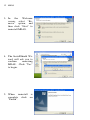
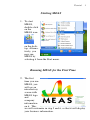
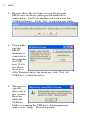
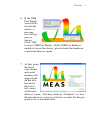
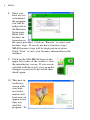
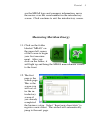
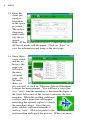
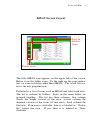
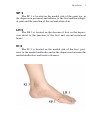
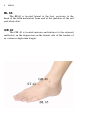
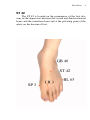
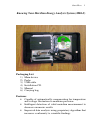
Start Here
1
Knowing Your Meridian Energy Analysis System (MEAS)
Packaging List
1) Main device
2) Probe
3) USB cable
4) Installation CD
5) Manual
6) Carrying bag
Features
• Capable of automatically compensating for temperature
and voltage fluctuation to maintain precision
• Intelligent detection of valid meridian measurement to
decrease erroneous results
• Improved data analysis using proprietary algorithm that
increases conformity to scientific findings
2
MEAS
•
•
Patent pending probe design that maintains pressure
consistence within the same measurement and, as well
as, across multiple measurements to decrease between
measurement variability
Comparison of multiple meridian measurements under
the same metric
System Requirements
• PC with 500 megahertz or higher processor clock speed
recommended; Intel Pentium/Celeron family, or AMD
K6/Athlon/Duron family, or compatible processor recommended
• 128 MB of RAM or greater
• CD-ROM or DVD drive
• Available USB 1.1 or 2.0 port
• 500 MB of available hard-disk space; installation of
Microsoft .NET Framework and MDAC requires additional 200 MB of available hard-disk space
• 800x600 Minimum screen resolution (1024x768 preferred)
• Operating System: Windows 2000®, Windows XP, or
Windows 2003
• Microsoft Internet Explorer 6 or later
• Administrator permissions on the computer (on Windows 2000, or Windows XP)
• MEAS™ supports most laser and ink-jet printers. The
printer you wish to use must be accessible to your computer by direct connection to your computer or through
a network. Best results are obtained when graphs are
printed in color, and a color printer is therefore recommended
Placing MEAS
The best location for placing MEAS is a location that allows
you to reach all the meridian points you would like to test.
Placing MEAS between your client and your laptop is acceptable.
Start Here
3
Installing MEAS
MEAS installation process can be divided into 2 parts: software and hardware. It is recommended that you install the
software first then the hardware. Typically the software installation takes about 3 minutes. However, if you system is not
up-to-date, installing Microsoft .NET Framework 1.1 with SP1
takes additional 20 minutes, and MDAC 2.8 takes additional 10
minutes. The time may vary depending on your system speed.
Step-by-step software installation instruction begins on the
next page.
The hardware installation typically takes less than 1 minute.
Step-by-step hardware installation instruction begins on page 8.
4
MEAS
Installing the Software
1. Insert the CD into your CD-ROM drive.
2. The MEAS installer will automatically appear. If it does not appear within 15-20
seconds, then select your CD-ROM drive
and double-click on the icon named “setup.exe”.
3. The Installer will
prepare the InstallShield Wizard to
guide you through
the program setup
process. First it will
ask you to install
Microsoft.
NET
Framework 1.1 SP1
as shown in the dialog below:
4. Installation of Microsoft .NET Framework is not optional
contrary to what InstallShield says. However, if you already have Microsoft .NET Framework 1.1 installed on
your system, you do not need to install it again. In this case,
click on “No” and skip to instruction 7. If you are uncertain, click on “Yes” to install it.
Start Here
5
5. Carefully read the
Microsoft
.NET
Framework 1.1 License Agreement and,
when finish, select “I
agree” and click on
“Install”. MS .NET
Framework 1.1 installation takes about 10
to 20 minutes depending on you system speed.
6. When Microsoft NET
Framework1.1
finishes copying the
files, it will say the
installation
is
complete. Click “OK”
to
continue.
InstallShield will now
config Microsoft NET
Framework 1.1 on
your system. This step takes about 10 to 20 minutes
depending on your system speed. Please be patient.
7. We are now ready to
install
Meridian
Energy Analysis System (MEAS). Click
“Next” when you see
the welcome screen.
6
MEAS
8. Carefully read the
“End User License
Agreement”. When
you finish, select “I
accept the terms of
the license agreement” and then click
on “Next” to continue.
9. Choose the destination location to install
MEAS. If you wish
to change the default
location “C:\Program
Files\MEAS”, click
on “Change”; otherwise, click on “Next”
to continue.
10. InstallShield will now
ask whether you are
satisfied with the installation settings. If
you are, click on “Install” to begin copying the files.
Start Here
7
11. File copy and shortcut creation will take about 1 minute,
depending on your computer speed. However, on some
systems, MDAC 2.8 is not installed. Installshield will automatically install this software package after copying the
files. Installing MDAC 2.8 takes about 10 minutes depending on you system speed. So, please be patient.
12. On some systems,
you may see the Microsoft
Windows
Logo warning, click
“Continue Anyway”
to install Meridian
Energy Analysis System (MEAS).
13. When
InstallShield
finishes
installing
MEAS, it may ask
you to restart the
computer if it just installed
soft .NET Frameworks 1.1 or MDAC
2.8 on your computer.
In which case, save
your work and click on “Finish” to finish the software installation process.
8
MEAS
Installing the Hardware
1. Insert the CD into your CD-ROM drive if you have not already done so.
2. Assemble the MEAS
hardware by plugging
the probe into the sensor port and USB cable into the USB port.
Plug in the other end
of the USB cable into
the USB port of laptop.
3. New Hardware Wizard will pop up when
the computer detects
the
presence
of
MEAS
hardware.
The wizard will install Meridian Energy
Analysis
Device
Communications Port
on your computer.
Click “Next” to begin.
4. The New Hardware
Wizard will search for
hardware
driver,
which is installed
with software when
you complete the
software installation.
Start Here
5. On some systems, you
may see the Microsoft
Windows Logo warning, click “Continue
Anyway” to install
Meridian
Energy
Analysis
Device
Communication Port.
6. The hardware installation process should
take less than 1
minute.
Computer
reboot is typically not
required.
Click
“Finish” to finish the
installation.
9
10 MEAS
Starting MEAS
1. When the installation is complete, the
MEAS icon will be
on your desktop.
To start MEAS,
doubleclick on
this icon.
Alternatively, you may run
MEAS by selecting
it from the Start
menu.
2. To help you get started using MEAS, we have prepared a
step-by-step tutorial. Please read the document titled “Tutorial”.
Start Here 11
Uninstalling the Software and Drivers
If you need to remove the software and drivers for any reason,
please remember to first backup the databases in the installation directories. Typically these databases are found under
“C:\Program Files\MEAS\db”. Copy them to a different location for safe keeping. When you finish, you can easily remove
the software in one of two ways. You can insert the software
CD and select “Remove” option in the InstallShield Wizard, or
you can go to the Windows Control Panel and select the
“Add/Remove Programs” option. The second option is described below.
1. Open up Control Panel and double-click
“Add or Remove Programs” icon.
2. Select Meridian Energy Analysis System
(MEAS) and click
“Change/Remove”.
12 MEAS
3. In
the
Welcome
screen, select “Remove” option, and
then click “Next” to
uninstall MEAS.
4. The InstallShield Wizard will ask you to
confirm
removing
MEAS. Click “Yes”
to begin.
5. When uninstall is
complete click on
“Finish”.
Start Here 13
Updates
For the latest software updates and technical information, visit
us at www.MEASUS.com. For more detailed installation information, refer to your User Manual.
Tutorial
1
Starting MEAS
1. To start
MEAS,
double-click
on the
MEAS icon
on the desktop. Alternatively, you
may run
MEAS by
selecting it from the Start menu.
Running MEAS for the First Time
2. The first
time you run
MEAS, you
will see an
introductory
screen with
MEAS logo
and
company
information
on it. This
we will customize in step 5 and 6, so that it will display
your business information.
2
MEAS
3. Because this is the first time you run the program,
MEAS does not know which port the hardware is
connected to. It will ask whether you wish to run the
“USB Port Finder”. Click “Yes” to open the port finder.
4. Please make
sure the
MEAS
hardware is
connected to
the computer
via USB
port. If it is
not, please
do so now.
After Windows detect the hardware, click “Test All
USB Ports” to find the device.
5. This process
typically
takes only a
few seconds.
However,
while the
USB Port
Finder is scanning the USB ports, the program may
appear to be “hang”. Please be patient.
Tutorial
3
6. If the USB
Port Finder
successfully
located the
device, a
message
box will appear as
shown.
Click “OK”
to close USB Port Finder. If the USB Port Finder is
unable to locate the device, please check the hardware
connection then try again.
7. At this point,
the hardware model
and serial
number will
appear both
on the title
bar and at
the lower
left corner
of the introductory screen. You may click on “Continue” to close
the introductory screen or wait five seconds for the program to do so automatically.
4
MEAS
8. Since you
have not yet
customized
the program,
you will be
redirected to
the Business
Setup page.
Enter your
business information in
the space provided. Click on “Browse” to select your
business logo. If you do not have a business logo,
MEAS business logo will be displayed in its place.
Click “Save” to save your business information in the
database.
9. Click on the little MEAS logo on the
upper left corner of the screen to view
the introductory screen. If you are unsatisfied with the result, you can make
changes as previously described then
check again.
10. This new introductory
screen with
your business information will
from now on
appear every
time you
start the
program. To
Tutorial
see the MEAS logo and company information, move
the mouse over the serial number in the introductory
screen. Click continue to exit the introductory screen.
Measuring Meridian Energy
11. Click on the folder
labeled “MEAS” on
the upper left corner
of the screen to begin
your first measurement. After you
click on the folder, it
will light up and bring the MEAS measurement wizard
to the front.
12. The first
page is the
search page.
This is the
screen you
will see after the introductory
screen if
you already
completed
the business setup. Select “Input new client data” to
register a new client. The wizard will automatically
jump to the next page.
5
6
MEAS
13. Enter the
client personal information
in the space
provided.
The red exclamation
marks indicate the required
fields. If the information entered is formatted correctly,
all the red marks will disappear. Click on “Save” to
save the information and jump to the next page.
14. Since this is
a new client
and has no
history, the
page you
will see is
the measurement
page. All
the meridians are
pre-selected, so click on “Measure Selected Meridians”
to begin the measurement. You will hear a voice that
says “start”, find the meridian as shown in the figure at
the lower left corner of the screen to measure the first
meridian. When the reading stabilized,
a yellow and a green line will appear
indicating the optimal region to sample
the meridian energy. Once the program satisfies with measurement, it
will say “next”. Move the probe to the
next meridian and repeat the process. When you meas-
Tutorial
7
ured all the meridians, the program will say “done”.
Click “Next” (the blue fish pointed to the right on the
lower right corner of the screen) to visualize the result.
15. The program
will perform
preliminary
analysis to
indicate meridians with
energies deviating from
the norm. In
the bar
graph shown
on the right, right and left meridians are grouped together. Green indicates good, yellow tolerable, and red
poor. In the example, poor results are found for Pericardium Mi Fire, Liver Wood, Kidney Water, Stomach
Earth, and etc. Click “Next” to perform further analysis.
16. The program
will analyze
the meridian
energies to
check for
abnormalities that requires further attention. The
result is
listed in the screen shown on the right. The first column indicates severity of the condition (red for poor,
yellow tolerable, and green good), second is the function category, third the measured result, and forth the
8
MEAS
normal range. The last column, if checked, will show
the result in the report. Click “Next” to continue.
17. The next
page contains some
physical
conditions
associated
with the
previous
analysis.
These questions should
help decide which of the results on the previous screen
are valid and require treatment or follow-up. In the example shown, the client had bladder inflammation for 5
years. Therefore, question 3 is completed and checked
to show in the report. Click “Next” to continue.
18. The recommended herbal formulas
and acupuncture
points are
based on the
analyzed results and the
questions
answered.
You can customize these suggestions in the Setup folder. Click “Next” to continue.
Tutorial
9
19. The program
will generate
a report in
HTML.
You can
print the report by
clicking on
the printer
icon on the
bottom of
the screen.
Click
“Back” if
you wish to
change anything. Click “Next” to start a new measurement.
20. This completes our tutorial. You can check the “Icons
and Map” if you wish to know what each icon does or
indicates. Or, you can read the “User’s Manual” if you
need more information on topics such as customization
of recommend herbal formulas, acupuncture points, and
questions.
Icons and Map
1
MEAS Screen Layout
Page Indicator/
Icons
Folder Icons
The little MEAS icon appears on the upper left of the screen.
Below it are the folder icons. To the right are the page indicators (or icons in folders other than MEAS). The lower left corner is the exit program icon.
Followed is a list of icons used in MEAS and what each does.
The list is ordered by folders. Icons in the same folder are
grouped together. The list has three columns, first column
shows the bright version of the icon, second column the
dimmed version of the icons (if one exist), third column the
function. If an icon is clickable, then it is labeled as “Clickable” below the icon. If not, then it is labeled as “Nonclickable”.
2
MEAS
Show introductory screen.
Clickable
Exit MEAS
Clickable
Icons and Map
Folders
Meridian measurement
and analysis. If you are
in the middle of a measurement, click on this
icon will start a new
measurement.
Clickable
Clickable
View graph of previous
measurements
Non-clickable
Clickable
View report of previous
measurements
Non-clickable
Clickable
Program setup and customization
Non-clickable
Clickable
3
4
MEAS
Meridian Measurement Page Indicators
In client search page
Non-clickable
Non-clickable
In client browse page
Non-clickable
Non-clickable
In client information
page
Non-clickable
Non-clickable
In client history page
Non-clickable
Non-clickable
Icons and Map
In meridian measurement page
Non-clickable
Non-clickable
In graph page
Non-clickable
Non-clickable
In analysis result page
Non-clickable
Non-clickable
In physical condition
inquiry page
Non-clickable
Non-clickable
5
6
MEAS
In recommendation
page
Non-clickable
Non-clickable
In report page
Non-clickable
Non-clickable
Icons and Map
Meridian Measurement Buttons
Toggle sound on and
off
Clickable
Clickable
Previous page
Clickable
Non-clickable
Next page
Clickable
Non-clickable
7
8
MEAS
Graph Display Buttons
View as bar graph
Non-clickable
Clickable
View as line graph
Non-clickable
Clickable
View as dot-line graph
Non-clickable
Clickable
View as dot graph
Non-clickable
Clickable
Icons and Map
Report Printing and Editing Buttons
Print report
Clickable
Non-clickable
Print preview report
Clickable
Non-clickable
Printer page setup
Clickable
Non-clickable
Edit report
Clickable
Non-clickable
9
10 MEAS
Program Setup Buttons
Edit business information
Non-clickable
Clickable
Program setup
Non-clickable
Clickable
Analysis formulation
customization
Non-clickable
Clickable
Physical condition inquiry customization
Non-clickable
Clickable
Icons and Map 11
Recommendation customization
Non-clickable
Clickable
Meridians
1
Meridians
LU 9
The arm is stretched and the palm is turned over. The LU
9 is located at the radial end of the transverse crease of the
wrist and in the depression on the lateral side of the radial artery.
PC 7
When the palm is turned up, the PC 7 is located in the
middle of the transverse crease of the wrist, between the tendons of the m. palmaris longus and m. flexor carpi radialis.
HT 7
When the palm is turned upward, the HT 7 is at the ulnar
end of the transverse crease of the wrist, in the depression on
the radial side of the tendon of m. flexor carpi ulnaris.
2
MEAS
SI 4
The SI 4 is located on the ulnar end of the palm, in the depression between the base of the fifth metacarpal bone and the
triquetral bone.
TE 4
The TE 4 is located on the transverse crease of the dorsum
of the wrist and in the depression lateral to the tendon of m.
extensor digitorum communis. Or when the palm is turned upward, the TE 4 is in the depression at the point on the transverse crease of the wrist dorsum crossed with the vertical interstice between the third and fourth metacarpal bones.
LI 5
The LI 5 is located on the radial side of the wrist. When
the thumb is tilted upward, it is in the depression between the
tendons of m. extensor pollicis longus and brevis.
Meridians
3
SP 3
The SP 3 is located on the medial side of the great toe, in
the depression proximal and inferior to the first metatarsodigital joint and the junction of the red and white skin.
LR 3
The LR 3 is located on the dorsum of foot, in the depression distal to the junction of the first and second metatarsal
bones.
KI 3
The LI 3 is located on the medial side of the foot, posterior to the medial malleolus and in the depression between the
medial malleolous and tendo calcaneus.
4
MEAS
BL 65
The BL65 is located lateral to the foot, posterior to the
head of the fifth metatarsal bone and at the junction of the red
and white skin.
GB 40
The GB 40 is located anterior and inferior to the external
malleolus, in the depression on the lateral side of the tendon of
m. extensor digitorum longus.
Meridians
5
ST 42
The ST 42 is located on the prominence of the foot dorsum, in the depression between the second and third metatarsal
bones and the cuneiform bone and at the pulsating point of the
artery on the dorsum of foot.