1
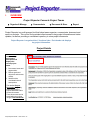
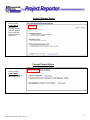
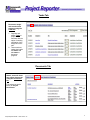
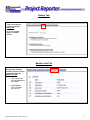
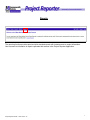
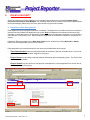
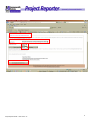
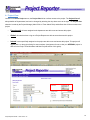
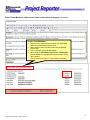
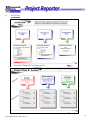
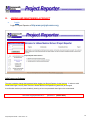
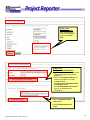
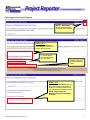
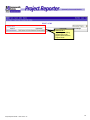
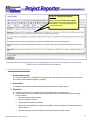
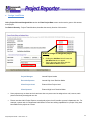
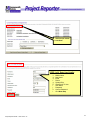
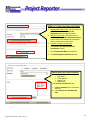
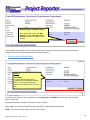
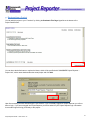
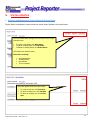
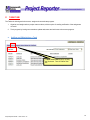
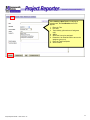
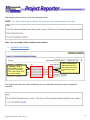
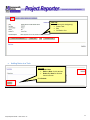
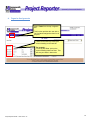
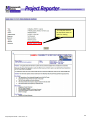
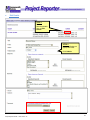
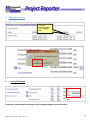
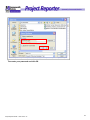
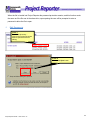
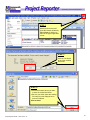
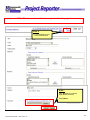
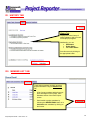
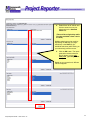
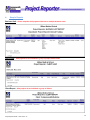
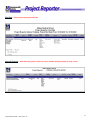
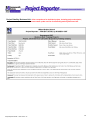
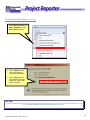
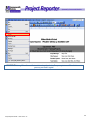
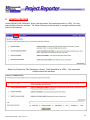
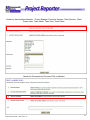
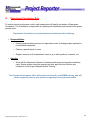
` User Manual 03/02/2012 Project Reporter Guide – .NET version 1.0 1 ` TABLE OF CONTENTS I. Overview pg. 3 II. Roles & Security a. Department Role Assignments b. Project View c. Project Team Member d. Definitions pg. 8 pg. 10 pg. 11 pg. 13 Adding and Maintaining a project a. Login b. Changing Project Reporter Password c. Adding a New Project d. Project Description Example e. Assign Lead Roles f. Entering User Defined Fields g. Bookmarking a Project pg. 14 pg. 15 pg. 19 pg. 21 pg. 22 pg. 26 pg. 27 Status Updates a. Entering and Maintaining Project Status & Project Notes b. Latest Status Update pg. 28 pg. 29 Tasks Tab a. Adding & Maintaining a Task b. Updating Task Status c. Adding Notes to Task d. Organize Assignments pg. 30 pg. 32 pg. 33 pg. 34 Documents Tab a. Add a Document b. View Details c. Edit Details d. Delete Document e. Lock a document f. Edit Document pg. 35 pg. 39 pg. 41 pg. 42 pg. 42 pg. 46 VII. History Tab pg. 50 VIII. Member List Tab pg. 50 a. pg. 50 III. IV. V. VI. IX. Group Email Reports a. Producing Reports b. Sample Reports c. Downloading Report Data pg. 53 pg. 56 pg. 63 X. Search Feature pg. 66 XI. Department Coordinator Role pg. 69 XII. Project Dashboards pg. 70 Project Reporter Guide – .NET version 1.0 2 ` I. OVERVIEW Project Reporter Connects Project Teams Organize & Manage Communicate Document & Store Report Project Reporter is a multi-pronged tool that helps teams organize, communicate, document and report on projects. This on-line tool provides instant access to key project information and status updates, as well as providing a centralized repository to store project documents. Project Reporter is organized into 5 functional tabs. Each header tab displays key project information. Project Details The Details tab contains a high level Project Description and displays the current project status. 1. Documents issues and opportunities. 2. Defines goals and objectives and success criteria. 3. Identifies risks, considerations and assumptions. The detailed Project Description is typically contained within the Project Statement and/or Charter documents. These documents can be stored within the project using the Documents tab. Project Reporter Guide – .NET version 1.0 3 ` Current Project Status Communicates Project Status information including schedule and cost updates, issues, and risks, and their effect on the project. Current Project Notes Communicates Project Notes Information including Upcoming Events. Project Reporter Guide – .NET version 1.0 4 ` Tasks Tab Document, assign and communicate progress using the Tasks tab 1. Organize and assign Tasks to project team members with the option of sending notification of the assignment via email. 2. Team members update their tasks and status and add notes to document progress. Documents Tab Attach, access & share any project documents using the Documents tab This tab serves as the library for Project Documents Project Reporter Guide – .NET version 1.0 5 ` History Tab Track overall project progress using the History tab. Review the Project History via status updates. Member List Tab Track project members and their access to project information using the Member List tab. 1. View a list of team member names and their roles. 2. Send emails to project members from this tab. Project Reporter Guide – .NET version 1.0 6 ` Reports The reporting function provides point and click standard reports with instant access to project information. User‟s access to information in reports replicates their access in the Project Reporter application. Project Reporter Guide – .NET version 1.0 7 ` II. ROLES & SECURITY Access to projects in the Project Reporter tool is managed using a tiered security model: Department Role, Project View and Project Team Members. By combining these functions, with the Project View explained below, the Project Manager (Admin Role) can limit or grant access to project team members. a. Department Role Assignments Each department has an assigned Department Coordinator. The Department Coordinator will process requests to add new users and maintain all department user access. Only the Department Coordinator has access to add, inactivate, or reactivate users for the department. Please contact your Department Coordinator if you would like to add, inactivate, or reactivate a user. Users outside the department must contact the Department Coordinator for access. Department Roles are assigned in the Enter User Profile screen, accessed by clicking My Profile or Admin button from the navigation bar (see screen shot below). Roles assigned in this screen determine the user access to the department level projects: • Team Administrators enter and edit project details & information, statuses, and adds clients. There must be at least one Team Administrator assigned to the project. • Project Users have the ability to add and maintain documents and see assigned projects. The Project User cannot edit project details. • Project Guests only have access to view projects in a department. Users assigned this role are not able to make any changes to the project. Project Reporter Guide – .NET version 1.0 8 ` Project Reporter Guide – .NET version 1.0 9 ` b. Project View Located on the Enter Project screen, the Project View limits or allows access to the project. The Project View will always default to Departmental, and can be changed by selecting the drop down arrow to the right. The Project View selection is made by the Project Manager (Admin Role or Team Admin Role) and defines who will have access to the project: • Departmental: all users assigned to the department are able to see and access this project. • Global: all users that have a log on to Project Reporter are able to see and access this project. • Internal: users specifically assigned to the project are able to see and access this project. This project will appear ONLY on the project listing for team members. (Assignment of user to view your INTERNAL project is defined in the Project Team Members Add New Projects section of this guide). Project Reporter Guide – .NET version 1.0 10 ` c. Project Team Member The Project Team Member Access is granted and maintained by the Project Manager (Admin Role) and the Department Coordinator. • Team Administrators enter and edit project details & information, statuses, and adds clients. There must be at least one Team Administrator assigned to the project. • Team Users have the ability to add and maintain documents and see assigned projects. The Project User cannot edit project details. • Team Guests only have access to view projects in a department. Users assigned this role are not able to make any changes to the project. Assignment of Project Team Members is made during the initial set up of the project, and can be changed at any time by clicking the Edit Project button in the header of any tab. This function is designed to: 1. Grant access to users from outside your department when the DEPARTMENTAL project View is selected. 2. Grant access to users when the Project View is INTERNAL. Internal Project views require the assignment of Project Team Members. Only the users assigned in the Project Team Member section will have the ability to view and access the project, including the Project Manager setting up the project. 3. Limit or demote access to users within the department. If a user has department ADMIN privileges, but need only have guest access in this project, you can limit access in the Project Team Member section below. Project Reporter Guide – .NET version 1.0 11 ` Project Team Members’ added can be edited at the bottom of the page (see below) – Project Team Members: Grant access to team members outside your department (when using departmental project view). Grant access to team members when using INTERNAL project View. Limit (or demote) access to the project. When using the INTERNAL Project View – All Members must be added here including the project manager setting up the project. There must be at least 1 Team Admin selected. Project Reporter Guide – .NET version 1.0 12 ` d. Definitions Project Reporter Guide – .NET version 1.0 13 ` III. ADDING AND MAINTAINING A PROJECT a. Login Login to Project Reporter at http:www.projrpt-umms.org Initial password/change The user is asked to change their password when logging into Project Reporter for the first time. In order to avoid unauthorized logon, security ‘Best Practices’ dictates that the initial password („password‟) be changed. A confirmation text box prevents mistakenly entering an incorrect password that might not be remembered. The initial login password is: Project Reporter Guide – .NET version 1.0 password (lower case) 14 ` b. Changing Project Reporter Password To change password click on My Profile. Click on (change password) Project Reporter Guide – .NET version 1.0 15 ` STEP 1 of 2 Enter User Details Enter new password, confirm new password, and then click Next Step. STEP 2 of 2 Enter User Department Roles Click Departments drop down list and choose or change the appropriate department Click on the Department Role drop down list and choose or change appropriate Role Click Save a new Department Role Combination button Click Exit Department Role Form if there is no department role combination. Click on Department Roles link to delete. Click Exit Department Role Form. Project Reporter Guide – .NET version 1.0 16 ` After logging in to Project Reporter: NOTE: Help button – brings you to the online Project Reporter Manual. STEP 1 of 3 Click the Department you have been given access to in order to find the project. To view all active projects assigned to you, click here. Printable version of the Project Reporter Guide STEP 2 of 3 Click the Business Unit where the project will reside (when adding a project) or currently resides (if you are maintaining an existing project). NOTE: Project Reporter Business Units show at bottom of screen Project Reporter Guide – .NET version 1.0 17 ` STEP 3 of 3 If updating an existing project click on the project listed under the Project Name Project Reporter Guide – .NET version 1.0 18 ` c. Adding a New Project STEP 1 – Click New Project on top navigation bar. Special Note: Access to the Enter a Project screen is limited to users assigned the Admin role within a department. If the New Project selection does not appear on the navigation bar the user cannot enter a project. Check with the Department Coordinator to add users or update user access. Adding a New Project the Enter Project Data screen will appear. STEP 2 – Populate the fields (See below for definitions) a. The Project Number will be auto assigned (you may edit the Project # by clicking in the box). Project #’s cannot be duplicated. b. Project View – Departmental, Global or Internal (see Roles & Security Defined in the Overview). c. Enter Title: Project titles can be duplicated across departments but not in same Business Unit. d. Select Business Unit (BU) from drop down (common to see more than one BU). Project Reporter Guide – .NET version 1.0 19 ` e. Select Funding type from drop down (USA funding, SSA funding, immigrant, grants, ISA, Fee for Service) f. Enter Funding Amount g. Select Client from drop down (if the client you require does not appear check with your Department Coordinator to add). h. Select State i. Select Status i. ii. Active – Current project Archive iii. Cancelled – Project cancelled prior to completion iv. Completed – Completed/success and including project closure v. Deleted – Project entered in error i.e. duplicate vi. On Hold vii. Pending – Project awaiting approval of feasibility cost benefit analysis j. Select Project Health - Overall Project status field allows for reporting/sorting by current project status. Red = Yellow = Green = k. Serious Risk Manageable Risk On Target Select Priority Code: i. High – Critical needs, mandated (cost, legal, etc.); ii. Medium – Important but not mandated iii. Low – Requested but not mandated l. Enter Start Date & End Date (Revised End Date used if the end date of project needs to be changed later). i. Start date – Date project officially began ii. End date – Projected date of completion iii. Revised End Date – Change projected date of completion m. Enter Project Description Project Reporter Guide – .NET version 1.0 20 ` STEP 3 - Project Description Add or Modify the Project Description by clicking in the text box and typing the description, or copying and pasting from another document. The project description details the project issues and opportunities, goals and objectives, success criteria, identifies risks, considerations and assumptions. d. Project Description Example 1. Problem/Opportunity: Our client has requested our assistance in developing and implementing the sample systems to coordinate the benefits of their members eligible for coverage. 2. Project Goal: To establish and coordinate required business functions with client on sample project. 3. Objectives: a. participate with client in the development of contract agreement for sample project. b. Communicate with client to establish mutually agreeable policies and business processes including, but not limited to: Data sharing format and frequency Billing and payment process Enrollment/dis-enrollment procedures Reporting and reconciliation of enrollment & eligibility, member utilization and claims and member appeals process Interface with project teams for claims processing planning and implementation Project Reporter Guide – .NET version 1.0 21 ` e. Assign Lead Roles Adding Project Role and Assigned User section the Enter Project Data screen can be used to grant or limit access to the project. See Roles & Security - Project Team Members, describes the security function of this section. STEP 4- Assign or change the project roles by: 2. Clicking the Add User link will cause the Add New User box to appear. 3. Type in the user‟s last name and click “Click here to Search” button. Project Manager: Internal Project Leader Executive Sponsor: Internal High Level Decision Maker Client Project Lead: External Client Project Lead Client Sponsor: External High Level Decision Maker Some projects may not have each role and more than one person can be assigned to a role, however, each person should only be assigned one role. Please note that within Project Reporter, an assigned project role will override a person‟s department role. For example, a person who is a department administrator will not have editing capabilities for a project if they have been added to the project as a Guest. Project Reporter Guide – .NET version 1.0 22 ` “Click here to create a new User” STEP 1 of 2 Enter User Details: b. c. d. e. f. g. h. i. j. k. l. Project Reporter Guide – .NET version 1.0 First Name Middle Name Last Name Email Phone System Role Send Email To User User Name Password Confirm Password Click Next Step 23 ` STEP 2 of 2 Enter User Department Roles 1. Departmental Project View: Use this section to grant access to users outside the department where this project resides. 2. Internal Project View: If the Project View is INTERNAL, users MUST BE granted access in the Project Team Member list to be able to view or have access to this project. 3. Promote or Demote User access 4. Click “Save a new Department Role Combination” button 5. Click a Department Role link to delete it. 6. Click Exit Department Role Form button Search Users for Project Roles By: First Name Last Name Email Address Search Text Department Click Click here to Search button Choose member(s) from Users drop down list. 2. Click Click here to Add Selected User 1. Project Reporter Guide – .NET version 1.0 24 ` To Remove a User: Click the Remove User link. This will cause the Remove Selected user list to appear. To Remove a User: 1. Type in the user‟s last name and click “Click here to Search” button 2. Click on the name(s) to remove. ”Click here to Remove Selected User” button Project Reporter Guide – .NET version 1.0 25 ` Maintaining an Existing Project – After opening the project, click Edit Project to access the Enter Project Screen from which all updates can be entered. The information on the Header Section, as well as the Project Description and user information, can be edited by clicking the Edit Project button and making any necessary changes. f. Entering User Defined Fields STEP 5: OPTIONAL The user defined Fields (UDF‟s) creates free form additional reference fields. It is a descriptive field that appears in the header section of each tab. To edit any of the Project or UDF information click the Edit Project or Edit UDF’s buttons located on the header section of each tab. Fields and values are searchable (see search function for details). UDF‟s appear on the Project Detail by Business Unit Report & Project Status Detail Report. NOTE: You are not required to enter any UDF‟s for a Project Project Reporter Guide – .NET version 1.0 26 ` g. Bookmarking a Project You can add this project to your “Favorites” by clicking the Bookmark This Page Hyperlink at the bottom of the Project Detail Screen. You can leave the default name or replace the Name, which will be pre-filled with “UMASSMED Project Reporter – Project Link”; with a name that describes the actual project and click Add. Upon first accessing the web and selecting the new favorite, if you are already logged into Project Reporter you will not have to login. If you are not logged into Project Reporter you will be asked for your Project Reporter login information. A successful login will bring you directly to this project. Project Reporter Guide – .NET version 1.0 27 ` IV. STATUS UPDATES a. Entering and Maintaining Project Status & Project Notes Project Status is designed to communicate an overall project update to the project team. The most recent status will appear on the bottom of the Project Description tab. To create a new status, click New Status. To edit an existing status, click Edit Status. To delete an existing status, click Delete Status. Only Admins can delete a status Remember to identify: Accomplishments Schedule/Costs Issues/Risks To be completed Notes will appear below the Project Status To create a new note, click New Note. To edit an existing note, click Edit Note. To delete an existing note, click Delete Note. Project Reporter Guide – .NET version 1.0 28 ` b. Latest Project Status Update The Latest Project Status, appearing on the Details Tab, under Project Description is designed to communicate an overall project update to the project team. The Project Manager will work with the Executive Sponsor, Client Project Lead and Client Sponsor to determine the schedule of project status updates (weekly, monthly). Each Status Update will begin with the color indicated below that allows for team members a quick reference Green: Project is on track, hitting all major and minor milestones. Interdependencies being well managed. Yellow: There is some risk in the project. Minor milestones have been missed. Some issues with interdependencies. Major milestones will still be met. Red: The project is at risk. Minor and major milestones will be missed. Interdependencies not cooperating or not aligned. Be sure and include pertinent info: 1. What has been accomplished? 2. Is the project on schedule and meeting cost projections? 3. Are there potential issues that affect the project schedule or cost, and what are the risks if the issues are not resolved? SAMPLE Project Status Update: Green: Draft of the Communication plan submitted to Senior Leadership for review and approval on 12/15/05. Schedule for distribution to the management staff for presentation is 1/5/06, upon approval from Senior Leadership. If revisions are needed, the schedule to present to the department staff may be extended and the projected cost will increase due to additional resource time. 1. Accomplishments: Draft of the Communication plan submitted to Senior Leadership for review and approval on 12/15/05. 2. Schedule/Costs: Schedule for distribution to the management staff for presentation is 1/5/06, upon approval from Senior Leadership. 3. Issues/Risks: If revisions are needed, the schedule to present to the department staff may be extended and the projected cost will increase due to additional resource time. 4. To be completed: Identify work the team will work on between now and the next status update. NOTE: The history of the Project Status updates can be found by clicking the History tab. Project Reporter Guide – .NET version 1.0 29 ` V. TASK TAB The Tasks tab is designed to document, assign and communicate progress. 1. Organize and assign tasks to project team members, with an option of sending notification of the assignment via email. 2. Track progress by having team members update task status and add notes to document progress. a. Adding and Maintaining a Task To Add a New Task begin by clicking the Tasks tab. Then click New Task link. Project Reporter Guide – .NET version 1.0 30 ` When Adding a New Task or modifying an existing task, the Task Details screen will appear. 1. Enter the Title 2. Due date 3. Task Visibility (all members of assignees only) 4. Status 5. Select the User to be assigned. 6. Determine if an Email should be sent to the assignee (yes or no) 7. Enter the Task Description 8. Select Submit Project Reporter Guide – .NET version 1.0 31 ` Task assignee will receive an e-mail in the following format: NOTE: The body of the E-mail includes a link that brings the recipient directly to the task. Note: You can assign a task to multiple team members b. Updating Task Status To Modify a Task or Add a Note to a Task, click on the underlined Title of the Project Task you wish to modify. Update Task Status by selecting percent that most closely represents the completion of your task. The assignor will receive an e-mail containing a link to the task when the task has been completed or reopened. Project Reporter Guide – .NET version 1.0 32 ` You can Remove this Assignee(s) Delete Task Edit Go Back to List c. Adding Notes to a Task You can Add a Note Edit any Note for this task or Delete any Note for this task from this screen Click Submit Project Reporter Guide – .NET version 1.0 33 ` d. Organize Assignments Select Tasks from the top navigation bar. This function provides the user with a list of all tasks assigned to them for all projects. Tasks can be sorted by clicking the column heading on the task bar. For example: To sort by Due Date: click on the column heading titled Due Date. This will sort your tasks in date order. Project Reporter Guide – .NET version 1.0 34 ` VI. DOCUMENTS TAB Any project document can be uploaded into a project. You can attach, access, and share any type of project documents using the Documents tab which serves as the library for project related documents. a. Add a Document To Add a Project Document click Add New Documents Link Project Reporter Guide – .NET version 1.0 35 ` STEP 1 Click Add a New Document button Project Reporter Guide – .NET version 1.0 36 ` Search for Documents to Associate to a Project. Project Reporter Guide – .NET version 1.0 37 ` STEP 2 – The Enter Project Documents Screen will be displayed. (Categories and Keywords provide additional information to search for documents later but are not required). 1. Title* 2. Folder* 3. Author* 4. Publish Date* 5. Category 6. Keyword 7. Source* 8. Abstract* 9. Click Browse and locate your document. The document name will appear in the document text box. 10. Click Submit Multiple selections can be made by depressing the Ctrl key when left-clicking the desired selections. *required fields FOLDER BLURB Project Reporter Guide – .NET version 1.0 38 ` Choose document to upload and click Open. See path and file name of selected document. Click Submit b. View Details To view document details click on View Details. Project Reporter Guide – .NET version 1.0 39 ` You may also click on the document name to open for viewing Project Reporter Guide – .NET version 1.0 40 ` c. Edit Details STEP 1 To view document details click on Edit Details. STEP 2 Make modifications to appropriate fields. Click Submit Project Reporter Guide – .NET version 1.0 41 ` d. Delete a Document To delete document details click on Delete link. e. Lock a Document Locking the document prevents anyone from making changes to your document. Project Reporter Guide – .NET version 1.0 42 ` IMPORTANT FILE ACCESS NOTE: Access to any file can be limited by using the Microsoft File PASSWORD PROTECTION: When saving a WORD document go to File > Save as then click on tools. Click on SECURITY OPTIONS. Project Reporter Guide – .NET version 1.0 43 ` Then enter your password and click OK. When saving an EXCEL document go to File > Save as then click on tools. Click on GENERAL OPTIONS. Project Reporter Guide – .NET version 1.0 44 ` Then enter your password and click OK. Project Reporter Guide – .NET version 1.0 45 ` When the file is loaded into Project Reporter the password protection remains, and this function works the same as if the file was in the share drive; upon opening the user will be prompted to enter a password to allow the file to open. f. Edit Documents STEP 1 To edit the document – Click on the Project Document listed to open document for editing. STEP 2 Click on the Open button Project Reporter Guide – .NET version 1.0 46 ` STEP 3 Modify the document and close the browser window by File > Close or clicking on the X in the upper right hand corner. STEP 4 – Click the Yes button to save the modified document. STEP 5 – Select the location where you want to save the revised document. Be sure you either select the existing file name from the dialogue box or enter a File Name. Click on Save. Project Reporter Guide – .NET version 1.0 47 ` NOTE: The document must then be re-uploaded into the project. STEP 6 To re-upload document Click on Edit Details STEP 7 Click “Browse” to locate the replacement document. Click Submit Project Reporter Guide – .NET version 1.0 48 ` STEP 8 – Select Document and then Click “Open”. See path and file name of selected document. STEP 9 – Click Submit to replace the document. Team Members will receive an email alerting them a revision occurred Project Reporter Guide – .NET version 1.0 49 ` VII. HISTORY TAB History Tab Displays the entire history of status updates to help you track overall project progress. Additionally, you can Edit Status Delete Status Add a New Status from this screen by clicking on the appropriate button. VIII. MEMBER LIST TAB Group Email Track project members and their access to project information using the Member List tab. Project Reporter Guide – .NET version 1.0 • A list of team members and their access level as assigned in the Project Team Members section of the Enter Project screen. • Send emails to project members by selecting the GROUP EMAIL button or to individual team members by clicking on their name. 50 ` Enter the Send Email to ALL Users with Access to Project screen To modify click on Modify Recipients 1. Review member list. If there is a team member or members you do not need to send the e-mail to uncheck the boxes. 2. Enter cc: if any 3. Enter subject 4. Enter the message in the text box below 5. Select SEND. Although a team member’s name may appear multiple times, they will receive only one email. WARNING: If you wish to exclude some individuals be sure you uncheck all occurrences. Project Reporter Guide – .NET version 1.0 51 ` IX. PROJECT REPORTER / BUSINESS OBJECTS REPORTS Standard Report Set 1. Business Unit 2. Client Lead 3. Client Report 4. End Date 5. Internal Projects 6. Project Detail by Business Unit 7. Project Detail 8. Project Manager 9. Project Status by Business Unit 10. Sponsor 11. Task Report By Person 12. Task Report By Project Note: All reports are exportable by clicking the file button at the top left hand corner. Project Reporter Guide – .NET version 1.0 52 ` a. Producing Reports Click on Reports from the TOP Project Reporter navigation bar. 1. Enter User name and Password 2. Click Log On Project Reporter Guide – .NET version 1.0 53 ` 3. Click directly on the report title to select a report. There will be a slight delay while the selection criteria screen is built. Project Reporter Guide – .NET version 1.0 54 ` 4. Select from list of values and click the arrow to move your selection(s) to the Selected Values list. (There will be a slight delay while the other available values criteria are built.) Multiple selections may be made by depressing the Ctrl key (for range selections) or the Shift key (for individual selections) while clicking on your selection(s) with the mouse. 5. Click the OK button. The report generation restarts whenever the OK button is hit so only click once. (you may have to scroll). Based on your access level, different values will appear. Project Reporter Guide – .NET version 1.0 55 ` b. Sample Reports Business Unit - View a snapshot of all projects within one or multiple business units. Client Lead – View projects for an individual or group of project Client Leads. Client Report - View projects for an individual or group of Clients. Project Reporter Guide – .NET version 1.0 56 ` End Date – View projects by project End Date. Internal Projects – View internal projects in which you are a member with appropriate security access. Project Reporter Guide – .NET version 1.0 57 ` Project Detail by Business Unit - View a snapshot of an individual project, including project description, current status update and list of outstanding tasks by Business Unit. Project Reporter Guide – .NET version 1.0 58 ` Project Report Detail – View a snapshot of an individual project, including project description, current status update and list of outstanding tasks. Project Status by Business Unit – View a snapshot of an individual project with current status update Project Reporter Guide – .NET version 1.0 59 ` Project Manager – View projects for an individual or group of Project Managers. Client Sponsor - View projects for Client Sponsors. Project Reporter Guide – .NET version 1.0 60 ` Executive Sponsor - View projects for Executive Sponsors. Task Report by Person – View project tasks by person. Task Report by Project – View project tasks by project. Project Reporter Guide – .NET version 1.0 61 ` c. Downloading Report Data In order to save a report to disk, or to edit the contents of a report, create the report within Project Reporter as described in the section above. Click on the Export This Document icon. Project Reporter Guide – .NET version 1.0 62 ` Downloading Report Data (continued): Select Microsoft Word (972003) – Editable from the File Format dropdown. Click on Open to view, edit, and/or print the document immediately. Click on Save to store the document for future retrieval in order to edit and/or print later. CAUTION: If you have opened the document for immediate viewing/editing/printing and you wish to save it from within Word, You must use File > Save As to store the document where you wish. Project Reporter Guide – .NET version 1.0 63 ` WARNING! Using File > Save will store it to a location in the Temporary Internet Files folder and you may not find it again! Project Reporter Guide – .NET version 1.0 64 ` X. SEARCH FEATURE Locate projects by title, description, history, task association, documents association or UDFs. You may select multiple criteria for searches. The Search Feature provides the ability to navigate to different areas within Project Reporter. Search for Projects by Title, Description, History, Task Association or UDFs. You may select multiple criteria for searches. Project Reporter Guide – .NET version 1.0 65 ` Search by Administrative Member: Project Manager, Executive Sponsor, Client Sponsor, Client Project Lead, Team Admin, Team User, Team Guest. Search for Documents by Document Title or Abstract Project Reporter Guide – .NET version 1.0 66 ` Search for Lessons Learned within the Lessons Learned Folder Project Reporter Guide – .NET version 1.0 67 ` XI. Department Coordinator Role To ensure security and access control, each department will identify and assign a Department Coordinator. The Coordinator is responsible for granting and maintaining user access at the proper security level: Department Coordinators must participate and understand the following: Responsibilities: o Creating and maintaining access for department users, including prompt inactivation of terminated employees. o Perform a period check of users. o Support resource for the department users to go to with questions, concerns, etc. Security: o Work with the Department Director to determine the proper level access needed by users. Admin access should be granted only after approval from Director and completion of the Project Reporter Admin Training. The Program Development office will provide the Security and ADMIN training, and will ensure support to answer any questions regarding security access issues. Project Reporter Guide – .NET version 1.0 68 ` XIII. PROJECT DASHBOARDS Project Reporter Guide – .NET version 1.0 69