1
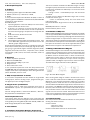
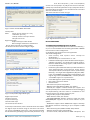
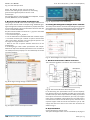
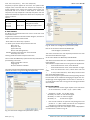
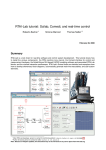
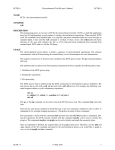
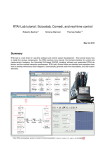
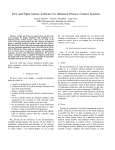
IJECT Vol. 2, Issue 1, March 2011
ISSN : 2230-7109(Online) | ISSN : 2230-9543(Print)
Real Time System Development & Speed Control
of a Stepper Motor Using Commercial Soft Tools
& Open Source Codes
1
Ujjwal Mondal , 2Anindita Sengupta
Electrical Engineering Dept., Haldia Institute of Technology, ICARE Complex, WB, India
Electrical Engineering Dept, Bengal Engineering & Science University, Howrah, WB, India
1
2
Abstract
The presented effort demonstrates in steps the ways of
developing Real Time System using commercial soft tools
(first solution) in Widows operating environment and using
open source code tools (second solution) in Linux operating
environment. The commercial and free (open source) suite
utilized and experienced with the real time speed control of a
stepper motor. First, the experiment is composed by MATLAB
with Real Time Workshop and Real Time Windows Target (RTW/
RTWT), very well known commercial soft tools for real time
experimentation and next, as open source code tools SCILAB/
SCICOS with Real Time Application Interface (RTAI) & and the
COMEDI (Control & Measurement Device Interface) are used
for the same. The most obvious advantage for the open source
code tool is that all the software or codes are available on the
web and it can be freely downloaded where commercial soft
tools costs few lacks, moreover in case of open source code
tools freedom is unlimited as user can modify the open source
codes for specific requirements but commercial soft tools do
not open source codes for user modification i.e. freedom is
limited. However, unlike the (costly) commercial packages,
the information available about this free software is scanty or
sometimes confusing. This paper attempts to remove some
of the difficulties by tracing through the development steps
and pitfalls. The objectives of this paper are (i) to understand
the concepts and practical aspects of using such software
development tools, (ii) to design simple experiments for
students which will let them learn the design process and
development life cycle for real time system and (iii) to compare
the relative advantages of using public domain free software
tools for the same purpose and making low cost laboratory set
up for real time experimentation. The investment is reduced
to the hardware as well as in software cost, which consists of
a standard old PC and a RTWT & COMEDI compatible data
acquisition board (commercial RT module for Lab experiment
costs few Lacks approximately). Successful implementation
of the real-time system development and deployment were
demonstrated by a uni-polar stepper motor control (sequencing)
in real time.
different targets with the help of RTWT. The main disadvantage
of this solution is the cost of the required software. The software
for the second proposed solution can be freely downloaded
from the web and thus cost effective. It is based on Scilab/
Scicos and Linux RTAI, a hard real-time extension of the GNU/
Linux Operating System. Dedicated hardware includes a PC and
a data acquisition card PCI-1711 (Advantech). For experiment
purpose a Stepper motor is taken whose specification is given
in the part (II). The RT environment allows quickly creating realtime controllers for real plants by generating and compiling the
full control application directly from the Matlab RTW/RTWT or
RTAI in Scilab/Scicos scheme.
Keywords
Real Time Control Systems, Real Time Workshop, Real Time
Windows Target, Real Time Application Interface, Computer
Aided Control System Design, Control & Measurement Device
Interface
In this stage keeping the entire previous configuration the RTAI
package with rtai-lab (a module of RTAI) and COMEDI can be
access through Scilab. Scilab/Scicos gives the graphical user
interface (GUI) to make RT simulation and as well as to generate
codes and executable for RT operation. In our experiments a
COMEDI supported DAQ card (PCI 1711) is taken to set the
RT target.
I. Introduction
Rapid Controller Prototyping (RCP) requires two components.
(a) Computer Aided Control System Design (CACSD) software
and (b) a dedicated hardware with a hard real-time operating
environment. First proposed solution in this paper is one of the
most widespread RCP environments, based on the commercial
software Matlab / Simulink / Real Time Workshop (RTW) CACSD
software which can be used to generate and compile codes for
96 International Journal of Electronics & Communication Technology
It is obvious to say that RTWT package in Matlab has the
most powerful component called Kernel, which is actually a
miniature Real Time Operating System (RTOS), piggybacking
on the Windows. The highly optimized real time Kernel provides
real time extension for Windows and allows real time execution
of the compiled code within the RTWT environment. The Kernel
runs at Ring 0 (highest priority) in the Windows environment
and supports single or multi tasking. RTWT is actually a suite of
software which permits a) the execution of the controller codes
in real time, b) manages its input & output with the external
world through an I/O board and c) manages communication
with the Matlab/Simulink parameter setting functions and
display devices. RTWT contains a set of target files that enables
RTW to generate & build a binary file for use in specific target
environment.
In order to get real-time operation using open source codes, a
standard kernel must be conFig. in Linux base and before this
configuration it will include the patching of Hardware Abstraction
Layer (HAL) or Adaptive Domain Environment for Operating
Systems (ADEOS) with the kernel. After patching and configuring
the kernel (to make it real time compatible), installation of
the RTAI package must be carried out including rtai-lab and
COMEDI. After this whole process, a set of kernel modules
are created in the user specified directory (“/usr/realtime”).
Loading these modules, the real-time functionality is obtained.
Running the created RT executable in Matlab or in a Linux
terminal the RT simulated signal is observed through a CRO and
extended the work to generate RT control signal for a stepper
motor.
w w w. i j e c t. o r g
IJECT Vol. 2, Issue 1, March 2011
ISSN : 2230-7109(Online) | ISSN : 2230-9543(Print)
II. Development System
A. Software
First Solution:
1. Operating system higher than Windows 98SE,
2. Matlab (version ≥ 6), 3. Simulink, 4. RTW,
5. RTWT
In this presented experiment Windows XP (SP2) is taken as
Operating System and Matlab 7.5 with Simulink, RTW and RTWT
packages as other software.
Second Solution:
1. Operating System: Functional GNU/Linux environment,
experimented with Ubuntu 6.06 .
2. A Kernel: it is necessary to ensure the best when the
kernel version of the Linux-OS is as close as possible to
the kernel we are going to compile and to merge with the
RTAI
3. RTAI source code, Scilab source code
4. Scilab / Scicos
5. COMEDI and COMEDI-LIB.
6. Two supporting source codes are required to install. First
one is “Mesa 3D” graphical library and second one is the
“EFLTK” graphic widgets library.
Some software packages may have to upgrade and those are
Automake, autoconf ,bison (for comedi) cpp, ftgl-dev (for efltk),
gcc, g77, g++, gtk, libbind, libglu1-mesa-dev, libglut-dev, libfltk,
libgtk-dev, libdrm-dev, libncurses, libperl-dev ,mesa ( related
all packages ),tcl8.4, tk8.4, tcl-8.4-dev, tk8.4-dev, tcllib-1.9,
x11-proto.
B. Hardware
1. A P4 or equivalent processor
2. Minimum 256MB RAM
3. Data Acquisition (DAQ) or I/O card
4. Stepper motor
5. Driver electronics circuit
In this presented experiment a PC with P4 processor with
512MB RAM, PCI 1711 Advantech make DAQ card, a unipolar
stepper motor and a simple Stepper motor driving electronics
(Driver ULN2003) circuit is used.
C. DAQ card specification as follows
It is a PCI slot compatible card with 16x12 bit single-ended
analog inputs, 2x12 bit analog output, programmable gain,
16 digital inputs and 16 digital outputs.
D. Stepper motor specifications
The stepper motor is taken from old floppy drive which is
MSJE200A53 unipolar. The specifications of the motor as
follows.
Normal Voltage=12Volts., Resistance=89ohms., Wires=5.,
Steps/Revolution=200,Stepsize =1.80.
III. Development Process
This section deals with the different steps to generate and
communicate real-time control signals to the external hardware
through DAQ card using Matlab/Simulink & RTW /RTWT and
RTAI through Scilab/Scicos with COMEDI.
A. First Solution
1. Installation of Real-Time Windows Target kernel
At first we have to install RT kernel in Matlab to work with RTWT.
w w w. i j e c t. o r g
The kernel enables the Real-Time Windows Target to assign
the highest priority of execution to real-time executable, which
is created by the Real-Time Workshop. To install the kernel
manually, type
“rtwintgt –install” at the Matlab prompt. This will initiate
the kernel.
To check that the Real-Time Windows Target has correctly
installed the kernel, type
“rtwho” at the Matlab prompt and it will show some
information likelyReal-Time Windows Target version 1.00 (C) The MathWorks,
Inc.
MATLAB performance = 100.0%
Kernel timeslice period = 1 ms
2. Installation of DAQ card
Before installing a DAQ card we should verify whether the specific
card is supported by Matlab RTW/RTWT. To find out names of
supported cards, first opening a new page from Simulink library
browser a Digital Input or Output block is taken in the page.
Then double clicking it opened block parameters. In the Block
parameters there is an option “Install new board”. Clicking over
this option we can find out a list of all supported cards by that
Matlab version supports and selected the required one.
3. Making of Simulink Block Diagram
Simulink Block diagram is to make with ‘Counter Limited’ block,
‘Lookup Table’ and ‘Digital Output’ block as shown below. Now
save this model as modelname.mdl in the current directory
of Matlab. Counter Limited block is taken from Simulink110Sources, Lookup Table is taken from Simulink->Lookup
Table (1-D Linear Interpolation of input values using the
specified table) and Digital Output block is taken from RealTime Windows Target of Simulink Library Browser.
Fig.1 : Simulink Block diagram
After creating block diagram model in Simulink we have to
build a real-time model (known as MEX file) using Real-Time
Workshop in the Simulink Parameters dialog box, but before
making real-time model we have to set few parameters to
work with Real-Time Windows Target which is discussed in the
next section. The MEX-file interface module allows Simulink’s
External (under simulation menu of the model) mode to export
new parameter values to the real time model and to retrieve
signals from the real-time model. Generated code from the
model can be targeted on special purpose hardware to provide
a real-time representation of the physical system.
4. Parameter Setting
Now the parameters of the Simulink blocks are set by double
clicking the blocks as below.
Counter Limited
‘upper limit’:4 and
‘sample time’:0.02.
Counter limited block looks like as shown below.
International Journal of Electronics & Communication Technology 97
IJECT Vol. 2, Issue 1, March 2011
ISSN : 2230-7109(Online) | ISSN : 2230-9543(Print)
and we can also specify it as [1:8].To use first four channels,
specify output channels parameter as [1,2,3,4].Initial value is
the value before simulation to start and final value is the value
after the simulation stops.
The block looks like as shown in Fig.5.
Fig.2 : Counter Limited Block Parameter
Lookup table
Main:
Vector of input values: [0 1 2 3]
Table data: [1 8 2 4]
Lookup method: use input nearest
Sample time: 0.02
Signal data types:
Output data type mode: double
Round integer calculations toward: Floor
Do not select saturate on integer overflow.
The blocks look like as shown in Fig.3 & Fig.4.
Fig.3 : Lookup Table (Main)
Fig.4 : Lookup Table (Signal Data Type)
Digital output block
sample time:0.02
output channels:[1]
channel mode: byte
initial value:0, final value:0
In the output channel box, enter a channel vector that selects
the digital output channels using on this board. The vector
can be any valid Matlab vector form. Here we have selected
first 8 channels by specifying output channel parameter as [1]
98 International Journal of Electronics & Communication Technology
Fig.5 : Digital Block Parameters
B. Second Solution
1. Software development process in steps
1. Unpacking of kernel and RTAI source codes in the directory “/
usr/src” in the installed Linux & Patching of the HAL or ADEOS
over the kernel under configuration.
2. Configuring the kernel for real time application
The kernel configuration:
• Code maturity level options: select “Prompt for
development...”
• General setup: set “Local version” to “rtai”
• Loadable module support: select “Enable module support”,
“Module unloading”, and “Automatic module loading”.
Deselect “Module versioning support”; RTAI modules are
not version dependent.
• Processor type and features: Select your Sub architecture
Type (PC-Compatible) and Processor family. Select
“Preemption Model (Preemptible kernel (Low-Latency
Desktop))”. You might need “High Memory Support (4GB)”
if you use a PCMCIA data acquisition card. Deselect “Use
register arguments (EXPERIMENTAL)”. Possibly deselect
“Local APIC support on uniprocessors”.
• Power Management options: Keep default
• Bus options: Leave the default
• Device Drivers:
– Generic driver options: keep default
– Memory Technology Devices (MTD): not needed
– Parallel port support: unselect Parallel port support. The
standard parallel port is a useful device for real time debugging
and experimenting. We must leave it unselected so that
Comedi’s drivers can directly access the port.
– Plug and Play support: keep default
– Block devices: select your devices
– ATA/ATAPI/MFM/RLL Support: select the main item “ATA/
ATAPI/MFM/RLL support” and all items relevant to your
system.
– SCSI device support: select “SCSI device support” and keep
the default selections according to your computer’s SCSI
devices.
– Multi-device support (RAID and LVM): Keep default
– Network device support: keep defaults
– Amateur Radio, IrDA, Bluetooth, ISDN subsystem, and
w w w. i j e c t. o r g
IJECT Vol. 2, Issue 1, March 2011
ISSN : 2230-7109(Online) | ISSN : 2230-9543(Print)
Telephony support: Leave disabled.
– Input device support: Ensure that Mouse is selected.
– Character devices: Keep default
– I2C support: keep unselected; there are reports of difficulties
when used with RTAI
– Multimedia devices: keep unselected.
– Graphics support: keep unselected.
– Sound: keep unselected
– USB Support: preferably enable as module.
• File Systems:
– Second extended fs support: select
– Ext3 journaling file system support: select it and “Ext3
extended attributes”
– Reiserfs support: the Suse distribution uses it, maybe your
Linux distribution doesn’t need it
– CD/ROM-DVD Filesystems: select “ISO 9660...” and subitems
– DOS/FAT/NT Filesystems: select as needed.
Keep other default selections
3. Compilation and Installation of the newly conFig. kernel.
4. Updating of the boot loader to access newly installed
kernel.
Here we are adding new kernel, not changing the settings of
the old one. This section gives an example to conFig.the GRUB
boot manager’s configuration file named “menu.lst” and usually
located in “/boot/grub/” in the old Linux. The script we should
add or write into the boot loader file below “## ## End Default
Options ##” is looks like below:
title
rtai, kernel 2.6.17
root
(hd0,3)
kernel /boot/vmlinuz-2.6.17 root=/dev/hda4 ro quiet
splash
initrd /boot/initrd.img-2.6.17
savedefault
boot
Now we have to re-boot the computer into newly compiled kernel
and have to choose the new kernel from master boot record.
5. Mesa and EFLTK installation
It is required in the directory “/usr/local” to support xrtailab
of RTAI.
6. Installation of COMEDI and COMEDI-LIB
7. Configuration, compilation and Installation of RTAI.
During configuration of RTAI say yes to “rtailib” and “COMEDI
support over LXRT”
8. Installation of Scilab and RTAI add-ons to Scilab/Scicos.
After Scilab Installation we should add a line “/usr/local/src/
scilab-4.x.x/bin” to the PATH variable in “.bash_profile” and/or
“.bashrc” or relevant shell start-up file. Add-ons to Scilab/Scicos
is necessary to access RTAI and its library through scilab/scicos
environment.
First step:
$ cd /<rtai dir>/rtai-lab/scilab/macros
$ make install
$ make user
These above commands add command lines to Scilab startup
file to access RTAI through Scicos.
9. Creating shared memory inodes for the activation of RTAI
and COMEDI.
Here we have to write a script and save it to home directory
as directed in the RTAI. Running this script in to the terminal
required inodes can be created.
w w w. i j e c t. o r g
10.
Loading RTAI, COMEDI and DAQ modules.
In this stage a set of kernel modules which are created in the
user specified directory (“/usr/realtime”), COMEDI modules and
DAQ modules is to load as directed in COMEDI guide. Loading
these modules, the real-time functionality is obtained.
2. Creating block diagram for Square wave generation
Open the TERMINAL and type “scilab”, it will open scilab window
and in the scilab window type ‘Scicos’ and it will open untitled
window. Then open menu “edit” and Select palettes. Go to
“Palettes” and select Sources at the top of the pop-up window.
This will open another window with a group of source blocks.
Take the red clock on the Scicos diagram page. Open the RTAILib palette in a similar way as before. From the RTAI-Lib palette,
take the “Square” block, “Scope” block & “COMEDI D/A” block
and place it in the main Scicos window. Connect those blocks
as in Fig.6. After drawing the Block diagram, we should make
the “super block”. So we should go to menu “Diagram” and
select “Region to super block”. Cover al the blocks excluding
the Clock and dragging the mouse i.e. we must draw an elastic
frame around all the blocks as in Fig.6 and it will make the
required super block. Double clicking on the super block we
can again open those basic blocks to set parameters as shown
in Fig.7.
3. Set parameters of Super-blocks:
Square block- “Val[0]/amplitude=1”, “Val[1]/time
Period=1” and “Val[2]/On time=0.5” & leave other parameter
to default value.
Comedi block- Keep default value (channel 0)
Scope block- Keep default value.
Close the window and set clock parameter.
Fig. 6: Making of RTAI Super block
International Journal of Electronics & Communication Technology 99
IJECT Vol. 2, Issue 1, March 2011
ISSN : 2230-7109(Online) | ISSN : 2230-9543(Print)
Fig. 7: Inside of Super block
Clock- Set “Period =0.001” and “Init Time=0”
Connect the analog output (Channel 0) and analog
ground of the signal acquisition card to a real
Oscilloscope.
For example: with the “advantech PCI-1711” DAQ card , connect
pins 58 (DAC0OUT) and 57 (AOGND).
4. RT square through X-rtailab and Oscilloscope
Now going to the “RTAI” menu select “Set Target” and click over
super block. Now we have to compile using “RTAI-Code gen”
again through menu “RTAI”. If compilation is properly done then
on the scilab prompt a group of information will come with the
lat line “Created Executable”.
Say the new executable is renamed as “rt_square” and saved
in the current directory.
• In one terminal type: rt_square -v
to run the executable in Hard RTS mode with verbose output.
• In another terminal type: “xrtailab” to open a GUI and from
“File” menu select “Connect” and it will give the option to set
the target as in Fig.8 & Click on “OK”.
• Now we can see a square wavelike wave form on the
Oscilloscope.
In xrtailab going to “View” select “parameters” and “scope”.
Now we can adjust visualization parameters in the “xrtailab” to
see the Square wave properly in to the oscilloscope as shown
in Fig.9 and Fig.10.
Fig. 10 : Square wave in the Oscilloscop
5. Creating block diagram for Stepper motor controller
As in the previous section we made a block diagram to generate
a RT square wave, here we repeated the way and block diagram
for stepper motor controller is created as shown in fig 11.
Fig. 11 : Block diagram for stepper motor driving
C. Hardware Connections & Driver electronics
The schematic hardware connections are shown below:
Fig. 8: RT target setting through xrtailab Interface
Fig. 9: Square wave in the scope of xrtailab
Fig. 12 : Schematic Hardware Circuit Diagram
In the above Fig. one opto-isolator circuit is shown explicitly.
Four digital outputs from the DAQ card (DO ports of the card)
are fed to the input of four opto-isolator for safety purpose and
the outputs of those are connected to (pins 1,2,3,4) stepper
motor driver (ULN2003). Digital Ground of the DAQ card is
connected to the Ground of the driver (pin 8). Common of the
unipolar stepper motor should be connected to (pin 9) 12V
supply and other four wires of the motor are connected as
shown in Fig. 2.
IV. Experimentation
Control Strategy for stepper motor
The speed of stepper motor can be controlled by varying the
100 International Journal of Electronics & Communication Technology
w w w. i j e c t. o r g
IJECT Vol. 2, Issue 1, March 2011
ISSN : 2230-7109(Online) | ISSN : 2230-9543(Print)
frequency of pulses applied to the motor. The speed of the
stepper motor increases with the increase in frequency of
pulses applied to the motor. The stepper motor inputs are
sequential and so it is driven in three ways i.e. wave drive
sequence, full step sequence & half step sequence. For this
experiment wave drive sequence is taken for its simplicity and
shown in Table 1.
Table 1
SEQUENCE
NAME
DESCRIPTION
0001
Consumes least power
0010
and gives smoother
0100
Wave drive running of stepper motor.
1000
A. First solution
For Real Time experimentation we have to build real time
executable codes.
To generate c-code from Simulink block diagram, we have to
adjust the parameters shown below
Tools→Real time work shop→options
In ‘Solver’ pane choose the parameters like this
Start time: 0
Stop time: 100
Type: Fixed step
Solver: ode 4(Runge-Kutta)
Periodic sample time constraint: unconstrained
Fixed step size: 0.01
Tasking mode for Periodic sample times: Auto
Then in ‘Real Time Workshop’ pane choose the parameters as
per following instruction.
System target file: rtwin.tlc
Language: C
Choose ‘Generate makefile’
The solver pane and the RTW configuration parameters windows
look like as shown in Fig.13 and Fig.14 respectively.
Fig. 14 : Real Time configuration parameters (RTW)
Now in the command window of Matlab type
rtwinconfigset (‘modelname’)
The above command sets the required parameters for work
with Real-Time Windows Target.
Go to Tools→Real-Time Workshop→Build Model
The above command builds the c-code files from the Simulink
block diagram.
Then follow the steps below for running real-time application.
•
From the Simulation menu, select External.
•
From the Simulation menu, select Connect to target.
•
From the Simulation menu, select Start real-time
code.
•
To stop model execution, select Stop real-time code
item under Simulation menu.
Now we can change the speed of the motor by opening ‘Counter
Limited’ block of the model and changing the upper limit of it.
Surprisingly the changing effect can be seen in real time i.e.
on the fly (when motor was running) we can change parameter
of the model.
B. Second solution
• Set the ON time of each signal equals to the one fourth
of the Time Period, i.e. TON = (1/4) * (TON + TOFF).
•
Set Delay = 3*TON for the first signal.
Set Delay = 2*TON for the second signal.
Set Delay = 1*TON for the third signal.
Set Delay = 0
for the fourth signal.
•
Fig. 13 : Real Time configuration parameters (solver)
w w w. i j e c t. o r g
Now to have variation in speed we may change the time
period i.e. T = (TON + TOFF) and we can see respective
change in the speed of the stepper motor.
Generated RT signal to drive the stepper motor is displayed in
x-rtailab which is shown in Fig. 15.
International Journal of Electronics & Communication Technology 101
IJECT Vol. 2, Issue 1, March 2011
ISSN : 2230-7109(Online) | ISSN : 2230-9543(Print)
same time experiencing the usefulness of open source code
tools compared to commercial soft tools. The interface routine
mentioned in this paper enables user to use any I/O card
(accessible via Matlab or COMEDI) for data I/O in experimental
environment. It provides a simple and inexpensive way to set
up hardware-in-the loop simulations, and enhance laboratory
experiments.
The objective is to compare the relative advantages or
disadvantages of using public domain free soft tools has been
explored through this paper with a suitable experiment.
Fig.15: Sequence of input signal to the stepper motor
Fig.16: Check out of RT square wave with LED
References
[1] “Simulink” Simulation, Model Based Design, version 6,
Mathworks,March 2006.
[2] “Real-Time Workshop” For use with Simulink,version 6,
Mathworks,March 2006.
[3] “Real-Time Windows Target” For use with Real-Time
Workshop,version 6, Mathworks,October 2004.
[4] “Data acquisition tool box ” vrsion 6 by Mathworks, March
2006.
[5] A.Gambier. “Real-Time control system” A tutorial
,Autamation Laboratory, B6 23-29,E.G Bautelc university
of Mannheim,68131 Mannheim,Germany.
[6] Warren E.Dixon,Darren M.Dawson,B.T.Costic,Marcio
S.de Queiroz: “A Matlab based control system laboratory
experiment for undergraduate students:Towards
Standardization and shared resources ”, July 3,2001.
[7] Asad Davari, Duoyan shen: ”On-line control of RealTime system using Matlab and simulink ”. Electrical
Engineering Department,West Virginia university Institute
of Technology, Montgomery,WV
[8] A.Cebi,L.Guvenc,M.Demircc,C.Kalpan Karadeniz,K.Kanar,
E.Guraslan,”A Low Cost Portable Engine Electronic Control
unit Hardware in the loop test system”.
[9] P. S. Bimbra, ”Electrical Machines: Dhanpat Rai
Publishers.
[10]Stephen L. Campbell, Jean-Philippe Chancelier, Ramine
Nikoukhah. “Modeling and Simulation in Scilab/Scicos”.
Springer, Berlin, Germany, 2006.
[11]Ramine Nikoukhah, Serge Steer. SCICOS - A Dynamic
System Builder and Simulator, User’s Guide,1998.
[12]Giovanni Racciu, Paolo Mantegazza. RTAI 3.3 User Manual,
2006.
[13]G. Sallet., “Ordinary differential equations with Scilab”.
Universit ´e de Saint-Louis / INRIA Lorraine, Universit ´e
de Metz, 2004.
[14]Pasi Sarolahti. “Real-time application interface”. Technical
report, University of Helsinki, Dept. of Comp. Science.
[15]R. Bucher, L. Dozio, “CACSD with Linux RTAI and RTAI-Lab,”
in Real Time Linux Workshop, Valencia, 2003.
[16]“RTAI-Lab Tutorial” Roberto Bucher
[17]Simone Mannori, Thomas Netter. “Scilab/Scicos and Linux
RTAI –A unified approach” R. Bucher.
Fig.17: Complete setup of the experiment
V. Conclusions
The presented work envisaged to explore the possibility of
developing ultra-low cost experimental set ups for teaching
and learning Real-Time systems in the laboratory and at the
102 International Journal of Electronics & Communication Technology
w w w. i j e c t. o r g