1
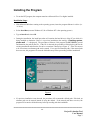
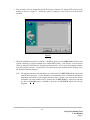
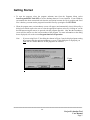
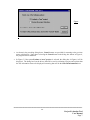
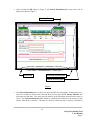
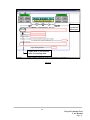
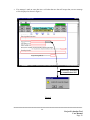
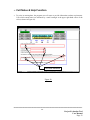
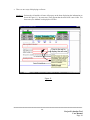
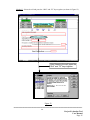
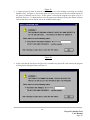
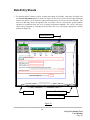
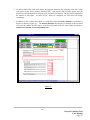
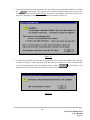
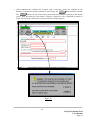
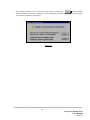
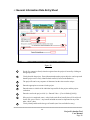
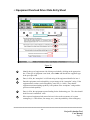
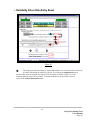
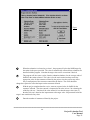
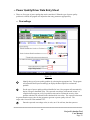
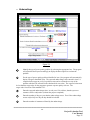
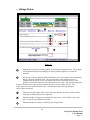
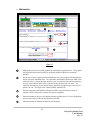
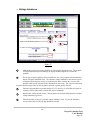
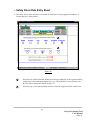
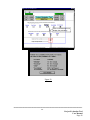
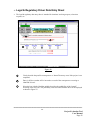
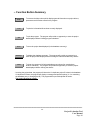
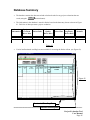
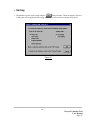
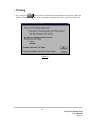
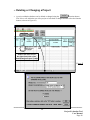
B 1 - 94
BC HYDRO UNDERTAKING
BC HYDRO REVENUE REQUIREMENT HEARING
2004/05 AN D 2005/06
HEARING DATE
June 1 , 2004
TRANSCRIPT REFERENCE
Volume 14 , Page 2401
REQUESTOR: JIESC
QUESTION
Please provide a copy of the manual as referred to in 81- 59 for the process of
fillng out PET project evaluation tool.
RESPONSE
Distribution uses the Project Evaluation Tool (PET) for prioritizing system
improvement capital expenditures. Pet was developed internally at 8C Hydro. It
has been reviewed by EPRI and is considered a leading edge tool. It provides
valuations for key performance drivers and considers the risk of project deferral.
The tool has been updated three times in five years and training is provided
regularly to those who use it (last training October 2003). A copy of the PET
Manual is attached.
PET is part of a comprehensive and well established planning process that
determines the requirements for capital investment. Specifically there are several
levels of review and approval as described below:
Step 1 - Engineering reviews the system constraint , evaluates solution options
recommends an option , and determines a Project Priority Indicator (PPI) using the
Project Evaluation Tool (PET). This is submitted to Distribution s Area Capacity
Planner.
Step 2 - The Area Capacity Planner reviews the project submission. This review
will determine if the best solution option has been submitted and verify the details
submitted. Input to the PET wil also be checked and verified to ensure a valid PPI.
The Area Capacity Planner makes his/her recommendation to the Capital Program
Leader. During the annual planning cycle (September - December) the Capital
Program Leader meets with each Field Service Engineer and Area Capacity
Planner to review each project in person. The Distribution Engineering Manager
Distribution Planning Manager and Strategic Planner may also attend.
Step 3 - Projects recommended by the Area Capacity Planner are reviewed by the
Capital Program Leader again. Details are reviewed , with particular focus on the
project description. The PPI score is examined as it compares to other projects
submitted. The project scope and cost are further reviewed.
Step 4 - Projects
$300k are sent to the Planning Manager for budget approval.
Projects C:$300k are
budget approved by the Capital Program Leader from highest
This is done both at a geographic
PPI to lowest PPI subject to budget constraints.
area " level and at a total program level. Projects with PPI below 10 are unlikely to
be funded regardless of budget constraints. Field Service Engineers are given an
opportunity to make a pitch for one project over another if PPI scores are close.
Step 5 - Engineering completes detailed design and estimate , and submits project
electronically through the estimating system to the Capital Program Leader for
approval. Capital Program Leader verifies the project has received budget
approval (in step 4) and that scope and cost have not strayed. If the project is
C:$300k the Capital Program Leader approves , and if
$300k the Capital Program
Leader sends to the Planning Manager, and recommends approval.
Project Evaluation Tool Program
(PET)
User Manual
Prepared by
Ψ Power Softech International Inc.
12296 Aurora Street
Maple Ridge, British Columbia
Canada, V2X 0R2
For
BC Hydro
Distribution Engineering & Planning
October 1999.
Ψ Power Softech International Inc.
Power Softech International Inc. does not warrant that the functions contained in the program described
herein will meet particular requirements, or that the operation of the program will be uninterrupted or error
free.
In no event will Power Softech International Inc. be liable for any damages, including but not limited to
loss of data, loss of profits, loss of savings, loss sustained by third parties or any other incidental or
consequential damages arising out of the use, or inability to use, the program even if Power Softech
International Inc. or its distributor have been advised of the possibility of such damages.
Power Softech International Inc. will also not be held responsible for any alterations or changes to the
program or associated documentation and the subsequent consequences due to those changes.
Contents
Introduction ________________________________________________
1
System Requirements ________________________________________
2
Installing the Program ________________________________________
3
Getting Started _____________________________________________
5
Program Interface ___________________________________________
6
General ________________________________________________
6
Cell Notes & Help Function ________________________________
11
Saving Evaluations _______________________________________
15
Program Shutdown ______________________________________
16
Data Entry Sheets ____________________________________________
20
General Information Data Entry Sheet _________________________
25
Equipment Overload Driver Data Entry Sheet ___________________
26
Reliability Driver Data Entry Sheet ___________________________
28
Power Quality Driver Data Entry Sheet _______________________
31
Overvoltage _______________________________________
31
Undervoltage ______________________________________
33
Voltage Flicker _____________________________________
35
Harmonics ________________________________________
37
Voltage Imbalance __________________________________
39
Safety Driver Data Entry Sheet ______________________________
41
Legal & Regulatory Driver Data Entry Sheet ____________________
43
Function Button Summary _________________________________
44
Database Summary __________________________________________
45
Sorting ________________________________________________
47
Printing ________________________________________________
48
Deleting or Changing a Project ______________________________
49
Adding a Project _________________________________________
51
Function Button Summary__________________________________
52
Summary of Steps for Entering a Project Evaluation _________________
53
Project Evaluation Tool User Manual
Introduction
•
This manual is intended to provide information on the use and application of the Project Evaluation
Tool (PET) program. Included is information on :
• the program installation procedure.
• the program interface.
• starting the program.
• program function routines.
• how to enter data for a project evaluation.
• how to access the data in the summary database.
• how to display and print results.
•
In an effort to include all related information in a particular section, some of the information may
appear more that once within the manual. Where this has not been practical, references to related or
pertinent sections are indicated.
____________________________________________________________________________
__
Project Evaluation Tool
User Manual
Page 1
System Requirements
•
The Project Evaluation Tool Program requires Microsoft Excel which is used to generate the
interface. Excel is used to direct program operation, control the display, perform printing operations
and calculations. To run the program, Microsoft Excel 5 or higher is required.
•
For the program installation, 1.0 MB of hard drive space is required. Additional hard drive space is
required if project evaluations are saved to the database.
•
System requirements (memory and CPU) are determined by the requirements for running the
operating system (i.e. Windows 95) and the version of Excel being used.
•
The program was designed for optimal viewing with a resolution of 800x600 or higher. Viewing at
lower resolution is permissible, however, portions of the input spreadsheet layouts may require using
the keyboard arrow or page down/up keys to access all parts of the sheets. When displaying the
database summary, the use of the arrow and page down/up keys will be required to view all database
information (or use the window scrolling bars).
____________________________________________________________________________
__
Project Evaluation Tool
User Manual
Page 2
Installing the Program
•
To run the PET program, the computer must have Microsoft Excel 5 or higher installed.
Installation Steps:
•
With Microsoft Windows running as the operating system, insert the program diskette in a drive (i.e.
“a” drive).
•
Select Start/Run (assumes Windows 95, 98 or Windows NT is the operating system.)
•
Type a:\install and select OK.
•
During the installation, the install procedure will examine the hard drive(s) of the PC on which it is
being installed to determine if there is a previous installation (the message “Checking system,
please wait …” is displayed). The procedure will detect if the program file PET.XLM is present
and determine the path for the file. If the file is detected, the procedure will display the path for the
existing installation and allow the files to be overwritten if desired (see Figure 1) . If the files are not
to be overwritten, an alternate path can be entered. For a specified alternate path, if the entered path
does not exist, the program will create the folder/directory before proceeding with the installation.
Figure 1
•
If a previous installation is not detected, the procedure will recommend a default path. If desired, an
alternate path can be entered instead of using the default. If the entered path does not exist, the
program will create the folder/directory before proceeding with the installation.
____________________________________________________________________________
__
Project Evaluation Tool
User Manual
Page 3
•
The procedure will also display the option for having a shortcut (for starting PET) placed on the
desktop as shown in Figure 2. When this option is displayed, select Yes to have the shortcut
installed.
Figure 2
•
When the installation procedure is complete, a Programs menu item called DEP Tools will have been
created containing a program submenu item labeled PET (Vx.x). Note that the version number
(Vx.x) is indicated in the label for the program submenu item. If you select this program submenu
item, the program will start. Alternatively, if the shortcut has been installed on the desktop, select
the shortcut to start the program.
Note : The program submenu item and shortcut are linked to the file PET.XLM which is associated
with the Excel program. If your Windows environment has been customized such that the
association between the Excel program and Excel files is broken, you must run the Project
Evaluation Tool from within Excel by opening the file PET.XLM (i.e. start Excel and then
use Excel’s File/Open menu command to open the file PET.XLM which will start the
program).
____________________________________________________________________________
__
Project Evaluation Tool
User Manual
Page 4
Getting Started
•
To start the program, select the program submenu item from the Programs Menu (select
Start/Programs/DEP Tools/PET) or use the desktop shortcut if it was installed. If your Windows
environment has been customized such that the association between the Excel program and Excel
files is broken, you must run the program from within Excel by opening the file PET.XLM.
•
When the program starts, an introductory screen will appear (and automatically close) followed by a
dialog boxes which requires the user to select the appropriate options (select by “clicking on” on the
desired button using the mouse) to proceed with the program operation. Note that the introductory
screen will also advise as to the version number of the program. For more information on the dialog
boxes displayed, refer to the section Program Interface & Operation.
Note
- If you are using Excel 97, the dialog box shown in Figure 3 may be displayed upon starting
the program (after the opening introductory screen). If this dialog box is displayed, you
must click on “Enable Macros” for the program to be initiated.
Figure
3
____________________________________________________________________________
__
Project Evaluation Tool
User Manual
Page 5
Program Interface & Operation
• General
•
The program uses dialog boxes for presenting information and user selectable options. Spreadsheet
layouts are used for entering data and presenting results. Within the spreadsheet layouts, function
buttons are available for selection to allow the user to perform specific operations necessary for
evaluating and saving a project, and printing the results.
•
When the program is started (see Getting Started for information on starting the program), a series
of Excel dialog boxes are used to present information and provide options to the user. After the
initial opening display showing the program title, version number, credits, etc., the dialog box shown
in Figure 4 will be displayed followed by the dialog box in Figure 5. The dialog box option in Figure
5, Review the project database., can be chosen if project evaluations have been previously entered
and saved to the database and the user desires to review these evaluations (i.e. for printing, changing,
etc.). Refer to the section Database Summary for more information if this option is selected.
Otherwise, the option Evaluate a “new” project., should be selected.
Figure
4
____________________________________________________________________________
__
Project Evaluation Tool
User Manual
Page 6
Figure
5
•
As shown in the preceding dialog boxes, Cancel buttons are provided for returning to the previous
menu or dialog box. Note that in selecting the Cancel button in the dialog box shown in Figure 4,
the program will be shutdown.
•
In Figure 5, if the option Evaluate a “new” project. is selected, the dialog box in Figure 6 will be
displayed. The dialog box lists the drivers that can be used in evaluating a project and explains that
the first information sheet to be displayed for entering data will be the General Information sheet.
____________________________________________________________________________
__
Project Evaluation Tool
User Manual
Page 7
Figure
6
____________________________________________________________________________
__
Project Evaluation Tool
User Manual
Page 8
•
Upon selecting the OK button in Figure 6, the General Information data entry layout will be
displayed as shown in Figure 7.
Scrolling Buttons
Sheet tabs
Horizontal Scrolling Bar
Vertical Scrolling Bar
Figure 7
•
The General Information sheet is one of six sheets available for entering data. Although there are a
total of seven sheets as shown on the sheet tab labels, the last sheet labeled Priority Statistics does
not require any data entry. This sheet provides statistics on the information entered into the other six
sheets. The General Information sheet should be completed first followed by the entering of data
into the other sheets as required. The other five sheets in which data can be entered, correspond to
____________________________________________________________________________
__
Project Evaluation Tool
User Manual
Page 9
the “drivers” which define system problem situations or conditions below the level of required
performance standards.
•
While data can be entered into more than one of the driver sheets (for multi-driven projects), it is
recommended to first enter data for the “driver” for which the deviation from the performance
standard is the greatest. This will provide a quick indication of the relative priority of the project.
The other “driver” sheets can be completed if necessary.
•
Each of the sheets can be individually accessed by either selecting the appropriate scrolling button or
by selecting the desired sheet tab at the bottom of the window. For more information on a particular
sheet, refer to the section titled Data Entry Sheets. For all of the sheets (including the database
summary), vertical and horizontal scrolling bars are available and can be used if required (see Figure
7).
•
In addition to the scrolling buttons, function buttons are available for performing specific operations.
The function buttons are available on all seven sheets. For more information about the buttons, refer
to the section titled Data Entry Sheets.
•
Data is entered into the sheets by selecting the appropriate option box displayed or by typing
information into the bordered cells (refer to Figure 8). In cases where more that one cell is hi-lighted
with a border, the leftmost cell is the position to select for entering data. Where two lines of a block
of cells are hi-lighted, the leftmost cell of the each line can be selected for entering of data.
____________________________________________________________________________
__
Project Evaluation Tool
User Manual
Page 10
Click on
the desired
option box.
Select one of the leftmost
cells for entering data.
Figure 8
____________________________________________________________________________
__
Project Evaluation Tool
User Manual
Page 11
•
If an attempt is made to enter data into a cell other than one that will accept data, an error message
will be displayed as shown in Figure 9.
Data entry attempted
in unauthorized cell.
Figure 9
____________________________________________________________________________
__
Project Evaluation Tool
User Manual
Page 12
• Cell Notes & Help Function
•
To assist in entering data, the program uses cell notes to provide information on data requirements.
Cells which contain notes are indicated by a small rectangle at the upper right hand corner of the
cells (as shown in Figure 10).
Cell Note Indicators
Figure 10
____________________________________________________________________________
__
Project Evaluation Tool
User Manual
Page 13
•
There are two ways of displaying a cell note :
Method 1 : Point to the cell and the cell note will pop-up on the sheet displaying the information (as
shown in Figure 11). In some cases, it may appear that the entire note is not visible. For
those cases, use Method 2 to display the cell note.
Point to the cell to
display the cell note
Figure 11
____________________________________________________________________________
__
Project Evaluation Tool
User Manual
Page 14
Method 2 : Select the cell and press the “Shift” and “F2” keys together (as shown in Figure 12).
After Selecting the cell, press the
“Shift” and “F2” keys together.
Figure 12
____________________________________________________________________________
__
Project Evaluation Tool
User Manual
Page 15
•
Help?
Help?
General program information is also available by using the
button. When the
button is selected, a dialog box (as shown in Figure 13) will be displayed showing a list of topics
which can be individually selected and displayed.
____________________________________________________________________________
__
Project Evaluation Tool
User Manual
Page 16
Figure 13
____________________________________________________________________________
__
Project Evaluation Tool
User Manual
Page 17
• Saving Evaluations
•
After all data has been entered, the evaluation can be saved to the database (for future review) by
selecting any one of the
•
Save
buttons in the data entry sheets.
During the process of saving the evaluation, the program will verify that the project ID for the
evaluation to be saved does not already exist in the database. The project ID must be unique. If an
entry in the database with the same project ID is detected, a dialog box (with options) will be
displayed as shown in Figure 14.
Figure 14
•
If a duplicate project ID is not detected, the project data will be saved in the database and a message,
as shown in Figure 15, will be displayed. Note that when an evaluation is saved to the database, the
record is permanent unless otherwise deleted using the database function buttons (i.e. the database
file is also saved when the evaluation is written to the database file).
____________________________________________________________________________
__
Project Evaluation Tool
User Manual
Page 18
Figure 15
• Program Shutdown
•
Quit
There are several ways of shutting down the program. One alternative is using the program
Quit
function button which is explicitly designed for shutting down the program. A
button is
available in each of the data entry sheets and in the database summary.
•
Quit
If the one of the
buttons in the data entry sheets is selected, the program will display a
dialog box (see Figure 16) warning about saving the current evaluation and providing an option to do
so before shutting down the program.
Figure 16
•
If the Save button is selected in Figure 16, the program will verify that the project ID for the
evaluation to be saved does not already exist in the database. If a duplicate does not exist, the
program will save the evaluation. After saving the evaluation information, the message shown in
Figure 15 will be displayed. When the OK button (for the dialog box shown in Figure 15) is
selected, the program will automatically proceed with shutting down the program.
____________________________________________________________________________
__
Project Evaluation Tool
User Manual
Page 19
•
An alternative for shutting down the program is to select (click on) the window exit button
in the
upper right hand corner of the window being displayed (as shown in Figure 17). Note that in Figure
17, there are two exit buttons; one for the Excel window and one for the program data entry sheet
window. Either button can be used to initiate shutdown. The exit button for the database summary
window can also be used to initiate shutdown.
Figure 17
____________________________________________________________________________
__
Project Evaluation Tool
User Manual
Page 20
•
If an exit button
is selected while a data entry sheet is being displayed, the program will display
the dialog box shown in Figure 18.
Figure 18
•
In the event that the evaluation data has not been saved, the Save button can be selected to save the
data before the program is shutdown. Note that if the Save button is selected, the program will verify
that the project ID for the evaluation to be saved does not already exist in the database. If a duplicate
does not exist, the program will save the evaluation, display a message advising of this (as per Figure
15) and then proceed with shutting down the program after the message has been cleared.
•
If the program detects that a duplicate project ID does exist, the program will display a message as
shown in Figure 19.
____________________________________________________________________________
__
Project Evaluation Tool
User Manual
Page 21
Figure 19
•
A unique project ID must be entered if the data is to be saved without overwriting an existing
database entry. In Figure 19, the second option will allow a new project ID to be entered directly so
the project evaluation can be saved. If this option is selected, the program will again verify if a
duplicate ID exists. If a duplicate does exist, the program will display a dialog box shown in Figure
20 (note that the overwrite option will not be available at this stage).
Figure 20
•
In the event that the first option in Figure 20 is selected but a project ID is not entered, the program
will display the dialog box shown in Figure 21.
____________________________________________________________________________
__
Project Evaluation Tool
User Manual
Page 22
Figure 21
____________________________________________________________________________
__
Project Evaluation Tool
User Manual
Page 23
Data Entry Sheets
•
For entering data to evaluate a project, six data entry sheets are available. Data entry will begin with
the General Information sheet as shown in Figure 22 (this sheet will be the first sheet displayed
when a new project is to be entered or when an existing project is to be reviewed or changed). The
other five data entry sheets correspond to the five project “drivers” which define system problem
situations or conditions below the level of desired performance standards. The “driver” data entry
sheets can be displayed by selecting the desired sheet tab or by selecting the appropriate scrolling
button (see Figure 22).
Scrolling Buttons
Sheet tabs
Horizontal Scrolling Bar
Vertical Scrolling Bar
Figure 22
____________________________________________________________________________
__
Project Evaluation Tool
User Manual
Page 20
____________________________________________________________________________
__
Project Evaluation Tool
User Manual
Page 21
•
As data is entered into each of the sheets, the program determines the associated costs and a value
will appear for the Project Priority Indicator (PPI). Note that the PPI will only appear after the
project cost and information for assessing a risk cost have been entered. The PPI will be displayed at
the bottom of each sheet. As more “driver” sheets are completed, the PPI value will change
accordingly.
•
In addition to the six data entry sheets, a seventh sheet labeled Priority Statistics is available for
display (as shown in Figure 23). The Priority Statistics sheet displays a summary of the calculated
costs used to produce the PPI values. Note that all benefits and cost entered and calculated are
annual costs expected for the forthcoming year.
Figure 23
____________________________________________________________________________
__
Project Evaluation Tool
User Manual
Page 22
•
Once all project data has been entered, the data and results can be saved to the database by selecting
Save
function button. The program will verify that the project ID does not already exist in
the
the database. The project ID must be unique. If an entry in the database with the same project ID is
detected, a dialog box (with options) will be displayed as shown in Figure 24.
Figure 24
•
If a duplicate project ID is not detected, the project data will be saved in the database and a message,
as shown in Figure 25, will be displayed. Note that when an evaluation is saved to the database, the
Delete/ Change
function button (i.e. the
record is permanent unless otherwise deleted using the database a Project
database file is also saved when the evaluation is written to the database file).
Figure 25
____________________________________________________________________________
__
Project Evaluation Tool
User Manual
Page 23
•
After completing the evaluation for a project (and, if necessary, saving the evaluation to the
Cle a r?
button should be selected.
database), if the data for another evaluation is to be entered, the
Cle a r?
button will clear all previously entered data and initialize all options to their default
The
values. Note that when the clear button is selected, a dialog box will be displayed (as shown in
Figure 26) requesting confirmation to proceed with the clearing operation.
Figure 26
____________________________________________________________________________
__
Project Evaluation Tool
User Manual
Page 24
•
Summary?
The summary database can be accessed at any time by selecting the
function button.
When the button is selected, a dialog box will be displayed (as shown in Figure 27) with an option
for saving the evaluation if necessary.
Figure 27
____________________________________________________________________________
__
Project Evaluation Tool
User Manual
Page 25
• General Information Data Entry Sheet
1
2
3
4
5
6
7
8
Figure 28
1
For the five categories listed, select the region where the project is located by clicking on
the appropriate box.
2
Clearly describe the project. Enter information about the project objective and scope such
that the project can be easily identified and recalled (if saved to the database).
3
The project ID can be any sequence of characters but the value must be unique.
4
Enter the appropriate cost centre for the project.
5
Enter the name or initials of the individual responsible for the project and the project
evaluation.
6
Enter the cost for the project in k$ (i.e. Entered Value = [Cost in Dollars]/[1000] ).
7
If the project is completed, enter a value for the total direct benefits that will be achieved
for the first year of service. Any benefit included must not be duplicated in any of the
other “driver” sheet.
Clearly identify and describe the type of benefits (two lines available for entry).
8
____________________________________________________________________________
__
Project Evaluation Tool
User Manual
Page 26
• Equipment Overload Driver Data Entry Sheet
1
2
3
4
5
6
Figure 29
1
Identify the type of equipment at risk of being overloaded by clicking on the appropriate
box. If the type of equipment is not listed, select Other and describe the equipment type
in the space provided.
2
Enter, in kVA, the “nameplate” or full load rating of the equipment identified in item 1.
3
Enter the equipment overload capability as a percentage of the “nameplate” rating. If the
equipment does not have overload capability, enter 100 (i.e. 100%). Note that the
equipment maximum loading capability is the product of the “nameplate” rating and the
percent overload capability.
4
Enter, in kVA, the equipment expected loading for the forthcoming year. The value should
be the forecast “normalized” value.
5
If the expected equipment load entered in item 4 is due to the occurrence of a system
contingency (i.e. cable failure, line outage, etc.), enter the probability of the contingency
____________________________________________________________________________
__
Project Evaluation Tool
User Manual
Page 27
occurring in the next year. The probability value must be expressed in perunit (i.e.
between 0 and 1). If a contingency is not involved, leave the cell blank (interpreted as
1.0) or enter 1.0.
6
If the project is deferred, enter the restoration costs (in k$) that may be incurred due to the
equipment overload or failure. Note that the cost must not be duplicated in any of the
other “driver” sheets.
____________________________________________________________________________
__
Project Evaluation Tool
User Manual
Page 28
• Reliability Driver Data Entry Sheet
1
2
3
4
5
6
7
Figure 30
The program provides the ability to extract SAIDI statistics on a substation basis which can
be used in calculating the reliability risk cost. By selecting the Substation button in
the data entry sheet, the program will display a list of regions (as shown in Figure 31) from
which the desired region can be selected. Note that the default is the previously selected
region in the General Information sheet.
1
____________________________________________________________________________
__
Project Evaluation Tool
User Manual
Page 29
Figure
31
After selecting the region, an alphabetical listing of the substations for the selected region will be
displayed (as per the example shown in Figure 32). If the number of substations is too
large to be displayed in one dialog box, Page Down and Page Up buttons are made
available to access all of the stations. When the substation is selected, the substation name
will be automatically placed in the space provided in the Reliability Driver data entry
sheet. Note that the substation name can be overwritten if desired.
____________________________________________________________________________
__
Project Evaluation Tool
User Manual
Page 30
Figure
32
2
When the substation is selected as per item 1, the program will place the SAIDI target for
the station in the space provided. The value is automatically extracted from a database file
installed with the program. Note that the target value can be overwritten if desired
3
The program will also enter a value, from the substation database, for the average value of
SAIDI for the station selected. This value is for the entire station and may not be the
appropriate value for the customers affected by the project since the project may affect
only a small portion of the customer connected to the station. The value should be
changed as required to reflect the impact on the customers affected.
4
With the project completed and in service, enter an expected value for SAIDI for the
customers affected. The value entered is compared to the value in item 3 in evaluating the
reliability risk cost. Note that if the value entered is less than the target value (item 2),
then the risk cost is based on the improvement to the target value. Improvement below the
target is not considered of any value.
5
Enter the number of customers affected by the project.
____________________________________________________________________________
__
Project Evaluation Tool
User Manual
Page 31
6
As an alternative or in addition to item 5, enter , in kVA, the load for the customers
affected. The load is used to determine an equivalent number of customers which is
compared to the actual number entered in item 5; the maximum of the two values is used
for the number of customers.
7
Indicate if essential or high priority customers are involved (i.e. hospital, critical medical
or process load, etc.). If at least one essential customer is involved, select Yes, otherwise
select No.
____________________________________________________________________________
__
Project Evaluation Tool
User Manual
Page 32
• Power Quality Driver Data Entry Sheet
•
There are five types of power quality that can be considered. When the type of power quality
problem is selected, the program will adjust the data entry parameters appropriately.
• Overvoltage
1
2
3
4
5
6
7
Figure 33
1
Identify the type of power quality problem by selecting the appropriate box. The program
will adjust the sheet layout accordingly to display the data required to evaluate the
problem.
2
For the type of power quality problem identified in item 1, the program will automatically
display a target or threshold value. The expected overvoltage value entered in item 3 is
compared to the target to verify if a problem exists and to evaluate the severity of the
problem which will be reflected in the calculated risk cost value. The expected value must
be greater than the target value for the program to generate a power quality risk cost. The
target value is based on CSA standard C235.
3
Enter the expected overvoltage value, in volts, on a 120 volt base, that the system or
____________________________________________________________________________
__
Project Evaluation Tool
User Manual
Page 33
customers will be subjected to (without the project completed).
4
Enter the number of days per year that the overvoltage occurs. Even if the overvoltage
occurs only briefly in a day, the day should be included.
5
Enter the number of customers affected by the overvoltage.
6
As an alternative or in addition to item 5, enter , in kVA, the load for the customers
affected. The load is used to determine an equivalent number of customers which is
compared to the actual number entered in item 5; the maximum of the two values is used
for the number of customers.
7
Not applicable to overvoltage power quality problems.
____________________________________________________________________________
__
Project Evaluation Tool
User Manual
Page 34
• Undervoltage
1
2
3
4
5
6
7
Figure 34
1
Identify the type of power quality problem by selecting the appropriate box. The program
will adjust the sheet layout accordingly to display the data required to evaluate the
problem.
2
For the type of power quality problem identified in item 1, the program will automatically
display a target or threshold value. The expected undervoltage value entered in item 3 is
compared to the target to verify if a problem exists and to evalute the severity of the
problem which will be reflected in the calculated risk cost value. The expected value must
be less than the target value for the program to generate a power quality risk cost. The
target value is based on CSA standard C235.
3
Enter the expected undervoltage value, in volts, on a 120 volt base, that the system or
customers will be subjected to (without the project completed).
4
Enter the number of days per year that the undervoltage occurs. Even if the undervoltage
occurs only briefly in a day, the day should be included.
5
Enter the number of customers affected by the undervoltage.
____________________________________________________________________________
__
Project Evaluation Tool
User Manual
Page 35
6
As an alternative or in addition to item 5, enter , in kVA, the load for the customers
affected. The load is used to determine an equivalent number of customers which is
compared to the actual number entered in item 5; the maximum of the two values is used
for the number of customers.
7
Not applicable to undervoltage power quality problems.
____________________________________________________________________________
__
Project Evaluation Tool
User Manual
Page 36
• Voltage Flicker
1
2
3
4
5
6
7
8
Figure 35
1
Identify the type of power quality problem by selecting the appropriate box. The program
will adjust the sheet layout accordingly to display the data required to evaluate the
problem.
2
For the type of power quality problem identified in item 1, the program will automatically
display a target or threshold value. The expected flicker value entered in item 3 is
compared to the target to verify if a problem exists and to evaluate the severity of the
problem which will be reflected in the calculated risk cost value. The expected value must
be greater than the target value for the program to generate a power quality risk cost. The
target value is based on the BCH flicker curve. Note that the target value may change as
items 6 and 8 are entered.
3
Enter the expected voltage flicker value, in percent, that the system or customers will be
subjected to (without the project completed).
4
Enter the number of days per year that flicker events occur. Even if flicker occurs only
once in a day, the day should be included.
5
Enter the number of customers affected by the voltage flicker.
____________________________________________________________________________
__
Project Evaluation Tool
User Manual
Page 37
6
Enter the number of flicker events that occur (on average) per day.
7
As an alternative or in addition to item 5, enter , in kVA, the load for the customers
affected. The load is used to determine an equivalent number of customers which is
compared to the actual number entered in item 5; the maximum of the two values is used
for the number of customers.
8
From the two options available, select the box which most suitably describes the type of
customers affected by the voltage flicker problem.
____________________________________________________________________________
__
Project Evaluation Tool
User Manual
Page 38
• Harmonics
1
2
3
4
5
6
7
Figure 36
1
Identify the type of power quality problem by selecting the appropriate box. The program
will adjust the sheet layout accordingly to display the data required to evaluate the
problem.
2
For the type of power quality problem identified in item 1, the program will automatically
display a target or threshold value. The expected Total Harmonic Distortion (THD) value
entered in item 3 is compared to the target to verify if a problem exists and to evaluate the
severity of the problem which will be reflected in the calculated risk cost value. The
expected value must be greater than the target value for the program to generate a power
quality risk cost. The target value is based on IEEE standard 519.
3
Enter the expected Total Harmonic Distortion (THD), in percent, that the system or
customers will be subjected to (without the project completed).
4
Enter the number of days per year that the harmonic problem occurs. Even if the problem
occurs only briefly in a day, the day should be included.
5
Enter the number of customers affected by the harmonics.
____________________________________________________________________________
__
Project Evaluation Tool
User Manual
Page 39
6
As an alternative or in addition to item 5, enter , in kVA, the load for the customers
affected. The load is used to determine an equivalent number of customers which is
compared to the actual number entered in item 5; the maximum of the two values is used
for the number of customers.
7
Not applicable to harmonic power quality problems.
____________________________________________________________________________
__
Project Evaluation Tool
User Manual
Page 40
• Voltage Imbalance
1
2
3
3
3
4
5
6
7
8
Figure 37
1
Identify the type of power quality problem by selecting the appropriate box. The program
will adjust the sheet layout accordingly to display the data required to evaluate the
problem.
2
For the type of power quality problem identified in item 1, the program will automatically
display a target or threshold value. The calculate voltage imbalance value shown in item 3
is compared to the target to verify if a problem exists and to evaluate the severity of the
problem which will be reflected in the calculated risk cost value. The expected value must
be greater than the target value for the program to generate a power quality risk cost.
3
Enter the expected phase to ground voltages (Va, Vb, and Vc), in volts, that the system or
customers will be subjected to (without the project completed).
4
Based on the values entered in item 3, the program will calculate and display the resultant
voltage imbalance in percent.
5
Enter the number of days per year that voltage imbalance occur. Even if the imbalance
occurs only briefly in a day, the day should be included.
____________________________________________________________________________
__
Project Evaluation Tool
User Manual
Page 41
6
Enter the number of customers affected by the voltage imbalance.
7
As an alternative or in addition to item 5, enter , in kVA, the load for the customers
affected. The load is used to determine an equivalent number of customers which is
compared to the actual number entered in item 5; the maximum of the two values is used
for the number of customers.
8
Not applicable to voltage imbalance power quality problems.
____________________________________________________________________________
__
Project Evaluation Tool
User Manual
Page 42
• Safety Driver Data Entry Sheet
•
The safety “driver” data entry sheet is intended for situations involving equipment conditions or
failures that pose a safety hazard.
1
2
Figure 38
1
Select the box with the label that suitably describes the probability of the equipment failing
(and posing a safety hazard) during the next year. The probability value associated with
the label can be displayed as shown in Figure 39.
2
Select the type of area which suitably describes where the equipment failure would occur.
____________________________________________________________________________
__
Project Evaluation Tool
User Manual
Page 41
Click on the description to
display the probability.
Figure 39
____________________________________________________________________________
__
Project Evaluation Tool
User Manual
Page 42
• Legal & Regulatory Driver Data Entry Sheet
•
The legal & regulatory data entry sheet is intended for situations involving trespass, relocation
requests, etc.
1
2
3
Figure 40
1
Clearly describe the possible consequences or “hazard” that may occur if the project is not
completed.
2
Enter, in k$, the cost that will be incurred as a result of the consequences occurring as
identified in item 1.
3
Select the box with the label that suitably describes the probability of the “hazard”
occurring in the next year. The probability value associated with the label can be displayed
as shown in Figure 39.
____________________________________________________________________________
__
Project Evaluation Tool
User Manual
Page 43
• Function Button Summary
Help?
To execute the help routine which displays general information on project drivers,
parameters and formulae utilized in the program.
Print
To print the information/driver sheet currently displayed.
Quit
To quit the program. The program will provide an opportunity to save the project
data displayed before initiating program shutdown*.
Save
To save the project data displayed (in the database summary)*.
Summary?
Clear?
To display the database summary. The program will provide an opportunity to
save the project data displayed before leaving the information/data entry sheets*.
To clear the contents of all information/data entry sheets (for entering data
another evaluation). The program will provide an opportunity to save the project
data displayed before clearing the sheets*.
* In saving the project data, the program will determine if a duplicate project ID exists in the database.
If a duplicate ID exists, the program will display a message and provide options (i.e. for overwriting
the database entry or changing the ID). The programwill not permit duplicate ID entries.
The project ID must be unique.
____________________________________________________________________________
__
Project Evaluation Tool
User Manual
Page 44
Database Summary
•
The database contains the data entered and calculated results for any project evaluations that are
saved (using the
•
Save
function button).
The information in the database is stored in blocks based on the data entry sheets as shown in Figure
41. Each line of data represents a project evaluation.
General
Information
Equipment
Overload
Driver Data
Reliability
Driver Data
Power
Quality
Driver Data
Safety
Driver Data
Legal &
Regulatory
Driver Data
Priority
Statistics
Figure 41
•
Vertical and horizontal scrolling bars are available for accessing the blocks of data. (see Figure 42).
Figure 42
Horizontal Scrolling Bar
____________________________________________________________________________
Vertical Scrolling Bar
__
Project Evaluation Tool
User Manual
Page 45
•
When scrolling vertically, the column titles are frozen or locked so that they always remain
displayed.
•
When scrolling horizontally, a portion of the General Information (Region, Project ID, Project
Description, Cost Centre, Engineer/Planner and Project Cost) is frozen or locked so that it is always
displayed.
____________________________________________________________________________
__
Project Evaluation Tool
User Manual
Page 46
• Sorting
•
Sort
The database records can be sorted using the Data function button. When the button is selected,
a dialog box will be displayed with sorting options that can be selected, as shown in Figure 43.
Figure 43
____________________________________________________________________________
__
Project Evaluation Tool
User Manual
Page 47
• Printing
•
Print
By selecting the Summary function button, the information in the database can be printed. When the
button is selected, a dialog box will be displayed with options that can be selected (see Figure 44).
Figure 44
____________________________________________________________________________
__
Project Evaluation Tool
User Manual
Page 48
• Deleting or Changing a Project
•
Delete/ Change
a Project
A project within the database can be deleted or changed using the
function button.
First select a cell within the row of the project to be deleted or changed and then select the function
button (as shown in Figure 45).
Select a cell in the row of
the project and click on the
“Delete/Change a Project” button.
Figure 45
____________________________________________________________________________
__
Project Evaluation Tool
User Manual
Page 49
•
Save
Note that if any projects are deleted, for the deletion to be permanent the Summary function button
must be selected. Otherwise the project will not be deleted and the next time the database is
accessed, the project will still be present. This does not apply using the change option. When the
change option is selected, the project information is displayed in the Data Entry sheets. If changes
Save
are made to the data, the changes must be saved using the data entry sheet
button (with
the overwrite option selected from the dialog box that will be displayed). The changes will be
permanent in the database.
____________________________________________________________________________
__
Project Evaluation Tool
User Manual
Page 50
• Adding a Project
•
Add a
When viewing the database, a project evaluation can be added by selecting the Project function
button. When the button is selected, the program will display the Data Entry sheets (the General
Information sheet will be initially displayed) for entering an evaluation. The evaluation can be saved
to the database by using the
Save
button in the Data Entry sheets.
____________________________________________________________________________
__
Project Evaluation Tool
User Manual
Page 51
• Function Button Summary
Sort
Data
Print
Summary
Delete/ Change
a Project
Save
Summary
Add a
Project
Quit
To sort the database summary records. Options are provided for sorting the
records (i.e. selection of sorting key and sorting order).
To print the database summary.
To delete or change a project evaluation. Select a cell in the row of the project
desired and click on this function button. The option for deleting or changing the
project evaluation will be displayed.
To save any changes (i.e. sorting or deleting of records) made to the
database summary.
To create (and add) a new project evaluation. The information/data entry sheets
will be displayed for creating a new evaluation. After entering the required data,
the evaluation can be added to the database summary by using the Save button
in the information/data entry sheets.
To quit the program.
____________________________________________________________________________
__
Project Evaluation Tool
User Manual
Page 52
Summary of Steps for Entering a Project Evaluation
1. Start the PET program by selecting the Programs menu item DEP Tools/PET (Vx.x) or by selecting
the desktop shortcut labeled PET (Vx.x).
2. In the second dialog box displayed, select the option Evaluate a “new” project.
3. Begin entering project data in the General Information data entry sheet.
4. Enter data into other data entry “driver” sheets as required.
5. Once all data entry is complete, print the data entry sheets or the Priority Statistics if desired by
using the
Print
function button .
6. Save the evaluation to the database by selecting the
entry sheets.
Save
function button in one of the data
7. To enter another evaluation, select the Cle a r? function button to clear the data entry sheets and
then enter data into the sheets, print and save the data, etc.
8. To view the data in the database, select the
9. With the database displayed, select the
Print
Summary
10. Use the
11. Use the
Summary?
Sort
Data
function button to go to the database.
function button to sort the database entries and the
function button to print the contents of the database.
Delete/ Change
a Project
Add a
Project
function button to delete an evaluation or to change the values in an evaluation.
function button to prepare another evaluation which can then be saved to the
database using the data entry
Save
12. Shutdown the program by selecting the
function button.
Quit
function button.
____________________________________________________________________________
__
Project Evaluation Tool
User Manual
Page 53