1
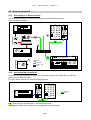
MS-4 – User’s manual © - Revision 1.4 MS-4 - User’s manual This symbol is intended to alert the user of important operating and maintenance (servicing) instructions in the literature provided with the equipment. This symbol is intended to alert the user of the presence of uninsulated dangerous voltage within the product’s enclosure that may present a risk of electric shock. 1 Caution Read Instruction: Read and understand all of the safety and operating instructions before using this equipment. Retain Instructions: The safety instructions should be kept for future reference. Follow Warnings: Follow all warnings and instructions marked on the equipment or in the user manual. Avoid Attachments: Do not use tools or attachments that are not recommended by Alyseum because they may be hazardous. ● ● ● Installation: Choose the installation location of your unit carefully. Avoid placing it in direct sunlight or close to a source of heat. Also avoid locations subject to vibrations and excessive dust, heat, cold or moisture. Power Source: This equipment should only be operated from the power source indicated on the product. Servicing: Refer all servicing to qualified service personnel. There are no user-serviceable parts inside. WARNING: TO PREVENT FIRE OR ELECTRIC SHOCK HAZARD, DO NOT EXPOSE THIS APPLIANCE TO RAIN OR MOISTURE. Page 1 MS-4 – User’s manual © - Revision 1.4 2 Contents 1 2 3 4 5 6 7 Caution............................................................................................................................................ 1 Contents.......................................................................................................................................... 2 What’s the MS-4 ? .......................................................................................................................... 3 3.1 Features ................................................................................................................................. 3 3.2 Specifications ......................................................................................................................... 3 Hardware......................................................................................................................................... 4 4.1 Package content..................................................................................................................... 4 4.2 Accessories ............................................................................................................................ 4 4.3 Installing the MS-4 into the A-100 rack .................................................................................. 4 4.4 Front panel description........................................................................................................... 5 4.5 Network installation ................................................................................................................ 6 4.5.1 Connecting to an Ethernet switch ...................................................................................... 6 4.5.2 Connecting MS-4 and MS-812 .......................................................................................... 6 Software MS-4 ................................................................................................................................ 7 5.1 CopperLan Manager .............................................................................................................. 7 5.1.1 Merging MIDI function........................................................................................................ 7 5.1.2 Establish MIDI connections................................................................................................ 7 5.2 Front panel functions.............................................................................................................. 7 5.2.1 CONTEXT MENUS............................................................................................................ 7 5.2.2 PRESETS : ........................................................................................................................ 8 5.2.3 MIDI CH. : .......................................................................................................................... 8 5.2.4 MODULE :.......................................................................................................................... 9 5.2.5 SECTION : ......................................................................................................................... 9 5.2.6 VOICING: ........................................................................................................................... 9 5.2.7 PORTAMENTO:............................................................................................................... 10 5.2.8 CUSTOM A & B: .............................................................................................................. 10 5.3 Browse/Assign CUSTOM A & B :......................................................................................... 11 5.4 Settings CV Inputs................................................................................................................ 12 5.5 Browse/Assign CV Inputs..................................................................................................... 13 5.6 Firmware Upgrade software................................................................................................. 13 About............................................................................................................................................. 14 6.1 Ethernet................................................................................................................................ 14 6.1.1 Note about Wi-Fi use ....................................................................................................... 14 6.1.2 Tips for a efficient Ethernet Network................................................................................ 14 6.2 CopperLan............................................................................................................................ 14 Miscellaneous ............................................................................................................................... 15 7.1 Disclaimer............................................................................................................................. 15 7.2 Maintenance......................................................................................................................... 15 7.3 Static Electricity, ESD........................................................................................................... 15 7.3.1 Standard symbols for ESD advertising ............................................................................ 15 7.3.2 Some tips and precautions for ESD sensitive environment............................................. 15 7.4 How to wire an Ethernet cable? ........................................................................................... 16 7.5 How to wiring a MIDI cable ? ............................................................................................... 16 7.6 Statement and Agency Compliance..................................................................................... 17 7.6.1 WEEE (for EU countries) ................................................................................................ 17 7.6.2 RoHS Compliance (for EU countries) ............................................................................. 17 7.6.3 CE (for EU countries)...................................................................................................... 17 7.7 Warranty and repair.............................................................................................................. 17 7.8 MIDI Chart ............................................................................................................................ 18 Page 2 MS-4 – User’s manual © - Revision 1.4 3 What’s the MS-4 ? The Alyseum MS-4 is the ideal companion product for one or several MS-812 or any other products stamped CopperLan. A MIDI input brings versatility for stage or computer-less setups. Several MS-4 can work together in the same set up. Direct control knobs give access to live settings while CV inputs allow dynamic modulation of parameters. 3.1 ● ● ● ● ● ● ● ● ● ● ● 3.2 Features Controls up to 9 MS-812 (automatically detected) 32 presets storage in flash memory. 1 general preset for the MIDI and CopperLan connections. Preset recall is possible via MIDI. Each of the 16 incoming MIDI channels can be directed to any mono, poly or drum section in any MS-812. In each target section, the MIDI and the network data are merged automatically. The MIDI clock can be sent to one or more MS-812. Direct access to monitor and edit the MS-812's voicing mode, portamento duration, and two freely defined parameters. Four CV inputs can be sent to any MS-812 parameter to be modulated in real time (e.g. portamento time, comparator, ...). Advanced routing and editing is possible via the CopperLan Manager freeware application. Knobs and CV can be sent to any CopperLan or MIDI (CC) destination. Specifications ● ● ● ● Front Panel width: 50.8 mm (10HP) Module Depth: 30 mm max Inputs Jacks: 3.5 mm - ring/tip CV Input Level: o 3 or 8 Volts o Unipolar or bipolar ● Power requirements: o +12 Volts, regulated @ 90 mA o -12 Volts, regulated @ 2 mA Page 3 MS-4 – User’s manual © - Revision 1.4 4 Hardware 4.1 Package content ● ● 1 MS-4 module with Eurorack compliant front panel and power supply connector 1 plastic bag containing: o 1 x 10/16-pins flat cable for Eurorack compliant power connector o 4 x M3 screws o 4 x M3 nylon washers ● Warranty & user’s manual access card 4.2 Accessories http://www.alyseum.com/accessories 4.3 Installing the MS-4 into the A-100 rack To install MS-4 yourself, pay attention to the following notes: ● First of all, take the A-100 rack's mains plug out of the wall socket ! ● Never using power supply delivery more as +12/-12Volts. ● Using the flat cable supplied with your MS-4. ● Check very carefully that the red wire of the flat cable is connected to the minus 12Volts on the MS-4 and on the A-100 bus board (both sides). ● Failure to check this may result in the module’s instant destruction as soon as the power is turned back on! ● The module has to be connected only to an A-100 bus board that is powered by a specified A-100 power supply. ● For damaged modules that have been connected obviously in the wrong way to the bus board the warranty is void ! ● Place the module carefully into the space in the rack, and fasten it firmly in place with the supplied screws and nylon washers. Put back any covers or blanking plates, and screw them in firmly. ● Now plug the system A-100 back into the main power supply, and switch it on. ● Test out the newly installed MS-4. ● If it doesn’t seem to be working as expected, immediately disconnect the system from the power supply again. In this case, double-check the connections, making completely sure that the ribbon cable is the right way round where it connects to the module and the bus. Page 4 MS-4 – User’s manual © - Revision 1.4 4.4 Front panel description MS-4 Yellow LED – Link/Activity on the Ethernet network 1. 11 Ethernet LK/ACT Mode LED Pattern No connection OFF LINK established ON Network activity ON with OFF pulses 10 PRESET 9 MIDI CH. MODULE SECTION VOICING PORTA. CUST. A CUST. B Green LED – CopperLan activity with the unit 2. CP activity Mode LED Pattern Firmware Upgrade ready Slow blinking Firmware Upgrade activity Fast blinking 8 88 MONO POLY DRUM 7 12 8 SEL./STO. EDIT/VAL. CP establishing connection OFF with ON pulses CP Activity ON with OFF pulses CV 1 CV 2 CV 3 CV 4 RJ45 – Ethernet connector – 100Base-T MIDI IN LK/ACT. MIDI In – DIN5 1 2 Green LED - Flashing with MIDI In activity Jack 3,5 mm – 4 x CV In 3 SELECT/STORE Encoder 100 Base-T EDIT/VALUE Encoder Green LED - Mode selected Green LED - Preset Alyseum Green single 7 segments numeric display + Green LED - SECTION Value display 12. Green dual 7 segments numeric display – Preset or MIDI CH. or MODULE or PORTAMENTO Value display 3. 4. 5. 6. 7. 8. 9. 10. 11. 6 5 4 N.B. To change the values of PORTAMENTO, CUSTOM A & B, the encoder EDIT/VALUE offers an automatic acceleration algorithm. ● Turn slowly the encoder EDIT/VALUE, to change the value in high resolution (small steps). ● Turn normally the encoder EDIT/VALUE, to change the value in medium resolution (average steps). ● Turn quickly the encoder EDIT/VALUE, to change the value in low resolution (big steps). Page 5 MS-4 – User’s manual © - Revision 1.4 4.5 4.5.1 Network installation Connecting to an Ethernet switch Connecting more than 2 devices to the network requires an Ethernet switch. Here is a typical example: MS-812 MS-4 8 88 Alyseum Alyseum Switch + WI-FI CP-MIDI8 AL-88 Wi-Fi iPad 4.5.2 Ethernet USB or 1394 MIDI Connecting MS-4 and MS-812 If you don't use any computer on stage, you can simply connect one MS-4 and one MS-812 directly with an Ethernet cable. For more than 2 devices you need an Ethernet switch. MS-4 MS-812 8 88 Ethernet MIDI Alyseum Alyseum N.B. Note that you can disconnect / reconnect at any time. Alyseum machines on the network are automatically resynchronized! Page 6 MS-4 – User’s manual © - Revision 1.4 5 Software MS-4 5.1 CopperLan Manager The CopperLan Manager is part of the CopperLan Package available cost free from the CopperLan website http://www.copperlan.org This application software provides 4 different tabs for the management of a CopperLan network: 1. An Overview tab, displaying all machines and their current connections. 2. A Connect tab, to add/remove connections between device’s outputs and inputs. 3. An Edit tab, providing a universal way to edit parameters. 4. A Snapshot tab, to store network configuration and settings. Remember to save your settings after being done with editing. 5.1.1 Merging MIDI function Connecting two or more sources to the same destination, realizes a merging function. Beware that MIDI does not allow merging every type of message at any time. Merging two sysex messages may lead to unpredictable results. More information on our application note: http://www.alyseum.com/download. 5.1.2 Establish MIDI connections It is possible to connect any source to any destination, as a whole virtual cable or according to message type. To connect a whole virtual cable, select the appropriate source device and click on the MIDI connector icon. You complete the operation by selecting a destination. All messages appearing at the source will be transferred to the destination without any filtering or remapping. Instead of connecting a whole cable content, it is allowed to connect individually one or more message types according to the following split: 1. Note and Controller messages on a channel basis – these are channel messages Any of the 16 MIDI channels content can be linked separately 2. Clock messages (incl. clock control and song position messages) Any clock from any source can be connected to any destination. Note that MIDI destinations can only accept a single clock whereas CopperLan destinations can accept many. 3. Other messages (Sys) This selection covers all messages to the exception of messages in categories 1 and 2 here above. This linking is essentially used for SYS EX and MTC messages. It is meaningful to only connect sources and destinations of adequate messages type (e.g. Sys to Sys). However, it is allowed to connect any source channel to any destination channel, effectively realizing a channel remapping. More information on our application note: http://www.alyseum.com/downloads 5.2 5.2.1 Front panel functions. CONTEXT MENUS Menus of the MS-4 are organized in downward priority. That is to say, first selects a source that is the MIDI CH and a destination in the order of MODULE / SECTION / VOICING or PORTAMENTO. Page 7 MS-4 – User’s manual © - Revision 1.4 5.2.2 PRESETS : Remember to save your settings after being done with editing. Up to 32 Presets can be saved in the unit’s Flash memory. Each Preset stores the values for: MIDI CH, MODULE, SECTION, VOICING, PORTAMENTO, CUSTOM A, CUSTOM B and CV Input 1, 2, 3 & 4 Settings and ASSIGN, during the procedure “save a preset”. Each of the 32 presets, also stores the settings of the CV inputs currently edited during the save procedure. RECALL A PRESET ● Turn the SELECT/STORE encoder and select the PRESET mode LED. ● Turn the EDIT/VALUE encoder to select a preset. ● Push the EDIT/VALUE encoder to recall the preset. ● The memory can be recalled via the MIDI Program change comprised between 1 and 32. N.B. 1. Preset recall is possible via MIDI or via CopperLan. 2. A flashing Preset number indicates that the preset selected is currently not active. It stops flashing once recalled. SAVE A PRESET ● Select as above, but push the SELECT/STORE encoder to save the preset. ● The PRESET LED mode blinks twice to confirm the operation CONNECTIONS PRESET A single global storage memorizes all MIDI and CopperLan connections from/to the MS-4. This is done automatically during each SAVE A PRESET operation and overwrites the previous connection settings. If needed, you can create unlimited connection snapshots with the CopperLan Manager (SNAPSHOT Tab) Using ALL MIDI CH, all channels are assigned to a single target. 5.2.3 ● ● MIDI CH. : Turn the SELECT/STORE encoder and select the MIDI CH. Mode LED. Turn the EDIT/VALUE encoder to select a MIDI Channel from 1 to 16, or ALL, arriving on the MIDI In port. Push the EDIT/VALUE encoder to confirm your choice. ● N.B. 1. Only MIDI channel 1 to 16 and Clock stream can be linked to MS-812 (SYS message is not handled). 2. Through the network, the physical MIDI Input of the MS-4 can be dispatched to multiple MS812, computers or CopperLan compliant devices. 3. Advanced MIDI connections are managed via the CopperLan Manager. Page 8 MS-4 – User’s manual © - Revision 1.4 5.2.4 MODULE : When using a single MS-812, it is automatically selected as the default target for the MS-4. You can skip this chapter. For a set of several MS-812 (maximum 9 modules) the network detection is also automatic, but you need to select which MS-812 you want to control via the MS-4. To select an MS-812: ● Turn the SELECT/STORE encoder and select the MODULE mode LED. ● Turn the EDIT/VALUE encoder to select which MS-812 (1 to 9) you want to edit. ● Press the EDIT/VALUE encoder to confirm your selection. N.B. 1. The MS-812 currently linked to the MS-4, will reverse its Blue LED NOTE indicator, with OFF pulses when playing. 2. Display of missing modules has their number preceded by a minus sign. 5.2.5 ● ● SECTION : Turn the SELECT/STORE encoder to select the SECTION mode LED. Turn the EDIT/VALUE encoder to select: o MONO 1 to 7 o POLY o DRUM Press the EDIT/VALUE encoder to confirm your choice. 8 MONO POLY DRUM ● N.B. The Section Display is only available while in SECTION, VOICING and PORTAMENTO modes 5.2.6 VOICING: This mode gives you direct access to the Voicing mode of the MS-812. ● Turn the SELECT/STORE encoder to select the VOICING mode LED. ● Turn the EDIT/VALUE encoder to select the voicing setting: o LA= LAst note o HI= HIghest note o LO= LOwest note o ST= STrongest note ● Press the EDIT/VALUE encoder to confirm your choice. N.B. You can also visualize the Voicing mode via the CopperLan Manager: TAB Edit / MS-812 / PERFORMANCE / SECTION / PITCH CONTROL. Page 9 MS-4 – User’s manual © - Revision 1.4 5.2.7 PORTAMENTO: This mode gives you direct access to the Portamento setting of the MS-812. First select the section you will edit (MONO 1 to 7, or POLY). ● Turn the SELECT/STORE encoder to select the PORTA LED. ● Turn the EDIT/VALUE encoder to adjust the Portamento value N.B. 1. The current Portamento setting is displayed as a crown, as shown below. 2. You can activate / deactivate the portamento by pressing the EDIT/VALUE encoder. 3. You can also visualize the Portamento value in real time via the CopperLan Manager: TAB Edit / MS-812 / PERFORMANCE / SECTION / PITCH CONTROL 5.2.8 CUSTOM A & B: This mode gives you direct access the CUSTOM A & B adjustments of the MS-812. ● Turn the SELECT/STORE encoder to select the CUSTOM A or B LED. ● Turn the EDIT/VALUE encoder to adjust the value N.B. 4. The value is displayed as a crown as shown below. 5. You can activate / deactivate the CUSTOM A/B value by pressing the EDIT/VALUE encoder. Page 10 MS-4 – User’s manual © - Revision 1.4 5.3 Browse/Assign CUSTOM A & B : CUSTOM A & CUSTOM B are assignable only via the CopperLan Manager (CONNECT Tab). For CUSTOM A and CUSTOM B, you can freely assign a controller to a single CopperLan target. This kind of output is hosting one or more controllers which can be assigned to a remote parameter. Select: MS-4/CONNECT Tab. BROWSE allows you to navigate the network to point to the target parameter. ASSIGN allows the outbreak of a Learning mode to be validated when a parameter is changed on the network, either via a GUI plug-in CopperLan, either via a button on the front of a target which displays parameters, either by modifying a parameter of MS-812 via the tab "EDIT" of the CopperLan Manager ... The idea is that the parameter that is modified gets automatically assigned to the controller currently in Assign mode. Page 11 MS-4 – User’s manual © - Revision 1.4 5.4 Settings CV Inputs Five settings for each CV Input are done only via the CopperLan Manager (EDIT Tab) Each of the 32 presets on the MS-4, stores the settings CV inputs currently edited during the “save a preset” procedure. Select: MS-4/EDIT Tab. Setting Description Value Monitor 0 to 100% Offset -100% to + 100% Gain -200% to + 200% Update rate Voltage range Mode Enable intelligent adaptation depending on the flow of the network and your choice of resolution Hi to Lo Low voltage span 3 volts max High voltage span 8 volts max Unipolar source 0 volts to +Vmax input Bipolar source - Vmax input to + Vmax input Page 12 MS-4 – User’s manual © - Revision 1.4 5.5 Browse/Assign CV Inputs CV1 to CV4 are assignable only via the CopperLan Manager. For each CV Input, you can assign a single controller to any CopperLan target. This kind of output is hosting one or more controllers which can be assigned to a remote parameter. Select: MS-4/CONNECT Tab. BROWSE allows you to navigate the network to point to the target parameter. ASSIGN allows the outbreak of a Learning mode to be validated when a parameter is changed on the network, either via a GUI plug-in CopperLan, either via a button on the front of a target which displays parameters, either by modifying a parameter of MS-812 via the tab "EDIT" of the CopperLan Manager ... The idea is that the parameter that is modified is automatically assigned to the controller currently in Assign mode. 5.6 Firmware Upgrade software Upgrading the firmware is done via the network. This is done automatically through the CopperLan Manager via the Ethernet connection. Page 13 MS-4 – User’s manual © - Revision 1.4 6 About 6.1 Ethernet Alyseum products rely on Ethernet to transport data; compared to other solutions (USB, IEEE1394, ...) Ethernet offers many advantages: ● Available on all computer platforms ● No real limit in cable length and node connections. ● Full Duplex. ● Very high bandwidth. ● Very low Latency. ● Frees the computer of the MIDI flow handling of USB/Firewire interfaces ● Embedded devices can work without any computer in the network ● Peer to peer capability. ● Full galvanic isolation between machines, preventing audio hum due to ground loops. ● Low-cost, ubiquitous and reliable infrastructure. 6.1.1 Note about Wi-Fi use Using these products via Wi-Fi is possible but not guaranteed. Wireless transmissions are subject to perturbations that require data resending which implies unavoidable delays which are inconvenient for real-time musical purposes. This is why Alyseum only guarantees good performance when using wired network. 6.1.2 Tips for a efficient Ethernet Network The performance of an Ethernet network is always related to the weakest link. ● Use the WI-FI only for the web, Email, ... and the wired network of your computer for the CopperLan and audio streaming ● For large installations, use an additional network card in your computer to create a network dedicated only for CopperLan and audio streaming ● For large installations, preferably use Gigabit Ethernet switches to guarantee a better data exchange ● Avoid Ethernet HUB as these create collisions in messages that could hamper the overall network performance 6.2 CopperLan CopperLan offers many advantages: ● Connectivity guaranteed with any hardware/software supporting CopperLan. ● No IP and DHCP configuration, thanks to an address abstraction layer. ● Protocol and networking system for command & control + streaming management. ● Self-configuring and Plug & Play. ● Universal remote editing with labels, dedicated data types and high resolution. ● Decentralized work distribution and storage – every CopperLan equipment incorporates its own server. CopperLan manages MIDI in a more powerful and flexible than any other technology available. The benefit of having its own dedicated protocol surpasses the afterthought solutions relying on TCP/UDP-IP in terms user-friendliness. Page 14 MS-4 – User’s manual © - Revision 1.4 7 Miscellaneous 7.1 Disclaimer All rights reserved. Reproduction in whole or part of this document is prohibited without the express permission of Alyseum. © 2011-2015 Alyseum The information and specifications described in this manual are subject to change without prior notice Other products or brand names mentioned herein are trademarks or registered trademarks of their respective holders. 7.2 Maintenance Switch Off the power before maintenance. Do not attempt to clean the unit with chemical solvents (thinner, benzene or alcohol) as this might damage the finish. Use only a clean, dry cloth. 7.3 Static Electricity, ESD Electrostatic discharge (ESD) can cause malfunction and/or damage to electronic devices if discharged into the device. Despite Alyseum products having built-in protections against ESD, voltages might build up at levels that could harm your equipment. 7.3.1 Standard symbols for ESD advertising 7.3.2 Some tips and precautions for ESD sensitive environment ● ● ● ● ● ● ● Make sure to discharge any built-up static electricity from yourself and your device before touching or connecting one device to another Ground yourself by touching a earth grounded metal surface before handling your device and other equipments. For fixed installations, place the device in a grounded metallic rack. Ensure air relative humidity at minimum 60%. Install ESD specific prevention items, such as grounding mats. Reduce movement speed when handling or (dis)connecting devices Avoid carpet or other synthetic flooring. Page 15 MS-4 – User’s manual © - Revision 1.4 7.4 How to wire an Ethernet cable? If you want to build your own Ethernet cable, use CAT5 cable, RJ45 connectors and a crimping clamp. The maximum length for a single cable is 100 meters 7.5 Pin Function 1 TX+ 2 TX- 3 RX- 6 RX+ 1 8 How to wiring a MIDI cable ? Pin Function 2 Ground 4 Data + 5 Data - 3 1 4 5 2 Page 16 MS-4 – User’s manual © - Revision 1.4 7.6 7.6.1 Statement and Agency Compliance WEEE (for EU countries) Waste Electrical and Electronic Equipment (Directive 2002/96/EC) (Applicable for E.U. Customers or others countries with separate collection systems) 1. This marking shown on the product or its literature, indicates that it should not be disposed with other household wastes at the end of its working life. 2. To prevent possible harm to the environment or human health from uncontrolled waste disposal, please separate this from other types of wastes and recycle it responsibly to promote the sustainable reuse of material resources. 3. Household users should contact either the retailer where they purchased this product, or their local government office, for details of where and how they can take this item for environmentally safe recycling. 7.6.2 RoHS Compliance (for EU countries) Alyseum products comply with the European Union restriction of the use of certain hazardous substances in electronics equipment, (RoHS directive 2002/95/EC) The RoHS directive prohibits the sale of certain electronic equipment containing some hazardous substances such as Mercury, Lead, Cadmium, Hexavalent chromium and certain Flame-retardants (PBB & PBDE) in the European Union. http://eur-lex.europa.eu/LexUriServ/LexUriServ.do?uri=CELEX:32002L0095:EN:HTML 7.6.3 CE (for EU countries) Alyseum products comply with the requirements of European Directive 89/336/EC. 7.7 Warranty and repair Alyseum warrants to you, the original purchaser, that each of its products will be free from defects in materials and workmanship for a period of two years from the date of purchase. This warranty does not apply to any products which have been repaired or altered by other than repair personnel authorized by Alyseum, or which have been subject to ESD, moisture, abuse, accident or improper installation and use. Alyseum assumes no liability as a consequence of such events under the terms of this Warranty. Please consult your dealer for more details. Page 17 MS-4 – User’s manual © - Revision 1.4 7.8 MIDI Chart MS-4 MIDI IMPLEMENTATION CHART ver.1.0. Function 2013-08-07 Transmitted Recognized Remarks Default -- 1-16 Changed -- -- via network mapping Default -- -- not applicable Messages O O Altered -- -- 0-127 0-127 O X Keys O X Channels O X Pitch Bend O X Control Change O X Prog. Change True# O X System exclusive O O Song Position O O Song Select O O Tune Request O O Clock O X 2 sets Commands O X 2 sets Local On/Off O O All Notes Off O X Active Sensing O X System Reset O O Basic Channel Mode Note Number Velocity not applicable After Touch System Common 1-32 System Realtime Aux Messages Notes X= yes, O = no Page 18 via CopperLan