1
HALCON Version 6.1.4
MVTec Software GmbH
HALCON / COM
User’s Manual
How to use the image analysis tool HALCON, Version 6.1.4, in your own COM programs
All rights reserved. No part of this publication may be reproduced, stored in a retrieval system,
or transmitted in any form or by any means, electronic, mechanical, photocopying, recording,
or otherwise, without prior written permission of the publisher.
Edition
Edition
Edition
Edition
Edition
Edition
1
2
2a
3
3a
3b
April 1999
October 2000
July 2001
June 2002
December 2002
April 2004
c 1999-2005
Copyright (HALCON 5.2)
(HALCON 6.0)
(HALCON 6.0.1)
(HALCON 6.1)
(HALCON 6.1.1)
(HALCON 6.1.3)
by MVTec Software GmbH, München, Germany
MVTec Software GmbH
Microsoft, Windows, Windows 95, Windows NT, Windows 2000, Windows XP, Microsoft
.NET, Visual C++, Visual Basic, and ActiveX are either trademarks or registered trademarks
of Microsoft Corporation.
All other nationally and internationally recognized trademarks and tradenames are hereby recognized.
More information about HALCON can be found at:
http://www.mvtec.com/halcon/
About This Manual
This manual gives an overview of the HALCON/COM interface. COM (“component object
model”) is a Microsoft standard for component-based, language-independent software development. This manual contains all information necessary to use the HALCON/COM interface and
understand its main concepts; a guided example shows how to develop HALCON applications
using Visual Basic.
This manual is intended for the advanced HALCON user. You should be familiar with the
main HALCON package and have experience in developing image analysis applications with
HDevelop. Of course, you must have knowledge about the language/tool you plan to develop
with (e.g. Visual Basic).
This manual is divided into the following parts:
• Introduction
This chapter provides a short overview of COM concepts in general.
• The HALCON/COM Interface
This chapter describes the structure of the HALCON/COM interface.
• Example Session
In this chapter a small image processing demo application is developed stepwise with
Visual Basic.
Release Notes
Please note the latest updates of this manual:
• Edition 3b, HALCON 6.1.3 (April 2004)
The manual now describes how to use the COM interface of Parallel HALCON.
• Edition 3a, HALCON 6.1.1 (December 2002)
The manual clarifies the point that only one HALCON language interface can be used in
an application. Furthermore, it briefly lists the example projects for Visual Basic .NET,
C#, Delphi, and Visual C++.
• Edition 3, HALCON 6.1 (June 2002)
The manual has been updated and revised, mainly regarding syntax and layout. Furthermore, it now contains links into the PDF version of the HALCON/COM Reference
Manual.
• Edition 2a, HALCON 6.0.1 (July 2001)
The section ’Limitations’ now also warns that HALCON/COM and HALCON/C++ cannot be used in one and the same application.
• Edition 2, HALCON 6.0 (October 2000)
Revision of the structure of the manual and minor updates.
Contents
1 Introduction
1.1 The Microsoft Component Object Model (COM) . .
1.1.1 COM and Microsoft .NET . . . . . . . . . .
1.1.2 A Quick Look at Some Programming Aspects
1.2 HALCON and COM . . . . . . . . . . . . . . . . .
1.3 Additional Sources of Information . . . . . . . . . .
.
.
.
.
.
.
.
.
.
.
.
.
.
.
.
.
.
.
.
.
.
.
.
.
.
.
.
.
.
.
.
.
.
.
.
.
.
.
.
.
.
.
.
.
.
.
.
.
.
.
.
.
.
.
.
.
.
.
.
.
.
.
.
.
.
.
.
.
.
.
1
1
1
2
3
3
2 The HALCON/COM Interface
2.1 More about Classes . . . . . . . . .
2.1.1 Different Types of Classes .
2.1.2 Classes for Special Purposes
2.2 Object Construction and Destruction
2.2.1 Construction . . . . . . . .
2.2.2 Destruction . . . . . . . . .
2.3 Interfaces and Inheritance . . . . . .
2.4 Methods and Properties . . . . . . .
2.5 A Closer Look at Data Types . . . .
2.6 Error Handling . . . . . . . . . . .
2.7 HALCON/COM and Visual Basic .
2.7.1 Object Instantiation . . . . .
2.7.2 Error Handling . . . . . . .
.
.
.
.
.
.
.
.
.
.
.
.
.
.
.
.
.
.
.
.
.
.
.
.
.
.
.
.
.
.
.
.
.
.
.
.
.
.
.
.
.
.
.
.
.
.
.
.
.
.
.
.
.
.
.
.
.
.
.
.
.
.
.
.
.
.
.
.
.
.
.
.
.
.
.
.
.
.
.
.
.
.
.
.
.
.
.
.
.
.
.
.
.
.
.
.
.
.
.
.
.
.
.
.
.
.
.
.
.
.
.
.
.
.
.
.
.
.
.
.
.
.
.
.
.
.
.
.
.
.
.
.
.
.
.
.
.
.
.
.
.
.
.
.
.
.
.
.
.
.
.
.
.
.
.
.
.
.
.
.
.
.
.
.
.
.
.
.
.
.
.
.
.
.
.
.
.
.
.
.
.
.
.
.
.
.
.
.
.
.
.
.
.
.
.
.
.
.
.
.
.
.
.
.
.
.
.
.
.
.
.
.
.
.
.
.
.
.
.
.
.
.
.
.
.
.
.
.
.
.
.
.
.
.
.
.
.
.
.
.
.
.
.
.
.
.
.
.
.
.
.
.
.
.
.
.
.
.
.
.
.
.
.
.
.
.
.
.
.
.
.
.
.
.
.
.
.
.
.
.
.
.
.
.
.
.
.
.
.
.
.
.
.
.
.
.
.
.
.
5
5
6
6
9
9
10
10
11
11
12
12
12
14
3 Example Visual Basic Session
3.1 First Step: The GUI . . . . . .
3.2 Second Step: Functionality . .
3.3 Final Step: More Functionality
3.4 Using Parallel HALCON . . .
3.5 Other Examples . . . . . . . .
.
.
.
.
.
.
.
.
.
.
.
.
.
.
.
.
.
.
.
.
.
.
.
.
.
.
.
.
.
.
.
.
.
.
.
.
.
.
.
.
.
.
.
.
.
.
.
.
.
.
.
.
.
.
.
.
.
.
.
.
.
.
.
.
.
.
.
.
.
.
.
.
.
.
.
.
.
.
.
.
.
.
.
.
.
.
.
.
.
.
.
.
.
.
.
.
.
.
.
.
.
.
.
.
.
.
.
.
.
.
.
.
.
.
.
15
15
16
18
20
21
.
.
.
.
.
.
.
.
.
.
.
.
.
.
.
Bibliography
23
Index
25
Chapter 1
Introduction
This chapter provides a short overview of the main aspects of component-based software development and shows how this can be achieved with Microsoft COM (Component Object Model).
It is not intended to discuss all aspects of COM in detail in this manual; please refer to the
corresponding literature.
1.1 The Microsoft Component Object Model (COM)
Component-based software engineering has been discussed intensively in the past years. Concrete standards evolving from this discussion include DCE, CORBA, Microsoft COM, and
lately the Microsoft Common Language Runtime , which is part of the .NET framework. The
main features of components are:
1. Reusability at binary level independent of the used language
2. Object orientation
3. Robust versioning
4. Location Transparency
Microsoft COM is the base for many commonly used software technologies, e.g., ActiveX, OLE
and DirectX. There are numerous tools for developing COM components, e.g., Visual Basic and
Visual C++ (and their .NET versions), or Borland Delphi.
1.1.1
COM and Microsoft .NET
As already mentioned, Microsoft provides a second approach to component-based programming with the Common Language Runtime of the .NET framework. The two approaches are
independent, i.e., a COM component is not related to a .NET component and vice versa. However, the two can communicate with each other; furthermore, you can create COM components
within Visual Studio.NET just as within Visual Studio.
1
2
1.1.2
CHAPTER 1. INTRODUCTION
A Quick Look at Some Programming Aspects
1.1.2.1 Interfaces
An important aspect of COM is the usage of component interfaces. Compared to the C++
terminology, an interface corresponds to the declaration of a class, thus showing its functionality and hiding the (internal) implementation details. This encapsulation allows to use a COM
component efficiently, without the need to know anything about its implementation.
In contrast to a C++ class, a COM component can have multiple interfaces. This is useful, e.g.,
for the versioning: Once defined, an interface stays exactly the way it is. Newer versions of the
component then define enhanced or extended functionality by new interfaces, while allowing
existing software to remain unchanged, because it can still use the older interfaces. Furthermore,
you can partition a component’s functionality into several well-defined portions via multiple
interfaces.
There are a couple of standard COM interfaces every component has by default, e.g., IUnknown
and IDispatch. They are not described in this manual; please refer to appropriate literature.
1.1.2.2 Objects, Methods and Data Members
Just as with C++ classes there are interfaces in COM and those interfaces are made up from
some methods. Several objects of a class correspond to several instances of a component, each
with its own internal state. However, there are some differences with data members, as their
handling within COM depends on the tool the component is used by. COM follows a concept
of properties, which are special methods allowing tools like Visual Basic to treat them just like
data members. With C++ they still are only methods, thus there is no way to modify and retrieve
data members directly. From this point of view COM class data members can be compared with
C++ private class members.
1.1.2.3 Inheritance and Polymorphism
As COM is a binary standard, inheritance must also take place at binary level which makes
the process slightly uncomfortable. Without going into detail one can say that the only thing
of interest here is that there are two methods of reusing existent components: containment and
aggregation. Both techniques are commonly used by C++ programmers as well: Containment
corresponds to C++ classes instantiated as a member object in other classes, whereas aggregation roughly corresponds to inheritance.
The main difference between containment and aggregation is the way the interface(s) of the
contained/aggregated component(s) are handled: The methods and properties of a contained
component are hidden to the outside so that only the containing component can use them. Any
method that should be visible from outside has to be re-defined in the outer component. In
contrast to this, the interface(s) of an aggregated component are merged with the interfaces of
the aggregating one, thus automatically making their methods visible to the outside.
The object-oriented feature of polymorphism is also achieved through interfaces: Different
COM classes exposing the same interface can be understood as showing polymorphic behavior,
as they act differently responding to the same methods.
HALCON / COM, 2005-02-01
1.2. HALCON AND COM
3
1.1.2.4 Early and Late Binding
Binding is the process of resolving the call adresses of a component’s exposed methods. This
can be done at compilation time (early binding) or at runtime (late binding). Thus, when using
a component you can take a specification of the contained methods and integrate it directly into
the application. Therefore, the specification must be available in a format that fits the used
programming language (e.g., when using C++ as client language one would typically include
the header files containing the method declarations).
Alternatively, you can let the methods be bound at runtime; in this case, no language-dependent
information is needed for compiling and the calling mechanism is totally different. Without
going into details we want to point out that runtime-bound methods calls are slower than their
early-bound counterparts. The HALCON/COM interface supports both early and late binding
so that special needs of different applications can be satisfied.
1.2 HALCON and COM
With the HALCON/COM interface you can use the full functionality of the HALCON library
within COM components (and therefore also ActiveX controls) developed, e.g., using Microsoft Visual Basic or Borland Delphi.
In fact, there are two HALCON/COM interfaces,
one to the standard HALCON library and one to Parallel HALCON, which automatically exploits multi-processor hardware and supports parallel programming. Please refer to the manual
Getting Started with HALCON for more information about Parallel HALCON; how to use the
corresponding COM interface is described in section 3.4.
Please note, that you can use only one HALCON language interface in one and the same
application, be it directly or indirectly, e.g., by including a DLL that uses another language
interface. This means that you cannot use both the HALCON/COM and the HALCON/C++
interface in the same application.
Note that currently the HALCON Extension Package Interface cannot be used to create extension packages for COM.
1.3 Additional Sources of Information
For further information you may consult the following manuals:
• Getting Started with HALCON
An introduction to HALCON in general, including how to install and configure HALCON.
• HDevelop User’s Manual
An introduction to the graphical development environment of the HALCON system.
• HALCON/C++ User’s Manual
How to use the HALCON library in your C++ programs.
HALCON 6.1.4
!
4
CHAPTER 1. INTRODUCTION
• HALCON/C User’s Manual
How to use the HALCON library in your C programs.
• Extension Package Programmer’s Manual
How to extend the HALCON system with your own operators.
• Frame Grabber Integration Programmer’s Manual
A guide on how to integrate a new frame grabber in the HALCON system. Note that
in some cases you might define new operators (using the Extension Package Interface)
instead of using the standard HALCON Frame Grabber Integration Interface in order to
exploit specific hardware features of a frame grabber board.
• HALCON/COM , HALCON/HDevelop , HALCON/C++ , HALCON/C
The reference manuals for all HALCON operators (versions for COM, HDevelop, C++,
and C).
• Application Guide
Multiple, independent documents called Application Notes, written from the point of
view of developing machine vision applications with HALCON. Each Note covers a specific topic, e.g., how to use shape-based matching to find and localize objects.
All these manuals are available as PDF documents. The reference manuals are available as
HTML documents as well. For the latest version of the manuals please check
http://www.mvtec.com/halcon/
HALCON / COM, 2005-02-01
Chapter 2
The HALCON/COM Interface
Let’s have a closer look at the HALCON/COM interface. This language interface (provided in
form of the DLL halconx.dll) contains the full functionality of HALCON partitioned into
several classes. Each class has one or more interfaces, which are built up from methods and
properties. The HALCON/COM interface uses inheritance and thus contains derived classes
and also an abstract base class. Since COM is not meant to supply a standardized inheritance
mechanism, HALCON/COM makes extensive use of interfaces to simulate inheritance (we will
discuss this topic in more detail afterwards).
Naming Conventions:
⊲ Classes are capitalized and begin with an “H”. They always end with an upper-case “X”;
for example: HFramegrabberX.
⊲ Interfaces are also capitalized and end with “X”, but begin with an “I”; for example:
IHObjectX.
⊲ Methods, properties and parameters are capitalized; for example: GrabImage, FileName.
Since COM is only available for the Windows operating systems family, all file paths and environment variables in this manual are printed in the Windows convention, e.g.,
%HALCONROOT%\examples\vb\Manual
to denote a subdirectory containing an example package within the HALCON base directory
referenced by the environment variable HALCONROOT.
2.1 More about Classes
Classes are the essential items to deal with when writing HALCON/COM applications. There
are quite a lot of them and there are different types of classes, thus we will have a closer look
on how classes are used and what attributes they have. The classes of the HALCON/COM
interface are partly related in a way which could be described as inheritance. Therefore, it is
important to get an impression of how inheritance is achieved within HALCON/COM and how
to use it.
5
6
CHAPTER 2. THE HALCON/COM INTERFACE
2.1.1
Different Types of Classes
There are two major categories of classes:
1. classes instantiating objects that have an internal state and
2. classes instantiating objects with no internal state.
The first category is used to implement special data structures (like images, files, frame grabbers, etc.) and the operators belonging to this data, whereas the second category is only used to
group operators belonging together. If several objects of a class belonging to the first category
are instantiated, they are all different from the HALCON point of view, whereas the second
category does not have this quality. For example, if we consider several objects instantiated
from the image class HImageX, they all denote something different: they represent different
HALCON images. In contrast, if we have an object of a class like HSystemX that represents
the internal state of the HALCON kernel, it does not matter how many of those objects will
be instantiated, because all of them denote the same (there is only one HALCON kernel to be
represented). Those classes can be understood as group classes, denoting that they supply a
bunch of methods that all have some semantic peculiarities in common.
In contrast to this, methods of the first category classes may share a common semantics, but
work on different data. For example, if an object of the class HImageX is instantiated, its methods always work exactly on one specific HALCON image: the one that is represented by the
object (to be precise an HImageX object may also represent an array of images). Different
HImageX objects represent different images and therefore work on different data.
Besides the first two groups, we can categorize classes in another way well known in the object
oriented world:
1. abstract classes and
2. non-abstract classes.
A class is called abstract, if it can not be instantiated. Thus, an abstract class must be the base
class for other classes, if it should be of any use. The idea behind this concept is that abstract
classes provide a semantic base for their derived classes without being concrete enough for
instantiation. A look on real world terms reveals many analogous cases: there is, e.g., the class
animal which can be seen as an abstract base class for classes like fish, bird and horse. Any
existing being can not be only an animal, it is always either a fish, a bird or a horse (or whatever
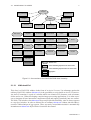
else). There is only one such abstract class in the HALCON/COM interface: HObjectX. It
represents a HALCON iconic object, such as an image, a region, or an XLD. The derived
classes (HImageX, HRegionX and so on) then specify the exact type of the HALCON iconic
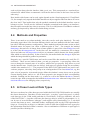
object (see also the class overview in figure 2.1).
2.1.2
Classes for Special Purposes
There are some HALCON/COM classes that have special jobs. Although they do fit into the
above systematics, they are worth mentioning, because they have to be used in a specific way
or show some specific semantics.
HALCON / COM, 2005-02-01
2.1. MORE ABOUT CLASSES
7
HObjectX
HXLDExtParaX
HUntypedObjectX
HXLDX
HImageX
HXLDModParaX
HXLDParaX
HRegionX
HXLDContX
HXLDPolyX
HBarcodeX
HBgEstiX
HClassBoxX
HFeatureSetX
HFileX
HFramegrabberX
HFunction1dX
HGnuplotX
HHistogramX
HHomMat2dX
HHomMat3dX
HInfoX
HMeasureX
HMiscX
HOcrX
HOcvX
HOperatorSetX
HPoseX
HSerialX
HShapeModelX
HSocketX
HSystemX
HTemplateX
HTupleX
HVariationModelX
HWindowX
HWindowXCtrl
abstract class
class instantiating objects with an internal state
class instantiating objects without an internal state
aggregation
Figure 2.1: An overview of the HALCON/COM class hierarchy.
2.1.2.1 HWindowXCtrl
This class is a HALCON window in the form of an ActiveX control. Its advantage against the
ordinary HALCON window (HWindowX) is the possibility to exist inside an ActiveX container.
An ActiveX container is a part of a window which can contain GUI elements, such as buttons,
sliders and so on. When developing complex image processing applications, it is often necessary to integrate all user interaction components (input and output) seamlessly into one surface.
The HALCON window class HWindowX does not provide this flexibility, since it always appears
as a top-level window. In order to behave like an ordinary HWindowX window, HWindowXCtrl
uses the COM technique of aggregation. Thus, any newly created HWindowXCtrl automatically
instantiates an HWindowX object which is bound to the control.
HALCON 6.1.4
8
CHAPTER 2. THE HALCON/COM INTERFACE
2.1.2.2 HOperatorSetX
This is basically a group class for all existing HALCON operators. HOperatorSetX is meant
to provide access to a procedural way of HALCON programming. The reason for that is the
fact that it is easier for some non-object-oriented tools like HDevelop to generate COM code
automatically when using a procedural technique. The specificity about HOperatorSetX is
that all its methods require instances of HObjectX for all iconic input parameters and return
instances of HUntypedObjectX (see below) for all iconic output objects. Furthermore, all
control parameters (input and output) are of the type VARIANT (see also section 2.5).
Note that it is allowed to have input parameters of an abstract type! C++ programmers will
know this concept; it corresponds to passing objects through a pointer to their abstract base
class. However, this is not allowed for output parameters. Here, the data type must be specified,
because there has to be some (typed) variable which can store the output object. Since methods
of the class HOperatorSetX must use a generic data type scheme, output iconic objects are
always of the type HUntypedObjectX.
Hand-written COM code should not use the HOperatorSetX/HUntypedObjectX concept, since
it weakens the otherwise strong-typed object-oriented approach; it becomes relevant only in
cases, where automatically generated code is involved.
2.1.2.3 HUntypedObjectX
The class HUntypedObjectX is derived from HObjectX just like HImageX, HRegionX and so
on. Its purpose is to get an instantiable form of the abstract base class. The class does not have
any members, as it just consists of a polymorphic data type without any special meaning. As
it is this weak-typed, it can not be used together with the strong-typed methods of the other
classes, except by using the method Cast() which allows arbitrary type conversions between
all classes derived from HObjectX (explained later on). HUntypedObjectX is meant to be a
generic data type used by the special class HOperatorSetX.
2.1.2.4 The Method Cast()
All classes derived from HObjectX supply the method Cast() which is used for type conversions between the concerned classes. This method breaks up the well-defined data type scheme
evolving from the class hierarchy, so it should not be used except when there is no other possibility! By using the method Cast(), an image object can be turned into a region, an XLD can
become an HUntypedObjectX object and so on. The reason for that is, as mentioned above, the
need to convert back and forth to the HUntypedObjectX objects used by the HOperatorSetX
methods. For example, if an automatically generated code fraction produces an object variable
of type HUntypedObjectX which shall be used as an image in some handwritten code, it can be
forced to become an HImageX object. Of course, it must be assured that the variable really does
contain an image (it is the programmer’s task to take care for that).
The following short Visual Basic example reads an image via HOperatorSetX and then casts
it into the class HImageX. Note that in order to apply the method Cast(), the variable Image
must be a “living” COM object, thus it is declared as New HImageX. See section 2.7 for more
information about using HALCON/COM within Visual Basic.
HALCON / COM, 2005-02-01
2.2. OBJECT CONSTRUCTION AND DESTRUCTION
9
Dim Op As New HOperatorSetX
Dim Untyped As HUntypedObjectX
Dim Image As New HImageX
Call Op.ReadImage(Untyped, "monkey")
Call Image.Cast(Untyped)
2.2 Object Construction and Destruction
2.2.1
Construction
A HALCON/COM object can be in different states. It can be instantiated and it can be initialized. An instantiated object needs not necessarily be initialized, but an initialized object
is always instantiated. Instantiation means using an appropriate technique to produce a “living” COM object (this technique differs according to what client language is used). Initializing
means to give the object a well-defined internal state.
There is another state an object can have: neither instantiated nor initialized. Since not being
instantiated means not existing, what exactly does this condition mean? The answer depends
somewhat on the client language used, but is rather easy to understand, if we realize that COM
object variables actually are references to an existing (or not existing) object. Thus, if such a
variable is declared, there is not necessarily already an object created it refers to. As we like
to mix up the terms “reference to an object” and “object” in this manual, we may speak of an
uninstantiated object in that case. For example, if an HImageX object is created (not only the
referring variable is declared), it is usable in terms of COM (since it is instantiated), but it does
not yet contain any HALCON image. To be a valid HALCON/COM object, it still must be
initialized. This can be done in two different ways:
• The object can initialize itself or
• the object can be initialized by another object’s method.
In the first case, a so-called constructor is executed. The term “constructor” is somewhat misleading here, since it has a slightly different meaning than, e.g., a C++ constructor. In C++
terms, a constructor is a special method (always named exactly as the class) which performs
the object construction automatically without the need to be called explicitly. In the HALCON/COM, case a constructor is an ordinary method which initializes the object’s internal
state and must be called explicitly.
For that reason, a HALCON/COM class can have many (differently named) constructors. One
of the constructors of the class HImageX, e.g., is ReadImage, which initializes the object by
reading an image file from the hard disk. Another way to initialize an object is to get it as result
after calling another object’s method. For example, an uninitialized HImageX object becomes
initialized when it is returned from a call to MeanImage (which does a convolution on an image
and produces another image).
Note that the mechanism is indeed slightly more complicated and again depends on the client
language. In fact, an object variable needs not refer to a living COM object, when being used as
a return value of a method call. Even more, if it does, the referred object gets destroyed before
the new object is assigned to the variable.
HALCON 6.1.4
10
CHAPTER 2. THE HALCON/COM INTERFACE
Actually, there is yet another way to initialize a HALCON/COM object: by using the method
Cast() mentioned before. This method takes another object of a related class, i.e., derived from
HObjectX, as parameter, which in turn has to be initialized. Then, the object the calling method
belongs to gets initialized with the internal state of the other object. Because no copying or
duplication takes place, the other object gets uninitialized.
Note that not all HALCON/COM objects can have this initialized state! An object can only be
initialized, if it has an internal state. Thus, all the group classes described in section 2.1.1 have
no constructor methods.
2.2.2
Destruction
We have seen that creating a valid HALCON/COM object is a two-step process: First, the COM
object needs to be instantiated, then it must be initialized. This implies also a two-step destruction process: To destruct an object it must be uninitialized before being destroyed (which is
the opposite of being instantiated). The latter is done by COM and the client environment, the
first must be performed by some automatic destruction process. To pick up the HImageX example again, the automatic destructor must free the image data using the HALCON memory
management. Another example: If a top level HALCON window gets initialized, it is physically opened. The automatic destructor must take care of the window getting closed before the
according COM object finally gets destroyed.
2.3 Interfaces and Inheritance
As said before, COM classes are built from interfaces which in turn contain methods and properties. Each HALCON/COM class has got one default interface named according to the class.
For example, the class HImageX contains the default interface IHimageX which provides all the
relevant methods. Dealing with interfaces is strongly related to the client environment used, so
we will not have a too close look at this topic now. For example, Visual Basic tries to completly
hide the whole interface topic from the user; in that case, an interface and the related class are
the same most of the time.
Actually, an interface behaves similar to a C++ pointer or reference to an object and that is
exactly what Visual Basic tries to hide. As said before, interfaces are used for inheritance simulation within HALCON/COM. The way this works is simple: We have seen that HObjectX is
an abstract (and thus not instantiable) class. On the other hand, the derived classes HImageX,
HRegionX, etc. have to supply their own functionality plus the inherited HObjectX functionality. This is achieved with the help of interfaces: Currently there is no COM class named
HObjectX (thus no HObjectX object can be initialized), only an interface named IHObjectX.
This interface appears in all “derived” classes together with their default interfaces. HImageX,
e.g., has two interfaces (in fact it has a hidden third one):
1. IHImageX (the default interface) and
2. IHObjectX (the inherited interface).
This allows to satisfy every method which expects a parameter HObjectX (actually it expects
a reference to that class in form of the interface IHObjectX) with any derived class object, as
HALCON / COM, 2005-02-01
2.4. METHODS AND PROPERTIES
11
such an object always has the interface IHObjectX, too. This corresponds to a certain objectoriented rule which allows an automatic cast from the derived class to the base class (not the
other way).
How intuitive this feature can be used, again depends on the client language/tool: Visual Basic
5.0, for example, only regards the default interface an object supplies and treats that as if it were
the class itself. That implies that only the methods contained in the default interface seem to
belong to a class. To also use the “inherited” methods (contained in the IHObjectX interface),
thus an explicit cast to the base class is necessary. This is a widely known Visual Basic weakness
and may get improved by Microsoft in forthcoming versions.
2.4 Methods and Properties
There is not much to say about methods, since they can be used quite intuitively. The only
interesting aspect here is the fact that different classes can have methods with the same name,
but with a different parameter configuration. These methods perform the same action (as their
identical names let expect), but “show a different point of view”. For example, the method
GrabImage that retrieves an image from a frame grabber is part of the class HImageX as well
as of the class HFramegrabberX. In the first case, the method is a constructor for an image
object and takes an HFramegrabberX object as parameter (which denotes the frame grabber
from which to retrieve the data). In the second case, the method takes the HImageX object into
which the image should be grabbed as parameter.
Properties are a special COM feature and can be treated like data members by tools like Visual Basic. There are two kinds of them: put and get properties. A put property allows the
user to change the internal state of an object, whereas the get property only allows to read
out the internal state. Usually (but not always), both types are present acting like an ordinary
variable class member in C++. The properties in the HALCON/COM interface are just for convenience purposes, since they always map to an existing method. The class HWindowX, e.g, has
quite a lot of properties: Width and Height define the window’s extent, Draw sets or gets the
current drawing mode, and so on. All of these properties are mapped to their corresponding
methods. Reading out the draw mode, e.g., results in a call to the Method GetDraw, whereas
Width/Height both are mapped to the method GetWindowExtents when retrieving values, and
SetWindowExtents for changing values, respectively.
2.5 A Closer Look at Data Types
We have seen that a lot of the data types used within the HALCON/COM interface are actually
the classes themselves. But there are also more basic, “everyday” types being used. A widely
used data type in the COM world (and thus in Visual Basic) is the type VARIANT. All users
of the HALCON/C++ interface will know the data type HTuple which is polymorphic (i.e., it
can be one of several different “subtypes”) and supplies array functionality (i.e., it can hold
several data items at once). VARIANTs behave analogously and are the COM equivalent for
HTuples. Exactly like an HTuple a VARIANT is able to hold data of different basic types plus
the information what kind of data it contains. Also a combination of different or equal types is
possible just like with HTuples.
HALCON 6.1.4
12
CHAPTER 2. THE HALCON/COM INTERFACE
The main difference is that a VARIANT is no class. This implies the complete absence of any
methods. Thus, all the additional functionality of the very powerful class HTuple must be
accessed in another way. For this reason, there is an class HTupleX, which groups methods for
tuple operations like vector addition, string concatenation, and so on.
Another important and widely used COM data type is BSTR. This standard COM flavor of
character strings is not directly compatible with standard C-like string implementations, mainly
because it uses wide chars. This means, that auxiliary functions must be used to access or
modify BSTRs when using C/C++. Again, this is no problem with Visual Basic, where it is the
default string data type. Additionally, there are integral data types like long and double as
well. They are used in situations where array- or multitype-parameters are not allowed or make
no sense.
2.6 Error Handling
The HALCON/COM interface uses the standard COM error handling technique where every
method call passes both a numerical and a textual representation of the error to the calling
framework. It is then up to the caller to react to this information. Since low error numbers
are reserved for COM, HALCON/COM uses a very high offset to its own error codes. To
get the correct HALCON error code, this offset must be subtracted from the received code.
The offset is a (read only) property of the class HSystemX. There are two offsets: one for the
HALCON/COM interface and one for HALCON itself. Those properties are named:
• HSystemX.ErrorBaseCOM and
• HSystemX.ErrorBaseHalcon.
In order to get the correct HALCON error code, an HSystemX object must be instantiated (one
is enough for the whole application anyway, since HSystemX objects have no “identity”). Then,
the value of the respective property of HSystemX must be subtracted from the returned error
code to get the correct HALCON error code. For an example how to deal with error codes see
section 2.7.2.
2.7 HALCON/COM and Visual Basic
So far, the important basics of the HALCON/COM interface have been explained. Now let’s
have a look at what things behave like when using Visual Basic.
2.7.1
Object Instantiation
There are many different ways to instantiate COM objects in Visual Basic. We will discuss
only one of them, because it has certain advantages over all the others. We have seen in the
sections before that a distinction should be made between the instantiation and the initialization
of objects. Even more important, we should also distinguish objects from object reference
variables. An object reference variable is set up by its declaration with the keyword Dim:
HALCON / COM, 2005-02-01
2.7. HALCON/COM AND VISUAL BASIC
13
Dim image1 As HImageX
This statement does not yet create a COM object, it just declares a variable able to reference an
HImageX object. If we want to declare a reference variable and immediately create an object it
refers to, we should write
Dim image1 As New HImageX
Now, a “new” HImageX object is created and the variable ’image1’ refers it. Note that the declaration of variables is not obligatory with Visual Basic, but should be done anyway! Undeclared
variables get declared automatically when referenced and that can lead to errors which are very
hard to track down! It is a good idea to place the statement ’Option Explicit’ on top of every
Visual Basic module, because then variable declaration is forced.
We now have a valid COM object, to which the declared variable refers. To initialize this object,
we could call a constructor method:
Dim image1 As New HImageX
Call image1.ReadImage(’some_file_name’)
Note the keyword Call! It’s necessary in Visual Basic if the called method doesn’t return a
value. The other way of initialization would be using another object’s method:
Dim image1 As New HImageX
Dim region1 As HRegionX
Call image1.ReadImage(’some_file_name’)
Set region1 = image1.Threshold(128, 255)
There are two important things here. First, the keywordSet, which replaces the Call keyword
when the called method returns another COM object (in this case a region). Secondly, the
second variable declaration omits the keyword New because the corresponding variable does
not need to instantiate an object at declaration time. Instead, this is done within the Threshold
method, which creates a new COM object itself and passes a reference to this object as its return
value.
HALCON/COM objects get destroyed as soon as no variable references them anymore. For
local variables, this is the case when they go out of scope (e.g., when a subroutine is left). For
global variables, or if an explicit destruction is desired, this has to be done by the user:
Dim image1 As New HImageX
Dim region1 As HRegionX
Call image1.ReadImage(’some_file_name’)
Set region1 = image1.Threshold(128, 255)
Set image1 = Nothing
Set region1 = Nothing
Here, both variables are assigned the special Visual Basic keyword ’Nothing’ which denotes
that they do not reference their related COM objects anymore. These COM objects thus are not
referenced at all which leads to their immediate destruction.
HALCON 6.1.4
14
CHAPTER 2. THE HALCON/COM INTERFACE
There is, of course, a lot more to say about Visual Basic/HALCON programming. Some further
aspects might become clear in the example session described in chapter 3.
2.7.2
Error Handling
When using Visual Basic, errors can be trapped by an error handler. If no custom error handler
is present, Visual Basic itself supplies a default one, which shows a message box containing the
textual error description. Error handlers in Visual Basic can be set with the keyword On Error.
To trap an error in a portion of code, the appropriate construct could look like this:
Dim LastErrorCode As Long
Dim SysObject As New HSystemX
On Error Goto myErrorHandler
<some code>
myErrorHandler:
’ do something with the error information, for example:
Debug.Print "Error occurred: " + Err.Description
LastErrorCode = Err.Number - SysObject.ErrorBaseHalcon
Resume Next
If an error occurs in <some code>, an immediate jump to the label myErrorHandler is made,
where an arbitrary error processing mechanism can be placed. The scheme used in the example
tries to model a traditional, “procedural” error recovery strategy, where every function call
returns an error code, which has to be checked before program execution can continue. When
an error occurs, the error handling code at the corresponding label takes over, writes a status
message (the textual error representation) to the Visual Basic window ’Immediate’ and stores
the error code in a global integer variable. The global Visual Basic object Err is the source
of information in this case. Afterwards, control is returned to the line following the statement
which produced the error via the Visual Basic command Resume Next. The next line of code
then would be responsible for checking the error code stored in LastErrorCode.
We have seen that there are two types of errors: HALCON-related errors and COM-interfacerelated ones. Since the COM-interface errors have smaller error numbers than the HALCON
error codes, the above mechanism would lead to negative numbers. In this case, the produced
error code would have to be subtracted from SysObject.ErrorBaseCOM to get the correct
(interface-related) error code.
HALCON / COM, 2005-02-01
Chapter 3
Example Visual Basic Session
In this chapter you will learn how to develop HALCON applications quickly using Microsoft
Visual Basic and the HALCON/COM interface. There will be simple steps describing what to
do. The result will be a very small example vision application equipped with a graphical user
interface. As an additional source of information you are strongly encouraged to have a look at
the other examples which are supplied as Visual Basic sources together with HALCON.
The program developed in this chapter is also available ready to go in the directory
%HALCONROOT%\examples\vb\Manual together with other examples. However, it is recommended to follow the steps below and program it yourself, as you will get a better impression
of how Visual Basic program development works and gain a lot of additional information with
the single steps.
Please note, that to use HALCON/COM inside Visual Basic you need Windows NT 4.0 with
Service Pack 4 or Windows 2000 or Windows XP; the example projects are created for Visual
Basic 6.0.
3.1 First Step: The GUI
Go ahead and
1. Launch Visual Basic. A dialog named New Project should appear allowing you to
select the type of project you want. Switch to New in the tab list, select Standard EXE
and click Open.
2. Select Project from the menu bar and click Components. A dialog box shows up
listing the components installed on your system. Switch to Controls in the tab list and
place a check next to the item Halcon/COM library.
3. Press F2. The object browser should appear. See if you can find HImageX and browse
through some of the corresponding methods. Clicking on a method shows its parameterization as well as a short help text about what it will do in the status area at the bottom
of the object browser. Close the object browser.
4. Have a look at the dialog template (’form’) showing in the lower half of the screen;
it should be titled Form1. In the upper half you will discover an area titled
Properties - Form1. Here you can set and retrieve the active GUI object’s (in this
15
16
CHAPTER 3. EXAMPLE VISUAL BASIC SESSION
case the form’s) properties. Click on Form1 right beside Caption and change the string
to HalconX example. You should see the effect of your action immediately in the caption text of the below form.
5. Grab the form and resize it to a suitable extent.
6. Have a look at the tool bar to the left: Here you can find all the control elements you can
place inside your form. They are represented as small icons. Move the mouse cursor
over the different icons to see the bubble help revealing their names. You should find an
icon showing the HALCON symbol named HWindowXCtrl. You guessed it! That is our
ActiveX control HALCON window.
7. Activate the HWindowXCtrl icon. Draw a rectangular region inside the form — make
sure it is approximately square. When releasing the mouse button the square area should
turn black.
8. Switch to the CommandButton icon (looking like a brick) in the left tool bar. Draw
a button inside the form beside or below the HALCON window. Change the button’s
caption text to Next >> in the properties box.
9. Now switch to Label in the tool bar and draw a longish rectangular area at the bottom
of the form. If you encounter placement difficulties due to lack of form space, you can
always resize the form to fit your needs.
10. Resize the form so that it fits around the before created items. Now you have the entire
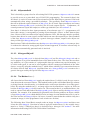
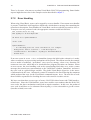
GUI for your application ready to go and your screen should look similar to figure 3.1.
3.2 Second Step: Functionality
Now you have the finished GUI, you should go ahead and make the application do something:
1. Right-click somewhere inside the form and select View Code. Another window will
pop up over the form with two combo boxes at its top border. Select Form in the left
combo box. You will see the code to be executed when the form is created.
2. Insert a line into the subroutine:
Private Sub Form_Load()
Label1.Caption = "Click Next to start"
End Sub
You just changed the text the label at the bottom will show when the application is
launched.
3. Next we will declare some important variables: Switch back to (General) in the left
combo box above the source code window and insert in the following lines at the top:
Dim Monkey As New HImageX
Dim Window As HWindowX
Some online selection boxes for the desired object type will assist you. We have just
created two objects: an HImageX and an HWindowX. The reason for the keyword New in
HALCON / COM, 2005-02-01
3.2. SECOND STEP: FUNCTIONALITY
17
Figure 3.1: Having performed all the steps from section 3.1 you should end up with a setup like
this.
the first line is that we want the HImageX object to be instantiated (i.e., memory being
allocated for it). This is not necessary for the HWindowX, since it is already instantiated;
it is the ActiveX control we have drawn inside the form.
4. The object ’Monkey’ is instantiated as we know (although it is not yet initialized with
an image), but the variable ’Window’ still refers to nowhere. Insert another line into the
subroutine Form Load():
Private Sub Form_Load()
Set Window = HWindowXCtrl1.HalconWindow
Label1.Caption = "Click Next to start"
End Sub
Now, the variable ’Window’ refers to the HWindowX part of our ActiveX control.
5. Switch to Command1. Another subroutine appears, which you complete like this:
Private Sub Command1_Click()
Call Monkey.ReadImage ("monkey")
Call Window.DispObj(Monkey)
End Sub
HALCON 6.1.4
18
CHAPTER 3. EXAMPLE VISUAL BASIC SESSION
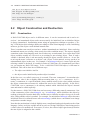
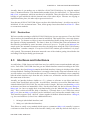
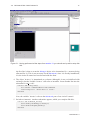
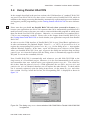
While typing, you will notice a very convenient Visual Basic feature: Since it knows
the methods of a class, it allows you to select one from a list, if you wish to do so (see
figure 3.2). You will also get assistance in supplying the parameter values for a method
call in the right order and with the right types (see figure 3.3); if no type is shown, a
VARIANT is required.
6. Start your application by pressing F5 and see what happens!
Figure 3.2: Visual Basic helping you to select a method.
Figure 3.3: Visual Basic helping you with the correct parameters.
3.3 Final Step: More Functionality
What we have now is a very basic application which can’t do very much — but it needs only
10 lines of code! Below, we will extend the functionality, turning our application into a small
image processing demo:
1. Extend the variable declaration section at the beginning of your listing so it looks like
this:
Dim
Dim
Dim
Dim
Dim
Monkey As New HImageX
Window As HWindowX
Region As HRegionX
Eyes As HRegionX
State As Integer
Although these declarations are not necesary (Visual Basic declares variables automatically), it is nevertheless a good idea to do so.
2. Select the subroutine Command1 Click() and modify it like this:
HALCON / COM, 2005-02-01
3.3. FINAL STEP: MORE FUNCTIONALITY
19
Private Sub Command1_Click()
If State = 3 Then
End
End If
If State = 2 Then
Set Eyes = Region.SelectShape("area", "and", 500, 50000)
Set Eyes = Eyes.SelectShape("anisometry", "and", 1, 1.7)
Call Window.DispObj(Monkey)
Call Window.DispObj(Eyes)
Label1.Caption = "click Finish to terminate"
Command1.Caption = "Finish"
State = 3
End If
If State = 1 Then
Set Region = Monkey.Threshold(128, 256)
Set Region = Region.Connection()
Call Window.SetColored(12)
Call Window.DispObj(Region)
Label1.Caption = "Next, the ape’s eyes will be selected"
State = 2
End If
If State = 0 Then
Call Monkey.ReadImage("monkey")
Call Window.DispObj(Monkey)
Label1.Caption = "Next, the image will be segmented into
several regions"
State = 1
End If
End Sub
3. Run your little program and enjoy a guided tour through a very common image processing example.
HALCON 6.1.4
20
CHAPTER 3. EXAMPLE VISUAL BASIC SESSION
3.4 Using Parallel HALCON
In the example described in the previous sections, the COM interface of “standard” HALCON
was used. From HALCON 6.0 on, there exists a second version, Parallel HALCON, which in
addition to the image processing functionality automatically exploits multi-processor hardware
and supports parallel programming (see the Getting Started with HALCON for more information).
!
Please note that you should use Parallel HALCON only when you need its features, e.g.,
because your application uses HALCON operators that can be automatically parallelized on a
multi-processor system or because you want to create multi-threaded programs in which more
than one thread uses HALCON operators. Otherwise, we recommend to use standard HALCON to save computing overhead. Please refer to the chapter about Parallel HALCON in
the Getting Started with HALCON to check whether your application can profit from Parallel
HALCON.
In order to use the COM interface of Parallel HALCON in your Visual Basic application (or
in other environments like Borland Delphi, Visual C++, or .NET), all you need to do is to
register the corresponding DLL parhalconx.dll, e.g., via the dialog Start ⊲ Run together
with the Windows Explorer: In the latter, “open” the directory bin\i586-nt4 of the folder
where you installed HALCON. Now, type regsvr32 the dialog Run and then drag and drop
parhalconx.dll from the Explorer into the dialog, where it automatically appears with the
full path. To execute the command, click OK.
Now, Parallel HALCON is automatically used whenever you add HALCON/COM to the
Components of a Visual Basic project. Moreover, it is also used automatically in all projects
and executables that were created before you registered parhalconx.dll. The reason for
this is that, from the point of view of a COM application, the two DLLs halconx.dll and
parhalconx.dll are identical, therefore one can replace the other directly. To check which
one is currently registered, open the dialog Components via the menu Project and select
Halcon/COM library; below the list box, the corresponding DLL is displayed as shown in
figure 3.4.
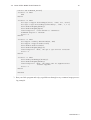
Figure 3.4: The dialog Components shows whether HALCON/COM or Parallel HALCON/COM
is registered.
HALCON / COM, 2005-02-01
3.5. OTHER EXAMPLES
21
3.5 Other Examples
There are some more pre-coded examples, so you can discover how things work with
HALCON/COM. These examples can be found under the following directory:
%HALCONROOT%\examples\\
The following list shows all the supplied examples and explains their topics in short. To experiment with these examples we recommend to create a private copy in your working directory.
1. %HALCONROOT%\examples\vb\Applications\FA\
An example showing how to use correlation-based pattern matching.
2. %HALCONROOT%\examples\vb\Applications\Monitoring\
An example showing how to use a background estimator for traffic monitoring.
3. %HALCONROOT%\examples\vb\Online\Barcode\
An online example showing how to read a bar code.
4. %HALCONROOT%\examples\vb\Online\Measure\
An interactive example showing how to use the measure tool.
5. %HALCONROOT%\examples\vb\Online\Movement\
An example showing how to discover movement by using the difference of images.
6. %HALCONROOT%\examples\vb\Segmentation\
An example illustrating the possibilities for interactive image processing applications.
7. %HALCONROOT%\examples\vb\Tools\Calibration\
An example showing how to calibrate a camera.
8. %HALCONROOT%\examples\vb\Tools\Matching\
An example showing how to use shape-based matching.
9. %HALCONROOT%\examples\vb\Tools\Measure\
An example showing how to measure the pins of an IC.
10. %HALCONROOT%\examples\vb\Manual\
The example described in this chapter.
Additional examples can be found in the subdirectories examples\vb.net, examples\c#,
examples\delphi, and examples\mfc; they show how to use HALCON/COM within Visual
Basic .NET, C#, Borland Delphi, or together with Microsoft MFC in Visual C++.
HALCON 6.1.4
22
HALCON / COM, 2005-02-01
CHAPTER 3. EXAMPLE VISUAL BASIC SESSION
Bibliography
[Arm98] Tom Armstrong. Active Template Library – A Developer’s Guide. M&T Books,
Foster City, CA, 1998.
[Bro95] Kraig Brockschmidt. Inside OLE. Microsoft Press, Redmond, Washington, 1995.
23
24
HALCON / COM, 2005-02-01
BIBLIOGRAPHY
Index
GetDraw, 11
GetWindowExtents, 11
GrabImage, 11
group class, 6
GUI, 15
.NET, 1, 20
abstract class, 5, 6, 8
ActiveX, 1
ActiveX container, 7
ActiveX control, 7
aggregation, 2, 7
HALCON window, 7
HALCON/C++, 3
HalconX, 5
HDevelop, 8
HImageX, 6, 8, 9, 16
HObjectX, 6, 8
HOperatorSetX, 8
HRegionX, 6, 8
HSystemX, 12
HTuple, 11
HUntypedObjectX, 8
HWindowX, 7
HWindowXCtrl, 7
base class, 5, 8
binary reusability, 1
binding, 3
BSTR, 12
C#, 21
Call, 13
Cast(), 8, 10
class definition, 2
classes, 5
code generation, 8
CommandButton, 16
component, 1
constructor, 9, 11
containment, 2
IDispatch, 2
IHImageX, 10
IHObjectX, 10
implementation, 2
inheritance, 2, 5, 10
inheritance simulation, 5
initialization, 9
instantiation, 9
interface, 2
interfaces, 5, 10
internal state, 6
IUnknown, 2
data members, 11
data type, 8
default interface, 10
Delphi, 1, 20, 21
derived class, 6, 10
Dim, 12
DirectX, 1
double, 12
early binding, 3
encapsulation, 2
error handling, 12
error offset, 12
ErrorBaseCOM, 12
ErrorBaseHalcon, 12
example, 15
Label, 16
language independence, 1
late binding, 3
library, 5
location transparency, 1
long, 12
MeanImage, 9
meaning of objects, 6
member, 2
form, 15
get properties, 11
25
26
memory management, 10
method, 2
methods, 5, 11
Microsoft .NET, 1, 20
naming convention, 5
New, 13, 16
Nothing, 13
object, 2
object browser, 15
object copying, 10
object destruction, 10
object duplication, 10
object initialization, 17
object instantiation, 17
object orientation, 1
OLE, 1
On Error, 14
Parallel HALCON, 3, 20
pointer, 8, 10
polymorphism, 2
properties, 5, 11
property, 2
put properties, 11
ReadImage, 9
reference, 10
Resume Next, 14
semantics of objects, 6
Set, 13
SetWindowExtents, 11
special classes, 6
strong-typed, 8
Threshold, 13
top-level window, 7
type conversion, 8
variable, 9
variable declaration, 16, 18
VARIANT, 8, 11
versioning, 1
Visual Basic, 1, 8, 12
Visual Basic .NET, 21
Visual C++, 1, 20, 21
weak-typed, 8
HALCON / COM, 2005-02-01
Index