1
Programmer's Guide
All about using the programming language interfaces of HALCON, Version 11.0
All rights reserved. No part of this publication may be reproduced, stored in a retrieval system, or
transmitted in any form or by any means, electronic, mechanical, photocopying, recording, or otherwise,
without prior written permission of the publisher.
Edition
Edition
Edition
Edition
Edition
Edition
Edition
Edition
Edition
Edition
Edition
Edition
Edition
1
1a
2
2a
2b
3
3a
3b
4
4a
4b
5
6
December 2003
July 2004
July 2005
April 2006
December 2006
June 2007
October 2007
April 2008
December 2008
June 2009
March 2010
October 2010
May 2012
Copyright © 2003-2012
(HALCON 7.0)
(HALCON 7.0.1)
(HALCON 7.1)
(HALCON 7.1.1)
(HALCON 7.1.2)
(HALCON 8.0)
(HALCON 8.0.1)
(HALCON 8.0.2)
(HALCON 9.0)
(HALCON 9.0.1)
(HALCON 9.0.2)
(HALCON 10.0)
(HALCON 11.0)
by MVTec Software GmbH, München, Germany
MVTec Software GmbH
Protected by the following patents: US 7,062,093, US 7,239,929, US 7,751,625, US 7,953,290, US
7,953,291. Further patents pending.
Microsoft, Windows, Windows XP, Windows Server 2003, Windows Vista, Windows Server 2008, Windows 7, Microsoft .NET, Visual C++, Visual Basic, and ActiveX are either trademarks or registered
trademarks of Microsoft Corporation.
Linux is a trademark of Linus Torvalds.
Tru64 and Alpha Server are either trademarks or registered trademarks of Compaq Computer Corporation.
Intel„ and Pentium are either trademarks or registered trademarks of Intel Corporation.
AMD and AMD Athlon are either trademarks or registered trademarks of Advanced Micro Devices,
Inc.
Mac OS X and OpenCL are trademarks of Apple Inc.
All other nationally and internationally recognized trademarks and tradenames are hereby recognized.
More information about HALCON can be found at: http://www.halcon.com/
About This Manual
This manual describes the programming language interfaces of HALCON and shows how to use HALCON in programming languages like C++, C#, C, or Visual Basic. It contains the necessary information
to understand and use the provided data structures and classes in your own programs.
We expect the reader of this manual to be familiar with the programming languages themselves and with
the corresponding development tools.
The manual is divided into the following parts:
• General Issues
This part contains information that is relevant for all programming interfaces, e.g., which interface
to use for which programming language or how to use HALCON with parallel programming.
• Programming With HALCON/C++
This part describes the HALCON’s language interface to C++.
• Programming With HALCON/C++ (legacy)
This part describes HALCON’s legacy language interface to C++. It includes instructions to convert code using the legacy C++ interface to the new default C++ interface introduced in HALCON
11.
• Programming With HALCON/.NET
This part describes HALCON’s language interface to .NET programming languages (C#, Visual
Basic .NET, etc.).
• Programming With HALCON/COM
This part describes HALCON’s language interface to languages that can handle Microsoft COM,
e.g., Visual Basic 6.0 or Delphi.
• Programming With HALCON/C
This part describes HALCON’s language interface to C.
• Using HDevEngine
This part describes how to use HDevEngine to execute HDevelop programs and procedures from
a programming language.
Contents
I
General Issues
11
1
Basic Information About Programming with HALCON
1.1 Which HALCON Interface to Use . . . . . . . . . . . . . . . . . . . . . . . . . . . . .
1.2 Platform-Specific HALCON Versions . . . . . . . . . . . . . . . . . . . . . . . . . . .
13
13
14
2
Parallel Programming and HALCON
2.1 Automatic Parallelization . . . . . . . . . . . . . . . . . . . . . . . . . . . . . . . . . .
2.1.1 Initializing HALCON . . . . . . . . . . . . . . . . . . . . . . . . . . . . . . .
2.1.2 The Methods of Automatic Parallelization . . . . . . . . . . . . . . . . . . . . .
2.2 Parallel Programming . . . . . . . . . . . . . . . . . . . . . . . . . . . . . . . . . . . .
2.2.1 A Closer Look at Reentrancy . . . . . . . . . . . . . . . . . . . . . . . . . . . .
2.2.2 Style Guide . . . . . . . . . . . . . . . . . . . . . . . . . . . . . . . . . . . . .
2.2.3 Multithreading Operators . . . . . . . . . . . . . . . . . . . . . . . . . . . . . .
2.2.4 Examples . . . . . . . . . . . . . . . . . . . . . . . . . . . . . . . . . . . . . .
2.3 Additional Information on HALCON . . . . . . . . . . . . . . . . . . . . . . . . . . .
2.3.1 Customizing the Parallelization Mechanisms . . . . . . . . . . . . . . . . . . .
2.3.2 Using an Image Acquisition Interface on Multi-Core or Multi-Processor Hardware
17
17
17
18
19
19
20
21
21
22
22
23
3
Tips and Tricks
3.1 Monitoring HALCON Programs with HALCON Spy . . . . . . . . . . . . . . . . . . .
3.1.1 HALCON Spy on Multi-Core or Multi-Processor Hardware . . . . . . . . . . .
3.2 Terminate HALCON Library . . . . . . . . . . . . . . . . . . . . . . . . . . . . . . . .
25
25
26
26
II
Programming With HALCON/C++
27
4
Introducing HALCON/C++
4.1 A First Example . . . . . . . . . . . . . . . . . . . . . . . . . . . . . . . . . . . . . . .
29
30
5
Basics of the HALCON/C++ Interface
5.1 The Namespace HalconCpp . . . . . . . .
5.2 Calling HALCON Operators . . . . . . . .
5.2.1 A Closer Look at Parameters . . . .
5.2.2 Calling Operators via Classes . . .
5.2.3 Constructors and Halcon Operators
5.2.4 Destructors and Halcon Operators .
33
33
34
35
37
38
39
.
.
.
.
.
.
.
.
.
.
.
.
.
.
.
.
.
.
.
.
.
.
.
.
.
.
.
.
.
.
.
.
.
.
.
.
.
.
.
.
.
.
.
.
.
.
.
.
.
.
.
.
.
.
.
.
.
.
.
.
.
.
.
.
.
.
.
.
.
.
.
.
.
.
.
.
.
.
.
.
.
.
.
.
.
.
.
.
.
.
.
.
.
.
.
.
.
.
.
.
.
.
.
.
.
.
.
.
.
.
.
.
.
.
.
.
.
.
.
.
.
.
.
.
.
.
.
.
.
.
.
.
.
.
.
.
.
.
.
.
.
.
.
.
5.3
5.4
5.5
5.6
5.2.5 The Tuple Mode . . . . . . . . . . . . . . . .
Error Handling . . . . . . . . . . . . . . . . . . . . .
Memory Management . . . . . . . . . . . . . . . . . .
How to Combine Procedural and Object-Oriented Code
I/O Streams . . . . . . . . . . . . . . . . . . . . . . .
6 The HALCON Parameter Classes
6.1 Iconic Objects . . . . . . . . . . . . .
6.1.1 Regions . . . . . . . . . . . .
6.1.2 Images . . . . . . . . . . . .
6.1.3 XLD Objects . . . . . . . . .
6.2 Control Parameters . . . . . . . . . .
6.2.1 Tuples . . . . . . . . . . . . .
6.2.2 Classes Encapsulating Handles
.
.
.
.
.
.
.
.
.
.
.
.
.
.
.
.
.
.
.
.
.
.
.
.
.
.
.
.
.
.
.
.
.
.
.
.
.
.
.
.
.
.
.
.
.
.
.
.
.
.
.
.
.
.
.
.
.
.
.
.
.
.
.
.
.
.
.
.
.
.
.
.
.
.
.
.
.
.
.
.
.
.
.
.
.
.
.
.
.
.
39
43
43
43
44
.
.
.
.
.
.
.
.
.
.
.
.
.
.
.
.
.
.
.
.
.
.
.
.
.
.
.
.
.
.
.
.
.
.
.
.
.
.
.
.
.
.
.
.
.
.
.
.
.
.
.
.
.
.
.
.
.
.
.
.
.
.
.
.
.
.
.
.
.
.
.
.
.
.
.
.
.
.
.
.
.
.
.
.
.
.
.
.
.
.
.
.
.
.
.
.
.
.
.
.
.
.
.
.
.
.
.
.
.
.
.
.
.
.
.
.
.
.
.
.
.
.
.
.
.
.
.
.
.
.
.
.
.
.
.
.
.
.
.
.
.
.
.
.
.
.
.
.
.
.
.
.
.
.
.
.
.
.
.
.
.
.
.
.
.
.
.
.
.
.
.
.
.
.
.
.
.
.
.
.
.
.
.
.
.
.
.
.
.
47
47
47
48
48
48
49
49
7 Creating Applications With HALCON/C++
7.1 Relevant Directories and Files . . . . .
7.2 Example Programs . . . . . . . . . . .
7.3 Relevant Environment Variables . . . .
7.4 Windows . . . . . . . . . . . . . . . .
7.5 Linux . . . . . . . . . . . . . . . . . .
7.6 Mac OS X . . . . . . . . . . . . . . . .
.
.
.
.
.
.
.
.
.
.
.
.
.
.
.
.
.
.
.
.
.
.
.
.
.
.
.
.
.
.
.
.
.
.
.
.
.
.
.
.
.
.
.
.
.
.
.
.
.
.
.
.
.
.
.
.
.
.
.
.
.
.
.
.
.
.
.
.
.
.
.
.
.
.
.
.
.
.
.
.
.
.
.
.
.
.
.
.
.
.
.
.
.
.
.
.
.
.
.
.
.
.
.
.
.
.
.
.
.
.
.
.
.
.
.
.
.
.
.
.
.
.
.
.
.
.
.
.
.
.
.
.
.
.
.
.
.
.
.
.
.
.
.
.
.
.
.
.
.
.
.
.
.
.
.
.
51
51
53
53
54
54
55
8 Typical Image Processing Problems
8.1 Thresholding an Image . . . . .
8.2 Edge Detection . . . . . . . . .
8.3 Dynamic Threshold . . . . . . .
8.4 Texture Transformation . . . . .
8.5 Eliminating Small Objects . . .
.
.
.
.
.
.
.
.
.
.
.
.
.
.
.
.
.
.
.
.
.
.
.
.
.
.
.
.
.
.
.
.
.
.
.
.
.
.
.
.
.
.
.
.
.
.
.
.
.
.
.
.
.
.
.
.
.
.
.
.
.
.
.
.
.
.
.
.
.
.
.
.
.
.
.
.
.
.
.
.
.
.
.
.
.
.
.
.
.
.
.
.
.
.
.
.
.
.
.
.
.
.
.
.
.
.
.
.
.
.
.
.
.
.
.
.
.
.
.
.
.
.
.
.
.
.
.
.
.
.
57
57
58
58
58
59
9 Information for Users of HALCON C++ (legacy)
9.1 Compiling legacy C++ applications with HALCON 11 or higher
9.2 Converting legacy C++ code to the new HALCON/C++ interface
9.2.1 Change the Namespace . . . . . . . . . . . . . . . . . .
9.2.2 Adapt existing code . . . . . . . . . . . . . . . . . . . .
9.2.3 Compilation . . . . . . . . . . . . . . . . . . . . . . .
.
.
.
.
.
.
.
.
.
.
.
.
.
.
.
.
.
.
.
.
.
.
.
.
.
.
.
.
.
.
.
.
.
.
.
.
.
.
.
.
.
.
.
.
.
.
.
.
.
.
.
.
.
.
.
.
.
.
.
.
.
.
.
.
.
61
62
62
62
62
63
III
.
.
.
.
.
.
.
.
.
.
.
.
.
.
.
.
.
.
.
.
Programming With HALCON/C++ (legacy)
65
10 Introducing HALCON/C++ (legacy)
10.1 A First Example . . . . . . . . . . . . . . . . . . . . . . . . . . . . . . . . . . . . . . .
67
68
11 Basics of the HALCON/C++ (legacy) Interface
11.1 The Namespace Halcon . . . . . . . . . . .
11.2 Calling HALCON Operators . . . . . . . .
11.2.1 A Closer Look at Parameters . . . .
11.2.2 Calling Operators via Classes . . .
71
72
72
73
75
.
.
.
.
.
.
.
.
.
.
.
.
.
.
.
.
.
.
.
.
.
.
.
.
.
.
.
.
.
.
.
.
.
.
.
.
.
.
.
.
.
.
.
.
.
.
.
.
.
.
.
.
.
.
.
.
.
.
.
.
.
.
.
.
.
.
.
.
.
.
.
.
.
.
.
.
.
.
.
.
.
.
.
.
.
.
.
.
.
.
.
.
.
.
.
.
11.3
11.4
11.5
11.6
11.2.3 Constructors and Halcon Operators . . . . . .
11.2.4 Destructors and Halcon Operators . . . . . . .
11.2.5 The Tuple Mode . . . . . . . . . . . . . . . .
Error Handling . . . . . . . . . . . . . . . . . . . . .
11.3.1 Object-Oriented Approach . . . . . . . . . . .
11.3.2 Procedural Approach . . . . . . . . . . . . . .
Memory Management . . . . . . . . . . . . . . . . . .
How to Combine Procedural and Object-Oriented Code
I/O Streams . . . . . . . . . . . . . . . . . . . . . . .
12 The HALCON Parameter Classes
12.1 Iconic Objects . . . . . . . . . . . . . . . . . .
12.1.1 Regions . . . . . . . . . . . . . . . . .
12.1.2 Images . . . . . . . . . . . . . . . . .
12.1.3 XLD Objects . . . . . . . . . . . . . .
12.1.4 Low-Level Iconic Objects . . . . . . .
12.2 Control Parameters . . . . . . . . . . . . . . .
12.2.1 The Basic Class for Control Parameters
12.2.2 Tuples . . . . . . . . . . . . . . . . . .
12.2.3 Classes Encapsulating Handles . . . . .
12.3 Auxiliary Classes . . . . . . . . . . . . . . . .
.
.
.
.
.
.
.
.
.
.
.
.
.
.
.
.
.
.
.
.
.
.
.
.
.
.
.
.
.
.
.
.
.
.
.
.
.
.
.
.
.
.
.
.
.
.
.
.
.
.
.
.
.
.
.
.
.
.
.
.
.
.
.
.
.
.
.
.
.
.
.
.
.
.
.
.
.
.
.
.
.
.
.
.
.
.
.
.
.
.
.
.
.
.
.
.
.
.
.
.
.
.
.
.
.
.
.
.
.
.
.
.
.
.
.
.
.
.
.
.
.
.
.
.
.
.
.
.
.
.
.
.
.
.
.
.
.
.
.
.
.
.
.
.
.
.
.
.
.
.
.
.
.
.
.
.
.
.
.
.
.
.
76
78
78
82
82
83
84
84
86
.
.
.
.
.
.
.
.
.
.
.
.
.
.
.
.
.
.
.
.
.
.
.
.
.
.
.
.
.
.
.
.
.
.
.
.
.
.
.
.
.
.
.
.
.
.
.
.
.
.
.
.
.
.
.
.
.
.
.
.
.
.
.
.
.
.
.
.
.
.
.
.
.
.
.
.
.
.
.
.
.
.
.
.
.
.
.
.
.
.
.
.
.
.
.
.
.
.
.
.
.
.
.
.
.
.
.
.
.
.
.
.
.
.
.
.
.
.
.
.
.
.
.
.
.
.
.
.
.
.
.
.
.
.
.
.
.
.
.
.
.
.
.
.
.
.
.
.
.
.
.
.
.
.
.
.
.
.
.
.
.
.
.
.
.
.
.
.
.
.
.
.
.
.
.
.
.
.
.
.
.
.
.
.
.
.
.
.
.
.
.
.
.
.
.
.
.
.
.
.
.
.
.
.
.
.
.
.
.
.
.
.
.
.
.
.
.
.
.
.
87
87
87
94
102
102
103
103
104
107
109
13 Creating Applications With HALCON/C++ (legacy)
13.1 Relevant Directories and Files . . . . . . . . . .
13.2 Relevant Environment Variables . . . . . . . . .
13.3 Windows . . . . . . . . . . . . . . . . . . . . .
13.4 Linux . . . . . . . . . . . . . . . . . . . . . . .
.
.
.
.
.
.
.
.
.
.
.
.
.
.
.
.
.
.
.
.
.
.
.
.
.
.
.
.
.
.
.
.
.
.
.
.
.
.
.
.
.
.
.
.
.
.
.
.
.
.
.
.
.
.
.
.
.
.
.
.
.
.
.
.
.
.
.
.
.
.
.
.
.
.
.
.
.
.
.
.
.
.
.
.
111
111
112
113
113
14 Typical Image Processing Problems
14.1 Thresholding an Image . . . . .
14.2 Edge Detection . . . . . . . . .
14.3 Dynamic Threshold . . . . . . .
14.4 Texture Transformation . . . . .
14.5 Eliminating Small Objects . . .
14.6 Selecting Oriented Objects . . .
14.7 Smoothing Contours . . . . . .
.
.
.
.
.
.
.
.
.
.
.
.
.
.
.
.
.
.
.
.
.
.
.
.
.
.
.
.
.
.
.
.
.
.
.
.
.
.
.
.
.
.
.
.
.
.
.
.
.
.
.
.
.
.
.
.
.
.
.
.
.
.
.
.
.
.
.
.
.
.
.
.
.
.
.
.
.
.
.
.
.
.
.
.
.
.
.
.
.
.
.
.
.
.
.
.
.
.
.
.
.
.
.
.
.
.
.
.
.
.
.
.
.
.
.
.
.
.
.
.
.
.
.
.
.
.
.
.
.
.
.
.
.
.
.
.
.
.
.
.
.
.
.
.
.
.
.
115
115
116
116
116
117
117
117
IV
.
.
.
.
.
.
.
.
.
.
.
.
.
.
.
.
.
.
.
.
.
.
.
.
.
.
.
.
.
.
.
.
.
.
.
.
.
.
.
.
.
.
.
.
.
.
.
.
.
.
.
.
.
.
.
.
.
.
.
.
.
.
.
Programming With HALCON/.NET
119
15 Introducing HALCON/.NET
16 Creating Applications With HALCON/.NET
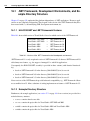
16.1 .NET Framework, Development Environments, and Example Directory Structure
16.1.1 HALCON/.NET and .NET Framework Versions . . . . . . . . . . . . .
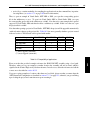
16.1.2 Example Directory Structure . . . . . . . . . . . . . . . . . . . . . . . .
16.2 Adding HALCON/.NET to an Application . . . . . . . . . . . . . . . . . . . . .
16.2.1 Customizing Visual Studio’s Toolbox . . . . . . . . . . . . . . . . . . .
121
.
.
.
.
.
.
.
.
.
.
.
.
.
.
.
.
.
.
.
.
123
124
124
124
126
126
.
.
.
.
.
.
.
.
.
.
.
.
.
.
.
.
.
.
.
.
.
.
.
.
.
.
.
.
.
.
.
.
.
.
.
.
.
.
.
.
.
.
.
.
.
.
.
.
.
.
.
.
.
.
.
.
.
.
.
.
.
.
.
.
.
.
.
.
.
.
.
.
.
.
.
.
.
.
.
.
.
.
.
.
.
.
.
.
.
.
.
.
.
.
.
.
.
.
.
.
.
.
.
.
.
.
.
.
.
.
.
.
.
.
.
.
.
.
.
.
.
.
.
.
.
.
.
.
.
.
.
.
.
.
.
.
.
.
.
.
.
.
.
.
126
127
128
129
129
130
131
133
135
135
136
137
140
141
142
142
17 Additional Information
17.1 HALCON Codelets . . . . . . . . . . . . . . . . . . . . . . . . . . . . .
17.2 Provided Examples . . . . . . . . . . . . . . . . . . . . . . . . . . . . .
17.2.1 C# . . . . . . . . . . . . . . . . . . . . . . . . . . . . . . . . . .
17.2.2 Visual Basic .NET . . . . . . . . . . . . . . . . . . . . . . . . .
17.2.3 C++ . . . . . . . . . . . . . . . . . . . . . . . . . . . . . . . . .
17.3 HALCON/.NET Applications under Linux Using Mono . . . . . . . . . .
17.3.1 Restrictions . . . . . . . . . . . . . . . . . . . . . . . . . . . . .
17.3.2 Deploying HALCON/.NET Applications Created under Windows
17.3.3 Compiling HALCON/.NET Applications with Mono . . . . . . .
17.3.4 Using Other GUI Libraries . . . . . . . . . . . . . . . . . . . . .
17.4 Using HDevelop Programs . . . . . . . . . . . . . . . . . . . . . . . . .
17.4.1 Using the Template Application . . . . . . . . . . . . . . . . . .
17.4.2 Combining the Exported Code with the HALCON/.NET Classes .
17.5 Miscellaneous . . . . . . . . . . . . . . . . . . . . . . . . . . . . . . . .
17.5.1 .NET Framework Security Configuration . . . . . . . . . . . . .
17.5.2 HALCON/.NET and Remote Access . . . . . . . . . . . . . . .
.
.
.
.
.
.
.
.
.
.
.
.
.
.
.
.
.
.
.
.
.
.
.
.
.
.
.
.
.
.
.
.
.
.
.
.
.
.
.
.
.
.
.
.
.
.
.
.
.
.
.
.
.
.
.
.
.
.
.
.
.
.
.
.
.
.
.
.
.
.
.
.
.
.
.
.
.
.
.
.
.
.
.
.
.
.
.
.
.
.
.
.
.
.
.
.
.
.
.
.
.
.
.
.
.
.
.
.
.
.
.
.
.
.
.
.
.
.
.
.
.
.
.
.
.
.
.
.
143
143
148
149
149
150
150
150
151
151
152
152
153
153
153
153
155
16.3
16.4
16.5
16.6
16.7
16.8
16.9
V
16.2.2 Adding a Reference to HALCON/.NET . . . . . . . . . . .
16.2.3 Specifying the Namespace . . . . . . . . . . . . . . . . . .
Adding and Customizing HWindowControl for the Visualization . .
Using HALCON/.NET Classes . . . . . . . . . . . . . . . . . . . .
16.4.1 Online Help . . . . . . . . . . . . . . . . . . . . . . . . . .
16.4.2 Calling HALCON Operators . . . . . . . . . . . . . . . . .
16.4.3 From Declaration to Finalization . . . . . . . . . . . . . . .
16.4.4 Operator Overloads . . . . . . . . . . . . . . . . . . . . . .
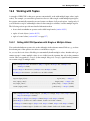
Working with Tuples . . . . . . . . . . . . . . . . . . . . . . . . .
16.5.1 Calling HALCON Operators with Single or Multiple Values
16.5.2 Iconic Tuples . . . . . . . . . . . . . . . . . . . . . . . . .
16.5.3 Control Tuples and the Class HTuple . . . . . . . . . . . .
Visualization . . . . . . . . . . . . . . . . . . . . . . . . . . . . .
Error Handling . . . . . . . . . . . . . . . . . . . . . . . . . . . .
Deploying an Application . . . . . . . . . . . . . . . . . . . . . . .
Using a Newer HALCON/.NET Release . . . . . . . . . . . . . . .
.
.
.
.
.
.
.
.
.
.
.
.
.
.
.
.
.
.
.
.
.
.
.
.
.
.
.
.
.
.
.
.
Programming With HALCON/COM
18 Introduction
18.1 The Microsoft Component Object Model (COM) . .
18.1.1 COM and .NET . . . . . . . . . . . . . . . .
18.1.2 A Quick Look at Some Programming Aspects
18.2 HALCON and COM . . . . . . . . . . . . . . . . .
157
.
.
.
.
.
.
.
.
.
.
.
.
.
.
.
.
.
.
.
.
.
.
.
.
.
.
.
.
.
.
.
.
.
.
.
.
.
.
.
.
.
.
.
.
.
.
.
.
.
.
.
.
.
.
.
.
.
.
.
.
.
.
.
.
.
.
.
.
.
.
.
.
.
.
.
.
159
159
159
160
161
19 The HALCON/COM Interface
163
19.1 More about Classes . . . . . . . . . . . . . . . . . . . . . . . . . . . . . . . . . . . . . 163
19.1.1 Different Types of Classes . . . . . . . . . . . . . . . . . . . . . . . . . . . . . 164
19.1.2 Classes for Special Purposes . . . . . . . . . . . . . . . . . . . . . . . . . . . . 164
19.2 Object Construction and Destruction
19.2.1 Construction . . . . . . . .
19.2.2 Destruction . . . . . . . . .
19.3 Interfaces and Inheritance . . . . . .
19.4 Methods and Properties . . . . . . .
19.5 A Closer Look at Data Types . . . .
19.6 Error Handling . . . . . . . . . . .
19.7 HALCON/COM and Visual Basic .
19.7.1 Object Instantiation . . . . .
19.7.2 Error Handling . . . . . . .
20 Example Visual Basic Session
20.1 First Step: The GUI . . . . . .
20.2 Second Step: Functionality . .
20.3 Final Step: More Functionality
20.4 Using HALCON XL . . . . .
20.5 Other Examples . . . . . . . .
VI
.
.
.
.
.
.
.
.
.
.
.
.
.
.
.
.
.
.
.
.
.
.
.
.
.
.
.
.
.
.
.
.
.
.
.
.
.
.
.
.
.
.
.
.
.
.
.
.
.
.
.
.
.
.
.
.
.
.
.
.
.
.
.
.
.
.
.
.
.
.
.
.
.
.
.
.
.
.
.
.
.
.
.
.
.
.
.
.
.
.
.
.
.
.
.
.
.
.
.
.
.
.
.
.
.
.
.
.
.
.
.
.
.
.
.
.
.
.
.
.
.
.
.
.
.
.
.
.
.
.
.
.
.
.
.
.
.
.
.
.
.
.
.
.
.
.
.
.
.
.
.
.
.
.
.
.
.
.
.
.
.
.
.
.
.
.
.
.
.
.
.
.
.
.
.
.
.
.
.
.
.
.
.
.
.
.
.
.
.
.
.
.
.
.
.
.
.
.
.
.
.
.
.
.
.
.
.
.
.
.
.
.
.
.
.
.
.
.
.
.
.
.
.
.
.
.
.
.
.
.
.
.
.
.
.
.
.
.
.
.
.
.
.
.
.
.
.
.
.
.
.
.
.
.
.
.
.
.
.
.
.
.
.
.
.
.
.
.
.
.
.
.
.
.
.
.
.
.
.
.
.
.
.
.
.
.
.
.
.
.
.
.
.
.
.
167
167
168
168
169
169
170
170
170
171
.
.
.
.
.
.
.
.
.
.
.
.
.
.
.
.
.
.
.
.
.
.
.
.
.
.
.
.
.
.
.
.
.
.
.
.
.
.
.
.
.
.
.
.
.
.
.
.
.
.
.
.
.
.
.
.
.
.
.
.
.
.
.
.
.
.
.
.
.
.
.
.
.
.
.
.
.
.
.
.
.
.
.
.
.
.
.
.
.
.
.
.
.
.
.
.
.
.
.
.
.
.
.
.
.
.
.
.
.
.
.
.
.
.
.
.
.
.
.
.
.
.
.
.
.
.
.
.
.
.
.
.
.
.
.
.
.
.
.
.
173
173
175
176
178
178
Programming With HALCON/C
179
21 Introducing HALCON/C
181
21.1 A First Example . . . . . . . . . . . . . . . . . . . . . . . . . . . . . . . . . . . . . . . 181
22 The HALCON Parameter Classes
22.1 Image objects . . . . . . . . .
22.2 Control parameters . . . . . .
22.2.1 The Simple Mode . . .
22.2.2 The Tuple Mode . . .
.
.
.
.
.
.
.
.
.
.
.
.
.
.
.
.
.
.
.
.
.
.
.
.
.
.
.
.
.
.
.
.
.
.
.
.
.
.
.
.
.
.
.
.
.
.
.
.
.
.
.
.
.
.
.
.
.
.
.
.
.
.
.
.
.
.
.
.
.
.
.
.
.
.
.
.
.
.
.
.
.
.
.
.
.
.
.
.
.
.
.
.
.
.
.
.
.
.
.
.
.
.
.
.
.
.
.
.
.
.
.
.
.
.
.
.
.
.
.
.
.
.
.
.
23 Return Values of HALCON Operators
183
183
185
186
186
195
24 Generation of HALCON/C Applications
24.1 Relevant Directories and Files . . .
24.2 Example Programs . . . . . . . . .
24.3 Relevant Environment Variables . .
24.4 Windows . . . . . . . . . . . . . .
24.5 Linux . . . . . . . . . . . . . . . .
.
.
.
.
.
.
.
.
.
.
.
.
.
.
.
.
.
.
.
.
.
.
.
.
.
.
.
.
.
.
.
.
.
.
.
.
.
.
.
.
.
.
.
.
.
.
.
.
.
.
.
.
.
.
.
.
.
.
.
.
.
.
.
.
.
.
.
.
.
.
.
.
.
.
.
.
.
.
.
.
.
.
.
.
.
.
.
.
.
.
.
.
.
.
.
.
.
.
.
.
.
.
.
.
.
.
.
.
.
.
.
.
.
.
.
.
.
.
.
.
.
.
.
.
.
.
.
.
.
.
.
.
.
.
.
.
.
.
.
.
197
197
198
199
200
200
25 Typical Image Processing Problems
25.1 Thresholding . . . . . . . . . .
25.2 Detecting Edges . . . . . . . . .
25.3 Dynamic Threshold . . . . . . .
25.4 Simple Texture Transformations
25.5 Eliminating Small Objects . . .
25.6 Selecting Specific Orientations .
25.7 Smoothing Region Boundaries .
.
.
.
.
.
.
.
.
.
.
.
.
.
.
.
.
.
.
.
.
.
.
.
.
.
.
.
.
.
.
.
.
.
.
.
.
.
.
.
.
.
.
.
.
.
.
.
.
.
.
.
.
.
.
.
.
.
.
.
.
.
.
.
.
.
.
.
.
.
.
.
.
.
.
.
.
.
.
.
.
.
.
.
.
.
.
.
.
.
.
.
.
.
.
.
.
.
.
.
.
.
.
.
.
.
.
.
.
.
.
.
.
.
.
.
.
.
.
.
.
.
.
.
.
.
.
.
.
.
.
.
.
.
.
.
.
.
.
.
.
.
.
.
.
.
.
.
.
.
.
.
.
.
.
.
.
.
.
.
.
.
.
.
.
.
.
.
.
.
.
.
.
.
.
.
.
.
.
.
.
.
.
.
.
.
.
.
.
.
.
.
.
.
.
.
.
203
203
203
204
204
205
205
205
.
.
.
.
.
.
.
.
.
.
.
.
.
.
VII
Using HDevEngine
207
26 Introducing HDevEngine
209
27 HDevEngine in C++ Applications
27.1 How to Create An Executable Application With HDevEngine/C++
27.2 How to Use HDevEngine/C++ . . . . . . . . . . . . . . . . . . .
27.2.1 Executing an HDevelop Program . . . . . . . . . . . . . .
27.2.2 Executing HDevelop Procedures . . . . . . . . . . . . . .
27.2.3 Display . . . . . . . . . . . . . . . . . . . . . . . . . . .
27.2.4 Error Handling . . . . . . . . . . . . . . . . . . . . . . .
27.2.5 Creating Multithreaded Applications . . . . . . . . . . . .
.
.
.
.
.
.
.
.
.
.
.
.
.
.
.
.
.
.
.
.
.
.
.
.
.
.
.
.
.
.
.
.
.
.
.
.
.
.
.
.
.
.
.
.
.
.
.
.
.
.
.
.
.
.
.
.
.
.
.
.
.
.
.
.
.
.
.
.
.
.
.
.
.
.
.
.
.
.
.
.
.
.
.
.
213
213
215
215
217
221
223
227
28 HDevEngine in .NET Applications
28.1 Basics . . . . . . . . . . . . . . . . . . . . .
28.2 Examples . . . . . . . . . . . . . . . . . . .
28.2.1 Executing an HDevelop Program . . .
28.2.2 Executing HDevelop Procedures . . .
28.2.3 Display . . . . . . . . . . . . . . . .
28.2.4 Error Handling . . . . . . . . . . . .
28.2.5 Creating Multithreaded Applications .
.
.
.
.
.
.
.
.
.
.
.
.
.
.
.
.
.
.
.
.
.
.
.
.
.
.
.
.
.
.
.
.
.
.
.
.
.
.
.
.
.
.
.
.
.
.
.
.
.
.
.
.
.
.
.
.
.
.
.
.
.
.
.
.
.
.
.
.
.
.
.
.
.
.
.
.
.
.
.
.
.
.
.
.
.
.
.
.
.
.
.
.
.
.
.
.
.
.
.
.
.
.
.
.
.
.
.
.
.
.
.
.
.
.
.
.
.
.
.
.
.
.
.
.
.
.
.
.
.
.
.
.
.
.
.
.
.
.
.
.
.
.
.
.
.
.
.
229
229
229
230
232
238
238
241
29 HDevEngine in COM Applications
29.1 Basics . . . . . . . . . . . . . . . . . . . . . . . .
29.2 Examples . . . . . . . . . . . . . . . . . . . . . .
29.2.1 Executing an HDevelop Program . . . . . .
29.2.2 Executing an External HDevelop Procedure
29.2.3 Display . . . . . . . . . . . . . . . . . . .
29.2.4 Error Handling . . . . . . . . . . . . . . .
.
.
.
.
.
.
.
.
.
.
.
.
.
.
.
.
.
.
.
.
.
.
.
.
.
.
.
.
.
.
.
.
.
.
.
.
.
.
.
.
.
.
.
.
.
.
.
.
.
.
.
.
.
.
.
.
.
.
.
.
.
.
.
.
.
.
.
.
.
.
.
.
.
.
.
.
.
.
.
.
.
.
.
.
.
.
.
.
.
.
.
.
.
.
.
.
.
.
.
.
.
.
.
.
.
.
.
.
.
.
.
.
.
.
.
.
.
.
.
.
257
257
257
258
259
263
267
30 General Information
30.1 Overview of the Classes . . . . . . . . . . . . . . . . . . . . . . . . .
30.1.1 HDevEngine, HDevEngineX . . . . . . . . . . . . . . . . . . .
30.1.2 HDevProgram, HDevProgramX . . . . . . . . . . . . . . . . .
30.1.3 HDevProgramCall, HDevProgramCallX . . . . . . . . . . . .
30.1.4 HDevProcedure, HDevProcedureX . . . . . . . . . . . . . . .
30.1.5 HDevProcedureCall, HDevProcedureCallX . . . . . . . . .
30.1.6 HDevOperatorImpl, IHDevOperators, HDevOperatorImplX
30.1.7 HDevEngineException . . . . . . . . . . . . . . . . . . . . .
30.2 Tips and Tricks . . . . . . . . . . . . . . . . . . . . . . . . . . . . . .
30.2.1 Troubleshooting . . . . . . . . . . . . . . . . . . . . . . . . .
30.2.2 Loading and Unloading Procedures . . . . . . . . . . . . . . .
.
.
.
.
.
.
.
.
.
.
.
.
.
.
.
.
.
.
.
.
.
.
.
.
.
.
.
.
.
.
.
.
.
.
.
.
.
.
.
.
.
.
.
.
.
.
.
.
.
.
.
.
.
.
.
.
.
.
.
.
.
.
.
.
.
.
.
.
.
.
.
.
.
.
.
.
.
.
.
.
.
.
.
.
.
.
.
.
.
.
.
.
.
.
.
.
.
.
.
269
269
270
273
275
276
278
280
281
282
282
282
Index
.
.
.
.
.
.
.
.
.
.
.
.
.
.
283
Part I
General Issues
13
General Issues
Basic Information About Programming with HALCON
Chapter 1
Basic Information About
Programming with HALCON
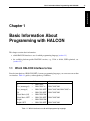
This chapter contains basic information:
• which HALCON interface to use for which programming language (section 1.1)
• the available platform-specific HALCON versions, e.g., 32-bit or 64-bit, SSE2-optimized, etc.
(section 1.2)
1.1
Which HALCON Interface to Use
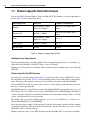
Since the introduction of HALCON/.NET, for many programming languages you can now use more than
one interface. Table 1.1 guides you through these possibilities.
recommendation
C
→ HALCON/C
C++ (unmanaged) → HALCON/C++
C++ (managed)
→ HALCON/.NET
C#
→ HALCON/.NET
Visual Basic (6.0) → HALCON/COM
Visual Basic .NET → HALCON/.NET
Delphi
→ HALCON/COM
Delphi .NET
→ HALCON/.NET
alternative(s)
HALCON/COM
HALCON/COM, HALCON/C++
HALCON/COM
HALCON/COM
HALCON/COM
Table 1.1: Which interface to use for which programming language.
14
Basic Information About Programming with HALCON
1.2
Platform-Specific HALCON Versions
You can use HALCON under Windows, Linux, and Mac OS X. The summary of system requirements is
listed in table 1.2; more details follow below.
Operating System
Processor
Compiler / Environment
Windows
Intel Pentium 4 / AMD
Athlon 64 or higher
Microsoft Visual Studio 6.0 or
higher
Windows x64
Intel 64 or AMD64
Microsoft Visual Studio 6.0 or
higher
Linux
Intel Pentium 4 / AMD
Athlon 64 or higher
gcc 4.x
Linux x86_64
Intel 64 or AMD64
gcc 4.x
Mac OS X 10.7
Intel 64
Xcode 4
Table 1.2: Platforms supported by HALCON.
Additional Linux Requirements
The Linux distribution has to be LSB compliant. The corresponding packages have to be installed, e.g.,
redhat-lsb (Fedora, RedHat), lsb (SuSE), lsb-base + lsb-core (Ubuntu).
Furthermore, an XServer has to be installed. This is required even for command-line tools provided with
HALCON.
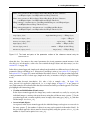
Platform-Specific HALCON Versions
For each of the operating systems listed in table 1.2, platform-specific versions of HALCON’s executables and libraries are provided. Table 1.3 lists all platform-specific versions with detailed system requirements. The name of the currently used version is stored in the environment variable HALCONARCH.
Note that HALCON should also run on newer versions of the operating systems than the ones listed;
however, we cannot guarantee this.
HALCONARCH appears in several directory paths: Executable HALCON programs like hdevelop, and
DLLs like halcon.dll (Windows only), reside in %HALCONROOT%\bin\%HALCONARCH%. On Windows
systems, this path is therefore automatically included in the environment variable PATH; on a Linux
system, you must include it in your login script.
The libraries that you need for linking programs, e.g., halcon.lib (Windows) or libhalcon.so
(Linux) %HALCONROOT%\lib\%HALCONARCH%.
Please note that when creating a 64-bit application, both the development computer and the computer
on which the application will run must be 64-bit platforms. On the other hand, you can use a 32-bit
HALCON version on a 64-bit platform.
Further note that in order to create .NET applications under Linux/Mac OS X you need to install Mono.
1.2 Platform-Specific HALCON Versions
x86sse2-win32
x64-win64
x86sse2-linux2.4-gcc40
x64-linux2.4-gcc40
x64-macosx
Windows XP/2003/Vista/2008/7,
on x86 processor with SSE2 extension,
e.g., Intel Pentium 4 / AMD Athlon 64 or
higher
Windows XP/2003/Vista/2008/7 x64
Edition,
on Intel 64 or AMD64
Linux, Kernel 2.4 or higher,
libc.so.6 (GLIBC_2.3.4 or higher),
libstdc++.so.6 (GLIBCXX_3.4 or higher),
on x86 processor with SSE2 extension,
e.g.,
Intel Pentium 4 / AMD Athlon 64 or
higher
Linux x86_64, Kernel 2.4 or higher,
libc.so.6 (GLIBC_2.3.4 or higher),
libstdc++.so.6 (GLIBCXX_3.4 or higher),
on Intel 64 or AMD64
Mac OS X 10.7 on Intel 64
Compiler
Visual Studio 6.0 or
higher
Visual Studio 2005
or higher
gcc 3.4/4.x
gcc 3.4/4.x
Xcode 4
Table 1.3: Values of HALCONARCH and detailed system requirements.
Platform-Independent Applications
Even when using a platform-specific version of HALCON, you can still create platform-independent
applications, in two ways:
• With HDevelop, HALCON’s integrated development environment (IDE). HDevelop programs are
stored in a platform-independent format, thus, you can run them on any supported platform.
• With HALCON/.NET, HALCON’s interface to .NET programming languages. Applications
written in .NET languages are stored in a platform-independent intermediate language, which is
then converted by the so-called common language runtime into platform-specific code.
You can combine both methods by using HDevEngine/.NET to run HDevelop programs from a HALCON/.NET application.
General Issues
Operating System, Processor
HALCONARCH
15
16
Basic Information About Programming with HALCON
17
General Issues
Parallel Programming and HALCON
Chapter 2
Parallel Programming and
HALCON
This chapter explains how to use HALCON on multi-core or multi-processor hardware, concentrating
on the main features: automatic parallelization (section 2.1) and the support of parallel programming
(section 2.2 on page 19).
2.1
Automatic Parallelization
If HALCON is used on multi-processor or multi-core hardware, it will automatically parallelize image
processing operators. Section 2.1.1 describes how to initialize HALCON in order to use this mechanism.
Section 2.1.2 explains the different methods which are used by HALCON operators for their automatic
parallelization.
2.1.1
Initializing HALCON
In order to adapt the parallelization mechanism optimally to the actual hardware, HALCON needs to
examine this hardware once. Afterwards, HALCON programs will be automatically parallelized without
needing any further action on your part. Even existing HALCON programs will run and be parallelized
without needing to be changed.
You trigger this initial examination by calling the operator optimize_aop (see the corresponding entry
in the HALCON Reference Manuals for further information). Note, that this operator will only work
correctly if called on a multi-core or multi-processor hardware; if you call the operator on a singleprocessor or single-core computer, it will return an error message. As a shortcut, you may call the
executable hcheck_parallel which resides in the directory %HALCONROOT%\bin\%HALCONARCH%.
Upon calling optimize_aop, HALCON examines every operator that can be sped up in principle by
an automatic parallelization. Each examined operator is processed several times - both sequentially and
in parallel - with a changing set of input parameter values, e.g., images. The latter helps to evaluate
18
Parallel Programming and HALCON
dependencies between an operator’s input parameter characteristics (e.g. the size of an input image) and
the efficiency of its parallel processing. Note that this examination may take some hours, depending on
your computer and the optimization parameters!
!
The extracted information is stored in the file .aop_info in the common application data folder (under
Windows) or in the HALCON installation directory $HALCONROOT (under Linux). Please note, that on
some operating systems you need special privileges to initialize HALCON successfully, otherwise the
operator optimize_aop is not able to store the extracted information. Note that in order to execute
command line tools with administrator privileges under Windows Vista and higher, you will need
to select “Run as Administrator” (even if you are already logged in as administrator).
Please refer to the examples in the directory %HALCONEXAMPLES%\hdevelop\System\
Parallelization for more information about optimize_aop and about other operators that
allow to query and modify the parallelization information.
2.1.2
The Methods of Automatic Parallelization
For the automatic parallelization of operators, HALCON exploits data parallelism, i.e., the property that
parts of the input data of an operator can be processed independently of each other. Data parallelism can
be found at four levels:
1. tuple level
If an operator is called with iconic input parameters containing tuples, i.e., arrays of images,
regions, or XLDs, it can be parallelized by distributing the tuple elements, i.e., the individual
images, regions, or XLDs, on parallel threads. This method requires that all input parameters
contain the same number of tuple elements (or contain a single iconic object or value).
2. channel level
If an operator is called with input images containing multiple channels, it can be parallelized by
distributing the channels on parallel threads. This method requires that all input image objects
contain the same number of channels or a single channel image.
3. domain level
An operator supporting this level can be parallelized by dividing its domain and distributing its
parts on parallel threads.
4. internal data level
Only parts of the operator are parallelized. The actual degree of parallelization depends on the
implementation of the operator. As a result, the potential speedup on multi-core systems varies
among operators utilizing this parallelization method.
The description of a HALCON operator in the Reference Manuals contains an entry called ’Parallelization Information’, which specifies its behavior when using HALCON on a multi-core or multi-processor
hardware. This entry indicates whether the operator will be automatically parallelized by HALCON and
by which method (tuple, channel, domain, internal data).
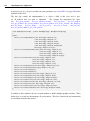
The parallelization method of an arbitrary operator opname can also be determined using
get_operator_info:
get_operator_info('opname', 'parallel_method', Information)
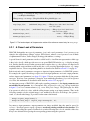
2.2 Parallel Programming
Parallel Programming Using HALCON
HALCON supports parallel programming by being thread-safe and reentrant, i.e., different threads can
call HALCON operators simultaneously without having to wait. However, not all operators are fully
reentrant. This section takes a closer look at the reentrancy of HALCON. Furthermore, it points out
issues that should be kept in mind when writing parallel programs that use HALCON.
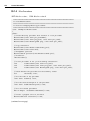
The example program example_multithreaded1.c in the directory example\c shows how to use
multithreading to extract different types of components on a board in parallel using HALCON/C.
Furthermore, HALCON provides special operators to synchronize threads (see section 2.2.3 on page 21).
2.2.1
A Closer Look at Reentrancy
In fact there are different “levels” of reentrancy for HALCON operators:
1. reentrant
An operator is fully reentrant if it can be called by multiple threads simultaneously independent
of the data it is called with.
Please note that you must take special care when multiple threads use the same data objects, e.g.,
the same image variable. In this case, you must synchronize the access to this variable manually
using the corresponding parallel programming mechanisms (mutexes, semaphores). Better still
is to avoid such cases as far as possible, i.e., to use local variables. Note that this is no special
problem of HALCON but of parallel programming in general.
2. local
This level of reentrancy is only relevant under Windows.
Under Windows, operators marked as local should be called only from the thread that instantiates
the corresponding objects. Typical examples are operators that use graphical I/O functions, which
should only be used in the main thread. The reason is that under Windows, there exists a direct
mapping between program threads and graphical elements, such as windows, dialog boxes or
button controls. In short, a graphical element only exists in the context of its associated thread.
This can cause severe problems (for example, hang the application) if a thread tries to perform
user interactions via graphical elements that belong to another thread. For example, you may get
a deadlock if one thread opens a window via open_window and another thread tries to get input
from this window via draw_circle.
3. single write multiple read
A certain group of operators should be called simultaneously only if the different calling threads
work on different data. For example, threads should not try to modify the same template for
pattern matching simultaneously by calling adapt_template with the same handle. Exactly the
same applies to the case that one thread should not modify a data set that is simultaneously read
by another thread. Other groups of operators with this behavior are concerned with file I/O (e.g.,
write_image – read_image, fwrite_string – fread_string but also non-HALCON file
commands) or background estimation (e.g., update_bg_esti – give_bg_esti).
As this thread behavior is not recommended quite generally, HALCON does not actively prevent
it and thus saves overhead. This means that if you (accidentally) call such operators simultaneously with the same data no thread will block, but you might get unwelcome effects.
General Issues
2.2
19
20
Parallel Programming and HALCON
4. mutual exclusive
Some operators cannot be called simultaneously by multiple threads but may be executed in
parallel to other HALCON operators. Examples for mutual exclusive operators are combine_roads_xld, pouring, or concat_ocr_trainf.
5. completely exclusive
A group of operators is executed exclusively by HALCON, i.e., while such an operator is executed, all other threads cannot call another HALCON operator. Examples are all OCR/OCV
operators that modify OCR classifiers, all operators that create or delete files, and the operator
reset_obj_db. The latter is switched off by default, together with the HALCON database of
iconic objects. If, however, you switch the database on via set_system, you must assure that all
operators that are to be executed before reset_obj_db is called have already finished, because
this operator resets HALCON and therefore strongly influences its behavior.
6. independent
A group of operators is executed independently from other, even exclusive operators. Examples
are all tuple operators.
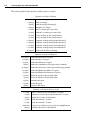
As mentioned already, the description of a HALCON operator in the Reference Manuals contains an
entry called ’Parallelization Information’, which specifies its behavior when using HALCON. This entry
specifies the level of reentrancy as described above.
2.2.2
Style Guide
The following tips are useful for multithreaded programming in general:
• Number of threads ≤ number of processors or cores
If you use more threads than there are processors or cores, your application might actually be
slower than before because of the synchronization overhead. Note that when counting threads only
the so-called worker threads are relevant, i.e., threads that are running / working continuously.
• Local variables
If possible, use local variables, i.e., instantiate variables in the thread that uses them. If multiple
threads use the same variable, you must synchronize their access to the variable using the appropriate parallel programming constructs (mutexes, semaphores; please refer to the documentation
of your programming language for details).
An exception are COM applications that use the so-called “Single-Threaded Apartment” mode,
because here calls are synchronized automatically. This mode, however, has other disadvantages,
as described in more detail in the tip for HALCON/COM below.
When using HALCON, please keep the following tips in mind:
• Initialization
Before calling HALCON operators in parallel in a multithreaded program, you have to call one
operator exclusively. This is necessary to allow HALCON to initialize its internal data structures.
• I/O and visualization
Under Windows, use I/O operators (including graphics operators like open_window or
disp_image) locally, i.e., in the same thread, otherwise you might get a deadlock. This means
that you should not open a window in one thread and request a user interaction in it from another
thread. In the Reference Manual, these operators are marked as locally reentrant (see section 2.2.1
on page 19).
For HALCON/.NET, this typically means that all visualization must be performed in the main
thread, because HWindowControl (see section 16.3 on page 128) is instantiated in the main
thread. However, other threads can also “delegate” the display to the main thread as shown, e.g.,
in the example program %HALCONEXAMPLES%\c#\MultiThreading or %HALCONEXAMPLES%\
hdevengine\c#\MultiThreading (the latter is described in detail in section 28.2.5.1 on page
241, the delegation of display on page 248).
Keep in mind that operators which create or delete files work exclusively, i.e., other threads have
to wait.
The programmer has to assure that threads do not access the same file (or handle) simultaneously!
• Multithreading vs. automatic parallelization
If you explicitly balance the load on multiple processors or cores in a multithreaded program,
we recommend to switch off the automatic parallelization mechanism in order to get an optimal
performance (or reduce the number of threads used by it so that the sum of threads does not exceed
the number of processors or cores). How to switch of the automatic parallelization or reduce the
number of threads is described in section 2.3.1.
• HALCON/COM
Please note that in COM applications threads are created by default using the so-called “SingleThreaded Apartment” (STA) mode. In this mode, calls to COM objects (and thereby all calls of
HALCON operators) are synchronized automatically with the windows message queue.
Furthermore, in this apartment model calls to a COM object are always executed by the thread
where the object was instantiated. Thus, if you instantiate HFramegrabberX in one thread and
call GrabImageAsync in another, both threads are blocked during image acquisition! Therefore,
it is very important to use local variables, i.e., instantiate objects in the thread that uses them (see
above).
2.2.3
Multithreading Operators
In the operator section “System . Multithreading”, HALCON provides operators for creating and using
synchronization objects like mutexes, events, condition variables, and barriers.
With them, you can synchronize threads in a platform-independent way. Note, however, that up to now
no operators for creating the threads are provided.
2.2.4
Examples
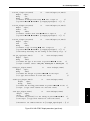
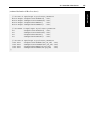
HALCON currently provides the following examples for parallel programming (paths relative to %HALCONEXAMPLES%):
HALCON/C
• c\source\example_multithreaded1.c
two threads extract different elements on a board in parallel
21
General Issues
2.2 Parallel Programming
22
Parallel Programming and HALCON
HALCON/.NET
• c#\MultiThreading (C#)
performs image acquisition, processing, and display in three threads
• hdevengine\c#\MultiThreading (C#)
executes the same HDevelop procedure in parallel by two threads using HDevEngine
• hdevengine\c#\MultiThreadingTwoWindows (C#)
executes different HDevelop procedures in parallel by two threads using HDevEngine
HALCON/C++
• mfc\FGMultiThreading (using MFC)
performs image acquisition / display and processing in two threads
• mfc\MultiThreading (using MFC)
performs image acquisition, processing, and display in three threads
• hdevengine\mfc\source\exec_programs_mt_mfc.cpp
executes HDevelop procedures for image acquisition, data code reading, and visualization in parallel using HDevEngine and MFC
• hdevengine\cpp\source\exec_procedures_mt.cpp
executes HDevelop programs in parallel using HDevEngine
2.3
Additional Information
This section contains additional information that helps you to use HALCON on multi-core or multiprocessor hardware.
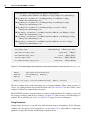
2.3.1
Customizing the Parallelization Mechanisms
With the help of HALCON’s system parameters, which can be set an queried with the operators
set_system and get_system, respectively, you can customize the behavior of the parallelization mechanisms.
You can query the number of processors (or cores) by calling
get_system('processor_num', Information)
You can switch off parts of the features of HALCON with the help of the operator set_system. To
switch off the automatic parallelization mechanism, call (HDevelop notation, see the Reference Manual
for more information)
2.3 Additional Information on HALCON
23
General Issues
set_system('parallelize_operators','false')
To switch of reentrancy, call
set_system('reentrant','false')
Of course, you can switch on both behaviors again by calling set_system with ’true’ as the second
parameter. Please note that when switching off reentrancy you also switch off automatic parallelization,
as it requires reentrancy.
Switch off these features only if you are sure you don’t need them but want to save the corresponding
computing overhead. e.g., if you write a sequential program that will never run on a multi-processor or
multi-core computer.
A reason for switching off the automatic parallelization mechanism could be if your multithreaded program does its own scheduling and does not want HALCON to interfere via automatic parallelization.
Note that you do not need to switch off automatic parallelization when using HALCON on a singleprocessor or single-core computer; HALCON does so automatically if it detects only one processor or
core.
When switching off the automatic parallelization, you might consider switching off the use of thread
pools (see the parameter ’thread_pool’ of set_system).
Please do not switch on reentrancy if this is already the case! Otherwise, this will reset the parallelization system, which includes switching on the automatic operator parallelization. This will decrease
the performance in case of manual parallelization (multithreading).
With the system parameter ’parallelize_operators’ you can customize the automatic parallelization mechanisms in more detail. Please see the description of set_system for more information.
Finally, you can influence the number of threads used for automatic parallelization with the parameters ’thread_num’ and ’tsp_thread_num’ (set_system). Reducing the number of threads is useful
if you also perform a manual parallelization in your program. If you switch off automatic parallelization
permanently, you should also switch off the thread pool to save resources of the operating system.
2.3.2
Using an Image Acquisition Interface on Multi-Core or MultiProcessor Hardware
All image acquisition devices supported by HALCON can be used on multi-core or multiprocessor hardware. Please note, that none of the corresponding operators is automatically parallelized.
Most of the operators are reentrant, only the operators concerned with the connection to the device (open_framegrabber, info_framegrabber, close_framegrabber, and
close_all_framegrabbers) are processed completely exclusively. Furthermore, these operators are
local, i.e., under Windows they should be called from the thread that instantiates the corresponding object
(see section 2.2.1 on page 19).
!
24
Parallel Programming and HALCON
25
General Issues
Tips and Tricks
Chapter 3
Tips and Tricks
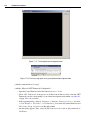
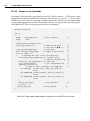
3.1
Monitoring HALCON Programs with HALCON Spy
HALCON Spy helps you to debug image processing programs realized with HALCON operators by
monitoring calls to HALCON operators and displaying their input and output data in graphical or textual
form. Furthermore, it allows you to step through HALCON programs. Note that under Windows
HALCON Spy does only work in combination with a console application, i.e., you can not use it
together with HDevelop.
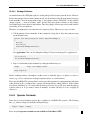
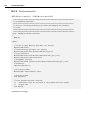
HALCON Spy is activated within a HALCON program by inserting the line
set_spy('mode','on')
Alternatively, you can activate HALCON Spy for an already linked program by defining the environment
variable HALCONSPY (i.e., by setting it to any value). How to set environment variables is described in
the Installation Guide, section A.2 on page 64.
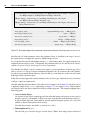
You specify the monitoring mode by calling the operator set_spy again with a pair of parameters, for
example
set_spy('operator','on')
set_spy('input_control','on')
to be informed about all operator calls and the names and values of input control parameters. The
monitoring mode can also be specified via the environment variable HALCONSPY, using a colon to separate
multiple options:
operator=on:input_control=on
Please take a look at the entry for set_spy in the HALCON Reference Manuals for detailed information
on all the debugging options.
!
26
Tips and Tricks
3.1.1
HALCON Spy on Multi-Core or Multi-Processor Hardware
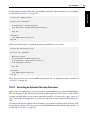
Please note that HALCON Spy cannot be used to debug multithreaded programs or programs using the
automatic parallelization.
If you want to use HALCON Spy on a multi-core or multi-processor hardware, you must therefore first
switch off the automatic parallelization as described in section 2.3.1 on page 22.
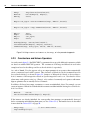
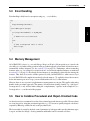
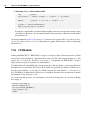
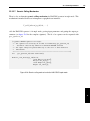
3.2
Terminate HALCON Library
In applications where DLLs are unloaded in a thread-exclusive context (such as applications using
COM), the HALCON library will not terminate properly if the thread pool is still active, except when
using the HALCON/COM interface.
A possible scenario where the problem may occur is, e.g., when using HALCON/C++ to implement an
ATL control.
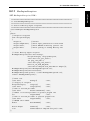
To overcome this problem, it is necessary to either call set_system(’thread_pool’,’false’) early
enough before terminating the application (typically in the main application windows close event), or to
disable thread pool cleanup by setting HShutdownThreadPool = FALSE at any time.
The latter setting implies a resource leak on termination. However, this is only relevant to applications
that need to dynamically unload DLLs without terminating the application.
HALCON/COM will automatically set HShutdownThreadPool = FALSE. Other language interfaces,
that are not normally used in a COM context, retain HShutdownThreadPool = TRUE so they may be
unloaded without resource leak by default.
Part II
Programming With HALCON/C++
Introducing HALCON/C++
29
C++
Chapter 4
Introducing HALCON/C++
HALCON/C++ is HALCON’s interface to the programming language C++. Together with the HALCON
library, it allows to use the image processing power of HALCON inside C++ programs.
Please note that the HALCON/C++ interface described here was introduced in HALCON 11. Older
versions of HALCON used a different C++ interface which is still provided for backwards compatibility
for some time and is referred to as HALCON/C++ (legacy) (see part III on page 67). Users are advised
to use the new C++ interface. See chapter 9 on page 61 for information on how to compile legacy C++
applications, and how to convert legacy code to the new interface.
This part is organized as follows:
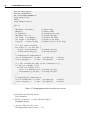
• In section 4.1, we start with a first example program.
• Chapter 5 on page 33 then takes a closer look at the basics of the HALCON/C++ interface,
• while chapter 6 on page 47 gives an overview of the classes HImage, etc.
• Chapter 7 on page 51 shows how to create applications based on HALCON/C++.
• Chapter 8 on page 57 presents typical image processing problems and shows how to solve them
using HALCON/C++.
• Chapter 9 on page 61 compares HALCON/C++ to HALCON/C++ (legacy) and shows how to
compile legacy C++ code or convert it to the new C++ interface.
!
30
Introducing HALCON/C++
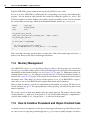
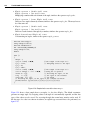
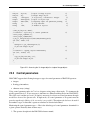
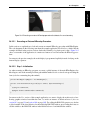
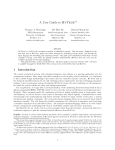
4.1
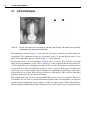
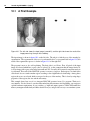
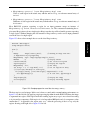
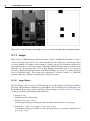
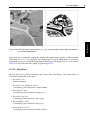
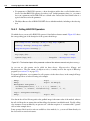
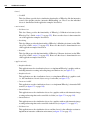
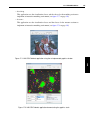
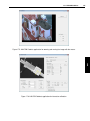
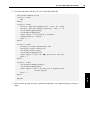
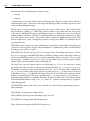
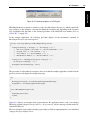
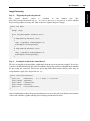
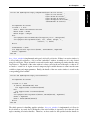
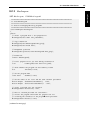
A First Example
Figure 4.1: The left side shows the input image (a mandrill), and the right side shows the result of the
image processing: the eyes of the monkey.
The input image is shown in figure 4.1 on the left side. The task is to find the eyes of the monkey by
segmentation. The segmentation of the eyes is performed by the C++ program listed in figure 4.2, the
result of the segmentation process is shown in figure 4.1 on the right side.
The program is more or less self-explaining. The basic idea is as follows: First, all pixels of the input
image are selected which have a gray value of at least 128, on the assumption that the image Mandrill
is a byte image with a gray value range between 0 and 255. Secondly, the connected component analysis
is performed. The result of the HALCON operator is an array of regions. Each region is isolated in the
sense that it does not touch another region according to the neighbourhood relationship. Among these
regions those two are selected which correspond to the eyes of the monkey. This is done by using shape
properties of the regions, the size and the anisometry.
This example shows how easy it is to integrate HALCON operators in any C++ program. Their use is
very intuitive: You don’t have to care about the underlying data structures and algorithms, you can ignore
specific hardware requirements, if you consider e.g. input and output operators. HALCON handles the
memory management efficiently and hides details from you, and provides an easy to use runtime system.
4.1 A First Example
31
C++
#include "HalconCpp.h"
int main()
{
using namespace HalconCpp;
HImage Mandrill("monkey");
Hlong width,height;
Mandrill.GetImageSize(&width,&height);
// read image from file "monkey"
HWindow w(0,0,width,height);
// window with size equal to image
Mandrill.DispImage(w);
w.Click();
w.ClearWindow();
// display image in window
// wait for mouse click
HRegion Bright = Mandrill >= 128;
HRegion Conn = Bright.Connection();
// select all bright pixels
// get connected components
// select regions with a size of at least 500 pixels
HRegion Large = Conn.SelectShape("area","and",500,90000);
// select the eyes out of the instance variable Large by using
// the anisometry as region feature:
HRegion Eyes = Large.SelectShape("anisometry","and",1,1.7);
Eyes.DispRegion(w);
w.Click();
// display result image in window
// wait for mouse click
}
Figure 4.2: This program extract the eyes of the monkey.
32
Introducing HALCON/C++
Basics of the HALCON/C++ Interface
33
Basics of the HALCON/C++
Interface
The HALCON/C++ interface provides two different approaches to use HALCON’s functionality within
your C++ program: a procedural and an object-oriented approach. The procedural approach corresponds
to calling HALCON operators directly as in C or HDevelop, e.g.:
HObject original_image, smoothed_image;
ReadImage(&original_image, "monkey");
MeanImage(original_image, &smoothed_image, 11, 11);
In addition to the procedural approach, HALCON/C++ allows to call HALCON operators in an objectoriented way, i.e., via a set of classes. For example, the code from above can be “translated” into:
HImage original_image("monkey");
HImage smoothed_image = original_image.MeanImage(11, 11);
This simple example already shows that the two approaches result in clearly different code: The operator
calls differ in the number and type of parameters. Furthermore, functionality may be available in different
ways; for example, images can be read from files via a constructor of the class HImage. In general, we
recommend to use the object-oriented approach. Note, however, that HDevelop can export programs only
as procedural C++ code. Section 5.5 on page 43 shows how to combine procedural with object-oriented
code.
In the following sections, we take a closer look at various issues regarding the use of the HALCON/C++
interface; chapter 6 on page 47 describes the provided classes in more detail.
5.1
The Namespace HalconCpp
Starting with HALCON 11, all functions and classes of HALCON/C++ use the namespace HalconCpp
to prevent potential name conflicts with other C++ libraries.
C++
Chapter 5
34
Basics of the HALCON/C++ Interface
You can specify (“use”) the namespace in three ways:
• specifically, by prefixing each class name or operator call with the namespace
HalconCpp::HObject original_image, smoothed_image;
HalconCpp::ReadImage(&original_image, "monkey");
• locally, by placing the directive using namespace HalconCpp; at the beginning of a block, e.g.,
at the beginning of a function:
int main(int argc, char *argv[])
{
using namespace HalconCpp;
HObject original_image, smoothed_image;
ReadImage(&original_image, "monkey");
Then, you can use HALCON’s classes and functions without prefix inside this block.
• globally, by placing the directive using directly after including HalconCpp.h. Then, you do not
need the prefix in your whole application.
#include "HalconCpp.h"
using namespace HalconCpp;
Which method is the most suitable depends on your application, more exactly on what other libraries it
includes and if there are name collisions.
Please note that the namespace is not mentioned in the operator descriptions in the reference manual in
order to keep it readable. Similarly, in the following sections the namespace is left out.
5.2
Calling HALCON Operators
How a HALCON operator can be called via the HALCON/C++ interface is described in detail in the
HALCON operator reference manual. As an example, figure 5.1 shows parts of the entry for the operator
MeanImage.
Please note that the reference manual does not list all possible signatures of the operators. A complete
list can be found in the file include\cpp\HCPPGlobal.h.
Below, we
• take a closer look at the parameters of an operator call (section 5.2.1)
• describe how to call operators via classes (section 5.2.2 on page 37) or via special constructors
(section 5.2.3 on page 38) or destructors (section 5.2.4 on page 39)
• explain another special HALCON concept, the tuple mode (section 5.2.5 on page 39)
5.2 Calling HALCON Operators
35
void MeanImage (const HObject& Image, HObject* ImageMean, const HTuple& MaskWidth,
const HTuple& MaskHeight)
HImage HImage::MeanImage (Hlong MaskWidth, Hlong MaskHeight) const
ImageMean (output_object) . . . (multichannel-)image(-array) ; HImage (byte / int2 / uint2 / int4 /
int8 / real / vector_field)
MaskWidth (input_control) . . . . . . . . . . . . . . . . . . . . . . . . . . . . . . . . . . . . . . . . extent.x ; HTuple (Hlong)
MaskHeight (input_control) . . . . . . . . . . . . . . . . . . . . . . . . . . . . . . . . . . . . . . . . extent.y ; HTuple (Hlong)
Figure 5.1: The head and parts of the parameter section of the reference manual entry for mean_image.
5.2.1
A Closer Look at Parameters
HALCON distinguishes two types of parameters: iconic and control parameters. Iconic parameters are
related to the original image (images, regions, XLD objects), whereas control parameters are all kinds
of alphanumerical values, such as integers, floating-point numbers, or strings.
A special form of control parameters are the so-called handles. A well-known representative of this type
is the window handle, which provides access to an opened HALCON window, e.g., to display an image
in it. Besides, handles are used when operators share complex data, e.g., the operators for shape-based
matching which create and then use the model data, or for accessing input/output devices, e.g., image
acquisition devices. Classes encapsulating handles are described in detail in section 6.2.2 on page 49.
Both iconic and control parameters can appear as input and output parameters of a HALCON operator.
For example, the operator MeanImage expects one iconic input parameter, one iconic output parameter,
and two input control parameters (see figure 5.1); figure 5.2 shows an operator which has all four parameter types. Note how some parameters “disappear” from within the parentheses if you call an operator
via a class; this mechanism is described in more detail in section 5.2.2 on page 37.
An important concept of HALCON’s philosophy regarding parameters is that input parameters are
not modified by an operator. As a consequence, they are passed by value (e.g., Hlong MaskWidth
in figure 5.1) or via a constant reference (e.g., const HObject& Image). This philosophy also holds
if an operator is called via a class, with the calling instance acting as an input parameter. Thus, in the
following example code the original image is not modified by the call to MeanImage; the operator’s
result, i.e., the smoothed image, is provided via the return value instead:
HImage original_image("monkey");
HImage smoothed_image = original_image.MeanImage(11, 11);
In contrast to input parameters, output parameters are always modified, thus they must be passed by
reference. Note that operators expect a pointer to an already existing variable or class instance! For
example, when calling the operator FindBarCode as in the following lines of code, variables of the class
HTuple are declared before passing the corresponding pointers using the operator &.
C++
Image (input_object) . . . (multichannel-)image(-array) ; HImage (byte / int2 / uint2 / int4 / int8 /
real / vector_field)
36
Basics of the HALCON/C++ Interface
void FindBarCode (const HObject& Image, HObject* SymbolRegions,
const HTuple& BarCodeHandle, const HTuple& CodeType, HTuple* DecodedDataStrings)
HRegion HBarCode::FindBarCode (const HImage& Image, const HTuple& CodeType,
HTuple* DecodedDataStrings) const
HRegion HBarCode::FindBarCode (const HImage& Image, const HString& CodeType,
HString* DecodedDataStrings) const
HRegion HBarCode::FindBarCode (const HImage& Image, const char* CodeType,
HString* DecodedDataStrings) const
HRegion HImage::FindBarCode (const HBarCode& BarCodeHandle, const HTuple& CodeType,
HTuple* DecodedDataStrings) const
HRegion HImage::FindBarCode (const HBarCode& BarCodeHandle, const HString& CodeType,
HString* DecodedDataStrings) const
HRegion HImage::FindBarCode (const HBarCode& BarCodeHandle, const char* CodeType,
HString* DecodedDataStrings) const
Image (input_object) . . . . . . . . . . . . . . . . . . . . . . . . . . . . . . singlechannelimage ; HImage (byte / uint2)
SymbolRegions (output_object) . . . . . . . . . . . . . . . . . . . . . . . . . . . . . . . . . . . . region(-array) ; HRegion
BarCodeHandle (input_control) . . . . . . . . . . . . . . . . . . . . . . . . . . . . . . . . . . . barcode ; HTuple (Hlong)
CodeType (input_control) . . . . . . . . . . . . . . . . . . . . . . . . . . . . . . . . . . . string(-array) ; HTuple (HString)
DecodedDataStrings (output_control) . . . . . . . . . . . . . . . . . . . . . . string(-array) ; HTuple (HString)
Figure 5.2: The head and parts of the parameter section of the reference manual entry for find_bar_code.
HImage
HBarCode
HString
image("barcode/ean13/ean1301");
barcode(HTuple(), HTuple());
result;
HRegion code_region = barcode.FindBarCode(image, "EAN-13", &result);
The above example shows another interesting aspect of output parameters: When calling operators via
classes, one output parameter may become the return value (see section 5.2.2 for more details); in the
example, FindBarCode returns the bar code region.
Many HALCON operators accept more than one value for certain parameters. For example, you can call
the operator MeanImage with an array of images (see figure 5.1); then, an array of smoothed images is
returned. This is called the tuple mode; see section 5.2.5 on page 39 for more information.
String Parameters
Output strings are always of type HString with automatic memory management. In the following
example code, the operator InfoFramegrabber (see also figure 5.3) is called with two output string
parameters to query the currently installed image acquisition board:
5.2 Calling HALCON Operators
37
void InfoFramegrabber (const HTuple& Name, const HTuple& Query, HTuple* Information,
HTuple* ValueList)
HString HInfo::InfoFramegrabber (const HString& Name, const HString& Query,
HTuple* ValueList)
HString HInfo::InfoFramegrabber (const char* Name, const char* Query, HTuple* ValueList)
Query (input_control) . . . . . . . . . . . . . . . . . . . . . . . . . . . . . . . . . . . . . . . . . . . . . string ; HTuple (HString)
Information (output_control) . . . . . . . . . . . . . . . . . . . . . . . . . . . . . . . . . . . . . string ; HTuple (HString)
ValueList (output_control) . . . . . . . . . . . . . . . . . . . string-array ; HTuple (HString / Hlong / double)
Figure 5.3: The head and parts of the parameter section of the reference manual entry for
info_framegrabber.
HString
sInfo, sValue;
InfoFramegrabber(FGName, "info_boards", &sInfo, &sValue);
Note that it is also not necessary to allocate memory for multiple output string parameters returned as
HTuple:
HTuple
tInfo, tValues;
InfoFramegrabber(FGName, "info_boards", &tInfo, &tValues);
5.2.2
Calling Operators via Classes
As already described in the previous section, the HALCON/C++ reference manual shows via which
classes an operator can be called. For example, FindBarCode can be called via objects of the class HImage or HBarCode (see figure 5.2 on page 36). In both cases, the corresponding input parameter (Image
or BarCodeHandle, respectively) does not appear within the parentheses anymore as it is replaced by
the calling instance of the class (this).
There is a further difference to the procedural operator signature: The first output parameter (in the
example the bar code region SymbolRegions) also disappears from within the parentheses and becomes
the return value instead of the error code (more about error handling can be found in section 5.3 on page
43).
Figure 5.4 depicts code examples for the three ways to call FindBarCode. When comparing the objectoriented and the procedural approach, you can see that the calls to the operators ReadImage and CreateBarCodeModel are replaced by special constructors for the classes HImage and HBarCode, respectively.
This topic is discussed in more detail below.
C++
Name (input_control) . . . . . . . . . . . . . . . . . . . . . . . . . . . . . . . . . . . . . . . . . . . . . . . string ; HTuple (HString)
38
Basics of the HALCON/C++ Interface
HImage
HBarCode
HString
image("barcode/ean13/ean1301");
barcode(HTuple(), HTuple());
result;
HRegion code_region = barcode.FindBarCode(image, "EAN-13", &result);
HRegion code_region = image.FindBarCode(barcode, "EAN-13", &result);
HObject
HTuple
HObject
HTuple
image;
barcode;
code_region;
result;
ReadImage(&image, "barcode/ean13/ean1301");
CreateBarCodeModel(HTuple(), HTuple(), &barcode);
FindBarCode(image, &code_region, barcode, "EAN-13", &result);
Figure 5.4: Using FindBarCode via HBarCode, via HImage, or in the procedural approach.
5.2.3
Constructors and Halcon Operators
As can be seen in figure 5.4, the HALCON/C++ parameter classes provide additional constructors, which
are based on suitable HALCON operators. The constructors for HImage and HBarCode used in the
example are based on ReadImage and CreateBarCodeModel, respectively.
As a rule of thumb: If a class appears only as an output parameter in an operator, there automatically
exists a constructor based on this operator. Thus, instances of HBarCode can be constructed based on
CreateBarCodeModel as shown in figure 5.4, instances of HShapeModel based on CreateShapeModel, instances of HFramegrabber based on OpenFramegrabber and so on. Note that for classes
where many such operators exist (e.g., HImage), only a subset of commonly used operators with unambiguous parameter list are actually used as constructor.
In addition, all classes have empty constructors to create an uninitialized object. For example, you can
create an instance of HBarCode with the default constructor and then initialize it using CreateBarCodeModel as follows:
HBarCode
barcode;
barcode.CreateBarCodeModel(HTuple(), HTuple());
If the instance was already initialized, the corresponding data structures are automatically destroyed
before constructing and initializing them anew (see also section 5.2.4). The handle classes are described
in more detail in section 6.2.2.2 on page 50.
HImage image;
image.ReadImage("clip");
// still uninitialized
5.2 Calling HALCON Operators
39
Below we take a brief look at the most important classes. A complete and up-to-date list of available
constructors can be found in the HALCON operator reference and the corresponding header files in
%HALCONROOT%\include\cpp.
• Images:
The class HImage provides constructors based on the operators ReadImage, GenImage1, and GenImageConst.
• Windows:
The class HWindow provides a constructor based on the operator OpenWindow.
Of course, you can close a window using CloseWindow and then open it again using OpenWindow.
In contrast to the iconic parameter classes, you can call the “constructor-like” operator OpenWindow via an instance of HWindow in the intuitive way, i.e., the calling instance is modified; in addition
the corresponding handle is returned. HWindow is described in more detail in section 6.2.2.1 on
page 50.
5.2.4
Destructors and Halcon Operators
All HALCON/C++ classes provide default destructors which automatically free the corresponding memory. For some classes, the destructors are based on suitable operators:
• Windows:
The default destructor of the class HWindow closes the window based on CloseWindow. Note that
the operator itself is no destructor, i.e., you can close a window with CloseWindow and then open
it again using OpenWindow.
• Other Handle Classes:
The default destructors of the other classes encapsulating handles, e.g., HShapeModel or
HFramegrabber, apply operators like ClearShapeModel or CloseFramegrabber, respectively.
In contrast to CloseWindow, these operators cannot be called via instances of the class, as can be
seen in the corresponding reference manual entries; the same holds for operators like ClearAllShapeModels. In fact, there is no need to call these operators as you can initialize instances anew
as described in section 5.2.3.
Please note that you must not use operators like ClearShapeModel, ClearAllShapeModels, or
CloseFramegrabber together with instances of the corresponding handle classes!
5.2.5
The Tuple Mode
As already mentioned in section 5.2.1 on page 35, many HALCON operators can be called in the socalled tuple mode. In this mode, you can, e.g., apply an operator to multiple images or regions with
a single call. The standard case, e.g., calling the operator with a single image, is called the simple
mode. Whether or not an operator supports the tuple mode can be checked in the reference manual. For
example, take a look at figure 5.5, which shows an extract of the reference manual entry for the operator
C++
• Regions:
The class HRegion provides constructors based on operators like GenRectangle2 or GenCircle.
40
Basics of the HALCON/C++ Interface
void CharThreshold (const HObject& Image, const HObject& HistoRegion, HObject* Characters,
const HTuple& Sigma, const HTuple& Percent, HTuple* Threshold)
HRegion HImage::CharThreshold (const HRegion& HistoRegion, double Sigma,
const HTuple& Percent, HTuple* Threshold) const
HRegion HImage::CharThreshold (const HRegion& HistoRegion, double Sigma, double Percent,
Hlong* Threshold) const
Image (input_object) . . . . . . . . . . . . . . . . . . . . . . . . . . . . . singlechannelimage(-array) ; HImage (byte)
HistoRegion (input_object) . . . . . . . . . . . . . . . . . . . . . . . . . . . . . . . . . . . . . . . . . . . . . . . region ; HRegion
Characters (output_object) . . . . . . . . . . . . . . . . . . . . . . . . . . . . . . . . . . . . . . . . region(-array) ; HRegion
Sigma (input_control) . . . . . . . . . . . . . . . . . . . . . . . . . . . . . . . . . . . . . . . . . . . . . number ; HTuple (double)
Percent (input_control) . . . . . . . . . . . . . . . . . . . . . . . . . . . . . . . . . . . number ; HTuple (double / Hlong)
Threshold (output_control) . . . . . . . . . . . . . . . . . . . . . . . . . . . . . . . . . . integer(-array) ; HTuple (Hlong)
Figure 5.5: The head and parts of the parameter section of the reference manual entry for CharThreshold.
CharThreshold: In the parameter section, the parameter Image is described as an image(-array);
this signals that you can apply the operator to multiple images at once.
If you call CharThreshold with multiple images, i.e., with an image tuple, the output parameters automatically become tuples as well. Consequently, the parameters Characters and Threshold are described as region(-array) and integer(-array), respectively.
Note that the class HTuple can also contain arrays (tuples) of control parameters of mixed type; please
refer to section 6.2.1 on page 49 for more information about this class. In contrast to the control parameters, the iconic parameters remain instances of the class HObject in both modes, as this class can contain
both single objects and object arrays.
In the object-oriented approach, control parameters can be of a basic type (simple mode only) or instances
of HTuple (simple and tuple mode).
After this rather theoretic introduction, let us take a look at example code. In figure 5.6, CharThreshold
is applied in simple mode, i.e., to a single image, in figure 5.7 to two images at once. Both examples
are realized both in the object-oriented and in the procedural approach. The examples highlight some
interesting points:
• Access to iconic objects:
As expected, in the object-oriented approach, the individual images and regions are accessed via
the array operator []; the number of objects in an array can be queried via the method CountObj().
In the procedural approach, objects must be selected explicitly using the operator SelectObj; the
number of objects can be queried via CountObj.
Note that object indexes start with 1 (as used by SelectObj.
• Polymorphism of HObject:
The class HObject is used for all types of iconic objects. What is more, image objects can be used
5.2 Calling HALCON Operators
HImage
HRegion
Hlong
41
image("alpha1");
region;
threshold;
HObject
HObject
HTuple
image;
region;
threshold;
ReadImage(&image, "alpha1");
CharThreshold(image, image, ®ion, 2, 95, &threshold);
DispObj(image, window);
DispObj(region, window);
cout << "Threshold for 'alpha1': " << threshold;
Figure 5.6: Using CharThreshold in simple mode, via HImage, or in the procedural approach (declaration
and opening of window omitted).
for parameters expecting a region, as in the call to CharThreshold in the examples; in this case,
the domain of the image, i.e., the region in which the pixels are “valid”, is extracted automatically.
The object-oriented approach supports an implicit cast from HImage to HRegion.
C++
region = image.CharThreshold(image.GetDomain(), 2, 95, &threshold);
image.DispImage(window);
region.DispRegion(window);
cout << "Threshold for 'alpha1': " << threshold;
42
Basics of the HALCON/C++ Interface
HImage
HRegion
HTuple
images;
regions;
thresholds;
images.GenEmptyObj();
for (int i=1; i<=2; i++)
{
images = images.ConcatObj(HImage(HTuple("alpha") + i));
}
regions = images.CharThreshold(images.GetDomain()[1], 2, 95, &thresholds);
for (int i=1; i<=images.CountObj(); i++)
{
images[i].DispImage(window);
regions[i].DispRegion(window);
cout << "Threshold for 'alpha" << i << "': " << thresholds[i-1].L();
window.Click();
HObject
HObject
HTuple
HTuple
images, image;
regions, region;
num;
thresholds;
GenEmptyObj(&images);
for (int i=1; i<=2; i++)
{
ReadImage(&image, HTuple("alpha") + i);
ConcatObj(images, image, &images);
}
CharThreshold(images, image, ®ions, 2, 95, &thresholds);
CountObj(images, &num);
for (int i=0; i<num; i++)
{
SelectObj(images, &image, i+1);
DispObj(image, window);
SelectObj(regions, ®ion, i+1);
DispObj(region, window);
cout << "Threshold for 'alpha" << i+1 << "': " << thresholds[i].L();
}
Figure 5.7: Using CharThreshold in tuple mode, or in the procedural approach (declaration and opening
of window omitted).
5.3 Error Handling
5.3
43
Error Handling
try
{
image.ReadImage(filename);
}
catch (HException &except)
{
if (except.ErrorNumber() == H_ERR_FNF)
{
// Handle file not found error
}
else
{
// Pass on unexpected error to caller
throw except;
}
}
5.4
Memory Management
All of HALCON’s classes, i.e., not only HImage, HRegion, HTuple, HFramegrabber etc., but also the
class HObject used when calling operators in the procedural approach, release their allocated resources
automatically in their destructor (see also section 5.2.4 on page 39). Furthermore, when constructing
instances anew, e.g., by calling CreateBarCodeModel via an already initialized instance as mentioned
in section 5.2.3 on page 38, the already allocated memory is automatically released before reusing the
instance. Thus, there is no need to call the operator ClearObj in HALCON/C++; what is more, if you
do use it HALCON will complain about already released memory. To explicitly release the resources
before the instance gets out of scope, you can call the method Clear() of the instance.
However, there is one occasion for explicit memory management on your part: This applies when using
handles in the procedural approach: The memory allocated when creating a handle, e.g., with OpenFramegrabber, is only released when calling the “complementary” operator, in the example CloseFramegrabber — or at the end of the program.
5.5
How to Combine Procedural and Object-Oriented Code
As already noted, we recommend to use the object-oriented approach wherever possible. However, there
are some reasons for using the procedural approach, e.g., if you want to quickly integrate code that is
exported by HDevelop, which can only create procedural code.
The least trouble is caused by the basic control parameters as both approaches use the elementary types
long etc. and the class HTuple. Iconic parameters and handles can be converted as follows:
C++
Error handling is fully based on exceptions using try ... catch blocks.
44
Basics of the HALCON/C++ Interface
• Converting HObject into iconic parameter classes
HObject
p_image;
ReadImage(&p_image, "barcode/ean13/ean1301");
HImage
o_image(p_image);
Iconic parameters can be converted from HObject to, e.g., HImage simply by calling the constructor with the procedural variable as a parameter.
• Converting handles into handle classes
HTuple
p_barcode;
CreateBarCodeModel(HTuple(), HTuple(), &p_barcode);
HBarCode
o_barcode(p_barcode[0]);
o_code_region = o_barcode.FindBarCode(o_image, "EAN-13", &result);
Handles cannot be converted directly via a constructor; instead, you call the method SetHandle()
with the procedural handle as a parameter.
• Accessing handle classes through handles
p_barcode = o_barcode.GetHandle();
Note that o_barcode remains the owner of the handle. To reset o_barcode without destroying
the object, use InvalidateHandle().
Similarly, a handle can be extracted from the corresponding class via the method GetHandle().
You can even omit the method, as the handle classes provide cast operators which convert them
automatically into handles.
p_barcode = o_barcode;
Note that instances of HImage can be used in procedural code where HObject is expected.
As already remarked in section 5.2.4 on page 39, you must not use operators like ClearShapeModel,
ClearAllShapeModels, or CloseFramegrabber together with instances of the corresponding handle
classes!
5.6
I/O Streams
HALCON/C++ provides iostream operators by default. Note that it may be necessary to enable the
namespace std:
using namespace std;
If you want to use the older iostream interface (i.e., <iostream.h> instead of <iostream>), the
following line has to be added (otherwise, there may be conflicts with the HALCON include files):
5.6 I/O Streams
45
C++
#define HCPP_NO_USE_IOSTREAM
46
Basics of the HALCON/C++ Interface
The HALCON Parameter Classes
47
The HALCON Parameter Classes
The HALCON operator reference contains a complete list of the generic classes and member functions
of HALCON/C++. This chapter contains a summary of additional convenience members.
In addition, HALCON/C++ contains many operator overloads, which are consistent with HALCON/.NET. See section 16.4.4 on page 133 for a list of the overloaded operators.
6.1
Iconic Objects
The base class of the iconic parameter classes in HALCON/C++ is the class HObject which manages
entries in the database, i.e., the copying or releasing of objects. The class HObject can contain all types
of iconic objects. This has the advantage that important methods like DispObj() can be applied to all
iconic objects in the same manner.
Three classes are derived from the root class HObject:
• Class HRegion for handling regions.
• Class HImage for handling images.
• Class HXLD for handling polygons.
These classes are described in more detail below.
6.1.1
Regions
A region is a set of coordinates in the image plane. Such a region does not need to be connected and
it may contain holes. A region can be larger than the actual image format. Regions are represented by
the so-called runlength coding in HALCON. The class HRegion represents a region in HALCON/C++.
Besides those operators that can be called via HRegion (see also section 5.2.2 on page 37), HRegion
provides the following member functions:
C++
Chapter 6
48
The HALCON Parameter Classes
• HTuple HRegion::Area()
Area of the region, i.e., number of pixels, see reference manual entry of AreaCenter.
• HTuple HRegion::Row()
Center row of the region.
• HTuple HRegion::Column()
Center column of the region.
6.1.2
Images
There is more to HALCON images than just a matrix of pixels: In HALCON, this matrix is called a
channel, and images may consist of one or more such channels. For example, gray value images consist
of a single channel, color images of three channels. Channels can not only contain the standard 8 bit
pixels (pixel type byte) used to represent gray value images, HALCON allows images to contain various
other data, e.g. 16 bit integers (type int2) or 32 bit floating point numbers (type real) to represent
derivatives. Besides the pixel information, each HALCON image also stores its so-called domain in
form of a HALCON region. The domain can be interpreted as a region of interest, i.e., HALCON
operators (with some exceptions) restrict their processing to this region.
• HTuple HImage::Width()
Return the width of the image, see reference manual entry of GetImageSize.
• HTuple HImage::Height()
Return the height of the image, see reference manual entry of GetImageSize.
6.1.3
XLD Objects
XLD is the abbreviation for eXtended Line Description. This is a data structure used for describing areas
(e.g., arbitrarily sized regions or polygons) or any closed or open contour, i.e., also lines. In contrast to
regions, which represent all areas at pixel precision, XLD objects provide subpixel precision. There are
two basic XLD structures: contours and polygons.
HALCON/C++ provides both a base class HXLD and a set of specialized classes derived from HXLD, e.g.,
HXLDCont for contours or HXLDPoly for polygons.
In contrast to the classes described in the previous sections, the XLD classes provide only member
functions corresponding to HALCON operators (see also section 5.2.2 on page 37).
6.2
Control Parameters
HALCON/C++ can handle different types of alphanumerical control parameters for HALCON operators:
• integer numbers (Hlong),
• floating point numbers (double), and
6.2 Control Parameters
49
• strings (HString).
A special form of control parameters are the so-called handles, which provide access to more complex
data structures like windows, image acquisition connections, or models for shape-based matching. Internally, handles are almost always represented by discrete numbers (long). For handles there exist
corresponding classes, which are described in section 6.2.2.
6.2.1
Tuples
The class HTuple implements an array of dynamic length. The default constructor constructs an empty
array (Length() == 0). This array can dynamically be expanded via assignments. The memory management, i.e., reallocation, freeing, is also managed by the class. The index for accessing the array is in
the range between 0 and Length() − 1.
The following member functions reflect only a small portion of the total. For further information please
refer to the file HTuple.h in %HALCONROOT%\include\cpp.
• HTuple &HTuple::Append(const HTuple& tuple)
Append data to existing tuple.
• void HTuple::Clear()
Clear all data inside the tuple.
• HTuple HTuple::Clone()
Create a detached copy duplication the tuple data.
• Hlong HTuple::Length()
Return the number of elements of the tuple.
• HTupleType HTuple::Type()
Return the data type of the tuple (pure data types or mixed tuple).
• HString HTuple::ToString()
Return a simple string representation of the tuple contents.
• Hlong* HTuple::LArr()
double* HTuple::DArr()
char** HTuple::SArr()
Hcpar* HTuple::PArr()
Access tuple data.
6.2.2
Classes Encapsulating Handles
The perhaps most prominent handle class is HWindow, which is described in section 6.2.2.1. HALCON/C++ also provides classes for handles to files or functionality like access to image acquisition
devices, measuring, or shape-based matching. See section 6.2.2.2 for an overview.
C++
With the class HTuple, HALCON/C++ provides a container class for control parameters. What’s more,
HTuple is polymorphic, i.e., it can also contain arrays of control parameters of mixed type.
50
The HALCON Parameter Classes
6.2.2.1
Windows
The class HWindow provides the management of HALCON windows in a very convenient way. The
properties of HALCON windows can be easily changed, images, regions, and polygons can be displayed,
etc. Besides those operators that can be called via HWindow (see also section 5.2.2 on page 37), HWindow
provides the following member functions:
• void HWindow::Click()
Wait for a mouse click in the window.
• void HWindow::CloseWindow()
Close the window.
6.2.2.2
Other Handle Classes
HALCON/C++ provides the so-called handle classes like HFramegrabber, HBarCode, or
HClassBoxMlp.
Besides the default constructor, the classes typically provide additional constructors based on suitable
operators as described in section 5.2.3 on page 38; e.g., the class HBarCode provides a constructor based
on the operator CreateBarCodeModel.
All handle classes listed above provide the methods SetHandle() and GetHandle(), which allow to
access the underlying handle; furthermore, the classes provide an operator that casts an instance of the
class into the corresponding handle. These methods are typically used when combining procedural and
object-oriented code; for examples please refer to section 5.5 on page 43.
The reference manual provides short overview pages for these classes, listing the operators that can be
called via them.
Creating Applications With HALCON/C++
51
Creating Applications With
HALCON/C++
The HALCON distribution contains examples for creating an application with HALCON/C++. The
following sections show
• the relevant directories and files (section 7.1)
• the list of provided example applications (section 7.2 on page 53)
• the relevant environment variables (section 7.3 on page 53)
• how to create an executable under Windows (section 7.4 on page 54)
• how to create an executable under Linux (section 7.5 on page 54)
• how to create an executable under Mac OS X (section 7.6 on page 55)
7.1
Relevant Directories and Files
Here is an overview of the relevant directories and files (relative to %HALCONROOT%, Windows notation
of paths):
include\halconcpp\HalconCpp.h:
include file; contains all user-relevant definitions of the HALCON system and the declarations
necessary for the C++ interface.
bin\%HALCONARCH%\halcon.dll,
lib\%HALCONARCH%\halcon.lib:
The HALCON library (Windows).
bin\%HALCONARCH%\halconcpp.dll,
C++
Chapter 7
52
Creating Applications With HALCON/C++
lib\%HALCONARCH%\halconcpp.lib:
The HALCON/C++ library (Windows).
bin\%HALCONARCH%\halconxl.dll, halconcppxl.dll,
lib\%HALCONARCH%\halconxl.lib, halconcppxl.lib:
The corresponding libraries of HALCON XL (Windows).
lib/$HALCONARCH/libhalcon.so:
The HALCON library (Linux).
lib/$HALCONARCH/libhalconcpp.so:
The HALCON/C++ library (Linux).
lib/$HALCONARCH/libhalconxl.so,libhalconcppxl.so:
The corresponding libraries of HALCON XL (Linux).
/Library/Frameworks/HALCONCpp.framework
The HALCON/C++ framework (Mac OS X).
/Library/Frameworks/HALCONCppxl.framework
The corresponding framework of HALCON XL (Mac OS X).
include\HProto.h:
External function declarations.
%HALCONEXAMPLES%\cpp\console\makefiles\makefile, makefile.win:
Example makefiles which can be used to compile the example programs (Linux/Mac OS X and
Windows, respectively).
%HALCONEXAMPLES%\cpp\make.%HALCONARCH%, macros.mak, rules.mak:
Auxiliary makefiles included by the makefiles listed above.
%HALCONEXAMPLES%\cpp\console\source\
Directory containing the source files of the example programs.
%HALCONEXAMPLES%\cpp\console\vs2005\examples.sln:
Visual Studio 2005 solution containing projects for all examples; the projects themselves are
placed in subdirectories (Windows only).
%HALCONEXAMPLES%\cpp\console\bin\%HALCONARCH%\
Destination of the example programs when compiled and linked using the makefiles.
%HALCONEXAMPLES%\images\:
Images used by the example programs.
help\operators_*:
Files necessary for online information.
doc\pdf\:
Various manuals (in subdirectories).
7.2 Example Programs
7.2
53
Example Programs
error_handling.cpp
demonstrates the C++ exception handling (see section 5.3 on page 43).
ia_callback.cpp
shows the usage of the HALCON image acquisition callback functionality.
matching.cpp
locates a chip on a board and measures the pins.
serialized_item.cpp
shows how to use the serialization of HALCON objects and tuples in the C++
interface.
Additional examples for using HALCON/C++ can be found in the subdirectories mfc, motif and qt of
%HALCONEXAMPLES%.
7.3
Relevant Environment Variables
In the following, we briefly describe the relevant environment variables; see the Installation Guide,
section A.2 on page 64, for more information, especially about how to set these variables. Note, that
under Windows, all necessary variables are automatically set during the installation.
While a HALCON program is running, it accesses several files internally. To tell HALCON where to
look for these files, the environment variable HALCONROOT has to be set. HALCONROOT points to the
HALCON home directory. HALCONROOT is also used in the sample makefile.
The variable HALCONARCH describes the platform HALCON is used on. Please refer to section 1.1 on
page 13 for more information.
The variable HALCONEXAMPLES indicates where the provided examples are installed.
If user-defined packages are used, the environment variable HALCONEXTENSIONS has to be set. HALCON will look for possible extensions and their corresponding help files in the directories given in
HALCONEXTENSIONS.
Two things are important in connection with the example programs: The default directory for the HALCON operator ReadImage to look for images is %HALCONEXAMPLES%\images. If the images reside
in different directories, the appropriate path must be set in ReadImage or the default image directory
must be changed, using SetSystem("image_dir","..."). This is also possible with the environment
variable HALCONIMAGES. The latter has to be set before starting the program.
The second remark concerns the output terminal under Linux. In the example programs, no host name
is passed to OpenWindow. Therefore, the window is opened on the machine that is specified in the
environment variable DISPLAY. If output on a different terminal is desired, this can be done either directly
in OpenWindow(...,"hostname",...) or by specifying a host name in DISPLAY.
C++
There are several example programs in the HALCON/C++ distribution (%HALCONEXAMPLES%\cpp\
source\console\). To experiment with these examples we recommend to create a private copy in
your working directory.
54
Creating Applications With HALCON/C++
7.4
Creating an Executable Under Windows
Your own C++ programs that use HALCON operators must include the file HalconCpp.h, which contains all user-relevant definitions of the HALCON system and the declarations necessary for the C++
interface. Do this by adding the command
#include "HalconCpp.h"
near the top of your C++ file. In order to create an application you must link the library halconcpp.lib
to your program.
The example projects show the necessary Visual C++ project settings.
Please assure that the stacksize is sufficient. Some sophisticated image processing problems require up
to 1 MB stacksize, so make sure to set the settings of your compiler accordingly (See your compiler
manual for additional information on this topic).
HALCON XL applications: If you want to use HALCON XL, you have to link the library
halconcppxl.lib instead.
7.5
Creating an Executable Under Linux
Your own C++ programs that use HALCON operators must include the file HalconCpp.h, which contains all user-relevant definitions of the HALCON system and the declarations necessary for the C++
interface. Do this by adding the command
#include "HalconCpp.h"
near the top of your C++ file. Using this syntax, the compiler looks for HalconCpp.h in the current
directory only. Alternatively you can tell the compiler where to find the file, giving it the -I<pathname>
command line flag to denote the include file directory.
To create an application, you have to link two libraries to your program: The library libhalconcpp.so
contains the various components of the HALCON/C++ interface. The library libhalcon.so is the
HALCON library.
HALCON XL applications: If you want to use HALCON XL, you have to link the libraries
libhalconcppxl.so and libhalconxl.so instead.
Please take a look at the example makefiles for suitable settings. If you call gmake without further
arguments, the example application matching will be created. To create the other example applications
(e.g., error_handling), call
gmake error_handling
You can use the example makefiles not only to compile and link the example programs but also your own
programs (if placed in the subdirectory source). For example, to compile and link a source file called
myprogram.cpp call
7.6 Mac OS X
55
gmake myprogram
You can link the program to the HALCON XL libraries by adding XL=1 to the make command, for
example
gmake myprogram XL=1
C++
In order to link and run applications under Linux, you have to include the HALCON library path
$HALCONROOT/lib/$HALCONARCH in the system variable LD_LIBRARY_PATH.
7.6
Creating an Executable Under Mac OS X
Your own C++ programs that use HALCON operators must include the file HalconCpp.h, which contains all user-relevant definitions of the HALCON system and the declarations necessary for the C++
interface. Do this by adding the command
#include <HALCONCpp/HalconCpp.h>
near the top of your C++ file. Using this syntax, the compiler looks for HalconCpp.h in the HALCONCpp framework. For HALCON XL the include statement has to be adapted:
#include <HALCONCppxl/HalconCpp.h>
To create an application, you have to link the framework HALCONCpp to your program.
HALCON XL applications: If you want to use HALCON XL, you have to link the library framework
HALCONCppxl instead.
Please take a look at the example Xcode projects under /Users/Shared/Library/Application
Support/HALCON-11.0/examples/cpp for suitable project settings.
56
Creating Applications With HALCON/C++
Typical Image Processing Problems
57
Typical Image Processing
Problems
This chapter shows the power the HALCON system offers to find solutions for image processing problems. Some typical problems are introduced together with sample solutions.
8.1
Thresholding an Image
Some of the most common sequences of HALCON operators may look like the following one:
HImage
HRegion
HRegion
HRegion
Image("file_xyz");
Threshold
= Image.Threshold(0,120);
ConnectedRegions = Threshold.Connection();
ResultingRegions =
ConnectedRegions.SelectShape("area","and",10,100000);
This short program performs the following:
• All pixels are selected with gray values between the range 0 and 120. It is also possible to use the
equivalent call:
HRegion Threshold = (Image <= 120);
• A connected component analysis is performed.
• Only regions with a size of at least 10 pixel are selected. This step can be considered as a step to
remove some of the noise from the image.
C++
Chapter 8
58
Typical Image Processing Problems
8.2
Edge Detection
For the detection of edges the following sequence of HALCON/C++ operators can be applied:
HImage
HImage
HRegion
HRegion
Image("file_xyz");
Sobel = Image.SobelAmp("sum_abs",3);
Max
= Sobel.Threshold(30,255);
Edges = Max.Skeleton();
Some notes:
• Before applying the sobel operator it might be useful first to apply a low-pass filter to the image in
order to suppress noise.
• Besides the sobel operator you can also use filters like EdgesImage, PrewittAmp, RobinsonAmp,
KirschAmp, Roberts, BandpassImage, or Laplace.
• The threshold (in our case 30) must be selected appropriately depending on data.
• The resulting regions are thinned by a Skeleton operator. This leads to regions with a pixel width
of 1.
8.3
Dynamic Threshold
Another way to detect edges is the following sequence:
HImage Image("file_xyz");
HImage Mean
= Image.MeanImage(11,11);
HRegion Threshold = Image.DynThreshold(Mean,5,"light");
Again some remarks:
• The size of the filter mask (in our case 11 × 11) is correlated with the size of the objects which
have to be found in the image. In fact, the sizes are proportional.
• The dynamic threshold selects the pixels with a positive gray value difference of more than 5
(brighter) than the local environment (mask 11 × 11).
8.4
Texture Transformation
Texture transformation is useful in order to obtain specific frequency bands in an image. Thus, a texture
filter detects specific structures in an image. In the following case this structure depends on the chosen
filter; 16 are available for the operator TextureLaws.
HImage
HImage
HImage
HRegion
Image("file_xyz");
TT
= Image.TextureLaws("ee",2,5);
Mean = TT.MeanImage(71,71);
Reg = Mean.Threshold(30,255);
8.5 Eliminating Small Objects
59
• The mean filter MeanImage is applied with a large mask size in order to smooth the “frequency”
image.
• You can also apply several texture transformations and combine the results by using the operators
AddImage and MultImage.
8.5
Eliminating Small Objects
...
segmentation(Image,&Seg);
HRegion Circle(100,100,3.5);
HRegion Res = Seg.Opening(Circle);
• The term segmentation() is an arbitrary segmentation step that results in an array of regions
(Seg).
• The size of the mask (in this case the radius is 3.5) determines the size of the resulting objects.
• You can choose an arbitrary mask shape.
C++
The morphological operator Opening eliminates small objects and smoothes the contours of regions.
60
Typical Image Processing Problems
Information for Users of HALCON C++ (legacy)
61
Information for Users of HALCON
C++ (legacy)
HALCON 11 comes with a new HALCON/C++ interface that includes the following features:
• The API of HALCON/C++ is consistent to HALCON/.NET.
• Error handling is fully based on exceptions.
• Automatic memory management for output strings via new class HString.
• Fast native C++ array access to data stored in a tuple, when all elements of the tuple have the same
type (e.g., array of doubles).
• Support for data classes such as HPose.
• Support for arrays of handle classes, e.g., multiple shape models.
• Mixing procedural and object-oriented code has been simplified.
This interface is not compatible with HALCON/C++ applications developed for HALCON 10 or older.
However, the previous HALCON/C++ interface is still available as HALCON/C++ (legacy), so existing
applications will continue to work (see section 9.1.
If you choose to migrate existing code, e.g., for reuse in a new project, please consult section 9.2.
C++
Chapter 9
62
Information for Users of HALCON C++ (legacy)
9.1
Compiling legacy C++ applications with HALCON 11 or
higher
Legacy code needs to be linked against halconcpp10 instead of halconcpp.
On Windows systems:
/libpath:"$(HALCONROOT)\lib\$(HALCONARCH)" halconcpp10.lib
On Linux systems:
-L$(HALCONROOT)/lib/$(HALCONARCH) -lhalconcpp10 -lhalcon
HALCON/C++ (legacy) is not available on Mac OS X.
9.2
Converting legacy C++ code to the new HALCON/C++
interface
As the interface has been completely redesigned, it is not meaningful to provide a full list of changed
classes, signatures or members. However, the important basic changes and how to address them when
migrating code are listed below:
9.2.1
Change the Namespace
HALCON/C++ uses a different namespace, which needs to be adapted in your code (see section 11.1 on
page 72 and section 5.1 on page 33).
// legacy
using namespace Halcon;
...
9.2.2
// new
using namespace HalconCpp;
...
Adapt existing code
• Global operators are camel-cased, e.g., MeanImage instead of mean_image, and have no return
value.
• Error handling is now fully based on exceptions.
• The iconic Array classes are no longer available (for example, always use HImage instead of
HImageArray).
• Support for data classes (e.g., HPose) and arrays of tools and data classes.
• New class HString for automatic output string management.
9.2 Converting legacy C++ code to the new HALCON/C++ interface
63
• Support for direct tuple access when tuple is pure (no mixed types), e.g., double *d =
tuple.DArr();
• The class Hobject for procedural code has been removed. The base class HObject of the objectoriented API is now used instead. This class also offers members for operators that work on
untyped objects such as CountObj, SelectObj, or ConcatObj.
GetEnv
ToString(pattern)
Subset
Add, Sum, Sin,...
Substring
Reset
->
->
->
->
->
->
TupleEnvironment
TupleString(pattern)
TupleSelect
TupleAdd, TupleSum, TupleSin, ...
no longer available
Clear
...
Hobject
Iconic;
HImage
Image;
HImageArray Images;
HRegionArray Regions;
HXLDArray
XLDs;
char Characters[MAX_STRING];
...
read_image(&Iconic,"clip")
long
Var;
HTuple
Values;
...
Var = Values.Num();
...
HObject Iconic; // upper-case O
HImage Image;
HImage Images;
HRegion Regions;
HXLD XLDs;
HString Characters;
...
ReadImage(&Iconic,"clip")
Hlong Var;
HTuple Values;
...
Var = Values.Length();
Limited backwards compatibility
Old signatures of global operators and old members of HTuple are still available when defining
HCPP_LEGACY_API.
HTuple Values;
...
Values.Reset()
9.2.3
#define HCPP_LEGACY_API
HTuple Values;
...
Values.Reset() // better use Clear()
Compilation
The include directory needs to be adapted:
$HALCONROOT/include/cpp
$HALCONROOT/include/halconcpp
Code using HALCON/CPP is linked against halconcpp, so the linkage does not have to be adapted.
C++
• Members of HTuple corresponding to operators are now named according to the operator name,
e.g.,
64
Information for Users of HALCON C++ (legacy)
Part III
Programming With HALCON/C++
(legacy)
Introducing HALCON/C++ (legacy)
67
Chapter 10
HALCON/C++ (legacy) is HALCON’s old interface to the programming language C++. Together with
the HALCON library, it allows to use the image processing power of HALCON inside C++ programs.
HALCON C++ (legacy) has been the default (and only) C++ interface in HALCON up to and including
version 10.
In HALCON 11, an improved HALCON/C++ interface has been introduced, which is described in part II
on page 29. Users are advised to use the new C++ interface. See chapter 9 on page 61 for information
on how to compile legacy C++ applications, and how to convert legacy code to the new interface.
This part is organized as follows:
• In section 10.1, we start with a first example program.
• Chapter 11 on page 71 then takes a closer look at the basics of the HALCON/C++ (legacy) interface,
• while chapter 12 on page 87 gives an overview of the classes HImage, etc.
• Chapter 13 on page 111 shows how to create applications based on HALCON/C++ (legacy).
• Finally, chapter 14 on page 115 presents typical image processing problems and shows how to
solve them using HALCON/C++ (legacy).
C++ (legacy)
Introducing HALCON/C++ (legacy)
68
Introducing HALCON/C++ (legacy)
10.1
A First Example
Figure 10.1: The left side shows the input image (a mandrill), and the right side shows the result of the
image processing: the eyes of the monkey.
The input image is shown in figure 10.1 on the left side. The task is to find the eyes of the monkey by
segmentation. The segmentation of the eyes is performed by the C++ program listed in figure 10.2, the
result of the segmentation process is shown in figure 10.1 on the right side.
The program is more or less self-explaining. The basic idea is as follows: First, all pixels of the input
image are selected which have a gray value of at least 128, on the assumption that the image Mandrill
is a byte image with a gray value range between 0 and 255. Secondly, the connected component analysis
is performed. The result of the HALCON operator is an array of regions. Each region is isolated in the
sense that it does not touch another region according to the neighbourhood relationship. Among these
regions those two are selected which correspond to the eyes of the monkey. This is done by using shape
properties of the regions, the size and the anisometry.
This example shows how easy it is to integrate HALCON operators in any C++ program. Their use is
very intuitive: You don’t have to care about the underlying data structures and algorithms, you can ignore
specific hardware requirements, if you consider e.g. input and output operators. HALCON handles the
memory management efficiently and hides details from you, and provides an easy to use runtime system.
10.1 A First Example
69
#include "HalconCpp.h"
HImage Mandrill("monkey");
HWindow w;
// read image from file "monkey"
// window with size equal to image
Mandrill.Display(w);
w.Click();
// display image in window
// wait for mouse click
HRegion Bright = Mandrill >= 128;
// select all bright pixels
HRegionArray Conn = Bright.Connection(); // get connected components
// select regions with a size of at least 500 pixels
HRegionArray Large = Conn.SelectShape("area","and",500,90000);
// select the eyes out of the instance variable Large by using
// the anisometry as region feature:
HRegionArray Eyes = Large.SelectShape("anisometry","and",1,1.7);
Eyes.Display(w);
w.Click();
// display result image in window
// wait for mouse click
}
Figure 10.2: This program extract the eyes of the monkey.
C++ (legacy)
main()
{
using namespace Halcon;
70
Introducing HALCON/C++ (legacy)
Basics of the HALCON/C++ (legacy) Interface
71
Chapter 11
In fact, the HALCON/C++ (legacy) interface provides two different approaches to use HALCON’s functionality within your C++ program: a procedural and an object-oriented approach. The procedural
approach corresponds to calling HALCON operators directly as in C or HDevelop, e.g.:
Hobject
original_image, smoothed_image;
read_image(&original_image, "monkey");
mean_image(original_image, &smoothed_image, 11, 11);
In addition to the procedural approach, HALCON/C++ (legacy) allows to call HALCON operators in an
object-oriented way, i.e., via a set of classes. For example, the code from above can be “translated” into:
HImage
original_image("monkey"), smoothed_image;
smoothed_image = original_image.MeanImage(11, 11);
This simple example already shows that the two approaches result in clearly different code: Besides
the different operator names (procedural: small letters and underscores; object-oriented: capitals), the
operator calls differ in the number and type of parameters. Furthermore, functionality may be available
in different ways; for example, images can be read from files via a constructor of the class HImage. In
general, we recommend to use the object-oriented approach. Note, however, that HDevelop can export
programs only into procedural C++ code. Section 11.5 on page 84 shows how to combine procedural
with object-oriented code.
In the following sections, we take a closer look at various issues regarding the use of the HALCON/C++
(legacy) interface; chapter 12 on page 87 describes the provided classes in more detail.
C++ (legacy)
Basics of the HALCON/C++
(legacy) Interface
72
Basics of the HALCON/C++ (legacy) Interface
11.1
The Namespace Halcon
Starting with HALCON 7.1, all functions and classes of HALCON/C++ (legacy) use the namespace
Halcon to prevent potential name conflicts with other C++ libraries. This means that the code examples
on the previous page are incomplete, because the classes and operator calls cannot be used without
specifying their namespace.
You can specify (“use”) the namespace in three ways:
• specifically, by prefixing each class name or operator call with the namespace
Halcon::Hobject original_image, smoothed_image;
Halcon::read_image(&original_image, "monkey");
• locally, by placing the directive using namespace Halcon; at the beginning of a block, e.g., at
the beginning of a function:
int main(int argc, char *argv[])
{
using namespace Halcon;
Hobject
original_image, smoothed_image;
read_image(&original_image, "monkey");
Then, you can use HALCON’s classes and functions without prefix inside this block.
• globally, by placing the directive using directly after including HalconCpp.h. Then, you don’t
need the prefix in your whole application.
#include "HalconCpp.h"
using namespace Halcon;
Which method is the most suitable depends on your application, more exactly on what other libraries it
includes and if there are name collisions.
Please note that the namespace is not mentioned in the operator descriptions in the reference manual in
order to keep it readable. Similarly, in the following sections the namespace is left out.
11.2
Calling HALCON Operators
How a HALCON operator can be called via the HALCON/C++ (legacy) interface is described in detail
in the HALCON/C++ (legacy) reference manual. As an example, figure 11.1 shows parts of the entry for
the operator mean_image.
Please note that the reference manual does not list all possible signatures of the operators. A complete
list can be found in the file include\cpp\HCPPGlobal.h.
Below, we
• take a closer look at the parameters of an operator call (section 11.2.1)
11.2 Calling HALCON Operators
73
Herror mean_image (Hobject Image, Hobject* ImageMean, const HTuple& MaskWidth,
const HTuple& MaskHeight)
HImage HImage::MeanImage (const HTuple& MaskWidth, const HTuple& MaskHeight) const
HImageArray HImageArray::MeanImage (const HTuple& MaskWidth, const HTuple& MaskHeight)
const
Image (input_object) . . . (multichannel-)image(-array) ; HImage (byte / int2 / uint2 / int4 / int8 /
real / vector_field)
ImageMean (output_object) . . . (multichannel-)image(-array) ; HImage (byte / int2 / uint2 / int4 /
int8 / real / vector_field)
MaskWidth (input_control) . . . . . . . . . . . . . . . . . . . . . . . . . . . . . . . . . . . . . . . . extent.x ; HTuple (Hlong)
Figure 11.1: The head and parts of the parameter section of the reference manual entry for mean_image.
• describe how to call operators via classes (section 11.2.2 on page 75) or via special constructors
(section 11.2.3 on page 76) or destructors (section 11.2.4 on page 78)
• explain another special HALCON concept, the tuple mode (section 11.2.5 on page 78)
11.2.1
A Closer Look at Parameters
HALCON distinguishes two types of parameters: iconic and control parameters. Iconic parameters are
related to the original image (images, regions, XLD objects), whereas control parameters are all kinds
of alphanumerical values, such as integers, floating-point numbers, or strings.
A special form of control parameters are the so-called handles. A well-known representative of this type
is the window handle, which provides access to an opened HALCON window, e.g., to display an image
in it. Besides, handles are used when operators share complex data, e.g., the operators for shape-based
matching which create and then use the model data, or for accessing input/output devices, e.g., image
acquisition devices. Classes encapsulating handles are described in detail in section 12.2.3 on page 107.
Both iconic and control parameters can appear as input and output parameters of a HALCON operator.
For example, the operator mean_image expects one iconic input parameter, one iconic output parameter,
and two input control parameters (see figure 11.1); figure 11.2 shows an operator which has all four
parameter types. Note how some parameters “disappear” from within the brackets if you call an operator
via a class; this mechanism is described in more detail in section 11.2.2 on page 75.
An important concept of HALCON’s philosophy regarding parameters is that input parameters are
not modified by an operator. As a consequence, they are passed by value (e.g., Hobject Image in
figure 11.1) or via a constant reference (e.g., const HTuple &MaskWidth). This philosophy also holds
if an operator is called via a class, with the calling instance acting as an input parameter. Thus, in the
following example code the original image is not modified by the call to MeanImage; the operator’s
result, i.e., the smoothed image, is provided via the return value instead:
C++ (legacy)
MaskHeight (input_control) . . . . . . . . . . . . . . . . . . . . . . . . . . . . . . . . . . . . . . . . extent.y ; HTuple (Hlong)
74
Basics of the HALCON/C++ (legacy) Interface
Herror find_bar_code (Hobject Image, Hobject* SymbolRegions, const HTuple& BarCodeHandle,
const HTuple& CodeType, char* DecodedDataStrings)
Herror find_bar_code (Hobject Image, Hobject* SymbolRegions, const HTuple& BarCodeHandle,
const HTuple& CodeType, HTuple* DecodedDataStrings)
HRegionArray HImage::FindBarCode (const HBarCode& BarCodeHandle,
const HTuple& CodeType, HTuple* DecodedDataStrings) const
HRegionArray HBarCode::FindBarCode (const HImage& Image, const HTuple& CodeType,
HTuple* DecodedDataStrings) const
Image (input_object) . . . . . . . . . . . . . . . . . . . . . . . . . . . . . . singlechannelimage ; HImage (byte / uint2)
SymbolRegions (output_object) . . . . . . . . . . . . . . . . . . . . . . . . . . . . . . . . . . . . region(-array) ; HRegion
BarCodeHandle (input_control) . . . . . . . . . . . . . . . . . . . . . . . . barcode ; HBarCode / HTuple (Hlong)
CodeType (input_control) . . . . . . . . . . . . . . . . . . . . . . . . . . . . . . . . . . . . . string(-array) ; HTuple (char*)
DecodedDataStrings (output_control) . . . . . . . . . . . . . . . . . . . . . . . . . string(-array) ; HTuple (char*)
Figure 11.2: The head and parts of the parameter section of the reference manual entry for
find_bar_code.
HImage
original_image("monkey"), smoothed_image;
smoothed_image = original_image.MeanImage(11, 11);
In contrast to input parameters, output parameters are always modified, thus they must be passed by
reference. Note that operators expect a pointer to an already declared variable! For example, when
calling the operator FindBarCode as in the following lines of code, variables of the class HTuple are
declared before passing the corresponding pointers using the operator &.
HImage
HTuple
HBarCode
HRegionArray
HTuple
image("barcode/ean13/ean1301");
paramName, paramValue;
barcode(paramName, paramValue);
code_region;
result;
code_region = barcode.FindBarCode(image, "EAN-13", &result);
The above example shows another interesting aspect of output parameters: When calling operators via
classes, one output parameter becomes the return value (see section 11.2.2 for more details); in the
example, FindBarCode returns the bar code region.
Many HALCON operators accept more than one value for certain parameters. For example, you can call
the operator MeanImage with an array of images (see figure 11.1); then, an array of smoothed images is
returned. This is called the tuple mode; see section 11.2.5 on page 78 for more information.
11.2 Calling HALCON Operators
75
Herror info_framegrabber (const HTuple& Name, const HTuple& Query, HTuple* Information,
HTuple* ValueList)
Name (input_control) . . . . . . . . . . . . . . . . . . . . . . . . . . . . . . . . . . . . . . . . . . . . . . . . . string ; HTuple (char*)
Query (input_control) . . . . . . . . . . . . . . . . . . . . . . . . . . . . . . . . . . . . . . . . . . . . . . . . string ; HTuple (char*)
Information (output_control) . . . . . . . . . . . . . . . . . . . . . . . . . . . . . . . . . . . . . . . string ; HTuple (char*)
ValueList (output_control) . . . . . . . . . . . . . . . . . . . . . string-array ; HTuple (char* / Hlong / double)
Figure 11.3: The head and parts of the parameter section of the reference manual entry for
info_framegrabber.
Please note that output parameters of the type string need special attention: First of all, you must
allocate memory for them yourself, e.g., by declaring them as character arrays; we recommend to allocate
memory for at least 1024 characters for string parameters of unknown length. Secondly, you don’t pass
them by reference, because such parameters are pointers already. In the following example code, the
operator InfoFramegrabber (see also figure 11.3) is called with two output string parameters to query
the currently installed image acquisition board:
char
sInfo[1024], sValue[1024];
info_framegrabber(FGName, "info_boards", sInfo, sValue);
Note that it isn’t necessary to allocate memory for output string parameters in the already mentioned tuple
mode, i.e., when using instances of the class HTuple instead of “plain” strings (also see section 11.2.5
on page 78 and section 12.2.2 on page 104):
HTuple
tInfo, tValues;
info_framegrabber(FGName, "info_boards", &tInfo, &tValues);
11.2.2
Calling Operators via Classes
As already described in the previous section, the HALCON/C++ (legacy) reference manual shows via
which classes an operator can be called. For example, FindBarCode can be called via objects of the class
HImage or HBarCode (see figure 11.2 on page 74). In both cases, the corresponding input parameter
(Image or BarCodeHandle, respectively) does not appear within the brackets anymore as it is replaced
by the calling instance of the class (this).
There is a further difference to the procedural operator signature: The first output parameter (in the
example the bar code region SymbolRegions) also disappears from within the brackets and becomes
the return value instead of the error code (more about error handling can be found in section 11.3 on
page 82).
!
C++ (legacy)
String Parameters
76
Basics of the HALCON/C++ (legacy) Interface
HImage
HTuple
HBarCode
HRegionArray
HTuple
image("barcode/ean13/ean1301");
paramName, paramValue;
barcode(paramName, paramValue);
code_region;
result;
code_region = barcode.FindBarCode(image, "EAN-13", &result);
code_region = image.FindBarCode(barcode, "EAN-13", &result);
Hobject
HTuple
Hobject
HTuple
image;
barcode;
code_region;
result;
read_image(&image, "barcode/ean13/ean1301");
create_bar_code_model(HTuple(), HTuple(), &barcode);
find_bar_code(image, &code_region, barcode, "EAN-13", &result);
Figure 11.4: Using FindBarCode via HBarCode, via HImage, or in the procedural approach.
Figure 11.4 depicts code examples for the three ways to call FindBarCode. When comparing the
object-oriented and the procedural approach, you can see that the calls to the operators read_image and
create_bar_code_model are replaced by special constructors for the classes HImage and HBarCode,
respectively. This topic is discussed in more detail below.
Please note that the two object-oriented methods seem to be “asymmetric”: If you call FindBarCode
via HImage, the reference manual seems to suggest that you must pass the handle instead of an instance
of HBarCode. In fact, you can pass both a handle and a class instance, because the latter is automatically
“casted” into a handle; the signature was not changed to keep the HALCON/C++ (legacy) interface
backward compatible as far as possible.
11.2.3
Constructors and Halcon Operators
As can be seen in figure 11.4, the HALCON/C++ (legacy) parameter classes provide additional constructors, which are based on suitable HALCON operators. The constructors for HImage and HBarCode used
in the example are based on read_image and create_bar_code_model, respectively.
Please note that in the current HALCON version constructors are provided inconsistently for the different
classes. Below we take a brief look at the most important classes. A complete and up-to-date list
of available constructors can be found in the corresponding header files in %HALCONROOT%\include\
cpp.
• Images:
The class HImage provides constructors based on the operators read_image, gen_image1,
gen_image1_extern, and gen_image_const.
11.2 Calling HALCON Operators
77
Please beware of the following pitfall when using the operators themselves via HImage: Contrary
to intuition, the operators do not modify the instance they are called from; instead, the created
image is the return value of the operator! Thus, after the following code the image is still uninitialized:
HImage
image;
image.ReadImage("barcode/ean13/ean1301");
// incorrect
The correct way to call ReadImage is as follows:
image = HImage::ReadImage("barcode/ean13/ean1301");
// correct
• Regions:
The class HRegion provides constructors based on operators like gen_rectangle2 or
gen_circle. However, instead of the parameters of these operators, the constructors expect instances of auxiliary classes like HRectangle2 or HCircle (see section 12.3 on page 109 for more
information about these classes).
Please note that HRegion presents the same pitfall as HImage, i.e., operators like
GenRectangle2 do not modify the calling instance of HRegion but return the created region!
More information about HRegion can be found in section 12.1.1 on page 87.
• XLDs:
The classes for XLDs (HXLD, HXLDCont, etc., see section 12.1.3 on page 102 for more information)
do not provide constructors based on operators.
• Windows:
The class HWindow provides constructors based on the operators open_window and
new_extern_window. Note that the former is realized with default values for all parameters, thus
becoming the default constructor, i.e., all window instances are already opened upon construction!
Of course, you can close a window using CloseWindow and then open it again using
OpenWindow. In contrast to the iconic parameter classes, you can call the “constructor-like” operator OpenWindow via an instance of HWindow in the intuitive way, i.e., the calling instance is
modified; in addition the corresponding handle is returned. HWindow is described in more detail in
section 12.2.3.1 on page 107.
• Other Handle Classes:
The other classes encapsulating handles, e.g., HBarCode or HFramegrabber, provide constructors
in a systematic way: If a class appears as an output parameter in an operator, there automatically
exists a constructor based on this operator. Thus, instances of HBarCode can be constructed based
on create_bar_code_model as shown in figure 11.4 on page 76, instances of HShapeModel
based on create_shape_model, instances of HFramegrabber based on open_framegrabber
and so on.
In contrast to the iconic parameter classes, handle classes allow to call constructor-like operators
via instances of the class in the intuitive way, i.e., the calling instance is modified. For example,
you can create an instance of HBarCode with the default constructor and then initialize it using
CreateBarCodeModel as follows:
C++ (legacy)
Note that this pitfall concerns all operators where HImage appears as an output parameter, e.g.,
GrabImage. More information about HImage can be found in section 12.1.2 on page 94.
78
Basics of the HALCON/C++ (legacy) Interface
HBarCode
barcode;
barcode.CreateBarCodeModel(HTuple(), HTuple());
If the instance was already initialized, the corresponding data structures are automatically destroyed before constructing and initializing them anew (see also section 11.2.4). The handle classes
are described in more detail in section 12.2.3.2 on page 108.
11.2.4
Destructors and Halcon Operators
All HALCON/C++ (legacy) classes provide default destructors which automatically free the corresponding memory. For some classes, the destructors are based on suitable operators:
• Windows:
The default destructor of the class HWindow closes the window based on close_window. Note
that the operator itself is no destructor, i.e., you can close a window with CloseWindow and then
open it again using OpenWindow.
• Other Handle Classes:
The default destructors of the other classes encapsulating handles, e.g., HShapeModel or
HFramegrabber, apply operators like clear_shape_model or close_framegrabber, respectively. In contrast to close_window, these operators cannot be called via instances of the class,
as can be seen in the corresponding reference manual entries; the same holds for operators like
clear_all_shape_models. In fact, there is no need to call these operators as you can initialize
instances anew as described in section 11.2.3.
Please note that you must not use operators like clear_shape_model,
clear_all_shape_models, or close_framegrabber together with instances of the corresponding handle classes!
11.2.5
The Tuple Mode
As already mentioned in section 11.2.1 on page 73, many HALCON operators can be called in the socalled tuple mode. In this mode, you can, e.g., apply an operator to multiple images or regions with
a single call. The standard case, e.g., calling the operator with a single image, is called the simple
mode. Whether or not an operator supports the tuple mode can be checked in the reference manual. For
example, take a look at figure 11.5, which shows an extract of the reference manual entry for the operator
char_threshold: In the parameter section, the parameter Image is described as an image(-array);
this signals that you can apply the operator to multiple images at once.
If you call char_threshold with multiple images, i.e., with an image tuple, the output parameters
automatically become tuples as well. Consequently, the parameters Characters and Threshold are
described as region(-array) and integer(-array), respectively.
The head section of the reference entry in figure 11.5 shows how simple and tuple mode are reflected
in the operator’s signatures. In the procedural approach, the simple and tuple mode methods of calling
char_threshold differ only in the type of the output parameter Threshold: a pointer to a long or
to a HTuple of long values, respectively. Note that the class HTuple can also contain arrays (tuples)
of control parameters of mixed type; please refer to section 12.2.2 on page 104 for more information
11.2 Calling HALCON Operators
79
Herror char_threshold (Hobject Image, Hobject HistoRegion, Hobject* Characters,
const HTuple& Sigma, const HTuple& Percent, Hlong* Threshold)
Herror char_threshold (Hobject Image, Hobject HistoRegion, Hobject* Characters,
const HTuple& Sigma, const HTuple& Percent, HTuple* Threshold)
HRegion HImage::CharThreshold (const HRegion& HistoRegion, const HTuple& Sigma,
const HTuple& Percent, Hlong* Threshold) const
HRegionArray HImageArray::CharThreshold (const HRegion& HistoRegion,
const HTuple& Sigma, const HTuple& Percent, HTuple* Threshold) const
Image (input_object) . . . . . . . . . . . . . . . . . . . . . . . . . . . . . singlechannelimage(-array) ; HImage (byte)
HistoRegion (input_object) . . . . . . . . . . . . . . . . . . . . . . . . . . . . . . . . . . . . . . . . . . . . . . . region ; HRegion
Characters (output_object) . . . . . . . . . . . . . . . . . . . . . . . . . . . . . . . . . . . . . . . . region(-array) ; HRegion
Percent (input_control) . . . . . . . . . . . . . . . . . . . . . . . . . . . . . . . . . . . number ; HTuple (double / Hlong)
Threshold (output_control) . . . . . . . . . . . . . . . . . . . . . . . . . . . . . . . . . . integer(-array) ; HTuple (Hlong)
Figure 11.5: The head and parts of the parameter section of the reference manual entry for
CharThreshold.
about this class. In contrast to the control parameters, the iconic parameters remain instances of the
class Hobject in both modes, as this class can contain both single objects and object arrays (see also
section 12.1.4 on page 102).
In the object-oriented approach, simple mode and tuple mode methods use different classes for the iconic
parameters: HImage and HRegion vs. HImageArray and HRegionArray (see section 12.1.1 on page 87
and section 12.1.2 on page 94 for more information about these classes). As in the procedural approach,
control parameters can be of a basic type (simple mode only) or instances of HTuple (simple and tuple
mode).
After this rather theoretic introduction, let’s take a look at example code.
In figure 11.6,
char_threshold is applied in simple mode, i.e., to a single image, in figure 11.7 to two images at
once. Both examples are realized both in the object-oriented and in the procedural approach. The examples highlight some interesting points:
• Creation and initialization of iconic arrays:
In the object-oriented approach, the image array can be constructed very easily by assigning the
individual images to certain positions in the array using the well-known array operator []. In the
procedural approach, you must explicitly create an empty object using gen_empty_obj and then
add the images via concat_obj.
• Access to iconic objects:
As expected, in the object-oriented approach, the individual images and regions are accessed via
the array operator []; the number of objects in an array can be queried via the method Num(). In
the procedural approach, objects must be selected explicitly using the operator select_obj; the
number of objects can be queried via count_obj.
C++ (legacy)
Sigma (input_control) . . . . . . . . . . . . . . . . . . . . . . . . . . . . . . . . . . . . . . . . . . . . . number ; HTuple (double)
80
Basics of the HALCON/C++ (legacy) Interface
HImage
HRegion
long
image("alpha1");
region;
threshold;
region = image.CharThreshold(image.GetDomain(), 2, 95, &threshold);
image.Display(window);
region.Display(window);
cout << "Threshold for 'alpha1': " << threshold;
Hobject
Hobject
long
long
image;
region;
num;
threshold;
read_image(&image, "alpha1");
char_threshold(image, image, ®ion, 2, 95, &threshold);
disp_obj(image, window);
disp_obj(region, window);
cout << "Threshold for 'alpha1': " << threshold;
Figure 11.6: Using CharThreshold in simple mode, via HImage, or in the procedural approach (declaration
and opening of window omitted).
• Polymorphism of Hobject: (part I)
As already noted, instances of Hobject can be used both in simple and in tuple mode. In contrast,
you must use different classes when switching from simple to tuple mode in the object-oriented
approach.
• Polymorphism of Hobject: (part II)
The class Hobject is used for all types of iconic objects. What’s more, image objects can be
used for parameters expecting a region, as in the call to char_threshold in the examples; in
this case, the domain of the image, i.e., the region in which the pixels are “valid”, is extracted
automatically. In the object-oriented approach, you must extract the domain explicitly via the
operator GetDomain.
• Array (tuple) indices:
Object-oriented iconic arrays start with the index 0, the same is true for HTuple. In contrast,
Hobject arrays start with the index 1!!
Most of the time you will call operators in tuple mode without noticing: As soon as you divide a region
into connected components via the operator Connection, you end up with a HRegionArray– thus, any
subsequent processing, e.g., morphological operations like DilationCircle or the calculation of the
region’s position using AreaCenter is automatically performed on all regions in the array, i.e., in tuple
mode. Thus, the tuple mode is a simple mode after all!
11.2 Calling HALCON Operators
HImageArray
HRegionArray
HTuple
81
images;
regions;
thresholds;
for (int i=1; i<=2; i++)
{
images[i-1] = HImage::ReadImage(HTuple("alpha") + i);
}
regions = images.CharThreshold(images[0].GetDomain(), 2, 95, &thresholds);
Hobject
Hobject
long
HTuple
images, image;
regions, region;
num;
thresholds;
gen_empty_obj(&images);
for (int i=1; i<=2; i++)
{
read_image(&image, HTuple("alpha") + i);
concat_obj(images, image, &images);
}
char_threshold(images, image, ®ions, 2, 95, &thresholds);
count_obj(images, &num);
for (int i=0; i<num; i++)
{
select_obj(images, &image, i+1);
disp_obj(image, window);
select_obj(regions, ®ion, i+1);
disp_obj(region, window);
cout << "Threshold for 'alpha" << i+1 << "': " << thresholds[i].L();
}
Figure 11.7: Using CharThreshold in tuple mode, via HImageArray, or in the procedural approach (declaration and opening of window omitted).
C++ (legacy)
for (int i=0; i<images.Num(); i++)
{
images[i].Display(window);
regions[i].Display(window);
cout << "Threshold for 'alpha" << i+1 << "': " << thresholds[i].L();
window.Click();
82
Basics of the HALCON/C++ (legacy) Interface
class LIntExport HException {
public:
HException(const HException &except);
HException(const char *f, Hlong l, const char *p, Herror e, const char *m);
HException(const char *f, Hlong l, const char *p, const char *m);
HException(const char *f, Hlong l, const char *p, Herror e);
static Handler InstallHHandler(Handler proc);
void
PrintException(void);
static Handler handler;
Hlong
line;
char
*file;
char
*proc;
Herror
err;
char
*message;
};
/*
/*
/*
/*
/*
/*
handler in use */
line number where error occured */
file name where error occured */
Name of procedure/operator */
error number */
error text */
Figure 11.8: Part of the declaration of the class HException.
11.3
Error Handling
In case of a runtime error, HALCON/C++ (legacy) by default prints a corresponding error message and
terminates the program. In some applications, however, it might be useful to slacken this rule for certain
errors. For example, if an application allows the user to specify an image file to read interactively, it
would be inconvenient if the application terminates because the user misspelled the file name. Therefore,
HALCON/C++ (legacy) allows to integrate your own error handling. The following sections describe
how to do this in the
• object-oriented approach (section 11.3.1) and in the
• procedural approach (section 11.3.2).
Please note that you cannot mix object-oriented and procedural error handling.
11.3.1
Object-Oriented Approach
If a runtime error occurs in an object-oriented operator call, an instance of the class HException is
created (see figure 11.8 for the declaration of the class). This instance contains all information concerning
the error. The important members of an exception are:
line:
file:
proc:
err:
message:
Number of the program line in which the error occurred
Name of the file in which the error occurred
Name of the actual HALCON operator
Number of the error, see below
Error text
After the generation, the instance of HException is passed to a so-called exception handler. HALCON’s
default exception handler prints the corresponding error message and terminates the program.
11.3 Error Handling
83
As an alternative, you can implement and use your own exception handler. In order to act as a HALCON
exception handler, a procedure must have the following signature:
typedef void (*Handler)(const Halcon::HException &exception);
You “install” your exception handler procedure via HException’s class method InstallHHandler (see
figure 11.8). In case of a runtime error, HALCON then calls your procedure, passing the instance of the
actual exception as a parameter.
The following example shows how to use a user-specific exception handler together with
the standard C++ exception handling mechanism (try...catch). The corresponding program
example_errorhandling.cpp can be found in the subdirectory %HALCONEXAMPLES%\cpp. It realizes the application mentioned above: You can type in image files to load; if a file does not exist, the
program prints a corresponding message but continues nevertheless.
HException::InstallHHandler(&MyHalconExceptionHandler);
The installed procedure simply hands the exception object to the C++ exception handling via throw:
void MyHalconExceptionHandler(const Halcon::HException& except)
{
throw except;
}
The call to ReadImage is then encapsulated by a try block; a possibly ensuing exception is then evaluated in a corresponding catch block:
Herror
error_num;
try
{
image = HImage::ReadImage(filename);
}
catch (HException &except)
{
error_num = except.err;
return error_num;
}
return H_MSG_TRUE;
11.3.2
Procedural Approach
As can be seen in the extracts of the reference manual in section 11.2 on page 72, in the procedural
approach operators return a value of the type Herror. This value can fall into two categories: messages
H_MSG_* and errors H_ERR_*.
C++ (legacy)
At the beginning of the program, a user-specific exception handler is installed with the following line:
84
Basics of the HALCON/C++ (legacy) Interface
Typically, HALCON operators return the message H_MSG_TRUE if no error occurs.
In case of an error, HALCON by default prints the corresponding error message and terminates the
program. You can deactivate (and reactivate) this reaction by calling the operator set_check. The
following example code checks whether a file could be opened successfully; in case of an error, it prints
the corresponding error message, which can be determined with the operator get_error_text.
Herror
char
long
error_num;
message[1024];
file;
set_check("~give_error");
error_num = open_file("not_existing_file", "input", &file);
set_check("give_error");
if (error_num != H_MSG_TRUE)
{
get_error_text(error_num, message);
cout << "HALCON error " << error_num << ": " << message;
}
Please note that some tuple operations have no return value. Then, the described approach leads to a
memory leak. Please use the object-oriented approach instead.
11.4
Memory Management
All of HALCON’s classes, i.e., not only HImage, HRegion, HTuple, HFramegrabber etc., but also the
class Hobject used when calling operators in the procedural approach, release their allocated memory
automatically in their default destructor (see also section 11.2.4 on page 78). Furthermore, when constructing instances anew, e.g., by calling CreateBarCodeModel via an already initialized instance as
mentioned in section 11.2.3 on page 76, the already allocated memory is automatically released before
allocating it anew. Thus, there is no need to call the operator clear_obj in HALCON/C++ (legacy);
what’s more, if you do use it HALCON will complain about already released memory.
However, there are still two occasions for explicit memory management on your part: The first one was
already described on page 75: For output parameters of the type string, you must allocate must alocate
memory explicitely.
The second occasion is when using handles in the procedural approach: The memory allocated when
creating a handle, e.g., with open_framegrabber, is only released when calling the “complementary”
operator, in the example close_framegrabber — or at the end of the program.
11.5
How to Combine Procedural and Object-Oriented Code
As already noted, we recommend to use the object-oriented approach wherever possible. However, there
are some reasons for using the procedural approach, e.g., if you want to quickly integrate code that is
11.5 How to Combine Procedural and Object-Oriented Code
85
exported by HDevelop, which can only create procedural code. Besides, currently some operators are
only available in procedural form, e.g., operators creating affine transformations like vector_to_rigid.
The least trouble is caused by the basic control parameters as both approaches use the elementary types
long etc. and the class HTuple. Iconic parameters and handles can be converted as follows:
• Converting Hobject into iconic parameter classes
Hobject
p_image;
read_image(&p_image, "barcode/ean13/ean1301");
HImage
o_image(p_image);
Iconic parameters can be converted from Hobject to, e.g., HImage simply by calling the constructor with the procedural variable as a parameter.
HTuple
p_barcode;
create_bar_code_model(HTuple(), HTuple(), &p_barcode);
HBarCode
o_barcode;
o_barcode.SetHandle(p_barcode[0]);
o_code_region = o_barcode.FindBarCode(o_image, "EAN-13", &result);
Handles cannot be converted directly via a constructor; instead, you call the method SetHandle()
with the procedural handle as a parameter.
• Converting handle classes into handles
p_barcode = o_barcode.GetHandle();
Similarly, a handle can be extracted from the corresponding class via the method GetHandle().
You can even omit the method, as the handle classes provide cast operators which convert them
automatically into handles.
p_barcode = o_barcode;
• Converting iconic parameter classes into Hobject
Hobject
p_code_region = o_code_region.Id();
Iconic parameters can be converted from classes like HRegion back into Hobject via the method
Id(). In contrast to the handle classes no cast operator is provided.
C++ (legacy)
• Converting handles into handle classes
86
Basics of the HALCON/C++ (legacy) Interface
• Converting HWindow into a window handle
long
p_window;
open_window(0, 0, width/2, height/2, 0, "visible", "", &p_window);
HWindow
o_window(0, 0, 100, 100, 0, "visible", "");
p_window = o_window.WindowHandle();
disp_obj(p_code_region, p_window);
In contrast to other handles, procedural window handles cannot be converted into instances of the
class HWindow! However, you can extract the handle from an instance of HWindow via the method
WindowHandle().
As already remarked in section 11.2.4 on page 78, you must not use operators like clear_shape_model,
clear_all_shape_models, or close_framegrabber together with instances of the corresponding
handle classes!
11.6
I/O Streams
Starting with HALCON 7.1, HALCON/C++ (legacy) no longer provides iostream operators by default
because this created problems for applications that want to use the older iostream interface (i.e., that
want to use <iostream.h> instead of <iostream>). Consequently, the HALCON/C++ (legacy)
library now does not provide operators for either interface.
To enable backwards compatibility, the iostream operators for the class HTuple are now provided as inline functions in a new header file HIOStream.h, which can optionally be included. HIOStream.h
uses the newer interface <iostream> by default, but uses the older interface <iostream.h> if
USE_IOSTREAM_H is defined before HIOStream.h is included. Note that it may be necessary to include
the statement using namespace std;.
To use the iostream operators, we recommend to insert the following lines of code after including
HalconCpp.h:
#include "HalconCpp.h"
#include "HIOStream.h"
#if !defined(USE_IOSTREAM_H)
using namespace std;
#endif
The HALCON Parameter Classes
87
Chapter 12
12.1
Iconic Objects
The base class of the iconic parameter classes in HALCON/C++ (legacy) is the (abstract) class HObject
which manages entries in the database, i.e., the copying or releasing of objects. The entries themselves
are represented by the class Hobject (see also section 12.1.4 on page 102). The classes HObject and
Hobject can contain all types of iconic objects. This has the advantage that important methods like
Display() can be applied to all iconic objects in the same manner.
Three classes are derived from the root class HObject:
• Class HImage for handling images.
• Class HRegion for handling regions.
• Class HXLD for handling polygons.
These classes are described in more detail below.
12.1.1
Regions
A region is a set of coordinates in the image plane. Such a region does not need to be connected and
it may contain holes. A region can be larger than the actual image format. Regions are represented by
the so-called runlength coding in HALCON. The class HRegion represents a region in HALCON/C++
(legacy). Besides those operators that can be called via HRegion (see also section 11.2.2 on page 75),
HRegion provides the following member functions:
• HRegion(void)
Default constructor. It creates an empty region, i.e., the area of this region is zero. Not all operators
can handle the empty region as input, e.g. some shape property operators.
• HRegion(const HDChord &line)
Constructing a region from a chord. A chord is a horizontal line.
C++ (legacy)
The HALCON Parameter Classes
88
The HALCON Parameter Classes
• HRegion(const HDPoint2D &point)
Constructing a region from a discrete 2-dimensional point.
• HRegion(const HRectangle1 &rect)
Constructing a region from a rectangle parallel to the coordinate axis. The coordinates do not need
to be discrete.
• HRegion(const HRectangle2 &rect)
Constructing a region from an arbitrarily oriented rectangle. The coordinates do not need to be
discrete.
• HRegion(const HCircle &circle)
Constructing a region from a circle. The radius and center do not need to be discrete.
• HRegion(const HEllipse &ellipse)
Constructing a region from an arbitrarily oriented ellipse. The radii and center do not need to be
discrete.
• HRegion(const char *file)
Constructing a region by reading the representation from file. This file can be generated by the
member function WriteRegion.
• HRegion(const HRegion ®)
Copy constructor.
• HRegion &operator = (const HRegion ®)
Assignment operator.
• ~HRegion(void)
Destructor.
• void Display(const HWindow &w) const
Output of the region in a window.
• HRegion operator * (double scale) const
Zooming the region by an arbitrary factor. The center of scaling is the origin (0, 0).
• HRegion operator >> (double radius) const
HRegion &operator >>= (double radius)
Erosion of the region with a circle of radius radius, see reference manual entry of
erosion_circle.
• HRegion operator << (double radius) const
HRegion &operator <<= (double radius)
Dilation of the region with a circle of radius radius, see reference manual entry
dilation_circle.
• HRegion operator + (const HDPoint2D &point) const
HRegion &operator += (const HDPoint2D &point)
Translating the region by a 2-dimensional point.
• HRegion &operator ++ (void)
Dilation of the region with a cross containing five points.
12.1 Iconic Objects
89
• HRegion operator + (const HRegion ®) const
HRegion &operator += (const HRegion ®)
Minkowsky addition of the region with another region, see reference manual entry of
minkowski_add1.
• HRegion operator - (const HRegion ®) const
HRegion &operator -= (const HRegion ®)
Minkowsky subtraction of the region with another region, see reference manual entry of
minkowski_sub1.
• HRegion &operator -- (void)
Erosion of the region with a cross containing five points.
• HRegion operator ! (void) const
Transpose the region at the origin, see reference manual entry of transpose_region.
• HRegion operator & (const HRegion ®) const
HRegion &operator &= (const HRegion ®)
Intersection of the region with another region, see reference manual entry of intersection.
• HRegion operator | (const HRegion ®) const
HRegion &operator |= (const HRegion ®)
Union of the region with another region, see reference manual entry of union2.
• HRegion operator / (const HRegion ®) const
HRegion &operator /= (const HRegion ®)
Subtract another region from the region, see reference manual entry of difference.
• HBool operator == (const HRegion ®) const
Boolean test if two regions are identical, see reference manual entry of test_equal_region.
• HBool operator >= (const HRegion ®) const
HBool operator > (const HRegion ®) const
HBool operator <= (const HRegion ®) const
HBool operator < (const HRegion ®) const
Boolean test if another region is included in the region by using the subset of the corresponding
coordinates.
• double Phi(void) const
Orientation of the region by using the angle of the equivalent ellipse, see reference manual entry
of elliptic_axis.
• double Ra(void) const
Length of the major axis of the equivalent ellipse of the region, see reference manual entry of
elliptic_axis.
• double Rb(void) const
Length of the minor axis of the equivalent ellipse of the region, see reference manual entry of
elliptic_axis.
C++ (legacy)
• HRegion operator ~ (void) const
Complement of the region, see reference manual entry of complement.
90
The HALCON Parameter Classes
• long Area(void) const
Area of the region, i.e., number of pixels, see reference manual entry of area_center.
• double X(void) const
double Y(void) const
Center point of the region, see reference manual entry of area_center.
• double Contlength(void) const
Length of the contour of the region, see reference manual entry of contlength.
• double Compactness(void) const
Compactness of the actual region, see reference manual entry of compactness.
• double Anisometry(void) const
double Bulkiness(void) const
double StructureFactor(void) const
Shape factors, see reference manual entry of eccentricity.
• double M11(void) const
double M20(void) const
double M02(void) const
double Ia(void) const
double Ib(void) const
Moments of the region, see reference manual entry of moments_region_2nd.
• HRectangle1 SmallestRectangle1(void) const
Smallest surrounding rectangle parallel to the coordinate axis, see reference manual entry of
smallest_rectangle1.
• HBool In(const HDPoint2D &p) const
Boolean test if a point is inside a region, see reference manual entry of test_region_point.
• HBool IsEmpty(void) const;
Boolean test if the region is empty, i.e., the area of the region is zero.
A program shows the power of the class HRegion, see figure 12.1.
First, an aerial image (mreut.png) is read from a file. All pixels with a gray value ≥ 190 are selected.
This results in one region (region).
This region is transformed by the next steps: All holes in the region are filled (FillUp), small parts of the
region are eliminated by two morphological operations, first an erosion, a kind of shrinking the region,
followed by a dilation, a kind of enlarging the region. The last step is the zooming of the region. For that
the region is first shifted by a translation vector (−100, −150) to the upper left corner and then zoomed
by the factor two. Figure 12.2 shows the input image and the result of the opening operation.
12.1.1.1
Region Arrays
The class HRegionArray serves as container class for regions. Besides those operators that can be called
via HRegionArray (see also section 11.2.2 on page 75), HRegionArray provides the following member
functions:
12.1 Iconic Objects
91
#include "HalconCpp.h"
using namespace Halcon;
Reading an aerial image
Calculating a threshold
Display window
Set color for regions
Display the region
Fill holes in region
Display the region
with a circle mask
Set color for regions
Display the region
Vector for translation
Translation
Zooming the region
Figure 12.1: Sample program for the application of the class HRegion .
Figure 12.2: On the left the input image (mreut.png), and on the right the region after the opening (open).
• HRegionArray(void)
Constructor for an empty array (Num() is 0).
• HRegionArray(const HRegion ®)
Constructor with a single region.
C++ (legacy)
main ()
{
HImage
image("mreut");
//
HRegion
region = image >= 190;
//
HWindow
w;
//
w.SetColor("red");
//
region.Display(w);
//
HRegion
filled = region.FillUp();
//
filled.Display(w);
//
// Opening: erosion followed by a dilation
HRegion
open = (filled >> 4.5) << 4.5;
w.SetColor("green");
//
open.Display(w);
//
HDPoint2D trans(-100,-150);
//
HRegion
moved = open + trans;
//
HRegion
zoomed = moved * 2.0;
//
}
92
The HALCON Parameter Classes
• HRegionArray(const HRegionArray &arr)
Copy constructor.
• ~HRegionArray(void)
Destructor.
• HRegionArray &operator = (const HRegionArray &arr)
Assignment operator.
• long Num(void)
Number of regions in the array, largest index is Num() − 1.
• HRegion const &operator [] (long index) const
Reading the element i of the array. The index is in the range 0 . . . Num() − 1.
• HRegion &operator [] (long index)
Assigning a region to the element i of the array. The index index can be ≥ Num().
• HRegionArray operator () (long min, long max) const
Selecting a subset between the lower min and upper max index.
• HRegionArray &Append(const HRegion ®)
Appending another region to the region array.
• HRegionArray &Append(const HRegionArray ®)
Appending another region array to the region array.
• void Display(const HWindow &w) const
Display the regions of the array in a window.
• HRegionArray operator << (double radius) const
Applying a dilation to all regions using a circular mask, see reference manual entry of
dilation_circle.
• HRegionArray operator >> (double radius) const
Applying an erosion to all regions using a circular mask, see reference manual entry of
erosion_circle.
• HRegionArray operator + (const HRegion ®) const
Applying the Minkowsky addition to all regions using another region as mask, see reference manual entry of minkowski_add1.
• HRegionArray operator - (const HRegion ®) const
Applying the Minkowsky subtraction to all regions using another region as mask, see reference
manual entry of minkowski_sub1.
• HRegionArray operator ~ (void) const
Applying the complement operator to each region of the array, see reference manual entry of
complement.
• HRegionArray operator & (const HRegionArray ®) const
Intersection of each region of the actual array with the union of reg, see reference manual entry of
intersection.
12.1 Iconic Objects
93
• HRegionArray operator | (const HRegionArray ®) const
Union of each region in the actual array with the union of reg, see reference manual entry of
union2.
• HRegionArray operator / (const HRegionArray ®) const
Difference of each region in the actual array with the union of reg, see reference manual entry of
difference.
Most HALCON operators expecting a region for an input parameter accept an instance of
HRegionArray, e.g. Union1, Intersection, Difference, etc. The constructor instantiating the region array HRegionArray from a single region HRegion makes it possible to handle operators expecting
a single region: Without changing the data structure a HRegionArray can be used as input parameter
even in the case of a single region.
#include "HalconCpp.h"
using namespace Halcon;
main ()
{
HImage
image("control_unit");
// Reading an image from file
// Segmentation by regiongrowing
HRegionArray regs = image.Regiongrowing(1,1,4,100);
HWindow
w;
// Display window
w.SetColored(12);
// Set colors for regions
regs.Display(w);
// Display the regions
HRegionArray rect;
// New array
for (long i = 0; i < regs.Num(); i++)
// For all regions in array
{ // Test size and shape of each region
if ((regs[i].Area() > 1000) && (regs[i].Compactness() < 1.5))
rect.Append(regs[i]);
// If test true, append region
}
image.Display(w);
// Display the image
rect.Display(w);
// Display resulting regions
}
Figure 12.3: Sample program for use of the class HRegionArray .
The first step is to read an image. In this case it shows a control unit in a manufacturing environment, see
figure 12.4 on the left side. By applying a regiongrowing algorithm from the HALCON library the image
is segmented into regions. Each region inside the resulting region array regs is now selected according
to its size and its compactness. Each region of a size larger than 1000 pixels and of a compactness value
smaller than 1.5 is appended to the region array rect. After the processing of the for loop only the
regions showing on the right side of figure 12.4 are left.
C++ (legacy)
Figure 12.3 shows a short example how to use the class HRegionArray.
94
The HALCON Parameter Classes
Figure 12.4: On the left side the input image (fabrik.png), and on the right side the selected rectangles.
12.1.2
Images
There is more to HALCON images than just a matrix of pixels: In HALCON, this matrix is called a
channel, and images may consist of one or more such channels. For example, gray value images consist
of a single channel, color images of three channels. Channels can not only contain the standard 8 bit
pixels (pixel type byte) used to represent gray value images, HALCON allows images to contain various
other data, e.g. 16 bit integers (type int2) or 32 bit floating point numbers (type real) to represent
derivatives. Besides the pixel information, each HALCON image also stores its so-called domain in
form of a HALCON region. The domain can be interpreted as a region of interest, i.e., HALCON
operators (with some exceptions) restrict their processing to this region.
12.1.2.1
Image Objects
The class HImage is the root class for all derived image classes. By using the class HImage all different
pixel types can be handled in a unique way (polymorphism). The class HImage is not virtual, thus it can
be instantiated. Besides those operators that can be called via HRegion (see also section 11.2.2 on page
75), HRegion provides the following member functions:
• HImage(void)
Default constructor, empty image.
• HImage(const char *file)
Constructing an image by reading from a file, see reference manual entry of read_image.
• HImage(int width, int height, const char *type)
Constructing an image of a defined size and a specific pixel type, see reference manual entry of
gen_image_const.
12.1 Iconic Objects
95
• HImage(void *ptr, int width, int height, const char *type)
Constructing an image of a defined size and a specific pixel type by copying memory, see reference
manual entry of gen_image1.
• HImage(const HImage &image)
Copy constructor.
• virtual ~HImage(void)
Destructor.
• HImage &operator = (const HImage &arr)
Assignment operator.
• virtual const char *PixType(void) const
Return the pixel type of the image, see reference manual entry of get_image_type.
• int Height(void) const
Return the height of the image, see reference manual entry of get_image_size.
• HPixVal GetPixVal(int x, int y) const
Access a pixel value via the (x, y) coordinates, see reference manual entry of get_grayval.
• HPixVal GetPixVal(long k) const
Linear access of a pixel value.
• virtual void SetPixVal(int x, int y, const HPixVal &val)
Set the pixel value via the (x, y) coordinates, see reference manual entry of set_grayval.
• virtual void SetPixVal(long k, const HPixVal &val)
Set the pixel value by linear access.
• virtual void Display(const HWindow &w) const
Display an image in a window.
• HImage operator & (const HRegion ®) const
Reduce the domain of an image, see reference manual entry of reduce_domain.
• HImage operator + (const HImage &add) const
Adding two images, see reference manual entry of add_image.
• HImage operator - (const HImage &sub) const
Subtracting two images, see reference manual entry of sub_image.
• HImage operator * (const HImage &mult) const
Multiplication of two images, see reference manual entry of mult_image.
• HImage operator - (void) const
Inverting the values of the image, see reference manual entry of invert_image.
• HImage
HImage
HImage
operator + (double add) const
operator - (double sub) const
operator * (double mult) const
C++ (legacy)
• int Width(void) const
Return the width of the image, see reference manual entry of get_image_size.
96
The HALCON Parameter Classes
HImage operator / (double div) const
Arithmetic operators, see reference manual entry of scale_image.
• HRegion operator >= (const HImage &image) const
HRegion operator <= (const HImage &image) const
Selecting all pixel with gray values brighter than or equal to (or darker than or equal to, respectively) those of the input image, see reference manual entry of dyn_threshold.
• HRegion operator >= (double thresh) const
HRegion operator <= (double thresh) const
HRegion operator == (double thresh) const
HRegion operator != (double thresh) const
Selecting all pixel with gray values brighter than or equal to (or darker than or equal to, or equal
to, or not equal to, respectively) a threshold, see reference manual entry of threshold.
Figure 12.5 gives an example of the use of the class HImage.
#include "HalconCpp.h"
using namespace Halcon;
#include "HIOStream.h"
#if !defined(USE_IOSTREAM_H)
using namespace std;
#endif
main ()
{
HImage
image("mreut");
// Aerial image
HWindow w;
// Output window
image.Display(w);
// Display image
// Returning the size of the image
cout << "width = " << image.Width();
cout << "height = " << image.Height() << endl;
// Interactive drawing of a region by using the mouse
HRegion mask = w.DrawRegion();
// Reduce the domain of the image to the mask
HImage
reduced = image & mask;
w.ClearWindow();
// Clear the window
reduced.Display(w);
// Display the reduced image
// Applying the mean filter in the reduced image
HImage
mean = reduced.MeanImage(61,61);
mean.Display(w);
HRegion reg = bild >= (mean + 3);
reg.Display(w);
}
Figure 12.5: Sample program for the use of the class HImage .
The example starts by reading a byte image from a file. The aim is to extract bright parts from the image.
The used filter and the segmentation process itself is applied only in a pre-chosen part of the image in
order to accelerate the runtime. This part is selected by drawing an arbitrary region with the mouse. This
Figure 12.6: On the left side the input image (mreut.png), and on the right side the segmented regions in
the selected image domain.
region mask serves as input for reducing the domain of the original image (operator &). The mean filter
with a mask size of 61 × 61 is applied to the resulting region reduced. Bright pixels are selected by
applying the operator >=. All pixels brighter than the filtered part of the image reduced +3 are selected.
Figure 12.6 shows the result of the sample program in figure 12.5.
12.1.2.2
Pixel Values
The class HPixVal is used for accessing the pixel values of the class HImage. Gray values can be set
and returned independent of their types:
• HPixVal(void)
Default constructor.
• HPixVal(const HComplex &Val)
Constructing a pixel value from a complex number.
• HPixVal(int Val)
Constructing a pixel value from an integer (int).
• HPixVal(long Val)
Constructing a pixel value from a long (long).
• HPixVal(HByte Val)
Constructing a pixel value from a byte (byte).
• HPixVal(double Val)
Constructing a pixel value from a double (double).
97
C++ (legacy)
12.1 Iconic Objects
98
The HALCON Parameter Classes
#include "HalconCpp.h"
#include "HIOStream.h"
#if !defined(USE_IOSTREAM_H)
using namespace std;
#endif
using namespace Halcon;
main ()
{
HByteImage in("mreut");
HWindow w;
in.Display(w);
HByteImage out = in;
int width = out.Width();
int height = out.Height();
long end
= width * height;
//
//
//
//
//
//
//
Aerial image
Output window
Displaying the image
Copying the image
Width of the image
Height of the image
Number of pixel of the image
// 1. run: linear accessing
for (long k = 0; k < end; k++) {
int pix = in.GetPixVal(k);
// Reading the pixel
out.SetPixVal(k,255-pix);
// Setting the pixel
}
// Displaying the transformation
cout << "Transformed !" << endl; out.Display(w);
w.Click();
cout << "Original !"
<< endl; in.Display(w);
w.Click();
// 2. run: accessing the image via the coordinates (x,y)
for (int y=0; y<height; y++) {
for (int x=0; x<width; x++) {
int pix = in.GetPixVal(x,y); // Reading the pixel
out.SetPixVal(x,y,255-pix); // Setting the pixel
}
}
// Displaying the transformation
cout << "Transformed !" << endl; out.Display(w);
w.Click();
cout << "Original !"
<< endl; in.Display(w);
w.Click();
}
Figure 12.7: Sample program for the use of the class HPixVal.
• HPixVal(const HPixVal &Val)
Copy constructor.
• HPixVal &operator = (const HPixVal &grey)
Assignment operator.
• operator HByte(void) const
Converting a pixel value to byte (0 . . . 255).
12.1 Iconic Objects
99
• operator int(void) const
Converting a pixel value to int.
• operator long(void) const
Converting a pixel value to long.
• operator double(void) const
Converting a pixel value to double.
• operator HComplex(void) const
Converting a pixel value to Complex.
12.1.2.3
Image Arrays
The same way which was used to define arrays of regions is used to obtain arrays of images. The class
is named HImageArray and contains the following member functions (in addition to the operators):
• HImageArray(void)
Default constructor: empty array, no element.
• HImageArray(const HImage ®)
Constructing an image array from a single image.
• HImageArray(const HImageArray &arr)
Copy constructor.
• ~HImageArray(void)
Destructor.
• HImageArray &operator = (const HImageArray &arr)
Assignment operator.
• long Num(void) const
Returning the number of elements in the array.
• HImage const &operator [] (long index) const
Reading the element i of the array. The index is in the range 0 . . . Num() − 1.
• HImage &operator [] (long index)
Assigning an image to the element i of the array. The index index can be ≥ Num().
• HImageArray operator () (long min, long max)
Selecting a subset between the lower min and upper max index.
• HImageArray &Append(const HImage &image)
Appending another image to the image array.
• HImageArray &Append(const HImageArray &images)
Appending another image array to the image array.
C++ (legacy)
The handling of the class HPixVal is explained by an example in figure 12.7 which inverts an input
image. The input image is a byte image. First, a copy is generated and the image size is determined.
In the first run the pixels are accessed linearly. In the second run the pixel are accessed via the (x, y)ccordinates.
100
The HALCON Parameter Classes
#include "HalconCpp.h"
#include "HIOStream.h"
#if !defined(USE_IOSTREAM_H)
using namespace std;
#endif
using namespace Halcon;
main ()
{
HByteImage in("mreut");
HWindow w;
in.Display(w);
HImageByte out = in;
int width = out.Width();
int height = out.Height();
long end
= width * height;
// 1. run: linear accessing
for (long k = 0; k < end; k++)
out[k] = 255 - in[k];
// Displaying the transformation
cout << "Transformed !" << endl;
cout << "Original !"
<< endl;
//
//
//
//
//
//
//
Aerial image
Output window
Displaying the image
Copying the image
Width of the image
Height of the image
Number of pixel of the image
// Reading and setting the pixel
out.Display(w);
in.Display(w);
w.Click();
w.Click();
// // 2. run: accessing the image via the coordinates (x,y)
for (int y=0; y<height; y++)
for (int x=0; x<width; x++)
out(x,y) = 255 - out(x,y);
// Reading and setting the pixel
// Displaying the transformation
cout << "Transformed !" << endl;
cout << "Original !"
<< endl;
out.Display(w);
in.Display(w);
w.Click();
w.Click();
}
Figure 12.8: Sample program for accessing a pixel value using the class HByteImage.
12.1.2.4 Byte Images
For each pixel type, there exists a corresponding image class derived from HImage, e.g., HByteImage
for the pixel type byte (standard 8 bit pixels) or HInt2Image for the pixel type int2 (unsigned 16 bit
pixels). The most important derived class is naturally HByteImage, as this pixel type still covers the
majority of all applications in the field of image processing. The advantage of the class HByteImage
in comparison to the class HImage is the simplified access to the pixel values. This is because the class
HPixVal is not necessary. Besides the member functions of HImage, the class HByteImage contains the
following extensions:
• HByteImage(void)
Default constructor.
12.1 Iconic Objects
101
• HByteImage(const char *file)
Constructing a byte image by reading a file.
• HByteImage(int width, int height)
Constructing an empty byte image of a given size.
• HByteImage(HByte *ptr, int width, int height)
Constructing a byte image by copying memory.
• HByteImage(const HByteImage &image)
Copy constructor.
• virtual ~HByteImage(void)
Destructor.
• HByte operator[] (long k) const
Reading a pixel value by linear accessing.
• HByte &operator() (long k)
Setting a pixel value by linear accessing.
• HByte operator() (long k) const
Reading a pixel value by linear accessing.
• HByte &operator()(int x, int y)
Setting a pixel value by accessing it via (x, y) coordinates.
• HByte operator()(int x, int y) const
Reading a pixel value by accessing it via (x, y) coordinates.
• HByteImage operator & (int i)
Applying the logical “and”-operation on each pixel with i.
• HByteImage operator << (int i)
Applying a left-shift on each pixel with i.
• HByteImage operator >> (int i)
Applying a right-shift on each pixel with i.
• HByteImage operator ~ (void)
Complement of each pixel.
• HByteImage operator & (HByteImage &ima)
Pixel by pixel logical “and”-operation of two images.
• HByteImage operator | (HByteImage &ima)
Pixel by pixel logical “or”-operation of two images.
• HByteImage operator ^ (HByteImage &ima)
Pixel by pixel logical “xor”-operation of two images.
The advantage of the class HByteImage can be seen when accessing each pixel, see figure 12.8. The
class HPixVal is not necessary in this example. Furthermore, the member functions GetPixVal and
C++ (legacy)
• HByte &operator[] (long k)
Setting a pixel value by linear accessing.
102
The HALCON Parameter Classes
SetPixVal are not used. HByteImage allows to access pixel values in a notation like in the programming language C. The result of the example in figure 12.8 is basically the same as in the example in
figure 12.7 on page 98. The program in figure 12.8 is shorter, easy to read, and has a better runtime
performance.
12.1.3
XLD Objects
XLD is the abbreviation for eXtended Line Description. This is a data structure used for describing areas
(e.g., arbitrarily sized regions or polygons) or any closed or open contour, i.e., also lines. In contrast to
regions, which represent all areas at pixel precision, XLD objects provide subpixel precision. There are
two basic XLD structures: contours and polygons.
Similarly to images, HALCON/C++ (legacy) provides both a base class HXLD and a set of specialized
classes derived from HXLD, e.g., HXLDCont for contours or HXLDPoly for polygons. For all classes there
exists a corresponding container class, e.g., HXLDArray.
In contrast to the classes described in the previous sections, the XLD classes provide only member
functions corresponding to HALCON operators (see also section 11.2.2 on page 75).
12.1.4
Low-Level Iconic Objects
As could be seen in the examples in chapter 11 on page 71, when calling operators in the procedural
approach, the class Hobject is used for all iconic parameters, be it an image, a region, or even an image
array. In fact, the class Hobject is HALCON’s basic class for accessing the internal data management,
i.e., it handles the keys of the database. Furthermore, Hobject serves as the basis for the class HObject
and the derived classes, e.g., HImage.
The class Hobject has the following member functions:
• Hobject(void)
Default constructor.
• Hobject(const Hobject &obj)
Copy constructor.
• virtual ~Hobject(void)
Destructor.
• Hobject &operator = (const Hobject &obj)
Assignment operator.
• void Reset(void)
Freeing the memory and resetting the corresponding database key.
As noted above, an instance of Hobject can also contain a tuple (array) of iconic objects. Unfortunately,
Hobject provides no special member functions to add objects or select them; instead, you must use the
operators gen_empty_obj, concat_obj, select_obj, and count_obj as described in section 11.2.5
on page 78.
12.2 Control Parameters
12.2
103
Control Parameters
HALCON/C++ (legacy) can handle different types of alphanumerical control parameters for HALCON
operators:
• discrete numbers (long),
• floating point numbers (double), and
• strings (char *).
With the class HTuple, HALCON/C++ (legacy) provides a container class for control parameters.
What’s more, HTuple is polymorphic, i.e., it can also contain arrays of control parameters of mixed
type. To realize this, the auxiliary class HCtrlVal is introduced, which is described in the next section.
12.2.1
The Basic Class for Control Parameters
The class HCtrlVal serves as the basis for the class HTuple and is normally hidden from the user
because it is only used temporarily for type conversion. The main point is that it can contain the three
elementary types of control parameters, i.e., discrete numbers (long), floating point numbers (double),
and strings (char *). HCtrlVal provides the following member functions:
• HCtrlVal(void)
Default constructor.
• HCtrlVal(long l)
Constructing a value from long.
• HCtrlVal(int l)
Constructing a value from int.
• HCtrlVal(double d)
Constructing a value from double.
• HCtrlVal(const char *s)
Constructing a value from char *.
• HCtrlVal(const HCtrlVal &v)
Copy constructor.
• ~HCtrlVal(void)
Destructor.
• HCtrlVal& operator = (const HCtrlVal &v)
Assignment operator.
• int ValType() const
Type of a value (1: long, int; 2: float, double; 4: string).
C++ (legacy)
A special form of control parameters are the so-called handles, which provide access to more complex
data structures like windows, image acquisition connections, or models for shape-based matching. Internally, handles are almost always represented by discrete numbers (long). For handles there exist
corresponding classes, which are described in section 12.2.3 on page 107.
104
The HALCON Parameter Classes
• operator int(void) const
Conversion to int.
• operator long(void) const
Conversion to long.
• operator double(void) const
Conversion to double.
• operator const char*(void) const
Conversion to char *.
• double D() const
Accessing a value and conversion to double.
• long L() const
Accessing a value and conversion to long.
• int I() const
Accessing a value and conversion to int.
• const char *S() const
Accessing a value and conversion to char *.
• HCtrlVal operator + (const HCtrlVal &val) const
Adding two values.
• HCtrlVal operator - (const HCtrlVal &val) const
Subtracting two values.
• HCtrlVal operator * (const HCtrlVal &val) const
Multiplying two values.
• HCtrlVal operator / (const HCtrlVal &val) const
Division of two values.
12.2.2
Tuples
The class HTuple is built upon the class HCtrlVal; it implements an array of dynamic length for instances of the class HCtrlVal. The default constructor constructs an empty array (Num() == 0). This
array can dynamically be expanded via assignments. The memory management, i.e., reallocation, freeing, is also managed by the class. The index for accessing the array is in the range between 0 and
Num() − 1.
The following member functions reflect only a small portion of the total. For further information please
refer to the file HTuple.h in %HALCONROOT%\include\cpp.
• HTuple(void)
Default constructor. Constructs an empty tuple.
• HTuple(long l)
Constructing an array of length 1 from a discrete number long at index position 0.
12.2 Control Parameters
105
• HTuple(int l)
Constructing an array of length 1 from a discrete number converted to the internal type long at
index position 0.
• HTuple(HCoord c)
Constructing an array of length 1 from a coordinate at index position 0.
• HTuple(double d)
Constructing an array of length 1 from a floating number double at index position 0.
• HTuple(const char *s)
Constructing an array of length 1 from a string char* at index position 0.
• HTuple(int length, const HTuple \&value)
Constructing an array of the specified length with a constant value, similar to the operator
tuple_gen_const.
• ~HTuple()
Destructor.
• HTuple &operator = (const HTuple& in)
Assignment operator.
• HTuple Sum(void) const
Adding all elements in case they are numbers, similar to the operator tuple_sum.
• HCtrlVal &operator [] (int i)
Setting the i−th element.
• HCtrlVal operator [] (int i) const
Reading the i−th element.
• HTuple operator + (const HTuple &val) const
Adding two tuples element by element, similar to the operator tuple_add. The arrays have to be
of the same size.
• HTuple operator + (double &val) const
HTuple operator + (int &val) const
Adding a number to each element of the tuple, similar to the operator tuple_add.
• HTuple operator - (const HTuple &val) const
Subtracting two tuples element by element, similar to the operator tuple_sub. The arrays have to
be of the same size.
• HTuple operator - (double &val) const
HTuple operator - (int &val) const
Subtracting a number from each element of the tuple, similar to the operator tuple_sub.
• HTuple operator * (const HTuple &val) const
Multiplying two tuples element by element, similar to the operator tuple_mult. The arrays have
to be of the same size.
C++ (legacy)
• HTuple(const HTuple &t)
Copying a tuple.
106
The HALCON Parameter Classes
• HTuple operator * (double &val) const
HTuple operator * (int &val) const
Multiplying a number with each element of the tuple, similar to the operator tuple_mult.
• HTuple operator / (const HTuple &val) const
Division of two tuples element by element, similar to the operator tuple_div. The arrays have to
be of the same size.
• HTuple operator / (double &val) const
HTuple operator / (int &val) const
Division of each element of the tuple by a number, similar to the operator tuple_div.
• HTuple Concat(const HTuple &t) const
Concatenating two tuples, similar to the operator tuple_concat.
#include "HalconCpp.h"
using namespace Halcon;
#include "HIOStream.h"
#if !defined(USE_IOSTREAM_H)
using namespace std;
#endif
main ()
{
HTuple t;
cout << t.Num() << '\n';
// The length of the tuple is 0
t[0] = 0.815;
// Assigning values to the tuple
t[1] = 42;
t[2] = "HAL";
cout << t.Num() << '\n';
// The length of the tuple is 3
cout << "HTuple = " << t << '\n';
// Using the << operator
double d = t[0];
// Accessing the tuple, if the
long
l = t[1];
// the types of the elements
const char *s = t[2];
// are known
// Accessing the tuple, if the types of the elements are known
printf("Values: %g %ld %s\n",t[0].D(),t[1].L(),t[2].S());
}
Figure 12.9: Sample for the use of the class HTuple .
Figure 12.9 shows a short sample how to use tuples, i.e., the class HTuple: The default constructor
generates an empty tuple. By assigning values to the tuple it is automatically expanded, and the data
types of the values are also stored. For accessing the tuple the normal array notation can be used. If
the data type of a value is not known in advance, an explicit type conversion has to be performed, see
figure 12.9.
12.2 Control Parameters
12.2.3
107
Classes Encapsulating Handles
The perhaps most prominent handle class is HWindow, which is described in section 12.2.3.1. Starting
with version 6.1, HALCON/C++ (legacy) also provides classes for handles to files or functionality like
access to image acquisition devices, measuring, or shape-based matching. See section 12.2.3.2 on page
108 for an overview.
12.2.3.1
Windows
• HWindow(int Row=0, int Column=0,
int Width=-1, int Height=-1,
int Father = 0, const char *Mode = "",
const char *Host = "")
Default constructor. The constructed window is opened.
• ~HWindow(void)
Destructor. This closes the window.
• void Click(void) const
Waiting for a mouse click in the window.
• HDPoint2D GetMbutton(int *button) const
HDPoint2D GetMbutton(void) const
Waiting for a mouse click in the window. It returns the current mouse position in the window and
the number of the button that was pressed, see the reference manual entry of get_mbutton.
• HDPoint2D GetMposition(int *button) const
HDPoint2D GetMposition(void) const
Returning the mouse position and the pressed button without waiting for a mouse click, see the
reference manual entry of get_mposition.
• HCircle DrawCircle(void) const
Waiting for the user to draw a circle in the window, see the reference manual entry of
draw_circle.
• HEllipse DrawEllipse(void) const
Waiting for the user to draw an ellipse in the window, see the reference manual entry of
draw_ellipse.
• HRectangle1 DrawRectangle1(void) const
Waiting for the user to draw a rectangle parallel to the coordinate axis in the window, see the
reference manual entry of draw_rectangle1.
• HRectangle2 DrawRectangle2(void) const
Waiting for the user to draw a rectangle with an arbitrary orientation and size in the window, see
the reference manual entry of draw_rectangle2.
C++ (legacy)
The class HWindow provides the management of HALCON windows in a very convenient way. The
properties of HALCON windows can be easily changed, images, regions, and polygons can be displayed,
etc. Besides those operators that can be called via HWindow (see also section 11.2.2 on page 75), HWindow
provides the following member functions:
108
The HALCON Parameter Classes
#include "HalconCpp.h"
using namespace Halcon;
main ()
{
HImage image("control_unit");
// Reading an image from a file
HWindow w;
// Opening an appropriate window
image.Display(w);
// Display the image
w.SetLut("change2");
// Set a lookup table
w.Click();
// Waiting for a mouse click
w.SetLut("default");
// Set the default lookup table
w.SetPart(100,100,200,200);
// Set a part of the window
image.Display(w);
w.Click();
// Adapting the part to the image again
w.SetPart(0,0,bild.Height()-1,bild.Width()-1);
image.Display(w);
HRegionArray regs = image.Regiongrowing(1,1,4,100);
w.SetDraw("margin");
w.SetColored(6);
regs.Display(w);
w.Click();
image.Display(w);
w.SetShape("rectangle1");
regs.Display(w);
}
Figure 12.10: Sample program for the use of the class HWindow .
Figure 12.10 shows the typical use of some member functions of the class HWindow and the different
possibilities of displaying images and regions. The window is opened after reading the image from a
file. This means, the window is scaled to the size of the image. The lookup table is changed afterwards,
and the program waits for a mouse click in the window. A part of the image is zoomed now, and the
program waits again for a mouse click in the window. By applying a region growing algorithm from
the HALCON library (Regiongrowing) regions are generated and displayed in the window. Only the
margin of the regions is displayed. It is displayed in 6 different colors in the window. The example ends
with another way of displaying the shape of regions. The smallest rectangle parallel to the coordinate
axes surrounding each region is displayed.
12.2.3.2
Other Handle Classes
Starting with version 6.1, HALCON/C++ (legacy) provides the so-called handle classes like
HFramegrabber, HBarCode, or HClassBoxMlp.
Besides the default constructor, the classes typically provide additional constructors based on suitable
operators as described in section 11.2.3 on page 76; e.g., the class HBarCode provides a constructor
based on the operator create_bar_code_model.
12.3 Auxiliary Classes
109
All handle classes listed above provide the methods SetHandle() and GetHandle(), which allow to
access the underlying handle; furthermore, the classes provide an operator that casts an instance of the
class into the corresponding handle. These methods are typically used when combining procedural and
object-oriented code; for examples please refer to section 11.5 on page 84.
The reference manual provides short overview pages for these classes, listing the operators that can be
called via them.
12.3
Auxiliary Classes
Please note that the header files in include/cpp include other classes, which do not appear in this
manual. These classes are used by MVTec internally for testing purposes; they should not be used in an
application.
C++ (legacy)
In section 12.1.1 on page 87, you already got a glimpse of additional classes provided by HALCON/C++
(legacy): Instances of HRegion can be constructed from classes like HDPoint2D or HRectangle1. Currently, these classes are not documented in any of the manuals. We recommend to have a look at the
header files in the directory include/cpp.
110
The HALCON Parameter Classes
Creating Applications With HALCON/C++ (legacy)
111
Chapter 13
The HALCON distribution contains examples for creating an application with HALCON/C++ (legacy).
The following sections show
• the relevant directories and files (section 13.1)
• the relevant environment variables (section 13.2)
• how to create an executable under Windows (section 13.3 on page 113)
• how to create an executable under Linux (section 13.4 on page 113)
13.1
Relevant Directories and Files
Here is an overview of the relevant directories and files (relative to %HALCONROOT%, Windows notation
of paths):
include\cpp\HalconCpp.h:
include file; contains all user-relevant definitions of the HALCON system and the declarations
necessary for the C++ (legacy) interface.
bin\%HALCONARCH%\halcon.dll,
lib\%HALCONARCH%\halcon.lib:
The HALCON library (Windows).
bin\%HALCONARCH%\halconcpp10.dll,
lib\%HALCONARCH%\halconcpp10.lib:
The HALCON/C++ (legacy) library (Windows).
bin\%HALCONARCH%\halconxl.dll, halconcpp10xl.dll,
C++ (legacy)
Creating Applications With
HALCON/C++ (legacy)
112
Creating Applications With HALCON/C++ (legacy)
lib\%HALCONARCH%\halconxl.lib, halconcpp10xl.lib:
The corresponding libraries of HALCON XL (Windows).
lib/$HALCONARCH/libhalcon.so:
The HALCON library (Linux).
lib/$HALCONARCH/libhalconcpp10.so:
The HALCON/C++ (legacy) library (Linux).
lib/$HALCONARCH/libhalconxl.so,libhalconcpp10xl.so:
The corresponding libraries of HALCON XL (Linux).
include\HProto.h:
External function declarations.
help\operators_*:
Files necessary for online information.
doc\pdf\:
Various manuals (in subdirectories).
13.2
Relevant Environment Variables
In the following, we briefly describe the relevant environment variables; see the Installation Guide,
section A.2 on page 64, for more information, especially about how to set these variables. Note, that
under Windows, all necessary variables are automatically set during the installation.
While a HALCON program is running, it accesses several files internally. To tell HALCON where to
look for these files, the environment variable HALCONROOT has to be set. HALCONROOT points to the
HALCON home directory. HALCONROOT is also used in the sample makefile.
The variable HALCONARCH describes the platform HALCON is used on. Please refer to section 1.1 on
page 13 for more information.
The variable HALCONEXAMPLES indicates where the provided examples are installed.
If user-defined packages are used, the environment variable HALCONEXTENSIONS has to be set. HALCON will look for possible extensions and their corresponding help files in the directories given in
HALCONEXTENSIONS.
Two things are important in connection with the example programs: The default directory for the
HALCON operator read_image to look for images is \images. If the images reside in different
directories, the appropriate path must be set in read_image or the default image directory must be
changed, using set_system("image_dir","..."). This is also possible with the environment variable HALCONIMAGES. It has to be set before starting the program.
The second remark concerns the output terminal under Linux. In the example programs, no host name
is passed to open_window. Therefore, the window is opened on the machine that is specified in the
environment variable DISPLAY. If output on a different terminal is desired, this can be done either directly
in OpenWindow(...,"hostname",...) or by specifying a host name in DISPLAY.
In order to link and run applications under Linux, you have to include the HALCON library path
$HALCONROOT/lib/$HALCONARCH in the system variable LD_LIBRARY_PATH.
13.3 Windows
13.3
113
Creating an Executable Under Windows
Your own C++ programs that use HALCON operators must include the file HalconCpp.h, which contains all user-relevant definitions of the HALCON system and the declarations necessary for the C++
(legacy) interface. Do this by adding the command
#include "HalconCpp.h"
near the top of your C++ file. In order to create an application you must link the library
halconcpp10.lib/.dll to your program.
HALCON XL applications: If you want to use HALCON XL, you have to link the libraries halconxl.lib/.dll and halconcp10pxl.lib/.dll instead of halcon.lib/.dll and
halconcpp10.lib/.dll in your project.
13.4
Creating an Executable Under Linux
Your own C++ programs that use HALCON operators must include the file HalconCpp.h, which contains all user-relevant definitions of the HALCON system and the declarations necessary for the C++
(legacy) interface. Do this by adding the command
#include "HalconCpp.h"
near the top of your C++ file. Using this syntax, the compiler looks for HalconCpp.h in the current
directory only. Alternatively you can tell the compiler where to find the file, giving it the -I<pathname>
command line flag to denote the include file directory.
To create an application, you have to link two libraries to your program: The library
libhalconcpp10.so contains the various components of the HALCON/C++ (legacy) interface.
libhalcon.so is the HALCON library.
HALCON XL applications: If you want to use HALCON, you have to link the libraries
libhalconcpp10xl.so and libhalconxl.so instead.
As a basic example: To compile your own C++ (legacy) application example.cpp using the GNU C++
compiler, the following call can be used:
g++ -I$HALCONROOT/include -I$HALCONROOT/include/cpp \
-L$HALCONROOT/lib/$HALCONARCH -lhalconcpp10 -lhalcon -o example example.cpp
C++ (legacy)
Please assure that the stacksize is sufficient. Some sophisticated image processing problems require up
to 1 MB stacksize, so make sure to set the settings of your compiler accordingly (See your compiler
manual for additional information on this topic).
114
Creating Applications With HALCON/C++ (legacy)
Typical Image Processing Problems
115
Chapter 14
This chapter shows the power the HALCON system offers to find solutions for image processing problems. Some typical problems are introduced together with sample solutions.
14.1
Thresholding an Image
Some of the most common sequences of HALCON operators may look like the following one:
HByteImage
HRegion
HRegionArray
HRegionArray
Image("file_xyz");
Threshold
= Image.Threshold(0,120);
ConnectedRegions = Threshold.Connection();
ResultingRegions =
ConnectedRegions.SelectShape("area","and",10,100000);
This short program performs the following:
• All pixels are selected with gray values between the range 0 and 120.
• A connected component analysis is performed.
• Only regions with a size of at least 10 pixel are selected. This step can be considered as a step to
remove some of the noise from the image.
C++ (legacy)
Typical Image Processing
Problems
116
Typical Image Processing Problems
14.2
Edge Detection
For the detection of edges the following sequence of HALCON/C++ (legacy) operators can be applied:
HByteImage
HByteImage
HRegion
HRegion
Image("file_xyz");
Sobel = Image.SobelAmp("sum_abs",3);
Max
= Sobel.Threshold(30,255);
Edges = Max.Skeleton();
A brief explanation:
• Before applying the sobel operator it might be useful first to apply a low-pass filter to the image in
order to suppress noise.
• Besides the sobel operator you can also use filters like EdgesImage, PrewittAmp, RobinsonAmp,
KirschAmp, Roberts, BandpassImage, or Laplace.
• The threshold (in our case 30) must be selected appropriately depending on data.
• The resulting regions are thinned by a Skeleton operator. This leads to regions with a pixel width
of 1.
14.3
Dynamic Threshold
Another way to detect edges is e.g. the following sequence:
HByteImage Image("file_xyz");
HByteImage Mean
= Image.MeanImage(11,11);
HRegion
Threshold = Image.DynThreshold(Mean,5,"light");
Again some remarks:
• The size of the filter mask (in our case 11 × 11) is correlated with the size of the objects which
have to be found in the image. In fact, the sizes are proportional.
• The dynamic threshold selects the pixels with a positive gray value difference of more than 5
(brighter) than the local environment (mask 11 × 11).
14.4
Texture Transformation
Texture transformation is useful in order to obtain specific frequency bands in an image. Thus, a texture
filter detects specific structures in an image. In the following case this structure depends on the chosen
filter; 16 are available for the operator TextureLaws.
HByteImage
HByteImage
HByteImage
HRegion
Image("file_xyz");
TT
= Image.TextureLaws(Image,"ee",2,5);
Mean = TT.MeanImage(71,71);
Reg = Mean.Threshold(30,255);
14.5 Eliminating Small Objects
117
• The mean filter MeanImage is applied with a large mask size in order to smooth the “frequency”
image.
• You can also apply several texture transformations and combine the results by using the operators
AddImage and MultImage.
14.5
Eliminating Small Objects
The following morphological operator eliminates small objects and smoothes the contours of regions.
• The term segmentation() is an arbitrary segmentation operator that results in an array of regions
(Seg).
• The size of the mask (in this case the radius is 3.5) determines the size of the resulting objects.
• You can choose an arbitrary mask shape.
14.6
Selecting Oriented Objects
Another application of morphological operators is the selection of objects having a certain orientation:
...
segmentation(Image,&Seg);
HRectangle2 Rect(100,100,0.5,21,2);
HRegionArray Res = Seg.Opening(Rect);
• Again, segmentation() leads to an array of regions (Seg).
• The width and height of the rectangle determine the minimum size of the resulting regions.
• The orientation of the rectangle determines the orientation of the regions.
• Lines with the same orientation as Rect are kept.
14.7
Smoothing Contours
The last example in this user’s manual deals again with morphological operators. Often the margins of
contours have to be smoothed for further processing, e.g. fitting lines to a contour. Or small holes inside
a region have to be filled:
C++ (legacy)
...
segmentation(Image,&Seg);
HCircle Circle(100,100,3.5);
HRegionArray Res = Seg.Opening(Circle);
118
Typical Image Processing Problems
...
segmentation(Image,&Seg);
HCircle Circle(100,100,3.5);
HRegionArray Res = Seg.Closing(Circle);
• Again, segmentation() leads to an array of regions (Seg).
• For smoothing the contour a circle mask is recommended.
• The size of the mask determines how much the contour is smoothed.
Part IV
Programming With HALCON/.NET
Introducing HALCON/.NET
121
Chapter 15
Introducing HALCON/.NET
This chapter introduces you to HALCON/.NET. Chapter 16 on page 123 shows how to use it to create
.NET applications, chapter 17 on page 143 contains additional information.
What is HALCON/.NET?
Why use HALCON/.NET and not HALCON/COM or HALCON/C++?
HALCON/.NET is a native .NET assembly, whereas HALCON/COM is used in .NET via so-called
wrappers. This means that HALCON/.NET applications are faster than their HALCON/COM counterparts.
HALCON/C++ is meant for standard, i.e., unmanaged C++ applications. If your application needs both
managed and unmanaged code, you can combine HALCON/C++ and HALCON/.NET.
Being the newest HALCON interface, HALCON/.NET provides you with state-of-the-art technology,
e.g., an improved IntelliSense support in Visual Studio.
Platform Independency
HALCON/.NET is highly platform-independent: It is written in C# but can be used in any .NET language. Like .NET in general, it can be used under Windows and Linux, on 32-bit and 64-bit systems.
What’s more, you can not only use it on all these platforms, but you can run an application created on one
of them on the other ones without needing to recompile. This is possible because applications written in
.NET languages are stored in a platform-independent intermediate language, which is then compiled by
the so-called common language runtime into platform-specific code.
HDevEngine/.NET
By combining HALCON/.NET and HDevEngine/.NET, you can execute HDevelop programs and procedures from a .NET application. For more information, please refer to part VII on page 209.
.NET
HALCON/.NET is HALCON’s interface to .NET programming languages, e.g., C# or Visual Basic
.NET. It provides you with a set of .NET classes and controls.
122
Introducing HALCON/.NET
HALCON/.NET XL and HDevEngine/.NET XL
In fact, two sets of assemblies are provided: HALCON/.NET and HDevEngine/.NET are based on HALCON, while HALCON/.NET XL and HDevEngine/.NET XL are based on HALCON XL, i.e., they use
the XL versions of the HALCON library and of HDevEngine, respectively.
Creating Applications With HALCON/.NET
123
Chapter 16
Creating Applications With
HALCON/.NET
This chapter shows you how to create applications with HALCON/.NET. The examples are given in C#,
using Visual Studio .NET under Windows as development environment.
The provided online help is listed in section 16.4.1 on page 129.
This chapter describes how to
• add HALCON/.NET to an application (section 16.2 on page 126)
• add and customize HWindowControl for visualization (section 16.3 on page 128)
• use HALCON/.NET classes to call HALCON operators (section 16.4 on page 129)
• work with tuples (section 16.5 on page 135)
• visualize images and results (section 16.6 on page 140)
• perform error handling (section 16.7 on page 141)
• deploy an application (section 16.8 on page 142)
• use a newer release of HALCON/.NET (section 16.9 on page 142)
Many of the code examples stem from the example Matching, which is provided in C#
(%HALCONEXAMPLES%\c#), Visual Basic .NET (%HALCONEXAMPLES%\vb.net), and managed C++
(%HALCONEXAMPLES%\cpp.net). An overview of the provided example applications can be found in
section 17.2 on page 148.
But before explaining how to create applications, we must take a brief look under the hood of .NET: at
the dependency of applications on the .NET Framework.
.NET
If programming constructs or activities differ in Visual Basic .NET or managed C++, this is noted at
the first occurrence. How to create applications under Linux using Mono is described in section 17.3 on
page 150.
124
Creating Applications With HALCON/.NET
16.1
.NET Framework, Development Environments, and Example Directory Structure
Chapter 15 on page 121 emphasized the platform-independency of .NET applications. However, applications are not completely independent: They depend on the version of the .NET Framework they have
been created with, i.e., the underlying SDK, development environment, etc.
16.1.1
HALCON/.NET and .NET Framework Versions
Table 16.1 shows which version of Visual Studio is based on which version of the .NET Framework.
Visual Studio .NET 2002
Visual Studio .NET 2003
Visual Studio 2005
Visual Studio 2008
Visual Studio 2010
→
→
→
→
→
.NET Framework 1.0
.NET Framework 1.1
.NET Framework 2.0
.NET Framework 3.5
.NET Framework 4.0
Table 16.1: Versions of the .NET Framework and of development environments.
.NET Framework 1.1 is only an updated version of .NET Framework 1.0, whereas .NET Framework 2.0
added many new features, e.g., the support of managed C++ and 64-bit applications.
Consequently, the HALCON/.NET assembly is provided in three variants (with identical functionality):
• based on .NET Framework 1.0: in the directory %HALCONROOT%\bin\dotnet10
• based on .NET Framework 2.0: in the directory %HALCONROOT%\bin\dotnet20
• based on .NET Framework 3.5: in the directory %HALCONROOT%\bin\dotnet35
Newer versions of the .NET Framework provide backwards compatibility, e.g., .NET Framework 4.0 can
use assemblies from 3.5. Mono at the time of writing implements most features of .NET Framework 3.5.
16.1.2
Example Directory Structure
Furthermore, the example applications (see section 17.2 on page 148 for an overview) are provided in a
modular directory structure:
. source: contains shared source files
. vs.net: contains the project files for Visual Studio .NET 2002 and 2003
. vs2005: contains the project files for Visual Studio 2005 and Visual Studio 2008
. vs2008: contains the project files for Visual Studio 2008
16.1 .NET Framework, Development Environments, and Example Directory Structure
125
. makefiles: contains makefiles for compiling the applications from the command line, in particular using Mono (see section 17.3 on page 150 for more information)
Thus, to open an example in Visual Studio .NET 2002 or 2003, you open the corresponding project
file in the subdirectory vs.net. To open it in Visual Studio 2005 or Visual Studio 2008, you open
the corresponding project file in the subdirectory vs2005. Note that only some examples have special
support for Visual Studio 2008 and therefore have a subdirectory vs2008. If this is not the case, open
the project file in vs2005.
Note that when opening a project in Visual Studio .NET 2003, the project will be upgraded automatically
(with only minor changes to the project file). Table 16.2 lists more generally whether a project created
with one version of Visual Studio can be opened with another.
created with \ open with
VS .NET 2002
VS .NET 2002
VS .NET 2003
VS 2005
VS 2008
(*) minor upgrade (automatic)
(**) major upgrade (automatic)
×
–
–
–
VS .NET 2003
∗)
×
×
–
–
VS 2005
∗∗)
×
×∗∗)
×
–
VS 2008
×∗∗)
×∗∗)
×∗)
×
Please note that the provided examples reference the HALCON/.NET assembly using a local path.
Therefore, when you copy an example to another location, the assembly will not be found, which is
signalled in the Solution Explorer by a broken reference. In such a case, delete the reference and add the
correct one as described in section 16.2.2.
If you are copying examples to locations other than on a local disk, please note that you must adapt the
.NET Framework Configuration as described in section 17.5.1 on page 153, otherwise you get a warning
upon loading the project and a run-time error upon executing it.
.NET
Table 16.2: Compatibility of applications.
126
Creating Applications With HALCON/.NET
16.2
Adding HALCON/.NET to an Application
You add HALCON/.NET to an application with the following steps: For the first application:
• customize Visual Studio’s toolbox (section 16.2.1)
For each application:
• add a reference to HALCON/.NET (section 16.2.2) and
• specify the namespace (section 16.2.3)
16.2.1
Customizing Visual Studio’s Toolbox
In fact, the HALCON/.NET assembly provides not only a class library but also one control:
HWindowControl, which contains a HALCON graphics window for visualizing images and results.
You can add this control to Visual Studio’s toolbox by performing the following steps (note that the exact
menu names are slightly different in different versions of Visual Studio!):
• Right-click on the toolbox and select Customize Toolbox. This will open a dialog displaying all
available .NET Framework components in a tab.
• Click on Browse, navigate to the directory %HALCONROOT%\bin\dotnet10 (Visual Studio .NET
2002 and 2003) or %HALCONROOT%\bin\dotnet20 (Visual Studio 2005, Visual Studio 2008) and
select halcondotnet.dll.
• Then, the icon of HWindowControl appears in the toolbox (compare figure 16.1).
Standard HALCON/.NET
HALCON/.NET XL
Figure 16.1: Adding HWindowControl to the toolbox.
HALCON XL applications: When developing an application with HALCON XL, you must select
halcondotnetxl.dll instead of halcondotnet.dll. In the toolbox, the control appears with the
same name but with a different icon (see figure 16.1). You can add both HALCON versions to the
toolbox, but only one of them to an application.
16.2.2
Adding a Reference to HALCON/.NET
In many applications you will use at least one instance of HWindowControl to visualize results. By
adding the control to the form (as described in section 16.3 on page 128), you automatically create a
reference to the assembly halcondotnet.dll.
If you do not want to use HWindowControl, you add a reference as follows:
• Right-click References in the Solution Explorer and select Add Reference.
16.2 Adding HALCON/.NET to an Application
127
• Click on Browse, navigate to the subdirectory %HALCONROOT%\bin\dotnet10 (Visual Studio
.NET 2002 and 2003) or %HALCONROOT%\bin\dotnet20 (Visual Studio 2005, Visual Studio
2008) and select the assembly halcondotnet.dll.
HALCON XL applications: When developing an application with HALCON XL, you must select
halcondotnetxl.dll instead of halcondotnet.dll. If you already added a reference to the HALCON version, simply delete that reference and add one to halcondotnetxl.dll.
16.2.3
Specifying the Namespace
To be able to use the HALCON/.NET classes without prefixing them with their namespace, we
recommend to specify this namespace at the beginning of each source file (see, e.g., the example
MatchingForm.cs)) by adding the following line:
using HalconDotNet;
Visual Basic .NET applications:
MatchingForm.vb):
The corresponding Visual Basic .NET code is (see, e.g.,
Imports HalconDotNet
using namespace HalconDotNet;
.NET
C++ applications: The corresponding managed C++ code is (see, e.g., MatchingForm.h):
128
Creating Applications With HALCON/.NET
16.3
Adding and Customizing HWindowControl for the Visualization
In most application you want to visualize at least some results. Then, you start by adding
HWindowControl to the form by double-clicking the corresponding icon in the toolbar (see figure 16.1
on page 126). An empty (black) window appears (see figure 16.2).
HALCON XL applications: If you already added the HALCON version of the control, but now want
to use HALCON XL, simply delete the reference to halcondotnet.dll in the Solution Explorer and
add a reference to halcondotnetxl.dll instead (also see section 16.2.2 on page 126).
If you want to visualize images (which is typically the case), you should adapt the size of the window
to the size of the images to display, otherwise the display will be significantly slower because of the
necessary interpolation. The window should have the same size as the image, or half its size, quarter its
size, etc. To be more exact, it is not the image size that matters, but the size of the part of the image you
want to display. But in most cases you will display the full image, then the two sizes are identical.
You can modify both the window size and the image part in the Property Window (see figure 16.2) by
entering them in the properties WindowSize and ImagePart. Note that the part is specified with the
values X, Y, Width, and Height, whereas the corresponding operator SetPart expects the four corner
points.
Note that you can modify the displayed part in your application at any time, e.g., to display a zoomed
part of the image. See section 16.6 on page 140 for more information about actually visualizing results.
set window size and image part
Figure 16.2: Adapting window size and image part of HWindowControl.
16.4 Using HALCON/.NET Classes
16.4
129
Using HALCON/.NET Classes
In HALCON/.NET, you call HALCON operators via instances of classes. The following code, e.g.,
grabs the first image of an image sequence and displays it in the graphics window of HWindowControl:
private HWindow
private HFramegrabber
private HImage
Window;
Framegrabber;
Img;
Window = WindowControl.HalconWindow;
Framegrabber = new HFramegrabber("File", 1, 1, 0, 0, 0, 0, "default",
-1, "default", -1, "default",
"board/board.seq", "default", 1, -1);
Img = Framegrabber.GrabImage();
Img.DispObj(Window);
The operator GrabImage is called via an instance of HFramegrabber. As an experienced HALCON
user you will perhaps have identified the constructor of HFramegrabber as a call to the operator
OpenFramegrabber.
Below, we take a closer look at:
• how to call operators via HALCON/.NET’s classes (section 16.4.2)
• overloads of operator calls (section 16.4.4 on page 133)
But first, we give you an overview of the provided online help.
16.4.1
Online Help
The main source of information about HALCON/.NET operators and classes is the reference manual, which is available as HTML and PDF version (note that the latter is only provided in HDevelop syntax). Under Windows, you can open both versions via the Start Menu. Under Linux, open
table_of_contents.html in the directory $HALCONROOT/doc/html/reference/operators , and
reference_hdevelop.pdf in the directory $HALCONROOT/doc/pdf/reference , respectively. You
can access them also via HDevelop’s Help Browser.
The Reference Manual describes the functionality of each HALCON operator and its signatures, i.e., via
which classes it can be called with which parameters. Furthermore, it gives an overview of the provided
classes (which does not list all methods, however, only the HALCON operators).
Online help is also available in Visual Studio:
• When you type a dot (.) after the name of a class or class instance, the automatic context help
(IntelliSense) lists all available methods.
• Similarly, when you type the name of a method, its signature(s) is (are) listed.
.NET
• construction, initialization, and destruction of class instances (section 16.4.3 on page 131)
130
Creating Applications With HALCON/.NET
• For parameters of HALCON operators, a short description and the the so-called default value is
shown. Note that HALCON operators do not have “real” default parameter values, i.e., you cannot
leave out a parameter and let HALCON use a default value. Instead, the listed default value is a
typical value chosen for the parameter.
• The Object Browser lists all HALCON/.NET classes with their methods, including a short description.
16.4.2
Calling HALCON Operators
Via which classes you can call a HALCON operator is listed in the reference manual. Figure 16.3 shows
the corresponding part of the description of the operator GrabImage:
static void HOperatorSet.GrabImage (out HObject image, HTuple acqHandle)
void HImage.GrabImage (HFramegrabber acqHandle)
HImage HFramegrabber.GrabImage ()
image (output_object) . . . . . . . . . . . . . . . . . . . . . . . . . . . . . . . . . . . . . . . . . . . . . . . . . . . . . image ; HImage
acqHandle (input_control) . . . . . . . . . . . . . . . . . . . . . . . . . . framegrabber ; HFramegrabber / HTuple
Figure 16.3: The head and parts of the parameter section of the reference manual entry for GrabImage.
As you can see, the operator can be called via three classes: HOperatorSet, HImage, and
HFramegrabber. The first variant, via HOperatorSet, is mainly used for the export of HDevelop
programs (see section 17.4 on page 152).
For normal applications, we recommend to call operators via the other classes, in the example HImage
and HFramegrabber as in the following code example:
HImage
Image1;
HImage
Image4 = new HImage();
HFramegrabber Framegrabber =
new HFramegrabber("File", 1, 1, 0, 0, 0, 0, "default", -1,
"default", -1, "default", "board/board.seq", "default", -1, -1);
Image1 = Framegrabber.GrabImage();
HImage
Image3 = null;
Note that in the call via HFramegrabber the grabbed image is the return value of the method, whereas
the call via HImage has no return value and the calling class instance is modified instead. Usually, calling
class instances are not modified by an operator call - with the exception of “constructor-like” operator
calls as in the example above.
Some operators like CountSeconds are available as class methods, i.e., you can call them directly via
the class and do not need an instance:
16.4 Using HALCON/.NET Classes
double
131
S1, S2;
S1 = HSystem.CountSeconds();
In the reference manual, these operator calls start with the keyword static:
static void HOperatorSet.CountSeconds (out HTuple seconds)
static double HSystem.CountSeconds ()
Figure 16.4: The head of the reference manual entry for CountSeconds.
16.4.3
From Declaration to Finalization
During the lifecycle of an object, i.e., from declaration to finalization, different amounts of memory are
allocated and released.
The following declaration just declares a variable of the class HImage that does not yet refer to any
object:
Image1;
In this state, you cannot use the variable to call operators; depending on the programming language, you
might not even be able to use it as an output parameter (e.g., in Visual Basic 2005). However, you can
assign image objects to the variable, e.g., from the return value of an operator:
Image1 = Framegrabber.GrabImage();
You can also initialize a variable when declaring it:
HImage
HImage
Image2 = Framegrabber.GrabImage();
Image3 = null;
Note that you can check the initialization state of a class instance with the method IsInitialized.
16.4.3.1
Constructors
In contrast, the following declaration calls the “empty” constructor of the class HImage, which creates
an unititialized class instance:
HImage
Image4 = new HImage();
.NET
HImage
132
Creating Applications With HALCON/.NET
This class instance can be used to call “constructor-like” operators like GrabImage, which initializes it
with a grabbed image:
Image4.GrabImage(Framegrabber);
Besides the empty constructor, most HALCON/.NET classes provide one or more constructors that initialize the created object based on HALCON operators. For example, HImage provides a constructor
based on the operator ReadImage:
HImage
Image5 = new HImage("fuse");
You can check which constructors are provided via the online help:
• The reference manual pages for the classes don’t list the constructors themselves but the operators
they are based on. The constructor then has the same signature as the operator (minus the output
parameter that corresponds to the class, of course).
• The online help in Visual Studio lists the constructors but not the operators they are based on.
16.4.3.2
Finalizers
The main idea behind memory management in .NET is that the programmer does not worry about it and
lets the garbage collector delete all objects that are not used anymore. HALCON/.NET fully complies to
this philosophy by providing corresponding finalizers for all classes so that even unmanaged resources,
e.g., a connection to an image acquisition device, are deleted correctly and automatically.
For most classes, the finalizer automatically calls suitable operators like CloseFramegrabber to free
resources. Which operator is called is listed in the reference manual page of a class (see, e.g., the entry
for HFramegrabber). This operator cannot be called via the class, as can be seen in the corresponding
reference manual entry:
static void HOperatorSet.CloseFramegrabber (HTuple acqHandle)
Figure 16.5: The head of the reference manual entry for CloseFramegrabber.
You do not even need to call such an operator if you, e.g., want to re-open the connection with different
parameters, because this is done automatically.
!
Please don’t call Close or Clear operators via HOperatorSet when using the normal classes like
HFramegrabber.
16.4 Using HALCON/.NET Classes
16.4.3.3
133
Garbage Collection
As remarked above, the .NET philosophy is to let the garbage collector remove unused objects. However,
because the garbage collector deletes unused objects only from time to time, the used memory increases
in the meantime. Even more important is that, to the garbage collector, HALCON’s iconic variables
(images, regions, ...) seem to be rather “small”, because they only contain a reference to the (in many
cases rather large) iconic objects in the database. Thus, the garbage collector may not free such variables
even if they are not used anymore.
Therefore, you might need to force the removal of (unused) objects. There are two ways to do this:
• Call the garbage collector manually. In the example Matching, this is done after each processing
run in the timer event:
private void Timer_Tick(object sender, System.EventArgs e)
{
Action();
GC.Collect();
GC.WaitForPendingFinalizers();
}
C++ applications: The code for calling the Garbage Collector in a managed C++ application is
GC::Collect();
GC::WaitForPendingFinalizers();
.NET
• Dispose of individual objects manually by calling the method Dispose:
HImage
Image = new HImage("fuse");
...
Image.Dispose();
Besides reducing memory consumption, another reason to manually dispose of objects is to free resources, e.g., close a connection to an image acquisition device or a serial interface.
Please note that HALCON operators always create a new object instance for output parameters and return
values (but not in the “constructor-like” operator calls that modify the calling instance). If the variable
was already initialized, its old content (and the memory allocated for it) still exists until the garbage
collector removes it. If you want to remove it manually, you must call Dispose before assigning an
object to it.
16.4.4
Operator Overloads
Some classes overload standard operators like + (addition) to call HALCON operators. The following
line, e.g., adds two images by internally calling AddImage:
Image5 = Image1 + Image2;
Please note that operator overloads are not available in Visual Basic .NET!
!
134
Creating Applications With HALCON/.NET
The following tables list the currently available operator overloads.
- (unary)
+ (image)
- (image)
∗ (image)
+ (scalar)
- (scalar)
∗ (scalar)
/ (scalar)
>= (image)
<= (image)
>= (scalar)
<= (scalar)
& (region)
& (region)
| (region)
/ (region)
! (unary)
& (image)
+ (region)
- (region)
+ (scalar)
- (scalar)
+ (point)
∗ (scalar)
- (unary)
+ (scalar)
- (scalar)
- (unary)
∗ (scalar)
/ (scalar)
∗ (function)
! (unary)
Operator overloads for HImage
inverts an image
adds two images
subtracts image2 from image1
multiplies two images
adds a constant gray value offset
subtracts a constant gray value offset
scales an image by the specified factor
scales an image by the specified divisor
segments an image using dynamic threshold
segments an image using dynamic threshold
segments an image using constant threshold
segments an image using constant threshold
reduces the domain of an image
Operator overloads for HRegion
returns the intersection of regions
returns the union of regions
returns the difference of regions
returns the complement of the region (may be infinite)
returns the intersection of the region and the image domain
returns the Minkowski addition of regions
returns the Minkowski subtraction of regions
dilates the region by the specified radius
erodes the region by the specified radius
translates the region
zooms the region
transposes the region
Operator overloads for HFunction1D
adds a constant offset to the function’s Y values
subtracts a constant offset from the function’s Y values
negates the Y values of the function
scales the function’s Y values
scales the function’s Y values
composes two functions (not a point-wise multiplication)
calculates the inverse of the function
16.5 Working with Tuples
16.5
135
Working with Tuples
A strength of HALCON is that most operators automatically work with multiple input values (tuple
values). For example, you can call the operator AreaCenter with a single or with multiple input regions;
the operator automatically returns the area and center coordinates of all passed regions. Analogously, if
you call GenRectangle1 with multiple values for the rectangle coordinates, it creates multiple regions.
The following sections provide more detailed information about
• how to find out whether an operator can be called in tuple mode (section 16.5.1)
• tuples of iconic objects (section 16.5.2)
• tuple of control values (section 16.5.3 on page 137)
16.5.1
Calling HALCON Operators with Single or Multiple Values
You can check whether an operator also works with tuples in the reference manual. Below, e.g., we show
the relevant parts of the operators AreaCenter and GenRectangle1.
static void HOperatorSet.AreaCenter (HObject regions, out HTuple area, out HTuple row,
out HTuple column)
HTuple HRegion.AreaCenter (out HTuple row, out HTuple column)
int HRegion.AreaCenter (out double row, out double column)
regions (input_object) . . . . . . . . . . . . . . . . . . . . . . . . . . . . . . . . . . . . . . . . . . . . region(-array) ; HRegion
area (output_control) . . . . . . . . . . . . . . . . . . . . . . . . . . . . . . . . . . . . . . . . . . . integer(-array) ; HTuple (int
row (output_control) . . . . . . . . . . . . . . . . . . . . . . . . . . . . . . . . . . . . . . . point.y(-array) ; HTuple (double)
column (output_control) . . . . . . . . . . . . . . . . . . . . . . . . . . . . . . . . . . . . point.x(-array) ; HTuple (double)
static void HOperatorSet.GenRectangle1 (out HObject rectangle, HTuple row1, HTuple column1,
HTuple row2, HTuple column2)
public HRegion (HTuple row1, HTuple column1, HTuple row2, HTuple column2)
public HRegion (double row1, double column1, double row2, double column2)
void HRegion.GenRectangle1 (HTuple row1, HTuple column1, HTuple row2, HTuple column2)
void HRegion.GenRectangle1 (double row1, double column1, double row2, double column2)
.NET
As you see, the iconic classes like HRegion automatically handle multiple values; whether such a parameter accepts / returns multiple values is not visible from the signature but only in the parameter
section: Here, an appended (-array) (in the example: HRegion(-array)) signals that the parameter
can contain a single or multiple values.
136
Creating Applications With HALCON/.NET
rectangle (output_object) . . . . . . . . . . . . . . . . . . . . . . . . . . . . . . . . . . . . . . . . . region(-array) ; HRegion
row1 (input_control) . . . . . . . . . . . . . . . . . . . . . . . . . . . . . . rectangle.origin.y(-array) ; HTuple (double
column1 (input_control) . . . . . . . . . . . . . . . . . . . . . . . . . . . rectangle.origin.x(-array) ; HTuple (double
row2 (input_control) . . . . . . . . . . . . . . . . . . . . . . . . . . . . . . rectangle.corner.y(-array) ; HTuple (double
column2 (input_control) . . . . . . . . . . . . . . . . . . . . . . . . . . . rectangle.corner.x(-array) ; HTuple (double
In contrast, control parameters show by their data type whether they contain a single or multiple values:
In the first case, they use basic data types like double, in the second case the HALCON/.NET class
HTuple. Thus, you can call GenRectangle1 via HRegion in two ways, either by passing doubles or
HTuples (here using the constructor form):
HRegion SingleRegion = new HRegion(10.0, 10.0, 50.0, 50.0);
HRegion MultipleRegions = new HRegion(new HTuple(20.0, 30.0), new HTuple(20.0, 30.0),
new HTuple(60.0, 70.0), new HTuple(60.0, 70.0));
Similarly, AreaCenter can be called in two ways:
double Area, Row, Column;
HTuple Areas, Rows, Columns;
Area = SingleRegion.AreaCenter(out Row, out Column);
Areas = MultipleRegions.AreaCenter(out Rows, out Columns);
Below, we provide additional information about iconic tuples (section 16.5.2) and control tuples (section 16.5.3).
16.5.2
Iconic Tuples
The iconic classes HImage, HRegion, and HXLD can contain single of multiple objects. To process all
elements of a tuple you first query the number of elements with with the operator CountObj
int NumRegions = MultipleRegions.CountObj();
and then access elements either with the HALCON operator SelectObj or (when using C#) with the
operator []:
for (int i=1; i<=NumRegions; i++)
{
HRegion Region = MultipleRegions[i];
...
}
!
Note that in iconic tuples element indices start with 1!
You can create or extend iconic tuples with the HALCON operator ConcatObj:
16.5 Working with Tuples
137
HRegion ThreeRegions = SingleRegion.ConcatObj(MultipleRegions);
16.5.3
Control Tuples and the Class HTuple
For control tuples, HALCON/.NET provides the class HTuple. Instances of HTuple can contain elements of the types double, int, and string. They can also contain a mixture of element types.
The following sections describe
• how to access tuple elements (section 16.5.3.1)
• how to create tuples (section 16.5.3.2)
• the automatic cast methods and how to resolve ambiguities caused by the casts (section 16.5.3.3)
• HALCON operators for processing tuples (section 16.5.3.4 on page 140)
• proved overloads for arithmetic operations (section 16.5.3.5 on page 140)
16.5.3.1
Accessing Tuple Elements
To process all elements of a tuple, you first query its length via the property Length:
.NET
int TupleLength = Areas.Length;
You can access tuple elements with the operator []:
for (int i=0; i<TupleLength; i++)
{
double Element = Areas[i];
...
}
Note that you get an exception if you try to read a non-existing tuple element or if you try to assign an
element to a variable with a different type without cast.
16.5.3.2
Creating Tuples
The class HTuple provides many different constructors (see the Visual Studio’s Object Browser for a
list). The following line creates an int tuple with a single value:
HTuple Tuple1 = new HTuple(1);
In contrast, the following line creates a double tuple:
138
Creating Applications With HALCON/.NET
HTuple Tuple2 = new HTuple(1.0);
You can also pass multiple values to a constructor. Note that when mixing double and int values as in
the following line, a double tuple is created:
HTuple Tuple3 = new HTuple(1.0, 2);
In contrast, when the list of values also contains a string, a mixed type tuple is created, in which the
second value is stored as an int:
HTuple Tuple4 = new HTuple(1.0, 2, "s");
The type of a tuple or of a tuple element can be queried via its property Type:
HTupleType TupleType = Tuple4.Type;
HTupleType TupleElementType = Tuple4[1].Type;
You can concatenate tuples very simply by passing them in a constructor:
HTuple Tuple5 = new HTuple(Tuple2, Tuple3);
You can also append elements to a tuple by writing into a non-existing element:
Tuple3[2] = 3;
16.5.3.3
Casts, Ambiguities, Unexpected Results
The class HTuple provides many implicit cast methods so that you can intuitively use the basic data
types in most places. For example, the line
double Element = Areas[i];
automatically casts the element, which is in fact an instance of the class HTupleElement, into a double.
Similarly, basic types are automatically casted into instances of HTuple. The drawback of the casts is
that the compiler often cannot decide whether you want to use the simple or the tuple version of an
operator and issues a corresponding error. For example, if you used the following line, the values can
either be casted from int to double or to HTuple:
// HRegion SingleRegion = new HRegion(10, 10, 50, 50);
You can resolve the ambiguity very simply by appending .0 to the first parameter:
16.5 Working with Tuples
139
HRegion SingleRegion = new HRegion(10.0, 10.0, 50.0, 50.0);
The example Matching contains two other cases of ambiguities, both arising because basic-type and
HTuple parameters are mixed in the same call. In the first, the ambiguity is solved by explicitly casting
the double parameters into instances of HTuple:
private double
Row, Column;
HTuple
RowCheck, ColumnCheck, AngleCheck, Score;
HHomMat2D
Matrix = new HHomMat2D();
Matrix.VectorAngleToRigid(new HTuple(Row), new HTuple(Column), new HTuple(0.0),
RowCheck, ColumnCheck, AngleCheck);
In the second case, the instances of HTuple (which only contain single values) are explicitly casted into
doubles by using the property D, which returns the value of the first element as a double (actually, it is
a shortcut for tuple[0].D):
With similar properties, you can cast tuple elements into the other basic types. Note, however, that you
get an exception if you try to cast an element into a “wrong” type.
In contrast to input parameters, output parameters are not automatically casted. Sometimes, this leads
to unexpected results. In the following code, e.g., doubles are used for the output parameters and the
return value in a call to AreaCenter with a tuple of regions:
HRegion MultipleRegions = new HRegion(new HTuple(20.0, 30.0), new HTuple(20.0, 30.0),
new HTuple(60.0, 70.0), new HTuple(60.0, 70.0));
double Area, Row, Column;
HTuple Areas, Rows, Columns;
Area = MultipleRegions.AreaCenter(out Row, out Column);
Consequently, only the area and the center of the first region are returned. The same happens if you
assign the return value to an HTuple, but still pass doubles for the output parameters:
Areas = MultipleRegions.AreaCenter(out Row, out Column);
In contrast, if you pass HTuples for the output parameters and assign the return value to a double, the
operator returns the center coordinates of all regions but only the area of the first region:
Area = MultipleRegions.AreaCenter(out Rows, out Columns);
.NET
private double
RectPhi, RectLength1, RectLength2;
HTuple
Rect1RowCheck, Rect1ColCheck;
Rectangle1.GenRectangle2(Rect1RowCheck.D, Rect1ColCheck.D,
RectPhi + AngleCheck.D,
RectLength1, RectLength2);
140
Creating Applications With HALCON/.NET
16.5.3.4
HALCON Operators for Processing Tuples
HALCON provides many operators for processing tuples. In the reference manual, these operators can
be found in the chapter “Tuple”. An overview of these operators is given in the HDevelop User’s Guide in
chapter 8 on page 337. Note that instead of the operator name, the name of the corresponding HDevelop
function is used, which omits the Tuple and uses lowercase characters, e.g., rad instead of TupleRad.
16.5.3.5
Operator Overloads
For the basic arithmetic operations, HALCON/.NET provides operator overloads. For example, the
operator + automatically calls the HALCON operator TupleAdd.
16.6
Visualization
In most applications you will use an instance of HWindowControl for the display of images of results.
How to configure this control is described in section 16.3 on page 128. The actual display operators,
however, do not use the control but the HALCON graphics window (class HWindow) encapsulated inside.
You can access the graphics window via the property HalconWindow of HWindowControl:
private HWindow
Window;
private void Form1_Load(object sender, System.EventArgs e)
{
Window = WindowControl.HalconWindow;
}
In the code above, the variable for the instance of HWindow was declared globally and initialized in the
event Load of the form. If you (also) want to run your application under Linux, you currently cannot use
this event (see the restrictions of Mono listed in section 17.3.1 on page 150). Instead, you can perform
the initialization in the event HInitWindow of HWindowControl:
private void WindowControl_HInitWindow(object sender, System.EventArgs e)
You can configure the display parameters like pen color or line width with the operators in the reference
manual chapter “Graphics . Parameters”:
Window.SetDraw("margin");
Window.SetLineWidth(3);
Images and other iconic objects are displayed with the operator DispObj, which can be called via the
object to display with the window as parameter or vice versa:
Img.DispObj(Window);
16.7 Error Handling
141
More display operators, e.g., to display lines or circles, can be found in the reference manual chapter
“Graphics . Output”.
Instead of (or in addition to) using HWindowControl, you can also open a HALCON graphics windows
directly with the operator OpenWindow:
HWindow
ZoomWindow = new HWindow(0, 0, width, height, 0, "visible", "");
In the code above, the window was opened “free-floating” on the display. You can also open it within
another GUI element by passing its handle in the parameter fatherWindow.
Before displaying anything in the graphics window, you should set the image part to display with the
operator SetPart. In the example code below, the opened window is used to display a zoomed part of
the image:
ZoomWindow.SetPart(row1, col1, row1+height-1, col1+width-1);
More information about visualization in general can be found in the Solution Guide I, chapter 19 on page
303. Note that in this manual, the HDevelop version of the display operators is used, i.e., with the prefix
dev_, e.g., dev_open_window instead of OpenWindow.
Error Handling
The .NET programming languages each offer a mechanism for error handling. In C# and managed
C++, you use try...catch blocks. Within this standard mechanism, HALCON/.NET offers its special
exceptions:
• HOperatorException is raised when an error occurs within a HALCON operator
• HTupleAccessException is raised when an error occurs upon accessing a HALCON tuple
The following code shows how to catch the error that occurs when the operator ReadImage is called with
a wrong image file name. Then, a message box is shown that displays the error number in the caption
and the HALCON error message:
HImage Image;
try
{
Image = new HImage("unknown");
}
catch
(HOperatorException
exception)
{
MessageBox.Show(exception.Message, "HALCON error # " + exception.GetErrorNumber());
}
.NET
16.7
142
Creating Applications With HALCON/.NET
Figure 16.6: Catching an HALCON operator error and displaying its message.
16.8
Deploying an Application
By default, .NET applications use local assemblies. For HALCON/.NET applications, this means that
the HALCON/.NET assembly halcondotnet.dll is automatically copied to the directory of the application’s executable (e.g., bin\Release). To deploy an application on another computer, you therefore
simply copy the content of this directory. Because of .NET’s platform independency, this computer can
also run under a different operating system than the development computer.
Of course, the .NET Framework and HALCON must be installed on the destination computer as well,
and the environment variables PATH and HALCONARCH must be set correctly (see the Installation Guide,
section A.2 on page 64).
Note that you can also install the HALCON/.NET assembly in the so-called global assembly cache.
Then, it is not necessary to copy it with each application. See the .NET Framework documentation for
details about this method.
16.9
Using a Newer HALCON/.NET Release
Please note that applications that use HALCON/.NET have local copies of the corresponding assemblies.
After installing a newer release of HALCON, these applications would therefore still use their old HALCON assemblies. In order to benefit from the changes in the HALCON/.NET interface as well, you must
either replace the assemblies manually or re-compile the projects.
If you replace the assemblies manually, you must furthermore map the application’s expected assembly version to the new version. For this, copy the file bin\dotnet10\app.config or bin\
dotnet20\app.config (identical files) into the directory of the application and rename it to
<application_name>.exe.config.
Another application of the configuration file is the case that a Visual Studio project references an assembly based on HALCON that expects another maintenance release of HALCON. In this case, you must
add app.config to the project and re-compile it.
Additional Information
143
Chapter 17
Additional Information
This chapter provides additional information for developing applications with HALCON/.NET:
• Section 17.1 describes the so-called HALCON Codelets, a set of classes and example projects that
let you use part of HDevelop’s functionality for interactive application development.
• Section 17.2 on page 148 gives an overview of the available example applications.
.NET
• Section 17.3 on page 150 explains how to use HALCON/.NET applications under Linux using
Mono.
• Section 17.4 on page 152 shows how to use HDevelop programs or procedures in your .NET
application.
• Section 17.5 on page 153 contains miscellaneous information.
17.1
HALCON Codelets
With HALCON Codelets, you can use (part of) HDevelop’s functionality for interactive application
development within a programmed application. HALCON Codelets are provided in form of classes and
example projects. Currently, they are provided only for HALCON/.NET (C#, Visual Studio 2005/2008).
They reside in the directory %HALCONEXAMPLES%\codelets. An HTML API reference can be found
via the start menu (or under doc\html\reference\codelets\index.html).
You can use HALCON Codelets in different ways:
• by copying complete projects or solutions and adapting them to your needs,
• by using / referencing parts the classes,
• by looking at the source code and learning how to implement HDevelop’s functionality.
Please note, however, that the API of HALCON Codelets is not fixed yet, thus, coming versions might
not be source-code compatible.
Currently, the following functionality is provided:
!
144
Additional Information
• base\
– ViewROI
This class library provides basic visualization functionality of HDevelop like the interactive
control of the graphics window, interactive ROI handling, etc. How to use the individual
classes is demonstrated in the application examples listed below.
• assistants\
– Calibration
This class library provides the functionality of HDevelop’s Calibration Assistant (see the
HDevelop User’s Guide, section 7.1 on page 225). How to use the classes is demonstrated in
one of the application examples listed below.
– Matching
This class library provides the functionality of HDevelop’s Matching Assistant (see the HDevelop User’s Guide, section 7.3 on page 252). How to use the classes is demonstrated in one
of the application examples listed below.
– Measure
This class library provides the functionality of HDevelop’s Measure Assistant (see the HDevelop User’s Guide, section 7.4 on page 293). How to use the classes is demonstrated in one
of the application examples listed below.
• applications\
– GraphicsWindow
This application uses the visualization classes to re-implement HDevelop’s graphics window,
including interactive zooming and scaling image and window size (see figure 17.1).
– GraphicsStack
This application uses the visualization classes to re-implement HDevelop’s graphics stack,
i.e., the visualization of iconic objects on top of each other (see figure 17.2).
– InteractiveROI
This application uses the visualization classes to re-implement HDevelop’s interactive ROI
creation (see figure 17.3 on page 146).
– SmartWindow1
This application uses the visualization classes for a graphics window with interactive image
zooming and moving that can be controlled via sliders (see figure 17.4 on page 146).
– SmartWindow2
This application uses the visualization classes for a graphics window with interactive image
zooming and moving that can be controlled via the mouse (see figure 17.5 on page 147).
– Calibration
This application uses the visualization classes and the classes for the calibration assistant to
implement an interactive calibration environment (see figure 17.6 on page 147).
17.1 HALCON Codelets
145
– Matching
This application uses the visualization classes and the classes for the matching assistant to
implement an interactive matching environment (see figure 17.7 on page 148).
– Measure
This application uses the visualization classes and the classes for the measure assistant to
implement an interactive matching environment (see figure 17.8 on page 148).
.NET
Figure 17.1: HALCON Codelets application using the re-implemented graphics window.
Figure 17.2: HALCON Codelets application demonstrating the graphics stack.
146
Additional Information
Figure 17.3: HALCON Codelets application for interactive ROI control.
Figure 17.4: HALCON Codelets application for zooming and moving the image with sliders.
17.1 HALCON Codelets
147
.NET
Figure 17.5: HALCON Codelets application for zooming and moving the image with the mouse.
Figure 17.6: HALCON Codelets application for interactive calibration.
148
Additional Information
Figure 17.7: TODO: HALCON Codelets application for interactive matching.
Figure 17.8: HALCON Codelets application for interactive 1D measuring.
17.2
Provided Examples
The following sections briefly describe the provided example applications for
• C# (section 17.2.1)
• Visual Basic .NET (section 17.2.2)
• (managed) C++ (section 17.2.3 on page 150)
17.2 Provided Examples
149
All paths are relative to %HALCONEXAMPLES%.
17.2.1
C#
• c#\Matching (Visual Studio .NET 2002/2003, Visual Studio 2005/2008, Mono)
Locate an IC on a board and measure pin distances using shape-based matching (HShapeModel)
and 1D measuring (HMeasure)
• c#\MatchingWPF (Visual Studio 2008)
Matching example to demonstrate the use of HALCON in a WPF application using Visual Studio
2008 or higher.
• c#\MultiThreading (Visual Studio .NET 2002/2003, Visual Studio 2005/2008, Mono)
Use HALCON/.NET with multiple threads for image acquisition, processing (2D data code reading, HDataCode2D), and display
• hdevengine\c#\ExecProgram (Visual Studio .NET 2002/2003, Visual Studio 2005/2008,
Mono)
Execute an HDevelop program for fin detection using HDevEngine
• hdevengine\c#\ExecExtProc (Visual Studio .NET 2002/2003, Visual Studio 2005/2008,
Mono)
• hdevengine\c#\ExecProcedures (Visual Studio .NET 2002/2003, Visual Studio 2005/2008,
Mono)
Execute local and external HDevelop procedures for fin detection using HDevEngine
• hdevengine\c#\ErrorHandling (Visual Studio .NET 2002/2003, Visual Studio 2005/2008,
Mono)
Handle HDevEngine exceptions
• hdevengine\c#\MultiThreading (Visual Studio .NET 2002/2003, Visual Studio 2005/2008,
Mono)
Executing an HDevelop procedure in parallel by two threads using HDevEngine/.NET
• hdevengine\c#\MultiThreadingTwoWindows (Visual Studio .NET 2002/2003, Visual Studio
2005/2008, Mono)
Executing different HDevelop procedures in parallel by two threads using HDevEngine/.NET
17.2.2
Visual Basic .NET
• vb.net\Matching (Visual Studio .NET 2002/2003, Visual Studio 2005/2008)
Locate an IC on a board and measure pin distances using shape-based matching (HShapeModel)
and 1D measuring (HMeasure)
.NET
Execute an external HDevelop procedure for fin detection using HDevEngine
150
Additional Information
• hdevengine\vb.net\ExecProgram (Visual Studio .NET 2002/2003, Visual Studio 2005/2008)
Execute an HDevelop program for fin detection using HDevEngine
• hdevengine\vb.net\ExecExtProc (Visual Studio .NET 2002/2003, Visual Studio 2005/2008)
Execute an external HDevelop procedure for fin detection using HDevEngine
• hdevengine\vb.net\ExecProcedures (Visual Studio .NET 2002/2003, Visual Studio
2005/2008)
Execute local and external HDevelop procedures for fin detection using HDevEngine
• hdevengine\vb.net\ErrorHandling (Visual Studio .NET 2002/2003,
2005/2008)
Visual Studio
Handle HDevEngine exceptions
17.2.3
C++
• cpp.net\Matching (Visual Studio 2005/2008)
Locate an IC on a board and measure pin distances using shape-based matching (HShapeModel)
and 1D measuring (HMeasure)
Please note that the files of this example are not located in subdirectories as described in section 16.1.2 on page 124 but all reside directly in the example directory.
• cpp.net\Interoperate (Visual Studio 2005 or higher)
Demonstrate the use of a HALCON/C++ DLL from within a HALCON/.NET application using
Visual Studio 2005 or higher.
17.3
HALCON/.NET Applications under Linux Using Mono
Chapter 16 on page 123 describes in detail how to develop HALCON/.NET applications in general. The
following sections contain additional information for the case that you want to create applications under
Linux using Mono:
• restrictions (section 17.3.1)
• how to deploy applications created under Windows (section 17.3.2)
• how to compile an application with Mono (section 17.3.3)
• other GUI libraries (section 17.3.4 on page 152)
17.3.1
Restrictions
Please note the following restrictions when developing or using HALCON/.NET applications via
Mono:
17.3 HALCON/.NET Applications under Linux Using Mono
151
• Mono supports Windows Forms but does not claim to implement the full functionality (yet). This
has to be kept in mind when developing applications under Windows and compiling or deploying
them under Linux.
• HWindowControl is not yet initialized in the event Load of a form, due to a different initialization
order of X Window widgets. Please place initialization and similar code in the event handler of
HWindowControl’s event HInitWindow (see e.g. the example Matching):
private HWindow
private HFramegrabber
private HImage
Window;
Framegrabber;
Img;
private void WindowControl_HInitWindow(object sender, System.EventArgs e)
{
Window = WindowControl.HalconWindow;
Framegrabber = new HFramegrabber("File", 1, 1, 0, 0, 0, 0, "default",
-1, "default", -1, "default",
"board/board.seq", "default", 1, -1);
Img = Framegrabber.GrabImage();
Img.DispObj(Window);
}
HOperatorSet.TupleChr(128, out t)
will fail with an exception on Mono, as the one-byte string containing only the value of 128 is not
valid UTF-8 and cannot be marshalled into the output string.
17.3.2
Deploying HALCON/.NET Applications Created under Windows
Because of HALCON/.NET’s platform independency, you can copy an application created under Windows to a Linux computer and simply start it there - provided that Mono and HALCON are installed on
the destination computer (see section 16.8 on page 142 for more information).
17.3.3
Compiling HALCON/.NET Applications with Mono
Most of the HALCON/.NET examples provide a set of makefiles in the subdirectory makefiles to let
you compile them under Linux (see section 17.2 on page 148 for a list of the examples that support
Linux). To start the compilation, simply type
gmake
The executable is placed in the subdirectory makefiles/bin.
.NET
• When using HALCON under Mono, only ASCII characters in the range 0-127 may be passed in
string parameter between application and HALCON library, unless it is known in advance that the
data within the HALCON library actually represents valid UTF-8. The reason is that Mono only
supports marshalling to/from UTF-8 when calling into native libraries. For example, the call
152
Additional Information
<configuration>
<dllmap dll="halcon"
target="/opt/halcon/lib/x86-linux2.4-gcc33/libhalcon.so"/>
</configuration>
Figure 17.9: Example for a configuration file with HALCON being installed in the directory /opt/halcon.
HALCON XL applications: To create a HALCON/.NET XL application, type
gmake XL=1
In some cases, Mono may not find the native HALCON library libhalcon.so, which should be resolved via the environment variable LD_LIBRARY_PATH and issue a corresponding error. You can create
configuration files for the HALCON/.NET (and HDevEngine/.NET) assembly, which explicitly specify
the path to the HALCON library (see figure 17.9 for an example), by calling
gmake config
If you want to create a configuration file for only one of the assemblies, use the make commands
config_halcon and config_engine.
17.3.4
Using Other GUI Libraries
In principle, you could also use other GUI libraries instead of Windows Forms, e.g., Gtk#. Note, however, that HWindowControl is a Windows Forms element and thus can no longer be used. Instead, you
can open HALCON graphics windows directly with the operator OpenWindow. If you want to place
a graphics window inside another element, pass the element’s native window handle in the parameter
fatherWindow.
Please note that HALCON/.NET has not been tested with other GUI libraries.
17.4
Using HDevelop Programs
You can use HDevelop programs or procedures in two ways in your .NET application:
• by executing them directly via HDevEngine (see part VII on page 209 for detailed information) or
• by exporting them into C# or Visual Basic .NET code via the menu item File . Export (see the
HDevelop User’s Guide, section 6.2.1.13 on page 60) and integrating the code in your application.
The latter method is described in this section.
17.5 Miscellaneous
17.4.1
153
Using the Template Application
In most cases you will manually integrate the exported code into your application. To quickly test
the exported code, you can integrate it into the so-called template project (available for C# and Visual
Basic .NET) in the subdirectory HDevelopTemplate (or HDevelopTemplateWPF, depending on your
preferred GUI platform) as follows:
• Move or copy the exported source code file into subdirectory source of the template application.
• Open the solution file, right-click in the Solution Explorer, and select the menu item
Add Existing Item. Navigate to the source code file, but don’t click Open but on the arrow
on the right side of this button and select Link File (see figure 17.10).
Figure 17.10: Linking existing items to an application.
• When you run the application, the form depicted in figure 17.11 appears. Click Run to start the
exported HDevelop program.
17.4.2
Combining the Exported Code with the HALCON/.NET Classes
The exported code does not use the classes like HImage described in the previous chapter. Instead, all
operators are called via the special class HOperatorSet. Iconic parameters are passed via the class
HObject (which is the base class of HImage, HRegion, and HXLD), control parameters via the class
HTuple.
You can combine the exported code easily with “normal” HALCON/.NET code because iconic classes
provide constructors that initialize them with instances of HObject. Furthermore, iconic classes can be
passed to methods that expect an HObject.
17.5
Miscellaneous
17.5.1
.NET Framework Security Configuration
If you want to develop .NET application (independent on the used HALCON interface) in other locations
than on a local disk, you must configure the .NET security policy to allow executing code from your
desired project location. Otherwise, you get a warning upon creating or loading the project that the
location is not trusted and a run-time error upon executing it.
You can configure the .NET security policy in two ways:
.NET
• If you did not add the exported code correctly, the error message depicted in figure 17.12 appears.
In Visual Basic .NET, different error messages appear.
154
Additional Information
Figure 17.11: The template form for exported code.
Figure 17.12: Error message upon running a template without exported code.
• with the command line tool caspol
• with the “Microsoft .NET Framework Configuration”:
– Open the Control Panel and select the Administrative Tools.
– Select .NET Framework Configuration (if there is more than one entry, select the .NET
Framework version corresponding to your current development environment, see table 16.1
on page 124 for an overview).
– In the appearing dialog, select My Computer . Runtime Security Policy . Machine
. Code Groups . All Code . LocalIntranet_Zone in the left column and then select
Edit Code Group Properties in the right column.
– Another dialog appears; here, select the tab Permission Set and set the permissions to
FullTrust.
17.5 Miscellaneous
155
Note that you need administrator privileges to change the .NET security policy.
Further note that to create .NET applications in Visual Studio, you must be a member of the group
Debugger User.
17.5.2
HALCON/.NET and Remote Access
.NET
For performance reasons, HALCON/.NET suppresses unmanaged code security when making calls into
the native HALCON library. Should your machine vision application run in an environment which allows
remote access, you might wish to explicitly check permissions for code calling into your application or
library.
156
Additional Information
Part V
Programming With HALCON/COM
Introduction
159
Chapter 18
Introduction
This chapter provides a short overview of the main aspects of component-based software development
and shows how this can be achieved with Microsoft COM (Component Object Model). It is not intended
to discuss all aspects of COM in detail in this manual; please refer to the corresponding literature.
18.1
The Microsoft Component Object Model (COM)
Component-based software engineering has been discussed intensively in the past years. Concrete standards evolving from this discussion include DCE, CORBA, Microsoft COM, and lately the Microsoft
Common Language Runtime , which is part of the .NET framework. The main features of components
are:
1. Reusability at binary level independent of the used language
3. Robust versioning
4. Location Transparency
Microsoft COM is the base for many commonly used software technologies, e.g., ActiveX, OLE and
DirectX. There are numerous tools for developing COM components, e.g., Visual Basic and Visual C++
(and their .NET versions), or Borland Delphi.
18.1.1
COM and .NET
As already mentioned, Microsoft provides a second approach to component-based programming with
the Common Language Runtime of the .NET framework. The two approaches are independent, i.e., a
COM component is not related to a .NET component and vice versa. However, the two can communicate
with each other; furthermore, you can create COM components within Visual Studio .NET just as within
Visual Studio.
COM
2. Object orientation
160
Introduction
18.1.2
A Quick Look at Some Programming Aspects
The following sections take a closer look at some programming aspects of COM:
• interfaces (section 18.1.2.1)
• objects, methods, data members (section 18.1.2.2)
• inheritance and polymorphism (section 18.1.2.3)
• early and late binding (section 18.1.2.4)
18.1.2.1
Interfaces
An important aspect of COM is the usage of component interfaces. Compared to the C++ terminology, an
interface corresponds to the declaration of a class, thus showing its functionality and hiding the (internal)
implementation details. This encapsulation allows to use a COM component efficiently, without the need
to know anything about its implementation.
In contrast to a C++ class, a COM component can have multiple interfaces. This is useful, e.g., for the
versioning: Once defined, an interface stays exactly the way it is. Newer versions of the component then
define enhanced or extended functionality by new interfaces, while allowing existing software to remain
unchanged, because it can still use the older interfaces. Furthermore, you can partition a component’s
functionality into several well-defined portions via multiple interfaces.
There are a couple of standard COM interfaces every component has by default, e.g., IUnknown and
IDispatch. They are not described in this manual; please refer to appropriate literature.
18.1.2.2
Objects, Methods and Data Members
Just as with C++ classes there are interfaces in COM and those interfaces are made up from some
methods. Several objects of a class correspond to several instances of a component, each with its own
internal state. However, there are some differences with data members, as their handling within COM
depends on the tool the component is used by. COM follows a concept of properties, which are special
methods allowing tools like Visual Basic to treat them just like data members. With C++ they still are
only methods, thus there is no way to modify and retrieve data members directly. From this point of view
COM class data members can be compared with C++ private class members.
18.1.2.3
Inheritance and Polymorphism
As COM is a binary standard, inheritance must also take place at binary level which makes the process
slightly uncomfortable. Without going into detail one can say that the only thing of interest here is that
there are two methods of reusing existent components: containment and aggregation. Both techniques
are commonly used by C++ programmers as well: Containment corresponds to C++ classes instantiated
as a member object in other classes, whereas aggregation roughly corresponds to inheritance.
The main difference between containment and aggregation is the way the interface(s) of the contained/aggregated component(s) are handled: The methods and properties of a contained component
18.2 HALCON and COM
161
are hidden to the outside so that only the containing component can use them. Any method that should
be visible from outside has to be re-defined in the outer component. In contrast to this, the interface(s)
of an aggregated component are merged with the interfaces of the aggregating one, thus automatically
making their methods visible to the outside.
The object-oriented feature of polymorphism is also achieved through interfaces: Different COM classes
exposing the same interface can be understood as showing polymorphic behavior, as they act differently
responding to the same methods.
18.1.2.4
Early and Late Binding
Binding is the process of resolving the call addresses of a component’s exposed methods. This can be
done at compilation time (early binding) or at runtime (late binding). Thus, when using a component you
can take a specification of the contained methods and integrate it directly into the application. Therefore,
the specification must be available in a format that fits the used programming language (e.g., when using
C++ as client language one would typically include the header files containing the method declarations).
Alternatively, you can let the methods be bound at runtime; in this case, no language-dependent information is needed for compiling and the calling mechanism is totally different. Without going into details
we want to point out that runtime-bound methods calls are slower than their early-bound counterparts.
The HALCON/COM interface supports both early and late binding so that special needs of different
applications can be satisfied.
HALCON and COM
With the HALCON/COM interface you can use the full functionality of the HALCON library within
COM components (and therefore also ActiveX controls) developed, e.g., using Microsoft Visual Basic
or Borland Delphi.
In fact, there are two HALCON/COM interfaces, one to HALCON and one to
HALCON XL, which is optimized for large images. How to use the latter is described in section 20.4 on
page 178.
COM
18.2
162
Introduction
The HALCON/COM Interface
163
Chapter 19
The HALCON/COM Interface
Let’s have a closer look at the HALCON/COM interface. This language interface (provided in form of the
DLL halconx.dll) contains the full functionality of HALCON partitioned into several classes. Each
class has one or more interfaces, which are built up from methods and properties. The HALCON/COM
interface uses inheritance and thus contains derived classes and also an abstract base class. Since COM
is not meant to supply a standardized inheritance mechanism, HALCON/COM makes extensive use of
interfaces to simulate inheritance (we will discuss this topic in more detail afterwards).
Naming Conventions:
. Classes are capitalized and begin with an “H”. They always end with an upper-case “X”; for example: HFramegrabberX.
. Interfaces are also capitalized and end with “X”, but begin with an “I”; for example: IHObjectX.
Since COM is only available for the Windows operating systems family, all file paths and environment
variables in this manual are printed in the Windows convention, e.g.,
%HALCONROOT%\examples\vb6\Matching
to denote a subdirectory containing an example project within the HALCON base directory referenced
by the environment variable HALCONROOT.
19.1
More about Classes
Classes are the essential items to deal with when writing HALCON/COM applications. There are quite
a lot of them and there are different types of classes, thus we will have a closer look on how classes are
used and what attributes they have. The classes of the HALCON/COM interface are partly related in
a way which could be described as inheritance. Therefore, it is important to get an impression of how
inheritance is achieved within HALCON/COM and how to use it.
COM
. Methods, properties and parameters are capitalized; for example: GrabImage, FileName.
164
The HALCON/COM Interface
19.1.1
Different Types of Classes
There are two major categories of classes:
1. classes instantiating objects that have an internal state and
2. classes instantiating objects with no internal state.
The first category is used to implement special data structures (like images, files, image acquisition
devices, etc.) and the operators belonging to this data, whereas the second category is only used to group
operators belonging together. If several objects of a class belonging to the first category are instantiated,
they are all different from the HALCON point of view, whereas the second category does not have this
quality. For example, if we consider several objects instantiated from the image class HImageX, they all
denote something different: they represent different HALCON images. In contrast, if we have an object
of a class like HSystemX that represents the internal state of the HALCON kernel, it does not matter
how many of those objects will be instantiated, because all of them denote the same (there is only one
HALCON kernel to be represented). Those classes can be understood as group classes, denoting that
they supply a bunch of methods that all have some semantic peculiarities in common.
In contrast to this, methods of the first category classes may share a common semantics, but work on
different data. For example, if an object of the class HImageX is instantiated, its methods always work
exactly on one specific HALCON image: the one that is represented by the object (to be precise an
HImageX object may also represent an array of images). Different HImageX objects represent different
images and therefore work on different data.
Besides the first two groups, we can categorize classes in another way well known in the object oriented
world:
1. abstract classes and
2. non-abstract classes.
A class is called abstract, if it can not be instantiated. Thus, an abstract class must be the base class for
other classes, if it should be of any use. The idea behind this concept is that abstract classes provide
a semantic base for their derived classes without being concrete enough for instantiation. A look on
real world terms reveals many analogous cases: there is, e.g., the class animal which can be seen as an
abstract base class for classes like fish, bird and horse. Any existing being can not be only an animal,
it is always either a fish, a bird or a horse (or whatever else). There is only one such abstract class in
the HALCON/COM interface: HObjectX. It represents a HALCON iconic object, such as an image, a
region, or an XLD. The derived classes (HImageX, HRegionX and so on) then specify the exact type of
the HALCON iconic object (see also the class overview in figure 19.1).
19.1.2
Classes for Special Purposes
There are some HALCON/COM classes that have special jobs. Although they do fit into the above
systematics, they are worth mentioning, because they have to be used in a specific way or show some
specific semantics.
19.1 More about Classes
165
HObjectX
HUntypedObjectX
HXLDExtParaX
HXLDX
HImageX
HXLDModParaX
HRegionX
HXLDParaX
HXLDContX
HOperatorSetX
HTupleX
HSystemX
HXLDPolyX
HFramegrabberX
HWindowX
...
HWindowXCtrl
abstract class
class instantiating objects with an internal state
class instantiating objects without an internal state
aggregation
Figure 19.1: Main part of the HALCON/COM class hierarchy.
HWindowXCtrl
This class is a HALCON window in the form of an ActiveX control. Its advantage against the ordinary
HALCON window (HWindowX) is the possibility to exist inside an ActiveX container. An ActiveX
container is a part of a window which can contain GUI elements, such as buttons, sliders and so on. When
developing complex image processing applications, it is often necessary to integrate all user interaction
components (input and output) seamlessly into one surface. The HALCON window class HWindowX
does not provide this flexibility, since it always appears as a top-level window. In order to behave like an
ordinary HWindowX window, HWindowXCtrl uses the COM technique of aggregation. Thus, any newly
created HWindowXCtrl automatically instantiates an HWindowX object which is bound to the control.
19.1.2.2
HOperatorSetX
This is basically a group class for all existing HALCON operators. HOperatorSetX is meant to provide
access to a procedural way of HALCON programming. The reason for that is the fact that it is easier
for some non-object-oriented tools like HDevelop to generate COM code automatically when using a
COM
19.1.2.1
166
The HALCON/COM Interface
procedural technique. The specificity about HOperatorSetX is that all its methods require instances
of HUntypedObjectX (see below) for all iconic input and output parameters. Furthermore, all control
parameters (input and output) are of the type VARIANT (see also section 19.5 on page 169).
Hand-written COM code should not use the HOperatorSetX/HUntypedObjectX concept, since it weakens the otherwise strong-typed object-oriented approach; it becomes relevant only in cases, where automatically generated code is involved.
19.1.2.3
HUntypedObjectX
The class HUntypedObjectX is derived from HObjectX just like HImageX, HRegionX and so on. Its
purpose is to get an instantiable form of the abstract base class. The class does not have any members, as
it just consists of a polymorphic data type without any special meaning. As it is this weak-typed, it can not
be used together with the strong-typed methods of the other classes, except by using the method Cast()
which allows arbitrary type conversions between all classes derived from HObjectX (explained later on).
HUntypedObjectX is meant to be a generic data type used by the special class HOperatorSetX.
19.1.2.4
The Method Cast()
All classes derived from HObjectX supply the method Cast() which is used for type conversions between the concerned classes. This method breaks up the well-defined data type scheme evolving from the
class hierarchy, so it should not be used except when there is no other possibility! By using the method
Cast(), an image object can be turned into a region, an XLD can become an HUntypedObjectX object and so on. The reason for that is, as mentioned above, the need to convert back and forth to the
HUntypedObjectX objects used by the HOperatorSetX methods. For example, if an automatically
generated code fraction produces an object variable of type HUntypedObjectX which shall be used as
an image in some handwritten code, it can be forced to become an HImageX object. Of course, it must be
assured that the variable really does contain an image (it is the programmer’s task to take care for that).
The following short Visual Basic example reads an image via HOperatorSetX and then casts it into the
class HImageX. Note that in order to apply the method Cast(), the variable Image must be a “living”
COM object, thus it is declared as New HImageX. See section 19.7 on page 170 for more information
about using HALCON/COM within Visual Basic.
Dim Op As New HOperatorSetX
Dim Untyped As HUntypedObjectX
Dim Image As New HImageX
Call Op.ReadImage(Untyped, "monkey")
Call Image.Cast(Untyped)
19.2 Object Construction and Destruction
19.2
Object Construction and Destruction
19.2.1
Construction
167
A HALCON/COM object can be in different states. It can be instantiated and it can be initialized.
An instantiated object does not necessarily need to be initialized, but an initialized object is always
instantiated. Instantiation means using an appropriate technique to produce a “living” COM object (this
technique differs according to what client language is used). Initializing means to give the object a
well-defined internal state.
There is another state an object can have: neither instantiated nor initialized. Since not being instantiated
means not existing, what exactly does this condition mean? The answer depends somewhat on the
client language used, but is rather easy to understand, if we realize that COM object variables actually
are references to an existing (or not existing) object. Thus, if such a variable is declared, there is not
necessarily already an object created it refers to. As we like to mix up the terms “reference to an object”
and “object” in this manual, we may speak of an uninstantiated object in that case. For example, if an
HImageX object is created (not only the referring variable is declared), it is usable in terms of COM
(since it is instantiated), but it does not yet contain any HALCON image. To be a valid HALCON/COM
object, it still must be initialized. This can be done in two different ways:
• The object can initialize itself or
• the object can be initialized by another object’s method.
For that reason, a HALCON/COM class can have many (differently named) constructors. One of the
constructors of the class HImageX, e.g., is ReadImage, which initializes the object by reading an image
file from the hard disk. Another way to initialize an object is to get it as result after calling another
object’s method. For example, an uninitialized HImageX object becomes initialized when it is returned
from a call to MeanImage (which does a convolution on an image and produces another image).
Note that the mechanism is indeed slightly more complicated and again depends on the client language.
In fact, an object variable needs not refer to a living COM object, when being used as a return value of a
method call. Even more, if it does, the referred object gets destroyed before the new object is assigned
to the variable.
Actually, there is yet another way to initialize a HALCON/COM object: by using the method Cast()
mentioned before. This method takes another object of a related class, i.e., derived from HObjectX,
as parameter, which in turn has to be initialized. Then, the object the calling method belongs to gets
initialized with the internal state of the other object. Because no copying or duplication takes place, the
other object gets uninitialized.
Note that not all HALCON/COM objects can have this initialized state! An object can only be initialized,
if it has an internal state. Thus, all the group classes described in section 19.1.1 on page 164 have no
constructor methods.
COM
In the first case, a so-called constructor is executed. The term “constructor” is somewhat misleading here,
since it has a slightly different meaning than, e.g., a C++ constructor. In C++ terms, a constructor is a
special method (always named exactly as the class) which performs the object construction automatically
without the need to be called explicitly. In the HALCON/COM, case a constructor is an ordinary method
which initializes the object’s internal state and must be called explicitly.
168
The HALCON/COM Interface
19.2.2
Destruction
We have seen that creating a valid HALCON/COM object is a two-step process: First, the COM object
needs to be instantiated, then it must be initialized. This implies also a two-step destruction process:
To destruct an object it must be uninitialized before being destroyed (which is the opposite of being
instantiated). The latter is done by COM and the client environment, the first must be performed by
some automatic destruction process. To pick up the HImageX example again, the automatic destructor must free the image data using the HALCON memory management. The automatic destructors of
classes like HShapeModelX or HFramegrabberX internally apply operators like ClearShapeModel or
CloseFramegrabber, respectively. These operators cannot be called via instances of the class (only
via HOperatorSetX); the same holds for operators like ClearAllShapeModels. Instead of using these
operators, you can destroy instances and then initialize anew.
Please note that you must not use operators like ClearShapeModel, ClearAllShapeModels, or
CloseFramegrabber via HOperatorSetX together with instances of the corresponding handle classes
(HShapeModelX, HFramegrabberX, etc.)!
19.3
Interfaces and Inheritance
As said before, COM classes are built from interfaces which in turn contain methods and properties.
Each HALCON/COM class has got one default interface named according to the class. For example, the
class HImageX contains the default interface IHimageX which provides all the relevant methods. Dealing
with interfaces is strongly related to the client environment used, so we will not have a too close look
at this topic now. For example, Visual Basic tries to completely hide the whole interface topic from the
user; in that case, an interface and the related class are the same most of the time.
Actually, an interface behaves similar to a C++ pointer or reference to an object and that is exactly
what Visual Basic tries to hide. As said before, interfaces are used for inheritance simulation within
HALCON/COM. The way this works is simple: We have seen that HObjectX is an abstract (and thus not
instantiable) class. On the other hand, the derived classes HImageX, HRegionX, etc. have to supply their
own functionality plus the inherited HObjectX functionality. This is achieved with the help of interfaces:
Currently there is no COM class named HObjectX (thus no HObjectX object can be initialized), only an
interface named IHObjectX. This interface appears in all “derived” classes together with their default
interfaces. HImageX, e.g., has two interfaces (in fact it has a hidden third one):
1. IHImageX (the default interface) and
2. IHObjectX (the inherited interface).
This allows to satisfy every method which expects a parameter HObjectX (actually it expects a reference
to that class in form of the interface IHObjectX) with any derived class object, as such an object always
has the interface IHObjectX, too. This corresponds to a certain object-oriented rule which allows an
automatic cast from the derived class to the base class (not the other way).
How intuitive this feature can be used, again depends on the client language/tool: Visual Basic 5.0, for
example, only regards the default interface an object supplies and treats that as if it were the class itself.
That implies that only the methods contained in the default interface seem to belong to a class. To also
use the “inherited” methods (contained in the IHObjectX interface), thus an explicit cast to the base
class is necessary. This is a widely known Visual Basic weakness and may get improved by Microsoft in
forthcoming versions.
19.4 Methods and Properties
19.4
169
Methods and Properties
There is not much to say about methods, since they can be used quite intuitively. The only interesting
aspect here is the fact that different classes can have methods with the same name, but with a different
parameter configuration. These methods perform the same action (as their identical names let expect),
but “show a different point of view”. For example, the operator GrabImage is part of the class HImageX
as well as of the class HFramegrabberX. In the first case, the method is a constructor for an image object
and takes an HFramegrabberX object as parameter (which denotes the image acquisition device from
which to retrieve the data). In the second case, the method takes the HImageX object into which the
image should be grabbed as parameter.
Properties are a special COM feature and can be treated like data members by tools like Visual Basic.
There are two kinds of them: put and get properties. A put property allows the user to change the
internal state of an object, whereas the get property only allows to read out the internal state. Usually
(but not always), both types are present acting like an ordinary variable class member in C++. The
properties in the HALCON/COM interface are just for convenience purposes, since they always map to
an existing method. The class HWindowX, e.g, has quite a lot of properties: Draw sets or gets the current
drawing mode, Font sets or gets the current font, and so on. All of these properties are mapped to their
corresponding methods. Reading out the draw mode, e.g., results in a call to the operator GetDraw.
A Closer Look at Data Types
We have seen that a lot of the data types used within the HALCON/COM interface are actually the classes
themselves. But there are also more basic, “everyday” types being used. A widely used data type in the
COM world (and thus in Visual Basic) is the type VARIANT. All users of the HALCON/C++ interface will
know the data type HTuple which is polymorphic (i.e., it can be one of several different “subtypes”) and
supplies array functionality (i.e., it can hold several data items at once). VARIANTs behave analogously
and are the COM equivalent for HTuples. Exactly like an HTuple a VARIANT is able to hold data of
different basic types plus the information what kind of data it contains. Also a combination of different
or equal types is possible just like with HTuples.
The main difference is that a VARIANT is no class. This implies the complete absence of any methods.
Thus, all the additional functionality of the very powerful class HTuple must be accessed in another
way. For this reason, there is an class HTupleX, which groups methods for tuple operations like vector
addition, string concatenation, and so on.
Another important and widely used COM data type is BSTR. This standard COM flavor of character
strings is not directly compatible with standard C-like string implementations, mainly because it uses
wide chars. This means, that auxiliary functions must be used to access or modify BSTRs when using
C/C++. Again, this is no problem with Visual Basic, where it is the default string data type. Additionally,
there are integral data types like long and double as well. They are used in situations where array- or
multitype-parameters are not allowed or make no sense.
COM
19.5
170
The HALCON/COM Interface
19.6
Error Handling
The HALCON/COM interface uses the standard COM error handling technique where every method call
passes both a numerical and a textual representation of the error to the calling framework. It is then up to
the caller to react to this information. Since low error numbers are reserved for COM, HALCON/COM
uses a very high offset to its own error codes. To get the correct HALCON error code, this offset must
be subtracted from the received code. The offset is a (read only) property of the class HSystemX. There
are two offsets: one for the HALCON/COM interface and one for HALCON itself. Those properties are
named:
• HSystemX.ErrorBaseCOM and
• HSystemX.ErrorBaseHalcon.
In order to get the correct HALCON error code, an HSystemX object must be instantiated (one is enough
for the whole application anyway, since HSystemX objects have no “identity”). Then, the value of the
respective property of HSystemX must be subtracted from the returned error code to get the correct
HALCON error code. For an example how to deal with error codes see section 19.7.2.
Special information for error handling in Visual Basic can be found in section 19.7.2.
19.7
HALCON/COM and Visual Basic
So far, the important basics of the HALCON/COM interface have been explained. The following sections
describe special aspects when using Visual Basic:
• object instantiation (section 19.7.1)
• error handling (section 19.7.2)
19.7.1
Object Instantiation
There are many different ways to instantiate COM objects in Visual Basic. We will discuss only one of
them, because it has certain advantages over all the others. We have seen in the sections before that a
distinction should be made between the instantiation and the initialization of objects. Even more important, we should also distinguish objects from object reference variables. An object reference variable is
set up by its declaration with the keyword Dim:
Dim image1 As HImageX
This statement does not yet create a COM object, it just declares a variable able to reference an HImageX
object. If we want to declare a reference variable and immediately create an object it refers to, we should
write
Dim image1 As New HImageX
19.7 HALCON/COM and Visual Basic
171
Now, a “new” HImageX object is created and the variable ’image1’ refers it. Note that the declaration
of variables is not obligatory with Visual Basic, but should be done anyway! Undeclared variables get
declared automatically when referenced and that can lead to errors which are very hard to track down! It
is a good idea to place the statement ’Option Explicit’ on top of every Visual Basic module, because
then variable declaration is forced.
We now have a valid COM object, to which the declared variable refers. To initialize this object, we
could call a constructor method:
Dim image1 As New HImageX
Call image1.ReadImage('some_file_name')
Note the keyword Call! It’s necessary in Visual Basic if the called method doesn’t return a value. The
other way of initialization would be using another object’s method:
Dim image1 As New HImageX
Dim region1 As HRegionX
Call image1.ReadImage('some_file_name')
Set region1 = image1.Threshold(128, 255)
There are two important things here. First, the keyword Set, which replaces the Call keyword when
the called method returns another COM object (in this case a region). Secondly, the second variable
declaration omits the keyword New because the corresponding variable does not need to instantiate an
object at declaration time. Instead, this is achieved within the operator Threshold, which creates a new
COM object itself and passes a reference to this object as its return value.
Dim image1 As New HImageX
Dim region1 As HRegionX
Call image1.ReadImage('some_file_name')
Set region1 = image1.Threshold(128, 255)
Set image1 = Nothing
Set region1 = Nothing
Here, both variables are assigned the special Visual Basic keyword ’Nothing’ which denotes that they
do not reference their related COM objects anymore. These COM objects thus are not referenced at all
which leads to their immediate destruction.
There is, of course, a lot more to say about Visual Basic/HALCON programming. Some further aspects
might become clear in the example session described in chapter 20 on page 173.
19.7.2
Error Handling
When using Visual Basic, errors can be trapped by an error handler. If no custom error handler is
present, Visual Basic itself supplies a default one, which shows a message box containing the textual
COM
HALCON/COM objects get destroyed as soon as no variable references them anymore. For local variables, this is the case when they go out of scope (e.g., when a subroutine is left). For global variables, or
if an explicit destruction is desired, this has to be done by the user:
172
The HALCON/COM Interface
error description. Error handlers in Visual Basic can be set with the keyword On Error. To trap an error
in a portion of code, the appropriate construct could look like this:
Dim LastErrorCode As Long
Dim SysObject As New HSystemX
On Error Goto myErrorHandler
<some code>
myErrorHandler:
' do something with the error information, for example:
Debug.Print "Error occurred: " + Err.Description
LastErrorCode = Err.Number - SysObject.ErrorBaseHalcon
Resume Next
If an error occurs in <some code>, an immediate jump to the label myErrorHandler is made, where
an arbitrary error processing mechanism can be placed. The scheme used in the example tries to model a
traditional, “procedural” error recovery strategy, where every function call returns an error code, which
has to be checked before program execution can continue. When an error occurs, the error handling
code at the corresponding label takes over, writes a status message (the textual error representation) to
the Visual Basic window ’Immediate’ and stores the error code in a global integer variable. The global
Visual Basic object Err is the source of information in this case. Afterwards, control is returned to the
line following the statement which produced the error via the Visual Basic command Resume Next. The
next line of code then would be responsible for checking the error code stored in LastErrorCode.
We have seen that there are two types of errors: HALCON-related errors and COM-interface-related
ones. Since the COM-interface errors have smaller error numbers than the HALCON error codes, the
above mechanism would lead to negative numbers. In this case, the produced error code would have to
be subtracted from SysObject.ErrorBaseCOM to get the correct (interface-related) error code.
Example Visual Basic Session
173
Chapter 20
Example Visual Basic Session
In this chapter you will learn how to develop HALCON applications quickly using Microsoft Visual
Basic and the HALCON/COM interface. There will be simple steps describing how to
• create a new project, add HALCON/COM, and create the GUI (section 20.1)
• add simple code to read and display an image (section 20.2 on page 175 )
• add image processing code (section 20.3 on page 176)
• use the appliaction with HALCON XL (section 20.4 on page 178)
As an additional source of information you are strongly encouraged to have a look at the other examples
which are supplied as Visual Basic sources together with HALCON.
COM
If you want to use HALCON/COM inside other programming languages, please have a look at the
examples in the subdirectories delphi and mfc of %HALCONEXAMPLES%; they show how to use HALCON/COM within Borland Delphi, or together with Microsoft MFC in Visual C++. Note that the examples using C# or Visual Basic .NET are based on HALCON/.NET.
20.1
First Step: The GUI
Go ahead and
1. Launch Visual Basic. A dialog named New Project should appear allowing you to select the
type of project you want. Switch to New in the tab list, select Standard EXE and click Open.
2. Select Project from the menu bar and click Components. A dialog box shows up listing the
components installed on your system. Switch to Controls in the tab list and place a check next
to the item Halcon/COM library.
3. Press F2. The object browser should appear. See if you can find HImageX and browse through
some of the corresponding methods. Clicking on a method shows its parameterization as well as
a short help text about what it will do in the status area at the bottom of the object browser. Close
the object browser.
174
Example Visual Basic Session
Figure 20.1: Having performed all the steps from section 20.1 you should end up with a setup like this.
4. Have a look at the dialog template (’form’) showing in the lower half of the screen; it should be
titled Form1. In the upper half you will discover an area titled Properties - Form1. Here you
can set and retrieve the active GUI object’s (in this case the form’s) properties. Click on Form1
right beside Caption and change the string to HalconX example. You should see the effect of
your action immediately in the caption text of the below form.
5. Grab the form and resize it to a suitable extent.
6. Have a look at the tool bar to the left: Here you can find all the control elements you can place
inside your form. They are represented as small icons. Move the mouse cursor over the different
icons to see the bubble help revealing their names. You should find an icon showing the HALCON symbol named HWindowXCtrl. You guessed it! That is our ActiveX control HALCON
window.
7. Activate the HWindowXCtrl icon. Draw a rectangular region inside the form | make sure it is
approximately square. When releasing the mouse button the square area should turn black.
8. Switch to the CommandButton icon (looking like a brick) in the left tool bar. Draw a button
inside the form beside or below the HALCON window. Change the button’s caption text to Next
>> in the properties box.
20.2 Second Step: Functionality
175
9. Now switch to Label in the tool bar and draw a longish rectangular area at the bottom of the
form. If you encounter placement difficulties due to lack of form space, you can always resize
the form to fit your needs.
10. Resize the form so that it fits around the before created items. Now you have the entire GUI for
your application ready to go and your screen should look similar to figure 20.1.
20.2
Second Step: Functionality
Now you have the finished GUI, you should go ahead and make the application do something:
1. Right-click somewhere inside the form and select View Code. Another window will pop up over
the form with two combo boxes at its top border. Select Form in the left combo box. You will
see the code to be executed when the form is created.
2. Insert a line into the subroutine:
Private Sub Form_Load()
Label1.Caption = "Click Next to start"
End Sub
You just changed the text the label at the bottom will show when the application is launched.
3. Next we will declare some important variables: Switch back to (General) in the left combo box
above the source code window and insert in the following lines at the top:
Some online selection boxes for the desired object type will assist you. We have just created
two objects: an HImageX and an HWindowX. The reason for the keyword in the first line is that
we want the HImageX object to be instantiated (i.e., memory being allocated for it). This is not
necessary for the HWindowX, since it is already instantiated; it is the ActiveX control we have
drawn inside the form.
4. The object ’Monkey’ is instantiated as we know (although it is not yet initialized with an image), but the variable ’Window’ still refers to nowhere. Insert another line into the subroutine
Form_Load():
Private Sub Form_Load()
Set Window = HWindowXCtrl1.HalconWindow
Label1.Caption = "Click Next to start"
End Sub
Now, the variable ’Window’ refers to the HWindowX part of our ActiveX control.
5. Switch to Command1. Another subroutine appears, which you complete like this:
COM
Dim Monkey As New HImageX
Dim Window As HWindowX
176
Example Visual Basic Session
Private Sub Command1_Click()
Call Monkey.ReadImage ("monkey")
Call Window.DispObj(Monkey)
End Sub
6. Start your application by pressing F5 and see what happens!
While typing, you will notice a very convenient Visual Basic feature: Since it knows the methods of a
class, it allows you to select one from a list, if you wish to do so (see figure 20.2). You will also get
assistance in supplying the parameter values for a method call in the right order and with the right types
(see figure 20.3); if no type is shown, a VARIANT is required.
Figure 20.2: Visual Basic helping you to select a method.
Figure 20.3: Visual Basic helping you with the correct parameters.
20.3
Final Step: More Functionality
What we have now is a very basic application which can’t do very much | but it needs only 10 lines of
code! Below, we will extend the functionality, turning our application into a small image processing
demo:
1. Extend the variable declaration section at the beginning of your listing so it looks like this:
Dim
Dim
Dim
Dim
Dim
Monkey As New HImageX
Window As HWindowX
Region As HRegionX
Eyes As HRegionX
State As Integer
Although these declarations are not necessary (Visual Basic declares variables automatically), it
is nevertheless a good idea to do so.
20.3 Final Step: More Functionality
177
2. Select the subroutine Command1_Click() and modify it like this:
Private Sub Command1_Click()
If State = 3 Then
End
End If
If State = 2 Then
Set Eyes = Region.SelectShape("area", "and", 500, 50000)
Set Eyes = Eyes.SelectShape("anisometry", "and", 1, 1.7)
Call Window.DispObj(Monkey)
Call Window.DispObj(Eyes)
Label1.Caption = "click Finish to terminate"
Command1.Caption = "Finish"
State = 3
End If
If State = 1 Then
Set Region = Monkey.Threshold(128, 256)
Set Region = Region.Connection()
Call Window.SetColored(12)
Call Window.DispObj(Region)
Label1.Caption = "Next, the ape's eyes will be selected"
State = 2
End If
End Sub
3. Run your little program and enjoy a guided tour through a very common image processing example.
COM
If State = 0 Then
Call Monkey.ReadImage("monkey")
Call Window.DispObj(Monkey)
Label1.Caption = "Next, the image will be segmented into
several regions"
State = 1
End If
178
Example Visual Basic Session
20.4
Using HALCON XL
From HALCON 9.0 on, there exists a second version, HALCON XL, which is optimized for large
images.
!
Please note that you should use HALCON XL only when you need its features.
In order to use the COM interface of HALCON XL in your Visual Basic application (or in other environments like Borland Delphi, Visual C++, or .NET), all you need to do is to register the corresponding
DLL halconxxl.dll, e.g., via the dialog Start . Run together with the Windows Explorer: In the
latter, “open” the directory bin\x86-win32 of the folder where you installed HALCON. Now, type
regsvr32 the dialog Run and then drag and drop halconxxl.dll from the Explorer into the dialog,
where it automatically appears with the full path. To execute the command, click OK.
Now, HALCON XL is automatically used whenever you add HALCON/COM to the Components of a
Visual Basic project. Moreover, it is also used automatically in all projects and executables that were
created before you registered halconxxl.dll. The reason for this is that, from the point of view of
a COM application, the two DLLs halconx.dll and halconxxl.dll are identical, therefore one can
replace the other directly. To check which one is currently registered, open the dialog Components via
the menu Project and select Halcon/COM library; below the list box, the corresponding DLL is
displayed.
20.5
Other Examples
Under vb6\Tools\Matching\ you can find an example showing how to use shape-based matching in
HALCON/COM.
Part VI
Programming With HALCON/C
Introducing HALCON/C
181
Chapter 21
Introducing HALCON/C
HALCON/C is the interface of the image analysis system HALCON to the programming language C.
Together with the HALCON library, it allows to use the image processing power of HALCON inside C
programs.
This part is organized as follows: We start with a first example program to show you how programming
with HALCON/C looks like. Chapter 22 on page 183 introduces the four different parameter classes
of HALCON operators. We will explain the use of HALCON tuples (section 22.2.2 on page 186) for
supplying operators with tuples of control parameters in great detail: Using tuples, the two calls to
select_shape in our example program could be combined into only one call. Chapter 23 on page 195
is dedicated to the return values of HALCON operators. Chapter 24 on page 197 gives an overview
over all the include files and C libraries necessary for compiling C programs and shows how to create a
stand-alone application. Finally, chapter 25 on page 203 contains example solutions for some common
problems in image processing (like edge detection).
21.1
A First Example
The program is quite self-explanatory. We will describe the basic principles nevertheless: First, all
image pixels with gray values greater than 128 are selected. Then all connected components of the
region formed by these pixels are calculated. The corresponding HALCON operator calculates a region
tuple, and thus splits the image in different regions (objects). From these, the mandrill’s eyes are selected
by their area and shape.
This example shows how easy it is to integrate HALCON operators in any C program. Their use is
very intuitive: Users don’t have to think about the basic data structures and algorithms involved. And
since all HALCON operators are hardware independent, users don’t even have to care about things like
different I/O devices. HALCON has its own memory management and provides a sophisticated runtime
environment.
C
Figure 21.1 depicts the example C program together with the input image and the results. The goal is
to find the eyes of the monkey by segmentation. The segmentation result is shown in figure 21.1 on the
upper right side.
182
Introducing HALCON/C
#include "HalconC.h"
main()
{
Hobject mandrill,thresh,conn,area,eyes;
Hlong
WindowHandle;
/* required objects
*/
open_window(0,0,512,512,0,"visible","",&WindowHandle); /* open window */
read_image(&mandrill,"monkey");
/* read input image ("monkey") */
disp_image(mandrill,WindowHandle);
/* display input image
*/
get_mbutton(WindowHandle,_,_,_);
/* wait for mouse click
*/
/* Select image region with pixels in [128,255]
threshold(mandrill,&thresh,128.0,255.0);
connection(thresh,&conn);
/* compute connected components
*/
*/
/* select regions with an area of at least 500 pixels
select_shape(conn,&area,"area","and",500.0,90000.0);
*/
/* select the eyes in these regions by using the anisometry feature
select_shape(area,&eyes,"anisometry","and",1.0,1.7);
disp_region(eyes,WindowHandle);
/* display result
*/
get_mbutton(WindowHandle,NULL,NULL,NULL); /* wait for mouse click
close_window(WindowHandle);
/* close window
*/
*/
/* delete image objects from the Halcon database
clear_obj(mandrill); clear_obj(thresh); clear_obj(conn);
clear_obj(area); clear_obj(eyes);
*/
*/
}
Figure 21.1: Example program with input image (upper left) and segmentation results (upper right).
The HALCON Parameter Classes
183
Chapter 22
The HALCON Parameter Classes
HALCON distinguishes four different classes of operator parameters:
• Input image objects
• Output image objects
• Input control parameters
• Output control parameters
Input parameters are passed by value, output parameters are passed by reference (using the &-operator).
An exception to this rule are output control parameters of type char*. Here, the caller has to provide the
memory and only a pointer to that memory is passed to the operator.
Most HALCON operators can also be called using tuples of parameters instead of single values (socalled tuple mode). Take the operator threshold from our example program in the previous chapter,
which segments an image and returns the segmented region: If you pass a tuple of images, it will return
a tuple of regions, one for each input image. However, in contrast to HDevelop and other programming
interfaces, in HALCON/C the tuple mode must be selected explicitly by prefixing the operator with T_
and by using tuples for all control values (see section 22.2 on page 185 for more details). Whether an
operator can be called in tuple mode can be seen in the HALCON reference manual.
C
HALCON/C provides the data structure Htuple for tuples of control parameters (see section 22.2.2 on
page 186 for details) and the data structure Hobject for image objects (single objects as well as object
tuples — see section 22.1).
22.1
Image objects
By using image objects, HALCON provides an abstract data model that covers a lot more than simple
image arrays.
184
The HALCON Parameter Classes
Basically, there are two different types of image objects:
• Images
• Regions
A region consists of a set of coordinate values in the image plane. Regions do not need to be connected
and may include “holes.” They may even be larger than the image format. Internally, regions are stored
in the so-called runlength encoding.
Images consist of at least one image array and a region, the so-called domain. The domain denotes
the pixels that are “defined” (i.e., HALCON operators working on gray values will only access pixels
in this region). But HALCON supports multi-channel images, too: Images may consist of an (almost)
arbitrary number of channels. An image coordinate therefore isn’t necessarily represented by a single
gray value, but by a vector of up to n gray values (if the coordinate lies within the image region). This
may be visualized as a “stack” of image arrays instead of a single array. RGB- or voxel-images may be
represented this way.
HALCON provides operators for region transformations (among them a large number of morphological
operators) as well as operators for gray value transformations. Segmentation operators are the transition
from images (gray values) to regions.
HALCON/C provides the data type Hobject for image objects (both images and regions). In fact,
Hobject is a surrogate of the HALCON database containing all image objects. Input image objects are
passed to the HALCON operators by value as usual, output image objects are passed by reference, using
the &-operator. Variables of type Hobject may be a single image object as well as tuples of image
objects. Single objects are treated as tuples with length one.
Of course, users can access specific objects in an object tuple, too. To do so, it is necessary to extract
the specific object key (converted to integer) first, using the operators obj_to_integer or copy_obj.
The number of objects in a tuple can be queried with count_obj. To convert the keys (returned from
obj_to_integer) back to image objects again, the operator integer_to_obj has to be used. It may be
noted that integer_to_obj duplicates the image objects (Don’t worry, this doesn’t mean necessarily
that the corresponding gray value arrays are duplicated too. As long as there is only read-access, a
duplication of the references is sufficient). Therefore, all extracted objects have to be deleted explicitly
from the HALCON database, using clear_obj. Figure 22.1 contains an excerpt from a C program to
clarify that approach.
Some HALCON operators like difference allow the use of the following specific image objects as
input parameters:
NO_OBJECTS: An empty tuple of image objects.
EMPTY_REGION: An image object with empty region (area = 0).
FULL_REGION: An image object with maximal region.
These objects may be returned by HALCON operators, too.
22.2 Control parameters
...
Hobject
Hobject
Hlong
Htuple
Htuple
Hlong
Hlong
objects;
obj;
surrogate;
Tsurrogates;
Index,Num;
i;
num;
/* tuple of image objects
/* single image object
/* object key, converted to integer
/* tuple of object keys
/* temporary tuple for parameter passing
/* loop variable
/* number of objects
...
count_obj(objects, &num);
/* variant 1: object key -> control parameter
create_tuple_i(&Index,1);
create_tuple_i(&Num,num);
T_obj_to_integer(objects,Index,Num,&Tsurrogates);
for (i=0; i<num; i++)
{
surrogate = get_i(Tsurrogates,i);
/* process single object
}
/* variant 2: copying objects individually
for (i=1; i<=num; i++)
{
copy_obj(objects,&obj,i,1);
/* process single object
}
...
185
*/
*/
*/
*/
*/
*/
*/
*/
*/
*/
*/
Figure 22.1: Accessing the i-th image object in a tuple of image objects.
22.2
Control parameters
HALCON/C supports the following data types as types for control parameters of HALCON operators:
• integers,
• floating point numbers,
Using control parameter tuples in C isn’t as elegant as using image object tuples. To circumvent the
missing generic lists in C, it was necessary to introduce two different working modes into HALCON/C:
The simple mode and the tuple mode. If a tuple is necessary for at least one control parameter, the tuple
mode has to be used for operator calls. In tuple mode, all control parameters of an operator must be
passed as type Htuple (Mixing of the two modes is not possible). The tuple mode also has to be used if
the number or type of values that a operators calculates isn’t known beforehand.
Mentioning the control parameter types — How is the default type of control parameters determined for
a given operator? Basically there are three ways:
1. The operator description in the HALCON reference manual,
C
• character arrays (strings)
186
The HALCON Parameter Classes
2. the HALCON system operator get_param_info and
3. the description of the HALCON interface in the file HProto.h.
Sometimes the manuals mention more than one possible type. If only integers and floating point numbers
are allowed for a parameter, values have to be passed as parameters of type double. For all other
combinations of types, the tuple mode has to be used.
HALCON operators, that are called in tuple mode are distinguished from simple mode calls by a preceding T_. That means,
select_shape
is a call of the HALCON operator select_shape (as described in the HALCON reference manual) in
simple mode, whereas
T_select_shape
is a call of the same operator in tuple mode.
22.2.1
The Simple Mode
In the so-called simple mode, all operators described in the HALCON reference manual can be used in
a very intuitive way in your own C programs. All control parameters are variables (or constants) of the
data types
• Hlong for integers (HALCON type LONG_PAR),
• double for floating point numbers (DOUBLE_PAR) or
• char* for character arrays (strings, STRING_PAR).
Hlong and double input control parameters are passed by value as usual, the corresponding output
control parameters are passed by reference, using the &-operator. String parameters are pointers to char
in both cases. Please note, that the memory for output control parameters (in particular strings) has
to be provided by the caller! We recommend to allocate memory for at least 1024 characters for string
parameters of unknown length. Output parameter values that are of no further interest can be set to NULL
(e.g.,as in the call get_mbutton in figure 21.1 on page 182).
Examples for HALCON operator calls in simple mode can be found in the C programs in figure 22.1 and
figure 21.1 on page 182.
22.2.2
The Tuple Mode
We mentioned already that control parameter tuples for HALCON operators need special treatment. In
this chapter we will give the details on how to construct and use those tuples. The HALCON reference
manual describes a large number of operators that don’t operate on single control values but on tuples of
22.2 Control parameters
187
values. Using those operators, it is easy to write very compact and efficient programs, because often it is
possible to combine multiple similar operator calls into a single call.
Unfortunately, C provides no generic tuple or list constructor. In contrast, HALCON allows tuples with
mixed types as control parameter values (e.g., integers mixed with floating point numbers).
Therefore, in addition to the very intuitive simple mode there is another mode in HALCON/C: the tuple
mode. Using this mode is a little more elaborate. If at least one of the control parameters of a HALCON
operator is passed as a tuple, the tuple mode has to be used for all control parameters (Mixing of both
modes isn’t possible). Furthermore, the tuple mode also has to be used if the number or type of the
calculated values aren’t known beforehand.
Syntactically, tuple mode is distinguished from simple mode by a T_ preceding the operator name. For
example, calling disp_circle in tuple mode is done by
T_disp_circle(...).
To ease the usage of the tuple mode, HALCON/C provides the abstract data type Htuple for control
parameter tuples. Objects of type Htuple may be constructed using arrays of the types
• Hlong* for integer arrays (HALCON type LONG_PAR),
• double* for floating point arrays (DOUBLE_PAR) or
• char** for string arrays (strings, STRING_PAR)
Additionally, a MIXED_PAR array type is supported that can hold an array with any of the three native
value types in arbitrary combination. The usage of these four array types is transparent.
Control parameter tuples must be created, deleted, and manipulated using the appropriate HALCON/C
procedures only (overview in figures 22.2, 22.3, and 22.4).
The rules for parameter passing are valid in tuple mode, too: Input control parameters (type Htuple) are
passed by value as usual, output control parameters are passed by reference, using the &-operator. For
output parameters that are of no further interest you can pass NULL. .
The following sections describe the five most important steps when calling a HALCON operator in tuple
mode:
• allocate memory (section 22.2.2.1)
• call operator (section 22.2.2.3 on page 189)
• process output parameters (section 22.2.2.4 on page 189)
• free memory (section 22.2.2.5 on page 190)
Section 22.2.2.6 on page 192 contains an example.
Finally, section 22.2.2.7 on page 193 describes a generic calling mechanism that can be used in interpreters or graphical user interfaces.
C
• construct input parameters (section 22.2.2.2)
188
The HALCON Parameter Classes
22.2.2.1
Allocate Memory
First, memory must be allocated for all tuples of input control parameters, using create_tuple or
create_tuple_type, respectively (see figures 22.2). Memory for output control parameter tuples is
allocated by HALCON/C (a call of create_tuple isn’t necessary). With create_tuple_i etc. you
can create a tuple of length 1 and set its value in a single step (see figures 22.3). With reuse_tuple_i
etc. you can reuse an existing tuple, i.e., destroy and reallocate it and set a single value.
void create_tuple(tuple,length)
or
macro CT(tuple,length)
Htuple
*tuple;
Hlong
length;
/* creates a MIXED_PAR tuple that can hold 'length' entries h
*/
void create_tuple_type(tuple,length,type)
Htuple
*tuple;
Hlong
length;
INT
type
/* creates a tuple of 'type' that can hold 'length' entries.
* 'type' can hold either LONG_PAR, DOUBLE_PAR, STRING_PAR,
* or MIXED_PAR.
*/
void destroy_tuple(tuple)
or
macro DT(tuple)
Htuple
tuple;
/* deletes a tuple (if the tuple contains string entries,
/* the memory allocated by the strings is freed, too)
*/
*/
Hlong length_tuple(tuple)
or
macro LT(tuple)
Htuple
tuple;
/* returns the length of a tuple (number of entries)
void copy_tuple(input,output)
or
macro CPT(input,output)
Htuple
input;
Htuple
*output;
/* creates a tuple and copies the entries of the input tuple
*/
*/
void resize_tuple(htuple,new_length) or
macro RT(htuple,new_length)
Htuple
*htuple;
Hlong
new_length;
/* creates a tuple with the new size and copies the previous entries */
Figure 22.2: HALCON/C Htuple procedures (part one).
22.2.2.2 Create Input Parameters
You set tuple elements using the appropriate procedures set_*. set_s, which insert a string into a tuple,
allocates the needed memory by itself, and then copies the string (see figure 22.4).
22.2 Control parameters
void create_tuple_i(tuple,value)
Htuple
*tuple;
Hlong
val;
/* creates a tuple with specifified integer value
*/
void create_tuple_d(tuple,value)
Htuple
*tuple;
double
val;
/* creates a tuple with specifified double value
*/
void create_tuple_d(tuple,value)
Htuple
*tuple;
char
*val;
/* creates a tuple with specifified string value
*/
void reuse_tuple_i(tuple,val)
Htuple
*tuple;
Hlong
val;
/* reuses a tuple with specifified integer value
*/
void reuse_tuple_d(tuple,val)
Htuple
*tuple;
double
val;
/* reuses a tuple with specifified double value
*/
void reuse_tuple_s(tuple,val)
Htuple
*tuple;
char
*val;
/* reuses a tuple with specifified string value
*/
189
Figure 22.3: HALCON/C Htuple procedures (part two).
22.2.2.3
Call Operator
Then, the HALCON operator is actually called. The operator name is (as already explained) preceded
by a T_ to denote tuple mode.
Process Output Parameters
Further processing of the output parameter tuples takes place, using the procedures length_tuple,
get_type and get_* (see figure 22.4). When processing strings (using get_s), please note that the
allocated memory is freed automatically upon deleting the tuple with destroy_tuple. If the string has
to be processed even after the deletion of the tuple, the whole string must be copied first. The maximal
string length (incl. termination character “\0”) in HALCON is MAX_STRING (1024 in HALCON version
11.0).
C
22.2.2.4
190
The HALCON Parameter Classes
22.2.2.5
Free Memory
Finally the memory allocated by all the tuples (input and output) has to be freed again. This is done with
destroy_tuple. If you still need the values of the tuple variables, remember to copy them first. Now,
the whole series can start again — using different or the same tuple variables.
22.2 Control parameters
191
void set_i(tuple,val,index)
or
macro SI(tuple,val,index)
Htuple
tuple;
Hlong
val;
Hlong
index;
/* inserts an integer with value 'val' into a tuple at
*/
/* position 'index' ('index' in [0,length_tuple(tuple) - 1]) */
void set_d(tuple,val,index)
or
macro SD(tuple,val,index)
Htuple
tuple;
double
val;
Hlong
index;
/* inserts a double with value 'val' into a tuple at
*/
/* position 'index' ('index' in [0,length_tuple(tuple) - 1]) */
void set_s(tuple,val,index)
or
macro SS(tuple,val,index)
Htuple
tuple;
char
*val;
Hlong
index;
/* inserts a copy of string 'val' into a tuple at
*/
/* position 'index' ('index' in [0,length_tuple(tuple) - 1]). */
/* The memory necessary for the string is allocated by set_s. */
int get_type(tuple,index)
or
macro GT(tuple,index)
Htuple
tuple;
Hlong
index;
/* returns the type of the value at position 'index' in the
/* tuple. Possible values: LONG_PAR, DOUBLE_PAR or STRING_PAR
*/
*/
*/
*/
double get_d(tuple,index)
or
macro GD(tuple,index)
Htuple
tuple;
Hlong
index;
/* returns the floating point number at position 'index' in the
/* tuple. (a type error results in a run time error)
*/
*/
char *get_s(tuple,index)
or
macro GS(tuple,index)
Htuple
tuple;
Hlong
index;
/* returns the pointer(!) to the string at position 'index' in
/* the tuple. (a type error results in a run time error)
*/
*/
C
Hlong get_i(tuple,index)
or
macro GI(tuple,index)
Htuple
tuple;
Hlong
index;
/* returns the integer at position 'index' in the tuple
/* (a type error results in a run time error)
/* Attention: all indices must be in [0,length_tuple(tuple) - 1] */
Figure 22.4: HALCON/C Htuple procedures (part three).
192
The HALCON Parameter Classes
22.2.2.6
Example for the Tuple Mode
An example for the tuple mode can be found in figure 22.5 or the file example3.c): The aim is to obtain
information about the current HALCON system state. The operator get_system(’?’,Values) (here
in HDevelop syntax) returns all system flags with their current values. Since in our case neither number
nor type of the output parameters is known beforehand, we have to use tuple mode for the actual operator
call in HALCON/C. The rest of the program should be self explanatory.
#include "HalconC.h"
main ()
{
Htuple
Hlong
In,SysFlags,Info;
i,num;
printf("system information:\n");
create_tuple_s(&In,"?");
/* tuple variables
/*
/*
/*
/*
prepare first query
only value of 'In': "?"
first query
number of system flags
*/
*/
*/
*/
*/
T_get_system(In,&SysFlags);
num = length_tuple(SysFlags);
for (i=0; i<num; i++)
{
/* determine the value of the i-th system flag:
*/
reuse_tuple(&In,get_s(SysFlags,i)) /* prepare query
*/
/* insert i-th system flag
*/
printf("%s ",get_s(SysFlags,i)); /* print name
*/
T_get_system(In,&Info);
/* get corresponding info
*/
switch(get_type(Info,0))
{
/* print the value according to the flag's type:
*/
case LONG_PAR:
printf("(int): %ld\n",get_i(info,0));
break;
case DOUBLE_PAR: printf("(double): %f\n",get_d(info,0));
break;
case STRING_PAR: printf("(string): %s\n",get_s(info,0));
break;
}
destroy_tuple(Info);
/* free parameter
*/
} /* for(i=... */
destroy_tuple(In);
/* free parameter
*/
}
Figure 22.5: Tuple mode example program: Printing the current HALCON system state.
22.2 Control parameters
22.2.2.7
193
Generic Calling Mechanism
There is also an alternative generic calling mechanism for HALCON operators in tuple mode. This
mechanism is intended for the use in interpreters or graphical user interfaces:
T_call_halcon_by_id(id, ...)
calls the HALCON operator id in tuple mode, passing input parameters and getting the output parameters (see figure 22.6 for the complete signature). The id of an operator can be requested with
get_operator_id.
/* generic HALCON operator call style:
* - the operator is called by an id that is returned by get_operator_id;
*
attention: this id may differ for different HALCON versions
* - the tuple arrays are passed directly to the call -> this method is
*
thread-safe
*-----------------------------------------------------------------------*/
int
get_operator_id(const char* name);
Herror T_call_halcon_by_id(int id,
const Hobject in_objs[],
Hobject out_objs[],
const Htuple in_ctrls[],
Htuple out_ctrls[]);
C
Figure 22.6: Generic calling mechanism for the HALCON/C tuple mode.
194
The HALCON Parameter Classes
Return Values of HALCON Operators
195
Chapter 23
Return Values of HALCON
Operators
HALCON operator return values (type Herror) can be divided into two categories:
• Messages (H_MSG_*) and
• Errors (H_ERR_*).
HALCON operators return H_MSG_TRUE, if no error occurs. Otherwise, a corresponding error value is
returned.
Errors in HALCON operators usually result in an exception, i.e., a program abort with the appropriate
error message in HALCON/C (default exception handling). However, users can disable this mechanism
(with a few exceptions, like errors in Htuple operators), using
set_check("~give_error");
to provide their own error handling routines. In that case, the operator get_error_text is very useful:
This operator returns the plain text message for any given error number. Finally, the operator
enables the HALCON error handling again. Several examples showing the handling of error messages
can be seen in the file example5.c.
C
set_check("give_error");
196
Return Values of HALCON Operators
Generation of HALCON/C Applications
197
Chapter 24
Generation of HALCON/C
Applications
The HALCON distribution contains examples for creating an application with HALCON/C++. The
following sections show
• the relevant directories and files (section 24.1)
• the list of provided example applications (section 24.2)
• the relevant environment variables (section 24.3 on page 199)
• how to create an executable under Windows (section 24.4 on page 200)
• how to create an executable under Linux (section 24.5 on page 200)
24.1
Relevant Directories and Files
include\HalconC.h:
include file; contains all user-relevant definitions of the HALCON system and the declarations
necessary for the C interface.
bin\%HALCONARCH%\halcon.dll,
lib\%HALCONARCH%\halcon.lib:
The HALCON library (Windows).
bin\%HALCONARCH%\halconc.dll,
lib\%HALCONARCH%\halconc.lib:
The HALCON/C library (Windows).
C
The HALCON distribution contains examples for building an application with HALCON/C. Here is an
overview of HALCON/C (Windows notation of paths):
198
Generation of HALCON/C Applications
bin\%HALCONARCH%\halconxl.dll, halconcxl.dll,
lib\%HALCONARCH%\halconxl.lib, halconcxl.lib:
The corresponding libraries of HALCON XL (Windows).
lib/$HALCONARCH/libhalcon.so:
The HALCON library (Linux).
lib/$HALCONARCH/libhalconc.so:
The HALCON/C library (Linux).
lib/$HALCONARCH/libhalconxl.so,libhalconcxl.so:
The corresponding libraries of HALCON XL (Linux).
include\HProto.h:
External function declarations.
%HALCONEXAMPLES% \c\makefile, makefile.win:
Example makefiles which can be used to compile the example programs (Linux and Windows,
respectively).
%HALCONEXAMPLES% \c\make.%HALCONARCH%, macros.mak, rules.mak:
Auxiliary makefiles included by the makefiles listed above.
%HALCONEXAMPLES% \c\source\
Directory containing the source files of the example programs.
%HALCONEXAMPLES% \c\win\examples.dsw:
Visual Studio workspace containing projects for all examples; the projects themselves are placed
in subdirectories (Windows only).
%HALCONEXAMPLES% \c\bin\%HALCONARCH%\
Destination of the example programs when compiled and linked using the makefiles.
images\:
Images used by the example programs.
help\operators_*:
Files necessary for online information.
doc\*:
Various manuals (in subdirectories).
24.2
Example Programs
There are several example programs in the HALCON/C distribution (%HALCONEXAMPLES% \c\source\
). To experiment with these examples we recommend to create a private copy in your working directory.
example1.c
reads an image and demonstrates several graphics operators.
24.3 Relevant Environment Variables
example2.c
introduces several image processing operators.
example3.c
is an example for the usage of the tuple mode.
example4.c
shows more (basic) image processing operators like the sobel filter for edge detection, region growing, thresholding, histograms, the skeleton operator, and the usage
of different color lookup tables.
example5.c
describes the HALCON messages and error handling.
example6.c
demonstrates the generic
(T_call_halcon_by_id).
example7.c
describes the handling of RGB images.
example8.c
demonstrates the creation of an image from user memory.
example9.c
describes some additional handling of RGB images.
calling
interface
for
the
tuple
199
mode
A special case is the example program example_multithreaded1.c. It demonstrates the use of HALCON in a multithreaded application. Please note, that it does not make sense to run the example on a
single-processor or single-core computer.
24.3
Relevant Environment Variables
In the following, we briefly describe the relevant environment variables; see the Installation Guide,
section A.2 on page 64, for more information, especially about how to set these variables. Note, that
under Windows, all necessary variables are automatically set during the installation.
While a HALCON program is running, it accesses several files internally. To tell HALCON where to
look for these files, the environment variable HALCONROOT has to be set. HALCONROOT points to the
HALCON home directory; it is also used in the sample makefile.
The variable HALCONARCH describes the platform HALCON is used on. Please refer to section 1.1 on
page 13 for more information.
The variable %HALCONEXAMPLES% indicates where the provided examples are installed.
Two things are important in connection with the example programs: The default directory for the HALCON operator read_image to look for images is %HALCONROOT%\images. If the images reside in
different directories, the appropriate path must be set in read_image or the default image directory must
be changed, using set_system("image_dir","..."). This is also possible with the environment
variable HALCONIMAGES. It has to be set before starting the program.
The second remark concerns the output terminal under Linux. In the example programs, no host name
is passed to open_window. Therefore, the window is opened on the machine that is specified in the
C
If user-defined packages are used, the environment variable HALCONEXTENSIONS has to be set. HALCON will look for possible extensions and their corresponding help files in the directories given in
HALCONEXTENSIONS.
200
Generation of HALCON/C Applications
environment variable DISPLAY. If output on a different terminal is desired, this can be done either directly
in open_window(...,"hostname",...) or by specifying a host name in DISPLAY.
In order to link and run applications under Linux, you have to include the HALCON library path
$HALCONROOT/lib/$HALCONARCH in the system variable LD_LIBRARY_PATH.
24.4
Creating Applications Under Windows
Your own C programs that use HALCON operators must include the file HalconC.h, which contains all
user-relevant definitions of the HALCON system and the declarations necessary for the C interface. Do
this by adding the command
#include "HalconC.h"
near the top of your C file. In order to create an application you must link the library halconc.lib/.dll
to your program.
The example projects show the necessary Visual C++ settings. For the examples the project should be of
the WIN 32 ConsoleApplication type. Please note that the Visual C++ compiler implicitly calls “Update
all dependencies” if a new file is added to a project. Since HALCON runs under Linux as well as under
Windows, the include file HalconC.h includes several Linux-specific headers as well if included under
Linux. Since they don’t exist under Windows, and the Visual C++ compiler is dumb enough to ignore
the operating-system-specific cases in the include files, you will get a number of warning messages about
missing header files. These can safely be ignored.
Please assure that the stacksize is sufficient. Some sophisticated image processing problems require up
to 1 MB stacksize, so make sure to set the settings of your compiler accordingly (See your compiler
manual for additional information on this topic).
HALCON XL applications: If you want to use HALCON XL, you have to link the
libraries halconxl.lib/.dll and halconcxl.lib/.dll instead of halcon.lib/.dll and
halconc.lib/.dll in your project.
24.5
Creating Applications Under Linux
Your own C programs that use HALCON operators must include the file HalconC.h, which contains all
user-relevant definitions of the HALCON system and the declarations necessary for the C interface. Do
this by adding the command
#include "HalconC.h"
near the top of your C file. Using this syntax, the compiler looks for HalconC.h in the current directory only. Alternatively you can tell the compiler where to find the file, giving it the -I<pathname>
command line flag to denote the include file directory.
24.5 Linux
201
To create an application, you have to link two libraries to your program: The library libhalconc.so
contains the various components of the HALCON/C interface. libhalcon.so is the HALCON library.
HALCON XL applications: If you want to use HALCON XL, you have to link the libraries
libhalconcxl.so and libhalconxl.so instead.
Please take a look at the example makefiles for suitable settings. If you call gmake without further
arguments, the example application example1 will be created. To create the other example applications
(e.g., example2), call
make example2
You can use the example makefiles not only to compile and link the example programs but also your own
programs (called e.g. test.c) by calling
make test
You can link the program to the HALCON XL libraries by adding XL=1 to the make command, for
example
C
make test XL=1
202
Generation of HALCON/C Applications
Typical Image Processing Problems
203
Chapter 25
Typical Image Processing
Problems
This final chapter shows the possibilities of HALCON and HALCON/C on the basis of several simple
image processing problems.
25.1
Thresholding
One of the most common HALCON operators is the following:
read_image(&Image,"File_xyz");
threshold(Image,&Thres,0.0,120.0);
connection(Thres,&Conn);
select_shape(Conn,&Result,"area","and",10.0,100000.0);
Step-by-step explanation of the code:
• First, all image pixels with gray values between 0 and 120 (channel 1) are selected.
• The remaining image regions are split into connected components.
25.2
Detecting Edges
The following HALCON/C sequence is suitable for edge detection:
read_image(&Image,"File_xyz");
sobel_amp(Image,&Sobel,"sum_abs",3);
threshold(Sobel,&Max,30.0,255.0);
skeleton(Max,&Edges);
C
• By suppressing regions that are too small, noise is eliminated.
204
Typical Image Processing Problems
Some remarks about the code:
• Before filtering edges with the sobel operator, a low pass filter may be useful to suppress noise.
• Apart from the sobel operator, filters like edges_image, roberts, bandpass_image or laplace
are suitable for edge detection, too.
• The threshold (30.0, in this case) has to be selected depending on the actual images (or depending
on the quality of the edges found in the image).
• Before any further processing, the edges are reduced to the width of a single pixel, using skeleton.
25.3
Dynamic Threshold
Among other things, the following code is suitable for edge detection, too:
read_image(&Image,"File_xyz");
mean_image(Image,&Lp,11,11);
dyn_threshold(Image,Lp,&Thres,5.0,"light");
• The size of the filter mask (11 x 11, in this case) depends directly on the size of the expected objects
(both sizes are directly proportional to each other).
• In this example, the dynamic threshold operator selects all pixels that are at least 5 gray values
brighter than their surrounding (11 x 11) pixels.
25.4
Simple Texture Transformations
Texture transformations are used to enhance specific image structures. The behavior of the transformation depends on the filters used (HALCON provides many different texture filters).
read_image(&Image,"File_xyz");
Filter = "ee";
texture_laws(Image,&TT,Filter,2,5);
mean_image(TT,&Lp,31,31);
threshold(Lp,&Seg,30.0,255.0);
• mean_image has to be called with a large mask to achieve a sufficient generalization.
• It is also possible to calculate several different texture transformations and to combine them later,
using add_image, mult_image or a similar operator.
25.5 Eliminating Small Objects
25.5
205
Eliminating Small Objects
The following morphological operation eliminates small image objects and smoothes the boundaries of
the remaining objects:
...
segmentation(Image,&Seg);
gen_circle(&Mask,100.0,100.0,3.5);
opening(Seg,Mask,&Res);
• The size of the circular mask (3.5, in this case) determines the smallest size of the remaining
objects.
• It is possible to use any kind of mask for object elimination (not only circular masks).
• segmentation(...) is used to denote a segmentation operator that calculates a tuple of image
objects (Seg).
25.6
Selecting Specific Orientations
Yet another application example of morphological operations is the selection of image objects with specific orientations:
...
segmentation(Image,&Seg);
gen_rectangle2(&Mask,100.0,100.0,0.5,21.0,2.0);
opening(Seg,Mask,&Res);
• The rectangle’s shape and size (length and width) determine the smallest size of the remaining
objects.
• The rectangle’s orientation determines the orientation of the remaining regions (In this case, the
main axis and the horizontal axis form an angle of 0.5 rad).
• Lines with an orientation different from the mask’s (i.e., the rectangle’s) orientation are suppressed.
25.7
Smoothing Region Boundaries
The third (and final) application example of morphological operations covers another common image
processing problem — the smoothing of region boundaries and closing of small holes in the regions:
...
segmentation(Image,&Seg);
gen_circle(&Mask,100.0,100.0,3.5);
closing(Seg,Mask,&Res);
C
• segmentation(...) is used to denote a segmentation operator that calculates a tuple of image
objects (Seg).
206
Typical Image Processing Problems
• For the smoothing of region boundaries, circular masks are suited best.
• The mask size determines the degree of the smoothing.
• segmentation(...) is used to denote a segmentation operator that calculates a tuple of image
objects (Seg).
Part VII
Using HDevEngine
209
HDevEngine
Introducing HDevEngine
Chapter 26
Introducing HDevEngine
As the name suggests, HDevEngine is the “engine” of HDevelop. This chapter briefly introduces you
to its basic concepts. Chapter 27 on page 213 explains how to use it in C++ applications, chapter 28 on
page 229 how to use it in .NET applications (C#, Visual Basic .NET, etc.), and chapter 29 on page 257
how to use it in COM applications (Visual Basic 6.0). Additional information that is independent of the
used programming language can be found in chapter 30 on page 269.
What Can You Do With HDevEngine?
With HDevEngine, you can execute complete HDevelop programs or individual procedures from a C++
application or an application that can integrate .NET or COM objects, e.g., C#, Visual Basic .NET, or
Visual Basic 6.0. Thus, you can use HDevelop programs not only for prototyping, but also to completely
develop and run the machine vision part of your application.
Because HDevEngine acts as an interpreter, you can modify the HDevelop program or procedure without
needing to compile and link the application (if you don’t change the procedure’s signature), as would be
necessary if you export the program or procedure and integrate the code manually. This means that you
can easily update the machine vision part of an application by replacing individual HDevelop files.
What HDevEngine Does Not Do
Note that HDevEngine does not implement the complete functionality of HDevelop, only what is necessary to execute programs and procedures. In particular, it does not implement the display of variables
and results in the graphics window, i.e., the internal operators like dev_display. However, you can
“redirect” these operators to your own implementation. Thus, you can decide which visualization is
important and where and how it is to take place in your application.
210
Introducing HDevEngine
What is HDevEngine?
HDevEngine is provided as a C++ and COM class library and a .NET assembly. It consists of the
following classes:
• HDevEngine (C++), HDevEngine (.NET), HDevEngineX (COM)
This is the main class of HDevEngine. With it you manage global settings.
• HDevProgram (C++), HDevProgram (.NET), HDevProgramX (COM)
With this class you load an HDevelop program and get general information about it.
• HDevProgramCall (C++), HDevProgramCall (.NET), HDevProgramCallX (COM)
With this class you execute a program and get the values of its variables.
• HDevProcedure (C++), HDevProcedure (.NET), HDevProcedureX (COM)
With this class you load an HDevelop procedure and get general information about it.
• HDevProcedureCall (C++), HDevProcedureCall (.NET), HDevProcedureCallX (COM)
With this class you pass input parameters to an HDevelop procedure, execute it, and retrieve its
output parameters.
• HDevOperatorImplCpp (C++), HDevOperatorImplX (COM),
IHDevOperators, HDevOpMultiWindowImpl, HDevOpFixedWindowImpl (.NET)
As noted above, HDevEngine does not implement internal HDevelop operators like dev_display.
All HDevEngine variants provide a class or interface to create your own implementation for those
operators that are useful in your application. HDevEngine/.NET also includes two convenience
classes that provide a default implementation of the operators.
• HDevEngineException (C++), HDevEngineException (.NET)
Instances of this class are “thrown” if an exception occurs inside HDevEngine, e.g., because the
application tried to load a non-existing program or because of an error inside an operator in the
executed program or procedure.
Note that in the COM version of HDevEngine, the standard error handling mechanism is used
instead of a separate class.
How to Develop Applications With HDevEngine
With HDevEngine, you can execute complete HDevelop programs or individual local or external HDevelop procedures. Which way is better depends on the stage of development and on your task:
• When developing the image processing part of your application, you will of course create an
HDevelop program. Thus, as a first test of your (programmed) application it is useful to execute the
HDevelop program via HDevEngine. This test will already assure that the general configuration
of your application (environment variables, procedure path, etc.) is correct.
The HDevelop program itself should of course use the same procedures that you plan to execute
from the programmed application.
• After you finished its development, you integrate the image processing part into your programmed application by executing the corresponding HDevelop procedures. Typically, you
display image processing results by using the methods of the underlying HALCON programming language interface, i.e., HALCON/C++ for HDevEngine/C++, HALCON/.NET for HDev-
Engine/.NET (C#, Visual Basic .NET, etc.), or HALCON/COM for HDevEngine/COM (Visual
Basic 6.0), but you can also encapsulate recurring display tasks in HDevelop procedures.
• Whether to use local or external procedures depends on the reusability of the procedure. External
procedures should be used for widely reusable tasks, e.g., opening the connection to and configuring the image acquisition device, or for standard image processing tasks like bar code or data
code reading.
In contrast, local procedures are suitable for not completely reusable tasks, e.g., for training and
configuring a shape model to find objects. Then, different applications can use their optimized
variant of the procedure instead of creating a single procedure with many parameters and internal
switches that suits all applications.
Of course, using local procedures means that you must load the HDevelop program that contains
them. However, as noted above, loading and executing the corresponding HDevelop program is a
good test of the general configuration of the application.
Parallel Programming With HDevEngine
HDevEngine is thread-safe and reentrant. Settings like the procedure path and the implementation of
the display operators are managed globally for all threads by the main HDevEngine class. Threads then
typically have their own instance of program or procedure calls. They can share instances of the classes
for programs and procedures.
Please have a look at the general information about parallel programming with HALCON in section 2.2
on page 19, in particular the style guide in section 2.2.2 on page 20!
HDevEngine XL
Like HALCON, the language-dependent versions of HDevEngine are provided in two variants: based
on HALCON and based on HALCON XL. The latter use the XL versions of the HALCON library and
of HALCON/C++, HALCON/.NET, and HALCON/COM, respectively.
HDevEngine
211
212
Introducing HDevEngine
213
HDevEngine
HDevEngine in C++ Applications
Chapter 27
HDevEngine in C++ Applications
This chapter explains how to use HDevEngine in C++ applications. Section 27.1 quickly summarizes
some basic information, e.g., how to compile and link such applications. Section 27.2 on page 215 then
explains how to use HDevEngine based on examples.
An overview about the classes of HDevEngine and their methods can be found in section 30.1 on page
269.
27.1
How to Create An Executable Application With HDevEngine/C++
You create executable HDevEngine applications in a way similar to normal HALCON/C++ applications.
Chapter 13 on page 111 describes this in detail; here, we summarize the most important points and
include the extensions for HDevEngine:
• In your application, you include the main header file HalconCpp.h and HDevEngine’s header file
HDevEngineCpp.h and use the corresponding namespaces:
#include "HalconCpp.h"
#include "HDevEngineCpp.h"
using namespace HalconCpp;
using namespace HDevEngineCpp;
• To compile the application, use the following include paths on Windows systems
/I "$(HALCONROOT)\include" /I "$(HALCONROOT)\include\hdevengine"
and on Linux systems
-I$(HALCONROOT)/include -I$(HALCONROOT)/include/hdevengine
214
HDevEngine in C++ Applications
• Link the following libraries on Windows systems
/libpath:"$(HALCONROOT)\lib\$(HALCONARCH)" hdevenginecpp.lib halconcpp.lib
and on Linux systems
-L$(HALCONROOT)/lib/$(HALCONARCH) -lhdevenginecpp -lhalconcpp -lhalcon
and on Mac OS X system
-framework HDevEngineCpp -framework HALCONCpp
HDevEngine XL applications: If you want to use HDevEngine XL, link the following libraries
on Windows systems
/libpath:"$(HALCONROOT)/lib/$(HALCONARCH)" hdevenginecppxl.lib halconcppxl.lib
and on Linux systems
-L$(HALCONROOT)/lib/$(HALCONARCH) -lhdevenginecppxl -lhalconcppxl -lhalconxl
and on Mac OS X system
-framework HDevEngineCppxl -framework HALCONCppxl
HALCON/C++ (legacy)
If you want to use HDevEngine with HALCON/C++ (legacy), note the following changes:
• HALCON/C++ (legacy) uses a different namespace:
using namespace Halcon;
• To compile the application, use the following include paths on Windows systems
/I "$(HALCONROOT)\include" /I "$(HALCONROOT)\include\hdevengine10"
and on Linux systems
-I$(HALCONROOT)/include -I$(HALCONROOT)/include/hdevengine10
• Link the following libraries on Windows systems
/libpath:"$(HALCONROOT)\lib\$(HALCONARCH)" hdevenginecpp10.lib halconcpp10.lib
and on Linux systems
-L$(HALCONROOT)/lib/$(HALCONARCH) -lhdevenginecpp10 -lhalconcpp10 -lhalcon
215
HDevEngine
27.2 How to Use HDevEngine/C++
Figure 27.1: Executing an HDevelop program that detects fins on a boundary.
27.2
How to Use HDevEngine/C++
This section explains how to employ HDevEngine based on example applications, which reside in the
subdirectory %HALCONEXAMPLES%\hdevengine\cpp. Like the examples for HALCON/C++ described
in chapter 13 on page 111, they are provided as Visual Studio projects for Windows systems and with
makefiles for Linux, Mac OS X, and Windows systems.
The example applications show how to
• execute an HDevelop program (section 27.2.1)
• execute HDevelop procedures (section 27.2.2 on page 217)
• implement display operators (section 27.2.3 on page 221)
• error handling (section 27.2.4 on page 223)
Section 27.2.5 on page 227 contains additional information for creating multithreaded applications using
HDevEngine.
27.2.1
Executing an HDevelop Program
In this section, we explain how to load and execute an HDevelop program with HDevEngine. The code
fragments stem from the example application exec_program (source file exec_program.cpp), which
checks the boundary of a plastic part for fins. Figure 27.1 shows a screenshot of the application.
27.2.1.1
Step 1: Initialization
First, we include the main header files of HALCON/C++ and of HDevEngine and the corresponding
namespaces:
216
HDevEngine in C++ Applications
#include "HalconCpp.h"
#include "HDevEngineCpp.h"
using namespace HalconCpp;
using namespace HDevEngineCpp;
The main procedure just calls a procedure that does all the work of the example. First, we create an
instance of the main HDevEngine class HDevEngine.
HDevEngine my_engine;
The path to the HDevelop program and the external procedure path are stored in string variables, with
a suitable syntax for the used platform. Note that in Windows applications you can use both / and \ in
path strings:
char
std::string
*halcon_examples_env = getenv("HALCONEXAMPLES");
halcon_examples;
if (halcon_examples_env == NULL || strlen(halcon_examples_env) == 0)
{
halcon_examples = (std::string)getenv("HALCONROOT") + "/examples";
}
else
{
halcon_examples = (std::string)halcon_examples_env;
}
std::string program_path(halcon_examples), ext_proc_path(halcon_examples);
program_path += "/hdevengine/hdevelop/fin_detection.hdev";
ext_proc_path += "/hdevengine/procedures";
If the HDevelop program calls external procedures, you must set the external procedure path with the
method SetProcedurePath:
my_engine.SetProcedurePath(ext_proc_path.c_str());
27.2.1.2
Step 2: Load Program
Now, we create an instance of the class HDevProgram and load the HDevelop program with the method
LoadProgram. The call is encapsulated in a try...catch-block to handle exceptions occurring in the
HDevEngine method, e.g., because the file name was not specified correctly. A detailed description of
error handling can be found in section 27.2.4 on page 223.
HDevProgram my_program;
try
{
my_program.LoadProgram(program_path.c_str());
}
catch (HDevEngineException& hdev_exception)
...
27.2.1.3
Step 3: Execute Program
If the program could be loaded successfully, we execute the program with the method Execute and
store the returned instance of the class HDevProgramCall in a variable for later use:
HDevProgramCall prog_call = my_program.Execute();
27.2.1.4
Step 4: Get Results
That’s all you need to do to execute an HDevelop program. You can also access its “results”, i.e., its
variables with the method GetCtrlVarTuple. In the example program, the area of the extracted fin is
queried and then displayed:
HTuple result = prog_call.GetCtrlVarTuple("FinArea");
printf("\nFin Area: %f\n\n",result[0].D());
Note that program variables can only be accessed when the program has terminated.
27.2.1.5
General: Display Results
How to display results while the program is running is described in section 27.2.3 on page 221.
27.2.2
Executing HDevelop Procedures
This section describes example applications that execute HDevelop procedures:
• a single external procedure (section 27.2.2.1) and
• multiple local and external procedures (section 27.2.2.8 on page 221).
217
HDevEngine
27.2 How to Use HDevEngine/C++
218
HDevEngine in C++ Applications
Figure 27.2: Executing an external HDevelop procedure that detects fins on a boundary.
27.2.2.1 Executing an External HDevelop Procedure
In this section, we explain how to load and execute an external HDevelop procedure with HDevEngine.
The code fragments in the following stem from the example application exec_extproc (source file
exec_extproc.cpp), which, like the example described in the previous section, checks the boundary
of a plastic part for fins. Figure 27.2 shows a screenshot of the application.
In contrast to the previous example, the result display is programmed explicitly in HALCON/C++ instead
of relying on the internal display operators. How to provide your own implementation of the internal
display operators is described in section 27.2.3 on page 221.
27.2.2.2
Step 1: Initialization
As when executing an HDevelop program, we include the main header files of HALCON/C++ and of
HDevEngine and the namespaces. In the main procedure, we temporarily create an instance of the
main HDevEngine class HDevEngine and directly set the external procedure path with the method
SetProcedurePath (code for constructing the path omitted):
#include "HalconCpp.h"
#include "HDevEngineCpp.h"
using namespace HalconCpp;
using namespace HDevEngineCpp;
int main(int argc, char *argv[])
{
char
*halcon_examples_env = getenv("HALCONEXAMPLES");
std::string
halcon_examples;
if (halcon_examples_env == NULL || strlen(halcon_examples_env) == 0)
{
halcon_examples = (std::string)getenv("HALCONROOT") + "/examples";
}
else
{
halcon_examples = (std::string)halcon_examples_env;
}
std::string ext_proc_path(halcon_examples);
...
HDevEngine().SetProcedurePath(ext_proc_path.c_str());
DetectFin();
return 0;
}
27.2.2.3
Step 2: Load Procedure
In the “action” routine, we load the external procedure with the constructor of the class
HDevProcedure, specifying the name of the procedure, and store the returned procedure call in
an instance of the class HDevProcedureCall. The call is encapsulated in a try...catch-block to
handle exceptions occurring in the constructor, e.g., because the file name or the procedure path was not
specified correctly. A detailed description of error handling can be found in section 27.2.4 on page 223.
void DetectFin()
{
try
{
HDevProcedure
proc("detect_fin");
HDevProcedureCall proc_call(proc);
Before executing the procedure, we open and initialize the graphics window in which the results are
to be displayed and load an example image sequence:
219
HDevEngine
27.2 How to Use HDevEngine/C++
220
HDevEngine in C++ Applications
const char* image_sequ_str = "fin";
HWindow win(00,100,384,288);
win.SetPart(0,0,575,767);
win.SetDraw("margin");
win.SetLineWidth(4);
HFramegrabber fg("File",1,1,0,0,0,0,"default",-1,"default",-1,"default",
image_sequ_str,"default",-1,-1);
27.2.2.4
Step 3: Set Input Parameters Of Procedure
Each image should now be processed by the procedure, which has the following signature, i.e., it expects
an image as (iconic) input parameter and returns the detected fin region and its area as iconic and control
output parameter, respectively:
procedure detect_fin (Image: FinRegion: : FinArea)
We pass the image as input object by storing it in the instance of HDevProcedureCall with the method
SetInputIconicParamObject. Which parameter to set is specified via its index (starting with 1); there
is also a method to specify it via its name (see section 30.1.5 on page 278):
for (long i=0; i<3; i++)
{
HImage image = fg.GrabImage();
proc_call.SetInputIconicParamObject(1,image);
As as alternative to passing parameters, you can also use global variables in HDevEngine (compare
the HDevelop User’s Guide, section 8.3.1 on page 341). You set the value of a global variable with the
methods SetGlobalIconicVarObject or SetGlobalCtrlVarTuple and query it with the methods
GetGlobalIconicVarObject and GetGlobalCtrlVarTuple.
27.2.2.5
Step 4: Execute Procedure
Now, we execute the procedure with the method Execute.
proc_call.Execute();
27.2.2.6
Step 5: Get Output Parameters Of Procedure
If the procedure was executed successfully, we can access its results, i.e., the fin region and its
area, with the methods GetOutputIconicParamObject and GetOutputCtrlParamTuple of the class
HDevProcedureCall; again, you can specify the parameter via its index or name (see section 30.1.5 on
page 278).
HRegion fin_region = proc_call.GetOutputIconicParamObject(1);
HTuple fin_area;
proc_call.GetOutputCtrlParamTuple(1,&fin_area);
27.2.2.7
Step 6: Display Results Of Procedure
Now, we display the results in the graphics window. Note how we access the area by selecting the first
element of the returned tuple:
char
fin_area_str[200];
sprintf(fin_area_str,"Fin Area: %ld",fin_area[0].L());
win.DispImage(image);
win.SetColor("red");
win.DispRegion(fin_region);
win.SetColor("white");
win.SetTposition(150,20);
win.WriteString(fin_area_str);
27.2.2.8
Executing Local and External HDevelop Procedures
The example application exec_procedures (source file exec_procedures.cpp) executes local and
external HDevelop procedures with HDevEngine. It mimics the behavior of the HDevelop program
described in section 27.2.1 on page 215. The display of results is partly programmed explicitly and
partly delegated to an HDevelop procedure, using the implementation of the internal display operators
described in section 27.2.3.
Local and external procedures are created and executed in exactly the same way. The only difference
is that in order to use a local procedure, you must load the program it is contained in, whereas to load
external procedures you must set the procedure path. HDevProcedure provides different constructors to
facilitate this task (see section 30.1.4 on page 276).
27.2.3
Display
In this section, we explain how to provide your own implementation of HDevelop’s internal display
operators. The files my_hdevoperatorimpl.h and my_hdevoperatorimpl.cpp contain an example
implementation, which is used in the applications exec_program (source file exec_program.cpp),
which was already discussed in section 27.2.1 on page 215, and exec_procedures (source file
exec_procedures.cpp).
In fact, HDevEngine does not provide an implementation of the internal display operators but provides
the class HDevOperatorImplCpp, which contains empty virtual methods for all those operators that you
can implement yourself. The methods are called like the object-oriented version of the operators, e.g.,
221
HDevEngine
27.2 How to Use HDevEngine/C++
222
HDevEngine in C++ Applications
DevDisplay for dev_display and have the same parameters (see section 30.1.6 on page 280 for the
definition of the class).
The first step towards the implementation is to derive a child of this class and to specify all methods that you want to implement.
The example file implements the operators dev_open_window,
dev_set_window_extents,
dev_set_part,
dev_set_window,
dev_get_window, dev_clear_window, dev_clear_window, dev_close_window, dev_display,
dev_set_draw,
dev_set_shape,
dev_set_color,
dev_set_colored,
dev_set_lut,
dev_set_paint, and dev_set_line_width:
class MyHDevOperatorImpl : public HDevEngineCpp::HDevOperatorImplCpp
{
public:
virtual int DevOpenWindow(const HalconCpp::HTuple& row,
const HalconCpp::HTuple& col,
const HalconCpp::HTuple& width,
const HalconCpp::HTuple& height,
const HalconCpp::HTuple& background,
HalconCpp::HTuple* win_id);
virtual int DevSetWindowExtents(const HalconCpp::HTuple& row,
const HalconCpp::HTuple& col,
const HalconCpp::HTuple& width,
const HalconCpp::HTuple& height);
virtual int DevSetPart(const HalconCpp::HTuple& row1,
const HalconCpp::HTuple& col1,
const HalconCpp::HTuple& row2,
const HalconCpp::HTuple& col2);
virtual int DevSetWindow(const HalconCpp::HTuple& win_id);
virtual int DevGetWindow(HalconCpp::HTuple* win_id);
virtual int DevClearWindow();
virtual int DevCloseWindow();
virtual int DevDisplay(const HalconCpp::HObject& obj);
virtual int DevSetDraw(const HalconCpp::HTuple& draw);
virtual int DevSetShape(const HalconCpp::HTuple& shape);
virtual int DevSetColor(const HalconCpp::HTuple& color);
virtual int DevSetColored(const HalconCpp::HTuple& colored);
virtual int DevSetLut(const HalconCpp::HTuple& lut);
virtual int DevSetPaint(const HalconCpp::HTuple& paint);
virtual int DevSetLineWidth(const HalconCpp::HTuple& width);
};
In addition to these methods, the class contains methods to handle multiple graphics windows. These
methods use a second class that manages all open windows. This class is thread-safe and reentrant but
not described in detail in this section.
Hlong
size_t
void
Hlong
Hlong
GetCurrentWindow() const;
GetCount()
const;
AddWindow(Hlong id);
PopWindow();
SetWindow(Hlong id);
class WinIdContainer
In the executed HDevelop program, two graphics windows are used, one for the main display and one
for zooming into the image (see figure 27.1 on page 215).
To use the implementation of HDevOperatorImplCpp, you include the header file:
#include "my_hdevoperatorimpl.h"
With the method SetHDevOperatorImpl, you pass an instance of your version of
HDevOperatorImplCpp to HDevEngine, which then calls its methods when the corresponding
operator is used in the HDevelop program or procedure.
my_engine.SetHDevOperatorImpl(new MyHDevOperatorImpl);
Now, we take a closer look at the implementation of the display operators in the example. It tries to
mimic the behavior in HDevelop: Multiple graphics windows can be open, with one being “active” or
“current”. The methods for the internal display operators simply call the corresponding non-internal
display operator: For example, a call to dev_display in the HDevelop program is “redirected” in
DevDisplay to disp_obj, with the iconic object to display and the handle of the active window as
parameters:
int MyHDevOperatorImpl::DevDisplay(const HObject& obj)
{
HCkDev(DispObj(obj,GetCurrentWindow()));
}
Similarly, dev_set_draw is redirected in DevSetDraw to set_draw:
int MyHDevOperatorImpl::DevSetDraw(const HTuple& draw)
{
HCkDev(SetDraw(GetCurrentWindow(),draw));
}
As you can see, these operators can be implemented quite easily. The implementation of the operators
for handling graphics windows is not described here; we recommend to use the example implementation
as it is because it provides all the necessary functionality for single- and multithreaded applications.
27.2.4
Error Handling
In this section, we take a closer look at exceptions in HDevEngine. The code fragments in the following stem from the example application error_handling (source file error_handling.cpp), which
223
HDevEngine
27.2 How to Use HDevEngine/C++
224
HDevEngine in C++ Applications
provokes different types of exceptions and “catches” them.
HDevEngine “throws” exceptions in form of the class HDevEngineException, which contains the type
(category) of the exception, a message describing the exception, and, depending on the exception type,
information like the name of the executed procedure or the HALCON error number (see section 30.1.7
on page 281 for the declaration of the class).
The example code for displaying information about exceptions in a graphics window is contained in the
files my_error_output.cpp and my_error_output.h. You can use it in your application by including
the header file:
#include "my_error_output.h"
The files provide two procedures. The simpler one displays only the error message and waits for a mouse
click to continue:
void DispMessage(const char* message)
{
HWindow win(100,100,ERR_WIN_WIDTH_SIMPLE,ERR_WIN_HEIGHT_SIMPLE,
NULL,"visible","");
win.SetPart(0,0,ERR_WIN_HEIGHT_SIMPLE-1,ERR_WIN_WIDTH_SIMPLE-1);
win.SetColor("yellow");
win.SetTposition(10,10);
WriteMessageNL(win,message);
// wait for mouse click to continue
win.SetColor("red");
win.SetTposition(ERR_WIN_HEIGHT_SIMPLE/2+10,ERR_WIN_WIDTH_SIMPLE/2);
win.WriteString("...click into window to continue");
win.Click();
}
The more complex one prints all available information for the exception (only relevant code shown):
void DispErrorMessage(const HDevEngineCpp::HDevEngineException& exception,
const char* context_msg/*=NULL*/)
{
char
text[2000];
HWindow win(100,100,ERR_WIN_WIDTH_COMPLEX,ERR_WIN_HEIGHT_COMPLEX,
NULL,"visible","");
WriteMessageNL(win,exception.Message());
sprintf(text,"
Error category: <%d : %s>",
exception.Category(),exception.CategoryText());
WriteMessageNL(win,text);
sprintf(text,"
Error number:
WriteMessageNL(win,text);
<%d>",exception.HalconErrNum());
sprintf(text,"
Procedure:
WriteMessageNL(win,text);
<%s>",exception.ExecProcedureName());
sprintf(text,"
Line:
<%d : %s>",
exception.ProgLineNum(),exception.ProgLineName());
WriteMessageNL(win,text);
}
This procedure is called when an exception occurs. The example provokes different errors and displays
the corresponding information; some of them are described in the following. Figure 27.3 displays an
exception that occurred because the application tried to load a non-existing HDevelop program (category
ExceptionFile).
try
{
program.LoadProgram(wrong_program_path.c_str());
}
catch (HDevEngineException &hdev_exception)
{
DispErrorMessage(hdev_exception,
"Error #1: Try to load a program that does not exist");
}
The same exception category occurs when a program is loaded whose external procedures are not found
(see figure 27.4).
The exception displayed in figure 27.5 occurs because an input iconic parameter is not initialized (category ExceptionInpNotInit). It contains very detailed information about where the error occurred and
why.
The exception displayed in figure 27.6 on page 227 is provoked by calling an operator with an invalid
parameter (category ExceptionCall):
With the method UserData (see section 30.1.7 on page 281), you can also access user exception data
225
HDevEngine
27.2 How to Use HDevEngine/C++
226
HDevEngine in C++ Applications
Figure 27.3: Content of the exception if an HDevelop program could not be found.
Figure 27.4: Content of the exception if external procedures of an HDevelop program could not be loaded.
that is thrown within an HDevelop program or procedure by the operator throw similarly to the operator
dev_get_exception_data.
Note that you can configure the behavior of HDevEngine when loading programs or procedures that
contain invalid lines or unresolved procedure calls with the method SetEngineAttribute (see section 30.1.1 on page 270).
Figure 27.5: Content of the exception if an input parameter was not initialized.
227
HDevEngine
27.2 How to Use HDevEngine/C++
Figure 27.6: Content of the exception if an error occurred in a HALCON operator call.
Figure 27.7: Example program with three threads performing image acquisition, data code reading, and
visualization in parallel.
27.2.5
Creating Multithreaded Applications
In the example mfc\exec_procedures_mt_mfc , three threads execute HDevelop procedures for image
acquisition, data code reading, and visualization in parallel. Please have a look at the example source
files (in the directory mfc\exec_procedures_mt_mfc\source\) to see how the threads synchronize
their input and output data.
The example exec_programs_mt (source file exec_programs_mt.cpp) shows how one or several
different HDevelop programs can be executed in different threads in parallel. Note that it is kept very
general and does not realize a specific application.
The HDevelop program(s) must be passed as command line arguments. Optionally, you can pass for
every program the number of threads and/or how often the program should be performed consecutively
within each thread. The command line parameters are explained when calling the executable without
parameters.
228
HDevEngine in C++ Applications
229
HDevEngine
HDevEngine in .NET Applications
Chapter 28
HDevEngine in .NET Applications
This chapter explains how to use HDevEngine in C# and Visual Basic .NET applications. Section 28.1
quickly summarizes some basic information about creating HDevEngine applications with Visual Studio
.NET and Visual Studio 2005. Section 28.2 then explains how to use HDevEngine/.NET based on
examples.
28.1
Basics
To use HDevEngine in Visual Studio .NET, you must
• add a reference to the HALCON/.NET assembly halcondotnet.dll, either by adding an instance
of HWindowControl to the form or by adding the reference directly via the Solution Explorer (also
see section 16.2.2 on page 126):
• add a reference to the HDevEngine/.NET assembly hdevenginedotnet.dll via the Solution
Explorer
• specify the namespace with the following line (also see section 16.2.3 on page 127):
using HalconDotNet;
HDevEngine XL applications: If you want to use HDevEngine/.NET XL, you must add the XL versions
of the HALCON/.NET and HDevEngine/.NET assembly instead.
A short reference of the C++ classes for the HDevEngine can be found in section 30.1 on page 269. The
.NET classes are very similar; their exact definition can be seen in the online help of Visual Studio (see
section 16.4.1 on page 129).
28.2
Examples
This section explains how to employ HDevEngine/.NET based on example applications for C# and
Visual Basic .NET, which reside in the subdirectories %HALCONEXAMPLES%\hdevengine\c# and
230
HDevEngine in .NET Applications
Figure 28.1: Executing an HDevelop program that detects fins on a boundary.
%HALCONEXAMPLES%\hdevengine\vb.net. In the following, we describe only the C# examples; the
Visual Basic .NET versions are identical except for the standard differences between the two languages.
Furthermore, in contrast to the C# versions, the Visual Basic .NET versions do not contain support for
Linux.
• executing an HDevelop program (section 28.2.1),
• executing HDevelop procedures (section 28.2.2 on page 232), and
• display operators (section 28.2.3 on page 238),
• error handling (section 28.2.4 on page 238), and
• multithreading (section 28.2.5 on page 241).
28.2.1
Executing an HDevelop Program
In this section, we explain how to load and execute an HDevelop program with HDevEngine. The code
fragments stem from the example application ExecProgram, which checks the boundary of a plastic part
for fins. Figure 28.1 shows a screenshot of the application; it contains two buttons to load and execute
the HDevelop program.
28.2.1.1
Step 1: Initialization
First, we create a global instance of the main HDevEngine class HDevEngine.
private HDevEngine MyEngine = new HDevEngine();
Upon loading the form, we store the path to the HDevelop program and set the external procedure path
with the method SetProcedurePath:
28.2 Examples
ProgramPathString;
private void ExecProgramForm_Load(object sender, System.EventArgs e)
{
string halconExamples;
string ProcedurePath;
try
{
halconExamples = Environment.GetEnvironmentVariable("HALCONEXAMPLES");
if (halconExamples == null)
throw new Exception();
}
catch (Exception)
{
halconExamples = Environment.GetEnvironmentVariable("HALCONROOT") + @"\examples";
}
ProgramPathString = halconExamples +
@"\hdevengine\hdevelop\fin_detection.hdev";
ProcedurePath = halconExamples + @"\hdevengine\procedures";
if (!HalconAPI.isWindows)
{
ProcedurePath = ProcedurePath.Replace('\\', '/');
ProgramPathString = ProgramPathString.Replace('\\', '/');
}
MyEngine.SetProcedurePath(ProcedurePath);
}
Note that the latter is only necessary if the HDevelop program calls external procedures.
28.2.1.2
Step 2: Load Program
When you click the button to load the HDevelop program, an instance of the class HDevProgram is
created, with the path of the program as parameter. Furthermore, an instance of HDevProgramCall
is created for later use. Exceptions occurring in the constructors, e.g., because the file name was not
specified correctly, are handled with the standard C# error handling mechanism:
private void LoadBtn_Click(object sender, System.EventArgs e)
{
try
{
HDevProgram Program = new HDevProgram(ProgramPathString);
ProgramCall = new HDevProgramCall(Program);
}
catch (HDevEngineException Ex)
{
MessageBox.Show(Ex.Message, "HDevEngine Exception");
return;
}
}
HDevEngine
String
231
232
HDevEngine in .NET Applications
More information on error handling can be found in section 28.2.4 on page 238.
28.2.1.3
Step 3: Execute Program
When you click the button to execute the program, the method Execute is called:
private void ExecuteBtn_Click(object sender, System.EventArgs e)
{
try
{
ProgramCall.Execute();
}
catch (HDevEngineException Ex)
{
MessageBox.Show(Ex.Message, "HDevEngine Exception");
return;
}
}
28.2.1.4
Step 4: Get Results
That’s all you need to do to execute an HDevelop program. You can also access its “results”, i.e., its
variables with the method GetCtrlVarTuple. In the example program, the area of the extracted fin is
queried and then displayed:
double FinArea;
FinArea = ProgramCall.GetCtrlVarTuple("FinArea");
Window.SetTposition(150, 20);
Window.WriteString("Fin Area: ");
Note that program variables can only be accessed when the program has terminated.
28.2.1.5
General: Display Results
How to display results while the program is running is described in section 28.2.3 on page 238.
28.2.2
Executing HDevelop Procedures
This section describes example applications that execute HDevelop procedures:
• a single external procedure (section 28.2.2.1) and
• multiple local and external procedures (section 28.2.2.8 on page 236).
233
HDevEngine
28.2 Examples
Figure 28.2: Executing an external HDevelop procedure that detects fins on a boundary.
28.2.2.1
Executing an External HDevelop Procedure
In this section, we explain how to load and execute an external HDevelop procedure with HDevEngine.
The code fragments in the following stem from the example application ExecExtProc, which, like the
example described in the previous section, checks the boundary of a plastic part for fins. Figure 28.2
shows a screenshot of the application; it contains two buttons to load and execute the HDevelop procedure.
In contrast to the previous example, the result display is programmed explicitly instead of relying on the
internal display operators.
28.2.2.2
Step 1: Initialization
As when executing an HDevelop program, we create a global instance of the main HDevEngine class
HDevEngine and set the external procedure path with the method SetProcedurePath upon loading the
form (code for constructing the path omitted):
private HDevEngine MyEngine = new HDevEngine();
private void ExecExtProcForm_Load(object sender, System.EventArgs e)
{
string ProcedurePath;
...
MyEngine.SetProcedurePath(ProcedurePath);
}
In contrast to the C++ version of this example application, we want to display the results not in a freefloating graphics window, but within the form, i.e, inside an instance of HWindowControl (also see
section 16.3 on page 128 and section 16.6 on page 140). For calling the HALCON operators, we declare
a global variable of the class HWindow for the underlying HALCON window; upon loading the form, we
set this variable to the HALCON window in the HWindowControl and initialize the window:
234
HDevEngine in .NET Applications
private HWindow Window;
private void WindowControl_HInitWindow(object sender, System.EventArgs e)
{
Window = WindowControl.HalconWindow;
Window.SetDraw("margin");
Window.SetLineWidth(4);
}
28.2.2.3
Step 2: Load Procedure
When you click the button Load, the HDevelop procedure is loaded with the constructor of the class
HDevProcedure, specifying the name of the procedure, and a corresponding procedure call is created
as an instance of the class HDevProcedureCall. Exceptions occurring in the constructors, e.g., because
the file name or the procedure path was not specified correctly, are handled with the standard C# error
handling mechanism. More information on error handling can be found in section 28.2.4 on page 238.
private void LoadBtn_Click(object sender, System.EventArgs e)
{
try
{
HDevProcedure Procedure = new HDevProcedure("detect_fin");
ProcCall = new HDevProcedureCall(Procedure);
}
catch (HDevEngineException Ex)
{
MessageBox.Show(Ex.Message, "HDevEngine Exception");
return;
}
}
Executing a procedure consists of multiple steps. First, we load an example image sequence:
private void ExecuteBtn_Click(object sender, System.EventArgs e)
{
HFramegrabber Framegrabber = new HFramegrabber();
Framegrabber.OpenFramegrabber("File", 1, 1, 0, 0, 0, 0, "default",
-1, "default", -1, "default", "fin.seq", "default", -1, -1);
28.2.2.4
Step 3: Set Input Parameters Of Procedure
Each image should now be processed by the procedure, which has the following signature, i.e., it expects
an image as (iconic) input parameter and returns the detected fin region and its area as iconic and control
output parameter, respectively:
28.2 Examples
235
We pass the image as an input object by storing it in the instance of HDevProcedureCall with the
method SetInputIconicParamObject. Which parameter to set is specified via its name (as an alternative, you can specify it via its index):
HImage Image = new HImage();
HRegion FinRegion;
HTuple FinArea;
for (int i=0; i<=2; i++)
{
Image.GrabImage(Framegrabber);
Image.DispObj(Window);
ProcCall.SetInputIconicParamObject("Image", Image);
As as alternative to passing parameters, you can also use global variables in HDevEngine (compare
the HDevelop User’s Guide, section 8.3.1 on page 341). You set the value of a global variable with the
methods SetGlobalIconicVarObject or SetGlobalCtrlVarTuple and query it with the methods
GetGlobalIconicVarObject and GetGlobalCtrlVarTuple.
28.2.2.5
Step 4: Execute Procedure
Now, we execute the procedure with the method Execute.
ProcCall.Execute();
28.2.2.6
Step 5: Get Output Parameters Of Procedure
If the procedure was executed successfully, we can access its results, i.e., the fin region and its
area, with the methods GetOutputIconicParamRegion and GetOutputCtrlParamTuple of the class
HDevProcedureCall; again, you can specify the parameter via its name or index. Note that you can
get iconic output objects either as instances of the corresponding class (here, HRegion) or as instance of
HObject by using GetOutputIconicParamObject.
FinRegion = ProcCall.GetOutputIconicParamRegion("FinRegion");
FinArea = ProcCall.GetOutputCtrlParamTuple("FinArea");
28.2.2.7
Step 6: Display Results Of Procedure
Finally, we display the results in the graphics window:
HDevEngine
procedure detect_fin (Image: FinRegion: : FinArea)
236
HDevEngine in .NET Applications
Figure 28.3: Screenshot of the application.
Image.DispObj(Window);
Window.SetColor("red");
Window.DispObj(FinRegion);
Window.SetColor("white");
Window.SetTposition(150, 20);
Window.WriteString("FinArea: " + FinArea.D);
}
28.2.2.8
Executing Local and External HDevelop Procedures
The example application ExecProcedures executes local and external HDevelop procedures with
HDevEngine. It mimics the behavior of the HDevelop program described in section 28.2.1 on page
230. The display of results is partly programmed explicitly and partly delegated to an HDevelop procedure, using the implementation of the internal display operators described in section 28.2.3 on page 238.
Figure 28.3 shows a screenshot of the application.
In the following, we briefly describe parts of the code.
Local and external procedures are created and executed in exactly the same way. The only difference
is that in order to use a local procedure, you must load the program it is contained in, whereas to load
external procedures you must set the procedure path. In the example, the image processing procedure is
local, the other external. Note that the code for constructing the program and procedure path is omitted.
private HDevProcedureCall InitAcqProcCall;
private HDevProcedureCall ProcessImageProcCall;
private HDevProcedureCall VisualizeDetailsProcCall;
private void ExecProceduresForm_Load(object sender, System.EventArgs e)
{
string ProcedurePath;
...
MyEngine.SetProcedurePath(ProcedurePath);
}
237
private void LoadBtn_Click(object sender, System.EventArgs e)
{
try
{
HDevProgram Program = new HDevProgram(ProgramPathString);
HDevProcedure InitAcqProc = new HDevProcedure(Program, "init_acquisition");
HDevProcedure ProcessImageProc = new HDevProcedure(Program, "detect_fin");
HDevProcedure VisualizeDetailsProc = new HDevProcedure(Program, "display_zoomed_region");
InitAcqProcCall = new HDevProcedureCall(InitAcqProc);
ProcessImageProcCall = new HDevProcedureCall(ProcessImageProc);
VisualizeDetailsProcCall = new HDevProcedureCall(VisualizeDetailsProc);
...
}
One of the procedures opens the image acquisition device. It returns the corresponding handle, which
we store in an instance of the class HFramegrabber.
HFramegrabber Framegrabber;
private void InitAcqBtn_Click(object sender, System.EventArgs e)
{
InitAcqProcCall.Execute();
Framegrabber = new HFramegrabber(InitAcqProcCall.GetOutputCtrlParamTuple("AcqHandle"));
...
}
In the example application, the device is closed when the application terminates and calls the finalizer
of the class HFramegrabber, which in turn calls the operator CloseFramegrabber. If you use an
HDevelop procedure for closing the connection to the device, you would invalidate the handle so that the
finalizer raises an exception.
As in the previous example, the results of image processing (button Process Image) are displayed
“manually” by calling HALCON/.NET operators. In contrast, when you click the button Visualize
Details, an HDevelop procedure is executed that zooms onto the extracted fin. For this, we pass an
implementation of HDevelop’s internal display operators (see section 28.2.3 for more information about
the implementation classes) and remove it again after the procedure has been executed.
private void VisualizeDetailsBtn_Click(object sender, System.EventArgs e)
{
MyEngine.SetHDevOperators(MyHDevOperatorImpl);
VisualizeDetailsProcCall.SetInputIconicParamObject("Image", Image);
VisualizeDetailsProcCall.SetInputIconicParamObject("Region", FinRegion);
VisualizeDetailsProcCall.SetInputCtrlParamTuple("ZoomScale", 2);
VisualizeDetailsProcCall.SetInputCtrlParamTuple("Margin", 5);
VisualizeDetailsProcCall.Execute();
MyEngine.SetHDevOperators(null);
}
HDevEngine
28.2 Examples
238
HDevEngine in .NET Applications
The instance of the implementation class is initialized with the HALCON window of the form.
private HDevOpMultiWindowImpl MyHDevOperatorImpl;
private void WindowControl_HInitWindow(object sender, System.EventArgs e)
{
Window = WindowControl.HalconWindow;
...
MyHDevOperatorImpl = new HDevOpMultiWindowImpl(Window);
}
28.2.3
Display
In contrast to the C++ (and COM) version of HDevEngine, HDevEngine/.NET already provides convenience implementations of HDevelop’s internal display operators in form of two classes:
• HDevOpFixedWindowImpl directs all display operators to a single graphics window (passed in the
constructor), even if the HDevelop program or procedure uses multiple windows.
• HDevOpMultiWindowImpl can handle multiple graphics windows. You can pass an arbitrary number of graphics windows in the constructor; if the HDevelop program or procedure uses more than
them, HDevEngine opens additional free-floating windows.
!
Please note that these classes must not be used in multithreaded applications because they are not
reentrant. If you need a reentrant version, please discuss your application requirements with your local
distributor.
The example program ExecProgram uses HDevOpMultiWindowImpl.
To use this class (or
HDevOpFixedWindowImpl), you pass an instance of it to HDevEngine with the method :
private void WindowControl_HInitWindow(object sender, System.EventArgs e)
{
Window = WindowControl.HalconWindow;
MyEngine.SetHDevOperators(new HDevOpMultiWindowImpl(Window));
}
If your application has special display requirements that are not satisfied by the two classes, you can
provide your own implementation of the display operators similar to the C++ version of HDevelop (see
section 27.2.3 on page 221) by creating a class implementing the interface IHDevOperators and overloading its methods DevOpenWindow, DevDisplay, etc.
Please note that currently you cannot use any form of display operator implementation with Mono (see
section 17.3.1 on page 150).
28.2.4
Error Handling
In this section, we take a closer look at exceptions in HDevEngine. The code fragments in the following
stem from the example application ErrorHandling, which provokes and catches different types of
exceptions when you press some buttons. Figure 28.4 shows a screenshot of the application.
Figure 28.4: Provoking exceptions in HDevEngine .
HDevEngine throws exceptions as instances of the class HDevEngineException, which contains the
type (category) of the exception, a message describing the exception, and, depending on the exception
type, information like the name of the executed procedure or the HALCON error number (also see
section 30.1.7 on page 281).
In the example application, the following procedure displays all the information contained in
HDevEngineException in a message box:
private void DisplayException(HDevEngineException Ex)
{
string FullMessage = "Message: <" + Ex.Message + ">" +
", Error in program / procedure: <" + Ex.ProcedureName + ">" +
", program line: <" + Ex.LineText + ">" +
", line number: <" + Ex.LineNumber + ">" +
", HALCON Error Number: <" + Ex.HalconError + ">";
string Title = "HDevEngine Exception (Category: " +
Ex.Category.ToString() + ")";
MessageBox.Show(FullMessage, Title);
}
This procedure is called when an exception occurs; note that the example applications described in the
previous sections only display the exception message.
try
{
HDevProgram Program = new HDevProgram(ProgramPathString);
ProgramCall = new HDevProgramCall(Program);
}
catch (HDevEngineException Ex)
{
DisplayException(Ex);
return;
}
Figure 28.5 displays an exception that occurred because the application tried to load a non-existing
HDevelop program (category ExceptionFile). As you can see, only the message contains useful information in this case.
The next exception occurs when executing a procedure in which an input parameter is not initialized
(category ExceptionInpNotInit):
239
HDevEngine
28.2 Examples
240
HDevEngine in .NET Applications
Figure 28.5: Content of the exception if an HDevelop program could not be loaded.
procedure detect_fin_with_error_inpnotinit (Image: FinRegion: : FinArea)
bin_threshold (NotExistingImage, Dark)
...
Figure 28.6 displays the content of the exception, which now contains very detailed information about
where the error occurred and why.
Figure 28.6: Content of the exception if an input parameter was not initialized.
The final exception is provoked by executing a procedure in which the call to the operator
closing_circle fails because the third parameter is not valid (category ExceptionCall):
procedure detect_fin_with_error_call (Image: FinRegion: : FinArea)
bin_threshold (Image, Dark)
difference (Image, Dark, Background)
dev_set_color ('blue')
dev_display (Background)
closing_circle (Background, ClosedBackground, -1)
...
Figure 28.7 shows the content of the exception.
Figure 28.7: Content of the exception if an error occurred in a HALCON operator call.
With the method UserData (see section 30.1.7 on page 281), you can also access user exception data
that is thrown within an HDevelop program or procedure by the operator throw similarly to the operator
dev_get_exception_data.
Note that you can configure the behavior of HDevEngine when loading programs or procedures that
contain invalid lines or unresolved procedure calls with the method SetEngineAttribute (see section 30.1.1 on page 270).
28.2.5
Creating Multithreaded Applications
HALCON provides two C# example applications that use multithreading with HDevEngine/.NET:
• In MultiThreading, the application is sped up by executing the same HDevelop procedure in
parallel by two threads.
• In contrast, in MultiThreadingTwoWindows different procedures are executed in parallel.
The first one is described in detail in section 28.2.5.1. The second one is very similar, thus, in section 28.2.5.2 on page 249 only the differences are described.
In the following, we briefly list the most important rules to observe when creating multithreaded HDevEngine applications. Please also have a look at the general information about parallel programming using
HALCON in section 2.2 on page 19, in particular the style guide in section 2.2.2 on page 20!
• When multiple threads execute HDevelop programs in parallel, each thread must create its own
instance of the corresponding HDevProgramCall.
• External procedure path and the implementation of HDevelop’s display operators are always
set globally for all instances of HDevEngine. We recommend to set them via a separate HDevEngine instance to keep the code more readable.
• Because the implementation of HDevelop’s display operators can only be set globally, it must be thread-safe and reentrant. The classes HDevOpFixedWindowImpl and
HDevOpMultiWindowImpl described in section 27.2.3 on page 221 do not fulfill this condition.
For a reentrant version please discuss your application requirements with your local distributor.
28.2.5.1
Executing a Procedure in Parallel by Multiple Threads
The example application MultiThreading presented in this section exploits multi-core or multiprocessor systems by executing the same HDevelop procedure (task) in parallel by two threads. The
procedure finds bottle caps using shape-based matching.
Figure 28.8 shows an overview of the structure of the application. It consists of four threads: The main
thread (i.e., the form) is in charge of the graphical user interface (GUI), which is depicted in figure 28.9.
It consists of a HALCON window for the display of results and buttons to initialize, start, and stop the
application.
The main thread also initializes the application by training the shape model via an HDevelop procedure
and by creating and initializing the other three threads: two processing threads and the so-called control
thread, whichs controls the two processing threads.
241
HDevEngine
28.2 Examples
242
HDevEngine in .NET Applications
Main Thread
(MultiThreadingForm)
GUI (buttons, HALCON window)
initialize application
Control Thread
Processing Thread
(ControlThread)
(EngineThread)
acquire images
pass image to processing thread
process image
pass results
collect results
delegate result display
display results
Figure 28.8: Tasks of the threads.
Figure 28.9: Screenshot of the application.
The control thread acquires the images and passes them to the processing threads, which then process
the images and pass back the results. The control thread collects the results, but does not display them
itself, because all activities in the HALCON window must be performed by the thread that created it,
i.e., the main thread.
Now, we take a closer look at the corresponding code. Please note that we do not show all details; in
particular, error handling, and termination including memory management are left out.
28.2 Examples
243
The application is initialized in the event handler of the Init button (file: MultiThreadingForm.cs).
private void InitButton_Click(object sender, System.EventArgs e)
Step 1:
Switch off automatic operator parallelization
HOperatorSet.SetSystem("parallelize_operators", "false");
First, the automatic operator parallelization is switched off, otherwise the two mechanisms (multithreading and operator parallelization) would use more than the available number of cores / processors and thus
slow down the application instead of speeding it up (see the style guide in section 2.2.2 on page 20). If
you have a system with more than two cores or processors, you can consider to allocate some of them to
the automatic operator parallelization as described in section 2.3.1 on page 22.
Step 2:
Set external procedure path
Then, we create an instance of HDevEngine and set the path for searching the HDevelop procedures
(code for constructing the path omitted).
HDevEngine
MyEngine = new HDevEngine();
string halconExamples, ProcedurePath;
...
MyEngine.SetProcedurePath(ProcedurePath);
Step 3:
Train the shape model
To initialize the image processing part, we execute an HDevelop procedure that trains the shape model
of the caps.
HDevProcedureCall
ProcTrain;
HDevProcedure Procedure = new HDevProcedure("train_shape_model");
ProcTrain = new HDevProcedureCall(Procedure);
ProcTrain.Execute();
Step 4:
Store the model data
The procedure returns the handle of the shape model and the model contours. We store both in variables
of the form so that the processing threads can access them.
public HTuple
public HXLD
ModelID;
ModelContours;
ModelID = ProcTrain.GetOutputCtrlParamTuple("ModelID");
ModelContours = ProcTrain.GetOutputIconicParamXld("ModelContours");
HDevEngine
Initialization
244
HDevEngine in .NET Applications
Step 5:
Create and initialize the processing engines
The actual image processing is encapsulated in the class EngineThread (file: EngineThread.cs).
The main members of this class are a thread and instances of HDevEngine and HDevProcedureCall.
Besides, an EngineThread contains variables for accessing the shape model data trained in the main
thread and an event that signals that the “engine” is ready for the next image.
public class EngineThread
{
Thread
WorkerObject = null;
HDevProcedureCall
ProcCall;
HTuple
ModelID;
HXLD
ModelContours;
public AutoResetEvent EngineIsReady;
public EngineThread(MultiThreadingForm mainForm)
{
ModelID = mainForm.ModelID;
ModelContours = mainForm.ModelContours;
EngineIsReady
= new AutoResetEvent(true);
}
The main thread creates and initializes two instances of this class and also stores their events (file:
MultiThreadingForm.cs).
EngineThread WorkerEngine1;
EngineThread WorkerEngine2;
AutoResetEvent
AutoResetEvent
// processing thread
// processing thread
Engine1Ready;
Engine2Ready;
WorkerEngine1 = new EngineThread(this);
WorkerEngine1.Init();
Engine1Ready = WorkerEngine1.EngineIsReady;
WorkerEngine2 = new EngineThread(this);
WorkerEngine2.Init();
Engine2Ready = WorkerEngine2.EngineIsReady;
An EngineThread initializes itself by creating the procedure call for detecting the caps in the images.
Because the input parameters of the procedure that concern the shape model are the same for each call,
they can be set once in advance (file: EngineThread.cs).
public void Init()
{
HDevProcedure Procedure = new HDevProcedure("detect_shape");
ProcCall = new HDevProcedureCall(Procedure);
ProcCall.SetInputCtrlParamTuple("ModelID", ModelID);
ProcCall.SetInputIconicParamObject("ModelContours", ModelContours);
}
28.2 Examples
Initialize image acquisition
Finally, we initialize the image acquisition. The handle is stored in a variable of the form, so that the
control thread can access it (file: MultiThreadingForm.cs).
private HFramegrabber
AcqHandle;
string ImagePath = halconExamples + "/images/cap_illumination";
AcqHandle = new HFramegrabber("File", 1, 1, 0, 0, 0, 0, "default", -1,
"default", -1, "default", ImagePath, "default", -1, -1);
Image Processing
When you click the Run button, the application starts to process images in a loop.
Step 1:
Starting the processing threads and the control thread
First, the main thread starts the processing engines (file: MultiThreadingForm.cs).
private void RunButton_Click(object sender, System.EventArgs e)
{
WorkerEngine1.Run();
WorkerEngine2.Run();
The corresponding method creates and starts their thread and sets the “ready” signal (file:
EngineThread.cs).
public void Run()
{
EngineIsReady.Set();
WorkerObject = new Thread(new ThreadStart(Process));
WorkerObject.Start();
}
Then, the main thread starts the control thread (file: MultiThreadingForm.cs):
ControlThread = new Thread(new ThreadStart(Run));
ControlThread.Start();
Step 2:
Triggering the processing threads from the control thread
The control thread’s action is contained in the method Run (file: MultiThreadingForm.cs). As long
as the Stop is not pressed (please take a look at the project’s code for more information), it waits until
one of the processing engine is ready.
HDevEngine
Step 6:
245
246
HDevEngine in .NET Applications
EngineThread
WorkerEngine;
// variable to switch between processing threads
public void Run()
{
HImage Image;
while (!StopEventHandle.WaitOne(0, true))
{
if (Engine1Ready.WaitOne(0, true))
WorkerEngine = WorkerEngine1;
else if (Engine2Ready.WaitOne(0, true))
WorkerEngine = WorkerEngine2;
else
continue;
Image = AcqHandle.GrabImageAsync(-1);
WorkerEngine.SetImage(Image);
Then, it acquires the next image and passes it to the engine, which stores it in a member variable (file:
EngineThread.cs).
private HImage
InputImage = null;
public void SetImage(HImage Img)
{
InputImage = Img;
}
Step 3:
Processing the image
In their action method (Process), the processing threads wait for the image to be set (file:
EngineThread.cs). The actual image processing is performed by the HDevelop procedure, passing
the image as input parameter.
public void Process()
{
while (!DelegatedStopEvent.WaitOne(0, true))
{
if (InputImage == null)
continue;
ProcCall.SetInputIconicParamObject("Image", InputImage);
ProcCall.Execute();
28.2 Examples
Passing the results to the control thread
To pass the results, a class is defined that stores the relevant data: the processed image and the position,
orientation, and the contours of the found cap.
public class ResultContainer
{
public HImage InputImage;
public HXLD
FoundContours;
public double Row;
public double Column;
public double Angle;
}
After executing the procedure, the processing thread accesses its results and stores them in a new instance
of the result class (“result container”), together with the processed image.
ResultContainer Result;
HTuple
ResultTuple;
Result = new ResultContainer();
Result.InputImage = InputImage;
Result.FoundContours = ProcCall.GetOutputIconicParamXld("ResultObject");
ResultTuple = ProcCall.GetOutputCtrlParamTuple("ResultData");
Result.Row = ResultTuple[0];
Result.Column = ResultTuple[1];
Result.Angle = ResultTuple[2];
The processing thread then passes the result container to the control thread by appending it to a list.
ResultMutex.WaitOne();
ResultList.Add(Result);
ResultMutex.ReleaseMutex();
This list is a member variable of the main thread (file: MultiThreadingForm.cs). It is protected by a
mutex so that the threads can access it safely.
public ArrayList
public Mutex
ResultList;
ResultDataMutex;
public MultiThreadingForm()
{
ResultDataMutex
= new Mutex();
ResultList = new ArrayList();
}
The processing threads store references to the list and to the mutex in own member variables (file:
EngineThread.cs).
HDevEngine
Step 4:
247
248
HDevEngine in .NET Applications
ArrayList
Mutex
ResultList;
ResultMutex;
public EngineThread(MultiThreadingForm mainForm)
{
ResultList
= mainForm.ResultList;
ResultMutex
= mainForm.ResultDataMutex;
}
Step 5:
“Ready again”
Finally, the processing thread signals that it is ready for the next image by setting the corresponding
event and by setting the input image to null.
InputImage = null;
this.EngineIsReady.Set();
Result Display
Step 1:
Checking whether new results are available
Let’s return to the action method (Run) of the control thread (file: MultiThreadingForm.cs). After
triggering a processing thread by passing the image to process, it checks whether the result list contains
new items.
int
Count = -1;
ResultDataMutex.WaitOne();
Count = ResultList.Count;
ResultDataMutex.ReleaseMutex();
Step 2:
Delegating the display
As described in the style guide for parallel programming in section 2.2.2 on page 20, display activities in
a HALCON window should only be performed by the thread that creates the window, which is typically
the main thread, i.e., the form. Therefore, the control thread does not perform the display of results itself
but delegates it to the main thread (running the form) with the method Invoke.
for( ;Count > 0;Count--)
Invoke(DelegatedDisplay);
The necessary members are defined by the form.
delegate void
FuncDelegate
FuncDelegate();
DelegatedDisplay;
public MultiThreadingForm()
{
DelegatedDisplay = new FuncDelegate(DisplayResults);
}
28.2 Examples
Displaying the results
The actual display is performed by the method DisplayResults. Each time it is called, it removes an
item from the result list and displays the processed image with the contours of the found cap. Then, it
frees the corresponding HALCON-internal memory.
public void DisplayResults()
{
ResultDataMutex.WaitOne();
Result = (ResultContainer) ResultList[0];
ResultList.Remove(Result);
ResultDataMutex.ReleaseMutex();
Window.ClearWindow();
Window.DispImage(Result.InputImage);
Window.DispObj(Result.FoundContours);
Result.InputImage.Dispose();
Result.FoundContours.Dispose();
}
28.2.5.2
Executing Multiple Procedures in Parallel by Multiple Threads
In contrast to the previous section, the example application MultiThreadingTwoWindows presented
here executes different HDevelop procedures (tasks) in parallel by two threads. One task is to find bottle
caps using shape-based matching, the other to read ECC 200 data codes.
Figure 28.10 shows an overview of the structure of the application. Like the application described in the
previous section, it consists of four threads: The main thread (i.e., the form) is in charge of the graphical
user interface (GUI), which is depicted in figure 28.9 on page 242. It consists of a HALCON window
for the display of results and buttons to initialize, start, and stop the application.
The main thread also initializes the application by creating and initializing the other three threads: two
processing threads and the so-called control thread, whichs controls the two processing threads. In
contrast to the previous application, here the processing threads initialize the image processing tasks by
training the shape model and the data code model, respectively, via HDevelop procedures.
The control thread acquires the images and passes them to the processing threads, which then process
the image and pass back the results. The control thread collects the results, but does not display them
itself, because all activities in the HALCON window must be performed by the thread that created it,
i.e., the main thread. In contrast to the previous application the results of the two tasks are displayed in
two separate windows.
Below, we take a closer look at the corresponding code, restricting ourselves, however, to the parts that
are diferent to the previous application.
HDevEngine
Step 3:
249
250
HDevEngine in .NET Applications
Main Thread
Processing Thread
(MultiThreadingTwoWindowsForm)
Control Thread
GUI (buttons, HALCON window)
initialize application
(ControlThread)
(EngineThread)
initialize task
acquire images
pass image to processing thread
process image
pass results
collect results
delegate result display
display results
Figure 28.10: Tasks of the threads.
Figure 28.11: Screenshot of the application.
28.2 Examples
251
As in the previous example, the application is initialized in the event handler of the Init button (file:
MultiThreadingTwoWindowsForm.cs).
Step 1:
Create and initialize the processing engines
The processing engines are created and initialized similarly to the previous example, with some exceptions: First, the shape and the data code model are now trained by the processing threads instead of
the control thread (see the step below). Secondly, the processing engines now also have a variable that
indicates “their” HALCON window (file: EngineThread.cs).
public class EngineThread
{
...
public int
...
The
control
thread
sets
this
MultiThreadingTwoWindowsForm.cs).
WindowIndex = -1;
variable
after
creating
the
engines
(file:
private void InitButton_Click(object sender, System.EventArgs e)
{
...
WorkerEngine1.WindowIndex = 1;
...
WorkerEngine2.WindowIndex = 2;
Step 2:
Train the shape and data code model
The training of the shape and data code model is now performed by the initialization method of the
processing threads, which now has a parameter that specifies the task of the processing thread (file:
MultiThreadingTwoWindowsForm.cs).
WorkerEngine1.Init("shape");
...
WorkerEngine2.Init("datacode");
The HDevelop procedures for training the models and for performing the image processing have similar
names for the two tasks, so that their names can be generated automatically (file: EngineThread.cs).
The task name itself is stored in a variable of the class EngineThread.
HDevEngine
Initialization
252
HDevEngine in .NET Applications
public class EngineThread
{
HDevProcedureCall
string
HTuple
HXLD
...
ProcCall;
Task;
ModelID;
ModelContours;
public void Init(string Task)
{
string
TrainMethod = "train_" + Task + "_model";
string
ProcessingMethod = "detect_" + Task;
HDevProcedureCall ProcTrain;
this.Task = Task;
Then, the model of the shape or datacode, respectively, is trained by executing the corresponding HDevelop procedure and the returned model data is stored in variables of the class.
HDevProcedure Procedure = new HDevProcedure(TrainMethod);
ProcTrain = new HDevProcedureCall(Procedure);
ProcTrain.Execute();
ModelID = ProcTrain.GetOutputCtrlParamTuple("ModelID");
if (Task.Equals("shape"))
{
ModelContours = ProcTrain.GetOutputIconicParamXld("ModelContours");
}
Step 3:
Store the model data
Finally, those input parameters of the image processing procedure that are the same for each call are set
(file: EngineThread.cs).
HDevProcedure Procedure = new HDevProcedure(ProcessingMethod);
ProcCall = new HDevProcedureCall(Procedure);
ProcCall.SetInputCtrlParamTuple("ModelID", ModelID);
if (Task.Equals("shape"))
{
ProcCall.SetInputIconicParamObject("ModelContours", ModelContours);
}
Step 4:
Initialize image acquisition
The two image processing tasks are performed in different images, therefore, two image acquisition
devices are opened by the main thread (file: MultiThreadingTwoWindowsForm.cs, code not shown).
28.2 Examples
253
Step 1:
Triggering the processing threads
The
control
thread’s
action
is
contained
in
the
method
Run
(file:
MultiThreadingTwoWindowsForm.cs). As long as the Stop is not pressed, it checks whether
the processing engines are ready and, if this is the case, acquires and passes images..
public void Run()
{
HImage Image;
while (!StopEventHandle.WaitOne(0,true))
{
if (Engine1Ready.WaitOne(0,true))
{
Image = AcqHandle1.GrabImageAsync(-1);
WorkerEngine1.SetImage(Image);
}
if (Engine2Ready.WaitOne(0,true))
{
Image = AcqHandle2.GrabImageAsync(-1);
WorkerEngine2.SetImage(Image);
}
Step 2:
Passing the results to the control thread
The class storing the result data differs significantly from the one in the previous example: It now also
contains a variable that indicates the window in which to display the results and a flag that shows whether
the processing was successful. Because the processing results differ between the two tasks, they are
encapsulated in a tuple (file: EngineThread.cs).
public class ResultContainer
{
public int
WindowIndex;
// 1 -> shape, 2 -> datacode
public HImage InputImage;
public HXLD
FoundContours;
public HTuple ResultData;
public bool
DetectionSuccessful;
}
After executing the procedure, the processing thread accesses its results and stores them in a new instance
of the result container, together with the processed image and the window index.
HDevEngine
Image Processing
254
HDevEngine in .NET Applications
public void Process()
{
ResultContainer Result;
Result = new ResultContainer();
...
Result.InputImage
= InputImage;
DetectionSuccessful = ProcCall.GetOutputCtrlParamTuple("DetectionSuccessful").S;
if (DetectionSuccessful.Equals("true"))
{
Result.DetectionSuccessful = true;
Result.FoundContours = ProcCall.GetOutputIconicParamXld("ResultObject");
Result.ResultData
= ProcCall.GetOutputCtrlParamTuple("ResultData");
}
else
{
Result.DetectionSuccessful = false;
}
Result.WindowIndex = WindowIndex;
Result Display
As in the previous example, the display of results is performed by the main thread in the method
ResultDisplay (file: MultiThreadingTwoWindowsForm.cs). The main difference is that the display now is switched between the two HALCON windows, based on the variable in the result container.
public void DisplayResults()
{
HWindow Window;
if (Result.WindowIndex == 1)
{
Window = Window1;
}
else
{
Window = Window2;
}
Furthermore, the display method now checks the success of the image processing to avoid accessing
non-existing result elements. For both tasks, the resulting contours, i.e., the found shape or data code
region, respectively, are displayed. For the data code task, also the read code is displayed.
Window.ClearWindow();
Window.DispImage(Result.InputImage);
if (Result.DetectionSuccessful)
{
Window.DispObj(Result.FoundContours);
// additional display for data code result: code
if (Result.WindowIndex == 2)
{
Row = (int) Result.ResultData[0].D;
Col = (int) Result.ResultData[1].D;
Window.SetTposition(Row,Col);
Window.WriteString((string) Result.ResultData[2].S);
}
}
else
{
Window.SetColor("red");
Window.SetTposition(20, 20);
Window.WriteString("Detection failed!");
Window.SetColor("green");
}
255
HDevEngine
28.2 Examples
256
HDevEngine in .NET Applications
257
HDevEngine
HDevEngine in COM Applications
Chapter 29
HDevEngine in COM Applications
This chapter explains how to use HDevEngine in Visual Basic applications. Section 29.1 quickly summarizes some basic information about creating HDevEngine applications with Visual Basic 6.0. Section 29.2 then explains how to use HDevEngine by presenting example applications for
• executing an HDevelop program (section 29.2.1),
• executing an (external) HDevelop procedure (section 29.2.2 on page 259),
• implementing display operators (section 29.2.3 on page 263), and
• error handling (section 29.2.4 on page 267).
29.1
Basics
To use HDevEngine in Visual Basic 6.0, you must add the Halcon/COM library to your project via
the menu item Project . Components (see also section 20.1 on page 173) and furthermore add the
HDevEngine/COM library to the project’s references via the menu item Project . References.
HDevEngine XL applications: If you want to use HDevEngine XL, you must register the corresponding
DLL hdevenginexxl.dll as described in section 20.4 on page 178 for the COM interface of HALCON
XL itself.
A short reference of the COM classes for the HDevEngine can be found in section 30.1 on page 269.
29.2
Examples
This section explains how to employ the COM HDevEngine based on example applications for Visual
Basic 6.0, which reside in the subdirectories %HALCONEXAMPLES%\hdevengine\vb6
258
HDevEngine in COM Applications
Figure 29.1: Executing an HDevelop program that detects fins on a boundary.
29.2.1
Executing an HDevelop Program
In this section, we explain how to load and execute an HDevelop program with HDevEngine. The code
fragments stem from the example application ExecProgram, which checks the boundary of a plastic part
for fins. Figure 29.1 shows a screenshot of the application; it contains two buttons to load and execute
the HDevelop program.
First, we create a global instance of the main HDevEngine class HDevEngineX.
Dim MyEngine As HDevEngineX
Upon loading the form, we store the path to the HDevelop program and the external procedure path in
string variables :
Dim ProgramPathString As String
Dim ProcPathString As String
Private Sub Form_Load()
Dim HalconExamples As String
HalconExamples = Environ("HALCONEXAMPLES")
If (HalconExamples = "") Then
HalconExamples = Environ("HALCONROOT") & "\examples"
End If
ProgramPathString = HalconExamples & "\hdevengine\hdevelop\fin_detection.hdev"
ProcPathString = HalconExamples & "\hdevengine\procedures"
If the HDevelop program calls external procedures, you must set the external procedure path with the
method SetProcedurePath:
Call MyEngine.SetProcedurePath(ProcPathString)
When you click the button to load the HDevelop program, the method LoadProgram is called. Exceptions occurring in the HDevEngine method, e.g., because the file name was not specified correctly, are
handled with the standard Visual Basic error handling mechanism. More information on error handling
can be found in section 29.2.4 on page 267.
Private Sub LoadBtn_Click()
On Error GoTo errHandler
Set MyProgram = New HDevProgramX
Call MyProgram.LoadProgram(ProgramPathString)
Exit Sub
errHandler:
Call MsgBox(Err.Description)
End Sub
When you click the button to execute the program, the method Execute is called:
Private Sub ExecuteBtn_Click()
On Error GoTo errHandler
execute program
Dim ProgramCall As HDevProgramCallX
Set ProgramCall = MyProgram.CreateCall()
Call ProgramCall.Execute
'
Exit Sub
errHandler:
Call MsgBox(Err.Description)
End Sub
That’s all you need to do to execute an HDevelop program. How to display the results is described in
section 29.2.3 on page 263.
29.2.2
Executing an External HDevelop Procedure
In this section, we explain how to load and execute an external HDevelop procedure with HDevEngine.
The code fragments in the following stem from the example application ExecExtProc, which, like the
example described in the previous section, checks the boundary of a plastic part for fins. Figure 29.2
shows a screenshot of the application; it contains two buttons to load and execute the HDevelop procedure.
In contrast to the previous example, the result display is programmed explicitly instead of relying on the
internal display operators. How to provide your own implementation of the internal display operators is
described in section 29.2.3 on page 263.
259
HDevEngine
29.2 Examples
260
HDevEngine in COM Applications
Figure 29.2: Executing an external HDevelop procedure that detects fins on a boundary.
As when executing an HDevelop program, we create a global instance of the main HDevEngine class
HDevEngineX and set the external procedure path with the method SetProcedurePath upon loading
the form (code for constructing the path omitted):
Dim ProcPathString As String
Dim MyEngine As HDevEngineX
Private Sub Form_Load()
...
Call MyEngine.SetProcedurePath(ProcPathString)
End Sub
In contrast to the C++ version of this example application, we want to display the results not in a freefloating graphics, but within the form, i.e, inside an instance of HWindowXCtrl (see section 19.1.2.1 on
page 165). For calling the HALCON operators, we declare a global variable of the class HWindowX for
the underlying HALCON window; upon loading the form, we set this variable to the HALCON window
in the HWindowXCtrl and initialize the window:
Dim Window As HWindowX
Private Sub Form_Load()
Set Window = HXCtrl.HalconWindow
Call Window.SetPart(0, 0, 575, 767)
Call Window.SetDraw("margin")
Call Window.SetLineWidth(4)
End Sub
When you click the button Load, the HDevelop procedure is loaded with the constructor of the class
HDevProcedureX, specifying the name of the procedure. Exceptions occurring in the HDevEngine
method, e.g., because the file name or the procedure path was not specified correctly, are handled with
the standard Visual Basic error handling mechanism. More information on error handling can be found
in section 29.2.4 on page 267.
Dim ProcName As String
Private Sub LoadBtn_Click()
On Error GoTo errHandler
Set MyProcedure = New HDevProcedureX
Call MyProcedure.LoadProcedureExtern("detect_fin")
Exit Sub
errHandler:
Call MsgBox(Err.Description)
End Sub
Executing a procedure consists of multiple steps. First, we create an instance of the class
HDevProcedureCallX and attach it to the loaded procedure:
Private Sub ExecuteBtn_Click()
Dim ProcCall As HDevProcedureCallX
Set ProcCall = MyProcedure.CreateCall()
Before executing it, we load an example image sequence:
Dim FGHandle As HFramegrabberX
Set FGHandle = New HFramegrabberX
Call FGHandle.OpenFramegrabber("File", 1, 1, 0, 0, 0, 0, "default", -1, _
"default", -1, "default", "fin.seq", _
"default", -1, -1)
Each image should now be processed by the procedure, which has the following signature, i.e., it expects
an image as (iconic) input parameter and returns the detected fin region and its area as iconic and control
output parameter, respectively:
procedure detect_fin (Image: FinRegion: : FinArea)
We pass the image as an input object by storing it in the instance of HDevProcedureCallX with the
method SetInputIconicParamObjectByIndex. Which parameter to set is specified via its index
(there is also a method to specify it via its name):
261
HDevEngine
29.2 Examples
262
HDevEngine in COM Applications
Dim Image As HImageX
Dim i As Integer
For i = 0 To 2
Set Image = FGHandle.GrabImage()
Call Image.DispObj(Window)
Call ProcCall.SetInputIconicParamObjectByIndex(1, Image)
As as alternative to passing parameters, you can also use global variables in HDevEngine (compare
the HDevelop User’s Guide, section 8.3.1 on page 341). You set the value of a global variable with the
methods SetGlobalIconicVarObject or SetGlobalCtrlVarTuple and query it with the methods
GetGlobalIconicVarObject and GetGlobalCtrlVarTuple.
Now, we execute the procedure with the method Execute.
Call ProcCall.Execute
If the procedure was executed successfully, we can access its results, i.e., the fin region and its area, with
the methods GetOutputIconicParamObjectByIndex and GetOutputCtrlParamTupleByIndex of
the class HDevProcedureCallX; again, you can specify the parameter via its index or name. Note that
output objects are returned as instances of HUntypedObjectX (and not as HRegionX in this case), while
you can pass input objects as HImageX.
Dim FinRegion As HUntypedObjectX
Dim FinArea As Variant
Set FinRegion = ProcCall.GetOutputIconicParamObjectByIndex(1)
FinArea = ProcCall.GetOutputCtrlParamTupleByIndex(1)
Finally, we display the results in the raphics window:
Call
Call
Call
Call
Call
Call
Next
Image.DispObj(Window)
Window.SetColor("red")
Window.DispObj(FinRegion)
Window.SetColor("white")
Window.SetTposition(150, 20)
Window.WriteString("FinArea: " & FinArea)
Exit Sub
errHandler:
Call MsgBox(Err.Description)
End Sub
263
HDevEngine
29.2 Examples
Figure 29.3: Creating event handlers for the display operators.
29.2.3
Display
In this section, we explain how to provide your own implementation of HDevelop’s internal display
operators. The code fragments in the following stem from the example application ExecProgram, which
was already discussed in section 29.2.1 on page 258. Please note that the example implementation
is not reentrant; therefore, it can not be used on a multi-processor or multi-core platform without
switching off the automatic parallelization.
In fact, HDevEngine does not provide an implementation of the internal display operators but provides
the class HDevOperatorImplX, which contains event handlers for all those operators that you can implement yourself. The handlers are called like the object-oriented version of the operators, e.g., DevDisplay
for dev_display, and have the same parameters.
The first step towards the implementation is to declare a global instance of the class
HDevOperatorImplX. Upon loading the form, we pass this instance to HDevEngine, which then raises
the events when the corresponding operator is used in the HDevelop program or procedure.
Dim WithEvents MyHDevOperatorImpl As HDevOperatorImplX
Private Sub Form_Load()
Set MyHDevOperatorImpl = New HDevOperatorImplX
Call MyEngine.SetHDevOperatorImpl(MyHDevOperatorImpl)
To create an event handler for a display operator, select the instance of HDevOperatorImplX in the
upper left combo box of the form’s code window and then select the event handler in the combo box to
the right (see figure 29.3).
Compared to the previous example, we want to realize a more complex display: We want to
• display the image and the results in a graphics window that is “embedded” within the form, i.e,
inside an instance of HWindowXCtrl (see section 19.1.2.1 on page 165) and
• zoom onto the detected fin in a second, free-floating graphics window (see figure 29.1 on page
258).
!
264
HDevEngine in COM Applications
To switch between multiple windows, we store their window in a tuple and provide a second global
variable containing the handle of the active window. However, using window handles instead of instances
of the class HWindowX means that we need an instance of the class HOperatorSetX for calling HALCON
operators (see section 19.1.2.2 on page 165). As another consequence, the tuple of window handles is
declared as a Variant:
Dim MyOperatorSet As New HOperatorSetX
Dim WinIDs As Variant
Dim WinID As Variant
Furthermore, we provide a variable for the window handle of the HALCON window inside the
HWindowXCtrl:
Dim EmbeddedWinID As Variant
We initialize all these variables upon loading the form. The handle of the active window is set to the
handle of the “embedded” window. The tuple is filled with three elements: -1, -1, and the handle of the
embedded window.
Private Sub Form_Load()
EmbeddedWinID = HXCtrl.HalconWindow.HalconID
WinID = EmbeddedWinID
Call MyOperatorSet.TupleGenConst(3, -1, WinIDs)
WinIDs(2) = EmbeddedWinID
To understand this initialization, we briefly describe how the tuple of window handles is used, the details
follow below: The last element of the tuple contains the handle of the active window (-1 if there is
none). When a new window is opened with dev_open_window, its handle is appended at the end of the
tuple; when dev_close_window is called, the last tuple element is removed. If we would use only one
element -1 and then close the last window, the Variant would change from an array to a single value
and we would get an error when trying to append a value again. To circumvent this, we use two elements
-1.
Now, we show how the management of the windows is realized. dev_open_window is implemented
in DevOpenWindow as follows: If there is no active window yet, i.e., the variable storing the handle of
the active window is equal to -1, we use the (already opened) “embedded” graphics window and adapt
its size to the one specified in the operator call. Otherwise, we open a new window with OpenWindow,
passing most of the parameters of dev_open_window and store the returned handle in the variable for the
active window handle. We also copy the active window handle into the output parameter of the operator.
The window background is set with the operator SetWindowAttr.
Then, we update the tuple of window handles by appending the handle of the active window using
TupleConcat. Note that in contrast to, e.g., C++ or HDevelop you cannot use the same variable as input
and output parameter, therefore a temporary tuple variable is necessary:
Private Sub MyHDevOperatorImpl_DevOpenWindow(ByVal vRow As Variant, _
ByVal vCol As Variant, _
ByVal vWidth As Variant, _
ByVal vHeight As Variant, _
ByVal vBackground As Variant, _
vWindowHandle As Variant)
Dim TmpWinIDs As Variant
If WinID = -1 Then
WinID = HXCtrl.HalconWindow.HalconID
HXCtrl.Width = vWidth
HXCtrl.Height = vHeight
Else
Call MyOperatorSet.SetWindowAttr("background_color", vBackground)
Call MyOperatorSet.OpenWindow(vRow, vCol, vWidth, vHeight, 0, _
"visible", "", WinID)
End If
vWindowHandle = WinID
Call MyOperatorSet.TupleConcat(WinIDs, vWindowHandle, TmpWinIDs)
WinIDs = TmpWinIDs
End Sub
dev_close_window is implemented analogously in DevCloseWindow: If there is an active window, it
is closed using CloseWindow – if it is not the “embedded” window, in which case it is only cleared
using ClearWindow. Then, its handle is removed from the tuple containing all window handles using
TupleRemove. The handle of the active window is always stored at the end of the tuple, so that we do
not need to “search” for it. Again, we need a temporary tuple variable because we cannot use the same
variable as input and output parameter. Finally, the handle of the new active window is stored in the
corresponding global variable.
Private Sub MyHDevOperatorImpl_DevCloseWindow()
Dim TmpWinIDs As Variant
If WinID <> -1 Then
If (WinID = EmbeddedWinID) Then
Call MyOperatorSet.ClearWindow(WinID)
Else
Call MyOperatorSet.CloseWindow(WinID)
End If
Call MyOperatorSet.TupleRemove(WinIDs, UBound(WinIDs), TmpWinIDs)
WinIDs = TmpWinIDs
WinID = WinIDs(UBound(WinIDs))
End If
End Sub
The third operator for handling graphics windows, dev_set_window, is implemented as follows in
DevSetWindow: As noted above, the handle of the active window is expected to be at the end of the
tuple containing all window handles. Therefore, we first search for the specified window handle in
265
HDevEngine
29.2 Examples
266
HDevEngine in COM Applications
the tuple using TupleFind. If the search was successful, we remove the handle from the tuple using
TupleRemove and then append it at the end using TupleConcat. Finally, we store it in the corresponding
global variable:
Private Sub MyHDevOperatorImpl_DevSetWindow(ByVal vWindowId As Variant)
Dim Index As Variant
Dim TmpWinIDs As Variant
If WinID <> -1 Then
Call MyOperatorSet.TupleFind(WinIDs, vWindowId, Index)
If Index <> -1 Then
Call MyOperatorSet.TupleRemove(WinIDs, Index, TmpWinIDs)
Call MyOperatorSet.TupleConcat(TmpWinIDs, vWindowId, WinIDs)
WinID = vWindowId
Else
Call MsgBox("DevSetWindow: window handle does not exist!")
End If
End If
End Sub
Note that this operator is not used in the executed HDevelop program, it is only implemented so that you
can use it in your own applications.
The actual display operators can be implemented quite easily. If there is an active window, the methods
simply call the corresponding non-internal display operator, e.g., a call to dev_display in the HDevelop
program is “redirected” in DevDisplay to DispObj, with the iconic object to display and the handle of
the active window as parameters:
Private Sub MyHDevOperatorImpl_DevDisplay(ByVal hObj As _
HDevEngineXLib.IHUntypedObjectX)
If WinID <> -1 Then
Call MyOperatorSet.DispObj(hObj, WinID)
End If
End Sub
Operators with input control parameters are implemented analogously. For example, dev_set_color is
“redirected” in DevSetColor to SetColor:
Private Sub MyHDevOperatorImpl_DevSetColor(ByVal vColor As Variant)
If WinID <> -1 Then
Call MyOperatorSet.SetColor(WinID, vColor)
End If
End Sub
267
HDevEngine
29.2 Examples
Figure 29.4: Provoking exceptions in HDevEngine .
29.2.4
Error Handling
In this section, we take a closer look at exceptions in HDevEngine. The code fragments in the following
stem from the example application ErrorHandling, which provokes different types of exceptions when
you press the buttons and “catches” them. Figure 29.4 shows a screenshot of the application.
Note that in contrast to the C++ version, the COM version of HDevEngine does not provide a special
class for exceptions. Instead, it uses the standard Visual Basic error handling mechanism and displays
the information contained in the C++ class HDevEngineException (see section 27.2.4 on page 223) in
a message box.
Figure 29.5 displays an exception that occurred because the application tried to load a non-existing
HDevelop program. As you can see, only the message contains useful information in this case.
Private Sub LoadProgBtn_Click()
On Error GoTo errHandler
Dim HalconExamples As String
Dim ProgramPathString As String
HalconExamples = Environ("HALCONEXAMPLES")
ProgramPathString = HalconExamples & "\hdevengine\hdevelop\fin_detectionn.hdev"
Dim Program As HDevProgramX
Set Program = New HDevProgramX
Call Program.LoadProgram(ProgramPathString)
Exit Sub
errHandler:
Call MsgBox(Err.Description)
End Sub
Figure 29.5: Content of the exception if an HDevelop program could not be loaded.
The next exception occurs when executing a procedure in which an input parameter is not initialized:
268
HDevEngine in COM Applications
procedure detect_fin_with_error_inpnotinit (Image: FinRegion: : FinArea)
bin_threshold (NotExistingImage, Dark)
...
Figure 29.6 displays the content of the exception, which now contains very detailed information about
where the error occurred and why.
Figure 29.6: Content of the exception if an input parameter was not initialized.
The final exception is provoked by executing a procedure in which the call to the operator
closing_circle fails because the third parameter is not valid:
procedure detect_fin_with_error_call (Image: FinRegion: : FinArea)
bin_threshold (Image, Dark)
difference (Image, Dark, Background)
dev_set_color ('blue')
dev_display (Background)
closing_circle (Background, ClosedBackground, -1)
...
Figure 29.7 shows the content of the exception.
Figure 29.7: Content of the exception if an error occurred in a HALCON operator call.
With the method UserData (see section 30.1.7 on page 281), you can also access user exception data
that is thrown within an HDevelop program or procedure by the operator throw similarly to the operator
dev_get_exception_data.
Note that you can configure the behavior of HDevEngine when loading programs or procedures that
contain invalid lines or unresolved procedure calls with the method SetEngineAttribute (see section 30.1.1 on page 270).
269
HDevEngine
General Information
Chapter 30
General Information
This chapter contains an overview about the main classes of HDevEngine and their methods (section 30.1) and miscellaneous application tips (section 30.2 on page 282).
30.1
Overview of the Classes
Note in the following, we print only the declaration of the classes for HDevEngine/C++. In the other
variants of HDevEngine, the methods and properties have the same names.
270
General Information
30.1.1 HDevEngine
.NET: HDevEngine;
COM: HDevEngineX
*****************************************************************************
** class HDevEngine
**===========================================================================
** Class for managing global engine settings:
** + external procedure path
** + implementation of dev_ operators (HDevOperatorImpl)
** + Attention: all changes made to one HDevEngine instance all global
**
for all .dev programs or .dvp procedure that are executed in one
**
application
*****************************************************************************
*****************************************************************************/
class LIntExport HDevEngine
{
public:
HDevEngine();
// Via engine attributes the behavior of the engine can be configured
// currently the following flags are supported:
// "ignore_unresolved_lines" [default: false, 0]
//
- if set to true (or "true"), program lines that refer to an
//
unresolved procedure are ignored, i.e., the program or procedure is
//
executed without the corrupted program line;
//
this may lead to an unexpected behavior or an error during the
//
program execution
//
- as the default an exception is thrown while creating the program or
//
procedure instance
// "ignore_invalid_lines" [default: false, 0]
//
- if set to true (or "true"), invalid program lines are ignored,
//
i.e., the program or procedure is executed without the corrupted
//
program line;
//
this may lead to an unexpected behavior or an error during the
//
program execution
//
- as the default an exception is thrown while creating the program or
//
procedure instance
// "ignore_invalid_results" [default: true, 1]
//
- if set to false (or "false") throw an exception if the accessed
//
procedure output parameter or program variable is invalid
//
- the following methods are concerned:
//
HenProgramCall::GetIconicVarObject()
//
HenProgramCall::GetCtrlVarTuple()
//
HenProcedureCall::GetOutputIconicParamObject()
//
HenProcedureCall::GetOutputCtrlParamTuple()
//
- as the default an empty region object or an empty tuple is returned
//
if the object was not set within the program or procedure
void SetEngineAttribute(const char* name, const Halcon::HTuple& value);
Halcon::HTuple GetEngineAttribute(const char* name);
30.1 Overview of the Classes
271
HDevEngine
(continued on next page)
272
General Information
(continued declaration of HDevEngine)
// Set path(s) for external procedures
// - several paths can be passed together separating them by ';' or ':'
//
on Windows or UNIX systems resp.
// - NULL removes all procedure paths and unloads all external procedures
//
(Attention: procedures that are used by programs (HDevProgram) or
//
procedures (HDevProcedures) remain unchanged until the program or
//
procedure is reloaded explicitely. The appropriate calls must be
//
recreated or reassigned by the reloaded program or procedure.)
// - additional calls of SetProcedurePath will remove paths set before
//
and unload all external procedures
void SetProcedurePath(const char* path);
void AddProcedurePath(const char* path);
// Get names of all available external procedures
Halcon::HTuple GetProcedureNames() const;
// Get names of all loaded external procedures
Halcon::HTuple GetLoadedProcedureNames() const;
// Unload a specific procedure <proc_name>
void UnloadProcedure(const char* proc_name);
// Unload all external procedures
void UnloadAllProcedures();
// global variable access
Halcon::HTuple GetGlobalIconicVarNames() const;
Halcon::HTuple GetGlobalCtrlVarNames()
const;
// get value of a global vaiable
Halcon::Hobject GetGlobalIconicVarObject(const char* var_name);
Halcon::HTuple GetGlobalCtrlVarTuple(const char* var_name);
// these method is provided for efficiency:
// the results are copied directly into the tuple variable provided by
// the user without additional copying
void GetGlobalCtrlVarTuple(const char* var_name, Halcon::HTuple* tuple);
// set global variable
void SetGlobalIconicVarObject(const char* var_name,
const Halcon::Hobject& obj);
void SetGlobalIconicVarObject(const char* var_name,
const Halcon::HObject& obj);
void SetGlobalIconicVarObject(const char* var_name,
const Halcon::HObjectArray& obj);
void SetGlobalCtrlVarTuple(const char* var_name,
const Halcon::HTuple& tuple);
// Set implementation for HDevelop internal operators
void SetHDevOperatorImpl(HDevOperatorImplCpp* hdev_op_impl,
bool mem_free_intern=true);
};
30.1 Overview of the Classes
273
.NET: HDevProgram;
COM: HDevProgramX
*****************************************************************************
** class HDevProgram
**===========================================================================
** Class for managing HDevelop programs
*****************************************************************************
class LIntExport HDevProgram
{
public:
// Create a program from a .dev program file
HDevProgram(const char* file_name=NULL);
// Copy constructor
HDevProgram(const HDevProgram& hdev_prog);
HDevProgram(const Data& data);
// Assignment operation
HDevProgram& operator=(const HDevProgram& hdev_prog);
// Destructor
virtual ~HDevProgram();
// Load a program if not yet done during construction
void
LoadProgram(const char* file_name);
// check whether the program was successfully loaded
bool
IsLoaded() const;
// Get the program name
const char*
GetName() const;
// Get the names of all local and the used external procedures
Halcon::HTuple GetUsedProcedureNames()
const;
Halcon::HTuple GetLocalProcedureNames()
const;
// create a program call for execution
HDevProgramCall CreateCall() const;
// This is a method provided for convenience:
// execute the program and return the program call for
// accessing the variables of the program's main procedure
HDevProgramCall Execute() const;
(continued on next page)
HDevEngine
30.1.2 HDevProgram
274
General Information
(continued declaration of HDevProgram)
// get some information about the variables of the program's main procedure:
// - get the variable names as a tuple
Halcon::HTuple GetIconicVarNames() const;
Halcon::HTuple GetCtrlVarNames()
const;
// - get the number of iconic and control variables
size_t
GetIconicVarCount() const;
size_t
GetCtrlVarCount()
const;
// - get the names of the variables
const char*
GetIconicVarName(size_t var_idx) const;
const char*
GetCtrlVarName(size_t var_idx)
const;
};
30.1 Overview of the Classes
275
.NET: HDevProgramCall;
COM: HDevProgramCallX
*****************************************************************************
** class HDevProgramCall
**===========================================================================
** Class for managing the execution of an HDevelop program
*****************************************************************************
class LIntExport HDevProgramCall
{
public:
// Create an empty HDevelop program call instance
HDevProgramCall();
// Create an HDevelop program call from a program
HDevProgramCall(const HDevProgram& prog);
// Copy constructor
HDevProgramCall(const HDevProgramCall& hdev_prog_call);
HDevProgramCall(const Data& data);
// Assignment operation
HDevProgramCall& operator=(const HDevProgramCall& hdev_prog_call);
// Destructor
virtual ~HDevProgramCall();
// Get the program
HDevProgram GetProgram() const;
// Execute program
void Execute();
// Clear program and reset callstack
// - this method stops the execution of the program after the current
//
program line
void Reset();
// Get the objects / values of the variables by name or by index
//
(indices of the variables run from 1 to count)
Halcon::Hobject GetIconicVarObject(size_t var_idx);
Halcon::Hobject GetIconicVarObject(const char* var_name);
Halcon::HTuple
Halcon::HTuple
GetCtrlVarTuple(size_t var_idx);
GetCtrlVarTuple(const char* var_name);
// these methods are provided for efficiency:
// the results are copied directly into the tuple variable provided by
// the user without additional copying
void GetCtrlVarTuple(size_t var_idx, Halcon::HTuple* tuple);
void GetCtrlVarTuple(const char* var_name, Halcon::HTuple* tuple);
};
HDevEngine
30.1.3 HDevProgramCall
276
General Information
30.1.4 HDevProcedure
.NET: HDevProcedure;
COM: HDevProcedureX
*****************************************************************************
** class HDevProcedure
**===========================================================================
** Class for managing HDevelop procedures
*****************************************************************************
class LIntExport HDevProcedure
{
public:
// Create HDevelop procedure from external or local procedure
HDevProcedure(const char* proc_name=NULL);
HDevProcedure(const char* prog_name, const char* proc_name);
HDevProcedure(const HDevProgram& prog, const char* proc_name);
// Copy constructor
HDevProcedure(const HDevProcedure& hdev_proc);
HDevProcedure(const Data& data);
// Assignment operation
HDevProcedure& operator=(const HDevProcedure& proc);
// Destructor
~HDevProcedure();
// Load a procedure if not yet done during construction
void
LoadProcedure(const char* file_name);
void
LoadProcedure(const char* prog_name, const char* proc_name);
void
LoadProcedure(const HDevProgram& prog, const char* proc_name);
// Check whether the procedure was successfully loaded
bool
IsLoaded() const;
// Get the name of the procedure
const char* GetName() const;
// Get the short description of the procedure
const char* GetShortDescription() const;
// Get all refered procedures
Halcon::HTuple GetUsedProcedureNames() const;
// Create a program call for execution
HDevProcedureCall CreateCall() const;
(continued on next page)
30.1 Overview of the Classes
277
// Get name of
Halcon::HTuple
Halcon::HTuple
Halcon::HTuple
Halcon::HTuple
input/output object/control
GetInputIconicParamNames()
GetOutputIconicParamNames()
GetInputCtrlParamNames()
GetOutputCtrlParamNames()
parameters
const;
const;
const;
const;
// Get number of input/output object/control parameters
int
GetInputIconicParamCount() const;
int
GetOutputIconicParamCount() const;
int
GetInputCtrlParamCount()
const;
int
GetOutputCtrlParamCount()
const;
// Get name of input/output object/control parameters
const char*
GetInputIconicParamName(int par_idx) const;
const char*
GetOutputIconicParamName(int par_idx) const;
const char*
GetInputCtrlParamName(int par_idx)
const;
const char*
GetOutputCtrlParamName(int par_idx)
const;
};
HDevEngine
(continued declaration of HDevProcedure)
278
General Information
30.1.5 HDevProcedureCall
.NET: HDevProcedureCall;
COM: HDevProcedureCallX
*****************************************************************************
** class HDevProcedureCall
**===========================================================================
** Class for executing an HDevelop procedure and managing the parameter
** values
*****************************************************************************
*****************************************************************************/
class LIntExport HDevProcedureCall
{
HDEV_PD;
public:
// Create an empty HDevelop procedure call instance
HDevProcedureCall();
// Create HDevelop procedure call instance
HDevProcedureCall(const HDevProcedure& hdev_proc);
// Copy constructor
HDevProcedureCall(const HDevProcedureCall& hdev_proc_call);
HDevProcedureCall(const Data& data);
// Assignment operation
HDevProcedureCall& operator=(const HDevProcedureCall& hdev_proc_call);
// Destructor
~HDevProcedureCall();
// Get the procedure
HDevProcedure GetProcedure() const;
// Execute program
void Execute();
// Clear program and reset callstack
// - this method stops the execution of the program after the current
//
program line
void Reset();
(continued on next page)
30.1 Overview of the Classes
279
// Set input object/control parameter
void SetInputIconicParamObject(int par_idx, const Halcon::Hobject& obj);
void SetInputIconicParamObject(int par_idx, const Halcon::HObject& obj);
void SetInputIconicParamObject(int par_idx, const Halcon::HObjectArray& obj);
void SetInputIconicParamObject(const char* par_name,
const Halcon::Hobject& obj);
void SetInputIconicParamObject(const char* par_name,
const Halcon::HObject& obj);
void SetInputIconicParamObject(const char* par_name,
const Halcon::HObjectArray& obj);
void SetInputCtrlParamTuple(int par_idx, const Halcon::HTuple& tuple);
void SetInputCtrlParamTuple(const char* par_name,
const Halcon::HTuple& tuple);
// Get the objects / values of the parameters by name or by index
//
(indices of the variables run from 1 to count)
Halcon::Hobject GetOutputIconicParamObject(int par_idx)
const;
Halcon::Hobject GetOutputIconicParamObject(const char* par_name) const;
Halcon::HTuple GetOutputCtrlParamTuple(int par_idx)
const;
Halcon::HTuple GetOutputCtrlParamTuple(const char* par_name)
const;
// These methods are provided for efficiency:
// the results are copied directly into the tuple variable provided by
// the user without additional copying
void GetOutputCtrlParamTuple(int par_idx, Halcon::HTuple* tuple) const;
void GetOutputCtrlParamTuple(const char* par_name,
Halcon::HTuple* tuple)
const;
};
Note that HDevEngine/.NET provides additional methods that return iconic output parameters of a procedure call in the corresponding class (GetOutputIconicParamImage,
GetOutputIconicParamRegion, GetOutputIconicParamXld).
Note that in COM methods cannot be overloaded. Therefore, HDevEngine/COM provides two separate
methods in such a case, in particular
• SetInputIconicParamObjectByIndex/ SetInputIconicParamObjectByName,
• SetInputCtrlParamTupleByIndex/ SetInputCtrlParamTupleByName,
• GetOutputIconicParamObjectByIndex/ GetOutputIconicParamObjectByName, and
• GetOutputCtrlParamTupleByIndex/ GetOutputCtrlParamTupleByName
to set and access procedure parameters.
HDevEngine
(continued declaration of HDevProcedureCall)
280
General Information
30.1.6 HDevOperatorImplCpp
.NET: IHDevOperators;
COM: HDevOperatorImplX
*****************************************************************************
** class HDevOperatorImplCpp
**===========================================================================
** Class for the implemention of HDevelop internal operators
*****************************************************************************
class LIntExport HDevOperatorImplCpp
{
public:
HDevOperatorImplCpp();
// Copy constructor
HDevOperatorImplCpp(const HDevOperatorImplCpp& hdev_op_impl);
HDevOperatorImplCpp(const Data& data);
// Assignment operation
HDevOperatorImplCpp& operator=(const HDevOperatorImplCpp& hdev_op_impl);
// Destructor
virtual ~HDevOperatorImplCpp();
virtual
virtual
virtual
virtual
virtual
int
int
int
int
int
virtual
virtual
virtual
virtual
virtual
virtual
virtual
int
int
int
int
int
int
int
virtual int
virtual int
};
DevClearWindow();
DevCloseWindow();
DevSetWindow(const Halcon::HTuple& win_id);
DevDisplay(const Halcon::Hobject& obj);
DevSetWindowExtents(const Halcon::HTuple& row,
const Halcon::HTuple& col,
const Halcon::HTuple& width,
const Halcon::HTuple& height);
DevSetDraw(const Halcon::HTuple& draw);
DevSetShape(const Halcon::HTuple& shape);
DevSetColored(const Halcon::HTuple& colored);
DevSetColor(const Halcon::HTuple& color);
DevSetLut(const Halcon::HTuple& lut);
DevSetPaint(const Halcon::HTuple& paint);
DevSetPart(const Halcon::HTuple& row1,
const Halcon::HTuple& col1,
const Halcon::HTuple& row2,
const Halcon::HTuple& col2);
DevSetLineWidth(const Halcon::HTuple& width);
DevOpenWindow(const Halcon::HTuple& row,
const Halcon::HTuple& col,
const Halcon::HTuple& width,
const Halcon::HTuple& height,
const Halcon::HTuple& background,
Halcon::HTuple* win_id);
30.1 Overview of the Classes
281
.NET: HDevEngineException; COM: –
*****************************************************************************
** class HDevEngineException
**===========================================================================
** Class for HDevelop engine exceptions
*****************************************************************************
class LIntExport HDevEngineException
{
public:
// Exception categories
enum ExceptionCategory
{
Exception,
// Generic
ExceptionInpNotInit, // Error input parameters not initialized
ExceptionCall,
// Error HALCON or HDevelop operator call
ExceptionFile
// Error opening or reading HDevelop file
};
// Create HDevelop engine exception
HDevEngineException(const char* message,
ExceptionCategory category=Exception,
const char* exec_proc_name="",
int prog_line_num=-1,
const char* prog_line_name="",
Herror h_err_nr=H_MSG_VOID,
const Halcon::HTuple& user_data=Halcon::HTuple());
HDevEngineException(const HDevEngineException& exc);
HDevEngineException(const Data& data);
HDevEngineException& operator = (const HDevEngineException& exc);
virtual ~HDevEngineException();
// Error text
const char*
Message()
const;
// Category of exception
ExceptionCategory
Category()
const;
const char*
CategoryText()
const;
// Name of executed procedure
const char*
ExecProcedureName() const;
// Number of executed procedure or operator program line
int
ProgLineNum()
const;
// Name of executed procedure or operator program line
const char*
ProgLineName()
const;
// HALCON error number
Herror
HalconErrNum()
const;
Halcon::HTuple
void
};
UserData()
const;
UserData(Halcon::HTuple& user_Data) const;
HDevEngine
30.1.7 HDevEngineException
282
General Information
30.2
Tips and Tricks
30.2.1
Troubleshooting
?
Executed program or procedure raises exception for display operators like set_tposition
when not using implementation of display operators
If you are not using an implementation of HDevelop’s internal display operators (dev_*), calls
to these operators in the executed HDevelop program or procedure are simply ignored. However,
if the program or procedure contains other, “external” display operators like set_tposition or
write_string, which need a window handle as input parameter, the program / procedure will
raise an exception at this operator if the window handle has not been instantiated.
Typically, this problem will not arise when executing programs, because you will in most cases
use an implementation of the display operators. When executing procedures, we recommend to
leave out the external display operators that use window handles. If this is not possible, you
could place them in a separate procedure and use the implementation of display operators for just
this procedure. Alternatively, initialize the window handle with a value like -1 and test it before
executing the external display operators.
?
External procedures cannot call local procedures
Note that local procedures can call external procedures but not the other way round.
30.2.2
Loading and Unloading Procedures
In most applications there is no need to delete loaded HDevelop procedures explicitly using
UnloadProcedure. A reason might be to free memory.
Please note that when creating a procedure with the class HDevProcedure, the procedure is loaded
together with all the procedures it uses. In contrast, UnloadProcedure deletes only the specified procedure. To delete the automatically loaded procedures, you can query their names using
GetLoadedProcedureNames and then delete them (if you are sure that they are not used by another
loaded procedure!), or you can use UnloadAllProcedures to unload all external procedures.
As an alternative, you can reset the external procedure paths by passing an empty string to
SetProcedurePath or call UnloadAllProcedures.
Index
283
.NET framework, 124
add HALCON/.NET to applicaton, 126
add reference to HALCON/.NET, 126
allocate memory for tuple (HALCON/C), 188
automatic operator parallelization, 17
auxiliary classes (HALCON/C++), 109
barrier (multithreading), 21
C# application
example, 149
call operator (HALCON/.NET), 130
call operator (HALCON/C++)
detailed description, 37, 75
overview, 34, 72
call operator generically (HALCON/C), 193
call operator in tuple mode (HALCON/C), 189
cast methods of HTuple (HALCON/.NET), 138
combine exported HDevelop code with HALCON/.NET classes, 153
combine object-oriented and procedural code
(HALCON/C++), 43, 84
compile HALCON/.NET application with
Mono, 151
condition (multithreading), 21
configure security policy of .NET Framework,
153
constructors (HALCON/.NET), 131
constructors (HALCON/C++), 38, 76
control parameters (HALCON/C), 185
control parameters (HALCON/C++), 48, 103
control tuples (HALCON/.NET), 137
create C application (HALCON/C), 197
create C++ application (HALCON/C++), 51,
111
create C# application (HALCON/.NET), 123
create executable (HALCON/C)
Linux, 200
Windows, 200
create executable (Halcon/C++)
Linux, 54, 113
Mac OS X, 55
Windows, 54, 113
create executable (HDevEngine/C++), 213
create tuple (HALCON/.NET), 137
create tuple (HALCON/C), 188
create Visual Basic .NET application (HALCON/.NET), 123
customize Visual Studio for HALCON/.NET,
126
customize visualization (HALCON/.NET), 128
declare class instance (HALCON/.NET), 131
deploy HALCON/.NET application, 142
Linux, 151
destroy tuple (HALCON/C), 190
destructors (HALCON/C++), 39, 78
develop application (HDevEngine), 210
development
environments
and
HALCON/.NET, 124
display classes (HDevEngine/.NET), 238
display results of HDevelop procedure (HDevEngine/.NET), 235
display results of HDevelop procedure (HDevEngine/C++), 221
display results of HDevelop program (HDevEngine/.NET), 232
display results of HDevelop program (HDevEngine/C++), 217
error handling (HALCON/.NET), 141
error handling (HALCON/C), 195
error handling (HALCON/C++), 43, 82
error handling (HDevEngine/.NET), 238
error handling (HDevEngine/C++), 223
event (multithreading), 21
example file structure (HALCON/.NET), 124
Index
Index
284
Index
execute external HDevelop procedure (HDevEngine/.NET), 233
execute external HDevelop procedure (HDevEngine/C++), 218
execute HDevelop procedure (HDevEngine/.NET), 232, 235
execute HDevelop procedure (HDevEngine/C++), 217, 220
execute HDevelop program (HDevEngine/.NET), 230, 232
execute HDevelop program (HDevEngine/C++), 215, 217
execute local HDevelop procedure (HDevEngine/.NET), 236
execute local HDevelop procedure (HDevEngine/C++), 221
finalizers (HALCON/.NET), 132
garbage collection (HALCON/.NET), 133
get tuple element (HALCON/.NET), 137
get tuple element (HALCON/C), 189
HALCON Codelets, 143
HALCON language interface for C applications, 13
HALCON language interface for C++ applications, 13
HALCON language interface for C# applications, 13
HALCON language interface for Delphi applications, 13
HALCON language interface for managed C++
applications, 13
HALCON language interface for Visual Basic
.NET applications, 13
HALCON language interface for Visual Basic
6.0 applications, 13
HALCON spy, 25
HALCON/.NET
overview, 121
HALCON/C
example, 198
HALCON/C++
example, 53
overview, 29, 67, 181
HALCON/COM
overview, 159
handle classes (HALCON/C++), 50, 108
HByteImage (HALCON/C++), 100
HCtrlVal (HALCON/C++), 103
HDevEngine
overview, 209
HDevEngine (HDevEngine/.NET class), 270
HDevEngine (HDevEngine/C++ class), 270
HDevEngine troubleshooting, 282
HDevEngine XL, 211
HDevEngine/.NET
example, 229
overview, 229
HDevEngine/C++
example, 215
overview, 213
HDevEngine/COM
overview, 257
HDevEngineException
(HDevEngine/.NET
class), 281
HDevEngineException
(HDevEngine/C++
class), 281
HDevOperatorImpl (HDevEngine/C++ class),
280
HDevProcedure (HDevEngine/.NET class),
276
HDevProcedure (HDevEngine/C++ class), 276
HDevProcedureCall (HDevEngine/.NET class),
278
HDevProcedureCall (HDevEngine/C++ class),
278
HDevProgram (HDevEngine/.NET class), 273
HDevProgram (HDevEngine/C++ class), 273
HDevProgramCall (HDevEngine/.NET class),
275
HDevProgramCall (HDevEngine/C++ class),
275
HImage (HALCON/C++), 94
HImageArray (HALCON/C++), 99
Hobject (HALCON/C data type), 183
HObject (HALCON/C++), 47, 87
Hobject (HALCON/C++), 102
HOperatorSet (HALCON/.NET class), 153
HPixVal (HALCON/C++), 97
HRegion (HALCON/C++), 47, 87
HRegionArray (HALCON/C++), 90
HTuple (HALCON/.NET class), 137
Htuple (HALCON/C data type), 186
HTuple (HALCON/C++), 49, 104
HWindow (HALCON/C++), 50, 107
HXLD (HALCON/C++), 48, 102
HXLDArray (HALCON/C++), 102
I/O streams (HALCON/C++), 44, 86
iconic objects (HALCON/.NET), 136
iconic objects (HALCON/C), 183
iconic objects (HALCON/C++), 47, 87
IHDevOperators (HDevEngine/.NET class),
280
implement
display
operators
(HDevEngineCpp), 221
initialize automatic operator parallelization, 17
initialize class instance (HALCON/.NET), 131
installed file structure (HALCON/C), 197
installed file structure (HALCON/C++), 51,
111
load HDevelop procedure (HDevEngine/.NET),
234
load HDevelop procedure (HDevEngine/C++),
219
load HDevelop program (HDevEngine/.NET),
231
load HDevelop program (HDevEngine/C++),
216
managed C++ application
example, 150
memory management (HALCON/C++), 43, 84
monitor HALCON program, 25
Mono and HALCON/.NET, 150
mutex (multithreading), 21
namespace Halcon (HALCON/C++), 33, 72
namespace HalconDotNet (HALCON/.NET),
127
object-oriented HALCON/C++, 33, 71
online help (HALCON/.NET), 129
online help (HALCON/C++), 34, 72
output parameters of HDevelop procedure
(HDevEngine/.NET), 235
output parameters of HDevelop procedure
(HDevEngine/C++), 220
overload operator (HALCON/.NET), 133
overloads for arithmetic tuple operations (HALCON/.NET), 140
parallel programming (HDevEngine)
overview, 211
parallel programming (HDevEngine/.NET),
241
parallel programming (HDevEngine/C**), 227
parallel programming style guide, 20
parallel programming with HALCON
example, 21
overview, 19
parallelize operators on channel level, 18
parallelize operators on domain level, 18
parallelize operators on internal data level, 18
parallelize operators on tuple level, 18
parameters (HALCON/C++), 35, 73
procedural HALCON/C++, 33, 71
reentrancy of HALCON operators, 19
remote access (HALCON/.NET), 155
resolve ambiguity of HTuple (HALCON/.NET), 138
restrictions for using Mono and HALCON/.NET, 150
results of HDevelop program (HDevEngine/.NET), 232
results of HDevelop program (HDevEngine/C++), 217
return values (HALCON/C), 195
set
external procedure path (HDevEngine/.NET), 233
set external procedure path (HDevEngine/C++),
218
set input parameters of HDevelop procedure
(HDevEngine/.NET), 234
set input parameters of HDevelop procedure
(HDevEngine/C++), 220
set tuple element (HALCON/C), 188
simple mode (HALCON/C), 186
simple mode (HALCON/C++), 39, 78
switch off automatic operator parallelization, 22
thread safety of HALCON operators, 19
tuple mode (HALCON/.NET), 135
tuple mode (HALCON/C), 186
example, 192
tuple mode (HALCON/C++), 39, 78
tuple operators (HALCON/.NET), 140
285
Index
Index
286
Index
unload HDevelop procedure from HDevEngine,
282
use exported HDevelop code (HALCON/.NET), 153
use HALCON Spy on multi-processing hardware, 26
use HALCON/.NET classes, 129
use HDevelop procedure in HALCON/.NET,
152
use HDevelop program in HALCON/.NET, 152
use HDevEngine/.NET in Visual Studio, 229
use image acquisition interface on multiprocessing hardware, 23
Visual Basic .NET application
example, 149
visualization (HALCON/.NET), 140